

Denver CRP-716 User Manual
DENVER CRP-716
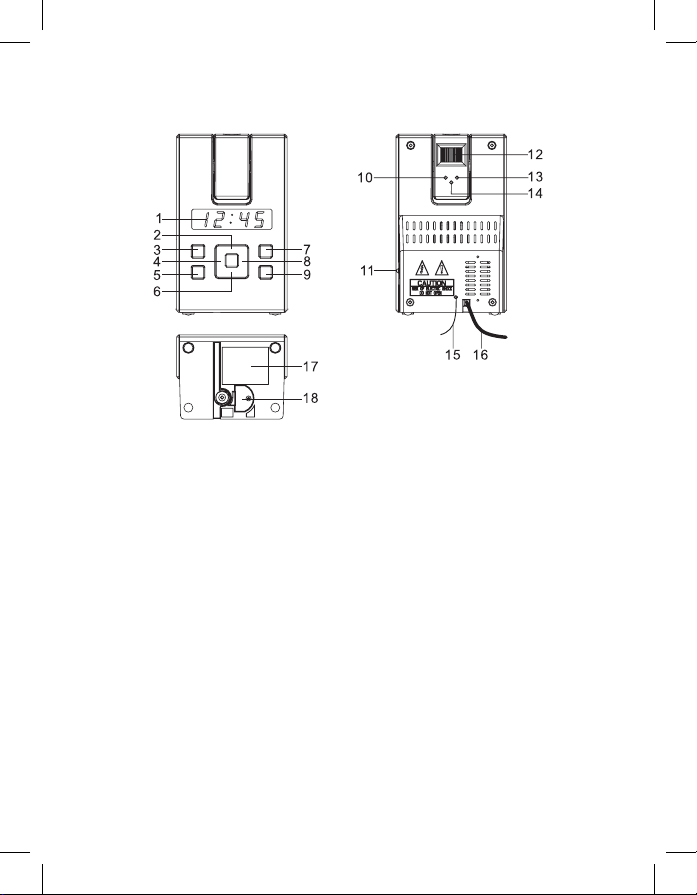
FUNCTION AND CONTROLS
1. DISPLAY
2. DISPLAY AUTO OFF
3. VOLUME UP / ALARM 2 ON / OFF SET
4. << / TUNE -
5. VOLUME DOWN / ALARM 1 ON / OFF SET
6. SNOOZE / SLEEP
7. SET.MEM / MEMORY+
8. >> / TUNE +
9. ON / OFF
10. HOUR SET FOR PROJECTION
11. PROJECTION ON/OFF SWITCH
12. FOCUS ADJUSTMENT FOR PROJECTION
13. MIN SET FOR PROJECTION
14. TIME SET FOR PROJECTION
15. FM ANTENNA
16. AC POWER CORD
17. RATING LABEL (BOTTOM OF UNIT)
18. BATTERY COMPARTMENT (BOTTOM OF UNIT)
English
ENG-1

POWER CONNECTION
Plug the AC power cord to a household outlet AC source. This unit
is equipped with a battery back up system, it requires a 3V CR2032
at lithium battery (not included). Insert the battery in the battery
compartment, making certain that the positive and negative (+ and -)
battery terminals are attached to the corresponding terminals on the
plate in the battery compartment. If an AC power failure occurs, the
clock automatically switches to the battery power supply, the clock and
timer memory continue running. When the AC power resumes, the clock
switches back to AC again.
GETTING STARTED
TIME MANUAL SETTING
With the radio off mode, press and hold the SET.MEM / M+ button (7)
; “24 Hr” will blink. Press the Tune + (8) or Tune – (4) button to set the
unit to the 12 hour (12 Hr) mode or 24 Hour (24 Hr) mode. Press the
SET.MEM / M + button (7) and the hours will blink. Press the Tune+ (8)
or Tune – (4) to set the current hour, then press the SET.MEM / M + (7)
button again; the minute digits will blink. Press the Tune + (8) or Tune –
(4) to set the current minutes. When done and you press SET.MEM / M +
(7) button once again to indicate the current time is set.
THE LED DIGITAL CLOCK AND THE PROJECTION CLOCK MUST BE
SET SEPARATELY.
TIME SETTING FOR PROJECTION
To preset the HOURS, press simultaneously the HOUR button (10) and
the TIME button (14). Keep them depressed until the hour digits to be
preset are displayed. To preset the MINUTES, press simultaneously the
MINUTE button (13) and the TIME button (14). Keep them depressed
until the minutes digits to be preset are displayed. Focus setting: To
adjust the brightness of the projection clock, turn the focus (12) until the
projected time is clearly shown on the ceiling or wall.
NOTE: The projected time is intended for display on the ceiling or wall of
a darkened room. The projection range is 3 – 9 feet.
ENG-2

Setting Alarm Time
To preview the alarm time. Press the ALARM button (3/5) once.
While the display is showing the alarm time and you hold the ALARM
button for 3 seconds and the hours will blink. Press the Tune + (8) or
Tune - (4) to set the alarm hour.
Press the ALARM button again; the minute digits will blink. Press the
Tune + (8) or Tune – (4) to set the alarm minutes.
Press the ALARM button and you can change the sound mode (Buzzer,
Radio) for the alarm.
Press Tune + (8) or Tune – (4) to choose different volume. The alarm
volume will gradually increase. Then press the ALARM button when
done.
To delay the alarm, press SNOOZE. It will come on again in approx. 9
minutes. You may repeat this cycle several times during the alarm cycle.
To stop the alarm, press ALARM button .
To stop the alarm from coming on the following day, hold the ALARM
button to turn it off. The alarm icon will disappear to indicate the alarm is
disarmed.
Listening to Radio
Press the ON/OFF button (9) to turn the unit on.
Use the Tune + (8) or Tune – (4) button to select the desired FM station.
If you press and hold the Tune + (8) or Tune – (4) button for one second,
the release, the unit will automatically scan to the next broadcasting
station.
Press the ON/OFF button (9) to turn the radio OFF.
To set / recall the radio presets
Press the ON/OFF button (9) to turn the unit ON.
Use the Tune + (8) or Tune – (4) button to select the desired FM station.
Press the SET.MEM/ M + button (7); “P02” will blink in the display.
Press the SET.MEM / M + button (7) again to set the preset.
Repeat steps 2 through 4 to set more presets.
The unit can preset 10 stations totally for FM.
When “P01-P10” is blinking, press the Tune+ (8) or Tune- (4) button to
select the preset number.
When recalling preset stations, press SET.MEM / M + button (7) to select
the preset number.
ENG-3
 Loading...