

Contents Connections Playback
.
PMA-50
INTEGRATED AMPLIFIER
Owner’s Manual
Setting procedure
Tips Appendix
You can print more than one page of a PDF onto a single sheet of paper.
Front panel Display Rear panel Remote Index
1
Contents Connections Playback
Contents
Setting procedure
Tips Appendix
Accessories
Features
High quality
High performance
Part names and functions
Front panel
Display
Rear panel
Remote control unit
Connections
Connections
Installing this unit
Installing horizontally
Installing vertically
Before using the remote control unit
Operating range of the remote control unit
Connecting speakers
Speaker connection
Connecting to a device with analog audio output connectors
Connecting to a device with digital audio output connectors
Connecting a PC or Mac
Connecting the power cord
4
Playback
5
Basic operation
5
Turning the power on
5
Selecting the input source
6
Adjusting the master volume
6
Switching the display’s brightness
8
Playing a device
9
10
11
12
12
13
15
16
17
18
19
20
21
22
Playing music on a computer (USB-DAC)
Listening to music via a digital connection (COAXIAL/
OPTICAL-1/OPTICAL-2)
Listening to music via a analog connection (AUX)
Listening to music on a Bluetooth device
Setting procedure
Menu map
Source Direct
Bass
Treble
Balance
H/P AMP Gain
Bluetooth
Auto Standby
24
24
25
26
26
27
27
35
36
37
45
47
47
47
47
47
48
48
Front panel Display Rear panel Remote Index
2
Contents Connections Playback
Tips
Tips
Troubleshooting
Resetting to factory settings
Appendix
Types of playable digital audio input signals
D/A converter
Playing back Bluetooth devices
Bluetooth communications
Explanation of terms
Trademark information
Specifications
Index
Setting procedure
50
51
58
59
59
59
59
60
61
62
65
Tips Appendix
Front panel Display Rear panel Remote Index
3
Contents Connections Playback
Setting procedure
Tips Appendix
Thank you for purchasing this Denon product. To ensure proper operation, please read this owner’s manual carefully before using the product.
After reading this manual, be sure to keep it for future reference.
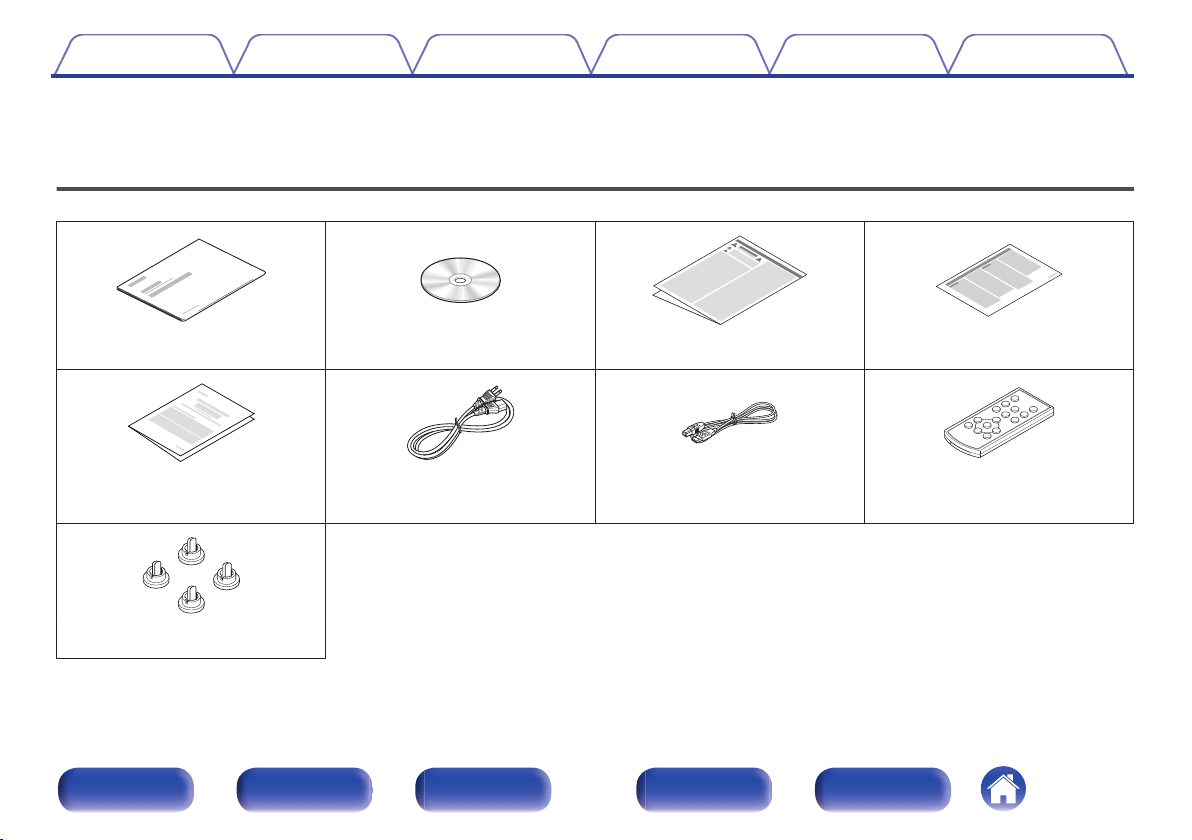
Accessories
Check that the following parts are supplied with the product.
.
.
.
Quick Start Guide Owner’s Manual Safety Instructions Notes on radio
.
Warranty (for North America model
.
Power cord USB cable Remote control unit (RC-1202)
.
only)
.
Caps (silver) (x4)
Front panel Display Rear panel Remote Index
4
.
.
(built-in battery)
Contents
Features
Connections Playback
Setting procedure
Tips Appendix
High quality
Equipped with a high-quality class D amplifier
0
The amplifier section incorporates DDFA® technology from CSR. The
output stage circuit has a discrete construction which realizes higher
S/N and lower distortion compared to conventional class D amplifiers.
Additionally, the high 50 W/4 Ω output which exceeds the size of the
housing lets you enjoy Denon’s ideal audio playback environment that
delivers “delicate yet powerful sound”.
Advanced AL32 Processing
0
Equipped with Advanced AL32 Processing, Denon’s unique analog
wave reproduction technology. Reproducibility of weak signals is
increased by expanding the 16-bit digital data to 32 bits.
High performance
Supports playback of high resolution audio files
0
DSD signals and up to 192 kHz/24 bit PCM signals are supported. You
can enjoy high-quality audio playback from this unit by inputting music
files into this unit from a computer via USB connection.
Wireless connection with Bluetooth enabled devices (v p. 37)
0
You can connect Bluetooth enabled devices such as smartphones and
tablets with this unit to listen to music while browsing email and Web
sites in the Internet away from this unit. In addition, this unit supports
high quality audio codecs, aptX and AAC, to enjoy music and games
with a powerful sound.
NFC function included that enables one touch
0
connection (v
You can just touch this unit with an NFC enabled smartphone or tablet
to turn on power to this unit and establish the Bluetooth connection.
Supports vertical installation
0
This unit can be installed vertically or horizontally. The display
automatically rotates to match the installation orientation.
p. 42)
Front panel Display Rear panel Remote Index
5
w
i
e
t y u
q r
Contents Connections Playback
Part names and functions
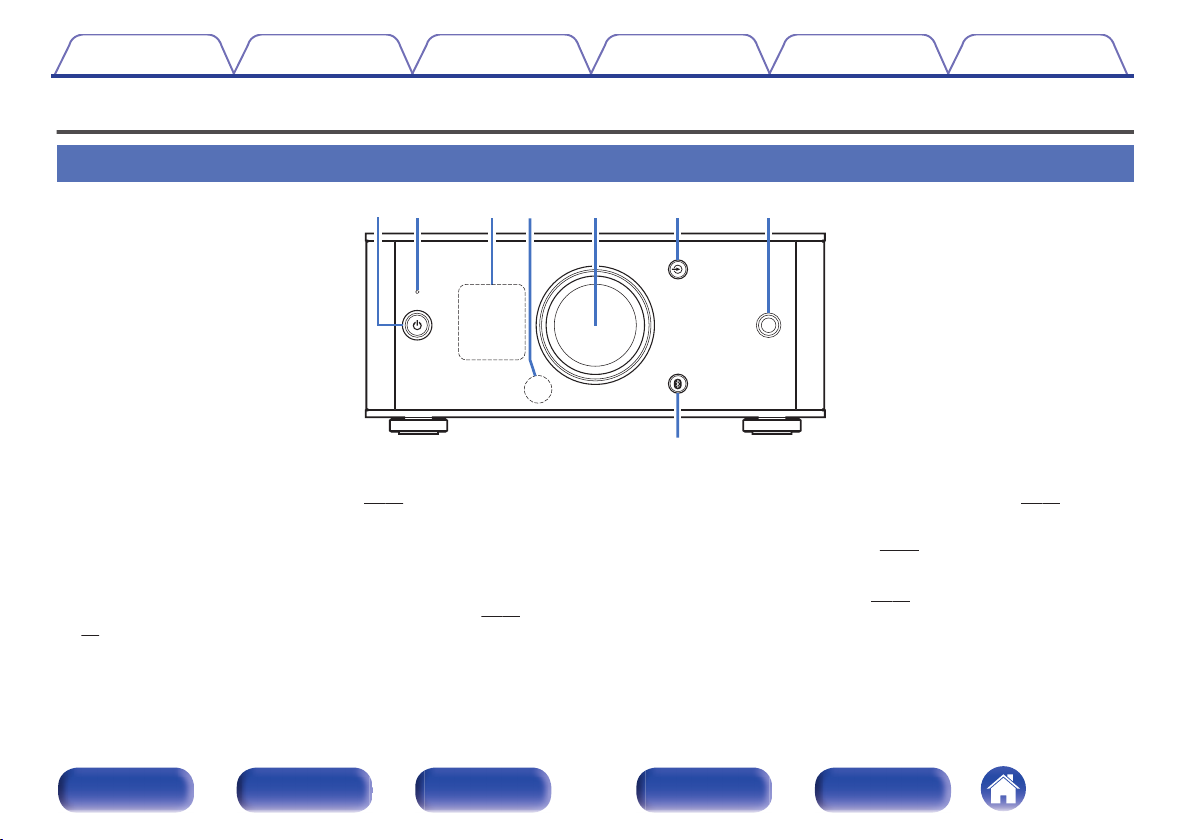
Front panel
Power operation button (X)
A
This turns the power on/to standby. (v p. 24)
The power status is indicated as follows.
Power on: Display lit
0
Standby: Display off
0
Protection circuit indicator
B
C
This blinks when the protection circuit has operated. (v p. 52,
60)
Display
This displays various pieces of information.
Setting procedure
.
Remote control sensor
D
This receives signals from the remote control unit. (v
Volume control knob
E
This adjusts the volume level. (v p. 26)
F
Input source select buttons (q)
This switches input sources. (v
Tips Appendix
p. 16)
p. 25)
Front panel Display Rear panel Remote Index
6
i
u
Q
0
o
Contents
.
Connections Playback
Setting procedure
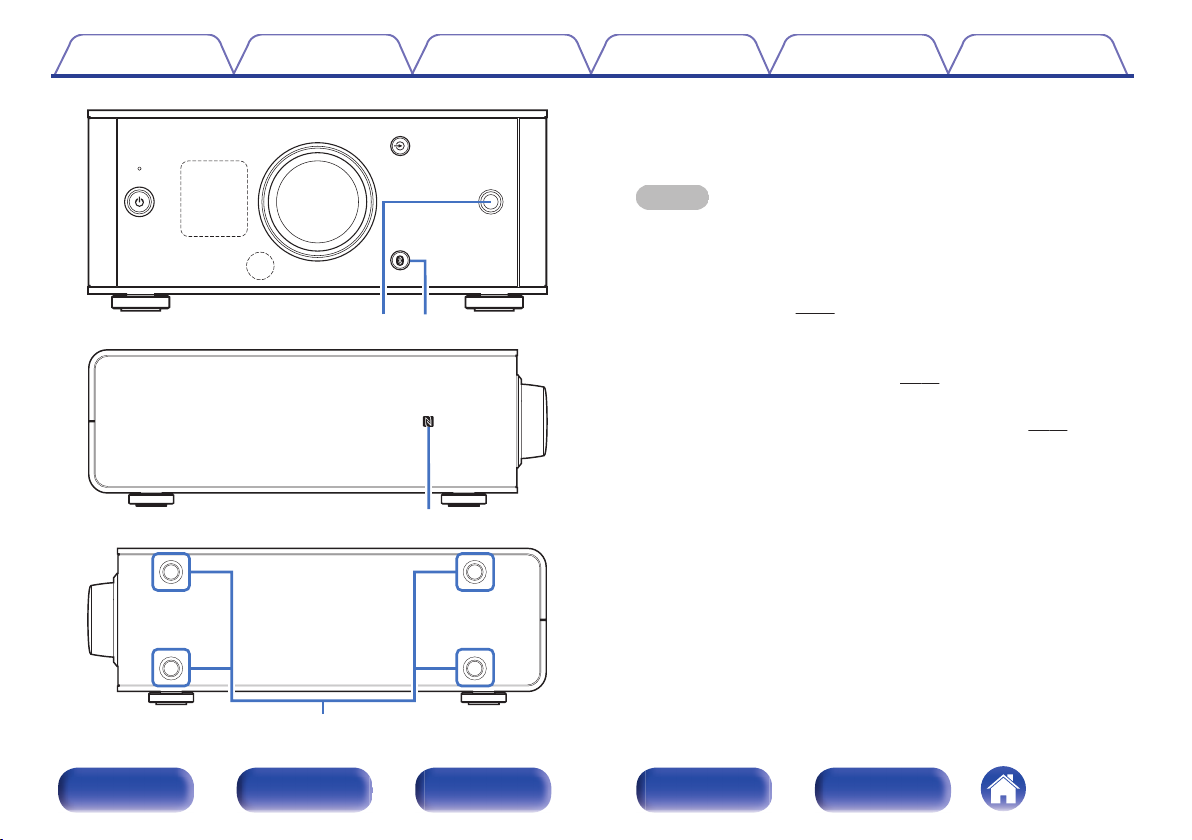
Headphones jack
G
Tips Appendix
Used to connect headphones.
When the headphones are plugged into this jack, audio will no longer
be output from the speaker terminals.
NOTE
To prevent hearing loss, do not raise the volume level excessively when using
headphones.
H
Bluetooth button (V)
This switches the input to Bluetooth. This is also pressed during the
pairing operation. (v
I
N mark (Q)
p. 38)
Touch this mark with a Bluetooth device that includes the NFC function
when pairing (registering) with it. (v
Installation holes for vertical installation feet
J
These are used when the unit is installed vertically. (v
p. 42)
p. 13)
.
Front panel Display Rear panel Remote Index
7
q w
Contents Connections Playback
Display
.
Input source indicator
A
The following is displayed depending on the selected input source.
USB-DAC
COAXIAL
OPTICAL-1 OPTICAL-2
AUX
Bluetooth
Setting procedure
Information display
B
Tips Appendix
Displays items such as information on the audio signal being input or
the name of a Bluetooth device.
. .
.
.
.
Front panel Display Rear panel Remote Index
.
8
AUDIOPRE OUT
IN
RL
OPTICAL
2
OPTICAL
1
USB-DAC COAXIAL
AUDIODIGITAL
IN
SPEAKERS
IMPEDANCE : 4㹼16Ȑ
AC
IN
SUBWOOFER
q
r t
we
Contents Connections Playback
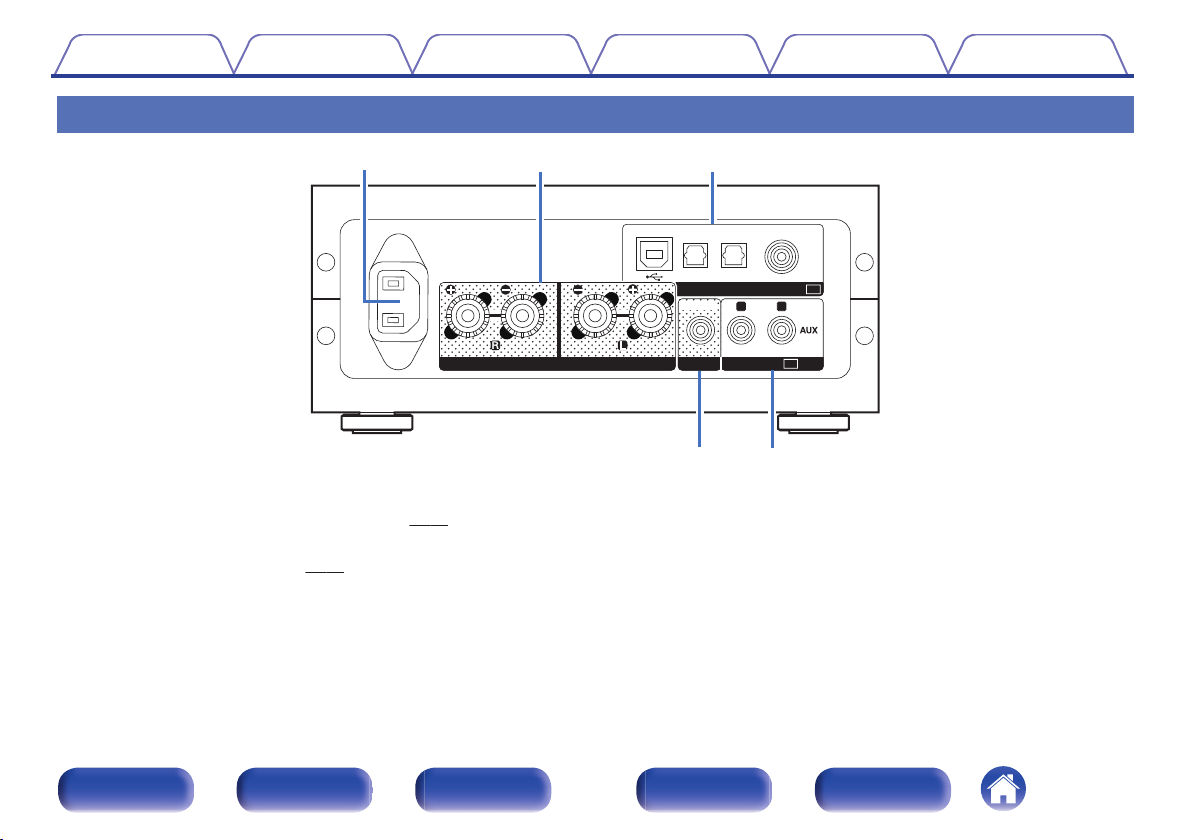
Rear panel
.
Setting procedure
Tips Appendix
AC inlet (AC IN)
A
Used to connect the supplied power cord. (v
Speaker terminals (SPEAKERS)
B
p. 22)
Used to connect speakers. (v p. 18)
DIGITAL AUDIO IN connectors
C
Used to connect devices equipped with PC and digital audio output
connectors.
Front panel Display Rear panel Remote Index
Subwoofer terminal (PRE OUT)
D
Used to connect a subwoofer with a built-in amplifier.
AUX input connectors (AUDIO IN)
E
Used to connect devices equipped with analog audio connectors such
as CD players.
9
INPUT SELECT
INPUT SELECT
VOLUME
VOLUME
DIMMER
DIMMER
SETUP
SETUP
BACK
BACK
POWER
POWER
ENTER
ENTER
y
t
w
q
e
r
u
i
o
Contents
Connections Playback
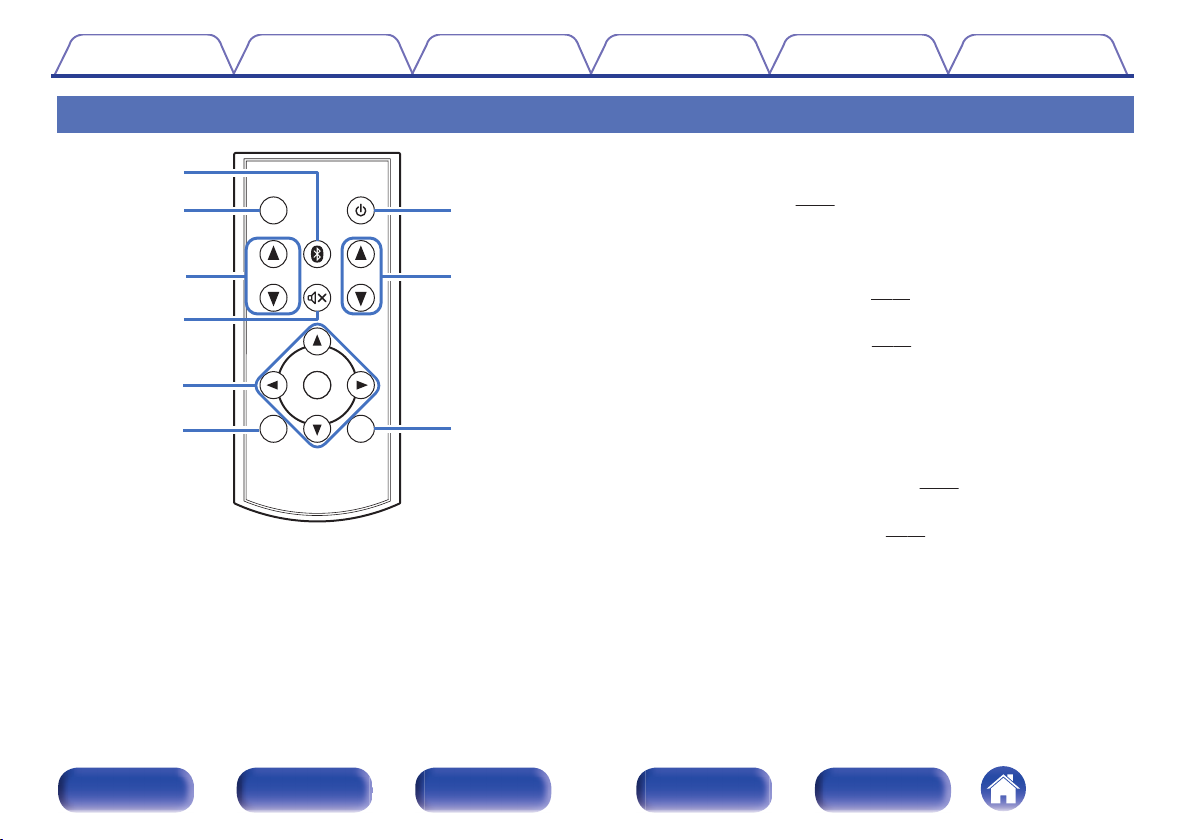
Remote control unit
.
Setting procedure
A
Bluetooth button (V)
Tips Appendix
This switches the input to Bluetooth. This is also pressed during the
pairing operation. (v
DIMMER button
B
p. 38)
Adjust the display brightness of this unit.
INPUT SELECT df
C
This switches input sources. (v
Mute button (:)
D
This mutes the output audio. (v
Cursor buttons (df0 1)
E
p. 25)
p. 26)
These select menu items.
BACK button
F
Returns to the previous item.
Power operation button (X)
G
This turns the power on/to standby. (v p. 24)
VOLUME buttons (VOLUME df)
H
These adjust the volume level. (v p. 26)
SETUP button
I
The setting menu is displayed on the display.
Front panel Display Rear panel Remote Index
10
R
L
R
L
Contents Connections Playback
Connections
Connections
Setting procedure
Tips Appendix
Contents
o
Installing this unit 12
Installing horizontally 12
Installing vertically 13
Before using the remote control unit 15
Connecting speakers 17
Connecting to a device with analog audio output connectors 19
Connecting to a device with digital audio output connectors 20
Connecting a PC or Mac 21
Connecting the power cord 22
NOTE
Do not plug in the power cord until all connections have been completed.
0
Do not bundle power cords together with connection cables. Doing so can result in
0
humming or noise.
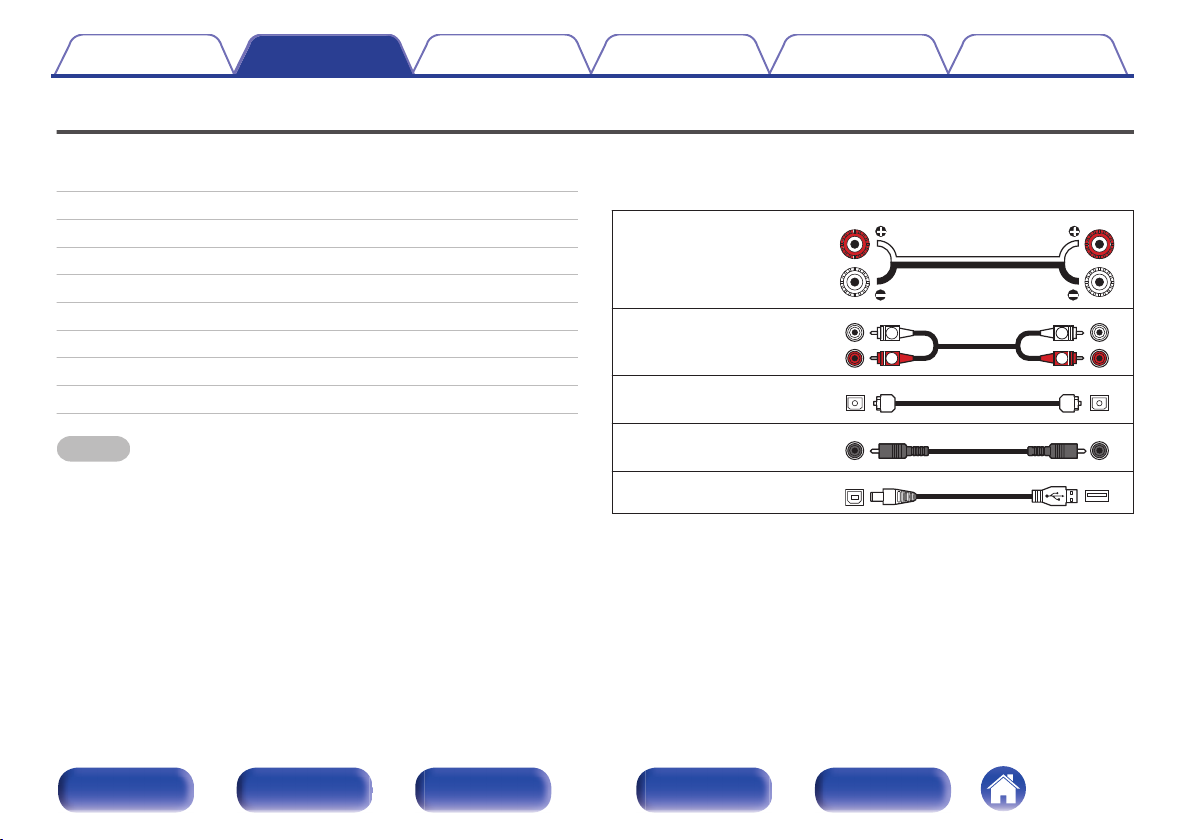
Cables used for connections
o
Provide necessary cables according to the devices you want to
connect.
Speaker cable
.
Audio cable
.
Optical cable
Coaxial digital cable
USB cable
.
.
.
Front panel Display Rear panel Remote Index
11
Contents
Connections Playback
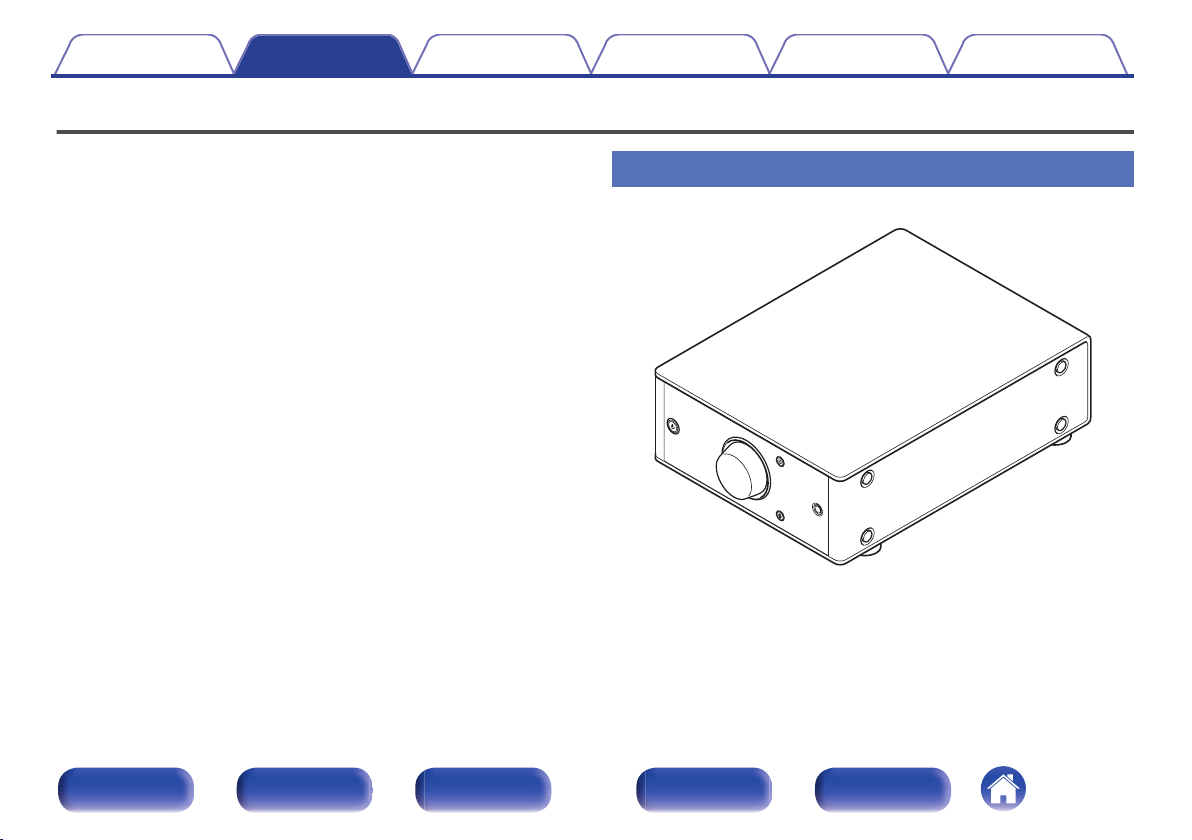
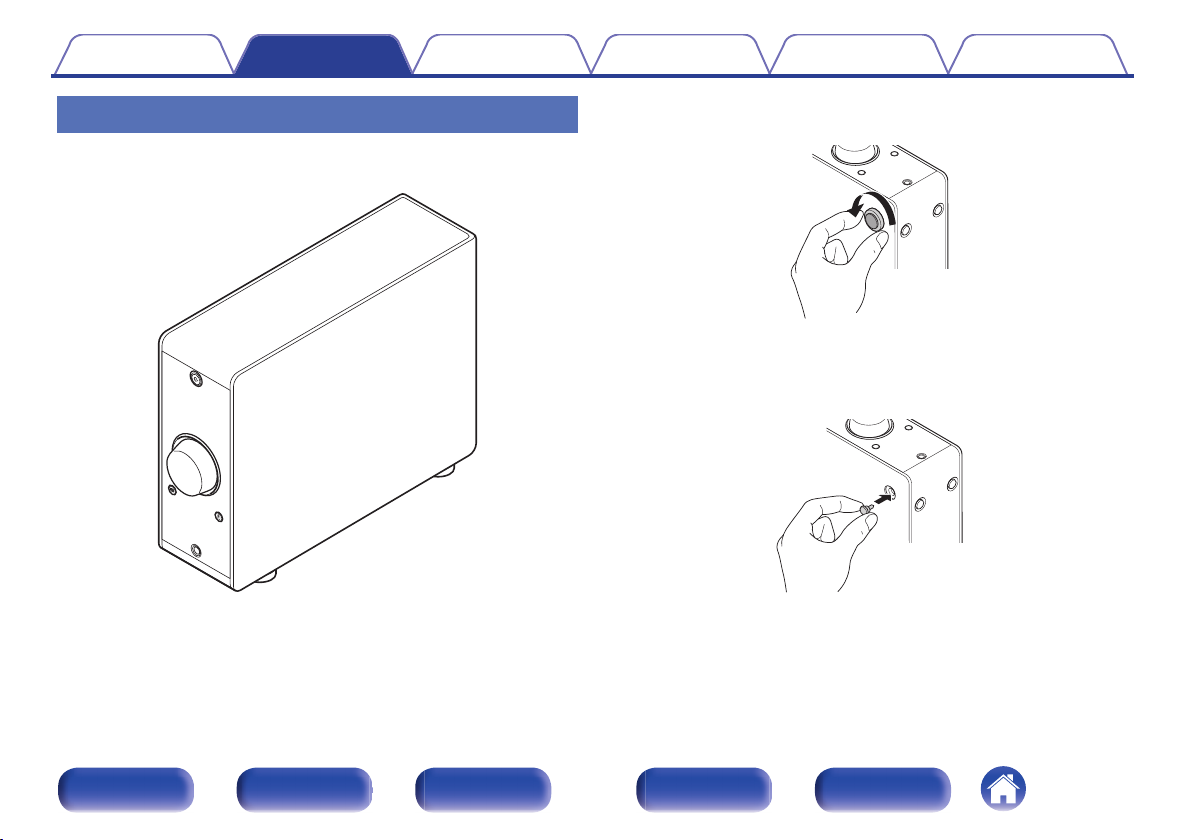
Installing this unit
This unit can be installed in two ways - horizontally or vertically. You can
select how to install this unit according to the installation place and your
preference.
Setting procedure
Tips Appendix
Installing horizontally
The feet are initially attached to the unit for horizontal installation.
.
Front panel Display Rear panel Remote Index
12
Contents
Connections Playback
Setting procedure
Tips Appendix
Installing vertically
This orientation is suitable for placing a narrow place such as a place next
to a laptop computer.
.
Remove the feet.
1
.
Rotate each of the 4 feet counter-clockwise to remove.
0
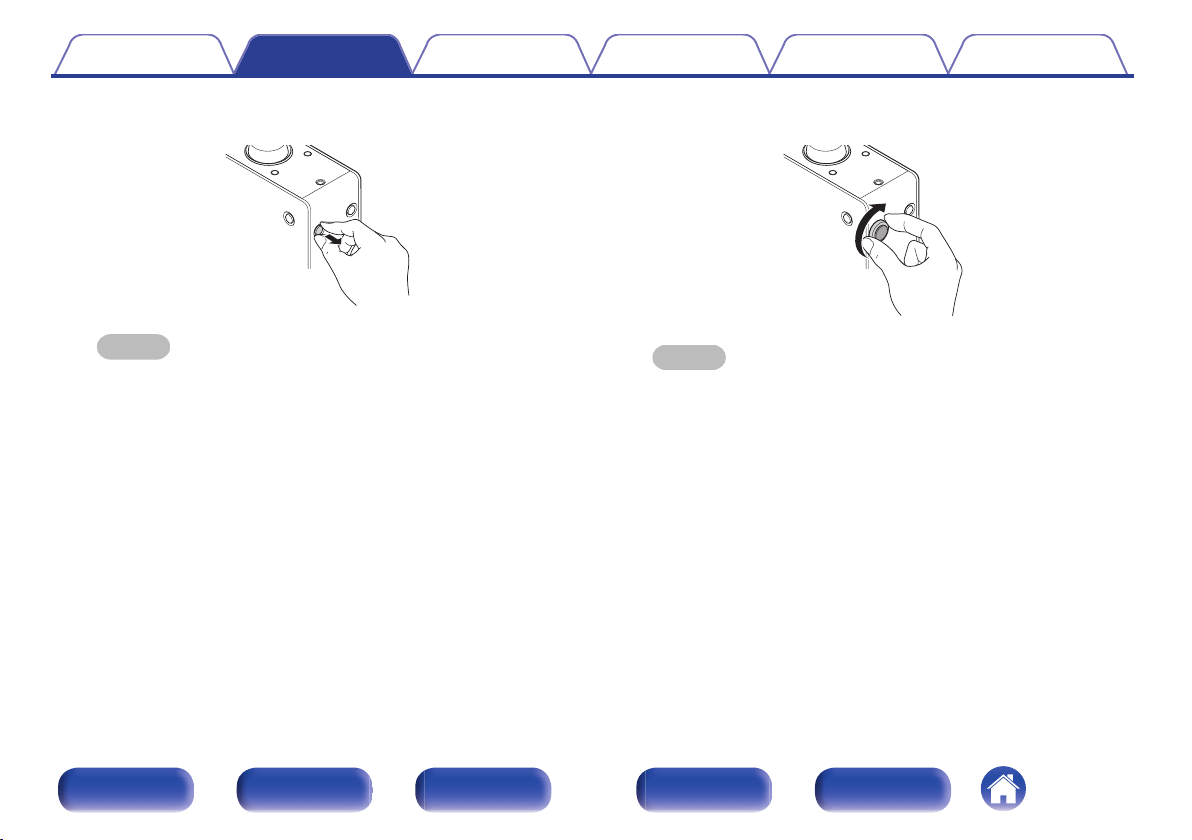
Insert the supplied caps (silver) into the holes from
2
which the feet were removed.
.
Front panel Display Rear panel Remote Index
13
Contents Connections Playback
Setting procedure
Tips Appendix
Remove the cap (black).
3
.
NOTE
Be careful not to damage your nails when removing the caps.
If necessary, use a thin-tipped tool to remove the caps. However, be careful
not to damage the unit when using tools.
Rotate the removed feet clockwise to attach them.
4
.
NOTE
After attaching the feet, adjust the height of the feet as necessary so that the
set is stable when installed.
Front panel Display Rear panel Remote Index
14
Contents Connections Playback
Setting procedure
Tips Appendix
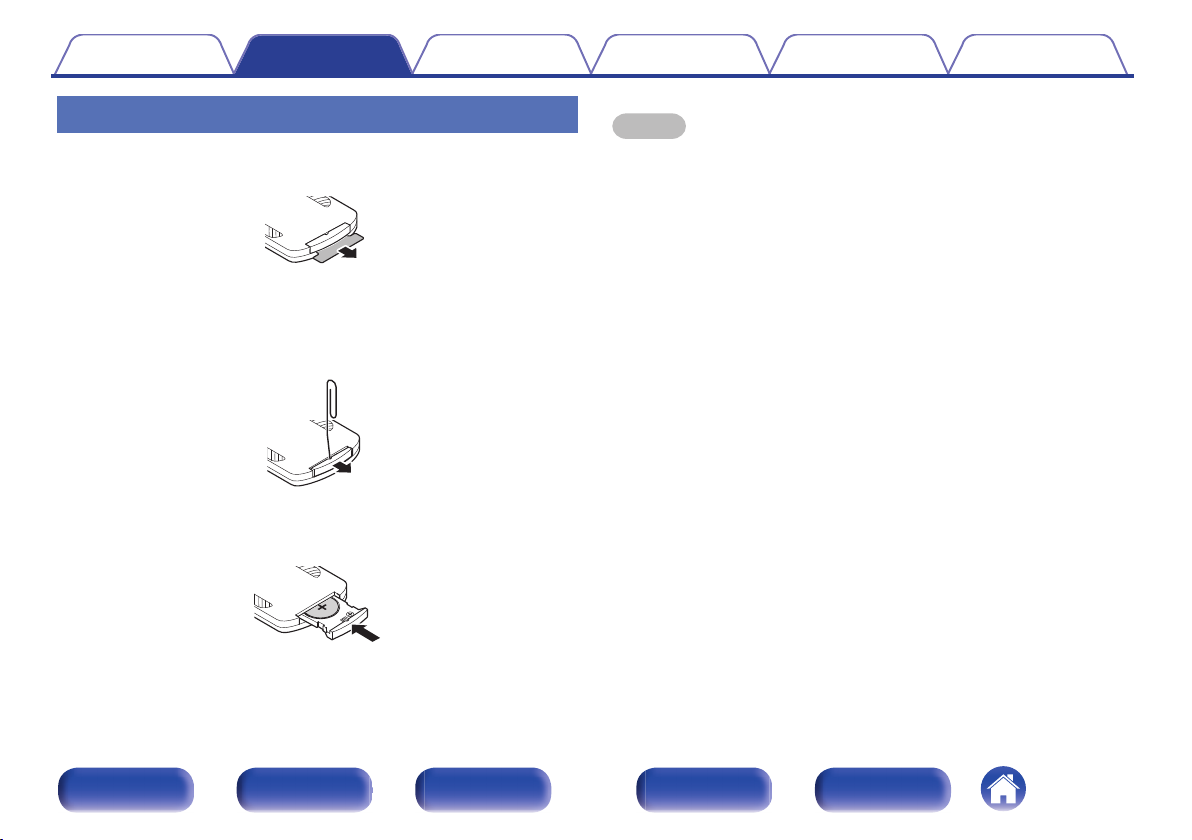
Before using the remote control unit
The remote control unit has a built-in lithium battery.
Pull out the insulation sheet before use.
.
o
Replacing the battery
1. Insert a pointed object into the hole in the battery case and pull out the
battery tray.
2. Insert the lithium battery correctly into the battery compartment as
indicated.
3. Replace the battery case in the original position.
.
.
NOTE
When inserting the lithium battery, be sure to do so in the proper direction,
0
following the F and G marks in the battery compartment.
If the battery should have a leakage, immediately replace and dispose of the
0
battery. In this case, there is a risk of burn when the liquid comes in contact with
skins or clothes, so a great care should be taken. If the liquid accidentally comes in
contact, wash with tap water and consult a doctor.
Remove the battery from the remote control unit if it will not be in use for long
0
periods.
Front panel Display Rear panel Remote Index
15
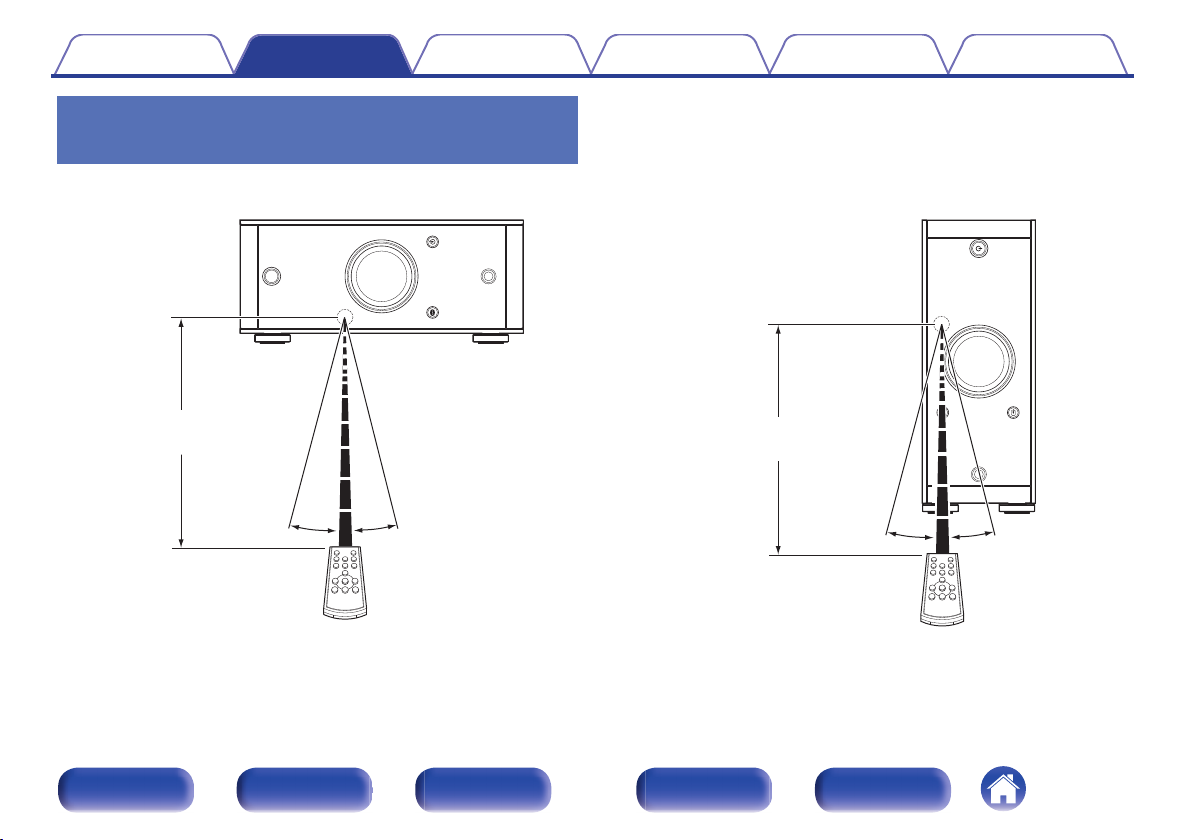
Approx. 23 ft/7 m
30° 30°
30°
30°
Approx. 23 ft/7 m
Contents
Connections Playback
Operating range of the remote control
unit
Point the remote control unit at the remote sensor when operating it.
Setting procedure
Tips Appendix
.
Front panel Display Rear panel Remote Index
[Horizontal installation]
.
[Vertical installation]
16
Contents Connections Playback
Connecting speakers
Setting procedure
Tips Appendix
NOTE
Disconnect this unit’s power plug from the power outlet before connecting the
0
speakers. Also, turn off the subwoofer.
Connect so that the speaker cable core wires do not protrude from the speaker
0
terminal. The protection circuit may be activated if the core wires touch the rear
panel or if the + and - sides touch each other. (“Connecting the speaker
cables” (v p. 17))
Never touch the speaker terminals while the power cord is connected. Doing so
0
could result in electric shock.
Use speakers with impedance of 4 - 16 Ω/ohms.
0
o
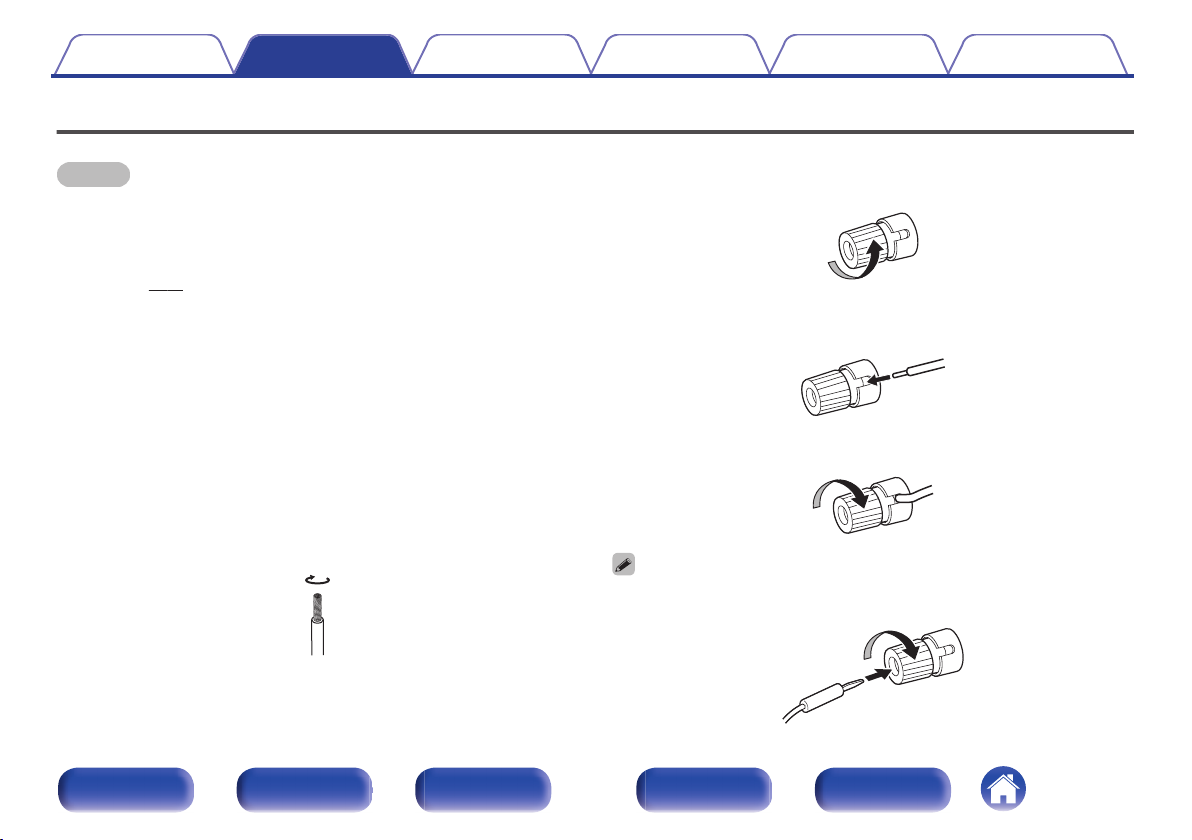
Connecting the speaker cables
Carefully check the left (L) and right (R) channels on the speakers being
connected to this unit, and be sure to connect the polarities correctly.
Peel off about 3/8 inch (10 mm) of sheathing from the
1
tip of the speaker cable, then either twist the core wire
tightly or terminate it.
.
Turn the speaker terminal counterclockwise to loosen
2
it.
.
Insert the speaker cable’s core wire to the hilt into the
3
speaker terminal.
.
Turn the speaker terminal clockwise to tighten it.
4
.
When using banana plugs, rotate the terminals clockwise to tighten them before
inserting the banana plugs.
.
Front panel Display Rear panel Remote Index
17
AUDIO
IN
RL
OPTICAL
2
OPTICAL
1
USB-DAC COAXIAL
AUDIODIGITAL
IN
AC
IN
SPEAKERS
IMPEDANCE : 4㹼16Ȑ
PRE OUT
SUBWOOFER
wq
wq
(R) (L)
Contents
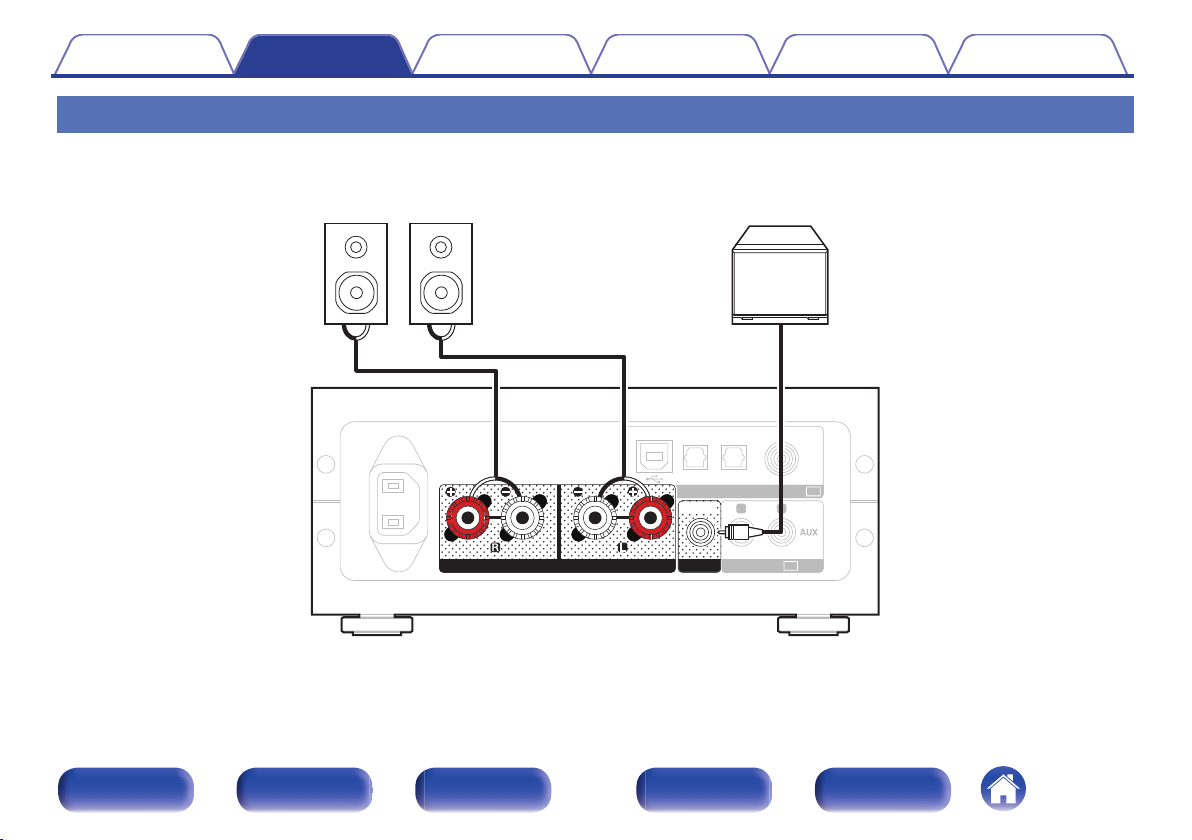
Speaker connection
Connections Playback
Setting procedure
Tips Appendix
Front panel Display Rear panel Remote Index
.
18
PRE OUT
OPTICAL
2
OPTICAL
1
USB-DAC COAXIAL
AUDIODIGITAL
IN
SPEAKERS
IMPEDANCE : 4㨪16ǡ
AC
IN
SUBWOOFER
AUDIO
IN
RL
AUDIO
OUT
LR
L
L
R
R
CD player/
Analog device
Contents
Connections Playback
Setting procedure
Tips Appendix
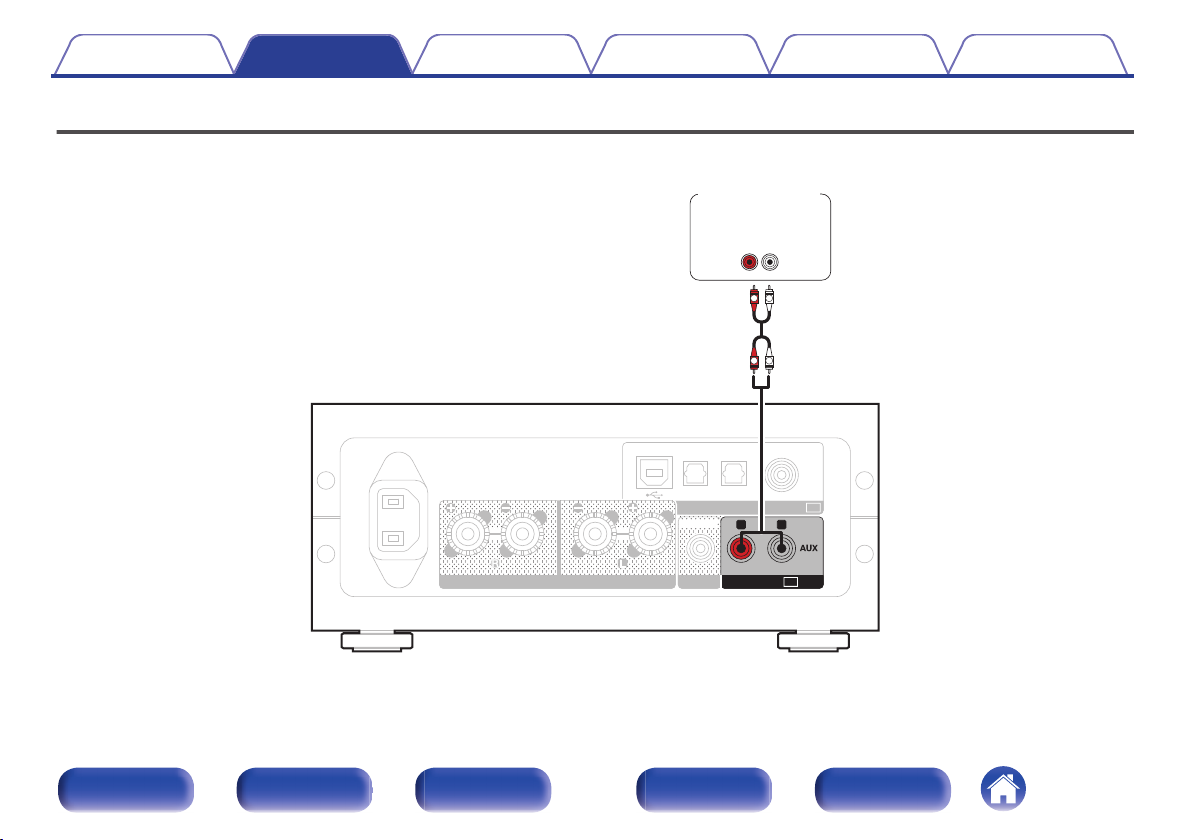
Connecting to a device with analog audio output connectors
This unit can be connected to an analog device such as a CD player.
.
Front panel Display Rear panel Remote Index
19
AUDIOPRE OUT
IN
RL
OPTICAL
2
OPTICAL
1
USB-DAC COAXIAL
AUDIODIGITAL
IN
SPEAKERS
IMPEDANCE : 4㨪16ǡ
AC
IN
SUBWOOFER
OPTICAL
OUT
COAXIAL
OUT
CD Transport/
digital device
Contents Connections Playback
Setting procedure
Tips Appendix
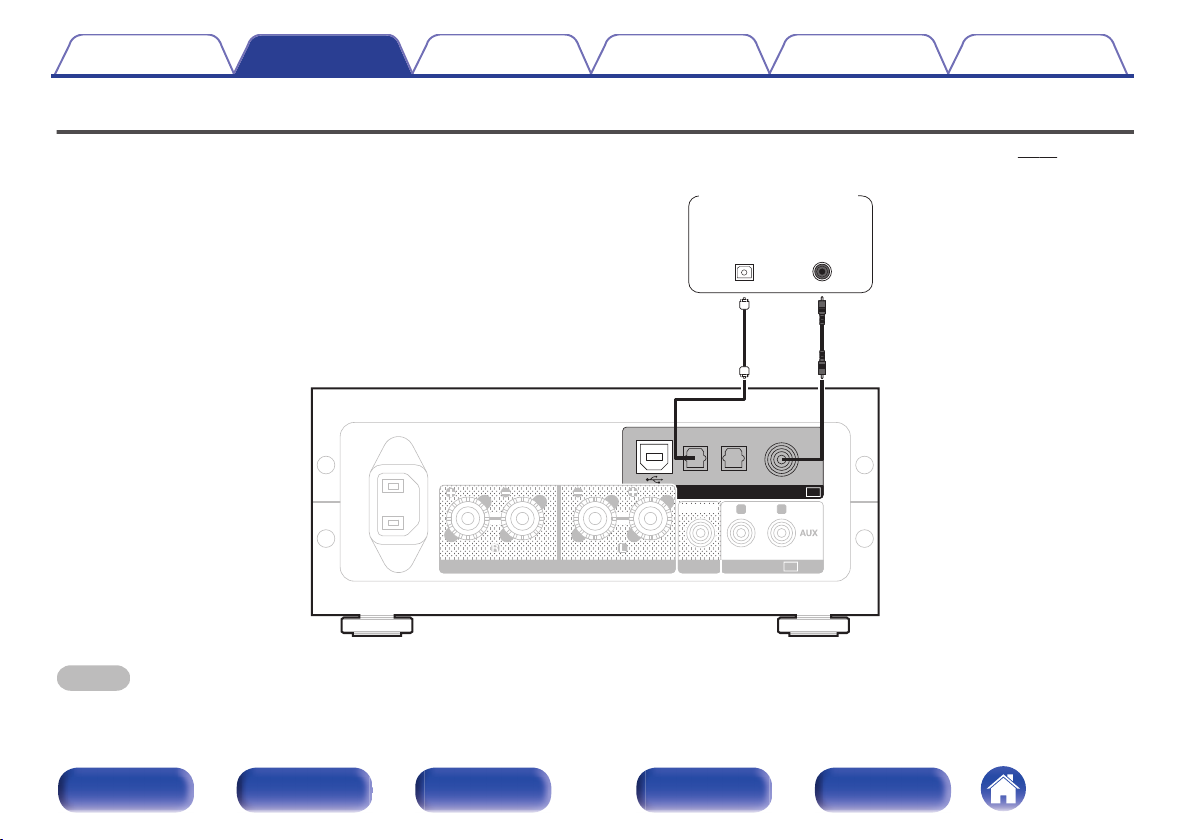
Connecting to a device with digital audio output connectors
Use this connection to input digital audio signals to this unit, and convert the signals for playback using the D/A converter of this unit. (v p. 27)
.
NOTE
Linear PCM signals with a sampling frequency of 32 kHz, 44.1 kHz, 48 kHz, 64 kHz, 88.2 kHz, 96 kHz, 176.4 kHz, or 192 kHz can be input into this device.
0
Do not input non-PCM signals, such as DTS and AAC. This causes noise and could damage the speakers.
0
Front panel Display Rear panel Remote Index
20
AUDIOPRE OUT
IN
RL
OPTICAL
2
OPTICAL
1
USB-DAC COAXIAL
AUDIODIGITAL
IN
SPEAKERS
IMPEDANCE : 4㨪16ǡ
AC
IN
SUBWOOFER
Ty p e A
Ty p e B
Computer on which the driver software and audio
player software are installed
USB 2.0 cable
(supplied)
Contents Connections Playback
Setting procedure
Tips Appendix
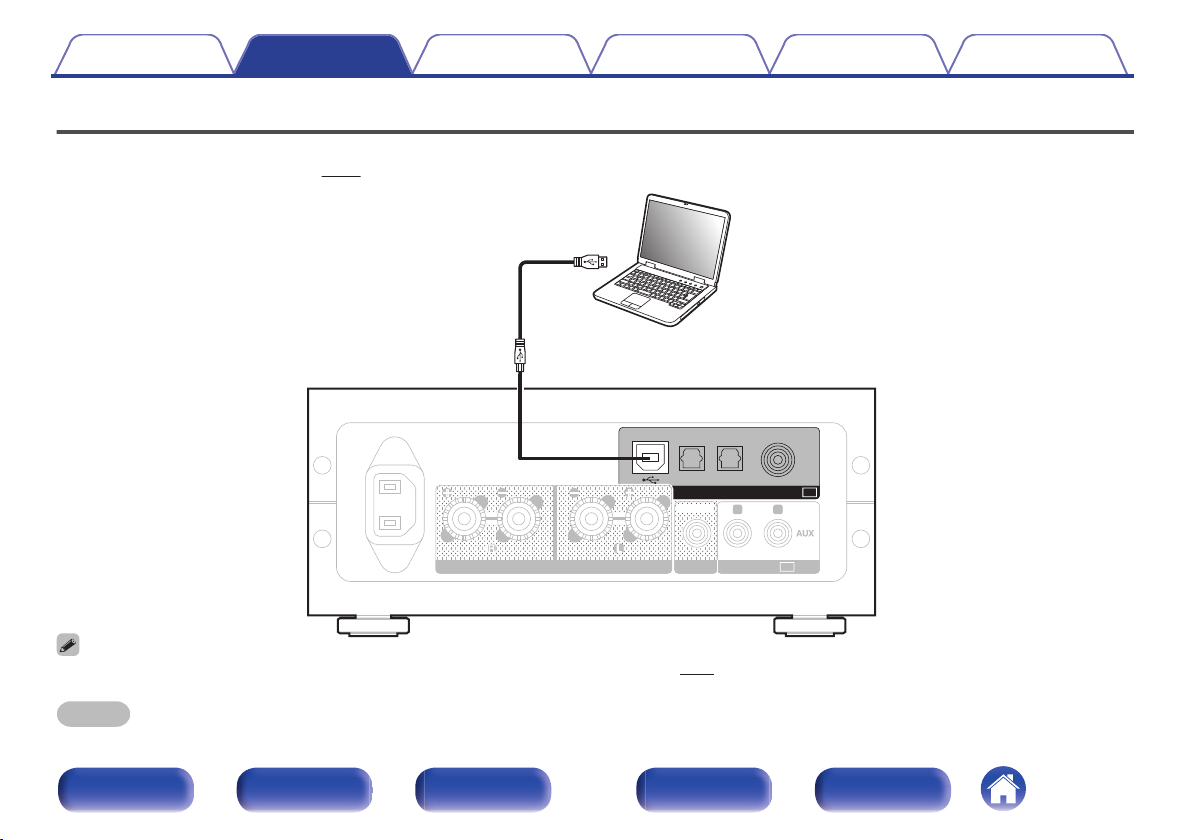
Connecting a PC or Mac
By connecting a computer to the USB-DAC port on the rear panel of this unit using a commercially available USB connecting cable (supplied), this unit
can be used as a D/A converter. (v p. 27)
Before USB connecting this unit to your computer, install the driver software in your computer. (v p. 27)
0
Download the driver software from the PMA-50 page of the Denon website.
0
NOTE
.
Use a cable that is 10 ft (3 m) or less to connect to the computer.
Front panel Display Rear panel Remote Index
21

USB-D
A
SPEAKERS
IMPEDANCE : 4㹼16
Ȑ
AC
IN
Power cord (supplied)
To household power outlet
(AC 120V, 60 Hz)
Contents
Connections Playback
Setting procedure
Connecting the power cord
Wait until all connections have been completed before connecting the power cord.
.
Tips Appendix
Front panel Display Rear panel Remote Index
22

Contents Connections Playback
Contents
o
Playback
Setting procedure
Tips Appendix
Basic operation
Turning the power on 24
Selecting the input source 25
Adjusting the master volume 26
Switching the display’s brightness 26
Playing a device
Playing music on a computer (USB-DAC) 27
Listening to music via a digital connection (COAXIAL/OPTICAL-1/
OPTICAL-2) 35
Listening to music via a analog connection (ANALOG IN)
Listening to music via a analog connection (AUX) 36
Listening to music on a Bluetooth device 37
Front panel Display Rear panel Remote Index
23

Display
Volume control knob
INPUT SELECT
INPUT SELECT
VOLUME
VOLUME
DIMMER
DIMMER
SETUP
SETUP
BACK
BACK
POWER
POWER
ENTER
ENTER
Contents Connections Playback
Basic operation
.
Setting procedure
Tips Appendix
Turning the power on
Press X to turn on power to this unit.
1
Turns the display on.
o
Switching power to the standby mode
Press X.
1
Turns the display off.
You can also press X on the remote control unit for this operation.
NOTE
When the power is in the standby mode, some circuits are electrified. Before you go
out or travel for a long period of time, disconnect the power cord from the power
outlet.
.
Front panel Display Rear panel Remote Index
24

Contents Connections Playback
Selecting the input source
o
Selecting USB-DAC, DIGITAL IN or ANALOG IN
Press q to select the input source to be played.
1
The following icon appears on the display.
USB-DAC: Plays back audio on the computer.
.
Setting procedure
o
Selecting Bluetooth
Press V.
1
Tips Appendix
The following icon appears on the display.
Bluetooth:
.
Connects and plays back a Bluetooth
device.
COAXIAL:
.
OPTICAL 1:
.
OPTICAL 2:
.
AUX:
.
You can also press INPUT SELECT df on the remote control unit for this operation.
Plays back the device connected to the
COAXIAL connector.
Plays back the device connected to the
OPTICAL 1 connector.
Plays back the device connected to the
OPTICAL 2 connector.
Plays back the device connected to the
AUX connector.
Front panel Display Rear panel Remote Index
You can also press V on the remote control unit for this operation.
25

Contents Connections Playback
Setting procedure
Tips Appendix
Adjusting the master volume
Turn the volume control knob to adjust the volume.
1
The volume level appears on the display.
You can also press VOLUME df on the remote control unit for this operation.
0
You can adjust the volume level to --- dB (minimum) and between -90 dB and 0
0
dB.
o
Turning off the sound temporarily (muting)
You can also press : on the remote control unit.
1
MUTING is displayed on the display.
Press : again to cancel the muting.
0
Switching the display’s brightness
The display brightness can be adjusted between three levels.
Press DIMMER.
1
Front panel Display Rear panel Remote Index
26

Contents Connections Playback
Playing a device
Connect the device you want to play back beforehand.
(“Connections” (v p. 11))
Playing music on a computer (USBDAC)
You can enjoy high-quality audio playback from the D/A converter built in
to this unit by inputting music files into this unit from a computer via USB
connection.
Before USB connecting this unit to your computer, install the driver
0
software in your computer.
Drivers do not need to be installed for Mac OS.
0
Also, you can use whichever commercially available or downloadable
0
player software you like to playback files on your computer.
o
Computer (recommended system)
OS
0
Windows® Vista, Windows 7 or Windows 8/8.1
Mac OS X 10.6.3 or later
0
USB
USB 2.0: USB High speed/USB Audio Class Ver.2.0
0
NOTE
This unit was checked the operation using the recommended system by us, but it
does not guarantee the operation of all systems.
Setting procedure
DSD is a registered trademark.
0
Microsoft, Windows Vista, Windows 7 and Windows 8 are
0
either registered trademarks or trademarks of Microsoft
Corporation in the United States and/or other countries.
Apple, Macintosh and Mac OS are trademarks of Apple Inc.,
0
registered in the U.S. and other countries.
Windows OS
Mac OS
Installing the dedicated driver (v p. 28)
Audio Device Settings (v p. 33)
Tips Appendix
Front panel Display Rear panel Remote Index
27

w
q
Contents Connections Playback
Setting procedure
Tips Appendix
Installing the dedicated driver
o
(Windows OS only)
n
Installing the driver software
Disconnect the USB cable between your PC and the
1
unit.
The driver software cannot be installed correctly if your PC is
0
connected to the unit by a USB cable.
If the unit and your computer are connected by a USB cable and
0
the computer is switched on before installation, disconnect the
USB and restart the computer.
Download the dedicated driver from the “Download”
2
section of the PMA-50 page of the Denon website onto
your PC.
Unzip the downloaded file, select the 32-bit or 64-bit
3
exe file that matches your Windows operating system,
and double-click the file.
Install the driver.
4
Select the language to use for the installation.
A
Click “OK”.
B
.
Front panel Display Rear panel Remote Index
28

e
Marantz
SOFTWARE LICENSING AGREEMENT
t
r
Contents
Connections Playback
Setting procedure
Tips Appendix
The wizard menu is displayed. Click “Next”.
C
.
Read the Software Licensing Agreement, and click “I accept the
D
terms in the license agreement”.
Click “Next”.
E
.
Front panel Display Rear panel Remote Index
29

y
u
i
Contents
Connections Playback
Setting procedure
Tips Appendix
Click “Install” on the installation start dialog.
F
The installation starts. Do not perform any operation on the PC
0
until the installation is completed.
.
In the Windows security dialog, select “Always trust software
G
from “DandM Holdings Inc.””.
Click “Install”.
H
.
Front panel Display Rear panel Remote Index
30

o
Contents Connections Playback
When the installation is completed, click “Finish”.
I
.
With the unit power off, connect the unit and PC using
5
a USB cable (supplied).
For the connection procedure, refer to the “Connecting a PC or
0
Mac” (v p. 21) section.
Setting procedure
Press POWER X.
6
7
8
When the unit power is turned on, the PC automatically finds and
0
connects to the unit.
Press the input source select button (USB-DAC) to
switch the input source to “USB-DAC”.
Checking the installed driver.
Click the “Start” button and click “Control Panel” on the PC.
A
The control panel setting list is displayed.
0
Click the “Sound” icon.
B
The sound menu window is displayed.
0
Check that there is a checkmark next to “Default Device” under in
C
“Digital Audio Interface” of the “Playback” tab.
When there is a checkmark for a different device, click Denon
0
USB Audio and “Set Default”.
Tips Appendix
Front panel Display Rear panel Remote Index
31

ApplyCancelOK
Properties
Select a playback device below to modify its settings:
DigitalAudioInterface
DefaultDevice
Speakers
Ready
Sound
Appl
y
Configure
C
o
nfigure Set Default
S
e
t Defaul
t
Playback
Recording CommunicationsSounds
elect a playback device below to modif
y
ita
lA
udi
udi
oI
oI
nte
nte
rfa
ce
aul
tD
evi
ce
Spe
akers
q
ApplyCancel
Tes t
OK
2 channel, 24 bit, 192000 Hz ( Studio Quality)
Give exclusive mode applications priority
Default Format
Select the sample rate and bit depth to be used when running
in shared mode.
Digital Audio Interface Properties
Allow applications to take exclusive control of this device
A
pp
ly
Restore Defaults
estore efault
s
General Supported Formats Levels Advanced
2 channel, 24 bit, 44100 Hz ( Studio Quality)
2 channel, 24 bit, 48000 Hz ( Studio Quality)
2 channel, 24 bit, 96000 Hz ( Studio Quality)
2 channel, 24 bit, 192000 Hz ( Studio Quality)
w
e
r
t
Contents
Checking audio output.
9
Connections Playback
Outputs a TEST signal from the PC and checks the audio output
from the USB-DAC function.
Select “Digital Audio Interface” and click “Properties”.
A
The Digital Audio Interface Properties window is displayed.
0
.
Setting procedure
Click the “Advanced” tab.
B
Select the sampling rate and bit rate to be applied to the D/A
C
converter.
It is recommended that “2 channel, 24 bit, 192000 Hz (Studio
0
Quality)” is selected.
Click “Apply”.
D
Click “Test”.
E
Check that audio from this unit is output from the PC.
0
Tips Appendix
Front panel Display Rear panel Remote Index
.
NOTE
The dedicated driver must be installed in the PC before this unit is connected to a
0
PC. Operation will not occur correctly if connected to the PC before the dedicated
driver has been installed.
Operation may fail in some PC hardware and software configurations.
0
32

Contents
o
Audio Device Settings (Mac OS X only)
Move the cursor to “Go” on the computer screen, and then click
A
Connections Playback
“Utilities”.
The utility list is displayed.
0
Double-click “Audio MIDI Setup”.
B
The “Audio Devices” window is displayed.
0
Check that “Use this device for sound output” is checked in “PMA-50”.
C
If a different device is checked, select and “Secondary click” on
0
“PMA-50”, and then select “Use this device for sound output”.
Setting procedure
Select the “PMA-50” format.
D
It is normally recommended to set the format to “192000.0 Hz” and
0
Tips Appendix
“2ch-24 bit Interger”.
.
Quit Audio MIDI Setup.
E
.
Front panel Display Rear panel Remote Index
33

or
Contents
Connections Playback
Setting procedure
Tips Appendix
o
Playback
Install the desired player software on your computer beforehand.
Use the rear panel USB-DAC port to connect this unit to a computer.
(v p. 21)
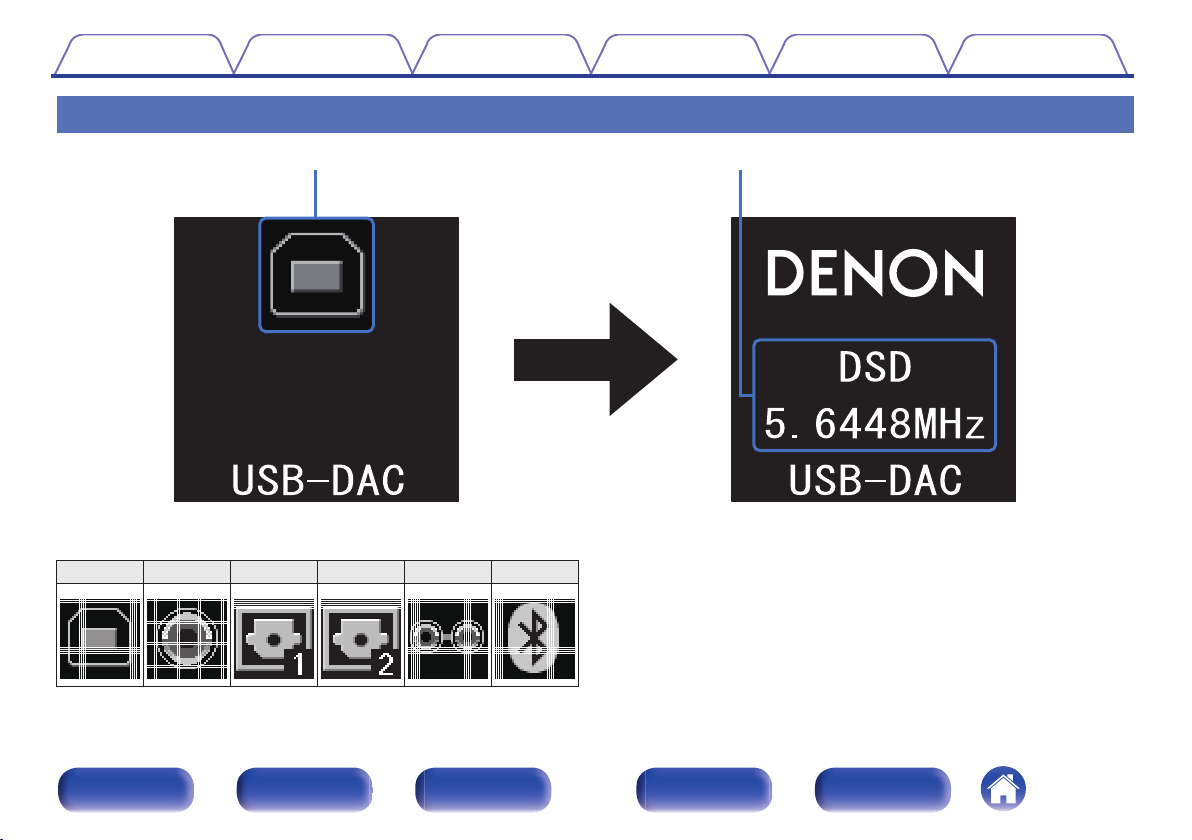
Press q to select the input source to “USB-DAC”.
1
Start playback on the computer’s player software.
The digital audio signal that is being input is shown as follows in the
display.
You can also press INPUT SELECT df on the remote control unit for this
operation.
.
(xxxx is the sampling frequency.)
If the sampling frequency cannot be detected, “Unlocked” will be
0
displayed.
“Unsupported” is displayed when audio signals that are not
0
supported by this unit are input.
o
Files that can be played back
See “D/A converter” (v p. 59).
NOTE
Perform operations such as playback and pause on the computer. At this time, you
0
cannot perform operations with buttons on this unit or the remote control.
You can also control the volume and equalizer on the computer. Enjoy playing
0
music at the desired volume.
When this unit is functioning as a D/A converter, sound is not output from the
0
computer’s speakers.
If the computer is disconnected from this unit while the computer music playback
0
software is running, the playback software may freeze. Always exit the playback
software before disconnecting the computer.
When an error occurs on the computer, disconnect the USB cable and restart the
0
computer.
The sampling frequency of the music playback software and sampling frequency
0
displayed on this unit may differ.
Use a cable that is 10 ft (3 m) or less to connect to the computer.
0
Front panel Display Rear panel Remote Index
34

or
or
Contents
Connections Playback
Listening to music via a digital
connection (COAXIAL/OPTICAL-1/
OPTICAL-2)
Press q to select the input source to “COAXIAL”,
1
“OPTICAL-1” or “OPTICAL-2”.
The digital audio signal that is being input is shown as follows in the
display.
You can also press INPUT SELECT df on the remote control unit for this
operation.
.
(xxxx is the sampling frequency.)
If the sampling frequency cannot be detected, “Unlocked” will be
0
displayed.
“Unsupported” is displayed when audio signals that are not
0
supported by this unit are input.
Setting procedure
o
Files that can be played back
See “D/A converter” (v p. 59).
NOTE
Do not input non-PCM signals, such as Dolby Digital, and DTS. This causes noise
0
and could damage the speakers.
If the sampling frequency switches, such as from A mode to B mode in a CS
0
broadcast, muting may operate for 1 – 2 seconds, cutting the sound.
Tips Appendix
Front panel Display Rear panel Remote Index
35

Contents Connections Playback
Listening to music via a analog
connection (AUX)
Press q to select the input source to “AUX”.
1
Play back music on the connected device.
2
The speakers output music from the connected device.
Setting procedure
Tips Appendix
Front panel Display Rear panel Remote Index
36

Contents Connections Playback
Listening to music on a Bluetooth
device
You can listen to music wirelessly by connecting this unit to a Bluetooth
device via Bluetooth.
o
Pairing
Pairing (registration) is an operation that is required in order to connect
a Bluetooth device to this unit using Bluetooth. When paired, the
devices authenticate each other and can connect without mistaken
connections occurring.
When using Bluetooth connection for the first time, you need to pair
this unit and the Bluetooth device to be connected. This unit can store
pairing information for a maximum of 8 devices.
NOTE
You cannot simultaneously output music from multiple Bluetooth devices.
Setting procedure
o
How to establish a Bluetooth connection
There are three types of Bluetooth connection methods. Use an
appropriate type depending on your environment.
Case 1
Case 2
Case 3
Pairing with this unit for the first time
(v p. 38)
Connecting a Bluetooth device that this unit performed
pairing for before
(v p. 41)
Connecting a Bluetooth device with the NFC function via
NFC
p. 42)
(v
Tips Appendix
Front panel Display Rear panel Remote Index
37

Bluetooth ON
Contents
Case 1: Pairing with this unit for the first time
o
Connections Playback
Setting procedure
Tips Appendix
Press X to turn on power to this unit.
1
Turn the display on.
.
Turn on the Bluetooth function on the Bluetooth device.
2
For details, see the owner’s manual for your Bluetooth device.
0
.
Press V for 3 seconds or longer.
3
“Pairing” appears on the display, and the unit enters the pairing
mode.
0
When you press V for the first time after purchase, this unit
automatically enters the paring mode.
.
Front panel Display Rear panel Remote Index
38

Denon PMA-50
Contents
Select “Denon PMA-50” from the list of devices
4
displayed in the screen on the Bluetooth device.
Connections Playback
When pairing is complete and the device is connected via Bluetooth,
the device name appears on the display of this unit.
.
Setting procedure
When “Denon PMA-50” is not displayed in the screen on the Bluetooth
0
device, search for devices on the Bluetooth device.
When you are prompted for a pass key in the screen on the Bluetooth
0
device, enter “0000”.
English letters, numbers and certain symbols are displayed. Incompatible
0
characters are displayed as “.” (period).
Tips Appendix
Front panel Display Rear panel Remote Index
39

Contents
Play back music on the Bluetooth device.
5
The speakers output music that the Bluetooth device is playing
back.
Adjust to the appropriate volume level.
0
When the pairing fails, retry from step 3.
0
To perform pairing for another Bluetooth device, repeat steps 2 to 5 for each
0
device you want to perform pairing for.
When no Bluetooth device is connected, “No Connection” appears on the display.
0
NOTE
The pairing mode on this unit lasts for approx. 5 minutes. When the pairing mode
0
on this unit is canceled before the pairing is completed, retry from step 3.
This unit cannot perform pairing against a Bluetooth device with a pass key other
0
than “0000”.
Connections Playback
Setting procedure
Tips Appendix
Front panel Display Rear panel Remote Index
40

Bluetooth ON
Denon PMA-50
Contents
Case 2: Connecting a Bluetooth device that this unit performed pairing for before
o
Connections Playback
Setting procedure
Tips Appendix
Turn on the Bluetooth function on the Bluetooth device.
1
For details, see the owner’s manual for your Bluetooth device.
0
.
Select “Denon PMA-50” from the list of devices
2
displayed in the screen on the Bluetooth device.
Power to this unit is automatically turned on and this unit attempts to
establish the Bluetooth connection. When the device is connected
via Bluetooth, the device name appears on the display of this unit.
.
Play back music on the Bluetooth device.
3
The speakers output music from the Bluetooth device.
Front panel Display Rear panel Remote Index
41

Contents
Case 3: Connecting a Bluetooth device with the NFC function via NFC
o
You can just touch this unit with a Bluetooth device to turn on power to
this unit and perform pairing or establish a connection between this
unit and the Bluetooth device.
Turn on the NFC function on the Bluetooth device.
1
2
For details, see the owner’s manual for your Bluetooth device.
0
Touch Q on this unit with the NFC antenna part on the
Bluetooth device.
Power to this unit is turned on and this unit attempts to establish the
Bluetooth connection.
When the device is connected via Bluetooth, the device name
appears on the display of this unit.
Complete operations as instructed by the Bluetooth device.
0
Connections Playback
Setting procedure
Play back music on the Bluetooth device.
3
This unit outputs music from the Bluetooth device.
0
When you touch the N mark (Q) on this unit with the Bluetooth device that
is playing back music, this unit outputs that music.
0
Touch the N mark (Q) again during the Bluetooth connection to disconnect
the connection.
0
When you touch the N mark (Q) with a different Bluetooth device during
the Bluetooth connection, this unit stops playing back for the currently
connected Bluetooth device and connects to the newly touched Bluetooth
device.
NOTE
Before establishing a NFC connection, cancel the lock function on the Bluetooth
0
device.
When you touch this unit with a Bluetooth device, do so softly.
0
Tips Appendix
.
Front panel Display Rear panel Remote Index
42

o
Audio signals
Playing back
Connected via Bluetooth
Contents
Connections Playback
Simultaneously connecting multiple Bluetooth
devices (multi point function)
This unit can only output music from one connected Bluetooth device,
but up to 3 Bluetooth devices can simultaneously be connected.
(“Listening to music on a Bluetooth device” (v p. 37))
If frequently used devices are connected, it is useful for switching the
playback device because you do not have to reconnect them.
Perform pairing for devices you want to connect to beforehand.
Setting procedure
Tips Appendix
Front panel Display Rear panel Remote Index
.
43

Contents Connections Playback
o
Switching the playback device
Stop or pause the device that is currently played back.
1
Play back the device that you want to output music
2
from.
Turn the power of this unit to standby before turning the Bluetooth function of the
Bluetooth device off.
Setting procedure
Tips Appendix
Front panel Display Rear panel Remote Index
44

Contents Connections Playback
Setting procedure
Setting procedure
Tips Appendix
Menu map
For menu operations, see the following page.
By default, this unit has recommended settings defined. You can customize this unit based on your existing system and your preferences.
Setting items Description Page
Source Direct Sets the tone adjustment. 47
Bass Adjusts the bass sound. 47
Treble Adjusts the treble sound. 47
Balance Adjust the left/right volume balance. 47
H/P AMP Gain Set the gain of the headphone amplifier. 47
Bluetooth Switches the Bluetooth function on/off. 48
Auto Standby When there is no input signal and operation for 30 minutes, this unit automatically enters the standby mode. 48
Front panel Display Rear panel Remote Index
45

INPUT SELECT
INPUT SELECT
VOLUME
VOLUME
DIMMER
DIMMER
SETUP
SETUP
BACK
BACK
POWER
POWER
ENTER
ENTER
SETUP
BACK
uio p
ENTER
Contents Connections Playback
.
Setting procedure
Menu operation
o
Press SETUP.
1
The menu is displayed on the display.
Use ui to select the menu to be set or operated, then
2
press ENTER.
Use uio p to change to desired setting.
3
Press ENTER to enter the setting.
4
To return to the previous item, press BACK or o.
0
Exiting the Menu, press SETUP while the menu is displayed. The
0
display returns to the normal display.
Tips Appendix
Front panel Display Rear panel Remote Index
46

Contents Connections Playback
Setting procedure
Tips Appendix
Source Direct
Set whether to adjust the tone.
Off
(Default):
On:
Adjusting the tone.
Tone is not adjusted. Tone adjustments (Bass,
Treble, Balance) are disabled.
Bass
Adjusts the bass sound.
–8dB – +8dB (Default : 0dB)
Treble
Adjusts the treble sound.
–8dB – +8dB (Default : 0dB)
Balance
Use o p to adjust the left/right volume balance.
H/P AMP Gain
Set the gain of the headphone amplifier. Set this according to the
impedance of the connected headphones. It is recommended that this is
set on the “Low” side if the headphones have low impedance and on the
“High” side if they have high impedance.
Low
(Default):
Mid:
High:
NOTE
The headphone volume varies depending on the “H/P AMP Gain” setting. Decrease
the volume or mute the audio first if changing this setting while listening to audio.
Set the gain of the headphone amplifier to
“Low”.
Set the gain of the headphone amplifier to
“Mid”.
Set the gain of the headphone amplifier to
“High”.
Front panel Display Rear panel Remote Index
47

Contents Connections Playback
Bluetooth
Stopping Bluetooth function reduces a source of noise that affects sound
quality, enabling higher sound quality playback.
Setting procedure
Tips Appendix
On
(Default):
Off: Disables the Bluetooth function.
When Bluetooth is “Off”, the input source cannot be switched to Bluetooth.
Enables the Bluetooth function.
Auto Standby
When there is no input signal and operation for 30 minutes, this unit
automatically enters the standby mode.
On:
Off:
(Default):
Front panel Display Rear panel Remote Index
The unit goes into standby after 30 minutes.
The unit does not go into standby
automatically.
48

Contents Connections Playback
Contents
o
Setting procedure
Tips Appendix
Tips
Tips
I want to turn on power to this unit from a Bluetooth device 50
I want to switch the connection to a different Bluetooth device 50
I want to connect to an NFC enabled device via NFC 50
I want to adjust the tone myself 50
I want sound playback that is faithful to the original sound 50
Troubleshooting
Power does not turn on / Power is turned off 52
No sound comes out 53
Sound is distorted or interrupted, or noise occurs 54
Desired sound does not come out 54
Files on a computer cannot be played back 55
Audio from digital devices cannot be played back (Coaxial/Optical) 56
Pairing fails 56
NFC connection fails 56
Operations cannot be performed through the remote control unit 57
The Bluetooth device names are not displayed properly 57
Front panel Display Rear panel Remote Index
49

Contents
Connections Playback
Setting procedure
Tips Appendix
Tips
I want to turn on power to this unit from a Bluetooth device
Once you perform paring between this unit and a Bluetooth device, you can turn on power to this unit by operating the Bluetooth device. Select
0
“PMA-50” from the list of Bluetooth devices to turn on power to this unit.
I want to switch the connection to a different Bluetooth device
This unit can only output music from one connected Bluetooth device, but up to 3 Bluetooth devices can simultaneously be connected. To switch the
0
connection easily, always have the frequently used Bluetooth devices connected. When multiple Bluetooth devices are connected and you want to
switch to a different Bluetooth device, stop playback on the device that is currently played back and play back the Bluetooth device that you want to
output music from. (v
I want to connect to an NFC enabled device via NFC
0
Enable the NFC function on an NFC enabled device, and touch the N mark (Q) on this unit with the NFC device. (v p. 42)
I want to adjust the tone myself
Adjust the “Bass”, “Treble” and “Balance” in the setup menu to the desired levels.
0
I want sound playback that is faithful to the original sound
Set “Source Direct” in the setup menu to “On”.
0
p. 44)
Front panel Display Rear panel Remote Index
50

Contents Connections Playback
Setting procedure
Tips Appendix
Troubleshooting
1. Are the connections correct?
2. Is the set being operated as described in the owner’s manual?
3. Are the other devices operating properly?
If this unit does not operate properly, check the corresponding symptoms in this section.
If the symptoms do not match any of those described here, consult your dealer as it could be due to a fault in this unit. In this case, disconnect the power
immediately and contact the store where you purchased this unit.
Front panel Display Rear panel Remote Index
51

Contents Connections Playback
Power does not turn on / Power is turned off
o
Symptom Cause / Solution Page
Power does not turn on.
Power automatically turns
off.
Power turns off and the
protection circuit indicator
flashes in red approx.
every 2 seconds.
Power turns off and the
protection circuit indicator
flashes in red approx.
every 0.5 seconds.
Check whether the power cord is correctly inserted into the power outlet. 22
0
Check the connection between this unit and the power cord. 22
0
This unit is in the standby mode. Press the power button (X).
0
Use the power cord that is supplied with this unit. 22
0
The auto standby mode is on. When approx. 30 minutes pass with no audio input, this unit automatically
0
enters the standby mode. To turn Auto Standby mode off, set “Auto Standby” on the setup menu to “Off”.
The protection circuit has been activated due to a rise in temperature within this unit. Turn the power off,
0
wait about an hour until this unit cools down sufficiently, and then turn the power on again.
Please re-install this unit in a place having good ventilation. -
0
Check the speaker connections. The protection circuit may have been activated because speaker cable
0
core wires came in contact with each other or a core wire was disconnected from the connector and
came in contact with the rear panel of this unit. After unplugging the power cord, firmly re-twist the core
wire, and then reconnect the wire.
Turn down the volume and turn on the power again. 24
0
This unit’s amplifier circuit has failed. Unplug the power cord and contact our customer service center. -
0
Setting procedure
Tips Appendix
24
48
24
17
Front panel Display Rear panel Remote Index
52

Contents Connections Playback
No sound comes out
o
Symptom Cause / Solution Page
Audio is not output.
Check the connections for all devices. 17
0
Check the sound settings on the computer. 27
0
Insert connection cables all the way in. -
0
Check that the covered part of the speaker cable is not inserted into the speaker terminal. 17
0
Check cables for damage. -
0
Check that a proper input source is selected. 25
0
Check that power to this unit and the connected devices is on. -
0
Adjust to an appropriate volume level on this unit and the connected devices. 26
0
To playback via a Bluetooth connection, perform pairing between this unit and the Bluetooth device. 37
0
When the muting mode is enabled, cancel the muting. 26
0
Setting procedure
Tips Appendix
Front panel Display Rear panel Remote Index
53

Contents Connections Playback
Sound is distorted or interrupted, or noise occurs
o
Symptom Cause / Solution Page
Sound is distorted or
interrupted, or noise
occurs.
Sound is interrupted during
playback of music from a
computer.
Desired sound does not come out
o
Symptom Cause / Solution Page
No sound comes out of a
specific speaker.
The left and right of stereo
sound is reversed.
Adjust to an appropriate volume level on this unit and the connected devices. 26
0
Place the device connected via Bluetooth closer to this unit. -
0
Place this unit away from microwaves, wireless LAN devices, etc. -
0
Turn off and on power to Bluetooth devices. -
0
Turn down the volume of the playback device connected to the AUX connector. -
0
Switch “H/P AMP Gain” to “Mid” or “High” if using headphones with high impedance or low sensitivity. -
0
During playback of music from the computer, do not run any applications other than the player software. -
0
Check that speaker cables are properly connected. 17
0
Adjust the BALANCE control knob. 47
0
Check whether the left and right speakers are connected to the correct speaker terminals. 18
0
Setting procedure
Tips Appendix
Front panel Display Rear panel Remote Index
54

Contents Connections Playback
Files on a computer cannot be played back
o
Symptom Cause / Solution Page
This unit is not recognized
on the computer.
This unit is not selected as
the playback device.
“Unlocked” is displayed.
“Unsupported” is
displayed.
Reconnect the USB cable to the USB port on your computer. When this unit is still not recognized after
0
reconnection, connect to a different USB port.
Restart your computer. -
0
Check the OS of your computer. 27
0
When your computer is running on Windows, a dedicated driver software should be installed. 28
0
Select this unit as the playback device in the sound settings on the computer. 27
0
When digital audio signals cannot be detected properly, “Unlocked” is displayed. 27
0
“Unsupported” is displayed when audio signals that are not supported by this unit are input. Check the
0
settings on your computer or player software.
If the computer you use is “Mac OS”, please check if the “PMA-50” format is set below “192000.0 Hz”
0
using the “Audio MIDI Setup”.
Setting procedure
Tips Appendix
21
27
33
Front panel Display Rear panel Remote Index
55

Contents Connections Playback
Audio from digital devices cannot be played back (Coaxial/Optical)
o
Symptom Cause / Solution Page
“Unlocked” is displayed.
“Unsupported” is
displayed.
Pairing fails
o
Symptom Cause / Solution Page
Pairing fails.
NFC connection fails
o
Symptom Cause / Solution Page
NFC connection fails.
When digital audio signals cannot be detected properly, “Unlocked” is displayed. 35
0
“Unsupported” is displayed when audio signals that are not supported by this unit are input. Check the
0
audio output signal format from your digital device.
Turn off and on power to this unit. 24
0
Place the Bluetooth device within 1m of this unit and perform pairing again. 37
0
Search for devices from the list of the Bluetooth devices. -
0
Turn off and on power to Bluetooth devices. -
0
Check that the Bluetooth device has the NFC function. -
0
0
Touch the N mark (Q) on this unit, checking the location of the NFC antenna on the Bluetooth device.
Touch surely until the Bluetooth device responds.
Setting procedure
Tips Appendix
35
42
Front panel Display Rear panel Remote Index
56

Contents Connections Playback
Operations cannot be performed through the remote control unit
o
Symptom Cause / Solution Page
Operations cannot be
performed through the
remote control unit.
The Bluetooth device names are not displayed properly
o
Symptom Cause / Solution Page
The device names are not
displayed properly (“…”,
etc.).
Batteries are worn out. Replace with new batteries. 15
0
Operate the remote control unit within a distance of about 23 ft/7 m from this unit and at an angle of within
0
30°.
Remove any obstacle between this unit and the remote control unit. -
0
0
Insert the batteries in the proper direction, checking the F and G marks.
The set’s remote control sensor is exposed to strong light (direct sunlight, inverter type fluorescent bulb
0
light, etc.). Move the set to a place in which the remote control sensor will not be exposed to strong light.
When using a 3D video device, the remote control unit of this unit may not function due to effects of
0
wireless communications between units (such as TV and glasses for 3D viewing). In this case, adjust the
direction of units with the 3D communications function and their distance to ensure they do not affect
operations from the remote control unit of this unit.
Characters that cannot be displayed have been used. On this unit, characters that cannot be displayed
0
are replaced with a “.” (period).
The device address is displayed when the device name cannot be obtained. -
0
Setting procedure
Tips Appendix
16
15
-
-
-
Front panel Display Rear panel Remote Index
57

Contents Connections Playback
Resetting to factory settings
Perform this when this unit does not operate properly.
Various settings are reset to the factory default values. Make settings
again.
.
When this unit is in the standby mode, press X while
1
holding q.
“INITIALIZE” appears on the display and this unit restarts.
NOTE
Pairing information stored on this unit is also initialized. Perform pairing again.
Setting procedure
Tips Appendix
Front panel Display Rear panel Remote Index
58

Contents
Connections Playback
Setting procedure
Tips Appendix
Appendix
Types of playable digital audio
input signals
D/A converter
Compatible formats
o
n
USB-DAC
Sampling frequency Bit length
DSD (2-channel) 2.8/5.6 MHz 1 bit
Linear PCM (2-channel)
n
Coaxial/Optical
Linear PCM (2-channel)
32/44.1/48/88.2/96/
176.4/192 kHz
Sampling frequency Bit length
32/44.1/48/64/88.2/96/
176.4/192 kHz
16/24 bits
16/24 bits
Playing back Bluetooth devices
This unit supports the following Bluetooth profiles.
A2DP (Advanced Audio Distribution Profile) :
0
When a Bluetooth device that supports this specification is connected, you
can perform high quality streaming distribution of monaural and stereo
audio data.
AVRCP (Audio/Video Remote Control Profile) :
0
When a Bluetooth device that supports this specification is connected, you
can operate the Bluetooth device from this unit.
Bluetooth communications
The radio waves broadcast from this unit may interfere with operations on
medical equipment. The radio wave interference may cause a malfunction.
Therefore, make sure to turn off power to this unit and Bluetooth devices in
the following places.
Hospitals, trains, airplanes, gas stands, and other places where
0
flammable gas may occur.
Places near automatic doors and fire alarms.
0
Front panel Display Rear panel Remote Index
59

Contents
Connections Playback
Explanation of terms
Setting procedure
Tips Appendix
Bluetooth
Technology for near field wireless communications. This unit can connect
to Bluetooth devices wirelessly. To establish a Bluetooth connection, you
must perform pairing (registering) beforehand.
DSD (Direct-Stream Digital)
One of the audio data recording methods, it is the signal aspect used to
store audio signals on a super audio CD, and is Δ-Σ modulated digital
audio. It is configured of an array of single bit values at a 2.8224MHz
sampling rate.
NFC (Near Field Communication)
Technology for near field wireless communications. You can just touch
this unit with a device with the NFC function to establish a connection
between this unit and the device.
Sampling frequency
Sampling involves taking a reading of a sound wave (analog signal) at
regular intervals and expressing the height of the wave at each reading in
digitized format (producing a digital signal).
The number of readings taken in one second is called the “sampling
frequency”. The larger the value, the closer the reproduced sound is to the
original.
Pairing
Pairing (registration) is an operation that is required in order to connect a
Bluetooth device to this unit using Bluetooth. When paired, the devices
authenticate each other and can connect without mistaken connections
occurring.
When using Bluetooth connection for the first time, you need to pair this
unit and the Bluetooth device to be connected.
This unit can store pairing information for a maximum of 8 devices.
Protection circuit
This is a function to prevent damage to devices within the power supply
when an abnormality such as an overload, excess voltage occurs or over
temperature for any reason.
Linear PCM
Uncompressed PCM (Pulse Code Modulation) signals. Unlike lossy
compression audio sources such as MP3, no audio quality or dynamic
range deteriorates.
Front panel Display Rear panel Remote Index
60

Contents Connections Playback
Trademark information
Setting procedure
Tips Appendix
.
The Bluetooth® word mark and logos are registered trademarks owned
by Bluetooth SIG,Inc. and any use of such marks by D&M Holdings Inc. is
The N Mark is a trademark or registered trademark of NFC Forum, Inc. in
the United States and in other countries.
.
under license. Other trademarks and trade names are those of their
respective owners.
.
Adobe, the Adobe logo and Reader are either registered trademarks or
trademarks of Adobe Systems Incorporated in the United States and/or
.
other countries.
The CSR logo is a trademark of CSR plc or one of its group companies.
Front panel Display Rear panel Remote Index
61

Contents Connections Playback
Setting procedure
Specifications
Audio section
o
Output performance
0
Rated output: both channels driven
25 W+25 W (8 Ω/ohms, 1 kHz, T.H.D. 0.1 %)
Output connectors: Speaker: 4-16 Ω/ohms
Total harmonic distortion: 0.004 % (Digital in, Rated output -3 dB, 8 Ω/ohms, 1 kHz)
S/N ratio: 110 dB (Digital in, 25 W, 8 Ω/ohms, 1 kHz, IHF-A)
Digital input signal
0
Audio formats: Digital audio interface (Linear PCM)
Coaxial input: 0.5 Vp-p/50 Ω/ohms
Optical input: More than – 27 dBm
Wavelength: 660 nm
Input performance
0
Input sensitivity / Input impedance: AUX: 0.13 V / 22 kΩ/kohms
50 W+50 W (4 Ω/ohms, 1 kHz, T.H.D. 1.0 %)
Headphones: Φ6.3 mm jack
Tips Appendix
Front panel Display Rear panel Remote Index
62

Contents
Bluetooth section
o
Communication system: Bluetooth version 3.0
Transmission power: Maximum 2.5 mW (Class2)
Maximum communication range: Approx. 32.8 ft/10 m in line of sight *
Frequency band: 2.4 GHz band
Modulation method: FHSS (Frequency-Hopping Spread Spectrum)
Supported profiles: A2DP 1.3/AVRCP 1.5
Supported codecs: aptX Low Latency/AAC/SBC
The actual communication range varies depending on the influence of such factors as obstructions between devices, electromagnetic waves from microwave ovens, static
z
electricity, cordless phones, reception sensitivity, antenna performance, operating system, application software etc.
General
o
Power supply: AC120 V, 60 Hz
Power consumption: 35 W
Power consumption in standby mode: 0.2 W
For purposes of improvement, specifications and design are subject to change without notice.
Connections Playback
Setting procedure
Tips Appendix
Front panel Display Rear panel Remote Index
63

7 7/8 (200) 15/64 (6)
3 5/32 (80)
3 25/64 (86)
15/64
(6)
6 1/16 (154)
1 3/16
(30)
6 11/16 (170)
29/32
(23)
29/32
(23)
9 29/64 (240)
10 5/32 (258)
45/64
(18)
10 5/32 (258)
1 37/64
(40)
Contents Connections Playback
Dimensions
o
Unit : in. (mm)
o
Weight: 5 lbs 8 oz (2.5 kg)
.
Setting procedure
Tips Appendix
Front panel Display Rear panel Remote Index
64

Contents
Connections Playback
Setting procedure
Tips Appendix
Index
v A
Accessories ..................................................... 4
Adjusting the volume ...................................... 26
Auto Standby ................................................. 48
v C
Computer (recommended system) ................. 27
Connecting a computer .................................. 21
Connecting a power cord ............................... 22
v D
Display ............................................................. 8
v F
Front panel ....................................................... 6
v I
Initialize .......................................................... 58
Installing horizontally ...................................... 12
Installing vertically .......................................... 13
v L
Linear PCM .................................................... 60
Listening to music on a Bluetooth device ....... 37
v M
Multi point function ......................................... 43
v N
N mark ............................................................. 7
NFC function ............................................ 42, 60
v P
Pairing ...................................................... 37, 60
Protection circuit ............................................ 60
v R
Rear panel ........................................................ 9
Remote control unit ........................................ 10
v S
Sampling frequency ....................................... 60
Selecting the input source .............................. 25
Speaker connection ....................................... 17
Standby .......................................................... 24
v T
Troubleshooting ............................................. 49
Turning the power on ..................................... 24
v U
USB cable ...................................................... 21
Front panel Display Rear panel Remote Index
65


www.denon.com D&M Holdings Inc.
3520 10370 00AD
66
 Loading...