

Denon PMA-150H Owner's Manual
Contents
.
Connections Playback Settings Tips Appendix
PMA-150H
INTEGRATED AMPLIFIER
Owner’s Manual
.
Front panel Rear panel
Remote control
unit
1
Index

Contents Connections Playback Settings Tips Appendix
Accessories
Inserting the batteries
Operating range of the remote control unit
Features
High quality sound
High performance
Part names and functions
Front panel
Rear panel
Remote control unit
7
Connections
8
Connecting speakers
8
Connecting the speaker cables
9
Connecting the subwoofer
9
10
12
12
14
17
Connecting speakers
Connecting a digital device
Connecting an analog device
Connecting a PC or Mac
Connecting a USB memory device to the USB port
Connecting an FM/AM antenna
Connecting to a home network (LAN)
Wired LAN
Wireless LAN
Connecting to the IR control connector
Connecting the power cord
22
22
23
23
24
25
26
27
28
30
30
31
32
33
Front panel Rear panel
Remote control
unit
2
Index
Contents Connections Playback Settings Tips Appendix
Playback
Basic operation
Turning the power on
Switching the power to standby
Selecting the input source
Adjusting the volume
Turning off the sound temporarily (Muting)
Listening to Internet Radio
Listening to Internet Radio
Playing back files stored on PC or NAS
Playing back files stored on PC or NAS
Playing a USB memory device
Playing files stored on USB memory devices
Listening to music on a Bluetooth device
Listening to music on a Bluetooth device
Pairing with other Bluetooth devices
Reconnecting to this unit from a Bluetooth device
Getting the HEOS App
HEOS Account
Playing from streaming music services
Listening to the same music in multiple rooms
Listening to FM/AM broadcasts
35
35
35
36
36
36
37
38
39
40
42
43
45
46
47
48
49
50
51
54
Listening to FM/AM broadcasts
Changing the reception mode (Tune Mode)
Presetting FM/AM stations
Automatically presetting FM stations (Auto Preset)
Listening to stations registered in the preset list
Deleting a station from the preset list
Using as a D/A converter
Connecting and playing back from a computer (USB-DAC)
Connect and playback from a digital device (Coaxial/Optical 1/
Optical 2)
Connect and play back from an analog device
58
58
59
59
60
60
61
62
63
72
74
Front panel Rear panel
Remote control
unit
3
Index
Contents Connections Playback Settings Tips Appendix
AirPlay function
Playing songs from your iPhone, iPod touch or iPad
Playing iTunes music with this unit
Play a song from your iPhone, iPod touch or iPad on multiple
synced devices (AirPlay 2)
Spotify Connect function
Playing Spotify music with this unit
Convenience functions
Adding to HEOS Favorites
Playing back HEOS Favorites
Deleting a HEOS Favorites
Adjusting the tone
Switching the display’s brightness
Using the sleep timer
75
Settings
76
Menu map
76
77
78
78
79
79
80
80
81
82
82
Menu operation
Inputting characters
Using the number buttons
Using the cursor buttons
Audio
Volume Limit
H/P Amplifier Gain
General
TV Input
IR Control
Language
Auto-Standby
Usage Data
Firmware
Information
Reset
83
88
89
89
90
91
91
91
92
92
93
93
93
94
94
97
97
Front panel Rear panel
Remote control
unit
4
Index

Contents Connections Playback Settings Tips Appendix
Network
Network Information
Wi-Fi
Bluetooth
Network Control
Friendly Name
Connection
Settings
Diagnostics
HEOS Account
You have not signed in
You have already signed in
98
98
98
98
99
99
100
103
104
105
105
105
Tips
Tips
Troubleshooting
Power does not turn on / Power is turned off
LED is flashing
Operations cannot be performed through the remote control unit
No sound comes out
Sound is interrupted or noise occurs
Desired sound does not come out
AirPlay cannot be played back
USB memory devices cannot be played back
File names on the USB memory device are not displayed properly
Bluetooth cannot be played back
107
109
110
110
111
112
113
114
115
116
117
117
Front panel Rear panel
Remote control
unit
5
Index
Contents Connections Playback Settings Tips Appendix
The Internet radio cannot be played back
Music files on PC or NAS cannot be played back (Music server)
Various online services cannot be played
Cannot connect to a wireless LAN network
Music files on PC or Mac cannot be played back (USB-DAC)
Audio from digital devices cannot be played back (Coaxial/
Optical)
The input source switches to “Optical 1”, “Optical 2” or “Coaxial”
Update/upgrade error messages
Resetting network settings
118
119
120
120
121
122
122
123
124
Appendix
Playing back a USB memory devices
D/A converter
Playing back a Bluetooth device
Playing back files stored on a PC and NAS
Playing back Internet Radio
Last function memory
Explanation of terms
Trademark information
Specifications
Index
License
125
126
127
128
129
129
130
134
135
140
142
Front panel Rear panel
Remote control
unit
6
Index
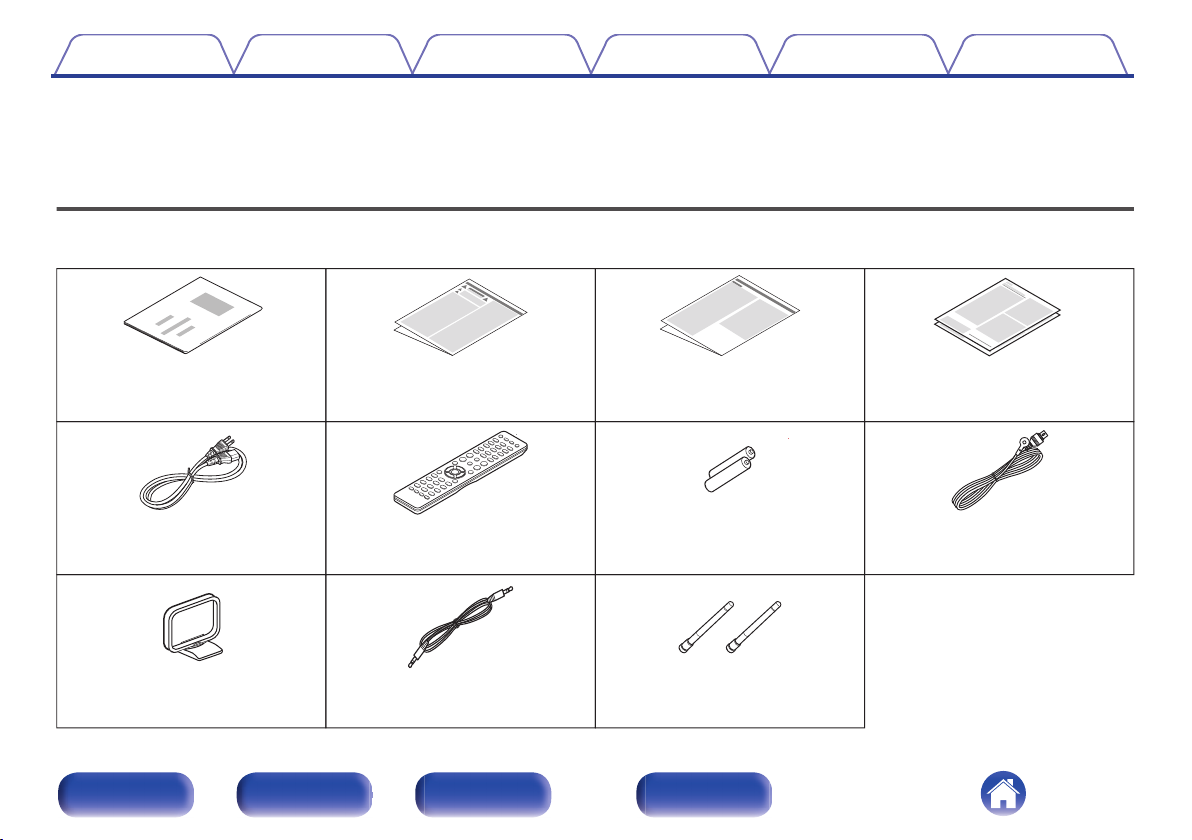
Quick Start Guide
Safety Instructions
Power cord
AM loop antenna
Remote control unit
(RC-1233)
IR control cable
R03/AAA batteries
FM indoor antenna
Warranty
(for North America model only)
Notes on radio
External antennas for
Bluetooth/wireless
connectivity
Contents Connections Playback Settings Tips Appendix
Thank you for purchasing this Denon product.
To ensure proper operation, please read this owner’s manual carefully before using the product.
After reading this manual, be sure to keep it for future reference.
Accessories
Check that the following parts are supplied with the product.
.
Front panel Rear panel
Remote control
unit
7
Index
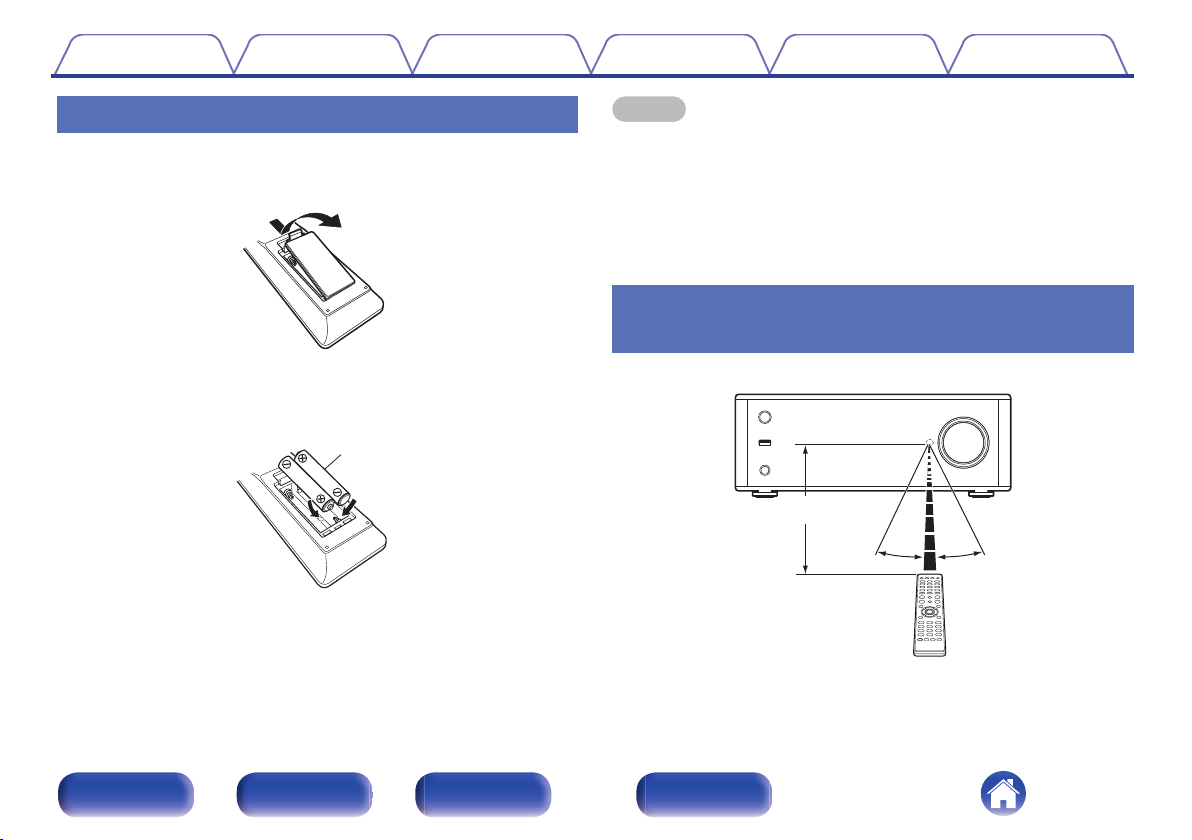
Batteries
30°
Approx. 23 ft/7 m
30°
Contents
Connections Playback Settings Tips Appendix
Inserting the batteries
Remove the rear lid in the direction of the arrow and
1
remove it.
Insert two batteries correctly into the battery
2
compartment as indicated.
Put the rear lid back on.
3
NOTE
To prevent damage or leakage of battery fluid:
0
Do not use a new battery together with an old one.
0
Do not use two different types of batteries.
0
Remove the batteries from the remote control unit if it will not be in use for long
0
periods.
If the battery fluid should leak, carefully wipe the fluid off the inside of the battery
0
compartment and insert new batteries.
Operating range of the remote control
unit
.
.
Point the remote control unit at the remote sensor when operating it.
.
Front panel Rear panel
Remote control
unit
8
Index
Contents
Connections Playback Settings Tips Appendix
Features
High quality sound
Equipped with a high-quality class D amplifier
0
The amplifier incorporates Qualcomm® DDFA TM technology. The
output stage circuit utilizes discrete BTL construction that realizes
higher S/N and lower distortion than conventional class D amplifiers.
Additionally, 70 W+70 W (4 Ω/ohms) output that is more powerful than
the size of the housing delivers the “delicate yet powerful sound” of
Denon’s ideal audio playback environment.
.
Qualcomm DDFA is a product of Qualcomm Technologies, Inc. and/or its subsidiaries.
Qualcomm is a trademark of Qualcomm Incorporated, registered in the United States and
other countries. DDFA is a trademark of Qualcomm Technologies International, Ltd.,
registered in the United States and other countries.
High grade headphone circuit
0
The high-grade headphone circuit incorporates discrete output stage
construction for a high-quality listening experience, even when using
the headphones to listen to music late at night, etc.
High Bitrate and High Sampling with Advanced AL32 Processing
0
Plus
A high bitrate and high sampling has been achieved with Denon’s
unique data interpolation algorithm. 16 bit audio signals are converted
to a high bitrate of 32 bit and 44.1 kHz sampling signals are up-sampled
by 16x to achieve smoother recreation of sound waves. Data
interpolation is also used, predicting interpolation points from a large
number of surrounding points to provide audio as close as possible to
the original sound. This elaborate restoration of data lost during digital
recording achieves fine, distortion-free rendering, accurate sound
localizing, rich bass and recreation that is faithful to the original sound.
High sound quality electrolytic capacitor
0
The unit’s features the same audiophile-grade Denon original high
sound quality electrolytic capacitor specifically used in top-range
models.
Front panel Rear panel
Remote control
unit
9
Index
Contents
Connections Playback Settings Tips Appendix
High performance
Equipped with a USB-DAC function to support playback of high-
0
resolution sound sources
This unit supports the playback of high resolution audio formats such as
DSD (2.8/5.6/11.2 MHz) and PCM files up to 384 kHz/32 bits. It
provides high quality playback of high resolution files into this unit from a
computer via USB-B connection.
Supports a variety of devices with digital inputs
0
Equipped with two optical digital inputs and one coaxial digital input to
connect televisions and other devices with digital inputs. This unit also
has an automatic playback function. When a device connected to this
unit by digital connection is turned on, this unit automatically turns on
and plays audio from the device.
Can be operated with the remote control of your TV
0
By learning the infrared signal of the remote control of your TV, you can
operate this unit with the remote control of the TV. (v p. 93)
0
The device is equipped with a AirPlay® function in addition to
network functions such as Internet radio etc.
You can enjoy a wide variety of content, including listening to Internet
Radio, playing audio files stored on your PC. This unit also supports
Apple AirPlay which lets you stream your music library from an iPhone®,
iPad®, iPod touch® or iTunes®.
0
Supports AirPlay 2® wireless audio
Sync multiple AirPlay 2 compatible devices/speakers for simultaneous
playback.
This unit supports AirPlay 2 and requires iOS 11.4 or later.
Wireless connection with Bluetooth devices can be carried out
0
easily
You can enjoy music simply by connecting wirelessly with your
smartphone, tablet, PC, etc.
Support for Gapless playback
0
Playback with no gap between music files.
(for WAV/FLAC/Apple Lossless/DSD only)
Front panel Rear panel
Remote control
unit
10
Index
Contents Connections Playback Settings Tips Appendix
0
Compatible with the HEOS Appz for performing basic operations
of the unit with an iPad, iPhone or Android™ devices (Google,
Amazon Kindle Fire)
Download the appropriate HEOS App for your iOS or Android devices. This unit
z
needs to be connected to the same LAN or Wi-Fi (wireless LAN) network that
the iPad, iPhone or Android devices are connected to.
HEOS provides streaming music from your favorite online music
0
sources
.
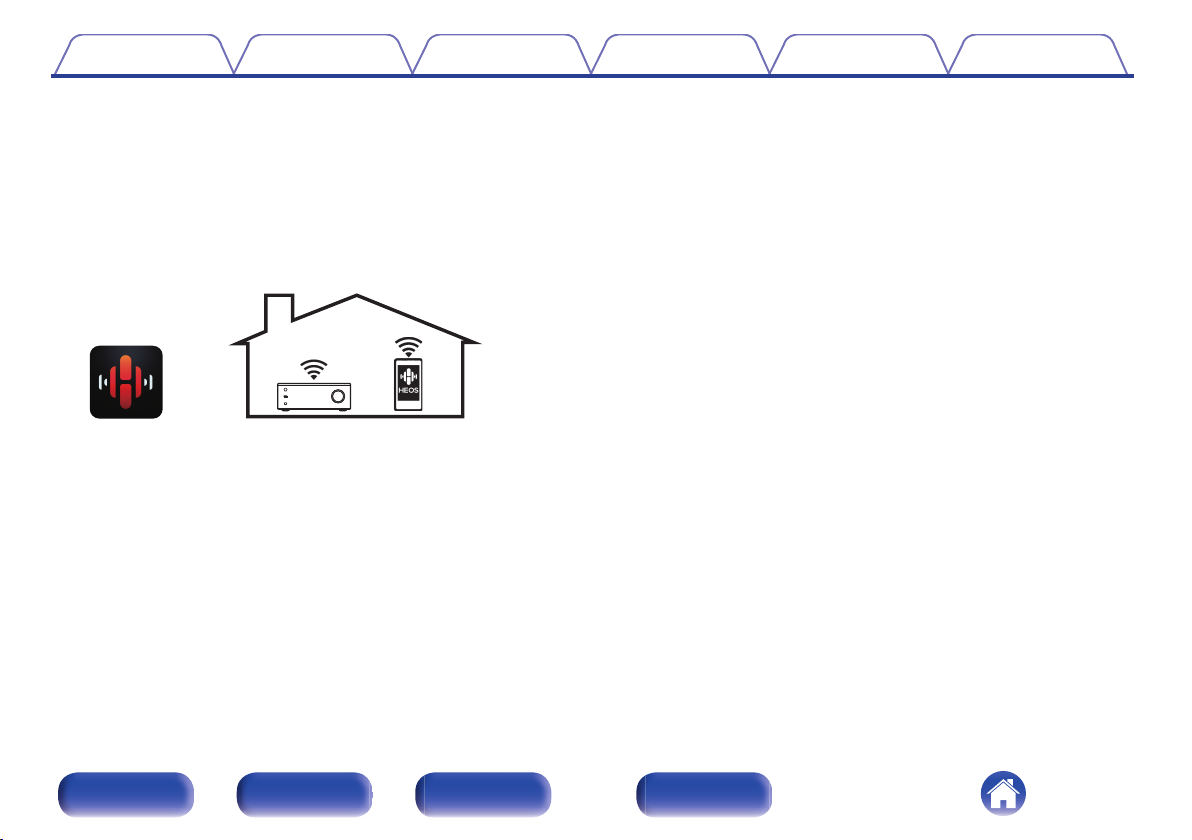
HEOS wireless multi-room sound system that enables you to enjoy your
favorite music anywhere and everywhere around your home. By utilizing
your existing home network and the HEOS App (available for iOS,
Android and Amazon devices), you can explore, browse, and play
music from your own music library or from many online streaming music
services.
When multiple HEOS devices are connected to the same network,
HEOS devices can be grouped to play back the same music on all
devices simultaneously, or different music can be played on each
separate HEOS device.
Headphone Amplifier Gain selector function
0
This unit has a gain control function with three levels that can be
switched according to the characteristics of the connected headphones.
System remote control included
0
Includes a system remote control that can also be used for Denon’s CD
Player DCD-100 operations.
OLED (Organic Light Emitting Diode) display that can display 3
0
lines
Equipped with auto standby mode function that reduces power
0
consumption
Front panel Rear panel
Remote control
unit
11
Index
qrewty
uioQ
0
Q
1
Contents
Connections Playback Settings Tips Appendix
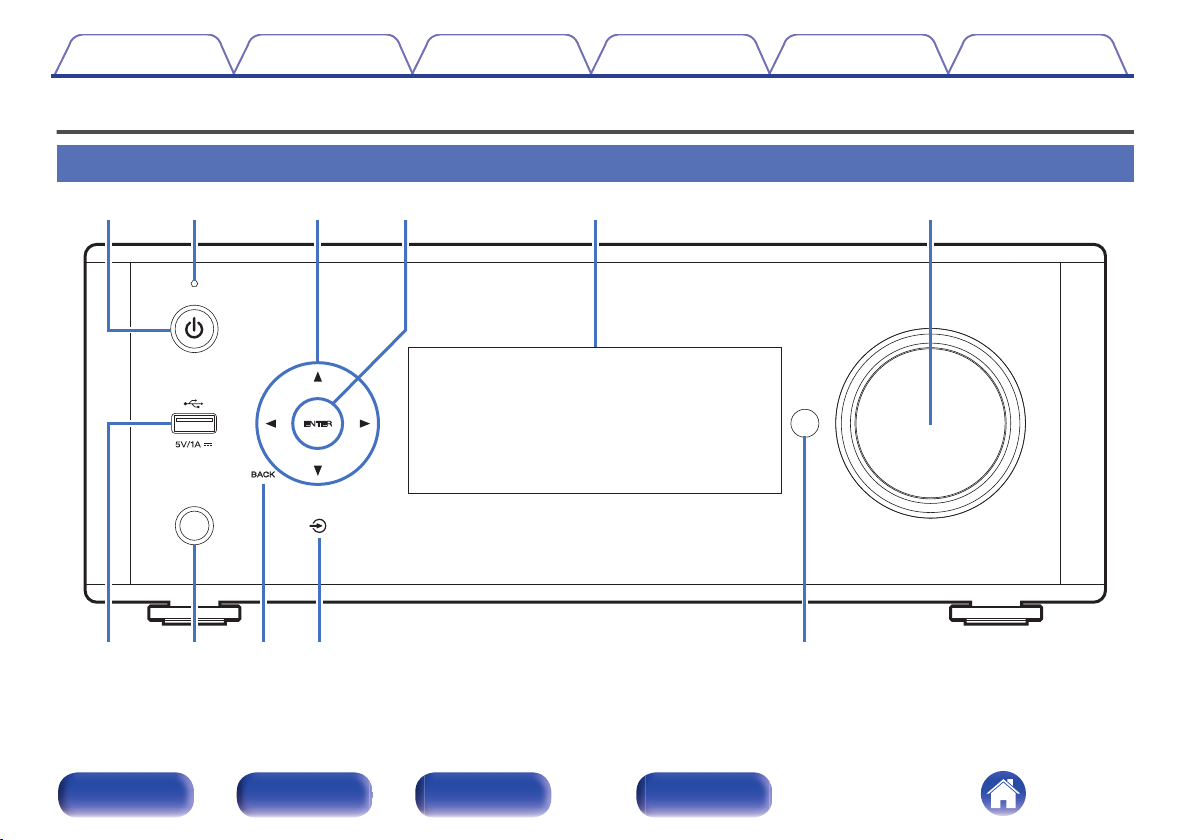
Part names and functions
Front panel
.
For details, see the next page.
Front panel Rear panel
Remote control
unit
12
Index
uioQ0 Q1
qrewty
Contents
.
Power operation button (X)
A
Connections Playback Settings Tips Appendix
This turns the power on/off (standby). (v p. 35)
Standby indicator
B
Lights as follows according to unit status:
Not lit:
0
When powered on
0
During normal standby (When “Auto-Play” is set to
0
“Off” (v p. 92))
Orange:
0
When “Auto-Play” is set to “On” (v p. 92)
0
When “Network Control” is set to “On” (v p. 99)
0
Cursor keys (uio p)
C
These select items.
ENTER key
D
This determines the selection.
Display
E
This displays various pieces of information.
Volume control knob
F
Adjusts the volume.
G
USB port (T)
This is used to connect USB storages (such as USB memory devices).
(v p. 27)
Headphones jack
H
Used to connect headphones.
When the headphones are plugged into this jack, audio will no longer
be output from the connected speakers.
NOTE
To prevent hearing loss, do not raise the volume level excessively when using
0
headphones.
BACK key
I
Returns to the previous item.
J
Input source switching key (q)
This selects the input source.
Remote control sensor
K
This receives signals from the remote control unit. (v p. 8)
Front panel Rear panel
Remote control
unit
13
Index
yui o
q ewrt q
Contents
Connections Playback Settings Tips Appendix
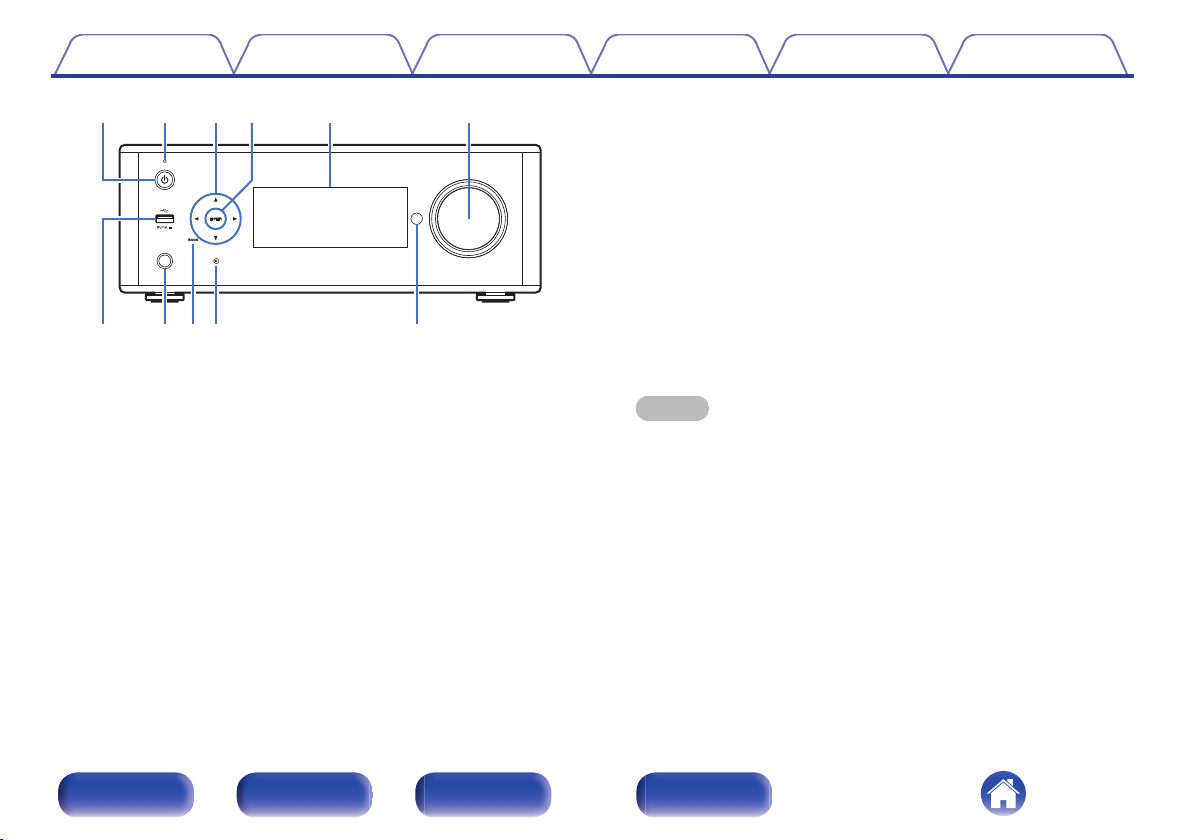
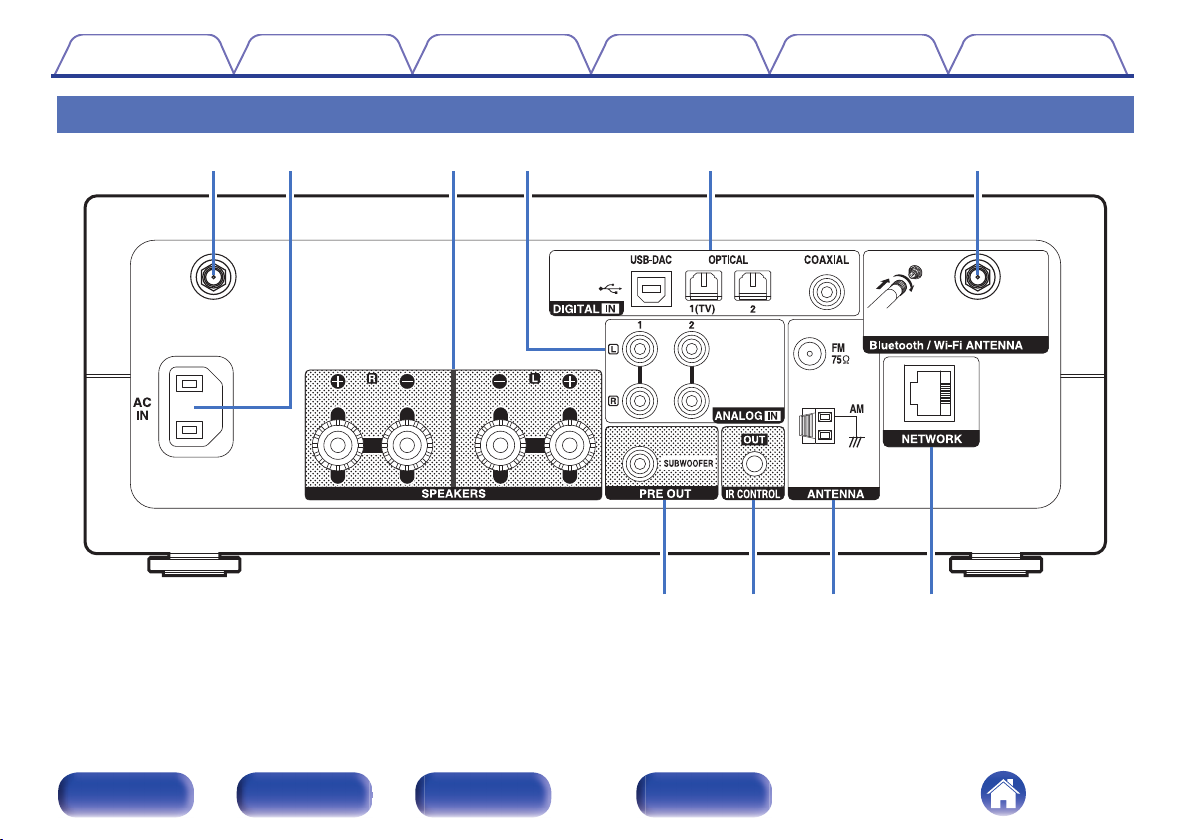
Rear panel
.
For details, see the next page.
Front panel Rear panel
Remote control
unit
14
Index
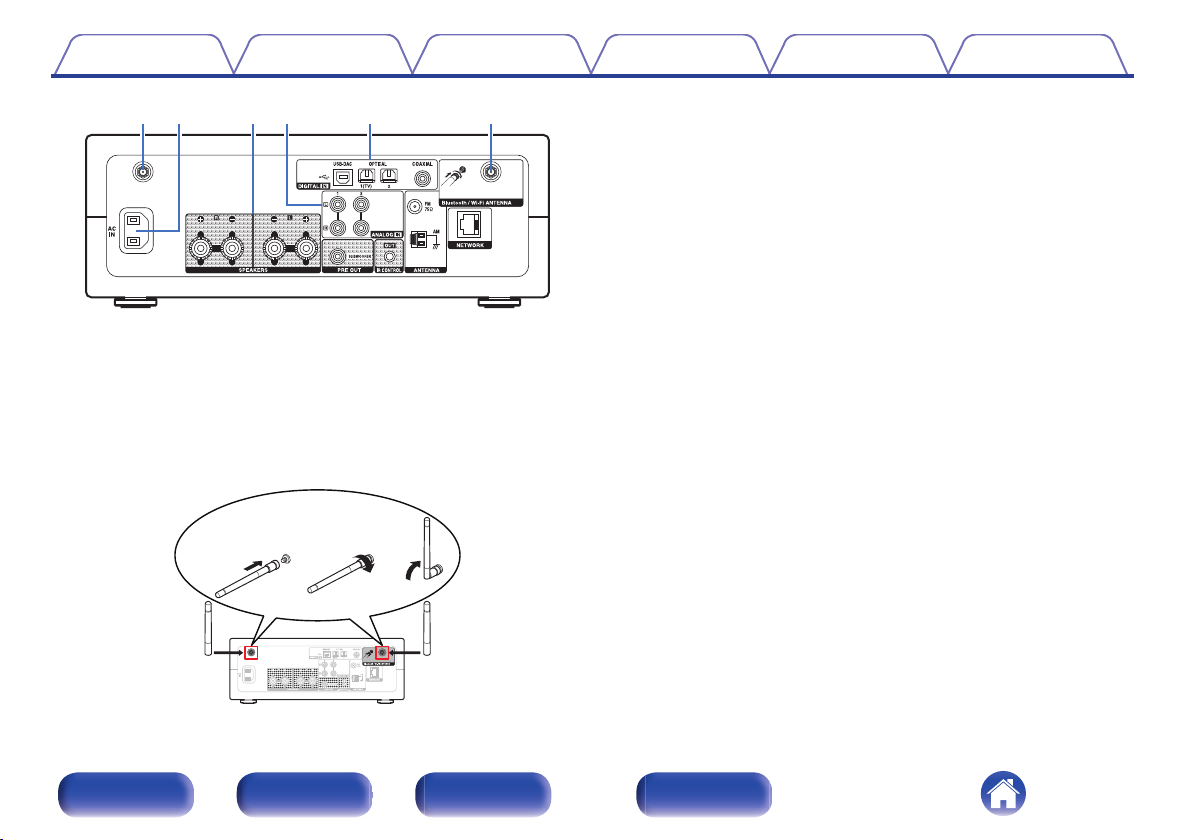
q ewrt q
qwe
Contents Connections Playback Settings Tips Appendix
AC inlet (AC IN)
B
Used to connect the power cord. (v p. 33)
Speaker terminals (SPEAKERS)
C
Used to connect speakers. (v p. 22)
ANALOG IN connectors
D
Connecting to a device with analog audio output connectors.
(v p. 25)
DIGITAL IN connectors
E
.
Bluetooth/wireless LAN antenna connectors
A
Used to connect the included external antennas for Bluetooth/wireless
connectivity when connecting to a network via wireless LAN, or when
connecting to a handheld device via Bluetooth. (v p. 31)
Place the external antennas for Bluetooth/wireless connectivity
A
evenly over the screw terminal of rear.
Turn clockwise until the antennas is fully connected.
B
Rotate the antenna upwards for best reception.
C
Connecting to a device with digital audio output connectors.
(v p. 24)
.
Front panel Rear panel
Remote control
unit
15
Index
yui o
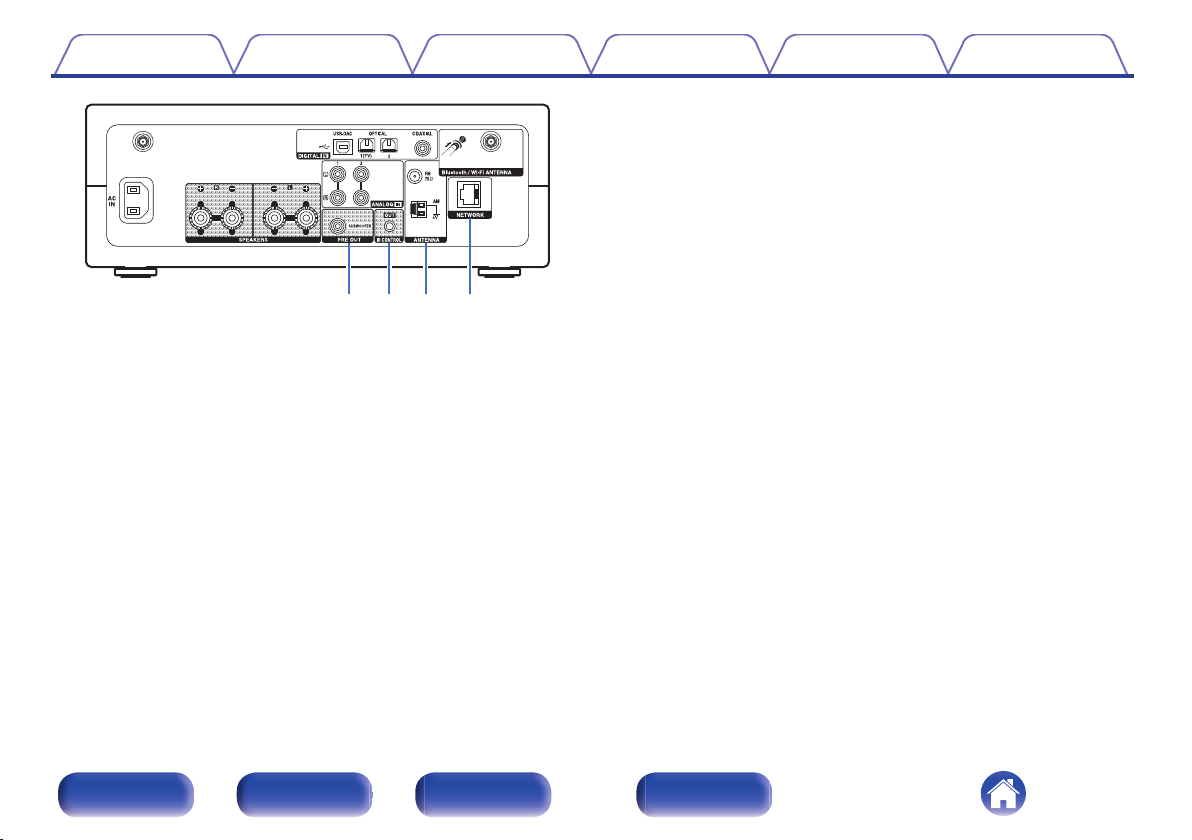
Contents Connections Playback Settings Tips Appendix
.
PRE OUT connector
F
Used to connect a subwoofer with a built-in amplifier. (v p. 23)
IR CONTROL jack
G
Connects to a Denon CD player that is equipped with a IR control jack.
(v p. 32)
Antenna terminals (ANTENNA)
H
Used to connect FM room antennas and AM loop antennas.
(v p. 28)
NETWORK connector
I
Used to connect to a LAN cable when connecting to a wired LAN
network. (v p. 30)
Front panel Rear panel
Remote control
unit
16
Index
q
w
y
r
e
t
Contents
Connections Playback Settings Tips Appendix
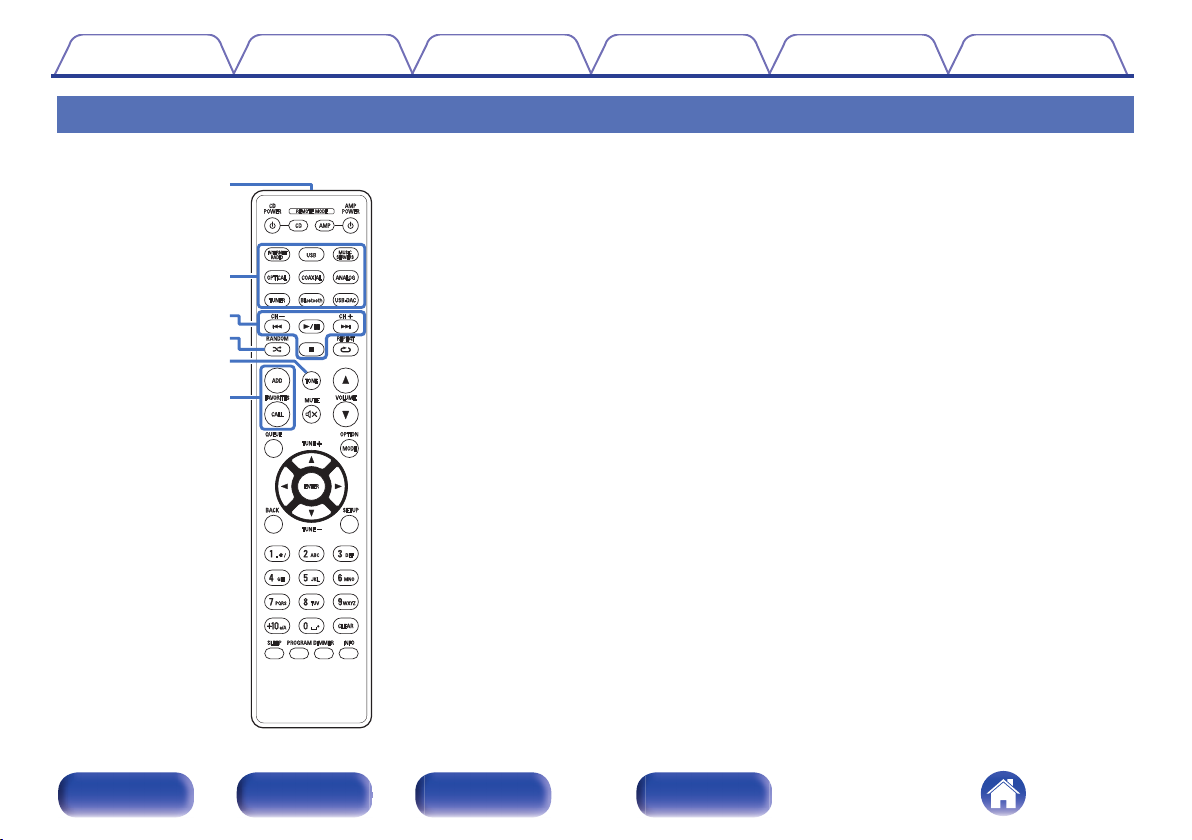
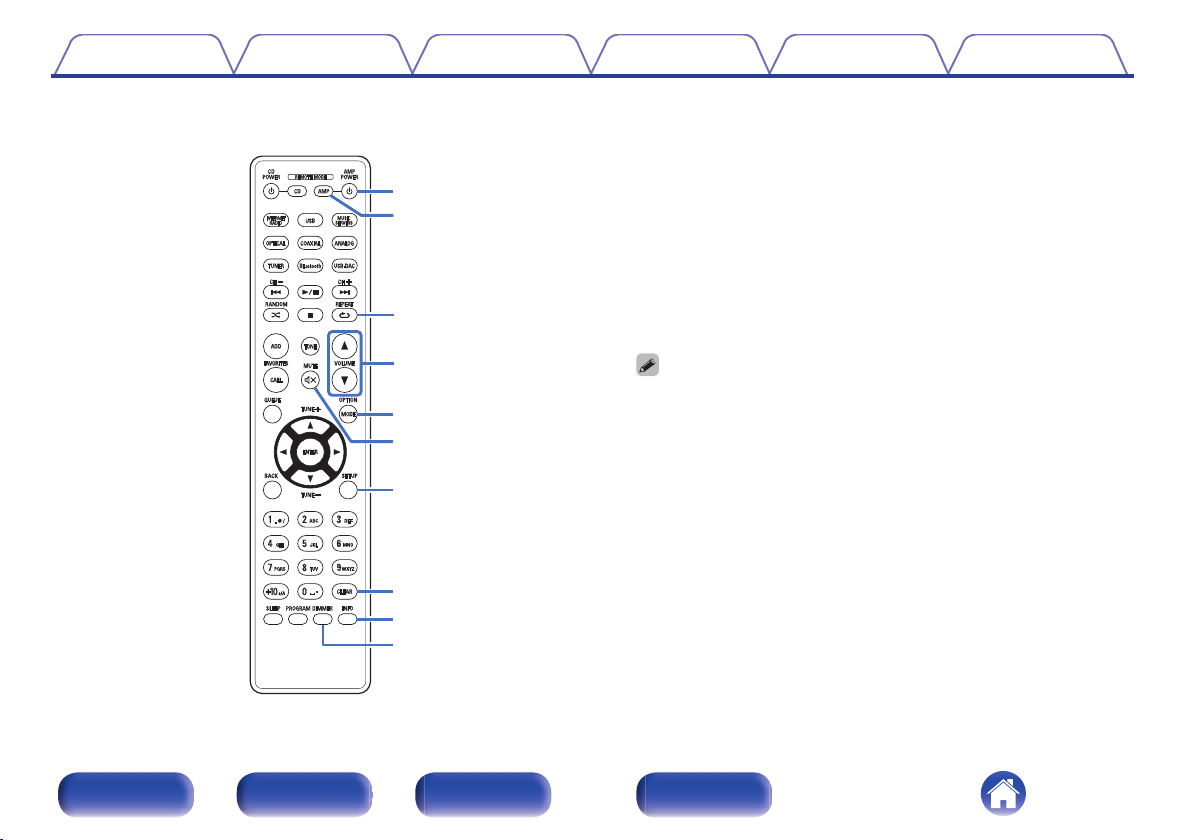
Remote control unit
Remote control signal transmitter
A
This transmits signals from the remote control unit. (v p. 8)
Input source select buttons
B
These select the input source. (v p. 36)
System buttons
C
These perform playback related operations.
Channel buttons (CH +, –)
These select stations registered to the preset list. (v p. 60)
D
RANDOM button (P)
Switches the random playback.
TONE button
E
Adjusting the tone. (v p. 81)
FAVORITES ADD / CALL buttons
F
This allows you to register content to “HEOS Favorites” and call
registered content.
“Adding toHEOS Favorites” (v p. 79)
0
“Playing backHEOS Favorites” (v p. 80)
0
Front panel Rear panel
Remote control
unit
17
Index
Q0
u
Q1
Q2
i
o
Contents
Connections Playback Settings Tips Appendix
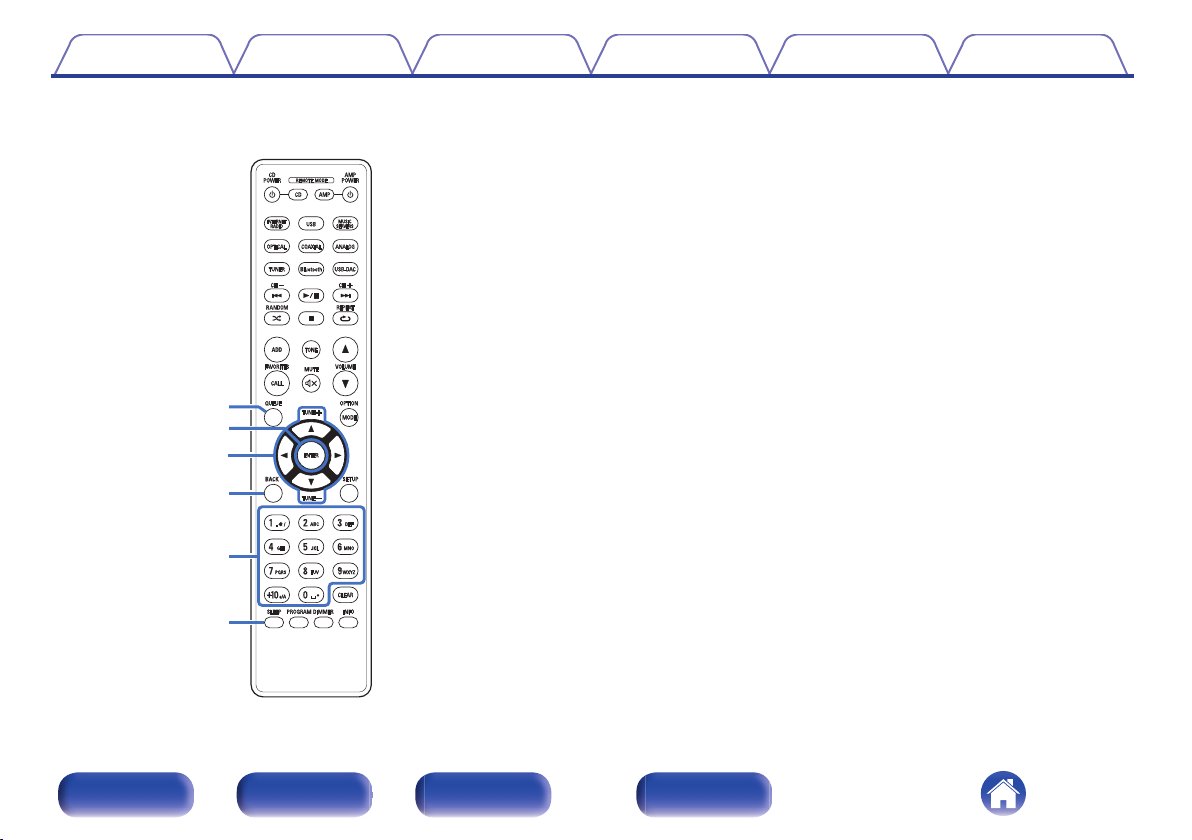
QUEUE button
G
This displays the queue.
“Playing back files stored on PC or NAS” (v p. 39)
0
“Playing a USB memory device” (v p. 42)
0
ENTER button
H
This determines the selection.
Cursor buttons (uio p)
I
These select items.
Tuning buttons (TUNE +, –)
These operate the tuner. (v p. 58)
BACK button
J
Returns to the previous item.
Number/letter buttons (0 – 9, +10)
K
These enter letters or numbers into the unit. (v p. 89)
SLEEP button
L
This sets the sleep timer. (v p. 82)
Front panel Rear panel
Remote control
unit
18
Index
W0
W1
Q7
Q8
Q3
W2
Q6
Q5
Q9
Q4
Contents
Connections Playback Settings Tips Appendix
Power operation button (AMP POWER X)
M
This turns the power on/off (standby). (v p. 35)
Remote mode select button
N
(REMOTE MODE AMP)
Switches the remote control operating mode to this unit.
O
REPEAT button (L)
Switches the repeat playback.
VOLUME buttons (df)
P
Adjusts the volume. (v p. 36)
OPTION button
Q
This displays the option menu on the display.
An option menu is not displayed for some input sources.
0
MUTE button (:)
R
This mutes the output audio. (v p. 36)
SETUP button
S
The setting menu is displayed on the display. (v p. 83)
CLEAR button
T
This cancels the settings.
Information button (INFO)
U
This switches the track information shown in the display during
playback.
DIMMER button
V
Adjust the display brightness of this unit. (v p. 82)
Front panel Rear panel
Remote control
unit
19
Index
Q0
Q1
Q2
Q3
Q4
u
o
t
y
w
e
r
q
i
Contents Connections Playback Settings Tips Appendix
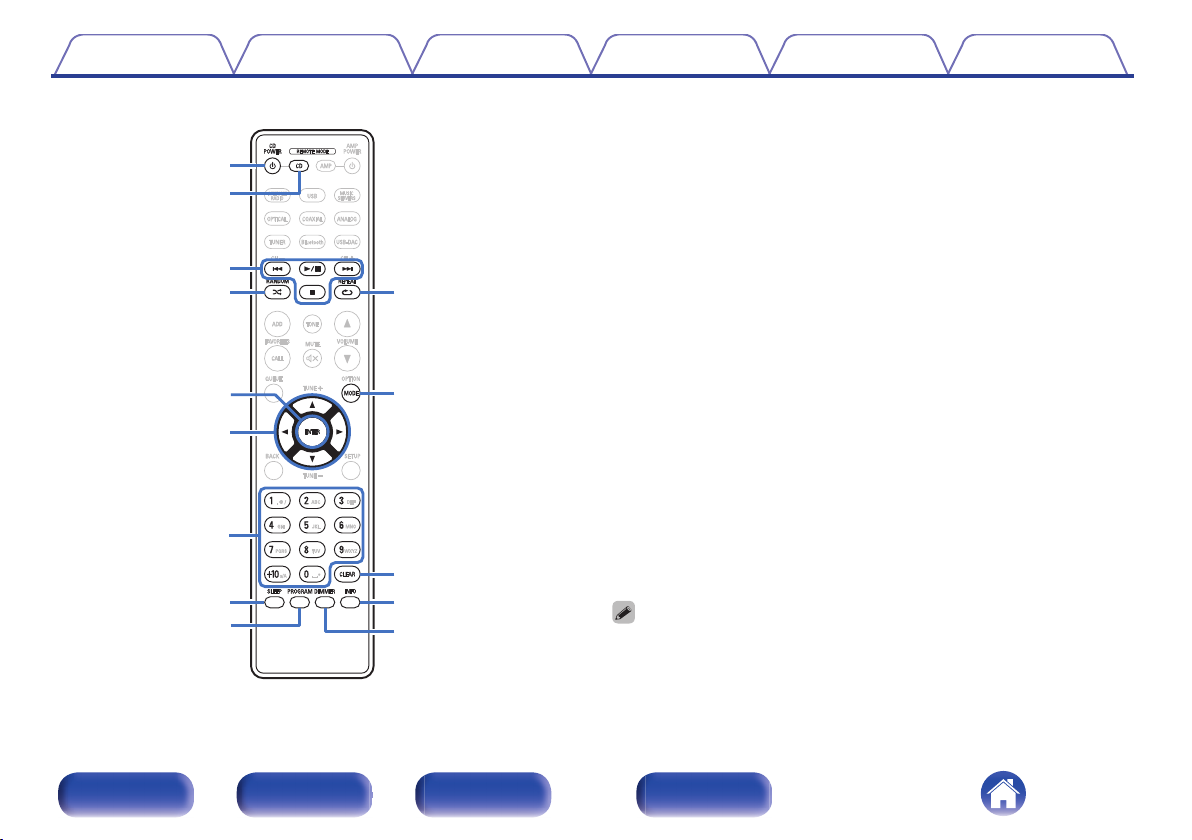
o
CD player operations
A Denon CD player can be operated.
Power button (CD POWER X)
A
Remote mode select button
B
(REMOTE MODE CD)
System buttons
C
Skip buttons (8, 9)
0
Play/pause button (1/3)
0
Stop button (2)
0
D
RANDOM button (P)
ENTER button
E
Cursor buttons (uio p)
F
Number buttons (0 – 9, +10)
G
SLEEP button
H
PROGRAM button
I
J
REPEAT button (L)
MODE button
K
CLEAR button
L
Information button (INFO)
M
DIMMER button
N
Front panel Rear panel
Remote control
unit
The remote control may not operate some products.
0
20
Index
R
L
R
L
Contents Connections Playback Settings Tips Appendix
o
Contents
Connecting speakers 22
Connecting a digital device 24
Connecting an analog device 25
Connecting a PC or Mac 26
Connecting a USB memory device to the USB port 27
Connecting an FM/AM antenna 28
Connecting to a home network (LAN) 30
Connecting to the IR control connector 32
Connecting the power cord 33
NOTE
Do not plug in the power cord until all connections have been completed.
0
Do not bundle power cords with connection cables. Doing so can result in
0
humming or noise.
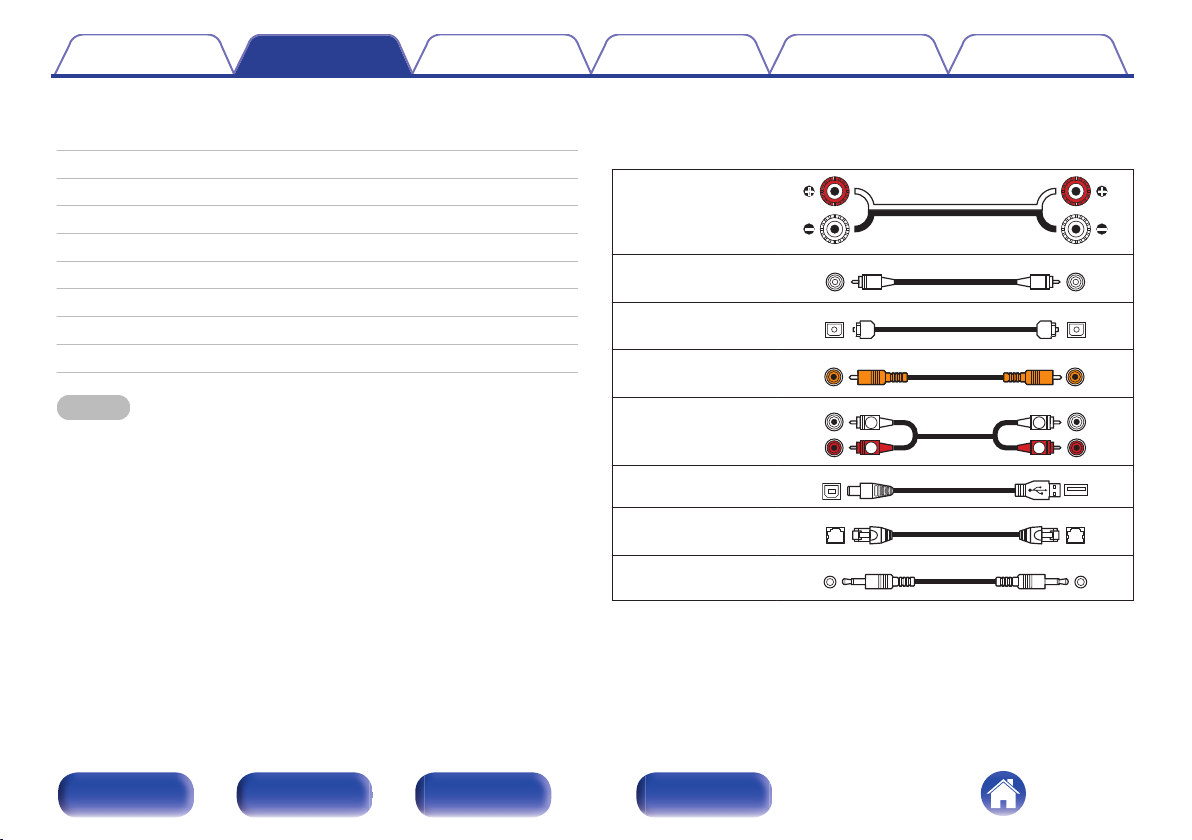
o
Cables used for connections
Provide necessary cables according to the devices you want to
connect.
Speaker cable
.
Subwoofer cable
Optical cable
Coaxial digital cable
.
.
.
Audio cable
.
USB Cable
LAN cable
IR control cable
(supplied)
.
.
.
Front panel Rear panel
Remote control
unit
21
Index
Contents
Connections Playback Settings Tips Appendix
Connecting speakers
Here we connect the speakers in the room to this unit.
This section explains how to connect them using typical examples.
NOTE
Disconnect this unit’s power plug from the power outlet before connecting the
0
speakers. Also, turn off the subwoofer.
Connect so that the speaker cable core wires do not protrude from the speaker
0
terminal. The protection circuit may be activated if the core wires touch the rear
panel or if the + and - sides touch each other. “Protection circuit” (v p. 133)
Never touch the speaker terminals while the power cord is connected. Doing so
0
could result in electric shock.
Use speakers with an impedance of 4 – 16 Ω/ohms.
0
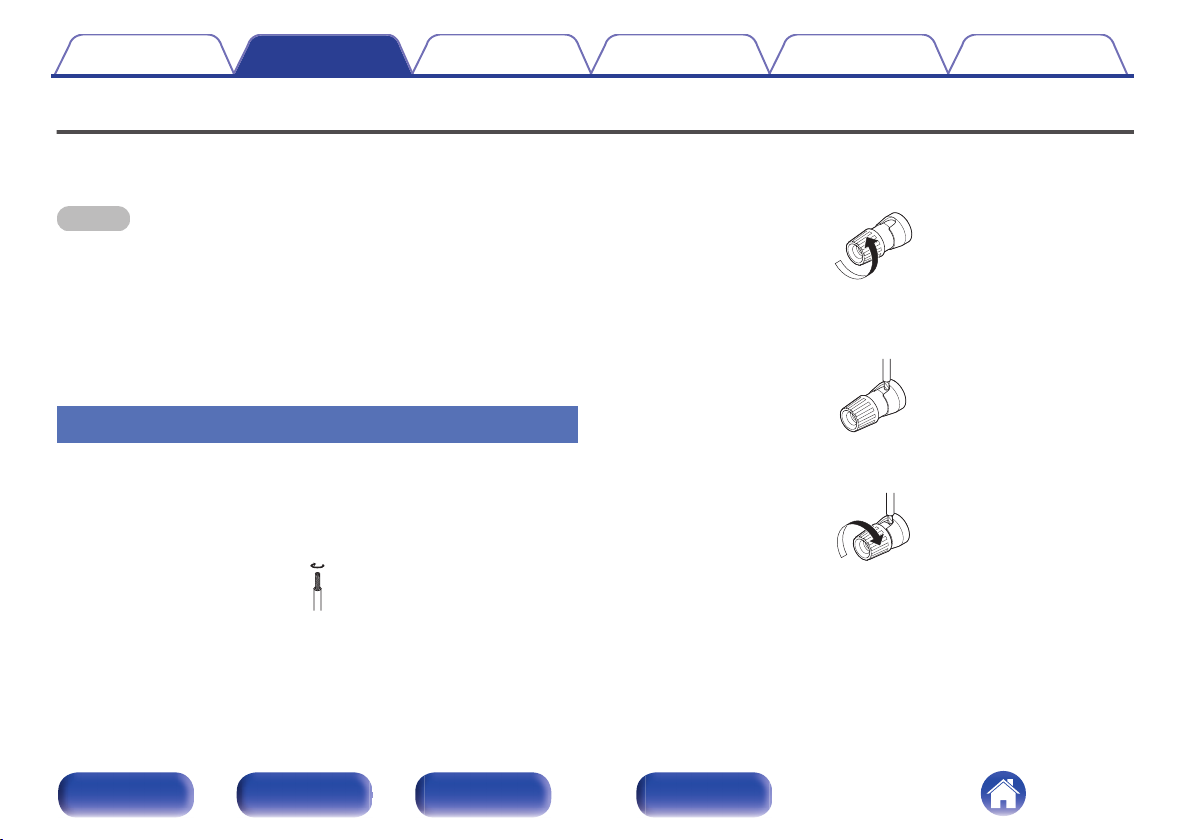
Connecting the speaker cables
Connect the speaker cable to the + speaker terminal (red) and the speaker terminal (black).
Peel off about 3/8 inch (10 mm) of sheathing from the
1
tip of the speaker cable, then twist the core wire tightly.
.
Turn the speaker terminal counterclockwise to loosen
2
it.
.
Insert the speaker cable’s core wire to the hilt into the
3
speaker terminal.
.
Turn the speaker terminal clockwise to tighten it.
4
.
Front panel Rear panel
Remote control
unit
22
Index
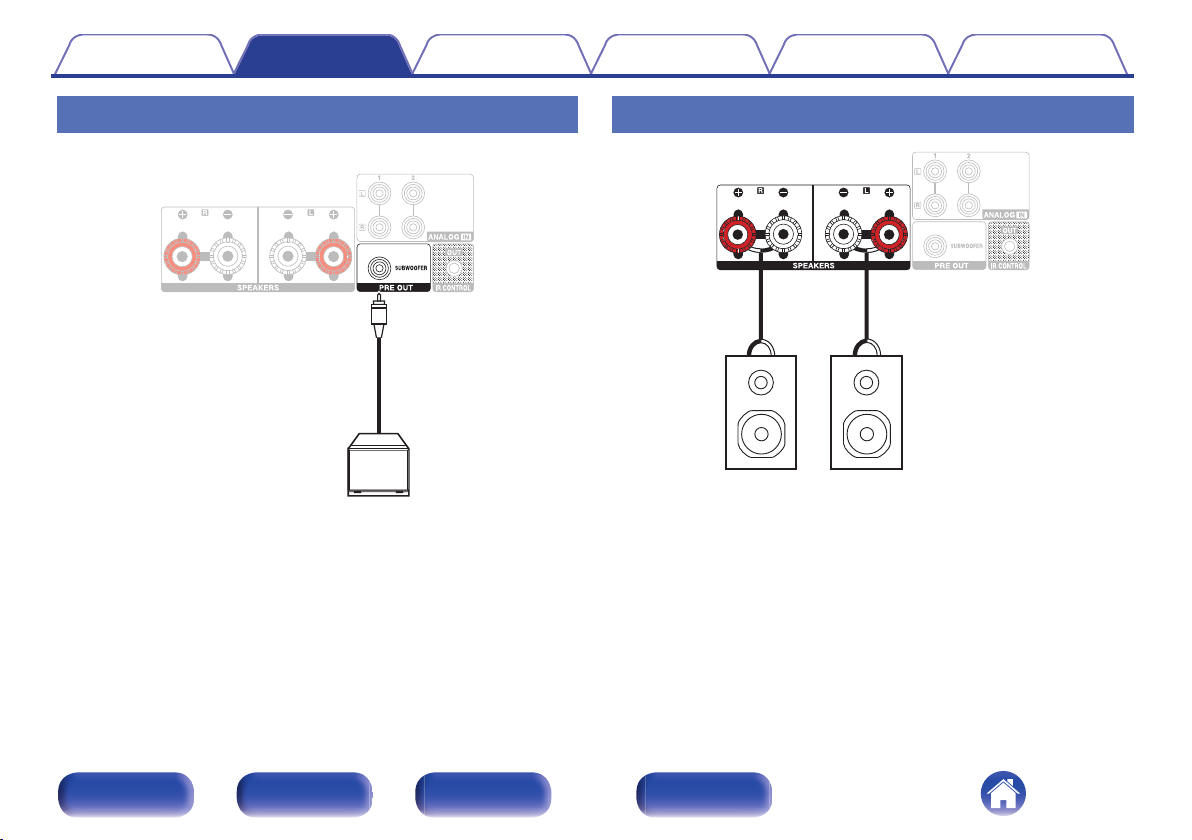
Subwoofer
wq
wq
(R)
(L)
Contents
Connections Playback Settings Tips Appendix
Connecting the subwoofer
Use a subwoofer cable to connect the subwoofer.
.
Connecting speakers
.
Front panel Rear panel
Remote control
unit
23
Index
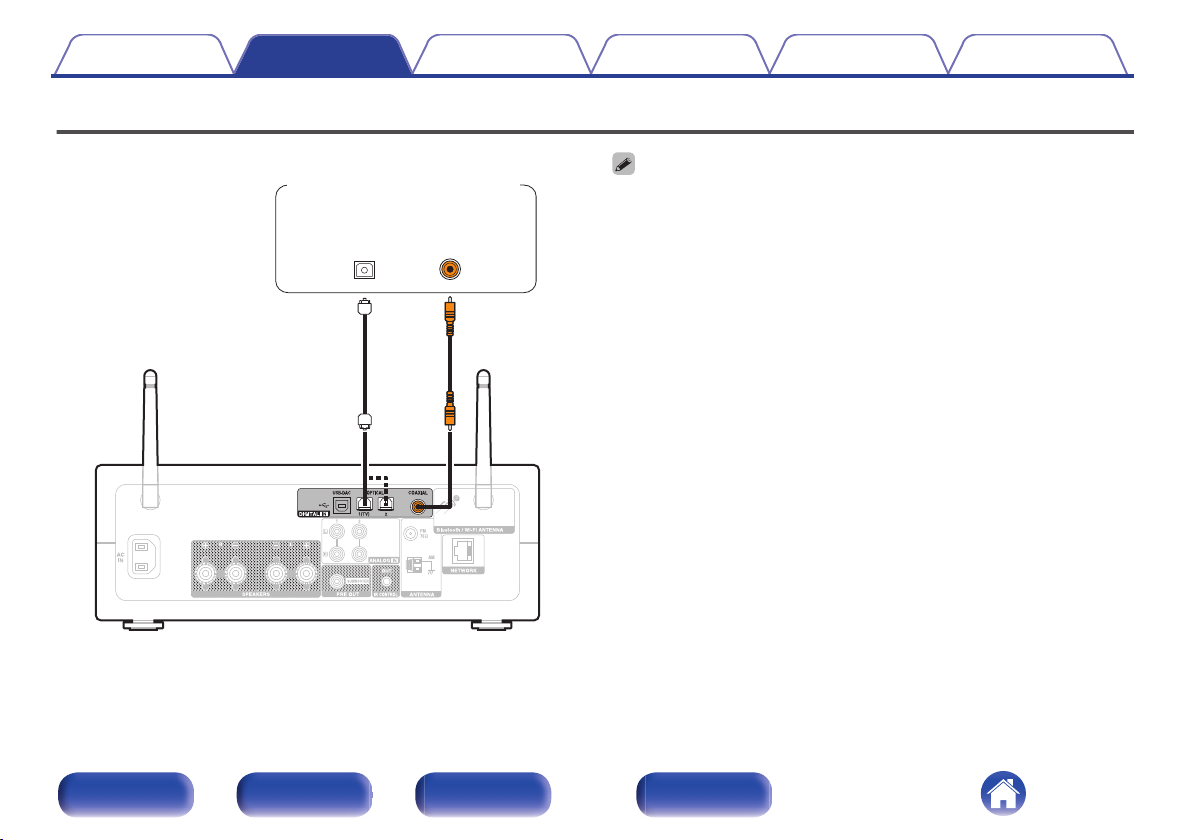
OPTICAL
OUT
COAXIAL
OUT
TV/Digital device
Contents Connections Playback Settings Tips Appendix
Connecting a digital device
Connect this unit to a device with digital output connectors, such as a TV.
When connecting a TV to this unit, turn off the audio output of the TV’s internal
0
speakers. See the owner’s manual of your TV for details.
o
Specifications of supported audio formats
See “D/A converter” (v p. 126).
.
Front panel Rear panel
Remote control
unit
24
Index

AUDIO
LR
OUT
L
R
L
R
AUDIO
Analog
device
Contents
Connections Playback Settings Tips Appendix
Connecting an analog device
You can connect this unit to various devices with analog audio output.
.
Front panel Rear panel
Remote control
unit
25
Index
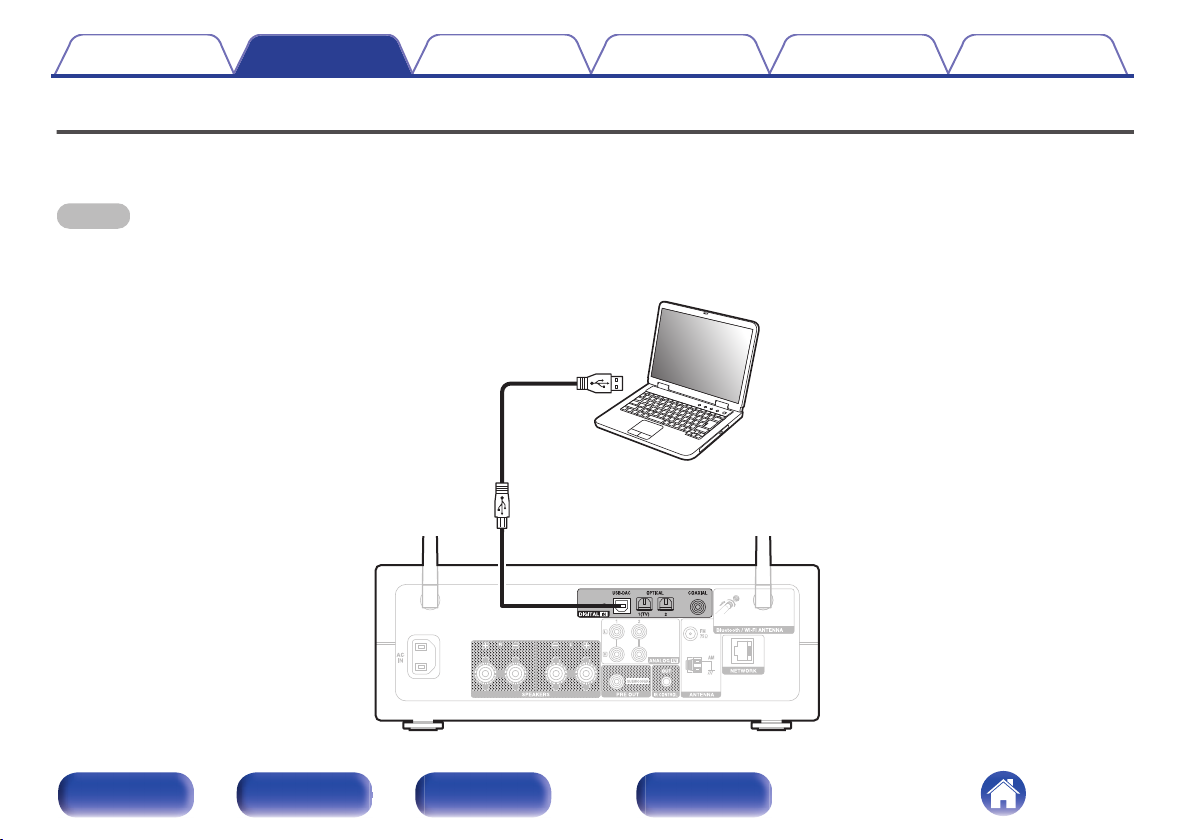
Ty p e A
USB 2.0 cable
(Sold separately)
Ty p e B
Computer on which the driver software and
audio player software are installed
Contents
Connections Playback Settings Tips Appendix
Connecting a PC or Mac
By connecting a computer to the USB-DAC port on the rear panel of this unit using a commercially available USB connecting cable, this unit can be used
as a D/A converter. (v p. 62)
NOTE
Before USB connecting this unit to your computer, install the driver software in your computer. (v p. 63)
0
Download the driver software from the PMA-150H page of the Denon website.
0
Use a cable that is 10 ft (3 m) or less to connect to the computer.
0
.
Front panel Rear panel
Remote control
unit
26
Index
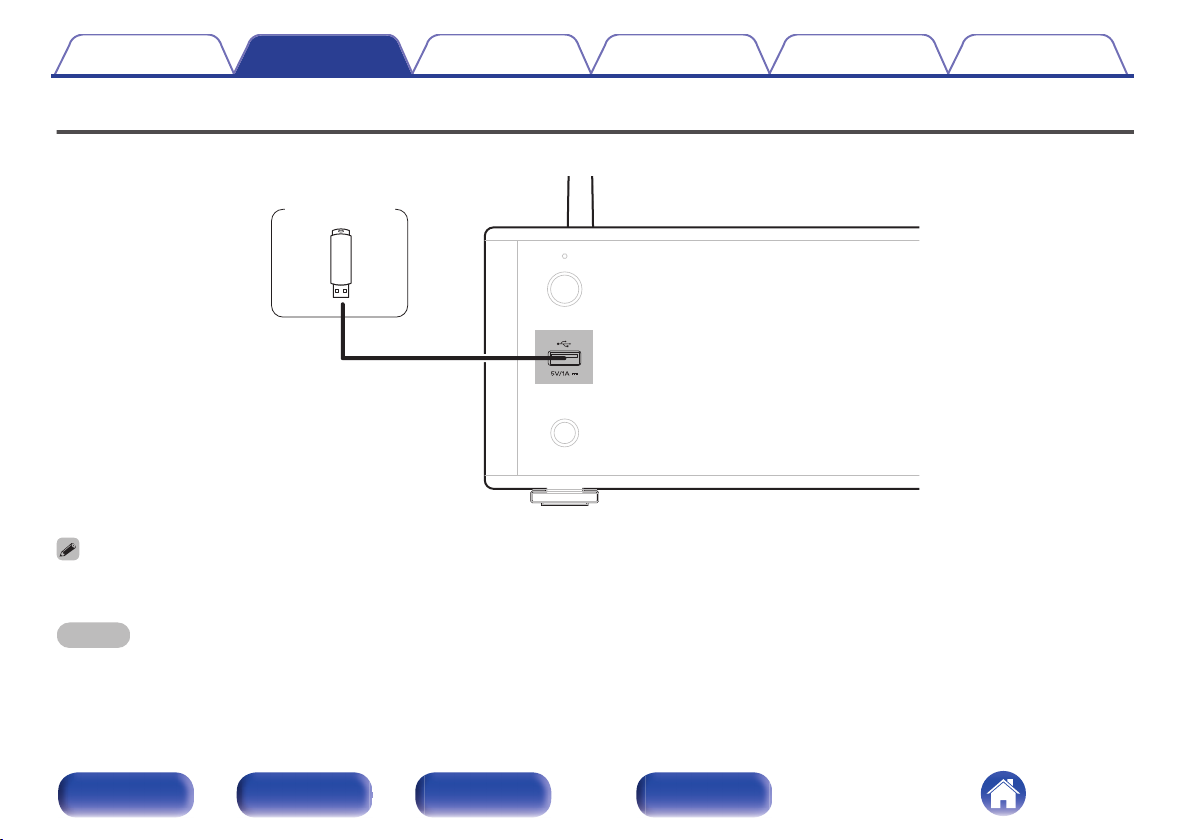
USB memory
device
Contents Connections Playback Settings Tips Appendix
Connecting a USB memory device to the USB port
For operating instructions see “Playing a USB memory device”. (v p. 42)
Denon does not guarantee that all USB memory devices will operate or receive power. When using a portable USB hard disk drive (HDD) which came with an AC adapter,
0
use that device’s supplied AC adapter.
.
NOTE
USB memory devices will not work via a USB hub.
0
It is not possible to use this unit by connecting the unit’s USB port to a PC via a USB cable.
0
Do not use an extension cable when connecting a USB memory device. This may cause radio interference with other devices.
0
Front panel Rear panel
Remote control
unit
27
Index
FM indoor antenna
(supplied)
AM loop antenna
(supplied)
q we
Black
White
Contents Connections Playback Settings Tips Appendix
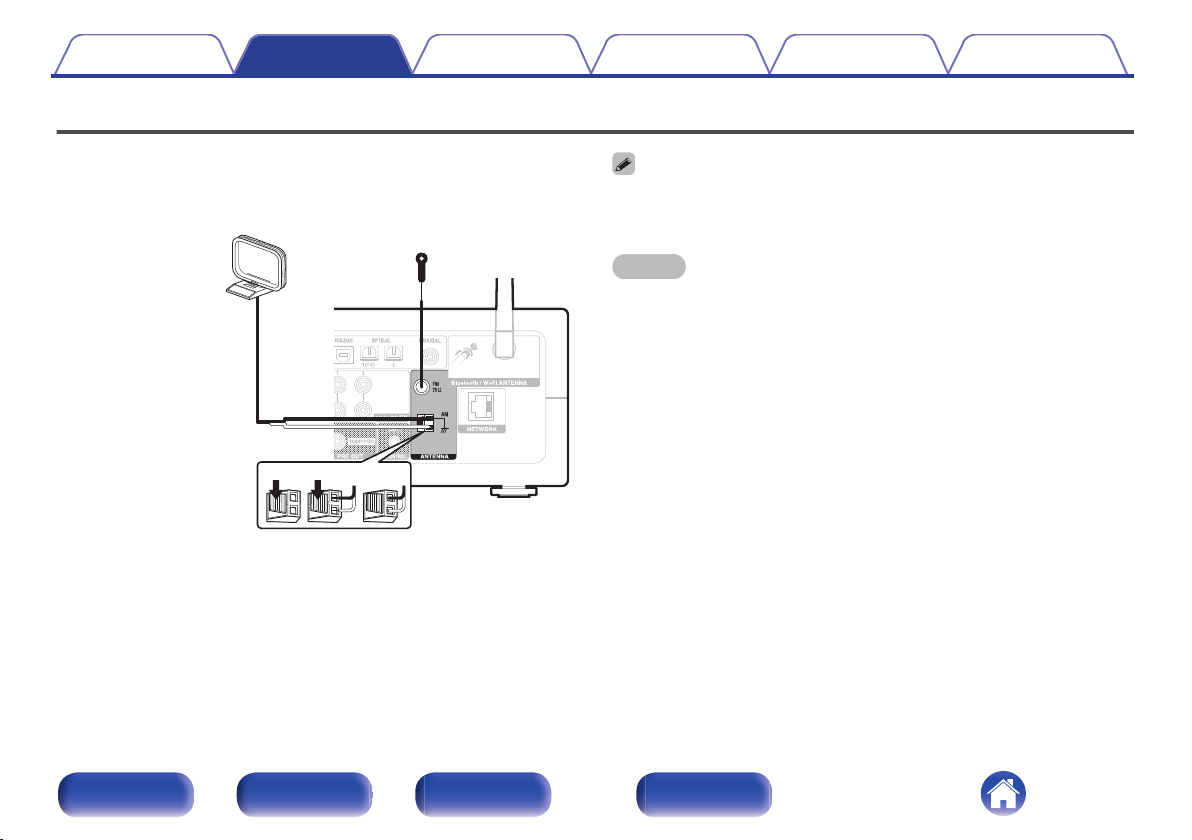
Connecting an FM/AM antenna
After connecting the antenna and receiving a broadcast signal, fix the
antenna with tape in a position where the noise level becomes minimal.
“Listening to FM/AM broadcasts” (v p. 58)
If you are unable to receive a good broadcast signal, we recommend installing an
0
outdoor antenna. For details, inquire at the retail store where you purchased the
unit.
NOTE
Make sure the AM loop antenna lead terminals do not touch metal parts of the
0
panel.
.
Front panel Rear panel
Remote control
unit
28
Index
Nail, tack, etc.
Projecting part
Square hole
Stand
Loop antenna
Contents
Connections Playback Settings Tips Appendix
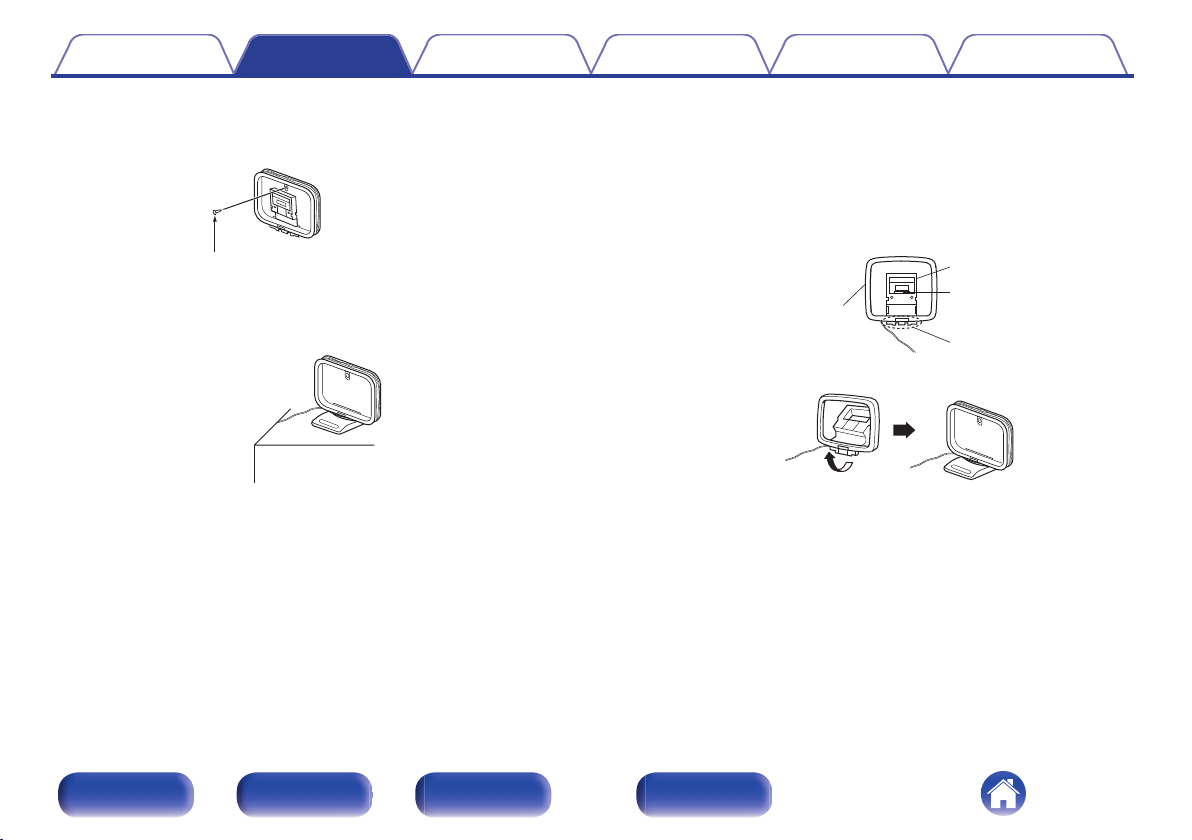
o
Using the AM loop antenna
Suspending on a wall
Suspend directly on a wall without assembling.
.
Standing alone
Use the procedure shown above to assemble.
When assembling, refer to “AM loop antenna assembly”.
.
o
AM loop antenna assembly
Put the stand section through the bottom of the loop
1
antenna from the rear and bend it forward.
Insert the projecting part into the square hole in the
2
stand.
.
Front panel Rear panel
Remote control
unit
29
Index
Internet
Modem
PC
Router
To WAN side
To LAN port
To LAN port
LAN port/
Ethernet
connector
LAN port/
Ethernet
connector
NAS
(Network Attached
Storage)
Contents
Connections Playback Settings Tips Appendix
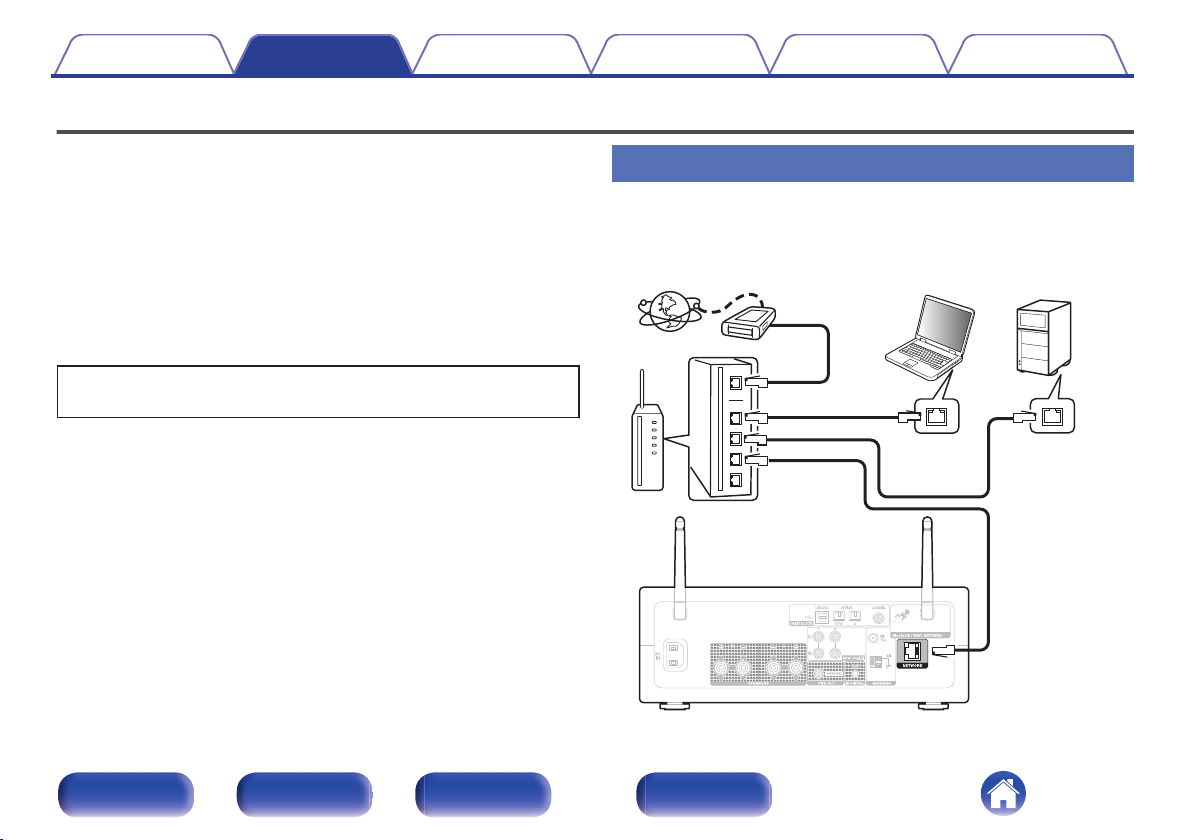
Connecting to a home network (LAN)
This unit can connect to a network using a wired LAN or wireless LAN.
You can connect this unit to your home network (LAN) to enable various
types of playback and operations as described below.
Playback of network audio such as Internet Radio and from your media
0
server(s)
Playback of streaming music services
0
Using the Apple AirPlay function
0
Operation on this unit via the network
0
Operation with the HEOS wireless multi-room sound system
0
Firmware Update
0
For connections to the Internet, contact an ISP (Internet Service
Provider) or a computer shop.
Wired LAN
To make connections via wired LAN, use a LAN cable to connect the
router to this unit as shown in the figure below.
.
Front panel Rear panel
Remote control
unit
30
Index
 Loading...