

Page 1
DJ Controller
Audio player
MC2000
Quick Setup Guide
Schnell-Installationsanleitung
Guide de configuration rapide
Guida di installazione rapida
Guía de instalación rápida
Beknopte handleiding
Snabbinstallationsguide
クイック セット アップガイド
CAUTION
RISK OF ELECTRIC SHOCK
DO NOT OPEN
CAUTION:
TO REDUCE THE RISK OF ELECTRIC SHOCK, DO
NOT REMOVE COVER (OR BACK). NO USERSERVICEABLE PARTS INSIDE. REFER SERVICING
TO QUALIFIED SERVICE PERSONNEL.
The lightning flash with arrowhead symbol,
within an equilateral triangle, is intended to
alert the user to the presence of uninsulated
“dangerous voltage” within the product’s
enclosure that may be of sufficient magnitude
to constitute a risk of electric shock to persons.
The exclamation point within an equilateral
triangle is intended to alert the user to
the presence of important operating and
maintenance (servicing) instructions in the
literature accompanying the appliance.
IMPORTANT TO SAFETY
WARNING:
To reduce the risk of fire and electric shock, this
apparatus should not be exposed to rain or
moisture and objects filled with liquids, such as
vases, should not be placed on this apparatus.
CAUTION
1. Do not open the top cover
In order to prevent electric shock, do not open
the top cover.
If problems occur, contact your DENON DEALER.
2. Do not place anything inside
Do not place metal objects or spill liquid inside
the system.
Electric shock or malfunction may result.
Please, record and retain the Model name and
serial number of your set shown on the rating label.
Model No. MC2000
Serial No.
FCC INFORMATION (For US customers)
1. COMPLIANCE INFORMATION
Product Name: Professional DJ Controller
Model Number: MC2000
This product complies with Part 15 of the FCC
Rules. Operation is subject to the following
two conditions: (1) this product may not cause
harmful interference, and (2) this product must
accept any interference received, including
interference that may cause undesired
operation.
Denon Professional div. D&M Professional
1100 Maplewood Drive Itasca, IL 60143
Tel. 630-741-0330
IMPORTANT NOTICE: DO NOT MODIFY THIS
2.
PRODUCT
This product, when installed as indicated in the
instructions contained in this manual, meets
FCC requirements. Modification not expressly
approved by DENON may void your authority,
granted by the FCC, to use the product.
3. NOTE
This product has been tested and found to
comply with the limits for a Class B digital device,
pursuant to Part 15 of the FCC Rules. These limits
are designed to provide reasonable protection
against harmful interference in a residential
installation.
This product generates, uses and can radiate radio
frequency energy and, if not installed and used
in accordance with the instructions, may cause
harmful interference to radio communications.
However, there is no guarantee that interference
will not occur in a particular installation. If this
product does cause harmful interference to radio
or television reception, which can be determined
by turning the product OFF and ON, the user is
encouraged to try to correct the interference by
one or more of the following measures:
•Reorientorrelocatethereceivingantenna.
•Increase the separation between the
equipment and receiver.
•
Connect the product into an outlet on a circuit
different from that to which the receiver is
connected.
•Consult the local retailer authorized to
distribute this type of product or an
experienced radio/TV technician for help.
For Canadian customers:
This Class B apparatus complies with Canadian ICES-
003.
Cet appareil numérique de la classe B est conforme à
la norme NMB-003 du Canada.
IMPORTANT SAFETY
INSTRUCTIONS
READ BEFORE OPERATING EQUIPMENT
This product was designed and manufactured to meet
strict quality and safety standards. There are, however,
some installation and operation precautions which you
should be particularly aware of.
1. Read these instructions.
2. Keep these instructions.
3. Heed all warnings.
4. Follow all instructions.
5. Do not use this apparatus near water.
6. Clean only with dry cloth.
7. Do not install near any heat sources such as radiators,
heat registers, stoves, or other apparatus (including
amplifiers) that produce heat.
8.
Only use attachments/accessories specified by the
manufacturer.
9.
Use only with the cart, stand,
tripod, bracket, or table specified
by the manufacturer, or sold with
the apparatus. When a cart is used,
use caution when moving the cart/
apparatus combination to avoid injury
from tip-over.
10. Refer all servicing to qualified service personnel.
Servicing is required when the apparatus has been
damaged in any way, such as power-supply cord or
plug is damaged, liquid has been spilled or objects
have fallen into the apparatus, the apparatus has
been exposed to rain or moisture, does not operate
normally, or has been dropped.
n NOTE ON USE / HINWEISE ZUM GEBRAUCH /
OBSERVATIONS RELATIVES A L’UTILISATION /
NOTE SULL’USO / NOTAS SOBRE EL USO /
ALVORENS TE GEBRUIKEN / OBSERVERA
WARNINGS
•Keep the unit free from moisture, water, and dust.
•Do not let foreign objects into the unit.
•Do not let insecticides, benzene, and thinner come in
contact with the unit.
•Never disassemble or modify the unit in any way.
•Naked flame sources such as lighted candles should
not be placed on the unit.
•Do not expose the unit to dripping or splashing fluids.
•Do not place objects filled with liquids, such as vases,
on the unit.
WARNHINWEISE
•Halten Sie das Gerät von Feuchtigkeit, Wasser und
Staub fern.
•Lassen Sie keine fremden Gegenstände in das Gerät
kommen.
•Lassen Sie das Gerät nicht mit Insektiziden, Benzin
oder Verdünnungsmitteln in Berührung kommen.
•Versuchen Sie niemals das Gerät auseinander zu nehmen
oder zu verändern.
•Auf dem Gerät sollten keinerlei direkte Feuerquellen
wie beispielsweise angezündete Kerzen aufgestellt
werden.
•Das Gerät sollte keiner tropfenden oder spritzenden
Flüssigkeit ausgesetzt werden.
•Auf dem Gerät sollten keine mit Flüssigkeit gefüllten
Behälter wie beispielsweise Vasen aufgestellt werden.
AVERTISSEMENTS
•Protéger l’appareil contre l’humidité, l’eau et la poussière.
•Ne pas laisser des objets étrangers dans l’appareil.
•Ne pas mettre en contact des insecticides, du
benzène et un diluant avec l’appareil.
•Ne jamais démonter ou modifier l’appareil d’une
manière ou d’une autre.
•Ne jamais placer de flamme nue sur l'appareil,
notamment des bougies allumées.
•L’appareil ne doit pas être exposé à l’eau ou à l’humidité.
•Ne pas poser d’objet contenant du liquide, par
exemple un vase, sur l’appareil.
AVVERTENZE
•Tenete l’unità lontana dall’umidità, dall’acqua e dalla
polvere.
•Non inserite corpi estranei all’interno dell’unità.
•Assicuratevi che l’unità non entri in contatto con
insetticidi, benzolo o solventi.
•Non smontate né modificate l’unità in alcun modo.
•Non posizionate sull’unità fiamme libere, come ad
esempio candele accese.
•L’apparecchiatura non deve essere esposta a gocciolii
o spruzzi.
•Non posizionate sull’unità alcun oggetto contenente
liquidi, come ad esempio i vasi.
ADVERTENCIAS
•Mantenga el equipo libre de humedad, agua y polvo.
•No deje objetos extraños dentro del equipo.
•No permita el contacto de insecticidas, gasolina y
diluyentes con el equipo.
•Nunca desarme o modifique el equipo de ninguna manera.
•No deberán colocarse sobre el aparato fuentes
inflamables sin protección, como velas encendidas.
•No exponer el aparato al goteo o salpicaduras cuando
se utilice.
•No colocar sobre el aparato objetos llenos de líquido,
como jarros.
WAARSCHUWINGEN
•Laat geen vochtigheid, water of stof in het apparaat
binnendringen.
•Laat geen vreemde voorwerpen in dit apparaat vallen.
•Voorkom dat insecticiden, benzeen of verfverdunner
met dit toestel in contact komen.
•Dit toestel mag niet gedemonteerd of aangepast worden.
•Plaats geen open vlammen, bijvoorbeeld een
brandende kaars, op het apparaat.
•Stel het apparaat niet bloot aan druppels of spatten.
•Plaats geen voorwerpen gevuld met water,
bijvoorbeeld een vaas, op het apparaat.
VARNINGAR
•Utsätt inte apparaten för fukt, vatten och damm.
•Se till att främmande föremål inte tränger in i
apparaten.
•Se till att inte insektsmedel på spraybruk, bensen och
thinner kommer i kontakt med apparatens hölje.
•Ta inte isär apparaten och försök inte bygga om den.
•Placera inte öppen eld, t.ex. tända ljus, på apparaten.
•Apparaten får inte utsättas för vätska.
•Placera inte föremål fyllda med vätska, t.ex. vaser, på
apparaten.
•DECLARATION OF CONFORMITY (English)
We declare under our sole responsibility that this
product, to which this declaration relates, is in
conformity with the following standards:
EN55022, EN55024, EN61000-3-2, EN61000-3-3.
Following the provisions of EMC Directive 2004/108/
EC, the EC regulation 1275/2008 and its frame work
Directive 2009/125/EC for Energy-related Products
(ErP).
•ÜBEREINSTIMMUNGSERKLÄRUNG (Deutsch)
Wir erklären unter unserer Verantwortung, daß
dieses Produkt, auf das sich diese Erklärung
bezieht, den folgenden Standards entspricht:
EN55022, EN55024, EN61000-3-2, EN61000-3-3.
Gemäß den Bestimmungen der EMV-Richtlinie
2004/108/EG, der Verordnung (EG) Nr. 1275/2008
der Kommission und deren Rahmenrichtlinie
2009/125/EG zu energieverbrauchsrelevanten
Produkten (ErP).
•DECLARATION DE CONFORMITE (Français)
Nous déclarons sous notre seule responsabilité que
l’appareil, auquel se réfère cette déclaration, est
conforme aux standards suivants:
EN55022, EN55024, EN61000-3-2, EN61000-3-3.
Selon la directive CEM 2004/108/EC, la
réglementation européenne 1275/2008 et la
directive 2009/125/EC établissant un cadre de
travail applicable aux produits liés à l’énergie (ErP).
•DICHIARAZIONE DI CONFORMITÀ (Italiano)
Dichiariamo con piena responsabilità che questo
prodotto, al quale la nostra dichiarazione si riferisce,
è conforme alle seguenti normative:
EN55022, EN55024, EN61000-3-2, EN61000-3-3.
Facendo seguito alle disposizioni della direttiva
EMC 2004/108/EC, alla norma EC 1275/2008 e alla
relativa legge quadro 2009/125/EC in materia di
prodotti alimentati ad energia (ErP).
QUESTO PRODOTTO E’ CONFORME
AL D.M. 28/08/95 N. 548
•DECLARACIÓN DE CONFORMIDAD (Español)
Declaramos bajo nuestra exclusiva responsabilidad que
este producto al que hace referencia esta declaración,
está conforme con los siguientes estándares:
EN55022, EN55024, EN61000-3-2, EN61000-3-3.
De acuerdo con la directiva CEM 2004/108/CE,
la normativa CE 1275/2008 y su directiva marco
2009/125/EC para productos relacionados con la
energía (ErP).
•EENVORMIGHEIDSVERKLARING (Nederlands)
Wij verklaren uitsluitend op onze verantwoordelijkheid
dat dit produkt, waarop deze verklaring betrekking
heeft, in overeenstemming is met de volgende
normen:
EN55022, EN55024, EN61000-3-2, EN61000-3-3.
Volgens de voorzieningen van EMC-richtlijn
2004/108/EC, de EU-richtlijn 1275/2008 en de
kaderrichtlijn 2009/125/EC voor energieverbruikende
producten (ErP).
•ÖVERENSSTÄMMELSESINTYG (Svenska)
Härmed intygas helt på eget ansvar att denna
produkt, vilken detta intyg avser, uppfyller följande
standarder:
EN55022, EN55024, EN61000-3-2, EN61000-3-3.
Uppfyller reglerna i EMC-direktivet 2004/108/EC,
EU-förordningen 1275/2008 och ramverksdirektivet
2009/125/EC för energirelaterade produkter (ErP).
D&M Professional Europe
A division of D&M Europe B.V.
Beemdstraat 11
5653 MA Eindhoven
The Netherlands
A NOTE ABOUT RECYCLING:
This product’s packaging materials are
recyclable and can be reused. Please
dispose of any materials in accordance with
the local recycling regulations.
When discarding the unit, comply with local
rules or regulations.
Batteries should never be thrown away or
incinerated but disposed of in accordance
with the local regulations concerning battery
disposal.
This product and the supplied accessories,
excluding the batteries, constitute the
applicable product according to the WEEE
directive.
HINWEIS ZUM RECYCLING:
Das Verpackungsmaterial dieses Produktes ist zum
Recyceln geeignet und kann wieder verwendet werden.
Bitte entsorgen Sie alle Materialien entsprechend der
örtlichen Recycling-Vorschriften.
Beachten Sie bei der Entsorgung des Gerätes die
örtlichen Vorschriften und Bestimmungen.
Die Batterien dürfen nicht in den Hausmüll geworfen
oder verbrannt werden; bitte entsorgen Sie die
Batterien gemäß der örtlichen Vorschriften.
Dieses Produkt und das im Lieferumfang enthaltene
Zubehör (mit Ausnahme der Batterien!) entsprechen
der WEEE-Direktive.
UNE REMARQUE CONCERNANT LE RECYCLAGE:
Les matériaux d’emballage de ce produit sont
recyclables et peuvent être réutilisés. Veuillez
disposer des matériaux conformément aux lois sur le
recyclage en vigueur.
Lorsque vous mettez cet appareil au rebut, respectez
les lois ou réglementations en vigueur.
Les piles ne doivent jamais être jetées ou incinérées,
mais mises au rebut conformément aux lois en
vigueur sur la mise au rebut des piles.
Ce produit et les accessoires inclus, à l’exception des
piles, sont des produits conformes à la directive DEEE.
NOTA RELATIVA AL RICICLAGGIO:
I materiali di imballaggio di questo prodotto
sono riutilizzabili e riciclabili. Smaltire i materiali
conformemente alle normative locali sul riciclaggio.
Per lo smaltimento dell’unità, osservare le normative
o le leggi locali in vigore.
Non gettare le batterie, né incenerirle, ma smaltirle
conformemente alla normativa locale sui rifiuti chimici.
Questo prodotto e gli accessori inclusi nell’imballaggio
sono applicabili alla direttiva RAEE, ad eccezione delle
batterie.
ACERCA DEL RECICLAJE:
Los materiales de embalaje de este producto son
reciclables y se pueden volver a utilizar. Disponga
de estos materiales siguiendo los reglamentos de
reciclaje de su localidad.
Cuando se deshaga de la unidad, cumpla con las
reglas o reglamentos locales.
Las pilas nunca deberán tirarse ni incinerarse. Deberá
disponer de ellas siguiendo los reglamentos de su
localidad relacionados con los desperdicios químicos.
Este producto junto con los accesorios empaquetados
es el producto aplicable a la directiva RAEE excepto
pilas.
EEN AANTEKENING MET BETREKKING TOT DE RECYCLING:
Het inpakmateriaal van dit product is recycleerbaar
en kan opnieuw gebruikt worden. Er wordt verzocht
om zich van elk afvalmateriaal te ontdoen volgens de
plaatselijke voorschriften.
Volg voor het wegdoen van de speler de voorschriften
voor de verwijdering van wit- en bruingoed op.
Batterijen mogen nooit worden weggegooid of verbrand,
maar moeten volgens de plaatselijke voorschriften
betreffende chemisch afval worden verwijderd.
Op dit product en de meegeleverde accessoires,
m.u.v. de batterijen is de richtlijn voor afgedankte
elektrische en elektronische apparaten (WEEE) van
toepassing.
OBSERVERA ANGÅENDE ÅTERVINNING:
Produktens emballage är återvinningsbart och
kan återanvändas. Kassera det enligt lokala
återvinningsbestämmelser.
När du kasserar enheten ska du göra det i
överensstämmelse med lokala regler och bestämmelser.
Batterier får absolut inte kastas i soporna eller
brännas. Kassera dem enligt lokala bestämmelser för
kemiskt avfall.
Denna apparat och de tillbehör som levereras med den
uppfyller gällande WEEE-direktiv, med undantag av
batterierna.
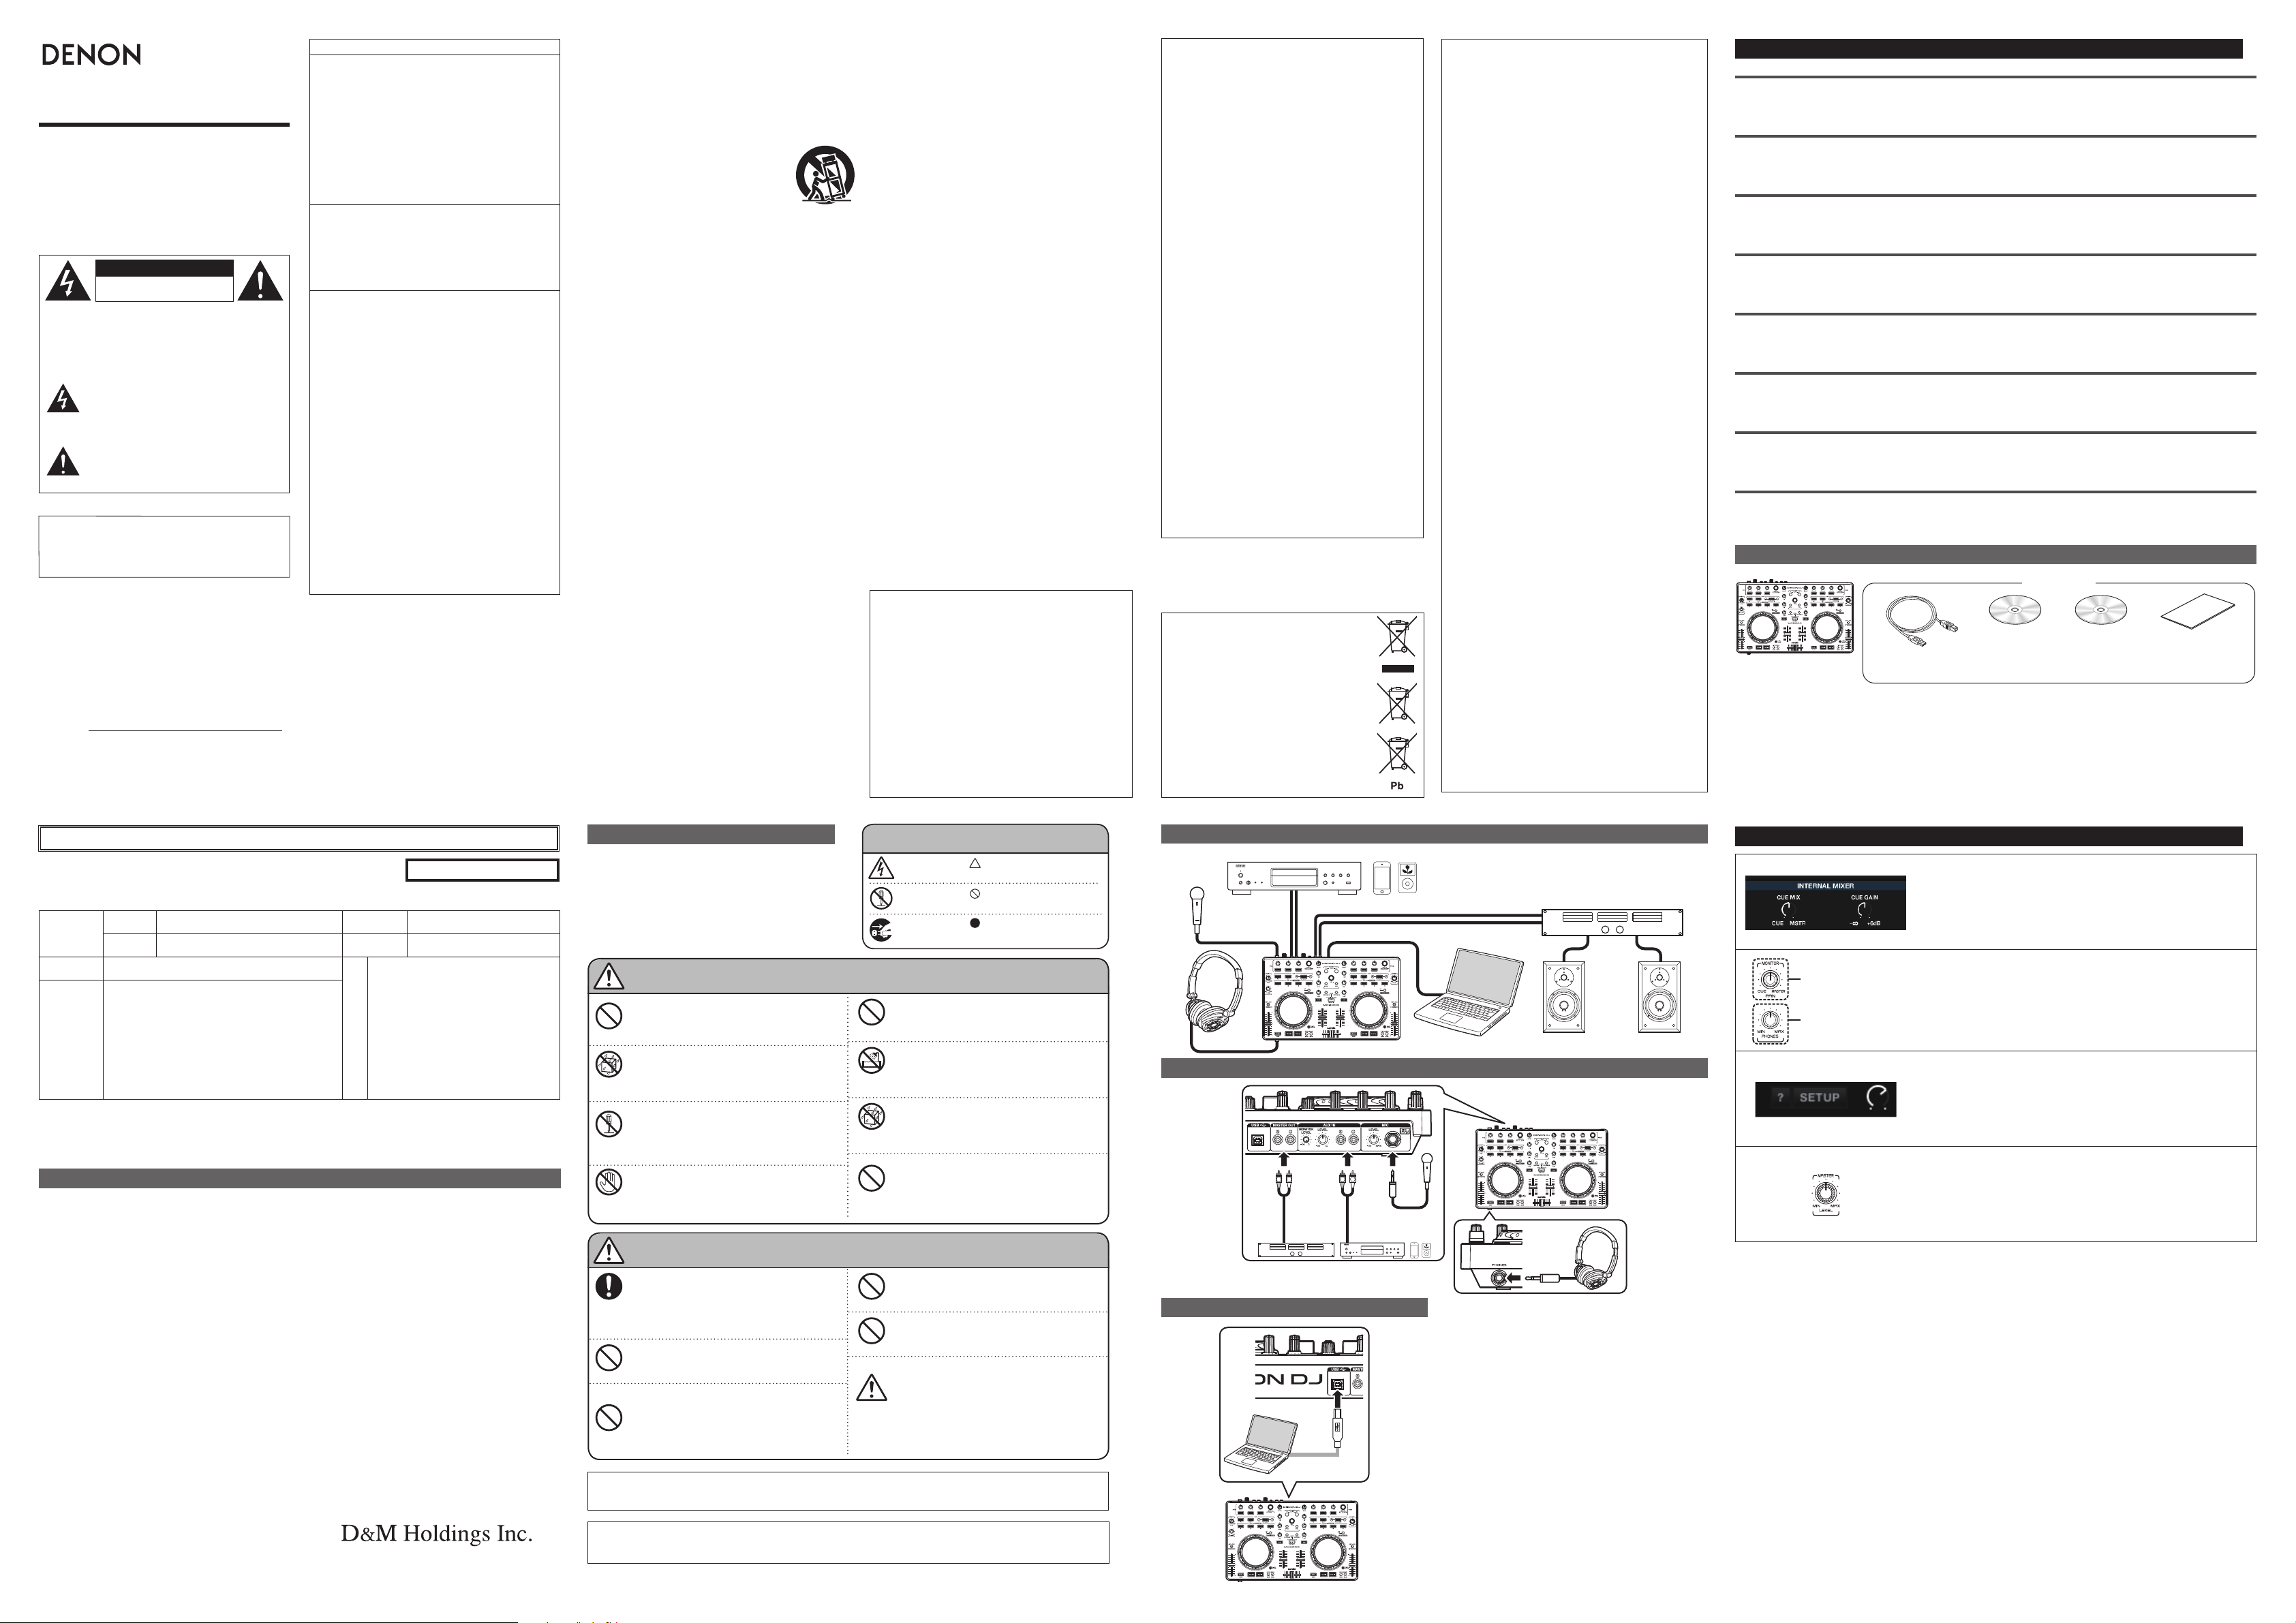
About the Quick Setup Guide
This Quick Setup Guide explains the setup procedure for how to connect the MC2000 to a computer, and set up the system
so that DJ software can be operated.
When using the MC2000, refer to the Owner’s Manual and DJ software instruction manual.
Informationen zur Schnell-Installationsanleitung
Diese Schnell-Installationsanleitung erläutert das Anschließen des M2000 an einen Computer und die Einrichtung des
Systems, sodass die DJ-Software verwendet werden kann.
Beachten Sie bei der Verwendung des MC2000 die Bedienungsanleitung und die Anleitung der DJ-Software.
À propos du Guide de configuration rapide
Le Guide de configuration rapide explique la procédure de configuration, notamment comment connecter le MC2000 à un
ordinateur et configurer le système de façon à pouvoir utiliser le logiciel DJ.
Pour l’utilisation du MC2000, reportez-vous au Manuel de l’Utilisateur et au manuel d’utilisation du logiciel DJ.
Informazioni sulla Guida di installazione rapida
Questa Guida di installazione rapida illustra la procedura di installazione per la connessione di MC2000 a un computer e la
configurazione del sistema per l’utilizzo del software DJ.
Quando si utilizza MC2000, fare riferimento al documento Manuale delle istruzioni e al manuale di istruzioni del software DJ.
Acerca de la Guía de instalación rápida
Esta Guía de instalación rápida explica el procedimiento de instalación para la conexión del MC2000 a un ordenador y la
configuración del sistema para que se pueda utilizar el software de DJ.
Cuando utilice el MC2000, consulte el Manual del usuario y el manual de instrucciones del software de DJ.
Over de beknopte handleiding
Deze beknopte handleiding beschrijft de setup-procedure voor het aansluiten van de MC2000 op een computer en de
instellingen van het systeem zodat DJ software kan worden gebruikt.
Raadpleeg bij het gebruik van de MC2000, zowel de Gebruiksaanwijzing als de handleiding van DJ software.
Om snabbinstallationsguiden
I denna snabbinstallationsguide förklaras inställningsproceduren för hur man ansluter MC2000 till en dator, och ställer in
systemet så att DJ-programvara kan användas.
När du använder MC2000, se Bruksanvisning och DJ-programvarans instruktionsmanual.
クイック セットアップ ガイドについて
このクイックセットアップガイドでは、本機をパソコンに接続してDJソフトウエアの操作ができるようにセットアップす
る手順を説明しています。
本機をご使用になるときは、取扱説明書およびDJソフトウエアの取扱説明書をご覧ください。
Check contents
DEUTSCHENGLISH FRANÇAIS ITALIANO ESPAÑOL NEDERLANDS SVENSKA
Accessories
MC2000
USB cable
MC2000
Resource
disc
SERATO DJ INTRO
installation disc
日本語
Quick setup guide
(This guide)
保 証 書
本書は日本国内においてのみ有効です。ThiswarrantyisvalidonlyinJapan.
本書は下記の無料修理規定に記載の内容により、無料修理をお約束するものです。
※印欄に記入がない場合は無効となります。※修理をご依頼される場合は、お買い上げの領収書(またはレシート)を必ずご持参ください。
保証期間
※お買い上げ日
※お客様
対象部分 期間 型名
本体 1カ 年
※製造番号
年 月 日
ご住所
お名前
電話
〒
____________________
様
____________________
( )
____________________
株式会社ディーアンドエムホールディングス D&Mプロフェッショナル機器営業本部
※故障・修理についてのお問い合わせ先(サービスセンター)は上記の URL からご確認ください。
※
お
買
い
上
げ
販
売
店
MC2000
住 所・店 名
電話 ( )
持込修理
http://www.dm-pro.jp
無料修理規定
1. 取扱説明書、本体添付ラベル等の注意書に従った正常
な使用状態で故障した場合には、お買い上げの販売店、
又は弊社サービスセンターが無料修理致します。
2.保証期間に故障して無料修理をお受けになる場合は、
製品、本書、お買い上げの領収書 ( またはレシート )
をご持参のうえ、お買い上げの販売店、又は弊社サー
ビスセンターにご依頼ください。なお、離島および離
島に準ずる遠隔地への出張修理を行った場合には、出
張に要する実費を申し受けます。
3.ご贈答品などで、所定事項の記入がない場合、またご
転居の場合には、最寄りの弊社サービスセンターにお
問い合わせください。
4.保証期間内でも、次の場合には有料修理になります。
( イ )使用上の誤り、及び不当な修理や改造による故
障及び損傷
( ロ )お買い上げ後の輸送移動、落下などによる故障
および損傷
( ハ ) 火災、地震、水害、落雷その他の天災地変、公害、
ガス(硫化ガスなど)、異常電圧、指定以外の使
用電源(電圧、周波数など)による故障および
損傷
( ニ )接続している他の機器に起因する故障および損
傷
( ホ )異常摩擦、異常損傷を除き、自然消耗と見なさ
れた消耗部品の故障及び損傷
( ヘ )車両・船舶への搭載での使用による故障および
損傷
( ト )本書およびお買い上げの領収書 ( またはレシー
ト ) のご提示がない場合
( チ )本書に製造番号、お買い上げ年月日、お客様名、
取扱い店名の記入がない場合、あるいは字句を
書き換えられた場合
5.本書は日本国内においてのみ有効です。
ThiswarrantyisvalidonlyinJapan.
・ この保証書は、本書に明示した期間、条件の元におい
て無料修理をお約束するものです。従って、この保証
書によって保証書を発行しているもの(保護責任者)、
およびそれ以外の事業者に対するお客様の法律上の権
利を制限するものではありませんので、保証期間経過
後の修理についてご不明の場合は、お買い上げの販売
店、又は弊社サービスセンターにお問い合わせくださ
い。
・ 保証期間経過後の修理、補修用性能部品の保有期間に
ついて、詳しくは取扱説明書をご覧ください。
・ お客様にご記入いただいた保証書の内容は、保証期間
内のサービス活動及びその後の安全点検活動のために
記載内容を利用させて頂く場合がございますので、ご
了承ください。
安全上のご注意
正しく安全にお使いいただくため、ご使用の前に必ずよくお
読みください。お読みになった後は、いつでも見られるところ
に大切に保管してください。
この取扱説明書および製品への表示では、製品を安全に正し
くお使いいただき、あなたや他の人々への危害や財産への損
害を未然に防止するために、いろいろな絵表示をしています。
その絵表示と意味は次のようになっています。
内容をよく理解してから本文をお読みください。
警告
内部に水などの液体や異 物を入れない
機器内部に水などの液体や金属類、燃えやすいものなどを
差し込んだり、落とし込んだりしないでください。
火災・感電の原因となります。
禁止
特にお子様のいるご家庭ではご注意ください。
水をかけ たり、 濡 らしたりしない
雨天・降雪中・海岸・水辺での使用は特にご注意ください。
火災・感電の原因となります。
水ぬれ
禁止
キャビネット( 天 板 ・裏ぶた ) を外したり、 改 造したりしない
内部には電圧の高い部分がありますので、触ると感電の原
因となります。内部の点検・調整・修理は販売店にご依頼
くださ い 。
分解
この機器を改造しないでください。火災・感電の原因となり
禁止
ます。
雷が 鳴り出したら
機器には触れないでください。
感電の原因となります。
接触
禁止
注意
機器の接続は説明書をよく読んでから接続する
機器を接続する場合は、機器の取扱説明書に従って接続し
てくだ さい 。
必ず実施
また、接続には指定のコードを使用してください。指定以外
のコ ードを使用し たり、コ ードを延長し たりすると 発 熱し 、や
けど の 原 因となることが あります。
不安定な場所に置 かない
ぐらついた台の上や傾いたところなど不安定な場所に置か
ないでください 。 落ち たり倒 れ たりして、け が の 原 因となる
ことがあります 。
禁止
次のような場所には 置かない
火災・感電の原因となることがあります。
●
調理台や加湿器のそばなど油煙や湯気が当たるようなと
ころ
●
湿気やほこりの多いところ
禁止
●
直射日光の当たるところや暖房器具の近くなど高温になる
ところ
お手入 れについて
●
キャビネットや操作パネル部分の汚れは、柔らかい布で軽く拭き取ってください。化学ぞうきんをご使用の際は、その注意書きに従ってください。
●
ベンジンやシンナーなどの有機溶剤および殺虫剤などが本機に付着すると、変質や変色の原因になりますので使用しないでください。
この表示を無視して、誤った取り扱いをすると、
人が死亡または重傷を負う可能性が想定される内容を示しています。
この表示を無視して、誤った取り扱いをすると、
人が軽傷を負う可能性が想定される内容および物的損害のみの発生が想定される内容を示していま
図の中や近傍に具体的な禁止内容が描かれています。
感電注意
分解禁止
電源プラグ を
コ ン セ ント か ら 抜
け
落としたり、キャビネットを破損 した場合は
販売店にご連絡ください。そのまま使用すると火災・感電の
原 因 と なります 。
禁止
風呂・シャワー室では使用しない
火災・感電の原因となります。
水場での
使用禁止
この機器の上に花瓶・植木鉢・コップ・化粧品・薬品や水
などが入った容器 、および小さな金属物を置かない
こぼれたり、中に入った場合、火災・感電の原因となります。
水ぬれ
禁止
この機器の上に小さな金属物を置かない
万一内部に異物が入った場合は、使用を中止し販売店にご
連絡ください。そのまま使用すると、火災・感電の原因とな
ります 。
禁止
この 機 器に 乗ったり、 ぶ ら下 がったりしない
特に幼いお子様のいるご家庭では、ご注意ください。倒れ
たり、壊 れ たりして、けが の 原 因 となることがあります 。
禁止
重いものをのせない
機器の上に重いものや外枠からはみ出るような大きなもの
を置かないでください 。 バランスがくずれ て倒れたり、落下
して 、けが の 原因とな ることがあります。
禁止
5 年に一度は内 部の掃 除を
販売店などにご相談ください。内部にほこりがたまったまま、
長い間掃除をしないと火災や故障の原因となることがありま
す。
特に、湿気の多くなる梅雨期の前におこなうと、より効果的
注意
です。なお、内部の掃除費用については販売店などにご相
談くだ さ い 。
絵表示の例
記号は注意(危険・警告を含む)を
促す内容があることを告げるもの
記号は禁止の行為であることを告
げるものです。
記号は行為を強制したり指示する
内容を告げるものです。
す。
です。
System connection
Microphone
Headphones
RCA
cable
USB cable
Connect your audio system
w qe
L
R
L
R
RCA cableRCA cable
Connect the MC2000 to your computer
RCA cable
Computer
Power amplifier
Speakers
DEUTSCHENGLISH FRANÇAIS ITALIANO ESPAÑOL NEDERLANDS SVENSKA
G
G
G
G
G
G
G
【図 1】
G
H
Fig. 2
G
Abb 2
q
G
Fig. 2
G
Fig. 2
G
Fig. 2
G
Fig. 2
w
G
Bild 2
【図 2】 MC2000qPAN 調節つまみ/wヘッドホン出力音量調節つまみ
MC2000 q PAN adjustment knob / w Headphone output volume adjustment knob
H
MC2000 q PAN-Einstellknopf / w
H
MC2000 q Bouton de réglage PAN / w
H
MC2000 q Manopola di regolazione PAN / w
H
MC2000 q Mando de ajuste de PAN / w
H
MC2000 q PAN-regelknop / w Regelknop uitvoervolume hoofdtelefoon
H
MC2000 q PAN-justeringsreglage / w Justeringsreglage för hörlursutgång
G
G
G
G
G
G
G
【図 3】 SERATODJINTRO のメイン出力設定
G
G
G
G
G
G
G
【図 4】 MC2000 のマスター出力調節つまみ
SERATO DJ INTRO Monitor Settings
H
Fig. 1
Monitor-Einstellungen für SERATO DJ INTRO
H
Abb. 1
Paramètres moniteur de SERATO DJ INTRO
H
Fig. 1
Impostazioni monitor di SERATO DJ INTRO
H
Fig. 1
Ajustes de monitorización de SERATO DJ INTRO
H
Fig. 1
Monitorinstellingen SERATO DJ INTRO
H
Fig. 1
SERATO DJ INTRO monitorinställningar
H
Bild 1
SERATO DJ INTRO
SERATO DJ INTRO Main Output Settings
H
Fig. 3
Haupt-Ausgangseinstellungen für SERATO DJ INTRO
H
Abb 3
Paramètres de sortie principale de SERATO DJ INTRO
H
Fig. 3
Impostazioni uscita principale SERATO DJ INTRO
H
Fig. 3
Ajustes de salida principal de SERATO DJ INTRO
H
Fig. 3
Hoofdingangsinstellingen SERATO DJ INTRO
H
Fig. 3
SERATO DJ INTRO huvudutgångsinställningar
H
Bild 3
MC2000 Master output volume adjustment knob
H
Fig. 4
MC2000 Einstellungsknopf für die Master-Ausgangslautstärke
H
Abb 4
MC2000 Bouton de réglage du volume de la sortie principal
H
Fig. 4
MC2000 Manopola di regolazione volume uscita master
H
Fig. 4
MC2000 Mando de ajuste del volumen de salida principal
H
Fig. 4
MC2000 Regelknop uitvoervolume master
H
Fig. 4
MC2000 Justeringsreglage för huvudvolym
H
Bild 4
のモニター設定
Einstellungsknopf für die Ausgangslautstärke der Kopfhörer
Bouton de réglage du volume de la sortie du casque
Manopola di regolazione volume uscita cuffie
Mando de ajuste del volumen de salida de los auriculares
日本語
http://www.d-mpro.com
Printed in China 5411 10926 00AP
D&M Holdings Inc.
この装置は、クラス B 情報技術装置です。この装置は、家庭環境で使用することを目的としていますが、この装置がラジオやテレビジョン受信機に
近接して使用されると、受信障害を引き起こすことがあります。
取扱説明書に従って正しい取り扱いをしてください。 VCCI-B
Page 2
ENGLISH
Setup Procedure
Procedure for installing SERATO DJ INTRO
Only perform this step when using Windows.
1
Insert the supplied “MC2000 Resource disc” into the
computer, and install the ASIO driver.
v
Page 6 on the Resource disc Owner’s Manual
Insert the SERATO DJ INTRO installation disc into the
2
computer, and install the program.
Page 9 on the Resource disc Owner’s Manual
v
Only perform this step when using Windows.
3
Check that MC2000 is displayed on the ASIO driver
control panel screen.
•When the ASIO driver control panel screen is displayed,
close it before launching SERATO DJ INTRO.
•If there is no check mark on the left of the MC2000, click
the Enable button to display a check mark and display the
device name in bold-type.
Page 8 on the Resource disc Owner’s Manual
v
Only perform this step when using Mac.
4
Set up the AUDIO and MIDI devices in Mac OS.
Launch Audio MIDI Setup in Mac OS.
q
w
After opening the audio device window, right-click
on MC2000 and set up the sound input device and
sound output device.
Resource disc
v
MC2000_mac_configuration_manual
Launch SERATO DJ INTRO.
5
DJ software installation disc
v
Serato DJ Intro Manual
Congure the SERATO DJ INTRO monitor settings as
6
shown in g. 1 (Back).
•Do not set the VOL to “0”. No monitor sound will be
output from the MC2000 headphone output.
•The monitor/master mix balance is controlled by the
MC2000 PAN adjustment knob (fig. 2output level is controlled by the MC2000 Headphone
output volume adjustment knob (fig. 2-
Set the SERATO DJ INTRO master output (g. 3).
7
•Do not set the VOL to “0”. No master sound will be
output from the MC2000 master output.
•The master output level can be adjusted using the
MC2000 Master output volume adjustment knob (fig. 4).
•It is recommended that you always use the newest version
of SERATO DJ INTRO.
•The latest version can be downloaded free of charge from
the web site of SERATO.
•For detailed information about how to set up and use the
DJ software, see the supplied instruction manual for the
DJ software.
q
), and the monitor
w
).
DEUTSCH
Installation
Installieren von SERATO DJ INTRO
Führen Sie diese Schritte nur unter Windows aus.
1
Legen Sie die “MC2000 Resource disc” in den Computer
ein, und installieren Sie den ASIO-Treiber.
v
Seite 6 in der Bedienungsanleitung auf der Resource-disk
Legen Sie die Installations-Disk für SERATO DJ INTRO
2
in den Computer ein und installieren Sie das Programm.
v
Seite 9 in der Bedienungsanleitung auf der Resource-Disk
Führen Sie diese Schritte nur unter Windows aus.
3
Überprüfen Sie, dass der MC2000 im Bildschirm der
Steuerkonsole des ASIO-Treibers angezeigt wird.
•Sollte der Einstellbildschirm für den ASIO-Treiber
angezeigt werden, schließen Sie ihn, bevor Sie SERATO
DJ INTRO starten.
•Wenn das Kontrollkästchen links neben dem MC2000
nicht markiert ist, klicken Sie auf die Schaltfläche
“Enable” (Aktivieren). Das Kontrollkästchen wird
daraufhin aktiviert, und der Gerätename wird in fett
angezeigt.
v
Seite 8 in der Bedienungsanleitung auf der Resource-Disk
Führen Sie diese Schritte nur auf einem Mac aus.
4
Richten Sie die AUDIO- und MIDI-Geräte in Mac OS
ein.
Starten Sie in Mac OS das Audio MIDI Setup.
q
w
Klicken Sie im Fenster für Audiogeräte mit der
rechten Maustaste auf MC2000, und richten Sie das
Gerät für den Sound-Eingang und Sound-Ausgang ein.
Resource-Disk
v
MC2000_mac_configuration_manual
Starten Sie SERATO DJ INTRO.
5
Installations-Disk für die DJ-Software
v
Serato DJ Intro Manual
Kongurieren Sie die Monitoreinstellungen für SERATO
6
DJ INTRO wie in Abb. 1 gezeigt (Rückseite).
•Stellen Sie VOL nicht auf “0” ein. In diesem Fall wird
über die Kopfhörerausgänge des MC2000 kein Klang
ausgegeben.
•Die Balance des Monitor-/Master-Mischers wird mithilfe
des Pan-Einstellknopfs des MC2000 geregelt (Abb.
q
), und der Monitorausgangspegel wird mithilfe
2des Einstellungsknopfs für die Ausgangslautstärke der
Kopfhörer des MC2000 (Abb. 2-
Stellen Sie den Master-Ausgang von SERATO DJ
7
INTRO ein (Abb. 3).
•Stellen Sie VOL nicht auf “0”. Dann wird kein MasterTon aus dem Master-Ausgang des MC2000 ausgegeben.
•Der Master-Ausgangspegel kann mithilfe des
Einstellungsknopfs für die Master-Ausgangslautstärke
des MC2000 (Abb. 4) eingestellt werden.
•Sie sollten immer die neueste Version von SERATO DJ
INTRO verwenden.
•Die neueste Version kann kostenlos von der SERATOWebsite heruntergeladen werden.
•Genauere Informationen über die Einrichtung und
Verwendung der DJ-Software finden Sie im mitgelieferten
Handbuch für die DJ-Software.
w
) geregelt.
FRANÇAIS ITALIANO
Procédure de configuration Procedura di installazione
Procédure d’installation de SERATO DJ INTRO
N’effectuez cette étape que si vous utilisez Windows.
1
Insérez le “MC2000 Resource disc” fourni dans l’ordinateur
et installez le pilote ASIO.
v
Page 6 du Manuel de l’Utilisateur dans le disque Resource
Insérez le disque d’installation SERATO DJ INTRO dans
2
l’ordinateur et installez le programme.
Page 9 du Manuel de l’Utilisateur dans le disque Resource
v
N’effectuez cette étape que si vous utilisez Windows.
3
Vériez que MC2000 apparaît dans la fenêtre du panneau de
commande du pilote ASIO.
•Lorsque le pilote ASIO du panneau de commande s’affiche,
fermez-le avant de lancer SERATO DJ INTRO.
•Si aucune coche ne figure à gauche du MC2000, cliquez sur
le touche Enable (Activer) pour afficher une coche. Le nom
de l’appareil doit alors s’afficher en caractères gras.
Page 8 du Manuel de l’Utilisateur dans le disque Resource
v
N’effectuez cette étape que si vous utilisez un Mac.
4
Congurez les périphériques AUDIO et MIDI dans Mac OS.
Lancez la configuration MIDI audio dans Mac OS.
q
w
Après avoir ouvert la fenêtre des périphériques audio,
cliquez sur MC2000 et configurez le périphérique
d’entrée audio et le périphérique de sortie audio.
Disque Resource
v
MC2000_mac_configuration_manual
Lancez SERATO DJ INTRO.
5
Disque d’installation du logiciel DJ
v
Serato DJ Intro Manual
Congurez les réglages de l’écran SERATO DJ INTRO
6
comme indiqué sur la g. 1 (Verso).
•Ne réglez pas la commande VOL sur “0”. La sortie casque
ne restituerait alors aucun son de monitoring depuis le
MC2000.
•La balance de mixage moniteur/maître est commandée
par le bouton de réglage PAN du MC2000 (fig. 2que le niveau de sortie du moniteur est commandé par le
bouton de réglage du volume de sortie casque du MC2000
w
).
(fig. 2-
Réglez la sortie master du SERATO DJ INTRO (g. 3).
7
•Ne réglez pas la commande VOL sur “0”. Aucun son
principal ne sortira de la sortie master MC2000.
•Il est possible de régler le niveau de la sortie maître à
l’aide du bouton de réglage du volume de sortie maître du
MC2000 (fig. 4).
•Il est recommandé de toujours utiliser la version la plus
récente de SERATO DJ INTRO.
•La dernière version peut être téléchargée gratuitement depuis
le site internet de SERATO.
•Pour plus d’information détaillée concernant le réglage et
l’utilisation du logiciel de DJ, se référer au mode d’emploi
fourni pour le logiciel de DJ.
q
), tandis
Procedura per l’installazione di SERATO DJ INTRO
Eseguire questo passaggio solo se si utilizza Windows.
1
Inserire nel computer il “MC2000 Resource disc” fornito e
installare il driver ASIO.
v
Pagina 6 del Manuale delle istruzioni del disco Resource
Inserire il disco di installazione di SERATO DJ INTRO nel
2
computer, quindi installare il programma.
Pagina 9 del Manuale delle istruzioni del disco Resource
v
Eseguire questo passaggio solo se si utilizza Windows.
3
Vericare che nella schermata del pannello di controllo del
driver ASIO sia visualizzato MC2000.
•Quando è visualizzata la schermata del pannello di controllo
del driver ASIO, chiuderla prima di lanciare SERATO DJ
INTRO.
•Se a sinistra di MC2000 non è presente un segno di spunta,
fare clic sul pulsante Enable affinché venga visualizzato
un segno di spunta e il nome del dispositivo compaia in
grassetto.
v
Pagina 8 del Manuale delle istruzioni del disco Resource
Eseguire questo passaggio solo se si utilizza Mac.
4
Congurare i dispositivi AUDIO e MIDI in Mac OS.
Avviare l’installazione di Audio MIDI in Mac OS.
q
w
Dopo aver aperto la finestra del dispositivo audio, fare
clic con il pulsante destro del mouse su MC2000 e
configurare i dispositivi di ingresso e uscita audio.
Disco Resource
v
MC2000_mac_configuration_manual
Avviare SERATO DJ INTRO.
5
Disco di installazione del software DJ
v
Serato DJ Intro Manual
Congurare le impostazioni del monitor di SERATO DJ
6
INTRO come mostrato in g. 1 (Indietro).
•Non impostare VOL su “0”. In caso contrario, non verrà
emesso alcun suono dall’uscita della cuffia di MC2000.
•Il bilanciamento tra monitor/master è controllato dalla
manopola di regolazione PAN di MC2000 (fig. 2-q) e il livello
di uscita master è controllato dalla manopola di regolazione
volume uscita cuffie di MC2000 (fig. 2-
Impostare l’uscita master di SERATO DJ INTRO (g. 3).
7
•Non impostare VOL su “0”. Nessun audio master verrà
emesso dall’uscita master di MC2000.
•Il livello di uscita master può essere regolato tramite la
manopola di regolazione volume uscita master di MC2000
(fig. 4).
•È consigliabile utilizzare sempre la versione più recente di
SERATO DJ INTRO.
•L’ultima versione può essere scaricata gratis dal sito web di
SERATO.
•Per informazioni dettagliate sul metodo di impostazione e
l’uso del software DJ, vedere il manuale di istruzioni fornito
con il software DJ.
-
Fast search
w
).
Fast search
-
-
Shift lock/unlock
*After having pushed shift button, push cue button.
-
ESPAÑOL NEDERLANDS
Setup-procedureProcedimiento de instalación
Procedimiento para instalar SERATO DJ INTRO
Sólo debe realizar este paso cuando se utiliza Windows.
1
Inserte en el ordenador el disco suministrado “MC2000
Resource disc” e instale el controlador ASIO.
v
Página 6 del Manual del usuario del disco Resource
Inserte el disco de instalación de SERATO DJ INTRO en
2
el ordenador e instale el programa.
v
Página 9 del Manual del usuario del disco Resource
Sólo debe realizar este paso cuando se utiliza Windows.
3
Compruebe que se muestra MC2000 en la pantalla del
Panel de control del controlador ASIO.
•Cuando visualice la pantalla del panel de control del
controlador ASIO, ciérrela antes de iniciar SERATO DJ
INTRO.
•Si no hay marca de verificación a la izquierda del MC2000,
haga clic en el botón Enable (Habilitar) para visualizar una
marca de verificación y para visualizar el nombre del
dispositivo en negrita.
v
Página 8 del Manual del usuario del disco Resource
Sólo debe realizar este paso cuando se utiliza Mac.
4
Congure los dispositivos AUDIO y MIDI en el SO Mac.
Inicie la Configuración de audio MIDI en el SO Mac.
q
w
Después de abrir la ventana del dispositivo de audio,
haga clic con el botón secundario en MC2000 y
configure el dispositivo de entrada de sonido.
Disco Resource
v
MC2000_mac_configuration_manual
Inicie SERATO DJ INTRO.
5
Disco de instalación del software de DJ
v
Serato DJ Intro Manual
Congure los ajustes de monitorización de SERATO DJ
6
INTRO como se muestra en la Fig. 1 (ver reverso del
documento).
•No ajuste el VOL a “0”. No se emitirá ningún sonido
de monitorización desde la salida de los auriculares del
MC2000.
•El balance de la mezcla de monitorización/maestra está
controlado por el Mando de ajuste de PAN (Fig. 2del MC2000, y el nivel de salida de monitorización está
controlado por el Mando de ajuste del volumen de salida
de los auriculares (Fig. 2-
Ajuste la salida maestra de SERATO DJ INTRO (Fig. 3).
7
•No ajuste el VOL a “0”. No se emitirá ningún sonido
maestro desde la salida maestra MC2000.
•El nivel de salida principal se puede ajustar mediante el
Mando de ajuste del volumen de salida principal (Fig. 4) del
MC2000.
•Se recomienda que utilice siempre la versión más reciente
de SERATO DJ INTRO.
•La versión más reciente se puede descargar sin coste
alguno desde el sitio web de SERATO.
•Para obtener más información detallada sobre cómo
configurar y usar el software de DJ, consulte el manual de
instrucciones suministrado para el software de DJ.
w
) del MC2000.
Procedure voor het installeren van SERATO DJ INTRO
Deze stap alleen uitvoeren wanneer u Windows gebruikt.
1
Stop de bijgeleverde “MC2000 Resource disc” in de
computer en installeer het ASIO-stuurprogramma.
v
Pagina 6 van de Resource-schijf Gebruiksaanwijzing
Doe de installatie-cd van SERATO DJ INTRO in de
2
computer, en installeer het programma.
v
Pagina 9 van de
Deze stap alleen uitvoeren wanneer u Windows gebruikt.
3
Controleer of MC2000 wordt weergegeven in het
scherm met het bedieningspaneel van het ASIOstuurprogramma.
•Als het bedieningspaneel van het ASIO-stuurprogramma
wordt weergegeven, sluit het dan voordat u SERATO DJ
INTRO opstart.
•Als er geen vinkje links van de MC2000 staat, klikt u op
de knop Enable (Inschakelen) om een vinkje te tonen en
de apparaatnaam dikgedrukt weer te geven.
v
Pagina 8 van de Resource
Deze stap alleen uitvoeren wanneer u Mac gebruikt.
4
De AUDIO- en MIDI-apparaten instellen in Mac OS.
q
w
Resource
v
MC2000_mac_configuration_manual
Start SERATO DJ INTRO.
5
Installatieschijf DJ software
v
Serato DJ Intro Manual
Stel de monitorinstellingen in voor SERATO DJ INTRO
6
zoals getoond in g. 1 (Rugzijde).
•Stel VOL niet in op “0”. Er wordt geen monitorgeluid
uitgevoerd via de MC2000-hoofdtelefoonuitgang.
•De monitor/mastermixbalans wordt gecontroleerd
door de MC2000-PAN-regelknop (fig. 2-q) en het
monitoruitgangsniveau wordt gecontroleerd door de
q
)
MC2000-regelknop uitvoervolume hoofdtelefoon (fig.
2-w).
Stel het masteruitgangsniveau in voor SERATO DJ
7
INTRO (g. 3).
•Stel VOL niet in op “0”. Er wordt geen mastergeluid
voortgebracht door de MC2000 masteruitgang.
•Het masteruitgangsniveau kan worden geregeld via de
MC2000-regelknop uitvoervolume master (fig. 4).
•Het is aanbevolen altijd de nieuwste versie van SERATO
DJ INTRO te gebruiken.
•De nieuwste versie kan gratis gedownload worden via de
website van SERATO.
•Voor gedetailleerde informatie over het instellen en
gebruiken van de DJ software, zie de meegeleverde
gebruikshandleiding van de DJ software.
Resource-schijf
Start de Audio MIDI-instelling in Mac OS.
Nadat u het venster voor het audio-apparaat hebt
geopend, klikt u met de rechtermuisknop op MC2000
en stelt u het apparaat voor de geluidsinvoer en dat
voor de geluidsuitvoer in.
-schijf
Gebruiksaanwijzing
-schijf
Gebruiksaanwijzing
SVENSKA
Inställningsprocedur
Procedur för att installera SERATO DJ INTRO
Utför endast detta steg när du använder Windows.
1
Sätt i den medföljande skivan “MC2000 Resource disc” i
datorn, och installera ASIO-drivrutinen.
v
Sidan 6 i Resource-skivans Bruksanvisning
Sätt in SERATO DJ INTRO-installationsskivan i datorn och
2
installera programmet.
v
Sidan 9 i Resource-skivans Bruksanvisning
Utför endast detta steg när du använder Windows.
3
Kolla så att MC2000 visas på ASIO-drivrutinens
kontrollpanelskärm.
•När ASIO drivrutinskontrollpanelskärmen visas, stäng den
innan du startar SERATO DJ INTRO.
•Om det inte finns någon markering till höger på MC2000,
klicka på knappen Enable (Aktivera) för att visa en markering
och visa enhetsnamnet i fet stil.
v
Sidan 8 i Resource-skivans Bruksanvisning
Utför endast detta steg när du använder Mac.
4
Ställ in AUDIO- och MIDI-enheterna i Mac OS.
Starta Ljud-MIDI-inställning i Mac OS.
q
w
Efter att du öppnat ljudenhetsfönstret, högerklicka
på MC2000 och ställ in ljudingångsenhet och
ljudutgångsenhet.
Resource-skiva
v
MC2000_mac_configuration_manual
Starta SERATO DJ INTRO.
5
Installationsskiva för DJ-programvara
v
Serato DJ Intro Manual
Kongurera SERATO DJ INTRO-monitorinställningarna
6
enligt bild 1 (Baksida).
•Ställ inte in VOL till “0”. Inget monitorljud kommer att gå ut
från MC2000-hörlursutgången.
•Monitor-/huvudmixbalansen styrs av MC2000:s PANjusteringsreglage (bild 2av MC2000:s Justeringsreglage för hörlursutgång (bild 2-
Ställ in SERATO DJ INTRO MASTER-utgången (bild 3).
7
•Ställ inte in VOL till ”0”. Inget MASTER-ljud kommer att
sändas från MC2000 MASTER-utgången.
•Huvudutgångsnivån kan justeras med MC2000:s
justeringsreglage för huvudvolym (bild 4).
•Du rekommenderas att alltid använda den senaste versionen
av SERATO DJ INTRO.
•Den senaste versionen kan laddas ner gratis från SERATOS
hemsida.
•För detaljerad information om inställningar och användning av
DJ-mjukvaran, se den medföljande instruktionsmanualen för
DJ-mjukvaran.
q
), och monitorutgångsnivån styrs
w
).
日本語
セットアップ手順
SERATO DJ INTRO のインストール手順
Windows をご使用の場合のみ、この手順をおこなってください 。
1
パソコンに、付属の“MC2000Resourcedisc”を入れて、
ASIO ドライバをインストールする。
v
Resourcedisc取扱説明書の9ページ
パソコンに、SERATODJINTROinstallationdisc を
2
入れて、SERATODJINTRO をインストールする。
v
Resourcedisc取扱説明書の12ページ
Windows をご使用の場合のみ、この手順をおこなってください 。
3
ASIO ドライバのコントロールパネル画面上に MC2000
が表示されていることを確認する。
•
ASIO のコントロールパネル画面が表示されている場 合は、
SERATO DJ INTRO をスタートする前にコントロール画面を
閉じてください。
•
MC2000 の左側にチェックマークが表 示されていない場合は、
Enable ボタンをクリックするとチェックマークが表示され、デ
バイス名が太字になります。
v
Resourcedisc取扱説明書の11ページ
Mac をご使用の場合のみ、この手順をおこなってください。
4
MacOS の AUDIO と MIDI デバイスの設定をする。
MacOS 上で AudioMIDISetup を起動する。
q
オーディオデバイスウィンドウを開いたあと、MC2000 を
w
右クリックしてサウンド入力装 置およびサウンド出力装置
に設定する。
v
Resourcedisc
MC2000_mac_conguration_manual
SERATODJINTRO を起動する。
5
v
DJsoftwareinstallationdisc
SeratoDJIntroManual
SERATODJINTRO のモニター設定を図1(裏面)のよう
6
におこなう。
•
VOL を“0”にしないでください。MC2000 のヘッドホン出
力からモニター音が出なくなります。
•
モニター / マスターのミックスバランスは、MC2000 の
PAN 調節つまみ(図 2-q)、モニター出力レベルは
MC2000 のヘッドホン出力音量調節つまみ(図 2-w)で 操 作
できます。
SERATODJINTRO のマスター出力を設定する(図 3)。
7
•
VOL を“0”にしないでください。MC2000 のマスター出 力
からマスター音が出なくなります。
•
マスター出力レベルは MC2000 のマスター 出力 音量調節つま
み
(図 4)
で調節できます。
•
SERATODJINTRO は、最新のバージョンのものをご使用にな
ることをおすすめします。
•
最新のバージョンは、SERATO の WEB サイトから無償でダウ
ンロードできます。
•
DJ ソフトウェアのセットアップ、使い方については DJ ソフト
ウェアに付属のマニュアルもご覧ください。
During Playback Scratch
During Pause/Cue Search
During loop adjust mode Adjusts the loop in/out point
During Playback Pitch Bend
During Pause/Cue Fine Adjusts
During Playback Pitch Bend
During Pause/Cue Search
During loop adjust mode Adjusts the loop in/out point
During Playback Pitch Bend
During Pause/Cue Fine Adjusts
During loop adjust mode Adjusts the loop in/out point
outer wheel
top plate
top plate
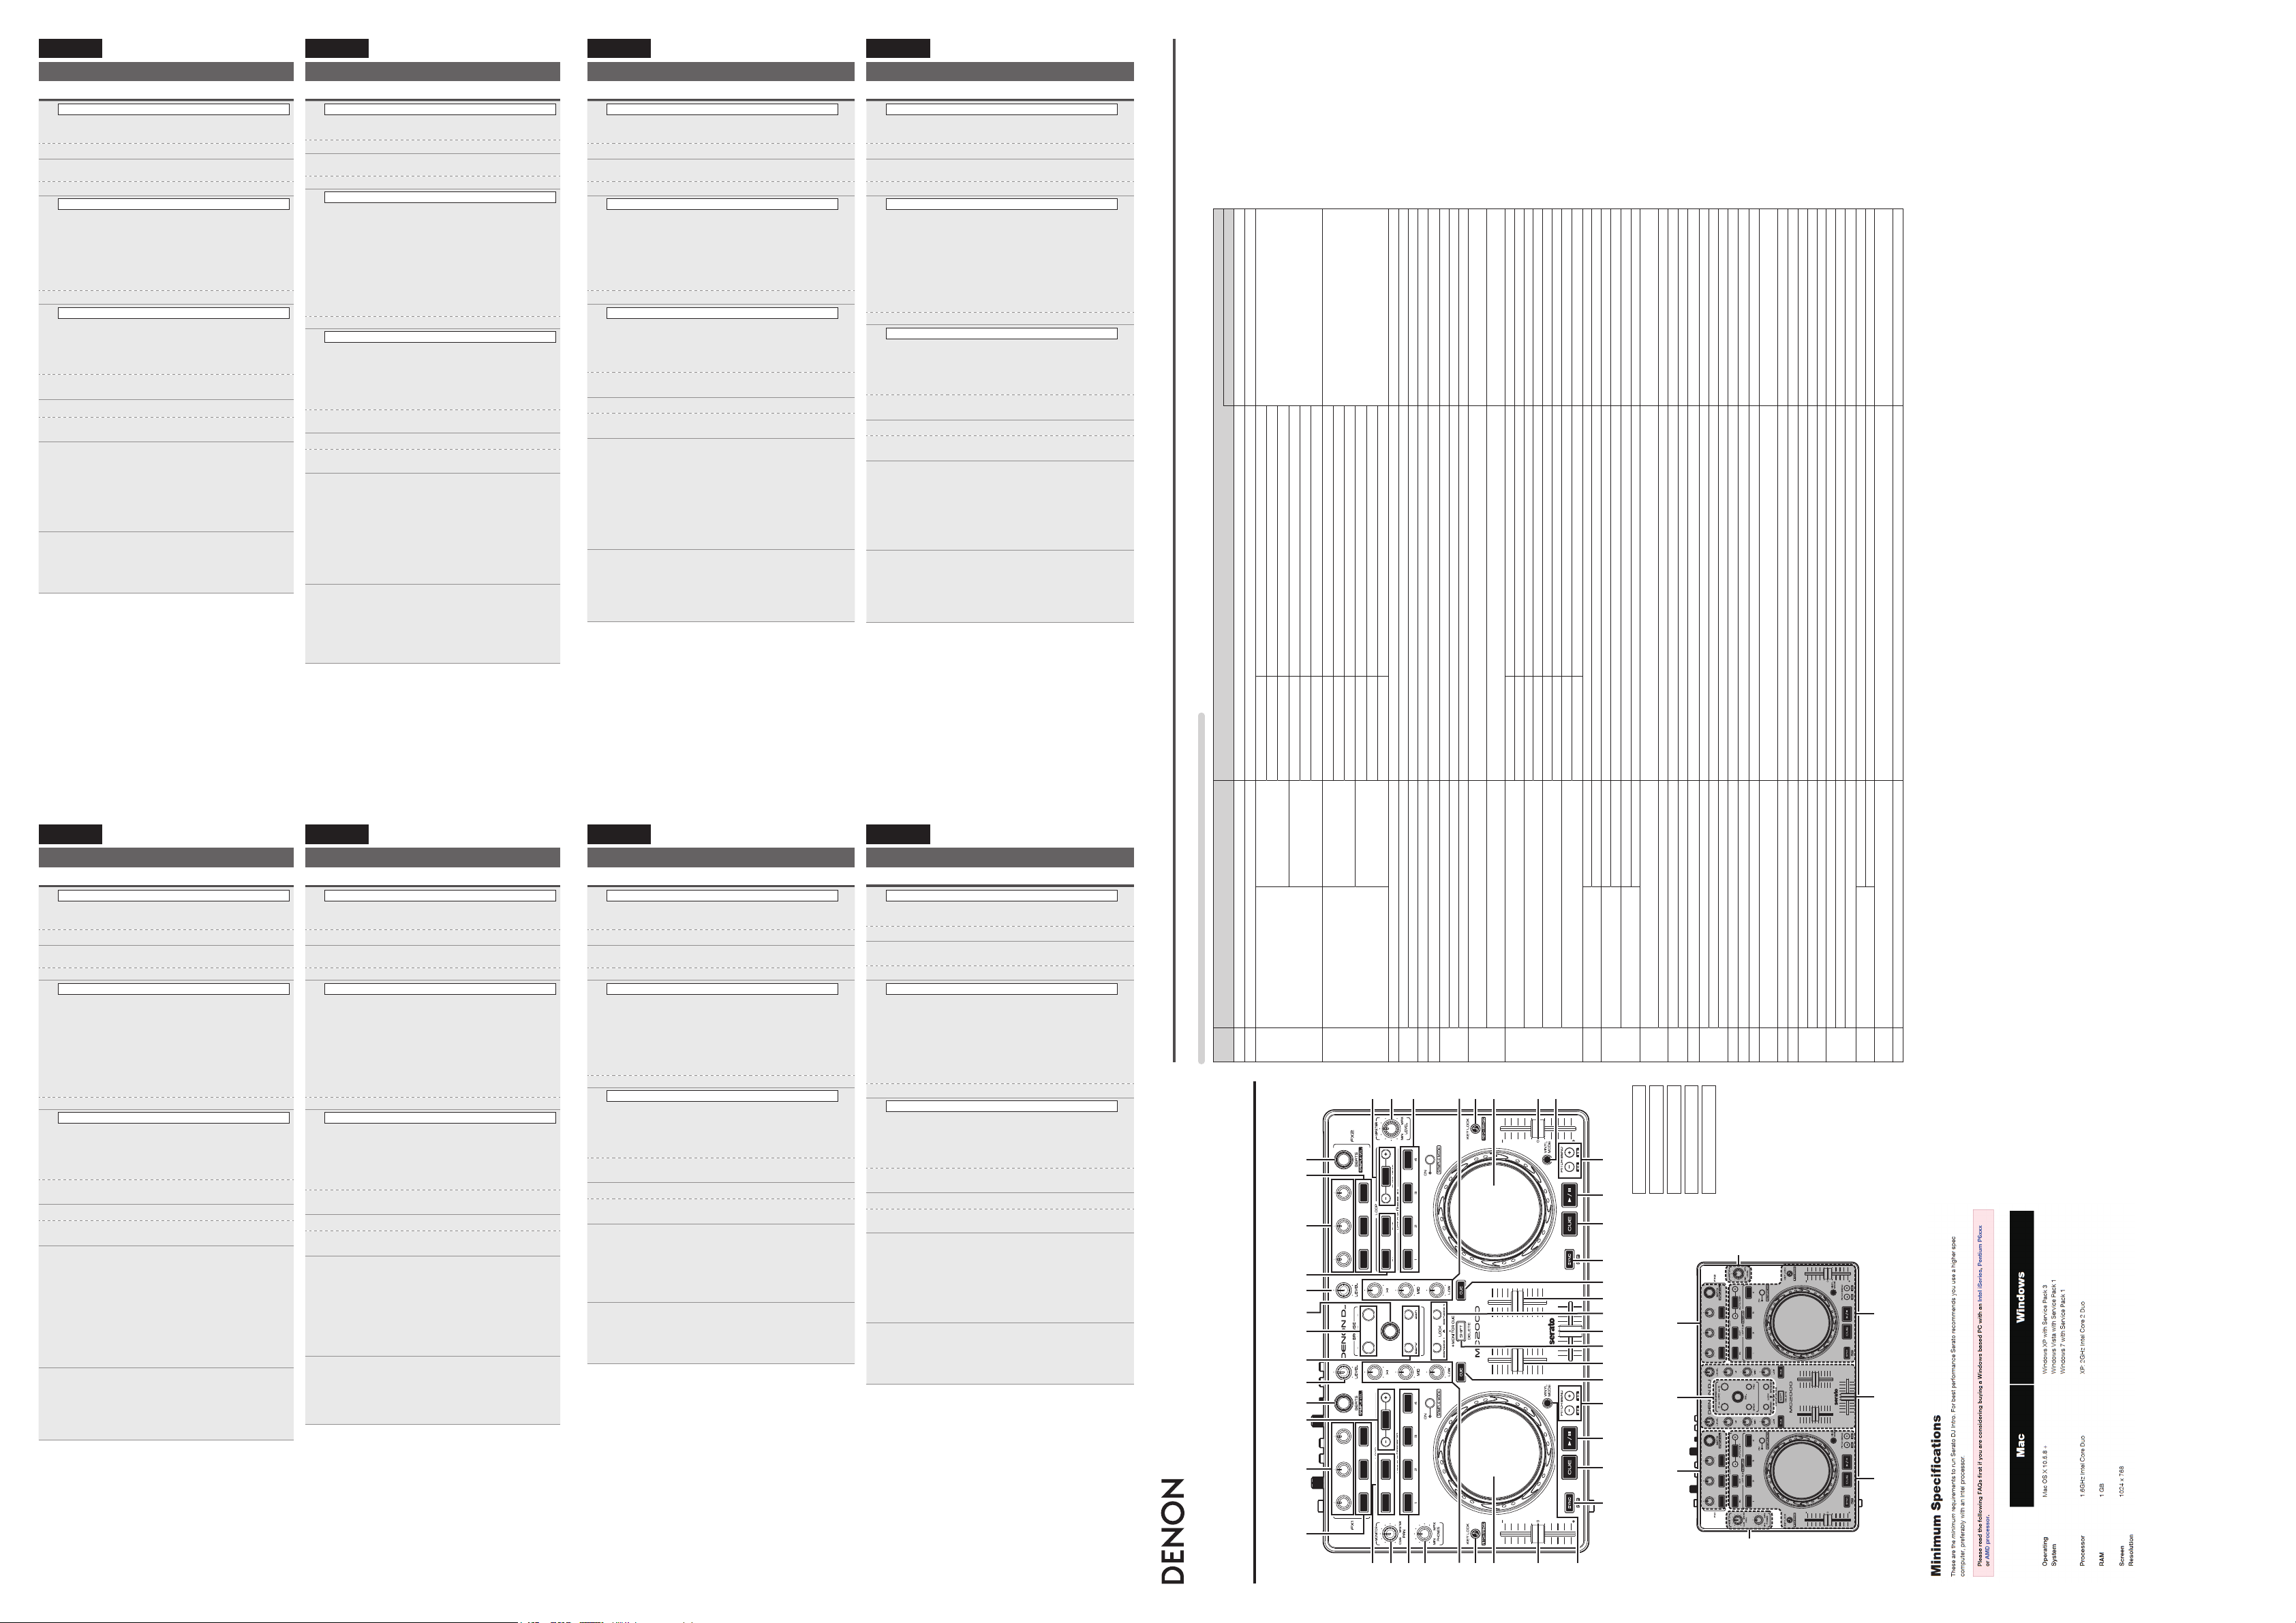
MC2000 FUNCTIONALITY
CONTROLS SHIFT +
PLAY/PAUSE Play or Pause. -wCUE Sets cue point, or back to current cue point, or play from cue point. -
q
No.
Available for SERATO DJ INTRO control with MC2000
Function table
JOG WHEEL - Vinyl Off
ea
During loop adjust mode Adjusts the loop in/out point
outer wheel
PITCH FADER Adjusts the pitch. -tPITCH BEND + Increases the pitch. Fast forward
i
r
Q9
PITCH BEND - Decreases the pitch. Fast rewind
Q0
JOG WHEEL - Vinyl On
eb
SYNC Sync Sync offuKEYLOCK Key lock on/off Pitch Range (8%, 16%, 50%)
AUTO LOOP/EXIT Auto loop on / Exit loop. -
LOOP SIZE + Loop size select (double) -
LOOP SIZE - Loop size select (half) -oLOOP IN
y
i
Q6ue
W4 W4oW3 W3W5 W5Q5 Q5i Q3 Q1Q2
Sets loop in point.
*During looping: Loop adjust mode for in point, on/off.
Sets loop out point.
*During looping: Loop adjust mode for out point, on/off.
SAMPLE MODE: OFF Hot Cue 1 set or play Deletes CUE point 1.
SAMPLE MODE: ON Sample slot 1play / retrigger Sample Slot 1 stop
SAMPLE MODE: OFF Hot Cue 2 set or play Deletes CUE point 2.
SAMPLE MODE: ON Sample slot 2play / retrigger Sample Slot 2 stop
SAMPLE MODE: OFF Hot Cue 3 set or play Deletes CUE point 3.
SAMPLE MODE: ON Sample slot 3play / retrigger Sample Slot 3 stop
SAMPLE MODE: OFF Hot Cue 4 set or play Deletes CUE point 4.
SAMPLE MODE: ON Sample slot 4play / retrigger Sample Slot 4 stop
Rotate Track/Folder/Crate Select -
Push Cycles focus through the currently open library areas. -
Single click Loads the selected track on deck A. -
Double click Duplicates the track on deck B (Instant Double). -
Single click Loads the selected track on deck B. -
Double click Duplicates the track on deck A (Instant Double). -
LOOP OUT
HOT CUE 1
HOT CUE 2
HOT CUE 3
HOT CUE 4
TRACK SELECT KNOB
LOAD A
LOAD B
Q0
r
W7
Q1
Q2
FXQ0Sampler
W5
–
W3
q t W0 W0Q7 Q7Q4W6Q8wy q twy
Moves focus backwards through the currently selected panel. If in the crates list opens and closes a crate
with subcrates or moves it back to crates.
BACK
FWD Moves the focus forward in the currently open library panel or moves forwards into the track list. -Q4BROWSE 1 - -
BROWSE 2 - -Q5CHANNEL LEVEL Adjusts the level of the selected channel. -Q6CHANNEL EQ HI Adjusts the Hi-frequency response. -
CHANNEL EQ MID Adjusts the Mid-frequency response. -
CHANNEL EQ LOW Adjusts the Low-frequency response. -Q7CHANNEL FADER Controls the level of the selected channel. -Q8CROSS FADER Controls the relative output level from the summed A and B Mixes. -Q9MASTER VOLUME KNOB Adjusts the level of the master output (of Serato DJ Intro). -W0CUE (Monitor) Selects the source of the channel to the headphone output.
Q3
Browser
Mixer
Deck
Q4
W2
Q0
–
–
–
Q1
Q5
q
Q9
W3-W5W3-W5
Q1-Q4
PAN KNOB Adjusts the CUE-MASTER balance of the headphone output (of Serato DJ Intro). -W2PHONES KNOB Adjusts the level of headphone output (of Serato DJ Intro). -W3EFX.1 KNOB EFX 1 Depth -
W1
EFX.2 KNOB EFX 2 Depth -
EFX.3 KNOB EFX 3 Depth -W4EFX1 Button EFX 1 On/Off -
Shift function
Rotate EFX beats select. Sample Player Volume
Push EFX BPM Tap -
EFX 2 Button EFX 2 On/Off -
EFX 3 Button EFX 3 On/Off -W5BEATS KNOB
SHIFT
W6
q-Q0 q-Q0Q5-Q8,W0
*SHIFT + (monitor) Cue => Shift lock/unlock
VINYL MODE Switches touch sensor on and off (VINYL MODE on and off). *Toggle Switch Jog Wheel Lock *Local to the MC2000
W7
Q0
W1
MC2000 Mapping Guide
for SERATO DJ INTRO
o
W2
Q6
u
e
r
W7
W1,W2
 Loading...