


User Guide
English ( 2 – 6 )
Guía del usuario
Español ( 7 – 11 )
Guide d'utilisation
Français ( 12 – 16 )
Guida per l'uso
Italiano ( 17 – 21 )
Benutzerhandbuch
Deutsch ( 22 – 26 )
Appendix
English ( 27 )

2
User Guide (English)
Introduction
Key Features
• 2400 Watts peak Class D power (1200 Watts continuous)
• Wireless connectivity for remote setup and sound-shaping control
• Works with Alto Professional's Live Drive wireless speaker app for iPad, iPhone, and iPod
touch
• App allows level-matching, EQ adjustment, delay compensation, compression and more
• Optimized 90° x 60° coverage field
• DSP-controlled with custom crossover, superior tuning and active thermal protection
• Specifically designed, purpose-matched components for maximum efficiency and
industry-leading power
• Precision-engineered HF waveguide, extensively tested for optimized audience coverage
• Built-in mixer with two Mic/Line combo inputs, volume controls and balanced XLR mix
output
• 12" (305 mm) low-frequency transducer, 1.75" (44 mm) driver
• Contour switch for increased EQ control
• Ground Lift switch to disconnect signal ground from chassis ground
• Switch to turn off logo LED
• Lightweight, portable design with comfortable, custom-molded handles
• Heavy-duty 18 mm hardwood plywood cabinet
• Rugged, highly durable scratch-resistant finish
• Use as traditional PA loudspeaker or as floor wedge monitor
• Steel-reinforced rubber feet on bottom and side
• Heavy-duty, powder-coated steel speaker grille
• Stand- and pole-mountable via standard 35 mm socket
• Flyable via 12 M10 rigging points
• Designed and tuned in the U.S.A.
Box Contents
Delta 12 User Guide
Power Cord Safety & Warranty Manual
Support
For the latest information about this product (system requirements, compatibility information,
etc.) and product registration, visit denonpro.com.

3
Important Safety Precautions
Please note: Denon Professional and inMusic are not responsible for the use of its products or the misuse
of this information for any purpose. Denon Professional and inMusic are not responsible for the misuse of its
products caused by avoiding compliance with inspection and maintenance procedures. Please also refer to
the included safety and warranty manual for more information.
Suspenion/Rigging
• Only qualified persons using safe rigging standards should install this loudspeaker. The installer
is responsible for proper selection and use of hardware to properly and safely install the
speakers.
• Always install loudspeakers in accordance with applicable electrical and building codes.
• This loudspeaker should be suspended only from its suspension points (M10 x 1.5PH, 30mm
length).
• Do not suspend multiple loudspeakers in a vertical array.
• Make sure your cables are out of the way of performers, production crew, and audience so they
will not trip over them, pulling the loudspeaker off the stand or pole.
Stand-Mounting
• Always install loudspeakers in accordance with applicable electrical and building codes.
• Install the loudspeaker according to its maximum weight. Check the specifications of your stand
or pole to ensure it can support the loudspeaker's weight. Also, observe all safety precautions
specified by the manufacturer.
• Do not mount multiple loudspeakers on the same stand or pole.
• Always verify that the stand or pole is on a flat, level, and stable surface. Also, fully extend the
legs of tripod-style stands, and ensure its legs do not present a trip hazard.
• Inspect the stand (or pole and associated hardware) before each use and do not use equipment
with worn, damaged, or missing parts.
• Always be cautious in windy, outdoor conditions. You may need to place additional weight (e.g.,
sandbags) on stand's base to improve stability. Do not attach banners or similar items to any
part of a loudspeaker system. Such attachments could act as a sail and topple the system.
• Unless you are confident that you can handle the loudspeaker's weight, ask another person to
help you lift it onto the stand or pole.
• Make sure your cables are out of the way of performers, production crew, and audience so they
will not trip over them, pulling the loudspeaker off the stand or pole.
Sound Level
Permanent hearing loss may be caused by exposure to extremely high noise levels. The U.S.
Occupational Safety and Health Administration (OSHA) has specified permissible exposures to
certain noise levels. According to OSHA, exposure to high sound pressure levels (SPL) in excess of
these limits may result in hearing loss. When using equipment capable of generating high SPL, use
hearing protection while such equipment is under operation.
Hours per day SPL (dB) Example
8 90 Small gig
6 92 Train
4 95 Subway train
3 97 High level desktop monitors
2 100 Classical music concert
1.5 102 Riveting machine
1 105 Machine factory
0.50 110 Airport
0.25 or less 115 Rock concert
4
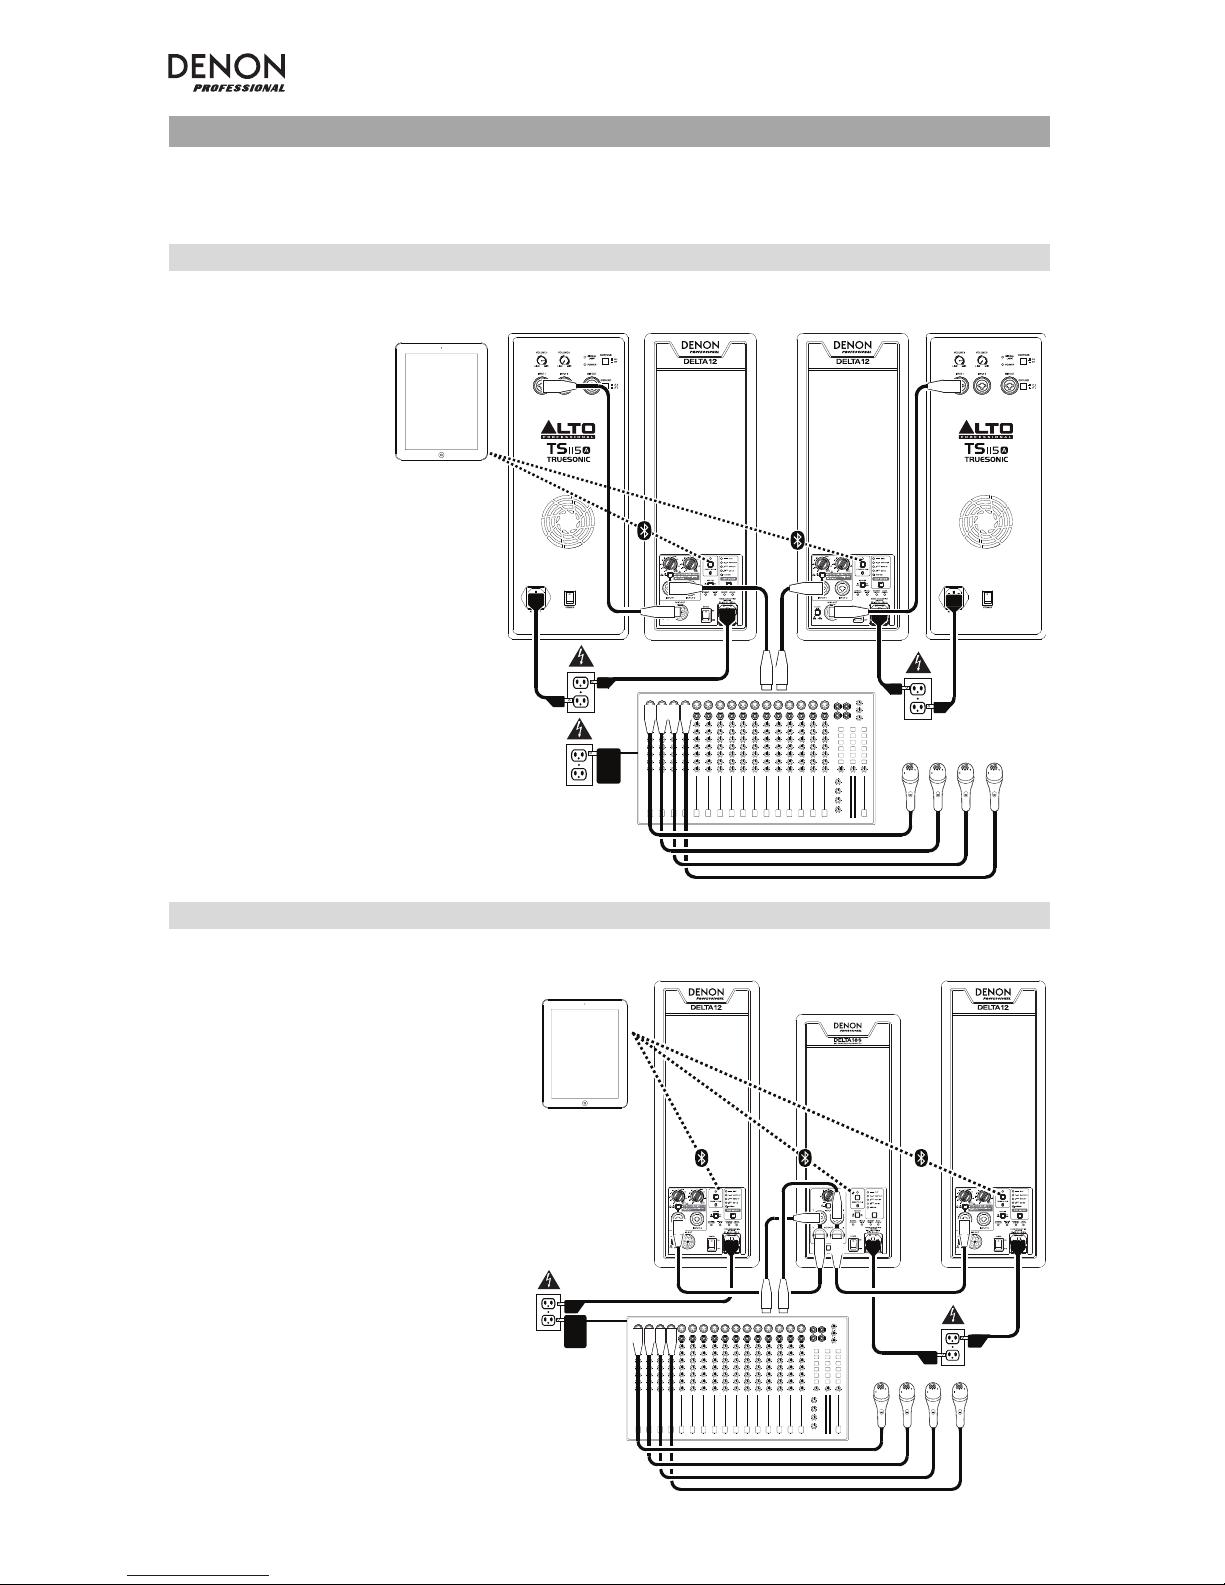
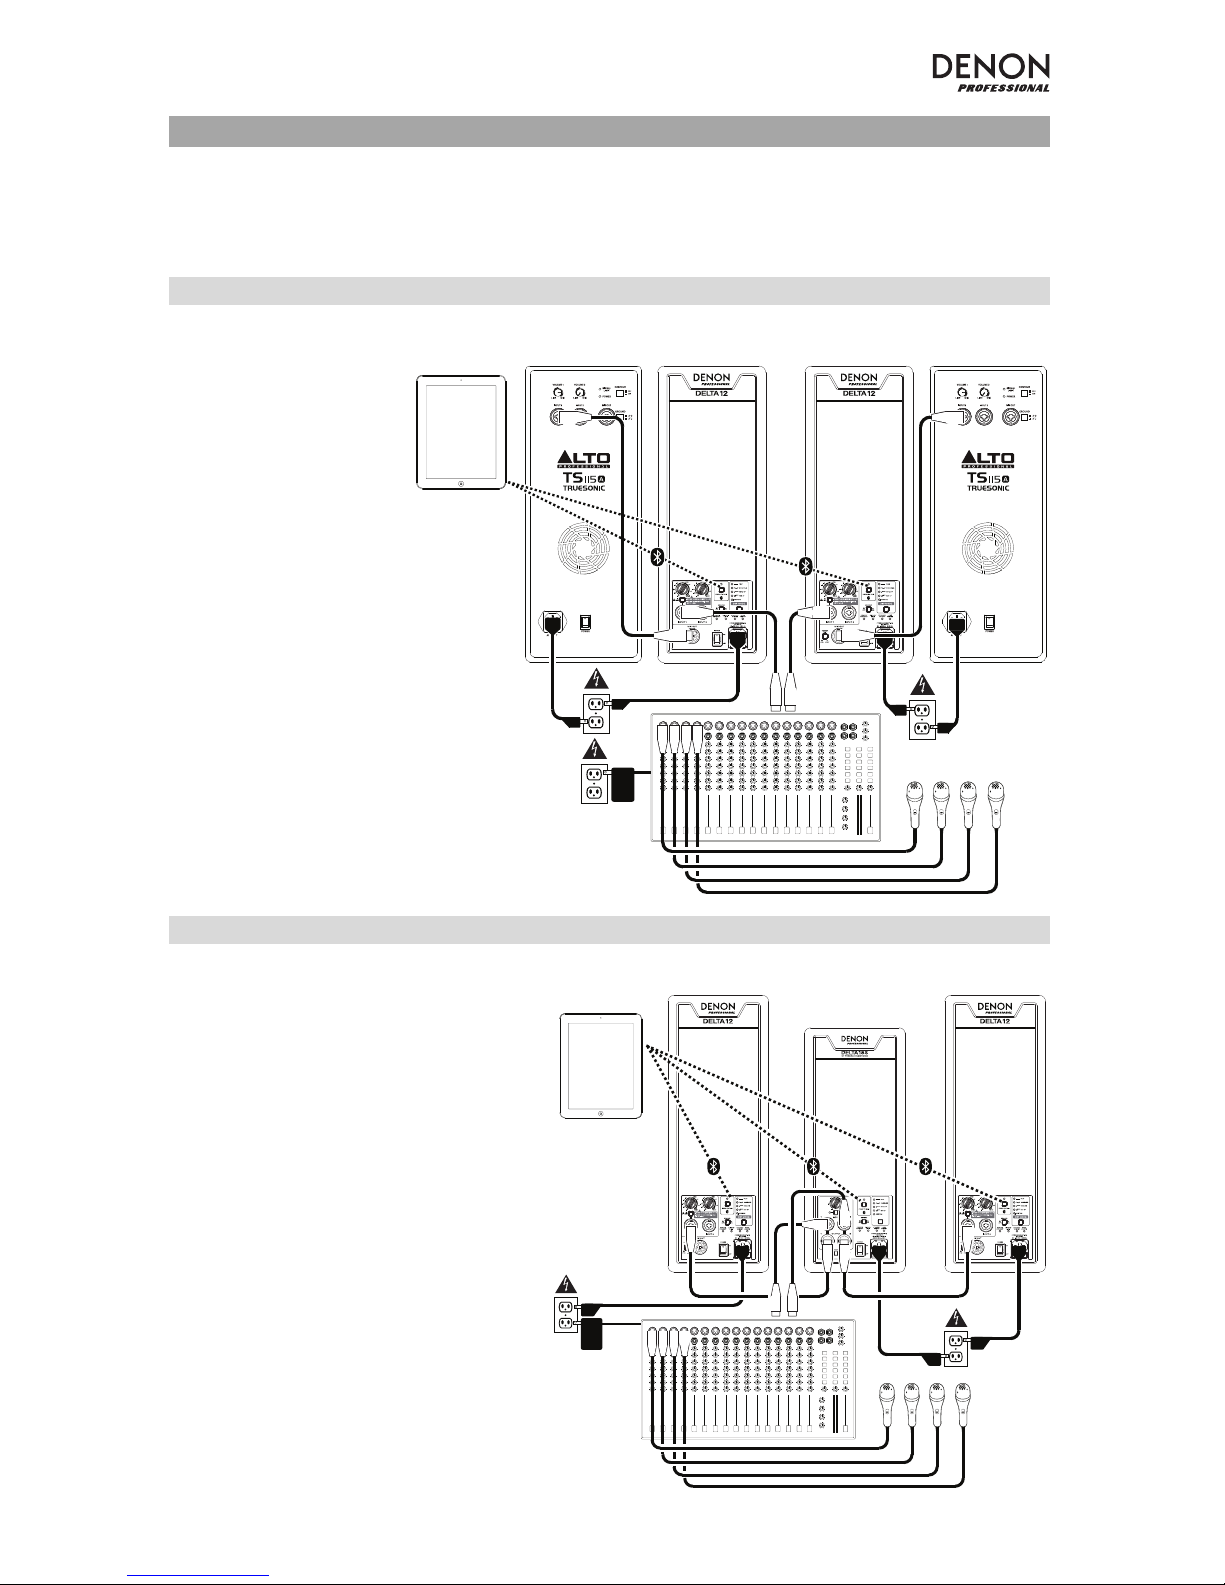
Quick Start / Connection Diagram
Note: Only items listed in this manual's Box Contents section are included with this product. iPad, iPhone,
iPod touch, extra loudspeakers and subwoofers, microphones, mixer, cables, etc. are sold separately. Live
Drive app is available on the App Store.
Example A: 4 loudspeakers (2 Delta Series, 2 extension)
12” POWERED LOUDSPEAKER 12” POWERED LOUDSPEAKER
Example B: 2 loudspeakers, 1 subwoofer
12” POWERED LOUDSPEAKER 12” POWERED LOUDSPEAKER
Microphones
Mixer
iPad, iPhone,
or iPod touch
Extension
loudspeaker
Extension
loudspeaker
Delta 12
loudspeakers
Connect your mixer's main outputs
to your Delta Series loudspeakers'
inputs.
Connect each of your Delta Series
loudspeakers' outputs to the inputs
of your extension loudspeakers.
Microphones
Mixer
Subwoofer
Connect each of your mixer's
main outputs to an input on a
subwoofer.
Connect the high-pass output on
your subwoofer to the inputs of
the Delta Series loudspeakers,
using the subwoofer's
crossover.*
* For Delta Series subwoofers:
set the crossover in the Live
Drive app.
iPad, iPhone,
or iPod touch
Delta 12
loudspeaker
Delta 12
loudspeaker

5
Using the Live Drive App
Delta Series loudspeakers also come equipped with wireless technology and the unmatched
capabilities of the Alto Professional Live Drive wireless speaker app. You'll be able to levelmatch, adjust EQ and compression, compensate for delay, and more. The Delta Series puts
active live sound control at your fingertips. Using the app on your iPad, iPhone, or iPod touch,
you can adapt the speakers to new venues or tweak settings remotely from any corner of the
room. Delta Series loudspeakers offer a powerful new experience, not only for your audiences,
but also for you—you get streamlined, sound-shaping capabilities at your fingertips.
Downloading the App
To download the App, just search for Live Drive in the App Store
and download the Alto
Professional Live Drive app.
Bluetooth Pairing
About Range: Delta Series loudspeakers use an advanced, extended-range Bluetooth
antenna design, allowing for ranges far greater than traditional Bluetooth devices. The typical
range is approximately 100 feet (30 meters) with a clear line of sight. However, the range may
vary depending on your source device and the environment.
To maximize the range:
• Set your source device on a flat surface and make sure there are no obstacles between
the loudspeaker and your device (e.g., walls, furniture, etc.).
• Turn off your source device's Wi-Fi.
• Turn off any unneeded 2.4 GHz devices in the nearby vicinity (e.g., other Bluetooth
devices, baby monitors, Wi-Fi access points, microwave ovens, etc.).
• Try using a different Bluetooth source device (iPad, iPhone, or iPod touch). Bluetooth
signal strength varies between different devices.
To pair the speaker to your Bluetooth device:
1. Do this on one loudspeaker only: With the loudspeaker powered on, press and release its
Pairing Button. Its Pairing LED will flash.
2. From your Bluetooth device's settings page, enable Bluetooth and select Denon
Professional as the device. When paired successfully, the Pairing LED will light
continuously. (This process may take up to 30 seconds.)
Important: If your device prompts you to enter a PIN code to pair it to the speaker, enter
0000 (four zeros).
3. Once your device is paired to the speaker, the speaker will remember the device even
after power-cycling it. If the device does not reconnect automatically, go to your device's
Bluetooth settings page and select Connect to reestablish the connection.
To erase all previous pairing and linking settings, press and hold the Pairing Button for 10
seconds. The LED will also flash to confirm the pairing records are erased. Now, you can pair
to a new device.
Live Drive Operation
For more information about using Live Drive, visit altoprofessional.com/livedrive.

6
Features
Rear Panel
1. Power Input: Use the included IEC power
cable to connect this input to a power
source.
2. Fuse: If the unit's fuse is broken, lift this
tab to replace the fuse. Replace it with a
fuse with an appropriate rating (printed
under the unit's power cable input). Using
a fuse with an incorrect rating can damage
the unit and/or fuse.
3. Power Switch: Use this switch to power
the loudspeaker on or off.
4. Power/Standby LED: This LED illuminates
when the loudspeaker is powered on.
5. Standby On/Off Switch: By default, this
loudspeaker has its Standby Mode
enabled: when no incoming audio signal is
detected for approximately 15 minutes, the
loudspeaker will enter a low-power state.
The loudspeaker will exit Standby Mode within 0.5 seconds of detecting an incoming audio signal. Change
this recessed switch's setting to the Off position to disable this feature.
6. Logo On/Off Switch: Press this to turn the light in the Denon Professional logo on or off.
7. Line/Mic Switch: Engage (depress) this switch if your Input 1 audio source is a microphone. Disengage (raise)
this switch if your Input 1 audio source is line-level.
8. Input 1: Use a standard XLR or 1/4" (6.35 mm) cable to connect your audio source to this input. This input
accepts both line-level and microphone-level sources. Set the Line/Mic Switch to the appropriate setting.
9. Input 2: Use a standard XLR or 1/4" (6.35 mm) cable to connect your audio source to this input. This input
accepts line-level sources only.
10. Input Volume Knob: Use this knob to set the level of the audio going into its corresponding input below.
When connecting to the output of a pro audio mixer or signal processor, we recommend setting this to the
0 dB setting; the Delta Series loudspeaker's gain structure is optimized for standard XLR or 1/4" (6.35 mm)
maximum signal levels of +10 dB RMS/continuous (+20 dB peak) from your source. Such devices include live
sound audio mixers, rack mount signal processors, DJ mixers, etc.
11. Signal/Limit LED: This LED illuminates green when an incoming audio signal is detected. It illuminates red
when the audio signal level is too high and is being dynamically reduced to protect the loudspeaker from
damage or distortion. If this LED is continually illuminated red, or if the audio output sounds excessively
distorted, then reduce the volume of the connected audio source, or reduce the setting of the Input Volume
Knob.
12. Mix Out: Use a standard XLR cable to connect this balanced output to the input of a second Delta Series
loudspeaker. Audio is sent from this output at 0 dB, depending on the setting of the Output Mix Switch.
13. Output Mix Switch: In the "out" (raised) position, the Mix Out is the sum of Input 1 and Input 2, pre-volume
(i.e., the Input Volume Knobs do not affect the audio signal level of the Mix Out). In the "in" (depressed)
position, the Mix Out is the sum of Input 1 and Input 2 but adjustable with the Input Volume Knobs.
14. Ground Switch: Engage (depress) this switch to reduce hum or noise.
15. DSP Mode Button: Press this button to set the loudspeaker's internal DSP to any of the following settings:
• Flat: No change to the audio.
• Contour: Boosted bass and treble with a gradual cut of mid-range frequencies—a useful setting for
most contemporary music.
• 80Hz HP: Applies a high-pass filter. This is useful when using the Delta 12 as a crossover with a
subwoofer that does not have a high-pass output. This setting is also useful for cutting all bass
frequencies (e.g., for in speech-only applications, or when used as a delay or fill loudspeaker where the
extra bass frequencies are not needed).
• Ext LF: Extends the loudspeaker's low-frequency response, providing increased output of bass
frequencies.
• Custom: Applies your custom DSP mode, set in the Live Drive app.
16. Pairing Button: Press and release this button to pair the loudspeaker to your iPad, iPhone, or iPod touch. The
Pairing LED will illuminate when it is paired. See the Bluetooth Pairing section for instructions.
1
5
23
4
6
7
8
9
11
12
13
14
10
15
16

7
Guía del usuario (Español)
Introducción
Características principales
• Potencia pico clase D de 2400 vatios (1200 vatios continuos)
• Conectividad inalámbrica para instalaciones remotas y control de modelación del sonido
• Funciona con la aplicación para altavoces inalámbricos Live Drive de Alto Professional
para iPad, iPhone y iPod touch
• La aplicación permite adaptación de niveles, ajuste de ecualización, compensación de la
demora, compresión y más
• Campo de cobertura optimizado de 90° x 60°
• Controlado por DSP con crossover personalizado, afinación superior y protección térmica
activa.
• Componentes diseñados específicamente, adaptados especialmente para brindar máxima
eficiencia y potencia líder en la industria
• Guía de onda de HF diseñada con precisión, probada exhaustivamente para optimizar la
cobertura de la audiencia
• Mezclador integrado con entradas combinadas de micrófono/línea y salida de mezclador
XLR balanceada
• Transductor de baja frecuencia de 12 pulg. (305 mm) y driver de 1,75 pulg. (44 mm)
• Conmutador de contorno para un mayor control de ecualización
• Interruptor de levantamiento de tierra para desconectar la tierra de señal de la tierra del
chasis
• Interruptor para apagar el LED del logotipo
• Diseño liviano y portátil con mangos cómodos moldeados en forma personalizada
• Gabinete de madera terciada dura de 18 mm para servicio pesado
• Acabado robusto, altamente durable y resistente a los rayones
• Úselo como altavoz de megafonía tradicional o como monitor de piso
• Patas de goma reforzadas con acero en la parte inferior y el costado
• Rejilla del altavoz de acero con recubierto pulvimetalúrgico de alta resistencia
• Posibilidad de montaje en soporte y columna con zócalo estándar de 35 mm
• Posibilidad de suspensión con 12 puntos de sujeción M10
• Diseñado y afinado en EE.UU.
Contenido de la caja
Delta 12 Guía del usuario
Cable de alimentación Manual sobre la seguridad y garantía
Soporte
Para obtener la información más completa acerca de este product (los requisitos del sistema,
compatibilidad, etc) y registro del producto, visite denonpro.com.
8
Precauciones importantes para la seguridad
Para tener en cuenta: Denon Professional e inMusic no son responsables del uso de sus productos o el
mal uso de esta información para cualquier propósito. Denon Professional e inMusic no son responsables
del mal uso de sus productos causados por la omisión del cumplimiento de los procedimientos de
inspección y mantenimiento. Para más información, consulte también el manual de seguridad y garantía
incluido.
Suspensión/Elementos de sujeción
• Este altavoz debe ser instalado únicamente por personas calificadas aplicando normas de suspensión
segura. El instalador es responsable de la selección y uso correctos de elementos de sujeción para
instalar los altavoces en forma apropiada y segura.
• Instale siempre los altavoces de acuerdo con los códigos de electricidad y construcción aplicables.
• Este altavoz debe colgarse únicamente por sus puntos de suspensión (M10 x 1.5PH, 30 mm de
longitud).
• No suspenda varios altavoces en un arreglo vertical.
• Asegúrese de que los cables estén fuera del camino de los intérpretes, personal de producción y
audiencia, de modo que no tropiecen con ellos y hagan caer el altavoz del soporte o columna.
Montaje en soporte
• Instale siempre los altavoces de acuerdo con los códigos de electricidad y construcción aplicables.
• Instale el altavoz de acuerdo a su peso máximo. Compruebe las especificaciones de su soporte o
columna para asegurarse de que pueda soportar el peso del altavoz. Asimismo, observe todas las
precauciones para la seguridad especificadas por el fabricante.
• No monte varios altavoces en el mismo soporte o columna.
• Verifique siempre que el soporte o columna esté sobre una superficie plana, nivelada y estable.
Asimismo, extienda totalmente las patas de los soportes tipo trípode y asegúrese de que las patas no
representen un riesgo de tropiezo.
• Inspeccione el soporte (o columna y elementos de fijación asociados) antes de cada uso y no utilice
equipos con piezas desgastadas, dañadas o faltantes.
• Tenga siempre cuidado en condiciones de viento a la intemperie. Es posible que deba colocar peso
adicional (como bolsas de arena) en la base del soporte para mejorar la estabilidad. No fije pancartas o
elementos similares a ninguna parte del sistema de altavoces. Tales agregados pueden funcionar como
velas y hacer volcar el sistema.
• Salvo que tenga confianza de que puede manejar el peso del altavoz, solicite a otra persona que le
ayude a levantarlo para colocarlo en el soporte o columna.
• Asegúrese de que los cables estén fuera del camino de los intérpretes, personal de producción y
audiencia, de modo que no tropiecen con ellos y hagan caer el altavoz del soporte o columna.
Nivel de sonido
La exposición a niveles muy altos de ruido puede causar pérdidas auditivas permanentes. La
Administración de Seguridad y Salud Ocupacional de EE.UU. (OSHA) ha especificado los niveles de
exposición permisibles a ciertos niveles de ruido. Según la OSHA, la exposición a niveles de presión sonora
(SPL) elevados que excedan estos límites puede causar pérdidas auditivas. Cuando utilice equipos capaces
de generar SPL elevados, use protecciones auditivas mientras dichos equipos están en funcionamiento.
Horas diarias SPL (dB) Ejemplo
8 90 Música de bajo volumen
6 92 Tren
4 95 Tren subterráneo
3 97 Monitores de escritorio de alto nivel
2 100 Concierto de música clásica
1,5 102 Remachadora
1 105 Máquina fabril
0,50 110 Aeropuerto
0,25 o menos 115 Concierto de rock
9
Diagrama de inicio y conexión rápida
Nota: Solo se incluyen con este producto los elementos enumerados en la sección Contenido de la
caja de este manual. El iPad, iPhone, iPod touch, los altavoces y subwoofers extra, micrófonos,
mezclador y cables, etc. se venden por separado. La aplicación Live Drive está disponible en App
Store.
Ejemplo A: 4 altavoces (2 serie Delta, 2 de extensión)
12” POWERED LOUDSPEAKER 12” POWERED LOUDSPEAKER
Ejemplo B: 2 altavoces, 1 subwoofer
12” POWERED LOUDSPEAKER 12” POWERED LOUDSPEAKER
Micrófonos
Mezclado
r
iPad, iPhone
o iPod touch
Altavoz
de extensión
Altavoz
de extensión
Altavoces
Delta 12
Conecte las salidas principales
de su mezclador a las entradas
de sus altavoces serie Delta.
Conecte cada una de las salidas
de sus altavoces serie Delta a las
entradas de sus altavoces de
extensión.
Micrófonos
Mezclado
r
Subwoofe
r
iPad, iPhone
o iPod touch
Conecte cada una de las salidas
principales de su mezclador a una
entrada pasaaltos de un
subwoofer.
Conecte las salidas de su
subwoofer a las entradas de sus
altavoces serie Delta, usando el
crossover del subwoofer. *
* Para subwoofers serie Delta:
configurar el crossover en la
aplicación Live Drive.
Altavoz
Delta 12
Altavoz
Delta 12
 Loading...