

Denon DCM-280 User Manual

STEREO CD PLAYER
DCM-280
OPERATING INSTRUCTIONS
BEDIENUNGSANLEITUNG
MODE D’EMPLOI
ISTRUZIONI PER L’USO
INSTRUCCIONES DE OPERACION
GEBRUIKSAANWIJZING
BRUKSANVISNING
INSTRUÇÕES DE OPERAÇÃO
FOR ENGLISH READERS PAGE 06 ~ PAGE 16
FÜR DEUTSCHE LESER SEITE 17 ~ SEITE 27
POUR LES LECTEURS FRANCAIS PAGE 28 ~ PAGE 38
PER IL LETTORE ITALIANO PAGINA 39 ~ PAGINA 46
PARA LECTORES DE ESPAÑOL PAGINA 47 ~ PAGINA 54
VOOR NEDERLANDSTALIGE LEZERS PAGINA 55 ~ PAGINA 62
FÖR SVENSKA LÄSARE SIDA 63 ~ SIDA 70
PARA LEITORES PORTUGUESES PÁGINA 71 ~ PÁGINA 78

2
ENGLISHDEUTSCHFRANCAISITALIANO
CAUTION:
• The ventilation should not be impeded by
covering the ventilation openings with items,
such as newspapers, table-cloths, curtains, etc.
• No naked flame sources, such as lighted
candles, should be placed on the apparatus.
• Please be care the environmental aspects of
battery disposal.
• The apparatus shall not be exposed to dripping
or splashing for use.
• No objects filled with liquids, such as vases,
shall be placed on the apparatus.
IMPORTANT TO SAFETY
WARNING:
TO PREVENT FIRE OR SHOCK HAZARD, DO
NOT EXPOSE THIS APPLIANCE TO RAIN
OR MOISTURE.
CAUTION:
1. Handle the power supply cord carefully
Do not damage or deform the power supply cord.
If it is damaged or deformed, it may cause electric
shock or malfunction when used. When removing
from wall outlet, be sure to remove by holding the
plug attachment and not by pulling the cord.
2. Do not open the top cover
In order to prevent electric shock, do not open the
top cover.
If problems occur, contact your DENON dealer.
3. Do not place anything inside
Do not place metal objects or spill liquid inside the
CD player.
Electric shock or malfunction may result.
Please, record and retain the Model name and serial
number of your set shown on the rating label.
Model No. DCM-280 Serial No.
• DECLARATION OF CONFORMITY
We declare under our sole responsibility that this
product, to which this declaration relates, is in
conformity with the following standards:
EN60065, EN55013, EN55020, EN61000-3-2 and
EN61000-3-3.
Following the provisions of 73/23/EEC,
89/336/EEC and 93/68/EEC Directive.
• ÜBEREINSTIMMUNGSERKLÄRUNG
Wir erklären unter unserer Verantwortung, daß
dieses Produkt, auf das sich diese Erklärung
bezieht, den folgenden Standards entspricht:
EN60065, EN55013, EN55020, EN61000-3-2 und
EN61000-3-3.
Entspricht den Verordnungen der Direktive
73/23/EEC, 89/336/EEC und 93/68/EEC.
• DECLARATION DE CONFORMITE
Nous déclarons sous notre seule responsabilité
que l’appareil, auquel se réfère cette déclaration,
est conforme aux standards suivants:
EN60065, EN55013, EN55020, EN61000-3-2 et
EN61000-3-3.
D’après les dispositions de la Directive
73/23/EEC, 89/336/EEC et 93/68/EEC.
• DICHIARAZIONE DI CONFORMITÀ
Dichiariamo con piena responsabilità che questo
prodotto, al quale la nostra dichiarazione si
riferisce, è conforme alle seguenti normative:
EN60065, EN55013, EN55020, EN61000-3-2 e
EN61000-3-3.
In conformità con le condizioni delle direttive
73/23/EEC, 89/336/EEC e 93/68/EEC.
QUESTO PRODOTTO E’ CONFORME
AL D.M. 28/08/95 N. 548
CLASS 1 LASER PRODUCT
LUOKAN 1 LASERLAITE
KLASS 1 LASERAPPARAT
,
CLASS 1
LASER
PRODUCT
,
,,
ADVARSEL:
USYNLIG LASERSTRÅLING VED ÅBNING, NÅR
SIKKERHEDSAFBRYDERE ER UDE AF
FUNKTION. UNDGÅ UDSAETTELSE FOR
STRÅLING.
VAROITUS!
LAITTEEN KÄYTTÄMINEN MUULLA KUIN
TÄSSÄ KÄYTTÖOHJEESSA MAINITULLA
TAVALLA SAATTAA ALTISTAA KÄYTTÄJÄN
TURVALLISUUSLUOKAN 1 YLITTÄVÄLLE
NÄKYMÄTTÖMÄLLE LASERSÄTEILYLLE.
VARNING-
OM APPARATEN ANVÄNDS PÅ ANNAT SÄTT
ÄN I DENNA BRUKSANVISNING
SPECIFICERATS, KAN ANVÄNDAREN
UTSÄTTAS FÖR OSYNLIG LASERSTRÅLNING
SOM ÖVERSKRIDER GRÄNSEN FÖR
LASERKLASS 1.
• DECLARACIÓN DE CONFORMIDAD
Declaramos bajo nuestra exclusiva
responsabilidad que este producto al que hace
referencia esta declaración, está conforme con
los siguientes estándares:
EN60065, EN55013, EN55020, EN61000-3-2 y
EN61000-3-3.
Siguiendo las provisiones de las Directivas
73/23/EEC, 89/336/EEC y 93/68/EEC.
• EENVORMIGHEIDSVERKLARING
Wij verklaren uitsluitend op onze
verantwoordelijkheid dat dit produkt, waarop
deze verklaring betrekking heeft, in
overeenstemming is met de volgende normen:
EN60065, EN55013, EN55020, EN61000-3-2 en
EN61000-3-3.
Volgens de bepalingen van de Richtlijnen
73/23/EEC, 89/336/EEC en 93/68/EEC.
• ÖVERENSSTÄMMELSESINTYG
Härmed intygas helt på eget ansvar att denna
produkt, vilken detta intyg avser, uppfyller
följande standarder:
EN60065, EN55013, EN55020, EN61000-3-2 och
EN61000-3-3.
Enligt stadgarna i direktiv 73/23/EEC, 89/336/EEC
och 93/68/EEC.
• DECLARAÇÃO DE CONFORMIDADE
Declaramos sob nossa exclusiva responsabilidade
que este produto, ao qual esta declaração
corresponde, está em conformidade com as
seguintes normas:
EN60065, EN55013, EN55020, EN61000-3-2 e
EN61000-3-3.
De acordo com o estabelecido nas Directivas
73/23/EEC, 89/336/EEC e 93/68/EEC.
ESPAÑOLNEDERLANDSSVENSKAPORTUGUÊS
CAUTION:
TO REDUCE THE RISK OF ELECTRIC SHOCK,
DO NOT REMOVE COVER (OR BACK). NO
USER SERVICEABLE PARTS INSIDE. REFER
SERVICING TO QUALIFIED SERVICE PERSONNEL.
The lightning flash with arrowhead
symbol, within an equilateral triangle, is
intended to alert the user to the presence
of uninsulated “dangerous voltage”
within the product’s enclosure that may
be of sufficient magnitude to constitute a
risk of electric shock to persons.
The exclamation point within an equilateral
triangle is intended to alert the user to the
presence of important operating and
maintenance (servicing) instructions in the
literature accompanying the appliance.
CAUTION
RISK OF ELECTRIC SHOCK
DO NOT OPEN

3
FRONT PANEL
BEDIENFELD
PANNEAU AVANT
PANNELLO ANTERIORE
PANEL DELANTERO
VOORPANEEL
FRONTPANEL
PAINEL DIANTEIRO
REAR PANEL
RÜCKSEITE
PANNEAU ARRIERE
PANNELLO POSTERIORE
PANEL TRASERO
ACHTERPANEEL
BAKPANEL
PAINEL TRASEIRO
q
wertyuio!0
!4
!3
!2 !1
COAXIAL
DIGITAL OUT
LINE OUT
VARIABLE
SYNCHRO
!6
!7 !8
!5
ENGLISH DEUTSCH FRANCAIS ITALIANO ESPAÑOL NEDERLANDS SVENSKA PORTUGUÊS
CAROUSEL
KARUSSELL
CARROUSEL
MECCANISMO A GIOSTRA
CARROUSEL
CARROUSEL
KARUSELL
CARROCEL

4
NOTE ON USE / HINWEISE ZUM GEBRAUCH/OBSERVATIONS RELATIVES A L’UTILISATION
NOTE SULL’USO / NOTAS SOBRE EL USO / ALVORENS TE GEBRUIKEN / OBSERVERA
OBSERVAÇÕES QUANTO AO USO
• Avoid high temperatures.
Allow for sufficient heat dispersion when installed on a rack.
• Vermeiden Sie hohe Temperaturen.
Beachten Sie, daß eine ausreichend Luftzirkulation
gewährleistet wird, wenn das Gerät auf ein Regal gestellt
wird.
• Eviter des températures élevées
Tenir compte d’une dispersion de chaleur suffisante lors
de l’installation sur une étagère.
• Evitate di esporre l’unità a temperature alte.
Assicuratevi che ci sia un’adeguata dispersione del calore
quando installate l’unità in un mobile per componenti audio.
• Evite altas temperaturas.
Permite la suficiente dispersión del calor cuando está
instalado en la consola.
• Vermijd hoge temperaturen.
Zorg voor een degelijk hitteafvoer indien het apparaat op
een rek wordt geplaatst.
• Undvik höga temperaturer.
Se till att det finns möjlighet till god värmeavledning vid
montering i ett rack.
• Evite temperaturas altas.
Conceda suficiente dispersão de calor quando o equipamento
for instalado numa prateleira.
• Handle the power cord carefully.
Hold the plug when unplugging the cord.
• Gehen Sie vorsichtig mit dem Netzkabel um.
Halten Sie das Kabel am Stecker, wenn Sie den Stecker
herausziehen.
• Manipuler le cordon d’alimentation avec précaution.
Tenir la prise lors du débranchement du cordon.
• Manneggiate il filo di alimentazione con cura.
Agite per la spina quando scollegate il cavo dalla presa.
• Maneje el cordón de energía con cuidado.
Sostenga el enchufe cuando desconecte el cordón de
energía.
• Hanteer het netsnoer voorzichtig.
Houd het snoer bij de stekker vast wanneer deze moet
worden aan- of losgekoppeld.
• Hantera nätkabeln varsamt.
Håll i kabeln när den kopplas från el-uttaget.
• Manuseie com cuidado o fio condutor de energia.
Segure a tomada ao desconectar o fio.
• Keep the set free from moisture, water, and dust.
• Halten Sie das Gerät von Feuchtigkeit, Wasser und Staub
fern.
• Protéger l’appareil contre l’humidité, l’eau et lapoussière.
• Tenete l’unità lonta na dall’umidità, dall’acqua e dalla
polvere.
• Mantenga el equipo libre de humedad, agua y polvo.
• Laat geen vochtigheid, water of stof in het apparaat
binnendringen.
• Utsätt inte apparaten för fukt, vatten och damm.
• Mantenha o aparelho livre de qualquer umidade, água ou
poeira.
• Unplug the power cord when not using the set for long
periods of time.
• Wenn das Gerät eine längere Zeit nicht verwendet
werden soll, trennen Sie das Netzkabel vom Netzstecker.
• Débrancher le cordon d’alimentation lorsque l’appareil
n’est pas utilisé pendant de longues périodes.
• Disinnestate il filo di alimentazione quando avete
l’intenzione di non usare il filo di alimentazione per un
lungo periodo di tempo.
• Desconecte el cordón de energía cuando no utilice el
equipo por mucho tiempo.
• Neem altijd het netsnoer uit het stopkontakt wanneer het
apparaat gedurende een lange periode niet wordt gebruikt.
• Koppla ur nätkabeln om apparaten inte kommer att
användas i lång tid.
• Desligue o fio condutor de força quando o aparelho não
tiver que ser usado por um longo período.
• Do not obstruct the ventilation holes.
• Die Belüftungsöffnungen dürfen nicht verdeckt werden.
• Ne pas obstruer les trous d’aération.
• Non coprite i fori di ventilazione.
• No obstruya los orificios de ventilación.
• De ventilatieopeningen mogen niet worden beblokkeerd.
• Täpp inte till ventilationsöppningarna.
• Não obstrua os orifícios de ventilação.
* (For sets with ventilation holes)
• Do not let foreign objects in the set.
• Keine fremden Gegenstände in das Gerät kommen
lassen.
• Ne pas laisser des objets étrangers dans l’appareil.
• E’ importante che nessun oggetto è inserito all’interno
dell’unità.
• No deje objetos extraños dentro del equipo.
• Laat geen vreemde voorwerpen in dit apparaat vallen.
• Se till att främmande föremål inte tränger in i apparaten.
• Não deixe objetos estranhos no aparelho.
• Do not let insecticides, benzene, and thinner come in
contact with the set.
• Lassen Sie das Gerät nicht mit Insektiziden, Benzin oder
Verdünnungsmitteln in Berührung kommen.
• Ne pas mettre en contact des insecticides, du benzène et
un diluant avec l’appareil.
• Assicuratevvi che l’unità non venga in contatto con
insetticidi, benzolo o solventi.
• No permita el contacto de insecticidas, gasolina y
diluyentes con el equipo.
• Laat geen insektenverdelgende middelen, benzine of
verfverdunner met dit apparaat in kontakt komen.
• Se till att inte insektsmedel på spraybruk, bensen och
thinner kommer i kontakt med apparatens hölje.
• Não permita que inseticidas, benzina e dissolvente entrem
em contacto com o aparelho.
• Never disassemble or modify the set in any way.
• Versuchen Sie niemals das Gerät auseinander zu nehmen
oder auf jegliche Art zu verändern.
• Ne jamais démonter ou modifier l’appareil d’une manière
ou d’une autre.
• Non smontate mai, nè modificate l’unità in nessun modo.
• Nunca desarme o modifique el equipo de ninguna manera.
• Nooit dit apparaat demonteren of op andere wijze modifiëren.
• Ta inte isär apparaten och försök inte bygga om den.
• Nunca desmonte ou modifique o aparelho de alguma forma.
Use compact discs that include the mark.
CD’s with special shapes (heart-shaped CD’s,
octagonal CD’s etc.) cannot be played on this set.
Attempting to do so may damage the set. Do not use
such CD’s.
Benutzen Sie Compact Discs, die das
Zeichen tragen.
Speziell geformte CD’s (herzförmige CDs, achteckige
CDs, usw.) können auf dieser Anlage nicht abgespielt
werden.
Der Versuch derartige CDs abzuspielen kann die
Anlage beschädigen. Verzichten Sie auf die
Benutzung solcher CDs.
Utiliser des disques compacts portant le logo .
Des CD avec des formes spéciales (CD en forme de
coeur, des CD octogonaux, etc.) ne peuvent pas être
lus sur cet appareil.
Le fait de l’essayer, risque d’endommager le lecteur.
Ne pas utiliser de tels CD.
Usare compact disc che includono il marchio .
II CD con forme particolari (CD a forma di cuore, CD
ottogonali ecc.) non possono essere riprodotti su
questo apparecchio.
L’apparecchio si potrebbe danneggiare se si cerca di
farlo. Non utilizzare questi CD.
Use discos compactos con la marca .
En este equipo no es posible reproducir CDs con
formas especiales (CDs con forma de corazón, CDs
octagonales, etc.).
Si intenta hacerlo, el equipo podrá resultar dañado. No
use este tipo de CDs.
Gebruik compact discs voorzien van het logo .
CD’s met speciale vormen (bijv. CD’s in de vorm van
een hart, achthoekige CD’s, enz.) kunnen met dit
toestel niet worden afgespeeld.
Wanneer u dit toch probeert, zal u het toestel
beschadigen. Speel dergelijke CD’s dus niet af.
Använd CD-skivor med -märket.
Specialformade CD-skivor (hjärtformade, åttkantiga, m
m) går inte att spela på den här apparaten.
Utrustningen kan skadas om du försöker göra detta.
Använd inte CD-skivor av denna typ.
Use discos compactos que tenham a marca .
Os CDs com formas especiais (em feitio de coração,
octogonais, etc.) não podem ser reproduzidos neste
equipamento.
Pode danificar o equipamento se tentar reproduzi-los.
Não os utilize.
ENGLISH DEUTSCH FRANCAIS ITALIANO ESPAÑOL NEDERLANDS SVENSKA PORTUGUÊS
5
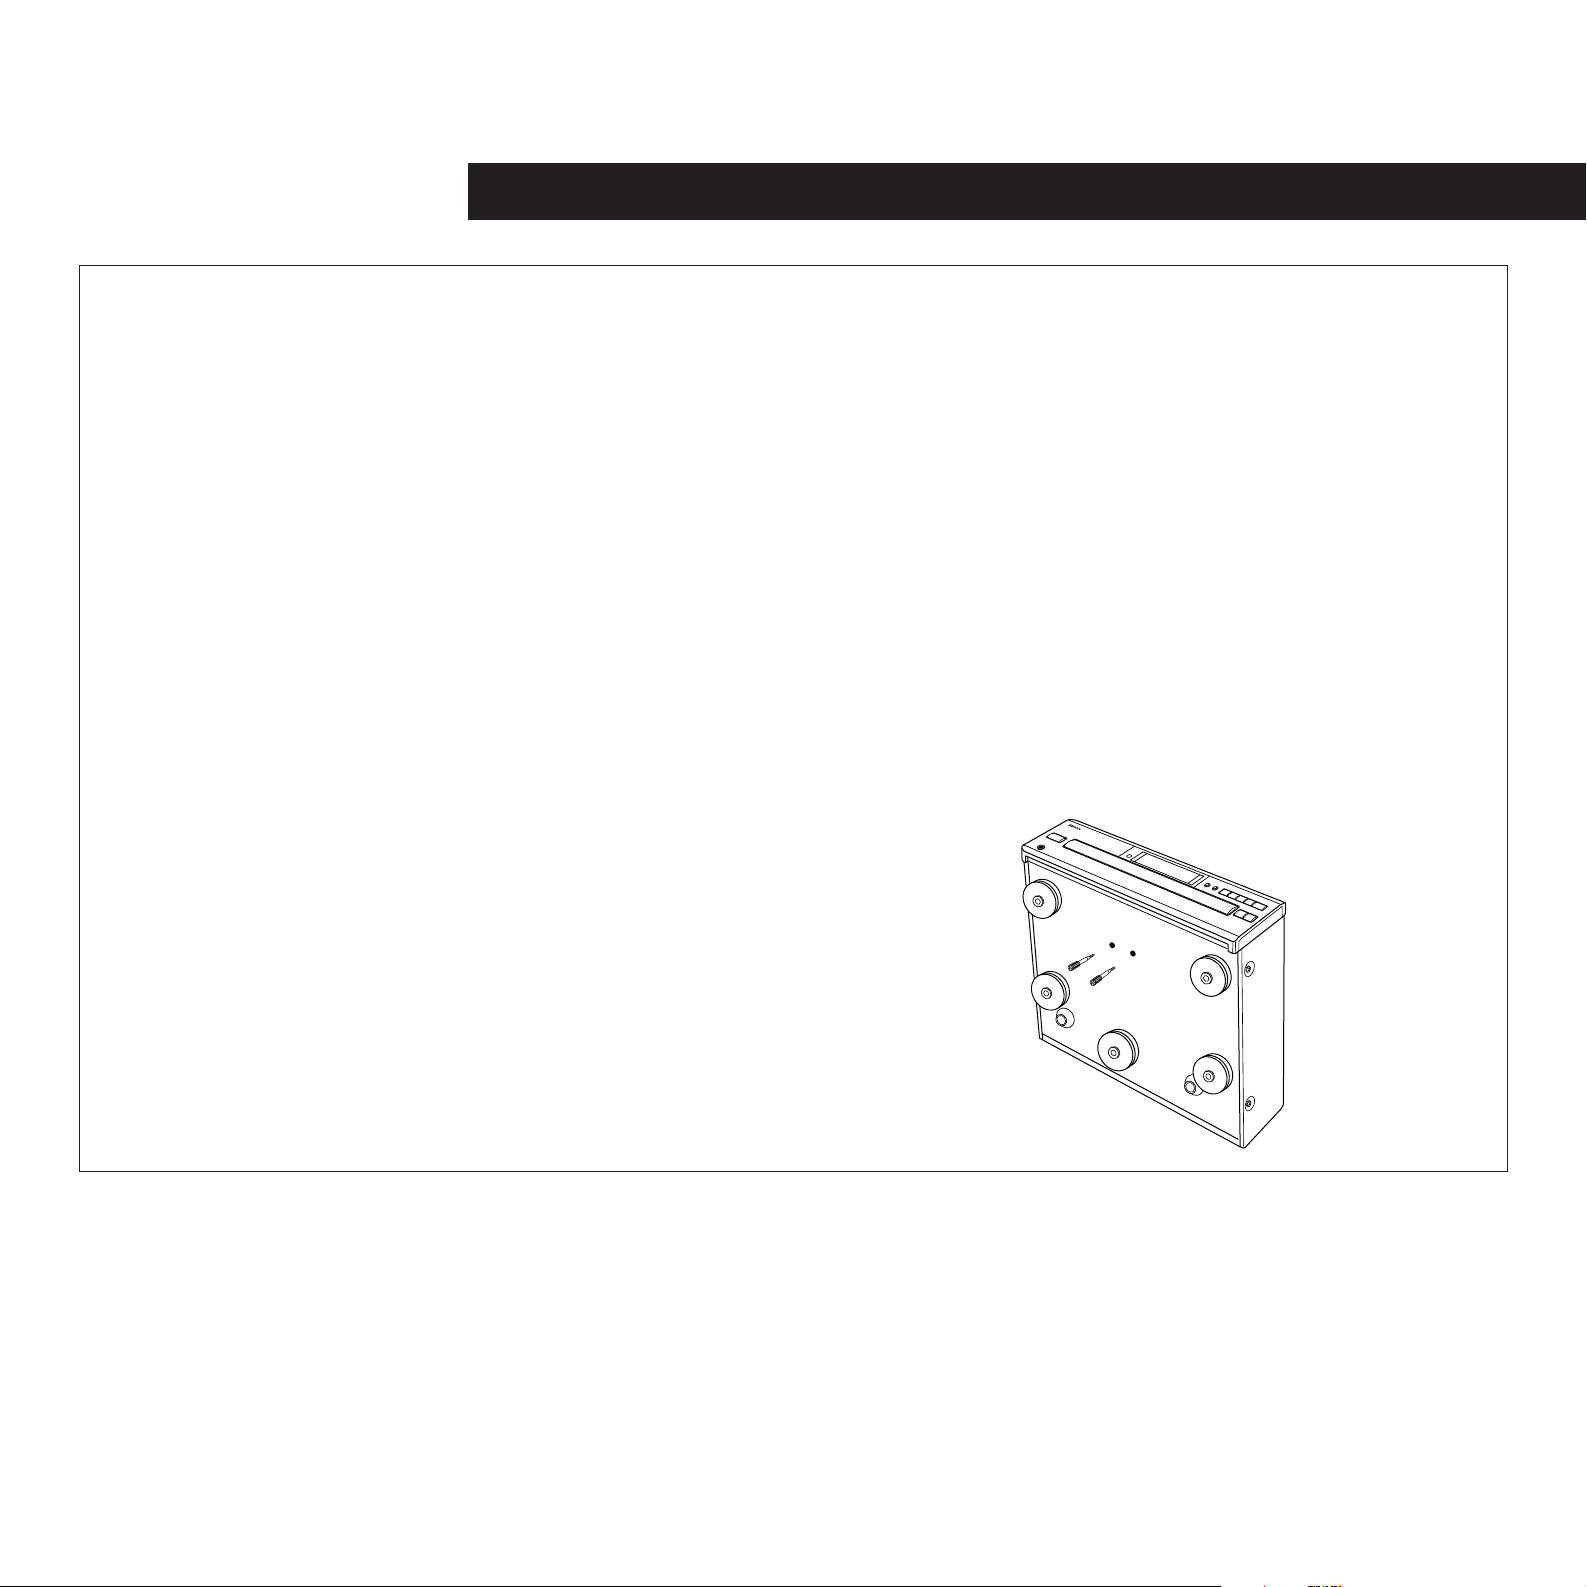
CAUTION:
At the bottom of the player there are two red shipping screws for use when the player is transported. Before
using the player, turn these screws counterclockwise and remove them.
If the shipping screws are still in place and the power is turned on, the disc tray will not open. If this happens,
turn off the power, unplug the power cord from the power outlet and remove the shipping screws.
Retain these screws as they will be needed when the player is transported.
Before transporting the player, take out the discs, close the disc tray, turn off the power after “0 00 00:00” is
displayed and unplug the power cord from the power outlet. Then install the shipping screws by turning them
clockwise. Be sure to fasten them securely.
VORSICHT:
Zum Schutz während des Transportes befinden sich unter dem Gerät zwei rote Transportschrauben.
Entfernen Sie diese Transportschrauben vor der Inbetriebnahme des Spielers, indem Sie sie entgegen dem
Uhrzeigersinn drehen.
Wenn die Transportschrauben nicht vor Einschalten des Gerätes entfernt werden, öffnet sich das Disc-Fach
nicht. Schalten Sie das Gerät in einem derartigen Fall noch einmal aus, trennen Sie das Netzkabel von der
Netzsteckdose ab und entfernen Sie die Transportschrauben.
Bewahren Sie die Schrauben für einen eventuell erneuten Transport des Gerätes auf.
Nehmen Sie vor dem Transport des Gerätes alle Discs aus dem Gerät heraus, schließen Sie das Disc-Fach
und schalten Sie das Gerät – nachdem “0 00 00:00” angezeigt worden ist – aus und trennen Sie das
Netzkabel von der Netzsteckdose ab. Bringen Sie dann die Transportschrauben an, indem Sie sie im
Uhrzeigersinn drehen. Achten Sie darauf, daß die Schrauben fest angezogen sind.
ATTENTION:
Au fond du lecteur, se trouvent deux vis de transport rouges, à utiliser lors du tranport du lecteur. Avant
d’utiliser le lecteur, tourner ces vis dans le sens inverse des aiguilles d’une montre, et les retirer.
Si les vis de transport sont encore en place et l’alimentation allumée, le plateau de disque ne s’ouvrira pas. Si
cela se produit, couper l’alimentation, débrancher le cordon d’alimentation de la prise de sortie d’alimentation,
et retirer les vis de transport.
Conserver ces vis, car elle seront nécessaires lors d’un transport du lecteur.
Avant de transporter le lecteur, retirer les disques, fermer le plateau de disque, couper l’alimentation après
que “0 00 00:00” ait été affiché, et débrancher le cordon d’alimentation de la prise de sortie d’alimentation.
Puis installer les vis de transport en les tournant dans le sens des aiguilles d’une montre. Assurez-vous de les
avoir serrées solidement.
PRECAUZIONE:
Sul fondo del lettore ci sono due viti rosse per il trasporto che vengono usate quando il lettore viene
trasportato. Prima di usare il lettore, svitate queste viti in senso antiorario e rimuovetele.
Se le viti non vengono rimosse e il lettore viene acceso, il piatto portadischi non si aprirà. Se ciò si dovesse
verificare, spegnete l’apparecchio, scollegate il filo di alimentazione dalla presa e rimuovete le viti.
Conservate queste viti, dal momento che vi serviranno ancora quando dovrete trasportare il lettore in futuro.
Prima del trasporto, estraete i dischi, chiudete il piatto portadischi, spegnete l’apparecchio dopo che “0 00
00:00” viene visualizzato, e scollegate il filo di alimentazione dalla presa. Avvitate poi le viti per il trasporto
girandole in senso orario. Assicuratevi di avvitarle in modo ben saldo.
PRECAUCION:
En la parte inferior del reproductor hay dos tornillos de transporte para su utilización durante el transporte. Antes
de utilizar el reproductor, gire estos tornillos en sentido contrario a las agujas del reloj y extráigalos.
Si se activa la alimentación y los tornillos de transporte todavía están en su sitio, la bandeja de discos no se
abrirá. Si ocurriera esto, desconecte el cable de alimentación de la toma de red eléctrica general y extraiga los
tornillos de transporte.
Guarde estos tornillos ya que serán necesarios cuando se transporte el reproductor.
Antes de transportar el reproductor, saque los discos, cierre la bandeja de discos, desactive la alimetnación
después de que se visualice “0’ 00 00:00” y desconecte el cable de alimentación de la toma de red. A
continuación proceda a instalar los tornillos de transporte girándolos en el sentido de las agujas del reloj.
Asegúrese de fijarlos firmemente.
LET OP:
Aan de onderkant van de speler zitten twee schroeven die dienen voor transport. Draai de schroeven linksom
los en verwijder ze voordat u de speler in gebruik neemt.
Als de schroeven nog op hun plaats zitten wanneer de netspanning wordt ingeschakeld, dan kan de CD-lade
niet worden geopend. Wanneer dit het geval is, dan schakelt u de netspanning uit, trekt u de stekker uit het
stopcontact en verwijdert u de twee schroeven alsnog. Bewaar de schroeven omdat ze voor transport nodig
zijn.
Neem alvorens de speler te transporteren de CD’s uit de CD-lade, sluit de lade en schakel de netspanning uit
wanneer “0 00 00:00” op de display is verschenen en trek de stekker uit het stopcontact. Plaats vervolgens
de twee schroeven en draai ze rechtsom vast. Draai de schroeven goed vast.
FÖRSIKTIGT:
Längst ner på spelaren finns två röda transportskruvar som används när spelaren transporteras. Vrid skruvarna
motsols och ta bort dem innan du använder spelaren.
Om transportskruvarna sitter kvar när strömmen slås på öppnas inte skivsläden. Stäng då av strömmen, dra ut
nätsladden ur vägguttaget och ta bort transportskruvarna. Spara transportskruvarna. De behövs vid eventuell
transport av spelaren i framtiden.
Ta ut alla CD-skivor före transport av spelaren. Stäng sedan släden, vänta tills displayen visar “0 00 00:00” och
stäng sedan av strömmen. Dra ut nätsladden ur väggen och installera transportskruvarna genom att vrida dem
motsols. Det är viktigt att de sitter fast ordentligt.
PRECAUÇÃO:
Sob o reprodutor existem dois parafusos vermelhos de acondicionamento para utilização quando o reprodutor
for transportado. Antes de utilizar o reprodutor, rode estes parafusos no sentido oposto ao dos ponteiros do
relógio e retire-os.
Se os parafusos de acondicionamento ainda estiverem colocados e for ligada a energia, o tabuleiro de discos
não se abrirá. Se isto acontecer, desligue a energia, desconecte o cabo de energia da tomada da corrente e
retire os parafusos de acondicionamento.
Conserve estes parafusos, pois eles serão necessários quando o reprodutor for transportado.
Antes de transportar o reprodutor, retire os discos, encerre o tabuleiro, desligue a energia após ser mostrado
“0 00 00:00” e desconecte o cabo de energia da tomada de corrente. Depois, instale os parafusos de
acondicionamento, rodando-os no sentido dos ponteiros do relógio. Assegure-se de que eles se encontram
firmemente apertados.
ENGLISHDEUTSCHFRANCAISITALIANOESPAÑOLNEDERLANDSSVENSKAPORTUGUÊS
ENGLISH
6
ENGLISH
— TABLE OF CONTENTS —
z
FEATURES...........................................................6
x
BEFORE USING...................................................6
c
CLEANING ...........................................................7
v
CDs ......................................................................7
b
NAMES OF PARTS AND
THEIR FUNCTIONS..........................................7, 8
n
OPENING AND CLOSING THE DRAWER
AND LOADING A DISC........................................8
m
CONNECTIONS ...................................................9
,
NORMAL PLAY....................................................9
.
OTHER PLAY METHODS............................10~12
⁄0
PLAYING MP3 FILES...................................13, 14
⁄1
PLAY USING THE REMOTE CONTROL
UNIT.............................................................14, 15
⁄2
COMPACT DISCS..............................................16
⁄3
TROUBLE? CHECK THE PLAYER TO FIND
WHAT’S WRONG ..............................................16
⁄4
SPECIFICATIONS...............................................16
In addition to the CD Player unit, please check to
make sure the following items are included in the
packing box:
(1) Operating Instructions . . . . . . . . . . . . . . . . . . . .1
(2) Connection Cords . . . . . . . . . . . . . . . . . . . . . . .1
(3) Remote Control Unit RC-258 . . . . . . . . . . . . . . .1
(4) R6P (AA size) Dry batteries . . . . . . . . . . . . . . . .2
(1) High performance digital filter
The DCM-280 uses high precision 8-times
oversampling digital filters.
(2) Simple Playback of 8cm CD Singles
8cm CD singles can be played without using an
adaptor.
(3) Programming of up to 32 tracks
All of the tracks on a CD can be programmed to
play in any order. Programming in units of discs
(all tracks on a disc) is also possible.
(4) Newly developed carousel-type changer
mechanism included
This mechanism can house five discs, and while
one disc is playing the remaining four discs can
be changed. In addition, the carousel can be
rotated either clockwise or counterclockwise, so
searching between discs is fast.
(5) Wireless Remote Control Accessory
In addition to general operations such as Play,
Stop and Pause, this remote control unit enables
direct selection, direct programming, and other
functions. Use of the remote control unit adds
greatly to the operating ease of the DCM-280,
enhancing its outstanding features.
(6) CD-RW Playback Capability
The DCM-280 can play finalized CD-R and CD-RW
discs.
(7) MP3 Playback
1
FEATURES
Thank you for purchasing the DENON compact disc
player. Read the Operating Instructions thoroughly,
and operate this player properly.
NOTE:
This
CD player
uses the semiconductor laser. To allow
you to enjoy music at a stable operation, it is
recommended to use this in a room of 10°C (50°F) ~
35°C (95°F).
Copyrights
2 It is prohibited by law to reproduce, broadcast, rent
or play discs in public without the consent of the
copyright holder.
2
BEFORE USING
Condensation Setup Precautions
2 Condensation
Condensation can be seen as water droplets that
have formed on the windows of a heated room in
winter.
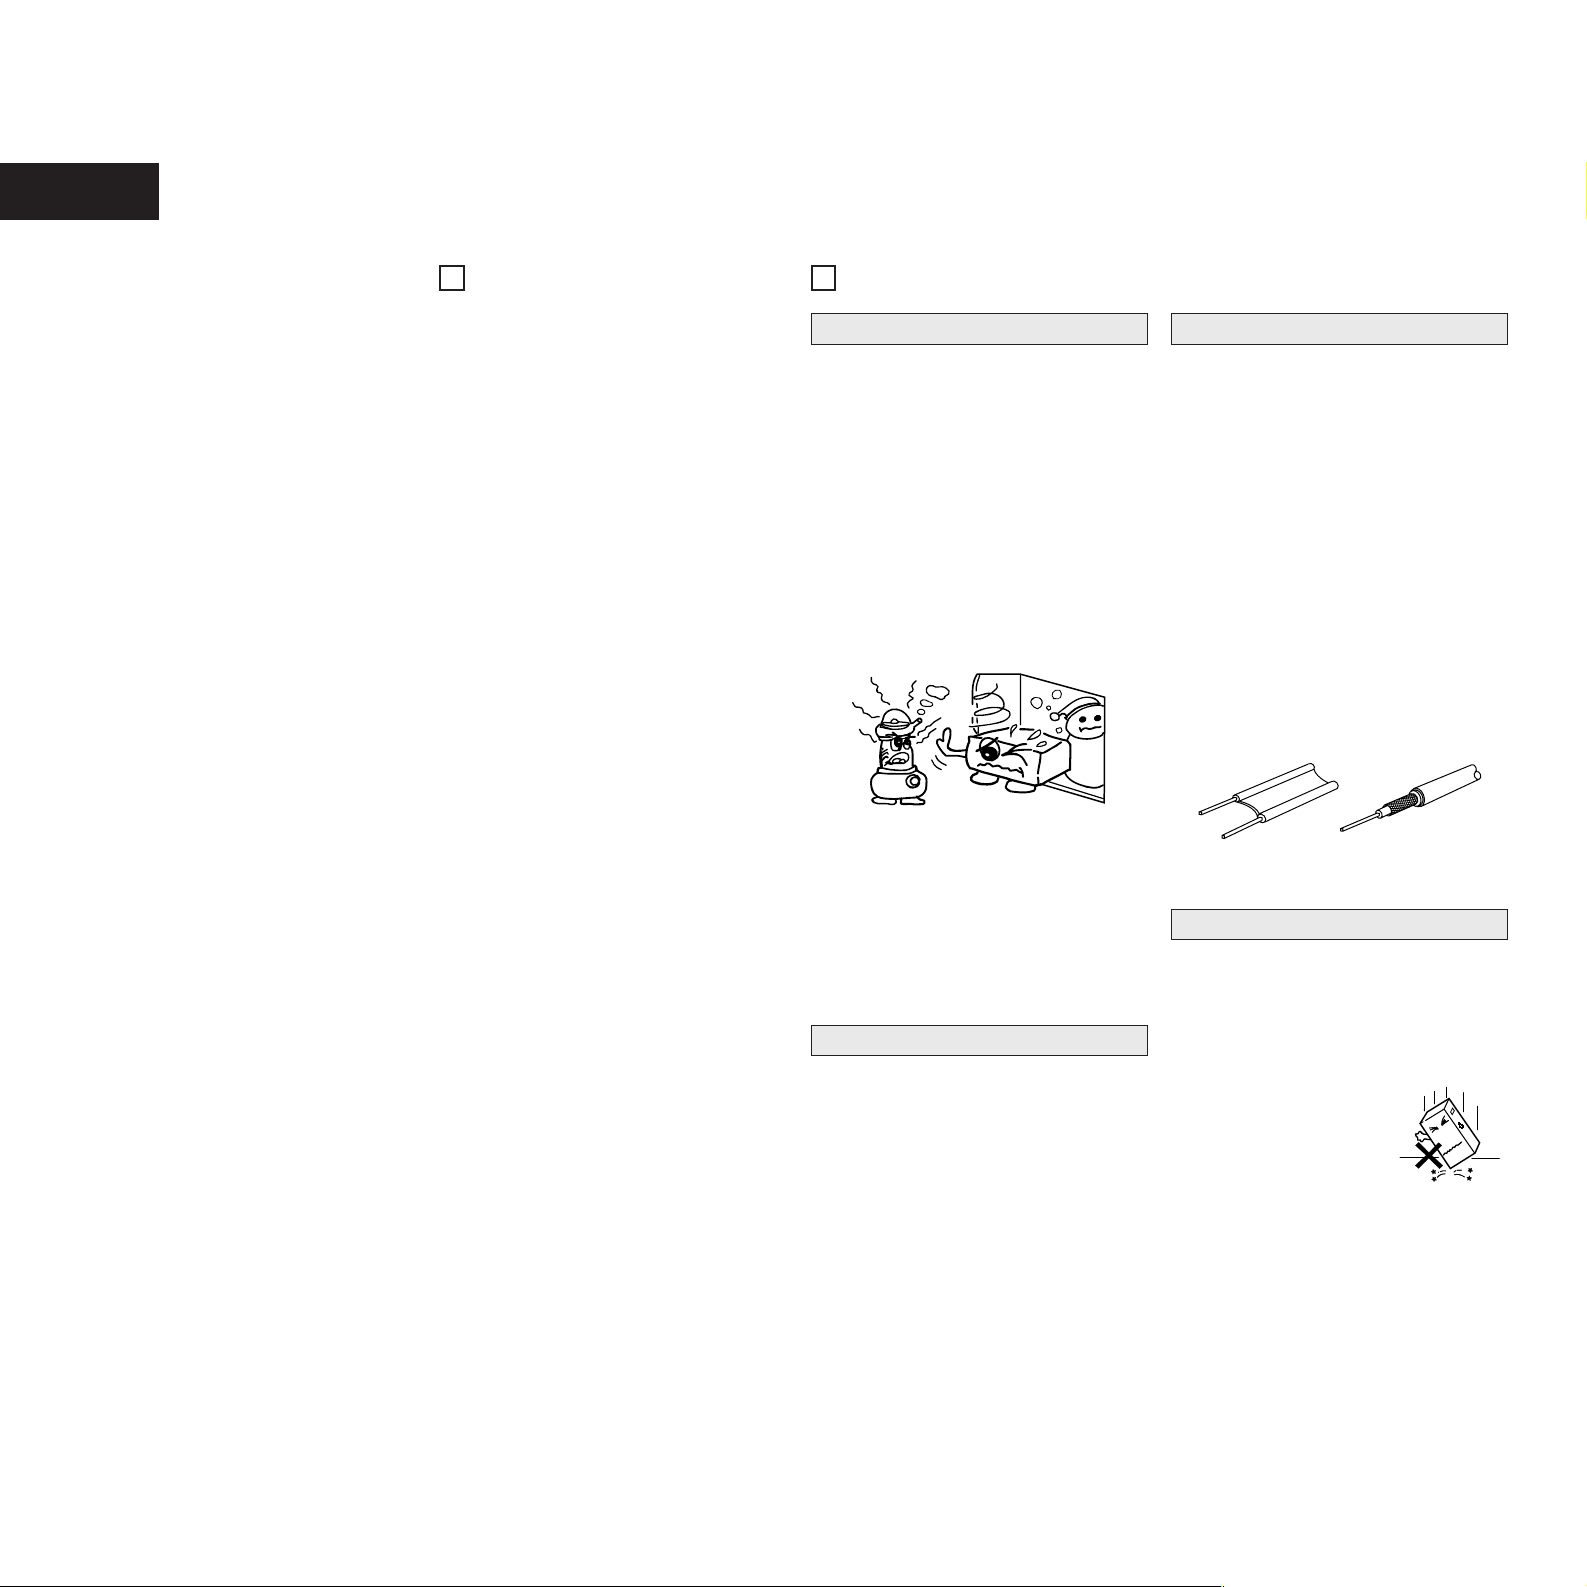
2 Conditions for the Formation of Condensation
In winter, when the unit is brought from outdoors
to a warm indoor location, or when the room
temperature is suddenly raised by a heater,
condensation will form on the operating parts
within the unit and normal operation will no longer
be possible.
Condensation can also form in summer when the
breeze from an air conditioner strikes the unit
directly. Should this occur, change the setup
location of the unit.
2 Measures to Take After Condensation Forms
• If condensation has formed, switch on the
power and leave the unit for a while. Although
the time will differ according to the surrounding
conditions, the unit should be usable in 1 to 2
hours.
• Should condensation form on the disc, wipe
the disc clean.
Other Precautions
2 Illustrations used for descriptive purposes may
differ from the actual items.
2 Please keep the instruction manual.
After reading this instruction manual, please keep
it in a safe place together with the warranty.
2 Please provide a spacing of more than 10 cm
between the top, rear, and side surfaces of
subwoofer and walls or other audio/video
equipment, etc.
2 When using this unit or other electronic
equipment that contains microprocessors at the
same time as using a tuner or TV, noise or screen
interference can occur on the audio and video of
the tuner or TV. Should this occur, pay careful
attention to the following points.
• Separate this unit as much as possible from the
tuner or TV.
• Separate the antenna line of the tuner or TV
from the power cable and input/output
connection cables of this unit as much as
possible.
• Use of indoor antennas and 300 Ω/ohms
feedline are especially susceptible to such
interference. We recommend the use of
outdoor antennas and 75 Ω/ohms coaxial cable.
300 Ω/ohms feedline 75 Ω/ohms coaxial cable
2 Under normal circumstances
• Always remove the disc and turn the power off.
• When leaving home for long periods of times
such as for trips, be sure to unplug the power
supply cord.
2 When moving the DCM-280
• Do not subject the DCM-280
to shocks.
• Always check that the disc
has been removed and the
connection cords
disconnected before moving
the DCM-280.
When not using the DCM-280

7
ENGLISH
3
CLEANING
Cleaning the main unit
2 Use a soft cloth and wipe lightly to remove dirt
from the cabinet and operation panel.
• When using chemically treated cloths, follow
the precautions that have been written for
them.
2 Do not use benzene, thinners, or other organic
solvents or insecticides on the main unit since
they may cause a change in quality or color.
NOTE:
Do not use record spray or antistatic. Also do not
use volatile chemicals such as benzene or thinner.
ThinnerRecord
spray
Benzene
Cleaning discs
2 Fingerprints or dirt on the disc may lower sound
and picture quality or cause breaks in playback.
Wipe off fingerprints or dirt.
2 Use a commercially available disc cleaning set or a
soft cloth to wipe off fingerprints or dirt.
Wipe gently from the
middle outwards.
Do not wipe with a
circular motion.
4
CDs
Discs
This unit uses CDs (optical digital
audio discs) which bear the mark
located at the right.
Note that specially shapes CDs, for
example, heart shaped or hexagonal cannot be
played. Do not attempt to use such CDs since doing
so may cause breakdown of this unit.
C
Holding discs
Avoid touching the surface of discs when loading and
unloading them.
Be careful not to get
fingerprints on the signal
surface (the side which
shines in rainbow colors).
Cautions on Handling Discs
• Do not get fingerprints, grease or dirt on discs.
• Be especially careful not to scratch discs when
removing them from their cases.
• Do not bend discs.
• Do not heat discs.
• Do not enlarge the center hole.
• Do not write on the labeled (printed) side with a
ball-point pen or a pencil.
• Water droplets may form on the surface if the disc
is moved suddenly from a cold place to a warm
one. Do not use a hairdryer, etc., to dry the disc.
Cautions on Storing Discs
• Always eject discs after playing them.
• Keep discs in their cases to protect them from
dust, scratches and warping.
• Do not put discs in the following places:
1. Exposed to direct sunlight for long periods of
time
2. Humid or dusty places
3. Places exposed to heat from heaters, etc
5
NAMES OF PARTS AND THEIR FUNCTIONS
(See page 3.)
(1) Front Panel
q
Power Switch (POWER)
• Press this button to switch on the power.
w
Remote Control Receptor
(REMOTE SENSOR)
• This receptor receives infrared signals from the
wireless remote control unit.
• Aim the wireless remote control unit at this
receptor window when operating it.
e
Display Window
• The Disc No., Track No., playing time and other
information are displayed in the display
window.
r
Repeat Button (REPEAT)
• Press this button for repeated playback. The
“REPEAT” indicator appears on the display.
The following three types of repeat modes are
available.
• When pressed once, the “REPEAT” and “1”
indicators light and the track currently playing is
repeated.
• When pressed again, the “REPEAT” and “1
DISC” indicators light and all the tracks on the
disc currently playing are repeated.
• When pressed again, the “REPEAT” and
“DISC” indicators light and all the discs
currently set on the tray are repeated.
• When pressed again, the “REPEAT” and
“DISC” indicators turn off and the repeat mode
is cancelled.
The repeat function can also be used during
programmed and random playback, but in this
case only the all repeat (“REPEAT” and
“DISC” indicator) mode is available.
(Refer to page 11 for details.)
t
Random button (RANDOM)
• Press this button to begin random play.
• Pressing this button during stop, and press the
1 PLAY button play to full automatic random
play.
• Pressing this button during playing of a
program starts random play of the tracks in the
program.
(See page 11, item u.)
y
Automatic/Manual Search Reverse
Button (8/6)
• Press this button to return the pickup to the
beginning of the present track. Press again to
return to other tracks.
• By pressing the button a number of times, the
pickup will move back the corresponding
number of tracks.
• Keep on pressing this button for more than 0.5
seconds during playback for fast reverse
search. As long as the button is kept pressed,
music signals are played back faster than
normal.
• Keep on pressing this button for more than 5
seconds, reverse search becomes approximately
4 times faster.
u
Automatic/Manual Search Forward
Button (7/9)
• Press this button to move the pickup forward
to the beginning of the next track. Press again
to move ahead to other tracks.
• By pressing the button a number of times, the
pickup will advance the corresponding number
of tracks.
• Keep on pressing this button for more than 0.5
seconds during playback for fast forward
search. As long as the button is kept pressed,
music signals are played back faster than
normal.
• Keep on pressing this button for more than 5
seconds, forward search becomes approximately
4 times faster.
i
Stop Button (2 STOP)
• Press this button to stop play.
o
Pause Button (3 PAUSE)
• Press this button to stop play temporarily.
• Pressing the 3 PAUSE button during play
stops play temporarily. The “1” indicator goes
off and the “3” indicator lights up.
• To cancel the Pause state, press either the 1
PLAY button !0 or the 3 PAUSE button o a
second time.

ENGLISH
8
(2) Rear Panel
!6
Output Terminal (LINE OUT)
• Connect the connection cords from these
terminals to the amplifier’s input terminals.
(Refer to page 9 for connections.)
!7
SYNCHRO Jack (SYNCHRO)
• To make a synchronized recording, this jack
must be connected to the SYNCHRO jack of
the deck with a connection cord. (Refer to
page 9 for connections.)
!8
Digital Audio Output Connector
(COAXIAL)
• Connect a commercially available 75 Ω/ohms
pin-plug cord.
• Digital data is output from this connector.
(3) Display
1
2
3
4
5
TRACK
DISC
°°
°
°°°°°
MIN
SEC
PROGRAM
RANDOM REPEAT
REMAIN
EACH
TOTAL
R
MP3 CD
1 DISC
1617 1918 20
1112 1413 15
67 9810
12 435
Play Indicator
Disc Indicator
Disc Number
CD Indicator
MP3 Indicator
Pause Indicator
Random
Indicator
Repeat
Indicator
Program
Indicator
Disc
Remaining
time Indicator
Remote control signal
Receive Indicator
Track
Number
minute second
Time
20-track
music calendar
Continuous Button Operation
If the Automatic/Manual Search Reverse button
y
or the Automatic/Manual Search Forward button
u
are held in, the function of that button will be
repeated.
6
OPENING AND CLOSING THE DRAWER AND LOADING A DISC
Opening and closing the drawer (This operation
only works while the power is on.)
1. Press the POWER switch to turn on the power.
2. Press the 5 OPEN/CLOSE button.
How to load a disc
• Make sure the drawer is completely open.
• Hold the disc by the edges and place it on the disc
tray. (Do not touch the signal surface, i.e., the
glossy side.)
• Set the disc properly in the tray according to its
size.
Set 8 cm discs in the center hole.
Set 12 cm discs in the outer hole.
• When the drawer is opened during the stop mode,
discs can be loaded in the 3 disc trays. If the DISC
SKIP button is pressed, the carousel turns and a
disc can be loaded in the another disc tray.
When the drawer is opened during the play mode,
it is possible to load and unload discs in all of the
disc trays other than the one whose disc is
currently playing. 3 discs can be replaced and press
the DISC SKIP button to switch the other disc tray
that can be replaced.
• Press the 5 OPEN/CLOSE button to close the
drawer.
Caution:
• The player will not operate properly and the disc
may even be damaged if it is not set correctly.
• If your finger should get caught in the drawer when
it closes, press the 5 OPEN/CLOSE button.
• Do not place any foreign objects on the disc tray,
and do not place more than one disc on the tray at
a time. Otherwise malfunction may occur.
• Do not push in the disc tray manually when the
power is off as this may cause malfunction and
damage the CD player.
• Do not touch the carousel while it is turning. Also,
do not turn the carousel by hand when it is
stopped. Doing so could damage it.
• Do not insert disc where indicated by arrow.
This could damage the internal mechanism in the
unit.
LABEL SIDE
UP WARD
!0
Play Button (1 PLAY)
• Press this button to play a disc.
The “1” indicator lights up when the button is
pressed, the number of the disc and the track
being played is displayed by the Disc Number
and Track No. indicator, and the amount of
elapsed time for the current track is displayed
by the Time indicator.
• The “1” indicator goes off after playing of the
final track of the final disc is finished and the
player stops.
!1
Disc Skip Button (DISC SKIP)
• Each time this button is pressed, the carousel
will rotate in a clockwise direction to the next
tray position. This allows for loading or
unloading of discs.
This button is also used to select the next disc,
in the normal play continuously.
!2
Open/Close Button (5 OPEN/CLOSE)
• Press this button when opening.
• The drawer is opened toward the front.
• Press the button again to close the drawer.
!3
Loading Drawer
• Discs can be loaded and unloaded when this
drawer is open. Do not force the drawer closed
by hand.
!4
Headphone Jack (PHONES)
• Insert the jack of the headphones when
desiring to listen to a disc privately.
(Headphones are sold separately.)
!5
Disc Trays (1 ~ 5)
• One disc per tray can be loaded.
ENGLISH
9
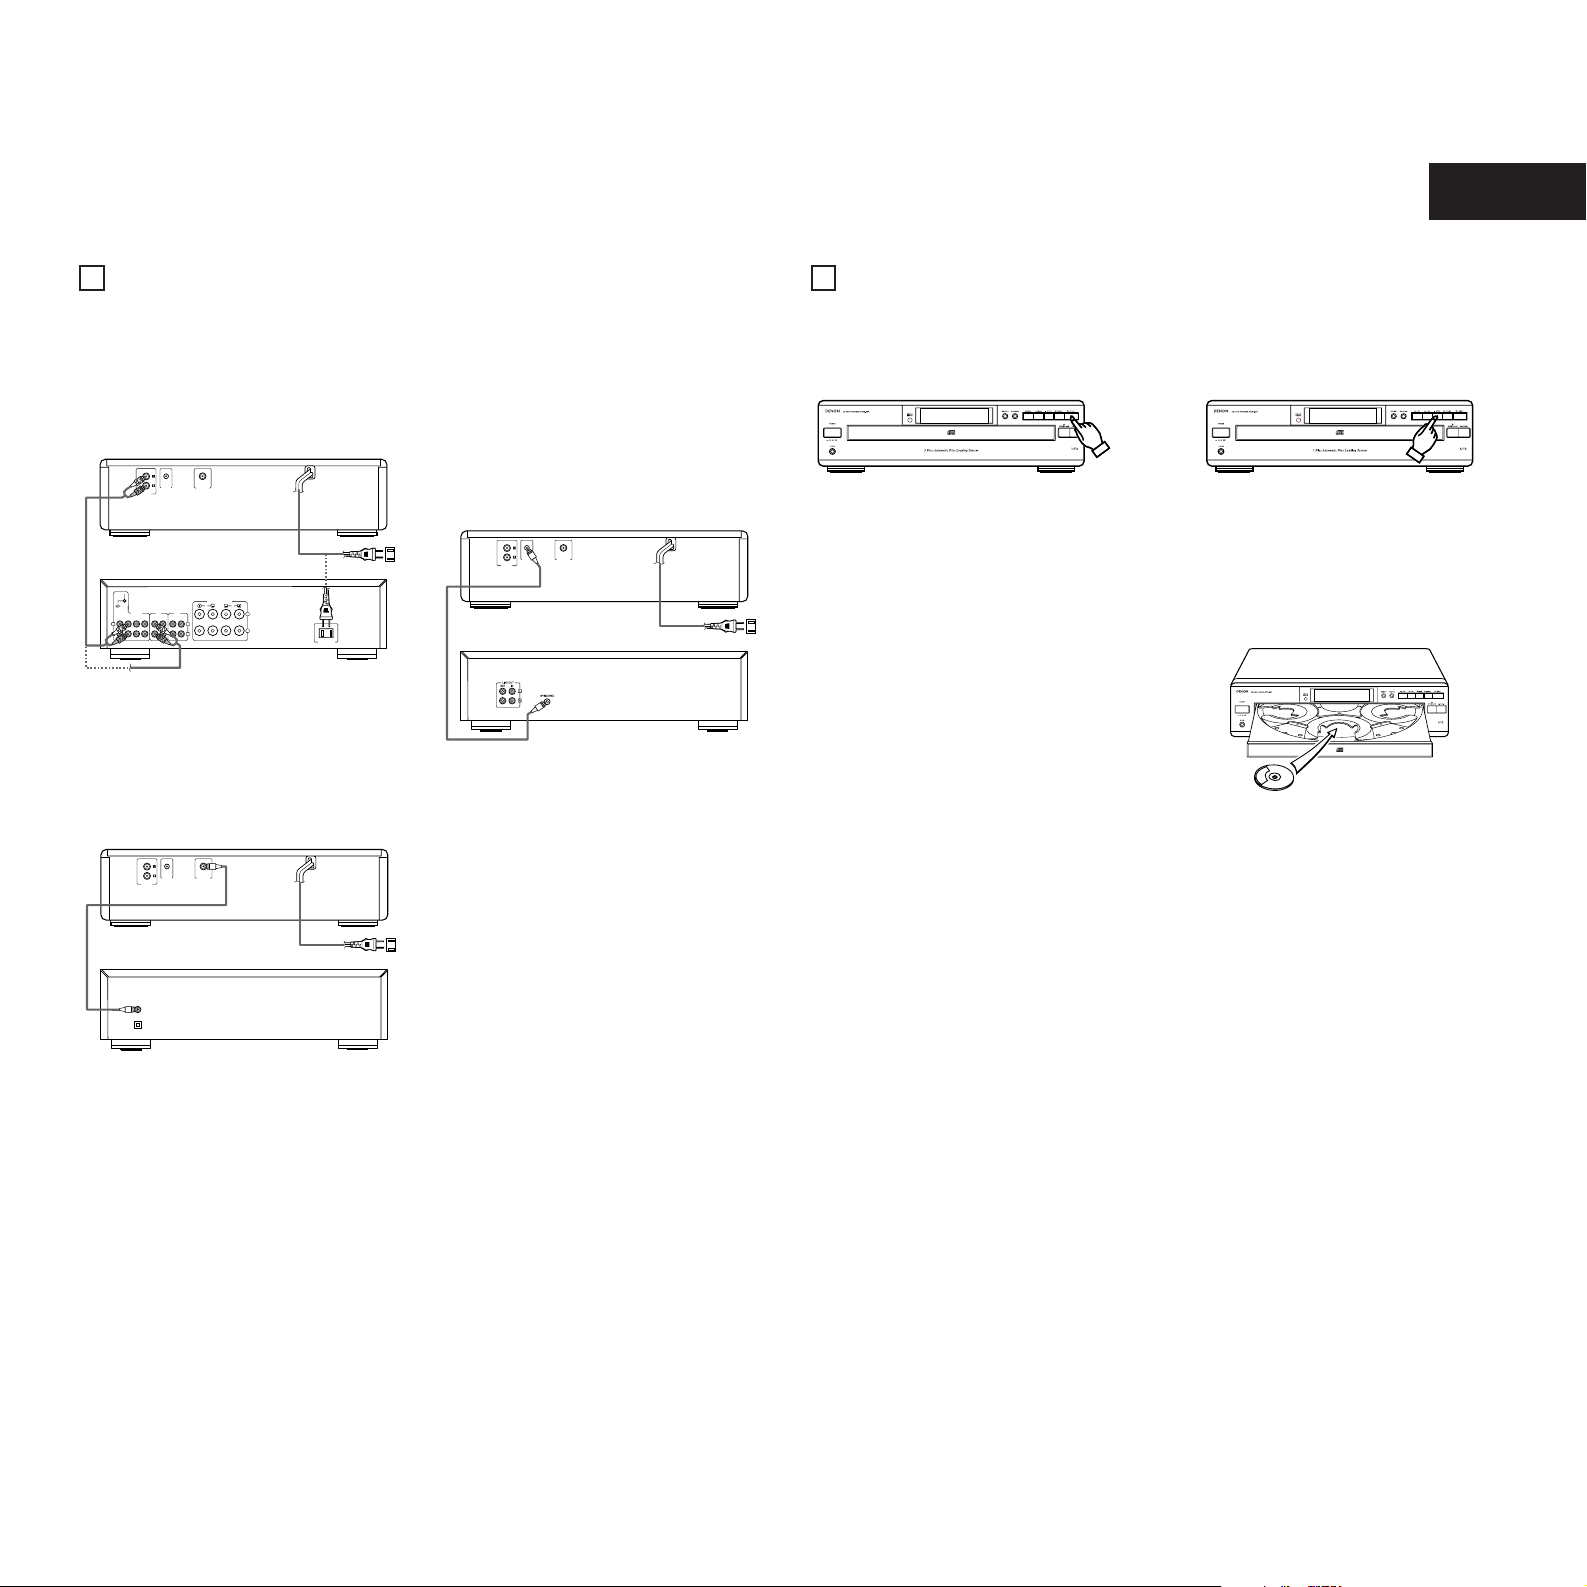
7
CONNECTIONS
(1) Connecting the Output Terminal
• Connect one end of the connection cord supplied
with the CD Player to the output terminals, left (L)
and right (R) of the CD Player, and the other end
to the CD, AUX or TAPE PLAY input terminals,
left (L) and right (R), of the amplifier.
COAXIAL
DIGITAL OUT
LINE OUT
VARIABLE
SYNCHRO
AC OUTLET
PHONO CD TUNER AUX
TAPE-1
/DAT
TAPE-2
/MD
TAPE-1
/DAT
TAPE-2
/MD
L
R
PB REC
SIGNAL
GND
INPUTS
L
R
RL
SPEAKER SYSTEMS
A
B
DCM-280
Power supply outlet
(Amplifier)
(2) Connecting the Digital Output Jack (COAXIAL)
• Use a 75 Ω/ohm pin cord to connect the digital
output jack (COAXIAL) of the CD Player to the
digital input jack (COAXIAL) on a digital processor
or MD recorder, available in stores.
COAXIAL
DIGITAL OUT
LINE OUT
VARIABLE
SYNCHRO
DIGITAL INPUT
COAXIAL
OPTICAL
DCM-280
Power supply outlet
(Digital processor or MD recorder)
(3) SYNCHRO Jack Connections
• Connect the SYNCHRO jack with a DENON
cassette deck which is equipped with a
SYNCHRO jack, then make a synchronized
recording. Use the connection cord supplied with
the cassette deck.
• To make use of this function, also connect the
output jacks and make the settings so that a
recording can be made from the CD player to the
cassette deck.
COAXIAL
DIGITAL OUT
LINE OUT
VARIABLE
SYNCHRO
DCM-280
Power supply outlet(Cassette Deck)
8
NORMAL PLAY
Follow the steps below to get an understanding of the disc play procedure.
(1) Starting Playback
( 1 PLAY )
1. Turn the POWER switch on and press the 5
OPEN/CLOSE button to open the drawer.
2. Set the disc to be played in the front side tray.
3. Press the 1 PLAY button.
4. The drawer closes and the disc just loaded is
played.
5. The disc number, track number and elapsed time,
etc., for the disc currently playing appear on the
display window.
6. If the 5 OPEN/CLOSE button is pressed while a
disc is playing, playback continues, but the drawer
opens and four discs can be replaced. The disc
that can be replaced switches when the DISC
SKIP button is pressed.
Press the 5 OPEN/CLOSE button again to close
the drawer.
(2) Stopping Playback
( 2 STOP )
1. Press the 2 STOP button to stop playback.
2. To replace discs, press the 5 OPEN/CLOSE
button.
The disc which was playing switches over to the
front side and the drawer opens.
• Set the disc you want to played in the front side.
 Loading...