

Page 1
Contents Preparation Connections Operation Troubleshooting Appendix
.
AH-GC30
Wireless Noise Cancelling Over-Ear Headphone
Owner’s Manual
1
Page 2
Contents Preparation Connections Operation Troubleshooting Appendix
Preparation
Unpacking
Features
Sound quality
Functions
Telephone Calls
Part names and functions
Charging / Battery status
Wearing
Switching Audio Guidance
Connections
Bluetooth operation
Pairing
Connecting
1: Connecting to the headphones for the first time
2: Reconnecting paired devices
Simultaneously connecting multiple Bluetooth devices (Multipoint
function)
Connecting to a computer via USB
Operation
Listening to music
4
Listening to music using a Bluetooth connection
5
Listening to music using the audio cable
5
Listening to music on a computer via USB
5
Decreasing outside noise (Noise cancell function)
6
Listening to surrounding sound (ambient sound mix function)
7
Conducting phone calls
8
10
11
13
13
13
14
16
17
19
Making a call
Answering an incoming call
Ending a call
Using the call waiting function
Ignoring an incoming call
Switching a call from the headphones to a mobile phone
Other operations
Turning the power off
Auto standby function
Information
Audio Playback and Phone Calls on a Bluetooth Device
Storage in the carrying case
Deleting pairing information
Auto dimmer function
20
20
22
23
25
27
28
28
28
28
29
29
29
30
30
31
32
32
32
33
33
2
Page 3
Contents Preparation Connections Operation Troubleshooting Appendix
Troubleshooting
Troubleshooting
Power does not turn on / power is turning off automatically
The device cannot be charged
No sound comes out
Sound is distorted, noisy, or cuts in and out
Cannot play media using Bluetooth
Cannot make a phone call
34
34
35
35
35
36
37
Appendix
Precautions for Use
Disposal of these headphones
Trademark information
Specifications
38
39
39
40
3
Page 4
DENON
Quick Start Guide
USB cable
(Micro-B connector,
approximately 1.2 m)
Carrying case
Accessory pouch
Audio cable
(approx. 1.3 m)
Safety Instructions
Audio cable (approx. 1.3 m)
with remote control mic
Contents Preparation Connections Operation Troubleshooting Appendix
Thank you for purchasing this product.
To ensure proper operation, please read this Owner’s Manual carefully before using the product.
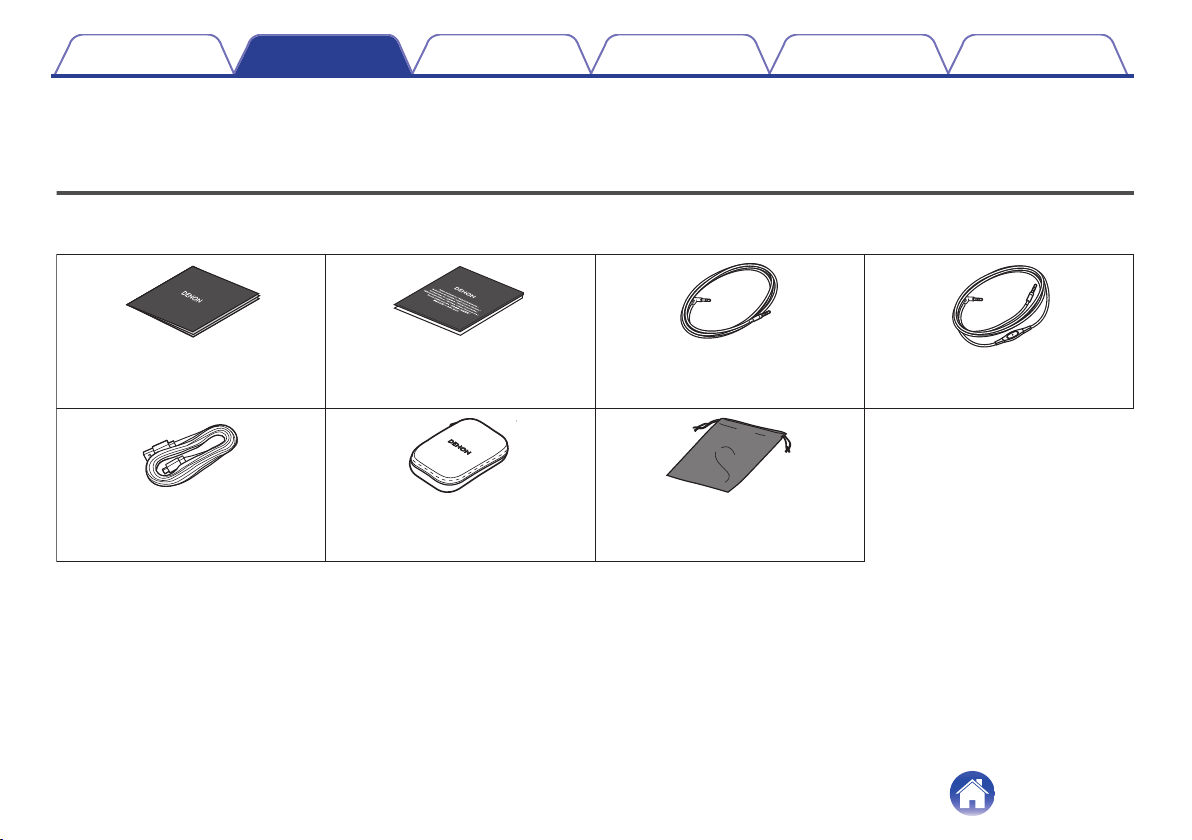
Unpacking
Check that all of these are present before using this device.
.
4
Page 5
Contents
Features
Preparation Connections Operation Troubleshooting Appendix
Sound quality
Equipped with a 40 mm free edge driver for the ideal piston
0
motion. This enables natural, delicate audio to be enjoyed with
minimal distortion.
These headphones are compatible with a wide range of codecs,
0
including the high sound quality codecs aptX HD, AAC and SBC.
These headphones automatically select the optimum compatible
codec for your Bluetooth device (smartphone or tablet) so you
can enjoy high-grade wireless sound.
Functions
You can enjoy listening to music wirelessly by connecting these
0
headphones to your Bluetooth device. Playback operations and
volume adjustment can be performed for the paired audio device
using the headphones.
When the noise cancelling function is turned on, you can hear
0
clear sound even if you are in a noisy location such as inside a
train. Equipped with three noise cancel modes with different
effects for use as needed for the surrounding environment.
You can connect to an audio device that is not equipped with
0
Bluetooth using the supplied cable, or in case Bluetooth is not
allowed or the battery runs out. The included audio cable with a
remote control mic is compatible with operations and calls on
playback devices.
Connect to a computer with the included USB cable to enjoy
0
high-quality music played from your computer. Music can be
played back from your computer even while the headphones are
charging so that music can be enjoyed without worrying about
the battery running out.
5
Page 6
Contents Preparation Connections Operation Troubleshooting Appendix
Telephone Calls
You can also make hands-free phone calls by pairing these
0
headphones to a Bluetooth compatible mobile phone. Equipped
with Qualcomm® cVcTM technology that suppresses echoes,
enabling low-noise phone calls.
6
Page 7
Q
3
y
u
r
q w w qe
iQ
2Q1Q0
o
R
L
t
Contents
Preparation Connections Operation Troubleshooting Appendix
Part names and functions
.
L/R Indicators
A
Noise cancelling microphones
B
Call microphones
C
Charging LED
D
Tap sensor panel
E
Lightly tap with your finger to toggle the ambient sound mix function on
or off. (v p. 27)
NC (Noise Cancel) LED
F
Bluetooth LED
G
Control button (1/3)
H
Pairs the headphones with Bluetooth devices.
0
(v p. 14)
Connects to Bluetooth devices. (v p. 16)
0
Turns the power off. (v p. 30)
0
Performs playback operations. (v p. 20)
0
Volume buttons (+/–) (v p. 21)
I
Noise cancelling function button (NC)
J
Sets the noise cancelling function. (v p. 25)
Stereo mini jack (2.5 mm)
K
Connects to playback devices using the included audio cable.
(v p. 22)
USB port (Micro-B)
L
Call button
M
Indicates the remaining battery power. (v p. 9)
0
Controls call operations on the mobile phones connected via
0
Bluetooth. (v p. 28)
7
Page 8
PC
or
USB cable (supplied)
USB AC
adapter
Contents
Preparation Connections Operation Troubleshooting Appendix
Charging / Battery status
Connect the headphones to a computer or USB AC adapter (sold
separately) using the supplied dedicated USB cable to charge the battery.
.
The charging status can be checked from the charging LED on headphones.
Charging status Color of charging LED
When using the headphones for the first time after purchase or when the
0
remaining power of the rechargeable battery is low, charge the battery.
You can connect the headphones to a device using the supplied audio cable to
0
enjoy listening to music even if the battery is drained. (v p. 22)
The headphones can be used for approximately 20 hours of music playback when
0
fully charged.
It takes approximately 2 hours to fully charge the rechargeable battery from the
0
state of no remaining battery power.
You can listen to music from a paired Bluetooth device or make phone calls even
0
during charging. In this case, noise may occur in the audio from the headphones
depending on the type of computer used.
When the USB cable is connected to this unit, the headphones disconnect from
0
Bluetooth and enter charging mode. Reconnect to Bluetooth to start Bluetooth
playback again. (v p. 13)
The usable time of the headphones differs depending on the temperature of the
0
environment in which they are used and method of use.
NOTE
When connecting the USB cable to the USB port, be sure to match the cable
0
connector with the shape of the socket. Forcing the connector into the socket will
cause damage.
The rating of the charging output should be DC 5 V, 2.4 A or less.
0
Charging Red
Fully charged Green
.
.
8
Page 9

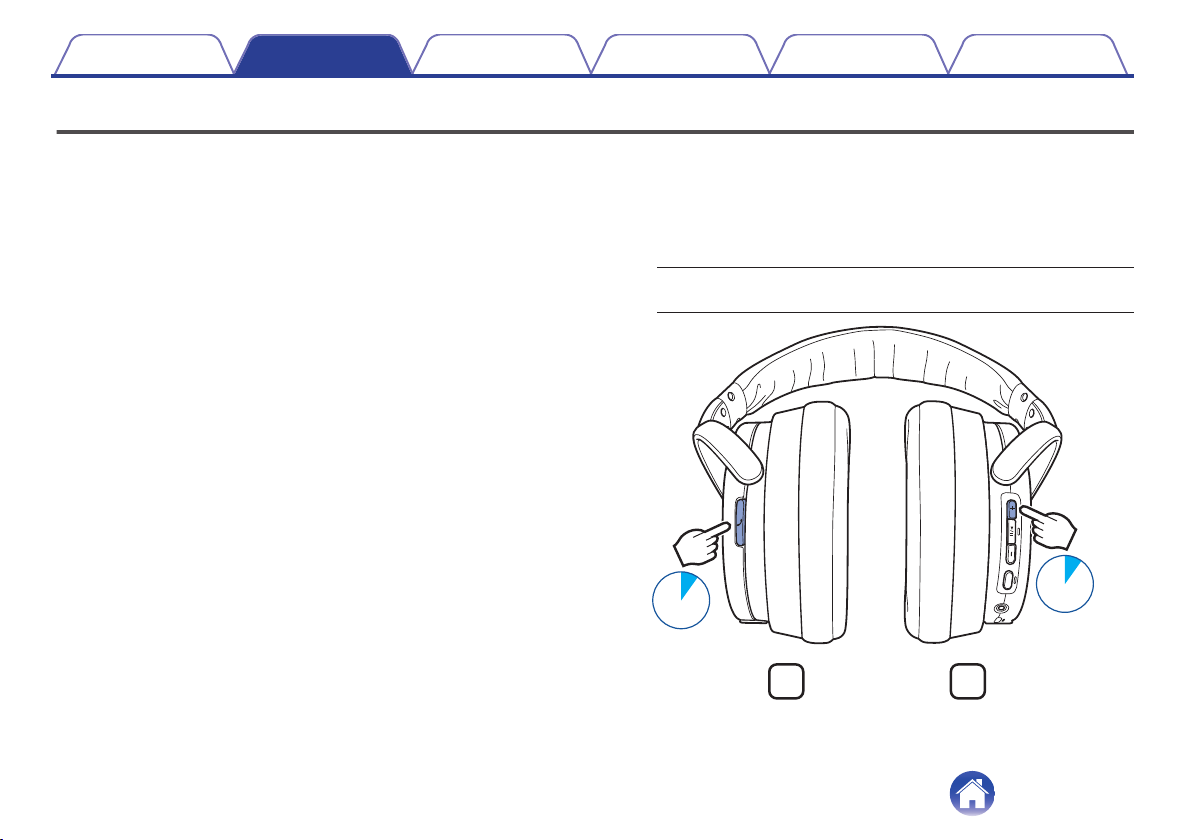
L
×2
Contents Preparation Connections Operation Troubleshooting Appendix
o
Checking the remaining battery power
The remaining power of the rechargeable battery can be checked from
the number of alert sounds or audio guidance. It can also be checked
from the number of times the charging LED flashes. Press and hold the
1/3 button for approximately 2 second to turn the power on, then
press the call button twice when a call is not in progress.
.
Number of alert
sounds
Four times Four times Approx. 20 hours
Three times Three times Approx. 10 hours
Twice Twice Approx. 5 hours
Once Once Less than 1 hours
Number of times the
charging LED flashes
Remaining time of
rechargeable battery
When the remaining power of the rechargeable battery is running low, the charging
0
LED flashes at approximately 3-second intervals together with an alert sound.
You can also check the remaining power of the rechargeable battery on an iPhone.
0
(*)
The remaining power of the rechargeable battery can be displayed as a
z
percentage (%) on an iPhone, but this number is an approximate value.
9
Page 10
R
L
Contents Preparation Connections Operation Troubleshooting Appendix
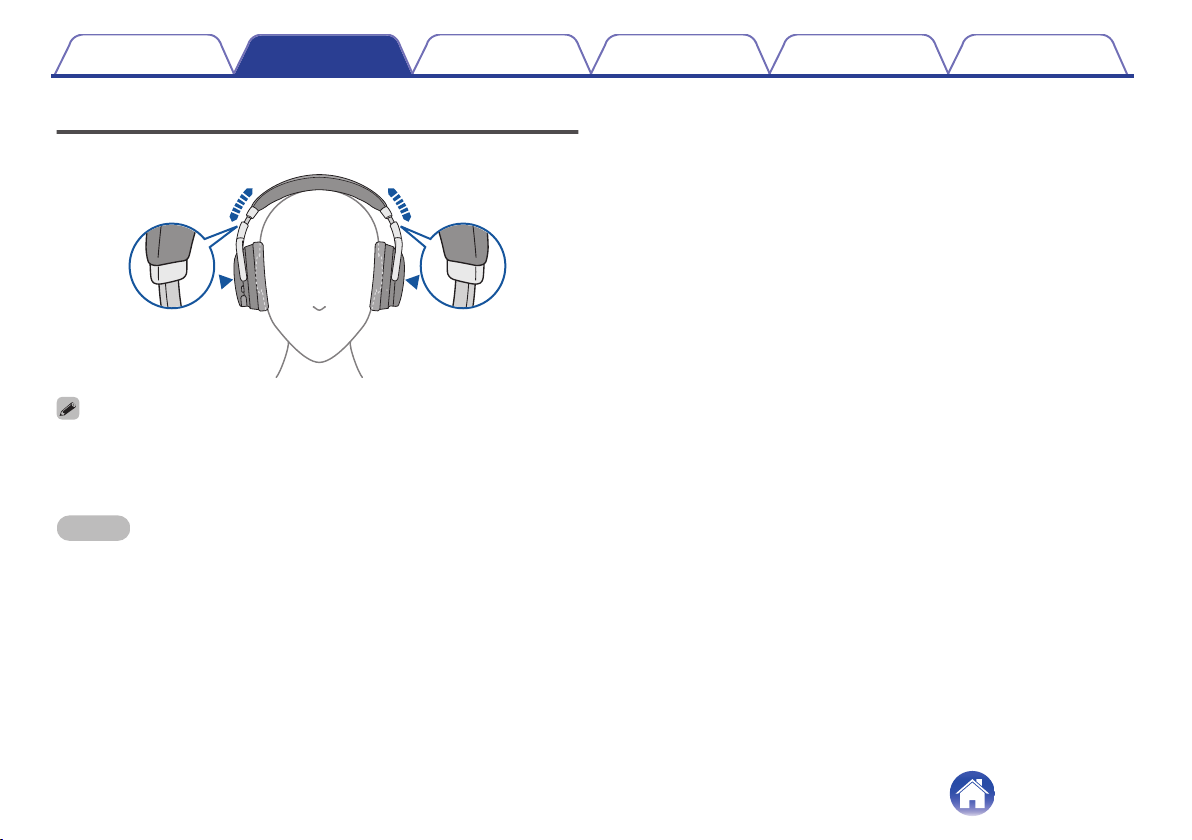
Wearing
Adjust the slider to the preferred length.
.
In order to hear the best quality sound, be sure that the ear pads correctly cover
0
both the left and right ears. If there are gaps between your ears and the
headphone ear pads, sound will leak and the bass level and effectiveness of the
noise cancelling function will be reduced.
NOTE
Be careful not to trap your fingers, etc. in the moving parts.
0
Do not pull the slider too forcefully.
0
10
Page 11
1sec.
L
R
1sec.
Contents
Preparation Connections Operation Troubleshooting Appendix
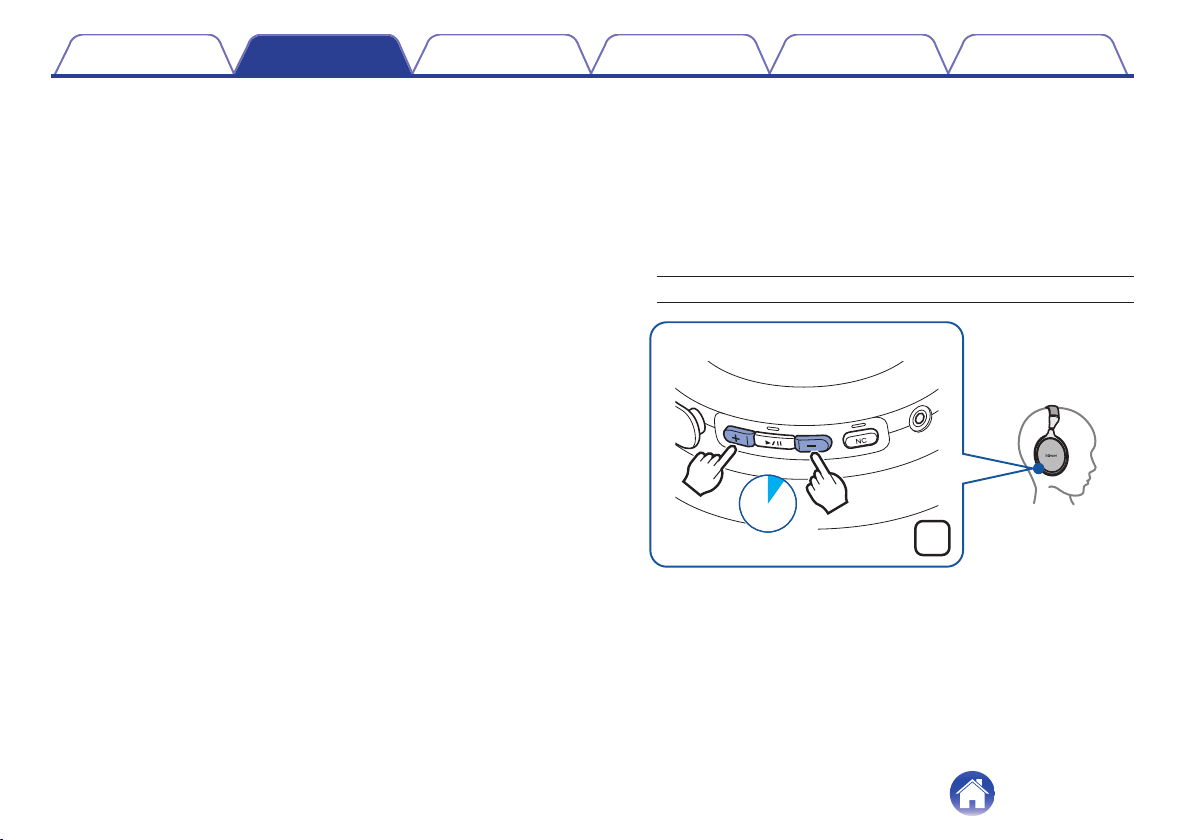
Switching Audio Guidance
You will be notified when an operation has been correctly completed via
the audio guidance or an alert sound.
You can switch to audio guidance in your preferred language or use only
an alert sound for guidance.
While the power is on and a call is not in progress,
1
press and hold the call button and volume “+” button
together for approximately 1 second.
The options switch between the audio guidance languages or only
alert sounds in the following order while the buttons are pressed.
English / Japanese / German / French / Italian / Spanish /
Chinese / Alert sounds (Default: English)
.
11
Page 12
5sec.
R
Contents
Release the buttons when the options have switched to
2
your desired setting.
This commits the audio guidance setting.
Preparation Connections Operation Troubleshooting Appendix
o
Adjusting the audio guidance volume
The audio guidance volume can be adjusted between 3 levels.
Press and hold the volume “+” button and volume “-”
1
button together for approximately 5 seconds.
An alert sound is heard and the audio guidance volume changes in
the following order. Repeat step 1 until the desired volume is
selected.
Medium / High / Low (Default: Medium)
.
12
Page 13
Contents Preparation Connections Operation Troubleshooting Appendix
Bluetooth operation
You can enjoy listening to music wirelessly by connecting the headphones to your Bluetooth device.
Pairing
Pairing (registration) is an operation that is required in order to connect a
Bluetooth device to the headphones. When using Bluetooth for the first
time, you need to pair the headphones and your Bluetooth device so they
can communicate with each other. Once a Bluetooth device has been
paired with your headphones, pairing does not need to be performed
again for future Bluetooth connections with that device.
Pairing needs to be done again in the following cases.
0
When 9 or more devices have been paired with the headphones
0
These headphones can store pairing information from a maximum of 8 devices.
When 9 or more devices are paired, the new pairing information overwrites the
oldest pairing information in order from the oldest information onwards.
Multiple Bluetooth devices cannot be played back at the same time.
0
Connecting
There are two methods for connecting with Bluetooth devices:
1
Connecting to the headphones for the first time
(v p. 14)
2
Reconnecting paired devices (v p. 16)
13
Page 14

4sec.
R
Contents
Preparation Connections Operation Troubleshooting Appendix
1: Connecting to the headphones for
the first time
Check that the headphones are not connected to any Bluetooth device
before pairing.
Turn on the Bluetooth function of your Bluetooth
1
device.
For details, see the Owner’s Manual of the Bluetooth device that
0
you want to connect.
.
While the power is off, press and hold the 1/3 button
2
for approximately 4 seconds.
The Bluetooth LED lights and then blinks in approximately 1-second
intervals as the headphones enter pairing mode.
.
The headphones turn on after pressing and holding the 1/3 button for
0
approximately 2 second. Continue pressing the button.
If the Bluetooth LED does not light even when the 1/3 button is pressed,
0
the rechargeable battery has no power remaining. Charge the battery.
(v p. 8)
14
Page 15

DENON AH-GC30
Contents Preparation Connections Operation Troubleshooting Appendix
Select “DENON AH-GC30” from the list of devices
3
displayed on the screen of your Bluetooth device.
When pairing is completed and the Bluetooth connection is
established, the Bluetooth LED lights for approximately 5 seconds.
.
Playing back music on the Bluetooth device.
4
Music played back on the connected Bluetooth device is output from
the headphones.
If the power is on, press and hold the 1/3 button for approximately 3 seconds to
0
turn the power off before pairing.
The headphones pairing mode is canceled if pairing is not completed within 3
0
minutes. In this case, press and hold the 1/3 button for approximately 3 seconds
to turn the power off and then pair the devices again.
If you are requested to enter a PIN code (pass key), enter “0000” (four zeros).
0
15
Page 16

R
2sec.
Contents
Preparation Connections Operation Troubleshooting Appendix
2: Reconnecting paired devices
Check that the headphones are not connected to any Bluetooth device
before connecting.
Turn on the Bluetooth function of your Bluetooth
1
device.
For details, see the Owner’s Manual of the Bluetooth device that
0
you want to connect.
.
While the power is off, press and hold the 1/3 button
2
for approximately 2 second.
The Bluetooth LED flashes for approximately 1.5 seconds and the
headphones power on before automatically connecting to the
Bluetooth device.
When the Bluetooth connection is established, the Bluetooth LED
0
lights for approximately 5 seconds.
.
If the Bluetooth connection is not made automatically, select “DENON AH-
0
GC30” from the list of devices displayed on the screen of your Bluetooth
device.
Playing back music on the Bluetooth device.
3
Music played back on the connected Bluetooth device is output from
the headphones.
16
Page 17

4sec.
R
Contents
Preparation Connections Operation Troubleshooting Appendix
Simultaneously connecting multiple
Bluetooth devices (Multipoint function)
Two Bluetooth devices can be simultaneously connected to the
headphones, but of these only one device can be used to listen to music
or make phone calls at any time. It is convenient to connect devices that
you use frequently so that you do not need to re-connect each time you
want to switch devices.
Connecting to a second Bluetooth device
o
Turn off the Bluetooth function of the 1st paired
1
Bluetooth device. (For details, see the Owner’s Manual
of the Bluetooth device that you want to connect.)
Turn off the headphones and then pair the 2nd
2
Bluetooth device.
When pairing is completed and the Bluetooth connection is
established, the Bluetooth LED lights for approximately 5 seconds.
.
See “1: Connecting to the headphones for the first
0
time” (v p. 14) for details on how to pair devices.
17
Page 18

DENON AH-GC30
Contents Preparation Connections Operation Troubleshooting Appendix
Switching Bluetooth playback devices
Turn on the Bluetooth function of the 1st Bluetooth
3
device, and select “DENON AH-GC30” from the list of
devices displayed on the screen.
.
This procedure connects two Bluetooth devices to the
0
headphones.
o
Stop or pause playback on the current playback
1
device.
Start playback on the device that you want to listen to.
2
Call standby
o
Simultaneous call standby is possible, but the device that receives the
call first takes priority. Calls cannot be made simultaneously.
18
Page 19

PC
USB cable (supplied)
Contents Preparation Connections Operation Troubleshooting Appendix
Connecting to a computer via USB
Audio data on a computer can be played through the headphones by
inserting the USB cable (supplied) in the USB port of the headphones and
connecting them to the computer. (v p. 23)
.
The headphones automatically start charging when they are connected to a
0
computer.
19
Page 20

R
Contents
Preparation Connections Operation Troubleshooting Appendix
Listening to music
Listening to music using a Bluetooth
connection
First check that the headphones and Bluetooth device are connected via
Bluetooth. (v p. 13)
Playback operations can be performed from both the Bluetooth device and
headphones. Here we will explain the operations using the buttons on the
headphones.
When the headphones are connected using the audio cable, the Bluetooth
0
function is automatically turned off and the Bluetooth device cannot be controlled
using the headphones.
Playback/pause
Press the 1/3 button once.
The Bluetooth LED flashes in 5-second intervals during playback.
0
.
20
Page 21

R
×2
R
×3
R
Contents
Preparation Connections Operation Troubleshooting Appendix
Select track
Next track: Press the 1/3 button twice.
.
Previous track: Press the 1/3 button 3 times.
Volume adjustment
Increase volume: Press the volume “+” button.
Decrease volume: Press the volume “-” button.
An alert sound is heard when the maximum or minimum volume is
0
reached.
.
.
21
Page 22

Audio cable (supplied)
Back
Button
Microphone
Contents Preparation Connections Operation Troubleshooting Appendix
o
Listening to music using the audio
cable
Use the included audio cable to connect to an audio device that is not
equipped with Bluetooth, when Bluetooth is not allowed or the battery runs
out.
.
Using the audio cable with remote control mic
An audio cable with a remote control mic as well as an audio cable are
included with these headphones. Use the audio cable with the remote
control mic to connect with remote control-compatible playback
devices to play and pause music, as well as receive, make and hang
up phone calls.
The noise cancelling function can be used when the headphones are connected
0
via the audio cable as long as the battery remains charged. (v p. 25)
Call and playback operations using Bluetooth are disabled when the headphones
0
are connected via the audio cable.
.
Audio playback/pause
Press the remote control button.
Answer / hang up phone call
Press the remote control button when a call is incoming or while on a
call.
Enabled remote control operations may vary depending on the device connected,
0
and mic operations may not work correctly.
22
Page 23

Contents
Preparation Connections Operation Troubleshooting Appendix
Listening to music on a computer via
USB
First check that the headphones and computer are connected via USB.
(v p. 19)
o
For Windows OS
Click “Start” on the computer screen and then click
1
“Control Panel”.
This displays the Control Panel settings list.
Click “Sound”.
2
This displays the Sound menu screen.
In the “Playback” tab, make sure that “Default Device”
3
is checked for “AH-GC30”.
If it is checked for another device, select “AH-GC30” and click
0
“Set Default”.
Play the music in the player software on your
4
computer.
The music being played is output through the headphones.
o
For Mac OS
Move the cursor to “Go” on the computer screen and
1
click “Utilities”.
This displays the Utilities list.
Double click “Audio MIDI Setup”.
2
This displays the “Audio Devices” screen.
In “AH-GC30”, make sure that “Use this device for
3
sound output” is checked.
If it is checked for another device, secondary click “AH-GC30”
0
and select “Use this device for sound output”.
Play the music in the player software on your
4
computer.
The music being played is output through the headphones.
23
Page 24

Contents Preparation Connections Operation Troubleshooting Appendix
The buttons on the headphones can be used to control playback in addition to the
0
controls on the computer.
Playback/pause
Next track
Previous track
Increase volume Press the volume “+” button
Decrease volume Press the volume “-” button
It may not be possible to use the buttons of the headphones to control the
z
playback with some computers or player software.
Press the 1/3 button once
Press the 1/3 button twice
Press the 1/3 button three times
24
Page 25

R
2sec.
Contents
Preparation Connections Operation Troubleshooting Appendix
Decreasing outside noise (Noise
cancell function)
Turn the noise cancelling function on while listening to music to reduce
surrounding noise and better focus on your music. These headphones are
equipped with three noise cancelling modes that can be set as needed for
the surrounding environment. Try using the noise cancelling function when
you aren’t listening to music to help yourself concentrate in quiet
environments.
o
Turning the noise cancelling function on
Press and hold the NC button for approximately 2
1
seconds.
The NC LED blinks orange and the noise cancelling function turns
on.
.
25
Page 26

R
2sec.
Contents
Preparation Connections Operation Troubleshooting Appendix
o
Switching the noise cancelling mode
Press the NC button while the noise cancelling function
1
is on.
Switches to the next setting each time the button is pressed.
0
Setting
Airplane mode Blinks once
City mode Blinks twice
Office mode
LED display
(repeats)
Blinks three
times
Description
The optimal mode to use
when on a plane.
The optimal mode to use
when on trains or buses, or
when in an urban area.
The optimal mode to use in
relatively quiet rooms.
o
Turning the noise cancelling function off
Press and hold the NC button for approximately 2
1
seconds while the noise cancelling function is on.
The NC LED turns off and the noise cancelling function turns off.
.
26
Page 27

R
×2
R
×2
Contents Preparation Connections Operation Troubleshooting Appendix
o
Listening to surrounding sound
(ambient sound mix function)
Turn on the ambient sound mix function while listening to music to use the
mic to mix surrounding sound into the music you are listening to. Enjoying
music while also being able to hear surrounding sound is useful when you
are listening to an in-flight announcement or talking with your headphones
on.
o
Turning the ambient sound mix function on
Tap the center of the tap sensor panel twice.
1
The NC LED lights orange and the ambient sound mix function turns
on.
.
Turning the ambient sound mix function off
Tap the center of the tap sensor panel twice while the
1
ambient sound mix function is on.
The NC LED returns to its original state (either flashing or off) and
the ambient sound mix function turns off.
.
The ambient sound mix function can be turned off by pressing and holding the NC
0
button for approximately 2 seconds. Performing this operation while the noise
cancelling function is on also simultaneously turns off the noise canceling function.
Ambient sound is not mixed into the low range that is not affected by
0
announcements and conversation.
27
Page 28

L
Contents
Preparation Connections Operation Troubleshooting Appendix
Conducting phone calls
Calls can be made while you are wearing the headphones. You can hear
the caller’s voice through the headphones, and your voice is picked up by
the built-in microphone in the headphones. Use the call button to operate
Bluetooth compatible mobile phones connected via Bluetooth.
.
When the headphones are connected using the audio cable, the Bluetooth
function is automatically turned off and calls cannot be made using the
headphones.
Making a call
Dial the number with the mobile phone connected via Bluetooth. Audio
playback is paused and the call is connected.
Answering an incoming call
When an incoming call is received, audio playback is paused and the ring
tone is heard.
Press the call button once to answer the call.
Ending a call
Press the call button once during the call.
When a call is ended, playback of the paused track is restarted.
28
Page 29

Contents Preparation Connections Operation Troubleshooting Appendix
Using the call waiting function
If you receive a call while another call is already in progress, you can place
the current call (call A) on hold and switch to the new call (call B).
Some of mobile phones may not be compatible with these functions.
0
Press the call button once during the call.
1
o
1
This places the current call (call A) on hold and switches to the
0
new call (call B).
When the new call (call B) ends, the headphones return to the call
0
that is on hold (call A).
To return to the call that is on hold (call A)
Press and hold the call button for approximately 3
seconds during the call (call B).
This places the current call (call B) on hold and switches to the
0
call that is on hold (call A).
Ignoring an incoming call
Press and hold the call button for approximately 3 seconds when an
incoming call is received.
Switching a call from the headphones
to a mobile phone
Switch the current call to the mobile phone.
Press the call button three times.
The switch operation cannot be used when a call waiting call is received. Switch
0
using the mobile phone.
29
Page 30

3sec.
R
Contents Preparation Connections Operation Troubleshooting Appendix
Other operations
Incoming call
detected
In standby mode/
During audio
playback
Call in progress
Press the volume buttons (+/-) to adjust the volume of the caller’s voice.
0
Answer Press the call button once
Voice dial/
Voice activated call
End call Press the call button once
Mute on/off Press the call button twice
Press and hold the call
button
Turning the power off
Press and hold the 1/3 button for approximately 3
1
seconds.
The Bluetooth LED turns off and the power is turned off.
.
A small amount of power is consumed even when the power is off.
0
30
Page 31

1sec.
L
R
1sec.
Contents
Preparation Connections Operation Troubleshooting Appendix
Auto standby function
To keep the battery from draining, the headphones automatically turn off
after no operations are performed or they are stationary* for at least 10
minutes. The default setting for the auto standby function is “on”.
The headphones are stationary when they have been placed on a surface such
z
as a desk and are completely motionless.
o
Turning the auto standby function on and off
Press and hold the volume “-” button and call button
1
together for approximately 1 second or more.
An alert sounds and the auto standby switches between on and off.
.
31
Page 32

Extend
Contents Preparation Connections Operation Troubleshooting Appendix
Information
Audio Playback and Phone Calls on a
Bluetooth Device
These headphones are compatible with SCMS-T content security
0
standards. You can use these headphones with SCMS-T compatible
mobile phones or devices.
In order to listen to music via a Bluetooth connection, the connected
0
Bluetooth device needs to be A2DP (Advanced Audio Distribution
Profile) compatible. (*)
In order to control playback of the Bluetooth device using the
0
headphones, the connected Bluetooth device needs to be AVRCP
(Audio Video Remote Control Profile) compatible. (*)
The connected Bluetooth device needs to be compatible with either
0
HSP (Headset Profile) or HFP (Hands-free Profile) in order to use the
headphones for conducting phone calls. (*)
The Bluetooth device needs to be compatible with either HFP or HSP
0
and A2DP in order to conduct calls during audio playback. (*)
For details on profiles that the Bluetooth device is compatible with, see the
z
Bluetooth device Owner’s Manual.
Storage in the carrying case
Remove the cable from the headphones and store them in the included
carrying case as shown below.
.
NOTE
Do not force them into the carrying case. Doing so may damage the headphones.
0
32
Page 33

5sec.
R
Contents Preparation Connections Operation Troubleshooting Appendix
Deleting pairing information
Delete pairing information if you have made a mistake entering pairing
information or when re-pairing a device.
Press and hold the volume “+” button for
1
approximately 5 seconds while in pairing mode.
The Bluetooth LED flashes 5 times and the pairing information is
erased.
.
To make a Bluetooth connection after clearing the pairing information, follow the
0
instructions on “1: Connecting to the headphones for the first time” (v p. 14).
Auto dimmer function
The auto dimmer function changes the LED brightness when the
headphones are tilted past the defined angle. When the headphones are
on, the LED dims so that the brightness does not disturb people around
you. The brightness increases if the headphones are laid horizontally
when charging, etc.
33
Page 34

Contents
Preparation Connections Operation Troubleshooting Appendix
Troubleshooting
First, check the following.
1. Are all of the connections correct?
2. Were the instructions in the manual followed correctly?
3. Is the connected device being operated correctly?
If the headphones do not operate properly, check the corresponding issue here.
If the issue is not covered here, there may be a malfunction. Contact the store where you purchased the headphones. If the staff at the store where you
purchased the headphones also do not know how to resolve the issue, contact the Denon Customer Service Center or your nearest Repairs Center.
Power does not turn on / power is turning off automatically
Power does not turn on.
When the rechargeable battery has no power remaining, connect the headphones to an AC adapter or computer using the supplied USB cable to
0
charge the battery. (v p. 8)
Power is turning off automatically.
The auto standby function has turned on. In auto standby mode, the headphones automatically turn off after no operations are performed or they are
0
stationary (when they have been placed on a surface such as a desk and are completely motionless) for at least 10 minutes. To turn off auto standby
mode, press and hold the volume “-” button and call button together for 1 second or more while auto standby mode is on. (v p. 31)
34
Page 35

Contents
Preparation Connections Operation Troubleshooting Appendix
The device cannot be charged
The headphones cannot be charged.
Check whether the power plug is correctly inserted into the power outlet. (v p. 8)
0
Make sure the supplied USB cable is inserted correctly into the headphones. (v p. 8)
0
If the headphones are connected to the computer via the USB port, check that the computer is powered on.
0
No sound comes out
No sound comes out.
Check that the headphones and the connected device are powered on.
0
Adjust the volume of the headphones and the connected device to a suitable level. (v p. 21)
0
Pair the headphones with the Bluetooth device. (v p. 14)
0
If you are trying to play music on a computer via USB, check that the supplied USB cable is fully connected. (v p. 19)
0
Sound is distorted, noisy, or cuts in and out
Sound is distorted, noisy, or cuts in and out.
Adjust the volume of the headphones and the connected device to a suitable level. (v p. 21)
0
The Bluetooth device is out of range. Bring the Bluetooth device closer to the headphones.
0
The Bluetooth connection is experiencing wireless interference. Move the headphones away from appliances such as microwave ovens and other
0
wireless devices.
Power cycle the device and try again.
0
35
Page 36

Contents
Preparation Connections Operation Troubleshooting Appendix
Cannot play media using Bluetooth
Cannot connect using Bluetooth.
Check that the power of the Bluetooth device is on and the Bluetooth function is enabled.
0
Check whether the Bluetooth device is in sleep status.
0
Bring the headphones and the Bluetooth device closer together.
0
Turn the Bluetooth device off and back on and try again.
0
Pair the devices again. (v p. 14)
0
Select A2DP as the Bluetooth connection profile on the transmitting Bluetooth device. For details, see the Owner’s Manual of the Bluetooth device.
0
If the USB cable is connected, remove it.
0
If the audio cable is connected, remove it.
0
Sound is not output from the headphones when connected using Bluetooth.
Check that audio is being played back on the Bluetooth device.
0
Increase the volume. Increase the volume on the Bluetooth device if it is necessary to adjust the volume on the Bluetooth device. (v p. 21)
0
36
Page 37

Contents Preparation Connections Operation Troubleshooting Appendix
Cannot make a phone call
Cannot make a phone call.
Some smartphones and phone apps do not support hands-free calls.
0
Cannot hear the caller’s voice.
Press the call button to switch to the call if it comes while you are listening to music on the headphones. (v p. 28)
0
Check that the power of the Bluetooth device is on and the Bluetooth function is enabled.
0
Select HSP or HFP as the Bluetooth connection profile on the transmitting Bluetooth device. For details, see the Owner’s Manual of the Bluetooth
0
device.
Check that the Bluetooth device is set to handle calls through the headphones. For details, see the Owner’s Manual of the Bluetooth device.
0
Increase the incoming call volume. (v p. 30)
0
37
Page 38

Contents Preparation Connections Operation Troubleshooting Appendix
Precautions for Use
Be sure to read the Owner’s Manual of the device that you want to connect.
0
Check the volume settings when using the headphones on public transport or in public places and make sure you do not disturb people around you.
0
These headphones are not guaranteed to work with all combinations of Bluetooth devices/mobile phones.
0
These headphones do not support connection with all Bluetooth devices/mobile phones.
0
Bluetooth wireless technology can communicate over a distance of approximately 10 m. However, obstructions (people, metallic objects, walls, etc.)
0
and radio wave conditions affect the range in which communication is possible.
The Bluetooth device that you want to connect must support the same profile as these headphones in order to use the Bluetooth function. For details on
0
profiles that the Bluetooth device is compatible with, see the Bluetooth device Owner’s Manual.
Due to features of Bluetooth wireless technology, playback of audio on the headphones is slightly delayed compared to the voice/audio playback on the
0
transmitting device.
38
Page 39

Contents Preparation Connections Operation Troubleshooting Appendix
Disposal of these headphones
The rechargeable battery built into these headphones can be recycled.
Contact the Denon Customer Service Center for details on disposing of
these headphones.
Trademark information
.
The Bluetooth® word mark and logos are registered trademarks owned
by the Bluetooth SIG, Inc. and any use of such marks by D&M Holdings
Inc. is under license. Other trademarks and trade names are those of
their respective owners.
.
Qualcomm aptX and Qualcomm cVc are products of Qualcomm
Technologies, Inc. and/or its subsidiaries.
Qualcomm is a trademark of Qualcomm Incorporated, registered in the
United States and other countries. aptX and cVc are trademarks of
Qualcomm Technologies International, Ltd., registered in the United
States and other countries.
39
Page 40

Contents Preparation Connections Operation Troubleshooting Appendix
Specifications
Headphone section
o
Type: Dynamic type
Drive units: φ40 mm
Impedance: 16 Ω/ohms
Sound pressure sensitivity: 98 dB/mW
Maximum input: 1,000 mW
Playback frequency: 5 – 50,000 Hz
Bluetooth section
o
Compatible standards: Bluetooth Ver. 5.0
Transmission power class: Max. transmission power 10 mW (Class 1)
Compatible profiles: A2DP/AVRCP/HSP/HFP
A2DP codec support: aptX HD/aptX/AAC/SBC
Continuous playback time:
Bluetooth function ON + noise cancellation
function ON:
Approx. 20 hours
40
Page 41

Contents Preparation Connections Operation Troubleshooting Appendix
USB audio component
o
Supported format: PCM 16-bit / Sampling frequencies: 48, 44.1, 32 kHz
Supported device class: Audio device class ver.1.0, HID class ver.1.11
General
o
Operating temperature range: 5 ℃ - 40 ℃
Power supply: DC 3.7 V (internal lithium polymer rechargeable battery)
Weight: 287 g
For purposes of improvement, specifications and design are subject to change without notice.
z
41
Page 42

www.denon.com
42
Copyright © 2019 D&M Holdings Inc. All Rights Reserved.
3520 10656 00AD
 Loading...