

Page 1
DENON
BLU-RAY DISC I
DVD
VIDEO PLAYER
DVD-3800BDCI
OPERATING INSTRUCTIONS
MODE D'EMPLOI
INSTRUCCIONES
DE
FUNCIONAMIENTO
Page 2
ENGLISH
Introduction
FRAN<;:AIS
ESPANOL
Introduction
SafetyPrecautions
CAUTION:
TO
REDUCE
REMOVE
PARTS
SERVICE
A
A
THE
COVER
INSIDE.
RISKOFELECTRIC
(OR
BACK).NOUSER-SERVICEABLE
REFER
SERVICINGTOQUALIFIED
SHOCK,DONOT
PERSONNEL.
The lightning flash
triangle,isintendedtoalert the usertothepresence
uninsulated 'dangerous voltage"
that
may
shocktopersons.
The exclamation
to
alert the usertothe presenceofimportantoperating and
maintenance (servicing) instructions in the literature
accompanying the appliance.
with
arrowhead symbol.
beofsufficient magnitudetoconstituteariskofelectric
point
within
withinanequilateral triangleisintended
the product's enclosure
WARNING:
TO
REDUCE
EXPOSE
NOT
Laser Safety .
CAUTION:
VISIBLE
DO
NOT
LOCATION:
CAUTION:
USEOFCONTROLSORADJUSTMENTSORPERFORMANCE
PROCEDURES
HAZARDOUS
THIS
PRODUCT
EXCEPT
AND
INVISIBLE
STAREINTO
INSIDE,
OTHER
RADIATION
SHOULD
PROPERLY
THE
RISKOFFIREORELECTRIC
THIS
APPLIANCETORAINORMOISTURE.
LASER
RADIATION
WHEN
OPEN.
BEAM.
NEAR
THE
DECK
MECHANISM.
THAN
THOSE
SPECIFIED
HEREIN
EXPOSURE.
NOTBEADJUSTEDORREPAIREDBYANYONE
QUALIFIED
SERVICE
PERSONNEL.
MAY
withinanequilateral
of
SHOCK,
DO
OF
RESULT
IN
SAFETY
1.
Read
Instructions - All the safety and operating instructions should be read
before the productisoperated.
Retain Instructions - The safety and operating instructions should be retained
2.
future reference.
3.
Heed Warnings - All warnings on the product andinthe operating instructions
should beadhered to.
4.
Follow Instructions -All operating and use instructions should be followed.
5.
Cleaning - Unplug this productfrom the wall outletbefore cleaning.Donot
liquidcleanersoraerosol cleaners.
6.
Attachments -Donot
manufacturer
7.
Waterand Moisture -Donot
bath tub, wash bowl. kitchen sink,orlaundrytub; in a
swimming pool; and the like.
Accessories-Do
8.
or
table. The product
seriousdamagetotheproduct.
tripod, bracket,ortable recommendedbythe
manufacturer,orsold
the product should follow the manufacturer's
instructions, and should use a
recommended bythe manufacturer.
9.
A product and cartcombinationshould be moved with
care. Quick stops, excessive force, and uneven surfaces
may
cause the product and cart combinationtooverturn.
10. Ventilation - Slots and openings in the cabinet are
provided
for
of
the product andtoprotectitfrom overheating, and
these openings must
openingsshould neverbeblockedbyplacing the product on abed,sofa, rug,
other similar surface. This productshould
suchasabookcaseorrack unless proper ventilationisprovidedorthe
manufacturer's instructions have been adhered to.
11. Power Sources -This product should
source indicated on the marking label. Ifyouare
supplytoyour home, consult your product dealerorlocal
products intendedtooperate
operating instructions.
12. Grounding
alternating-currentline plug(aplug haVing one blade widerthanthe other). This
plug will fit into the
unabletoinsert the plug fully
should still failtofit, contact yourelectriciantoreplace your obsolete outlet. Do
not
or
defeatthesafety purposeofthe polarized plug.
EXAMPLEOFANTENNA
use attachments
as
they
may
cause hazards.
not
place this product on an unstable cart, stand,tripod,bracket,
may
fall, causing serious injurytoachildoradult, and
with
the product. Any
ventilation andtoensure reliable operation
not
beblockedorcovered. The
Polarization -This product
power
outlet
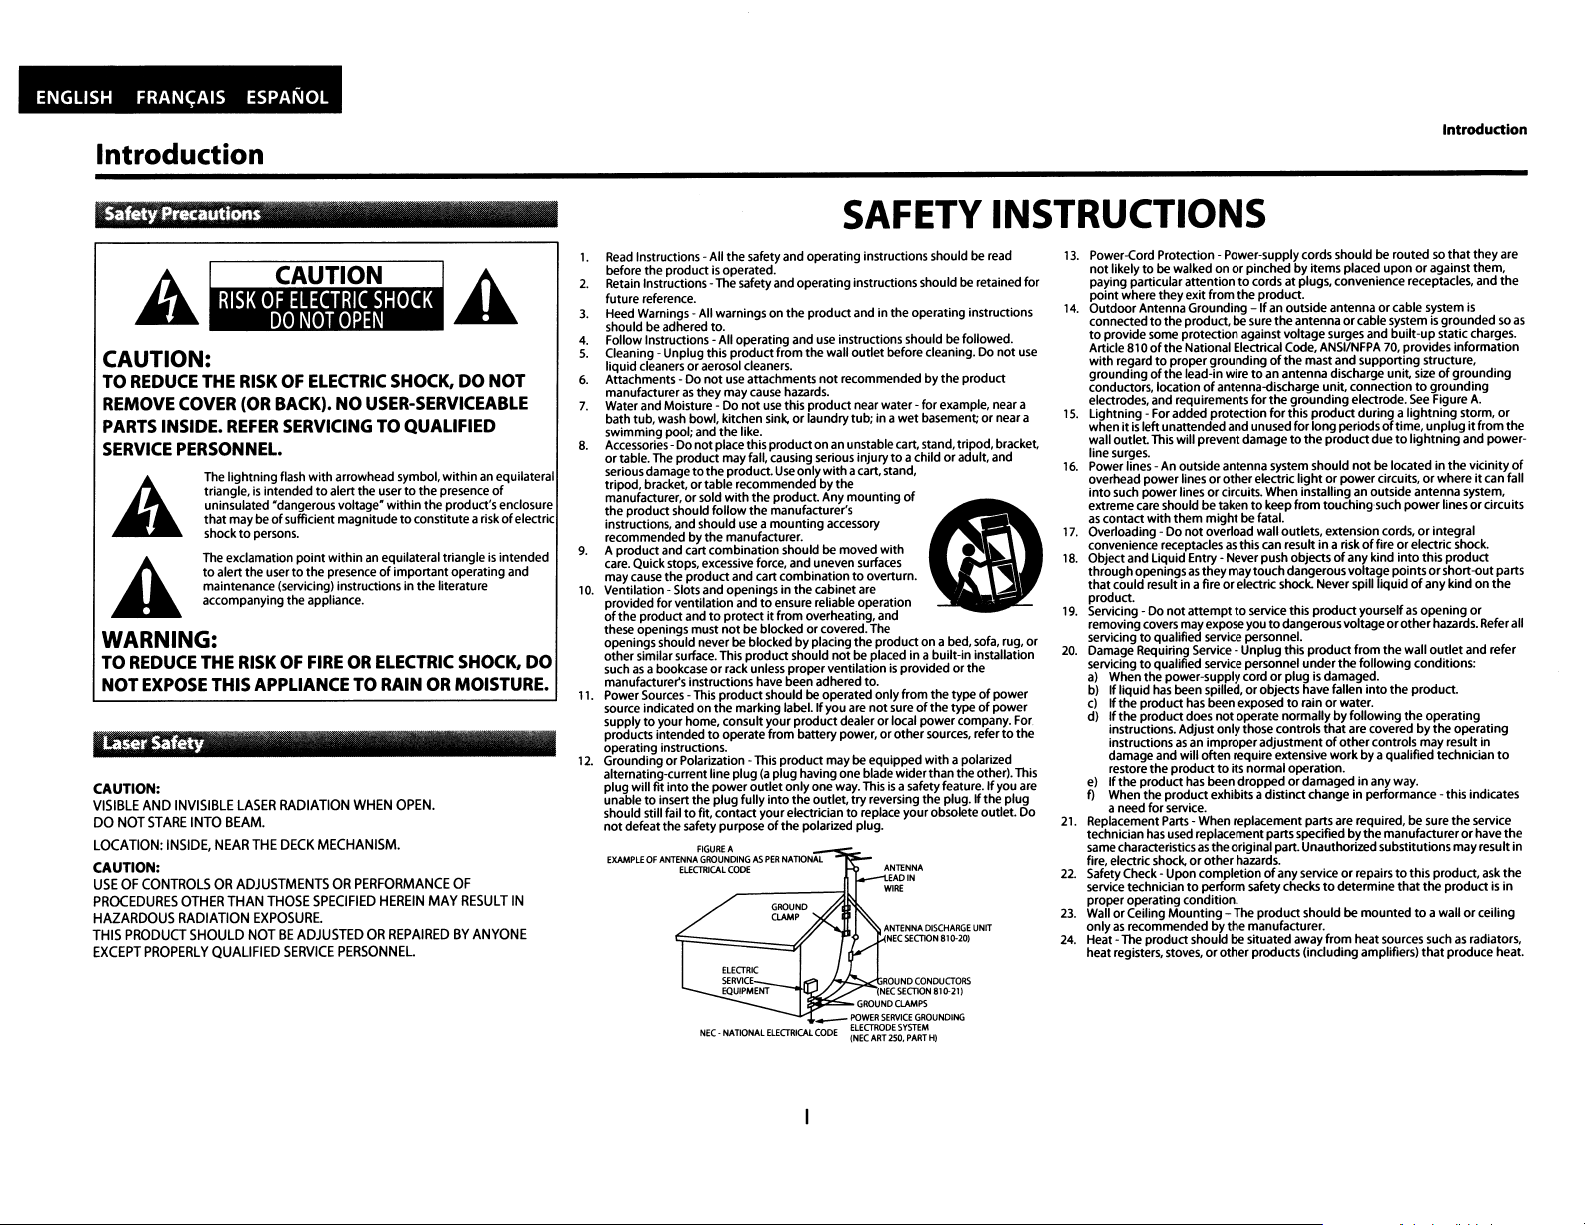
FIGURE
A
GROUNDINGASPER
ElKT1lJCAl
CODE
NEe-NATIONAL
not
recommendedbythe product
use
thiS
product near water -
Use
only
with acart,stand,
mounting
mounting
accessory
not
be placed in abuilt-in installation
be
operated only from the typeofpower
from
batterypower,orother sources, refertothe
may
be equipped
onlyone way. This isa
into
the outlet,
try
NATIONAl
GROUND
.---
ELECTRICAl
POWER
CODE
~f:R~D~;m~
for
wet
basementorneara
of
not
sureofthe typeofpower
power
with
safety
reversing the plug. Iftheplug
ANTENNA
OtSCHARGE
NEC
SECT10N
81o.20l
ROUND
CONOUOORS
(NECSKTION81G-21)
ClAMPS
SERVICE
GROUNDING
H}
example, near a
company. For
a polarized
feature.Ifyou are
INSTRUCTIONS
13.
Power-Cord Protection - Power-supplycords should be routedsothat
not
for
use
or
UNIT
likelytobe walked onorpinchedbyitemsplaced uponoragainst them,
paying particular attentiontocords at plugs,conveniencereceptacles, and
point
where
they
14. Outdoor Antenna Grounding
connectedtothe product, be sure theantennaorcable systemisgroundedsoas
to
prOVide some protection againstvoltagesurges and
ArtIcle 810oftheNational Electncal Code,
with
regardtoproper
groundingofthelead-in wiretoan antenna discharge unit, sizeofgrounding
conductors, locationofantenna-discharge
electrodes, and requirements
15.
Lightning - For added protection
whenItIS
wall outlet. This will prevent damagetothe
hne surges.
16.
Power lines - An outsideantenna system should
overhead
into
such power linesorcircuits. When installingan outside antenna system,
extremecare should betakentokeep from touching-such
as
contact
17. Overloading -Do
convenience receptaclesasthis can resultina riskoffireorelectric shock.
18. Objectand
throughopeningsasthey
that could result in a fireorelectric shock. Never spill liquidofany kind on
product.
19. Servicing -
removmg covers
servicingtoqualified service personnel.
20. Damage Requiring Service - Unplug tlhis product
servicingtoqualified service personnel
a)
Whenthe power-supply cordorplugisdamaged.
b)Ifliquid
c)Ifthe product
d)Ifthe product
,nstruct!ons. Adjust only those(Ontrols
mstructlonsasan Improperadjustmentofother
damage and will often require extensive
restore the producttoits normal operation.
e)Ifthe product
t) When the productexhibitsadistinct change in performance -this indicates
a need for service.
21. Replacement Parts - When replacementparts are required, be sure the service
technician
samecharacteristicsastheoriginal part. Unauthorized substitutions
fire, electric shock,orother
22.
SafetyCheck - Upon completionofanyserviceorrepairstothis product,
service techniciantoperform safety checkstodetermine
proper operating condition.
23.
WallorCeiling
onlyasrecommendedbythemanufacturer.
24.
Heat-
The
heat regIsters, stoves,orotlher products (including amplifiers)
exit from the product.
leftunattendedand unused
power
linesorother
with
them
might
not
overload wall outlets, extension cords,orintegral
liquid
Entry - Never push objectsofanykind
Do
not
attempttoservice this
may
exposeyoutodangerousvoltageorother
has
been spilled,orobjects have fallen into the product.
has
been exposedtorainorwater.
d~s
has
been droppedordamaged in any way.
has
usedreplacementpartsspecifiedbytlhe
Mounting
product should be situated away
-Ifanoutside antennaorcable system
built-up
groundingofthe mast and supporting structure,
for
electriC
be fatal.
may
touchdangerous voltage points
not
operate normallybyfollowing the operating
hazards.
-
The
product should be
ANSVNFPA
unit
the
for
this product during a
connectiontogrounding
grounding
electrode. see Figure
for
longperiodsoftime,
product
duetolightning
not
lightorpowercircuits,orwhereitcan fall
product
under
be located in the vicinity
yourselfasopening
from
the follOWing conditions:
that
are coveredbythe operating
controls may result in
workbyaqualified technician
mountedtoa wallorceiling
from
heat sources suchasradiators,
staticcharges.
70, provides information
lightning
unplugitfrom the
power
linesorcircuits
into
this product
orshort-out
hazards.Referall
the wall
outlet
manufacturer or have the
that
may
the
productisin
that
produce heat.
theyare
the
is
A.
storm,
or
and power-
parts
the
or
and refer
to
result in
ask
the
of
Page 3
EspMilOl
FRAN<;AIS
ENGLISH
Introduction
FCC
INFORMATION
1.
PRODUCT
This
product
complies
to
the
following
interference, and
including interference
2.
IMPORTANT
This product, when installedasindicated in the instructions contained in
this manual, meets
approved
the
3.
This
Class
are designed
interference in a residential installation.
This
if
harmful interference
guarantee
this
reception, which can be determined byturning
the
of
ThiS
by
product.
NOTE
product
Bdigital device, pursuanttoPart15of
product
not
the
generates,
installed and used in accordance
that
product
does cause harmful interferencetoradio ortelevision
userisencouragedtotrytocorrect
following
Reorient orrelocate
Increase
Connect
to
which
Consult
product
Class
Bdigital apparatus complies
Cet appareil numeriquedela
NMB-003
du
with
two
conditions:
(2)
this product must accept any interference received,
that
may
NOTICE:DONOTMODIFY
FCC
DENON
has
to
the
oran experienced radiofTV technician for help.
requirements. Modification
may
void your authority, granted by
been tested and foundtocomply
provide reasonable protection againstharmful
uses
to
radio communications. However, thereisno
interference will
measures:
the
the
the
the
separation between the
product
intoanoutlet
receiverisconnected.
local retailerauthorizedtodistribute this type
Canada.
(ForUScustomers)
Part15of
the
FCC
(1)
this product
cause undesired operation.
Rules.
may
THIS
with
the
FCC
and
can
radiate radiofrequency energy and,
with
the
instructions,
not
occur in a particular installation. If
the
the
receiving antenna.
on acircuit different from
c1asse
Best
product
interference by oneormore
equipment
with
Canadian
conforme
Operationissubject
not
cause harmful
PRODUCT
not
expressly
the
FCC,touse
the
limitsfora
Rules.
These limits
may
cause
OFF
and
and receiver.
that
of
ICES-003,
ala
norme
• Noteonuse
ON,
I-----------------l.
I Observations relatives aI'utilisation I
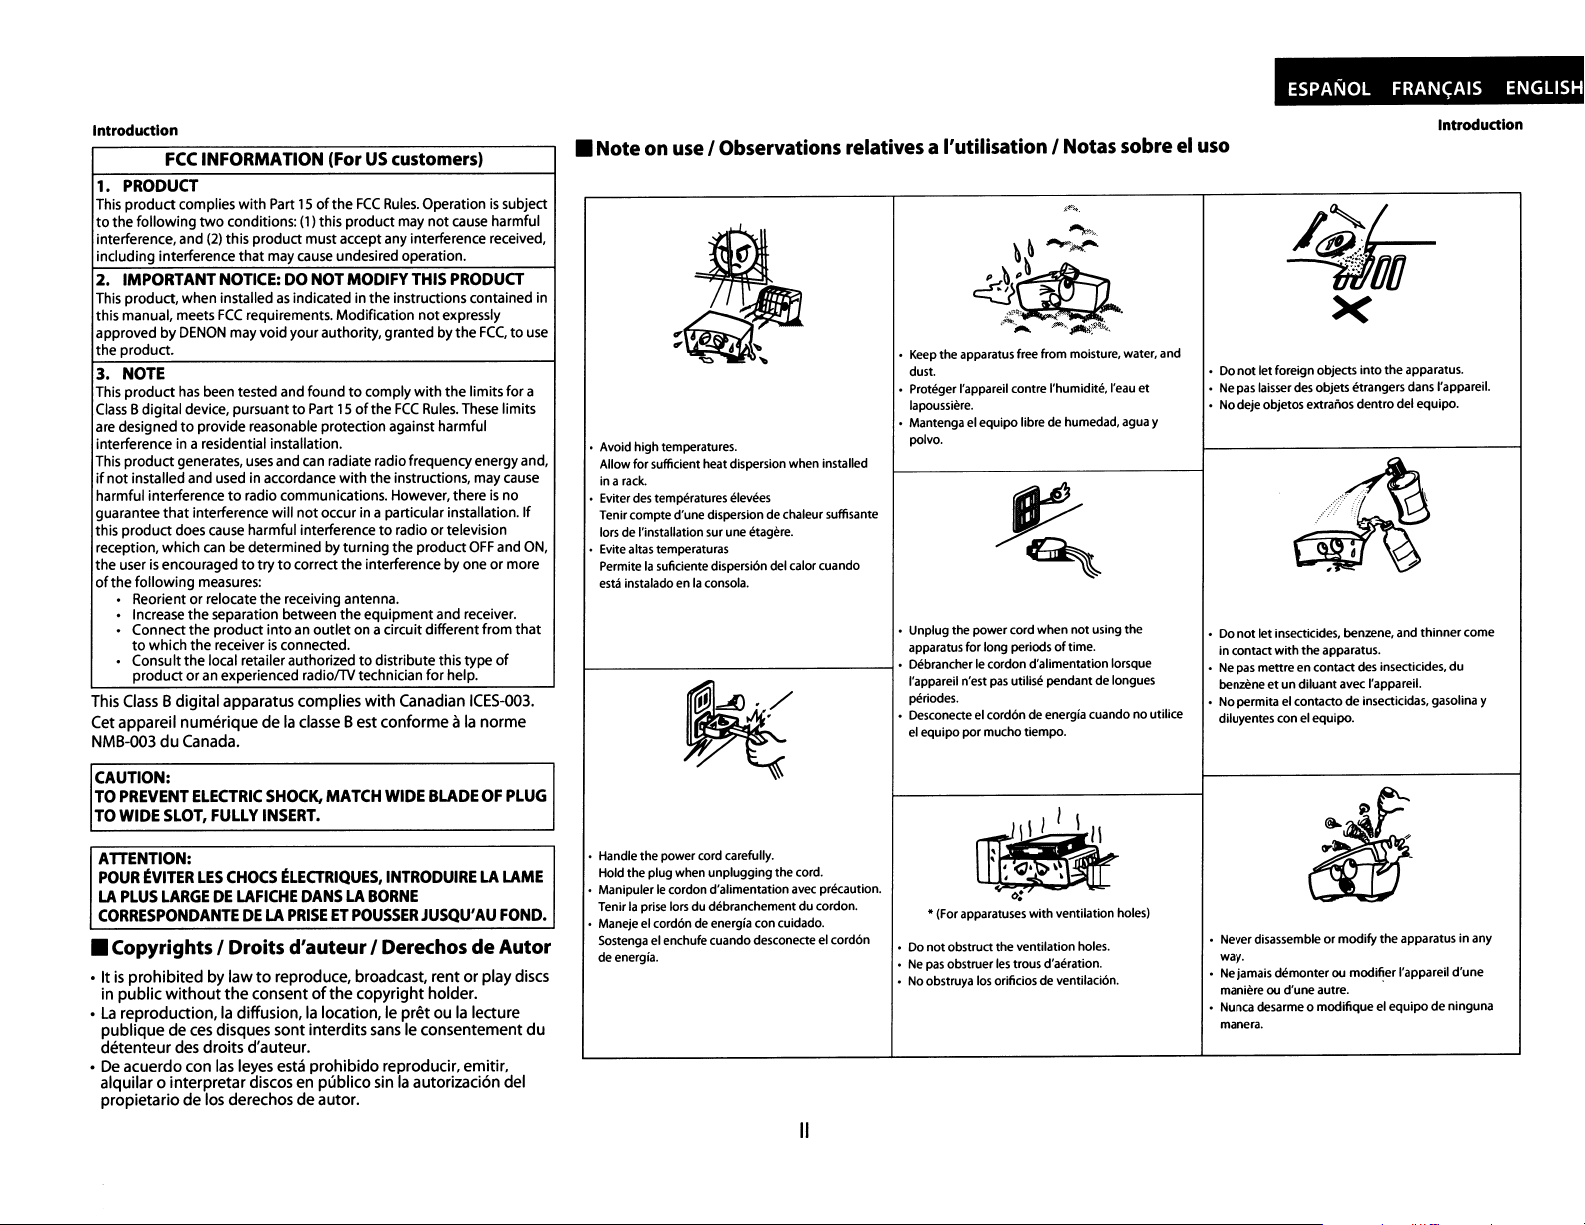
• Avoid high temperatures.
Allow for sufficient heat dispersion when installed
ina
rack.
• Eviter des temperatureselevees
Tenircompte d'une dispersion de chaleur suffisante
lors
de
I'installation sur une etagere.
• Evite altas temperaturas
Permite
la
suficientedispersion delcalorcuando
esta
instalado enlaconsola.
Notas
sobreeluso
...",.".
~
&
,..,..;.,.,.-
P~P~
<1
.):"'It:
"""'';'"
....;.-
...
,
..
"'.
• Keep the apparatus free from moisture, water, and
dust.
• Proteger I'appareil contre l'humidite,l'eau
lapoussiere.
• Mantenga el
polvo.
• Unplug the power cord
apparatus for long periodsoftime.
DebrancherIecordon d'alimentation lorsque
"appareil n'est
periodes.
• Desconecte el cord6n
equipo
el
equipo
libredehumedad,agua y
when
pas
utilise pendantdelongues
por
de
mucho tiempo.
not
energiacuandonoutilice
using
et
the
• Do
not
let foreign objects
pas
laisser des objets etrangers dans I'appareil.
• Ne
No
deje objetos extraflos
•
•
Do
not
letinsecticides, benzene, and
in
contact
with
pas
mettreencontact des insecticides.
• Ne
benzeneetun
• No permita el contacto
diluyentes con el equipo.
diluant
into
dentro
the apparatus.
avec I'apparei!.
de
insecticidas, gasolina y
the
apparatus.
del equipo.
Introduction
thinner
come
du
CAUTION:
TO
PREVENT
TO
WIDE
ELECTRIC
SLOT,
FULLY
SHOCK,
INSERT.
MATCH
WIDE
BLADEOFPLUG
ATTENTION:
POUR
~VITER
LES
CHOCS
LA
PLUS
CORRESPONDANTEDELA
LARGEDELAFICHE
DANSLABORNE
PRISEETPOUSSER
• Copyrights I Droits d'auteurI
~LECTRIQUES,
INTRODUIRELALAME
JUSQU'AUFOND.
DerechosdeAutor
• Itisprohibitedbylawtoreproduce, broadcast, rent orplay discs
in
public
without
the
•
consentofthe
La
reproduction,ladiffusion,lalocation,Iepretoula
publiquedeces
disques sontinterdits
copyright holder.
lecture
sansIeconsentement
du
detenteur des droits d'auteur.
•
De
acuerdo con
alquilar
propietario
las
0 interpretardiscos en publicosin
leyes esta
de
los derechos de autor.
prohibido
reproducir, emitir,
la
autorizaci6n del
• Handle the power cord carefully.
Hold the plug when
• Manipuler
la
prise
Tenir
• Manejeel cordon
Sostenga el enchufe cuando desconecte el cordon
deenergia.
unplugging
Ie
cordon d'alimentation avec precaution.
Iorsdudebranchementducordon.
de
energia con cuidado.
the cord.
II
with
• (For apparatuses
• Do
not
obstruct the ventilation holes.
Ne
pas
obstruerles trous d'aeration.
•
• No obstruya los orificios de ventilacion.
ventilation holes)
or
• Never disassemble
way.
Ne
jamais
•
• Nunca desarme
demonteraumodifier
maniereaud'uneautre. .
manera.
modify
0
modifiqueelequipodeninguna
the apparatusinany
I'appareil
d'une
Page 4

..
Introduction
Contents "
Intr..Qguction
Features 1
Advanced AL24 Processing 2
Important
Power Supply 2
Warning 2
Installation Location .........•.•....•..•.•....•.•..•..............•.••.•.•.••.••.••. 2
Cautions on Installation 2
Caution on Handling 3
Dew
Warning 3
Avoid the HazardsofElectrical Shockand Fire .....•.•.....•.•..... 3
Before Using 3
AboutCopyright 3
Supplied Accessories 3
Trademark Information 3
About
Discs
Disc Handling 4
Cleaning
Playable
Unplayable Discs 5
Color Systems 5
Region Codes 5
Structure
Symbols Used in this Operating Instructions 5
Aboutthe Remote Control
Loading
Using a Remote Control
Setting this
Changing
PartNames and Functions
Front Panel 7
Rear
Remote Control 8
Front Panel Display 9
Adjusting
Examples
'J~rmections
Connectingtoa
Connecting
Connecting
HDMI
Audio Setting
Digital ConnectiontoanAVAmplifier
Discs
Discs
and
Files
of
DisdSD
Memory
the
Batteries 6
Unit
not
Remote Control 6
the
Panel 7
the
of
to
Receiver
Built-in Decoder
to
with
Output
ReacttoOther
Signal Codeofa Remote Control 6
Brightnessofthe
Displays
TV
a Display Device
a Display Device and an Amplifier/
HDMI Cable 10
Mode
and Actual
Card Contents 5
DENON's
during
Display 9
Operation 9
with
HDMI Cable 10
Output
Signals
with
DVD
Player's
Connectiontoa Device
Analog Audio Inputs
Surround Connectionstoa Device
2
5.1-channelsofAnalog
Connecting
theACcord
with
Audio
2-channels
with
Inputs
of
7.1/
Playback
Turning
Direct Playback
Operations Using
Playing Back a
Pause
Resume Playback
Fast Forward I Fast Reverse Playback
Slow Forward Playback
4
StepbyStep Playback
Dialog Speed ..........................................................•....•.••.•......
4
Repeat Playback
4
Program Playback
Random Playback
Zoom
Camera Angle
Search
6
On-Screen Display
Selecting the FormatofAudio
6
7
Playing BackanMP3,Windows
Reading the
the
Power On
Disc
Popup Menu 15
A-B
Repeat 17
Selecting Audio Streams/Channels 22
Selecting Subtitle Language 22
Virtual Surround 23
Pure Direct
Setting
Adjusting
JPEG
Kodak Picture
Mode
theBDAudio Mode 23
the
and
DivX·
SO
Menu,Title
VR
mode DVD-RW/-R
Picture 24
File
CD
Memory
Card
Menu,
and
Media"
and
Video
Audio,
Function Setup
Using
the
10
Quick 29
Custom
Initialize 37
11
Others
11
Troubleshooting
Language Code
12
Specifications
Setup Menu 29
Features
eHDMI
(High-Definition Multimedia Interface)
You can enjoyclearer video
13
a displaydevice
13
eDialog
13
14
14
eStill/FastlSlow/Step Playback
15
eStill
15
16
16
eRandom Playback
16
16
17
eProgram Playback
17
18
18
eBD/DVD
19
19
19
eAuto
20
22
eSubtitlesin a Desired Language
23
eSelecting a Camera Angle
25
27
eChoices for Audio Language
27
eRatingsControl (Parental Lock)
29
eAutomatic Detection
ePure
38
39
40
Speed
Playback
output.
Dialog speedisavailable only on discs recorded in
Digital format.
Various playbackmodes are availableincluding still pictures,fast
forward/reverse, slow
in
slightlyfaster speed
Mode
The resolutionofpictures while in
adjusted.
Media"
This
Media"
You can program
order.
You can display BD/DVD menus
available ona BD/DVD.
The
unit
37).
You can select a desiredlanguage
available on
You can select adesired camera angle
sequences recorded from
You can selecta desiredaudio language and sound
different
You can set
notbesuitable
This
CD,
The sound
outputofvideo signals, etc.
Audio
unit
can shuffle
Audio
Menusin a Desired Language
PowerOff
power
turns
oritsremote control for
the
languages and modesare available on a disc.
the
control leveltolimit
for
unit
automaticallydetectsifa loaded discisBD,
MP3,
JPEG,
Windows
Direct
qualityofanalog audio
output
when
with
an HDMI-compatible port.
while
motion
and step frames.
for
audioCD, MP3,
the
playback
for
audio CD, MP3,
the
playback orderoftracks/files in a desired
in
off
automaticallyifthereisno
more
BD/DVD and Divxt'.
different
and
children.
of
Discs
Media-
AudioorDivxt'.
connecting
keeping
the
the
still (pause)
JPEG,
and
orderoftracks/files.
JPEG,
and
a desired language,
than 30minutes (refertopage
for
subtitlesifthat
if
angles.
Sound
playbackofdiscs which
outputisimprovedbystop
activityatthe
a disc contains
Mode
Introduction
this
sound
the
Dolby
mode
can be
Windows
Windows
if
languageis
mode
DVD,
unit
if
may
audio
to
ENGLISH
Page 5
Introduction
.On-Screen
Information
screen, allowing you
(such
.Dimmer
The brightnessofthe
.SCreen Saver
The
remote for more than 5minutes.
darken by
• Picture
Picture control adjusts black level and noise reductionofthe
specific display.
• Search
Chapter search: Search fora desired chapter.
Title search: Search for adesired title.
Track search: Search for adesired track/file.
Time search: Search
• Repeat
Chapter:
Title:
Track:
All:
A-B:
Group:
.Zoom
x1.2,
available for
•
Marker
Electric reference points designated by user
.Resume
User
has
.Bit
Rate
The
be displayed during
available for
.DRC
Use
signals when playing back DVD/BD recorded in Dolby Digital/
DolbyDigital Plus/Dolby TrueHD.
.DisplayingaJPEG
Kodak PictureCDcan
format on
played back.
Display
about
the
current operation
to
as
program playback) using the remote control.
screen
saver
75%.
The
Control
Repeated playback
Repeated playback
Repeated playback
Repeated playback
(notavailable
Repeated playback
Repeated playback
Windows Media""
back
x1.5, x2.0,
can
been stopped evenifthe
bit
(Dynamic
this proceduretoset the dynamic rangeofthe
x4.0
BD)
Playback
resume playbackfrom the
Indication
rate (the
BD)
Range
DVD-RW/-R,
confirm the currentlyactive functions
front
panel display
program
amountofvideodata currentlybeing read) can
startsifthereisno
programisdeactivated when thereisany
track/file.
is
magnified image
the
picture
beplayed back. Still images stored in
CD-RW/-RorSO
The
for
a desired
for
BD,
possible.
poweristurned off.
playbackofvideo contents. (not
Control)
can
be displayed on a
can
be adjusted.
activityat the unitor its
brightnessofthedisplay
time
pointoratitle or a
of
a chapterofthe disc.
of
atitleofthe disc.
of
a track/fileofthedisc.
of
the entire disc.
DVD-video)
of
a part between
of
afolderofthe MP3/JPEG/
Audio/Div~
can
point
disc being played
be displayed. (not
can
at which
MemoryCard
two
be called back.
the
playback
output
can
is
activity.
points.
JPEG
also be
.Playing
on
•
Playing
You can enjoy
CD-RW/-RorSO
•
Playing
You
CD-RW/-R.
• Official
•
.Playing
• You
• You
.BD-J
• With someBDthat
.Analog
This playerisequipped
out
Advanced
"Advanced AL24 Processing" which greatlyincreases the
of
signal detection and processing technology
BDIDVD/CD playback circuitry
addition
without
sampling.
In
technology, "AL24 Processing
audio
sources.
The "Advanced AL24" indicator lights
Advanced AL24 Processing
Back
You
can
DVD-RW/-R,
can
Plays
standard playback
inan
can
extras
playback
Application
enjoy interactivefunction
jacks for playback.
Windows
enjoyWindows Media"" Audio files which are recorded
CD-RW/-RorSO
Backan
MP3
Back
DivX-
enjoy
Div~files
DivX-
Certified product
all versions
Back
the
can
playback
SO
MemoryCard.
storepicture-in-picture commentary, subtitles or other
for
BD-ROM
with
the
7.1ch
Surround
AL24
information in the time axis area using uniquehigh speed
to
expansionofdatato24 bits, natural signal correction
marring theoriginal dataisperformed
addition,
DENON's
output,
resulting in high sound quality
Media"
Audio
File
MemoryCard.
MP3
File
files which are recorded on
Memory
Card.
File
which are recorded on DVD-RW/-R or
ofDiv~video
of
Div~
ContentsinSO
MP3,
Windows Media"" Audio, or
Profile
BD-ROM.
supports
Output
with
(including
media files.
Memory
1.1
files in anSOMemoryCard and
Java
applications
(e.g.,
game).
analog 7.1-channel surround audio
DVD-RW/-R,
Div~6)
Card
(BD-
Processing
for
the
is
provided
original analog waveform reproduction
PLUS",isused for
is
activated.
on
for
the
PCM
2-channel output. In
with
upconversion
the
7.1-channel
for
all
PCM
front
panel when
Important
Use
only discs marked
with
logos listed on page
4.
PowerSupply
The main power supplyisengaged when the main plug
plugged in a
<--
ONI & OFF>toturn
120V,
60HzACoutlet.To operate
on the unit.
the
unit, press
with
JPEG
J),
you
signal
signal
is
stored
can
amount
Introduction
Warning
To avoid fireorelectric shock.donot
moisture.
WARNING:
LIVE
PARTS
DO NOTREMOVE ANY
INSIDE•
SCREWS.
expose this
unittorain
Installation Location
For safetyand
• Do
not
and stable position. Do
unit. Do
• Shielditfrom directsunlight and keepitaway from sources
intense heat. Avoid dustyorhumid places. Avoid places
insufficientventilation
the
ventilation holesonthe
subject
Be
suretoremove adisc and unplug
•
before carrying the unit.
Non-use periods -Turn
unit
the
long time.Unplug
Please
unit, and keepitfor
optimum
stand
the
not
place the
to
strong vibration or strong magneticfields.
from
the
read this operatinginstructions carefully before using
performanceofthis unit:
unitupvertically. Install
not
place anything directlyon
unit
directlyon
for
proper heat dissipation. Do
sidesofthe
off
the
householdACoutletifitisnottobe used
the
future reference.
unit
unit
during lightning storms.
the
unit
ina horizontal
topofthe
theACcord from the
whenitis
TV.
unit. Avoid locations
not
in use. Unplug
topofthe
not
with
CautionsonInstallation .
Noiseordisturbanceofthe
any
other
electronic
tunerorTV.
near a
If
this happens,take
• Install this
•
set
AC
• Noise
indoor
using
unitasfaraspossible from
the
antenna wires
cord and
input/output
or
disturbancetendstooccurparticularly when using
antennasor300Q/ohms feederwires.Werecommend
outdoor
antennas and 75nJohms coaxial cables.
picturemay begenerated
equipment
the
from
using microprocessorsisused
following steps:
the
tunerorTV
connection cords.
the
tuner or
TV.
awayfrom this unit's
ifthis
or
of
block
outlet
for
the
unit
a
or
2
ENGLISH
Page 6
..
Introduction Introduction
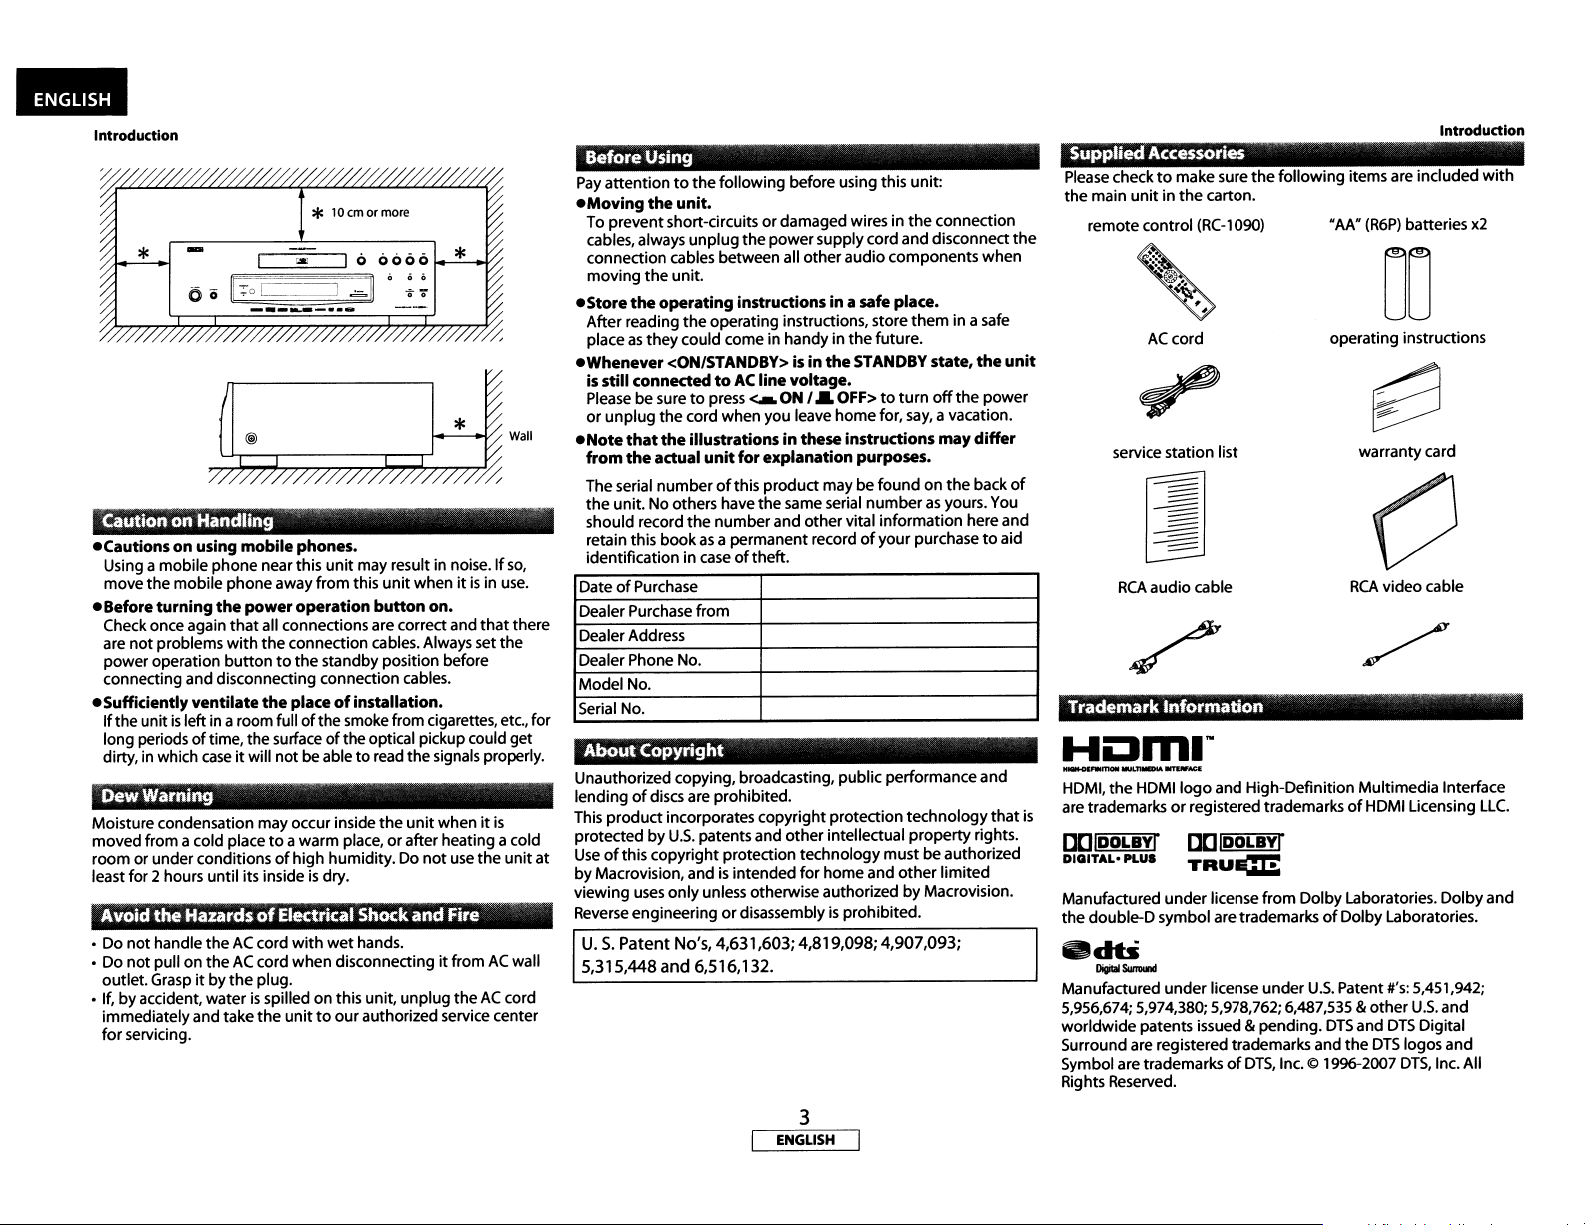
Before
Pay
attentiontothe
*10
em
or more
I
""'
*
o0
ffiE~
L~~--~---~_··~-
I 6 66661..-*':""""01//
~~
0
::
~~0
CautiononHandling
eCautionson using mobile phones.
Using a mobile phone nearthis
move
the
mobile
phone away
eBeforeturning
Check once again
are
not
power
operation
connecting and disconnecting connection cables.
eSufficiently ventilate
If
theunitisleftin a room fullofthe smoke from cigarettes, etc., for
long periods
dirty, in which
the
power
that
problems
of
caseitwill
all connections are correct and
with
the
buttontothe
the
time, the surfaceofthe optical pickupcould get
unit
may result in noise.Ifso,
from
this
unit
whenitisinuse.
operation button on.
connection cables. Always set
standby position before
placeofinstallation.
notbeabletoread the signals properly.
that
there
the
DewWarning
Moisture condensation may occur inside
moved from a cold placetoa warm place,orafter heating a cold
room
or under conditionsofhigh humidity. Do
least for 2 hours until its inside
Avoid the Hazardsof
• Do
not
handle
•
Do
not
outlet. Grasp
• If,
by
accident, waterisspilled on this unit, unplug theACcord
immediatelyand take
for
servicing.
theACcord
pull on
theACcord when disconnectingitfromACwall
itbythe
is
Electrical
with
plug.
the
unittoour authorized service center
dry.
wet
the
Shock
hands.
unit
not
and
whenitis
use
the
Fire
unit
eMoving
To preventshort-circuits ordamaged wires in
cables, always
connection cables between all
moving
the
eStore
the
After reading
place
as
eWhenever
is
still connectedtoAC
Please be sure
or
unplug
eNote
that
from
the
The serial
the
unit. No others have
should record
retain this book
identification in
Date
of
Purchase
Dealer Purchase
Dealer Address
Dealer Phone No.
Model No.
Serial No.
About Copyright
Unauthorized copying, broadcasting, public performanceand
lendingofdiscs are prohibited.
This
product
protected by
Useofthis
at
byMacrovision, and
viewing
uses
Reverse engineering
U.S.Patent
5,315,448
Using
following before using this unit:
the
unit.
unplug
the
power
supplycord and disconnect
other
unit.
operating instructions in a safe place.
the
they
copyright
operating instructions, store
could comeinhandyin
<ON/STANDBY>isin
to
the
cord when you leave
the
illustrations in these instructions
actual unitfor explanation purposes.
numberofthis
the
as
caseoftheft.
from
incorporates copyrightprotection
U.S.
patents and
only
line voltage.
press
<..ON
product
the
number
and
a permanent recordofyour purchasetoaid
protection technology
is
intended
unless otherwise authorized byMacrovision.
or
disassemblyisprohibited.
audio components
the
future.
the
STANDBY state,
/a
OFF>
to
home
for,
maybefoundonthe
same serial
other
other
for
numberasyours. You
vital information here and
intellectual
must
homeand
turn
other
No's, 4,631,603; 4,819,098;4,907,093;
and
6,516,132.
the
connection
them
in asafe
off
the
say,
a vacation.
may
technology
property
be authorized
limited
when
the
power
differ
back
that
rights.
Supplied
Please checktomake sure
the
the
unit
of
remote control
Trademark Information .
HDMI,
are trademarks
is
[][]JDDLByr
DIGITAL-
Manufactured underlicense from DolbyLaboratories. Dolby and
the
double-D symbol are trademarksofDolbyLaboratories.
.db
Manufactured underlicense under
5,956,674; 5,974,380; 5,978,762; 6,487,535
worldwide
Surround are registered trademarks and
Symbol are trademarks
Rights Reserved.
Accessories
main
unitinthe
,
service station list
RCA
the
HDMIIogo
PLUS
Il9tIISilmuld
patents issued & pending.
carton.
(RC
...
'.
~
.':~"
AC
cord
audio cable
and High-Definition Multimedia Interface
or
registered trademarksofHDMI Licensing
[J[]IDDLBYr
TRUEJI::
the
following items are included
-1090)
of
DTS,
MM"
operating instructions
U.S.
Patent
DTS
Inc.CO1996-2007
the
(R6P)
batteries
00
warranty card
RCA
video cable
#'s:
5,451,942;
&
other
u.s.
and
DTS
Digital
DTS
logos and
DTS,
with
x2
LLC.
and
Inc. All
3
ENGLISH
Page 7
Introduction
~)
c:-~
Java
POWEIED
Java
and
registered trademarks
States
all other trademarks and logos
and/or other countries.
of
Sun
Microsystems,
Em
DivX,
DivX
Inc.
Windows Media and the Windows logo
registered trademarks
States
"Blu-ray
~
Certified,
and
are
and/orother countries.
Disc"
is
atrademarkofDVD
used
and
and
associated logos
under
license.
of
Microsoft Corporation in the United
~
are
trademarks.
Format/Logo Licensing Corporation.
are
trademarks or
Inc.inthe United
are
trademarksofDivX,
are
trademarks or
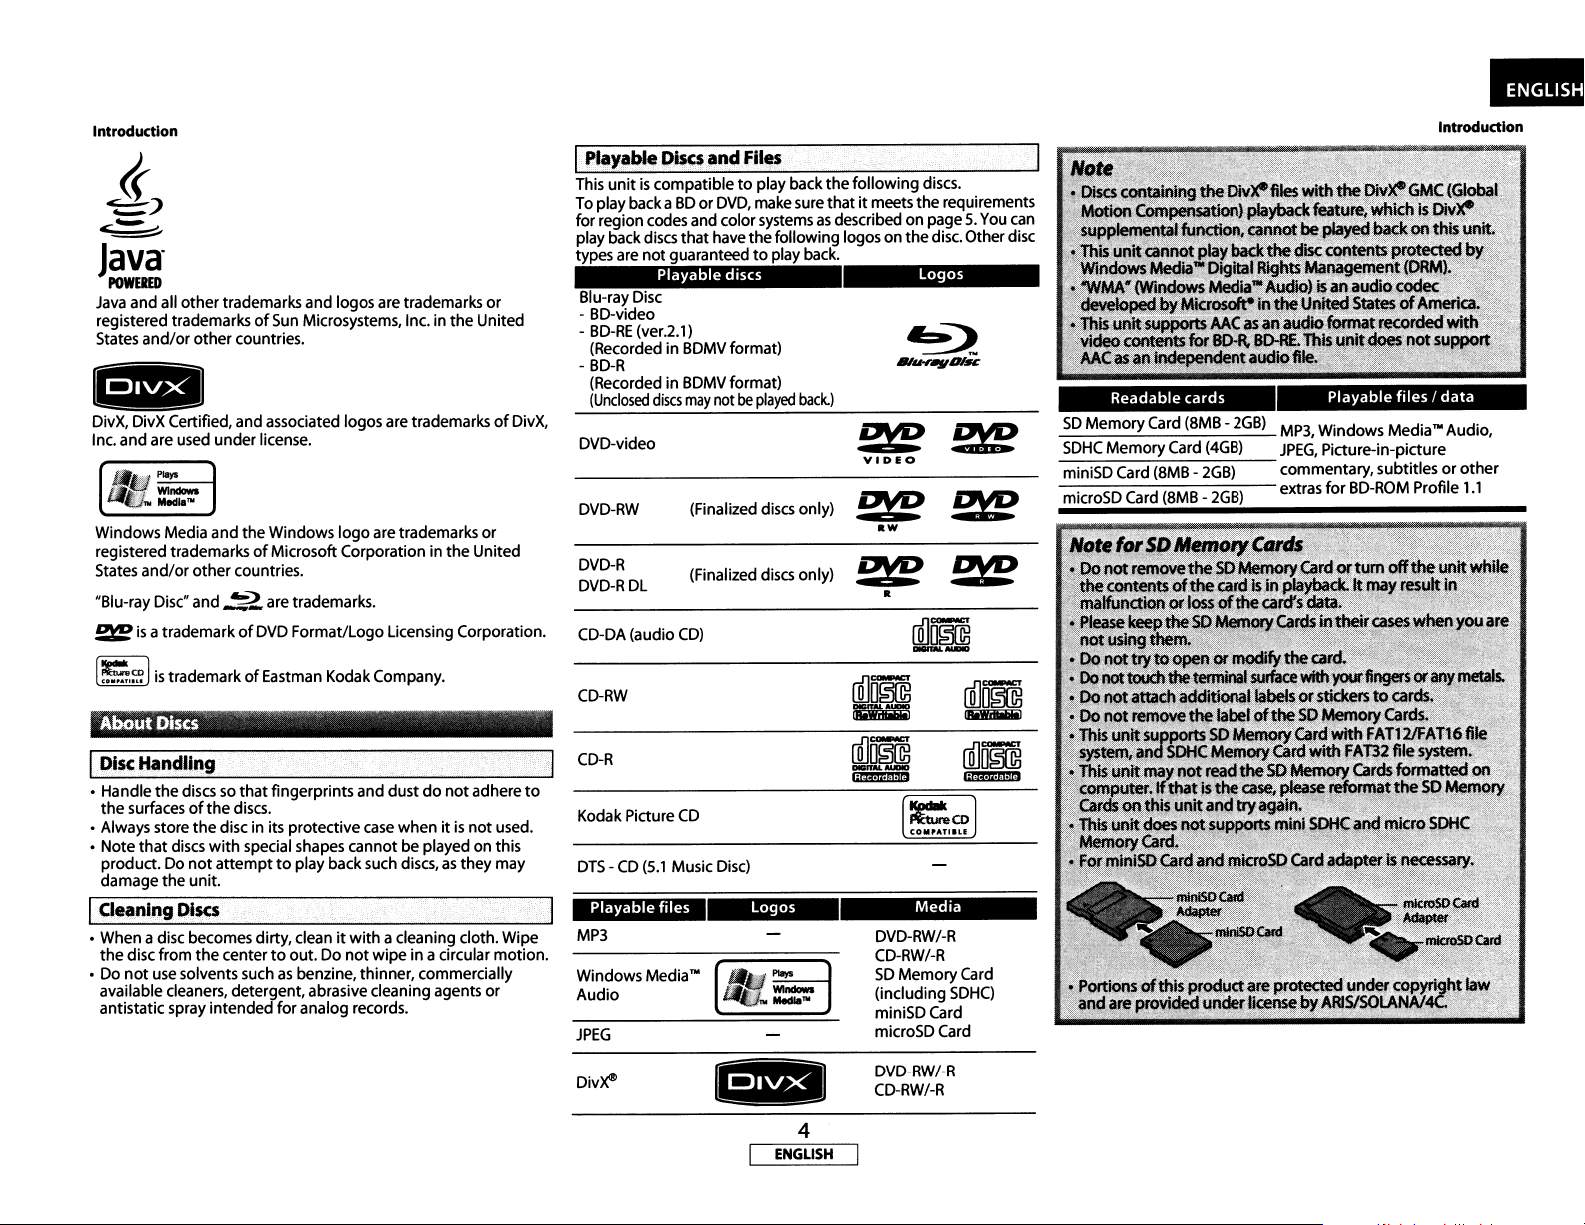
IPlayableDiscs
This
unitiscompatibletoplay backthe following
To
play
backaBDorDVD,
for region
play
types
Blu-ray
- BD-video
-
•
DVD-video
DVD-RW
DVD-R
DVD-RDL
CD-DA
codes
back
discs
are
not guaranteedtoplay
Disc
BD-RE
(ver.2.1)
(Recorded in
BD·R
(RecordedinBDMV
(Unclosed
(audio
and
and
color
that
have
Playable discs
BDMV
format)
may
notbeplayed
(Finalized
(Finalized
CD)
format)
discs
Files
make
sure
systemsasdescribedonpage5.You
thefollowing logosonthe
discs
discs
thatitmeets
back.
back.l
only)
only)
the requirements
~~
VIDEO
2YE
aw
~
a
discs.
disc.
Logos
~
£YO
Other
can
disc
Readable cards
SO
Memory
SDHC
miniSD
-m-i-c-ro-S-D-c-a-rd":"'-(8-M-B-'-2-G:-B:-)
Card
Memory
Card
(8MB-2GB)
Card
(4GB)
(8MB-2GB)
Playable files / data
MP3,
Windows Media'"Audio,
JPEG,
Picture·in-picture
commentary, subtitles orother
-
extras
for
BD-ROM
Introduction
Profile
1.1
[~:f.1
is
trademark of
AboutDiscs .
IDisc Handling
• Handle the
the
•
Always
• Note that
product.
damage the unit.
ICleaning
•
Whenadisc
thedisc from the center
Do
•
available
antistatic
discssothat fingerprints and dustdo not adhere
surfacesofthe
store thediscinits protective
discs
with
Do
notattempttoplay
Di~
becomes
not
use
solvents
cleaners,
spray
intended for analog
Eastman
discs.
special
dirty,
suchasbenzine, thinner, commercially
detergent,abrasive cleaning agents or
Kodak
Company.
case
shapes
back
clean
to
itwith acleaning cloth. Wipe
out.Donotwipeinacircular motion.
when itisnot
cannotbeplayedonthis
such
discs,asthey
records.
used.
may
CD-RW
CD-R
to
Kodak
DTS-CD
MP3
Windows Media'"
Audio
JPEG
Div~
Picture
(5.1
CD
Music
Disc)
4
ENGLISH
Media
DVD-RW/-R
CD-RW/-R
SO
Memory
(including
miniSDCard
microSD
DVD-RW/-R
CD-RW/-R
Card
Card
SDHC)
Page 8
Introduction
IUnplayable Discs
The
following
•
BD-RE
•BDcontains MP3/Windows Media""
• BD/DVD
• BD-video
• DVD-video
region code.
• DVD-ROM/RAM (ForDVD-ROM discs, data files in
S.x
and
• DVD-RW/-R recorded in
• CD-ROM (Data files in
•
CDV
•
CD-G
• CompactDisc-lnteractive
• Video Single
• Video
• Super audioCD(Only the sound on theCDlayer
sound on the high-densitysuper audioCDlayer cannotbeheard.)
·DVD-audio
• HDDVD
•
Disc
• Unauthorized disc (Pirated disc)
• Unfinalized disc
discs
will
not
play back on this unit.
Ver.1.0 (BD-disc
hybrid
that
that
6 canbeplayed)
(Only the audio part canbeplayed)
(Onlythe audio signals
Disc
CD,
Super Video
with recording
with
cartridge)
disc (e.g., Total Hi
does
not
include "A" on its region code.
does
not
include either "1"
non-compatible
Div~
canbeoutput)
(CD-I)
(VSD)
CD
area
less
than
Def
3.11, 4.x,
SSmm
Audio/
JPEG/
Div~
hybrid
disc)
nor
"ALL"onits
Div~
recording
S.x
and 6 can be played)
in diameter
format
can
be heard. The
3.11, 4.x,
files
Introduction
IColor Systems
BD
and DVD are recorded in
the
world.The
primarilyin
This
unit
in
the
NTSC
other
colorsystems.
most
the
United
uses
NTSC,soBDorDVD you play back
system. You cannot play backBDor
different
common
colorsystemisNTSC
States and Canada).
color systems
must
DVD recorded in
throughout
(whichisused
be recorded
IRegion Codes
BD
play
8o-video
@1
DVD-video
~
This
unit
region A and DVD-video
play backBDor
regions. Look
or
on yourBDor
disc in this unit. The
globe
DVD-video labeled
back on
has been designedtoplaybackBDwith
DVD-video
DVD-video.Ifthese region symbolsdonot
for
DVD-video, you
referstoregionofthe
the
unit
with
the
with
that
symbolsonthe
letterornumber
for
a specific region can
the
same region code.
region1.You
are labeled
rightonyour
cannot
world.ABDor
cannot
for
play back
inside
the
only
other
appear
the
~
1_'
S_t....:.OJ....:.d_u....:.r_e_o_f_D_iscJ~._S~D_M~,
The contentsofBD
maybefurther
subdivided
title 1 _I' title 2
""7'
~
-'"
.....
IIl~ory--=-·_Ca~rd~
/ DVD are generally
into
chapters.
BD/DVD
(jj
...
_c....:.on_te_n_t_s
divided
into
---------+1
~
,h.p~'3
titles. TItles
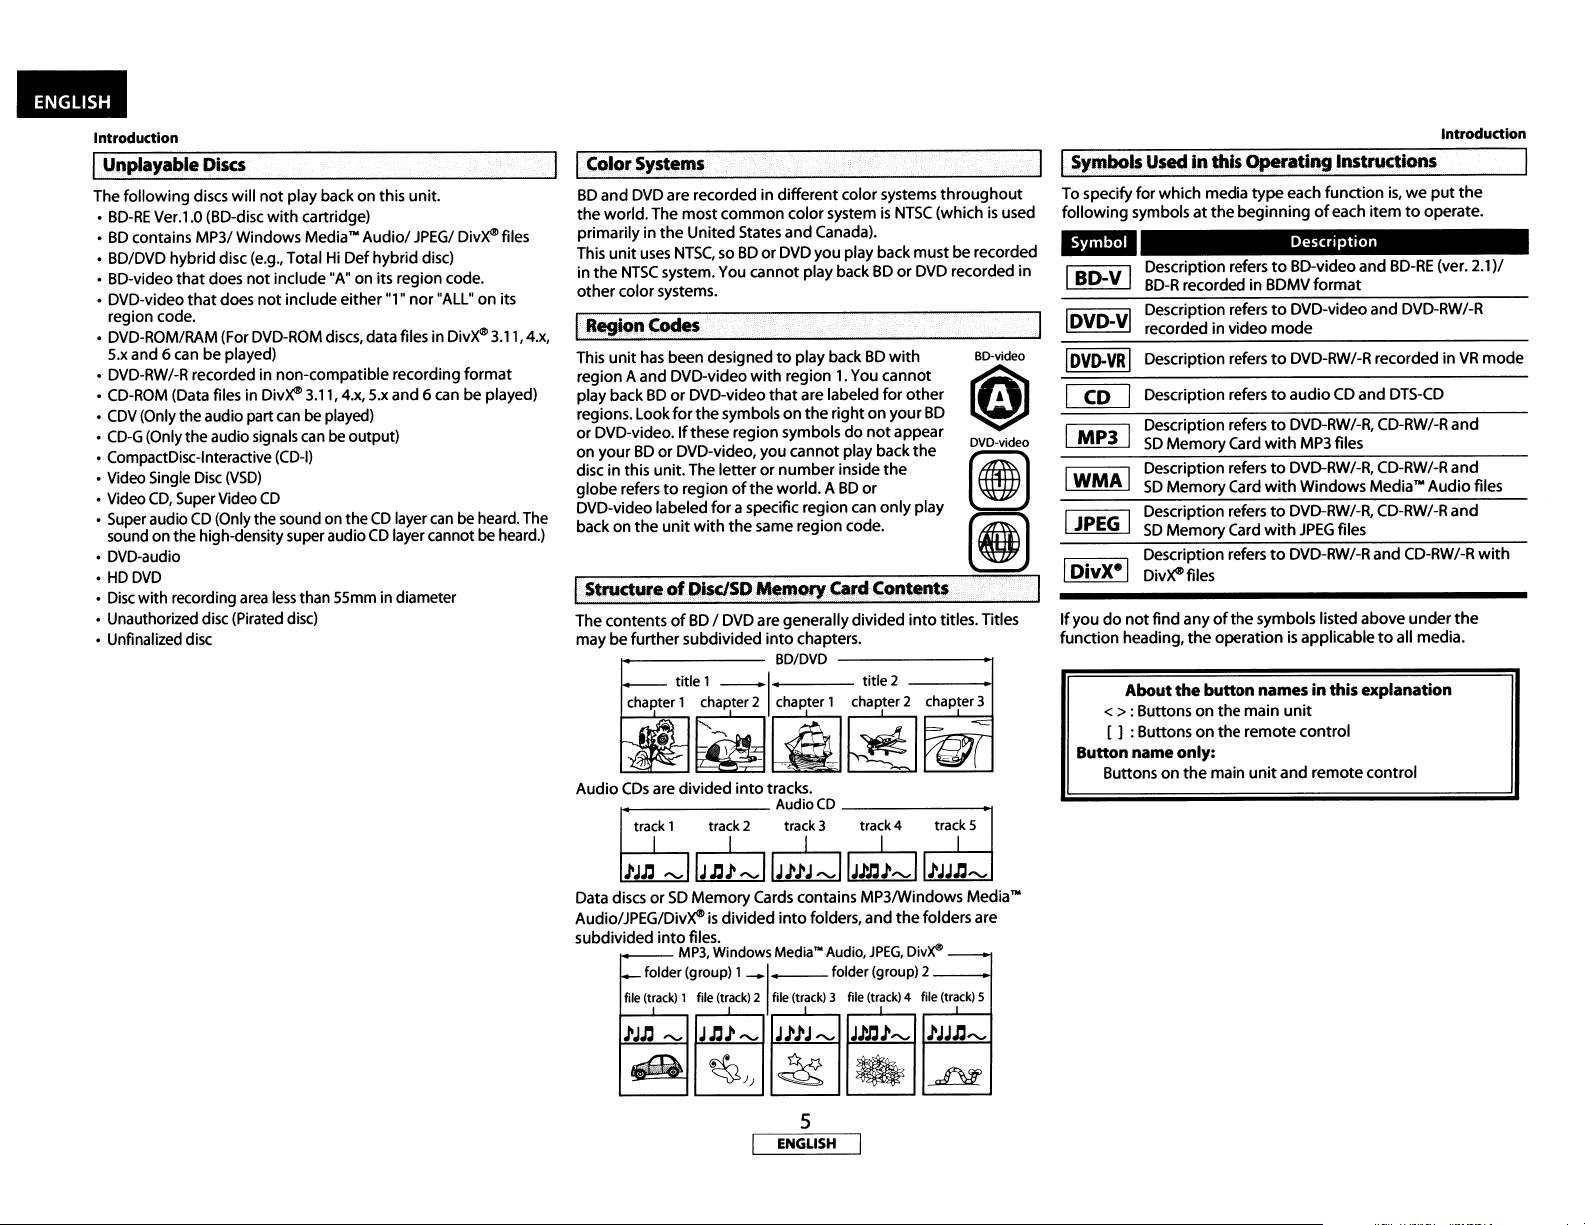
ISymbols
To specify
following
U$8d
for
which media
symbolsatthe
811I
I
SO
V I Description refers
-
BD-R
recorded in BDMV
DVD-VI
I
. recorded10Video
I
DVD-VR
I
CD
I
MP31
IWMAI
I
JPEG
IOivX-'
1
If
youdonot
function
Descripti~n
I Description refers
I Description refers
Description referstoDVD-RW/-R, CD-RW/-R
SD
Memory
Description referstoDVD-RW/-R, CD-RW/-R
SD
Memory
Description referstoDVD-RW/-R, CD-RW/-R
I
SD
Memory
Description referstoDVD-RW/-R and CD-RW/-R
Div~files
find
About
anyofthe
the
the
heading,
<> :Buttons
[ 1:Buttons
inthis Operating Instructions
type
each
beginningofeach
r~fers
Card
with
Card
with
Card
with
symbols listed
operationisapplicabletoall media.
function
Description
to
BD-videoand
format
to
DVD-video
mode
to
DVD-RW/-R recorded inVRmode
to
audioCDand
MP3 files
Windows Media""
JPEG
button names in this explanation
on
the
main
unit
on
the
remote
control
is,weput
itemtooperate.
BD-RE
and
DTS-CD
files
above
DVD-RW/-R
under
the
(ver. 2.1)/
and
and
Audio
and
the
files
with
Button name only:
Audio
CDs
are
..._------
track 1
divided
track
into
2
tracks.
Audio
track
CD
3 track 4
Buttonsonthe
~
track 5
main
unit
and
remote
control
J'Jn
'"
IJ.c~
'"
IIJJ'J'~
Data discsorSD
Audio/JPEG/Div~
subdivided
file
~Jn
Memory
into
files.
MP3.
folder (group) 1
(track)
1
~
'Jn~~IIJN~~IIJIn~~1
Cards contains MP3IWindows Media""
is
divided
into
Windows
MediaNAudio,
_1_
fde
(track)
2 file
~)}
~
ENGLISH
",IIJm)",IJ'JJ.c",
folders,
and
the
folders are
JPEG,
(track)
Divx<'
4
f,le
(track)
folder (group) 2
(track)
3 file
mn~
.
5
~
__
S
Page 9
Introduction
About
the
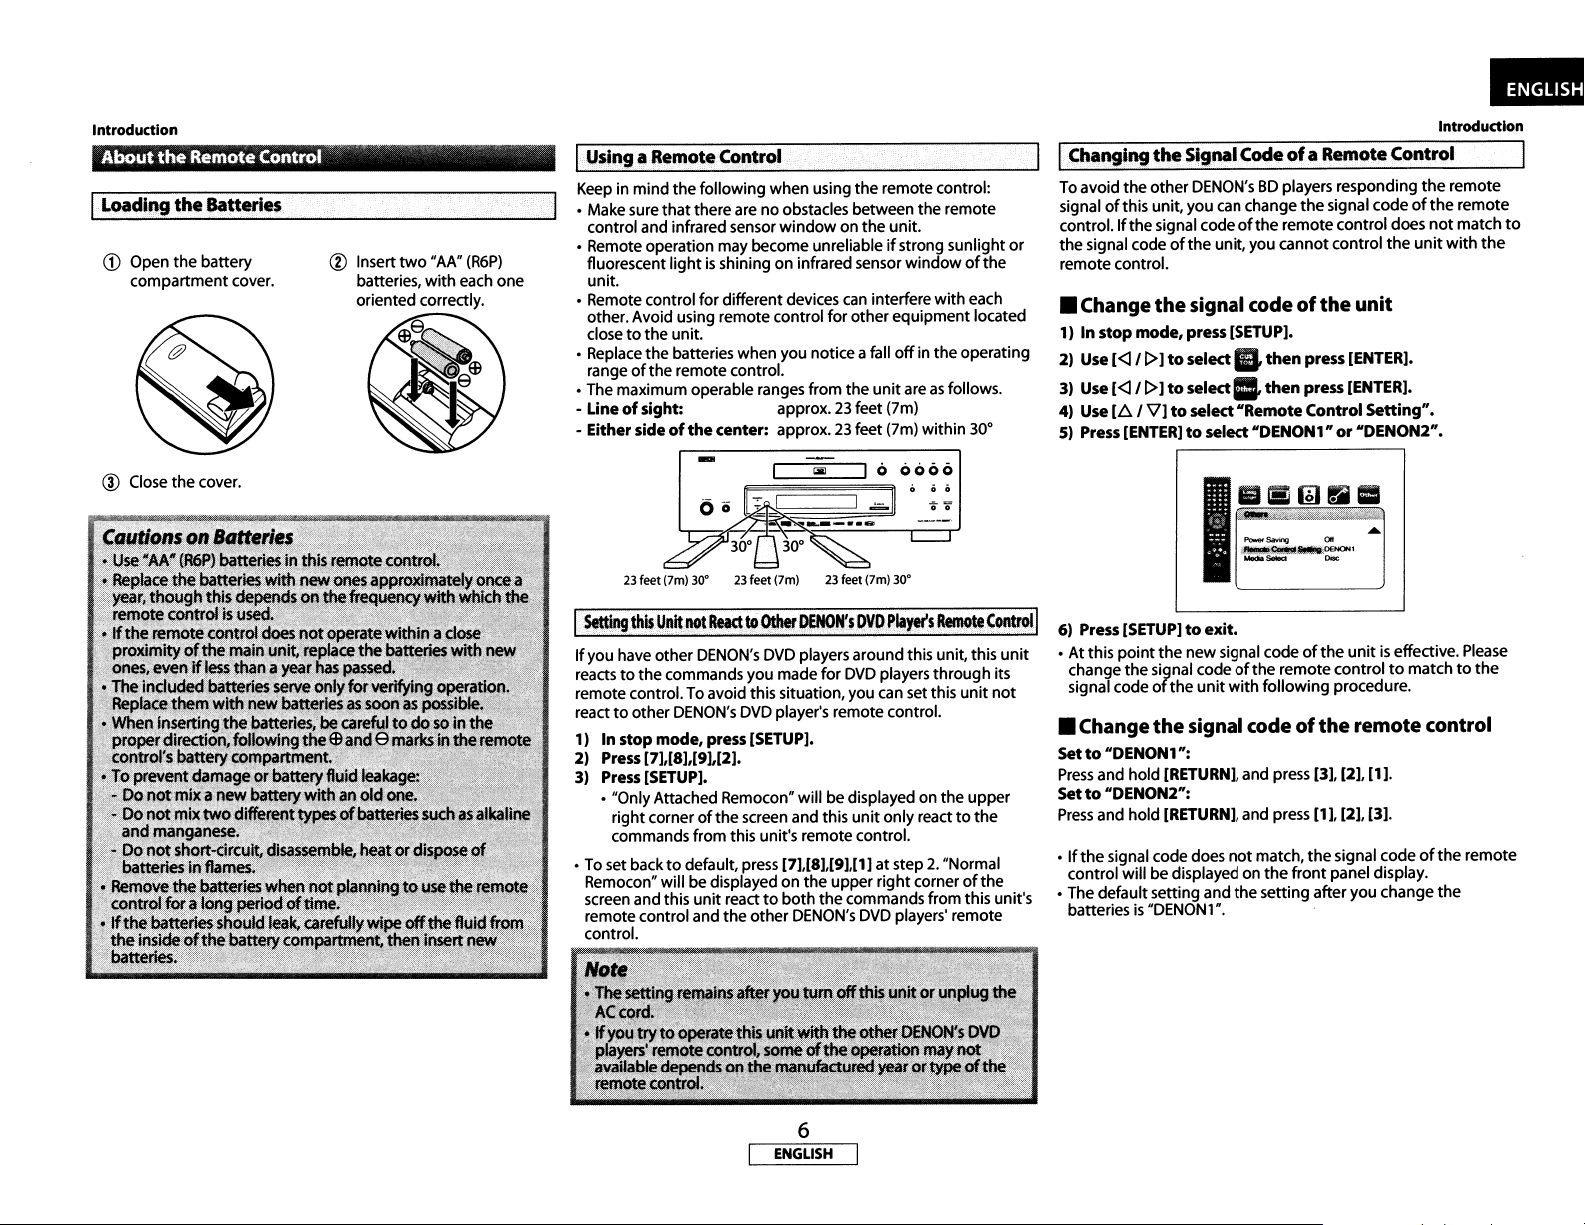
ILoadhlg
CD
the
Open
the
compartment cover.
Remote Control
ISatteries
battery
® Insert
two
batteries,
oriented correctly.
"AA"
with
(R6P)
each one
IUsing a Remote Control.
Keep in mind the following when usingthe remote control:
• Make sure
control and infrared sensor
• Remote operation may become unreliable
fluorescent
unit.
• Remote control
other. Avoid using remote control for otherequipment located
close
• Replace
range
• The maximum operable ranges from the
- Lineofsight: approx.
- Eithersideofthe
that
there arenoobstacles between the remote
lightisshiningoninfrared sensor
for
to
the
unit.
the
batteries when you noticea fall
of
the remotecontrol.
center: approx.
window
differentdevices
on the unit.
if
strong sunlight
windowofthe
can
interfere
off
unit
23
23
areasfollows.
feet (7m)
feet (7m) within
with
each
in the operating
30°
IChanging
To avoid
ofthis
signal
control.
the
or
signal codeofthe
remote control.
• Change
1)Instop mode, press
2)
Use
3)
Use
4)
Use
5)
Press
the
SigMICodeofa RemoteControl
the
other
DENON'sBDplayers responding
unit, you
Ifthe
signal code
the
[<l/[>]toselectllthen
[<ll
[>]toselect.
[LlI
V]toselect "Remote Control
[ENTER]toselect"DENON1"or"DENON2".
can
change
the
ofthe
unit, you cannotcontrol
signal code
remote control does
signal codeofthe
[SETUP].
press
then
press
the
unit
[ENTER).
[ENTER].
Setting".
Introduction
the
remote
ofthe
not
unit
with
remote
match
the
to
@ Close the cover.
-
00
[~J
23
feet (7m) 30·
I
Setting
this
Unit
If
you have other
reactstothe commands you made for
remote control.To avoid this situation, you
reacttoother
1) Instop mode, press
2) Press[7],[8],[91[2].
3)
Press
• "Only Attached RemoconHwill bedisplayed on the upper
right corner
commands from this unit's remote control.
• To set back
Remocon
screen and this unit react
remote control and
control.
DEN
[SETUP].
to
H
will be displayedon
23
feet (7m)
not
IleJct
to
DENON's
ON's
DVD
[SETUP].
of
the screen and this
default, press [7],[8],[9],[1]atstep2."Normal
the
other
tal
I 0
0000
olio
00
23
feet (7m) 30·
Other
DENON'$OVO
DVD players around this unit, this
player's remote control.
the
to
both
the
DENON's
Pllyer's
Remote
DVD
players through its
can
set this
unit
only reacttothe
upper
right
DVD
players' remote
cornerofthe
commands from this unit's
unit
Control
unit
not
I
6) Press
•Atthis
• Change
Setto
Press
Setto"DENON2":
Press
•
• The defaultsetting and
[SETUP]toexit.
point
the
change the signal codeofthe remotecontroltomatchtothe
signal codeofthe
"DENON1":
and hold
and hold
If
the
signal code does
control will be displayed on
batteriesis"DENON1".
newsignal codeofthe
unit
with
following
the
signal codeofthe
[RETURN],
[RETURN],
and press [3], [2], [1].
and press [1], [2], [3].
not
match,
the
the
setting afteryou change
unitiseffective.
procedure.
remote
the
signal codeofthe
front
panel display.
Please
control
remote
the
6
ENGLISH
Page 10
--
Introduction
PartNames andFunctions
Introduction
I_F_ro_n_t_p_a_n_el
n
II~O
'--T--i-!-f-
12345
The
unit
can also be
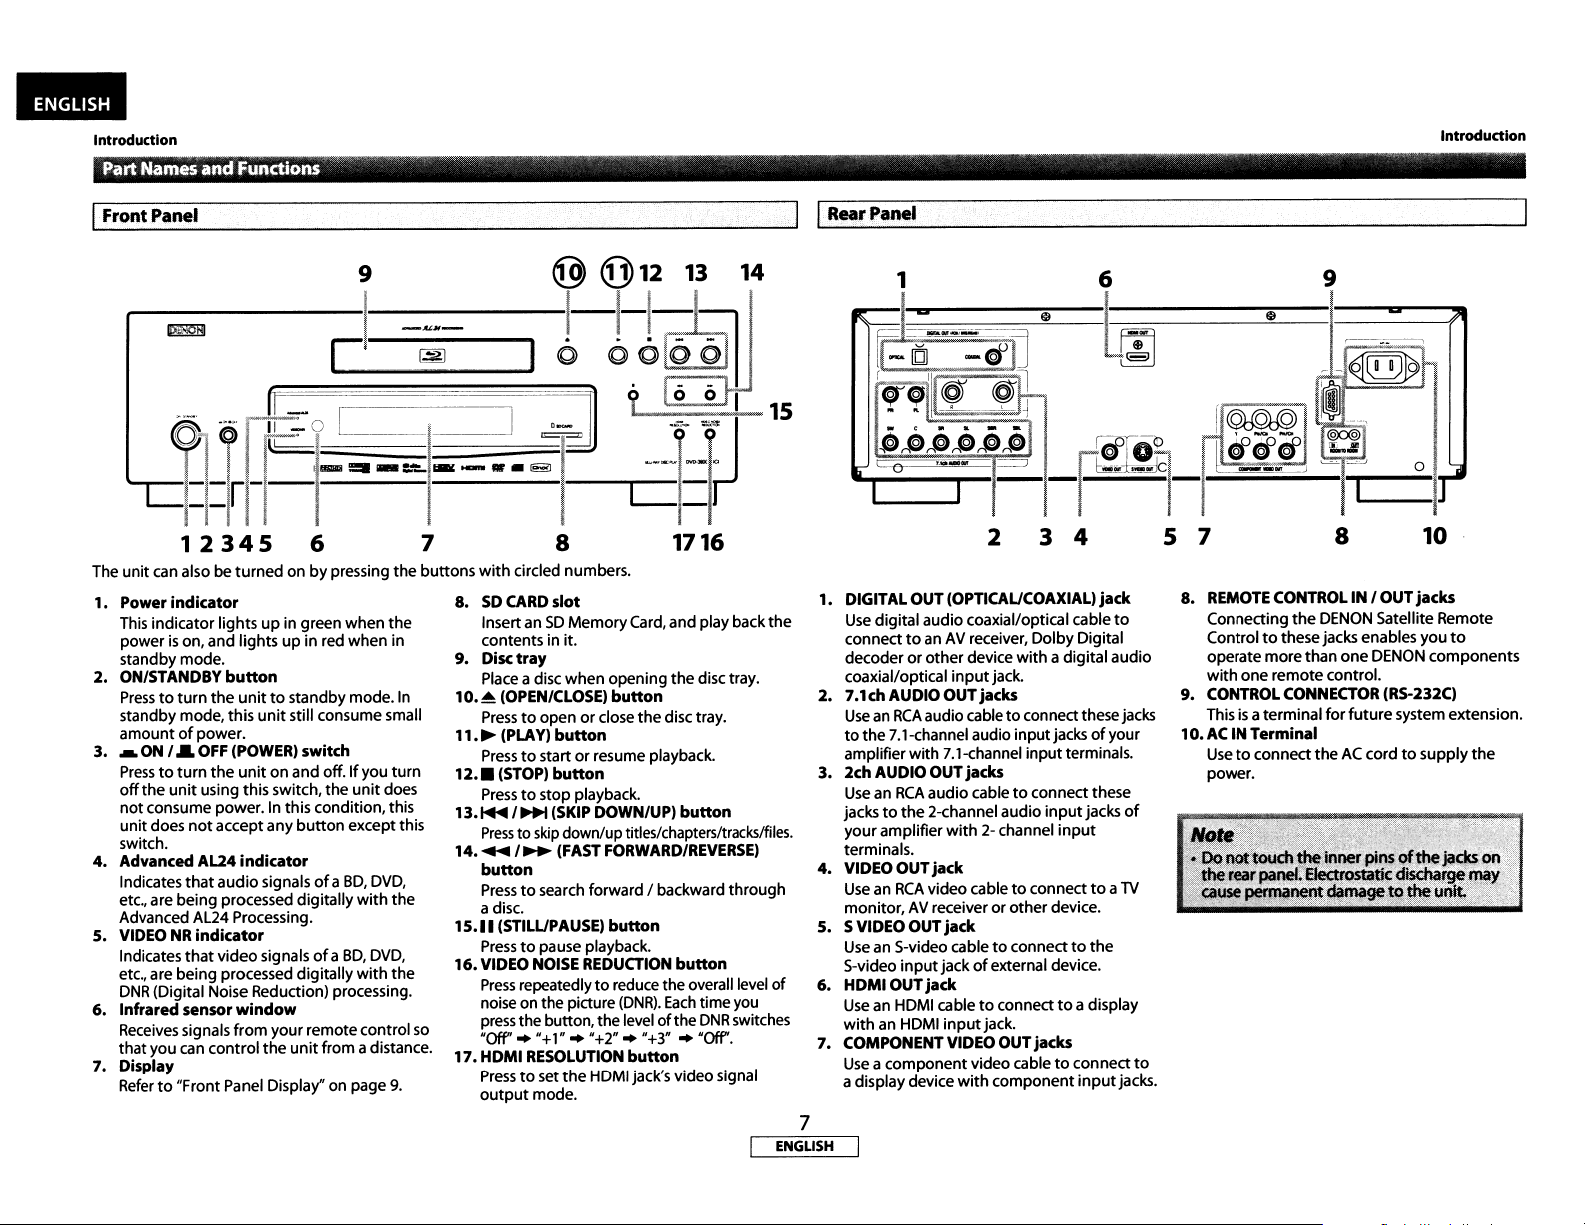
1. Power
2. ON/STANDBY
3. _
4.
5.
6. Infraredsensor
7. Display
indicator
This indicator lightsupin green
powerison, and lightsupin red when in
standby mode.
Presstoturn
standby mode,this
amountofpower.
ON/&OFF
Presstoturn
off
the
not
consume power. In this condition, this
unitdoes
switch.
Advanced A124
Indicates
etc., are being processed digitally
Advanced AL24 Processing.
VIDEONRindicator
Indicates
etc., are being processed digitally
DNR
Receives
that you
Referto"Front Panel Display" on page
the
the
unit
using thisswitch,
not
that
that
(Digital Noise Reduction) processing.
signals
can
control
L-,_~_=
6
turnedonby
button
unittostandby mode.
unit
still consume small
(POWER)
unit
accept any
indicator
audio
video signalsofaBO,
window
from
switch
on and off.Ifyou
the
button
signalsofaBO,
yourremotecontrol
the
unit
from a distance.
9 @
I
C_
I I
pressing
the
when
the
In
turn
unit
does
except this
DVD,
with
the
DVD,
with
the
9.
so
--..II
_;
__
••
7
buttons
with
8.SOCARD
InsertanSDMemory
contents in it.
9.
Disctray
Place a disc
1
o.
~
(OPENICLOSE)
Presstoopenorclose
11.~(PLAY)
Presstostartorresume playback.
12••(STOP)
Presstostop playback.
13.~/~(SKIP
Presstoskip
14
....
button
Presstosearch forward / backward
a disc.
15.11(STILUPAUSE)
Presstopause playback.
16.VIDEO
Press
noise on the picture
press
"Off'
17.HDMI
Presstoset
output
-...:.
(fj)
12 13
li.l~
11
~
~
--clir
8
circled numbers.
slot
when
button
button
down/uptitles/chapters/tracks/files.
/~
(FAST
NOISE
repeatedlytoreduce the overall level
the button, the levelofthe
..
"+1""
RESOLUTION
the
mode.
~
m
.~~
1716
Card,
and play back
opening
button
DOWN/UP)
FORWARD/REVERSE)
button
REDUCTION
"+2".."+3"
HDMI jack's video signal
the
(DNR).
button
the
disc tray.
disc tray.
button
button
Each
timeyou
DNR
..
"Off'.
I
through
switches
14
I
1 I
Rear
15
1. DIGITAL OUT (OPTICAUCOAXIAL)
the
2. 7.1ch AUDIO OUTjacks
3. 2ch AUDIO OUTjacks
4.
5. SVIDEO OUT
of
6. HDMIOUT
7. COMPONENT VIDEO OUTjacks
7
ENGLISH
Panel
jack
Use
digital audio coaxial/optical cable
connecttoanAVreceiver, Dolby Digital
decoder
coaxial/optical
UseanRCA
to
amplifierwith 7.1-ehannel
UseanRCA
jacks
youramplifier
terminals.
VIDEO OUT
UseanRCA
monitor,AVreceiverorother
Use
S-video
Use
with
Useacomponent
a display device
or
other
device
with
jack.
a digital audio
input
terminals.
input
input
device.
input
jacks
input
the 7.1-channel audio inputjacksofyour
audio cabletoconnectthesejacks
audiocabletoconnect these
to
the
2-ehannel audio
with
2- channel
jack
video cabletoconnecttoa
jack
an S-video cabletoconnecttothe
input
jackofexternal device.
jack
an HDMI cabletoconnecttoa display
an HDMI
input
jack.
video cabletoconnect
with
component
to
of
TV
jacks.
8.
Connecting
Control
operate
with
9.
CONTROL
Thisisaterminal
10.ACINTerminal
Usetoconnect
power.
to
REMOTE
one
CONTROL
to
thesejacks enables you
more
remotecontrol.
CONNECTOR
IN / OUT
the
DENON Satellite Remote
than
one
DENON
(RS-232C)
for
future
theACcordtosupply
jacks
to
components
system extension.
the
Page 11

Introduction
IRemote Control
~
--
DENON
RC-1090
The
unit
circled numbers.
1.
2.
3.
4.
5.
6.
7.
8.
9.
10.
11.
12.
13.
14.
15.
16.
17.
18.
can also be turned onbypressing
POWERONbutton
•
Presstoturn
POWER
•
Presstoturn
A-B
REPEAT
•
Presstomarka segment between Aand B
playback.
REPEAT
•
Presstoselect
RANDOM
•
Presstodisplay
playback orderoftracks/files.
ZOOM
• During playback, presstoenlarge
CLEAR
•
Presstoclear
marker settings, ortocancel
RED/GRN/BLUIYEL
•
Presstoselect item on someBDmenus.
TOP
MENU
•
Presstodisplay
Cursor
•
Presstoselect items orsettings.
ENTER
•
Presstoconfirm orselect menu items.
SETUP
•
Presstodisplay
ANGLE
•
Presstoaccess
•
Presstorotate
SUBTITLE
•
Presstodisplay
PURE
DIRECT
•
Presstostop
the
analog audiosignalstoachieve
analog audio outputs.
DISPLAY
•
Presstodisplay
OFF
button
button
button
button
button
button
6.
I V I <l/l>
button
button
button
button
button
button
the
unit
on.
the
unittostandbymode.
the
repeat mode.
the
random playbackscreen forshuffling
the
information once entered,toclear
button
the
top
menu.
buttons
the
setup menu.
various camera angles on
the
JPEG/Kodak Picture images.
the
subtitle menu.
button
outputofvideo
the
On-Screen display menu.
SKIP~button
• During playback, presstoreturntothe
current
title
chapter, trackorfile.
SKIP~button
• During playback, presstoskip
the
buttons
for
A-B
the
picture on
the
programming
the
disc.
signals, etc., and
high
the
nextchapter, track orfile.
output
qualitysound from
beginning
for
with
repeat
the
CD,
ofthe
screen.
the
etc.
only
the
19.
STOP.
•
•
20.
REW
• During playback, presstofast reverse
21.
STILUPAUSEIIbutton
•
• When playback
22.
FFW~button
• During playback, presstofast forward
• When playback
23.
PLAY~button
•
24.MODE
• During playback, presstodisplay
• During
• In stop
• In stop
• In
25.AUDIO
•
26.
RETURN
•
27.
POPUPMENU I MENU
•
28.
SEARCH
•
29.
Number
•
30.
OPENICLOSE~button
•
31.
DIMMER
•
button
Presstostop
Presstoexitfrom
...
Presstopause playback.
playback stepbystep.
Presstostart playback or resume playback.
playback.
button
the
title
menu.
is
in pause, press repeatedlytoforward
isinpause,
presstoslow forward
button
menu, and rapid playback.
the
JPEG
changing
changing
mode
setting
theBDaudiomode.
mode
menu
for
stop
mode
Media'"
Audio,
program and random playback.
playback, presstodisplay menus
the
visual effect
the
sizeofthe
withBDinserted, presstodisplaya menu
withBDorDVD inserted, presstodisplay a
setting
the
with
JPEG
for
image.
virtual surround.
audio
CD,ordisc
files inserted, presstodisplaymenus
button
Presstodisplay
the
audio menu.
button
Presstoreturntothe
previously displayed
button
Presstodisplay
Presstodisplay
MODE
the
disc menu.
button
the
search menu.
buttons
Presstoenter
Presstoopenorclose
the
title/chapter/track/file numbers.
the
disc tray.
button
Presstoadjust
the
brightnessofthe
the
switching
with
front
the
playback.
the
playback.
picture
adjustment
the
image or
MP3, Windows
menu
panel display.
IntroductIon
the
the
playback.
for
for
screen.
for
8
ENGLISH
Page 12
-
Introduction
IL.:F:..:r.::o.:.:nt.:..:P:...:a=n.:.:e:.:I.::D.::is:!:P.::Ia:!y_~
---,-
I
I~mple$
of
Displaysduring Operation
Introduction
12
1
1311 10 9
_
J~fGffi>-w1iiiib<~(WL
"1111111111111
2 3 4
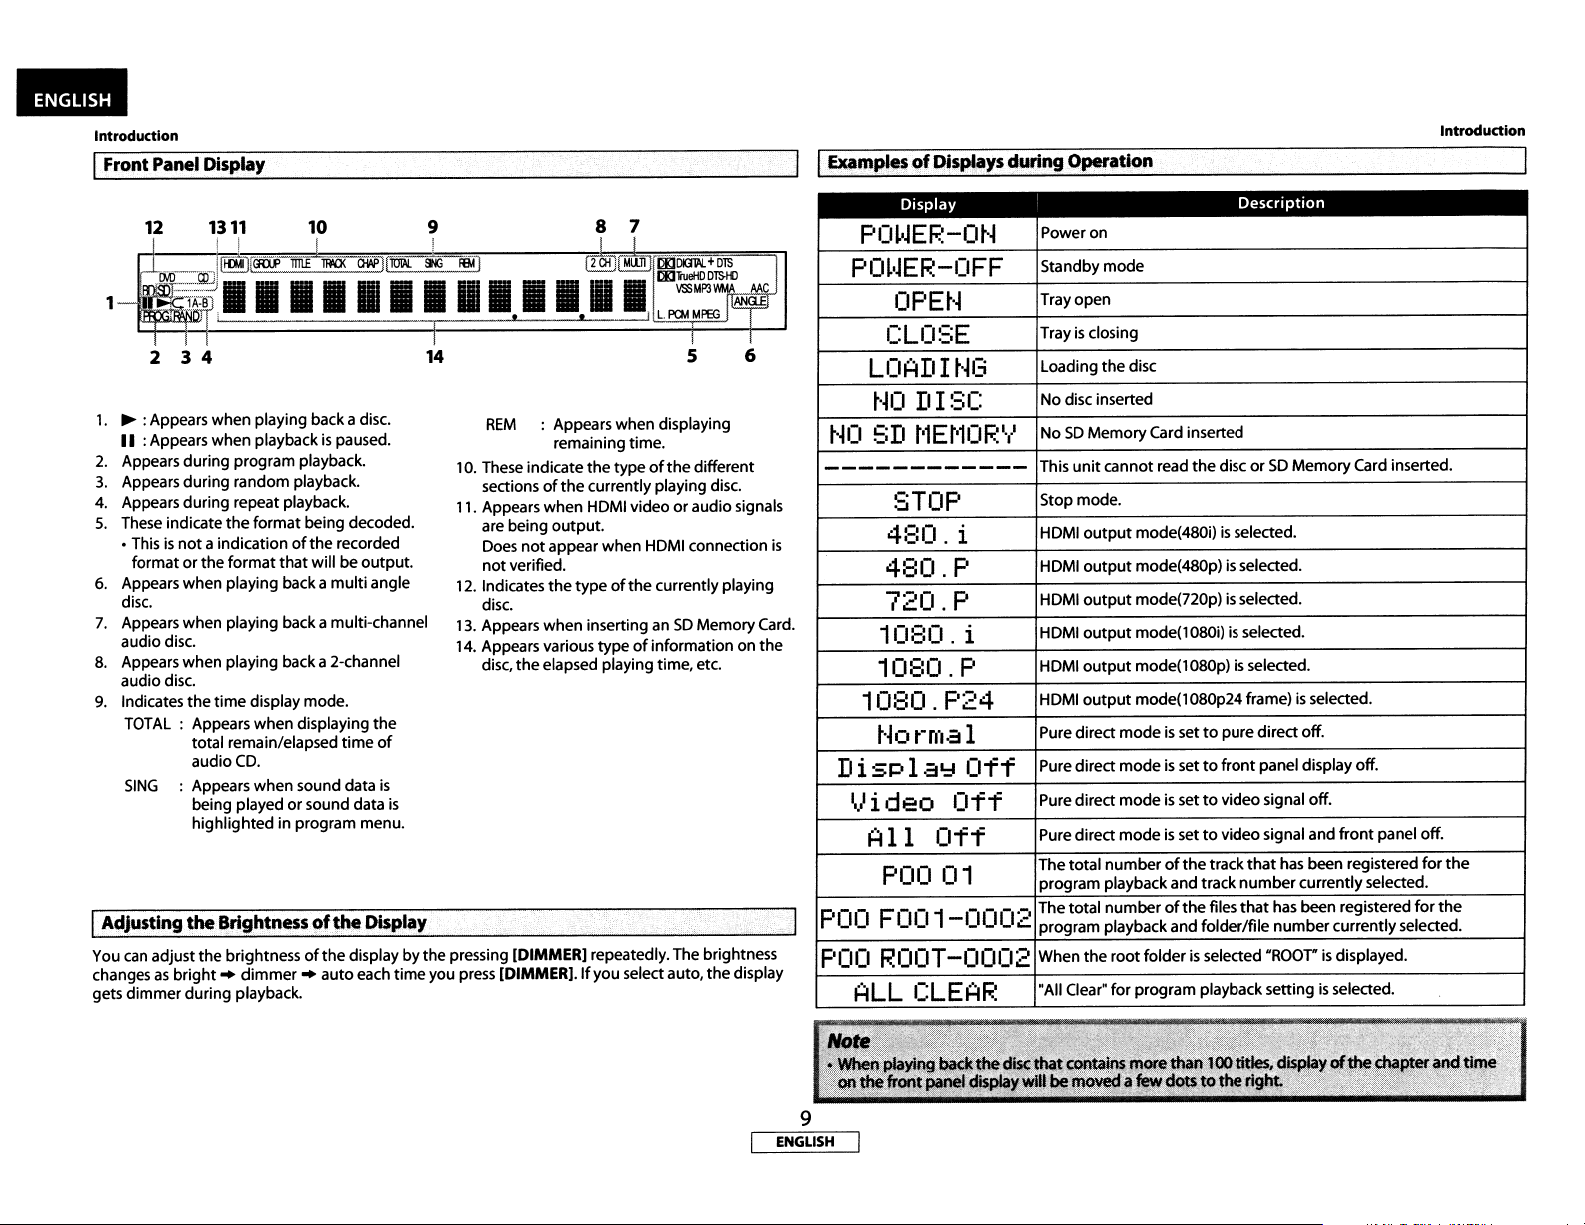
1.
~:
Appears when playing back a disc.
II
:Appears when playback
2.
Appears during program playback.
3.
Appears during random playback.
4.
Appears during repeat playback.
5.
These indicate
• This
formatorthe
6.
Appears when playing back a
disc.
7.
Appears when playing back a multi-channel
audio disc.
8.
Appears when playing back a 2-channel
audio disc.
9.
Indicates
TOTAL
SING
IAdjusting
You
can
adjust
changes
gets
as
dimmer
the
format
is
not
a indicationofthe
format
the
time
display mode.
: Appears when displaying
total remain/elapsed
audio
CD.
: Appears when sound data
being playedorsound data
highlighted
the
8rightnessof
the
brightnessofthe
bright..dimmer..auto
during
playback.
is
paused.
being decoded.
recorded
that
willbeoutput.
multi
time
in program menu.
the
7
8
2Qi
MLUl
the
typeofthe
currently playing disc.
typeofthe
of
different
or
audio signals
currently playing
SO
Memory
information on
65
Card.
the
angle
the
of
is
is
~
~
14
REM
: Appears when displaying
remaining time.
10. These indicate
sections
11. Appears when HOMI video
are being
Does
not
12.
Indicates
disc.
13. Appears when inserting an
14. Appears various type
disc,
of
the
output.
not
appear when HOMI connection
verified.
the
the
elapsed playing time,etc.
Display
displaybythe pressing (DIMMERj repeatedly. The brightness
each time you press
(DIMMERj.lf
you selectauto,
the
display
t~O
------------
is
Displal:l
I.}ideo
POO
POO
Display
PO~I~EF.~-O~~
PO~I~EF.~-OFF
OPEt·~
r:Ln~:;E
LOADI
t·~O
E;D
t'~13
DISC
t'lEt'l0
STOP
4:::0. i
480.P
720.P
10BO.i
1080.P
1080,P24
t'~ormal
Off
Off
All
POO
Off
01
F001-0002
ROOT-0002
ALL
CLEAF.:
Power on
Standby
Tray open
Trayisclosing
loading
No
disc inserted
NoSOMemory
p'
...
'
This
unit
Stop mode.
HDMI
HOMI
HDMI
HOMI
HOMI
output
HOMI
output
Pure direct
Pure direct
Pure direct
Pure direct
The
total
program playbackand track
The total
program playbackand folder/file
When
the
"All Clear"
Description
mode
the
disc
Card inserted
cannot read
output
output
output
output
modeissettopuredirect off.
modeissettofront
modeissettovideo signal off.
modeissettovideo signal and
numberofthe
number
root
for
program playback settingisselected.
the
disc orSOMemory
mode(480i)isselected.
mode(480p)isselected.
mode(720p)isselected.
mode(1080i)isselected.
mode(1080p)isselected.
mode(1080p24frame)isselected.
panel display off.
track
that
has been registered
number
ofthe
files
that
has been registered
number
folderisselected
"ROOT"isdisplayed.
Card inserted.
front
panel off.
currentlyselected.
currentlyselected.
for
for
the
the
9
ENGLISH
Page 13
Connections
I
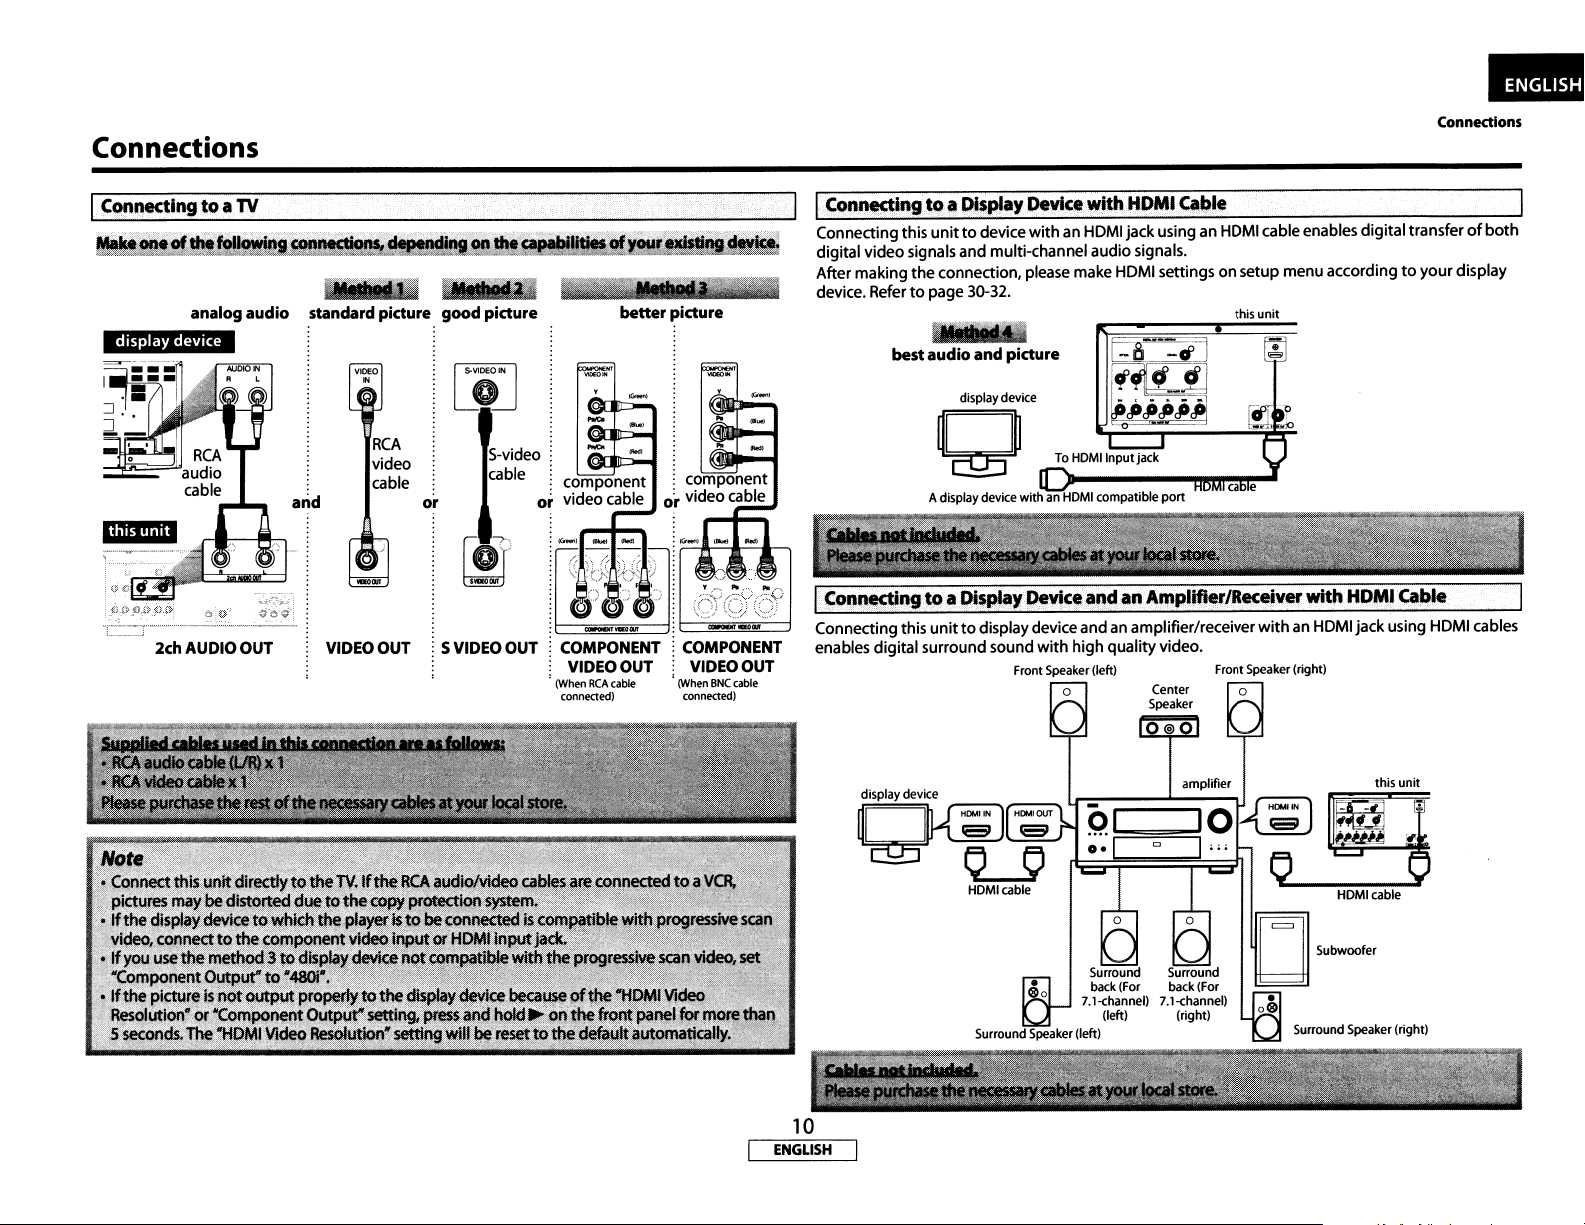
Connectingtoa
analog audio
TV
standard
pidure
good
....
pidure better pidure
3U,...
Connecting this
digital videosignals and multi-channel audio signals.
After making
device. Refer
unittodevice
the
connection, please make HOMI settings onsetup menu accordingtoyour
to
page 30-32.
withanHOMI
jackusing an HOMI cable enables digitaltransferofboth
Connealons
display
this unit
¥;-.:.::._.__..
L _ l
VIDEO
best audio
"
RCA
video
cable
or
C>
-••__
:.~~.:..:-.
AUDIO
0·'
__
._.-.::_...;._
••
~.
OUT
VIDEO
OUT
5
VIDEO
¥
••
_-~
2ch
OUT
component
or
video cable
component
or
videocable
COMPONENT
VIDEO
(When
ONe
conneaed)
cable
OUT
displaydevice
~Q~H~
and
pidure
display device
Q
Adisplaydevice withanHOMI
compatibleport
Center
Speaker
amplifier
~~~I;;;
IO~~)
Front
Speaker
0
(right)
o 0
HOMIcable
10
ENGLISH
•
o
Page 14

..
Connections
I
HOMI
OutputMode
Press
<HOMI RESOLUTION>toselect
following.
and
Actual
Output
the
HDMI
Front
Panel Oisplay
4:::(1
. i
Press <HOMI RESOLUTION>
4
:::
(I .
F'
Press <HOMI RESOLUTION>
72(1 .
1(I:::(I .
1(I:::
-1':'1-1
_1_1_.
11
F'
Press <HOMI RESOLUTION>
ill
Press <HOMI RESOLUTION>
(I
.
F'
Press <HOMI RESOLUTION>
F"-'4
.::.
Press <HOMI RESOLUTION>
Signals
output
mode. HDMI video resolution changes
HOMI
Video
Resolution
480
Interlaced
1---48-o-p-rog-r-e-ss-i-ve---
'---7-2-0-p-rog-r-e-ss-iv-e---
~
080
Interlaced
~
I
1080
Progressive
~
1080
Progressive24frame
IAu4io
as
When using HDMI connections make
setup menuaccordingtothe
Digital Plus
decoding
Device compatible
more
(not
Dolby Digital PlusorDolby
TrueHD compatible) you select "HDMI Multi(LPCM)".
Device compatible
2-channel audio
not
HDMI connectiontoadisplay Audio
device, and digitalaudio DolbyDigital/DTS bitstream
connection (coaxial/optical)
an AVamplifier. OUT depending on
•
setting
tobeconnected
Device
Device compatible
DTS-HD,
Dolby Digital, Dolby
or
Dolby
channelsofaudio inputs
DTS,
DTS-HD, Dolby Digital,
compatible
Audio
inputordevice
with
signals
the
specificationsofthe
with
DTS,
TrueHD bitstream are
with3or
with
audio
input
to
output
from
"HDMI Audio
"HDMI
Audio
HDMI Multi(Normal) DolbyDigital, Dolby Digital Plus,
HDMI Multi(LPCM)
HDMI2ch
Mute
HOMI
OUT
Out"
device or
Out"
setting
settings in
monitor
the
to
be connected.
Output
I
Dolby
TrueHD,
OUT.
Make
the
connectedAVamplifier, etc.
Multi-ehannelaudio signals are
output
from the HDMI terminal.
Make the speaker settings
speaker setting items appear after
Refertopage
Down-mixed 2-channel audio
signals are
OUT.
HDMI audio will be muted, and
LPCM
willbeoutput
Out"setting. Refer
"Audio"
menuonthe
HDMI
audio
DTS,orDTS-HD
output
the
speakersettings
32.
output
from
to
Connections
signal
from HDMI
with
HDMI
or
from DIGITAL
the
"Digital
page12.
on
the
11
ENGLISH
Dolby
Digital
Dolby Digital Plus
DolbyTrueHD
DTS
DTS-HD
LPCM
AAC
LPCM
Dolby Digital
DTS
LPCM
Dolby Digital
MP3/MP2
Dolby Digital*l
Dolby Digital
DolbyTrueHD*l
DTS-HD*l
Multi
LPCM
Multi
LPCM
Multi
LPCM
Dolby Digital
DTS
Multi
LPCM
DolbyDigital
2ch
LPCM
2ch
LPCM
Plus*1
Multi
Multi
Multi
Multi
Multi
Multi
Multi
Multi
Multi
Multi
Multi
2ch
2ch
Multi
LPCM*2
LPCM*3
LPCM
LPCM
LPCM
LPCM
LPCM
LPCM
LPCM
LPCM
LPCM
LPCM
LPCM
LPCM
2ch
Downmix
2ch
Downmix
2ch
Downmix
2ch
Downmix
I04
2ch
Downmix
2ch
Downmix
2ch
Downmix
2ch
Downmix
2ch
Downmix
2ch
Downmix
2ch
Downmix
2ch
Downmix
2ch
LPCM
2chLPCM
Downmix
2ch
LPCM
LPCM
LPCM
LPCM
LPCM
LPCM
LPCM
LPCM
LPCM
LPCM
LPCM
LPCM
LPCM
Page 15
Connedlons
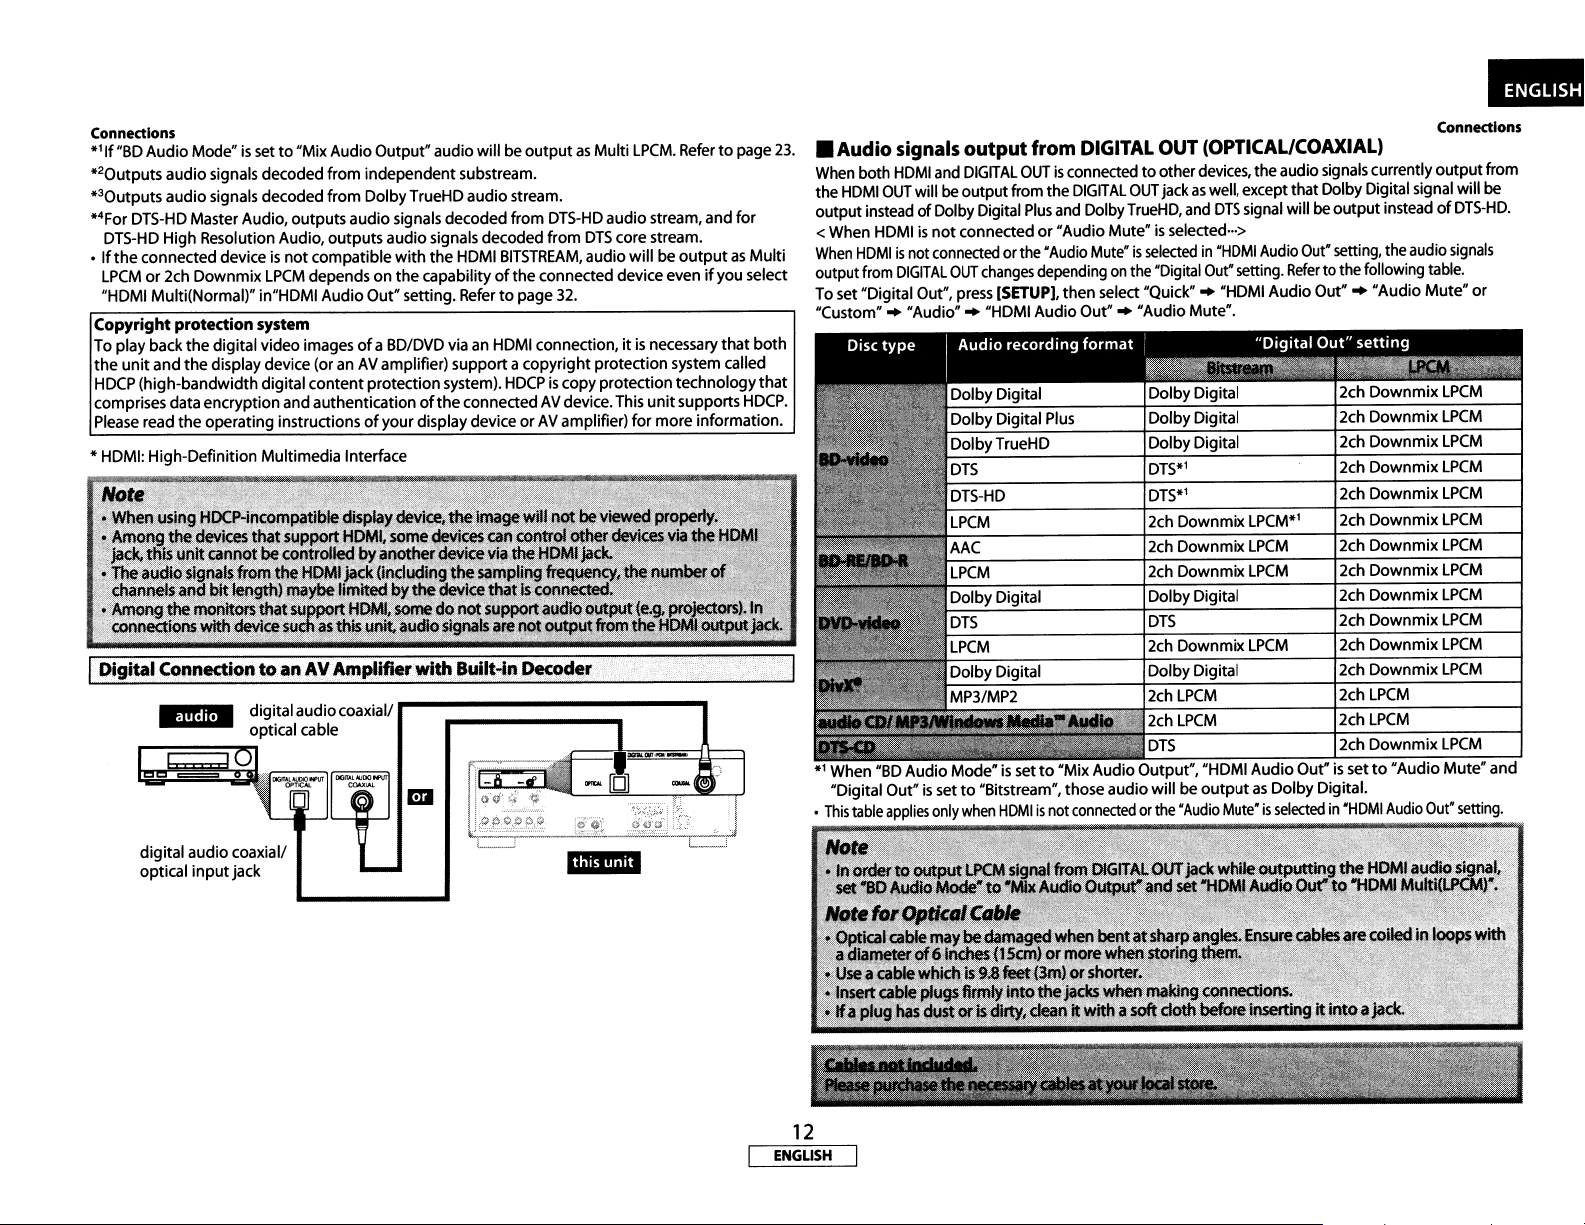
*llf"BD
Audio Mode"issetto"Mix Audio Output" audiowill be
*20
utputs audio signals decoded from independent substream.
*30utputs
*4For DTS-HD MasterAudio, outputs audio signals decoded from
DTS-HD
If
•
LPCM
"HDMI Multi(Normal)" in"HDMI Audio Out" setting.
Copyright protection
To play back the digital video imagesofa BD/DVD via an HDMI connection,itis
the
HDCP
comprises dataencryption and authenticationofthe
Please
* HDMI: High-Definition Multimedia Interface
audio signals decoded from Dolby TrueHD audiostream.
High Resolution Audio, outputs audiosignals decoded from
the connected deviceisnot
or 2ch Downmix
compatible
LPCM
depends on the capabilityofthe connected deviceevenifyou select
with
the HDMI
Refertopage
system
unit
and the displaydevice (oranAV
(high-bandwidth digital content protectionsystem).
read
the
operating instructionsofyour display device orAVamplifier) for more information.
digitalaudiocoaxial/
optical cable
amplifier) support a copyright protection system called
connectedAVdevice.This
outputasMulti
DTS-HD
audio stream, and
DTS
BITSTREAM,
HDCPiscopy protection technology
core stream.
audiowill be
32.
LPCM.
Refertopage
outputasMulti
necessary
unit
supports
that
for
both
that
HDCP.
23.
•
Audio
When
the
outputinsteadofDolbyDigital
<When HDMI
When
outputfrom
To
set "Digital Out", press
"Custom""
*1
When "BD Audio Mode"issetto"Mix Audio Output", "HDMI Audio Out"is setto"AudioMute" and
"Digital Out"
•
This
both
HDMI
OUT
HDMIisnot
table
signals
HDMI
DIGITAL
applies
output from
and
DIGITAL
will be output from the
is
not
connectedor"AudioMute"isselected···>
connected
OUT
"Audio""
DolbyDigital
Dolby Digital
DolbyTrueHD
DTS
DTS-HD
LPCM
AAC
LPCM
DolbyDigital
DTS
LPCM
Dolby Digital
MP3/MP2
is
setto"Bitstream", thoseaudio will be
only
when
OUTisconnectedtootherdevices, theaudio signalscurrently
DIGITAL
Plus
and Dolby
orthe "AudioMute"isselectedin"HDMI
changes
dependingonthe "Digital Out" setting.
(SETUP],
"HDMI Audio
HDMIisnot
then select
Plus
connectedorthe
DIGITAL
Out".."Audio Mute".
OUT
(OPTICAL/cOAXIAL)
OUT
jackaswell, except that Dolby Digital signal will be
TrueHD,
and
DTS
"Quick""
DolbyDigital 2ch
DolbyDigital 2ch
DolbyDigital 2ch
DTS*l 2ch
DTS*l 2ch
2ch Downmix
2ch Downmix
2ch Downmix
DolbyDigital 2ch
DTS
2ch Downmix
DolbyDigital 2ch
2ch
LPCM
•~.2ch
LPCM
DTS
outputasDolby Digital.
"Audio
signal will be
Audio Out" setting, theaudio
"HDMI Audio Out".."Audio
LPCM*1
LPCM
LPCM
LPCM
Mute"isselectedin"HDMI
output
Refer
tothe following table.
Downmix
Downmix
Downmix
Downmix
Downmix
2ch
Downmix
2ch
Downmix
2ch
Downmix
Downmix
2ch
Downmix
2ch
Downmix
Downmix
2ch
LPCM
2ch
LPCM
2ch
Downmix
insteadofDTS-HD.
Audio
Connedlons
output
signals
Mute"
or
LPCM
LPCM
LPCM
LPCM
LPCM
LPCM
LPCM
LPCM
LPCM
LPCM
LPCM
LPCM
LPCM
Out"
setting.
from
digital audio coaxial/
input
optical
jack
12
ENGLISH
Page 16

..
Connections
IConnection
FII".
to
etDevice
Stereo
with
2-<hClnnel.~f
component
~Cllo9
RCA
~lJdiolnpt.tt5
audio cable
I
I
(:onn~n9
After
you
cord to theACoutlet.
made all
the
necessary
A{::
J;ord
connections, connect theACcordtotheACIN.
Then
Connections
connect the
AC
I
Surrounct.
Analog 7.1ch/S.lch audio signals
(:ollllec:tion~
to
Gilfi!!.
Playback
<..
ON
/.&
OFF>
-
I
~~
0
00
0
0
-oo'oY
Turning
1
2
the
Power
On
Press
<..
ON
/.&
OFF>.
The powerindicatorlights red and the power
the
standby mode.
Press <ON/STANDBY>
The powerindicator lights green andthe power turns
on.
or
[POWER ON].
Playback
Place
the
disconthe
facing
4
is
set
to
up.
disc
tray
with
Align
the
disctothe
disc trayguide.
its
label
side
<ON/STANDBY>
[POWER ON]
[POWER OFF]
•
[.6./ 'V /
x.:;;;-jJl~!-4---
[ENTER]
<l
J[:>]
• Turning
Press
• The power
Press
• The powerindicatorturns off, and
the
power
<ON/STANDBY>or[POWER OFF].
is
settothe standby mode.
<..
ON/&OFF> .
off
Direct Playback
IBD-V IIDVD-viI
Turn
the
1
Turn
appropriate
2
is
connected.
3 Press
on
Power
on
~
DVD-Vij
the
powerofthis
On"onthis
the
display
inputonthe
to
open
the
I
device
disc
so
does the power.
CD
I
unit.
page.)
(Referto"Turning
and
select
devicetowhich
tray.
the
the
unit
Press~to
close
5
Some discs may start playbackautomatically.
Press
~
to
start
playback.
6
7
For manyofBD-videoand DVo-video, a menu screen
mayappear.
In this
case,
use
then
item,
Press.
Referto"Resume Playback" on page
To
eject
Press~to
before turning
[.6.
press [ENTER].
oncetostop
the
disc:
open
the
off
the
disc
/ 'V / <l/l>]
playback
disc tray,
the
unit.
tray.
then
to
select
the
temporarily.
16.
remove
desired
the
disc
About
< >: Buttons on
[ ] : Buttonson
Button
name
Buttons on
the
only:
the
button
the
main
the
remote control
main
unit
namesinthis
unit
and remote control
explanation
14
ENGLISH
Page 18

..
Playback
10
Playback
~
.
00
OperationsUsing DiscMenu,
Menu
IBO-V I
ManyofBD
(BD/DVD) or Pop-up menu (BD-video) which describes
contentsofthe
available functions in
differ depending on
Disc menu (DVD)
1) Press
2)
lovo-viIOVD-VRI
and
DVD
disc contains Disc menu (DVD), Title menu
disc, or a disc menu, which guides you
the
disc. The contentsofthe
the
discs.
(POPUPMENU
• The disc menu will appear.
Use
(.6. I '\11
<l/l»
I MENU)•
to
selectan
Title
item,
Menu,
then
and
menus may
press
Popup
the
through
(ENTER).
Playing BackaVAmode
IOVD-VRI
When you are playing back aVRmode
choose "Original"
1)Instopmode, press
the
2)
menu.
Use
(<l/l»
or
"Playlist"ifthe
to
select
DVD-RW/-R
DVD-RW/-R,
disc contains a "Playlist".
(POPUPMENU
"Original"or"Playlist".
~0i2SlP
, """''''''''00
"",,.p
I MENU)
f'I¥-I
'0<
Ef'
you
can
to
callupDVD
About
<
>:
Buttons on
[ I :Buttons on
Button name
Buttons on
the
only:
the
button
namesinthisexplanation
the
main
unit
the
remote control
main
unit
and remote control
Title menu(BD/DVD)
1) Press
2)
Pop-upmenu (BD-video)
1)
2)
(TOP
MENU).
Use
(.6. I '\11
• Thisisa special feature available for some
press
screen while
DuringBDplayback,press
Use
(.6. I '\11
<l/l»
to
(POPUPMENU
the
contents.still play back.
<l/l»
to
selectan item,
I MENU), a
(POPUPMENU
selectan
menu
item,
then
pops
then
press
BD.
When you
outonthe
I MENU).
press
(ENTER).
(ENTER).
Use
(.6. I '\1)
3)
Pause
1)
During
Playbackwillbepaused.
2) Press~to
to
playback.press
returntonormalplayback.
1
selectdesired
•••
title,
______
'N
then
press
-"""f""
(ENTER].
__
""""""....
15
ENGLISH
Page 19

Playback
Resume Playback <
1)
During playback, press
• Resume message will appear on
2)
Press~.
In a
few
seconds, playback
it
stopped last.Tocancel
playing back
the
playbackisstopped.
the
••
Preu'PlAY"lOllla'ftomlWlf"TorRtN~
P'Mf'SlOP'htand
disc from
...
'Pl.AY.
<Example: BD>
will
the
resume playback and start
the
the
screen.
resume from
beginning,
the
press.
point
atwhich
again while
Fast Forward I Fast Reverse Playback
I
SO-VIlovo-vl
IOVD-VRIICO
II
MP3
II
WMA I
IOivX·'
1)
During playback, press~or~repeatedlytoselecta
desired forward
_Button
iilj
_Button
irnl~1
2)
Press~to
• ForBDand
CD,
audio
changes in 3different levels.
• For audio
be
output
or
reverse
speed.
~I
~I~I_~I~I
~~I_~I~I
returntonormal playback.
DVD,
speed changes in S
MP3,
Windows
CD,
MP3 and Windows Media~Audio, sound will
atany speedoffast forward and reverse search.
Media~
different
Audio, and
levels. For
Div~,
Iii]I
~I
speed
StepbyStep
I
SO-V
1)
During playback, press
• Playback
advances frame
2)
Press~to
Playback .
Ilovo-viIOVD-VRlloivx·,
will
returntonormal playback.
II.
pause and sound willbemuted.
by
frameeach
timeIIis
pressed.
Playback
~
The disc
SlowForward Playback
I
SO-V
Ilovo-viIOVD-VRII
1)
During playback, press II.
2)
Press~.
• Slow
motion
playback will begin and soundwill be muted.
3)
Press~repeatedlytoselecta desired speed.
• Slow forward speed changes in 3 different levels.
_ Button
I
4)
Press~to
~I~I_~I
returntonormal playback.
oivx·1
~
16
ENGLISH
I_EDI
Page 20

..
Playback
Dialog Speed
Playback
Repeat Playback
___
....
_-
....
/"--?':>1L-hl-
••
SJ
[~/
'\1/
[ENTER]
[RETURN]
[MODE]
<1/[>]
lBo-v
This function plays back approximatelyat
playback while keeping
available onlyon discs recordedinthe
1) Duringplayback,press [MODE] repeatedly
2)
Ilovo-VIIDVD-VRI
the
sound
output.
Dolby Digital format.
speed settingappears.
Press
[ENTER]or[<1/[>]toswitch))(x1.3),oroff.
"OH":
Plays
backinnormal speed.
))":Plays
"
Press~to
backapproximately at 1.3 timesofnormal
playback.
returntonormal playback.
1.3
timesofnormal
This
function
until
the
is
dialog
Available repeat function mayvary depending on
1) During playback, press
repeat mode appears
The following repeat modesare available.
[REPEAT]
on
the
repeatedly
screen.
I
BO-VIIOVD-VII
~
I
JPEG
CMru
I
II
I
MP311wMAI
oivx·1
WMAIIJPEG
IOivX·1
All titles, tracksorfiles
the
media willbeplayed
back repeatedly.
in
jDVD-VRII
I
WMAIIJPEG
CO
the
discs.
until
desired
DVD-VRI
II
MP3
IloivX·'
I
I
About
the
button
namesinthis
<
>:
Buttonsonthe main
[ ] :Buttons on the remote control
Buttonname
Buttons on
only:
the
main
unit
explanation
unit
and remote control
17
ENGLISH
I
BO-VIlovo-vIIDVD-VRIICDIIOivX·
Desired section can be played back repeatedly.
1)
Press
[A-B
REPEAT]atthe
2)
Press
[A-B
REPEAT]atthe
• The repeat sequence begins.
3)
Press
[A-B
REPEAT]toexit
desired starting
desired
ending
the
sequence.
I
point
point
A.
B•
Page 21

Playback
3)
Press~to
• Program playback will start.
start
program playback.
Random Playback
~I
This function shuffles
MP311WMAIIJPEG I
..
the
play back orderoftracks/files.
Playback
"
I
CDIIMP3IIWMAIIJPEG
You can program
1)
In stopmode, press [MODE].
• The program screen
2) Use[.6. /V]to
MP3,
• For
select a folder, then press
[.6. /
•
Press
• Select
tracks/files in
• The programmed track/file
screen.
•
If
the
or
HAH
•
Use
[<l/I>]
folders.
If
eight or more tracks/files were setina program, use
•
l+1li1~to
the
disctoplay back in your desired order.
will
appear.
selectatrack/file, then press
Prog..m
.,~>::;ol
'.'
1:'::::0
IltOEF
8GHI
. .
AIIC!eat
I
Windows Media""Audio, and
V]
to
select a track/file,
[CLEAR]toerase
HAil
Clear· at
the
entire program cannotbedisplayed on
appears.
to
going back forward between
see
1/1
'"ABC
<Example: MP3>
the
the
bottomofthe
program.
all
the
trackslfiles.
I
111
[ENTER]
first, and then use
then
press
last track/fileofthe
is
displayed in
[ENTER].
1
I
JPEG,
use [.6. /V]to
[ENTER].
the
right hand
the
the
program.
screen,
hierarchy
listtoerase all
the
the
HoyH
of
1)Instop
Press~to
mode, press[RANDOM].
<Example:audio CO>
start
randomplayback.
18
ENGLISH
Page 22

Playback
00
[the
Number
_-=-
buttons)-++=-1~
-
••
Playback
Zoom'
lovo-vllovo-VRII
This function allows youtoenlargethe video imageandtopan
through
1)
S)
2)
the
zoomed image.
Press
[ZOOM)
• Playback will continue.
Press
[ZOOM)
xl.2,
xl.S, x2.0, x4.0oroff.
• ·x4.0· zoomisnot
.
JPEG
II
oivx·1
during playback.
repeatedlytoselecta desired zoomfactor:
available
for
JPEG
and Oivxe.
camera
I
BO-V
SomeBOand
simultaneouslyfrom various angles. You can change
angle when
1)
2) Use
~aKh
Angle
IIOVD-Vl
OVO
contain scenes which have been
5 appears on
Press
[ANGLE)
• The selected angle will be displayedonthe
topofthe
[~
I 'V)
screen.
to
the
screen.
during playback.
selectyourdesiredangle.
""'"""'
.......
_-~""!""""""l1I
' <
display
shot
the
camera
baratthe
<
[ANGLE)
[DISPLAY)
About
<
>:
Buttons on
[ ] : Buttonsonthe
Button
name
Buttons on
[ZOOM)
[CLEAR)
/+II
the
button
only:
the
----U=_~
-"..l....:::o:
..........
B----+if-
namesin thisexplanation
the
main
unit
remote control
main
unit
and remote control
unit
unit
3)
4}
Use
[~
I 'VI<JIt»
screen.
Press
[ZOOM)toexitzoom mode.
to
move
the
zoomed picture across
the
.Using~/~
1)
Press~to
playback.
Togobacktothe
twice
• Using
By
using
options.
• Track Search
• Time Search
• MarkerSearch
skiptothe
in quicksuccessions.
[SEARCH
the
[SEARCH
previous chapter, trackorfile, press
MODE]
MODE),
next
chapter,trackorfile
you
can select follOWing search
I
BD-V
IIOVD-VIIOVD-VRI
I
CD
"
MP3"
I
JPEG
II
Divx·1
during
/+II
WMA
lBO-VIlovo-vilovo-vRI
I
CDIIDivX·
lBO-V
I
Ilovo-vllovo-vRI
CD
I
,
I
19
ENGLISH
Page 23

Playback
1) Selecta
• Every
2) Enter
to
• Chapter, title, track ortime
typeofsearchbypressing
time
you
changes.
the
search
press
desiredchapter, track, file,
for
using
[SEARCH
[the
[SEARCH
MODE], typeofsearch
Number
search
buttons].
will start.
MODE].
title
numberortime
You
can
[DISPLAY].
To
Each
Depending on the media, available information varies.
checkinormation aboutthe currentdisc by pressing
call the On-Screen Display,
time you press [DISPLAY], the information changes.
IBO-V I
OFF"
Title/Chapter
..
time)
"OFF
I
OFF..Chapter information (elapsed time)
• Markersearch
This
feature allows youtoassign a specific pointon a title ortrack
to
be called back later.
1)
During
playback, press
marker
setting
2)
Use [<1/1>]toselecta
appears.
[SEARCH
marker
MODE]
number
repeatedly
(1-9).
until
1=~~:~:~A.6.A&m
3)
When
the
press[ENTER].
• The title ortrack and elapsed playbacktime will appear on
the screen.
4) Press
S)Toreturntothe
pressing
stop
then
discreaches
[SEARCH
[SEARCH
mode,
and
press [ENTER].
the
point
you
wanttoset
MODE]or[RETURN]toexit.
marker
later,call
MODE] repeatedly
use[<1/1>]tochoosea desiredmarker,
the
marker
during
a marker,
setting
playbackorin
by
..
(elapsed time)
..
~
OFF..Track information (elapsed time)..Track information
(remaining time)
..
..
(*notavailable during the program/random playback)
I
OFF..File
..
(*notavailable for
IWMA!
OFF..File
..
..
Title information(remaining time)..HDMI
DVD-vllovo-VR!
Chapter information (remaining time)..Title information
Bit rate
information"
Disc
information*(remaining time)..HDMI information
OFF
MP311
JPEG
name
HDMI
information"
Tag
name information..Tag
information(artist name)..File
HDMI
information"
IOivX·1
OFF..File
..
name information..File information (elapsed time)
File
information (remaining time)..HDMI
press
[DISPLAY] during playback.
information"
..
Title information (remaining time)
HDMI
..
Disc
information*(elapsed time)
Title information(elapsed
information..OFF
I
information"
OFF
JPEG)
OFF
File
information (elapsed time*)
information (title name)
information(elapsed time)
information
information"
• Chapterinformation
<Title / Chapter information for
BD>
"1.215
1.
Current
2. Elapsed
3. Indicates
on
Current
4.
S.
Current
6. Current repeat setting (Only when repeat settingis active)
(C:
• Title information
7.
Current
8. Elapsed
OFF
chapter
time/remaining
the
scene
playback
title
Chapter repeat,T:Titlerepeat,
title
time/remaining
numberltotal
that
the
number
number/total
multi
status
numberofchapters
timeofthe
camera
numberoftitles
timeofthe
angle
AB:
current
images
A-B repeat)
current
chapter
are
available
title
III
Playback
• For audio
program or random playback, the indication will be displayed
afterthe track/file information.
CD,
MP3,
Windows Mediano Audio and
JPEG,
during the
20
ENGLISH
Page 24

lIB
Playback
-
Playback
• Bitrate information
000
_
..
-
••
rE2l
• File name
information
II
IMP3 MUSIC I
[TOP
[,6
/
"V
[SUBTITLE)
[DISPLAY]
MENU]
/ <lIt>]
_-1:'1"--'---
dill)"---;-;;-
[POPUPMENU /
MENU)
[ENTER)
[AUDIO]
<ForVRmode
9.
Bit
10.Layer
(LO:
11.Type
DVD-RW/-R>
rate (the
amountofvideodata currently
number
Layer0 is played back. L1: Layer 1 isplayed back)
of
title
(Only
(ORG:
for
2-layereddiscs)
original,
PL:
playlist)
being
read)
• Track/File information
12.Currenttrack(file)
13.Elapsed
14.Indication
15.Currentrepeat setting(Onlywhen repeatsetting isactive)
(T: Track/file repeat,
time/remaining
ofSOMemory
number/total
timeofthe
G:
Grouprepeat, A: All repeat)
numberoftrack
current
Card playback
track
(file)
(file)
• Disc information
18.Mediaicon
IB:
MP3 file
Ell
JPEG
•
Tag
information
I
~@j----~-I
[iJ IARTIST NAME I
19.
Title
namebasedontag
....
20.
Media
Artist
Media
Audio
namebasedontag
....
Audio
and
File name
!II:
file It]:
~
file
file
Windows Media no Audio file
Div~
file
...........
informationofcurrent
[DISPLAY]
informationofcurrent
Windows
Windows
About
<>:Buttonsonthe
[ I : Buttonsonthe
Button name
Buttons on
the
only:
the
button
main
remote control
main
unit
namesinthis
unit
and remote control
explanation
16.Currenttrack numberlTotal
17.Elapsed
time/remaining
timeofthe
ENGLISH
numberoftracks
current
21
disc
•
HOMIinformation
• Video Info.
Audio Info.
Max Channel
Page 25

Playback
21.
HDMI
videoformat
of
the
HDMI
output
22. Resolution
23.
HDMI
audio
24. Maximum numbers
the
by
Selecting
format
connected device
the
FormatofAudio
of
audiochannels
image
and
that
canbeaccepted
Video
ISelecting Audio Streams/Channels
lBO-V
SomeBDand
often in differentaudio languages or audioformats. For
available audiovaries depends on the "BD AudioMode" setting.
Refertopage23for more information.
Ilovo-vIIDVD-VRI~IOivX-1
DVD
contain multipleaudiostreams. Those are
BD
-IOVD-vIIDVD-VRIICOIloivX-1
1)
During playback, press
2) Use
[.t./
'V]
to
selectyour desired
ENG
•
For
audio
CD,
you
can
"Stereo" : Both rightand
"L-ch" : Onlyleft channel
"R-ch" : Only right channel
3)
Press
[AUDIO]toexit.
[AUDIO].
audio
5.1
DolltyD
select following options.
ell
left
channels are active(stereo)
is
active
is
active
stream/channel.
f3
ISelecting Subtitle
I
BO-VIlovo-viIOivX-'
BD,
DVD-videoand
languages. Available subtitle languages can be
case.
You
can
I
-I
BO-V
1)
During playback, press
2)
Use
Subtitle"
_
I
"PrimarySubtitle":
"SecondarySubtitle":
"SubtitleStyle":
3)
Use
4)
Press
switch subtitle languages anytime
1
[.t./
'V]
or
.~
sec-.y
Subtitle
[.t.
/ 'V]
[SUBTITLE]toexit.
language
Div~
may have subtitles in 1 or
[SUBTITLE].
to
select"Primary Subtitle", "Secondary
"SubtitleStyle",
Subtitle
Style
Sets
the
Sets
the
Sets
styleofthesubtitle.
to
selectyour desired subtitle.
then
2.ENG/255
2.EHG/255
2125
subtitle
subtitle
press
for
for
the
the
more
foundonthe
during
[ENTER].
main picture.
sub-picture.
Playback
I
disc
playback.
-I
BO-V
1
1)
During playback, press
2)
Use
[.t.
/ 'V]
to
set,
then
~Prlmary
-1(1'1,,)[-
secondary
2 ENG
"Primary"
"secondary"
• In order
must be set to "Mix Audio Output".
3)
4)
to
Use
[.t./
Press
[AUDIO]toexit.
select"Primary"or"secondary"audio
press
[ENTER].
'""" '
Sets
Sets
sub-picture
output
be
listentothe
'V]
to
selectyour desire audiostream/channel.
[AUDIO).
DoII1y
D + Multi-e:h f3
the
audio
the
audio for the sub-picture. When
is
with
secondary audio, the
'"
_c,'
.d1l:,,,lllti;l!l!';4tn%lillI
for
the main picture.
on, the 'Secondary"audio will
the sub-picture.
"BD
Audio Mode"
Refertopage23.
-lovo-vlloivX-'
1)
During playback, press
2)
Use
[.t./
'V]
to
to
1
selectyour desired subtitle.
E_NG
__
22
ENGLISH
f3
__
[SUBTITLE].
~
__
Page 26

..
Playback
[b.IV
1<l/1>1
[PURE
DIRECT]
About
the
button
<
>:
Buttons on the main
[ 1:Buttons on the remote control
Button
name
only:
Buttonsonthe main
namesinthis
unit
unit
and remote control
explanation
I'
Virtual Surround
I
BO-V
Ilovo-vllovo-vRI
You
can enjoy stereo phonic virtual space through your existing
2-channel stereo system.
1) In
stop
mode,
surround
1111
2) Use [b.1
effect)
3) Press[RETURNI
I
P~rt!l)ir.~Mode
I
BO-VIIOVD-VIIOVD-VRI
press [MODE]
setting
appears.
011
VItoselect"1"
or
"Off".
to
• I
exit.
repeatedly
(Naturaleffect),
I
CO
II
MP3
until
the
"2"
(Emphasized
II
WMA I
IOivX·1
Use
this functiontoshut down unused circuitrytoachieve high
quality analog sound.
1) Press
Video
[PURE
direct
•
Each
changes
"All
front panel display.
1
audio
"Normal"
"Video
"Display
DIRECT]
mode
•
time you press
as
"Normal".."Video
Off'.."Normal".The modes will bedisplayed on the
outputs
Off"
Off"
repeatedlytoselect
[PURE
DIRECTI, the pure direct mode
Off'.."Display
for
each
mode
Normal playback mode(pure directmode
is
off).
Video signal will
Circuitry for front panel displayand
indicators will beshut down.
Video signal will
circuitry for front panel display and
indicators will be shut down.
not
be output.
notbeoutput
your
desired
Off'
and
virtual
..
Isetting
I
BO-V
BD
thesecondary and interactiveaudio accompaniedbythe
audio or you could
the settingofthe mode, Dolby Digital,
DolbyTrueHD,orDTS-HD
and bitstream.
1)
2) Use
•
Ifitis
output
• "HO
Only the primaryaudio will be output.
output
DTS-HD
3)
pure
the
BOAudioMode I
I
audio modeisto
In
stop
mode
with
[b.
I
V]toselect
"Mix
Audio
Output
available,BDvideo's secondary and interactive audiowill be
with
the
• The secondary audioisthe audio for thesub picture
(Director's comment etc.) and
audiofor
etc.).
DolbyDigital, Dolby Digital
Press [RETURN]toexit.
• You
Refertopage
primaryaudio.
the
Audio
Output"
soundofBD
can
also set
interactiveapplication (Button click sounds
choose between
output
the primaryaudio only. Depending on
output
BD inserted, press [MODE].
desired
ll
through HDMI connection.
"BD
Audio Mode"from thesetup menu.
32.
two
ways; you could
DTS,
changes between
setting.
the
Plus,
Dolby Digital
interactive audioisthe
Set
this modein order
DolbyTrueHD,
Multi
Playback
output
primary
Plus,
LPCM
DTS
to
or
23
ENGLISH
Page 27

Playback
IAdjusting
the
Picture
lovo-vIIDVo-VRlloivX·'
You can adjust
adjusted
1)
During
adjustment
• Picture adjustment menu:
the
on
memory 1-5.
playback,
picture
press [MODE]
menu
quality
appears
•
and store
repeatedly
the
setting you have
until
the
picture
• Gamma correction
• To adjust"Gamma Correction", afterselecting
press [ENTER], then
• In
the
graphofgamma correction,
the
brightness levelofthe
and
the
vertical axis indicates
whenitis
output
use
[.6.1V'1
image
from this unit.
<1/1>]
to
the
horizontal axis indicates
thatisrecordedonthe
the
brightness levelofthe
the
adjust
item at step
the
setting.
disc,
image
..
Playback
3,
I_
2) Use [.6. 1
"Memory5"to
3) Use[.6. 1
to
List
1.
Contrast
2.
Brightness
3.
Enhancer
4.DNR
5.
Gamma Correction
6.
Sharpness Mid
7.
Sharpness High Adjusts
8.
Hue Adjusts
9.
White Level
1
O.Black
11.Chroma Level
12.Setup Level
13.H_Position Control
14.V_Position Control
.....
oryi.
V']
to
selectamemory
store
your
setting,
V']
to
adjust
the
.omoryi
selectaitem
setting.
ll:t
.:jk
~
tobeadjusted,
i4.V
i.Contral
2.BrI.hl
of picture adjustment item/values
Item
Level
I
Adjusts
Adjusts
Strengthens
Reduces
Detailed adjustment
Adjusts
Adjusts
Adjusts
Adjusts
Makes
Adjusts
Adjusts
from
"Memory1"to
then
press[ENTER).
then
use
[<111>]
_Pooltlon Control
....
the
difference between
the
brightnessofthe
the
contoursofthe
the
overall levelofnoise on
the
sharpnessofthe
the
sharpnessofthe
the
balance between
the
white
the
black level. -5to+5
the
densityofthe
the
black partsofthe
the
left/right
the
top/bottom
o
"'+i~
o
bright
• When
the
output
become hard
Description
the
bright
and dark partsofthe
picture.
picture.
the
picture.
of
the
picture's brightness.
picture
for
the
medium
picture
for
the
high frequency range. -6to+6
the
green and red. -6to+6(0)
level. -5to+5
colors. -6to+6
pictures brighter.
position.
position.
pointsofthe
side,
the
to
see,
frequency range.
disc side are adjustedtothe
fine partsofthe
becomeaneasily discerned image.
picture.
bright
portion
I
-6
to+6(0)
Oto+12
Oto+ll
Offto+3 (Off)
to
16
-6
to
OIRE
7.5
IRE:
(7.5
IRE)
-7
to+7(0)
-7to+7(0)
235
+6(0)
:Shows
that
(0)
(0)
(GO=24/G1
(0)
(0)
(0)
(0)
Makes
• When darkpointsofthe
the
output
become hardtosee,
4)
Press [RETURN]
"dark"
of
normally
Adjustment
=32/G2=48/G3=64/G4=80/G5=96/G6=128/G7=160/ G8=192/G9=224)
the
original pictureasrecorded.
the
darkparts brighter.
side,
range
disc side are adjustedtothe
the
fine partsofthe
becomean easily discerned image.
repeatedlytoexit.
(default)
dark
portion
that
"bright"
normally
of
24
ENGLISH
Page 28

..
Playback
[TOP
MENU]
10
[POPUPMENU
MENU]
[1;:./ "il /
[ENTER]
<J
o 0
·0
/[>]
=0
Playing BackanMP3, Windows Media'"Audio,
and
Div~
File
I
MP311
1
2
/
WMAII
InsertaDVD-RW/-RorCD-RW/-R
Windows
• The file listwill appear on
If
•
[POPUPMENU
•
Press
the
Use
press
forward
•Ifyou press
JPEG
Media"
file list does
[POPUPMENU
file list.
[I;:. / "il]
to
[ENTER].
between
IIDivX· ,
Audio,
JPEG,
not
/ MENU].
selecta desired
Use
the
[ENTER]
the
appearautomatically, press
/ MENU]
.....
/~togoback
hierarchies.
on
the
files playback
with
MP3,
DivX·
files.
screen.
to
exitand resume
folderorfile,
and
will
JPEG
then
start.
It
is recommended
recorded
<MP3/
• Sampling frequency :
• Constant
<JPEG>
• Upper
• Lower
• File sizeofimage
<DivX->
Official Divl('!' Certified
• Playable codecofAVI
• Maximum size
• Sampling frequency
• Audio
under
Windows
bit
limit
limit
type
that
filestobeplayed backinthis
the
following
Media"
rate : 112 kbps - 320 kbps (MP3),
of
maximum
product
files
image
of
audio
Audio>
specifications:
44.1
kHzor48 kHz
48 kbps - 192 kbps (Windows
Media""Audio)
: 2,560 x 1,900 dots
(sub sampling
5,120 x 3,840 dots
(sub sampling
32x32
:
:
12MB
:
Div~
Div~6.0
: 720 x 480
720 x 576
8kHz-48kHz
:
:
MPEG1
MPEG1
Dolby
is
4:4:4)
isupto
dots
3.x,
Divl('!'4.x,
@30
@25
audio layer 3 (MP3),
audiolayer
Digital
Div~
fps,
fps
2,
Playback
unit
are
4:2:2)
5.x,
About
<
>:
Buttons on
[ ] : Buttons on
Button
name only:
Buttons on
the
the
button
the
main
the
remote control
main
namesinthis
unit
unit
and remote control
explanation
1. Current
displayed
2. List
3.
Selected
4. Current page/
5.
•
•
Icons:
[:]
iii:
g:
m:
I[J
folder
name(DiscorSD
for
the
of
the
file/folder
Indicationofprevious/nextpage
Use
.....
/~togoback and forward between
Press
[TOP
: Folders
MP3files
WindowsMedia""Audiofiles
JPEGfiles
:
Div~
files
topofthe
file/folder
total
MENU]
namesinthe
name
page
to
returntothe
ENGLISH
3
Memory Card name
hierarchies.)
currentfolder/disc
number
first item.
25
the
will
pages.
be
Page 29

Playback
To
Play
Back
the DivxeSubtitle Created bythe
User.
The subtitle created by
playback.
1)
After
selecting
appearwhen "DivX
than
"Off". (Refer
2)
Use
[6./
display,
Div~
'il]
then
with
the subtitlestarts playback. The subtitle cannot be
displayed when
If
thereismore than oneextension,
•
appears in
•Ifyou inserta
mixed
the
DVD-RW/-R,
with
MP3IWindows Media'" Audio/JPEG files,
playback media selection screen will be displayed.
to
select your desired mediatoplay back then press
the
user
can
bedisplayed during
the
DivX-
file,
the
Subtitle"
to
page
30.)
to
select
the
press
~lliI&~~1lliili:d£
File
:
Filenamel
the
settingis"Off'
desiredextension you
[ENTER].
19!a28K0JiJi
(ASS)
ISMI)
(SRT]
ISSAJ
(SUB)
(TXlJ
"Subtitle
issettoanything
File
USl;MENU
.
the
extension selection
subtitle list.
CD-RW/-R
with
Div~files
List"
that
the
Use
[ENTER].
Div~
will
other
want
are
[6. /
Hint
for
the
purchasedorrental official
product
• When you purchased orrented a
site
of
Div~
videowhichiscalled
(VOD)
services, a registration codeisrequired every timeyou
the
new
filefrom
on page 37.
Div~
• Some
to
restricted
VOD
with
playable times (you cannot play
them
back beyond
your
Div~
VOD
the playbackconfirmation screen
will appear.
•
Use
[<J
/[>]
to
select "No"ifyoudonot
to
confirm
the
You
cannot playback the
•
Div~
VOD
files,ofwhich rental
period
has
been expired. In such
case,
press
[POPUPMENU
MENU]
and select
can
be played back.
You
cannot playback
•
'il]
Div~
VOD
files obtained
different registration codes on
this unit.
MENU]
can
Press
and select
be played back.
DivX·
Div~
file through
Div~
Video-On-Demand
the
Div~
VOD
services. Referto"DivX(R) VOD"
files are
the limited
the
limit).
If
file
has
such limit,
select
"Yes"ifyou wanttoplayback thefile, or
DivX(R)
TI'lisrentaltIBsOviewsle'1.
(0)OU
want
wishtoplayitback.Then, press
selection.
Ttis rental
/
other
files that
the
with
[POPUPMENU
other
files
/
that
Certified
the
voo
Rental
10
uee
one01yourOvews
Rental Expired
i&
expiJecI.
P'&8Se
AUlOOrlZationError
official
No
[ENTER]
push
get
now?
to
'MENU'
•
Press
[TOP
MENU]
screen in stop mode.
to
callupthe playback media selection
•
You
cannot playback
file
that
has
the
this
unit
does
unit
does
not
files
that
have the image size that
exceeds 720 x 480
720 x 576 @ 25fps.
the
Div~
resolution which
not
support.This
support
the
@ 30fps
Div~
or
26
ENGLISH
Page 30

-
Playback
00
I I
~
.
I
,.....--~--I
~b:-
o~1
====~~~._
-=--~--
..
~
6
LoLO
ij
0
I
0 0
;.;.
IKodak Picture
I
JPEG
This
can enjoypicture images on
the
For detailsofKodak Picture
developing service
1
I
unit
can also run
Picture
When Kodak PictureCDis inserted in this unit, Kodak
Picture
CD.
This
CD
CD
JPEG
files stored on Kodak Picture
the
unit
of
Kodak Inc.
menu
displaydevice setbyplaying back
confirmstover.7.0ofKodak Picture
CD,
contacta shop
appear
automaticallyonthe
that
CD.
provides
screen.
You
CD.
Reading
I
MP311
You can playback
in an
enjoy
can be
anSOMemoryCard via
on
BD-video. For more information
contents, please refer
disc.
theSOMemory
WMAIIJPEG
the
SO
Memory
the
special additionalcontents
downloaded
o
Ii
MP3, WindowsMedia""
Card. With
from
to
the
Ib::~:
o~I~====~~~
-
..
-----_.-
I
theSOMemory
the
computer
instruction
~
Card . .
Audio
Card, you can also
for
and play
about
10
BD-ROM Profile
them
the
special additional
book
that
internet.You can store
and
the
back
came
Playback
JPEG
1.1
which
contents
with
with
the
files
the
<
>:
[ I :Buttons
Button
Buttons on
[SETUP]
[ANGLE]
•
About
the
Buttonsonthe
on
name
only:
the
: ;
;
'-------}
button
main
the
remote control
main
unit
~.;..---
~-+--
!
~~.~~~
names
unit
and remote control
I
i
_-_
1
in this explanation
[POPUPMENU
MENU]
[.6/
'V
/
<l/l>]
[ENTER]
/
1. Currenttrack
2. Indication
2
3
number/the
of
• In stopmode, press [POP
Picture
Use
played back,
• An image
and
Press.tostop
previous/next
CD
menu.
[.6
/ 'V /
gotothe
<l/l>]
to
then
press~or
will
be played backfrom
nextone in turn.
playback.
total
numberoftracks
page
UP
MENU/MENU]
selecta desired tracktobe
[ENTER]
to
.
the
selected track
call Kodak
• Setting
1 Press
Use
2
Use
3
4 Use
Press
5
• This will set
Press
6
the
media
[SETUP]instop
[<l/l>]
[<l/l>]
[.6
I 'V]
[ENTER]
the
back
modebyselecting "Disc".
[SETUP]toexit.
mode
mode.
to
select.
to
select.
to
select"MediaSelect"•
repeatedlytoselect"SO Memory".
the
unitto"SO
contents in
any
then
press
then
press
Memory"
discs, exit
[ENTER]
[ENTER].
mode.To play
"SO
Memory"
•
27
ENGLISH
Page 31

Playback
•
Inserting
1
2
theSOMemory
Insert
an
until it clicks with
File
Follow
Windows
page
soMemoryCard into
list will
appear.
the
step
Media"
25
•
Card
and
playback
the
label facing
thesoCARD
up.
t
B
2 in "Playing BackanMP3,
Audio,
JPEG
and
OivX· File"
Playback
slot
on
• Removing
In
stop
slowly
1
Grasp
slot.
2
theSOMemory
mode,
push
remove
the
card
theSOMemoryCard
your
finger.
and
pull it
Card
out
from
theSOCARD
and
then
28
ENGLISH
Page 32

Function Setup
10
000
0)
;);)
IUsipg
language,etc.
Quick setting menu contains setting items extracted
custom setting menu which may be used frequently.
the
Setup
Menu,
In
the setup menu you
.;;;:;,
Quick -
Press
can
You
[SETUP]instop
change the setting for audio, video,
cannot changethe setting during playback.
mode.
1
from.
to
Press [SETUP]
exit.
5
.='Custom
Custom menu contains all thesetting items.
in
stop
Press [SETUP]
mode.
1
Function Setup
[the
Number
Button
buttons]
[CLEAR]~:::::::/'''''
[b.I"V
1<]1
t>]
[SETUP]
About
the
button
namesinthis
<
>:
Buttons on the main unit
[ ] :Buttons on the remote control
name
only:
Buttons on the main unit and remote control
explanation
2
3
4
Use
[<]1 [>]toselect.
then
press[ENTER].
111111
BD
Audio Mode
HDMI
Audio
HDMI
Component
7.1chAudioOut
OSD1.8ng_
TV
Use
[b.1
Follow
items.
For
setting
Press
[ENTER]
For
setting
1)Press [ENTER].
2)Use
•
Use
[<]] or[RETURN]togo backtothe previous
screen.
Out
Video
Reaolution
Output
Aspect
"V]
to
select
the
procedure
item
A:
repeatedlytochange
item
B:
[b.1
"V]
to
select
setting
below
options,
lIix
HDllillulli
AulD
4lIOi
lIulti
EngHah
18:9 Wide
items.
dependsonthe
Audio
Output
(Normel)
Channel
options.
then
press [ENTER].
setting
Use [<]1 [>]
2
Use [<]1 [>]
then
3
4
5
6
press [ENTER].
II:Language
=:Others
• For "Ratings",follow the procedure on page
Use
[b.
• The setting items whichare
situation
cannotselect the items.
Follow
the
items.
setting
For
Press [ENTER] repeatedly
• For
"OivX(R)
registration code.
For
setting
1) Press [ENTER].
2) Use
[ENTER].
•
Use
screen.
Press [SETUP]
to
select.'then
to
select
your
Iii:
VideoQ:Audio
1"V]
to
select
setting
of
this unitwill be displayed in grayand you
procedure
item
item
[b.
1"V]
[<]] or [RETURN]togo backtothe previous
A:
VOO",
B:
to
exit.
to
below
press
select
press [ENTER].
desired
to
setting
category,
.:
Ratings
36.
items.
not
available with current
dependsonthe
change
options.
[ENTER]todisplayyour
options,
then
setting
press
29
ENGLISH
Page 33

Function Setup
-
III
Language
lID-
Dialog
Subtitle
Disc Menu
050
unguage
DivXSublitle
• For
howtoselect
Setting
items
Dialog
Sets
the language for audio.
Subtitle
Sets
the
language for subtitle.
Disc
Menu
Sets
the
language
OSD
Language
Sets
the language
(on-screen display).
DivX
Subtitle
Sets
the languagefor
Subtitle.
• Settings
• Quick menu consists
mark.
If
•
Code" on page 39). Only the languages supported by
with
you select "Other", enter the4-digit number code for
(*) are
for
for
the
Original
OH
English
English
OH
the
setting items and options, referto"Custom" on page
I
Original*/English/French/Spanish/German/ltalian/
Swedish/Dutch/Russian/Chinese/Japanese/Korean/
Danish/Finnish/Norwegian/lcelandiclHungarian/
RomanianlTurkish/Greekilrish/Portuguese/Polish/
Czech/SlovakiBulgarian/Other
Off*/English/French/Spanish/German/ltalian/Swedish/
Dutch/Russian/Chinese/Japanese/Korean/Danish/
Finnish/Norwegian/lcelandiclHungarian/Romanian/
Turkish/Greekllrish/Portuguese/Polish/Czech/Slovakl
Bulgarian/Other
English*/French/Spanish/German/ltalian/Swedish/
disc menu.
OSD
Div~
default.
of
the setting menus frequently used, and theyare accompanied
Dutch/Russian/Chinese/Japanese/Korean/Danish/
Finnish/Norwegian/lcelandiclHungarian/Romanian/
Turkish/Greekllrish/Portuguese/Polish/Czech/Slovakl
Bulgarian/Other
English*/Franr;ais/Espanol
II
Off*/ English / French / Spanish
29.
Options
the
desired language (referto"Language
the
disc
can
be selected.
with
II
_ri1Video
lV_
[ID-
HllIII_
,
HDIIl
AGB 5elting
HDIII
Aulo
HDM.
Video Resolution Auto
HDIII
~
HDMI5elect
Select an HDMI
between "YCbCr" and
Deep Color Auto
IIPDinIct
• For
howtoselect the setting items and options, referto"Custom"onpage 29.
Setting
TVAspect
Sets
a picture
aspect ratio
display device.
Form.
of
size
the
output
items
according
connected
mode
"RGB".
16:9Wide
YCbCr
-
-
011
to
II1liimrJlI
com_Output
,
~II-
~Sync
Still_
TV
Active""
_IPope,
i:
...
I
16:9Wide*:
II
Select this when awide-screenTVis
Disc recorded in wide screen
entirescreen.
4:3
Pan&Scan:
Selectthistoplay back
with
format
sidesofthe
not
4:3 Letter
Select thistoplay back
format
strips
4:3 Squeeze Auto:
When playing
centerofthe 16:9 screen
4:3 Squeeze On:
The picture
screen
image size.
YCbCf*:
Componentformat video signals and
output
RGB:
RGB
from
4:3TVin the pan & scan
picture cut off). Discs which pan & scan
speCified are played in
Box:
with
4:3TVin
at
the
top
is
with
a4:3 aspect ratio, regardlessofthe
from the HDMI
formatvideo signals and audio signals are
the
HDMI
the
and bottom).
4:3
images, the pictureisdisplayed in
displayed in
OUT.
Fundlon
".''''.
480i
Auto
HDIII
Auto
Full
Picture
Options
connected.
formatisplayed over
the
disc recorded in
the
letter
the
disc recorded in
letterbox mode. (with black
witha4:3
OUT.
the
centerofthe
aspect ratio.
mode
box
audio
wide
(with
mode.
wide
16:9
signals are
Setup
the
screen
the
is
screen
the
TV
original
output
30
ENGLISH
Page 34

Function Setup
Setting
items
HOMI
RGB
Setting
Sets
the
digital
RGS
(data range)
OUT.
HOMI
Auto
Makes
the
"HDMI Video Resolution".
HOMI
Sets
HOMI Deep
Sets
from HDMI
not.
lIP
Sets
material directlyfrom
ornot. This settingisforSDonly.
setting
Video
the
HDMI video resolution.
whether
with
Direct
whether
image range
output
from
Format
ofthe
Resolution
Color
output
the
the
Deep Color or
output
the
the
I
Normal·:
the
HDMI
"Auto"
picture The picture
24-frame
HDMI
Outputas"16 (black)"to"23S (white)".
Enhanced:
Outputas"0 (black)"to"246 (white)".
Depending on
black colors mayseemtostand
connections.
Max·:
for
The maximum resolution
connected HDMI device
output
Panel:
The
numberofpixelsofthe
panel
is
selected automatically.
Auto·:
HDMI video resolution will be selected automatically
•
depending on
of
the
"HDMI Auto Format".
480i
480p
nop
1080i
1080p
1080p24:
Gives a natural and high qualityfilm reproduction
frame film material.The connected displaydevice has
be compatible
Auto·:
to
Color
supported Deep Color.
Off:
The picture
Deep Color.
OW:
24 frame material will be converted
OUT
output
1080p60frame from
On:
24 frame material will be
the
from
Options
the
displaydevice you are using,
If
so,
setto"Enhanced".
resolutionisselected automatically.
detected and
through
the
connecting device via HDMI
through
HDMI
the
the
connected HDMI device and setting
with
1080p24frame input.
the
the
OUT.
out
when using HDMI
that
can be
is
detectedand
connected HDMI device's
HDMI
HDMI will be
HDMI will be
the
output
inputtothe
the
output
resolution
output
that
output
to
60 frame and
HDMI
OUT.
directly 1080p24frame
the
HDMI
with
is
without
is
of
24-
Deep
Function
Setting
items
Component
Sets
component
Progressive
Sets
mode
output
COMPONENT
AudioNideo
Sets
synchronize
to
Still
Mode
Adjusts picture resolution and Automatically selects
quality
Output
the
video resolution for
output.
Mode
the
optimum
for
the
from HDMI OUTjack and
which
in still mode. ("Frame"or"Field") based on
progressive The progressive
image material dependson
VIDEO
jacks.
Sync
video
signal
the
to
audio signal with.
I
48Oi·
480p
nop
10BOi
Auto·:
the
Videol:
Suited
for
playing
Vide02:
Suited
for
material discs.
HDMI·:
Synchronizes
OUT.
Progressive:
Synchronizes
signal
Interlace:
Synchronizes
from
SVIDEOOUT.
Other:
Select this
interlacedand HDMI pictures simultaneously.The
signals are settothe
pictures. (Theyare
Auto·:
the
Field:
Stabilizes
become coarse
Select "Field"
"Auto"isselected.
Frame:
Displays relatively motionless pictures in
resolution. "Frame" improves
althoughitmayunstabilize
outputoftwo
laying video material discs and 3D-frame
the
the
from
COMPONENT
when
the
the
pictures,
duetothe
when
field data.
COMPONENT
pictures.
Options
mode
will be selected automatically
material
you
type
(filmorvideo).
video
material discs.
audio
with
the
videosignal
audio
with
the
progressive
VIDEO
OUT.
audio
with
the
VIDEO
wanttoview progressive,
optimum
not
synchronized.)
the
although
the
pictures are still unstableeven
Interlace
OUT(48Oi),
best resolution setting
limited
the
VIDEO
timing
for
the
data characteristics
the
picture
amountofdata.
the
picture quality,
pictures
video
the
quality
higher
duetoalternate
film
from
HDMI
video
signal
OUT
or
audio
respective
may
Setup
of
if
31
ENGLISH
Page 35

Function Setup
Setting
items
TV Active
Sets
interlace (480j)
Area
the
horizontal display
output.
area
for Select thisifthe
Wall Paper Picture*
Sets
the
the
picturetobedisplayed on
screen for stop
modeoraudio
playback mode.
o Settings
o Quickmenu consists
with
( )are
*
the
default.
of
the
setting menus frequently used, and they are accompanied
mark.
o For "HOMI
effective
o
If
you set "HOMI Video Resolution"to"'080p24"
theBOis
o An individual picture on
called
RGB
Setting", select "Enhanced"ifthe black-white contrastisnot
only
for HOMI
not
compatible
as
"Field". Some pictures may be blurred at
RGB
output.
for'
080p24frame,
the
screeniscalledas"Frame" , which consistsoftwo
data characteristics.
o
If
the
pictureisnot
Resolution" or "Component
output
properlytothe display device becauseofthe
Output"
5 seconds. Both settings will bereset
o For
'1V
o
If
HOMIisconnected, for video resolution
resolution
Aspect",
o
If
thevideo resolution for
video resolution
jacks may
o
If
you set "liP Direct"to"On", thereisno
VIDEO
OUT
o
COMPONENT
that
not
jack.
4:3
squeeze functionisnot
currently
output
VIDEO
output
from
the
for
the
component
component
anysignals depend on the disc material.
OUT jacks may
"RGB"or"HDMI Deep Color"to"Auto".
o
If
you play back copy-protected
VIDEO
OUT jacks, when "ComponentOutput"issetto"480i",
o
If
connected display device does
"'080p24"
in "HDMI Video Resolution" will be displayed in gray and you
DVD
not
I
Normal:
professional-use display.
Full*:
Select this for connecting
display.
Blue
Black
Gray
'080p60
setting, press and hold~on
to
the default automatically.
available duringBOplayback.
for
the
HOMI
OUTor480i.
output
output
will be switchedto480i.
output
not
output
video, 480p signal will be
support'
080p24 frameor"liP Direct"issetto"Off',
imageisnot
and set "lIP Direct"to"On", and
frame will be output.
the
auto setting in "Still Mode"
component
and
from
VIDEO
output,
HOMI
video resolution does
OUT,SVIDEO
any signals when you set the "HDMI Select"
'720p"or"'080i".
Options
stable
with
to
commonly-marketed
clear. The setting
"HOMI Video
the
front
panel
you
can
COMPONENT
OUT
output
from
the
can
not
connecting
with.
the
contents
separate images
duetotheir
for
morethan
only
select video
not
match,
VIDEO
OUT
and
COMPONENT
COMPONENT
select
the
item.
to
is
of
the
to
.~Audio
o For
howtoselect
Setting
BO
Audio Mode •
For
BD,
selectwhethertooutput
the
secondary and interactive
with
audio
available or only
audio.
Audio Mode" on page
HOMI
Sets
output
primaryaudioifit
Referto"Setting the
Audio
the
audioformat
from the
Illx
Audio OUljKll
HDIlIllulll
Multi
Channel
Off
Off
-
Off
the
setting items and options, referto"Custom" on page29.
items
the
primary
BD
23.
Out •
for
theaudio
HOMI
OUT.
(_I)
I
Mix Audio
Output
primaryaudio
is
HD Audio Output:
Output
output
DTSorDTS-HD
HDMI Multi(Normal)*:
The multi-channel audiosignals are
HDMI OUT
HDMI Multi(LPCM):
The multi-channel audiosignals are
HDMI OUT
o Refer
HDMI2ch:
The audio signals are
down
Output*:
the
secondary and interactive audio
if itisavailable.
only
the
primaryaudio. Set this
Dolby Digital, Dolby Digital Plus, DolbyTrueHO,
soundofBD
with
a bitstreamorLPCM.
withaLPCM.
to
pages 34-35 for setting options.
mixedto2ch
output
LPCM.
Options
through
from
Function Setup
with
mode
in order
HDMI connection.
output
from
output
from
the
HOMI
OUT
the
the
with
to
a
32
ENGLISH
Audio Mute:
the
Mutes
ofthe
DIGITAL
o Refer
to
the
options.
HDMI audiosignal, and set
OUT.
"Digital
Out
Setting"onpage33for
the
signal format
setting
Page 36

lIB
Function Setup
Setting
7.1chAudio Out
Sets
the
audio
from
format
the
output
items
7.1
ch AUDIO
for
the
I
Multi
audio The multi-audiosignals are
OUT.
AUDIO
2 Channel:
Down-mixed 2-channel audio signals are
the
Down Sampling On:
Sets
the
digital audio
playingBDor DVD recorded in
lPCM.
DRC
Sets
whethertocompress
rangeofsound
Range Control)
Dolby Digital Plus or Dolby TrueHD
is
played back.
audio
Source
Direct On:
Setstooutput
adding speaker settingstothe
audio signals
Bass
Enhancer
Setstooutput
audio signal
speakers set
"Speaker Configuration" from
Subwoofer
sound.This setting
the
signal
AUDIO
output
OUT
output
to
to
and HDMI
output
volume
when
DolbyDigital,
the
audio
from
the
the
lowerfrequency
from
n
"large
enhance
is
effective
from
when lPCM signals are convertedto48 kHz for
•
Off*:
For
protection, 2-channel
outputaslPCM signals
Auto*:
the
(Dynamic
without
disc.
the
in
the
the
bass
7.1
ch
OUT
(lPCM).
When
formatisin
the
"Off'
Off
On
Selectthistooutput
speaker setting.
Off*:
Select thistooutput
speaker setting.
On:
lower
will be addedtothe soundofthe
Off*:
Normal soundsignal will be
for
Options
Channel*:
output
from
the
7.1
OUT.
Refertopages 34-35 forsetting options.
7.1
ch AUDIO
Setto"On" when using digitalconnectionstoan
amplifier
frequencies
BDorDVD
the
disc and set the
automatically.
frequency soundofthe
OUT
jacks.
thatisnot
discs thatare recorded in
playback, this
compatible
of96kHz.
recorded in lPCM
audio
signalsofupto192 kHz are
withnoconversion.
unit
DRC
settingofthis
the
audio
the
audio
output
detects
without
with
"large"
with
sampling
without
the
DRC
the
setting speakers
subwoofer.
from
ch
output
output.
copyright
DolbyTrueHD
setting
unitto"On"
anyeffect
effect
of
subwoofer.
from
AV
of
or
of
Setting
items
Virtual Surround
Setstocreate a surround effectin
a system
connected.
with
2 speakers
I
Off*:
Virtual surroundissettooff.
1:
A natural surround effectina system
connected.
2:
A stronger surroundeffectina system
connected than ·1".
• Settings
• Quickmenu consistsofthe
•Ifyou set "Source Direct"to"On", "HDMI Audio Out"to"HDM12chnor
• Under
with
(*) are
the
mark.
"2 Channel",
not
available.
- HDMI cableisnot
- Connected displaydevice
- Connected display device
"Bass
following
Enhancer"isnot
circumstances, "HDMI Multi(Normal)", "HDMI Multi(lPCM)" and "HDMI 2ch"
connectedtoHDMI OUTjack.
default. _
setting
menUS
frequently used, and they areaccompanied
available.
is
off.
is
not
compatible
with
audio
output.
Digital Out Setting
When
the
"Audio
and
the
audio signals
<"Digital Out" setting>
Audio.
Bitstream*:
When playing back discs recorded in Dolby Digital. Dolby Digital Plus,
DTS-HD,
lPCM:
lPCM
signal
• This setting
• When
both
output
from
Digital signal willbeoutput
output
insteadofDTS-HD.
"BD
• When
be
outputascore stream (Dolby Digital or DTS).lf
will
lPCM,
the
Multi
lPCM
• When
"BD
the
settinginthe
lPCM will be
Mutenis
HDMI
Audio
the
corresponding core stream (DolbyDigitalorDTS)
willbeoutput
is
not
HDMI and DIGITAL OUTisconnectedtoother
the
Audio Modenissetto"HD Audio Output", Dolby Digital Plus, Dolby TrueHD, or DTS-HD
same audiostream
from HDMI
Audio Mode"issetto"MixAudioOutput",
output
selected in "HDMI
output
from DIGITAL
Out.
Audio
Mute
from DIGITAL
effective when
HDMI
OUT
OUT,
"HDMI Audio Out". (When
from DIGITAL
the
HDMI
willbeoutput
insteadofDolby Digital
type
set in
2ch
Downmix
OUT.)
Audio
OUT
changes
OUT.
audio
from
the
the
"HDMI Audio
lPCM
outputting
Out" setting,audio signalofthe
dependingonthe
are
signalisoutput.
devices,
DIGITAL OUT jackaswell, except
Plus
and DolbyTrueHD, and
the
audio sourceisDolbyDigital,
n
Out
output
audio
Multi
will be
output
lPCM
will be
the
Options
"7.1chAudio
"Digital
Dolby
output.
the
from DIGITAL
from
TrueHD,
audio signals currently
output.
OUT.)
from DIGITAL OUT will
HDMI
Function Setup
with
2 speakers
with
2 speakers
Out"
HDMIismuted
n
Out
setting.
DTS
that
DTS
signal
(When
OUT,
DTS,
outputting
2ch
with
II
to
is
or
Dolby
will
be
or
follow
Downmix
33
ENGLISH
Page 37

Function Setup
SpeakerSetting
This
unit
surround.
<Example
allows youtoenjoy multi-channel surround sound suchas7.1-channel / S.l-channel
of
basic layout
Front speaker (left) g
with
7.1ch surround system>
-
@ @
q[]~
"ITO"d
To make
Speaker setting options are available
<Speaker setting for the audiosignal
(Available when you have
Setup"
Setup"
<Speaker setting for
Setup"
Setup"
,P:::::::
',no"d
the
Quick..HOMI Audio Out..HOMI Multi(LPCM)
Custom"
Quick"
Custom"
batk
,~ke,
(left)
mostofits feature, setupyour speakers appropriatelybyreferringtothe
HOMI
cable connectedtothe
Audio..HOMI
the
audio signal
7.1chAudio Out..Multi Channel
Audio"
7.1chAudio Out..Multi
-
1~_~~~~~~_:...,;".~lg
~=J
0
~ ~
at
the following locations;
output
from the HOMI
Audio
Out..HOMI Multi(LPCM)
output
from
the
HOMI
7.1
ch AUDIO
Channel
OUT
OUT
FrontsPeaker (right)
-
',no"d
',no"d
jack>
jack)
OUT
batk
jacks >
12
,~ke,
('9ht)
,pe'ke'
('9ht)
table below.
How
to
navigate through the "HOMI Multi(LPCM)" and "Multi Channel" setting
1)
Use
(~
1
2)
Use
•
Use
3) Use
For "Test Tone":
• The testtone
(<11
that
If
•
For "Default":
4) Press
• For "Speaker Configuration",
corresponding
set
If
you connecttoS.l-channel surround system, set "Surround Back" in "Speaker Configuration"
•
"None".
V]toselect
(~
1
V]toselect
(RETURN]
(<11
[>]
to
Use
(<11
[>]
[>]
output
you wanttostop
Press
SpeakerConfiguration
Select
speaker
change thesetting
appropriately by
referring
descriptions.
to
"On"and also you cannotset "Center", "Surround", and "Surround
will
to
adjust
the
(ENTER]toreset
(SETUP]toexit.
Menu
the
desired
to
set. Then
to
the
to
the
menu
setting
togobacktothe
selectdesired options.(Exceptfor "Test Tone"
to
select"Manual"or"Auto",
be output.Ifyou select "Manual",
the
volume.Ifyou select "Auto",
test tone.
the
test tone, press
each setting. (e.g.Ifthe
item.
items.
previous screen.
then
press
use
use
(RETURN].
the
"Delay Time"
Setting
Front
Center
Subwoofer
Surround
Surround
Crossover Freq: 40/60/80*/
For speakers set
"Small", thesound
with
frequencies
below
frequency are cut.
bass
This
has
been cut
output
subwoofer or a
speaker for which
"Large"
the
settingsofeach speaker
settingtothe
items
Large*
Small
Large*
Small/None
On*
Off
Large*
Small/None
Back
thatofthis
sound that
is
from the
is
set.
"Front"issetto"Small",
to
Large*
Small/None
100/120Hz
(ENTER].
(~I
(<11
Options
sizes
[>]
default.
and
"Default".)
V]toselect desiredspeaker,
to
adjustthe
I
Large:
For
the
with
reproduction capabilities.
Small:
the
For
which
strong
None:
Nospeakers.
For "Subwoofer"there
only
Select according
low
frequency
reproduction capabilities
ofthe
maybe adjusted automatically
the
"Subwoofer" will automatically
Back",to"Large".)
Function Setup
volume
ofthe
Descriptions
large speakers
strong
low
small speakers
do
not
bass
sound.
"On"
or
"Off".
connected speaker.
then
frequency
provide
to
-
use
speaker
is
the
to
34
ENGLISH
Page 38

..
Function Setup
Channel
Tests
or sets
volume
speakers.
Menu
Level
for
the
each
Setting
I
Test Tone:
''Test Tone"isthe
tone
put
from
so
that
the
volume
speaker.
Front Lch
Center
Front
Surround
Surround
Surround
Surround
Subwoofer
SW+
(Notavailable for HDMI)
items
which can be
the
speakers
you can adjust
for
each
Rch
Rch
Back
Rch
Back
Lch
Lch
10dB
test
out
I
Options
I
Off*
Manual
Auto
o
dB
(OdB*)
o
dB
(OdB*)
o
dB
(OdB*)
OdBto-12
(OdB*)
o
dB
(OdB*)
o
dBto
(OdB*)
OdBto-12
(OdB*)
o
dBto
(OdB*)
On/Off*
to-12
to-12
to-12
to-12
-12
-12 dB
,
dB
dB
dB
dB
dB
dB
dB
Descriptions
Select
"Off"
the
Select "Manual",
press
set
desired speaker.
Select "Auto",then press
[ENTER]
out
each speakers.
If
you have selected
"Manual" in ''Test Tone",
select
to
set and adjust
volume for
speaker.
If
you have selected
"Auto" in ''Test Tone", test
tone
automatically in order.
Adjust
speaker
testtone.
Set "On"
volumelevel
from
dB.
to
"Test Tone" feature.
[ENTER]
the
volume
to
automatically
put
the
test
the
desired speaker
the
will be
output
the
volumeofthe
that
to
increases
the
subwoofer by 10
deactivate
then
to
manually
for
the
tone
from
the
selected
output
the
the
thatisoutput
Menu
Delay
Time
This
is
a parameter
for optimizing
timingatwhich
soundisoutput
the
speakers
accordingtotheir
distance from
listening position.
• Settings
• For HDMI, "None" and
• For "Delay Time",
with
the
the
from
the
(*) are
the
I
Options
Feet*
Meters
Oft
- 60ft(12ft*)
(Om-18m (3.6m*))
Oft
- 60ft (12ft*)
(Om-18m (3.6m*))
Oft
- 60ft (12ft*)
(Om-18m (3.6m*))
Oft
- 60ft(1Oft*)
(Om-18m (3.0m*))
Oft
-60ft(1Oft*)
(Om-18m (3.0m*))
Oft
- 60ft (1Oft*)
(Om-18m (3.0m*))
Oft-60ft(1Oft*)
(Om-18m (3.0m*»
Oft
-60ft (12ft*)
(Om-18m (3.6m*»
Distance
Front Lch
Front
Center
Surround Lch
Surround
Surround Back Lch
Surround Back
Subwoofer
Default
the
default.
Setting
Rch
items
Rch
Rch
"Off' options for "Speaker Configuration" are
difference among
the
valueofthe
each speaker
Function Setup
Descriptions
Set
the
desired measure
system.This measure system
will be used
setting.
switch
Select
listening
speaker
delaytime.
Select "Default",
[ENTER],
Time" setting
not
available.
cannot
for
Press
[ENTER]
the
setting.
the
distance from
pointtothe
to
get
the
to
reset
to
exceed15ft
"DelayTime"
to
ideal
then
press
the
"Delay
the
default.
(4.5m).
the
35
ENGLISH
Page 39

Function Setup
_r'jRatings
Ratings control allows youtoset alimit, which preventsyour children from viewing inappropriate
materials. Playback
password before
SO
Rating
Leval
DVD
RatingLe..
""ssword
Change
1)
Use
[<lIt>]
2)
Press
[the
For
the
first
then press
password
•
If
you
forgot
will
be settoNAil"
• While you
ProceedtoA - C
A)BORating Level
1)
Use
[~
2)
Use
[~
"All"
"Age
• After selecting "Age Setting", use
press
(e.g. forage 15, press [0].[1],[5])
3)
Press
will
stopifthe
the
disc will play back.
'
to
select.
Number
[ENTER].
in
I '\7]
I '\7]
buttons]toenter
time
use:
That
case
you forgetit.
the
password, enter[4], [7], [3], [7]. The password will be cleared and rating level
.
input
the
password, press
to
select "BO Rating Level",
to
select
:To release
Setting":To set
[ENTER].
[SETUP]toexit.
All
All
then
Press
[the
number
your
the
the
age limitation.
ratings exceed
press[ENTER].
your
Number
will be usedasthe
buttons]
[CLEAR]
desired
option,
limitation.
[the
Number
the
levels you set, anditwill require youtoentera
4-digit
password.
enterany
password from the second time. Record your
to
clear
then
press
then
press
buttons]
4-digit
number
the
number, then re-enter
[ENTER).
[ENTER).
to
enter
the
(except for4737),
the
age from 0 - 254,
password.
then
• All
·8
[Adult]
·7
[NC-17]
·6
[R]
·5
[PGR]
·4
[PG13]
·3
[PG]
·2[G]
• 1[Kid Safe)
C)
Password Change
1)
Use
[~
2) Enter anew
3) Press
[SETUP]toexit.
RATING EXPLANATIONS
:Parental controlisinactive;all discs can play back.
:
DVD
softwareofanygrades (adult/general/childrenl can be played
back.
: No one
:Restricted; under
:Parental guidance recommended.
:Unsuitable for children
:Parental guidance suggested.
:General audience.
:Suitable
I '\7)
to
4-digit
under17admitted.
17
requires accompanying parentoradult
under
for
children.
select"Password Change",
password,
then
press
13.
then
[ENTER].
Function Setup
guardian.
press[ENTER].
B)
OVO
Rating Level
1)
Use
2)
Use
3)
Press
[~I
'\7]toselect "OVO Rating Level",
[~
I '\7]
to
selecta desiredlevel,
[SETUP]toexit.
then
then
press
press
[ENTER].
[ENTER],
36
ENGLISH
Page 40

l1li
Function Setup
_.Others
7,
Angle
Icon
Screen Saver On
~
Auto Power
ott
.....
, Diopllly
Slide Show
OlvX(R)VOO
;
CIOMd
caption
• For
howtoselect
Setting
Angle
Icon
SCreen
Saver On*:
Auto
PowerOff On*:
Panel Display Bright*:
Sets
the brightnessofthe
panel display.
Slide Show
Sets
the display
picture (in
DivX(R)YOD
Provides
code.
time
JPEG
format) playback
Div~
VOO
:\S7;,>/;
011
On
Bright
5_
011
the
setting itemsand options, referto"Custom" on page
items
front
for
the
still
registration
'".
_Soving
~"'"
Control
~
1Iod~
SeIoc:t
_ing
...
I
On:
The angle icon appears on
thescene
OfF:
The angle icon disappears on the screen.
If
minutes,
Off:
Sets
If
this
minutes,this
Off:
Sets
Front panel displaygets brighter.
Dimmer:
Front panel displaygets darker.
Auto:
Front panel gets darkduring playback.
Ssec*
10sec
For more information
www.diyx.comtvod
with
this
unitisleft
the
off
the screen saver.
unitisleft
off
the auto power off.
various angle.
screen saver will be activated.
unit
Options
the
screen when playback
withnoactivityfor more than S
withnoactivityfor morethan 30
turns
off
automatically.
about
Oiv~
VOO
On
OENONl
llIoc:
29.
visit
Setting
items
Closed
Caption
Sets
whether display the closed
or
not
caption
decoder(commercially available
Power
Lower
standby
command from
standby mode.
Remote
Changes
remote control. (Refertopage
Media
Select the media
Initialize
the
using the caption
Saving
the
power
mode
Control
Select
setting orSOMemory
consumption for
by denying the instandby mode.
RS-232C
Setting
the
signal codeofa
to
playback.
during
I
On
OfF
).
On:
the
Denies
OfF:
Accepts
in standby mode.
DENON1*
DENON2
6)
Disc*:
Select this when you playbacka disc.
SDMemory:
Select this when you play back a
Card.
command from
the
command from
.IIB
InitiaUe?
I'ii.;;;,"(
::""".\":1.
s.tup
_ClrfDovM:e
1)
Press [SETUP]instop
2) Use [<1/
[1:1./
3) Use
"No"
"Setup"
"Memory
• For "Setup" and "MemoryDevice", press [ENTER] after initialization
4) Press [SETUP]
'4;'\.;;di
t>]
to
select
'illtoselecta
Device"
to
exit.
mode.
"Initialize",
desired
:Exit
:Reset
:InitializetheSOMemoryCard.
without
the
SETUP
then
press [ENTER].
option,
then
any initialization.
settingtothe
press[ENTER].
factory default.
Options
RS-232C
RS-232C
is
when
when
SO
MemoryCard.
completed.
FunctionSetup
the
power
is
the
power
is
37
ENGLISH
Page 41

Others
Troubleshooting , . '
Others
Ifthe unit
Nopower
No soundorpicture
Distorted picture
Completely distorted picture or
black/white picture
Nosoundordistorted sound
Picturefreezes momentarilyduring
playback
Disc cannotbe played back
SD
No return
discisremoved
The
remotecontrol
Memory
unit
does
to
does
notperform properly when operatedasinstructedinthis Operating Instruction, check the unit, consulting thefollowing checklist.
with
BD/DVD
Card
cannot be read.
start-up screen when
not
respondtothe
Solution
- CheckiftheACcordisproperly connected.
- Unplug theAC cord once, and wait for 5-10 seconds and then
in again.
- Checkiftheconnected display deviceisturned on.
- Check the HDMI connection. (Check the statusofthe
indications.)
- Check
the
RCA
- Checkifthe
the
case.
- Checkwhethertheconnected displaydeviceorother device supports
HDCP.
supports
- Check whether
matches the supported input formatofotherconnected device.
- Check
"Off".
- Check
- Sometimes asmall amountofpicturedistortion may appear.
This
is
- Connect this
connectedtoa
protection system.
- Makesure the disc
-
Adjustthe
- Check that
- Check the HDMI connections.
- Check the "Audio" settings.
- Checkthe disc
wiping from center
- Clean
- Clean
- Ensure the disc labelisfacing up.
- Checkifthe
- Cancel the ratings control
- Insert a correct disc that
- The format
compatible.
-
Reset
- Aim the remotecontroldirectly
of
the
- Reduce the distancetoinfrared sensor window.
- Replace the batteries in
- Re-insert
- Make
of
the
audio/video cable connections.
pure direct modeissetto
setitto
"Display Off"or"Normal".
(This
unit
will
not
HDCP.)
ifthe
"HDMI DeepColor"issetto
if
the
"I/P Direct"issetto"On".Ifitisthe
not
amalfunction.
unit
volume.
the
the
disc.
the
disc.
discisdefective by trying anotherdisc.
of
the card does
this
unit
unit.
the
batteries
the
signal codeofthe remote control matchtothe
unit.
output
the
output
formatofthis
directly to
VCR.
speakers are connected correctly.
for
by turningitoff, thenonagain.
the
pictures maybedistorted duetothe
is
compatible
fingerprints/scratches and clean
to
edge.
or
change the control level.
can
be played back
not
the
remote control.
with
their
"Video Off"or"All Off'.Ifit
avideo signal unless
unit
"Auto".Ifitisthe
TV.Ifthe
RCA
with
this unit.
on
matchtothis
at
infrared sensor
polarities (+/- signs)asindicated.
(HDMI FORMAn
case.
audiolvideocables are
with
this unit.
unitorthe cardisnot
window
HDMI related
the
otherdevice
case.
setitto
setitto
"Off".
copy
asoft cloth
on thefront
signal code
plug
is
it
10
10.13
23
12
10,30,31
31
31
10
4
10,12,13
10
32,33
4
4
4
14
36
4
6
6
6
6
Problem Solution PageProblem
Buttonsdonot
stops responding
The
unit
operating commands
playback
The
unit
Angle does
Playback does
titleisselected
The password
been forgotten
workorthe
does
not
respondtosome
cannot read BD/DVD/CD
not
switch
not
for
rating level
during
startwhen
- Tocompletely reset
unit
for
5-10 seconds.
- Operations may
Refer
to
- Condensation? (Let sit 1
- You are
marks on page
- Wipe
the
- The anglecannot be switched
multiple
specific scenes.
the
- Check
the
the
- Enter
has
becleared.
the
unit, unplug theACcord from
not
the
attemptingtoplaya
dirt
angles. In some
default password "4737", then
be permittedbythe
instructionsofthe disc.
or
2 hours)
4.
off
the
discorreplace the disc.
cases
"Ratings" setting.
disc other than one
for
multiple angles are only recorded
disc.
with
BD/DVD whichdonot
your
forgotten password
theACoutlet
oneofthe
contain
for
will
14
3
4
4
19
36
36
38
ENGLISH
Page 42

--
Others
LanguageCode - - - - - ,
-,
- - - -
Others
-,
-~.
<'
Language
Abkhazian
Afar
Afrikaans
Albanian
Amharic
Arabic
Armenian
Assamese
Aymara
Azerbaijani
Bashkir
Basque
Bengali;Bangla
Bhutani
Bihari
Bislama
Breton
Bulgarian
Burmese
Byelorussian
Cambodian
Catalan
Chinese
Corsican
Croatian
Czech
Danish
Dutch [DUn
English
[BUL]
[CHI]
[CZE]
[DAN]
[ENG]
A-B
C-E
••
4748
4747
4752
6563
4759
4764
5471
4765
4771
4772
4847
5167
4860
5072
4854
4855
4864
4853
5971
4851
5759
4947
7254
4961
5464
4965
5047
6058
5160
Language
Esperanto
Estonian
Faroese
Fiji
Finnish
[FIN]
French
[FRE]
Frisian
Galician
Georgian
German
Greek
Greenlandic
Guarani
Gujarati
Hausa
Hebrew
Hindi
Hungarian
Icelandic
Indonesian
Interlingua
Interlingue
Inupiak
Irish
Italian
Japanese
Javanese
Kannada
Kashmiri
Kazakh
[GER]
[GRE]
[lRI]
[ITA]
[HUN]
[ICE]
[JPN]
F-H
I-K
5161
••
5166
5261
5256
5255
5264
5271
5358
5747
5051
5158
5758
5360
5367
5447
5569
5455
5467
5565
5560
5547
5551
5557
5347
5566
5647
5669
5760
5765
5757
Language
Kinyarwanda
Kirghiz
Kirundi
Korean
[KOR]
Kurdish
Laothian
Latin
Latvian;Lettish
Lingala
Lithuanian
Macedonian
Malagasy
Malay
Malayalam
Maltese
Maori
Marathi
Moldavian
Mongolian
Nauru
Nepali
Norwegian
Occitan
Oriya
Oromo(Afan)
Panjabi
Pashto;Pushto
Persian
Polish
[POL]
Portuguese
L-N
[NOR]
O-R
[POR]
ED
6469
5771
6460
5761
5767
5861
5847
5868
5860
5866
5957
5953
5965
5958
5966
5955
5964
5961
5960
6047
6051
6061
6149
6164
6159
6247
6265
5247
6258
6266
Language
Quechua
Rhaeto-Romance
Romanian
Russian
samoan
Sangho
sanskrit
Scots
Serbian
Serbo-Croatian
Sesotho
Setswana
Shona
Sindhi
Singhalese
Siswat
Slovak
Siovenian
Somali
Spanish
Sundanese
Swahili
Swedish
Tagalog
Tajik
Tamil
Tatar
Telugu
Thai
Tibetan
[RUM]
[RUS]
Gaelic
[SLO]
[SPA]
[SWE]
ED
6367
6459
6461
6467
s
6559
Language
Tigrinya
Tonga
Tsonga
Turkish
Turkmen
Twi
[TUR]
6553
6547
5350
6564
6554
6566
6660
6560
6550
6555
6565
6557
Ukrainian
Urdu
Uzbek
Vietnamese
Volapuk
Welsh
Wolof
Xhosa
Yiddish
Yoruba
Zulu
u-z
n •
6655
6661
6665
6664
6657
6669
6757
6764
6772
6855
6861
4971
6961
7054
5655
7161
7267
6558
6561
5165
6567
6569
6568
T
6658
6653
6647
6666
6651
6654
4861
39
ENGLISH
Page 43

Others
Specifications " " '
~,,'
Others
,
,,"
,
SIGNAL SYSTEM
NTSCcoior
APPLICABLE
(1)
BD/DVD-video Discs
I-layer
(1
I-layer
(1
(2)
BD-REIBD-R
1-layer 12cm single-sided discs, 2-layer 12cm single-sided discs
I-layer
(3)
DVD-R
1-layer 12cm single-sided discs, 2-layer 12cm single-sided discs
I-layer
(4)
DVD-RW
I-layer
I-layer
(5)
Compact discs (audio
12cm discs, 8cm discs
(6)
CD-RW/-R
12cm discs, 8cm discs
APPLICABLE MEMORY CARDS
(1)SDMemory
(2)
SDHC
(3)
miniSD Card
(4)
microSDCard
S-VIDEO OUTPUT
Y
output
C
output
Output
VIDEO OUTPUT
Y
output
Output
COMPONENT OUTPUT
Y
output
Pa/Ca
output
PRICR
output
Output
HDMIOUTPUT
Output
HDMI ver.
DISCS
12cm single-sided discs, 2-layer 12cm single-sided discs, 2-layer 12cm double-sideddiscs
layer per side)
8cm single-sided discs, 2-layer 8cm single-sided discs, 2-layer 8cm double-sided discs
layer per side)
(Recorded in BDMV format)
8cm single-sided discs, 2-layer8cm single-sided discs
8cm single-sided discs, 2-layer 8cm single-sided discs
12cm single-sided discs
8cm single-sided discs
CD)
Card
Memory
level: 1Vp-p
level: 0.286Vp-p
connectors: 5connector, 1 set
level: 1Vp-p
connectors: Pin jack, 1set
level:
connectors:
jack: 19-pin HDMI terminal, 1 set
l.3b
Card
(75ntohms)
(75ntohms)
lVp-p
(75ntohms)
level:0.648Vp'p
level: 0.648Vp-p
BNC
jacks, 1 set/Pin jacks, 1 set
(Deep Color,
(75ntohms)
(75ntohms)
Dolby
Digital Plus, Dolby TrueHD, DTS-HD)
ANALOG AUDIO OUTPUT
Output
level: 2Vrms
2 channel
Multi
AUDIO OUTPUT
(1)
(2)
(3)
(4)
DIGITAL AUDIO OUTPUT
Optical
Coaxial
POWER
AC
POWER
68W (Standby: 0.8Wl
MAXIMUM
W :434mm (17-2/16")
H :139mm (5-8/16")
D :399mm (15-12/16")
(including
MASS
10.3 kg (22.8Ibs)
REMOTE CONTROL
RC-1090
Infrared pulse
Supply:DC3V,
External dimensions:
(l,R)output
channel
(Fl,
Frequency response
1
BDs
(linear
2 DVDs (linear
3
CDs
SIN
ratio : 125dB
Total harmonic
Dynamicrange :
digital
digital
SUPPLY
120V, 60Hz
CONSUMPTION
EXTERNAL DIMENSIONS
protruding
type
connector: Pin jacks,
FR,C,Sl,
PROPERTIES
PCM)
PCM)
output:
output:
2 R6P/AA batteries
SR,
distortion
Optical connector, 1 set
Pin jack, 1set
parts)
SBl,
SBR,
SW):
Pin jacks, 1set
:4Hzto22kHz (48kHz sampling)
:4Hzto44kHz (96kHz sampling)
:4Hzto88kHz (192kHz sampling)
:4Hzto22kHz (48kHz sampling)
:4Hzto44kHz (96kHz sampling)
:4Hzto20kHz
: 1kHz 0.0008%
1l0dB
W :52mm (2-1/16")
H :227mm (8-15/16")
D :30mm (1-3/16")
Mass:
171
g (0.4Ibs) (included batteries)
• For purposesofimprovement,specifications and design are subjecttochange
without
notice.
40
ENGLISH
Page 44

PrintedinChina
5411100190060
DENON
TOKYO, JAPAN
_.denon.com
Denon Brand Company, O&M Holdings Inc.
E5EOOUO
I1VMN24353
*****
Page 45

BLU-RAY
DISC
I DVD
VIDEO
PLAYER
DVD-3800BDCI
ENGLISH
Correction
lIT
page
11:
<Correct>
ntl~ilAAC
lIT
page
12:
Thank you for purchasing
operate
and this sheet.
I_A_AC
the
unit, please read
Addendum Sheet I Addenda I Apendice
DENON's
the
product. When you
operating instruction
( Additional Information)
lIT
page
32,
33:
IlliJ~
r-
I
Vlrtu,l Surround Off
I_M_u_lti_L_PC_MLI2_C_h
_D_ow_n_m_i_x_LP_C_M_1
Audio Adjust
Sets
picture and audio signal.
Setting Items I Options
the
amountofthe
FRAN(:AIS
~~~:..:..
••
delay
DENON
II
IiJ
~
...
time
between
Merci d'avoir achete un
Avant d'utilisercet appareil, Iisez attentivementIemode
d'emploi et
Ie
if-
I J
~:::I~~:und
Omsto200ms(Oms*1
The
of
audio
time
produit
you set.
the
present addenda.
signal will be delayed
••
Om,
Off
DENON.
...
for
the
amount
<Correct>
<Wrong>
*1
When "BD
"Digital
Audio
Mode"issetto"Mix
Out"issetto"Bitstream", those
<Correct>
*1 For
theBDtitle
when
all
·When
·When "HDMI
·When "Digital Out"
If
theBDtitle
the
table.
Printed in China E5EOOUD/1VMN25276
S41110077002D
with
the
conditions listed
"BD
Audio
Audio
does
secondaryorinteractive audio, these
Mode"issetto"Mix
Out"issetto"Audio Mute".
is
setto"Bitstream".
not
have secondaryorinteractiveaudio,
below
Audio
audio
are met:
Audio
,."
Output", "HDMI
willbeoutputasDolby
Output".
Audio
audio
the
!2ch
Downmix
Out"issetto"Audio
Digital.
will be
outputasDolby
audio
willbeoutputasshown in
LPCM
Mute"
Digital
lIT
page
11:
<Incorrect>
and
<Correct>
I
B~RJi8MI-A-AC-----'1
lIT
page
12:(~fu'~C)ri~
A-A-C------rl
num,~iq~tlu~:a~pli~cjt;ilr
<Incorrect>
<Correct>
!.'~Mfl\f.J;0[I_AA_C
I_A_AC
M-u-It-i
L-P-C-M---12ch
AV~yec
Reduit
LPCM
'u.nO~OT'
l-12_ch_R_e_dU_it_L_PC_M
__
Page 46

<Incorrect>
*1
Quand "Mode Audio
"Sortie numerique" est sur "Train Binaire",
BO"
est regie sur "Sortie Audio Mixte", "Sortie Audio HOMI" est sur "Sourdine"
ces
signaux audio seront reproduits comme Oolby Oigital.
<Correct>
*1
PourIetitreBOavec
toutes
les
conditions suivantes
. Lorsque "Mode Audio
. Lorsque "Sortie Audio HOMI" est regie sur "Sourdine".
, Lorsque "Sortie numerique" est regie sur "Train Binaire".
SiIetitreBOn'a pas
tableau.
audio
secondaire ou interactif,Ieson sera emis en Oolby
sont
reunies :
BO"
est regie sur "Sortie Audio Mixte",
d'audio
secondaireouinteractif,Ieson sera emis
(Renseignements supplementaires)
lIT
page 32, 33:
fBl-.-j-j-
I
[A]--++AmbM) vlrtuel
Iff
L:::::.J
lliArnblovtrtuei
...........
lIT
pagina
et
12:
<Incorrecto>
Oigitallorsque
<Correcto>
tel
qu'indique
dans
~_A_A_C
Ie
<Incorrecto>
*1
Cuando
configuradoa"Audio
daran
el"Mododeaudio BO" esta configurado a "Salida audio comb.", "Salida audio HOMI" esta
como
salida
como
desactivado"y "Salida
Oolby Oigital.
I_A_A_C
digital"
esta
configurado
ILPCM
Oownmixde 2
a "Bitstream", esos sonidos
canalesl
se
<Correcto>
*1
ParaeltituloBOcon
se
cum plan todas
,Cuando
10
.....
Iff
'Cuando
.Cuando "Salida digital"
SieltituloBOno
"Modo
"Salida audio HOMI"seponga en
audio
secundario 0 interactivo, este
las
condiciones enumeradas mas abajo:
deaudio
tiene audio secundario 0 interactivo, el
BO"seponga en "Salida audio
"Audio
desactivado",
se
ponga en "Bitstream".
audio
comb
audio
saldra
como
Oolby Oigital
....
saldra
comosemuestra enlatabla,
cuando
(Informacion adicional)
Parametres
Reglage
Regieladureeduretard entreIesignal d'image
etIesignal audio.
Audio
ESPANOL
Gracias
por
Cuando use
adquirirelproducto
,
la
unidad, lea
Oms
Le
quevous avez regie.
y esta hoja.
lIT
pagina
11:
<Incorrecto>
<Correcto>
~RI-A-A-C-----'--I
A-A-C-------I_M_u_lt_._L_PC_M
Options
it200
ms
signal audio est retarde de
(Oms*)
de DENON.
las
instrucciones de funcionamiento
la
dureeamesure
ILPCM
Downmixde2
canales
lIT
pagina
r-
I
Ajustedeaudio
Establece el
video y
I
32,
33:
1l1ii~
VIr1ullI
Surround
Opcionesdeconfiguracion
tiempo
la
serial de audio,
••
Apdo.
de retardo entrelaserial de
...
llla~
..
r~
:;c:
II~=:=~
I
Omsa200
La
serialdeaudioseretrasaraeltiempo
usted establezca.
ms(O
••
.....
A",.
Opciones
ms*)
...
que
Page 47

• Please consult
the
outlet
where
• Bitte wenden Sie sich an den
the
Hindler,
DENON SERVICE NETWORK I
equipment
bei
was
dem
purchased.
Sie das Produkt gekaufthaben.
ijln~tM~
• SVP veuillez consulter votre revendeur.
•
Neemt
u alstublieft contactopmet
het
verkooppuntwaar u de apparatuur heeft gekocht.
• Por favor consulte en el establecimiento donde compro el equipo.
• Vanligentakontakt
med
butiken dar du kopt utrustningen.
• Rivolgetevi al rivenditore che vi ha venduto I'apparecchio.
• Contacte a loja onde comprou 0 equipamento.
•
aiDJ~•.A*~lY:Jillilll!.P.J
•
lW(iijfmJiJflll1;J~*maqiUHTi!I:~
Australia Audio Products Group Pty Ltd. 67 O'Riordan Street Alexandria NSW 2015,POBox 150, Mascot NSW 1460 Australia
Austria
Belgium
Canada
China
Czech republic
Denmark
Finland
France
Germany
Greece
Hong Kong
Hungary
Iceland
India
Indonesia
Israel
Italy
Korea
Malaysia
Mexico
Netherlands
New
Zealand
Norway
Philippines
Poland
Portugal
Tel:
Digital-Professional-Audio Vertriebsges.m.b.H., Seeb6ckgasse
Transtel-Sabima
D&M
~1f~~1fOJiiJfi%(l:.fflJ)~1lN0~
~11!i:(021
EUROSTAR
Tel:
Hifi Klubben
Soundata Oy Hameentie 157 5th floor 00560 Helsinki Finland
DENON FRANCE A division of
Tel:+33(0)1-41-383230
DENON DEUTSCHLAND A divisionofD&M
Tel:
KINOTECHNIKI
D&M
Tel:
wlt!l1L~~B>OJl.IJ'*l1l:5lJiJ1fflJlt!lJJ;Xm1$9=J,L'5t1501¥:
A.I.D.A. Audio Kft. 1112 Budapest Oltu.37. Hungary
Einar Farestveit & co hf., Borgartun 28, PBox 5440, 125 Reykjavik.
ProFXDynamic House. 64, Church Street, Bangalore-560 001, India
PT
Newpan Ltd. 14 Rosansky st. Rishon Lezion 75706, Israel.
Audiodelta
D&M
Tel:
Wo
Selangor Darul Ehsan, Malaysia
Labrador,SAde
Penhold B.v. Poppenbouwing 58, NL-4191NZGeldermalsen, Netherland
Avalon Pacific Marketing Limited. 15c Vestey Drive,MtWellington, Auckland,
PO
Hi-Fi Klubben Marcus Thranes gate
Lotteworld Audio Video Systems Incorporated
Bahay Toro, Project8,Ouezon City, Philippines.
HORN
Videoacustica Ota. Do Paizinho-Armazem 5-EstradaDeCircunvalai;ao-Apart. 3127 1303 Lisboa Codex
Tel:
Singapore
Slovakia
South Africa
Spain
Sweden
Switzerland
Taiwan R.O.C.
Thailand
Turkey
U.A.E.
Ukraine
United
Kingdom & Eire
U.S.A.
Vietnam
• If there is no service centerinyour local area, please contact one of our overseas service centers, listed above, for follow-up service consultation.
1st
kein Service-CenterinIhrer Nahe, setzen
•
*
Siiln'y a
* Ais er geen servicecenter bij uin de buurt
•
* Om det inte finns nagon auktoriserad Denon-verkstad dar du
•
* Caso nilo exista um centro de assistencia tecnica
•
*
pas
Si
no hayunservicio tecnicoensu
Se
nonclsene dei centri assistenza autorizzati nella vostra zona, potete fare riferimento agll altri centri assistenza autorizzati, vedi elenco sopra, per qualsiasi
consultazione tecnica.
ilO;s'M"tt!!jlHl\\mU9Jep,L,'
;s~tt!!~••r:p~
ALL
Tel:
BIS AUDIO s.r.o. Dobronivska cesta
Mandarin Distributors
Africa
Gaplasa
Hi-Fi Klubben G6teborg Skanegatan 25, 41252 G6teborg
KOENIG
Tel:
KOLIN-DENON Entertainment INC. 5F-3, No. 14, Shiwei Street, Sanchung City, Taipei Hsien,
w.:**7<:~1f~$~lRfJJ~1lN0i'i]
Realise Tech-Service
Jffil**f-f:f5i:~&~lRfJJfHIH~i'i]
Mahajak Development Co., Ltd. 46 Mahajak Building, Sukhumvit
Thailand. 10110
Ertekin electronik tic. ve san. a.s. Galipdede Caddesi No.: 113 Kuledibi-Karak6y I Istanbul, Turkey
Tel:
Vv.
Tel:
Mirs Ltd. Osipova str.
Tel:
DENON UK A division of
Longford, Middlesex, UB7
DENON ELECTRONICS (USA),
100 Corporate Drive, Mahwah,NJ07430-2041
Anh Duy Manufacturing - Trading Co., Ltd. 170 Ung
Tel:
destation technique proche de chez vous, veuillez contacter nosI'un
•••
0
0
1300
134400
CANADA INC. 5-505 Apple Creek Blvd., Markham, Ontario,
)64372299
261-112-901
+49(0)2157-1208-0
Sales
852-2516-5864
Autoaccindo Jaya. Cideng Barat NO.7 Jakarta, Indonesia
Sales and Marketing
02-715-9041
Kee
Hong Trading
Box11631
DISTRIBUTIONSAUlica
+351214241770
(E&E)
6747-8274
Tel:
SAAV
APPARATE
01-306-1626
+90(212)293-9515
& SONS L.L.C. Street No-11/B,
+971-4-266-2435, 268-4575
+380(482) 305530
+8488983424
~jJU.~plT?U*0E'Jl/j7~g~f9iep,L,]t~fHUU9J:jJ!Ij[
~~~ffi~ftm~.~••r:p~.~~
Fax:
+61
2 9578 0159
PV.BA
Duboisstraat 48, B-2060 Antwerpen, Belgium
l:.fflJmtlfflJ9=J~887{H(tIi'*1I6010¥:
)64339973
D&M
+33(0)1-41-380110
+49(0)2157-1208-10
STR.
Ltd. Unit
Korea
Ltd. Chung Jin
Bhd. 2nd Floor, (Left Wing), Bangunan Infinite Centre, Lot1,Jalan 13/6, 46200 Petaling Jaya,
Tel:
del
Naranjo
New
I!I~~:
France
SAS
Germany GmbHAnder Landwehr 19, D-41334 Nettetal, Germany
16675,
501,
Ocean
03-7954-8088
35,
Naucalpan,
Zealand
4-6,0473
Oslo, Norway
CET
200020
Tour Ventose, 2 rue des Bourets, 92156 Suresnes Cedex, France
GLYFADA ATHENS
Centre, Harbour
.~I!i:
BID.,
Fax:
Tel:
Building Mezzannine Floor NO.4 Mindanao Avenue, Barangay
Tel:
+632-929-5334
A/S
LTD.
Marketing
~Jl:(021
s.r.o. areal Vodni stavby Praha, budovaA2Dobronicka 635,148 00
Fax:
261-112-904
Dali
Aile1,9610 Noerager, Denmark
14, PYRGOU
Fax:
Via
Pietro Calvi 20129 Milano Italy
Fax:
02-715-9040
OSTRAVA
and
S.r.1.19
Sdn
C.V Callejon
Ellerslie, Auckland,
Fax:
Fax:
(H.K.)
852-2516-5940
Kurantow 34,02-873 Warszawa
Fax:
Service Center Pte Ltd. Machtech Industrial Building, #06-04, No.2,
Fax:
27-11-444-8445
Ing. Conde de Torroja, 25, 28022 Madrid
Fax:
Tel:
is,
zona,
por favor contacte con uno de los servicios tecnicos centrales, indicados abajo,
+351214188093
6748-9007
SA
1642/696001
10 Thora Crescent, Wynberg Ext.3 Sandton, P.O.Box 5137, Johannesburg RepublicofSouth
Fax:
27-11-444-8363
AG,
Abteilung Elektronik. Eggbuhlstrasse 28, CH-8052 Zurich, Switzerland
01-306-1690
Co.,
66-2-256-0020
Fax:
37/0ffice1,65012 Odessa, Ukraine
Fax:
Sie
neem
tJ~t~.=:.mmt~~m14lJiJ15F~3
Ltd.
2F,
No. 14, Shiwei Street, Sanchung City, Taipei Hsien,
tJ~t~.=:.mmt~~m14lJiJ12F
Fax:
66-2-253-1696
+90(212)249-3512
Road
Fax:
Fax:
+380(482)305555
D&M
Audiovisual Ltd. Moorbridge House, Padbury Oaks, 579 Bath
OEH,
United Kingdom
LLC(aD&M
NO-128, Shed No-39AIKhabisi, Deira, Dubai, U.A.E
+971-4-266-2052
+84 8 898 3425
sich bitte miteinem der hier aufgelisteten AdresseninVerbindung.
dan
contact op een een
bor,
kontakta enavvara
na
sua area, consulte um dos centros acima apresentados
•••
%W
Zvolen Tel:045-5400 703 Fax:045-5400 704
Tel:
Holdings Company)
Tel:
800-497-8921
Van
de noscentres techniques, Iistescidessous, pour toutes demandes techniques.
van
onze bovengenoemdeservicecenters voor ondersteuning.
•
••
59,
A-1160 Wien
Tel:
L3R
5B1
7<:).t;~F~&~;l:M~:
Tel:
45-96 72
852-2516-5864
Tel:
01-248-2030
Tel:
39-02-5411-6008 I 39-02-5412-8253
1
OF,
53-5, Wonhyoro 3
03-7954-7088
53560,
+64-9-573-5933
1000
Tel:
+358-(0)9-47693300
Tel:
City,
Tel:
Tel:
Tel:
+62-21-633-2730
Tel:
+972-3-953-5900
Edo.
Mex., Mexico
Tel:
Fax:
+4722806310
5 Canton
Fax:
+3545207900
Fax:
Poland
Tel:
Tel:
91-746-00-45
Tel:031
3351010
.~I!i:
(02)8287-2618
.~(
{-~*lJiJ1):
(02)8287-6668
Soi
3 (Nana-Nua) Klongtoey, Wattana, Bangkok
+44(0)1753-680568
Fax:
Kheim St., Ward 25, Blinh Thanh Dist., HCMC, Vietnam
internationella servicecentra
888-544-8434
+302109601071
f$Jl:
+91-80-5768-6722
Tel:
+632-929-1343
+4822331
Fax:
DENON
www.denon.com
Tel:
03-237-3607
01-480-1006
Tel:
905-475-4085
Fax:
Fax:
905-475-4159
021-62949285
Praha
4 Czech Rep.
Fax:
45-96 72 10 14
852-2516-5940
01-248-2039
Ga,
31-345-588080
New
+64-9-573-3720
Kallan~
Fax:
Fax:031
+44(0)1753-689697
Fax:
+358-(0)9-47693310
Fax:
Road,
Tsimshatsui, Kowloon, Hong
Fax:
Fax:
+62-21-632-2886
Fax:
+972-3-961-6193
+302109601072
+3545207910
Fax:
+91-80-2559-4298
Fax:
39-02-5412-0258
Yongsan-Gu, Seoul, 140-719, Korea
Tel:
52-5359-5161
Fax:
Fax:
31-345-588085
Zealand.
Fax:
+47
22806329
5533
Fax:
+4822331
Pudding
Road,
Singapore 349307
91-329-44-57
3351019
241
Taiwan, R.O.C.
(02)8287-1384
Taiwan, R.O.C.
f$Jl:
(02)8287-6272
241
f$Ji:
Road,
para
(se
realizar un seguimiento de su consult.
ovan).
Denon Brand Company,
Printed
in
China
ODD
01-485-7679
52-5357-1775
5500
D&M
Holdings Inc.
515 0921801 iii
Kong
611
Page 48

DENON®
LIMITED
(USA
WARRANTY
/ CANADA)
PAGE
USA
(ENGLISH)
CANADA
CANADA
(ENGLISH)
(FRENCH)
2
3
4
USA
DENON ELECTRONICS (USA), LLC
(a
D&M
Holdings
100 Corporate Drive
Mahwah,
(800) 497-8921
(888) 544-8434 Fax
DENON REGIONAL SUPER SERVICE CENTERS (Repair
-
PYRAMID
305E.Braker Lane
Austin,TX78753-2746
(512) 458-8292 (800) 634-8606
(512) 453-4542 Fax (315) 446-8505 Fax
--------------------------------------------------------------------------------------------------
INNER
1416
Portland,
(503) 238-1955 (770) 451-5057 Carson, CA 90746-1406
(503) 238-1787 Fax
--------------------------------------------------------------------------------------------------
SERVICE
2239 Curtiss Street
Downers
(630) 969-7333 (630) 208-4600
(630) 969-7330 Fax
AUDIO
SOUND
S.E.
Morrison
OR
97214-2646
WIDE
TECHNOLOGIES
Grove, IL 60515-4010
UNITED RADIO SERVICE
5717 Enterprise Parkway
E.
Syracuse, NY 13057-2905
NORMAN'S ELECTRONICS
Street 3653
Atlanta, GA 30341-4907 129
(770) 455-8337 Fax (310) 538-8282
ELECTRONICE
1809
West Chicago, IL 60185
(630) 208-4601 Fax
Clairmont
E.
Road
Fabyan Parkway
Company)
NJ 07430-2041
EXPRESS
only-No
parts
orders
AUDIO
544 Central Dr., Suite
Virginia Beach, VA 23454-5245
(757) 498-8277
(757) 498-9554 Fax
GOLD CROWN ELECTRONICS
Victoria Business Park
(310) 538-8281 Fax
E.
Savarona
SERVICES
please)
Way
101
CANADA
D&M
CANADA
5-505
Apple
Markham
(905) 475-4085
(905) 475-4159 Fax
Creek Boulevard
Ontario,
INC.
L3R
5B1
WARRANTY (HOME)
OOD
5150944600
1
Page 49

~"'11"'~'1I111"~"1111"""'1111"""'111J""""'11""'"111"
!Thi,
W'~"
wHl
k
~""red
......
,1111
........
"'"
i",~llU
1111
.......
,'111'
.......
'111'
......
,.,11
.......
1111··
...
·.lll"·
...
·.IIII··
...
·.'ll.'·
....
·.'I'Io·
...
·,'III'·
...
·.111,
.....
,111"
.....
'1111
.......
1111
.......
'11"
......
1111
.......
,1111'·
...
·.'11"·
...
·,1111··
...
·.'111··
...
·.1111'·
...
·,'111··
...
·.1111•.......
111.
DEN
0 N® I
t
t
LengthofNon-Transferable
: This warranty on your DENON product whichisdistributed and warranted by DEN ON ELECTRONICS (USA), LLC remains in effect for the following periods from ,
t the date
of
the original consumer purchase from an
Warranty
LIMITED
AUTHORIZED
WARRANTY
DENON ELECTRONICS (USA), LLC DEALER. t
t Product Category •
t i
t f
t ,
t
,
, t
t ,
t i
t i
t
t t
t ,Pod
t
WhatisCovered
• Except as specified below, this Warranty covers all defectsinmaterial and workmanshipinthis product occurring during the above warranty periods. The following are
~
not covered by the Warranty:
• the U.S.A. from an authorized DENON dealer, unless the productispurchased through the U.S.A. Military Exchange Service where the Warranty will be One
" all prooucts listed above exceptinthe caseofCartridges, Accessories, Remote Controller and Headphone which will remain at 90 days. (Note: AUTHORIZED DENON •
~_~_'.
DEALERS
AUTHORIZED DEALER, please contact DENONaslisted below). (3) Any product on which the serial number has been defaced, modified or removed. (4) Damaged ,
• deterioration or malfunction resulting from: a) Accident, actofnature, abuse, misuse, neglect, unauthorized product repair, openingofor modificationorfailure to follow t
: instructions supplied with the product. b) Repair or attempted repairbyanyone not authorized by DENON. c) Any shipmentofthe product (claim must be presented to
, carrier). (5) Items subject to wear from normal usage (tape heads. cartridges, stylus, battery, etc.). (6) Periodic check-ups which do not disclose any defect. (7) Useofthe
~
product outside the U.S.A. (8) Damaged magnetic tapeorCD/DVD discs. (9) Use
can
be identified by DENON
(I)
Any product whichisnot distributedinthe U.S.A.byDENON ELECTRONICS (USA), LLC. (2) Any product whichisnot purchasedin•
AUTHORIZED
DEALER sticker displayed in the stores.Ifyou are uncertain as to
os
a ',adema,kofApple Compute,. Inc.
in
industrial, commercial, and/or professional applications. (10) Any installation or t
<egos,.,ed
,n
,he
U.S.
and
oth.,
coun,nes f
(I)
year for "
whetheradealer
is a DENON
t removal charges resulting from product failure.
~
What
We Will
Pay
For
~
repI:i~U::~~
t
HowtoObtain
t.
whether a service station is DENON authorized, please contact
t be transported for warranty service;
~
~
~
~
, d.
~
t THIS WARRANTY IS VALID IN
t Ifyour product does not require service,
, THIS WARRANTY IS EXPRESSLY
" WARRANTIES
i
OUR
-
INCLUDEICIDENTALORCONSEQUENTIAL
t PRODUCTS LOST, STOLEN AND/OR
~
SOME
~
INCIDENTAL OR
t
wr~i~i:
i:~~;~~~~~~~~a~a:~t~t~:;~i~~e:r~;:~~~v~~~~t
If your unit ever needs service,itmay be taken or shipped to any authorized DENON service stationorDENON ELECTRONICS (if you are uncertain as to
a.
b.
c.
Warranty
You
are responsible for transporting your unitorarranging for its transportation.
If
shipmentofyour unit is required;
You
must pay the initial shipping charges, but we will pay the return shipping chargesifthe repairs are covered by the Warranty.
WHEN
You
should include the following: your name, address, daytime telephone number, model and serial numberofthe product and a descriptionofthe
problem. In the caseofa CDorDVD
OF
LIABILITY IS LIMITEDTOTHE
STATESDONOT
::~n~y
Performance
RETURNING YOUR UNIT FOR WARRANTY SERVICE, A
THE
U.S.A. ONLY. t
bUI
you have questions regarding its operation, please contact
MERCHANTABILITY AND FITNESS FOR A PARTICULAR PURPOSE. i
ALLOW
CONSEQUENTIAL
~;~~!'~:r
~~:~~e~~~~i;:~~sb~~~~uL~2.'
MADEINLIEUOFALL
REPAIR OR REPLACEMENT,ATOUR
DAMAGED
LIMITATIONSONHOW
DAMAGES,SOTHE
o~:~~:~:lc~o~::e~t~~:~~~~~~~
DENON
as listed below.) In all other cases, the following procedures apply whenever your unit must ,
Player, please enclose
COMMERCIALORPROPERTY
DURING SHIPPING.
also have other rights which vary from state to state. This Warranty may not be altered other than in a t
ONE
(1) disc that the unit has failed with for test reasons.
OTHER
WARRANTIES, EXPRESSED OR IMPLIED, INCLUDING
LONG
AN IMPLIED WARRANTY
ABOVE LIMITATIONS
~Tt~~~~~~:
COpyOFTHE
OPTION,OFANY
DAMAGESOFANY
AND
EXCLUSIONS MAY NOT APPLY
~~~~~~i~rf~:::r.
ORIGINAL
SALES
our
Technical Services Department as listed below.
DEFECTIVE
LASTS
AND/OR DO
to be defective by DENON,
SLIP
MUSTBEATTACHED.
It
will be returned with the unit. f
PRODUCT
KIND.WEARE
AND
NOT
NOT
ALLOW
TO
YOU. f
WITHOUT
SHALLINNO
RESPONSIBLE
THE
EXCLUSION
LIMITATION,
DENON
EVENT
will t
FOR
OF
!
I.
~_.
f
'
._:
.1,
~_:
'::~
t
~~~.
~_::~
~
.
~_~
,_:~
~::~.
,
,_::
t t
t
·
t 100 Corporate
~
!
·.IIII··~·.ltll··
...
·.'III··
...
·.tlllo·
....
·.,llh·
....
·'IJII··
...
·.IIII'
......
"II..·
...
·.,llt'·
...
·.IIIIo·
...
DENON
·.II1Io·
....
·.'IlIl·
ELECTRONICS (USA),
(a
D&M
Holdings
Mahwah,
~~~~
...
·'llll··..·.IIII··
...
·.~11o·
....
LLC
Company)
Drive
NJ
07430-2041 f
·,'IIIo·
...
·.,UIo·
...
·.IIII
.......
,I1I··
...
·.'lII.·
...
·.IIIII·
...
·.'II"·
......
1111>
......
'11'
......
,'1110
.......
11110
.......
11110
......
'1111
.......
1111
.......
11110
......
11110
......
2
'1110
.....
,~-
i
t
Page 50

~'''llh'~'''IIIo-'''''IIlI''''''''ln''.''''''~lr'''''''III'''''''''IIIo''''-'11~1o"""IUI''''''''III'''''''IIII''''''''II''-4'-''IIII'''''''IIII''
• ThIs warranty
Willbehonored
only
In
~
.....
,",
.......
1111
........
1111
.......
1111
.......
1111
.......
1111
........
11''·
...
·.III.'·
...
·.tll"·
...
··IIII··
...
·.tlll··
...
·'IIlI··
...
·'IIII
.......
1111
.........
111
.......
1111
~
......,••1.......
1111.
~
t
I
t
t
LengthofNon-Transferable
• This warranty on your DENON product which is distributed and warranted by D&M CANADA INC. remainsineffect for the following periods from the dateofthe
~
original consumer purchase from an AUTHORIZED D&M CANADA INC. DEALER.
Warranty
DENON®
LIMITED
WARRANTY
t Product Category •
t t
t t
t i
t t
t t
t t
t t
t f
t t
t
t f
t
WhatisCovered
• Except as specified below, this Warranty covers all defectsinmaterial and workmanshipinthis product occurring during the above warranty periods. The following are
~
not coveredbythe Warranty:
• authorized DENON dealer. (Note: AUTHORIZED DENON DEALERS canbeidentifiedbyDENON AUTHORIZED DEALER sticker displayedinthe stores.Ifyou are
~
uncertainasto
• number has been defaced, modified or removed. (4) Damaged deterioration or malfunction resulting from: a) Accident, actofnature, abuse, misuse, neglect, =
~
unauthorized product repair, opening of or modification or failure
,
by
DEN60N.
= etc.). ( ) Pen
whether a dealerisa DENON AUTHORIZED DEALER, please contact D&M CANADA INC.aslisted below). (3) Any product on which the serial
Cod)
Any
IC
chec -ups wIC0 not
(I)
shikPment
Any product whichisnot distributedinCanadabyD&M CANADA INC. (2) Any product whichisnot purchasedinCanada from
to
0hfthhedProductd(c1laim
ISC
ose any e,ect. se 0 t e pr uct
musldb;
follow instructions supplied with the product. b) Repair or attempted repair by anyone not authorized f
prese(n7t)eduto
cafmh·er).
od(5)
Items
OUtSl
sdubjecCl
e ana
todwear(8)fro
m
a.
norrndal
amage magnetIc tape or
D
usage (tape
headCs'Dc/DartvridDgeds,
stYlu(s9,)buattery,
ISCS.
an
se
In
t industrial, commercial, and/or professional applications. (10) Any installation or removal charges resulting from product failure.
•
What
We Will
Pay
~
If
during the applicable warranty period from the dateofOriginal consumer purchase your DENON productisfound to be defective by DENON, DENON will •
~_._
repair, or at its option, replace with new, used or equivalent model, such defective product without charge for parts or labor. !
HowtoObtain
•
If
your unit ever needs service, it may be taken or shipped to any authorized DENON service stationorD&M CANADA INC. (if you are uncertain as to whether a
§ service station
t must
be
transported for warranty service;
•
a.
~
b.
•
§ c. WHEN RETURNING YOUR UNIT FOR WARRANTY SERVICE, A COPY OF THE ORIGINAL SALES SLIP MUST BE ATIACHED.
•
d.
~
t THIS WARRANTY
t
If
your product does not require service, but you have questions regarding its operation, please contact
• THIS WARRANTY
~
WARRANTIES OF MERCHANTABILITY AND FITNESS FOR A PARTICULAR PURPOSE. i
• OUR LIABILITYISLIMITED TO THE REPAIR OR REPLACEMENT,ATOUR OPTION,OFANY DEFECTIVE
~
INCLUDE
For
Warranty
is
You
are responsible for transporting your unit or arranging for its transportation.
If shipmentofyour unit is required;
You
must pay the initial shipping charges, but we will pay the return shipping chargesifthe repairs are covered by the Warranty.
You
should include the following: your name, address, daytime telephone number, model and serial numberofthe product and a descriptionofthe
problem. In the caseofaCDor DVD Player, please enclose ONE
INCIDENTALORCONSEQUENTIAL
Performance
DENON authorized, please contact D&M CANADA INC. as listed below.) In all other cases, the following procedures apply whenever your unit f
(I)
disc that the unit has failed with for test reasons. It will be returned with the unit. ,
IS
VALIDINCANADA
IS
EXPRESSLY MADEINLIEUOFALL OTHER WARRANTlES, EXPRESSED OR IMPLIED, INCLUDING WITHOUT LIMITATION, .
ONLY.
COMMERCIALORPROPERTY
our
Technical Services Department as listed below. ,
DAMAGESOFANY
PRODUcr
KIND.WEARE
AND SHALL IN NO EVENT -
NOT
RESPONSIBLE
FOR
t PRODUCTS LOST, STOLEN AND/OR DAMAGED DURING SHIPPING.
• SOME PROVINCES DO NOT ALLOW LIMITATIONS ON HOW LONG AN IMPLIED WARRANTY LASTS AND/OR DO NOT ALLOWTHE EXCLUSION OF '
.. INCIDENTAL OR CONSEQUENTIAL DAMAGES, SO THE ABOVE LIMITATIONS AND EXCLUSIONS MAY NOTAPPLY TO YOU.
i This warranty gives you specific legal rights, but you may also have other rights which vary from province to province. This Warranty may not be altered other
thanina writing signed byanofficerofD&M Canada Inc. ,
t t
~
i D&M CANADA INC.
· 5-505 Apple Creek Boulevard
t Markham, Ontario t
t L3R5Bl
I
i
•
~
~
~
•
~_-
t
~
t~:'~
,
.~::
,
4,
._:
._~
~_~
t
t
~
t
t~:-.
~
_._:-_-.
~
t
·,dl..•..·"II
......
·.III~·
...
·'IIII.·
...
(~.~~~~~~c~5
·.llIl'·
....
·.IIII'·
...
·,'ll1'·
...
·.'II"·
....
·.lllr'·
...
·.lll"·
...
~IIII··
....
,'III'·
...
·'IIII'
......
1111
.......
'.11
......
'1111
.......
11110
......
'111
......
,1111'
•..,..'1111
......
'111'
......
'111"
.....
'1111
.......
1111
.......
1111'
......
'1110
.....
,1111......
'1111......
,'111.......
111'
........
'11......
'1111
t
......
3
Page 51

~"I'I"''''''llll''''''''(II''''''''llll,
•
Cette
garantienesera
.....
~tlll'''''''"I''''''''1
honoree
110
......
qu'au
~
'1111
......
"1111
.....
'111"
......
'1111'
.....
'1111'
.....
'1111
.....
·,IIII'·
...
·.III"·
....
·.III'··
...
·"III··
....
·'lltl.·
....
·.IIII'
.......
1111
.......
,'11
.......
'1111
......
'1111
......
"111'
......
111'
......
'111(
......
'11111
.....
'1111
......
'1111'
.....
'1111
.......
'1111
......
'1111.
~
~
~
t
DENON®
~_.
~
, GARANTIE
i
Dureedugarantie
i
~:=~::.~:~,:.~~'ii'2~~i::,'::~,0~;;::::,':,~.::0;.ANADA
non-transferable
LIMITE'
me.
,""d
offo';
E !
",rto
do"
d"o
d'",,,
d"
~wmm"o",
ori,i~1
,""",
d'""
f
1
t Categorie de produit !
t f
t f
t .
~--
~
i
t i
t •
t.
t f
t ,
t i
~..
~
Couverture
• Cette garantie couvre tous les defautsdemateriel ou
~
delagarantie.Nesont pas couvens parlagarantie:
• Canada aupres d'un revendeur officiel DENON (Note: On
~
dans leur magasin.
• serie a ete efface, modifie ou enleve. (4) Dommages dus aladeterioration ou aunfonctionnemcnt defectueux a
~
impropre, negligence, reparationaumoyen d'un produit non autorise, debale, modification, emploi contraire aux instructions foumies avecIeproduit, b) reparation ou
• tentativedereparation par quelqu'un non reconnu par DENON. c) tout envoi du produit (la reclamation doit etre presentee
~
par I'usage (tetes de magnetophone, cellules phono, pointes de lecture phono, piles, ctc.). (6) Verification periodique qui
~..
hords
ddu
.clanada. (8)
ou
e ep acement resu tant
t
~~~~
•
Si
votre produit DENON est reconnu defectueux par DENON durant la periode d'application de la garantie apres la date d'achat du consommateur, DENON
~
reparera ou, ason choix, remplacera avec un modele neuf, usage ou equivalent ce produit defectueux sans frais de pieces
• Execution
~
Si
votre produit necessite service,
~
service soit officiellement reconnu, contactez D&M CANADA INC. aI'adresse ci-dessous). Dans tous les autres cas, les procedures suivantes s'appliquent si votre
',.....
article doit etre transporte pourunservice sous garantie.
a.
•
b.
~
c.
~
d.
, DansIecas
Si
vous doutez qu'un revendeur soit officiellement reconnu, contactez D&M CANADA INC. aI'adresse ci-dessous.) (3) Tout produit
~anl
des
d~agnde~lf·qUeSd'
uneautupr
delagarantie
Vous
etes responsable du transport de votre article ou vous devez vous arranger vous·meme pour son transport. ,
Si votfe article doit etre envoye, vous devez payer les frais d'envoi initiaux, mais nous payerons les frais de retour si la garantie couvre les reparations. -
LORSQUE
~~~Td~~e~
VOUS
~;~~~:;a~~~:~~~~~m,
d'un
lecteur CD ou DVD, joindreundisque que l'appareil
disqodues
Ull.
il
peut etre envoye atout atelier de service officiel DENON ou chez D&M CANADA INC. (Si vous doutez que I'atelier de ,
RENVOYEZ
Appleet,Pod
de
fabrication du produit, aI'exception de ceux indiques ci-apres qui conforrment selon les termes durant
(I)
Tout produit qui n'est pas distribueauCanada par D&M CANADA INC. (2) Tout praduit qui
peUl
CD ou DVD endommages. (9) Utilisation commerciale, industrielleouprofessionnelle. (10) Toules charges d'installation
VOTRE
ARTICLE POUR UN SERVICE SOUS GARANTIE, VOUS
adresse, numero de telephone de jour, numeros de modele et de serie du produit et une description du probleme.
sont
des
marques
commerClalesdApple
identifier les revendeurs officiels DENON par leur aUlo-collant "REVENDEUR OFFICIEL DENON" affiche
n'a
pu lire pour test.IIvous sera retoume avec I'article.
Computer, Inc
.•
deposees
la
suite
aux
Etats-UOIsetdansdautres
de:
a) accident, acte de la nature, abus, utilisation '
au
transporteur), (5) Articles sujets adeterioration
ne
revele aucun defaut. (7) Utilisation du produit +
ni
de main d'reuvre. t
DEVEZ
JOINDRE
pays
n'a
pas ete acheteau,
dontle
UNE
COPIE
la
numero de
DE
~
!
~
,
._~_:
periode
~
~
~_:.'
t,~
.•.
,
_i_~'_:
i..
~
~
LA !
~_:
i.'.
CESTTE
GARdANTIE EST VALABLESEULMENT AU CAdNADA.. , f .
I votre
pro
ullnereqUIert
t CETTE GARANTIE EST EXPRESSEMENT FAlTE
• COMPRIS, SANS SE LIMITER ACELLES-CI, LES GARANTIES MARCHANDESETSPECIFIQUES POUR UN USAGE PARTICULIER.
~
NOTRE RESPONSABILITE SE LIMITE ALA REPARATIONOUAU REMPLACEMENT, ANOTRE CHOIX,DETOUT
t N'INCLUT EN AUCUN CAS DES DOMMAGES FORTUITS, COMMERCIAUX INDIRECTS NI MATERIELS
PAS
RESPONSABLES POUR LA PERTE DE LES PRODUITS ET/OU LES MARCHANDISES ENDOMMAGEES PENDANTLETR
t CERTAINES PROVINCES NE PERMETTENT
t
~A~O;~~~SSION
t Cette garantie vous donne des droits legaux speeifiques, mais
i etre modifiee que par
f
aucun
servIce
mals
que
vous
avez es questions
EN
LIEU ET PLACE DE TOUTES LES AUTRES GARANTIES EXPRIMEESOUSOUS-ENTENDUES' Y
PAS
DE DOMMAGES FORTUITS. LES LIMITATIONS ET EXCLUSIONS MENTIONNEES PLUS HAUT PEUVENT NE
un
document signe par
DE LIMITES QUANT A LA DUREE
un
gestionnaire autorise de D&M Canada. t
Quantason
il
se pourrait que vous ayez d'autres droits qui varient
onctlonnement, contactez notre epartement
D'UNE
GARANTIE SOUS-ENTENDUE ET/OU NE
5-5~~~p~I~~~~~~~;ard
d'
D'AUCUNE
h·
dI'd
tee
mque
ont
PRODUIT DEFECTUEUX
SORTE. NOUS NOUS SOMMES
d'une
province al'autre. La garantie ne peut ,
fi·-<I
a resse
IgureCIessous. ,
ASPORT DES BIENS. ,
PERMETfENT
PAS
S'APPLIQUER i
ET
t Markham, Ontario !
t
i www.denon.ca t
·.III
..
·~·.III.'·
....
·,'III'·
....
·,'lll··..,.·
..
I["·
...
·'IUI'·
....
·"11
1.·
....
·',III··
....
·.'II"·
....·••
nh·
....
·'llll··
....
·.llII··
....
·'IIII
4
(90;)3:7~~~085
......
~111··
....
·.III"·
....
·'II1I··
...
·.lllt'·
.....
·.IIII··
....
·"IIIo
......
,'1l1
.......
1111'
.....
,'111
.......
'1111
.......
1111
.......
'111'
......
'111'·...
·,'II..·
....
·,dl"·
...
·,'II'··
...
·.III'··
....
·,'II.,·~·,'II
_t~~.·.:.·
._.'.
i
t_-~~::.·
,
~
t
..·..
 Loading...