

Page 1
Mode l E -96
2-Sp eed Lat he
Owner’s Manual
HIGH SPEED POLISHER GRINDER
Please Read All Instructions Before Operating
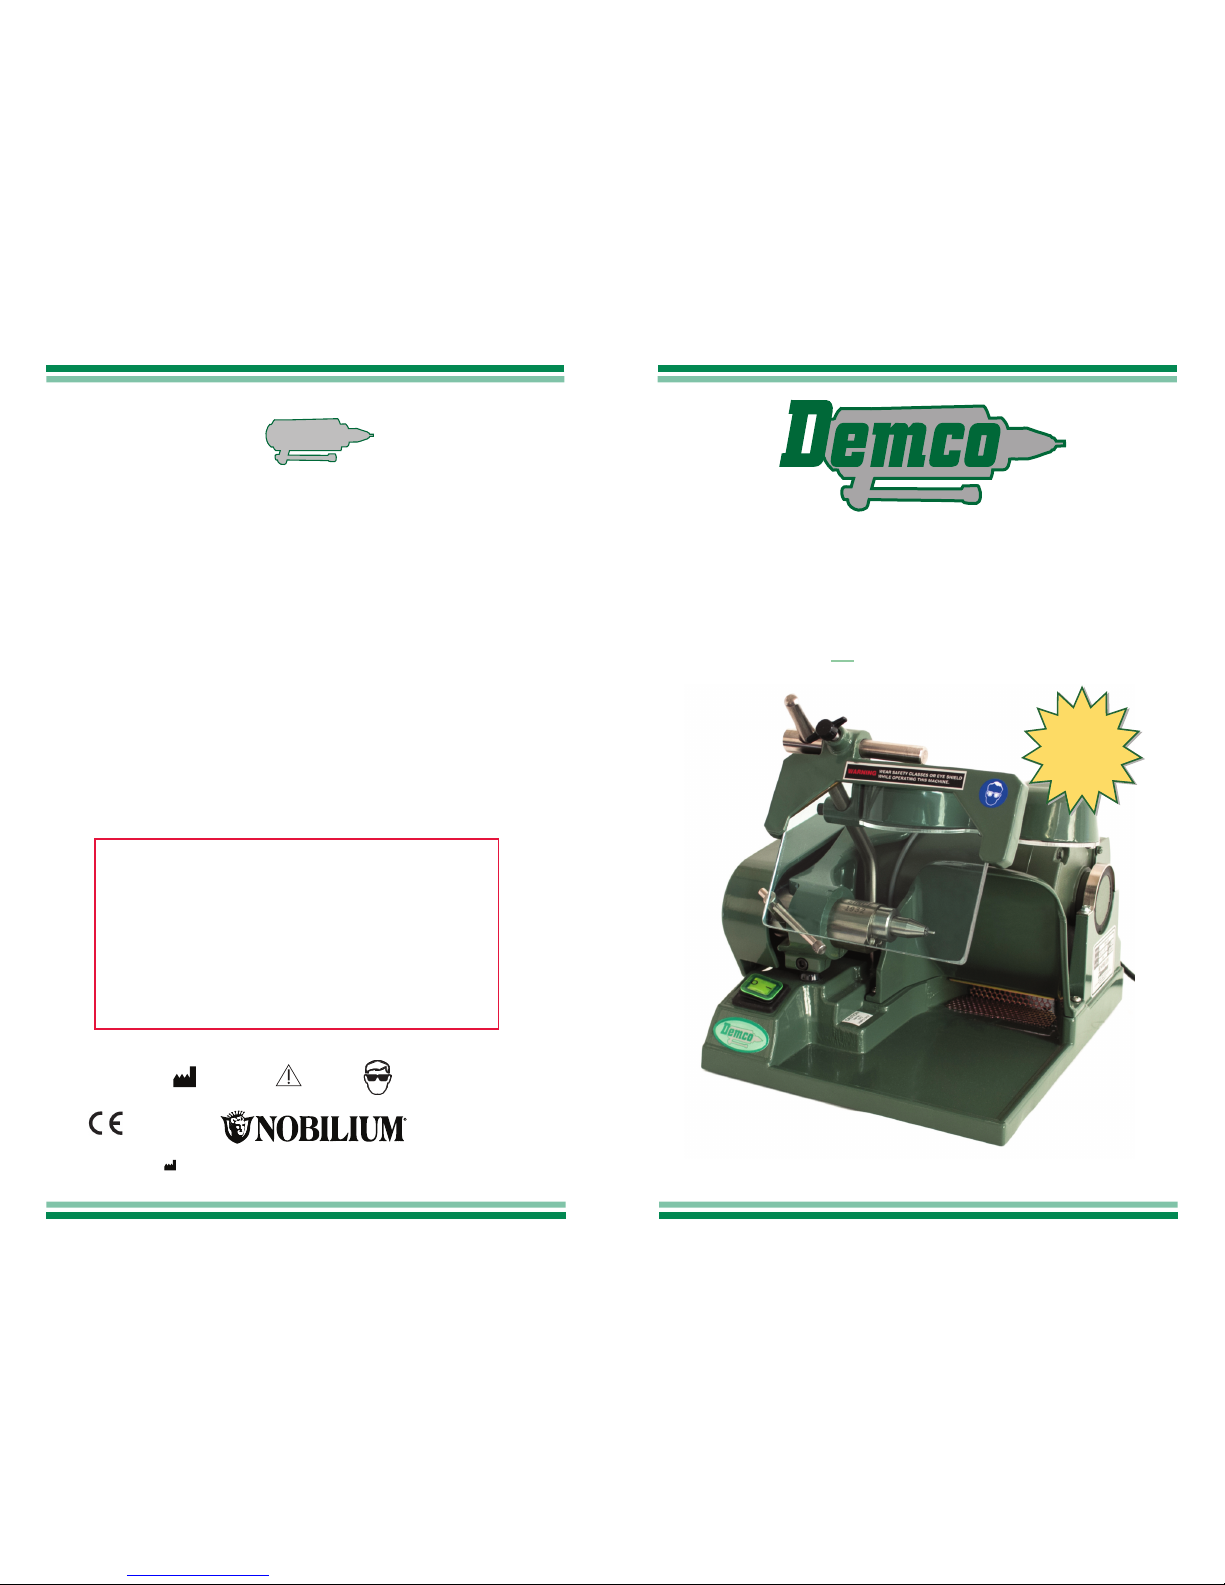
PULLEY REPLACEMENT (Figure 2)
Insert hex wrench into hexagonal hole at end of the shaft, to keep it from turning.
Unscrew nut and pull off old pulley. Replace with a new pulley and then replace nut.
BELT REPLACEMENT (Figure 2)
Loosen set screw. Rotate spindle by pushing handle forward to relieve belt tension.
Remove belt.
PROPER CARE OF MOTOR PULLEY & SPINDLE PULLEY
It is imperative that the belt tension be correct to assure a long life for pulley and bearings. To
set belt tension, loosen set screw(s) (see “BELT REPLACEMENT”). Align the motor pulley with
the spindle pulley by using a straight edge. Then move the spindle towards you by rotating
(Model E-96).
Adjust tension to allow approximately 3/8” play in the belt. This procedure
should be repeated as the new belt stretches. Motor pulleys and spindle pulleys should be
replaced when worn.
DRIVE MOTOR LUBRICATION
Newer Model E-96 motors have sealed, pre-lubricated bearings and DO NOT require oil.
Please visit our website for warranty policy, technique videos on proper care and usage.
Form DEMC ODFU Re v 3/ 2017
Div ision of CMP I ndust ries LLC
413 No rth Pear l Stree t
• Albany, Ne w York 12207
518.4 34.31 47 • 800.833.2 343 • www.n obili um.com
Demco
T
M
A Grinder you can rely on.
NEW
I
MPROVED!
E9
6
Caution
Protect Eyes
Manufacturer
Warning
Electric Shock Hazard
Regardless of control settings, on or off, a shock hazard exists at fuse located
below cover plate in components compartment. Unplug electric cord before
attempting any service.
Eye Safety
Wear safety glasses or eye shield while operating this machine.
Belt Guard
The belt guard must be in place while machine is in operation.
Do not wear loose clothing while opperating this machine.
Page 2
SAFETY FIRST!
Your DEMCO E96 Polisher/Grinder is designed with your
safety in mind. However, as with all power equipment, an
adherence to standard precautionary safety procedures will
protect the operator from possible injury.
RULES FOR SAFE OPERATION
POWER SUPPLY
The Polisher/Grinder is equipped with a three-pronged electrical plug intended
for a grounded three-hole receptacle. If an adapter is used to accommodate a
two-pronged receptacle, the adapter wire must be attached to a known ground.
EYE PROTECTION
Always wear safety glasses or an eye shield while operating the grinder. As
with any power tool, there is always a possibility of foreign objects being
thrown into the eye.
FUSE REPLACEMENT & BOTTOM COVER PLATE REMOVAL
(All Models)
Unplug the electric cord before attempting any service with the bottom cover
plate removed.
BELT GUARD
The belt guard must be in place while the polisher/grinder is in operation.
WEAR PROPER APPAREL
Do not wear loose clothing, jewelry, ties, ribbons, etc. See warning on back.
TURN GRINDER “OFF” AFTER COMPLETION OF WORK
OPERATION & MAINTENANCE
SPINDLE OPERATION
The collet is the part of the spindle nose with jaws that grasps a mandrel. To open the collet,
move the lever in (Figure 1) to the extreme left. Insert mandrel into the collet and move the lever
to the right.
Caution: Never close collet without having a mandrel or similar tool inserted. Spindle will bind
if lever is in position “A” without a mandrel in the collet.
To stop the mandrel, apply the brake by positioning the lever to the left. Once the mandrel stops,
stones and points can be removed and replaced in the collet. DO NOT apply the brake too
quickly, since mandrels may unscrew, causing needless wear. By loosening the set screw,
(Figure 2) the handle may be adjusted to the most comfortable operating position.
COLLET ADJUSTMENT
Please visit our website for technique videos on proper
care and usage.
If mandrel is loose when in the operating position, adjustment
of the collet may be necessary.
1) Open the collet to position.
2) Remove collet wrench from the end of the lever.
3) Place collet wrench in the collet and turn counter clockwise
to remove the collet.
4) Insert the hex wrench through the spindle nose and engage
the set screw deep inside the spindle.
5) Turn hex wrench clockwise to tighten (or counter-clockwise
to loosen).
6) Reinstall the collet using the collet wrench..
Note: If this procedure does not tighten the collet, replacement
of the collet may be necessary.
SPINDLE FAILURE
Caution: Spindle will not run without a tool or mandrel inserted in the collet.
Always check the collet first!
1) The collet must be clean.
2) Make sure the collet is not rusty and that it is lightly lubricated.
3) The collet must be screwed all the way in, with the clutch lever in position “C”.
4) Check to see if the collet is worn out. If it is, replace it.
5) If the spindle binds, it is usually the fault of the collet (it is advisable to have a new collet
on hand at all times).
Should the spindle become noisy or otherwise faulty, we can repair it for a fee.
SPINDLE CLEANING
Periodically, remove the collet (see COLLET ADJUSTMENT) and clean it. Also clean the
inside of the spindle nose to remove debris. Do not oil the spindle or collet.
Figu re 1
Figu re 2
Nut
Demco
TM
 Loading...