

Page 1

A
^1 HARDWARE REFERENCE MANUAL
^2 PMAC2
-PC/104
^3 PMAC2A-PC/104 Hardware Reference Manual
^4 4xx-603670-xHxx
^5 September 22, 2004
Single Source Machine Control Power // Flexibility // Ease of Use
21314 Lassen Street Chatsworth, CA 91311 // Tel. (818) 998-2095 Fax. (818) 998-7807 // www.deltatau.com
Page 2

Copyright Information
© 2003 Delta Tau Data Systems, Inc. All rights reserved.
This document is furnished for the customers of Delta Tau Data Systems, Inc. Other uses are
unauthorized without written permission of Delta Tau Data Systems, Inc. Information contained
in this manual may be updated from time-to-time due to product improvements, etc., and may not
conform in every respect to former issues.
To report errors or inconsistencies, call or email:
Delta Tau Data Systems, Inc. Technical Support
Phone: (818) 717-5656
Fax: (818) 998-7807
Email: support@deltatau.com
Website: http://www.deltatau.com
Operating Conditions
All Delta Tau Data Systems, Inc. motion controller products, accessories, and amplifiers contain
static sensitive components that can be damaged by incorrect handling. When installing or
handling Delta Tau Data Systems, Inc. products, avoid contact with highly insulated materials.
Only qualified personnel should be allowed to handle this equipment.
In the case of industrial applications, we expect our products to be protected from hazardous or
conductive materials and/or environments that could cause harm to the controller by damaging
components or causing electrical shorts. When our products are used in an industrial
environment, install them into an industrial electrical cabinet or industrial PC to protect them
from excessive or corrosive moisture, abnormal ambient temperatures, and conductive materials.
If Delta Tau Data Systems, Inc. products are exposed to hazardous or conductive materials and/or
environments, we cannot guarantee their operation.
Page 3

PMAC2A PC104 Hardware Reference Manual
Table of Contents
INTRODUCTION.......................................................................................................................................................1
Board Configuration..................................................................................................................................................1
Base Version.........................................................................................................................................................1
Option 2A: PC/104 Bus Stack Interface ..............................................................................................................1
Option 5xF: CPU Speed Options.........................................................................................................................1
Option 6: Extended Firmware Algorithm............................................................................................................1
Option 6L: Multi-block Lookahead Firmware.....................................................................................................1
Option 10: Firmware Version Specification.........................................................................................................1
Option 12: Analog-to-Digital Converters.............................................................................................................2
Acc-1P: Axis Expansion Piggyback Board...........................................................................................................2
Acc-1P Option 1: I/O Ports .................................................................................................................................2
Acc-1P Option 2: Analog-to-Digital Converters.................................................................................................2
Acc-2P: Communications Board.........................................................................................................................3
Acc-2P Option 1A: USB Interface.......................................................................................................................3
Acc-2P Option 1B: Ethernet Interface.................................................................................................................3
Acc-2P Option 2: DPRAM Circuitry...................................................................................................................3
Acc-2P Option 3: I/O Ports .................................................................................................................................3
Acc-8TS Connections Board.................................................................................................................................3
Acc-8ES Four-Channel Dual-DAC Analog Stack Board......................................................................................3
Acc-8FS Four-Channel Direct PWM Stack Breakout Board................................................................................3
BASE BOARD HARDWARE SETUP...................................................................................................................... 5
Clock Configuration Jumpers....................................................................................................................................5
Board Reset Jumpers.................................................................................................................................................5
CPU Jumper Configuration.......................................................................................................................................6
Communication Jumpers...........................................................................................................................................6
I/O Configuration Jumpers........................................................................................................................................6
Resistor Packs Configuration....................................................................................................................................6
Differential or Single-Ended Encoder Selection...................................................................................................6
ACC-1P HARDWARE SETUP..................................................................................................................................9
I/O Configuration Jumpers........................................................................................................................................9
Reserved Configuration Jumpers ..............................................................................................................................9
Resistor Packs Configuration....................................................................................................................................9
Differential or Single-Ended Encoder Selection...................................................................................................9
Handwheel Encoder Termination Resistors.......................................................................................................10
ACC-2P HARDWARE SETUP................................................................................................................................11
I/O Configuration Jumpers......................................................................................................................................11
Communication Jumpers.........................................................................................................................................11
Resistor Packs Configuration..................................................................................................................................12
Differential or Single-Ended Handwheel Encoder Selection..............................................................................12
Handwheel Encoder Termination Resistors.......................................................................................................12
MACHINE CONNECTIONS...................................................................................................................................13
Mounting.................................................................................................................................................................13
Power Supplies........................................................................................................................................................13
Digital Power Supply..........................................................................................................................................13
DAC Outputs Power Supply ...............................................................................................................................13
Flags Power Supply............................................................................................................................................14
Overtravel Limits and Home Switches....................................................................................................................14
Types of Overtravel Limits..................................................................................................................................14
Home Switches....................................................................................................................................................14
Motor Signals Connections.....................................................................................................................................14
Incremental Encoder Connection.......................................................................................................................14
Table of Contents i
Page 4

PMAC2A PC104 Hardware Reference Manual
DAC Output Signals ...........................................................................................................................................15
Pulse and Direction (Stepper) Drivers...............................................................................................................15
Amplifier Enable Signal (AENAx/DIRn).............................................................................................................15
Amplifier Fault Signal (FAULT-).......................................................................................................................16
Acc-1P General-Purpose Digital Inputs and Outputs (J7 Port)...............................................................................16
Acc-2P General-Purpose Digital Inputs and Outputs (JOPT Port)..........................................................................17
Acc-1P Thumbwheel Multiplexer Port (J2 Port).....................................................................................................17
Acc-2P Thumbwheel Multiplexer Port (JTHW Port)..............................................................................................17
Acc-1P or Acc-2P Handwheel Port (JHW / PD Port).............................................................................................18
Optional Analog Inputs...........................................................................................................................................18
Compare Equal Outputs..........................................................................................................................................18
Serial Port (JRS232 Port)........................................................................................................................................19
Acc-2P Ethernet RJ45 Connector (J10 Port)...........................................................................................................19
Acc-2P USB Connector (J1 Port)............................................................................................................................19
Machine Connections Example: Using Analog ±10V Amplifier............................................................................20
Machine Connections Example: Using Pulse and Direction Drivers......................................................................21
SOFTWARE SETUP ................................................................................................................................................23
Communications......................................................................................................................................................23
PMAC I-Variables...................................................................................................................................................23
Operational Frequency and Baud Rate Setup..........................................................................................................23
Filtered DAC Outputs Configuration......................................................................................................................24
Using Flag I/O as General-Purpose I/O...................................................................................................................25
General-Purpose Digital Inputs and Outputs...........................................................................................................25
Acc-1P with Jumper E6 on Position 1-2.............................................................................................................25
Acc-2P with Jumper E5 in Position 2-3..............................................................................................................26
Thumbwheel Port Digital Inputs and Outputs.........................................................................................................27
Acc-1P with Jumper E6 in Position 1-2..............................................................................................................27
Acc-2P with Jumper E5 in Position 2-3..............................................................................................................27
Analog Inputs Setup................................................................................................................................................28
Baseboard Analog Inputs....................................................................................................................................28
Acc-1P Analog Inputs.........................................................................................................................................28
BASE BOARD HARDWARE REFERENCE SUMMARY...................................................................................29
Board Dimensions...................................................................................................................................................29
Board Layout...........................................................................................................................................................30
Connectors and Indicators.......................................................................................................................................31
J3 - Machine Connector (JMACH1 Port)...........................................................................................................31
J4 - Machine Connector (JMACH2 Port)...........................................................................................................31
J8 - Serial Port (JRS232 Port)............................................................................................................................31
TB1 – Power Supply Terminal Block (JPWR Connector) ..................................................................................31
LED Indicators...................................................................................................................................................31
ACC-1P HARDWARE REFERENCE SUMMARY..............................................................................................33
Board Dimensions...................................................................................................................................................33
Board Layout...........................................................................................................................................................34
Connectors and Indicators.......................................................................................................................................35
J2 - Thumbwheel Multiplexer Port (JTHW Port) ...............................................................................................35
J3 - Machine Connector (JMACH1 Port)...........................................................................................................35
J4 - Machine Connector (JMACH2 Port)...........................................................................................................35
J7 - General-Purpose Digital Inputs and Outputs (JOPT Port).........................................................................35
J8 – Handwheel / Pulse and Direction Port (JHW / PD Port)...........................................................................35
TB1 – Power Supply Terminal Block (JPWR Connector) ..................................................................................35
ACC-2P HARDWARE REFERENCE SUMMARY..............................................................................................37
Board Dimensions...................................................................................................................................................37
Board Layout...........................................................................................................................................................38
Connectors and Indicators.......................................................................................................................................39
ii Table of Contents
Page 5

PMAC2A PC104 Hardware Reference Manual
J1 – USB Communications Port.........................................................................................................................39
J2 - Thumbwheel Multiplexer Port (JTHW Port) ...............................................................................................39
J7 - General-Purpose Digital Inputs and Outputs (JOPT Port).........................................................................39
J8 – Handwheel/Pulse and Direction Port (JHW / PD Port)............................................................................. 39
J10 – Ethernet Communications Port.................................................................................................................39
TB1 – Power Supply Terminal Block (JPWR Connector) ..................................................................................39
LED Indicators...................................................................................................................................................39
BASE BOARD E-POINT JUMPER DESCRIPTIONS.........................................................................................41
E0: Forced Reset Control.......................................................................................................................................41
E1: Servo and Phase Clock Direction Control .......................................................................................................41
E2: CPU Frequency Select.....................................................................................................................................41
E3: Normal/Re-Initializing Power-Up/Reset..........................................................................................................41
E4: CPU Frequency Select.....................................................................................................................................42
E8: Phase Clock Lines Output Enable....................................................................................................................42
E9: Servo Clock Lines Output Enable....................................................................................................................42
E10 – E12: Power-Up State Jumpers ..................................................................................................................... 42
E13: Power-Up/Reset Load Source........................................................................................................................43
E14: Watchdog Disable Jumper.............................................................................................................................43
E15A, B, C: Flash Memory Bank Select................................................................................................................43
E16:.........................................................................................................................................................................43
ADC Inputs Enable .................................................................................................................................................43
E18 – E19: PC/104 Bus Address............................................................................................................................44
ACC-1P E-POINT JUMPER DESCRIPTIONS.....................................................................................................45
E0: Reserved for Future Use..................................................................................................................................45
E1 - E2: Machine Output Supply Voltage Configure.............................................................................................45
E3 – E4: JHW, PD Function Select........................................................................................................................45
E5: Servo Gate Address Select...............................................................................................................................46
E6: I/O Gate Address Select....................................................................................................................................46
E7: Machine Input Source/Sink Control ................................................................................................................46
E16: ADC Inputs Enable........................................................................................................................................46
ACC-2P E-POINT JUMPER DESCRIPTIONS.....................................................................................................47
E1: USB/Ethernet Micro-Controller Firmware Reload Enable..............................................................................47
E3 – E4: JHW, PD Function Select........................................................................................................................47
E5: I/O Gate Address Select...................................................................................................................................47
E6: Communications Port Select............................................................................................................................47
E7- E10: Ports Direction Control............................................................................................................................48
BASE BOARD CONNECTOR PINOUTS..............................................................................................................49
TB1 (JPWR): Power Supply ..................................................................................................................................49
ACC-1P CONNECTOR PINOUTS.........................................................................................................................53
TB1 (JPWR): Power Supply ..................................................................................................................................53
J2 (JTHW): Multiplexer Port Connector.................................................................................................................54
J3 (JMACH1): Machine Port Connector (50-Pin Header).....................................................................................55
J4 (JMACH2): Machine Port Connector (34-Pin Header)......................................................................................57
J7 (JOPTO): I/O Port Connector.............................................................................................................................58
J8 (JHW) Handwheel Encoder Connector...............................................................................................................59
ACC-2P CONNECTOR PINOUTS.........................................................................................................................61
TB1 (JPWR): Power Supply ..................................................................................................................................61
J1 (USB) Universal Serial Bus Port (Optional).......................................................................................................61
J2 (JTHW): Multiplexer Port Connector.................................................................................................................62
J7 (JOPT): I/O Port Connector................................................................................................................................63
J8 (JHW) Handwheel Encoder Connector...............................................................................................................64
J10 Ethernet Port (Optional)....................................................................................................................................64
Table of Contents iii
Page 6

PMAC2A PC104 Hardware Reference Manual
iv Table of Contents
Page 7

PMAC2A PC104 Hardware Reference Manual
INTRODUCTION
The PMAC2A PC/104 motion controller is a compact, cost-effective version of the Delta Tau’s PMAC2
family of controllers. The PMAC2A PC/104 can be composed of three boards in a stack configuration.
The baseboard provides four channels of either DAC ±10V or pulse and direction command outputs. The
optional axis expansion board provides a set of four additional servo channels and I/O ports. The optional
communications board provides extra I/O ports and either the USB or Ethernet interface for faster
communications.
Board Configuration
Base Version
The base version of the PMAC2A PC/104 ordered with no options provides a 90mm x 95mm board with:
• 40 MHz DSP563xx CPU (80 MHz 560xx equivalent)
• 128k x 24 internal zero-wait-state SRAM
• 512k x 8 flash memory for user backup and firmware
• Latest released firmware version
• RS-232 serial interface
• Four channels axis interface circuitry, each including:
• 12-bit ±10V analog output
• Pulse-and-direction digital outputs
• 3-channel differential/single-ended encoder input
• Four input flags, two output flags
• Three PWM top-and-bottom pairs (unbuffered)
• 50-pin IDC header for amplifier/encoder interface
• 34-pin IDC header for flag interface
• PID/notch/feedforward servo algorithms
• 1-year warranty from date of shipment
• One CD-ROM per set of one to four PMACs in shipment (Cables, mounting plates, mating
connectors not included)
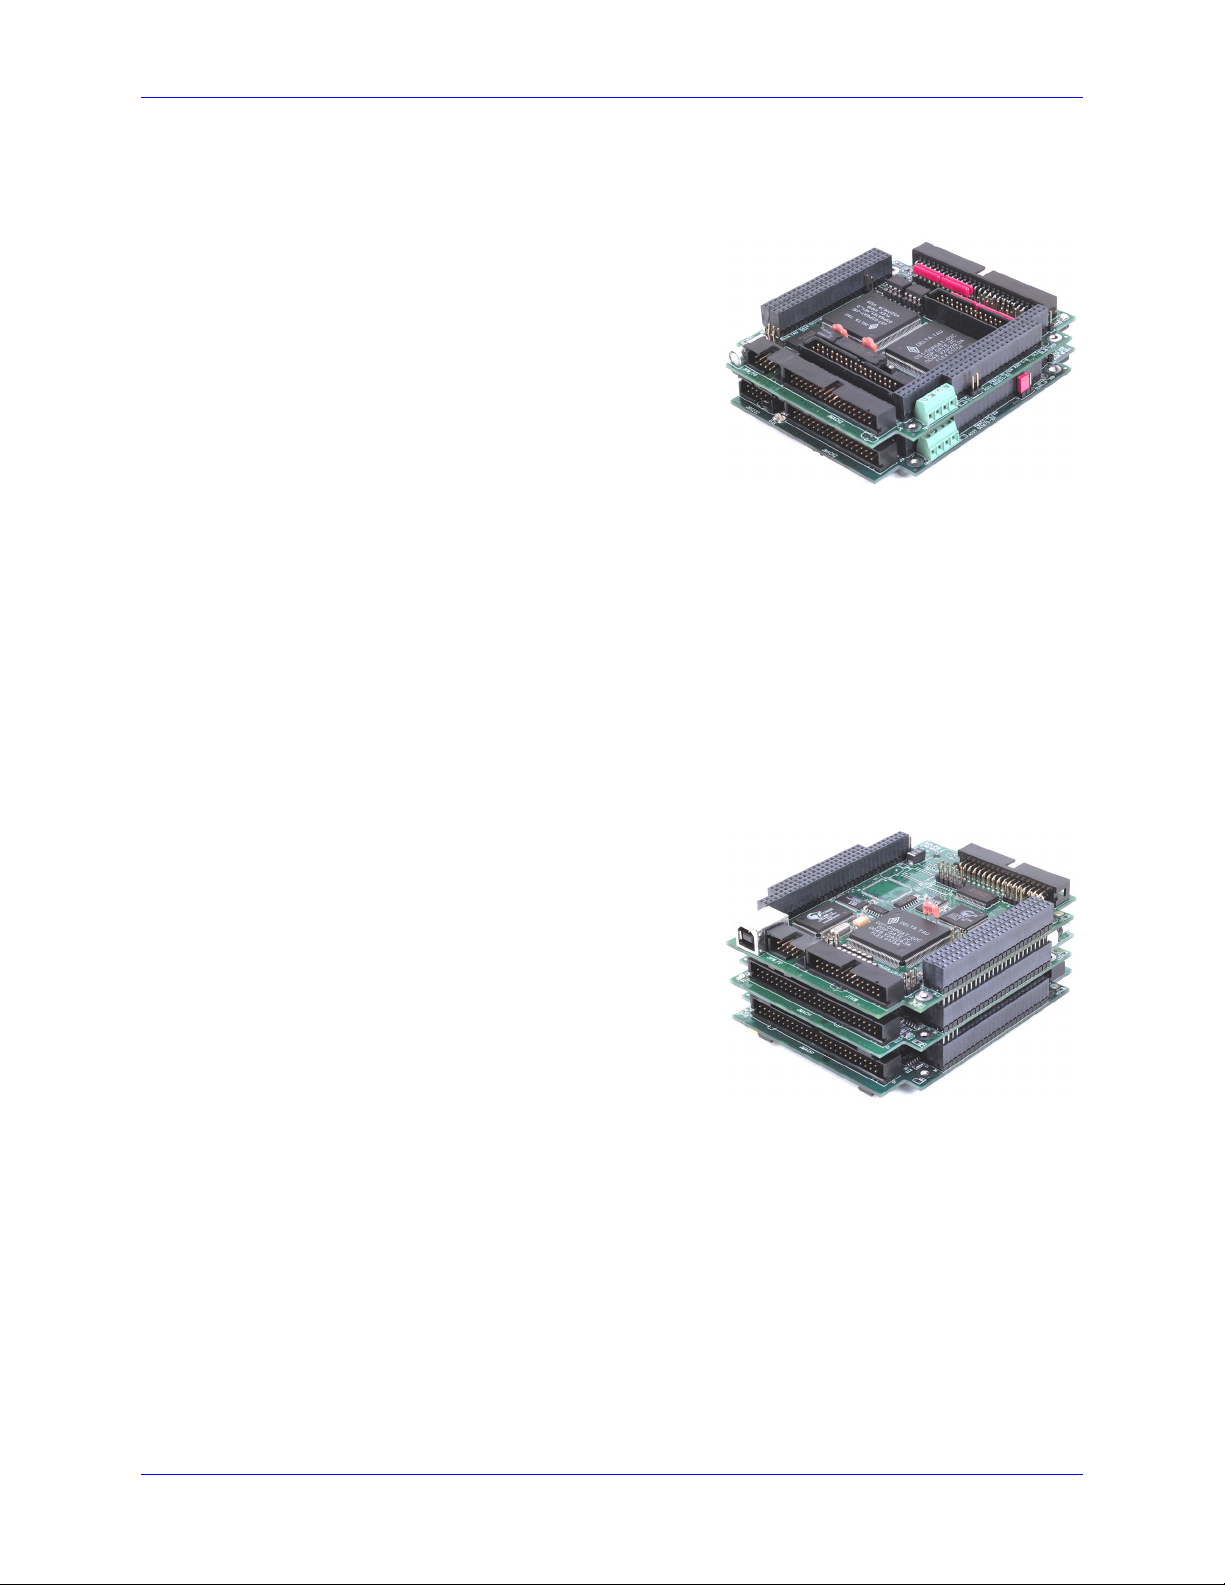
PMAC2A-PC/104 Base Board shown
Option 2A: PC/104 Bus Stack Interface
Option 2A provides the PC/104 bus interface allowing bus communications between a PC/104 type
computer and the PMAC2A PC/104 motion controller.
Option 5xF: CPU Speed Options
• Option 5CF: 80 MHz DSP563xx CPU (160 MHz 56002 equivalent)
• Option 5EF: 160 MHz DSP563xx CPU (320 MHz 56002 equivalent)
Option 6: Extended Firmware Algorithm
Option 6 provides an Extended (Pole-Placement) Servo Algorithm firmware instead of the regular servo
algorithm firmware. This is required only in difficult-to-control systems (resonances, backlash, friction,
disturbances, changing dynamics).
Option 6L: Multi-block Lookahead Firmware
Option 6L provides a special lookahead firmware for sophisticated acceleration and cornering profiles
execution. With the lookahead firmware PMAC controls the speed along the path automatically (but
without changing the path) to ensure that axis limits are not violated.
Option 10: Firmware Version Specification
Normally the PMAC PCI Lite is provided with the newest released firmware version. A label on the
memory IC shows the firmware version loaded at the factory. Option 10 provides for a user-specified
firmware version.
Introduction 1
Page 8
PMAC2A PC104 Hardware Reference Manual
Option 12: Analog-to-Digital Converters
Option 12 permits the installation of two channels of on-board analog-to-digital converters with ±10V
input range and 12-bits resolution. The key component installed with this option is U20.
Acc-1P: Axis Expansion Piggyback Board
Acc-1P provides four additional channels axis interface
circuitry for a total of eight servo channels, each including:
• 12-bit ±10V analog output
• Pulse-and-direction digital outputs
• 3-channel differential/single-ended encoder input
• Four input flags, two output flags
• Three PWM top-and-bottom pairs (unbuffered)
Acc-1P Option 1: I/O Ports
Option 1 provides the following ports on the Acc-1P axes
expansion board for digital I/O connections.
•
Multiplexer Port: This connector provides eight input lines and eight output lines at TTL levels.
When using the PMAC Acc-34x type boards these lines allow multiplexing large numbers of inputs
and outputs on the port. Up to 32 of the multiplexed I/O boards may be daisy-chained on the port, in
any combination.
• I/O Port: This port provides eight general-purpose digital inputs and eight general-purpose digital
outputs at 5 to 24Vdc levels. This 34-pin connector was designed for easy interface to OPTO-22 or
equivalent optically isolated I/O modules when different voltage levels or opto-isolation to the
PMAC2A PC/104 is necessary.
• Handwheel port: this port provides two extra channels, each jumper selectable between encoder input
or pulse output.
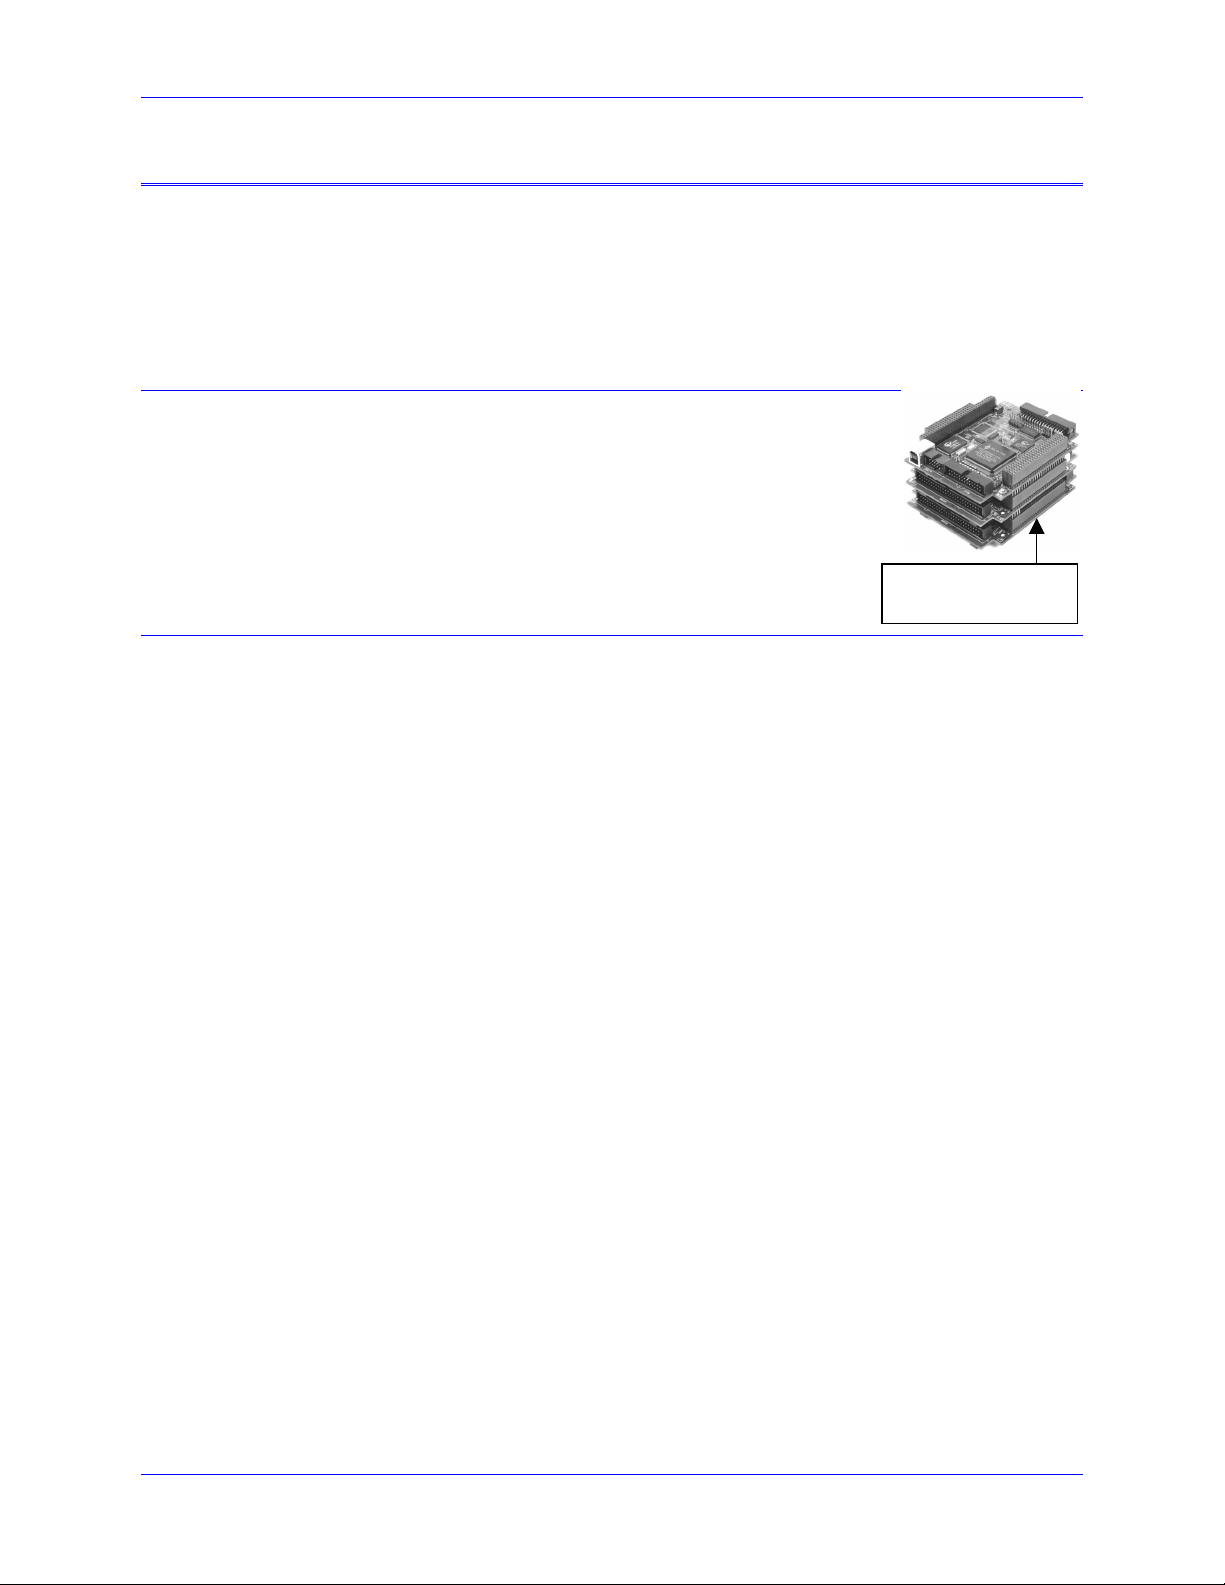
PMAC2A PC/104 Base Board shown
stacked with the Acc-1P axes
Acc-1P Option 2: Analog-to-Digital Converters
Option 2 permits the installation on the Acc-1P of two
channels of analog-to-digital converters with ±10V input
range and 12-bits resolution. The key component installed
with this option is U20.
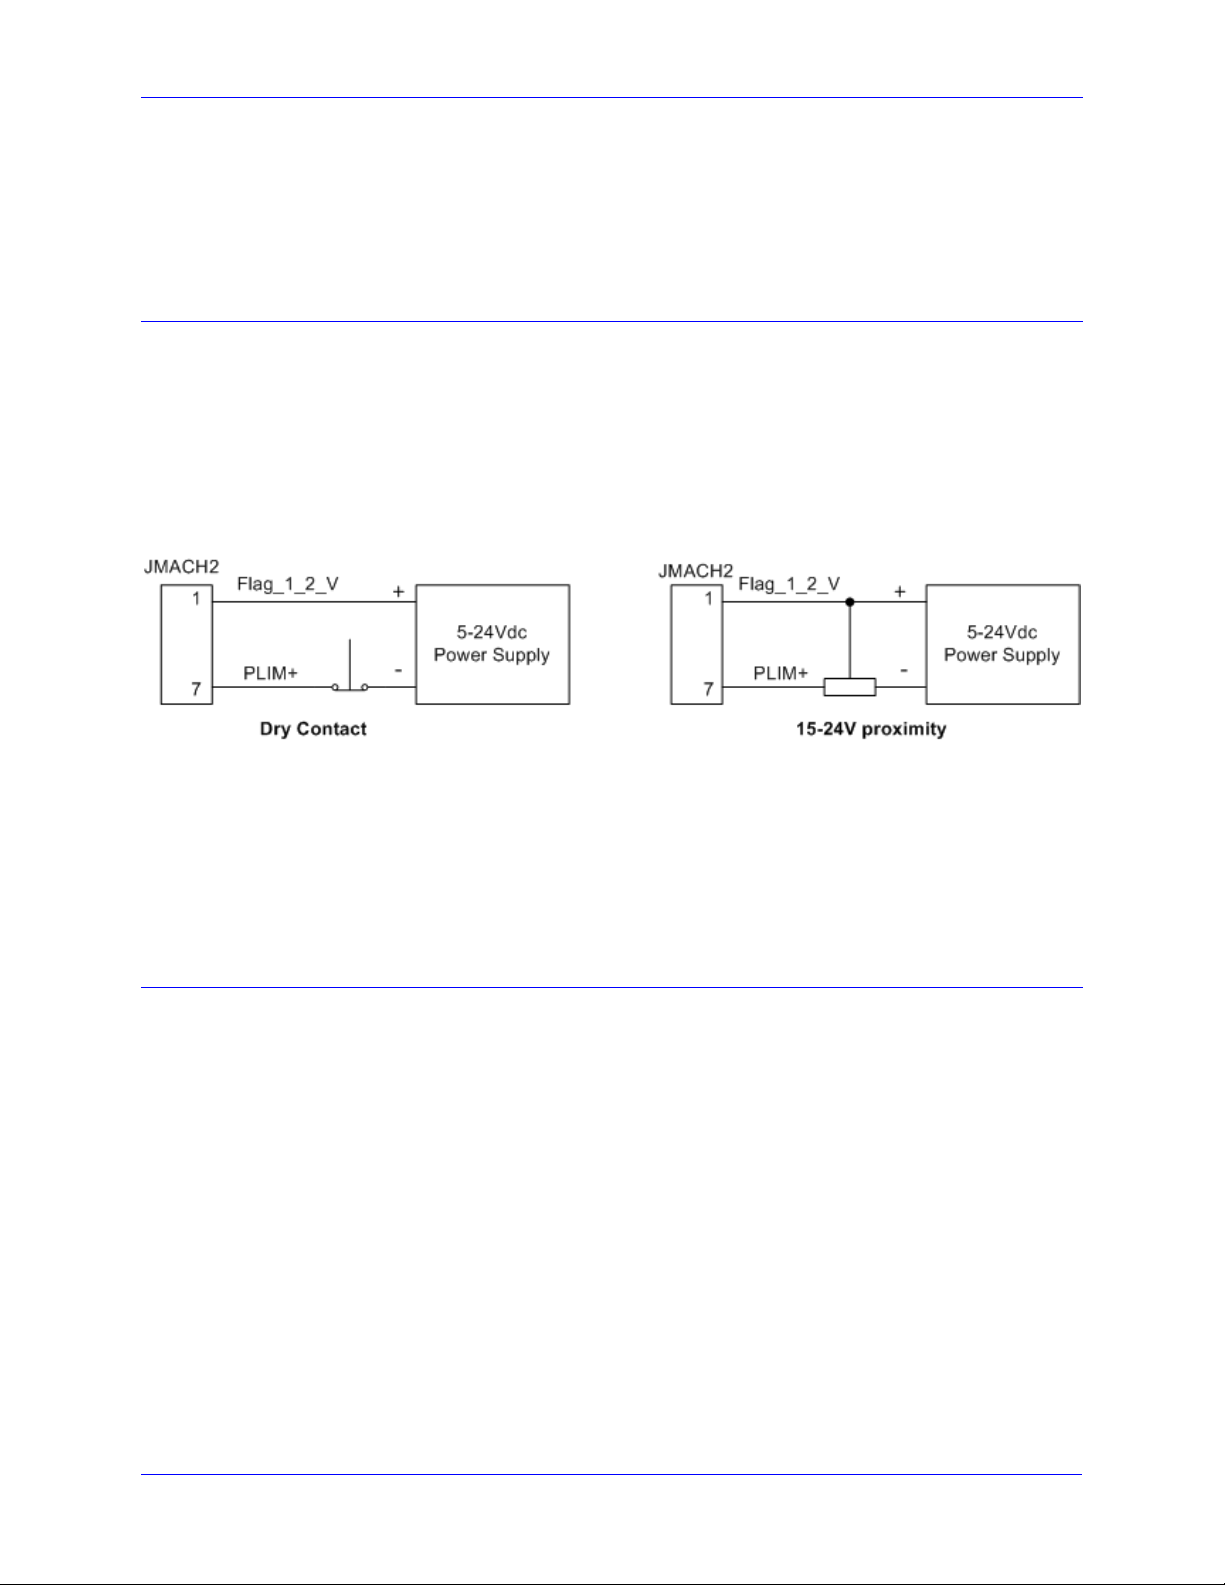
PMAC2A PC/104 Base Board shown
stacked with the Option-1P and Option-2P
boards
2 Introduction
Page 9

PMAC2A PC104 Hardware Reference Manual
Acc-2P: Communications Board
Without any options, the PMAC2A PC/104 communicates through the RS-232 serial interface using the
optional Acc-3L flat cable. Only one method of communication is allowed at a time.
Acc-2P Option 1A: USB Interface
Option 1A it provides a 12 Mbit/sec USB interface allowing USB communications with the PMAC2A
PC/104 motion controller.
Acc-2P Option 1B: Ethernet Interface
Option 1B provides a 10 Mbit/sec Ethernet interface allowing Ethernet communications with the
PMAC2A PC/104 motion controller.
Acc-2P Option 2: DPRAM Circuitry
Option 2 provides an 8K x 16 dual-ported RAM for USB, Ethernet or PC/104 ports on board of the Acc2P communications board. If using for USB or Ethernet communications, Acc-2P-Opt-1A or Acc-2POpt-1B must be ordered. If used for PC/104-bus communications, PMAC2A PC/104 Option-2A must be
ordered. The key component installed with this option is U17.
Acc-2P Option 3: I/O Ports
Option 3 provides the following ports on the Acc-2P communications board for digital I/O connections.
• Multiplexer Port: this connector provides eight input lines and eight output lines at TTL levels. When
using the PMAC Acc-34x type boards these lines allow multiplexing large numbers of inputs and
outputs on the port. Up to 32 of the multiplexed I/O boards may be daisy-chained on the port, in any
combination.
• I/O Port: this port provides 16 general-purpose digital I/O lines at TTL levels and these can be
configured as all inputs, all outputs or eight inputs and eight outputs.
• Handwheel port: this port provides two extra channels, each jumper selectable between encoder input
or pulse output.
Acc-8TS Connections Board
Acc-8TS is a stack interface board to for the connection of either one or two Acc-28B A/D converter
boards. When a digital amplifier with current feedback is used, the analog inputs provided by the Acc28B cannot be used.
Acc-8ES Four-Channel Dual-DAC Analog Stack Board
Acc-8ES provides four channels of 18-bit dual-DAC with four DB-9 connectors. This accessory is
stacked to the PMAC2A PC/104 board and it is mostly used with amplifiers that require two ±10 V
command signals for sinusoidal commutation.
Acc-8FS Four-Channel Direct PWM Stack Breakout Board
Acc-8FS it is a 4-channel direct PWM stack breakout board for PMAC2A PC/104. This is used for
controlling digital amplifiers that require direct PWM control signals. When a digital amplifier with
current feedback is used, the analog inputs provided by the Option 12 of the PMAC2A PC/104 (the
Option 2 of the Acc-1P or the Acc-28B) could not be used.
Introduction 3
Page 10

PMAC2A PC104 Hardware Reference Manual
4 Introduction
Page 11

PMAC2A PC104 Hardware Reference Manual
BASE BOARD HARDWARE SETUP
On the PMAC2 PC/104 baseboard, there are many jumpers (pairs of metal prongs) called E-points or Wpoints. Some have been shorted together; others have been left open. These jumpers customize the
hardware features of the baseboard for a given application and must be setup appropriately. The
following is an overview of the several jumpers grouped in appropriate categories. For a complete
description of the jumper setup configuration, refer to the E-Point Descriptions section.
Clock Configuration Jumpers
E1: Servo and Phase Clock Direction Control – Jumper E1 should be OFF if the board is to use its
own internally generated phase and servo clock signals. In this case, these signals are output on spare
pins on the J8 RS-232 serial-port connector, where they can be used by other PMAC controllers set up to
take external phase and servo clock signals.
Jumper E1 should be ON if the board is to use externally generated phase and servo clock signals brought
in on the J8 RS-232 serial port connector. In this case, typically the clock signals are generated by
another PMAC controller and output on its serial port connector.
If E1 is ON for external phase and clock signals, and these clock signals are not brought in on the serial
port connector, the watchdog timer will trip almost immediately and shut down the board.
E2 and E4: CPU Frequency Control Jumpers – When the PMAC I46 I- variable is set to zero jumpers
E2 and E4 on the base PMAC2A PC/104 board control the frequency at which the CPU will operate (or
attempt to operate). Generally, this will be the highest frequency at which the CPU is rated to operate.
Note that it is always possible to operate a CPU at a frequency lower than its maximum rating. While it
may be possible to operate an individual processor at a frequency higher than its maximum rating,
particularly at low ambient temperatures, performance cannot be guaranteed at such a setting, and this
operation is done completely at the user’s own risk.
• If jumpers E2 and E4 are both OFF, the CPU will operate at a 40 MHz frequency.
• If E2 is ON and E4 is OFF, the CPU will operate at a 60 MHz frequency.
• If E2 is OFF and E4 is ON, the CPU will operate at an 80 MHz frequency.
If I46 is set to a value greater than 0, the operational frequency is set to 10MHz * (I46 + 1), regardless of
the jumper setting. See the Software Setup section for details on this.
E8: Phase Clock Lines Output Enable – Jump pin 1 to 2 to enable the Phase clock line on the J8
connector. Remove jumper to disconnect the Phase clock line on the J8 connector.
E9: Servo Clock Lines Output Enable – Jump pin 1 to 2 to enable the Servo clock line on the J8
connector. Remove jumper to disconnect the Servo clock line on the J8 connector.
Board Reset Jumpers
E0: Forced Reset Control – Remove E0 for normal operation. Installing E0 forces PMAC to a reset
state, and this configuration is for factory use only; the board will not operate with E0 installed.
E3: Re-Initialization on Reset Control – If E3 is OFF (default), PMAC executes a normal reset,
loading active memory from the last saved configuration in non-volatile flash memory. If E3 is ON,
PMAC re-initializes on reset, loading active memory with the factory default values.
E13: Firmware Load Jumper – If jumper E13 is ON during power-up/reset, the board comes up in
bootstrap mode which permits the loading of new firmware into the flash-memory IC on the board. When
the PMAC Executive program tries to establish communications with a board in this mode, it will detect
automatically that the board is in bootstrap mode and ask what file to download as the new firmware.
Jumper E13 must be OFF during power-up/reset for the board to come up in normal operational mode.
Baseboard Hardware Setup 5
Page 12

PMAC2A PC104 Hardware Reference Manual
CPU Jumper Configuration
E15A-E15C: Flash Memory Bank Select Jumpers – The flash-memory IC in location U10 on the
PMAC2A PC/104 base board has the capacity for eight separate banks of firmware, only one of which
can be used at any given time. The eight combinations of settings for jumpers E15A, E15B, and E15C
select which bank of the flash memory is used. In the factory production process, firmware is loaded only
into Bank 0, which is selected by having all of these jumpers OFF.
E10-E12: Power-Up State Jumpers – Jumper E10 must be OFF, jumper E11 must be ON, and jumper
E12 must be ON, in order for the CPU to copy the firmware from flash memory into active RAM on powerup/reset. This is necessary for normal operation of the card. (Other settings are for factory use only.)
E14: Watchdog Timer Jumper – Jumper E14 must be OFF for the watchdog timer to operate. This is a
very important safety feature, so it is vital that this jumper be OFF in normal operation. E14 should only
be put ON to debug problems with the watchdog timer circuit.
W1: Flash chip select – Jumper W1 in position 1-2 selects a 28F320J3A part for the U10 flash chip.
Jumper W1 in position 2-3 selects a 28F320J5A part for the U10 flash chip. This jumper is installed in
the factory and must not be changed from its default state.
Communication Jumpers
E18-E19: PC/104 Bus Base Address Control – Jumpers E18 and E19 on the PMAC2A PC/104
baseboard determine the base address of the card in the I/O space of the host PC’s bus. Together, they
specify four consecutive addresses on the bus where the card can be found. The jumpers form the base
address in the following fashion:
E18 E19 Address (hex) Address (dec)
OFF OFF $200 512
OFF ON $210 528
ON OFF $220 544
ON ON $230 560
The default base address is 528 ($210) formed with jumper E18 removed and E19 installed. This
configuration is necessary for using the USB or Ethernet ports of the Acc-2P communications board.
I/O Configuration Jumpers
E16: ADC Enable Jumper – Install E16 to enable the analog-to-digital converter circuitry ordered
through Option-12. Remove this jumper to disable this option, which might be necessary to control
motor 1 through a digital amplifier with current feedback.
Resistor Packs Configuration
Differential or Single-Ended Encoder Selection
The differential input signal pairs to the PMAC have user-configurable pull-up/pull-down resistor
networks to permit the acceptance of either single-ended or differential signals in one setting, or the
detection of lost differential signals in another setting.
The ‘+’ inputs of each differential pair each have a hard-wired 1 kΩ pull-up resistor to +5V. This cannot
be changed.
The ‘-‘ inputs of each differential pair each have a hard-wired 2.2 kΩ resistor to +5V; each also has
another 2.2 kΩ resistor as part of a socketed resistor pack that can be configured as a pull-up resistor to
+5V, or a pull-down resistor to GND.
If this socketed resistor is configured as a pull-down resistor (the default configuration), the combination
of pull-up and pull-down resistors on this line acts as a voltage divider, holding the line at +2.5V in the
absence of an external signal. This configuration is required for single-ended inputs using the ‘+’ lines
alone; it is desirable for unconnected inputs to prevent the pick-up of spurious noise; it is permissible for
differential line-driver inputs.
6 Baseboard Hardware Setup
Page 13

PMAC2A PC104 Hardware Reference Manual
If this socketed resistor is configured as a pull-up resistor (by reversing the SIP pack in the socket), the
two parallel 2.2 kΩ resistors act as a single 1.1 kΩ pull-up resistor, holding the line at +5V in the absence
of an external signal. This configuration is required if complementary open-collector drivers are used; it
is permissible for differential line-driver inputs.
If Pin 1 of the resistor pack, marked by a dot on the pack, matches Pin 1 of the socket, labeled by a white
square, then the pack is configured as a bank of pull-down resistors. If the pack is reversed in the socket,
it is configured as a bank of pull-up resistors.
The following table lists the pull-up/pull-down resistor pack for each input device:
Device Resistor Pack Pack Size
Encoder 1 RP30 6-pin
Encoder 2 RP31 6-pin
Encoder 3 RP36 6-pin
Encoder 4 RP37 6-pin
Baseboard Hardware Setup 7
Page 14

PMAC2A PC104 Hardware Reference Manual
8 Baseboard Hardware Setup
Page 15

PMAC2A PC104 Hardware Reference Manual
ACC-1P HARDWARE SETUP
On the Acc-1P, you will see many jumpers (pairs of metal prongs), called E-points. Some have been
shorted together; others have been left open. These jumpers customize the hardware features of the Acc1P for a given application and must be setup appropriately. The following is an overview of the several
jumpers grouped in appropriate categories. For a complete description of the jumper setup configuration,
refer to the Acc-1P E-Point Description section.
I/O Configuration Jumpers
E1-E2: Machine Output Supply Configure – With the default sinking output driver IC (ULN2803A or
equivalent) in U7 for the J7 JOPT port outputs, these jumpers must connect pins 1 and 2 to supply the IC
correctly. If this IC is replaced with a sourcing output driver IC (UDN2981A or equivalent), these
jumpers must be changed to connect pins 2 and 3 to supply the new IC correctly. A wrong setting of
these jumpers will damage the associated output IC.
E3-E4: JHW, PD Function Select – When jumper E3 connects pins 2 and 3, a set of pulse and direction
signals can be output on channel 1 (pins 2 to 5) of the JHW, PD port. If E3 connects pins 1 and 2, then
channel 1 is configured as a handwheel encoder input. When jumper E4 connects pins 2 and 3, a set of
pulse and direction signals can be output on channel 2 (pins 6 to 9) of the JHW, PD port. If E4 connects
pins 1 and 2, then channel 2 is configured as a handwheel encoder input.
E5: Servo Gate address select – If jumper E5 connects pins 1 and 2 (default) the servo channels on the
Acc-1P will be accessed at the regular addresses for motors 5 to 8. When E5 connects pins 2 and 3 the
servo channels on the Acc-1P board will be accessed at the regular addresses for motors 5 to 8 plus $40,
and this is useful only when two Acc-1Ps are used with the same PMAC2A PC/104 baseboard.
E6: I/O Gate address select – If jumper E6 connects pins 1 and 2 (default) the I/O features on the Acc1P will be accessed at the regular addresses and the JTHW port can be used as a multiplexer port. When
E6 connects pins 2 and 3 the I/O features on the Acc-1P board will be accessed at the regular addresses
plus $40, and this is useful only when two Acc-1P are used with the same PMAC2A PC/104 baseboard.
E7: Machine Input Source/Sink Control – With this jumper connecting pins 1 and 2 (default) the
machine input lines on the J7 JOPT port are pulled up to +5V or the externally provided supply voltage
for the port. This configuration is suitable for sinking drivers. If the jumper is changes to connect pins 2
and 3, these lines are pulled down to GND – this configuration is suitable for sourcing drivers.
E16: ADC Enable Jumper – Install E16 to enable the analog-to-digital converter circuitry ordered
through Option-2. Remove this jumper to disable this option, which might be necessary to control motor
5 through a digital amplifier with current feedback.
Reserved Configuration Jumpers
E0: Reserved for future use
Resistor Packs Configuration
Differential or Single-Ended Encoder Selection
The differential input signal pairs to the PMAC have user-configurable pull-up/pull-down resistor
networks to permit the acceptance of either single-ended or differential signals in one setting, or the
detection of lost differential signals in another setting.
The ‘+’ inputs of each differential pair each have a hard-wired 1 kΩ pull-up resistor to +5V. This cannot
be changed.
Acc-1P Hardware Setup 9
Page 16

PMAC2A PC104 Hardware Reference Manual
0
The ‘-‘ inputs of each differential pair each have a hard-wired 2.2 kΩ resistor to +5V; each also has
another 2.2 kΩ resistor as part of a socketed resistor pack that can be configured as a pull-up resistor to
+5V, or a pull-down resistor to GND.
If this socketed resistor is configured as a pull-down resistor (the default configuration), the combination
of pull-up and pull-down resistors on this line acts as a voltage divider, holding the line at +2.5V in the
absence of an external signal. This configuration is required for single-ended inputs using the ‘+’ lines
alone; it is desirable for unconnected inputs to prevent the pick-up of spurious noise; it is permissible for
differential line-driver inputs.
If this socketed resistor is configured as a pull-up resistor (by reversing the SIP pack in the socket), the
two parallel 2.2 kΩ resistors act as a single 1.1 kΩ pull-up resistor, holding the line at +5V in the absence
of an external signal. This configuration is required if complementary open-collector drivers are used; it
is permissible for differential line-driver inputs.
If Pin 1 of the resistor pack, marked by a dot on the pack, matches Pin 1 of the socket, labeled by a white
square, then the pack is configured as a bank of pull-down resistors. If the pack is reversed in the socket,
it is configured as a bank of pull-up resistors. The following table lists the pull-up/pull-down resistor
pack for each input device:
Device Resistor Pack Pack Size
Encoder 1 RP30 6-pin
Encoder 2 RP31 6-pin
Encoder 3 RP36 6-pin
Encoder 4 RP37 6-pin
Handwheel Encoder RP55 6-pin
Handwheel Encoder Termination Resistors
The PMAC provides a socket for termination resistors on the handwheel encoder differential input pairs
coming into the board. As shipped, there is no resistor pack in the RP56 socket. If these signals are
brought long distances into the PMAC board and ringing at signal transitions is a problem, a SIP resistor
pack may be mounted on the RP56 socket to reduce or eliminate the ringing. The 6-pin termination
resistor pack is the type that has independent resistors (no common connection) with each resistor using 2
adjacent pins.
Acc-1P Hardware Setup
1
Page 17

PMAC2A PC104 Hardware Reference Manual
ACC-2P HARDWARE SETUP
On the Acc-2P, there are many jumpers (pairs of metal prongs), called E-points. Some have been shorted
together; others have been left open. These jumpers customize the hardware features of the Acc-2P for a
given application and must be setup appropriately. The following is an overview of the several jumpers
grouped in appropriate categories. For a complete description of the jumper setup configuration, refer to
the Acc-2P E-Point Descriptions chapter.
I/O Configuration Jumpers
E3-E4: JHW, PD Function Select – When jumper E3 connects pins 2 and 3, a set of pulse and direction
signals can be output on channel 1 (pins 2 to 5) of the JHW, PD port. If E3 connects pins 1 and 2, then
channel 1 is configured as a handwheel encoder input. When jumper E4 connects pins 2 and 3, a set of
pulse and direction signals can be output on channel 2 (pins 6 to 9) of the JHW, PD port. If E4 connects
pins 1 and 2, then channel 2 is configured as a handwheel encoder input.
E5: I/O Gate address select – If jumper E5 connects pins 1 and 2 the I/O features on the Acc-2P will be
accessed at the regular addresses and the JTHW port can be used as a multiplexer port. When E5
connects pins 2 and 3 the I/O features on the Acc-2P board will be accessed at the regular addresses plus
$40, and this is necessary only when both Acc-2P and Acc-1P are used with the same PMAC2A PC/104
baseboard.
E7-E10: Ports Direction Control – These jumpers select the I/O lines direction of the JTHW and the
JOPT connectors. This allows configuring these ports as all inputs, all outputs or half inputs and half
outputs according to the following tables:
JTHW Connector
E7 E8
OFF OFF Output Output OFF OFF Output Output
OFF ON Output Input OFF ON Output Input
ON OFF Input Output ON OFF Input Output
ON ON Input Input ON ON Input Input
If E7 is removed or E8 is installed then the multiplexing feature if the JTHW port cannot be used.
DATx
lines
SELx
lines
E9 E10
JOPT Connector
MOx
lines
MIx
Lines
Communication Jumpers
E1: USB/Ethernet Micro Controller Firmware reload enable – This jumper was added on revision –
103 and above of the Acc-2P. Factory default position is ON, and it should remain ON. If the firmware
was corrupted due to a previous firmware download, the card firmware may be reloaded by powering on
the card with the jumper off, installing the jumper without powering off, then downloading firmware with
out powering off. Under normal circumstances, this jumper should be on even when upgrading firmware.
E6: Communications Port Selection – When jumper E6 connects pins 1 and 2 the PC/104
communications port is enabled. If E6 connects pins 2 and 3 the Ethernet or USB ports are enabled. Only
one port can be used at a time. If either the Ethernet or USB ports are used then jumper E19 on the base
board must be installed and jumper E18 on the base board must be removed. In order to communicate
through the RS-232 serial port jumper E6 must be installed, either in position 1-2 or 2-3.
Acc-2P Hardware Setup 11
Page 18

PMAC2A PC104 Hardware Reference Manual
Resistor Packs Configuration
Differential or Single-Ended Handwheel Encoder Selection
The handwheel encoder differential input signal pairs to the PMAC have user-configurable pull-up/pulldown resistor networks to permit the acceptance of either single-ended or differential signals in one
setting, or the detection of lost differential signals in another setting.
The ‘+’ inputs of each differential pair each have a hard-wired 1 kΩ pull-up resistor to +5V. This cannot
be changed.
The ‘-‘ inputs of each differential pair each have a hard-wired 2.2 kΩ resistor to +5V; each also has
another 2.2 kΩ resistor as part of a socketed resistor pack that can be configured as a pull-up resistor to
+5V, or a pull-down resistor to GND.
If this socketed resistor is configured as a pull-down resistor (the default configuration), the combination
of pull-up and pull-down resistors on this line acts as a voltage divider, holding the line at +2.5V in the
absence of an external signal. This configuration is required for single-ended inputs using the ‘+’ lines
alone; it is desirable for unconnected inputs to prevent the pick-up of spurious noise; it is permissible for
differential line-driver inputs.
If this socketed resistor is configured as a pull-up resistor (by reversing the SIP pack in the socket), the
two parallel 2.2 kΩ resistors act as a single 1.1 kΩ pull-up resistor, holding the line at +5V in the absence
of an external signal. This configuration is required if complementary open-collector drivers are used; it
is permissible for differential line-driver inputs.
If Pin 1 of the resistor pack, marked by a dot on the pack, matches Pin 1 of the socket, labeled by a white
square, then the pack is configured as a bank of pull-down resistors. If the pack is reversed in the socket,
it is configured as a bank of pull-up resistors.
RP22 is the 6-pin pull-up/pull-down resistor pack for the handwheel encoder input.
Handwheel Encoder Termination Resistors
The PMAC provides a socket for termination resistors on the handwheel encoder differential input pairs
coming into the board. As shipped, there is no resistor pack in the RP23 socket. If these signals are
brought long distances into the PMAC board and ringing at signal transitions is a problem, a SIP resistor
pack may be mounted on the RP23 socket to reduce or eliminate the ringing. The 6-pin termination
resistor pack is the type that has independent resistors (no common connection) with each resistor using
two adjacent pins.
Acc-2P Hardware Setup
12
Page 19
PMAC2A PC104 Hardware Reference Manual
MACHINE CONNECTIONS
Typically, the user connections are actually made to terminal blocks that are attached to the JMACH
connectors by a flat cable. The following are the terminal blocks recommended for connections:
• 34-Pin IDC header to terminal block breakouts (Phoenix part number 2281063) Delta Tau part
number 100-FLKM34-000
• 50-Pin IDC header to terminal block breakouts (Phoenix part number 2281089) Delta Tau part
number 100-FLKM50-000
Mounting
The PMAC2A PC/104 is always installed either using standoffs, when it is
stacked to a PC/104 computer or used as a stand-alone controller. At each of
the four corners of the PMAC2A PC/104 board, there are mounting holes that
can be used to mount the board on standoffs.
The PMAC2A PC/104 baseboard is placed always at the bottom of the stack.
The order of the Acc-1P or Acc-2P with respect to the baseboard does not
matter.
Power Supplies
Baseboard mounted at
the bottom of the stack
Digital Power Supply
3A @ +5V (±5%) (15 W)
(Eight-channel configuration, with a typical load of encoders)
The PMAC2A PC/104, the Acc-1P and the Acc-2P each require a 1A @ 5VDC power supply for
operation. Therefore, a 3A @ 5VDC power supply is recommended for a PMAC2A PC/104 board stack
with Acc-1P and Acc-2P boards.
• The host computer provides the 5 Volts power supply in the case PMAC is installed in the PC/104
bus. With the board stack into the bus, it will automatically pull +5V power from the bus and it
cannot be disconnected. In this case, there must be no external +5V supply, or the two supplies will
"fight" each other, possibly causing damage. This voltage could be measured on the TB1 terminal
block or the JMACH1 connector.
• In a stand-alone configuration, when PMAC is not plugged in a computer bus, it will need an external
5V supply to power its digital circuits. The 5V power supply can be brought in either from the TB1
terminal block or from the JMACH1 connector.
DAC Outputs Power Supply
0.3A @ +12 to +15V (4.5W)
0.25A @ -12 to -15V (3.8W)
(Eight-channel configuration)
• The host computer provides the ±12 Volts power supply in the case PMAC is installed in the PC/104
bus. With the board stack into the bus, it will pull ±12V power from the bus automatically and it
cannot be disconnected. In this case, there must be no external ±12V supply, or the two supplies will
fight each other, possibly causing damage. This voltage could be measured on the TB1 terminal
block.
• In a stand-alone configuration, when PMAC is not plugged in a computer bus, it will need an external
±12V supply only when the digital-to-analog converter (DAC) outputs are used. The ±12V lines
from the supply, including the ground reference, can be brought in either from the TB1 terminal block
or from the JMACH1 connector.
Machine Connections 13
Page 20
PMAC2A PC104 Hardware Reference Manual
4
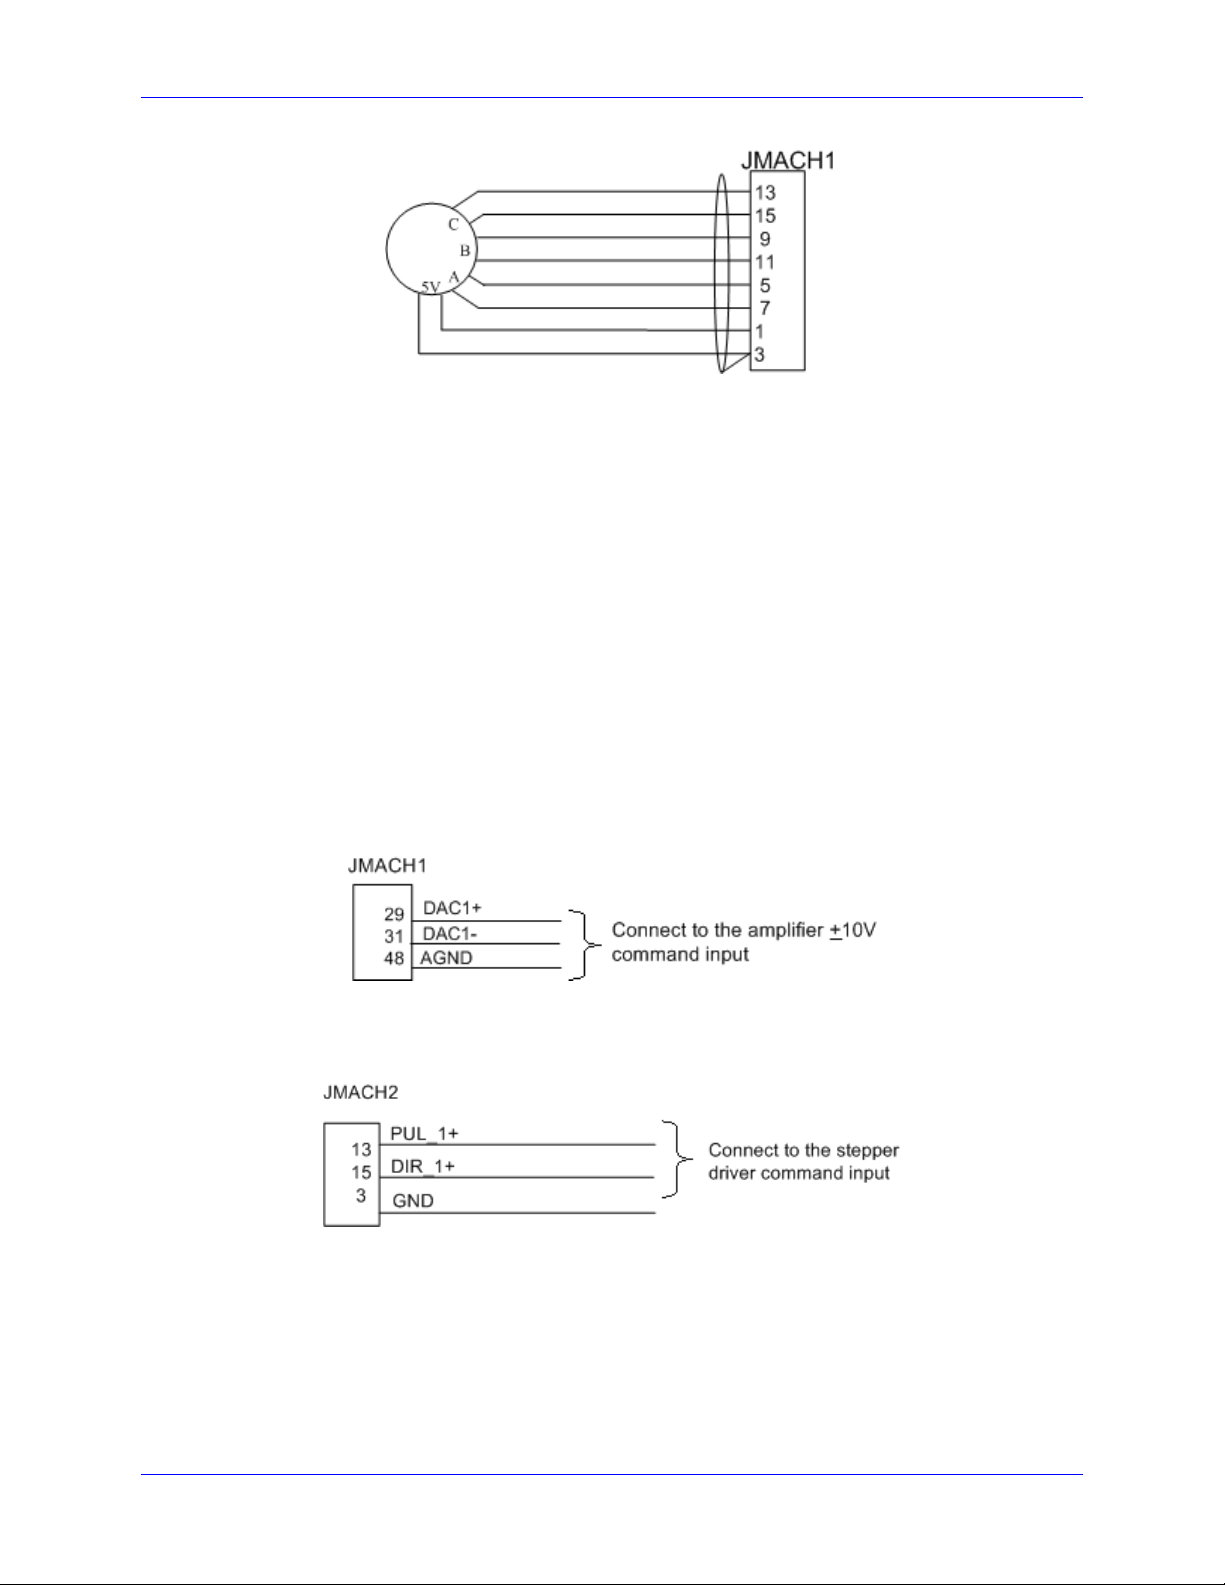
Flags Power Supply
Each channel of PMAC has five dedicated digital inputs on the machine connector: PLIMn, MLIMn
(overtravel limits), HOMEn (home flag), FAULTn (amplifier fault), and USERn. A power supply from 5
to 24V must be used to power the circuits related to these inputs. This power supply can be the same
used to power PMAC and can be connected from the TB1 terminal block or the JMACH1 connector.
Overtravel Limits and Home Switches
When assigned for the dedicated uses, these signals provide important safety and accuracy functions.
PLIMn and MLIMn are direction-sensitive over-travel limits that must conduct current to permit motion
in that direction. If no over-travel switches will be connected to a particular motor, this feature must be
disabled in the software setup through the PMAC Ix25 variable.
Types of Overtravel Limits
PMAC expects a closed-to-ground connection for the limits to not be considered on fault. This
arrangement provides a failsafe condition. Usually, a passive normally close switch is used. If a
proximity switch is needed instead, use a 5 to 24V normally closed to ground NPN sinking type sensor.
Home Switches
While normally closed-to-ground switches are required for the overtravel limits inputs, the home switches
could be either normally close or normally open types. The polarity is determined by the home sequence
setup, through the I-variables I9n2. However, for the following reasons, the same type of switches used
for over-travel limits are recommended:
• Normally closed switches are proven to have greater electrical noise rejection than normally open types.
• Using the same type of switches for every input flag simplifies maintenance stock and replacements.
Motor Signals Connections
Incremental Encoder Connection
Each JMACH1 connector provides two +5V outputs and two logic grounds for powering encoders and
other devices. The +5V outputs are on pins 1 and 2; the grounds are on pins 3 and 4. The encoder signal
pins are grouped by number: all those numbered 1 (CHA1+, CHA1-, CHB1+, CHC1+, etc.) belong to
encoder #1. The encoder number does not have to match the motor number, but usually does. Connect
the A and B (quadrature) encoder channels to the appropriate terminal block pins. For encoder 1, the
CHA1+ is pin 5 and CHB1+ is pin 9. If there is a single-ended signal, leave the complementary signal
pins floating – do not ground them. However, if single-ended encoders are used, check the settings of the
resistor packs (see the Hardware Setup section for details). For a differential encoder, connect the
complementary signal lines – CHA1- is pin 7, and CHB1- is pin 11. The third channel (index pulse) is
optional; for encoder 1, CHC1+ is pin 13, and CHC1- is pin 15.
Example: differential quadrature encoder connected to channel #1:
Machine Connections
1
Page 21
PMAC2A PC104 Hardware Reference Manual
DAC Output Signals
If PMAC is not performing the commutation for the motor, only one analog output channel is required to
command the motor. This output channel can be either single-ended or differential, depending on what
the amplifier is expecting. For a single-ended command using PMAC channel 1, connect DAC1+ (pin
29) to the command input on the amplifier. Connect the amplifier’s command signal return line to
PMAC’s GND line (pin 48). In this setup, leave the DAC1- pin floating; do not ground it.
For a differential command using PMAC channel 1, connect DAC1 (pin 29) to the plus-command input
on the amplifier. Connect DAC1- (pin 31) to the minus-command input on the amplifier. PMAC’s GND
should still be connected to the amplifier common.
To limit the range of each signal to ±5V, use parameter Ix69. Any analog output not used for dedicated
servo purposes may be utilized as a general-purpose analog output. Usually this is done by defining an
M-variable to the digital-to-analog-converter register (suggested M-variable definitions M102, M202,
etc.), then writing values to the M-variable. The analog outputs are intended to drive high-impedance
inputs with no significant current draw. The 220Ω output resistors will keep the current draw lower than
50 mA in all cases and prevent damage to the output circuitry, but any current draw above 10 mA can
result in noticeable signal distortion.
Example:
Pulse and Direction (Stepper) Drivers
The channels provided by the PMAC2A PC/104 board or the Acc-1P board can output pulse and
direction signals for controlling stepper drivers or hybrid amplifiers. These signals are at TTL levels.
Amplifier Enable Signal (AENAx/DIRn)
Most amplifiers have an enable/disable input that permits complete shutdown of the amplifier regardless
of the voltage of the command signal. PMAC’s AENA line is meant for this purpose. AENA1- is pin 33.
This signal is an open-collector output and an external 3.3 kΩ pull-up resistor can be used if necessary.
Machine Connections 15
Page 22

PMAC2A PC104 Hardware Reference Manual
Amplifier Fault Signal (FAULT-)
This input can take a signal from the amplifier so PMAC knows when the amplifier is having problems,
and can shut down action. The polarity is programmable with I-variable Ix25 (I125 for motor 1) and the
return signal is ground (GND). FAULT1- is pin 35. With the default setup, this signal must actively be
pulled low for a fault condition. In this setup, if nothing is wired into this input, PMAC will consider the
motor not to be in a fault condition.
Acc-1P General-Purpose Digital Inputs and Outputs (J7 Port)
Acc-1P J7 connector provides eight general-purpose digital inputs and eight general-purpose digital
outputs. Each input and each output has its own corresponding ground pin in the opposite row. The 34pin connector was designed for easy interface to OPTO-22 or equivalent optically isolated I/O modules.
Delta Tau’s Acc-21F is a six-foot cable for this purpose. Characteristics of the JOPTO port on the
PMAC:
• 16 I/O points. 100 mA per channel, up to 24V
• Hardware selectable between sinking and sourcing in groups of 8; default is all sinking (inputs can be
changed simply by moving a jumper; sourcing outputs must be special-ordered or field-configured)
• Eight inputs, and eight outputs only; no changes. Parallel (fast) communications to PMAC CPU
• Not opto-isolated; easily connected to Opto-22 (PB16) or similar modules through Acc-21F cable
Jumper E7 on the Acc-1P board controls the configuration of the eight inputs. If it connects pins 1 and 2
(the default setting), the inputs are biased to +5V for the OFF state, and they must be pulled low for the
ON state. If E7 connects pins 2 and 3, the inputs are biased to ground for the OFF state, and must be
pulled high for the ON state. In either case, a high voltage is interpreted as a 0 by the PMAC software,
and a low voltage is interpreted as a 1.
PMAC is shipped standard with a ULN2803A sinking (open-collector) output IC for the eight outputs.
These outputs can sink up to 100 mA and have an internal 3.3 kΩ pull-up resistor to go high (RP18). Do
not connect these outputs directly to the supply voltage, or damage to the PMAC will result from
excessive current draw. The user can provide a high-side voltage (+5 to +24V) into Pin 33 of the J7
connector, and allow this to pull up the outputs by connecting pins 1 and 2 of Jumper E1. Jumper E2
must also connect pins 1 and 2 for a ULN2803A sinking output.
It is possible for these outputs to be sourcing drivers by substituting a UDN2981A IC for the ULN2803A.
This U7 IC is socketed, and so may easily be replaced. Usually the U7 IC is offset by two pins on its
socket, and so pins 1 and 2 usually remain open.
WARNING
Having Jumpers E1 and E2 set wrong can damage the IC. The +V output on this
connector has a 2A fuse, F1, for excessive current protection.
Machine Connections
16
Page 23

PMAC2A PC104 Hardware Reference Manual
For this driver, the internal resistor packs pull-down instead. With a UDN2981A driver IC, Jumper E1
must connect pins 2 and 3, and Jumper E2 must connect pins 2 and 3.
Example: Standard configuration using the ULN2803A sinking (open-collector) output IC.
Further software settings are required to configure this port. See the Software Setup section for details.
Acc-2P General-Purpose Digital Inputs and Outputs (JOPT Port)
Acc-2P JOPT connector provides sixteen lines of general-purpose I/O. In contrast with the Acc-1P J7
connector, the lines on the Acc-2P JOPT connector are limited to TTL levels and are usually used with
external I/O modules. Each I/O line has its own corresponding ground pin in the opposite row. The 34pin connector was designed for easy interface to OPTO-22 or equivalent optically isolated I/O modules.
Delta Tau’s Acc-21F is a six-foot cable for this purpose.
Jumpers E9 and E10 on the Acc-2P board select the I/O lines direction of the JOPT connector. This
allows configuring this port as all inputs, all outputs or half inputs and half outputs. Further software
settings are required to configure this port. See the Software Setup section for details on this.
Acc-1P Thumbwheel Multiplexer Port (J2 Port)
The Thumbwheel Multiplexer Port, or Multiplexer Port, on the J2 connector has eight input lines and
eight output lines. The output lines can be used to multiplex large numbers of inputs and outputs on the
port, and Delta Tau provides accessory boards and software structures (special M-variable definitions) to
capitalize on this feature. Up to 32 of the multiplexed I/O boards may be daisy-chained on the port, in
any combination. Either the Acc-1P or the Acc-2P boards, but not both, can use this connector as a
multiplexing port. This is selected by jumper E6 on the Acc-1P board and jumper E5 on the Acc-2P
board.
Alternatively, the inputs and outputs on this port may be used as discrete, non-multiplexed I/O. In this
case, these I/O lines can be accessed through M-variables. See the Software Setup section for details on
this.
Acc-2P Thumbwheel Multiplexer Port (JTHW Port)
The Thumbwheel Multiplexer Port, or Multiplexer Port, on the JTHW connector has sixteen lines. These
lines can be used to multiplex large numbers of inputs and outputs on the port, and Delta Tau provides
accessory boards and software structures (special M-variable definitions) to capitalize on this feature. Up
to 32 of the multiplexed I/O boards may be daisy-chained on the port, in any combination. Either the
Acc-1P or the Acc-2P boards, but not both, can use this connector as a multiplexing port. This is selected
by jumper E6 on the Acc-1P board and jumper E5 on the Acc-2P board.
Alternatively, the inputs and outputs on this port may be used as discrete, non-multiplexed I/O. In this
case, these I/O lines can be accessed through M-variables. See the Software Setup section for details on
this.
Machine Connections 17
Page 24

PMAC2A PC104 Hardware Reference Manual
When used as non-multiplexed I/O, jumpers E7 and E8 on the Acc-2P board select the I/O lines direction
of the JTHW connector. This allows configuring this port as all inputs, all outputs or half inputs and half
outputs. If E7 is removed or E8 is installed then the multiplexing feature if the JTHW port cannot be
used.
Acc-1P or Acc-2P Handwheel Port (JHW / PD Port)
This port provides an extra encoder input or a set of pulse and direction outputs. Jumpers E3 and E4 on
either the Acc-1P or Acc-2P boards select the function of this connector between encoder input or pulse
and direction outputs. The handwheel encoder input can be linked to a servomotor for manual
displacement or used by a motor as a secondary encoder for dual-feedback applications. There is no C
index channel input on the handwheel encoder port. The pulse and direction outputs can be used, for
example, to control an external laser device but not a stepper driver\motor, since this would require more
than eight axes of motion control.
Optional Analog Inputs
The optional analog-to-digital converter inputs are ordered either through Option-12 on the baseboard or
Option-2 on the axes expansion board. Each option provides two 12-bit analog inputs analog inputs with
a ±10Vdc range.
Compare Equal Outputs
The compare-equals (EQU) outputs have a dedicated use of providing a signal edge when an encoder
position reaches a pre-loaded value. This is very useful for scanning and measurement applications.
Instructions for use of these outputs are covered in detail in the PMAC2 User Manual.
Machine Connections
18
Page 25

PMAC2A PC104 Hardware Reference Manual
Serial Port (JRS232 Port)
For serial communications, use a serial cable to connect your PC's COM port to the J8 serial port
connector present on the PMAC2A PC/104 baseboard. Delta Tau provides the Acc-3L cable for this
purpose that connects the PMAC to a DB-9 connector. Standard DB-9-to-DB-25 or DB-25-to-DB-9
adapters may be needed for your particular setup. If a cable needs to be made, the easiest approach is to
use a flat cable prepared with flat-cable type connectors as indicated in the following diagram:
PMAC (DB-9S) PC (DB-9)
1 (No connect) 1 (No connect)
DB-9 Female DB-9 Male
1 1
2 (TXD/) 2 (RXD)
3 (RXD/) 3 (TXD)
4 (DSR) 4 (DTR)
5 (Gnd) 5 (Gnd)
6 (DTR) 6 (DSR)
7 (CTS) 7 (RTS)
8 (RTS) 8 (CTS)
9 (No connect) 9 (No connect)
Acc-2P Ethernet RJ45 Connector (J10 Port)
This connector is used for Ethernet communications from the Acc-2P to a PC, and it is provided when
Acc-2P Option 1B is ordered. The PC must have a card dedicated solely to the PMAC network. The
appropriate Category 5 10/100-Base T network cable that mates to this connector can be readily
purchased from any local computer store. The type of network cable to purchase depends on the
configuration to the host PC.
When making a direct connection to a Host communication Ethernet card in a PC a cat 5 networking
crossover cable must be used. A standard cat 5 straight through networking cable cannot be used in this
scenario. When using a connection to a network hub or switch, the standard cat 5 straight through
networking cable must be used, and not a crossover cable.
Performance can be degraded seriously by the use of a hub or switch. Network hubs or the more
intelligent network switches have processors inside them, which can add delays of at least 15msec to the
PMAC communications.
Acc-2P USB Connector (J1 Port)
This connector is to be used in conjunction with USB A-B cable, which can be purchased from any local
computer store, and it is provided when Acc-2P Option 1A is ordered. The A connector is connected to a
PC or Hub device; the B connector plugs into the Acc-2P J1 port.
Machine Connections 19
Page 26

PMAC2A PC104 Hardware Reference Manual
0
Machine Connections Example: Using Analog ±10V Amplifier
Machine Connections
2
Page 27

PMAC2A PC104 Hardware Reference Manual
Machine Connections Example: Using Pulse and Direction Drivers
Machine Connections 21
Page 28

PMAC2A PC104 Hardware Reference Manual
Machine Connections
22
Page 29

PMAC2A PC104 Hardware Reference Manual
SOFTWARE SETUP
Note:
The PMAC2A PC/104 requires the use of V1.17 or newer firmware. There are
few differences between the previous V1.16H firmware and the V1.17 firmware
other than the addition of internal support for the Flex CPU design.
Communications
Delta Tau provides software tools that allow communicating with of the PMAC2A PC/104 board by
either its standard RS-232 port or the optional USB or Ethernet ports. PEWIN is the most important in
the series of software accessories, and it allows configuring and programming the PMAC for any
particular application.
PMAC I-Variables
PMAC has a large set of Initialization parameters (I-variables) that determine the "personality" of the card
for a specific application. Many of these are used to configure a motor properly. Once set up, these
variables may be stored in non-volatile EAROM memory (using the SAVE command) so the card is
always configured properly (PMAC loads the EAROM I-variable values into RAM on power-up).
The programming features and configuration variables for the PMAC2A PC/104 are described fully in the
PMAC2 User and Software manuals.
Operational Frequency and Baud Rate Setup
Note:
Older PMAC boards required a start-up PLC for setting the operational frequency
at 80 MHz. That method is not compatible with the PMAC2A PC/104 board and
will shutdown the board when used.
The operational frequency of the CPU can be set in software by the variable I46. If this variable is set to
0, PMAC firmware looks at the jumpers E2 and E4 to set the operational frequency for 40, 60, and 80
MHz operation. If I46 is set to a value greater than 0, the operational frequency is set to 10MHz * (I46 +
1), regardless of the jumper setting. If the desired operational frequency is higher than the maximum
rated frequency for that CPU, the operational frequency will be reduced to the rated maximum. It is
always possible to operate the Flex CPU board at a frequency below its rated maximum. I46 is used only
at power-up/reset, so to change the operational frequency, set a new value of I46, issue a SAVE command
to store this value in non-volatile flash memory, then issue a $$$ command to reset the controller.
To determine the frequency at which the CPU is actually operating, issue the TYPE command to the
PMAC. The PMAC will respond with five data items, the last of which is CLK Xn, where n is the
multiplication factor from the 20 MHz crystal frequency (not 10 MHz). n should be equivalent to
(I46+1)/2 if I46 is not requesting a frequency greater than the maximum rated for that CPU board. n will
be 2 for 40 MHz operation, 4 for 80 MHz operation, and 8 for 160 MHz operation.
Software Setup 23
Page 30

PMAC2A PC104 Hardware Reference Manual
4
If the CPU’s operational frequency has been determined by (a non-zero setting of) I46, the serial
communications baud rate is determined at power-up/reset by variable I54 alone according to the
following table:
I54 Baud Rate I54 Baud Rate
0 600 8 9600
1 900 9 14,400
2 1200 10 19,200
3 1800 11 28,800
4 2400 12 38,400
5 3600 13 57,600
6 4800 14 76,800
7 7200 15 115,200
For a saved value of 0 for I46, the serial baud rate is determined by the combination of I54 and the CPU
frequency as shown in the following table.
I54
0 600 Disabled 1200
1 900* (-0.05%) 900 1800* (-0.1%)
2 1200 1200 2400
3 1800* (-0.1%) 1800 3600* (-0.19%)
4 2400 2400 4800
5 3600* (-0.19%) 3600 7200* (-0.38%)
6 4800 4800 9600
7 7200* (-0.38%) 7200 14,400*(-0.75%)
8 9600 9600 19,200
9 14,400*(-0.75%) 14,400 28,800*(-1.5%)
10 19,200 19,200 38,400
11 28,800*(-1.5%) 28,800 57,600*(-3.0%)
12 38,400 38,400 76,800
13 57,600*(-3.0%) 57,600 115,200*(-6.0%)
14 76,800 76,800 153,600
15 Disabled 115,200 Disabled
* Not an exact baud rate
Baud Rate for
40 MHz CPU
Baud Rate for
60 MHz CPU
Baud Rate for
80 MHz CPU
Filtered DAC Outputs Configuration
The following I-variables must be set properly to use the digital-to-analog (filtered DAC) outputs:
I900 = 1001 ; PWM frequency 29.4kHz, PWM 1-4
I901 = 2 ; Phase Clock 19.6kHz
I902 = 3 ; Servo frequency 4.9kHz
I903 = 1746 ; ADC frequency
I906 = 1001 ; PWM frequency 29.4kHz, PWM 5-8
I907 = 1746 ; ADC frequency
I9n6 = 0 ; Output mode: PWM
Ix69 = 1001 ; DAC limit 10Vdc
I10 = 1710933 ; Servo interrupt time
n = channel number from 1 to 8
x = motor number from 1 to 8
Software Setup
2
Page 31

PMAC2A PC104 Hardware Reference Manual
Using Flag I/O as General-Purpose I/O
Either the user flags or other not assigned axes flag on the base board can be used as general-purpose I/O
for up to 20 inputs and 4 outputs at 5-24Vdc levels. The indicated suggested M-variables definitions,
which are defined in the PMAC2 Software reference, allows accessing each particular line according to
the following table:
Flag Type
HOME
PLIM
MLIM
USER
AENA
5-24 VDC Input M120 M220 M320 M420
5-24 VDC Input M121 M221 M321 M421
5-24 VDC Input M122 M222 M322 M422
5-24 VDC Input M115 M215 M315 M415
5-24 VDC Output M114 M214 M314 M414
#1 #2 #3 #4
Channel Number
Note:
When using these lines as regular I/O points the appropriate setting of the Ix25
variable must be used to enable or disable the safety flags feature.
General-Purpose Digital Inputs and Outputs
If one Acc-1P is present on the PMAC2A PC/104 stack configuration then its jumpers E5 and E6 should be
set at the default position 1-2. In this case, the lines on its J7 general-purpose I/O connector will be mapped
into PMAC’s address space in register Y:$C080. Jumpers E5 and E6 should be configured on position 2-3
only when two Acc-1Ps are used. In this case, the I/O lines can be accessed at address Y:$C0C0.
If no Acc-1P is present on the PMAC2A PC/104 stack configuration, and only Acc-2P is used, then
jumper E5 on the Acc-2P board should connect pins 1 and 2. In this case the lines on its JOPT generalpurpose I/O connector will be mapped into PMAC's address space in register Y:$C080.
If both Acc-1P and Acc-2P are used, then jumper E5 on the Acc-2P board should connect pins 2 and 3
and its I/O lines can be accessed at address Y:$C0C0.
Typically, these I/O lines are accessed individually with M-variables. Following is a suggested set of Mvariable definitions to use these data lines.
Acc-1P with Jumper E6 on Position 1-2
M0->Y:$C080,0 ; Digital Output M00
M1->Y:$C080,1 ; Digital Output M01
M2->Y:$C080,2 ; Digital Output M02
M3->Y:$C080,3 ; Digital Output M03
M4->Y:$C080,4 ; Digital Output M04
M5->Y:$C080,5 ; Digital Output M05
M6->Y:$C080,6 ; Digital Output M06
M7->Y:$C080,7 ; Digital Output M07
M8->Y:$C080,8 ; Digital Input MI0
M9->Y:$C080,9 ; Digital Input MI1
M10->Y:$C080,10 ; Digital Input MI2
M11->Y:$C080,11 ; Digital Input MI3
M12->Y:$C080,12 ; Digital Input MI4
M13->Y:$C080,13 ; Digital Input MI5
M14->Y:$C080,14 ; Digital Input MI6
M15->Y:$C080,15 ; Digital Input MI7
M32->X:$C080,0,8 ; Direction Control (1=output, 0 = input)
M34->X:$C080,8,8 ; Direction Control (1=output, 0 = input)
M40->X:$C084,0,24 ; Inversion control (0 = 0V, 1 = 5V)
M42->Y:$C084,0,24 ; J7 port data type control (1 = I/O)
Software Setup 25
Page 32

PMAC2A PC104 Hardware Reference Manual
In order to properly setup the digital outputs an initialization PLC must be written scanning through once
on power-up/reset, then disabling itself:
OPEN PLC1 CLEAR
M32=$FF ;BITS 0-8 are assigned as output
M34=$0 ;BITS 9-16 are assigned as input
M40=$FF00 ;Define inputs and outputs voltages
M42=$FFFF ;All lines are I/O type
DIS PLC1 ;Disable PLC1 (scanning through once on
;power-up/reset)
CLOSE
Note:
After loading this program, set I5=2 or 3 and ENABLE PLC 1.
Acc-2P with Jumper E5 in Position 2-3
M0->Y:$C0C0,0 ; Digital Output M00
M1->Y:$C0C0,1 ; Digital Output M01
M2->Y:$C0C0,2 ; Digital Output M02
M3->Y:$C0C0,3 ; Digital Output M03
M4->Y:$C0C0,4 ; Digital Output M04
M5->Y:$C0C0,5 ; Digital Output M05
M6->Y:$C0C0,6 ; Digital Output M06
M7->Y:$C0C0,7 ; Digital Output M07
M8->Y:$C0C0,8 ; Digital Input MI0
M9->Y:$C0C0,9 ; Digital Input MI1
M10->Y:$C0C0,10 ; Digital Input MI2
M11->Y:$C0C0,11 ; Digital Input MI3
M12->Y:$C0C0,12 ; Digital Input MI4
M13->Y:$C0C0,13 ; Digital Input MI5
M14->Y:$C0C0,14 ; Digital Input MI6
M15->Y:$C0C0,15 ; Digital Input MI7
M32->X:$C0C0,0,8 ; Direction Control (1=output, 0 = input)
M34->X:$C0C0,8,8 ; Direction Control (1=output, 0 = input)
M40->X:$C0C4,0,24 ; Inversion control (0 = 0V, 1 = 5V)
M42->Y:$C0C4,0,24 ; JI/O port data type control (1 = I/O)
In order to properly setup the digital outputs, an initialization PLC must be written scanning through once
on power-up/reset, and then disabling itself:
OPEN PLC1 CLEAR
M32=$FF ;BITS 0-8 are assigned as output
M34=$0 ;BITS 9-16 are assigned as input
M40=$FFFF ;Define inputs and outputs voltages
M42=$FFFF ;All lines are I/O type
DIS PLC1 ;Disable PLC1 (scanning through once on
;power-up/reset)
CLOSE
Note:
After loading this program, set I5=2 or 3 and ENABLE PLC 1.
Software Setup
26
Page 33

PMAC2A PC104 Hardware Reference Manual
Thumbwheel Port Digital Inputs and Outputs
The inputs and outputs on the thumbwheel multiplexer port of either the Acc-1P or the Acc-2P boards
may be used as discrete, non-multiplexed I/O. In this case, these I/O lines can be accessed through Mvariables that are defined according to the setup of the address selection jumpers. Jumper E6 on the Acc1P or E5 on the Acc-2P determine which set of the following M-variables are used:
Acc-1P with Jumper E6 in Position 1-2
M40->Y:$C082,8,1 ; SEL0 Output
M41->Y:$C082,9,1 ; SEL1 Output
M42->Y:$C082,10,1 ; SEL2 Output
M43->Y:$C082,11,1 ; SEL3 Output
M44->Y:$C082,12,1 ; SEL4 Output
M45->Y:$C082,13,1 ; SEL5 Output
M46->Y:$C082,14,1 ; SEL6 Output
M47->Y:$C082,15,1 ; SEL7 Output
M48->Y:$C082,8,8,U ; SEL0-7 Outputs treated as a byte
M50->Y:$C082,0,1 ; DAT0 Input
M51->Y:$C082,1,1 ; DAT1 Input
M52->Y:$C082,2,1 ; DAT2 Input
M53->Y:$C082,3,1 ; DAT3 Input
M54->Y:$C082,4,1 ; DAT4 Input
M55->Y:$C082,5,1 ; DAT5 Input
M56->Y:$C082,6,1 ; DAT6 Input
M57->Y:$C082,7,1 ; DAT7 Input
M58->Y:$C082,0,8,U ; DAT0-7 Inputs treated as a byte
Acc-2P with Jumper E5 in Position 2-3
M40->Y:$C0C2,8,1 ; SEL0 I/O Line
M41->Y:$C0C2,9,1 ; SEL1 I/O Line
M42->Y:$C0C2,10,1 ; SEL2 I/O Line
M43->Y:$C0C2,11,1 ; SEL3 I/O Line
M44->Y:$C0C2,12,1 ; SEL4 I/O Line
M45->Y:$C0C2,13,1 ; SEL5 I/O Line
M46->Y:$C0C2,14,1 ; SEL6 I/O Line
M47->Y:$C0C2,15,1 ; SEL7 I/O Line
M48->Y:$C0C2,8,8,U ; SEL0-7 I/O Lines treated as a byte
M50->Y:$C0C2,0,1 ; DAT0 I/O Line
M51->Y:$C0C2,1,1 ; DAT1 I/O Line
M52->Y:$C0C2,2,1 ; DAT2 I/O Line
M53->Y:$C0C2,3,1 ; DAT3 I/O Line
M54->Y:$C0C2,4,1 ; DAT4 I/O Line
M55->Y:$C0C2,5,1 ; DAT5 I/O Line
M56->Y:$C0C2,6,1 ; DAT6 I/O Line
M57->Y:$C0C2,7,1 ; DAT7 I/O Line
M58->Y:$C0C2,0,8,U ; DAT0-7 I/O Lines treated as a byte
Software Setup 27
Page 34

PMAC2A PC104 Hardware Reference Manual
Analog Inputs Setup
The optional analog-to-digital converter inputs are ordered either through Option-12 on the baseboard or
Option-2 on the axes expansion board. Each option provides two 12-bit analog inputs with a ±10Vdc range.
The M-variables associated with these inputs provided a range of values between +2048 and –2048 for the
respective ±10Vdc input range. The following is the software procedure to setup and read these ports.
Baseboard Analog Inputs
I903 = 1746 ;Set ADC clock frequency at 4.9152 MHz
WX:$C014, $1FFFFF ;Clock strobe set for bipolar inputs
M105->X:$0710,12,12,S ;ADCIN_1 on JMACH1 connector pin 45
M205->X:$0711,12,12,S ;ADCIN_2 on JMACH1 connector pin 46
Acc-1P Analog Inputs
I907 = 1746 ;Set ADC clock frequency at 4.9152 MHz
WX:$C034, $1FFFFF ;Clock strobe set for bipolar inputs
M305->X:$0714,12,12,S ;ADCIN_1 on JMACH1 connector (Acc-1P) pin 45
M405->X:$0715,12,12,S ;ADCIN_2 on JMACH1 connector (Acc-1P) pin 46
Software Setup
28
Page 35

PMAC2A PC104 Hardware Reference Manual
BASE BOARD HARDWARE REFERENCE SUMMARY
The following information is based on the PMAC2A PC/104 board, part number 603670-100.
Board Dimensions
Base Board Hardware Reference Summary 29
Page 36

PMAC2A PC104 Hardware Reference Manual
0
Board Layout
1
2
3
4
5
6
BACD E F
Feature Location Feature Location Feature Location
E0
E1
E2
E3
E4
E8
E9
E10
E11
E12
B3
B4
B4
C4
C4
B1
B1
E5
E5
E5
E13
E14
E15A
E15B
E15C
E16
E18
E19
W1
E5
B3
E4
E4
E4
D1
D4
D4
E6
RP30
RP31
RP36
RP37
D1
D2
TB1
JRS232
JMACH1
JMACH2
E2
E2
E3
E3
A2
A3
B6
A2
F3
A4
Base Board Hardware Reference Summary
3
Page 37

PMAC2A PC104 Hardware Reference Manual
Connectors and Indicators
J3 - Machine Connector (JMACH1 Port)
The primary machine interface connector is JMACH1, labeled J3 on the PMAC. It contains the pins for
four channels of machine I/O: analog outputs, incremental encoder inputs, amplifier fault and enable
signals and power-supply connections.
1. 50-pin female flat cable connector T&B Ansley P/N 609-5041
2. Standard flat cable stranded 50-wire T&B Ansley P/N 171-50
3. Phoenix varioface module type FLKM 50 (male pins) P/N 22 81 08 9
J4 - Machine Connector (JMACH2 Port)
This machine interface connector is labeled JMACH2 or J4 on the PMAC. It contains the pins for four
channels of machine I/O: end-of-travel input flags, home flag and pulse-and-direction output signals. In
addition, the B_WDO output allows monitoring the state of the Watchdog safety feature.
1. 34-pin female flat cable connector T&B Ansley P/N 609-3441
2. Standard flat cable stranded 34-wire T&B Ansley P/N 171-34
3. Phoenix varioface module type FLKM 34 (male pins) P/N 22 81 06 3
J8 - Serial Port (JRS232 Port)
This connector allows communicating with PMAC from a host computer through a RS-232 port. Delta
Tau provides the Accessory 3L cable that connects the PMAC to a DB-9 connector.
1. 10-pin female flat cable connector T&B Ansley P/N 609-1041
2. Standard flat cable stranded 10-wire T&B Ansley P/N 171-10
TB1 – Power Supply Terminal Block (JPWR Connector)
In almost in all cases the PMAC2A PC/104 will be powered from the PC/104 bus, when it is installed in a
host computer’s bus, or from the JMACH1 connector. This terminal block may be used as an alternative
power supply connector or to easily measure the voltages applied to the board.
1. 4-pin terminal block, 0.150 pitch
LED Indicators
D1: when this red LED is lit, it indicates that the watchdog timer has tripped and shut down the PMAC.
D2: when this green LED is lit, it indicates that power is applied to the +5V input.
Base Board Hardware Reference Summary 31
Page 38

PMAC2A PC104 Hardware Reference Manual
Base Board Hardware Reference Summary
32
Page 39

PMAC2A PC104 Hardware Reference Manual
ACC-1P HARDWARE REFERENCE SUMMARY
The following information is based on the Acc-1P board, part number 603671-100.
Board Dimensions
Acc-1P Hardware Reference Summary 33
Page 40

PMAC2A PC104 Hardware Reference Manual
Board Layout
1
2
3
4
5
6
BACD E F
Feature Location Feature Location
E0
E1
E2
E3
E4
E5
E6
E7
E16
D6
F1
C6
B2
B2
E4
E4
E5
E5
E5
D1
F6
A1
RP30
RP31
RP36
RP37
RP55
RP56
TB1
JMACH1
JMACH2
JHW / PD
J7
J2
E2
E2
E3
E3
E4
E5
B6
F4
A4
A2
A3
E4
34 Acc-1P Hardware Reference Summary
Page 41

PMAC2A PC104 Hardware Reference Manual
Connectors and Indicators
J2 - Thumbwheel Multiplexer Port (JTHW Port)
The Thumbwheel Multiplexer Port, or Multiplexer Port, on the JTHW connector has eight input lines and
eight output lines. The output lines can be used to multiplex large numbers of inputs and outputs on the
port, and Delta Tau provides accessory boards and software structures (special M-variable definitions) to
capitalize on this feature. Up to 32 of the multiplexed I/O boards may be daisy-chained on the port, in
any combination.
1. 26-pin female flat cable connector T&B Ansley P/N 609-2641
2. Standard flat cable stranded 26-wire T&B Ansley P/N 171.26
3. Phoenix varioface module type FLKM 26 (male pins) P/N 22 81 05 0
J3 - Machine Connector (JMACH1 Port)
The primary machine interface connector is JMACH1, labeled J3 on the PMAC. It contains the pins for
four channels of machine I/O: analog outputs, incremental encoder inputs, amplifier fault and enable
signals and power-supply connections.
1. 50-pin female flat cable connector T&B Ansley P/N 609-5041
2. Standard flat cable stranded 50-wire T&B Ansley P/N 171-50
3. Phoenix varioface module type FLKM 50 (male pins) P/N 22 81 08 9
J4 - Machine Connector (JMACH2 Port)
This machine interface connector is labeled JMACH2 or J4 on the PMAC. It contains the pins for four
channels of machine I/O: end-of-travel input flags, home flag and pulse-and-direction output signals. In
addition, the B_WDO output allows monitoring the state of the Watchdog safety feature.
1. 34-pin female flat cable connector T&B Ansley P/N 609-3441
2. Standard flat cable stranded 34-wire T&B Ansley P/N 171-34
3. Phoenix varioface module type FLKM 34 (male pins) P/N 22 81 06 3
J7 - General-Purpose Digital Inputs and Outputs (JOPT Port)
Acc-1P’s JOPT connector provides eight general-purpose digital inputs and eight general-purpose digital
outputs. Each input and each output has its own corresponding ground pin in the opposite row. The 34pin connector was designed for easy interface to OPTO-22 or equivalent optically isolated I/O modules.
Delta Tau's Acc-21F is a six-foot cable for this purpose.
1. 34-pin female flat cable connector T&B Ansley P/N 609-3441
2. Standard flat cable stranded 34-wire T&B Ansley P/N 171-34
3. Phoenix varioface module type FLKM 34 (male pins) P/N 22 81 06 3
J8 – Handwheel / Pulse and Direction Port (JHW / PD Port)
This port provides an extra encoder input or a set of pulse and direction outputs, and its function is
selectable by jumpers.
1. 10-pin female flat cable connector T&B Ansley P/N 609-1041
2. Standard flat cable stranded 10-wire T&B Ansley P/N 171-10
3. Phoenix varioface module type FLKM 10 (male pins) P/N 22 81 01 8
TB1 – Power Supply Terminal Block (JPWR Connector)
In almost in all cases the PMAC2A PC/104 will be powered from the PC/104 bus when it is installed in a
host computer’s bus, or from the JMACH1 connector. This terminal block may be used as an alternative
power supply connector or to easily measure the voltages applied to the board.
1. 4-pin terminal block, 0.150 pitch
Acc-1P Hardware Reference Summary 35
Page 42

PMAC2A PC104 Hardware Reference Manual
36 Acc-1P Hardware Reference Summary
Page 43

PMAC2A PC104 Hardware Reference Manual
ACC-2P HARDWARE REFERENCE SUMMARY
The following information is based on the Acc-2P board, part number 603672-100.
Board Dimensions
Acc-2P Hardware Reference Summary 37
Page 44

PMAC2A PC104 Hardware Reference Manual
Board Layout
1
2
3
4
5
6
BACD E F
Feature Location Feature Location
E3
E4
E5
E6
E7
E8
E9
E10
RP22
RP23
F4
F3
F1
E6
D1
D1
D2
D2
E3
E3
D2
D6
D7
TB1
J1
JTHW
JOPT
JHW / PD
J10
C6
A5
A6
B6
F6
F2
A2
F4
B5
Acc-2P Hardware Reference Summary
38
Page 45

PMAC2A PC104 Hardware Reference Manual
Connectors and Indicators
J1 – USB Communications Port
This connector provides access to the USB communications feature ordered through Option-1A. See the
Machine Connections section for details on using this port.
J2 - Thumbwheel Multiplexer Port (JTHW Port)
The Thumbwheel Multiplexer Port, or Multiplexer Port, on the JTHW connector has eight input lines and
eight output lines. The output lines can be used to multiplex large numbers of inputs and outputs on the
port, and Delta Tau provides accessory boards and software structures (special M-variable definitions) to
capitalize on this feature. Up to 32 of the multiplexed I/O boards may be daisy-chained on the port, in
any combination.
1. 26-pin female flat cable connector T&B Ansley P/N 609-2641
2. Standard flat cable stranded 26-wire T&B Ansley P/N 171.26
3. Phoenix varioface module type FLKM 26 (male pins) P/N 22 81 05 0
J7 - General-Purpose Digital Inputs and Outputs (JOPT Port)
Acc-2P’s JOPT connector provides eight general-purpose digital inputs and eight general-purpose digital
outputs. Each input and each output has its own corresponding ground pin in the opposite row. The 34pin connector was designed for easy interface to OPTO-22 or equivalent optically isolated I/O modules.
Delta Tau’s Acc-21F is a six-foot cable for this purpose.
1. 34-pin female flat cable connector T&B Ansley P/N 609-3441
2. Standard flat cable stranded 34-wire T&B Ansley P/N 171-34
3. Phoenix varioface module type FLKM 34 (male pins) P/N 22 81 06 3
J8 – Handwheel/Pulse and Direction Port (JHW / PD Port)
This port provides an extra encoder input or a set of pulse and direction outputs and its function is
selectable by jumpers.
1. 10-pin female flat cable connector T&B Ansley P/N 609-1041
2. Standard flat cable stranded 10-wire T&B Ansley P/N 171-10
3. Phoenix varioface module type FLKM 10 (male pins) P/N 22 81 01 8
J10 – Ethernet Communications Port
This connector provides access to the Ethernet communications feature ordered through Option-1B. See
the Machine Connections chapter for details on using this port.
TB1 – Power Supply Terminal Block (JPWR Connector)
In almost in all cases the PMAC2A PC/104 will be powered from the PC/104 bus when it is installed in a
host computer’s bus, or from the JMACH1 connector. This terminal block may be used as an alternative
power supply connector or to easily measure the voltages applied to the board.
1. 4-pin terminal block, 0.150 pitch
LED Indicators
D2: When this green LED is lit, it indicates that power is applied to the +5V input.
D6 – D7: These two LEDs monitor the operation of the Ethernet communications circuitry.
Acc-2P Hardware Reference Summary 39
Page 46

PMAC2A PC104 Hardware Reference Manual
0
Acc-2P Hardware Reference Summary
4
Page 47

PMAC2A PC104 Hardware Reference Manual
BASE BOARD E-POINT JUMPER DESCRIPTIONS
E0: Forced Reset Control
E Point and
Physical Layout
E0
Location Description Default
B3 Factory use only; the board will not operate
with E0 installed.
E1: Servo and Phase Clock Direction Control
E Point and
Physical Layout
E1
If the E1 jumper is ON and the servo and phase clocks are not brought in on the J8
serial port, the watchdog timer will trip immediately.
Location Description Default
B4 Remove jumper for PMAC to use its
internally generated servo and phase clock
signals and to output these signals on the J8
serial port connector.
Jump pins 1 and 2 for PMAC to expect to
receive its servo and phase clock signals on
the J8 serial port connector.
Note:
E2: CPU Frequency Select
No jumper
No jumper installed
E Point and
Physical Layout
E2
Location Description Default
B4 Rem ove jumper for 40 MHz operation (E4
OFF also) or for 80 MHz operation (E4
ON).
Jump pin 1 to 2 for 60 MHz operation (E4
OFF).
E3: Normal/Re-Initializing Power-Up/Reset
E Point and Physical
Layout
E3
Location Description Default
C4 Jump pin 1 to 2 to re-initialize on power-
up/reset, loading factory default settings.
Remove jumper for normal power-up/reset,
loading user-saved settings.
No jumper installed
No jumper installed
Base Board E-Point Jumper Descriptions 41
Page 48

PMAC2A PC104 Hardware Reference Manual
E4: CPU Frequency Select
E Point and
Physical Layout
E4
Location Description Default
C4 Remove jumper for 40 MHz operation (E2
OFF also) or for 60 MHz operation (E4 ON).
Jump pin 1 to 2 for 80 MHz operation (E2
OFF).
E8: Phase Clock Lines Output Enable
E Point and
Physical Layout
E8
Location Description Default
B1 Jump pin 1 to 2 to enable the PHASE clock
line on the J8 connector, allowing
synchronization with another PMAC.
Remove jumper to disable the PHASE clock
line on the J8 connector.
E9: Servo Clock Lines Output Enable
E Point and
Physical Layout
E9
Location Description Default
Jump pin 1 to 2 to enable the SERVO clock
line on the J8 connector, allowing
B1
synchronization with another PMAC.
Remove jumper to disable the SERVO clock
line on the J8 connector.
No jumper installed
(standard or Option 5EF)
Jumper installed (Option
5CF)
No Jumper
No Jumper
E10 – E12: Power-Up State Jumpers
E Point and
Physical Layout
E10
E12
Location Description Default
E5 Remove jumper E10;
Jump E11;
Jump E12;
To read flash IC on power-up/reset
Other combinations are for factory use only ;
the board will not operate in any other
configuration.
No E10 jumper installed;
Jump E11 and E12
Base Board E-Point Jumper Descriptions
42
Page 49

PMAC2A PC104 Hardware Reference Manual
E13: Power-Up/Reset Load Source
E Point and
Physical Layout
E13
Location Description Default
E5 Jump pin 1 to 2 to reload firmware through
serial or bus port.
Remove jumper for normal operation.
E14: Watchdog Disable Jumper
E Point and
Physical Layout
E14
Location Description Default
B3 Jump pin 1 to 2 to disable Watchdog timer
(for test purposes only).
Remove jumper to enable Watchdog timer.
E15A, B, C: Flash Memory Bank Select
E Point and
Physical Layout
E15A
Location Description Default
E4 Remove all 3 jumpers to select flash memory
bank with factory-installed firmware.
Use other configuration to select one of the 7
other flash memory banks.
No jumper
No jumper
No jumpers installed
E15C
E16:
ADC Inputs Enable
E Point and
Physical Layout
E16
Location Description Default
D1 Jump pin 1 to 2 to enable the Option-12
ADC inputs.
Remove jumper to disable the ADC inputs,
which might be necessary for reading
current feedback signals from digita l
amplifiers.
No jumper
Base Board E-Point Jumper Descriptions 43
Page 50

PMAC2A PC104 Hardware Reference Manual
4
E18 – E19: PC/104 Bus Address
E Point and Physical
Layout
E18
E19
Jumper E18 must be removed and jumper E19 must be installed for using either
the Ethernet or USB optional methods of communication.
Location Description
D4
Jumpers E18 and E19 select the PC/104 bus
address for communications according to
the following table:
E18 E19
OFF OFF $200 512
OFF ON $210 528
ON OFF $220 544
ON ON $230 560
Address
(Hex)
Address
(Dec)
Note:
Default
No E18 jumper installed;
Jumper E19 installed
Base Board E-Point Jumper Descriptions
4
Page 51

PMAC2A PC104 Hardware Reference Manual
ACC-1P E-POINT JUMPER DESCRIPTIONS
E0: Reserved for Future Use
E Point and
Physical Layout
E0
Location Description Default
C6 For future use. No jumper
E1 - E2: Machine Output Supply Voltage Configure
E Point and
Physical Layout
E1
E2
Location Description Default
B2 Jump pin 1 to 2 to apply +V (+5V to 24V) to
pin 10 of U7 (should be ULN2803A for sink
output configuration) JOPTO Machine
outputs M01-M08.
Jump pin 2 to 3 to apply GND to pin 10 of
U7 (should be UDN2981A for source output
configuration).
Warning:
The jumper setting must match the type of
driver IC, or damage to the IC will result.
B2 Jump pin 1 to 2 to apply GND to pin 10 of
U7 (should be ULN2803A for sink output
configuration).
Jump pin 2 to 3 to apply +V (+5V to 24V) to
pin 10 of U7 (should be UDN2981A for
source output configuration).
1-2 Jumper installed
1-2 Jumper installed
Warning:
The jumper setting must match the type of
driver IC, or damage to the IC will result.
E3 – E4: JHW, PD Function Select
E Point and
Physical Layout
E3
E4
Acc-1P E-Point Jumper Descriptions 45
Location Description Default
E4 Jump pin 1 to 2 to enable handwheel channel
1 inputs.
Jump pin 2 to 3 to enable pulse and direction
channel 1 outputs.
E4 Jump pin 1 to 2 to enable handwheel channel
2 inputs.
Jump pin 2 to 3 to enable pulse and direction
channel 2 outputs.
1-2 Jumper installed
1-2 Jumper installed
Page 52

PMAC2A PC104 Hardware Reference Manual
E5: Servo Gate Address Select
E Point and
Physical Layout
E5
Location Description Default
E5 Jump pin 1 to 2 to address Acc-1P channels at the
regular addresses for channels 5 to 8.
Jump pin 2 to 3 to address Acc-1P channels at the
regular addresses for channels 5 to 8 plus $40.
E6: I/O Gate Address Select
E Point and
Physical Layout
E6
Location Description Default
E5 Jump pin 1 to 2 to address Acc-1P I/O ports at
the regular addresses.
Jump pin 2 to 3 to address Acc-1P I/O ports at
the regular addresses plus $40.
E7: Machine Input Source/Sink Control
E Point and
Physical Layout
E7
Location Description Default
E5 Jump pin 1 to 2 to apply +5V to input reference
resistor sip pack; this will bias MI1 to MI8 inputs
to +5V for OFF state; input must then be
grounded for ON state.
Jump pin 2 to 3 to apply GND to input reference
resistor sip pack; this will bias MI1 to MI8 inputs
to GND for OFF state; input must then be pulled
up for ON state (+5V to +24V).
1-2 Jumper installed
1-2 Jumper installed
1-2 Jumper installed
E16: ADC Inputs Enable
E Point and
Physical Layout
E16
Location Description Default
D1 Jump pin 1 to 2 to enable the Option-12 ADC
No jumper
inputs.
Remove jumper to disable the ADC inputs,
which might be necessary for reading current
feedback signals from digital amplifiers.
Acc-1P E-Point Jumper Descriptions
46
Page 53

PMAC2A PC104 Hardware Reference Manual
ACC-2P E-POINT JUMPER DESCRIPTIONS
E1: USB/Ethernet Micro-Controller Firmware Reload Enable
E Point and
Physical Layout
E1
Note: This jumper was added on revision –103 and above of the Acc-2P
Location Description Default
Remove jumper to reload firmware on powerup reset.
Jump pin 1 to 2 for normal operations
E3 – E4: JHW, PD Function Select
E Point and
Physical Layout
E3
E4
Location Description Default
F4 Jump pin 1 to 2 to enable handwheel channel
1 inputs.
Jump pin 2 to 3 to enable pulse and direction
channel 1 outputs.
F3 Jump pin 1 to 2 to enable handwheel channel
2 inputs.
Jump pin 2 to 3 to enable pulse and direction
channel 2 outputs.
E5: I/O Gate Address Select
E Point and
Physical Layout
E5
Location Description Default
F1 Jump pin 1 to 2 to address Acc-2P I/O ports at
the regular addresses.
Jump pin 2 to 3 to address Acc-2P I/O ports at
the regular addresses plus $40.
1-2 Jumper Installed
1-2 Jumper installed
1-2 Jumper installed
1-2 Jumper installed
E6: Communications Port Select
E Point and
Physical Layout
E6
Acc-2P E-Point Jumper Descriptions 47
Location Description Default
E6 Jump pin 1 to 2 to enable the PC/104
communications port.
Jump pin 2 to 3 to enable either the USB or
Ethernet communications port.
1-2 Jumper installed
Page 54

PMAC2A PC104 Hardware Reference Manual
E7- E10: Ports Direction Control
E Point and Physical
Layout
E7
E8
E9
E10
Location Description Default
D1 Install jumper to make DATx lines inputs.
No jumper to make DATx lines outputs.
D1 Install jumper to make SELx lines inputs.
No jumper to make SELx lines outputs.
D2 Install jumper to make MOx lines inputs.
No jumper to make MOx lines outputs.
D2 Install jumper to make MIx lines inputs.
No jumper to make MIx lines outputs.
Jumper installed
No jumper
No jumper
Jumper installed
Acc-2P E-Point Jumper Descriptions
48
Page 55

PMAC2A PC104 Hardware Reference Manual
BASE BOARD CONNECTOR PINOUTS
TB1 (JPWR): Power Supply
(4-Pin Terminal Block)
Top View
Pin# Symbol Function Description Notes
1 GND Common Reference Voltage
2 +5V Input Po sitive Supply Voltage Supplies all PMAC digital circuits
3 +12V Input Positive Supply Voltage Ref to digital GND
4 -12V Input Negative Supply Voltage Ref to Digital GND
This terminal block can be used to provide the input for the power supply for the circuits on the PMAC board
when it is not in a bus configuration. When the PMAC is in a bus configuration, these supplies automatically
come through the bus connector from the bus power supply; in this case, this terminal block should not be used.
J4 (JRS232) Serial Port Connector
(10-Pin Connector)
Front View
Pin# Symbol Function Description Notes
1 PHASE Output Phasing Clock
2 DTR Bidirect Data Terminal Ready Tied to "DSR"
3 TXD/ Input Receive Data Host transmit data
4 CTS Input Clear to Send Host ready bit
5 RXD/ Output Send Data Host receive data
6 RTS Output Request to Send PMAC ready bit
7 DSR Bidirect Data Set Ready Tied to "DTR"
8 SERVO Output Servo Clock
9 GND Common PMAC Common
10 +5V Output +5Vdc Supply Power supply out
Base Board Connector Pinouts 49
Page 56

PMAC2A PC104 Hardware Reference Manual
0
J3 (JMACH1): Machine Port Connector
(50-Pin Header)
Top View
Pin# Symbol Function Description Notes
1 +5V Output +5V Power For encoders, 1
2 +5V Output +5V Power For encoders, 1
3 GND Common Digital Common
4 GND Common Digital Common
5 CHA1 Input Encoder A Channel Positive 2
6 CHA2 Input Encoder A Channel Positive 2
7 CHA1/ Input Encoder A Channel Negative 2,3
8 CHA2/ Input Encoder A Channel Negative 2,3
9 CHB1 Input Encoder B Channel Positive 2
10 CHB2 Input Encoder B Channel Positive 2
11 CHB1/ Input Encoder B Channel Negative 2,3
12 CHB2/ Input Encoder B Channel Negative 2,3
13 CHC1 Input Encoder C Channel Positive 2
14 CHC2 Input Encoder C Channel Positive 2
15 CHC1/ Input Encoder C Channel Negative 2,3
16 CHC2/ Input Encoder C Channel Negative 2,3
17 CHA3 Input Encoder A Channel Positive 2
18 CHA4 Input Encoder A Channel Positive 2
19 CHA3/ Input Encoder A Channel Negative 2,3
20 CHA4/ Input Encoder A Channel Negative 2,3
21 CHB3 Input Encoder B Channel Positive 2
22 CHB4 Input Encoder B Channel Positive 2
23 CHB3/ Input Encoder B Channel Negative 2,3
24 CHB4/ Input Encoder B Channel Negative 2,3
25 CHC3 Input Encoder C Channel Positive 2
26 CHC4 Input Encoder C Channel Positive 2
27 CHC3/ Input Encoder C Channel Negative 2,3
28 CHC4/ Input Encoder C Channel Negative 2,3
29 DAC1 Output Analog Output Positive 1 4
30 DAC2 Output Analog Output Positive 2 4
31 DAC1/ Output Analog Output Negative 1 4,5
32 DAC2/ Output Analog Output Negative 2 4,5
33 AENA1/ Output Amplifier-Enable 1
34 AENA2/ Output Amplifier -Enable 2
35 FAULT1/ Input Amplifier -Fault 1 6
36 FAULT2/ Input Amplifier -Fault 2 6
37 DAC3 Output Analog Output Positive 3 4
38 DAC4 Output Analog Output Positive 4 4
39 DAC3/ Output Analog Output Negative 3 4,5
Base Board Connector Pinouts
5
Page 57

PMAC2A PC104 Hardware Reference Manual
J3 JMACH1 (50-Pin Header)
(Continued)
Top View
Pin# Symbol Function Description Notes
40 DAC4/ Output Analog Output Negative 4 4,5
41 AENA3/ Output Amplifier -Enable 3
42 AENA4/ Output Amplifier -Enable 4
43 FAULT3/ Input Amplifier -Fault 3 6
44 FAULT4/ Input Amplifier -Fault 4 6
45 ADCIN_1 Input Analog Input 1 Option-12 required
46 ADCIN_2 Input Analog Input 2 Option-12 required
47 FLT_FLG_V Input Amplifier Fault pull-up V+
48 GND Input Analog Common
49 A+15V Input DACs +15V Supply
50 A-15V Input DACs -15V Supply
The J3 connector is used to connect PMAC to the first 4 channels (Channels 1, 2, 3, and 4) of servo amps
and encoders.
Note 1: In standalone applications, these lines can be used as +5V power supply inputs to power PMAC’s
digital circuitry.
Note 2: Referenced to digital common (GND). Maximum of ±12V permitted between this signal and its
complement.
Note 3: Leave this input floating if not used (i.e. digital single-ended encoders).
Note 4: ±10V, 10 mA max, referenced to common ground (GND).
Note 5: Leave floating if not used. Do not tie to GND.
Note 6: Functional polarity controlled by variable Ix25. Must be conducting to 0V (usually GND) to
produce a 0 in PMAC software. Automatic fault function can be disabled with Ix25.
Base Board Connector Pinouts 51
Page 58

PMAC2A PC104 Hardware Reference Manual
J4 (JMACH2): Machine Port Baseboard
Connector
(34-Pin Header)
Pin# Symbol Function Description Notes
1 FLG_1_2_V Input Flags 1-2 Pull-Up
2 FLG_3_4_V Input Flags 3-4 Pull-Up
3 GND Common Digital Common
4 GND Common Digital Common
5 HOME1 Input Home-Flag 1 10
6 HOME2 Input Home-Flag 2 10
7 PLIM1 Input Positive End Limit 1 8,9
8 PLIM2 Input Positive End Limit 2 8,9
9 MLIM1 Input Negative End Limit 1 8,9
10 MLIM2 Input Negative End Limit 2 8,9
11 USER1 Input User Flag 1
12 USER2 Input User Flag 2
13 PUL_1 Output Pulse Output 1
14 PUL_2 Output Pulse Output 2
15 DIR_1 Output Direction Output 1
16 DIR_2 Output Direction Output 2
17 EQU1 Output Encoder Comp-Equal 1
18 EQU2 Output Encoder Comp-Equal 2
19 HOME3 Input Home-Flag 3 10
20 HOME4 Input Home-Flag 4 10
21 PLIM3 Input Po sitive End Limit 3 8,9
22 PLIM4 Input Positive End Limit 4 8,9
23 MLIM3 Input Negative End Limit 3 8,9
24 MLIM4 Input Negative End Limit 4 8,9
25 USER1 Input User Flag 1
26 USER2 Input User Flag 2
27 PUL_3 Output Pulse Output 3
28 PUL_4 Output Pulse Output 4
29 DIR_3 Output Direction Output 3
30 DIR_4 Output Direction Output 4
31 EQU3 Output Encoder Comp-Equal 3
32 EQU4 Output Encoder Comp-Equal 4
33 B_WDO Output Watchdog Out Indicator/driver
34 No Connect
Note 1: Pins marked PLIMn should be connected to switches at the positive end of travel. Pins marked MLIMn
should be connected to switches at the negative end of travel.
Note 2: Must be conducting to 0V (usually GND) for PMAC to consider itself not into this limit. Automatic limit
function can be disabled with Ix25.
Note 3: Functional polarity for homing or other trigger use of HOMEn controlled by Encoder/Flag Variable I9n2.
HMFLn selected for trigger by Encoder/Flag Variable I9n3. Must be conducting to 0V (usually GND) to
produce a 0 in PMAC software.
Front View
Base Board Connector Pinouts
52
Page 59

PMAC2A PC104 Hardware Reference Manual
ACC-1P CONNECTOR PINOUTS
TB1 (JPWR): Power Supply
(4-Pin Terminal Block)
Top View
Pin# Symbol Function Description Notes
1 GND Common Reference Voltage
2 +5V Input Po sitive Supply Voltage Supplies all PMAC digital
circuits
3 +12V Input Positive Supply Voltage REF to digital GND
4 -12V Input Negative Supply Voltage REF to digital GND
This terminal block can be used to provide the input for the power supply for the circuits on the PMAC
board when it is not in a bus configuration. When the PMAC is in a bus configuration, these supplies
automatically come through the bus connector from the bus power supply; in this case, this terminal block
should not be used.
Acc-1P Connector Pinouts 53
Page 60

PMAC2A PC104 Hardware Reference Manual
4
J2 (JTHW): Multiplexer Port Connector
(26-Pin Connector)
Front View
Pin# Symbol Function Description Notes
1 GND Common PMAC Common
2 GND Common PMAC Common
3 DAT0 Input Data-0 Input Data input from multiplexed accessory
4 SEL0 Output Select-0 Output Multiplexer select output
5 DAT1 Input Data -1 Input Data input from multiplexed accessory
6 SEL1 Output Select -1 Output Multiplexer select output
7 DAT2 Input Data -2 Input Data input from multiplexed accessory
8 SEL2 Output Select -2 Output Multiplexer select outpu t
9 DAT3 Input Data -3 Input Data input from multiplexed accessory
10 SEL3 Output Select -3 Output Multiplexer select output
11 DAT4 Input Data -4 Input Data input from multiplexed accessory
12 SEL4 Output Select -4 Output Multiplexer select output
13 DAT5 Input Data -5 Input Data input from multiplexed accessory
14 SEL5 Output Select -5 Output Multiplexer select output
15 DAT6 Input Data -6 Input Data input from multiplexed accessory
16 SEL6 Output Select -6 Output Multiplexer select output
17 DAT7 Input Data -7 Input Data input from multiplexed accessory
18 SEL7 Output Select -7 Output Multiplexer select output
19 N.C. N.C. No Connection
20 GND Common PMAC Common
21 N.C. Output Buffer Request Low is Buffer Request
22 GND Common PMAC Common
23 N.C. Output In Position Low is In Position
24 GND Common PMAC Common
25 +5V Output +5VDC Supply Power supply out
26 N.C. Input PMAC Reset Low is Reset
The JTHW multiplexer port provides eight inputs and eight outputs at TTL levels. While these I/O can be used
in unmultiplexed form for 16 discrete I/O points, most users will utilize PMAC software and accessories to use
this port in multiplexed form to greatly multiply the number of I/O that can be accessed on this port. In
multiplexed form, some of the SELn outputs are used to select which of the multiplexed I/O are to be accessed.
Acc-1P Connector Pinouts
5
Page 61

PMAC2A PC104 Hardware Reference Manual
J3 (JMACH1): Machine Port Connector
(50-Pin Header)
Top View
Pin# Symbol Function Description Notes
1 +5V Output +5V Power For Encoders, 1
2 +5V Output +5V Power For Encoders, 1
3 GND Common Digital Common
4 GND Common Digital Common
5 CHA5 Input Encoder A Channel Positive 2
6 CHA6 Input Encoder A Channel Positive 2
7 CHA5/ Input Encoder A Channel Negative 2,3
8 CHA6/ Input Encoder A Channel Negative 2,3
9 CHB5 Input Encoder B Channel Positive 2
10 CHB6 Input Encoder B Channel Positive 2
11 CHB5/ Input Encoder B Channel Negative 2,3
12 CHB6/ Input Encoder B Channel Negative 2,3
13 CHC5 Input Encoder C Channel Positive 2
14 CHC6 Input Encoder C Channel Positive 2
15 CHC5/ Input Encoder C Channel Negative 2,3
16 CHC6/ Input Encoder C Channel Negative 2,3
17 CHA7 Input Encoder A Channel Positive 2
18 CHA8 Input Encoder A Channel Positive 2
19 CHA7/ Input Encoder A Channel Negative 2,3
20 CHA8/ Input Encoder A Channel Negative 2,3
21 CHB7 Input Encoder B Channel Positive 2
22 CHB8 Input Encoder B Channel Positive 2
23 CHB7/ Input Encoder B Channel Negative 2,3
24 CHB8/ Input Encoder B Channel Negative 2,3
25 CHC7 Input Encoder C Channel Positive 2
26 CHC8 Input Encoder C Channel Positive 2
27 CHC7/ Input Encoder C Channel Negative 2,3
28 CHC8/ Input Encoder C Channel Negative 2,3
29 DAC5 Output Analog Out Positive 5 4
30 DAC6 Output Analog Out Positive 6 4
31 DAC5/ Output Analog Out Negative 5 4,5
32 DAC6/ Output Analog Out Negative 6 4,5
33 AENA5/ Output Amplifier-Enable 5
34 AENA6/ Output Amplifier -Enable 6
35 FAULT5/ Input Amplifier -Fault 5 6
36 FAULT6/ Input Amplifier -Fault 6 6
37 DAC7 Output Analog Out Positive 7 4
38 DAC8 Output Analog Out Positive 8 4
39 DAC7/ Output Analog Out Negative 7 4,5
Acc-1P Connector Pinouts 55
Page 62

PMAC2A PC104 Hardware Reference Manual
J3 JMACH1 (50-Pin-Header)
(Continued)
Top View
Pin# Symbol Function Description Notes
40 DAC8/ Output Analog Out Negative 8 4,5
41 AENA7/ Output Amplifier-Enable 7
42 AENA8/ Output Amplifier -Enable 8
43 FAULT7/ Input Amplifier -Fault 7 6
44 FAULT8/ Input Amplifier -Fault 8 6
45 ADCIN_1 Input Analog Input 1 Option-2 required
46 ADCIN_2 Input Analog Input 2 Option-2 required
47 FLT_FLG_V Input Amplifier Fault pull-up V+
48 GND Input Analog Common
49 A+15V Input DACs +15V Supply
50 A-15V Input DACs -15V Supply
The J3 connector is used to connect PMAC to the second 4 channels (Channels 5, 6, 7, and 8) of servo amps and
encoders.
Note 1: In standalone applications, these lines can be used as +5V power supply inputs to power PMAC’s
digital circuitry.
Note 2: Referenced to digital common (GND). Maximum of ±12V permitted between this signal and its
complement.
Note 3: Leave this input floating if not used (i.e. digital single-ended encoders).
Note 4: ±10V, 10 mA max, referenced to common ground (GND).
Note 5: Leave floating if not used; do not tie to GND.
Note 6: Functional polarity controlled by variable Ix25. Must be conducting to 0V (usually GND) to produce a
0 in PMAC software. Automatic fault function can be disabled with Ix25.
Acc-1P Connector Pinouts
56
Page 63

PMAC2A PC104 Hardware Reference Manual
J4 (JMACH2): Machine Port
Connector (34-Pin Header)
Pin# Symbol Function Description Notes
1
2
FLG_5_6_V
FLG_7_8_V
3 GND Common Digital Common
4 GND Common Digital Common
5 HOME5 Input Home-Flag 5 10
6 HOME6 Input Home-Flag 6 10
7 PLIM5 Input Positive End Limit 5 8,9
8 PLIM6 Input Positive End Limit 6 8,9
9 MLIM5 Input Negative End Limit 5 8,9
10 MLIM6 Input Negative End Limit 6 8,9
11 USER5 Input User Flag 5
12 USER6 Input User Flag 6
13 PUL_5 Output Pulse Output 5
14 PUL_6 Output Pulse Output 6
15 DIR_5 Output Direction Output 5
16 DIR_6 Output Direction Output 6
17 EQU5 Output Encoder Comp-Equal 5
18 EQU6 Output Encoder Comp-Equal 6
19 HOME7 Input Home Flag 7 10
20 HOME8 Input Home Flag 8 10
21 PLIM7 Input Positive End Limit 7 8,9
22 PLIM8 Input Positive End Limit 8 8,9
23 MLIM7 Input Negative End Limit 7 8,9
24 MLIM8 Input Negative End Limit 8 8,9
25 USER7 Input User Flag 7
26 USER8 Input User Flag 8
27 PUL_7 Output Pulse Output 7
28 PUL_8 Output Pulse Output 8
29 DIR_7 Output Direction Output 7
30 DIR_8 Output Direction Output 8
31 EQU7 Output Encoder Comp-Equal 7
32 EQU8 Output Encoder Comp-Equal 8
33 B_WDO Output Watchdog Out Indicator/Driver
34 No Connect
Note 1: Pins marked PLIMn should be connected to switches at the positive end of travel. Pins marked MLIMn
should be connected to switches at the negative end of travel.
Note 2: Must be conducting to 0V (usually GND) for PMAC to consider itself not into this limit. Automatic limit
function can be disabled with Ix25.
Note 3: Functional polarity for homing or other trigger use of HOMEn controlled by Encoder/Flag Variable I9n2.
HMFLn selected for trigger by Encoder/Flag Variable I9n3. Must be conducting to 0V (usually GND) to
produce a 0 in PMAC software.
Input Flags 5-6 Pull-Up
Input Flags 7-8 Pull-Up
Front View
Acc-1P Connector Pinouts 57
Page 64

PMAC2A PC104 Hardware Reference Manual
J7 (JOPTO): I/O Port Connector
(34-Pin Connector)
Pin# Symbol Function Description Notes
1 MI8 Input Machine Input 8 Low is TRUE
2 GND Common PMAC Common
3 MI7 Input Machine Input 7 Low is TRUE
4 GND Common PMAC Common
5 MI6 Input Machine Input 6 Low is TRUE
6 GND Common PMAC Common
7 MI5 Input Machine Input 5 Low is TRUE
8 GND Common PMAC Common
9 MI4 Input Machine Input 4 Low is TRUE
10 GND Common PMAC Common
11 MI3 Input Machine Input 3 Low is TRUE
12 GND Common PMAC Common
13 MI2 Input Machine Input 2 Low is TRUE
14 GND Common PMAC Common
15 MI1 Input Machine Input 1 Low is TRUE
16 GND Common PMAC Common
17 MO8 Output Machine Output 8 Low-TRUE (Sinking)
High-TRUE (Sourcing)
18 GND Common PMAC Common
19 MO7 Output Machine Output 7 " "
20 GND Common PMAC Common
21 MO6 Output Machine Output 6 " "
22 GND Common PMAC Common
23 MO5 Output Machine Output 5 " "
24 GND Common PMAC Common
25 MO4 Output Machine Output 4 " "
26 GND Common PMAC Common
27 MO3 Output PMAC Common " "
28 GND Common PMAC COMMON
29 MO2 Output Machine Output 2 " "
30 GND Common PMAC Common
31 MO1 Output Machine Output 1 " "
32 GND Common PMAC Common
33 +V Input/Output +V Power I/O +V = +5V to +24V
+5V out from PMAC, +5 to +24V
in from external source, DIODE
isolation from PMAC
34 GND Common PMAC Common
This connector provides means for eight general-purpose inputs and eight general-purpose outputs. Inputs and
outputs may be configured to accept or provide either +5V or +24V signals. Outputs can be made sourcing with
an IC (U7 to UDN2981) and jumper (E1 and E2) change. E7 controls whether the inputs are pulled up or down
internally. Outputs are rated at 100mA per channel.
Front View
Acc-1P Connector Pinouts
58
Page 65

PMAC2A PC104 Hardware Reference Manual
J8 (JHW) Handwheel Encoder Connector
Pin# Symbol Function Description
1 GND Common Reference voltage
2 HWA1+ /
PUL1+
3 HWA1- /
PUL1-
4 HWB1+ /
DIR1+
5 HWB1- /
DIR1-
6 HWA2+ /
PUL2+
7 HWA2- /
PUL2-
8 HWB2+ /
DIR2+
9 HWB2- /
DIR2-
10 +5V Output Supply voltage
Input/Output HW1 Channel A or pulse output selected by jumpers E3 and E4
Input/Output HW 1 Channel A or pulse output selected by jumpers E3 and E4
Input/Output HW 1 Channel B or direction output selected by jumpers E3 and E4
Input/Output HW 1 Channel B or direction output selected by jumpers E3 and E4
Input/Output HW 2 Channel A or pulse output selected by jumpers E3 and E4
Input/Output HW 2 Channel A or pulse output selected by jumpers E3 and E4
Input/Output HW 2 Channel B or direction output selected by E3 and E4
Input/Output HW 2 Channel B or direction output selected by E3 and E4
Acc-1P Connector Pinouts 59
Page 66

PMAC2A PC104 Hardware Reference Manual
Acc-1P Connector Pinouts
60
Page 67

PMAC2A PC104 Hardware Reference Manual
ACC-2P CONNECTOR PINOUTS
TB1 (JPWR): Power Supply
(4-Pin Terminal Block)
Top View
Pin# Symbol Function Description Notes
1 GND Common Reference Voltage
2 +5V Input Po sitive Supply Voltage Supplies all PMAC digital circuits
3 +12V Input Positive Supply Voltage Ref to digital GND
4 -12V Input Negative Supply Voltage Ref TO Digital GND
This terminal block can be used to provide the input for the power supply for the circuits on the PMAC board
when it is not in a bus configuration. When the PMAC is in a bus configuration, these supplies automatically
come through the bus connector from the bus power supply; in this case, this terminal block should not be used.
J1 (USB) Universal Serial Bus Port (Optional)
Pin # Symbol Function
1 VCC N.C.
2 D- DATA-
3 D+ DATA+
4 GND GND
5 SHELL SHIELD
6 SHELL SHIELD
This connector is to be used in conjunction wit h USB A-B cable, which can be purchased from any local
computer store and it is provided when Acc-2P Option 1A is ordered. The A connector is connected to a PC or
Hub device; the B connector plugs into this port.
Acc-2P Connector Pinouts 61
Page 68

PMAC2A PC104 Hardware Reference Manual
J2 (JTHW): Multiplexer Port Connector
(26-Pin Connector)
Pin# Symbol Function Description Notes
1 GND Common PMAC Common
2 GND Common PMAC Common
3 DAT0 Input Data-0 Input Data input from multiplexed accessory
4 SEL0 Output Select-0 Output Multiplexer select output
5 DAT1 Input Data -1 Input Data input from multiplexed accessory
6 SEL1 Output Select -1 Output Multiplexer select output
7 DAT2 Input Data -2 Input Data input from multiplexed accessory
8 SEL2 Output Select -2 Output Multiplexer select output
9 DAT3 Input Data -3 Input Data input from multiplexed accessory
10 SEL3 Output Select -3 Output Multiplexer select output
11 DAT4 Input Data -4 Input Data input from multiplexed accessory
12 SEL4 Output Select -4 Output Multiplexer select output
13 DAT5 Input Data -5 Input Data input from multiplexed accessory
14 SEL5 Output Select -5 Output Multiplexer select output
15 DAT6 Input Data -6 Input Data input from multiplexed accessory
16 SEL6 Output Select -6 Output Multiplexer select output
17 DAT7 Input Data -7 Input Data input from multiplexed accessory
18 SEL7 Output Select -7 Output Multiplexer select output
19 N.C. N.C. No Connection
20 GND Common PMAC Common
21 N.C. Output Buffer Request Low is Buffer Request
22 GND Common PMAC Common
23 N.C. Output In Position Low is In Position
24 GND Common PMAC Common
25 +5V Output +5VDC Supply Power supply out
26 N.C. Input PMAC Reset Low is Reset
The JTHW multiplexer port provides 8 inputs and 8 outputs at TTL levels. While these I/O can be used in
unmultiplexed form for 16 discrete I/O points, most users will utilize PMAC software and accessories to use this
port in multiplexed form to greatly multiply the number of I/O that can be accessed on this port. In multiplexed
form, some of the SELn outputs are used to select which of the multiplexed I/O are to be accessed.
The direction of the input and output lines on this connector are set by jumpers E7 and E8. If E7 is removed or E8 is
installed then the multiplexing feature if the JTHW port cannot be used.
Front View
62 Acc-2P Connector Pinouts
Page 69

PMAC2A PC104 Hardware Reference Manual
J7 (JOPT): I/O Port Connector
(34-Pin Connector)
Pin# Symbol Function Description Notes
1 MI8 Input Machine Input 8 Direction selectable
2 GND Common PMAC Common
3 MI7 Input Machine Input 7 Direction selectable
4 GND Common PMAC Common
5 MI6 Input Machine Input 6 Direction selectable
6 GND Common PMAC Common
7 MI5 Input Machine Input 5 Direction selectable
8 GND Common PMAC Common
9 MI4 Input Machine Input 4 Direction selectable
10 GND Common PMAC Common
11 MI3 Input Machine Input 3 Direction selectable
12 GND Common PMAC Common
13 MI2 Input Machine Input 2 Direction selectable
14 GND Common PMAC Common
15 MI1 Input Machine Input 1 Direction selectable
16 GND Common PMAC Common
17 MO8 Output Machine Output 8 Direction selectable
18 GND Common PMAC Common
19 MO7 Output Machine Output 7 Direction selectable
20 GND Common PMAC Common
21 MO6 Output Machine Output 6 Direction selectable
22 GND Common PMAC Common
23 MO5 Output Machine Output 5 Direction selectable
24 GND Common PMAC Common
25 MO4 Output Machine Output 4 Direction selectable
26 GND Common PMAC Common
27 MO3 Output Machine Output 3 Direction selectable
28 GND Common PMAC Common
29 MO2 Output Machine Output 2 Direction selectable
30 GND Common PMAC Common
31 MO1 Output Machine Output 1 Direction selectable
32 GND Common PMAC Common
33 +5 Output +5 Power I/O
34 GND Common PMAC Common
This connector provides means for 16 general-purpose inputs or outputs at TTL levels. The direction of the input
and output lines on this connector are set by jumpers E9 and E10. Further software settings are required to
configure this port. See the Software Setup section for details.
Front View
Acc-2P Connector Pinouts 63
Page 70

PMAC2A PC104 Hardware Reference Manual
J8 (JHW) Handwheel Encoder Connector
Pin# Symbol Function Description
1 GND Common Reference voltage
2 HWA1+ / PUL1+ Input/Output HW1 channel A or pulse output selected by jumpers E3 and E4
3 HWA1- / PUL1- Input/Output HW1 channel a or pulse output selected by jumpers E3 and E4
4 HWB1+ / DIR1+ Input/Output HW1 channel b or direction output selected by jumpers E3 and E4
5 HWB1- / DIR1- Input/Output HW1 channel b or direction output selected by jumpers E3 and E4
6 HWA2+ / PUL2+ Input/Output HW2 channel a or pulse output selected by jumpers E3 and E4
7 HWA2- / PUL2- Input/Output HW2 channel a or pulse output selected by jumpers E3 and E4
8 HWB2+ / DIR2+ Input/Output HW2 channel b or direction output selected by jumpers E3 and E4
9 HWB2- / DIR2- Input/Output HW2 channel b or direction output selected by jumpers E3 and E4
10 +5V Output Supply voltage
J10 Ethernet Port (Optional)
Pin # Function
1 TXD+
2 TXD3 RXD+
4 No Connect
5 No Connect
6 RXD7 No Connect
8 No Connect
9 No Connect
10 No Connect
This connector is used for Ethernet communications from the Acc-2P to a PC, and it is provided when Acc-2P
Option 1B is ordered. The appropriate Category 5 10/100-Base T network cable that mates to this connector can
be readily purchased from any local computer store. The type of network cable to purchase depends on the
configuration to the host PC.
When making a direct connection to a Host communication Ethernet card in a PC a cat 5 networking crossover
cable must be used. A standard cat 5 straight through networking cable cannot be used in this scenario. When
using a connection to a network hub or switch, the standard cat 5 straight through networking cable must be used,
and not a crossover cable.
64 Acc-2P Connector Pinouts
 Loading...