

Page 1
^1 INSTALLATION MANUAL
^2 Geo Direct PWM Amplifier
^3 Direct PWM Amplifier
^4 500-603700-xIxx
^5 November 15, 2013
Single Source Machine Control
……………………………………………..…...……………….
Power // Flexibility // Ease of Use
21314 Lassen St. Chatsworth, CA 91311 // Tel. (818) 998-2095 Fax. (818) 998-7807 // www.deltatau.com
Page 2
Copyright Information
WARNING
A Warning identifies hazards that could result in personal injury
or death. It precedes the discussion of interest.
Caution
A Caution identifies hazards that could result in equipment damage. It
precedes the discussion of interest.
Note
A Note identifies information critical to the understanding or use of
the equipment. It follows the discussion of interest.
© 2013 Delta Tau Data Systems, Inc. All rights reserved.
This document is furnished for the customers of Delta Tau Data Systems, Inc. Other uses
are unauthorized without written permission of Delta Tau Data Systems, Inc.
Information contained in this manual may be updated from time-to-time due to product
improvements, etc., and may not conform in every respect to former issues.
To report errors or inconsistencies, call or email:
Delta Tau Data Systems, Inc. Technical Support
Phone: (818) 717-5656
Fax: (818) 998-7807
Email: support@deltatau.com
Website: http://www.deltatau.com
Operating Conditions
All Delta Tau Data Systems, Inc. motion controller products, accessories, and amplifiers
contain static sensitive components that can be damaged by incorrect handling. When
installing or handling Delta Tau Data Systems, Inc. products, avoid contact with highly
insulated materials. Only qualified personnel should be allowed to handle this
equipment.
In the case of industrial applications, we expect our products to be protected from
hazardous or conductive materials and/or environments that could cause harm to the
controller by damaging components or causing electrical shorts. When our products are
used in an industrial environment, install them into an industrial electrical cabinet or
industrial PC to protect them from excessive or corrosive moisture, abnormal ambient
temperatures, and conductive materials. If Delta Tau Data Systems, Inc. products are
directly exposed to hazardous or conductive materials and/or environments, we cannot
guarantee their operation.
Page 3

REVISION HISTORY
REV.
DESCRIPTION
DATE
CHANGE
APPROVAL
1
Added Power On/Off procedures,
Power PMAC section,
Refurbished entire manual
11/15/2013
RN
RN
Page 4

Geo Direct PWM Amplifier
Table of Contents
INTRODUCTION .....................................................................................................................6
SPECIFICATIONS ...................................................................................................................7
PART NUMBER .............................................................................................................................7
ENVIRONMENTAL SPECIFICATIONS ...............................................................................................7
ELECTRICAL SPECIFICATIONS .......................................................................................................8
230 VAC Drives – Single Axis .................................................................................................8
230 VAC Drives – Dual Axis...................................................................................................9
480 VAC Drives – Single Axis ............................................................................................... 10
480 VAC Drives – Dual Axis................................................................................................. 11
RECEIVING AND UNPACKING ......................................................................................... 12
USE OF EQUIPMENT .................................................................................................................... 12
MOUNTING, PHYSICAL LAYOUT .................................................................................... 13
GPX012 ..................................................................................................................................... 14
Low Profile, Single Width, No Fan ....................................................................................... 14
GPL032 .................................................................................................................................... 15
Single Width, No Fan............................................................................................................ 15
GPX05X, GPX102, GPL101, GPH032 ........................................................................................ 16
Single Width with Fan .......................................................................................................... 16
GPX201, GPX301, GPX152, GPH102 ........................................................................................ 17
Double Width, Two Fans ...................................................................................................... 17
CONNECTOR PINOUTS AND WIRING ............................................................................. 18
J1: MAIN BUS POWER INPUT ...................................................................................................... 18
Recommended Main Bus Power Wiring/Protection ............................................................... 19
Recommended Bus Power Fuse and Wire Gauge ................................................................ .. 22
J4: 24 VDC LOGIC CONTROL ..................................................................................................... 23
J2 – J3: MOTOR WIRING ............................................................................................................. 24
Motor Cable, Noise Elimination ........................................................................................... 25
Motor Selection .................................................................................................................... 26
J5: EXTERNAL SHUNT RESISTOR ................................................................................................. 28
Recommended Shunt Resistors ................................ .............................................................. 29
Shunt Resistor Layout ................................................................................................ ........... 30
X1 – X2: PWM CONNECTORS .................................................................................................... 31
X3: DISCRETE I/O FOR MOTOR THERMALS ................................................................................. 32
X4: SAFETY RELAY.................................................................................................................... 33
POWER ON/OFF PROCEDURES ........................................................................................ 34
Cycling Main Bus Power ...................................................................................................... 34
Table Of Contents 4
Page 5

Geo Direct PWM Amplifier
PWM FREQUENCY .............................................................................................................. 36
POWER PMAC3 DRIVE SETUP .......................................................................................... 37
KEY GATE PARAMETERS ............................................................................................................ 37
KEY CHANNEL PARAMETERS ..................................................................................................... 38
POWER PMAC2 DRIVE SETUP .......................................................................................... 40
KEY GATE PARAMETERS ............................................................................................................ 40
KEY CHANNEL PARAMETERS ..................................................................................................... 41
TURBO PMAC2 DRIVE SETUP ........................................................................................... 43
KEY GATE PARAMETERS ............................................................................................................ 43
KEY CHANNEL PARAMETERS ..................................................................................................... 44
DRIVE COMMAND STRUCTURE ...................................................................................... 46
DEFAULT MODE ......................................................................................................................... 46
ENHANCED MODE ...................................................................................................................... 47
TROUBLESHOOTING .......................................................................................................... 49
LED STATUS ............................................................................................................................. 49
7-SEGMENT DISPLAY ................................................................................................................. 49
Error Codes.......................................................................................................................... 50
APPENDIX A: CABLE/CONNECTOR KITS ...................................................................... 52
PWM CABLES ........................................................................................................................... 52
CONNECTOR KITS ...................................................................................................................... 52
CABLE KITS ............................................................................................................................... 53
Table Of Contents 5
Page 6

Geo Direct PWM Amplifier
INTRODUCTION
The Geo Direct PWM amplifiers provide a 1- or 2-axis motor power using highly integrated IGBT based
power circuitry. They support a wide variety of motors and power ranges. The Geo Direct PWM
amplifiers interface directly with Delta Tau’s PMAC2 or PMAC3 style digital ASICs, typically found in
the axis expansion cards inside a Turbo or Power UMAC rack.
The Geo Direct PWM Drive takes the actual power-transistor on/off signals from PMAC, while providing
digital phase-current feedback and status for closed-loop operation. The interface to the direct PWM
amplifier is through a standard 36-pin Mini-D style cable.
The Geo Direct PWM amplifiers are capable of driving brush, brushless, or induction motors. They
operate in the 100 VAC – 480 VAC (156 – 678 DC) range at 50/60Hz, while providing full protection:
Over voltage
Under voltage
Over temperature
PWM frequency limit
Motor over temperature input
Short circuit (phase – phase)
Over current
Safety relay circuit
Introduction 6
Page 7
Geo Direct PWM Amplifier
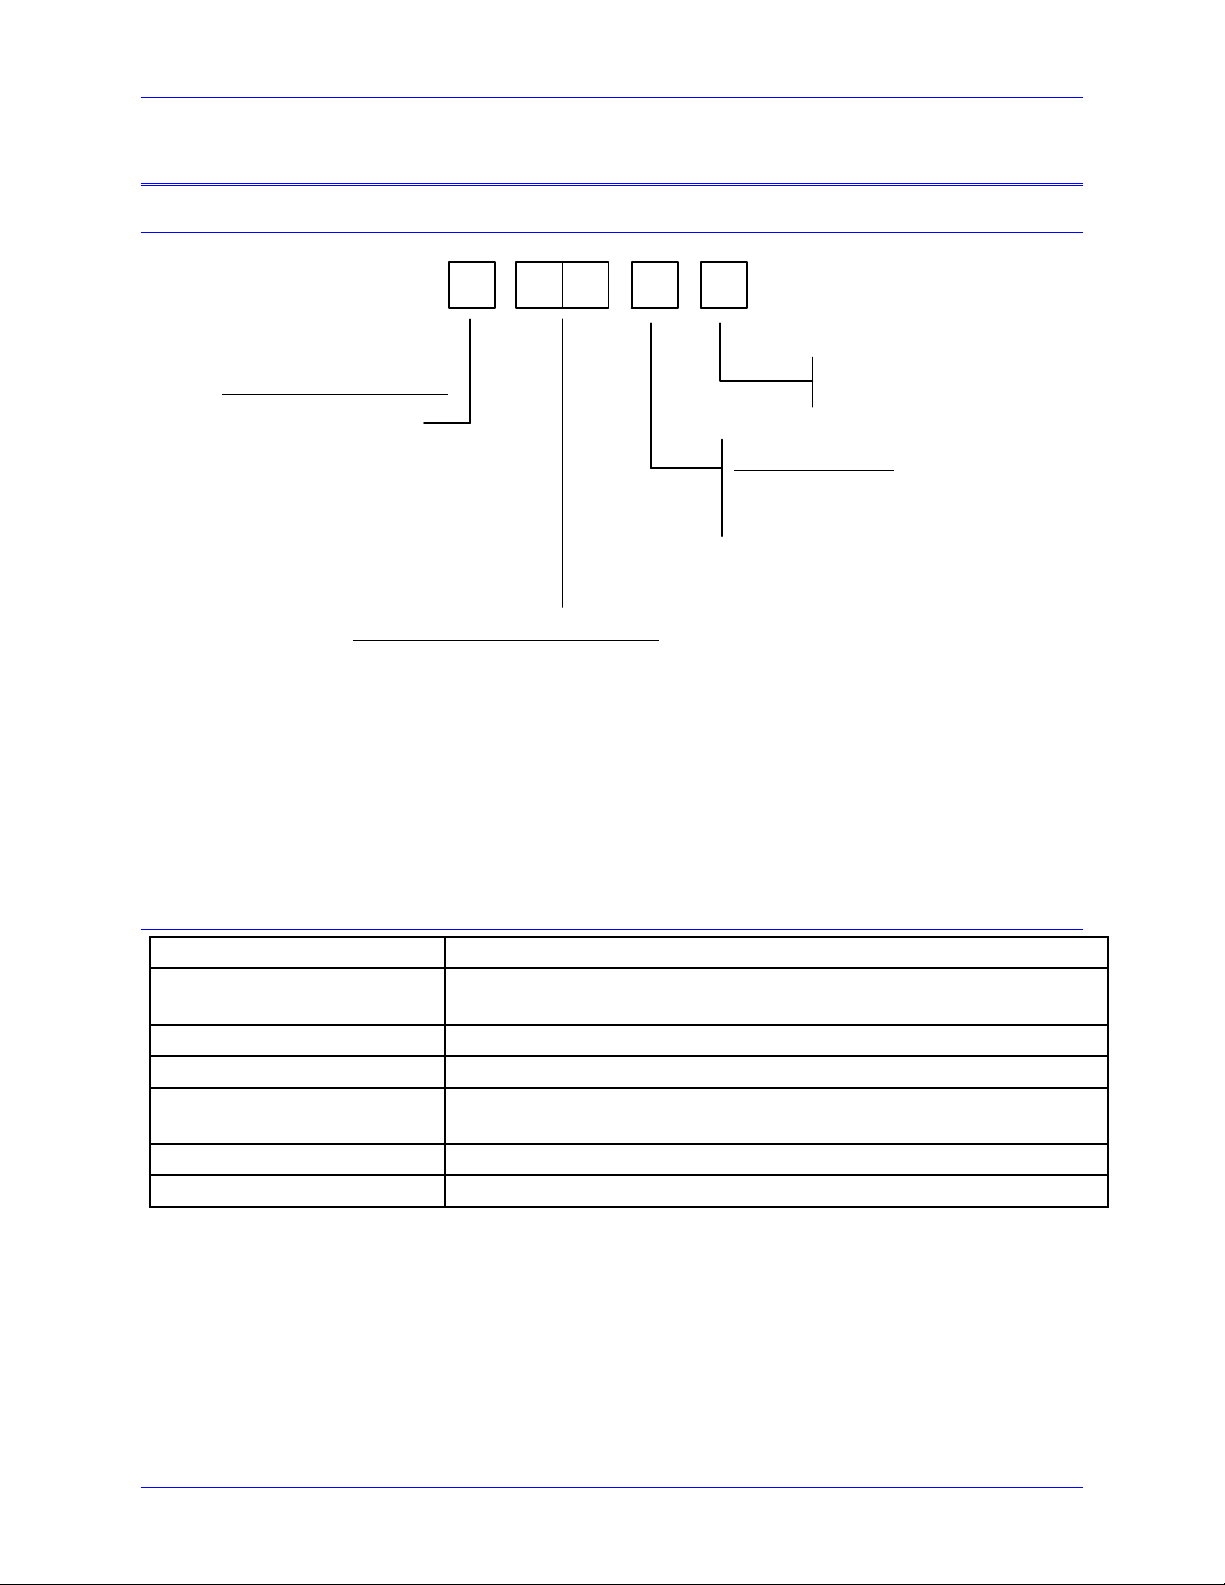
Main AC Voltage Input:
L = 115 - 230 VAC
H = 300 - 480 VAC
Number of Axes:
1 = Single Axis
2 = Dual Axis
P
Continuous/Peak Current Rating (Sinusoidal Amp rms)
G 0 0 0
0 = No Safety Relay
1 = Safety Relay
01 = 1.5 / 4.5
03 = 3 / 9
05 = 5 / 10
10 = 10 / 20
15 = 15 / 30
20 = 20 / 40
30 = 30 / 60
Description
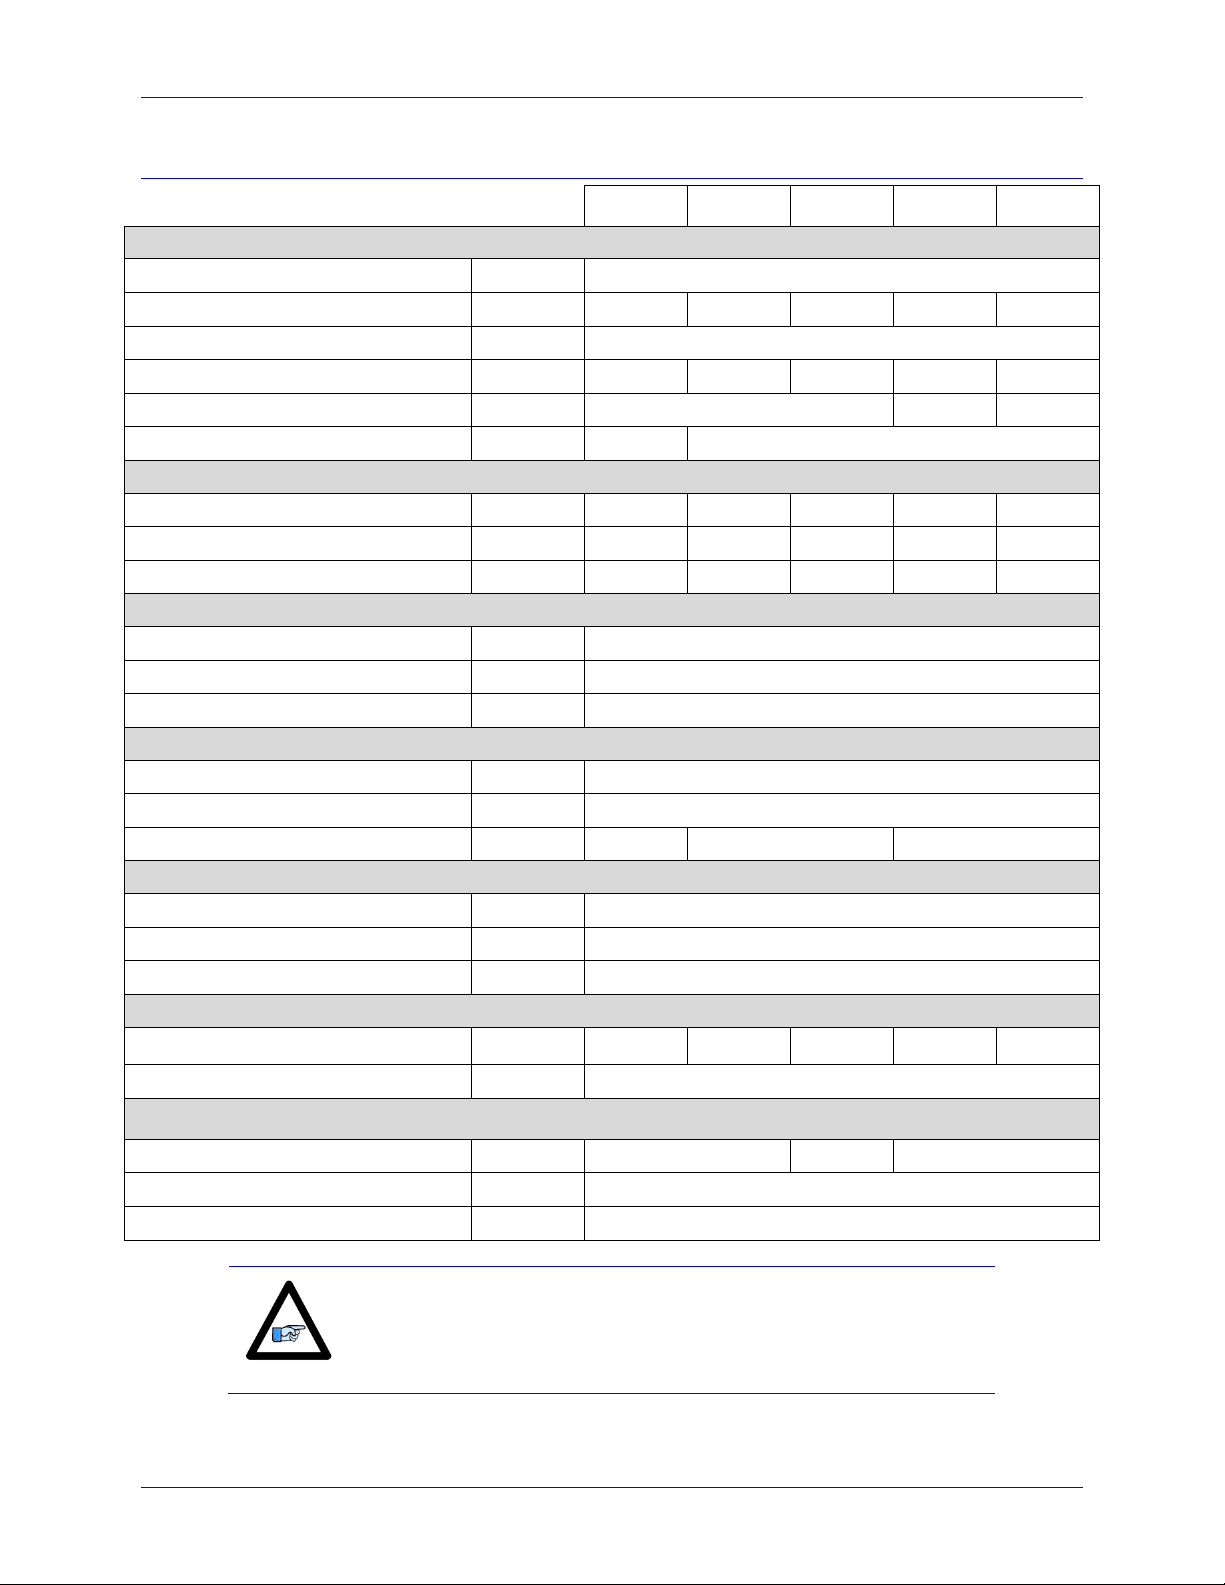
Specifications
Operating Temperature
0 to 45°C
Above 45°C,de-rate current output by 2.5% per °C
Storage Temperature
-25°C to +70°C
Humidity
10% to 90% non-condensing
Operating Altitude
~3300 Feet (1000 m)
De-rate current output by 1.1% per additional 330 feet (100m)
Air Flow Clearances
~3 inches (76.2mm) above and below unit for air flow
Operating Environment
Pollution Degree 2 or equivalent
SPECIFICATIONS
Part Number
Environmental Specifications
Specifications 7
Page 8
Geo Direct PWM Amplifier
230 VAC Drives – Single Axis
GxL051
GxL101
GxL151
GxL201
GxL301
Main Input Power
Main AC Input
[VAC rms]
110
-20%
– 240
+10%
(~87 – 264)
Rated Input Current @ 240VAC 3
[A rms]
3.3
6.6
9.9
13.2
19.8
Frequency
[Hz]
50/60 Hz
Rated Input Power
[Watts]
1315
2629
3944
5259
7888
Main Bus Capacitance
[µf]
3380
5020
6800
AC Input Phase Requirement
1Φ or 3Φ
3Φ
Output
Continuous Current Output per Axis
[A rms]
5
10
15
20
30
Peak Current Output per Axis @ 2 sec
[A rms]
10
20
30
40
60
Power Output per Axis
[Watts]
1195
2390
3585
4780
7171
Bus Protection
Nominal DC Bus
[VDC]
325
Over-Voltage Trip Level
[VDC]
410
Under-Voltage Lockout Level
[VDC]
137
Shunt Resistor
Shunt Turn-On Voltage
[VDC]
392
Shunt Turn-Off Voltage
[VDC]
372
Shunt Resistor (300 W max)
GAR78
GAR48
GAR48-3
Logic Power
Input Voltage
[VDC]
20 – 27
Input Current
[A rms] 2 Inrush Current
[A]
4
Current Feedback
Full Scale Reading
[A]
16.26
32.53
48.79
65.05
97.58
Resolution
[bits]
12
Transistor Control
Recommended PWM Frequency
[KHz]
12
10 8 Minimum Dead time
[µs]
1
Charge Pump Time (% of PWM Period)
5
Note
All values are at ambient temperature of 0 – 45°C (113 F) unless
otherwise stated.
Electrical Specifications
Specifications 8
Page 9

Geo Direct PWM Amplifier
230 VAC Drives – Dual Axis
GxL012
GxL032
GxL052
GxL102
GxL152
Main Input Power
Main AC Input
[VAC rms]
110
-20%
– 240
+10%
(~87 – 264)
Rated Input Current @ 240VAC 3
[A rms]
1.98
3.96
6.6
13.2
19.8
Frequency
[Hz]
50/60 Hz
Rated Input Power
[Watts]
789
1578
2629
5259
7888
Main Bus Capacitance
[µf]
3380
5020
AC Input Phase Requirement
1Φ or 3Φ
3Φ
Output
Continuous Current Output per Axis
[A rms]
1.5 3 5
10
15
Peak Current Output per Axis @ 2 sec
[A rms]
4.5 9 10
20
30
Power Output per Axis
[Watts]
359
717
1195
2390
3585
Bus Protection
Nominal DC Bus
[VDC]
325
Over-Voltage Trip Level
[VDC]
410
Under-Voltage Lockout Level
[VDC]
137
Shunt Resistor
Shunt Turn-On Voltage
[VDC]
392
Shunt Turn-Off Voltage
[VDC]
372
Shunt Resistor (300 W max)
GAR78
GAR48
Logic Power
Input Voltage
[VDC]
20 – 27
Input Current
[A rms] 2 Inrush Current
[A]
4
Current Feedback
Full Scale Reading
[A]
7.32
14.64
16.26
32.53
48.79
Resolution
[bits]
12
Transistor Control
Recommended PWM Frequency
[KHz]
16
12
10
Minimum Dead time
[µs]
1
Charge Pump Time (% of PWM Period)
5
Note
All values are at ambient temperature of 0–45°C (113 F) unless
otherwise stated.
Specifications 9
Page 10

Geo Direct PWM Amplifier
480 VAC Drives – Single Axis
GxH051
GxH101
GxH151
GxH201
GxH301
Main Input Power
Main AC Input
[VAC rms]
375
-20%
– 480
+10%
(~300 – 525)
Rated Input Current
[A rms]
3.3
6.6
9.9
13.2
19.8
Frequency
[Hz]
50/60 Hz
Rated Input Power
[Watts]
2744
5487
8231
10974
16461
Main Bus Capacitance
[µf]
845
1255
1700
AC Input Phase Requirement
1Φ or 3Φ
3Φ
Output
Continuous Current Output per Axis
[A rms]
5
10
15
20
30
Peak Current Output per Axis @ 2 sec
[A rms]
10
20
30
40
60
Power Output per Axis
[Watts]
2494
4988
7482
9977
14965
Bus Protection
Nominal DC Bus
[VDC]
678
Over-Voltage Trip Level
[VDC]
828
Under-Voltage Lockout Level
[VDC]
137
Shunt Resistor
Shunt Turn-On Voltage
[VDC]
784
Shunt Turn-Off Voltage
[VDC]
744
Shunt Resistor (300 W max)
GAR78
GAR48
GAR48-3
Logic Power
Input Voltage
[VDC]
20 – 27
Input Current
[A rms] 2 Inrush Current
[A]
4
Current Feedback
Full Scale Reading
[A]
16.26
32.53
48.79
65.05
97.58
Resolution
[bits]
12
Transistor Control
Recommended PWM Frequency
[KHz]
12
10 8 Minimum Dead time
[µs]
1.6
Charge Pump Time (% of PWM Period)
5
Note
All values are at ambient temperature of 0–45°C (113 F) unless
otherwise stated.
Specifications 10
Page 11
Geo Direct PWM Amplifier
480 VAC Drives – Dual Axis
GxH012
GxH032
GxH052
GxH102
GxH152
Main Input Power
Main AC Input
[VAC rms]
375
-20%
– 480
+10%
(~300 – 525)
Rated Input Current @ 240VAC 3
[A rms]
1.98
3.96
6.6
13.2
19.8
Frequency
[Hz]
50/60 Hz
Rated Input Power
[Watts]
1646
3292
5487
10974
16461
Main Bus Capacitance
[µf]
845
1255
AC Input Phase Requirement
1Φ or 3Φ
3Φ
Output
Continuous Current Output per Axis
[A rms]
1.5 3 5
10
15
Peak Current Output per Axis @ 2 sec
[A rms]
4.5 9 10
20
30
Power Output per Axis
[Watts]
748
1496
2494
4988
7482
Bus Protection
Nominal DC Bus
[VDC]
678
Over-Voltage Trip Level
[VDC]
828
Under-Voltage Lockout Level
[VDC]
137
Shunt Resistor
Shunt Turn-On Voltage
[VDC]
784
Shunt Turn-Off Voltage
[VDC]
744
Shunt Resistor (300 W max)
GAR78
GAR48
Logic Power
Input Voltage
[VDC]
20 – 27
Input Current
[A rms] 2 Inrush Current
[A]
4
Current Feedback
Full Scale Reading
[A]
7.32
14.64
16.26
32.53
48.79
Resolution
[bits]
12
Transistor Control
Recommended PWM Frequency
[KHz]
12
10 8 Minimum Dead time
[µs]
1.6
Charge Pump Time (% of PWM Period)
5
Note
All values are at ambient temperature of 0–45°C (113 F) unless
otherwise stated.
Specifications 11
Page 12

Geo Direct PWM Amplifier
RECEIVING AND UNPACKING
Delta Tau products are thoroughly tested at the factory and carefully packaged for shipment. When the
Geo Direct PWM Drive is received, there are several things to be done immediately:
Observe the condition of the shipping container and report any damage immediately to the
commercial carrier that delivered the drive.
Remove the drive from the shipping container and remove all packing materials. Check all shipping
material for connector kits, documentation, or other small pieces of equipment. Be aware that some
connector kits and other equipment pieces may be quite small and can be accidentally discarded if
care is not used when unpacking the equipment. The container and packing materials may be retained
for future shipment.
Verify that the part number of the drive received is the same as the part number listed on the purchase
order.
Inspect the drive for external physical damage that may have been sustained during shipment and
report any damage immediately to the commercial carrier that delivered the drive.
Electronic components in this product are design-hardened to reduce static sensitivity. However, use
proper procedures when handling the equipment.
If the Geo Direct PWM Drive is to be stored for several weeks before use, be sure that it is stored in a
location that conforms to published storage humidity and temperature specifications.
Use of Equipment
The following restrictions will ensure the proper use of the Geo Direct PWM Drive:
The components built into electrical equipment or machines can be used only as integral components
of such equipment.
The Geo Direct PWM Drive must not be operated on power supply networks without a ground or
with an asymmetrical ground.
If the Geo Direct PWM Drive is used in residential areas, or in business or commercial premises,
implement additional filtering measures.
The Geo Direct PWM Drive may be operated only in a closed switchgear cabinet, taking into account
the ambient conditions defined in the environmental specifications.
Delta Tau guarantees the conformance of the Geo Direct PWM Drives with the standards for industrial
areas stated in this manual, only if Delta Tau components (cables, controllers, etc.) are used.
Receiving and Unpacking 12
Page 13

Geo Direct PWM Amplifier
Caution
Unit must be installed in an enclosure that meets the environmental IP
rating of the end product (ventilation or cooling may be necessary to
prevent enclosure ambient from exceeding 45° C [113° F]).
MOUNTING, PHYSICAL LAYOUT
The location of the Geo Direct PWM Drive is important. Installation should be in an area that is
protected from direct sunlight, corrosives, harmful gases or liquids, dust, metallic particles, and other
contaminants. Exposure to these can reduce the operating life and degrade performance of the drive.
Several other factors should be carefully evaluated when selecting a location for installation:
For effective cooling and maintenance, the Geo Direct PWM Drive should be mounted on a
smooth, non- flammable vertical surface.
At least 76 mm (3 inches) top and bottom clearance must be provided for air flow. At least 10
mm (0.4 inches) clearance is required between units (each side).
Temperature, humidity and Vibration specifications should also be taken in account.
The Geo Direct PWM Drive can be mounted with a traditional 4-hole panel mount, two U shape/notches
on the bottom and two pear shaped holes on top.
If multiple Geo Direct PWM Drives are used, they can be mounted side-by-side, leaving at least a 122
mm clearance between drives. This means a 122 mm center-to-center distance (0.4 inches) with the 4axis Drives. 8- and 6-axis Geo Direct PWM Drives can be mounted side by side at 214 mm center-tocenter distance (8.4 inches). It is extremely important that the airflow is not obstructed by the placement
of conduit tracks or other devices in the enclosure.
If the drive is mounted to a back panel, the back panel should be unpainted and electrically conductive to
allow for reduced electrical noise interference. The back panel should be machined to accept the
mounting bolt pattern of the drive.
The Geo Direct PWM Drive can be mounted to the back panel using four M4 screws and internal-tooth
lock washers. It is important that the teeth break through any anodization on the drive’s mounting gears
to provide a good electrically conductive path in as many places as possible. Mount the drive on the back
panel so there is airflow at both the top and bottom areas of the drive (at least three inches).
Mounting, Physical Layout 13
Page 14
Geo Direct PWM Amplifier
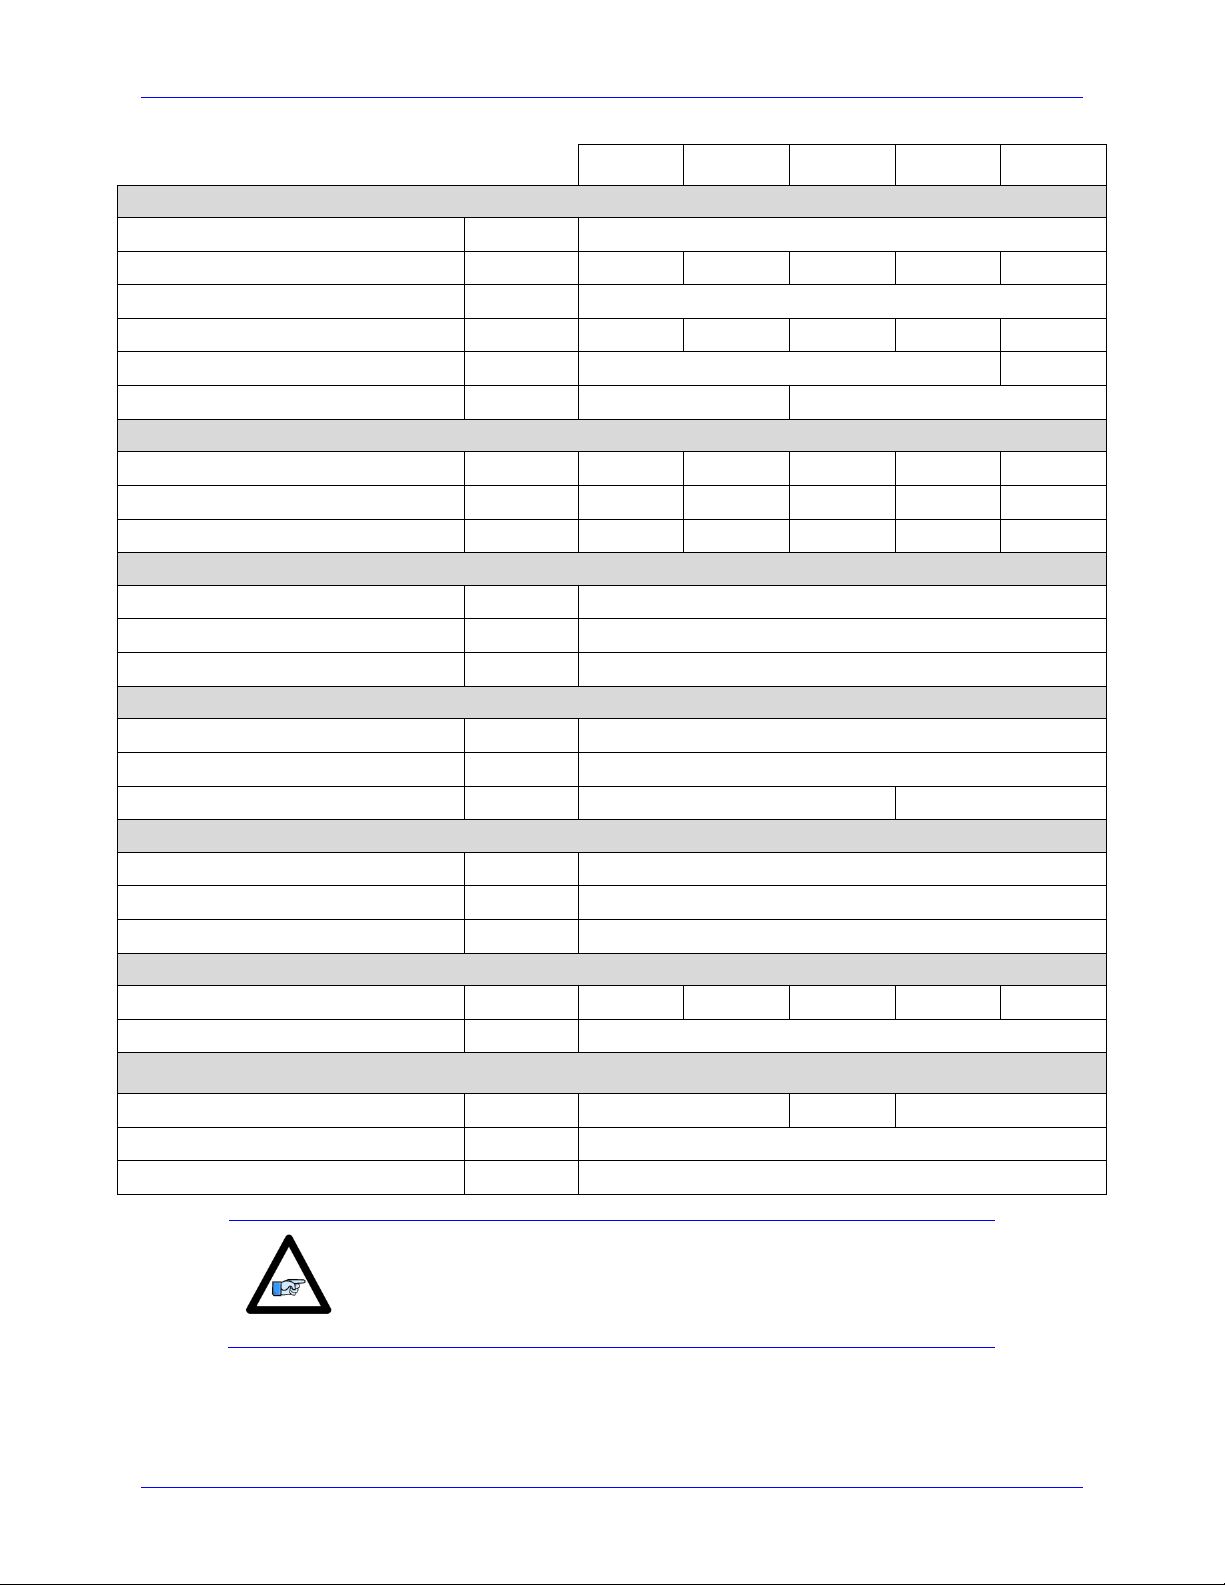
Width
Height
Depth
Weight
3.30 in. / 84 mm
11.00 in. / 280 mm
5.80 in. / 147 mm
4.2 lbs / 1.9 kgs
GATE ENABLE
DELTA TAU
Data Systems, Inc.
24VDC INPUT (J4)
L2
AC INPUT (J1)
L1
24VDC
+24VDC
RET
L3
DISCRETE I/O (X3)
Wait 5 minutes after
N/A
(X4)
SAFETY RELAY (X4)
before servicing unit.
removing power
WARNING:
HIGH VOLTAGE!
RELAY COMM
RELAY WB
RELAY WA
RELAY N/O
NOT USED
MTR1 PTC RET
MTR2 PTC RET
24V RET
MTR1 PTC
MTR2 PTC
Residual Voltage.
WARNING!
INPUT 1
DC BUS
AMP
STATUS
(D1)
SHUNT
ENABLE 1
+5V
ENABLE 2
(X1)
PWM
INPUT 2
PWM
(X2)
EXT SHUNT (J5)
REGEN -
REGEN +
MOTOR 2 (J3)
W V U
MOTOR 1 (J2)
W V U
10.625”
(269.875 mm)
2.7”
(68.6 mm)
9.875”
(250.825 mm)
3.3”
(83.82 mm)
5.79”
(147.066 mm)
GPx012
Low Profile, Single Width, No Fan
Mounting, Physical Layout 14
Page 15
Geo Direct PWM Amplifier
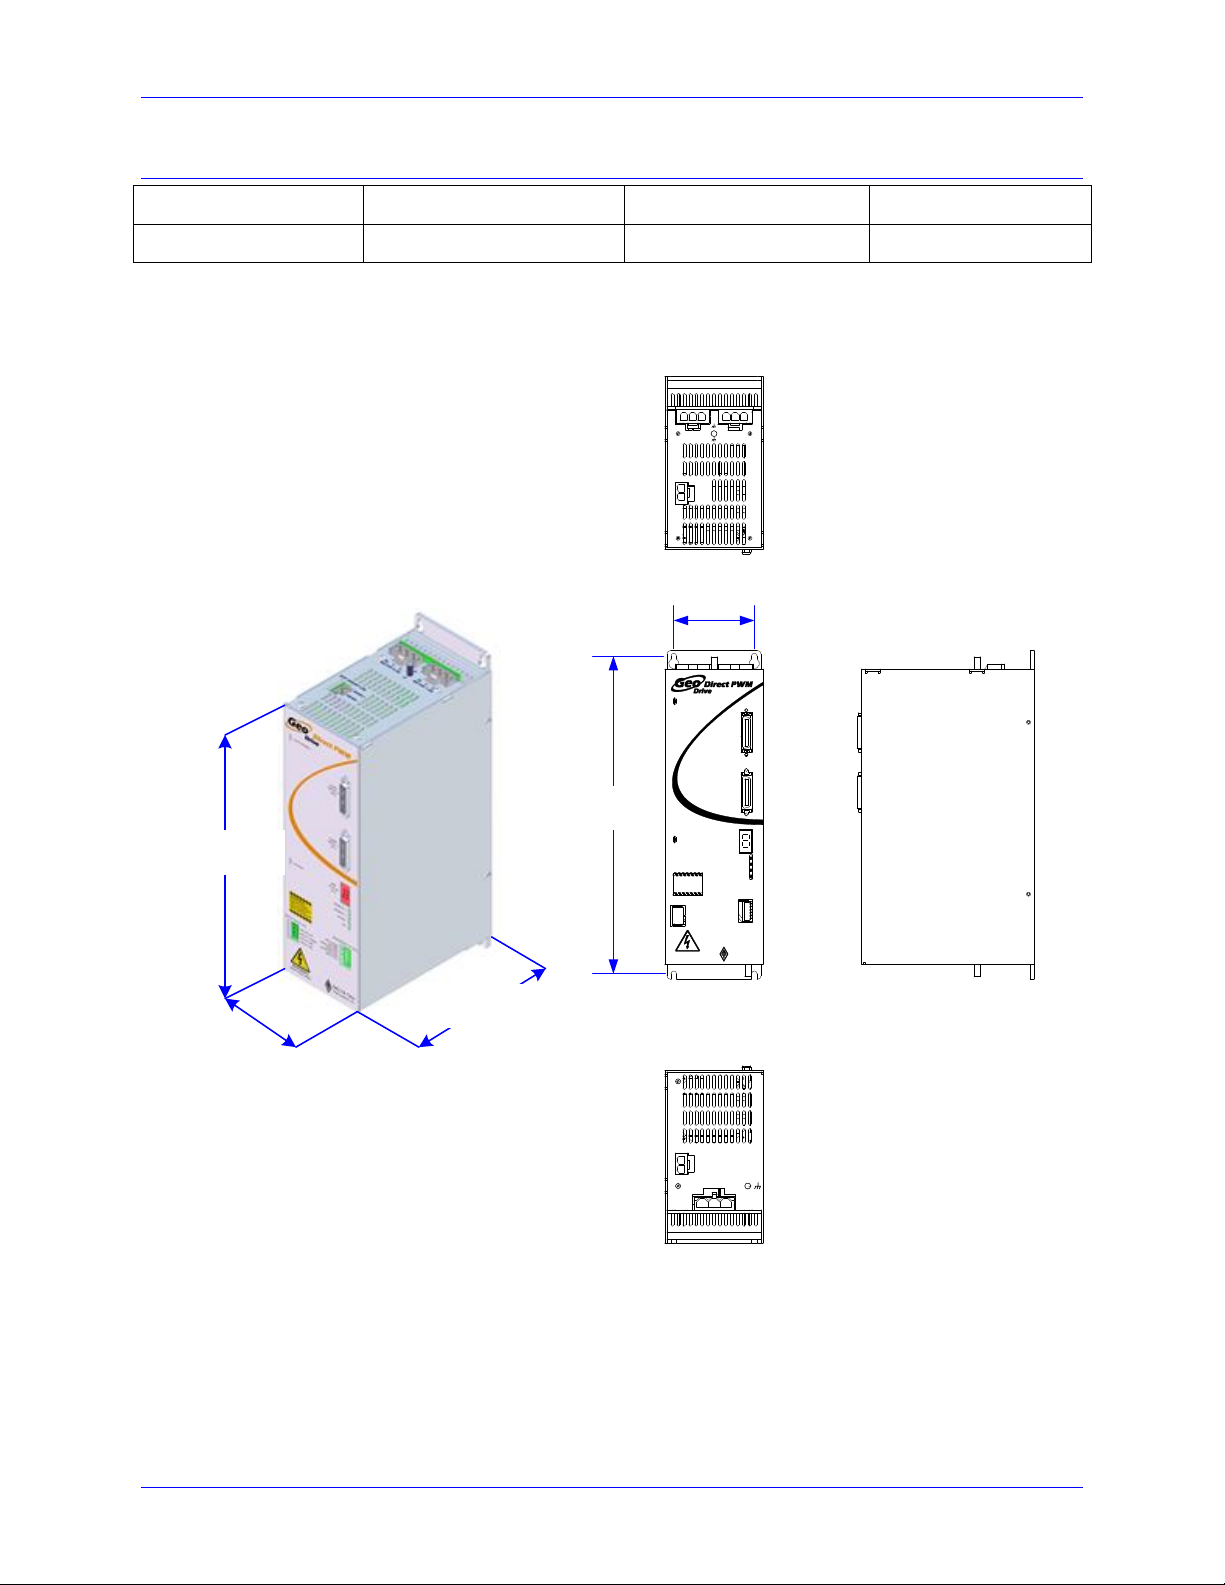
Width
Height
Depth
Weight
3.30 in./ 84 mm
11.00 in./ 280 mm
8.00 in./ 203 mm
5.4 lbs/ 2.45 kgs
L1
24VDC
+24VDC
24VDC INPUT (J4)
L2
AC INPUT (J1)
L3
RET
EXT SHUNT (J5)
REGEN +
REGEN -
MOTOR 2 (J3)
W V
MOTOR 1 (J2)
U W UV
GATE ENABLE
DELTA TAU
Data Systems, Inc.
DISCRETE I/O (X3)
Wait 5 minutes after
N/A
(X4)
SAFETY RELAY (X4)
before servicing unit.
removing power
WARNING:
HIGH VOLTAGE!
RELAY COMM
RELAY WB
RELAY WA
RELAY N/O
NOT USED
MTR1 PTC RET
MTR2 PTC RET
24V RET
MTR1 PTC
MTR2 PTC
Residual Voltage.
WARNING!
INPUT 1
DC BUS
AMP
STATUS
(D1)
SHUNT
ENABLE 1
+5V
ENABLE 2
(X1)
PWM
INPUT 2
PWM
(X2)
10.625”
(269.875 mm)
2.7”
(68.6 mm)
9.875”
(250.825 mm)
3.3”
(83.82 mm)
5.79”
(147.066 mm)
GPL032
Single Width, No Fan
Mounting, Physical Layout 15
Page 16
Geo Direct PWM Amplifier
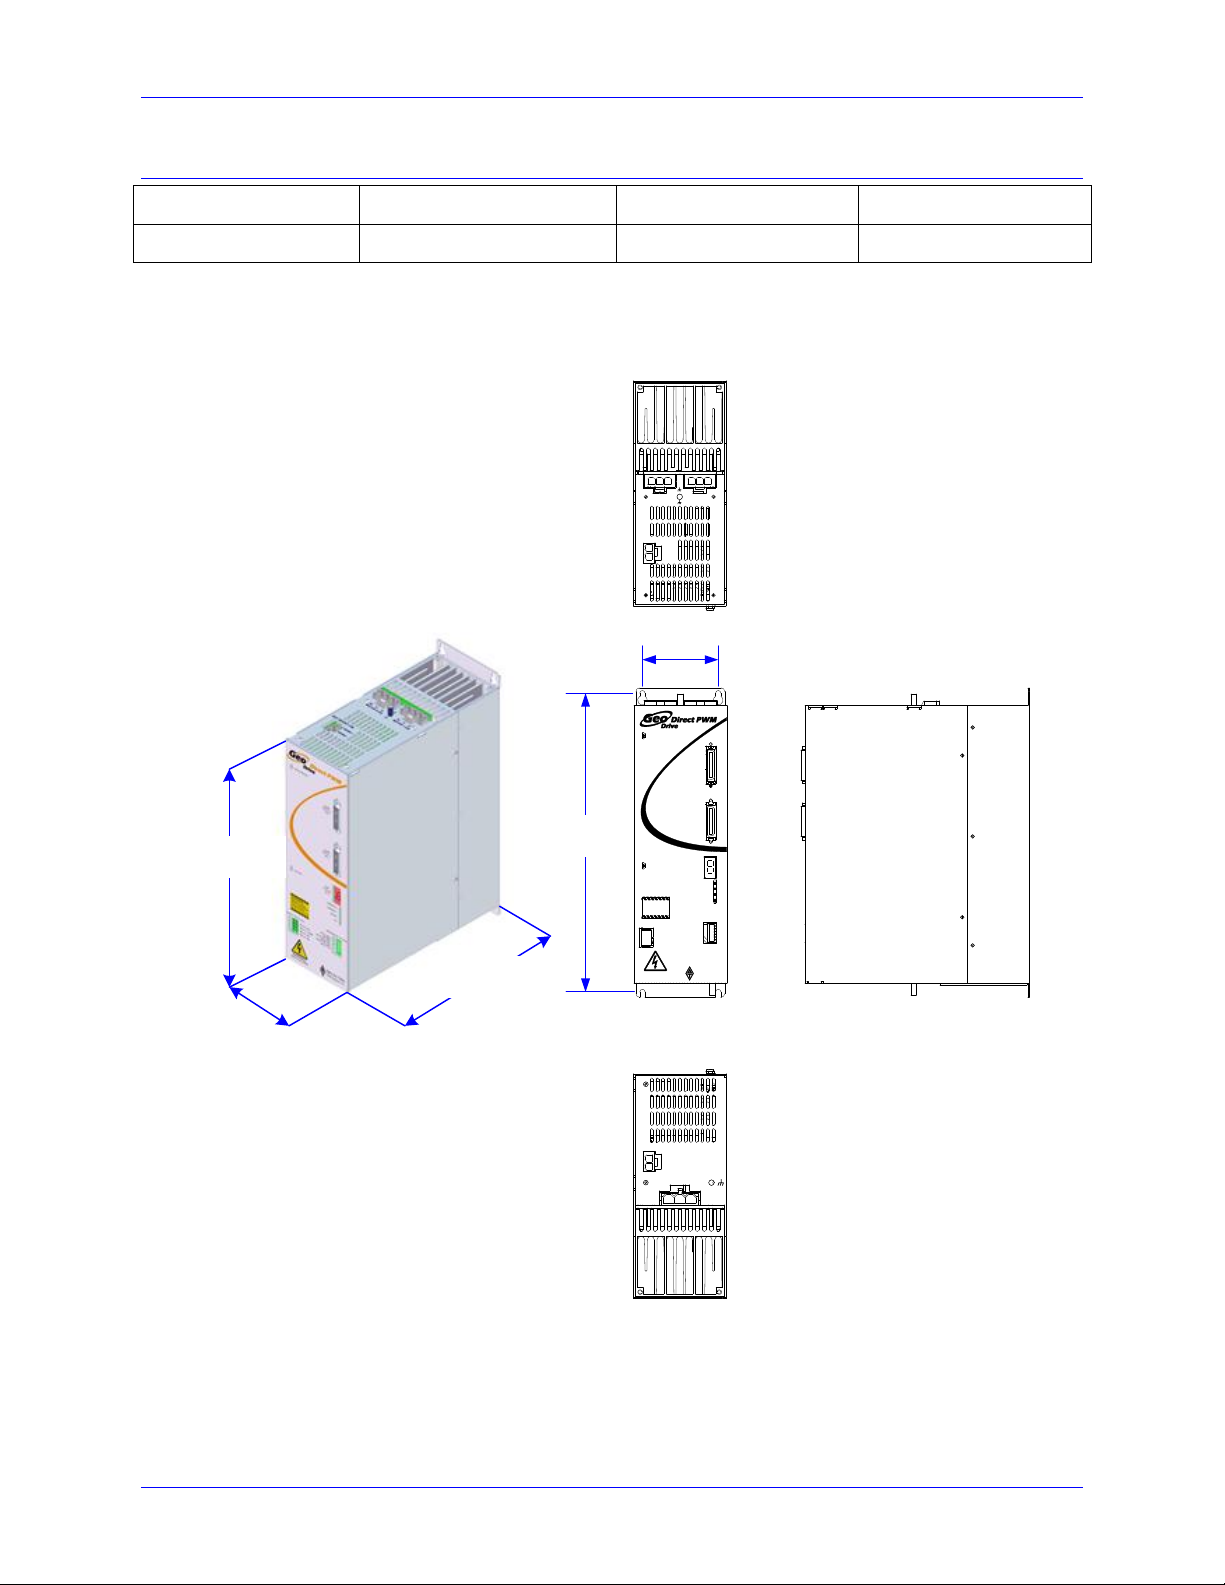
Width
Height
Depth
Weight
3.30 in./ 84 mm
11.00 in./ 280 mm
8.00 in./ 203 mm
5.5 lbs/ 2.5 kgs
AC INPUT (J1)
L2
L1
24VDC INPUT (J4)
+24VDC
RET
24VDC
L3
EXT SHUNT (J5)
REGEN -
REGEN +
MOTOR 2 (J3)
W V U
MOTOR 1 (J2)
W V U
GATE ENABLE
DELTA TAU
Data Systems, Inc.
DISCRETE I/O (X3)
Wait 5 minutes after
N/A
(X4)
SAFETY RELAY (X4)
before servicing unit.
removing power
WARNING:
HIGH VOLTAGE!
RELAY COMM
RELAY WB
RELAY WA
RELAY N/O
NOT USED
MTR1 PTC RET
MTR2 PTC RET
24V RET
MTR1 PTC
MTR2 PTC
Residual Voltage.
WARNING!
INPUT 1
DC BUS
AMP
STATUS
(D1)
SHUNT
ENABLE 1
+5V
ENABLE 2
(X1)
PWM
INPUT 2
PWM
(X2)
10.625”
(269.875 mm)
2.7”
(68.6 mm)
9.875”
3.3”
(83.82 mm)
5.79”
(147.066 mm)
GPx05x, GPx102, GPL101, GPH032
Single Width with Fan
Mounting, Physical Layout 16
Page 17

Geo Direct PWM Amplifier
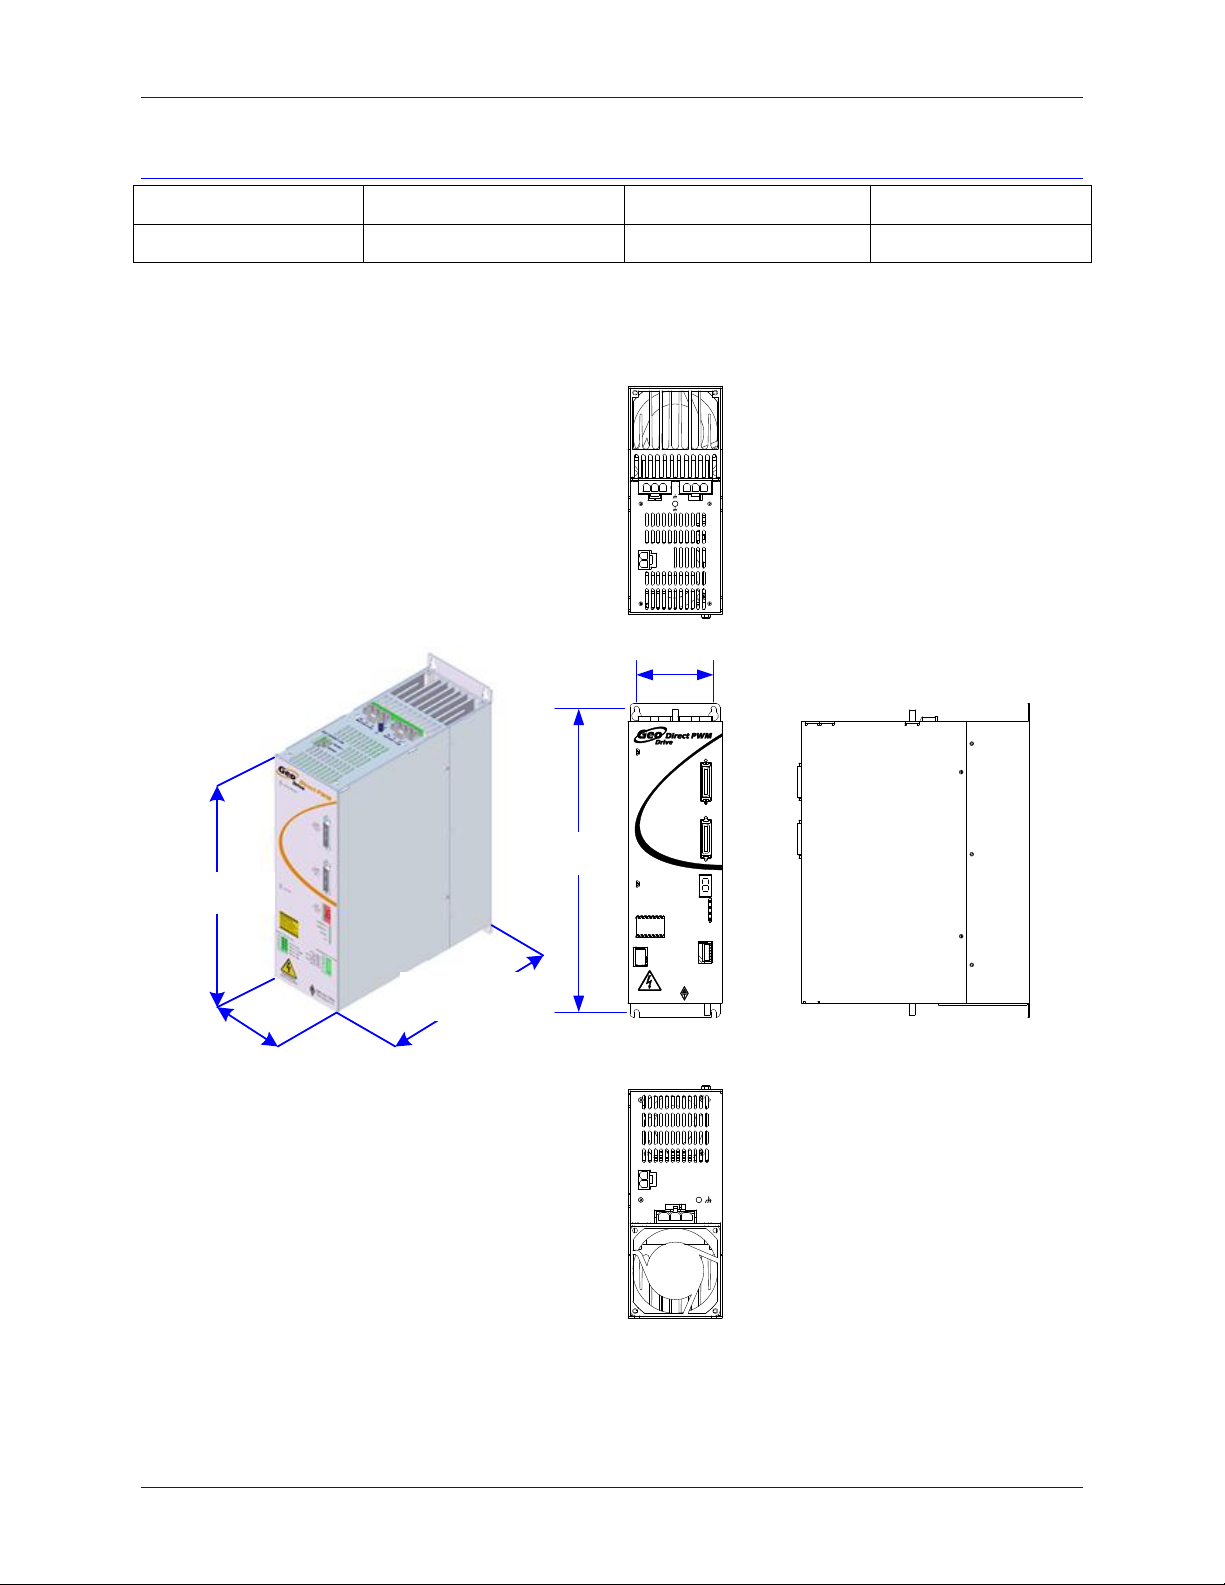
Width
Height
Depth
Weight
6.50 in./ 165 mm
11.00 in./ 280 mm
8.00 in./ 203 mm
11.5 lbs/ 5.2 kgs
5.860”
(148.844 mm)
10.625”
(269.875 mm)
8”
(203.2 mm)
6.46”
(164.084 mm)
9.875”
(250.825 mm)
GPx201, GPx301, GPx152, GPH102
Double Width, Two Fans
Mounting, Physical Layout 17
Page 18

Geo Direct PWM Amplifier
WARNING
Installation of electrical control equipment is subject to many
regulations including national, state, local, and industry guidelines
and rules. General recommendations can be stated but it is
important that the installation be carried out in accordance with
all regulations pertaining to the installation.
J1: Molex 3-pin Female
Mating: Molex 3-pin Male
L1
L2
L3
Tie Ground to
chassis stud
Pin #
Symbol
Function
Three Phase
Single Phase
DC
1
L3
Input
AC Line Phase 3
Line
DC+
2
L2
Input
AC Line Phase 2
Neutral
DC Return
3
L1
Input
AC Line Phase 1
Not connected
Not connected
DT Housing pn: 014-H00F03-049
DT Pins pn: 014-042815-0031
Molex housing pn: 42816-0312
Molex pins pn: 42815-0031
GPx201 and GPx301
J1: Molex 4-pin Female
Mating: Molex 4-pin Male
L3
L2
L1
GND
Pin #
Symbol
Function
Three Phase
Single Phase
DC
1
L3
Input
AC Line Phase 3
Line
DC+
2
L2
Input
AC Line Phase 2
Neutral
DC Return
3
L1
Input
AC Line Phase 1
Not connected
Not connected
4
GND
Common Ground
DT Housing pn: 014-H00F04-049
DT Pins pn: 014-042815-0031
Molex housing pn: 42816-0412
Molex pins pn: 42815-0031
CONNECTOR PINOUTS AND WIRING
J1: Main Bus Power Input
J1 is used to bring the main AC/DC bus power into the Geo Direct PWM Drive.
Connector PinOuts and Wiring 18
Page 19

Geo Direct PWM Amplifier
Note
AC input wires must be twisted together to eliminate as much noise
radiation as possible.
Caution
Main bus power lines should run in a separate duct (at least 12” or 30
cm away) from and should never be bundled with the I/O signal,
communication, or encoder cables.
Recommended Main Bus Power Wiring/Protection
Grounding, Bonding
System grounding is crucial for proper performance of the Geo Direct PWM Drive. Panel wiring requires
that a central earth-ground (also known as ground bus bar) location be installed at one part of the panel.
The ground bus bar is usually a copper plate directly bonded to the back panel. This electrical ground
connection allows for each device within the enclosure to have a separate wire brought back to the central
earth-ground.
Motor shields are best grounded at both ends of the cable. Motor cable shields should be
bonded to the back panel using 360-degree clamps at the point they enter or exit the panel.
Always use metal shells.
Implement a star point ground connection scheme; so that each device wired to earth ground
has its own conductor brought directly back to the central earth ground plate (bus bar).
Use an unpainted back panel. This allows a wide area of contact for all metallic surfaces,
reducing frequency impedances.
Use a heavy gauge ground earth conductors made up of many strands of fine conducts.
The Geo Direct PWM Drive is brought to the earth-ground via one or two wire(s) connected
to the M4 mounting stud(s) through a heavy gauge multi-strand conductor to the central
earth-ground.
Connector PinOuts and Wiring 19
Page 20

Geo Direct PWM Amplifier
Three-Phase Main AC Power Wiring Diagram
3-PHASE
TRANSFORMER
110-240 VAC
GND L1 L2 L3
PROTECTION EARTH
FUSE
FUSE
FUSE
MAGNETIC
CONTACTOR
L1
L2
L3
GND
Shielded
And
Twisted
EMC/EMI
FILTER
Phase-Phase
Voltage
Suppressors
Single-Phase Main AC Power Wiring Diagram
GND
Neutral
Line
PROTECTION EARTH
FUSE
FUSE
MAGNETIC
CONTACTOR
L2
L3
GND
Shielded
And
Twisted
EMC/EMI
FILTER
Phase-Phase
Voltage
Suppressors
Single Phase Source
110-240 VAC
Note
If the Geo Direct PWM Drive model does not have a ground pin on
the bus input connector, then the transformer ground (GND) can be
tied to the grounding stud or chassis ground.
Connector PinOuts and Wiring 20
Page 21

Geo Direct PWM Amplifier
Note
A line reactor should be installed if a transformer or reliable source of
power is not available. Line reactors suppress harmonics bidirectionally, eliminating low frequency spikes.
Transformers
Y-Y or Y- transformers should be used.
- Transformers are NOT advised. They try to balance phases dynamically, creating instances of
instability in the Geo Direct PWM Drive’s rectifying circuitry.
Fuses
High peak currents and high inrush currents demand the use of slow blow time delayed type fuses.
RK1 or RK5 (i.e. current limiting) classes are recommended. FRN-R and LPN-RK from Cooper
Bussmann or similar fuses can be used.
Magnetic Contactors
SC-E series from Fuji Electric or similar contactor can be used.
Line Filters
Line filters eliminate electromagnetic noise in a bi-directional manner (from and into the system).
T type filters are NOT recommended. PI type line filters are highly advised:
Filter should be mounted on the same panel as the drive and power source.
Filter should be mounted as close as possible to the power source.
Filter should be mounted as close as possible to incoming cabinet power.
FN-258 series from Schaffner or similar filter can be used.
Voltage Suppressors
Voltage suppressors eliminate undesirable voltage spikes typically generated by the magnetic contactor or
external machinery in the plant.
This 3-phase voltage arrester from Phoenix Contact or similar suppressor can be used.
Connector PinOuts and Wiring 21
Page 22

Geo Direct PWM Amplifier
Model
GPL01
2
GPL03
2
GPL05
1
GPL05
2
GPL10
1
GPL10
2
GPL15
1
GPL15
2
GPL20
1
GPL30
1
GPH01
2
GPH03
2
GPH05
1
GPH05
2
GPH10
1
GPH10
2
GPH15
1
GPH15
2
GPH20
1
GPH30
1
Fuse
(FRN/LPN
)
15
20
25
30
15
20
25
30
Wire
Gauge
14
12
10 8 14
12
25
30
Note
All ground conductors should be 8AWG minimum using wires
constructed of many strands of small gauge wire. This ensures the
lowest impedance to high-frequency noises.
Recommended Bus Power Fuse and Wire Gauge
Geo Drive electronics create a DC bus by rectifying the incoming AC lines. The current flow into the
drive is not sinusoidal but rather a series of narrow, high-peak pulses. Keep the incoming impedance
small so that these current pulses are not hindered. Conductor size, transformer size, and fuse size
recommendations may seem larger than normally expected.
Connector PinOuts and Wiring 22
Page 23

Geo Direct PWM Amplifier
J4: Molex 2-pin Female
Mating: Molex 2-pin Male
+24VDC
24VDC RET
Pin #
Symbol
Function
Description
Notes
1
24VDC RET
Common
Control power return
2
+24VDC
Input
Control power input
24V+/-10%, @ 2A
DT Housing pn: 014-000F02-HSG
DT Pins pn: 014-043375-001
Molex housing pn: 44441-2002
Molex pins pn: 43375-0001
Note
This connection can be made using 16 AWG wire.
J4: 24 VDC Logic Control
J4 is used to bring the 24VDC logic power into the Geo Direct PWM Drive. This power can remain on,
regardless of the main AC/DC bus power input, allowing the digital control electronics to be active while
the main motor power control is passive.
It is recommended to use a protected power supply. In situations where the power supply is shared with
other devices, it may be desirable to insert a filter before applying it to the Geo Direct PWM Drive.
If multiple drives are driven out of the same 24VDC power supply, it is recommended that each Geo
Direct PWM Drive be wired back to the power supply terminals independently. It is also recommended
that the power supply be sized to handle the instantaneous inrush current required to start up the DC-toDC converter action inside the Drive(s). See electrical specifications.
Connector PinOuts and Wiring 23
Page 24

Geo Direct PWM Amplifier
J2 – J3: Molex 3-Pin Female
Mating: Molex 3-Pin Male
W
V
U
Tie ground and shield
to chassis stud
Symbol
Function
Description
U
Motor Output
Axis 1 Phase 1
V
Motor Output
Axis 1 Phase 2
W
Motor Output
Axis 1 Phase 3
DT Housing pn: 014-H00F03-049
DT Pins pn: 014-042815-0031
Molex housing pn: 42816-0312
Molex pins pn: 42815-0031
GPx201, GPx301
J2 – J3: Molex 4-pin Female
Mating: Molex 4-pin Male
GND
W
V
U
Symbol
Function
Description
U
Motor Output
Axis 1 Phase 1
V
Motor Output
Axis 1 Phase 2
W
Motor Output
Axis 1 Phase 3
GND
Ground
DT Housing pn: 014-H00F04-049
DT Pins pn: 014-042815-0031
Molex housing pn: 42816-0412
Molex pins pn: 42815-0031
Note
The Geo Direct PWM Drive endorses the U, V, and W nomenclature
for phases 1 through 3 respectively. Some motor manufacturers will
call them A, B, and C. Others may call them L1, L2, and L3.
Note
For wiring DC brush motors, use phases U and W, and leave V
floating.
J2 – J3: Motor Wiring
The cable wiring must be shielded and have a separate conductor connecting the motor frame back to the
Geo Direct PWM Drive’s chassis.
Connector PinOuts and Wiring 24
Page 25

Geo Direct PWM Amplifier
Note
The motor thermostats are brought in through connector X3.
U
V
W
GND
Tie cable shield to
shield stud or chassis ground
Motor Cable
Motor Cable, Noise Elimination
The Geo Direct PWM Drives’ voltage output has a fundamental frequency and amplitude that
corresponds to motor speed, torque, and number of poles. The Geo Direct PWM Drive produces higher
frequency voltage components corresponding to the rise, fall and repetition rate of the fast switching
PWM signals. Subsequently, it could naturally couple current noise to nearby conductors. This electrical
coupling can be problematic, especially in noise-sensitive applications such as using high-resolution
sinusoidal encoders, or high rate of communication which could suffer from Electro-Magnetic
Interference EMI. Proper grounding, shielding, and filtering can alleviate most noise issues. Some
applications may require additional measures such as PWM edge filters. The following; are general
guidelines for proper motor cabling:
Use a motor cable with high quality shield. A combination braid-and-foil is best.
The motor drain wires and cable shield should be tied together, and attached at both ends
of the motor and Geo Direct PWM Drive chassis. At the motor end, make a 360 degree
connection between the shield and motor frame. If the motor has a metal shell connector, then
you can tie the shield directly to the metal shell of the mating connector. The connection between
the cable shield and the motor frame should be as short as possible). At the Geo Direct PWM
Drive end, make a 360 degree connection between the shield and the provided studs or grounded
chassis (protection earth) at the M4 mounting screws.
The motor cable should have a separate conductor (drain wire) tying the motor frame to the
Geo Direct PWM drive’s chassis.
Keep the motor cable as short as possible to maintain lower capacitance (desirable). A
capacitance of up to 50 PicoFarads per foot (0.3048 m), and runs of up to 200 feet (60 m) are
acceptable with 240VAC. Exceeding these lengths requires the installation of a Snubber at the
motor end or an in-series inductor at the Geo Direct PWM Drive end.
If the grounding/shielding techniques are insufficient, you may install chokes in the motor
phases at the Geo Direct PWM Drive end such as wrapping individual motor leads several
times through a ferrite core ring. DigiKey, Micro-Metals (T400-26D), Fair Rite (2643540002), or
equivalent ferrite cores are recommended. This adds high-frequency impedance to the outgoing
motor cable thereby making it harder for high-frequency noise to leave the control area.
Connector PinOuts and Wiring 25
Page 26

Geo Direct PWM Amplifier
Note
Ferrite cores are also commonly used with lower inductance motors to
enhance compatibility with the Geo Direct PWM Drive, which is
specified to a minimum of 2 mH.
Do not use a motor wire gauge less than 14 AWG for 5/10A or 8/16A axes, and 10 AWG for
15/30A or 30/60A axes unless otherwise specified by the motor manufacturer. Refer to Motor
manufacturer and local code recommendations.
Avoid running sensitive signal cables (i.e. encoders, small signal transducers) in the same cable
bundle as the motor cable(s).
Install dv/dt filter, Trans-coil V1K series (Optional).
Motor Selection
The Geo Direct PWM Drive interfaces with a wide variety of motors. It supports virtually any kind of
three-phase AC/DC rotary, linear brushless, or induction motors. Using two out of the three phases, it is
also possible to drive permanent magnet DC brush motors.
Motor Inductance
Digital direct PWM control requires a significant amount of motor inductance to drive the on-off voltage
signals resulting smooth current flow with minimal ripple. Typically, servomotors’ phase inductance
ranges from 2 to 15mH. The lower the inductance, the higher is the suitable PWM frequency.
Low inductance motors (less than 2 mH) can see large ripple currents causing excessive energy waste and
overheating. Additional in-series inductance is recommended in these cases.
High inductance motors (greater than 15 mH) are slower to react and generally not considered high
performance servo motors.
Motor Resistance
Motor resistance is not typically a determining factor in the drive/system performance but rather comes
into play when extracting a desired torque or horsepower out of the motor is a requirement.
Motor Inertia
Motor inertia is an important parameter in motor sizing. Considering the reflected load inertia back to the
motor in this process is important. In general, the higher the motor inertia, the more stable the system will
inherently be. A high ratio of load to motor inertia shrinks the operating bandwidth (gain limited) of the
system, especially in applications using belt or rubber based couplings. The ratio of load to motor inertia
is typically around 3:1. Mechanical gearing is often used to reduce reflected inertial load going back to
the shaft of the motor.
Motor Speed
In some applications, it is realistically impossible to achieve the motors’ specified maximum velocity.
Fundamentally, providing sufficient voltage and proper current-loop tuning should allow attaining motor
maximum speeds. Consider feedback devices being a limitation in some cases, as well as the load
attached to the motor. In general, the maximum speed can be determined dividing the line-to-line input
voltage by the back EMF constant Kb of the motor. Input voltage headroom of about 20% is
recommended for good servo control at maximum speed.
Connector PinOuts and Wiring 26
Page 27

Geo Direct PWM Amplifier
6/V
DC
6
V
Mπ2
3
K
60
R
R
K
T
K
T
Lπ2N
60
R
VVV
DC
derate
2
t
RPM
p
t
M
2
t
M
pp
RPM
2
BEMFR
2
L
V
L
: Voltage Across equivalent inductor
V
R
: Voltage Across equivalent resistor
V
BEMF
: Back electromotive force voltage
R
RPM
: Required Motor Speed [rpm]
N
P
: Number of pole pairs
L
P
: Phase Inductance [H]
R
P
: Phase Resistance [Ω]
T
M
: Required Continuous Torque [N.M]
K
T
: Motor Torque Constant RMS [N.M/A]
M
derate
: De-rate parameter (typically 0.8)
6
V
M
3
K
D
V
R
K
F
K
F
L
D
V
VVV
DC
derate
2
t
pitch
motor
p
t
M
2
t
M
p
pitch
motor
2
BEMFR
2
L
V
L
: Voltage across equivalent inductor
V
R
: Voltage across equivalent resistor
V
BEMF
: Back electromotive Force voltage
V
motor
: Required Motor Speed [m/s]
M
derate
: De-rate parameter (typically 0.8)
L
P
: Phase Inductance [H]
R
P
: Phase Resistance [Ω]
F
M
: Required Motor Force RMS [N]
K
t
: Motor Force Constant RMS [N/A]
D
Pitch
: Magnetic Pitch [m]
10mHLp
2OhmRp, 16Np
ps2.187Nm/AmKt
Motor Torque
Torque requirements in an application can be viewed as both instantaneous and average
Typically, the instantaneous or peak torque is the sum of machining, and frictional forces required to
accelerate the inertial load. The energy required to accelerate a load follows the equation T=JA where T is
the torque, J is the inertia, and A is the acceleration. The required instantaneous torque is then divided by
the motor torque constant (Kt) to determine the necessary peak current of the Geo Direct PWM Drive.
Headroom of about 10% is always desirable to account for miscellaneous losses (aging, wear and tear,
calculation roundups).
The continuous torque rating of the motor is bound by thermal limitation. If the motor applies more
torque than the specified threshold, it will overheat. Typically, the continuous torque ceiling is the RMS
current rating of the motor, also known as torque output per ampere of input current.
Required Bus Voltage for Speed and Torque
For a required motor Speed, and continuous Torque, the minimum DC Bus Voltage (VDC) can be
estimated by looking at the equivalent single phase circuit:
The vector sum of back EMF, voltage across resistor and inductor should be less than
For a Rotary Motor:
.
Where:
For a Linear Motor:
Where:
Example:
An application requires running a motor at 500 RPM with a continuous torque of 30 N.M. The motor
specs are as follow:
Using the equation above, a minimum bus of 233 VDC (~165VAC) is necessary to achieve the speed and
torque requirements.
,
,
Connector PinOuts and Wiring 27
Page 28

Geo Direct PWM Amplifier
Caution
All applications using Geo direct PWM Drives (all configurations) are
strongly advised to install an external shunt resistor.
J5: Molex 2-Pin Female
Mating: Molex 2-Pin Male
Regen+
Regen-
Pin #
Symbol
Function
1
REGEN-
Output
2
REGEN+
Output
Molex Mating Connector p/n: 0444412002
Molex Crimper tool p/n: 63811-0400
Molex Pins p/n: 0433751001
Delta Tau Mating Connector p/n: 014-000F02-HSG
Delta Tau Pins p/n: 014-043375-001
Gxx201, Gxx301
J5: Molex 3-Pin Female
Mating: Molex 3-Pin Male
1
2
3
Regen+
Regen-
Regen+
RegenCAP-
1
CAP-
Bus – (do NOT wire)
2
REGEN-
Output
3
REGEN+
Output
Molex Mating Connector p/n: 0428160312
Molex Crimper tool p/n: 63811-1500
Molex Pins p/n: 0433751001
Delta Tau Mating Connector p/n: 014-H00F03-049
Delta Tau Pins p/n: 014-042815-001
Caution
The external shunt resistors can reach temperatures of up to 200°C.
They must be mounted away from other devices and ideally near the
top of the cabinet, also ensure they are enclosed and cannot be touched
during operation or anytime they are hot. Sufficient warning labels
should be placed prominently nearby.
J5: External Shunt Resistor
J5 is used to wire an external shunt resistor to expel the excess power during demanding deceleration
profiles. These shunt resistors are designed to drain excess bus energy very quickly.
Connector PinOuts and Wiring 28
Page 29

Geo Direct PWM Amplifier
The black wires are for the thermostat and the white wires are
for the shunt resistor.
The shunt resistor incorporates a normally closed (N.C)
thermal overload protection thermostat that opens up when the
core temperature of the resistor exceeds 225°C (450° F). This
thermostat is accessible through the two black leads. It is
important that these two leads be wired in a safety circuit to
halt operation should the resistor temperature exceed the
specified threshold.
The external shunt resistor Ohm rating range is found so that
the minimum value limits the current to the permissible
amperage, and that the maximum value limits the bus (during
deceleration) to the permissible voltage.
Safety
Logic
Circuit
Regen+
Regen-
Hot!
Note
For GPL models, the shunt circuitry turn-on threshold is 392 VDC
(~278 VAC). The turn-off threshold is 372 VDC (~263VAC).
Note
For GPH models, the shunt circuitry turn-on threshold is 784 VDC
(~555 VAC). The turn-off threshold is 744 VDC (~526VAC).
Model
Ω
W
Peak
Power(W)
Pins
Shunt
Resistor
Model
Ω
W
Peak
Power(W)
Pins
Shunt
Resistor
GPL011
48
150
3,134
2
GAR48
GPH011
78
150
7,971
2
GAR78
GPL031
48
150
3,134
2
GAR48
GPH031
78
150
7,971
2
GAR78
GPL051
22
300
6,839
2
GAR22
GPH051
78
150
7,971
2
GAR78
GPL101
22
300
6,839
2
GAR22
GPH101
48
300
12,455
2
GAR48
GPL151
10
300
15,045
2
GAR10-2
GPH151
22
300
27,175
2
GAR22
GPL201
10
300
15,045
3
GAR10-3
GPH201
15
300
39,856
3
GAR15-3
GPL301
10
300
15,045
3
GAR10-3
GPH301
15
300
39,856
3
GAR15-3
GPL012
48
150
3,134
2
GAR48
GPH012
78
150
7,971
2
GAR78
GPL032
48
150
3,134
2
GAR48
GPH032
78
150
7,971
2
GAR78
GPL052
22
300
6,839
2
GAR22
GPH052
48
150
12,455
2
GAR48
GPL102
22
300
6,839
2
GAR22
GPH102
48
150
12,455
2
GAR48
GPL152
10
300
15,045
2
GAR10-2
GPH152
22
300
27,175
2
GAR22
Recommended Shunt Resistors
Connector PinOuts and Wiring 29
Page 30

Geo Direct PWM Amplifier
Shunt Resistor Layout
Connector PinOuts and Wiring 30
Page 31

Geo Direct PWM Amplifier
X1 – X2: 36-Pin Mini-D Connector
Pin#
Symbol
Function
Description
Notes
1
Reserved
2
Reserved
3
ADC_CLK1+
Command
A/D converter clock
4
ADC_STB1+
Command
A/D converter strobe
5 CURRENT1A+
Feedback
Phase A actual current data
Serial digital
6
CURRENT1B+
Feedback
Phase B actual current data
Serial digital
7
AENA1+
Command
Amplifier enable
High is enable
8
FAULT1+
Feedback
Amplifier fault
High is fault
9
PWMATOP1+
Command
Phase A top cmd
High is on command
10
PWMABOT1+
Command
Phase A bottom cmd
High is on command
11
PWMBTOP1+
Command
Phase B top cmd
High is on command
12
PWMBBOT1+
Command
Phase B bottom cmd
High is on command
13
PWMCTOP1+
Command
Phase C top cmd
High is on command
14
PWMCBOT1+
Command
Phase C bottom cmd
High is on command
15
GND
Common
Reference voltage
16
+5V
Power
+5V Power
From controller
17
Reserved
18
Reserved
19
Reserved
20
Reserved
21
ADC_CLK1-
Command
A/D converter clock
22
ADC_STB1-
Command
A/D converter strobe
23
CURRENT1A-
Feedback
Phase A actual current DATA
Serial digital
24
CURRENT1B-
Feedback
Phase B actual current DATA
Serial digital
25
AENA1-
Command
Amplifier enable
Low is enable
26
FAULT1-
Feedback
Amplifier fault
Low is fault
27
PWMATOP1-
Command
Phase A top cmd
Low is on command
28
PWMABOT1-
Command
Phase A bottom cmd
Low is on command
29
PWMBTOP1-
Command
Phase B top cmd
Low is on command
30
PWMBBOT1-
Command
Phase B bottom cmd
Low is on command
31
PWMCTOP1-
Command
Phase C top cmd
Low is on command
32
PWMCBOT1-
Command
Phase C bottom cmd
Low is on command
33
GND
Common
Reference Voltage
34
+5V
Power
+5V Power
From controller
35
Reserved
36
Reserved
X1 – X2: PWM Connectors
This mini D36 connector provides the interface to the PWM output channel from the controller (PMAC).
Connector PinOuts and Wiring 31
Page 32

Geo Direct PWM Amplifier
X3: Phoenix 6-Pin TB Female
Mating: Phoenix 6-pin TB Male
6
5
1 2 3 4
Pin #
Symbol
Function
Description
1
MTR1 PTC
Input
Motor 1 thermal
2
MTR 1 PTC RTN
Return
3
MTR2 PTC
Input
Motor 2 thermal
4
MTR2 PTC RTN
Return
5
24V RET
Common
6
N.C.
Not Connected
Part Type: FKMC 0,5/6-ST-2,5
Phoenix Contact p/n: 1881367
Note
If nothing is wired fault codes 5 and A are triggered respectively for
motors 1 and 2. Tie MTR PTC and MTR PTC RET to disable this
function.
Note
These contacts can be used for other general purpose safety functions
to kill motor power when desired.
X3: Discrete I/O for Motor Thermals
This 6-pin Phoenix Contact terminal block provides connectivity to low impedance 12 – 24 VDC motor
thermostat overload detection. This is a normally closed contact, in normal mode operation the Geo direct
PWM Drive expects to see 12 – 24 VDC coming into Pins #1 and #3 respectively for motors 1 and 2.
Connector PinOuts and Wiring 32
Page 33

Geo Direct PWM Amplifier
X4: Phoenix Contact 4-Pin TB Female
Mating: Phoenix Contact 4-Pin TB Male
1 2 3 4
TB-4: 016-PL0F04-38P
Pin #
Symbol
Function
Description
1
RELAY WA
Input
Safety Input 24V
2
RELAY WB
Input
Safety Input Return
3
RELAY COM
Common
4
RELAY N/O
Relay
Normally Open
Note
There are no software configurable parameters to enable/disable or
otherwise manipulate the Safety Input functionality.
X4: Safety Relay
This 4-pin Phoenix Contact Terminal Block provides connectivity to a safety relay input, and
If the Safety Relay option is installed, there is a dedicated Safety Input @24VDC (user supplied). When
the Safety Input is asserted, then the hardware will cut the 20V power to the gate driver which will
prevent all output from the power stage (the Gate Enable LED will turn off).
If the user doesn’t need to use the Safety Input and the drive has it installed, the user has to bypass it by
wiring a 24VDC input to WA (pin 1) and the return (24VDC) to WB (pin 2).
Connector PinOuts and Wiring 33
Page 34

Geo Direct PWM Amplifier
Caution
Changing the ADC clock on the controller (PMAC) side requires
recycling power on the Geo Direct PWM Drive.
Caution
Main bus power should NEVER be applied if the 24V logic power is
NOT applied.
Caution
Make sure that no motor commands (e.g. phasing, jogging, or open
loop) are being executed by or sent by the controller (PMAC) at the
time of applying main bus power.
Caution
Main bus power should NEVER be applied or cycled if the 24V logic
power is NOT applied.
Caution
Do NOT to cycle main bus power frequently and rapidly within a few
seconds.
POWER ON/OFF PROCEDURES
Powering up the Geo Direct PWM Drive must obey the following procedure:
1. Make sure that PMAC is powered up, and that the PWM cable is connected
2. Apply 24V logic power to the Geo Direct PWM Drive
3. Wait a minimum of ~3 seconds
4. Apply main bus power
5. Wait ~ 3seconds before enabling the drive (motor)
Powering down the Geo Direct PWM Drive must obey the following procedure:
1. Disconnect main bus power
2. Wait a minimum of ~5 seconds
3. Disconnect 24V logic power
Cycling Main Bus Power
Cycling main bus power must obey the following warning restrictions. A delay should be inserted in
either software, hardware or both to ensure that these restrictions are conformed.
Power On/Off Procedures 34
Page 35

Geo Direct PWM Amplifier
Caution
Main bus power should Not be recycled within a time range of about ~
5 minutes.
Note
With the GPx201 and GPx301 models, it is possible to use the
external shunt resistor as a bleeding resistor to avoid the downtime
delay. Contact Delta Tau for details.
If the main bus power is removed (i.e. E-Stop condition), it is necessary to keep it off until the Bus LED
is turned off or dimmed completely. About 5-6 minutes. This ensures that the capacitors’ voltage has
dropped below 97 VAC and that the soft start circuitry has been armed.
Power On/Off Procedures 35
Page 36

Geo Direct PWM Amplifier
;
=>
Note
Systems with very low time constants (needing higher PWM
frequencies) may require the addition of chokes or in-line inductive
loads to obtain a good current loop bandwidth.
Note
The maximum PWM frequency for each model of the Geo Direct
PWM Drives is listed in the electrical specifications.
PWM FREQUENCY
The minimum PWM frequency of a system is based on the time constant of the motor. In general, the
lower the time constant, the higher the PWM frequency should be. The motor time constant is calculated
dividing the motor inductance by the resistance (phase-phase). The minimum PWM Frequency is then
determined using the following relationship:
Example: A motor with an inductance of 6.1 millihenries (mH), and a resistance of 11.50 Ohms (
phase-phase) yields a time constant of 0.53 milliseconds. Therefore, the minimum PWM Frequency is
about ~6000Hz (6.0 KHz).
PWM Frequency 36
Page 37

Geo Direct PWM Amplifier
Caution
The ADC Strobe Word, Gate3[i].AdcAmpStrobe, must be set to
$FFFFFC for proper operation in default mode. Failure to do so could
result in damage to the amplifier.
Structure Element
Description
Typical/Default
Notes
Sys.WpKey
PMAC3 Write Protection
0
$AAAAAAAA to
allow writing
Gate3[i].PhaseFreq
Phase Frequency
9000
9.00 KHz Phase
Gate3[i].ServoClockDiv
Servo clock divider
3
2.25 KHz Servo
Gate3[i].HardwareClockCtrl
Hardware Clocks
$55555403
2.50 MHz ADC Clock
Sys.ServoPeriod
=1000*(Gate3[i].ServoClockDiv+1)/Gate3[i].PhaseFreq
Sys.PhaseOverServoPeriod
= 1 /(Gate3[i].ServoClockDiv + 1)
Gate3[i].AdcAmpStrobe
ADC Strobe Word
$FFFFFC
Default Mode
Gate3[i].Chan[j].OutputMode
Output mode
0
PWM output
Note
Sys.ServoPeriod and Sys.PhaseOverServoPeriod must be re-computed
if the main clocks (Phase, and Servo) are changed.
Note
The above settings require a Save and a Reset ($$$) on the PMAC
side in order to take effect.
POWER PMAC3 DRIVE SETUP
Key Gate Parameters
The following Gate-specific parameters are essential for the proper software setup of the Geo Direct
PWM Drive:
Power PMAC3 Drive Setup 37
Page 38

Geo Direct PWM Amplifier
Structure Element
Description
Typical/Default
Notes
Gate3[i].Chan[j].PwmFreqMult
PWM Frequency
0
4.5 KHz PWM
Motor[x].ServoCtrl
Activate channel
1
Motor[x].PhaseCtrl
Commutation enable
1
With PackInData = 0
Motor[x].PhaseOffset
Commutation Phase angle
-683
-512 for Brush Motor
Motor[x].pAdc
Current Feedback Address
Pointer
Initiated by the firmware
Motor[x].AdcMask
ADC Mask
$FFF00000
Motor[x].PwmSf
PWM Scale Factor
= 0.9 * 16384
Voltage limiter
Motor[x].I2TSet
Continuous current limit
To be
Computed
Motor I2T protection
Motor[x].I2TTrip
Integrated current limit
Motor I2T protection
Motor[x].MaxDac
Maximum command output
Current limiter
Motor[x].IiGain
Integral
Current Loop
Tuning
Motor[x].IpfGain
Forward path proportional
Motor[x].IpbGain
Back-path proportional
Note
A Save and a Reset ($$$) is necessary for these parameters to take
effect.
Key Channel Parameters
The following channel-specific parameters are essential for the proper software setup of the Geo Direct
PWM Drive:
Motor[x].PwmSf is calculated based on the motor and bus voltages
If the Motor Rated Voltage is greater than > Bus Voltage:
Motor[x].PwmSf = 0.9 * 16384
If the Motor Rated Voltage is less than < Bus Voltage:
Motor[x].PwmSf = 0.9 * 16384 * V
Motor/VBus
I2T Settings Example:
GLOBAL ContCurrent = 3; // RMS Continuous Current Limit [Amps] -User Input
GLOBAL PeakCurrent = 9; // RMS Instantaneous Current Limit [Amps] -User Input
GLOBAL MaxADC = 16.26; // =16.26 for 5/10A -User Input, see electrical specs
GLOBAL I2TOnTime = 2; // Time allowed at peak Current [sec] -User Input
Motor[1].MaxDac = (PeakCurrent / MaxADC) * 32767 * COSD(30)
Motor[1].I2tSet = (ContCurrent / MaxADC) * 32767 * COSD(30)
Motor[1].I2tTrip = (POW(Motor[1].MaxDac,2) - POW(Motor[1].I2tSet,2)) * I2TOnTime
Power PMAC3 Drive Setup 38
Page 39

Geo Direct PWM Amplifier
Caution
Trying to enable the Geo Direct PAM Drive with misreported current
data could result in damaging the electronics of the Drive.
Note
Complete closed loop setup procedure can be found in the pertaining
hardware axis-interface, and Power PMAC User/Software Reference
manuals.
At this point of the drive-motor setup, and before tuning the current loop, a couple of sanity checks can be
performed, making sure that:
Enabling the drive with a #nOut0 command does not produce any faults in neither the drive nor the
PMAC.
The current sensors are operating properly by monitoring the current measurements (i.e.
Motor[x].IaMeas, and Motor[x].IbMeas). These should be reporting values fluctuating around 0.
Frozen values, or values greater than 1000 indicate that the current sensors are not functioning
properly, or a software parameter is incorrect (i.e. Gate3[i].AdcAmpStrobe, Motor[x].PhaseOffset,
Motor[x].AdcMask)
Subsequently, the current loop (Motor[x].IiGain, Motor[x].IpfGain, and Motor[x].IpbGain) can be tuned
using the tuning utility in the IDE software. Commutation, encoder feedback, phasing, and position loop
tuning can then be configured for closed loop control.
Power PMAC3 Drive Setup 39
Page 40

Geo Direct PWM Amplifier
Caution
The ADC Strobe Word, Gate1[i].AdcStrobe, must be set to $3FFFFF
for proper operation in default mode. Failure to do so could result in
damage to the amplifier.
Structure Element
Description
Typical/Default
Notes
Gate1[i].PwmPeriod
PWM Frequency
6527
4.50 KHz PWM
Gate1[i].PhaseClockDiv
Phase clock divider
0
9.00 KHz Phase
Gate1[i].ServoClockDiv
Servo clock divider
3
2.25 KHz Servo
Gate1[i].HardwareClockCtrl
Hardware Clocks
2258
2.50 MHz ADC Clock
Sys.ServoPeriod
= 1000 * (Gate1[4].ServoClockDiv + 1) / 18000
Sys.PhaseOverServoPeriod
= 1 / (Gate1[4].ServoClockDiv + 1)
Gate1[i].AdcStrobe
ADC Strobe Word
$3FFFFF
Default Mode
Gate1[i].Chan[j].OutputMode
Output mode
0
PWM output
Note
Sys.ServoPeriod and Sys.PhaseOverServoPeriod must be re-computed
if the main clocks (Phase, PWM, and Servo) are changed.
Note
The above settings require a Save and a Reset ($$$) on the PMAC
side in order to take effect.
POWER PMAC2 DRIVE SETUP
Key Gate Parameters
The following Gate-specific parameters are essential for the proper software setup of the Geo Direct
PWM Drive:
Power PMAC2 Drive Setup 40
Page 41

Geo Direct PWM Amplifier
Structure Element
Description
Typical/Default
Notes
Motor[x].ServoCtrl
Activate channel
1
Motor[x].PhaseCtrl
Commutation enable
1
Motor[x].PhaseOffset
Commutation Phase angle
683
512 for Brush Motor
Motor[x].pAdc
Current Feedback Address
Pointer
Initiated by the firmware
Motor[x].AdcMask
ADC Mask
$FFF000
Motor[x].PwmSf
PWM Scale Factor
= 0.9 * Gate1[i].PwmPeriod
Voltage limiter
Motor[x].I2TSet
Continuous current limit
To be
computed
Motor I2T protection
Motor[x].I2TTrip
Integrated current limit
Motor I2T protection
Motor[x].MaxDac
Maximum command output
Current limiter
Motor[x].IiGain
Integral gain
Current Loop
Tuning
Motor[x].IpfGain
Forward path proportional gain
Motor[x].IpbGain
Back-path proportional gain
Note
A Save and a Reset ($$$) is necessary for these parameters to take
effect.
Key Channel Parameters
The following channel-specific parameters are essential for the proper software setup of the Geo Direct
PWM Drive:
Motor[x].PwmSf is calculated based on the motor and bus voltages
If the Motor Rated Voltage is greater than > Bus Voltage:
Motor[x].PwmSf = 0.9 * Gate1[i].PwmPeriod
If the Motor Rated Voltage is less than < Bus Voltage:
Motor[x].PwmSf = 0.9 * Gate1[i].PwmPeriod * V
Motor/VBus
I2T Settings Example:
GLOBAL ContCurrent = 3; // RMS Continuous Current Limit [Amps] -User Input
GLOBAL PeakCurrent = 9; // RMS Instantaneous Current Limit [Amps] -User Input
GLOBAL MaxADC = 16.26; // = 16.26 for 5/10A -User Input, see electrical specs
GLOBAL I2TOnTime = 2; // Time allowed at peak Current [sec] -User Input
Motor[1].MaxDac = (PeakCurrent / MaxADC) * 32767 * COSD(30)
Motor[1].I2tSet = (ContCurrent / MaxADC) * 32767 * COSD(30)
Motor[1].I2tTrip = (POW(Motor[1].MaxDac,2) - POW(Motor[1].I2tSet,2)) * I2TOnTime
Power PMAC2 Drive Setup 41
Page 42

Geo Direct PWM Amplifier
Caution
Trying to enable the Geo Direct PAM Drive with misreported current
data could result in damaging the electronics of the Drive.
Note
Complete closed loop setup procedure can be found in the pertaining
hardware axis-interface, and Power PMAC User/Software Reference
manuals.
At this point of the drive-motor setup, and before tuning the current loop, a couple of sanity checks can be
performed, making sure that:
Enabling the drive with a #nOut0 command does not produce any faults in neither the drive nor the
PMAC.
The current sensors are operating properly by monitoring the current measurements (i.e.
Motor[x].IaMeas, and Motor[x].IbMeas). These should be reporting values fluctuating around 0.
Frozen values, or values greater than 1000 indicate that the current sensors are not functioning
properly, or a software parameter is incorrect (i.e. Gate1[i].AdcStrobe, Motor[x].PhaseOffset,
Motor[x].AdcMask)
Subsequently, the current loop (Motor[x].IiGain, Motor[x].IpfGain, and Motor[x].IpbGain) can be tuned
using the tuning utility in the IDE software. Commutation, encoder feedback, phasing, and position loop
tuning can then be setup for closed loop control.
Power PMAC2 Drive Setup 42
Page 43

Geo Direct PWM Amplifier
Caution
The ADC Strobe Word, I7m06 ($C014 in Non-Turbo PMAC), must
be set to $3FFFFF for proper operation in default mode. Failure to set
I7m06 equal to $3FFFFF could result in damage to the amplifier.
Turbo
Non-Turbo
Description
Typical/Default
Notes
I7m00
I900
Max phase clock
6527
4.50 KHz PWM
I7m01
I901
Phase clock divider
0
9.00 KHz Phase
I7m02
I902
Servo clock divider
3
2.25 KHz Servo
I7m03
I903
Hardware Clocks
2258
2.50 MHz ADC Clock
I10
I10
Servo interrupt time
3713991
I7m06
X:$C014
ADC Strobe Word
$3FFFFF
Default Mode
I7mn6
I9n6
Output mode
0
PWM output
Note
Non-Turbo ADC Strobe words are at addresses X:$C014 for axis 1-4
(1st PMAC2 Gate), and X:$C024 for axis 5-8 (2nd PMAC2 Gate).
Note
The servo interrupt time I10 must be re-computed if the main clocks
(Phase, PWM, and Servo) are changed.
Note
The above settings require a Save and a Reset ($$$) on the PMAC
side in order to take effect.
TURBO PMAC2 DRIVE SETUP
Key Gate Parameters
The following Gate-specific parameters are essential for the proper software setup of the Geo Direct
PWM Drive:
Turbo PMAC2 Drive Setup 43
Page 44

Geo Direct PWM Amplifier
Variable
Description
Typical/Default
Notes
Ixx00
Activate channel
1
Ixx01
Commutation enable
1
Ixx72
Commutation Phase angle
683
512 for Brush Motor
Ixx82
Current Feedback Address
Address Location
Found in the SRM Manual
Ixx84
ADC Mask
$FFF000
Ixx66
PWM Scale Factor
= 0.9 * I7m00
Voltage limiter
Ixx57
Continuous current limit
To be
computed
Motor I2T protection
Ixx58
Integrated current limit
Motor I2T protection
Ixx69
Maximum command output
Current limiter
Ixx61
Integral gain
Current Loop
Tuning
Ixx62
Forward path proportional gain
Ixx76
Back-path proportional gain
Note
A Save and a Reset ($$$) is necessary for these parameters to take
effect.
Channel 1
$078206
Channel 5
$078306
Channel 2
$07820E
Channel 6
$07830E
Channel 3
$078216
Channel 7
$078316
Channel 4
$07821E
Channel 8
$07831E
Key Channel Parameters
The following channel-specific parameters are essential for the proper software setup of the Geo Direct
PWM Drive:
Ixx82 Turbo PMAC2 UMAC addresses (first 8 channels)
Ixx66 is calculated based on the motor and bus voltages
If the Motor Rated Voltage is greater than > Bus Voltage: Ixx66 = 0.9 * I7000
If the Motor Rated Voltage is less than < Bus Voltage: Ixx66 = 0.9 * I7000 * V
Motor/VBus
Turbo PMAC2 Drive Setup 44
Page 45

Geo Direct PWM Amplifier
Caution
Trying to enable the Geo Direct PAM Drive with misreported current
data could result in damaging the electronics of the Drive.
Note
Complete closed loop setup procedure can be found in the pertaining
hardware axis-interface, and Turbo User/Software reference manuals.
I2T Settings, Ixx57, Ixx58, and Ixx69 Example:
#define ServoClk 2.258 ; Servo Clock [KHz]—computed in Dominant Clock Settings Section
#define ContCurrent 3 ; Continuous Current Limit [Amps] -User Input
#define PeakCurrent 9 ; Instantaneous Current Limit [Amps] -User Input
#define MaxADC 16.26 ; =16.26 for 5/10A -User Input, see electrical specs
#define I2TOnTime 2 ; Time allowed at peak Current [sec] -User Input
I157 = INT(32767*(ContCurrent*1.414/MaxADC)*cos(30))
I169 = INT(32767*(PeakCurrent*1.414/MaxADC)*cos(30))
I158 = INT((I169*I169- I157*I157)*ServoClk*1000*I2TOnTime/(32767*32767))
At this point of the drive-motor setup, and before tuning the current loop, a couple of sanity checks can be
performed, making sure that:
Enabling the drive with a #nO0 command does not produce any faults in neither the drive nor PMAC.
The current sensors are operating properly by monitoring the current measurements (i.e. Mxx05, and
Mxx06). These should be reporting value fluctuating around 0. Frozen values, or values greater than
1000 indicate that the current sensors are not functioning properly, or a software parameter is
incorrect (i.e. I7m06, Ixx72, Ixx84)
Subsequently, the current loop (Ixx61, Ixx62, and Ixx76) can be tuned using the tuning utility in the
Pewin32Pro2 software. Commutation, encoder feedback, phasing, and position loop tuning can then be
setup for closed loop control.
Turbo PMAC2 Drive Setup 45
Page 46

Geo Direct PWM Amplifier
Caution
Failure to set the ADC strobe word correctly could result in damaging
the drive’s electronics.
ADC A Data Register
23
22
21
20
19
18
17
16
15
14
13
12
11
10 9 8 7 6 5 4 3 2 1 0
Phase A Current Measurement
Global and Axis Faults
PMAC Type
ADC Strobe Word
Value
ADC A data register
Non-Turbo
WX:$C014
$3FFFFF Y:$C005
Turbo
I7m06
$3FFFFF Mxx05
Power PMAC2
Gate1[i].AdcStrobe
$3FFFFF
Gate1[i].Chan[j].Adc[0]
Power PMAC3
Gate3[i].AdcAmpCtrl
$FFFFFC02
Gate3[i].Chan[j].AdcAmp[0]
Note
In normal mode operation, the ADC Strobe word has to be set for each
Servo IC which has a PWM Drive attached to it.
Note
The ADC Strobe word can be saved with the SAVE command. It will
be set automatically on the next power-up or normal reset.
Note
In default mode, ADC B does not contain any significant data.
DRIVE COMMAND STRUCTURE
Default Mode
In default mode, the Geo Direct PWM Drive returns phases A and B current measurements as well as
global and axis faults.
The global and axes faults are in the lower 12 bits of ADC A, whereas the current measurements are in
the upper 12bits of ADC A:
The ADC Strobe word must be set up properly for the data to come back correctly (and proper operation):
Drive Command Structure 46
Page 47

Geo Direct PWM Amplifier
Caution
The drive must be put in enhanced mode before accessing the
additional functions.
Caution
Once the drive is set up for enhanced mode, do not set it back to
default mode until the next logic power cycle.
PMAC Type
ADC Strobe Word
Enhanced
mode
Additional Functions
IGBT Temp
Bus Voltage
PWM For
Brush
Line
Monitor Off
Non-Turbo
WX:$C014
$C00003
$800003
$880003
$A00013
$A00023
Turbo
I7m06
Power PMAC2
Gate1[i].AdcStrobe
Power PMAC3
Gate3[i].AdcAmpCtrl
$C0000204
$80000204
$88000204
$A0001204
$A0002204
Note
Once in enhanced mode, the drive’s communication will remain in
enhanced mode until the next logic power cycle.
Enhanced Mode
Enhanced mode enables access to and control of additional functions:
Bus voltage reading
IGBT temperature(s) reading
Set PWM control for brush motor
Turn Line Monitor off
With Power PMAC3, setting the drive to enhanced mode requires the following motor setting changes:
Motor[x].PhaseCtrl = 4
Gate3[i].Chan[j].PackInData = 0
Gate3[i].Chan[j].PackOutData = 0
Drive Command Structure 47
Page 48

Geo Direct PWM Amplifier
PMAC Type
ADC B data register
Non-Turbo
Y:$C006
Turbo
Mxx06
Power PMAC2
Gate1[i].Chan[j].Adc[1]
Power PMAC3
Gate3[i].Chan[j].AdcAmp[1]
ADC B Data Register
23
22
21
20
19
18
17
16
15
14
13
12
11
10 9 8 7 6 5 4 3 2 1 0
Phase B Current Measurement
Enhanced Mode Data
Note
Subsequent additional information command code must follow the
same procedure with the drive always in enhanced mode until the next
logic power cycle.
And the data is found in the lower 12 bits of ADC B for each axis:
This is a read-modify-write register, once the drive is set up for enhanced mode, the following procedure
can be followed to access additional information:
Read the ADC B data register (i.e. query it in the terminal window)
Set the strobe word to the desired command code of a function (i.e. Reading Bus Voltage)
Read the lower 12 bits of ADC B to access the reported bus voltage value
Drive Command Structure 48
Page 49

Geo Direct PWM Amplifier
LED
Description
ENABLE 1
Green when axis 1 is enabled
Red when axis 1 is not enabled
Unlit does not necessarily mean a faulty condition
ENABLE 2
Green when axis 2 is enabled
Red when axis 2 is not enabled
Unlit does not necessarily mean a faulty condition
BUS
Red when bus is connected (capacitors are charged)
Unlit when bus is not connected (capacitors fully discharged)
SHUNT
Yellow when the drive is dissipating power
Unlit when the drive is not dissipating (most cases)
+5V
Green when 5 VDC power is present
Unlit indicates that the 5VDC is not present (failure condition)
GATE ENABLE
Green when the gate is enabled
Unlit when the gate is disabled
The Global and Axis faults are interpreted by the Amplifier processor(s) and sent to the 7segment 3-character scrolling display (D1 amp status).
The blinking dot is the heartbeat of the drive processor(s) and is always active in normal
mode operation. It is turned off or not blinking when the drive is in reset mode (reloading
firmware) or has no logic power.
Note
The Geo Drive disables (kills the output to the motors) automatically
at the occurrence of a fault.
TROUBLESHOOTING
LED Status
7-Segment Display
The display is blank if there are no axes enabled, and no faults. It shows a 0 if any of the axes are enabled,
this is the normal mode operation. Not all errors reflect a message back to the PMAC. In these cases, the
error is only sent to the Status Display.
The response of the Geo Drive to an error depends on the error's severity. There are two levels of severity:
Warnings, simply called errors and not considered faults. They do not disable operation.
Fatal errors which disable the drive’s output to the motors, occasionally communication to PMAC
Troubleshooting 49
Page 50

Geo Direct PWM Amplifier
Display
Code
Error / Fault
Description
Description
AXIS 1
AXIS 2
Over Current
RMS
Indicates that the I2T model, hard-coded in the
amplifier processor projecting current output over
time, has been violated within the operating current
specification range of the amplifier.
Over Current
Peak
Indicates that an excessive amount of current
(exceeding the specs of the amplifier) has been
detected through the motor leads. This could be due
to a shorted motor lead or a current/voltage surge.
PWM
Over Frequency
Indicates that the PWM frequency has exceeded the
permissible limit. This can occur if the clock settings
are incorrect, or the presence of a bad PWM cable.
IGBT
Over Temperature
Indicates excessive IGBT temperature (close to 75
ºC) has been detected. Power off the drive and let it
cool down.
Check cabinet ventilation, and fan functionality.
Check for blocked airflow.
Motor
Thermal Relay
Indicates that the normally closed Motor Thermal
contact (connector X3) is in open circuit.
Error Codes
Troubleshooting 50
Page 51

Geo Direct PWM Amplifier
Display
Code
Error / Fault
Description
Troubleshooting
Notes
GLOBAL
Normal Mode
Operation
No faults reported
Over
Voltage
The bus voltage has exceeded the permissible threshold:
420 VAC for GPL Drives
820 VAC for GPH Drives
Make sure that the external shunt is connected properly.
Make sure that the AC input is not excessively over spec.
Under
Voltage
No bus voltage input.
Bus voltage has dropped below the permissible threshold (97 VAC).
Shunt
Regulator
Shunt resistor leads or pins shorted.
Internal shunt regulator resistor failure.
Ground
Short
Motor leads shorted.
Shunt resistor leads or pins shorted.
Gate
Driver
Motor leads shorted
Shunt leads or pins shorted
Gate driver (internal) failure.
Line
Monitor
AC line voltage is low or not present.
Troubleshooting 51
Page 52

Geo Direct PWM Amplifier
Option
Cable Length
Part Number
CABPWM-1
24” (600 mm)
200-602739-024X
CABPWM-2
36” (900 mm)
200-602739-036x
CABPWM-3
60” (1.5 m)
200-602739-060x
CABPWM-4
72” (1.8 m)
200-602739-072x
CABPWM-5
84” (2.1 m)
200-602739-084x
CABPWM-6
144” (3.6 m)
200-602739-144x
Note
PWM cables are compatible with all models of the Geo Direct PWM
Drives.
Part Number
Model
Description
CONKIT1A
Gxx012xx
Gxx032xx
Gxx052xx
GxL102xx
Molex Connectors for 2 axes,
AC input, and 24 VDC input.
CONKIT1C
Gxx051xx
Molex Connectors for 1 axis,
AC input, and 24 VDC input.
CONKIT2A
GxH102xx
Gxx152xx
Molex Connectors for 2 axes,
AC input, and 24 VDC input.
CONKIT2C
Gxx101xx
Gxx151xx
Molex Connectors for 1 axis,
AC input, and 24 VDC input.
CONKIT4A
Gxx201xx
Gxx301xx
Molex Connectors for 1 axis
(4 pins), AC input (4 pins),
and 24 VDC input.
Note
The connector kits require Molex Crimping tools for proper
installation.
APPENDIX A: CABLE/CONNECTOR KITS
PWM Cables
Connector Kits
Appendix D: Compatible Motors 52
Page 53

Geo Direct PWM Amplifier
Part Number
Model
Description
CABKIT1B
Gxx012xx
Gxx032xx
Gxx052xx
GxL102xx
Molex mating connectors pre-crimped for 2 axes:
3 ft. AC Input Cable
3 ft. 24 VDC Power Cable
10 ft. shielded Motor Cables
CABKIT1C
Gxx051xx
Molex mating connectors pre-crimped for 1 axis:
3 ft. AC Input Cable
3 ft. 24 VDC Power Cable
10 ft. shielded Motor Cables
CABKIT2B
GxH102xx
Gxx152xx
Molex mating connectors pre-crimped for 2 axes:
3 ft. AC Input Cable
3 ft. 24 VDC Power Cable
10 ft. shielded Motor Cables
CABKIT2D
Gxx101xx
Gxx151xx
Molex mating connectors pre-crimped for 1 axis:
3 ft. AC Input Cable
3 ft. 24 VDC Power Cable
10 ft. shielded Motor Cables
CABKIT4B
Gxx201xx
Gxx301xx
Molex mating connectors pre-crimped for 1 axis:
3 ft. AC Input Cable (4 pins)
3 ft. 24 VDC Power Cable
10 ft. shielded Motor Cables (4 pins)
G14AWG
Gxx051xx
Gxx101xx
Gxx151xx
Gxx012xx
Gxx032xx
Gxx052xx
Gxx102xx
Gxx152xx
Extended cable length. Per foot per cable for the CABKITs.
Customer must specify length.
Note
Cable kits have terminated cables on the drive end and flying leads on
the other.
Cable Kits
Appendix D: Compatible Motors 53
 Loading...