

Page 1

1^ USER MANUAL
^2 Accessory 14M
^3 MACRO OPTO 48 bit Input/output
^4 3Ax-603741-xUxx
^5 December 9, 2009
Single Source Machine Control Power // Flexibility // Ease of Use
21314 Lassen Street Chatsworth, CA 91311 // Tel. (818) 998-2095 Fax. (818) 998-7807 // www.deltatau.com
Page 2

Copyright Information
© 2009 Delta Tau Data Systems, Inc. All rights reserved.
This document is furnished for the customers of Delta Tau Data Systems, Inc. Other uses are
unauthorized without written permission of Delta Tau Data Systems, Inc. Information contained in
this manual may be updated from time-to-time due to product improvements, etc., and may not
conform in every respect to former issues.
To report errors or inconsistencies, call or email:
Delta Tau Data Systems, Inc. Technical Support
Phone: (818) 717-5656
Fax: (818) 998-7807
Email: support@deltatau.com
Website: http://www.deltatau.com
Operating Conditions
All Delta Tau Data Systems, Inc. motion controller products, accessories, and amplifiers contain
static sensitive components that can be damaged by incorrect handling. When installing or handling
Delta Tau Data Systems, Inc. products, avoid contact with highly insulated materials. Only
qualified personnel should be allowed to handle this equipment.
In the case of industrial applications, we expect our products to be protected from hazardous or
conductive materials and/or environments that could cause harm to the controller by damaging
components or causing electrical shorts. When our products are used in an industrial environment,
install them into an industrial electrical cabinet or industrial PC to protect them from excessive or
corrosive moisture, abnormal ambient temperatures, and conductive materials. If Delta Tau Data
Systems, Inc. products are directly exposed to hazardous or conductive materials and/or
environments, we cannot guarantee their operation.
Page 3

REVISION HISTORY
REV. DESCRIPTION DATE CHG APPVD
1 NEW MANUAL 07/21/09 C.PERRY S. SATTARI
2 UPDATED 16-BIT ADC OPTION 12/08/09 C.PERRY S. FIERRO
Page 4

Page 5

Accessory 14M
TABLE OF CONTENTS
INTRODUCTION .......................................................................................................................................................1
Options ......................................................................................................................................................................2
HARDWARE REFERENCE SUMMARY ...............................................................................................................3
Mechanical Layout....................................................................................................................................................3
Board Layout.............................................................................................................................................................4
Connectors and Indicators.........................................................................................................................................4
Inputs and Outputs LED Indicators......................................................................................................................4
Status LED Indicators...........................................................................................................................................4
7-Segment LED Indicator.....................................................................................................................................4
USB Connector .....................................................................................................................................................4
24V Input Connector.............................................................................................................................................4
MACRO Link Connectors .....................................................................................................................................4
DB-15 Option-1 Connector ..................................................................................................................................4
Relay Status LED Indictors...................................................................................................................................4
Inputs and Outputs Terminal Blocks (J4 and J5)..................................................................................................5
E-Point Jumper Description ......................................................................................................................................5
CONNECTORS DESCRIPTION ..............................................................................................................................6
USB Universal Serial Bus Port .................................................................................................................................6
24VDC Input.............................................................................................................................................................6
MACRO RJ-45 Copper Connectors..........................................................................................................................6
MACRO Fiber Optic Connector ...............................................................................................................................7
U17: MACRO Fiber Optic Connector (OPT A, B)...................................................................................................7
Main IO Connectors J4 and J5 ..................................................................................................................................8
J4 (50 Pin Header) ...............................................................................................................................................8
J5 (50 Pin Header) ...............................................................................................................................................9
OPT-1: DB-15 Connector .......................................................................................................................................10
SOFTWARE SETUP ................................................................................................................................................11
ACC14M MACRO 72-Bit Node (24 Inputs / 24 Outputs) FORMAT w/ Outputs high 24-bit word......................11
ACC14M MACRO 72-Bit Node (48 Outputs) FORMAT......................................................................................11
ACC14M MACRO 72-Bit Node (48 Inputs) FORMAT.........................................................................................11
ACC14M MACRO 72-Bit Node (24 Outputs / 24 Inputs) FORMAT w/ Outputs low 24-bit word.......................12
ASCII Ring Order Initial Binding of the ACC-14M Station...................................................................................14
Establishing Communications with the ACC-14M Station .................................................................................14
USING ACC-14M FOR INPUTS AND OUTPUTS................................................................................................16
MI14 Mode Setting 0 or 3 (24 inputs and 24 outputs) ADD mode 1 and 2 ........................................................16
USING OPTION 1 – ADC’S, DAC’S, RELAY’S...................................................................................................18
Using the ACC-14M ADC......................................................................................................................................18
Using the ACC-14M DAC Output..........................................................................................................................19
Using the ACC-14M Amplifier Enable Outputs.....................................................................................................20
USING ACC-14M FOR SERVO FEEDBACK.......................................................................................................21
Example Turbo Encoder Conversion Table Setup for ACC-14M...........................................................................21
ECT Setup for 18-bit Encoder without Filtering ................................................................................................21
ECT Setup for 18-bit Encoder with Filtering......................................................................................................21
Absolute Encoder Setup for ACC-14M ..................................................................................................................22
Graycode Encoder Feedback...................................................................................................................................22
FEEDBACK DATA LATCHING AND HANDSHAKING ...................................................................................23
Method 1 .............................................................................................................................................................24
Method 2 .............................................................................................................................................................24
Table of Contents i
Page 6

Accessory 14M
Method 3 .............................................................................................................................................................25
Method 4 .............................................................................................................................................................25
Method 5 .............................................................................................................................................................26
MACRO ASCII Communication Reference:..........................................................................................................27
Firmware Updates ...................................................................................................................................................28
ACC-14M MACRO STATION MI-VARIABLE REFERENCE..........................................................................29
Global MI-Variables ...............................................................................................................................................29
MS{anynode}, MI0 Station Firmware Version (Read Only)..............................................................................29
MS{anynode},MI1 Station Firmware Date (Read Only) ...................................................................................29
MS{anynode},MI2 Station ID and User Configuration Word ...........................................................................29
MS{anynode},MI3 (Reserved for Future Use)...................................................................................................30
MS{anynode},MI4 Station Status Word (Read Only) ........................................................................................30
MS{anynode},MI5 Ring Error Counter.............................................................................................................30
MS{anynode},MI6 Maximum Permitted Ring Errors in One Second................................................................31
MS{anynode},MI7 (Reserved for Future Use)...................................................................................................31
MS{anynode},MI8 MACRO Ring Check Period................................................................................................31
MS{anynode},MI9 MACRO Ring Error Shutdown Count.................................................................................31
MS{anynode},MI10 MACRO Sync Packet Shutdown Count .............................................................................32
MS{anynode},MI11 Station Order Number.......................................................................................................32
MS{anynode},MI12 Card Identification ............................................................................................................32
MS{anynode},MI13 (Reserved for Future Use).................................................................................................32
MS{anynode},MI14 Input/Output Configuration...............................................................................................33
MS{anynode},MI15 Enable MACRO PLCC......................................................................................................34
MACRO IC MI-Variables.......................................................................................................................................34
MS{anynode},MI176 MACRO IC Base Address................................................................................................34
MS{anynode},MI177 MACRO IC Address for Node 14 ....................................................................................34
MS{anynode},MI178 MACRO IC Address for Node 15 ....................................................................................34
MS{anynode},MI181–MI188 MACRO Channels 1 - 8 Address ........................................................................34
MACRO IC I/O Transfer MI-Variables..................................................................................................................34
MS{anynode},MI198 Direct Read/Write Format and Address..........................................................................35
MI198 Format Digits..........................................................................................................................................36
MS{anynode},MI199 Direct Read/Write Variable.............................................................................................38
Global MACRO Status MI-Variables .....................................................................................................................38
MS{anynode}, MI203 Phase Period ..................................................................................................................38
MS{anynode}, MI204 Phase Execution Time ....................................................................................................38
MS{anynode}, MI205 Background Cycle Time .................................................................................................38
MS{anynode}, MI206 Maximum Background Cycle Time ................................................................................38
MS{anynode}, MI208 User Ram Start...............................................................................................................38
MACRO IC MI-Variables.......................................................................................................................................39
MS{anynode},MI942 ADC Strobe Word for ADC1 and ADC2 Inputs..............................................................39
MACRO IC Setup MI-Variables.............................................................................................................................39
MS{anynode},MI970-MI973 (Reserved for Future Use)...................................................................................39
MS{anynode},MI1974 Station Display Status (Read Only)...............................................................................39
MS{anynode},MI977 Motor Nodes Reporting Ring Break................................................................................39
MS{anynode},MI978-MI989 (Reserved for Future Use)...................................................................................40
MACRO IC MI-Variables.......................................................................................................................................40
MS{anynode},MI992 MaxPhase Frequency Control.........................................................................................40
MS{anynode},MI993 Hardware Clock Control Handwheel Channels..............................................................40
MS{anynode},MI994 PWM Deadtime / PFM Pulse Width Control for Handwheel........................................42
MS{anynode},MI995 MACRO Ring Configuration/Status................................................................................42
MS{anynode},MI996 MACRO Node Activate Control ......................................................................................43
MS{anynode},MI997 Phase Clock Frequency Control .....................................................................................45
MS{anynode},MI998 Servo Clock Frequency Control......................................................................................45
MS{anynode},MI999 Handwheel DAC Strobe Word (Not Used)......................................................................46
Other ACC-14M MACRO Station Mm & MP-Variables.......................................................................................46
ii Table of Contents
Page 7

Accessory 14M
ACC-14M MACRO STATION MACPLCCS.........................................................................................................46
Requirements...........................................................................................................................................................46
Arithmetic Data Types ............................................................................................................................................46
MACRO MI Integer Variables (n = 0 – 1099)........................................................................................................46
MACRO MM and MP Integer Variables (n = 0 – 511) ..........................................................................................46
MACROPlcc Ln Integer Variables (n = 0 – 511) ....................................................................................................46
Direct Memory Addressing for Integer Ln & Ln[] Variable Definitions............................................................46
Standard MACRO Program Commands .................................................................................................................47
Valid Math, Assignment and Conditional Operators ..............................................................................................47
Valid Expressions and Arrays.................................................................................................................................47
Ln Arrays Definition Examples...............................................................................................................................47
Example Program...............................................................................................................................................47
MACRO PLCC Code Memory ...............................................................................................................................47
MAC PLCC Related ASCII Commands .................................................................................................................48
ACC-14M MACRO STATION SERIAL COMMANDS.......................................................................................48
Serial Commands ....................................................................................................................................................48
$$$ Station Reset ...............................................................................................................................................48
$$$*** Station Re-initialize...............................................................................................................................48
CHN Report Channel Number...........................................................................................................................48
CID Report Card ID Number ............................................................................................................................48
CLRF Clear Station Faults................................................................................................................................48
DATE Report Firmware Date............................................................................................................................48
DISABLE PLCC or CNTRL D Disables PLCC .................................................................................................49
ENABLE PLCC Enables PLCC.........................................................................................................................49
MI{constant} Report Station MI-Variable Value...............................................................................................49
MI{constant}={constant} Set Station MI-Variable Value .................................................................................49
MM{constant} Report Station MM-Variable Value...........................................................................................49
MM{constant}={constant} Set Station MM-Variable Value .............................................................................49
MP{constant} Report Station MP-Variable Value.............................................................................................49
MP{constant}={constant} Set Station MP-Variable Value...............................................................................49
MM{constant}-> Report Station MM-Variable Definition................................................................................49
MM{constant}->{X/Y:offset,width,format} Set Station MM-Variable Definition..............................................49
R{address} Read Station Address......................................................................................................................49
SAVE Save Station MI-Variables.......................................................................................................................50
SID Reports Serial Identification Number.........................................................................................................50
VERS Report Firmware Version........................................................................................................................50
VID Report Vendor ID Number.........................................................................................................................50
W{address},{value} Write Value to Station Address .........................................................................................50
PMAC TYPE 1 ACC-14M MACRO STATION COMMANDS ...........................................................................52
On-Line Commands ................................................................................................................................................52
MS Command .....................................................................................................................................................52
MS Variable Read...............................................................................................................................................53
MS Variable Write ..............................................................................................................................................53
MS Variable Read Copy .....................................................................................................................................53
MS Variable Write Copy.....................................................................................................................................54
Turbo PMAC PLC Commands for Type 1 ACC-14M MACRO Stations ..............................................................55
MS Variable Read Copy .....................................................................................................................................55
MS Variable Write Copy.....................................................................................................................................55
ACC-14M MACRO STATION MEMORY AND I/O MAP..................................................................................57
Internal Calculation Registers .................................................................................................................................57
Open Memory .........................................................................................................................................................57
DSPGATE2 Registers.............................................................................................................................................57
Table of Contents iii
Page 8

Page 9

Accessory 14M
INTRODUCTION
The ACC-14M can be used with a TURBO PMAC2 Ultralite or UMAC MACRO for either general
purpose digital I/O, direct connection to Opto22 style boards, or as high speed latched inputs for servo
loop position or velocity feedback. The ACC-14M can also run a Delta Tau PLCC program that allows
the user to process their IO in real time using its on-board processor without adding overhead to the Ring
Master controller.
The ACC-14M can be used as follows:
INPUTS OUTPUTS MI14 Comments
24 24 0 Default. J4 is Input Port and J5
is Output Port. Uses one IO
Node
0 48 1 Uses two IO nodes
48 0 2 Uses two IO nodes
24 24 3 J4 is Output Port and J5 is
Input Port. Uses one IO node
Whatever your intent, this manual is equipped with the necessary examples and descriptions to allow for a
rapid setup. While setup of the Acc-14M is easy for all its’ purposes it is a bit easier to setup the board
for the purpose of machine I/O than it is for the purpose of servo control. This is because configuring the
board for closed loop servo data requires a few more jumper settings, the setup of various I-variables in
the encoder conversion table, and if used for power on position the setup of certain power-on position
variables.
The encoder conversion table is setup on the controller side using variables I8000 through I8191.
Encoder conversion types are $2 and $3 for the ACC-14M and are described in the Turbo PMAC
Software Reference Manual.
If option 1 is ordered a set of analog inputs, analog outputs, and relay contacts are installed. These can be
used to control, for example, one or two inverter drives through the MACRO link.
This accessory works only with a Turbo PMAC2 controller, either in Ultralite or UMAC format.
Features:
• Two 24-bit IO ports configured as Inputs or Outputs. OPTO 22 compatible
• One 24-bit Gray Code to Binary Conversion for J4 port only
• Latching inputs
• Output Clock for Binary or Gray code encoder synchronization
Introduction 1
Page 10

Accessory 14M
Options
• OPT-A (30A-603740-OPT): Fiber Optic MACRO connectors
• OPT-C (30C-603740-OPT): RJ45 MACRO connectors
• OPT-1 (301-603740-OPT): This option includes:
o Two relay contact outputs
o Two 12-bit DAC outputs with 0-10 V voltage range
o Two 16-bit ADC inputs with 0-10 V voltage range
2 Introduction
Page 11

Accessory 14M
HARDWARE REFERENCE SUMMARY
Mechanical Layout
ACC-14M MACRO Station I/O Transfer 3
Page 12

Accessory 14M
Board Layout
Connectors and Indicators
Inputs and Outputs LED Indicators
Each of the 24 input and 24 INPUT/OUTPUT lines has an associated LED that displays its state, either
active or inactive, in the front panel of the unit.
Status LED Indicators
+24V: When lit, this LED indicates that 24V is applied to the unit.
PWR: When lit, this LED indicates that proper power is applied to the logic circuits
WD: When lit, this LED indicates that the watchdog safety circuit is activated, indicating a
failure condition.
7-Segment LED Indicator
This indicator reports the status of the unit with respect to the MACRO link. These are the possible status
codes:
0: Ring Active with no errors
1-9: NA
a: NA
b: Ring-break fault
c: Configuration change fault
d: Ring data-error fault
e: NA
f: Momentary ring fault
USB Connector
This connector is used to perform some software diagnostic procedures, or to download the operational
firmware. This connector is used in conjunction with the PEWIN32-Pro or equivalent software package.
24V Input Connector
Power is applied to the unit through this connector. The power requirement for logic is 300mA @
24VDC. The power requirement for the outputs is 50mA per each, 2.4A if all 48 are used.
MACRO Link Connectors
The unit can be ordered to use either RJ45 connectors with twisted pair copper wires or a fiber optic
connection. In either case, there will be an input and an output connector, and both are used to connect to
the MACRO link. The input connector is tied to the MACRO output connector of the previous device on
the link. The output connector connects to the input MACRO connector of the next device on the link.
DB-15 Option-1 Connector
When OPT-1 is ordered this connector provides the lines for two relay contact outputs, two 16-bit DAC
outputs with 0-10 V voltage range and two 16-bit ADC inputs with 0-10 V voltage range.
Relay Status LED Indictors
RLY1: When lit, this indicates that the first amplifier enable relay is activated.
4 ACC-14M MACRO Station I/O Transfer
Page 13

Accessory 14M
RLY2: When lit, this indicates that the second amplifier enable relay is activated.
Inputs and Outputs Terminal Blocks (J4 and J5)
Allows for the 48 bit Inputs/Outputs connections, their clocking, and errors. Each connector is a 50-pin
IDE header that allows for direct connection to Opto22 style boards.
E-Point Jumper Description
Refer to the layout diagram of ACC-14M for the location of the jumpers on the board.
Table 1: E-Point Jumper configuration and settings
Jumper Config Description Settings
E1 1-2 Watchdog Disable ON to disable watchdog
OFF for normal operation
E2 1-2-3 BootStrap 1-2 for bootstrap mode
2-3 for normal operation
E3 1-2 Buadrate ON for 9600 Baud for USB to Serial Coverter
OFF for 38400 Baud for USB to Serial Coverter
E5 1-2-3 Output clock polarity 1-2 OCLK is sample clock-
2-3 OCLK is sample clock+
E6 1-2-3 Latch clock polarity 1-2 ENA_CLK is sample clock+
2-3 ENA_CLK is sample clock-
E7 1-2 Input latch signal for
bits 0-23
E8 1-2 Error latch signal for
bits 0-23
E9 1-2 Input latch signal for
bits 24-47
E10 1-2 Error latch signal for
bits 24-47
JP1 1-2 Board Type Reserved for ACC-65M/ACC-68M OFF
JP2 1-2 Board Type Install jumper for ACC-14M 1-2
JP3-JP6 - Reserved OFF
JP7 1-2 Re-initialization ON for re-initialization to factory defaults at power up
The E7, E8, E9, and E10 jumpers are pulled up to 5V if not using ICLK or ERR inputs from the encoder. If you are
NOT using the ICLK or ERR inputs to the ACC-14M, then you will need to jumper E7 and E8 when using J4
connector port for inputs and/or E9 and E10 when using the J5 connector port for inputs.
ON passes the ICLK1 0V input from J4 to latch Inputs 0-23
OFF passes the ICLK1 5V input from J4 to latch Inputs 0-23
ON allows a low ERR1/ input to latch Inputs 0-23
OFF allows a high ERR1/ input to latch Inputs 0-23
ON passes the ICLK2 0Vinput from J5 to latch Inputs 24-47
OFF passes the ICLK2 5Vinput from to latch Inputs 24-47
ON allows a low ERR2/ input to latch the Inputs 24-47
OFF allows a high ERR2/ input to latch the Inputs 24-47
OFF for normal operations
Default
OFF
2-3
OFF
1-2
1-2
1-2
1-2
1-2
1-2
1-2
ACC-14M MACRO Station I/O Transfer 5
Page 14
Accessory 14M
CONNECTORS DESCRIPTION
USB Universal Serial Bus Port
Pin # Symbol Function
1 VCC N.C.
2 D- DATA-
3 D+ DATA+
4 GND GND
5 SHELL SHIELD
6 SHELL SHIELD
This connector is only used to change the operational firmware, or to perform basic software diagnostic
operations. The user can user a serial port terminal window such as Microsoft HyperTerminal to
communicate to the MACRO Device. You should set your serial port communication settings as follows:
Buad Rate: 38400 for E3 not jumpered or 9600 for E3 jumpered
Data Bits: 8
Parity: None
Stop Bits: 1
Flow Control: Xon/Xoff
If you have installed PEWIN Pro software, then the USB device should be recognized by your operating
system. If the device is not recognized by Windows, please contact the factory and we can assist you.
24VDC Input
Symbol Function
24V RET AGND
+24V +24V
This connector is used to power the unit with a 25A @ 24VDC power supply.
MACRO RJ-45 Copper Connectors
Front View
Pin # Symbol Function Description
1 DATA+ Data + Differential MACRO Signal.
2 DATA- Data - Differential MACRO Signal
3 Unused Unused terminated pin
4 Unused Unused terminated pin
5 Unused Unused terminated pin
6 Unused Unused terminated pin
6 ACC-14M MACRO Station I/O Transfer
Page 15

Accessory 14M
7 Unused
Unused te
ated p
8 Unused Unused terminated pin
rmin
in
The cable used for MACRO wired connections is CAT5 verified straight-through 8 conductor. The input
connector is tied to the MACRO INPUT/OUTPUT connector of the previous device on the link. The
INPUT/OUTPUT connector connects to the input MACRO connector of the next device on the link.
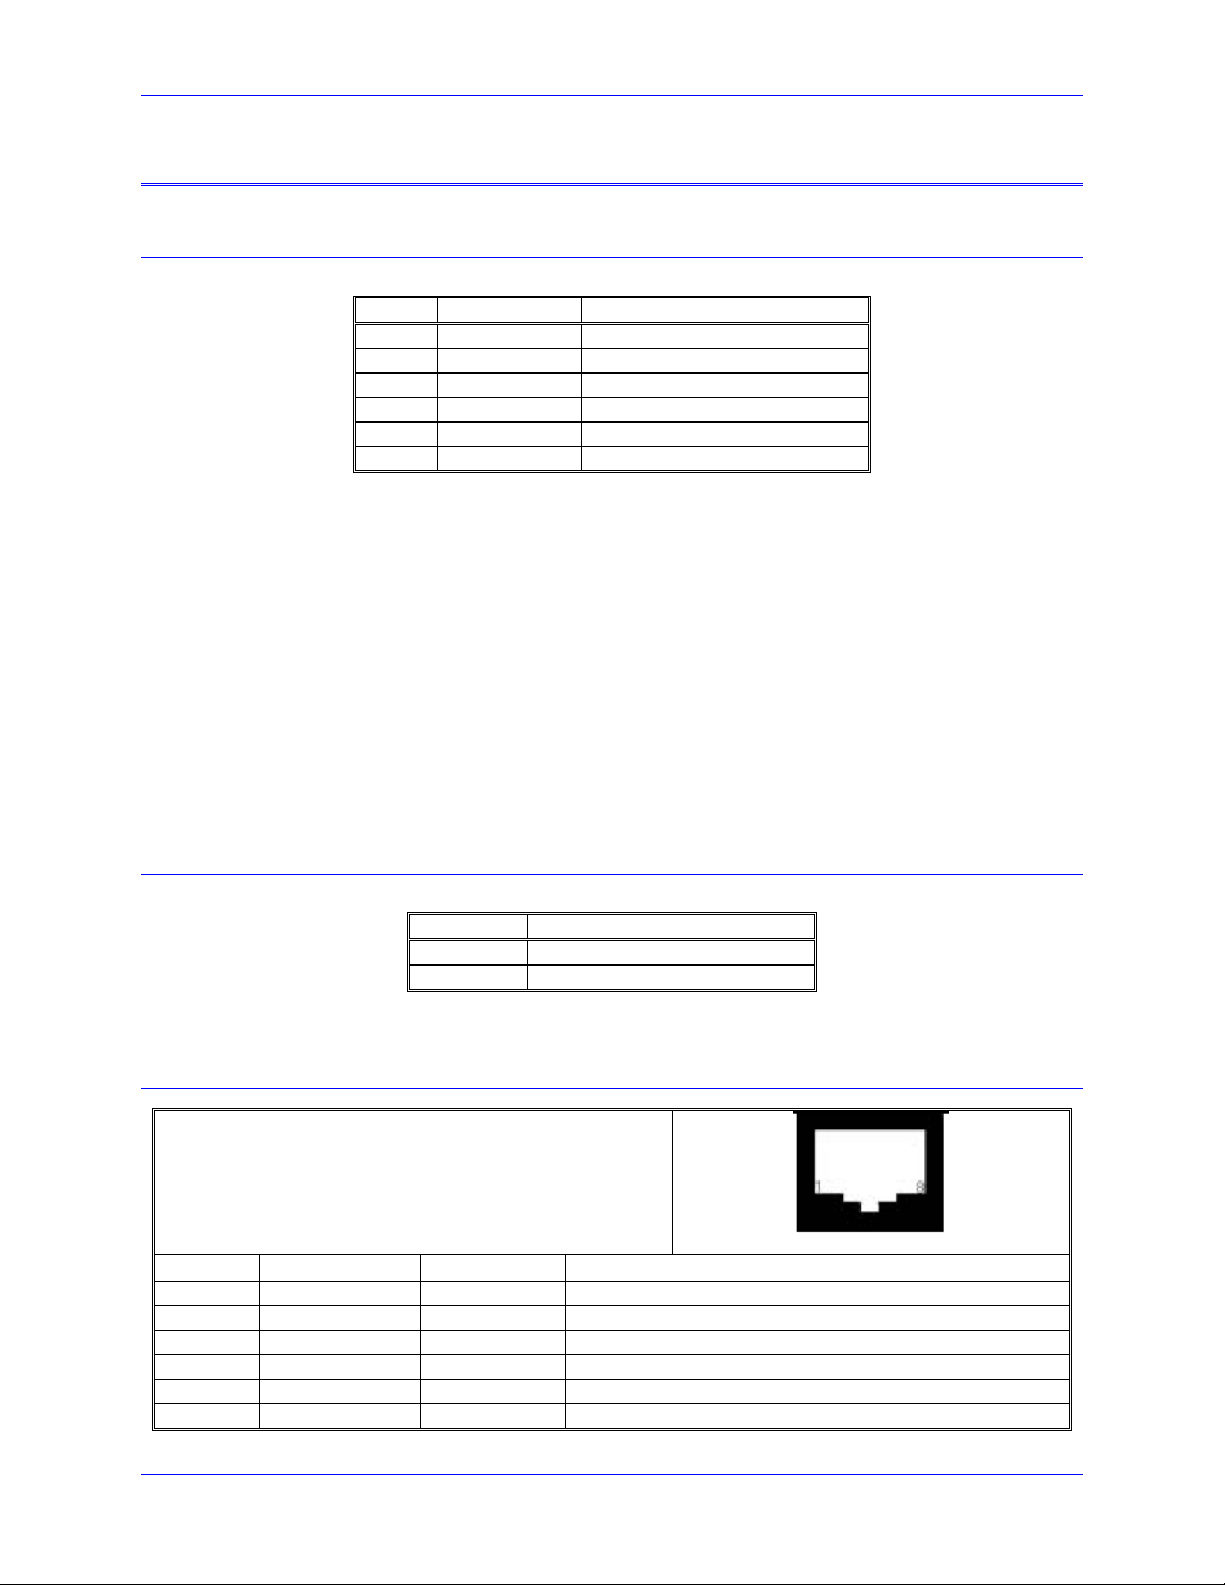
MACRO Fiber Optic Connector
U17: MACRO Fiber Optic Connector
(OPT A, B)
(2 Socket SC-Style)
Front View
Pin # Symbol Function Description Notes
1 RX Fiber Input MACRO Ring Receiver
2 TX Fiber Output MACRO Ring Transmitter
1. The fiber optic version of MACRO uses 62.5/125 multi-mode glass fiber optic cable terminated in an SC-style
connector. The optical wavelength is 1,300nm.
2. It is possible to "adapt" wire to fiber operation when using OPT B.
ACC-14M MACRO Station I/O Transfer 7
Page 16

Accessory 14M
Main IO Connectors J4 and J5
J4 (50 Pin Header)
Pin Symbol Function Description
1 MI/O23 In/out I/O at base address, bit 23
2 GND Common PMAC common
3 MI/O22 In/out I/O at base address, bit 22
4 GND Common PMAC common
5 MI/O21 In/out I/O at base address, bit 21
6 GND Common PMAC common
7 MI/O20 In/out I/O at base address, bit 20
8 GND Common PMAC common
9 MI/O19 In/out I/O at base address, bit 19
10 GND Common PMAC common
11 MI/O18 In/out I/O at base address, bit 18
12 GND Common PMAC common
13 MI/O17 In/out I/O at base address, bit 17
14 GND Common PMAC common
15 MI/O16 In/out I/O at base address, bit 16
16 GND Common PMAC common
17 MI/O15 In/out I/O at base address, bit 15
18 GND Common PMAC common
19 MI/O14 In/out I/O at base address, bit 14
20 GND Common PMAC common
21 MI/O13 In/out I/O at base address, bit 13
22 GND Common PMAC common
23 MI/O12 In/out I/O at base address, bit 12
24 GND Common PMAC common
25 MI/O11 In/out I/O at base address, bit 11
26 GND Common PMAC common
27 MI/O10 In/out I/O at base address, bit 10
28 GND Common PMAC common
29 MI/O9 In/out I/O at base address, bit 9
30 GND Common PMAC common
31 MI/O8 In/out I/O at base address, bit 8
32 GND Common PMAC common
33 MI/O7 In/out I/O at base address, bit 7
34 GND Common PMAC common
35 MI/O6 In/out I/O at base address, bit 6
36 GND Common PMAC common
37 MI/O5 In/out I/O at base address, bit 5
38 GND Common PMAC common
39 MI/O4 In/out I/O at base address, bit 4
40 GND Common PMAC common
41 MI/O3 In/out I/O at base address, bit 3
42 GND Common PMAC common
43 MI/O2 In/out I/O at base address, bit 2
44 ERR1 Input Error signal
45 MI/O1 In/out I/O at base address, bit 1
46 ICLK1 Input
47 MI/O0 In/out I/O at base address, bit 0
48 OCLK1 Output
49 +V Output 5V power
50 GND Common
8 ACC-14M MACRO Station I/O Transfer
Page 17

Accessory 14M
J5 (50 Pin Header)
Pin Symbol Function Description
1 MI/O47 In/Out I/O at base address, bit 47
2 GND Common PMAC common
3 MI/O46 In/Out I/O at base address, bit 46
4 GND Common PMAC common
5 MI/O45 In/Out I/O at base address, bit 45
6 GND Common PMAC common
7 MI/O44 In/Out I/O at base address, bit 44
8 GND Common PMAC common
9 MI/O43 In/Out I/O at base address, bit 43
10 GND Common PMAC common
11 MI/O42 In/Out I/O at base address, bit 42
12 GND Common PMAC common
13 MI/O41 In/Out I/O at base address, bit 41
14 GND Common PMAC common
15 MI/O40 In/Out I/O at base address, bit 40
16 GND Common PMAC common
17 MI/O39 In/Out I/O at base address, bit 39
18 GND Common PMAC common
19 MI/O38 In/Out I/O at base address, bit 38
20 GND Common PMAC common
21 MI/O37 In/Out I/O at base address, bit 37
22 GND Common PMAC common
23 MI/O36 In/Out I/O at base address, bit 36
24 GND Common PMAC common
25 MI/O35 In/Out I/O at base address, bit 35
26 GND Common PMAC common
27 MI/O34 In/Out I/O at base address, bit 34
28 GND Common PMAC common
29 MI/O33 In/Out I/O at base address, bit 33
30 GND Common PMAC common
31 MI/O32 In/Out I/O at base address, bit 32
32 GND Common PMAC common
33 MI/O31 In/Out I/O at base address, bit 31
34 GND Common PMAC common
35 MI/O30 In/Out I/O at base address, bit 30
36 GND Common PMAC common
37 MI/O29 In/Out I/O at base address, bit 29
38 GND Common PMAC common
39 MI/O28 In/Out I/O at base address, bit 28
40 GND Common PMAC common
41 MI/O27 In/Out I/O at base address, bit 27
42 GND Common PMAC common
43 MI/O26 In/Out I/O at base address, bit 26
44 ERR2 Input Error signal
45 MI/O25 In/Out I/O at base address, bit 25
46 ICLK2 Input
47 MI/O24 In/Out I/O at base address, bit 24
48 OCLK2 Output
49 +V Output 5v
50 GND Common
ACC-14M MACRO Station I/O Transfer 9
Page 18

Accessory 14M
OPT-1: DB-15 Connector
Pin # Symbol Function
1 GND COMMON GROUND
2 ADC1+ ANALOG INPUT 1+
3 ADC2+ ANALOG INPUT 2+
4 DAC1+ ANALOG OUTPUT 1+
5 DAC2+ ANALOG OUTPUT 2+
6 AE-NC-1 NORMALLY CLOSE RELAY 1
7 AE-COM-2 COMMON RELAY 2
8 AE-NO-2 NORMALLY OPEN RELAY 2
9 ADC1- ANALOG INPUT 1-
10 ADC2- ANALOG INPUT 2-
11 DAC1- ANALOG OUTPUT 1-
12 DAC2- ANALOG OUTPUT 2-
13 AE-COM-1 COMMON RELAY 1
14 AE-NO-1 NORMALLY OPEN RELAY 1
15 AE-NC-2 NORMALLY CLOSE RELAY 2
When OPT-1 is ordered this connector provides the lines for two relay contact outputs, two 12-bit DAC
outputs with 0-10 V voltage range and two 16-bit ADC inputs with 0-10 V voltage range.
10 ACC-14M MACRO Station I/O Transfer
Page 19

Accessory 14M
SOFTWARE SETUP
Typically, the MACRO Slave Device and MACRO Master IC (Ultralite) can support up to eight AXIS
nodes (0, 1, 4, 5, 8, 9, 12, and 13) and up to six I/O transfer nodes (2, 3, 6, 7, 10, and 11). This data
exchange goes through a MACRO IC at both points (master and slave) on the MACRO Ring. There are
three types of I/O transfers allowed that send information between the Turbo Ultralite and a MACRO
Device. These are, 48-bit I/O background data transfer, 72-bit phase rate I/O node transfer, and 48-bit
ASCII transfer.
The 48-bit I/O transfer occurs on node 15 of the MACRO ring and the 48-bit ASCII transfer occurs on
node 14 using the broadcast feature of MACRO. The 72-bit node transfer is used to exchange all
hardware I/O on the card, the 48-bit I/O transfer for MI variables and the 48-bit ASCII for Ring Order
setup of the Station. (The ACC-14M does not have switches that bind it to a certain Master and Node so
it uses Ring Order for initial binding to a Master and Node.) The Turbo PMAC2 Ultralite and the
MACRO Station enable transfer of 72 bits per I/O node with the I6841 and MI996 type variables.
Once the first node number has been established the Turbo Ultralite can control the Acc-14M through a
single I/O node, two consecutive I/O nodes, or an AXIS node depending on the type of control desired.
The data exchange format is described in the following table:
ACC14M MACRO 72-Bit Node (24 Inputs / 24 Outputs) FORMAT w/ Outputs high 24-bit word
1st X or Y: I/O Node (MI14.0 = 0, MI14.1 = 0) - One (1) I/O Node (Default)
Register # 0 ( 24 – bit ) 1 ( 16 – bit ) 2 ( 16 - bit ) 3 ( 16 - bit )
Command to
Acc-14M Station
Feedback from
Acc-14M Station
Outputs, bits 24 – 47 DAC 1
(Channel 1)
Inputs, bits 0 – 23 ADC 1 (08-23 bits)
(Channel 1)
DAC 2
(Channel 2)
ADC 2 (08-23 bits)
(Channel 2)
Flag Command
Flag Status
ACC14M MACRO 72-Bit Node (48 Outputs) FORMAT
1st X or Y: I/O Node (MI14.0 = 1, MI14.1 = 0) - Two (2) I/O Nodes (Two consecutive nodes must be enabled in MI996)
Register # 0 ( 24 – bit ) 1 ( 16 – bit ) 2 ( 16 - bit ) 3 ( 16 - bit )
Command to I/O
Station
Feedback from MI/O
Station
2nd I/O Node (Always the next consecutive X or Y: Node)
Register # 0 ( 24 – bit ) 1 ( 16 – bit ) 2 ( 16 - bit ) 3 ( 16 - bit )
Command to I/O
Station
Feedback from MI/O
Station
Outputs 0 – 23 DAC 1
(Channel 1)
Not used ADC 1 (08-23 bits)
(Channel 1)
Outputs 24 – 47 Not used Not used Not used
Not used Not used Not used Not used
DAC 2
(Channel 2)
ADC 2 (08-23 bits)
(Channel 2)
Flag Command
Flag Status
ACC14M MACRO 72-Bit Node (48 Inputs) FORMAT
1st X or Y: I/O Node (MI14.0 = 0, MI14.1 = 1) - Two (2) I/O Nodes (Two consecutive nodes must be enabled in MI996)
Register # 0 ( 24 – bit ) 1 ( 16 – bit ) 2 ( 16 - bit ) 3 ( 16 - bit )
Command to I/O
Station
Not used DAC 1
(Channel 1)
DAC 2
(Channel 2)
Flag Command
ACC-14M MACRO Station I/O Transfer 11
Page 20

Accessory 14M
Feedback from MI/O
Station
2nd I/O Node (Always the next consecutive X or Y: Node)
Register # 0 ( 24 – bit ) 1 ( 16 – bit ) 2 ( 16 - bit ) 3 ( 16 - bit )
Command to I/O
Station
Feedback from MI/O
Station
Inputs 0 – 23 ADC 1 (08-23 bits)
(Channel 1)
Not used Not used Not used Not used
Inputs 24 – 47 Not used Not used Not used
ADC 2 (08-23 bits)
(Channel 2)
Flag Status
ACC14M MACRO 72-Bit Node (24 Outputs / 24 Inputs) FORMAT w/ Outputs low 24-bit word
1st X or Y: I/O Node (MI14.0 = 1, MI14.1 = 1) - One (1) I/O Node (Default)
Register # 0 ( 24 – bit ) 1 ( 16 – bit ) 2 ( 16 - bit ) 3 ( 16 - bit )
Command to I/O
Station
Feedback from MI/O
Station
Note the 72-bit I/O can be done on a Y-Axis or X:IO Node
Outputs 0 – 23 DAC 1
(Channel 1)
Input 24 – 47 ADC 1 (08-23 bits)
(Channel 1)
DAC 2
(Channel 2)
ADC 2 (08-23 bits)
(Channel 2)
Flag Command
Flag Status
FLAG(s) Command Register
B09 - Reserved for future ring protocol control
B10 - Reserved for future ring protocol control
B11 - Reserved
B12 - Reserved
B13 - The Slave detected a MACRO Ring Break MRB & became a Ring master (Note 3)
B14 - Reserved
B15 – When B13 = 1 then B15 = 1 is a Station Fault.
B16 - Reserved for future ring protocol control
B17 - Reserved for future ring protocol control
B18 - Reserved for future ring protocol control
B19 - Fast User Defined Command Flag (UserCmd1) AENA_1 INPUT/OUTPUT
B20 - Fast User Defined Command Flag (UserCmd2) AENA_2 INPUT/OUTPUT
B21 - Fast User Defined Command Flag (UserCmd3)
B22 - Fast User Defined Command Flag (UserCmd4)
B23 - Fast User Defined Command Flag (UserCmd5)
12 ACC-14M MACRO Station I/O Transfer
Page 21

Accessory 14M
FLAG(s) Status Register
B08 - Reserved for future ring protocol status
B09 - Reserved for future ring protocol status
B10 - Reserved for future ring protocol status
B11 - Reserved
B12 - Reserved
B13 - This Node detected a MACRO Ring Break MRB (Note 3)
B14 - Reserved
B15 - Station or Real Time Data Node Fault
B16 - Reserved for future ring protocol status
B17 - Reserved for future ring protocol status
B18 - Reserved for future ring protocol status
B19 - Fast User Defined Status Flag (UserSatus1) AENA_1 INPUT/OUTPUT
B20 - Fast User Defined Status Flag (UserSatus2) AENA_2 INPUT/OUTPUT
B21 - Fast User Defined Status Flag (UserSatus3)
B22 - Fast User Defined Status Flag (UserSatus4)
B23 - Fast User Status Flag(UserSatus5)
To use this card the user will have to establish communications using the ring order method to activate the
nodes at MACRO Slave Device (ACC-14M). The user must also activate the nodes at the MACRO
Master Device (typically an Ultralite) to allow communications from the Master to the Slave. Once
communications is working properly the user can then setup the inputs and outputs or feedback devices.
The following sections will show the user how to setup:
• Ring Order Method of Communications
• General Purpose Inputs and outputs on ACC-14M
• Setting up Feedback Devices on ACC-14M
ACC-14M MACRO Station I/O Transfer 13
Page 22

Accessory 14M
ASCII Ring Order Initial Binding of the ACC-14M Station
To initially bind the ACC-14M to a MACRO Master, the Ring Order method is used. When this is used
the Ring Controller sends a command out on the Ring in the ASCII communication protocol. It is asking
to talk to the first MACRO Station that does not have a Station Number (MI11=0 or STN=0). When this
communication state is entered, the Ring Controller is now talking to the MACRO Station in an ASCII
data exchange mode. That Station can be either another Turbo PMAC MACRO Station or Slave Station
like the ACC-14M. Once communication is established, the developer at the Ring Controller binds the
Station to a Master and Node (It sets the Slave Station’s MI996). It is now setup for the normal 72-bit
and 48-bit I/O exchange between the Master and Slave Station (the ACC-14M). To come back and
communicate with this Station in the ASCII data exchange, its station number (STN) is set normally to its
order on the Ring. Once this is done, the Ring Order attempts to find the next station on the Ring that has
not been setup for Ring Order (STN=0). Control T is entered. It terminates the ASCII communication
transfer between the Ring Controller and the Station and returns to normal communication with the Ring
Controller.
At a minimum, the user must set the following I-variables to enable MACRO ASCII mode
communications.
I6840=$4030 ;to enable MACRO IC0 as sync-master and node 14 for auxiliary communications
I6841=$0FCxxx ;to enable node 15 and 14. If activating nodes 0,1,4,5 we would set I6841=$0FC033
I79=32 ;Timeout value for Node 14 Auxiliary communications
If the customer is using more than one MACRO IC, then they will setup I6890, I6891, I6940, I6941, I6990,
and I6991 appropriately. Once the communication variables are modified, they must be saved to the memory
of the controller with the save command and then reset the controller with either a “$$$” command or power
cycle the controller.
Note:
The PMAC Controller will be able to communicate to the MACRO Device in
MACRO ASCII communication mode after the unit has been reset with the
changes saved to its memory. This can be done by cycling power or by ussuing
the following commands:
mssav2 ;save settings to Macro station which has node 2 activated
ms$$$2 ;reset Macro station which has node 2 activated
Establishing Communications with the ACC-14M Station
After hooking up the Ring and 24VDC power, the user can try to read and write to the IO Device.
1. Ring Order (at the Ring Controller), enter MACSTA255. Now you can assign it a Station number by
entering STN=n where n is the Station number. If a Macro I/O error is received, make sure I6840,
I6841 and I79 are set correctly. Also make sure that the Unit has not been already assigned a Station
number.
If the Station has already been assigned a Station number, there are two options:
a) Find out the station number n and enter MACSTA<n>, where n is the station number, to initiate
MACRO ASCII communication with the Station.
b) Reset the station number of all the stations by entering MACSTA0 and then enter STN=
c) Note:
14 ACC-14M MACRO Station I/O Transfer
Page 23

Accessory 14M
This will NOT reset all the parameters in the MACRO Stations) or $$$**
Note:
This will reset all the parameters in the MACRO Stations).
Next enter ^T to exit MACRO ASCII communications. Then enter MACSTA255 to access the
first Station. Now you can assign it a Station number by entering STN=n where n is the Station
number. Enter ^T to exit MACRO ASCII Communications. Enter MACSTA255 again to
access the next station and repeat this process until you get a MACRO I/O error telling you that
there are no further unassigned stations.
2. Enter MACSTA<n> where n is the Station number. Enter I996=$F4004. (Binds to Ring Controller 0
& Node2)
3. Enter ^T. (Control-T terminates MACRO ASCII Communications)
4. Enter MSCLRF2. (Clears any faults)
5. Enter I6841=I6841 | $0FC004 (Enable Node 2).
6. Set up M-Variables for I/O as follows:
M0->X:$78420,24 ; 24 bit I/O
M1->X:$78421,8,16,S ; DAC_1 output
M2->X:$78422,8,16,S ; DAC_2 output
M3->X:$78423,0,24 ; AENA_1/2 output command
M4->X:$78421,8,16,S ; ADC_1 Input
M5->X:$78422,8,16,S ; ADC_2 Input
7. Test with the I/O (if I/O is powered properly and not connected to machine devices)
M0=$555555 ;The INPUT/OUTPUT LEDs in the 55 pattern.
M0=$AAAAAA ;The INPUT/OUTPUT LEDs in the AA pattern.
M3=$80000 ;The AENA_1 LED on and the relay closed.
M3=$100000 ;The AENA_2 LED on and the relay closed
M1=653 ;DAC_1 outputs at 1V
M2=653 ;DAC_2 outputs at 1V
M4 & M5 ;ADC_1/2 inputs
ACC-14M MACRO Station I/O Transfer 15
Page 24

Accessory 14M
USING ACC-14M FOR INPUTS AND OUTPUTS
For general purpose inputs and outputs, the ACC-14M can be used as follows:
INPUTS OUTPUTS MI14 Comments
24 24 0 Default. J4 is Input Port and J5 is Output Port.
Uses one IO Node
0 48 1 Uses two IO nodes
48 0 2 Uses two IO nodes
24 24 3 J4 is Output Port and J5 is Input Port. Uses one IO
node
The key parameter to set this up is MI14. When the user modifies MI14 on the ACC-14M, they must
issue a SAVE command to the ACC-14M and a $$$ command to the ACC-14M to activate the desired
mode. The default setting for the ACC-14M is MI14=0 and this means that the board is ready to function
as a 24 input and 24 output board when received from the factory.
MI14 Mode Setting 0 or 3 (24 inputs and 24 outputs) ADD mode 1 and 2
If MI4 is set to 0 then the ACC-14M allow the user to read and write to 24 inputs and 24 outputs. If MI14
is set to either 0 or 3 then the ACC-14M will use the 24-bit node register of the activated node to process
the inputs and outputs. The only difference between the MI4 setting of 0 and 3 is the physical location of
the inputs and outputs as shown below:
MI14 Input Output Notes
0 J4 Connector J5 Connector Default
3 J5 Connector J4 Connector
Using the IO is accomplished by writing to a node register to activate the desired outputs and reading the
same node register to read the status of the inputs. In other words the one 24-bit node register is used for
both inputs and outputs when MI14 = 0 and 3. This is efficient because it allows the 48-bits of
information to be processed using one 24-bit word and minimizes the number of nodes needed for the IO
data transfers for each MACRO Device. The only drawback to this technique is that the user will have to
keep track of the status of their outputs (see example).
Example: If the user has MI14=0 and has node 2 activated at both the Master and MACRO Device, they
can make the following definitions to read and write to the inputs and INPUT/OUTPUTs.
M3000->X:$78420,0,24 ;Actual Input/INPUT/OUTPUT Word
M4000->X:$10F0,0,24 ;Input Image Word
M4001->X:$10F1,0,24 ;Output Image word
Open PLC1 Clear
M4000=M3000 ;Input Image Word equals Actual Input Word
Process Inputs and Build image
output word (M4001)
16 ACC-14M MACRO Station I/O Transfer
Page 25

Accessory 14M
M3000=M4001 ;Set Actual output word to output Image word
Close
If the user is using another node they can be accessed at the following locations:
Table 1a Table 1b
User Node IO Word Address User Node IO Word Address
2 X:$078420,0,24 34 X:$07A420,0,24
3 X:$078424,0,24 35 X:$07A424,0,24
6 X:$078428,0,24 38 X:$07A428,0,24
7 X:$07842C,0,24 39 X:$07A42C,0,24
10 X:$078430,0,24 42 X:$07A430,0,24
11 X:$078434,0,24 43 X:$07A434,0,24
18 X:$079420,0,24 50 X:$07B420,0,24
19 X:$079424,0,24 51 X:$07B424,0,24
22 X:$079428,0,24 54 X:$07B428,0,24
23 X:$07942C,0,24 55 X:$07B42C,0,24
26 X:$079430,0,24 58 X:$07B430,0,24
27 X:$079434,0,24 59 X:$07B434,0,24
ACC-14M MACRO Station I/O Transfer 17
Page 26

Accessory 14M
USING OPTION 1 – ADC’S, DAC’S, RELAY’S
If the ACC-14M Option 1 is ordered, the ACC-14M also allows the user to use two analog inputs, two
DAC outpts, and two relay outputs.
Using the ACC-14M ADC
The MACRO Peripheral Accessories can be ordered with two analog to digital converters. These A/D
converters are 16-bit devices that are ready to be used without any software setup. Delta Tau uses the
Burr Brown ADS8361E for this circuit. This 16-bit option can be ordered on the ACC-14M (603741-
101) revision 1 and greater.
To read the A/D data from the MACRO device, the user must create the M-variable definitions to the
node associated with the MACRO device. The data received is a signed 16-bit number scaled from –10V
to +10V. The data is transferred into the upper 16-bits of the MACRO IO node registers. For example, if
the ACC-65M is associated with node 2, then the following M-variable assignment can be created:
M5000->X:$78421,8,16,S ;ADC0 upper 16 bits of IO Node 2 word1
M5001->X:$78422,8,16,S ;ADC1 upper 16 bits of IO Node 2 word2
Example Data Read: If you read a value of 20480 in M5000, then that would be approximately 6.25V. 16bit Voltage Conversion = Data×10V/32767 or for this example, 6.25V≈20480×10V/32767.
Earlier revisions of the ACC-14M used the 12-bit Burr Brown ADS7861E for this circuit. For proper
operation of the 12-bit ADC or if the users application requires 12-bit data reads then they can make the
following definitions (12-bit Voltage Conversion = Data×10V/2047):
M5000->X:$78421,12,12,S ;ADC0 upper 12 bits of IO Node 2 word1
These examples also assume that the IO nodes are activated at both the MACRO Peripheral Device
(Slave) and at the Ultralite (Master). The following table lists the locations of the ADCs if using other
node locations.
User Node ADC0 ADC1
2 X:$078421,8,16,S X:$078422,8,16,S
3 X:$078425,8,16,S X:$078426,8,16,S
6 X:$078429,8,16,S X:$07842A,8,16,S
7 X:$07842D,8,16,S X:$07842E,8,16,S
10 X:$078431,8,16,S X:$078432,8,16,S
11 X:$078435,8,16,S X:$078436,8,16,S
18 X:$079421,8,16,S X:$079422,8,16,S
19 X:$079425,8,16,S X:$079426,8,16,S
22 X:$079429,8,16,S X:$07942A,8,16,S
23 X:$07942D,8,16,S X:$07942E,8,16,S
26 X:$079431,8,16,S X:$079432,8,16,S
27 X:$079435,8,16,S X:$079436,8,16,S
34 X:$07A421,8,16,S X:$07A422,8,16,S
35 X:$07A425,8,16,S X:$07A426,8,16,S
38 X:$07A429,8,16,S X:$07A42A,8,16,S
39 X:$07A42D,8,16,S X:$07A42E,8,16,S
42 X:$07A431,8,16,S X:$07A432,8,16,S
43 X:$07A435,8,16,S X:$07A436,8,16,S
50 X:$07B421,8,16,S X:$07B422,8,16,S
51 X:$07B425,8,16,S X:$07B426,8,16,S
18 ACC-14M MACRO Station I/O Transfer
Page 27

Accessory 14M
54 X:$07B429,8,16,S X:$07B42A,8,16,S
55 X:$07B42D,8,16,S X:$07B42E,8,16,S
58 X:$07B431,8,16,S X:$07B432,8,16,S
59 X:$07B435,8,16,S X:$07B436,8,16,S
Using the ACC-14M DAC Output
The MACRO Peripheral Accessories can be ordered with two +/-10V outputs produced by filtering a
PWM signal. This technique has been used been for some time now by many of our competitors.
Although this technique does not contain the same levels of performance as a true Digital to Analog
converter, for most servo applications it is more than adequate.
Both the resolution and the frequency of the Filtered PWM outputs are configured in software on the
MACRO Peripheral Accessories through the variable MI992 (MaxPhase Setting). This MI992 variable
also effects the phase and servo interrupts. On most MACRO systems the MI992 value will be set to the
same value as the Turbo Ultrallite or UMAC ACC-5E equivalent MaxPhase I-variable
(I6800/I6850/I6900/I6950). Another key variable to be concerned about at the MACRO Peripheral
Device is MI994. MI994 is the PWM dead time specification and it is used to add dead-time to the PWM
signal as a safety feature for PMAC2 direct PWM commutation. For the DAC outputs for the MACRO
peripheral this variable (MI994) should be set to zero. For more details about these variables please refer
to the Software reference manuals for the respective hardware devices.
To write to the DAC devices at MACRO Peripheral Device the user must create the M-variable
definitions to the node associated with the MACRO device. The data received is a signed 16-bit number
scaled from –10V to +10V. The data is transferred into the upper-bits of the MACRO IO node registers.
For example if the user had the ACC-65M associated with node 2 then we could make the following Mvariable assignment:
M5000->X:$78421,8,16,S ;DAC0 bits of IO Node 2 word1
M5001->X:$78422,8,16,S ;DAC1 bits of IO Node 2 word2
MS2,MI992=6527 ;6527 is default
MS2,MI994=0
;set dead-time to zero
This example also assumes that the IO node number 2 is activated at both the MACRO Peripheral Device
(Slave) and at the Ultralite (Master).
To scale the outputs the user will have to know the relationship between MI992 and the DAC outputs. If
the user sets MI994=0, then they can assume that the maximum voltage output will be scaled relative to
MI992. For example, if MI992=6527 (default value), and if the user sets M5000=6527 then, they will
measure 10V on DAC1+ relative to AGND or 20V relative to DAC1-. Likewise, if they set
M5000=652.7 they will measure +1V on DAC1+ relative to AGND or +2V relative to DAC1-.
The following table list the locations of the DAC’s if using other node locations.
User Node DAC0 DAC1
2 X:$078421,8,16,S X:$078422,8,16,S
3 X:$078425,8,16,S X:$078426,8,16,S
6 X:$078429,8,16,S X:$07842A,8,16,S
7 X:$07842D,8,16,S X:$07842E,8,16,S
10 X:$078431,8,16,S X:$078432,8,16,S
11 X:$078435,8,16,S X:$078436,8,16,S
18 X:$079421,8,16,S X:$079422,8,16,S
19 X:$079425,8,16,S X:$079426,8,16,S
22 X:$079429,8,16,S X:$07942A,8,16,S
23 X:$07942D,8,16,S X:$07942E,8,16,S
26 X:$079431,8,16,S X:$079432,8,16,S
27 X:$079435,8,16,S X:$079436,8,16,S
ACC-14M MACRO Station I/O Transfer 19
Page 28

Accessory 14M
34 X:$07A421,8,16,S X:$07A422,8,16,S
35 X:$07A425,8,16,S X:$07A426,8,16,S
38 X:$07A429,8,16,S X:$07A42A,8,16,S
39 X:$07A42D,8,16,S X:$07A42E,8,16,S
42 X:$07A431,8,16,S X:$07A432,8,16,S
43 X:$07A435,8,16,S X:$07A436,8,16,S
50 X:$07B421,8,16,S X:$07B422,8,16,S
51 X:$07B425,8,16,S X:$07B426,8,16,S
54 X:$07B429,8,16,S X:$07B42A,8,16,S
55 X:$07B42D,8,16,S X:$07B42E,8,16,S
58 X:$07B431,8,16,S X:$07B432,8,16,S
59 X:$07B435,8,16,S X:$07B436,8,16,S
Using the ACC-14M Amplifier Enable Outputs
The MACRO Peripheral amplifier enable outputs are very similar to the amplifier enable circuits used on
other Delta Tau products. These outputs allow the user to send outputs that can be configured as either
normally open or normally closed. The amplifier enable outputs are memory mapped to the third 16-bit
node address or at the base address of the activated node +3. The AENA1 signal is at bit 19 and AENA2
signal is at bit 20. The following M-variable definitions can be made for the AENA signals at node 2
(assuming node 2 is activated at both the Master and MACRO Device).
M3003->X:$78423,8,16 ; AENA Outputs at bits 19 and 20
M3010->X:$78423,19 ;AENA1
M3011->X:$78423,20 ;AENA2
5V+
AENA
Isolation
AE_NO
AE_COM
AE_NC
The following table lists the AENA output locations for all nodes.
User Node AENA1 AENA2
2 X:$078423,19 X:$078423,20
3 X:$078427,19 X:$078427,20
6 X:$07842B,19 X:$07842B,20
7 X:$07842F,19 X:$07842F,20
10 X:$078433,19 X:$078433,20
11 X:$078437,19 X:$078437,20
18 X:$079423,19 X:$079423,20
19 X:$079427,19 X:$079427,20
22 X:$07942B,19 X:$07942B,20
23 X:$07942F,19 X:$07942F,20
26 X:$079433,19 X:$079433,20
27 X:$079437,19 X:$079437,20
34 X:$07A423,19 X:$07A423,20
35 X:$07A427,19 X:$07A427,20
20 ACC-14M MACRO Station I/O Transfer
Page 29

Accessory 14M
38 X:$07A42B,19 X:$07A42B,20
39 X:$07A42F,19 X:$07A42F,20
42 X:$07A433,19 X:$07A433,20
43 X:$07A437,19 X:$07A437,20
50 X:$07B423,19 X:$07B423,20
51 X:$07B427,19 X:$07B427,20
54 X:$07B42B,19 X:$07B42B,20
55 X:$07B42F,19 X:$07B42F,20
58 X:$07B433,19 X:$07B433,20
59 X:$07B437,19 X:$07B437,20
USING ACC-14M FOR SERVO FEEDBACK
The data ACC-14M can also be used for Servo Loop Feedback when used with a binary style or graycode
style feedback device. If using Graycode style feed back the ACC-14M can only process the data on the
J4 connector port. For Binary style feedback devices, the ACC-14M can use the inputs on both the J4
connector and J5 connector.
Delta Tau recommends using the standard IO node data transfer to the Master controller (Ultralite) and
then setup the encoder conversion at the Master controller.
For example, if the user has nodes 2 and 3 activated for feedback data then they would be receiving the
data in locations X:$78420 (node2) and X:$78424 (node3) as shown in Table 1a and 1b. Now that we
know where the data is coming from we can then process this information like any other parallel word.
Example Turbo Encoder Conversion Table Setup for ACC-14M
Two 18-bit encoders are used in an application with 10000 cts/in and a maximum velocity of 20 in/sec is
specified. Accessory 14M port A will be used for the first encoder and port B will be used for the second
encoder. The servo update rate is set at the factory default of 2258 Hz. For this example, setup an
encoder with filtering, without filtering, and with 24-bit resolution.
First, calculate the maximum velocity per servo cycle:
2010000
sec
in
sec
2258
=××=
cyc
V
max
cts
in
ECT Setup for 18-bit Encoder without Filtering
I8000=$678420 ;extended feedback entry from $078420 ($3501)
I8001=$012018 ;18-bit ($12) from $078420 base + 24 ($3502)
I8002=$678424 ;extended feedback entry from $078424 ($3503)
I8003=$012018 ;18-bit ($12) from $078424 base +24 ($3504)
I103=$3502 ;position feedback for motor 1 from $3502
I104=$3502 ;velocity feedback for motor 1 from $3502
I203=$3504 ;position feedback for motor 2 from $3504
I204=$3504 ;velocity feedback for motor 2 from $3504
ECT Setup for 18-bit Encoder with Filtering
I8000=$678420 ;extended feedback entry from $078420 ($3501)
I8001=$012018 ;18-bit ($12) from $078420 base + 24 ($3502)
I8002=$00006E ;filter 110cts/cyc (88.57*1.25) ($3503)
I8003=$678424 ;extended feedback entry from $078424 ($3504)
I8004=$012018 ;18-bit ($12) from $078424 base +24 ($3505)
I8005=$00006E ;filter 110cts/cyc (88.57*1.25) ($3506)
57.88
cyc
cts
ACC-14M MACRO Station I/O Transfer 21
Page 30

Accessory 14M
I103=$3503 ;position feedback for motor 1 from $3502
I104=$3503 ;velocity feedback for motor 1 from $3502
I203=$3506 ;position feedback for motor 2 from $3504
I204=$3506 ;velocity feedback for motor 2 from $3504
Absolute Encoder Setup for ACC-14M
(Add information Rich)
Graycode Encoder Feedback
If using a graycode style encoder with the ACC-14M the user can only use the J4 port as an input. The
processed data for the graycode encoder will be located in the Y:$C08C register in bits 0 through 23.
22 ACC-14M MACRO Station I/O Transfer
Page 31

Accessory 14M
FEEDBACK DATA LATCHING AND HANDSHAKING
When using a parallel-word absolute encoder, it is important to properly latch the encoder data to prevent
PMAC from reading the encoder data during an encoder transition. ACC-14M allows several latching
and handshaking methods to fit most types of latching schemes.
Note:
It is equally important to set up the Encoder Conversion Table Filter Word as a
software protection against bad encoder data.
PMAC reads the encoder data when it processes the Encoder Conversion Tables. This happens shortly
(approximately 2
first). Therefore, most of the following latching methods will be synchronized to the falling edge of the
servo clock.
The error signal inputs (ERR1/ and ERR2/) allow the feedback device to send a signal to the latch circuit
to interrupt the latch. Jumpers E8 and E10 are used to set the polarity for the error inputs signals. If the
feedback device does not have an error signal output, then set the jumpers E8 and E10 from 1-2 to allow
the latch circuit to work properly. See the Jumper Descriptions section of this manual for details on E8
and E10.
µ
sec) after the falling edge of the servo clock (the phase calculations are performed
ACC-14M MACRO Station I/O Transfer 23
Page 32

Accessory 14M
Method 1
This method requires the encoder inputs to be latched on the falling edge of the servo clock and no
latching to be done on ACC-14M. For latching the encoder inputs, the servo clock is accessed through
ACC-14M OCLK1 (see J4 pinout) and/or OCLK2 (see J5 pinout). If the encoder requires a rising edge
for its latch, then E5 should be jumpered 1 to 2 for OCLK1/OCLK2 respectively. If a falling edge is
required, E5 should be jumpered 2 to 3.
Required Signal E5 E6 E7/E9 Latch
Rising edge of OCLK 1 to 2 Don’t care Don’t care No
Falling edge of OCLK 2 to 3 Don’t care Don’t care No
The advantages and disadvantages of this method are as follows:
Advantage
Disadvantage
Easy to configure and set up.
Encoder's output latch must typically happen within 2 µsec.
Method 2
This method requires the encoder outputs to be latched on the rising edge of the servo clock and ACC14M to latch (strobe) the encoder inputs on the falling edge of the servo clock. For latching the encoder
outputs, the servo clock is accessed through ACC-14M OCLK1 (see J4 pinout ) and/or OCLK2 (see J5
pinout). If the encoder requires a rising edge for its latch, then E5 should be jumpered 1 to 2 for
OCLK1/OCLK2 respectively. If a falling edge is required, E5 should be jumpered 2 to 3. The control
words for the data must be setup for latching to allow the ACC-14M latch the data.
Required Signal E5 E6 E7/E9 Latch
Rising edge of OCLK 1 to 2 2 to 3 ON Yes
Falling edge of OCLK 2 to 3 1 to 2 ON Yes
The advantages and disadvantages of this method are as follows:
Advantage
Disadvantage
Encoder latch-time is not very critical (have almost 1 servo cycle to
latch).
Almost a 1-servo cycle delay between encoder output latch and ACC14M encoder read.
24 ACC-14M MACRO Station I/O Transfer
Page 33

Accessory 14M
Method 3
This method requires a self-latching encoder that outputs a signal that indicates it is latched and an ACC14M that latches (strobes) the encoder inputs on the falling edge of the ICLK only when the servo clock is
low. The encoder-latched indicator is brought into ACC-14M via the ICLK1/2 inputs (see J4 and/or J5
pinout). If the encoder outputs a rising edge for its latch indicator, then E7/E9 should be jumpered, so
that a rising ICLK latches the data when the servo is low. If a falling edge indicator is output, E7/E9
should not be jumpered, so that a falling ICLK latches the data when the servo is low. The control words
for the data must be setup for latching to allow the ACC-14M to latch the data.
Required Signal E5 E6 E7/E9 Latch
High ICLK means latched Don't care 2 to 3 ON Yes
Low ICLK means latched Don't care 2 to 3 OFF Yes
The advantages and disadvantages of this method are as follows:
Advantage
Disadvantage
Can only read latched encoder data.
Encoder latch is asynchronous to PMAC's servo cycle.
Method 4
This method is a combination of methods 1 and 3 above. It requires that the encoder outputs be latched
on the falling edge of the servo clock and the encoder to signal that it is latched. Also, ACC-14M must
latch (strobe) the encoder inputs on an edge of the ICLK only when the servo clock is low. For latching
the encoder outputs, the servo clock is accessed through ACC-14M OCLK1 (see J4) and/or OCLK2 (see
J5). If the encoder requires a rising edge for its latch, then E5 should be jumpered 1 to 2 for
OCLK1/OCLK2 respectively. If a falling edge is required, E5 should be jumpered 2 to 3. The encoderlatched indicator is brought into ACC-14M via the ICLK1/2 inputs (see J4 & J5 pinouts). If the encoder
outputs a rising edge for its latch indicator, then E7/E9 should be jumpered so that a rising ICLK latches
the data when the servo is low. If a falling edge indicator is output, E7/E9 should not be jumpered so that
a falling ICLK latches the data when the servo is low. The control words for the data must be setup for
latching to allow the ACC-14M to latch the data.
Required Signal E5 E6 E7/E9 Latch
High OCLK means latch
High ICLK means latched
Low OCLK means latch
High ICLK means latched
High OCLK means latch
Low ICLK means latched
Low OCLK means latch
Low ICLK means latched
1 to 2 1 to 2 ON Yes
2 to 3 1 to 2 ON Yes
1 to 2 1 to 2 OFF Yes
2 to 3 1 to 2 OFF Yes
The advantages and disadvantages of this method are as follows:
Advantage
Disadvantage
Can only read latched encoder data.
Have full handshaking between PMAC and encoder
Typically, encoder’s output latch must happen within 2 µsec.
More complex wiring and timing.
ACC-14M MACRO Station I/O Transfer 25
Page 34

Accessory 14M
Method 5
This method requires no latching on the encoder outputs and latching on the ACC-14M inputs at the
falling edge of the servo clock. For the encoder, no signals are used so the state of the OCLK does not
matter. E7/E9 must be jumpered and latching must be enabled from the control to allow ACC-14M to
latch (strobe) its inputs with the falling edge of the servo clock. The control words for the data must be set
up for latching to allow the ACC-14M to latch the data.
Required Signal E5 E6 E7/E9 Latch
Latch at Falling Edge Don't care 2 to 3 ON Yes
Latch at Rising Edge Don't care 1 to 2 ON Yes
The advantages and disadvantages of this method are as follows:
Advantage
Disadvantage
Easy to configure and set up.
The encoder data may be latched into ACC-14M at an encoder
transition causing bad encoder data for that servo cycle. Must set up
the Encoder Conversion Table Filter
26 ACC-14M MACRO Station I/O Transfer
Page 35

Accessory 14M
MACRO ASCII Communication Reference:
1. “VID” Vendor ID (Delta Tau = 1, Range=1- 65535)
2. “CID” Vendor Card ID, Part Number, (Range=1- 4,294,967,295) 32 bit unsigned.
a) Delta Tau: TURBO PMAC 2 VME = 602413 (MACRO Master)
b) Delta Tau: TURBO PMAC 2 Ultra-lite = 603182 (MACRO Master)
c) Delta Tau: UMAC TURBO = 603382 (MACRO Master)
d) Delta Tau: UMAC MACRO 8 = 602804 (MACRO Slave)
e) Delta Tau: UMAC MACRO 16 = 602??? (MACRO Slave)
3. “SID” Serial ID (Range = 64 bit unsigned, 0=Serial ID not available)
4. “$$$**” - Station to reset to default parameter with no station number and ready for Ring location
identification. Note not $$$***.
5. “SAVe” – Save station number and initialization parameters.
6. “$$$” – Reset Station to “SAVed” station number and initialization parameters.
7. “STN=n” <n=0-254> – Assigns the MACRO station number. Normally this would be its order in
the Ring. A “STN=0” resets the station number and is reserved for the Ring Controller Master.
8. Commands with STN=0 is a broadcast to all stations in Ring.
st
9. Commands with STN=255 is a request for communication with the 1
station in Ring with its
STN=0.
10. Commands with STN=1-254 is a request for communication with the station in Ring with STN=1-
254.
11. “STN” – The addressed MACRO Station responds with its station number (n).
12. “STN=n” where n=0-254 – Set the addressed MACRO Station’s STN to “n.”
Note:
The station will stop responding to you.
ACC-14M MACRO Station I/O Transfer 27
Page 36

Accessory 14M
Firmware Updates
Downloading new firmware to the MACRO IO Device is a simple process once the MACRO board is set
up properly. To download new firmware to the MACRO IO Device, obtain the following items:
• Two jumpers
• USB Cable
• Install drivers for MACRO IO USB Device from http://www.ftdichip.com. Usually PEWIN Pro will install
the driver and the board should automatically be seen by the operating system.
• MACRO Firmware Download Software (MacroFWDown.exe)
• New firmware file (MACROIO.bin)
To download the software to the MACRO Device, do the following:
1. Copy the firmware into a directory (C:\Macro\Firmware).
2. Jumper the E2 (1-2) and E1 (1-2).
3. Place the USB cable to the J2 USB connection on the MACRO Device and place the other end to the
USB port on the PC.
4. Power up the MACRO Device and then launch MacroFWDown.exe. Choose the com port and select
MACRO I/O and then press the Download FW button.
After the download is complete, power down the system and remove jumper E1 and place jumper E2
from
28 ACC-14M MACRO Station I/O Transfer
Page 37

Accessory 14M
ACC-14M MACRO STATION MI-VARIABLE REFERENCE
The ACC-14M is set up through its own set of initialization I-variables, which are distinct from the Ivariables on a Turbo PMAC2. Usually, they are referenced as MI-variables (e.g. MI900) to distinguish
them from PMAC’s own I-variables, although they can be referenced just as I-variables.
These MI-variables can be accessed through the on-line MS{node#},MI{variable#} read and
MS{node#},MI{variable#}={constant} write commands, or the
MSR{node#},MI{variable#},{PMAC variable} read-copy and
MSW{node#},MI{variable#},{PMAC variable} write-copy commands (either on-line or
background PLC), where {node#} specifies the MACRO node number (0 to 13), {variable#}
specifies the number of the Station MI-variable (0 - 1023), {constant} represents the numerical value to
be written to the Station MI-variable, or {PMAC variable} specifies the value to be copied to or from
the Station MI-variable.
For most Station MI-variables, the {node#} specifier can take the number of any active node on the
station (usually the lowest-numbered active node). These variables have MS{anynode}in the header of
their descriptions below.
Global MI-Variables
MS{anynode}, MI0 Station Firmware Version (Read Only)
Range: 1.200 - 1.999
Units: Revision numbers
This variable, when queried, reports the version of the firmware on the ACC-14M MACRO Station.
Example:
MS0,MI0
1.200
MS{anynode},MI1 Station Firmware Date (Read Only)
Range: 01/01/00 – 12/31/99
Units: MM/DD/YY
This variable, when queried, reports the date of implementation of the firmware on the ACC-14M
MACRO Station. The date is reported in the North American style of month/day/year with two decimal
digits for each.
Since the year is reported with only two digits, it rolls over at the turn of a century. If the software makes
any date comparisons based on this year value, care must be taken to avoid a Y2K error. The earliest
firmware date for the ACC-14M MACRO Station is in year 2003. The PMAC command MSDATE,
which polls this value, turns the year into a 4-digit value before reporting the value to the host computer.
MS{anynode},MI2 Station ID and User Configuration Word
Range: $000000 - $FFFFFF
Units: none
Default: 0
With this variable a station identification number can be written to the ACC-14M MACRO Station.
Typically, when the software setup of a station is complete, a unique value is written to this MI-variable
in the station and saved with the other MI-variables. On power-up/reset, the controller can query MI2 as
a quick test to see if the station has been set up properly for the application. If it does not report back the
expected value, the controller can download and save the setup values.
ACC-14M MACRO Station Serial Commands 29
Page 38

Accessory 14M
MS{anynode},MI3 (Reserved for Future Use)
Range: $00
Units: none
Default: 0
MS{anynode},MI4 Station Status Word (Read Only)
Range: $000000 - $FFFFFF
Units: Bits
This variable, when queried, reports the value of the current status word bits for the ACC-14M MACRO
Station. The value reported should be broken into bits. Each bit reports the presence or absence of a
particular fault on the Station. If the bit is 0, the fault has not occurred since station faults were last
cleared. If the bit is 1, the fault has occurred since station faults were last cleared.
BITn Fault Description
0 CPU – Fault (No MACRO IC #1 detected)
1 Ring Error - Temporary
2 Ring Break
3 Station Fault - Station Shutdown
4 Ring Fault - Any permanent Ring fault
5 Spare
6 Spare
7 Ring Break Received
8 EPROM Saved Variables Checksum Error
9 Spare
10 Spare
11 Spare
12 Ring Active
13 Spare
14 Spare
15 MI14.0 (Setup for IO 0-23)
16 MI14.0 (Setup for IO 24-47)
17 Spare
18 Spare
19 Spare
20 Spare
21 Spare
22 Spare
23 Detected CPU MACRO IC #1 ($C080)
Any of the fault bits that are set can be cleared with the MSCLRF{anynode} (clear fault) command, or
the MS$$${anynode} (Station reset) command.
MS{anynode},MI5 Ring Error Counter
Range: $000000 - $FFFFFF
Units: Error Count
This variable, when queried, reports the number of ring communications errors detected by the ACC-14M
MACRO Station since the most recent power-up or reset.
Note:
A value may be written to this variable, but this should not be done if using MI6.
The ring error counter value can be cleared to zero using the MS$$${anynode} command.
30 ACC-14M MACRO Station Serial Commands
Page 39

Accessory 14M
MS{anynode},MI6 Maximum Permitted Ring Errors in One Second
Range: $0000000 - $FFFFFFF
Units: Errors per second
This variable sets the maximum number of ring errors that can be detected by the ACC-14MMACRO
Station in a one second period without causing it to shut down for ring failure.
MS{anynode},MI7 (Reserved for Future Use)
Range: 0
Units: none
Default: 0
MS{anynode},MI8 MACRO Ring Check Period
Range: 0 - 255
Units: Station phase cycles
Default: 8
MI8 determines the period, in phase cycles, for the ACC-14M MACRO Station to evaluate whether or
not there has been a MACRO ring failure. Every phase cycle, the Station checks the ring
communications status. In MI8 phase cycles (or MACRO ring cycles), the Station must receive at least
MI10 sync packets and detect fewer than MI9 ring communications errors to conclude that the ring is
operating correctly. Otherwise, it will conclude that the ring is not operating properly, set its servo
command output values to zero, set its amplifier enable outputs to the disable state, and force all of its
digital outputs to their shutdown state.
If MI8 is set to 0 at power-on/reset, the ACC-14MMACRO Station will set it to 8 automatically.
MS{anynode},MI9 MACRO Ring Error Shutdown Count
Range: 0 - 255
Units: none
Default: 4
MI9 determines the number of MACRO communications errors detected that will cause a shutdown fault
of the ACC-14M MACRO Station. If the station detects MI9 or greater MACRO communications errors
in MI8 phase (MACRO ring) cycles, it will shut down on a MACRO communications fault, turning off
all outputs.
The station can detect one ring communications error per phase cycle (even if more than one error has
occurred). Setting MI9 greater than MI8 means that the Station will shut down for ring communications
error.
The station can detect four types of communications errors: byte violation errors, packet checksum errors,
packet overrun errors, and packet under run errors. If MI9 errors have occurred in the MI8 check period,
and at least half of these errors are byte violation errors, the station will conclude that there is a ring break
immediately upstream of it (if there are no ring input communications to the station, there will be
continual byte violation errors). In this case, not only will it set its servo command output values to zero,
set its amplifier enable outputs to the disable state, and force all of its digital outputs to zero, also it will
turn itself into a master so it can report to other devices downstream on the ring.
If MI9 is set to 0 at power-on/reset, the ACC-14MMACRO Station will set it to 4 automatically.
ACC-14M MACRO Station Serial Commands 31
Page 40

Accessory 14M
MS{anynode},MI10 MACRO Sync Packet Shutdown Count
Range: 0 – 65,535
Units: none
Default: 4
MI10 determines the number of MACRO ring sync packets that must be received during a check period
for the station to consider the ring to be working properly. If the station detects fewer than MI10 sync
packets in MI8 phase (MACRO ring) cycles, it will shut down on a MACRO communications fault,
setting its servo command output values to zero, setting its amplifier enable outputs to the disable state,
and forcing all of its digital outputs to their shutdown state as defined by I72-I89.
The node number (0-15) of the sync packet is determined by bits 16-19 of station variable MI996. On the
ACC-14M MACRO Station, this is node 15 ($F) because this node is always active for MACRO Type 1
auxiliary communications.
The station checks each phase cycle to see whether a sync packet has been received or not. Setting MI10
to 0 means the station will not shut down for lack of sync packets. Setting MI10 greater than MI8 means
that the Station will shut down for lack of sync packets.
If MI10 is set to 0 at power-on/reset, the ACC-14M MACRO Station will set it to 4 automatically.
MS{anynode},MI11 Station Order Number
Range: 0 – 254
Units: none
Default: 0
MI11 contains the station-order number of the ACC-14M MACRO Station on the ring. This permits it to
respond to auxiliary MACROSTASCIIn commands from a Turbo PMAC ring controller from a power-on
default state.
The station ordering scheme permits the ring controller to isolate each master or slave station on the ring
in sequence and communicate with it, without knowing in advance how the ring is configured or whether
there are any conflicts in the regular addressing scheme. This is useful for the initial setup and debugging
of the ring configuration.
Normally, station order numbers of devices on the ring are assigned in numerical order, with the station
downstream of the ring controller getting station-order number 1. This does not have to be the case,
however.
Unordered stations have the station-order number 0. When the ring controller executes a
MACROSTASCII255 command, the first unordered station in the ring will respond.
In addition, MI11 can be set with the ASCII command STN={constant} and the value of MI11 can be
queried with the ASCII command STN.
MS{anynode},MI12 Card Identification
Range: 0 – $FFFFFF
Units: none
Default: $9365D(603741)
This returns the card part number. This is the same as the CID ASCII command.
MS{anynode},MI13 (Reserved for Future Use)
Range: 0
Units: none
Default: 0
32 ACC-14M MACRO Station Serial Commands
Page 41

Accessory 14M
MS{anynode},MI14 Input/Output Configuration
Range: 0-3
Units: none
Default: 0
This MI variable must be set, SAVEd and then $$$ before it is activated. MI4 status bits 15 – 16 give the
setup state of the 48 I/O bits determined by MI14. The following table provides the four possible
configuration states:
ACC14M MACRO 72-Bit Node (24 Input / 24 INPUT/OUTPUT) FORMAT (MI14=0)
1st X IO or Y: Axis Node (MI14.0 = 0, MI14.1 = 0) 1 – Node & Default
Register # 0 ( 24 – bit ) 1 ( 16 – bit ) 2 ( 16 - bit ) 3 ( 16 - bit )
Command to I/O
Station
Feedback from MI/O
Station
INPUT/OUTPUT 24
– 47
Input 0 – 23 ADC 1 (08-23 bits)
DAC 1
(Channel 1)
(Channel 1)
DAC 2
(Channel 2)
ADC 2 (08-23 bits)
(Channel 2)
Flag Command
Flag Status
ACC14M MACRO 72-Bit Node (48 INPUT/OUTPUT) FORMAT (MI14=1)
1st X IO or Y: Axis (MI14.0 = 1, MI14.1 = 0) 2 – Nodes (Two consecutive nodes must be enabled in MI996)
Register # 0 ( 24 – bit ) 1 ( 16 – bit ) 2 ( 16 - bit ) 3 ( 16 – bit )
Command to I/O
Station
Feedback from MI/O
Station
2nd X IO or Y: Axis (Always the next consecutive X or Y: Node)
Register # 0 ( 24 – bit ) 1 ( 16 – bit ) 2 ( 16 - bit ) 3 ( 16 - bit )
Command to I/O
Station
Feedback from MI/O
Station
INPUT/OUTPUT 0
– 23
Not used ADC 1 (08-23 bits)
INPUT/OUTPUT 24
– 47
Not used Not used Not used Not used
DAC 1
(Channel 1)
(Channel 1)
Not used Not used Not used
DAC 2
(Channel 2)
ADC 2 (08-23 bits)
(Channel 2)
Flag Command
Flag Status
ACC14M MACRO 72-Bit Node (48 Input) FORMAT (MI14=2)
1st X IO or Y: Axis (MI14.0 = 0, MI14.1 = 1) 2 - Nodes (Two consecutive nodes must be enabled in MI996)
Register # 0 ( 24 – bit ) 1 ( 16 – bit ) 2 ( 16 - bit ) 3 ( 16 - bit )
Command to I/O
Station
Feedback from MI/O
Station
2nd X IO or Y: Axis (Always the next consecutive X or Y: Node)
Register # 0 ( 24 – bit ) 1 ( 16 – bit ) 2 ( 16 - bit ) 3 ( 16 - bit )
Command to I/O
Station
Feedback from MI/O Input 24 – 47 Not used Not used Not used
Not used DAC 1
(Channel 1)
Input 0 – 23 ADC 1 (08-23 bits)
(Channel 1)
Not used Not used Not used Not used
DAC 2
(Channel 2)
ADC 2 (08-23 bits)
(Channel 2)
Flag Command
Flag Status
ACC-14M MACRO Station Serial Commands 33
Page 42

Accessory 14M
Station
ACC14 MACRO 72-Bit Node (24 INPUT/OUTPUT / 24 Input) FORMAT (MI14=3)
1st X IO or Y: Axis (MI14.0 = 1, MI14.1 = 1) 1 - Node
Register # 0 ( 24 – bit ) 1 ( 16 – bit ) 2 ( 16 - bit ) 3 ( 16 - bit )
Command to I/O
Station
Feedback from MI/O
Station
Note the 72-bit I/O can be done on a Y:Axis or X:IO Node
INPUT/OUTPUT 0
– 23
Input 24 – 47 ADC 1 (08-23 bits)
DAC 1
(Channel 1)
(Channel 1)
DAC 2
(Channel 2)
ADC 2 (08-23 bits)
(Channel 2)
Flag Command
Flag Status
MS{anynode},MI15 Enable MACRO PLCC
Range: 0 - 1
Units: none
Default: 0
MI15 enables and disables the PLCCs running in the ACC-14M MACRO CPU.
MACRO IC MI-Variables
Each MACRO IC (0 & 1) has its own set of these variables; therefore, they are accessed through their
MACRO IC. These MI-Variables determine the servo channel transfer addresses. Most are read-only
variables and cannot be changed.
MS{anynode},MI176 MACRO IC Base Address
Range: $000000 - $00FFFF
Units: ACC-14MMACRO Station Addresses
Default: $C080 for MACRO IC
MS{anynode},MI177 MACRO IC Address for Node 14
Range: $000000 - $00FFFF
Units: ACC-14MMACRO Station Addresses
Default: $C0B8 for MACRO IC
MS{anynode},MI178 MACRO IC Address for Node 15
Range: $000000 - $00FFFF
Units: ACC-14MMACRO Station Addresses
Default: $C0BC for MACRO IC
MS{anynode},MI181–MI188 MACRO Channels 1 - 8 Address
Range: $000000000000- $00FFFF00FFFF
Units: ACC-14MMACRO Station Addresses
Default:
These are 48 bit read-only MI variables. The X:parts of the MI variable is the MACRO channel address
of the Command/Status word. The Y:part is zero.
MACRO IC I/O Transfer MI-Variables
Each MACRO IC (0 & 1) has its own set of these variables. Therefore, they are accessed through their
MACRO IC.
34 ACC-14M MACRO Station Serial Commands
Page 43

Accessory 14M
MS{anynode},MI198 Direct Read/Write Format and Address
Range: $000000 - $FFFFFF
Units: Modified ACC-14MMACRO Station Addresses
Default: $000000
MI198 controls the address and format of the register to be accessed (read from or written to) with
MI199. Any register on the ACC-14M MACRO Station can be accessed by first assigning a value to
MI198, then either reading MI199 or writing to it.
MI198 is a 24-bit variable that can be expressed as six hexadecimal digits. The low 16 bits, represented
by the last four hex digits, represent the ACC-14M MACRO Station address of the register. The high
eight bits, represented by the first two hex digits, represent the format of that address. The following
table shows the legal entries for the first two digits and the format each represents.
For example, for the host computer to read the contents of the DAC1A register as a signed quantity – the
high 16 bits of Y:$C002 – of the ACC-14M MACRO Station through a PMAC board, MI198 would be
set to $6DC002, then MI199 would be read. For a ACC-14M MACRO Station with an active node 0, this
could be done with the on-line commands:
MS0, MI198=$6DC002
MS0, MI199
16384
In another example, to read the state of Channel 2’s encoder A input – bit 12 of X:$C008 – through a
PMAC board, MI198 would be set to $8CC008, then MI99 would be read.
ACC-14M MACRO Station Serial Commands 35
Page 44

Accessory 14M
MI198 Format Digits
MI198
Digits
$00
$01
$02
$03
$04
$05
$06
$07
$08
$09
$0A
$0B
$0C
$0D
$0E
$0F
$10
$11
$12
$13
$14
$15
$16
$17
$18
$19
$1A
$1B
$1C
$1D
$1E
$1F
$20
$21
$22
$23
$24
$25
$26
$27
$28
$29
$2C
$2D
$30
$31
$34
Address
Space
Y 0 2 U
Y 2 2 U
Y 4 2 U
Y 6 2 U
Y 8 2 U
Y 10 2 U
Y 12 2 U
Y 14 2 U
Y 16 2 U
Y 18 2 U
Y 20 2 U
Y 22 2 U
- - - -
- - - -
- - - -
- - - Y 0 1 U
Y 1 1 U
Y 2 1 U
Y 3 1 U
Y 4 1 U
Y 5 1 U
Y 6 1 U
Y 7 1 U
Y 8 1 U
Y 9 1 U
Y 10 1 U
Y 11 1 U
Y 12 1 U
Y 13 1 U
Y 14 1 U
Y 15 1 U
Y 16 1 U
Y 17 1 U
Y 18 1 U
Y 19 1 U
Y 20 1 U
Y 21 1 U
Y 22 1 U
Y 23 1 U
Y 0 4 U
Y 0 4 S
Y 4 4 U
Y 4 4 S
Y 8 4 U
Y 8 4 S
Y 12 4 U
Starting
Bit
Bit
Width
Format MI198
Digits
$80
$81
$82
$83
$84
$85
$86
$87
$88
$89
$8A
$8B
$8C
$8D
$8E
$8F
$90
$91
$92
$93
$94
$95
$96
$97
$98
$99
$9A
$9B
$9C
$9D
$9E
$9F
$A0
$A1
$A2
$A3
$A4
$A5
$A6
$A7
$A8
$A9
$AC
$AD
$B0
$B1
$B4
Address
Space
X 0 1 U
X 1 1 U
X 2 1 U
X 3 1 U
X 4 1 U
X 5 1 U
X 6 1 U
X 7 1 U
X 8 1 U
X 9 1 U
X 10 1 U
X 11 1 U
X 12 1 U
X 13 1 U
X 14 1 U
X 15 1 U
X 16 1 U
X 17 1 U
X 18 1 U
X 19 1 U
X 20 1 U
X 21 1 U
X 22 1 U
X 23 1 U
X 0 4 U
X 0 4 S
- - - -
- - - X 4 4 U
X 4 4 S
- - - -
- - - X 8 4 U
X 8 4 S
- - - -
- - - X 12 4 U
X 12 4 S
- - - -
- - - X 16 4 U
X 16 4 S
X 20 4 U
X 20 4 S
X 0 8 U
X 0 8 S
X 4 8 U
Starting
Bit
Bit
Width
Format
36 ACC-14M MACRO Station Serial Commands
Page 45

Accessory 14M
MI198 Format Digits (continued)
MI198
Digits
$35
$38
$39
$3C
$3D
$40
$41
$44
$45
$48
$49
$4C
$4D
$50
$51
$54
$55
$58
$59
$5C
$5D
$60
$61
$64
$65
$68
$69
$6C
$6D
$70
$71
$72
$73
$74
$75
$76
$77
$78
$79
$7A
$7B
Address
Space
Y 12 4 S
Y 16 4 U
Y 16 4 S
Y 20 4 U
Y 20 4 S
Y 0 8 U
Y 0 8 S
Y 4 8 U
Y 4 8 S
Y 8 8 U
Y 8 8 S
Y 12 8 U
Y 12 8 S
Y 16 8 U
Y 16 8 S
Y 0 12 U
Y 0 12 S
Y 4 12 U
Y 4 12 S
Y 8 12 U
Y 8 12 S
Y 12 12 U
Y 12 12 S
Y 0 16 U
Y 0 16 S
Y 4 16 U
Y 4 16 S
Y 8 16 U
Y 8 16 S
Y 0 20 U
Y 0 20 S
- - - -
- - - Y 4 20 U
Y 4 20 S
- - - -
- - - Y 0 24 U
Y 0 24 S
- - - -
- - - -
Starting
Bit
Bit
Width
Format MI198
Digits
$B5
$B8
$B9
$BC
$BD
$C0
$C1
$C4
$C5
$C8
$C9
$CC
$CD
$D0
$D1
$D4
$D5
$D8
$D9
$DC
$DD
$E0
$E1
$E4
$E5
$E8
$E9
$EC
$ED
$F0
$F1
$F2
$F3
$F4
$F5
$F6
$F7
$F8
$F9
$FA
$FB
Address
Space
X 4 8 S
X 8 8 U
X 8 8 S
X 12 8 U
X 12 8 S
X 16 8 U
X 16 8 S
X 0 12 U
X 0 12 S
X 4 12 U
X 4 12 S
X 8 12 U
X 8 12 S
X 12 12 U
X 12 12 S
X 0 16 U
X 0 16 S
X 4 16 U
X 4 16 S
X 8 16 U
X 8 16 S
X 0 20 U
X 0 20 S
X 4 20 U
X 4 20 S
X 0 24 U
X 0 24 S
- - - -
- - - X 0 2 U
X 2 2 U
X 4 2 U
X 6 2 U
X 8 2 U
X 10 2 U
X 12 2 U
X 14 2 U
X 16 2 U
X 18 2 U
X 20 2 U
X 22 2 U
Starting
Bit
Bit
Width
Format
ACC-14M MACRO Station Serial Commands 37
Page 46

Accessory 14M
MS{anynode},MI199 Direct Read/Write Variable
Range: -8,388,608 – 16,777,215
Units: (dependent on register addressed)
Default: none
MI199 is a variable that can be addressed to any register in the ACC-14M MACRO Station’s memory
and I/O map, in order to read a value directly from that register, or write a value directly to that register.
This permits easy access to any register on the ACC-14M MACRO Station.
The address of the register to be accessed, which part of the register, and how the data is to be interpreted
is set by MI198. The value of MI198 must be set properly before MI199 can be used to access the
register. For repeated access of the same register with MI199, MI198 needs to be set once only.
Example:
MS0,MI198=$79C03C ; Set to Y:$C03C,0,24,S (PFM8 command value)
MS0,MI199 ; Request value of this register
0 ; PMAC reports this value
MS0,MI199=65536 ; Set to new value through PMAC
Global MACRO Status MI-Variables
These variables are used to help identify the MACRO, Servo, and I/O boards located in the UBUS rack.
They are similar to the Turbo PMAC I4900 type variables. They are global to the CPU and not a function
of the MACRO IC.
MS{anynode}, MI203 Phase Period
Range: 0
Units: Clock units/2
Default: $1540 (9KHZ)
MS{anynode}, MI204 Phase Execution Time
Range: 0
Units: Clock units/2
Normal: $4D - $E0
Phase duty cycle (%) = (MI204/MI203) * 100. It should be < 50 %
MS{anynode}, MI205 Background Cycle Time
Range: 0
Units: Clock units/2
Default: 0
The last background cycle time.
MS{anynode}, MI206 Maximum Background Cycle Time
Range: 0
Units: Clock units/2
Default: 0
The maximum background cycle time.
MS{anynode}, MI208 User Ram Start
Range: 0
Units: N.A.
Default: $700
This area is available for scratch pad use in the MACRO PLCCs.
38 ACC-14M MACRO Station Serial Commands
Page 47

Accessory 14M
MACRO IC MI-Variables
Each MACRO IC has a set of these variables and they are used to set up each MACRO IC.
MS{anynode},MI942 ADC Strobe Word for ADC1 and ADC2 Inputs
Range: $000000 - $FFFFFF
Units: Individual Bits
Default: $FFFFFE (For DSPGAT –02C)
MI942 specifies the strobe word for the serial A/Ds ADC_1 and ADC_2. The bits of the strobe word are
shifted out, one bit per ADC_CLK cycle, MSB first, starting on the rising edge of the phase clock.
MACRO IC Setup MI-Variables
Each MACRO IC (0 & 1) has its own set of these variables and is accessed from each MACRO IC.
MS{anynode},MI970-MI973 (Reserved for Future Use)
MS{anynode},MI1974 Station Display Status (Read Only)
Range: $0 - $F
Units: none
This variable, when queried, reports the hexadecimal digit displayed on the ACC-14MMACRO Station’s
7-segment display. The meaning of each digit is:
0: Ring Active with no errors
1-9: NA
A: NA
B: Ring-break fault
C: Configuration change fault
D: Ring data-error fault
E: NA
F: Momentary ring fault
Note:
If the display itself is blank, this indicates that ring communications are not active,
which means that this value cannot be reported back to the controller.
MS{anynode},MI977 Motor Nodes Reporting Ring Break
Range: $0000 - $FFFF
Units: none (individual bits)
Default: $0
MI977 permits the ACC-14M MACRO Station to enable additional motor nodes if it detects a ring break
immediately upstream from it, and send out the ring break bit (Bit 13) in the flag word for these nodes.
When the station detects a ring break, it turns itself into a ring master, and sets the ring break bit on all
active nodes. In this manner, other stations downstream of the break can be notified directly of the ring
break, so they can shut down properly.
MI977 is a 16-bit value – bits 0 to 15 – with bit n controlling the enabling of MACRO node n on a ring
break. If the bit is set to 0, the node will not be enabled on a ring break; if the bit is set to 1, the node will
be enabled on a ring break. Only bits 0 - 13 of MI975 should be set to 1.
Examples:
MS0,MI977=$3300 ; Enable Motor Nodes 8, 9, 12, & 13 on ring break
MS8,MI977=$0033 ; Enable Motor Nodes 0, 1, 4, & 5 on ring break
ACC-14M MACRO Station Serial Commands 39
Page 48

Accessory 14M
MS{anynode},MI978-MI989 (Reserved for Future Use)
MACRO IC MI-Variables
MI-Variables are numbered in the MI990s control hardware aspects of the MACRO IC and the
handwheel channels 1 and 2. Each MACRO IC has its own set of these variables.
MS{anynode},MI992 MaxPhase Frequency Control
Range: 0 - 32767
Units: MaxPhase Frequency = 117,964.8 kHz / [2*MI992+3]
PWM Frequency = 117,964.8 kHz / [4*MI992+6]
Default: 6527
MaxPhase Frequency = 117,964.8 / 13057 = 9.0346 kHz
PWM Frequency = 117,964.8 / 26114 = 4.5173 kHz
MI992 controls the maximum phase clock frequency for the ACC-14M MACRO Station, and the PWM
frequency for the filtered PWMs for supplementary handwheel interface channels 1 and 2. It does this by
setting the limits of the PWM up-down counter, which increments and decrements at the PWMCLK
frequency of 117,964.8 kHz (117.9648 MHz).
The actual phase clock frequency is divided down from the maximum phase clock according to the setting
of MI997. The phase clock frequency must be the same as the ring update frequency as set by the ring
controller (usually a PMAC or PMAC2). If the ring controller is a PMAC2 Ultralite, MI992 and MI997
on the ACC-14MMACRO Station should be set to the same values as MI992 and MI997 on the PMAC2
Ultralite.
To set MI992 for a desired maximum phase clock frequency, the following formula can be used:
MI992 = (117,964.8 kHz / [2*MaxPhase (kHz)]) - 1 (rounded down)
Examples:
To set a PWM frequency of 10 kHz and therefore a MaxPhase clock frequency of 20 kHz:
MI992 = (117,964.8 kHz / [4*10 kHz]) - 1 = 2948
To set a PWM frequency of 7.5 kHz and therefore a MaxPhase clock frequency of 15 kHz:
MI992 = (117,964.8 kHz / [4*7.5 kHz]) - 1 = 3931
MS{anynode},MI993 Hardware Clock Control Handwheel Channels
Range: 0 - 4095
Units: MI993 = Encoder SCLK Divider
+ 8 * PFM_CLK Divider
+ 64 * DAC_CLK Divider
+ 512 * ADC_CLK Divider
where:
Encoder SCLK Frequency = 39.3216 MHz / (2 ^ Encoder SCLK Divider)
PFM_CLK Frequency = 39.3216 MHz / (2 ^ PFM_CLK Divider)
DAC_CLK Frequency = 39.3216 MHz / (2 ^ DAC_CLK Divider)
ADC_CLK Frequency = 39.3216 MHz / (2 ^ ADC_CLK Divider)
Default: 2258 = 2 + (8 * 2) + (64 * 3) + (512 * 4)
Encoder SCLK Frequency = 39.3216 MHz / (2 ^ 2) = 9.8304 MHz
PFM_CLK Frequency = 39.3216 MHz / (2 ^ 2) = 9.8304 MHz
DAC_CLK Frequency = 39.3216 MHz / (2 ^ 3) = 4.9152 MHz
ADC_CLK Frequency = 39.3216 MHz / (2 ^ 4) = 2.4576 MHz
40 ACC-14M MACRO Station Serial Commands
Page 49

Accessory 14M
MI993 controls the frequency of three hardware clock frequencies -- SCLK, PFM_CLK, DAC_CLK and
ADC_CLK -- for the handwheel interface channels 1 and 2. It is a 12-bit variable consisting of four
independent 3-bit controls, one for each of the clocks. Each of these clock frequencies can be divided
down from a starting 39.3216 MHz frequency by powers of 2, 2
N
, from 1 to 128 times (N=0 to 7). This
means that the possible frequency settings for each of these clocks are:
Frequency Divide by Divider N in
1/2N
39.3216 MHz 1 0
19.6608 MHz 2 1
9.8304 MHz 4 2
4.9152 MHz 8 3
2.4576 MHz 16 4
1.2288 MHz 32 5
611.44 kHz 64 6
305.72 kHz 128 7
Usually the MI993 setting is not changed from the default value.
The encoder sample clock signal SCLK controls how often 2-axis board’s digital hardware looks at the
encoder inputs. PMAC2 can take at most one count per SCLK cycle, so the SCLK frequency is the
absolute maximum encoder count frequency. SCLK also controls the signal propagation through the
digital delay filters for the encoders and flags; the lower the SCLK frequency, the greater the noise pulse
that can be filtered out. Optimally, the SCLK frequency should be set to the lowest value that can accept
encoder counts at the maximum possible rate.
The pulse-frequency-modulation clock PFM_CLK controls the PFM circuitry on the 2-axis board that can
create pulse and direction outputs. The maximum pulse frequency possible is 1/4 of the PFM_CLK
frequency. Optimally, the PFM_CLK frequency should be set to the lowest value that can generate pulses
at the maximum frequency required.
The ADC_CLK controls the serial data frequency from A/D converters, either for digital current loop
closure, or from an ACC-28B A/D converter board.
The DAC-CLK controls the serial data frequency to D/A converters for the 2-axis board, either the onboard converters that come with Option A, or the external converters on an ACC-8E board.
To determine the clock frequencies set by a given value of MI993, use the following procedure:
1. Divide MI993 by 512 and round down to the nearest integer. This value N1 is the ADC_CLK
divider.
2. Multiply N1 by 512 and subtract the product from MI993 to get MI993'. Divide MI993' by 64 and
round down to the nearest integer. This value N2 is the DAC_CLK divider (not relevant here).
3. Multiply N2 by 64 and subtract the product from MI993' to get MI993''. Divide MI993'' by 8 and
round down to the nearest integer. This value N3 is the PFM_CLK divider.
4. Multiply N3 by 8 and subtract the product from MI993''. The resulting value N4 is the SCLK divider.
Examples:
The maximum encoder count frequency in the application is 800 kHz, so the 1.2288 MHz SCLK
frequency is chosen. A pulse train up to 500 kHz needs to be generated, so the 2.4576 MHz PFM_CLK
frequency is chosen. ADCs and DACs are not used, so the default DAC_CLK frequency of 4.9152 MHz
and the default ADC_CLK frequency of 2.4576 MHz are chosen. From the table:
SCLK Divider N: 5
PFM_CLK Divider N: 4
ACC-14M MACRO Station Serial Commands 41
Page 50

Accessory 14M
DAC_CLK Divider N: 3
ADC_CLK Divider N: 4
MI993 = 5 + (8 * 4) + (64 * 3) + (512 * 4) = 5 + 32 + 192 + 2048 = 2277
MI993 has been set to 3429. What clock frequencies does this set?
N1 = INT (3429/512) = 6 ADC_CLK = 611.44 kHz
MI993' = 3429 - (512*6) = 357
N2 = INT (357/64) = 5 DAC_CLK = 1.2288 MHz
MI993'' = 357 - (64*5) = 37
N3 = INT (37/8) = 4 PFM_CLK = 2.4576 MHz
N4 = 37 - (8*4) = 5 SCLK = 1.2288 MHz
MS{anynode},MI994 PWM Deadtime / PFM Pulse Width Control for Handwheel
Range: 0 - 255
Units: PWM Deadtime = [16 / PWM_CLK (MHz)] * MI994 = 0.135 µsec * MI994
PFM Pulse Width = [1 / PFM_CLK (MHz)] * MI994
= PFM_CLK_period (µsec) * MI994
Default: 0
PWM Deadtime = 0.135 µsec * 15 = 2.03 µsec
PFM Pulse Width = [1 / 9.8304 MHz] * 15 = 1.526 µsec (with default MI993)
MI994 controls the dead time period between top and bottom on-times in the ACC-14M MACRO
Station’s automatic PWM generation for machine interface handwheel channels 19 and 2. In conjunction
with MI993, it also controls the pulse width for PMAC2’s automatic pulse-frequency modulation
generation for these machine interface channels.
The PWM dead time, which is the delay between the top signal turning off and the bottom signal turning
on, and vice versa, is specified in units of 16 PWM_CLK cycles. This means that the dead time can be
specified in increments of 0.135 µsec. The equation for MI994 as a function of PWM dead time is:
MI994 = Deadtime (µsec) / 0.135 µsec
The PFM pulse width is specified in PFM_CLK cycles, as defined by MI993. The equation for MI994 as
a function of PFM pulse width and PFM_CLK frequency is:
MI994 = PFM_CLK Freq (MHz) / PFM pulse width (µsec)
In PFM pulse generation, the minimum off time between pulses is equal to the pulse width. This means
that the maximum PFM output frequency is:
PFM Max_Freq (MHz) = PFM_CLK Freq / (2 * MI994)
Examples:
A PWM deadtime of approximately one microsecond is desired:
MI994 ≅ 1 µsec / 0.135 µsec ≅ 7
With a 2.4576 MHz PFM_CLK frequency, a pulse width of 0.4 µsec is desired:
MI994 ≅ 2.4576 MHz * 0.4 µsec ≅ 1
MS{anynode},MI995 MACRO Ring Configuration/Status
Range: $0000 - $FFFF (0 - 65,535)
Units: none
Default: $4080
MI995 contains configuration and status bits for MACRO ring operation of the ACC-14M MACRO
Station. There are 11 configuration bits and 5 status bits, as follows:
42 ACC-14M MACRO Station Serial Commands
Page 51

Accessory 14M
Bit # Value Type Function
0 1($1) Status Data Overrun Error (cleared when read)
1 2($2) Status Byte Violation Error (cleared when read)
2 4($4) Status Packet Parity Error (cleared when read)
3 8($8) Status Packet Under run Error (cleared when read)
4 16($10) Config Master Station Enable
5 32($20) Config Synchronizing Master Station Enable
6 64($40) Status Sync Node Packet Received (cleared when read)
7 128($80) Config Sync Node Phase Lock Enable
8 256($100) Config Node 8 Master Address Check Disable
9 512($200) Config Node 9 Master Address Check Disable
10 1024($400) Config Node 10 Master Address Check Disable
11 2048($800) Config Node 11 Master Address Check Disable
12 4096($1000) Config Node 12 Master Address Check Disable
13 8192($2000) Config Node 13 Master Address Check Disable
14 16384($4000) Config Node 14 Master Address Check Disable
15 32768($8000) Config Node 15 Master Address Check Disable
An ACC-14M MACRO Station is a slave on the ring in all normal operation, so configuration bits 4 and
5 are set to 0. It should synchronize itself to the sync node, so configuration bit 7 should be set to 1. In
most applications, it will accept packets only from its own master so bits 8 to 15 are set to 0. All other
bits are status bits that are normally 0. This makes the usual setting of MI995 equal to $0080.
MS{anynode},MI996 MACRO Node Activate Control
Range: $000000 to $FFFFFF (0 to 8,388,607)
Units: none
Default: $0F0000 (all nodes de-activated, Synch packet = 15, Master = 0)
MI996 controls which of the 16 MACRO nodes on the ACC-14M MACRO Station are activated. In
addition, it controls the master station number and the node number of the packet that creates a
synchronization signal.
On a power-up or reset of the ACC-14MMACRO Station, MI996 is set to the saved value or to the
default.
ACC-14M MACRO Station Serial Commands 43
Page 52

Accessory 14M
The bits of MI996 are arranged as follows:
Bit # Value Type Function
0 1($1) Config Node 0 Activate
1 2($2) Config Node 1 Activate
2 4($4) Config Node 2 Activate
3 8($8) Config Node 3 Activate
4 16($10) Config Node 4 Activate
5 32($20) Config Node 5 Activate
6 64($40) Config Node 6 Activate
7 128($80) Config Node 7 Activate
8 256($100) Config Node 8 Activate
9 512($200) Config Node 9 Activate
10 1024($400) Config Node 10 Activate
11 2048($800) Config Node 11 Activate
12 4096($1000) Config Node 12 Activate
13 8192($2000) Config Node 13 Activate
14 16384($4000) Config Node 14 Activate
15 32768($8000) Config Node 15 Activate
16-19 $X0000 Config Packet Sync Node Slave Address (0 – 15)
20-23 $X00000 Config Master Station Number (0-15)
Bits 0 to 15 are individual control bits for the matching node number 0 to 15. If the bit is set to 1, the
node is activated; if the bit is set to 0, the node is de-activated. On power-up reset, these bits are set as
defined by the SW1 setting, with some motor nodes possibly disabled by MI976, and some I/O nodes
possibly enabled by MI975. Usually, Node 15 should be activated to support the Type 1 auxiliary
communications.
Bits 16-19 specify the slave number of the packet that will generate the sync pulse on the ACC-14M
MACRO Station. Usually, this is set to 15 ($F) on the ACC-14M MACRO Station.
Bits 20-23 specify the master number (0-15) for the ACC-14M MACRO Station.
H e x ( $ ) 0 0 0
B i t
S l a v e n o d e E n a b l e s
S y n c n o d e A d d r e s s
M a s t e r A d d r e s s ( 0 - 1 5 )
0 0 0
( 0 - 1 5 )
44 ACC-14M MACRO Station Serial Commands
Page 53

Accessory 14M
MS{anynode},MI997 Phase Clock Frequency Control
Range: 0 - 15
Units: Phase Clock Frequency = MaxPhase Frequency / (MI997+1)
Default: 0
Phase Clock Frequency = 9.0346 kHz / 1 = 9.0346 kHz (with default value of MI992)
MI997, in conjunction with MI992, determines the frequency of the Phase clock on an ACC-14M
MACRO Station. Each cycle of the Phase clock, a set of MACRO ring information is expected and any
data transfers between MACRO nodes and interface circuitry are performed. The Phase clock cycle on
the ACC-14M MACRO Station should match that of the PMAC commanding it as closely as possible.
Specifically, MI997 controls how many times the Phase clock frequency is divided down from the
maximum phase clock whose frequency is set by MI992. The Phase clock frequency is equal to the
maximum phase clock frequency divided by (MI997+1). MI997 has a range of 0 to 15, so the frequency
division can be by a factor of 1 to 16. The equation for MI997 is:
MI997 = (MaxPhase Freq / Phase Clock Freq) - 1
The ratio of MaxPhase Frequency to Phase Clock Frequency must be an integer.
Example:
With a 20 kHz MaxPhase Clock frequency established by MI992 and a desired 6.67 kHz Phase clock
frequency, the ratio between MaxPhase and Phase is 3:
MI997 = (20 / 6.67) - 1 = 3 -1 = 2
MS{anynode},MI998 Servo Clock Frequency Control
Range: 0 - 15
Units: Servo Clock Frequency = Phase Clock Frequency / (MI998+1)
Default: 0
Phase Clock Frequency = 9.0346 kHz / (0+1) = 9.0346 kHz
(with default values of MI992 and MI997)
Note:
There is currently no software use of the Servo clock on the ACC-14M MACRO
Station. However, it is needed to capture certain encoder values in the
DSPGATEx Servo ICs.
MI998, in conjunction with MI997 and MI992, determines the frequency of the Servo clock on the ACC14M MACRO Station.
Specifically, MI998 controls how many times the Servo clock frequency is divided down from the Phase
clock, whose frequency is set by MI992 and MI997. The Servo clock frequency is equal to the Phase
clock frequency divided by (MI998+1). MI998 has a range of 0 to 15, so the frequency division can be
by a factor of 1 to 16. The equation for MI998 is:
MI998 = (Phase Clock Frequency/Servo Clock Frequency) - 1
The ratio of Phase Clock Frequency to Servo Clock Frequency must be an integer. On the ACC-14M
MACRO Station, MI998 should always be set to 0 so the servo clock frequency is equal to the phase
clock frequency.
ACC-14M MACRO Station Serial Commands 45
Page 54

Accessory 14M
MS{anynode},MI999 Handwheel DAC Strobe Word (Not Used)
Range: $000000 - $FFFFFF
Units: Serial Data Stream (MSB first, starting on rising edge of phase clock)
Default: $7FFFC0 (for 18-bit DAC data)
Other ACC-14M MACRO Station Mm & MP-Variables
The ACC-14M MACRO CPU has 512 MM and 512 MP variables. The MM variables are similar to the
PMAC X/Y types which are 1 to 24 bit integer data types. The MP variables are general-purpose 24-bit
integer data types.
ACC-14M MACRO STATION MACPLCCS
The Open MACPLCC compiler in PewinPro is used to compile the MACRO PLCC program that runs in
the ACC-14M MACRO CPU. It is designed to handle a limited version of the standard PMAC PLCC
programming commands and it will include some new ones. The MACPLCC code is run in the
background process of the ACC-14M MACRO CPU. The additions and limitations to the standard
PMAC PLC commands are defined below.
Requirements
Turbo PMAC CPU with version 1.939 and greater and the ACC-14M MACRO station restricted to 8K of
PLCC memory and from X/Y:$700 - $13FF) of data memory.
Arithmetic Data Types
1. Integer – 24-bit signed integer (unsigned is not available)
2. Integer – 1, 4, 8, 12, 16, 20 bit (unsigned or signed)
MACRO MI Integer Variables (n = 0 – 1099)
1. MACRO MIn-Variable – Converted to 1 to 24-bit signed/unsigned integer variable. A function of
MI-variable.
2. MACRO MI[Index Exp.]-Array of MI Variables
3. Indexes into MIn[] arrays are limited to 0 - 1999. On a read of the index value outside this range, the
returned value is zero. On a write of the index value outside this range, no value is written.
MACRO MM and MP Integer Variables (n = 0 – 511)
1. MACRO MMn-Variable – Assumed to be defined as MMn-><X/Y:Addr,offset,width,SignType>.
2. MACRO MPn-Variable – 24-bit signed integer variable
3. MACRO MM[Index Exp.] – Array to MM Pointer Variables
4. MACRO MP[Index Exp.] – Array of 24 bit signed Integer MP Variables
5. Index expression into the MMn[] and MPn[] arrays are forced to a modulo 512
MACROPlcc Ln Integer Variables (n = 0 – 511)
1. PLCC Ln-Variable – Address must be defined. (Accessed with inline code.)
2. PLCC Ln[Index Exp.]-Array 24 bit signed integer data – Address must be defined.
3. Index expressions into the Ln[] arrays are forced to a modulo of the size of the array.
Direct Memory Addressing for Integer Ln & Ln[] Variable Definitions
1. MACROPlcc Ln->X/Y:Address[size] – Accesses entire 24-bit integer data value. The array size range
is 2 – 8192 and must be a power of two. If the definition is put after the OPEN MACPlcc, the size
range is limited to 2 - 512. This is the recommended limitation.
2. The current PLCC Ln-> definitions which access portions of the 24-bit word are still available.
46 ACC-14M MACRO Station Serial Commands
Page 55

Accessory 14M
Standard MACRO Program Commands
1. OPEN MACPLCC – Begins the MACPlcc program.
2. CLOSE – Closes MACPlcc the program.
3. RETURN – Returns from PLCC program.
4. IF, AND, OR, ELSE, ENDIF, WHILE, ENDW
Valid Math, Assignment and Conditional Operators
1. +, -, *, /, %, &, ^, and |
2. = , >, <, != , !>, !<
Valid Expressions and Arrays
OpenPlcc Ln integer variable array expression.
Example: L1 = L2[L3] + L3 +L4[L7+L5*L3] or L1[L1+L3]= L4 + L8
Note:
The [index] of the array must be an integer and it is limited to the range of the
defined Ln array.
Will be run through preprocessor so labels are allowed (#define Mtr1DAC MM1).
Ln Arrays Definition Examples
L5->X:$600[64]
L6->Y:$600[64]
MM[MM1 + MP2*MP3] &= MP[MP2 + MP4*MM5]
MP[MM1 + MP2*MP3] = MM[MP2 + MP4*MM5]
The following is allowed for the Ln[array index]:
L5[L1 + L2*L3] &= L6[L4(L2) – L4*L5]
L5[L1 + L2*L3] &= L6[L4[L2] – L4*L5]
Note:
MI[Int. Exp.], MM[Int. Exp.], MP[Int. Exp.] and Lnn[Int. Exp.] must use integer
variable indexes.
Example Program
MM1->X:$00700,24
MM2->Y:$00700,24
MM3->X:$00701,24
OPEN MACPLCC
MM3 = MM1*MM2
CLS
MACRO PLCC Code Memory
Memory
Location
$4000 End of PLCC Program + 1 ($$$*** is set to $4005)
$4001 JMP to location in $4002
$4002 Location of start of PLCC ($$$*** is set to $4003)
$4003 RTS Instruction
$4004 Start of PLCC Program ($$$*** set = RTS instruction)
Data Information
ACC-14M MACRO Station Serial Commands 47
Page 56

Accessory 14M
MAC PLCC Related ASCII Commands
Commands Operation
SAVE Saves PLCCs from $4000 to *($4000)
DISable PLCC & ^D Sets *$4002 = $4003
ENAble PLCC Sets *$4002 = $4004
$$$*** Restores $4000 - $4004 to default.
$$$ Restore from SAVEd $4000 to *($4000 end of PLCC). If is
SAVEd in DISable state will come up ENAbled.
Download Start of download sends MI15 = 0 and at end of download sets
*$4002 = $4004
MI15 = 1 Enables the JSR to $4001 (Runs MacPLCC)
ACC-14M MACRO STATION SERIAL COMMANDS
The ACC-14M MACRO Station can accept ASCII text commands directly through the USB to serial port
at connector on the CPU/Interface Board, or in auxiliary mode from a Turbo PMAC over the MACRO
ring using MACSTASCII commands. Serial communications is at 38400 (8 bits, 1 stop bit, no parity).
These commands are intended for basic setup and troubleshooting. Usually this port will not be used;
instead, commands will be sent only through the MACRO ring.
The following commands can be sent to the ACC-14M MACRO Station through the USB-serial port or
over the MACRO ring.
Serial Commands
$$$ Station Reset
The $$$ command will reset the ACC-14M MACRO Station and restore all station MI-variables to their
last saved values.
$$$*** Station Re-initialize
The $$$*** command will reset the ACC-14M MACRO Station and restore all station MI-variables to
their factory default values.
CHN Report Channel Number
The CHN command causes the ACC-14M MACRO Station to report its present channel number.
CID Report Card ID Number
The CID command causes the ACC-14M MACRO Station CPU to report its part number: 603740.
CLRF Clear Station Faults
The CLRF command will clear all faults on the ACC-14M MACRO Station and prepare it for further
operation.
DATE Report Firmware Date
The DATE command causes the ACC-14M MACRO Station to report the date of its firmware.
Example:
DATE
12/02/2003
48 ACC-14M MACRO Station Serial Commands
Page 57

Accessory 14M
DISABLE PLCC or CNTRL D Disables PLCC
The MACRO PLCCs are disabled.
Example:
DIS PLCC
^D
ENABLE PLCC Enables PLCC
The MACRO PLCCs are enabled if MI15 =1.
Example:
ENA PLCC
MI{constant} Report Station MI-Variable Value
The MI{constant} command causes the ACC-14M MACRO Station to report the current value of the
specified MI-variable.
MI{constant}={constant} Set Station MI-Variable Value
The MI{constant}={constant} command causes the ACC-14M MACRO Station to set the value
of the specified MI-variable to the specified value.
MM{constant} Report Station MM-Variable Value
The MM{constant} command causes the ACC-14M MACRO Station to report the current value of the
specified MM-variable.
MM{constant}={constant} Set Station MM-Variable Value
The MM{constant}={constant} command causes the ACC-14M MACRO Station to set the value
of the specified MM-variable to the specified value.
MP{constant} Report Station MP-Variable Value
The MP{constant} command causes the ACC-14M MACRO Station to report the current value of the
specified MP-variable.
MP{constant}={constant} Set Station MP-Variable Value
The MP{constant}={constant} command causes the ACC-14M MACRO Station to set the value
of the specified MP-variable to the specified value.
MM{constant}-> Report Station MM-Variable Definition
The MM{constant}-> command causes the ACC-14M MACRO Station to report the current
definition of the specified MM-variable.
MM{constant}->{X/Y:offset,width,format} Set Station MM-Variable Definition
The MM{constant}->={X/Y:offset,width,format} command causes the ACC-14M
MACRO Station to set the value of the specified MM-variable memory location to the specified 1 to 24
bit integer (signed or unsigned) definition.
R{address} Read Station Address
The R[H]{address}[,{count}] command causes the ACC-14M MACRO Station to report the
value stored at the specified address[es]. If H is used, the contents of the register[s] are reported back in
hexadecimal; otherwise, they are reported back in decimal form {address} consists of a register type
(X, Y, L, or P) and the numerical address of the register. The optional {count} value specifies the
number of registers to be reported, starting at the specified address and counting up. If no {count}
value is specified in the command, one register value is reported.
Examples:
ACC-14M MACRO Station Serial Commands 49
Page 58

Accessory 14M
RX:$20 ; Read X register $20
64 ; CMS responds in decimal
RHX:$20 ; Read X register $20 in hex
40 ; CMS responds in hex
RHY:$FFC0,3 ; Read Y registers $FFC0, $FFC1, $FFC2
FFFFA4 FFFF01 FFFFC7 ; CMS responds in hex
SAVE Save Station MI-Variables
The SAVE command causes the ACC-14M MACRO Station to copy its MI-variable values from volatile
active memory to the non-volatile flash memory. On the next power-up or reset, these values will be
copied back from flash memory to active memory.
SID Reports Serial Identification Number
Reports the SID of the Dallas ID chip.
VERS Report Firmware Version
The VERS command causes the ACC-14M MACRO Station to report its firmware version number.
Example:
VERS
1.201
VID Report Vendor ID Number
The VID command causes the ACC-14M MACRO Station to report its vendor identification number.
For Delta Tau, this number is 1.
W{address},{value} Write Value to Station Address
The W{address}[,{value}] command causes the ACC-14M MACRO Station to write the value to
the specified address[es]. {address} consists of a register type (X, Y, L, or P) and the numerical
address of the register. The optional {value} specifies the value to be written to the address.
Examples:
WX:$20,5 ; Write X register $20 = 5
50 ACC-14M MACRO Station Serial Commands
Page 59

Accessory 14M
ACC-14M MACRO Station Serial Commands 51
Page 60

Accessory 14M
PMAC TYPE 1 ACC-14M MACRO STATION COMMANDS
The following commands from the Turbo PMAC controllers can be used for Type 1 auxiliary
communication with the ACC-14M MACRO Station.
On-Line Commands
MS Command
Syntax: MS{command}{node #}
where:
{command} is one of the following text strings:
$$$ normal station reset
$$$*** station reset and re-initialize
CLRF station fault clear for
CONFIG report station configuration value
DATE report station firmware date
SAVE save station setup
VER report station firmware version
{node #} is a constant representing the number of the node to be commanded (if the
command affects the entire station, the number of any active node on the station may be
used).
This PMAC command causes PMAC to issue the specified command to a Type 1 MACRO slave station.
The MS CONFIG command allows the setting and reporting of a specified configuration value. This
provides an easy way to see if the ACC-14M MACRO Station has been configured already to the
specifications. The factory default configuration value is 0. It is recommended that after the software
configuration of the station is finished, a special number be given to the configuration value with the MS
CONFIG{node #}={constant} command. This number will be saved to the non-volatile memory
with the MS SAVE command. Subsequently, when the system is powered up, the station can be polled
with the MS CONFIG {node #} command. If the expected value is returned, it can be assumed that
the station has the proper software setup. If the expected value is not returned (for instance, when a
replacement station has just been installed), then the setup must be transmitted to the station.
Examples:
MS $$$0 ; Resets ACC-14MMACRO Station which has active node 0
MS $$$***4 ; Reinitializes ACC-14MMACRO Station which has active node 4
MS CLRF8 ; Clears fault on Node 8 of ACC-14MMACRO Station
MS CONFIG12 ; Causes ACC-14MMACRO Station to report its configuration number
37 ; PMAC reports ACC-14MMACRO Station configuration number to host
MS CONFIG12=37 ; Sets ACC-14MMACRO Station configuration number
MS DATE 0 ; Causes ACC-14MMACRO Station to report its firmware date
03/27/97 ; PMAC reports ACC-14MMACRO Station firmware date to host
MS SAVE 4 ; Causes ACC-14MMACRO Station to save setup variables
MS VER 8 ; Causes ACC-14MMACRO Station to report its firmware version
1.200 ; PMAC reports ACC-14MMACRO Station firmware version to host
52 ACC-14M MACRO Station Memory and I/O Map
Page 61

Accessory 14M
MS Variable Read
Syntax: MACROSLAVE{node #},{slave MI, MM or MP-variable}
MS{node #},{slave MI-variable}
where:
{node #} is a constant (0-14) representing the number of the node whose
variable is to be read (if the variable is not node-specific,
the number of any active node on the station may be used)
{slave MI, MM or MP-variable} is the name of the MI, MM or
MP-variable on the slave station whose value is to be reported
This command causes PMAC to query the MACRO slave station at the specified node # and report the
value of the specified slave station MI-variable to the host computer.
Examples:
MS0,MI910 ; Causes ACC-14M MACRO Station to report value of Node 0 variable MI910
7 ; PMAC reports this value back to host
MS1,MI997 ; Causes ACC-14M MACRO Station to report value global variable MI997
6258 ; PMAC reports this value back to host
MS Variable Write
Syntax: MACROSLAVE{node #},{slave variable}={constant}
MS{node #},{slave variable}={constant}
where:
{node #} is a constant (0-14) representing the number of the node whose
variable is to be written to (if the variable is not node-specific,
the number of any active node on the station may be used).
{slave MI, MM or MP -variable} is the name of the MI, MM,
MP or C -variable on the slave station whose value is to be reported
{constant} is a number representing the value to be written to the
specified MI, MM or MP –variable.
This command causes PMAC to write the specified constant value to the MACRO slave station MI,
MM, MP -variable, or if a C-command is specified, it causes the station to execute the specified command
number (in which case the constant value does not matter).
The valid C-commands are:
C1 Clear station faults
C2 Reset station, loading saved station MI-variables
C3 Re-initialize station, loading default station MI-variables
C4 Save station MI-variables to non-volatile memory
Examples:
MS0,MI910=7 ;sets Node 0 variable MI910 to 7
MS8,C4=0 ; Clears faults on ACC-14MMACRO Station with active node 8
MS Variable Read Copy
Syntax: MACROSLVREAD{node #},{slave MI-variable},{PMAC variable}
MSR{node #},{slave MI, MM or MP -variable},{PMAC variable}
where
{node #} is a constant (0-14) representing the number of the node whose
variable is to be read (if the variable is not node-specific,
the number of any active node on the station may be used)
ACC-14M MACRO Station Memory and I/O Map 53
Page 62

Accessory 14M
{slave MI, MM or MP -variable} is the name of the MI, MM or
MP -variable on the slave station whose value is to be reported
{PMAC variable} is the name of the variable on the PMAC into which
the value of the slave station variable is to be copied
This command copies the value of the specified MI, MM or MP -variable on the MACRO slave station
into the specified variable on PMAC.
The variable on the PMAC or PMAC2 can be any of the I, P, Q, or M-variable on the card.
If this command is issued to a PMAC while a PLC buffer is open, it will be stored in the buffer as a PLC
command, not executed as an on-line command.
Examples:
MS0,MI910,P1 ; Copies value of ACC-14M MACRO Station Node 0 variable MI910 into
; PMAC variable P1
MS1,MM9,M10 ; Copies value of ACC-14M MACRO Station global variable MM9 into
; PMAC variable M10
MS Variable Write Copy
Syntax: MACROSLVWRITE{node #},{slave variable},{PMAC variable}
MSW{node #},{slave MI, MM or MP -variable},{PMAC variable}
where:
{node #} is a constant (0-14) representing the number of the node whose
variable is to be read (if the variable is not node-specific,
the number of any active node on the station may be used).
{slave variable} is the name of the MI, MM, MP -variable or C-
command on the slave station whose value is to be reported.
{PMAC variable} is the name of the variable on the PMAC into which
the value of the slave station variable is to be copied.
This command copies the value of the specified variable on PMAC into the specified MI, MM or MP -
variable on the MACRO slave station, or if a slave station C-command number is specified, it executes
that command (in which case the PMAC variable value is not used).
The valid C-commands are:
C1 Clear station faults
C2 Reset station, loading saved station MI-variables
C3 Re-initialize station, loading default station MI-variables
C4 Save station MI-variables to non-volatile memory
The MI-variable on the MACRO slave station can be global to the station, or node-specific.
The variable on the PMAC or PMAC2 can be any of the I, P, Q, or M-variables on the card.
If this command is issued to a PMAC while a PLC buffer is open, it will be stored in the buffer as a PLC
command, not executed as an on-line command.
Examples:
MSW0,MI910,P35 ; Copies value of PMAC P35 into ACC-14MMACRO Station
; node 0 variable MI910
MSW4,C4,P0 ; Causes ACC-14MMACRO Station with active node 4 to save its
; MI-variable values to non-volatile memory
; (P0 is a dummy variable here)
54 ACC-14M MACRO Station Memory and I/O Map
Page 63

Accessory 14M
Turbo PMAC PLC Commands for Type 1 ACC-14M MACRO Stations
MS Variable Read Copy
Syntax: MACROSLVREAD{node #},{slave MI-variable},{PMAC variable}
MSR{node #},{slave MI, MM or MP -variable},{PMAC variable}
where
{node #} is a constant (0-14) representing the number of the node whose
variable is to be read (if the variable is not node-specific,
the number of any active node on the station may be used).
{slave MI, MM or MP -variable} is the name of the MI-variable on
the slave station whose value is to be reported.
{PMAC variable} is the name of the variable on the PMAC into which
the value of the slave station variable is to be copied.
This command copies the value of the specified MI-variable on the MACRO slave station into the
specified variable on PMAC.
The MI-variable on the MACRO slave station can be global to the station, or node-specific.
The variable on the PMAC or PMAC2 can be any of the I, P, Q, or M-variables on the card.
If this command is issued to a PMAC while no PLC buffer is open, it will be executed as an on-line
command, not stored in the buffer as a PLC command.
Examples:
MS0,MI910,P1 ; Copies value of ACC-14M MACRO Station Node 0 variable MI910 into
; PMAC variable P1
MS1,MI997,M10 ; Copies value of ACC-14M MACRO Station global variable MI997 into
; PMAC variable M10
MS Variable Write Copy
Syntax: MACROSLVWRITE{node #},{slave variable},{PMAC variable}
MSW{node #},{slave MI, MM or MP -variable},{PMAC variable}
where:
{node #} is a constant (0-14) representing the number of the node whose
variable is to be read (if the variable is not node-specific,
the number of any active node on the station may be used).
{slave variable} is the name of the MI, MM, MP -variable or C-
command on the slave station whose value is to be reported.
{PMAC variable} is the name of the variable on the PMAC into which
the value of the slave station variable is to be copied.
This command copies the value of the specified variable on PMAC into the specified MI-Variables on the
MACRO slave station, or if a slave station C-command number is specified, it executes that command (in
which case the PMAC variable value is not really used).
The valid C-commands are:
C1 Clear station faults
C2 Reset station, loading saved station MI-variables
C3 Re-initialize station, loading default station MI-variables
C4 Save station MI-variables to non-volatile memory
The MI, MM or MP -variable on the MACRO slave station can be global to the station, or nodespecific.
ACC-14M MACRO Station Memory and I/O Map 55
Page 64

Accessory 14M
The variable on the PMAC or PMAC2 can be any of the I, P, Q, or M-Variables on the card.
If this command is issued to a PMAC while no PLC buffer is open, it will be executed as an on-line
command, not stored in the buffer as a PLC command.
Examples:
MSW0,MI910,P35 ; Copies value of PMAC P35 into ACC-14M MACRO Station
; node 0 variable MI910
MSW4,C4,P0 ; Causes ACC-14M MACRO Station with active node 4 to save its
; MI-variable values to non-volatile memory
; (P0 is a dummy variable here)
56 ACC-14M MACRO Station Memory and I/O Map
Page 65

Accessory 14M
ACC-14M MACRO STATION MEMORY AND I/O MAP
Internal Calculation Registers
X/Y:$0000-$06FF
Open Memory
X: $00700 - $007FF ; Open Memory
Y: $00700 - $007FF ; Open Memory
DSPGATE2 Registers
Y:$C080 Input 00-23 Data Register
Note
The pins associated with this register are used for Input 00-23 on the ACC-14M
MACRO Station.
Bits: 0 Input 00 Input Data Value
...
23 Input 23 Input Data Value
X:$C080 General I/O Data Direction Control (Do not change.)
Note
The pins associated with this register are used for other purposes on the ACC-14M
MACRO Station.
Bits: 0 I/O00 Direction Control
...
23 I/O23 Direction Control
(All bits: 0=Input; 1=Output)
Y:$C081 Output 00-07 Data Register
Bits: 0 Output 00Data Value
...
7 Output 07 Data Value
8 I/O24 Latched Data Value
...
15 I/O31 Latched Data Value
16-23 Not used
X:$C081 General I/O Direction Control (Do not change.)
Bits: 0 I/O24 (SEL0 pin) Direction Control
...
7 I/O31 (SEL7 pin) Direction Control
(All bits: 0=Input; 1=Output)
ACC-14M MACRO Station Memory and I/O Map 57
Page 66

Accessory 14M
8-23 Not used
Y:$C082 Output 08-15 Data Register
Note:
The pins associated with this register are used for other purposes on the ACC-14M
MACRO Station.
Bits: 0 Output 08 Data Value
...
7 Output 15 Data Value
8 SEL0 Data Value
...
15 SEL7 Data Value
16-23 Not used
X:$C082 General I/O Data Direction Control Register (Do not change.)
Note:
The pins associated with this register are used for other purposes on the ACC-14M
MACRO Station.
Bits: 0 DAT0 Direction Control
...
7 DAT7 Direction Control
8 SEL0 Direction Control
...
15 SEL7 Direction Control
(All bits: 0=Input; 1=Output)
16-23 Not used
Y:$C083 Output 15-23 Data Register
Bits: 0 Output 16 Data Value
...
7 Output 23 Data Value
8 CTRL0 Data Value
9 CTRL1 Data Value (Output Enable)
10 CTRL2 Data Value (AENA_1)
11 CTRL3 Data Value (AENA_2)
12-23 Not used
X:$C083 General I/O Port Data Direction Control Register (Do not change.)
Bits: 0 DISP0 Direction Control
...
7 DISP7 Direction Control
8 CTRL0 Direction Control
...
11 CTRL3 Direction Control (Do not change.)
(All bits: 0=Input; 1=Output)
12-23 Not used
58 ACC-14M MACRO Station Memory and I/O Map
Page 67

Accessory 14M
Y:$C084 Data Type Control Register (Do not change.)
Bits: 0 I/O00 Data Type Control (0=FlagW9; 1=I/O00)
1 I/O01 Data Type Control (0=FlagV9; 1=I/O01)
2 I/O02 Data Type Control (0=FlagU9; 1=I/O02)
3 I/O03 Data Type Control (0=FlagT9; 1=I/O03)
4 I/O04 Data Type Control (0=USER9; 1=I/O04)
5 I/O05 Data Type Control (0=MLIM9; 1=I/O05)
6 I/O06 Data Type Control (0=PLIM9; 1=I/O06)
7 I/O07 Data Type Control (0=HMFL9; 1=I/O07)
8 I/O08 Data Type Control (0=PWM_B_BOT9; 1=I/O08)
9 I/O09 Data Type Control (0=PWM_B_TOP9; 1=I/O09)
10 I/O10 Data Type Control (0=PWM_A_BOT9; 1=I/O10)
11 I/O11 Data Type Control (0=PWM_A_TOP9; 1=I/O11)
12 I/O12 Data Type Control (0=PWM_B_BOT10; 1=I/O12)
13 I/O13 Data Type Control (0=PWM_B_TOP10; 1=I/O13)
14 I/O14 Data Type Control (0=PWM_A_BOT10; 1=I/O14)
15 I/O15 Data Type Control (0=PWM_A_TOP10; 1=I/O15)
16 I/O16 Data Type Control (0=HMFL10; 1=I/O16)
17 I/O17 Data Type Control (0=PLIM10; 1=I/O17)
18 I/O18 Data Type Control (0=MLIM10; 1=I/O18)
19 I/O19 Data Type Control (0=USER10; 1=I/O19)
20 I/O20 Data Type Control (0=FlagT10; 1=I/O20)
21 I/O21 Data Type Control (0=FlagU10; 1=I/O21)
22 I/O22 Data Type Control (0=FlagV10; 1=I/O22)
23 I/O23 Data Type Control (0=FlagW10; 1=I/O23)
(All bits: 0=dedicated hardware I/O; 1=general I/O)
(All bits must be 0 for use with ACC-1E 2-axis piggyback board)
X:$C084 Data Inversion Control Register (when used as general I/O; see
Y:$C084)
Bits: 0 I/O00 Inversion Control
...
23 I/O23 Inversion Control
(All bits: 0=Non-inverting; 1=Inverting)
Y:$C085 General I/O Data Type Control Register (Do not change.)
Bits: 0 I/O24 Data Type Control
...
7 I/O31 Data Type Control
(These bits are always 1; there is no alternate mode for these lines.)
8-23 Not used
X:$C085 General I/O Data Inversion Control
Bits: 0 I/O24 Inversion Control
...
7 I/O31 Inversion Control
(All bits: 0=Non-inverting; 1=Inverting)
8-23 Not used
Y:$C086 Data Type Control Register (Do not change.)
Bits: 0 DAT0 Data Type Control (0=ENCC9; 1 =DAT0)
1 DAT1 Data Type Control (0=ENCC10; 1 =DAT1)
2 DAT2 Data Type Control (0=Fault9; 1 =DAT2)
ACC-14M MACRO Station Memory and I/O Map 59
Page 68

Accessory 14M
3 DAT3 Data Type Control (0=Fault10; 1 =DAT3)
4 DAT4 Data Type Control (0=EQU9; 1 =DAT4)
5 DAT5 Data Type Control (0=EQU10; 1 =DAT5)
6 DAT6 Data Type Control (0=AENA9; 1 =DAT6)
7 DAT7 Data Type Control (0=AENA10; 1 =DAT7)
8 SEL0 Data Type Control (0=ADC_STROB; 1=SEL0)
9 SEL1 Data Type Control (0=ADC_CLK; 1=SEL1)
10 SEL2 Data Type Control (0=ADC_A9; 1=SEL2)
11 SEL3 Data Type Control (0=ADC_B9; 1=SEL3)
12 SEL4 Data Type Control (0=ADC_A10; 1=SEL4)
13 SEL5 Data Type Control (0=ADC_B10; 1=SEL5)
14 SEL6 Data Type Control (0=SCLK; 1=SEL6)
15 SEL7 Data Type Control (0=SCLK_DIR*; 1=SEL7)
(All bits: 0=dedicated hardware I/O; 1=general I/O)
(All bits must be 0 for use with ACC-1E 2-axis piggyback board)
16-23 Not used
X:$C086 JTHW Port Data Inversion Control Register (when used as general I/O, see
Y:$C086.)
Bits: 0 DAT0 Inversion Control
...
7 DAT7 Inversion Control
8 SEL0 Inversion Control
...
15 SEL7 Inversion Control
(All bits: 0=Non-inverting; 1=Inverting)
(All bits must be 0 to use standard port accessories)
16-23 Not used
Y:$C087 Data Type Control Register (Do not change.)
Bits: 0 DISP0 Data Type Control
...
7 DISP7 Data Type Control
8 CTRL0 Data Type Control
...
11 CTRL3 Data Type Control
(These bits are always 1; there is no alternate mode for these pins.)
12-23 Not used
X:$C087 Data Inversion Control Register
Bits: 0 DISP0 Inversion Control
...
7 DISP7 Inversion Control
8 CTRL0 Inversion Control
9 CTRL1 Inversion Control
10 CTRL2 Inversion Control (AENA_1 Relay)
11 CTRL3 Inversion Control (AENA_2 Relay)
(All bits: 0=Non-inverting; 1=Inverting)
(All bits must be 0 to use standard port accessories.)
12-23 Not used
Y:$C088-$C08B Not used
60 ACC-14M MACRO Station Memory and I/O Map
Page 69

Accessory 14M
X:$C088-$C08B Not used
Y:$C08C Pure binary conversion from gray code input on I/O00 to I/O23
Note:
The pins associated with this register are used for other purposes on the ACC-14M
MACRO Station.
X:$C08C DAC Strobe Word, 24 bits
(Shifted out MSB first, one bit per DACCLK cycle, starting on rising edge
of phase clock)
Y:$C08D Gray-to-binary conversion bit-length control
Note:
The pins associated with this register are used for other purposes on the ACC-14M
MACRO Station.
Bits: 0-3 Bit length of less significant word portion (I/O00 - I/Onn)
4 =1 specifies 16-bit lower/8-bit upper conversion
5-23 Not used
X:$C08D Not used
Y:$C08E MACRO Node Enable Control (I996)
Bits: 0 Node 0 enable control
...
15 Node 15 enable control
(0=node disable; 1=node enable)
16-19 Sync packet slave node number control
20-23 Master number control
X:$C08E Not used
Y:$C08F MACRO Ring Status and Control
Bits: 0 Data overrun error (cleared when read)
1 Byte violation error (cleared when read)
2 Packet parity error (cleared when read)
3 Data under run error (cleared when read)
4 Master station enable
5 Synchronizing master station enable
6 Sync packet received (cleared when read)
7 Sync packet phase lock enable
8 Node 8 master address check disable
9 Node 9 master address check disable
10 Node 10 master address check disable
11 Node 11 master address check disable
12 Node 12 master address check disable
13 Node 13 master address check disable
14 Node 14 master address check disable
15 Node 15 master address check disable
ACC-14M MACRO Station Memory and I/O Map 61
Page 70

Accessory 14M
X:$C08F DSPGATE2 clock control register
Bits (Bits 0-11 comprise I993)
0-2: SCLK Frequency Control n (f=39.3216MHz / 2n, n=0-7)
3-5: PFM Clock Frequency Control n (f=39.3216MHz / 2n, n=0-7)
6-8: DAC Clock Frequency Control n (f=39.3216MHz / 2n, n=0-7)
9-11: ADC Clock Frequency Control n (f=39.3216MHz / 2n, n=0-7)
12: Phase Clock Direction (0=output, 1=input)
(This must be 1)
13: Servo Clock Direction (0=output, 1=input)
(This must be 1)
14-15: Not used (report as zero)
16-19: Phase Clock Frequency Control n (I997)
(f=MAXPHASE / [n+1], n=0-15)
20-23: Servo Clock Frequency Control n
(f=PHASE / [n+1], n=0-15)
Chan #
Hex
9 10
[$C090] [$C098]
Y:$C09x Channel n Time between last two encoder counts (SCLK cycles)
X:$C09x Channel n Status Word
Bits: 0-2 Captured Hall Effect Device (UVW) State
3 Invalid demultiplex of C, U, V, and W
4-7 Not used (reports as 0)
8 Encoder Count Error (0 on counter reset, 1 on illegal transition)
9 Position Compare (EQUn) output value
10 Position-Captured-On-Gated-Index Flag
(=0 on read of captured position register, =1 on trigger capture)
11 Position-Captured Flag (on any trigger)
(=0 on read of captured position register, =1 on trigger capture)
12 Handwheel 1 Channel A (HWAn) Input Value
13 Handwheel 1 Channel B (HWBn) Input Value
14 Handwheel 1 Channel C (Index, HWCn) Input Value (ungated)
15 Amplifier Fault (FAULTn) Input Value
16 Home Flag (HMFLn) Input Value
17 Positive End Limit (PLIMn) Input Value
18 Negative End Limit (MLIMn) Input Value
19 User Flag (USERn) Input Value
20 FlagWn Input Value
21 FlagVn Input Value
22 FlagUn Input Value
23 FlagTn Input Value
Chan #
Hex
9 10
[$C091] [$C099]
Y:$C09x Channel n Encoder Time Since Last Encoder Count (SCLK cycles)
X:$C09x Channel n Encoder Phase Position Capture Register (counts)
62 ACC-14M MACRO Station Memory and I/O Map
Page 71

Accessory 14M
Chan #
Hex
9 10
[$C092] [$C09A]
Y:$C09x Channel n Output A Command Value
Bits: 8-23: PWM Command Value
6-23: Serial DAC Command Value
0-5: Not Used
X:$C09x Channel n Encoder Servo Position Capture Register
Bits: 0: Direction of last count (0=up, 1=down)
1-23: Position counter (units of counts)
Chan #
Hex
9 10
[$C093] [$C09B]
Y:$C09x Channel n Output B Command Value
Bits: 8-23: PWM Command Value
6-23: Serial DAC Command Value
0-5: Not used
X:$C09x Channel n Flag Position Capture Value; 24 bits, units of counts
Chan #
Hex
9 10
[$C094] [$C09C]
Y:$C09x Channel n Output C Command Value
Bits: 8-23: PWM Command Value
0-23: PFM Command Value
X:$C094 Channel 9-10 ADC Strobe Word, 24 bits
(Shifted out MSB first one bit per DAC_CLK cycle, starting on rising
edge of phase clock)
X:$C09C Channel 9-10 PWM, PFM, MaxPhase Control Word
Bits: 0-7: PWM Dead Time (16*PWM CLK cycles)
also PFM pulse width (PFM CLK cycles)
8-23: PWM Max Count Value
PWM Frequency = 117.96MHz / [10(MaxCount+1)]
"MaxPhase" Frequency = 2*PWM* Frequency
Chan #
Hex
9 10
[$C095] [$C09D]
Y:$C09x Supplementary Channel n* ADC A Input Value
Bits: 6-23: Serial ADC Value
0-5: Not used
X:$C09x Channel n Control Word
Bits 0-1: Encoder Decode Control
00: Pulse and direction decode
01: x1 quadrature decode
10: x2 quadrature decode
11: x4 quadrature decode
2-3: Direction & Timer Control
00: Standard timer control, external signal source, no inversion
ACC-14M MACRO Station Memory and I/O Map 63
Page 72

Accessory 14M
01: Standard timer control, external signal source, invert direction
10: Standard timer control, internal PFM source, no inversion
11: Alternate timer control, external signal source
4-5: Position Capture Control
00: Software capture (by setting bit 6)
01: Use encoder index alone
10: Use capture flag alone
11: Use encoder index and capture flag
6: Index Capture Invert Control (0=no inversion, 1=inversion)
7: Flag Capture Invert Control (0=no inversion, 1=inversion)
8-9: Capture Flag Select Control
00: Home Flag (HMFLn)
01: Positive Limit (PLIMn)
10: Negative Limit (MLIMn)
11: User Flag (USERn)
10: Encoder Counter Reset Control (1=reset)
11: Position Compare Initial State Write Enable
12: Position Compare Initial State Value
13: Position Compare Channel Select
(0= use this channel's encoder; 1=use first encoder on IC)
14: AENAn output value
15: Gated Index Select for Position Capture
(0=ungated index, 1=gated index)
16: Invert AB for Gated Index
(0: Gated Signal=A&B&C; 1: Gated Signal=A/&B/&C)
17: Index channel demultiplex control (0=no demux, 1=demux)
18: Reserved for future use (reports as 0)
19: Invert PFM Direction Control (0=no inversion, 1=invert)
20: Invert A & B Output Control (0=no inversion, 1=invert)
21: Invert C Output Control (0=no inversion, 1=invert)
22: Output A & B Mode Select (0=PWM, 1=DAC)
23: Output C Mode Select (0=PWM, 1=PFM)
Chan #
Hex
9 10
[$C096] [$C09E]
Y:$C09x Supplementary Channel n* ADC B Input Value (uses SEL3 in dedicated mode)
Bits: 6-23: Serial ADC Value
0-5: Not used
X:$C09x Channel n Encoder Compare Auto-increment value (24 bits, units of counts)
Chan #
Hex
9 10
[$C097] [$C09F]
64 ACC-14M MACRO Station Memory and I/O Map
 Loading...