

Page 1
DOR 920 LCD; UK;EX
Oil-filled Radiator
Artikel-Nr.: 2338352
Ident-Nr.: 01016
Page 2

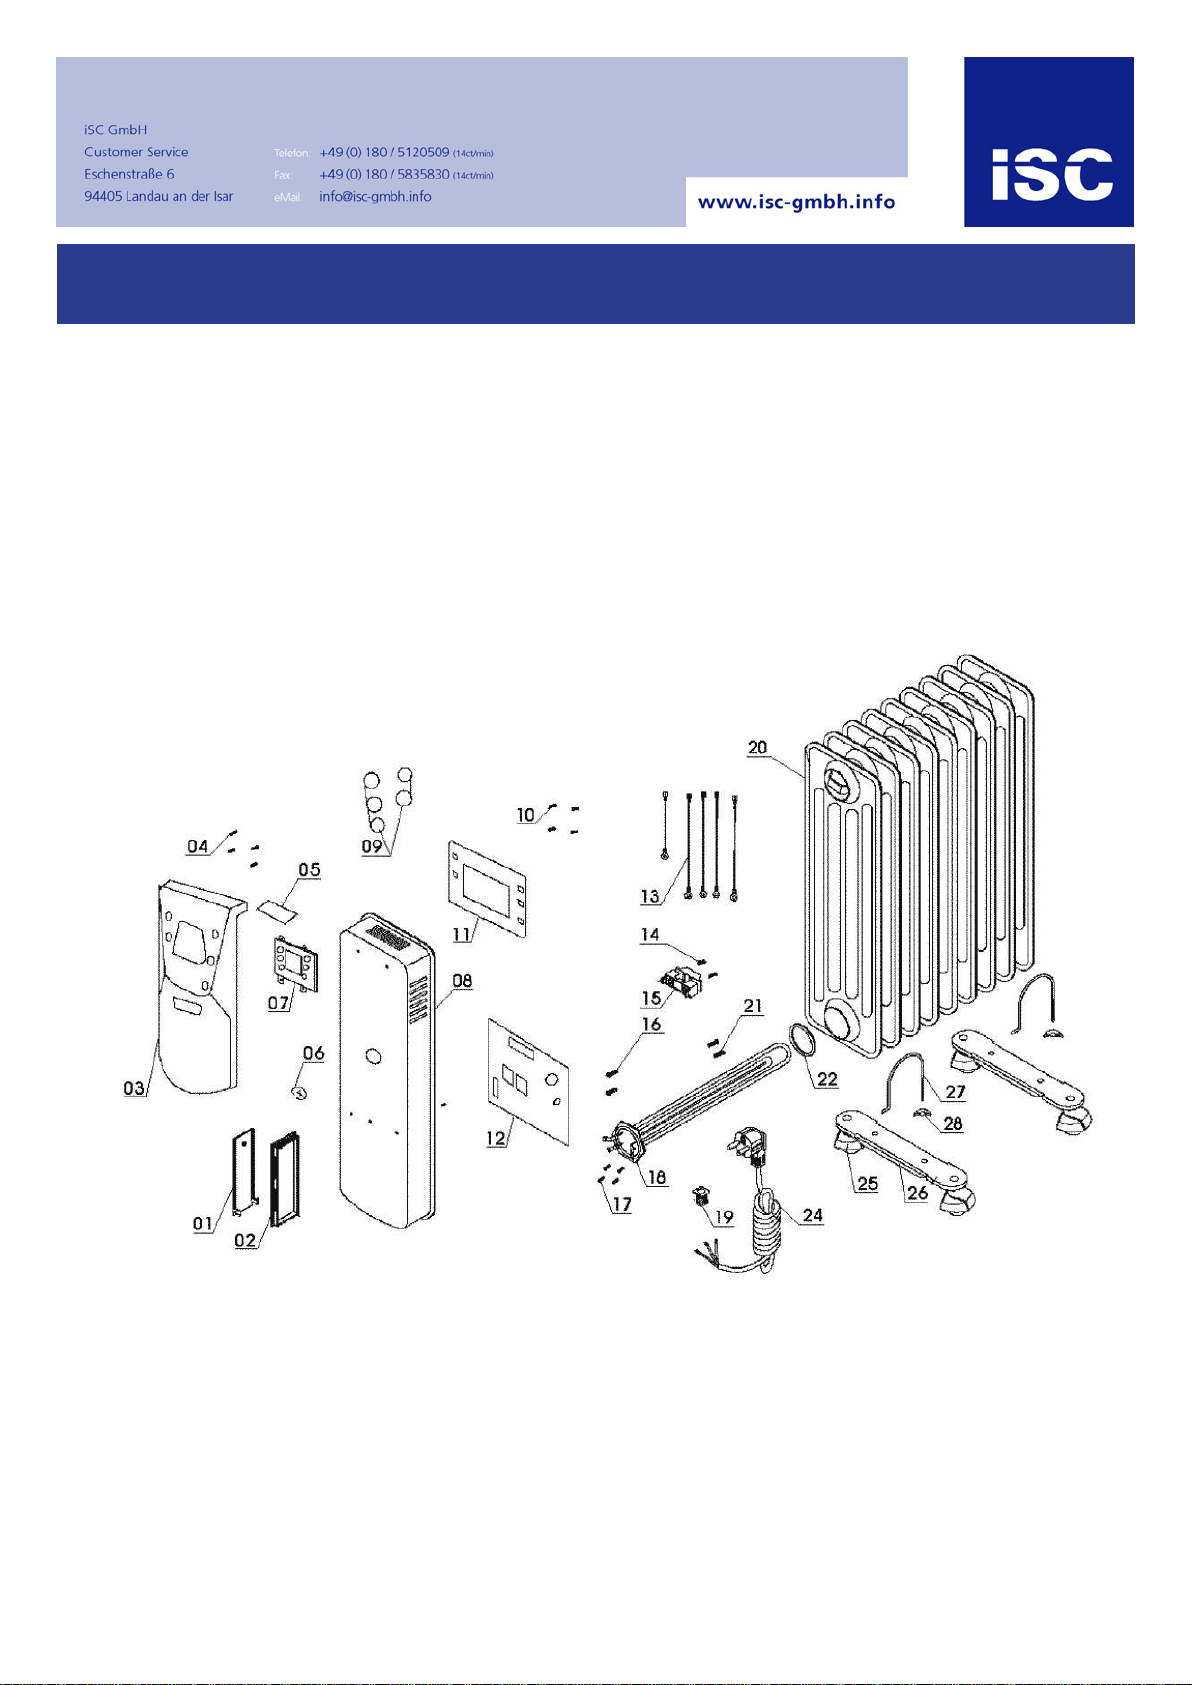
Komponenten / Ersatzteile
Position Artikel-Nr. Beschreibung
11 233835201011 LVD
25 233835201025 Wheel
26 233835201026 Wheel Nuts F=0.8mm
27 233835201027 U Bolt
28 233835201028 Wing Nuts
Page 3
Operating Instructions
Oil-Filled Radiator
EH-Art.-Nr.: 23.383.52 I.-Nr.: 01016
Art.-Nr.: 3337 I.-Nr.: 015r.:
DOR 920 LCD
Anleitung DOR 920 LCD SPK7 05.09.2006 13:11 Uhr Seite 1
Page 4

2
1
2
3
4
Anleitung DOR 920 LCD SPK7 05.09.2006 13:11 Uhr Seite 2
Page 5

GB
3
1. Safety information
앬 Read the operating instructions before using the
appliance for the first time. The appliance may
only be used as described. Any other use is not
permitted.
앬 Keep the instructions in a safe place and give
them to third parties if necessary.
앬 Check that the appliance has been delivered in
perfect condition. If it has suffered any damage,
do not connect the appliance to the power supply.
앬 Check the appliance, particularly the mains lead,
for signs of damage every time before use. If you
find signs of damage, contact your customer
service.
앬 Place the mains cable so that there is no danger
of tripping over the cable.
앬 Do not guide the mains cable over hot parts of the
appliance during operation.
앬 Never use the mains cable to pull the power plug
out of the socket-outlet! Never use the mains
cable to carry the appliance or try to move the
appliance by pulling the mains cable.
앬 Never jam the mains cable between objects, or
pull the cable over sharp edges, or place the cable
over hot plates or open flames.
앬 Not suitable for commercial purposes.
앬 Use the appliance in enclosed, dry areas only.
앬 Never open the appliance or touch live parts –
danger of fatal accident!
앬 Never immerse the appliance in water – danger
of fatal accident!
앬 Do not place the appliance near wet rooms or wet
areas (bathroom, shower room, swimming pool,
etc.). It must not be possible for the control
elements to be touched by a person in a shower,
a vessel filled with liquid or the bathtub.
앬 Never use the appliance with wet hands.
앬 The radiator may only be used in an upright
position and with mounted guide rollers.
앬 Do not cover the appliance and place no objects or
clothing on or between the heating ribs. Under no
circumstances are you to restrict the air circulation
around the heating ribs through curtains, furniture
or similar objects - fire hazard!
앬 Connect the device to an earthed socket outlet
only!
앬 If the radiator is damaged due to toppling or
otherwise or if the power cable is damaged,
contact an authorized professional or the customer
service responsible for your country.
앬 Position the appliance in such a way that the
mains plug is accessible at all times.
앬 If the appliance is not used for a lengthy period of
time, disconnect it from the mains supply.
앬 Do not position the appliance directly below a
socket.
앬 For supervised operation only.
앬 If the radiator topples, disconnect the mains plug
from the supply, wait until it has cooled and then
place it upright again.
앬 Caution! The heating ribs become hot during
operation.
앬 Never position the appliance on deep pile carpets.
앬 Do not use the appliance in rooms in which
inflammable materials (for example solvents, etc.)
or gases are used or stored.
앬 Keep highly inflammable substances and gases
away from the appliance.
앬 Do not use in areas where there is a fire risk (for
example wooden sheds).
앬 Only use the radiator with its mains lead fully
extended.
앬 Maintain a minimum distance of 50 cm from
objects, walls, etc.
앬 Not suitable for installation on permanently
installed electrical cables.
앬 Do not insert any foreign objects in the appliance’s
openings.
- Danger of electric shock and damage to the
appliance.
앬 Keep children and people on medication or under
the influence of alcohol away from the appliance.
앬 Maintenance and repair work may only be carried
out by authorized trained personnel.
앬 Important! Do not cover the appliance – fire risk!
Pay attention to the symbol on the appliance.
앬 Do not use in bathroom or areas likely to be wet or
damp.
앬 This heater is filled with a precise quantity of
special oil. Repairs requiring opening of the oil
container are only to be made by the manufacturer
or his service agent who should be contacted if
there is an oil leak.
2. Layout (Fig. 1)
1 Heating ribs
2 Control lamp
3 Indicator panel
4 LCD display
5 Temperature sensor
6 Recessed grip
7 Storage compartment for mains lead
8 Castors
Anleitung DOR 920 LCD SPK7 05.09.2006 13:11 Uhr Seite 3
Page 6

GB
4
3. Assembly
3.1 Fitting the castors (Fig. 2 – 3)
Important! To prevent damage, place the radiator
upside down on a soft surface (for example a carpet).
앬 Slide the fastening bar (1) under the radiator
element, engage it in the mounting (2) and secure
it with the wing nut (3). Repeat the above on the
last space between the ribs.
4. Technical data:
Rated voltage: 230 V ~ 50 Hz
Output: 2000 W (1000 W/2000 W)
Thermostat control: Electronic
Heating ribs: 9
Protection class: I
Mains lead: 3 x 1 mm2x 1,7 m
5. Proper use
The appliance is designed only for private use, not
for commercial heating purposes.
6. Starting up
Important! Before using the appliance for the first
time, check that the voltage supply is the same as
the voltage details set out on the data plate.
Read the safety instructions listed in section 1.
Note! The actual room temperature is not indicated
correctly for the first 20 or so minutes after the heater
is switched on.
Note! The electronic room temperature control will
switch the heater on and off automatically to maintain
the room temperature at an almost constant level.
However, this presupposes that the radiator has
sufficient output to cover the heating requirements for
the room.
6.1 Function switch (Fig. 4)
Button 1: Switches the device on and off, switches on
heat setting 1 or heat setting 2.
Button 2: Sets the desired room temperature, the
switch OFF time and the switch ON time.
Button 3: Changes over from “°F“ (degrees
Fahrenheit) to “°C“ (degrees Celsius).
Button 4: Decreases the desired room temperature,
the switch OFF time and the switch ON time.
Button 5: Increases the desired room temperature,
the switch OFF time and the switch ON time.
6.1.1 Continuous operation
앬 Press button 1 (Power) once when the appliance
is off. The appliance switches on and runs in heat
setting 2 (SS). The temperature displayed equals
the room temperature measured by the appliance.
앬 Press button 1 a second time and the appliance
switches to heat setting 1 (S); press it again and
the appliances switches to “OFF”.
Note: When the appliance is switched on it will run
continuously until it is switched off again manually as
previously described.
6.1.2 Switching on and off by the room
temperature control
앬 Switch on the appliance as previously described.
앬 Press the button 2 until the “Thermometer“ symbol
flashes in LCD display.
앬 Set the desired room temperature with the button
4 or 5.
앬 The “Thermometer” then symbol with a steady
light and the room temperature measured by the
appliance is indicated.
앬 When the room temperature rises above the
desired level, the appliance switches off the heater
and the temperature indicator flashes. When the
room temperature drops below the desired level,
the heater switches on again. The temperature
indicator shows the measured room temperature.
Example: with a desired room temperature of 21°C
the appliance switches off at 22°C and on at 20°C.
6.1.3 Programming the switch OFF time
When the appliance is running (the control lamp is
on) you can set a switch OFF time for the heater from
1h to 10h. The appliance then switches off
automatically once the set time has elapsed.
Note: Set the desired room temperature as
previously described in section 6.1.2. When the
desired temperature is reached the appliance will
switch off the heater, and when the temperature
drops below the desired level it will switch the heater
Anleitung DOR 920 LCD SPK7 05.09.2006 13:11 Uhr Seite 4
Page 7

GB
5
on again, even if the set OFF time has not yet
elapsed.
앬 Press button 2 until “AUTO OFF” flashes in the
LCD display.
앬 Set the desired switch OFF time with the button 4
or 5.
앬 “AUTO OFF” light will remain steady and the set
OFF time is indicated. The appliance shows the
time remaining up to the end of the set OFF time.
6.1.4 Programming the switch ON time
When the appliance is running (the control lamp is
on) you can set a switch ON time for the heater from
1h to 10h. The heater then switches on when the set
time has elapsed. If no switch OFF time was
programmed yet (see 6.1.3) the appliance will switch
off automatically after 10h. The heater can be
switched off manually at any time with the button 1
(Power).
Note: Set the desired room temperature as
previously described in section 6.1.2. When the
desired temperature is reached the appliance will
switch off the heater, and when the temperature
drops below the desired level it will switch the heater
on again.
앬 Press button 2 until “AUTO ON” flashes in the LCD
display.
앬 Set the desired switch ON time with the button 4 or
5.
앬 “AUTO ON” then shines with a steady light and the
set switch ON time is indicated. The appliance
switches on the heater after the set switch ON
time has elapsed.
앬 The display switches to “AUTO OFF“ and “10 HR“.
앬 The appliance switches off automatically after 10h.
앬 As long as the heater is running you can set the
switch OFF time manually as described in section
6.1.3.
6.2 Programming examples
6.2.1 Automatic switch ON time
앬 Set the automatic switch OFF time “AUTO OFF“ to
3 hours (see 6.1.3).
앬 Set the automatic switch ON time “AUTO ON“ to 2
hours (see 6.1.4).
Result:
The appliance switches on the heater after 2 hours
have elapsed and switches off after a further 3 hours
in heating mode.
6.2.2 Automatic switch OFF time
앬 Set the automatic switch OFF time “AUTO OFF“ to
7 hours (see 6.1.3).
Result:
The appliance switches off after 7 hours have
elapsed.
6.2.3 Temperature indication in °C / °F
앬 Press button 3 (F/C) to select between degrees
Celsius °C and degrees Fahrenheit °F for the
temperature indication in the LCD display. Press
button 3 repeatedly until the desired indication
appears.
7. Storage
If the radiator is not used for a lengthy period of time,
the mains lead must be stored in full in the
compartment provided for it. The radiator has to be
stored in a dry place, covered if possible.
8. Maintenance and cleaning
앬 Maintenance and repair work may only be carried
out by an authorized electrical servicing contractor
or the customer service responsible for your
country.
앬 Check the mains lead at regular intervals for signs
of defects or damage. A damaged mains lead may
only be replaced by an electrician or the customer
service responsible for your country in compliance
with the relevant regulations.
앬 Important: Disconnect the mains lead before
cleaning – danger of electric shock.
앬 Use a damp cloth to clean the casing.
앬 The ribs are filled with a special oil. Repairs that
necessitate the oil seal to be opened may only be
carried out by the customer service responsible for
your country. If oil leaks from the appliance, return
it to the customer service responsible for your
country for examination.
9. Ordering spare parts
Please provide the following information on all orders
for spare parts:
앬 Model/type of machine
Anleitung DOR 920 LCD SPK7 05.09.2006 13:11 Uhr Seite 5
Page 8

6
앬 Article number of the machine
앬 ID number of the machine
앬 Number of the required spare part
For our latest prices and information please go to
www.isc-gmbh.info
10. Waste disposal
Defective devices must be disposed of properly.
Please contact the customer service center
responsible for your country.
Accessories and packaging should be disposed of in
an environment-friendly fashion, i.e. by taking them
to a recycling depot. Plastic parts are coded for
purposes of separation when recycling.
GB
Anleitung DOR 920 LCD SPK7 05.09.2006 13:11 Uhr Seite 6
Page 9

7
Anleitung DOR 920 LCD SPK7 05.09.2006 13:11 Uhr Seite 7
Einhell AG
Wiesenweg 22
D-94405 Landau/Isar
erklärt folgende Konformität gemäß EU-Richtlinie
D
und Normen für Artikel
declares conformity with the EU Directive
and standards marked below for the article
déclare la conformité suivante selon la
F
directive CE et les normes concernant l’article
verklaart de volgende conformiteit in overeen-
stemming met de EU-richtlijn en normen voor
het artikel
declara la siguiente conformidad a tenor de la
E
directiva y normas de la UE para el artículo
declara a seguinte conformidade de acordo
P
com a directiva CE e normas para o artigo
förklarar följande överensstämmelse enl. EU-
S
direktiv och standarder för artikeln
ilmoittaa seuraavaa Euroopan unionin direkti-
ivien ja normien mukaista yhdenmukaisuutta
tuotteelle
erklærer herved følgende samsvar med EU-
direktiv og standarder for artikkel
заявляет о соответствии товара
следующим директивам и нормам EC
izjavljuje sljedeću uskladjenost s odredbama i
normama EU za artikl.
declarå urmåtoarea conformitate cu linia direc-
toare CE μi normele valabile pentru articolul.
ürün ile ilgili olarak AB Yönetmelikleri ve
Normlar∂ gere©ince aμa©∂daki uygunluk aç∂kla
mas∂n∂ sunar.
‰ЛПТУВИ ЩЛУ ·ОfiПФ˘ıЛ Ы˘МКˆУ›· Ы‡МКˆУ· МВ
ÙËÓ √‰ËÁ›· ∂∂ Î·È Ù· ÚfiÙ˘Ô ÁÈ· ÙÔ ÚÔ˚fiÓ
Konformitätserklärung
I dichiara la seguente conformità secondo la
direttiva UE e le norme per l’articolo
attesterer følgende overensstemmelse i
henhold til EU-direktiv og standarder for
produkt
prohlašuje následující shodu podle směrnice
EU a norem pro výrobek.
a következő konformitást jelenti ki a termékek-
H
re vonatkozó EU-irányvonalak és normák
szerint
pojasnjuje sledečo skladnost po smernici EU
in normah za artikel.
deklaruje zgodność wymienionego poniżej
artykułu z następującymi normami na
podstawie dyrektywy WE.
vydáva nasledujúce prehlásenie o zhode podľa
smernice EÚ a noriem pre výrobok.
деклаpиpа следното съответствие съгласно
диpективите и ноpмите на ЕС за пpодукта.
заявляє про відповідність згідно з Директивою
ЄС та стандартами, чинними для даного товару
deklareerib vastavuse järgnevatele EL direktiivi
EE
dele ja normidele
deklaruoja atitikti pagal ES direktyvas ir normas
straipsniui
izjavljuje sledeçi konformitet u skladu s odred
SCG
bom EZ i normama za artikl
Atbilstības sertifikāts apliecina zemāk minēto preču
atbilstību ES direktīvām un standartiem
SSaammrrææmmiissyyffiirrll‡‡ssiinngg ssttaa››ffeessttiirr eeffttiirrffaarraannddii ssaammrrææmmii
ssaammkkvvææmmtt rreegglluumm EEvvffrróóppuubbaannddaallaaggssiinnss oogg ssttöö››lluumm
ff
yyrriirr vvöörruurr
Ölradiator DOR 920 LCD
98/37/EG
x
73/23/EWG_93/68/EEC
97/23/EG
89/336/EWG_93/68/EEC
x
90/396/EWG
87/404/EWG
R&TTED 1999/5/EG
2000/14/EG:
95/54/EG:
97/68/EG:
89/686/EWG
EN 60335-1: 1994+A1+A2+A11+A16; EN 60335-2-30: 1997+A1;
EN 55014-1: 2000+A1+A2; EN 55014-2: 1997+A1;
EN 61000-3-2: 2000; EN 61000-3-3: 1995+A1
Landau/Isar, den 02.08.2006
Art.-Nr.: 23.383.52 I.-Nr.: 01016 Archivierung: 2338350-09-4155050
Subject to change without notice
Weichselgartner
General-Manager
Sievers
Product-Management
Page 10

WARRANTY CERTIFICATE
The product described in these instructions comes with a 3 year warranty
covering defects. This 3-year warranty period begins with the passing of risk or
when the customer receives the product.
For warranty claims to be accepted, the product has to receive the correct
maintenance and be put to the proper use as described in the operating
instructions.
Your statutory rights of warranty are naturally unaffected during these 3
years.
This warranty applies in Germany, or in the respective country of the
manufacturer’s main regional sales partner, as a supplement to local
regulations. Please note the details for contacting the customer service center
responsible for your region or the service address listed below.
Einhell UK Ltd
Unit 5 Morpeth Wharf
Twelve Quays
Birkenhead, Wirral
CH 41 1LF
Helpline-No.: GB 0044 151649 1500
IRL 189 09 46244
For EU countries only
Never place any electric tools in your household refuse.
To comply with European Directive 2002/96/EC concerning old electric and electronic equipment and its
implementation in national laws, old electric tools have to be separated from other waste and disposed of
in an environment-friendly fashion, e.g. by taking to a recycling depot.
Recycling alternative to the demand to return electrical devices:
As an alternative to returning the electrical device, the owner is obliged to cooperate in ensuring that the
device is properly recycled if ownership is relinquished. This can also be done by handing over the used
device to a returns center, which will dispose of it in accordance with national commercial and industrial
waste management legislation. This does not apply to the accessories and auxiliary equipment without
any electrical components which are included with the used device.
EH 09/2006
The reprinting or reproduction by any other means, in whole or in part,
of documentation and papers accompanying products is permitted only
with the express consent of ISC GmbH.
Technical changes subject to change
Anleitung DOR 920 LCD SPK7 05.09.2006 13:11 Uhr Seite 8
 Loading...