

Page 1
DMB TYXAL+
www.deltadore.com
FR
Notice d’installation
EN
Installation guide
DE
Installationsanleitung
IT
Guida di installazione
ES
Manual de instalación
PL
Instrukcja instalacji
NL
Installatiehandleiding
LS17500 – 3,6V - Lithium
Autonomie 10 ans - Autonomy 10 years
Consumption stand-by : 5 μA
Consumption : 26 mA
868,30 MHz / 868,95 MHz (EN 300 220) 100 m
-10°C / +70°C
-10°C / +55°C
IP
IP 30
IK 04
75%
67,8 x 77,3 x 45,3 mm
90,50 gr.
R&TTE 1999/5/CE
EN 50131-2-2 Grade 2, RTC 50131-2-2, EN 50131-5-3,
Environmental class II
Autoprotection à l’ouverture et à l’arrachement / Tamper alarm on opening or removal of unit /
Sabotagekontakt : Auslösung beim Öffnen und Abreißen / Autoprotezione all’apertura e alla rimozione
forzata / Autoprotección contra la apertura y el vandalismo / &UNKCJAÒANTYSABOTAêOWAÒWÒPRZYPADKUÒ
PRBYÒWYRWANIAÒLUBÒOTWARCIA / Automatische bescherming tegen opening en losrukken
Important product information (Ì)
Délai de reprise : 180 secondes - Délai d’initialisation : 60 secondes
Immunité au champ magnétique
Ý 300m
Contenu / Contents / Inhalt / Contenuto / Contenido / :AWARTOÜĀ / Inhoud
Instructions
Important
Product
Infor
mations
1
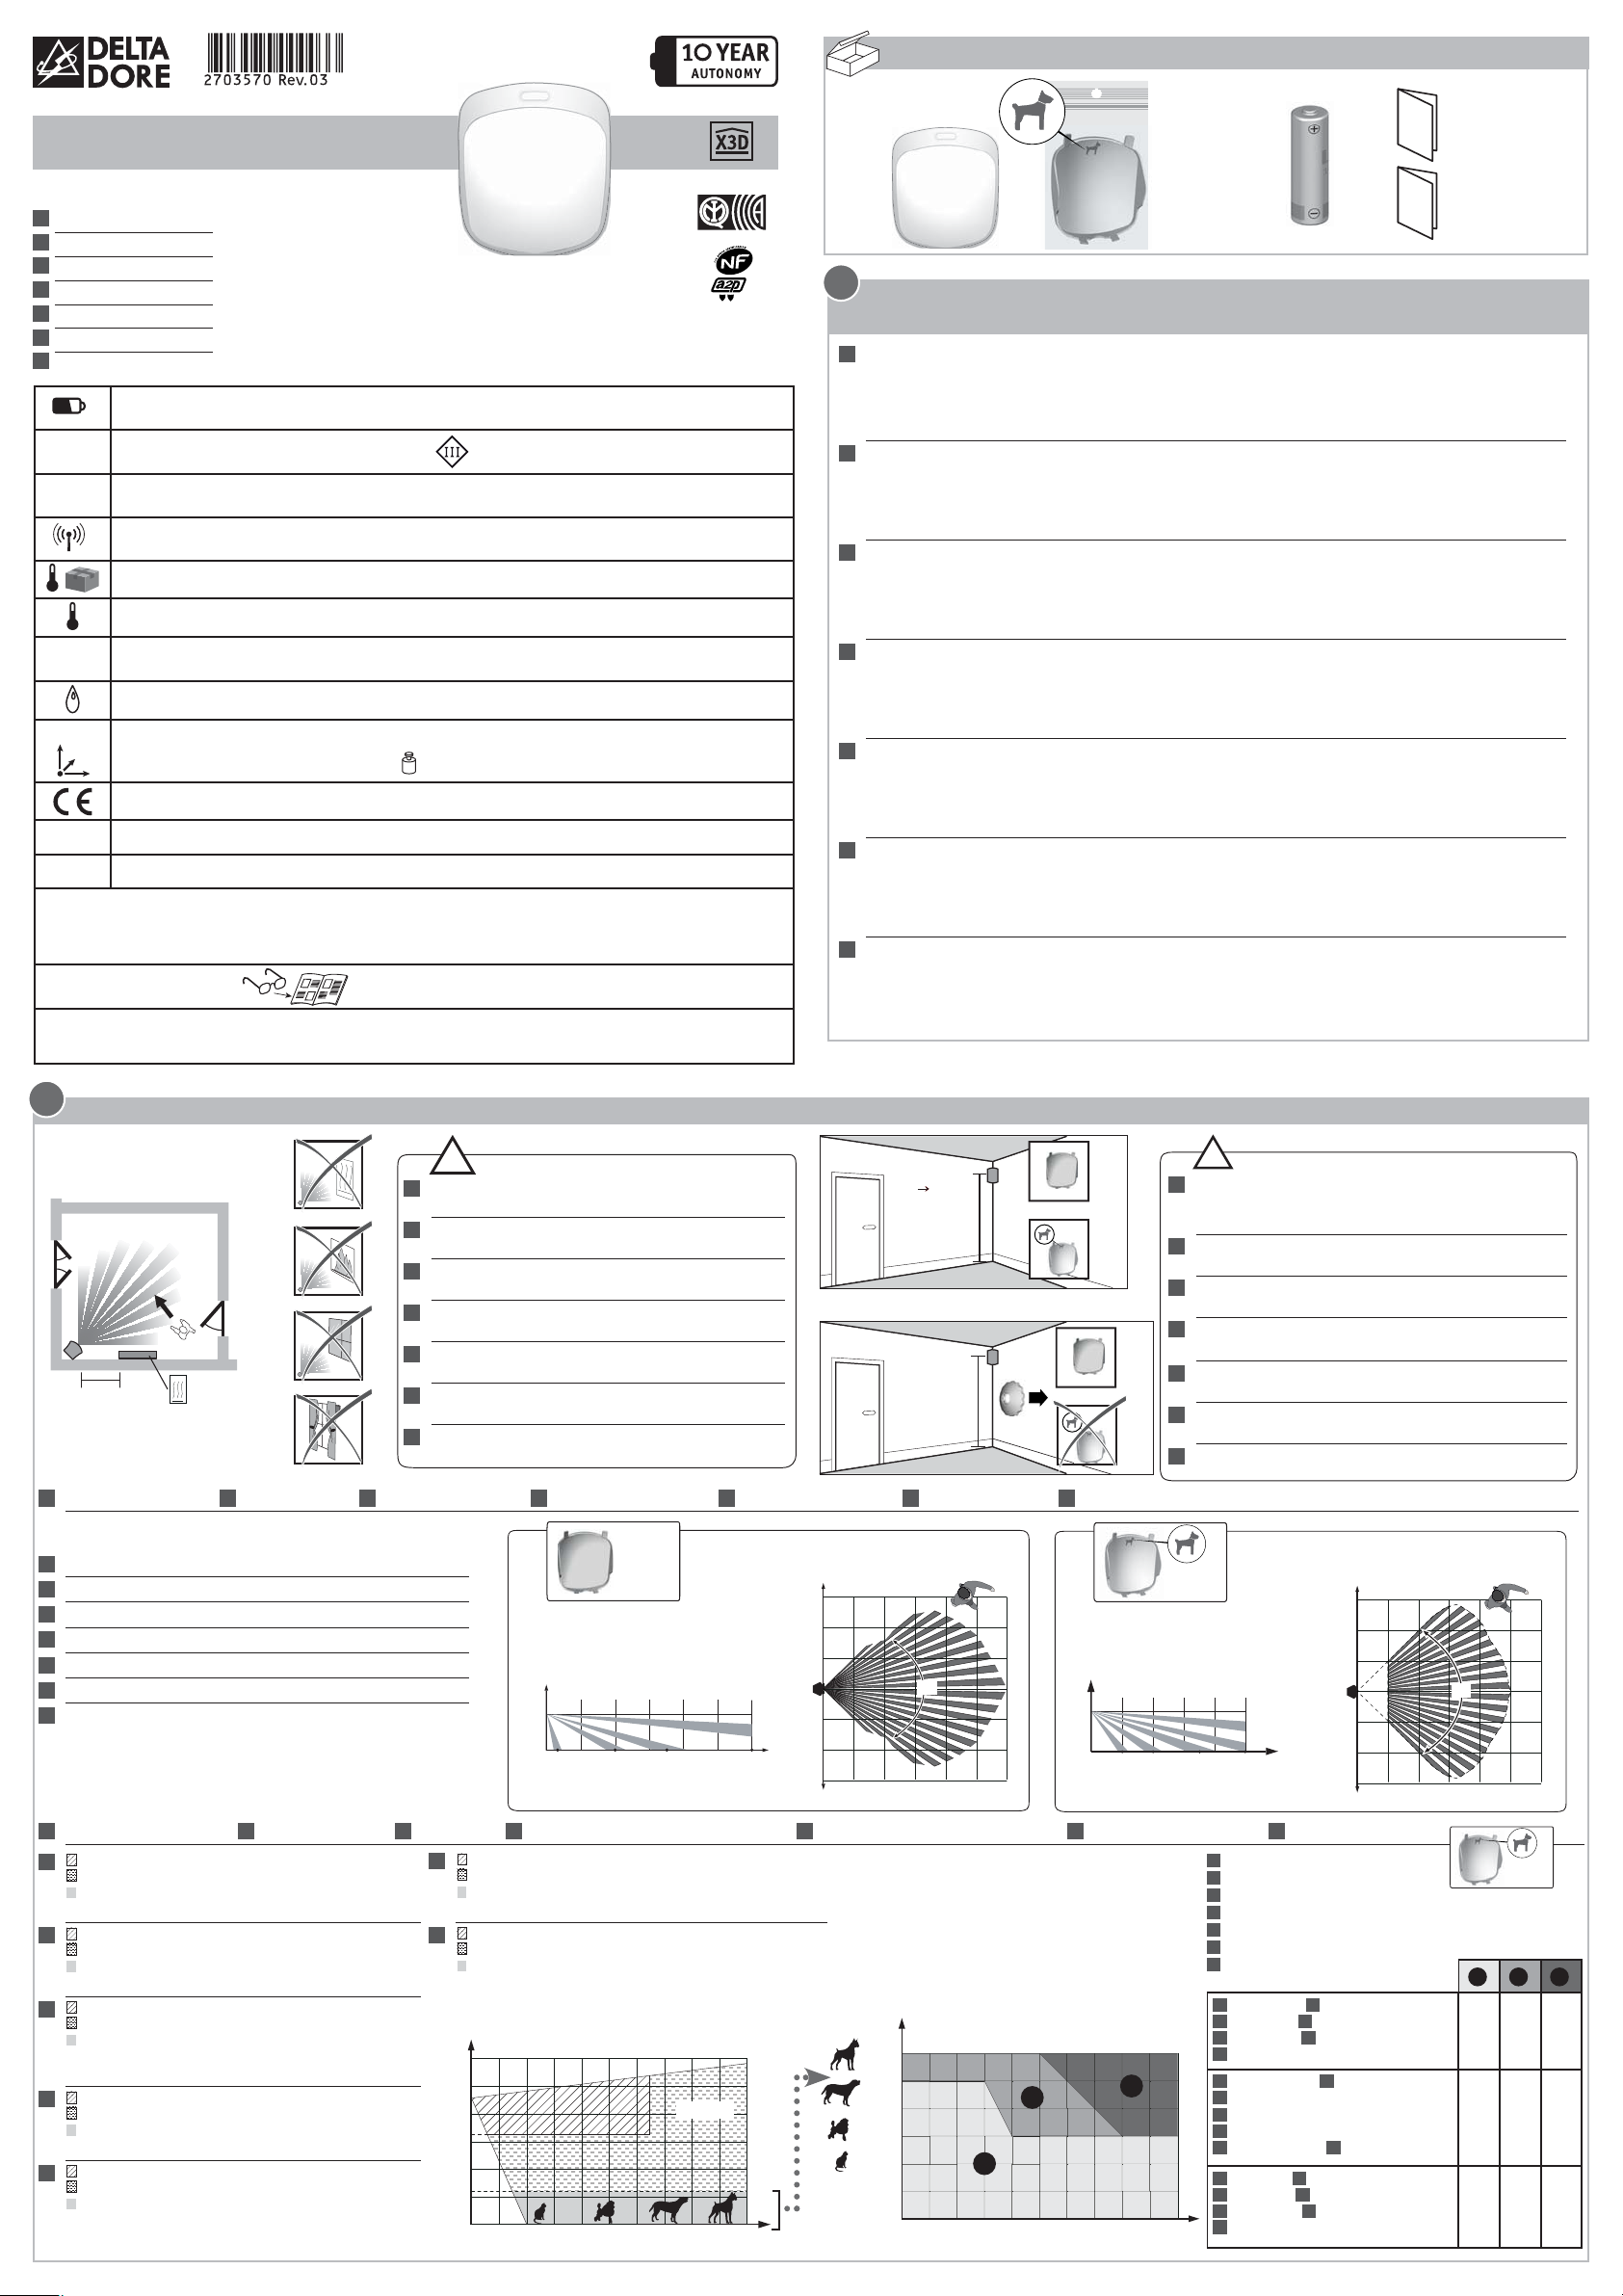
Présentation / Presentation / Beschreibung / Presentazione / Presentación / Prezentacja /
Voorstelling
Le TYXAL DMB détecte par infra-rouge (chaleur) toute présence en mouvement dans la pièce.
FR
Il dispose de 2 lentilles amovibles :
- n°1 : appelée standard (montée sur le produit livré).
- n°2 : appelée immunité animaux (ne détecte pas les animaux jusqu’à un certain gabarit, ou électroménager type aspirateur robot).
TYXAL DMB uses infrared (heat) to detect any moving presence in the room.
EN
It has 2 removable lenses:
- no. 1: standard (fitted on the product supplied).
- no. 2: animal immunity (does not detect animals up to a certain size, or household appliances such
as robot vacuum cleaners).
TYXAL DMB erkennt Bewegungen im Raum durch Infrarotstrahlung (Wärme).
DE
Er verfügt über 2 herausnehmbare Linsen:
- Nr. 1: Standardlinse (im Lieferumfang enthalten, im Gerät eingebaut).
- Nr. 2: Tierimmune Linse (keine Tiererfassung bis zu einer bestimmten Größe, keine Erfassung von
Haushaltsgeräten wie Staubsauger-Roboter).
Il Tyxal DMB rileva attraverso gli infrarossi (calore) qualsiasi presenza in movimento all’interno di una
IT
stanza. Dispone di 2 lenti interscambiabili :
- n° 1 : denominata «classica» (montata sul prodotto al momento dell’acquisto).
- n° 2 : denominata “selettiva animali” (non rileva gli animali di una certa dimensione o gli
elettrodomestici tipo gli aspirapolvere robot.
TYXAL DMB detecta a través de infrarrojos (calor) toda presencia en movimiento en la sala.
ES
Dispone de 2 lentes extraíbles:
- n°1 : denominada estándar (montada en el producto enviado).
- n°2 : denominada de inmunidad a la presencia animal (no detecta animales hasta un cierto volúmen,
o electrodomésticos como aspiradores robot).
#ZUJNIKÒ498!,Ò$-"ÒWYKRYWAÒZAÒPOÜREDNICTWEMÒPODCZERWIENIÒCIEPåAÒKAêDYÒRUCHÒWÒPOMIESZCZENIU
PL
7YPOSAêONYÒJESTÒWÒÒDEMONTOWANEÒSOCZEWKI
ÒNRÒÒZWANAÒSTANDARDOWæÒZAMONTOWANAÒWÒDOSTARCZANYMÒPRODUKCIE
ÒNRÒÒZWANAÒODPORNæÒNAÒZWIERZĂTAÒNIEÒWYKRYWAÒZWIERZæTÒDOÒPEWNEJÒWIELKOÜCIÒANIÒURZæDZEĆÒ!'$Ò
TYPUÒAUTOMATYCZNYÒODKURZACZ
De TYXAL DMB detecteert via infrarood alle bewegingen in een kamer.
NL
Deze heeft 2 verwisselbare lenzen:
- 1: standaard (gemonteerd op het geleverde product).
- 2 : huisdierenvrij (detecteert geen huisdieren, tot een bepaalde grootte, of elektrische huishoudtoestellen zoals een stofzuigrobot).
2
Emplacement / Location / Einbauort / Posizionamento / Ubicación / Lokalizacja / Locatie
!
Ne pas positionner en face d’un radiateur, d’une cheminée,
FR
d’une fenêtre, ou derrière un rideau.
Do not position the product opposite a radiator, fireplace,
EN
window, or behind a curtain.
Vermeiden Sie die Montage in der Nähe einer Heizung,
DE
eines Kamins, eines Fensters oder hinter einem Vorhang.
Non posizionare di fronte ad un calorifero, un camino, una
IT
finestra o dietro ad una tenda.
No coloque el dispositivo frente a un radiador, chimenea,
ES
ventana o detrás de cortinas.
.IEÒUMIESZCZAĀÒNAPRZECIWKOÒGRZEJNIKAÒKOMINKAÒOKNAÒANIÒ
1 m mini
Champ de détection / EN Detection field / DE Erfassungsbereich / IT Campo di rilevazione / ES Campo de detección / PL Pole wykrywania /
FR
T° = 19°C + personne de corpulence moyenne.
FR
T° = 19°C + person of average body size.
EN
T° = 19°C + Person von mittlerer Statur.
DE
T° = 19 °C + persona di corporatura media.
IT
T° = 19°C + persona de corpulencia media.
ES
4xÒÒx#ÒÒOSOBAÒÜREDNIEJÒPOSTURY
PL
T° = 19°C + persoon met gemiddelde lichaamsbouw.
NL
PL
ZAÒZASåONæ
Plaats niet voor een radiator, open haard, raam of achter
NL
een gordijn.
N°1 N°2
Vue latérale / Side view / Seitenansicht /
Vista laterale / Vista lateral /
7IDOKÒZÒBOKU / Lateraal gezien
H
2,30m
0,5m 4 m 7 m 12 m
Vue de dessus / Top view / Draufsicht /
Vista da sopra / Vista parte superior /
7IDOKÒODÒGRY / Van onderaf gezien
6 m
4 m
2 m
0 m
2 m
4 m
6 m
2,20 2,50 m
> 2,50 m
RO DMB
90°
12 m10 m8 m6 m4 m2 m0 m
✔
✔
✔
Detectieveld
NL
Vue latérale / Side view / Seitenansicht /
Vista laterale / Vista lateral /
7IDOKÒZÒBOKU / Lateraal gezien
H
2,30m
2m 4 m 7 m
Ne pas utiliser la rotule RO DMB (ref : 6416221) avec la
FR
lentille immunité animaux
NF&A2P).
Do not use ball joint RO DMB (ref.: 6416221) with the animal
EN
immunity lens.
Drehmodul RO DMB (Best.-Nr.: 6416221) nicht in
DE
Kombination mit der tierimmunen Linse verwenden.
Non utilizzare lo snodo RO DMB (ref: 6416221) con la lente
IT
selettiva animali
No utilice el acoplamiento RO DMB (ref: 6416221) con la lente
ES
de inmunidad a la presencia animal.
.IEÒUêYWAĀÒPRZEGUBUÒ2/Ò$-"ÒNRÒKATÒÒZÒSOCZEWKæÒ
PL
ODPORNæÒNAÒZWIERZĂTA
Gebruik de RO DMB kogelbout (ref : 6416221) niet met de
NL
lens tegen het detecteren van huisdieren.
10 m
!
(non couvert par la certification
(Non coperto dalla certificazione IMQ).
Vue de dessus / Top view / Draufsicht /
Vista da sopra / Vista parte superior /
7IDOKÒODÒGRY / Van onderaf gezien
6 m
4 m
2 m
0 m
2 m
4 m
6 m
90°
10 m8 m6 m4 m2 m0 m
Immunité aux animaux / EN Animal immunity / DE Tierimmun / IT Immune alla presenza degli animali / ES Inmunidad a la presencia animal / PL /DPORNOÜĀÒNAÒZWIERZĂTA / NL Huisdierenvrij
FR
Zone non autorisée aux animaux
FR
Zone autorisée aux animaux ≤ à 10 Kg
Zone autorisée aux animaux (voir détails A1, A2, A3)
Si plusieurs animaux, faire la somme de leurs masses.
Zone prohibited for animals
EN
Zone authorised for animals ≤ 10 kg
Zone authorised for animals (see A1, A2, A3)
If there are several animals, add together their weights.
Zone nicht zulässig für Tiere
DE
Zone zulässig für Tiere ≤ 10 kg
Zone zulässig für Tiere (siehe Details A1, A2, A3)
Bei mehreren Tieren müssen die Gewichte der Tiere
summiert werden.
Zona non autorizzata agli animali
IT
Zona autorizzata agli animali ≤ a 10 Kg
Zona autorizzata agli animali(vedi dettagli A1,A2,A3)
Se sono presenti più animali, sommare la loro massa.
Zona no autorizada para animales
ES
Zona autorizada para animales de hasta 10 Kg
Zona autorizada para animales (ver detalles A1, A2, A3)
Si existen varios animales, realice la suma de sus masas
corporales.
Ò3TREFAÒNIEDOZWOLONAÒDLAÒZWIERZæTÒ
PL
Ò3TREFAÒDOZWOLONAÒDLAÒZWIERZæTÒ°ÒÒKGÒ
3TREFAÒDOZWOLONAÒDLAÒZWIERZæTÒPATRZÒSZCZEGåYÒ!Ò!Ò!
7ÒPRZYPADKUÒKILKUÒZWIERZæTÒNALEêYÒZSUMOWAĀÒICHÒMASY
Niet-toegestande zone voor huisdieren
NL
Toegestane zone voor huisdieren ≤ 10 Kg
Toegestane zone voor huisdieren (zie A1, A2, A3)
Indien meerdere dieren, tel hun lichaamsgewicht op.
2,3 m
1,6 m
0,6 m
≤ 10 Kg
60 cm
50 cm
40 cm
30 cm
20 cm
10 cm
0 cm
10 m8 m6 m4 m2 m0 m
A2
A1
30 kg20 kg10 kg0 kg
A3
40 kg 50 kg
FR
Pelage autorisé zone A
EN
Fur authorised zone A
DE
Zulässiges Fell Zone A
IT
Pelo autorizzato zona A
ES
Pelaje autorizado en zona A
PL
3IERÜĀÒDOZWOLONAÒWÒSTREµÒEÒ!
NL
Vacht toegelaten zone A
FR
Poils longs / EN Long hair /
DE
Langhaar / IT Pelo lungo /
ES
Pelo largo / PL 3IERÜĀÒDåUGAÒ/
NL
Langharig
FR
Poils mi-longs / EN Medium-length hair /
DE
Mittellanges Haar /
IT
Pelo medio-lungo /
ES
Pelo de longitud media /
PL
3IERÜĀÒÜREDNIA / NL Halfl angharig
FR
Poils ras / EN Short hair /
DE
Kurzhaar / IT Pelo raso /
ES
Pelo corto / PL 3IERÜĀÒKRTKA /
NL
Korte vacht
N°2
A1 A2 A3
✔
✔
✔
✔ ✔
--
✔
-
Page 2
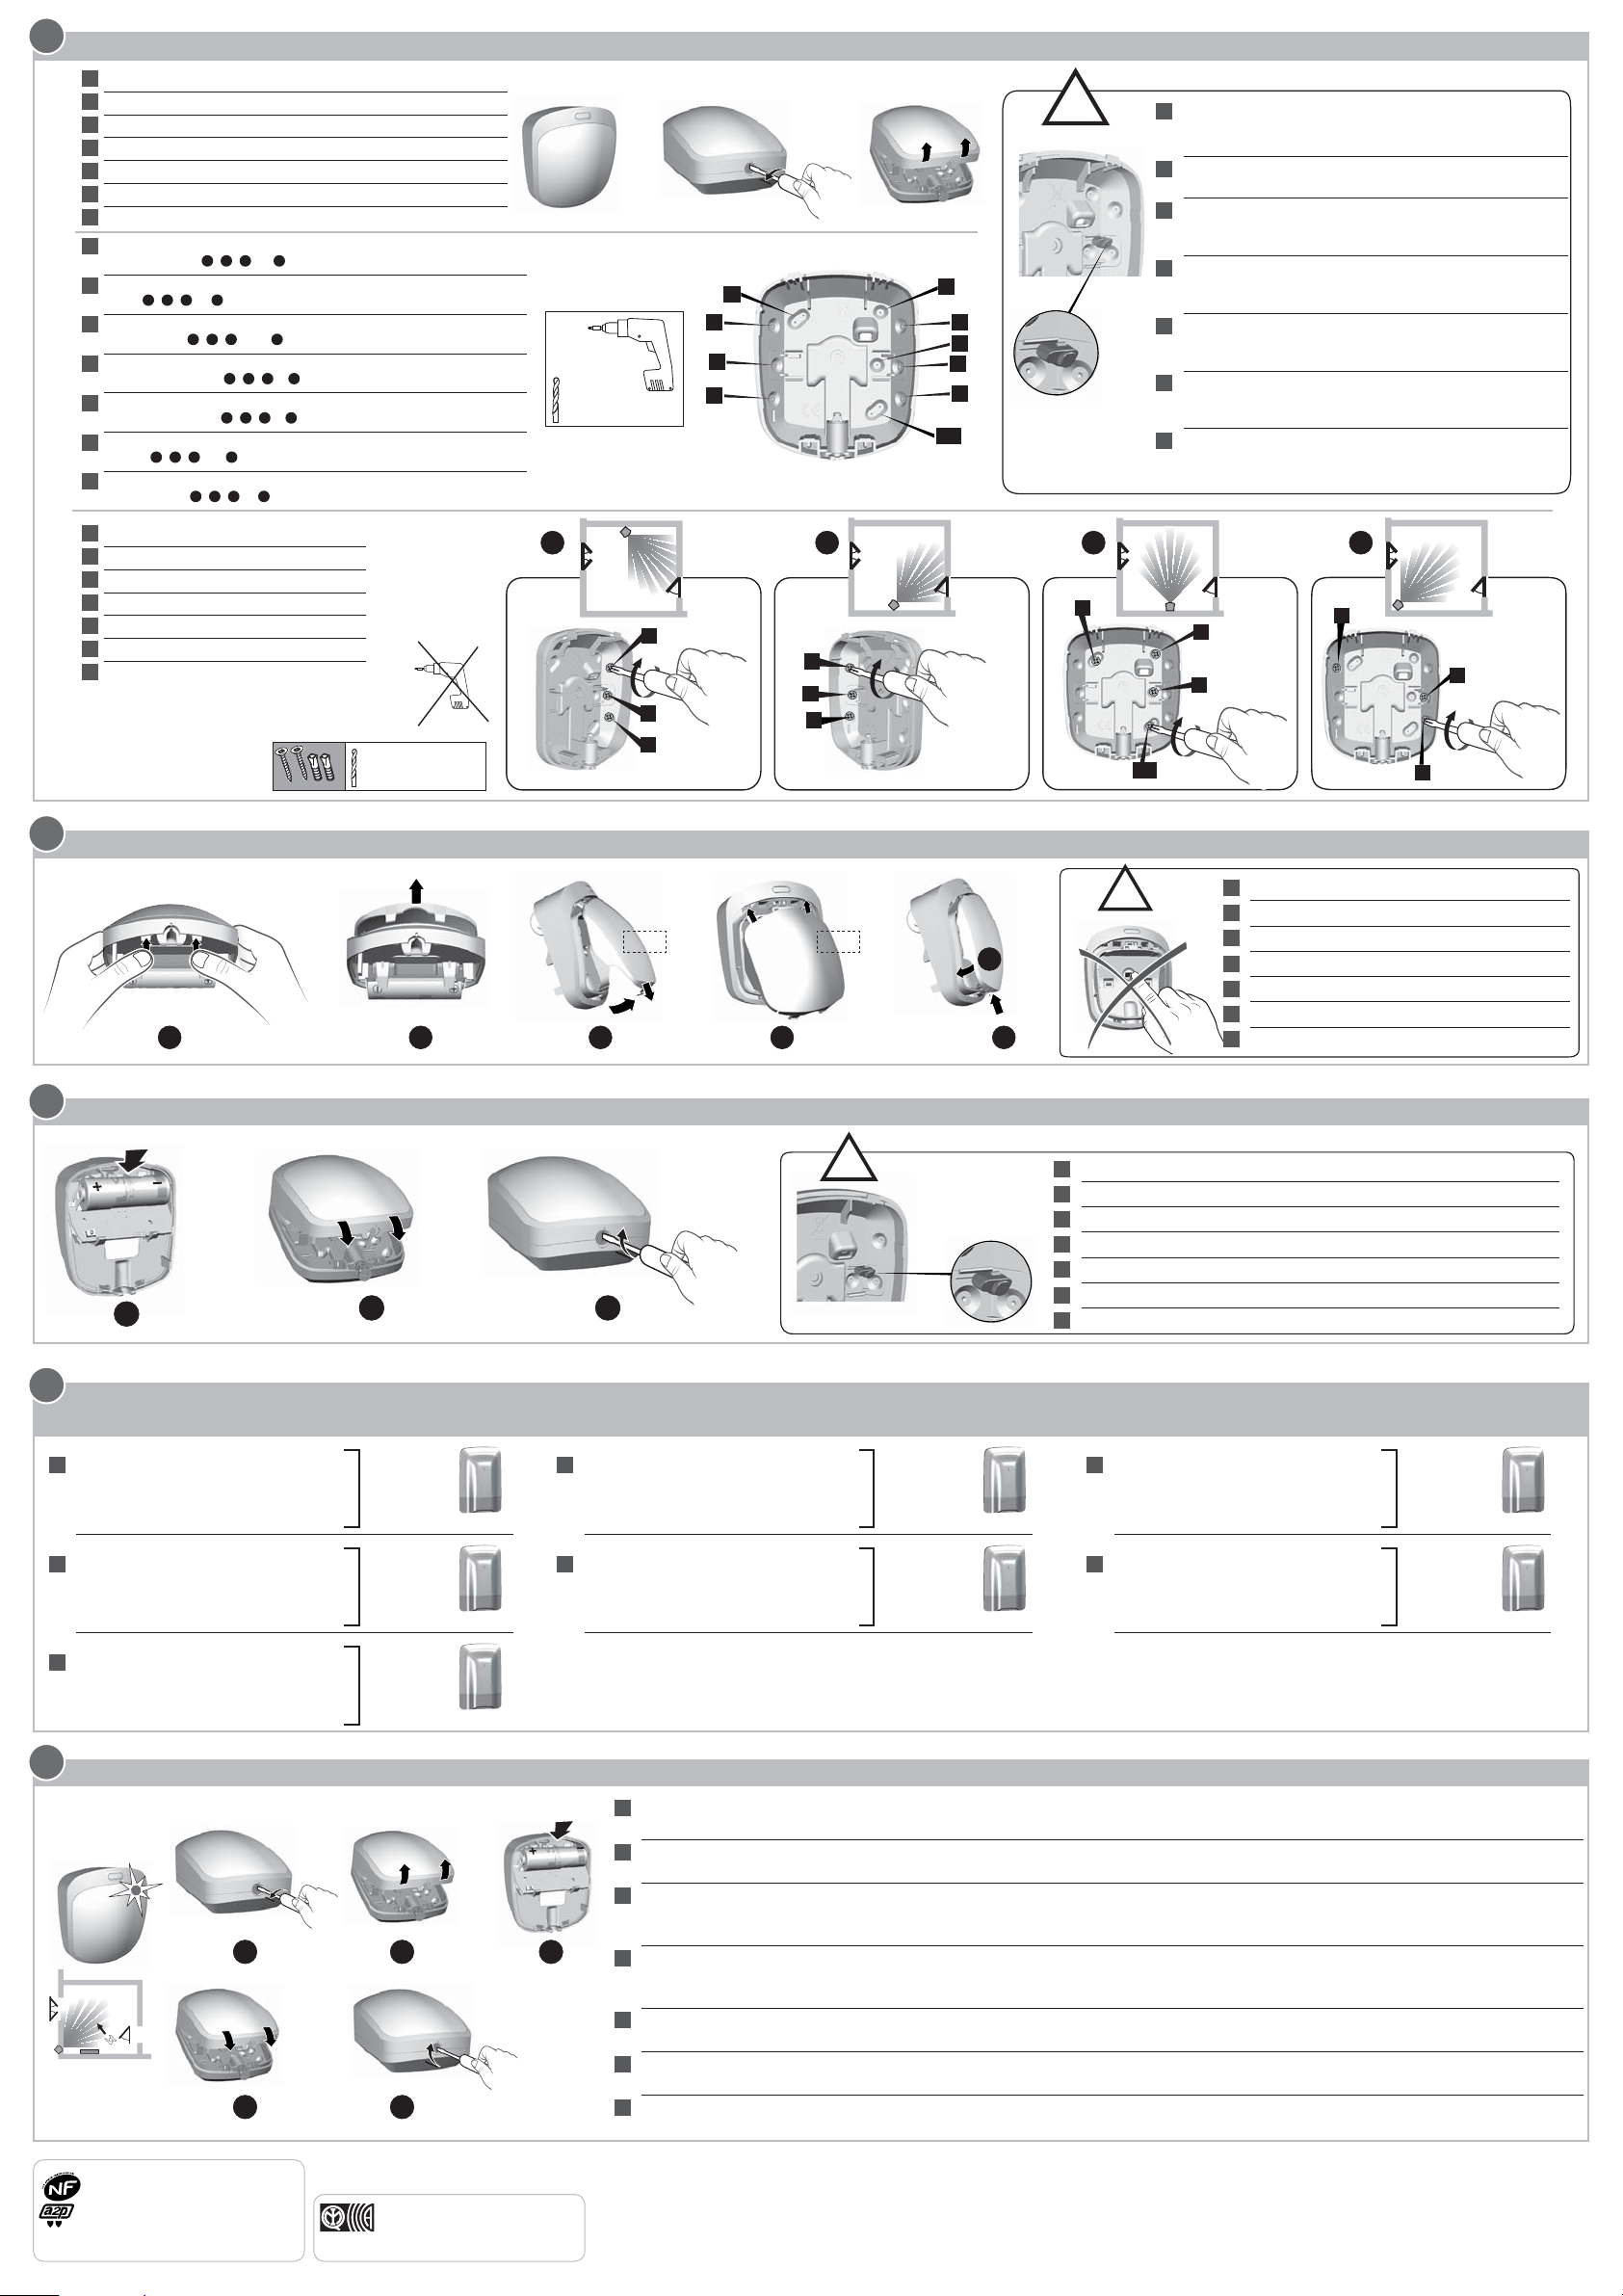
3
Fixation / Mounting / Montage / Fissaggio / Fijación / Mocowanie / Bevestigen
Séparez les 2 parties du boîtier
FR
Ê
Separate the 2 parts of the unit
EN
Öffnen Sie das Gehäuse, indem Sie die zwei Gehäuseteile trennen
DE
Separare le 2 parti del prodotto
IT
Separe las 2 partes de la carcasa
ES
/DDZIELÒOBIEÒCZĂÜCIÒOBUDOWY
PL
Scheid de twee delen van de behuizing
NL
Tracez et percez les trous en fonction de l’emplacement du détecteur
FR
Ë
Ì
(voir ci-dessous A, B, C ou D)
Mark and drill the holes according to the location of the detector (see
EN
below A, B, C or D)
Bohrstellen markieren und Löcher bohren, je nach Einbauort des
DE
Melders (s. u. A, B, C oder D)
Tracciare dei segni e fare dei fori in base al posizionamento del
IT
sensore. (vedi sotto A, B, C o D)
Señale y perfore los orificios en función de la ubicación del detector
ES
(ver a continuación A, B, C o D)
:AZNACZÒIÒWYWIERĀÒOTWORYÒWÒZALEêNOÜCIÒODÒLOKALIZACJIÒCZUJNIKAÒPATRZÒ
PL
NL
FR
EN
DE
IT
ES
PL
NL
AÒBÒC
PONIêEJÒ
Markeer en boor de gaten afhankelijk van de locatie van de detector
(zie hieronder A, B, C of D)
Fixez au mur
Mount it on the wall
An der Wand befestigen
Fissare al muro
Fíjelo a la pared
:AMOCUJÒDOÒÜCIANY
Bevestig aan de muur
ÒLUBÒD
Ø max = 3 mm
Ø max = 3 mm
A
V3,V7,V8 = Autoprotection à l’arrachement. Attention à ne pas
!
V1
V2
V3
V4
B
V6
V2
V3
V8
V9
V4
V5
V6
V7
V8
V9
V10
C
V1
FR
déteriorer ou perdre la pièce en caoutchouc (nécessaire à
l’autoprotection).
V3,V7,V8 = Tamper alarm on opening. Important: do not
EN
damage or lose the rubber part (required for the tamper alarm).
V3,V7,V8 = Sabotageschutz beim gewaltsamen Entfernen.
DE
Achtung: Gummiteil nicht beschädigen oder verlieren (für
Sabotageschutz).
V3,V7,V8= Autoprotezione allo strappo. Fare attenzione a non
IT
danneggiare o perdere la parte in gomma (necessaria per
l’autoprotezione).
V3,V7,V8 = Autoprotección contra extracción indebida. Procure
ES
no deteriorar o perder la pieza de caucho (necesaria para la
autoprotección).
666ÒÒ!UTOMATYCZNAÒOCHRONAÒPRZEDÒURWANIEMÒ5WAGAÒ
PL
BYÒNIEÒUSZKODZIĀÒANIÒNIEÒZGUBIĀÒELEMENTUÒGUMOWEGOÒ
KONIECZNEGOÒDOÒAUTOMATYCZNEJÒOCHRONY
V3,V7,V8 = bescherming tegen vandalisme. Wees voorzichtig
NL
dat u het rubberen deel niet beschadigt/verliest (nodig voor
antivandaalbescherming).
D
V5
V7
V10
V2
V8
V9
4
Changement de la lentille / Changing the lens / Linse austauschen / Sostituzione della lente / Cambio de la lente / Wymiana soczewki / Lens vervangen
Ne pas toucher le capteur
!
n°1
1
5
Mise en service / Activation / Inbetriebnahme / Attivazione / Activación / Uruchamianie / Inbedrijfstelling
,ITHIUMÒ"ATTERYÒÒ!!
,3ÒÒÒÒ6
2
3
B
1
6
Fonctionnement avec un système d’alarme / Operation with an alarm system / Betrieb mit einer Alarmanlage / Funzionamento con un sistema d’allarme / Funcionamiento con el sistema de alarma
2
3
n°2
6
4
!
5
Vérifiez la présence de la pièce en caoutchouc
FR
Check that the rubber part is in position
EN
Überprüfen, ob das Gummiteil vorhanden ist
DE
Verificare la presenza della parte in gomma
IT
Compruebe que la pieza de caucho está en su sitio
ES
3PRAWDßÒOBECNOÜĀÒELEMENTUÒGUMOWEGO
PL
Controleer of het rubber aanwezig is
NL
FR
Do not touch the sensor
EN
Sensor nicht anfassen
DE
Non toccare il sensore
IT
No toque el sensor
ES
.IEÒDOTYKAJÒCZUJNIKA
PL
Raak de sensor niet aan
NL
/ Działanie z systemem alarmowym / Werking met een alarmsysteem
• Association avec un système d’alarme
FR
• Choix du mode de déclenchement
• Test
• Retour à la configuration usine
• Association with an alarm system
EN
• Selection of triggering mode
• Test
• Restoring factory settings
• Verbindung mit einer Alarmanlage
DE
• Wahl des Auslösungsmodus
• Test
• Rückkehr zur Werkseinstellung
7
Changement de la pile / Changing the batteries / Batterien ersetzen / Sostituzione delle batterie / Cambiar las pilas / Wymiana baterii / De batterijen vervangen
Voir notice
d’intallation
système
Refer to
system
installation
guide
Siehe
Installationsanleitung
System
• Associazione con un sistema d’allarme
IT
• Scelta della modalità di funzionamento
• Test
• Ritorno alla configurazione di fabbrica
• Asociación con el sistema de alarma
ES
• Selección del modo de activación
• Prueba
• Volver a la configuración original
Le voyant clignote à chaque détection, la pile est usée (< 2,7V).
FR
Vedi le
istruzioni
“Sistema”
Ver manual
de instalación
del sistema
jÒ0OWIæZANIEÒZÒSYSTEMEMÒALARMOWYM
PL
jÒ7YBRÒSPOSOBUÒWYWOåANIA
jÒ4EST
jÒ0RZYWRCENIEÒKONµGURACJIÒFABRYCZNEJ
• Koppelen aan een alarmsysteem
NL
• Activeringsmodus selecteren
• Test
• Fabrieksinstellingen herstellen
Si une centrale d’alarme est associée, passez-la en mode maintenance avant d’ouvrir le produit (voir notice d’installation système).
The LED flashes each time movement is detected. The battery is dead (< 2,7V).
EN
If an alarm control unit is associated, set it to maintenance mode before opening the product (refer to system installation guide).
Kontrollleuchte blinkt bei jeder Erfassung, die Batterie ist leer (< 2,7V).
DE
Bei Kombination mit einer Alarmzentrale muss sich diese beim Öffnen des Geräts im Wartungsmodus befinden (siehe
Installationsanleitung System).
1
2
3
Il LED lampeggia ad ogni rilevazione, le batterie sono esaurite (< 2,7V dopo 20 minuti).
IT
Se il sensore è associato ad una centrale d’allarme, metterla in modalità manutenzione prima di aprire il prodotto. (Vedi le istruzioni di
installazione “Sistema”)
Si el indicador parpadea al detectar elementos es que la pila se ha agotado (< 2,7V).
ES
Si se asocia una central de alarma, póngala en modo de mantenimiento antes de abrir el detector (ver manual de instalación del sistema).
,AMPKAÒMIGAÒPRZYÒKAêDYMÒWYKRYCIUÒkÒBATERIAÒJESTÒROZåADOWANA (< 2,7V)
PL
*EêELIÒPOWIæZANAÒJESTÒCENTRALAÒALARMOWAÒPRZEDÒOTWARCIEMÒURZæDZENIAÒPRZEJDßÒWÒTRYBÒKONSERWACJIÒPATRZÒINSTRUKCJAÒINSTALACJIÒSYSTEMU
Als het lampje bij elke detectie knippert, dan is de batterij bijna leeg (< 2,7V).
4
5
NL
Als een alarmcentrale is verbonden, ga dan naar de modus Onderhoud voordat u het product opent (zie de installatiehandleiding).
Patrz
INSTRUKCJA
INSTALACJI
SYSTEMU
Zie installatiehandleiding
systeem
Référentiel de certification NF324-H58 pour
la classification 2 boucliers :
Certificat N°2620700006.
Organismes certificateurs
AFNOR Certification : www.marque-nf.com
CNPP Cert. : www.cnpp.com
Certificazione IMQ :
IMQ Sistemi di sicurezza.
IMQ S.p.A : www.imq.it
 Loading...