

DeLorme Earthmate GPS PN-20 User Manual
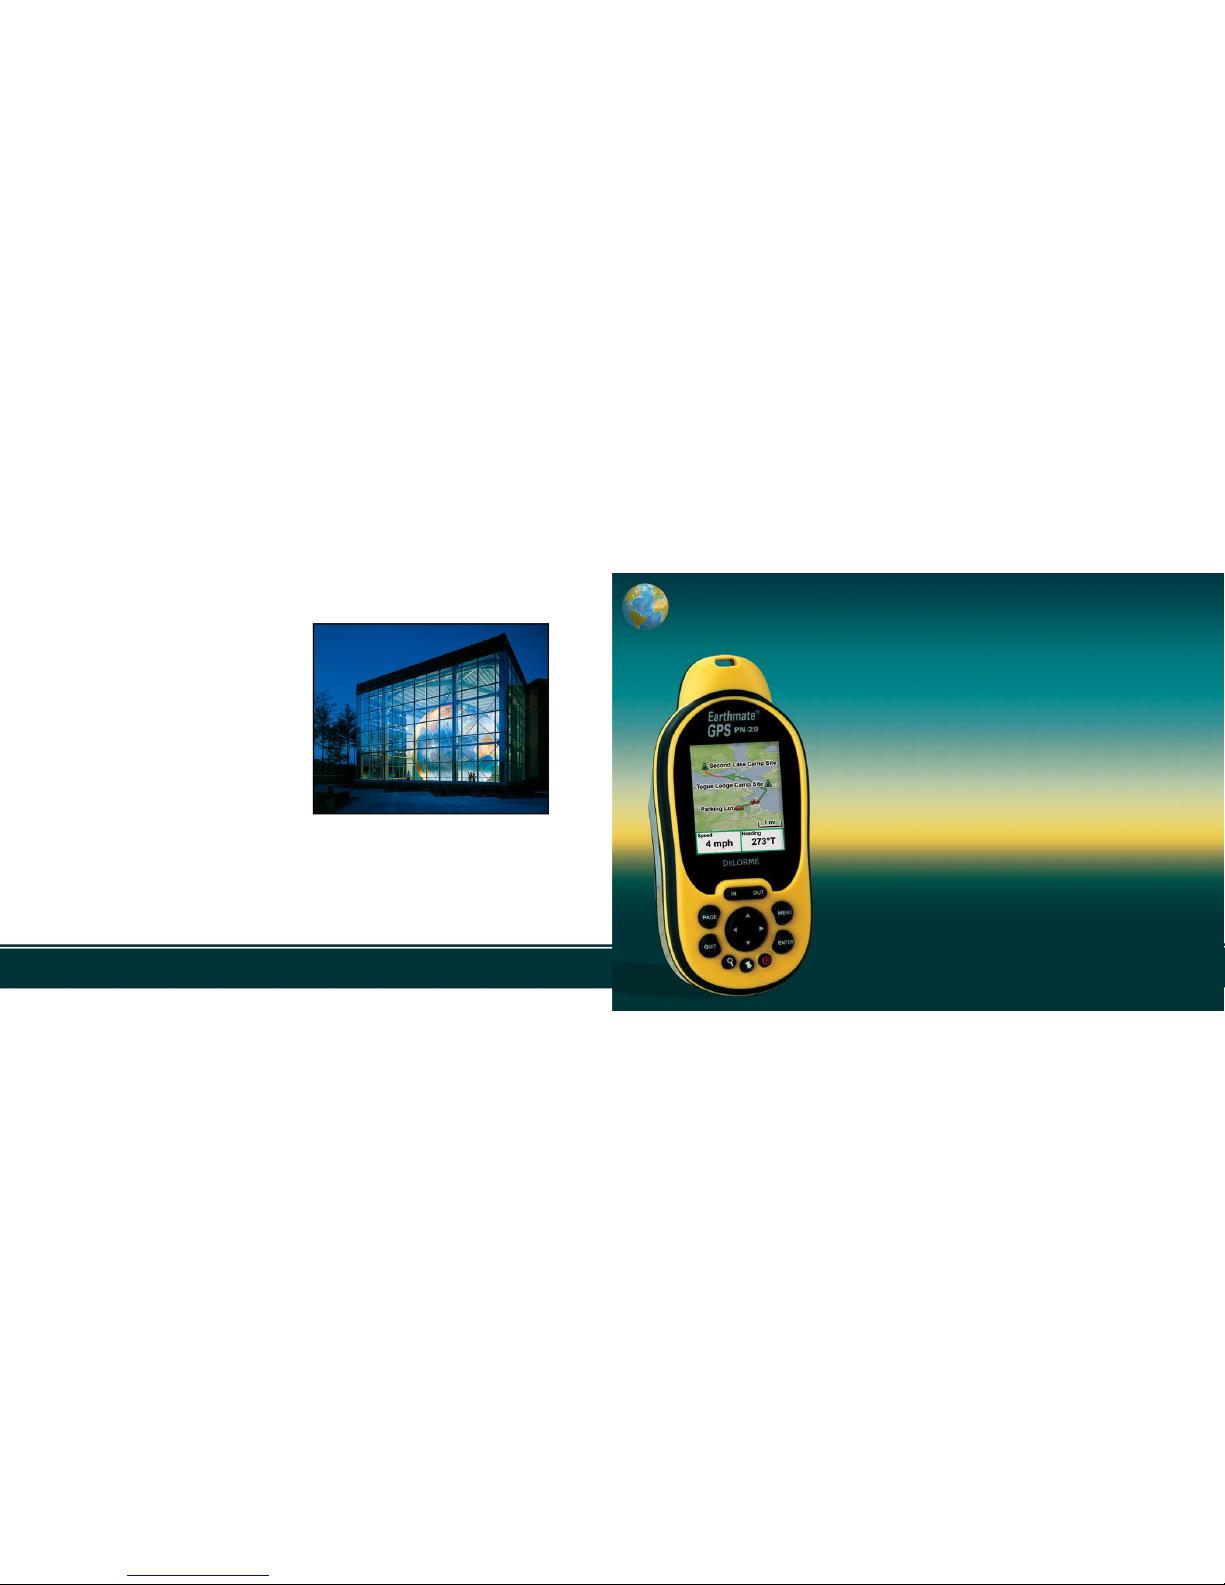
Earthmate GPS PN-20
DELORME
User Manual
®
We Bring Technology Down to Earth
™
Since its incorporation in 1976, DeLorme has developed an unprecedented reputation as a leader in the mapping industry. From early beginnings as a paper
atlas publisher, the company quickly emerged as a pioneering technological innovator. DeLorme not only embraced new technologies, it developed them.
In the mid-1990s, before GPS usage was widespread, DeLorme was pioneering laptop GPS solutions that today include the popular Earthmate GPS LT-20.
Subsequent development led to industry-first GPS solutions for Pocket PC and Palm OS devices and more recently for Bluetooth GPS solutions.
For more information, visit www.delorme.com.
Photograph© Jeffrey Stevenson
An All-in-One Handheld GPS Solution from DeLorme, the Leading
Digital Mapping and GPS Company

Earthmate® GPS PN-20 Accessories
We offer a variety of products designed to help you get the most out of your Earthmate GPS PN-20.
For more information, be sure to visit www.delorme.com/pn20.
And, remember to use your Topo USA® software's NetLink tab to access your Aerial Data Packet
downloads and other value-added content from DeLorme.
Also Available from DeLorme
DeLorme is a leading provider of mapping software for both consumer and professional markets.
Our Street Atlas USA® software titles deliver intelligent mapping, routing, and GPS navigation
solutions for laptop PCs and PDAs. XMap® is a three-tiered GIS sof tware suite that integrates
advanced geospatial data management into DeLorme's core GPS mapping framework.
We also publish the Atlas & Gazetteer™ series of topographic map books for individual states.
For more information, visit www.delorme.com.
Table of Contents
Getting Started ..................................................................................................................... 2
Basic Functions .....................................................................................................................9
Scenarios ............................................................................................................................ 11
The Satellites Page ............................................................................................................. 17
The Map Page.....................................................................................................................20
The Compass Page .............................................................................................................32
The Trip Info Page ............................................................................................................... 33
The Find Page .....................................................................................................................35
The Waypoints Page ...........................................................................................................44
The Routes Page ................................................................................................................ 48
The Tracks Page ..................................................................................................................52
The Sun/Moon Page ...........................................................................................................56
The Tide Page .....................................................................................................................58
The Device Setup Page ...................................................................................................... 59
Appendix A ......................................................................................................................... 65

2
3
Getting Started
Thank you for purchasing the DeLorme E arthmate GPS PN-20. This ver satile and co mpact GPS
receiver lets you create tracks of your travels, create routes so you never get lost, find p oints of interest,
and more!
This m anual provides inst ructions for using all of the functionality available on the Earthmate GPS
PN-20. M ost of the chapters are based on “Pages” whic h are the main screens on the device. Each
chapter describ es the features of that particular Pa ge as well as the Menu options which are available from that Page. In addition, this manual also discusses b asic functions (such as map panning ,
battery information, map data information, and more) as well as frequently asked questions, warranty
information, etc.
Step 1 — Ins talling t he Batter ies
The Earthmate G PS PN- 20 is a battery-powered device. It can be powered by on e rechargeable
Lithium- ion battery or two AA ba tteries (N iCd, NiMH, alkaline, or lithium ).
To instal l the batteries, uns crew the D-Rings on the back of the E arthmate GP S P N-20 until the
battery cover is able to be removed . T hen, insert the batter ies a ccording to the polarit y symbols
found inside of the batter y compar tment. When finished, position the battery cover back on t he
Earthmate GP S PN-20 and re-screw the D -Rings into the Earthmate G PS PN-2 0.
Step 2 — Turning On th e Earthma te GPS PN-20
The Power button is located at the b ottom-right corner of the button area. To turn on the Earthmate
GPS P N-20, press and hold t he Power button for 1.5 seconds. The first Page that displays on the
screen when you turn on th e Ear thmate G PS P N-20 is t he Satell ites Page. Your G PS s tatus displays in
the upper-lef t corner of the Satellites Page. If you press t he PAG E button, the Map Page will displ ay
on the screen. The m ap will not center on your current locatio n until you have achieved a 2- D or 3-D
fix. The default vi ew when a GPS fix cann ot be obtained is your last GPS positio n.
If it is taking a long tim e fo r the device to obtain a 2-D or 3- D fix, verify it has a clear view of th e sky.
Be sure that tre es, buildings, and other ob stacles are not blocking the Earthmate GPS PN -20. If the
device still cannot obtain a 2-D or 3-D fix, press the QUIT button to retur n to the Satellites Page, press
the MENU button, highlight the Set Current Loc ation option, and then press E NTER. The Map Page
displays automatic ally. Pan the map to your current location and press EN TER.
To turn off the Ea rthmate GPS PN-2 0, press the Power button an d then press the ENTER b utton to
confirm you want to turn the E arthmate GPS PN-20 of f.
Step 3 — Using t he Butto ns on the Ear thmate GPS PN -20
The button s on the E arthmate GPS PN -20 provide you with access to all of the functionality on the
device. Each but ton has a unique purpose:
In/Ou t
The IN and OUT bu tton lets you zoom in or zoom out on the map.
• Press the I N (left) side of the button onc e to zoom the map in one level ( showing more detail).
• Press and ho ld the IN side of the button to zoom the map in to its ma ximum level.
• Press the OUT (right) side of the button once to zoom the map out one level (showing less detail).
• Press and ho ld the OUT side of the button to zoom the map ou t to i ts maximum level.
Page
The PAGE button lets you scroll through all of the enabled “Pages” on the Earthmate GPS PN-20.
The default Page bu tton sequence is:
• Satellites
• Map
• Compa ss
• Trip Info
• Route Direc tions (available when navigati ng)
For an overview of w hat you can view and do on each Page a s well as each Page’s Menu fu nctions,
see Appendix A on pa ge 65.
Menu
The MENU button provides access to a multitude of functionality. The Menu is divided into top and
bottom sectio ns which are separated by a line. Th e items in the top sec tion are specific to the Page
that is curre ntly active. T he items in the bottom section are standard me nu options which are avail able from any Page.
Tip: You c an add, remove, or
reorder the Pages that display when the Pag e button
is pressed using the Device
Setup/Pag e Order settings. For
more information, see the To
Modify the Page Or der Se ttings section on page 61.
Gettin g Start ed
Tips:
• Setting the c orrect battery
type wil l optimize th e bat tery’s performance. For more
information o n selecting b at tery type , see To Modify the
System Settings on page 59.
• Because the Earthmate GPS
PN-20 has a real -time c lock
which requires power eve n
when the device is powered
off, your batteries are con stantly in use. If you use your
Earthmate GPS PN -20 spo radically ( e.g., more than a
month between uses) , it is
suggested that you remove
the ba tteries for long-term
storage and then reinsert
them when you want to use
the device.
Tip: If the Earthmate G PS PN20 does not tu rn on, ensure
that the batteries are inserted
into the device prope rly and
that they a re mostly or ful ly
charged.
4
5
Find
The Find butto n is labeled with a magnifyin g glass and it lets you search for a poi nt of interest, waypoint, address, coordin ate, and more. You can search for a location based on its name or its proximity
to the current map center.
Mark Waypoi nt
The Mark but to n is labeled with a push pin and ca n be used to mark a waypoint at your curre nt GPS
location or the cursor location ( if panning). Once a location has been mar ke d, you can e dit the waypoint name, coordinates, elevation , and provide c omments abo ut the waypoint; view the waypoint
on the map; navigate to the waypoint; average the waypoi nt for greater accuracy; save the waypoint;
or delete the waypoint.
Arrow Keypa d
You can use the arrow keypad to:
• Move the map c ursor left, right , up, or down.
• Pan the map by m oving the cursor on the edge of the map.
• Highlig ht options in menus or lists. Press down to move to the next entry or press up from t he
first entry to go to the la st entry (or down from the last entr y to go to the first entry). Press and
hold to scroll through a menu o r list quickly.
• Highlig ht characters in the keybo ard screen.
Enter
You can use the ENTER but ton to:
• Selec t a menu entry or on -screen button/ field.
• Get information about a point on the map (hover your cursor over the map location and press the
ENTER butto n to view detailed informat ion, if available).
Quit
The function of the QUIT button varies depending on the current status of the Earthmate GPS PN-20.
You can use the QUIT button to canc el actions (such as panning, keyboard ent ry, to delete individual
points when measuring distance, etc. ). If you are per fo rming an ac tion, pressing the QUIT button will
move you backward throu gh the Page sequence.
Power
Use the Power button to turn the Earthmate GPS PN -20 on and off, to c hange the backlight settings,
or to reset the Earthma te GPS PN-2 0:
• To turn the Earth mate GPS PN -20 on, press and hold the Power button for 1.5 seco nds.
• To turn the Ea rthmate GPS PN-20 off, press the Power button. When asked, “Press EN TER to
power d own”, press the EN TER button to confirm that you want to turn the Earthmate GP S
PN-20 off. If you do not wish to turn the Earthmate GPS PN-20 off, wait fi ve seconds or press
the QUIT butto n.
• To change the backlight intensity percentage, press and hol d the Powe r bu tton (for approxi mately two second s while the device is powered on ) until you see the backlight screen display.
Press the arrow keypad to the left to move the slider and decrease the backlight intensity. Press
the arrow keypad to the ri ght to move the slider and increase the back light intensity. Each level
of intensit y represents a 10% interval (100% is the maximum b acklight intensity, 10 % is the
minimum backlight intens ity).
• To turn the backlight off, press and hold the Power button for three seconds (whil e the devi ce is
powered on) until th e backlight shuts of f.
Note: Any button press on the Earthmate GPS PN-20 wi ll turn the backlight on unless it has
been specifica lly turned off in the Device Setup menu. For more information, see the To Modify
the Display Settings sec tion on page 59.
• To reset the Earthmate G PS PN-20 (while the device is p owered on), press and hold the Power
button for seven secon ds.
Step 4 — Transfe rring Map Da ta to the Ear thmate GPS PN -20
The E arthmate GPS PN-20 com es equi pped w ith an overv iew-level base map showing world and
U.S. coverage. While this provides a great vi ew of a large area , chances are that you will want a detailed view of a smaller area for hiking, geo caching, and other outdoor activities. More det ailed maps
can be transferred to the E arthmate GPS PN-20 usi ng:
• Compa tible DeLor me Mapping S oftware—Instruc tions for sending maps to your E arthmate
GPS PN -20 will var y by application. For more informatio n, see the mapp ing applic ation’s Help
system for instructio ns on sending maps to your Ea rthmate GPS PN-20.
Gettin g Start ed
Tip: Decreasing the Backlight
Timer will hel p to conserve
battery life.
Press ENTER to confirm that
you want to turn the device off
Note: Large maps may take
longer to transfer to the device.
Tip: While it is faster to acces s
maps that have been s aved to
internal memory, the quickest
way to transfer maps to your
device is to copy the map files
to an SD card with an SD card
reader.
6
7
• Online Map Cutter for Earthmate GPS PN- 20—Visit http:/ /data.delorme.com. You must have
an Internet connection to use this Web site. F or inst ructions on sending maps to your Ear thmate
GPS P N-20 with this online applicatio n, see the Onli ne Map Cutter for Earthmate GP S PN-20
Help system.
You can transfer many types of d ata such as satellite imagery, aerial imag ery, USGS Topo Quad
maps, and more. Maps can be saved in internal memory or on a removable memor y ( SD) card (in the
Maps director y).
Step 5 — Use th e Pages to Track, Vi ew Your Position Whi le You Travel, and More
This manual des cribes all of the functionalit y found in each Page on the E arthmate GPS PN-2 0. See
the Table of Contents to find the head ings that are most important to you.
About GPS
What is GPS ?
The Global Positionin g System (GPS ) applies modern technolo gy to the ancient ar t of nav igation.
The U.S. Dep artment of Defense has developed and launched a ser ies of positioning satellites in an
orbiting “constellation.” These satellites are used as reference points much the same way stars have
been used in convention al navigation.
Using these satellites, a GP S receiver can determine your position any where on the globe. GPS provides accurate infor mation about coo rdinate position, elev ation, speed, and d irection of travel. Many
people have discovere d the benefits of GPS for recording trac ks and much more.
How Does GPS Wo rk?
The GPS “constellat ion” consists of at least 24 satellites, e ach carry ing several atomic cl ocks to ensure the most accurate time possible. The satellites broadcas t low-power radio waves containing the
satellite’s identity cod e and the exact time (to the nanosecond ) that the message was sent.
When a GPS receiver picks up a satellite signal, it identifies the satellite and compares the signal time
with its own clo ck. The time difference represents the time it has taken for that radio wave to tr avel
from the sate llite to the re ceiver. Since radio waves t ravel at the speed of light, the time difference
can be used to calcul ate the distance from the satellite to the GPS recei ver.
The satellite’s identity code provides the locati on of the satellite, and the distanc e to the receiver creates a sphere of possible locatio ns fo r th e GPS receiver. Without more informat ion, the receiver only
knows that it is locate d somewhere on that sphere.
Two additional s atellites are nece ssary to narrow down the receiver’s position. E ach of these satellites sends a similar radio message containing time and id entity information. The GPS receiver checks
the orbi tal location of each satellite and uses the elapsed time to create two ad ditional spheres o f
possible locations. These three spheres intersect at two points; however, one of these points is eliminated because i t is far away from the earth’s surface. Therefore, the second point is assumed to be
correct. The d ata from these three satelli tes provides the receiver w ith a two-dimensional lo cation.
Data acquired from a fourth satellite pinpo ints the receiver ’s ex act location. This addi tional positioning information allows the GPS receiver to calculate its elevation, which is particularly important for
GPS users in mount ainous locations.
GPS Posit ion Accuracy
Any build ings, natur al structures, or heavy foliage t hat obstruct the GPS antenna’s view of the sky
prevent satellite signals from reachin g the re ceiver and therefore decreases the ac curacy of your
position.
Frequent ly Asked Qu estions
Can I inst all non-DeLorm e maps on the Ea rthmate GPS PN-2 0?
No, only DeLorm e maps can be installed on the Earthm ate GPS PN-20.
How can I imp rove the life of my batte ries?
When the backlight is on, it consumes a large part of the battery. Changing the backlight timer to turn
off after 15 seconds could double the life of your batteries. For inform ation on changing the backlight
timer, see To Modify the Display Settings on p age 59.
Other ways to increase th e life of the batteries inc lude:
• Removing yo ur batteries for long -term storage
• Settin g the GPS Settings to Power Saving mod e
• Disabl ing GPS while indoors
• Using bat teries with higher milliamp ratings ( such as Duracell Ultras, Energizer E2s , etc .)
Gettin g Start ed
Note: If you replace the SD
card while the devic e is being
powered through the USB ca ble, you will need to power the
device off and then on a gain to
view any data on the SD card.
Note: Placing the Ea rthmate
GPS PN-20 in a backpack poc ket or jacket should not result
in problem s with GPS position
accuracy.

8
9
Why are the new batteries t hat I put in the dev ice the last tim e I used it (a mont h ago) dead
already?
Because the Earthmate GPS PN-20 has a real-time clock which requires power even when the device
is powered of f, your batteries are c onstantly in use. If you use your Earthmate GPS PN-20 s poradically (more than a month bet ween uses), it is suggested that you remove the batter ies for long-term
storage and then reinser t them when you want to use the device.
Why does it t ake so long to find satel lites?
Acquiring satell ite data takes long er if the batteries are low or if th e Earthmate GPS PN- 20 does not
have a clear view of the sky. Be sure that trees, building s, and other obstacl es are not blocking the
Earthmate GP S PN-20 when you begin trackin g.
Other factor s, such as i f a long time has elapsed since you l ast used the device or i f the device has
been m oved a great distance from its last location, c an effect the amount of time it takes to fi nd
satellites.
How do I rese t the Earthmate GP S PN-20 when it will no t turn off?
You can reset the Earthmate GPS PN-20 by holding the Power button for seven seconds. If that does
not work, remove and repl ace the batteries to reset t he Earthmate GPS PN-20 .
Why won’t my Lit hium-ion batte ry hold a charge?
The Li-ion bat tery is designed to last for 3 00-50 0 uses ( depending on environmental c onditions).
Visit ww w.de lorme.com to purchase a re placement.
Basic Functions
This chapter provide s descriptions for some of the basic functio ns of the Earthmate GPS PN- 20.
Panning the M ap
There are two ways to pan th e map:
• You can pan the map m anually by placing the cursor along t he map edge and hold ing the arrow
keypad in the directio n that you want to move the map.
• You can pan the map automat ically when GPS tracking/naviga ting. The map will automatically
pan in the direction of t ravel when the GPS cur sor travels outside of the map area.
Gettin g Informat ion About a Ma p Objec t
You can position your cursor ove r a map object to learn more about it.
1. Press the arrow keypad to position your cursor over the map object you want to learn more
about. The status bar at the bottom of the Map Page provides name information for the object.
2. Press ENT ER. The Info Page disp lays.
Note: If mul tiple objects are found at the cursor loca tion, the Multiple Ob jects screen will display each of the available objects at that location. Use the arrow keypad to select the d esired
object and then pres s ENTER to view the Info Page for that object .
3. Optional : To save the ma p object as a waypoint, highlight and sel ect Mark.
Navigatin g vs. Tracking
There are several instances in this manual where we discuss navigating with the Ear thmate GPS PN20 or tracking wit h the Earthmate GP S PN-20. You may ask, “what’s the dif ference?”
• You are navigating with the E arthmate GPS PN-20 whe n you use it to follow a route.
• You are tra cking with the Earthmate GP S PN-20 wh en the G PS is on, but a route is not being
followed.
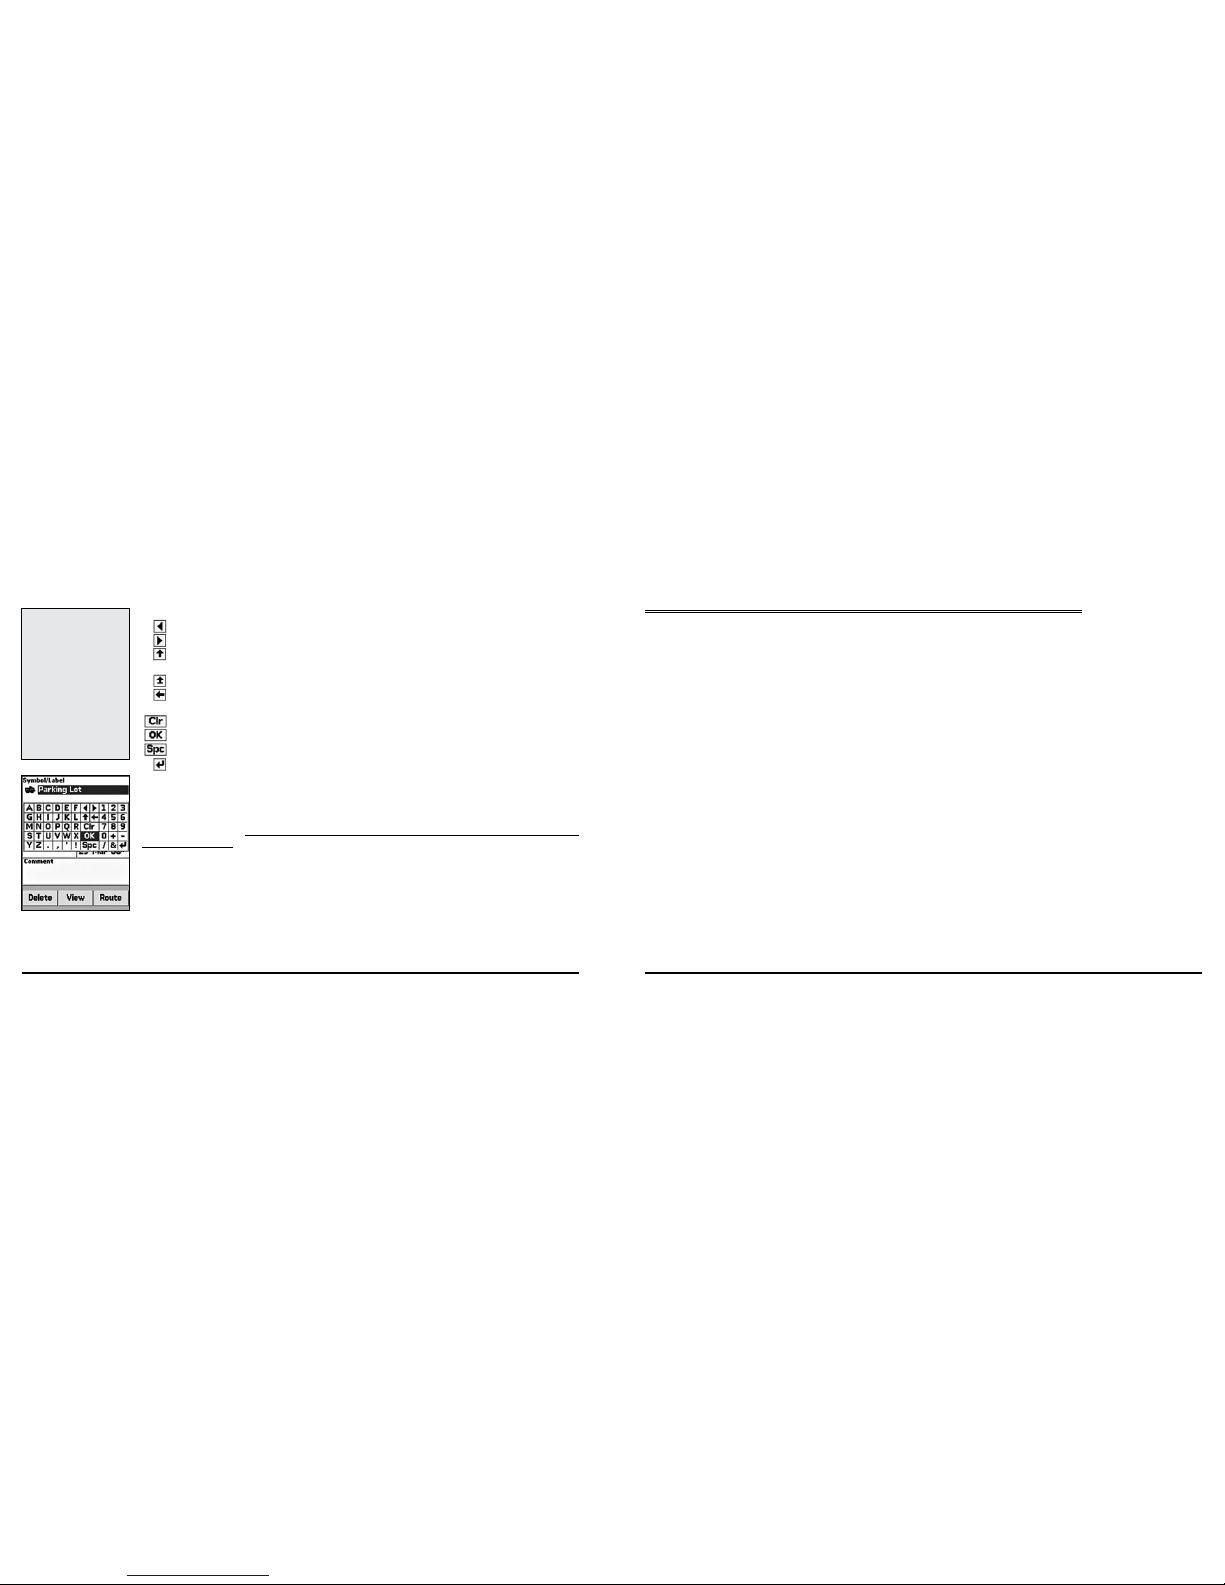
Using the Keyb oard
The keyboard is accessible when text entr y is necessar y (for example, when editing a waypoint label).
Once the keyboard display s, us e the arrow keypad to highlight the letter (A-Z ), number (0-9 ), symbol
Basic Func tions
Note: Manually panning the
map will c hange the focus of
the map from your GPS location to the manually panned
location.
Note: Once you have marked a
map objec t as a waypoint, you
can edit the waypoint detail s
(by highli ghting the waypoint
information, p ressing ENTER,
and then modifying the information), vi ew it by highlightin g
View and pressing ENTER, o r
create a route by hig hlighting
Route and pressi ng ENTER.
Move your cursor to the e dge
of the screen to pan the map i n
that direction
Note: The charging circuit in the
Earthmate GPS PN -20 was designed for optimum operation
with the RC R-V3 Li-Ion battery
sold through DeLorme. Other
RCR-V3 Li-Ion batteries may
work and charge in the device,
but DeLorme do es not guarantee compatible operation.
10
11
(+, -, /, & ), or punctuation ( period, comma, apo strophe, exclamation point) yo u want to use. In addition, the following sp ecial functions are provided:
Moves the cursor one sp ace to the left without deleting charac te rs.
Moves the cursor one sp ace to the right without deleting charac ters.
Changes the letter s from lowercase to upperc ase letters (the active case is show n in the key-
board). T his function toggles to all caps mode by p re ssing ENTER.
Changes the letters to a ll capital letters.
Moves the cursor one space to the left, de leting the character that was there. A lso changes
the letters to lowercase w hen the current mode is uppercase.
Clears the content of the text fi eld being edited.
Accepts the chang es made to the text field and closes the keyboard sc reen.
Moves the cursor one sp ace to the right, leaving a blank space.
Moves the cursor to the next line. T his o ption c an be used to type more than one line in a Com-
ment field.
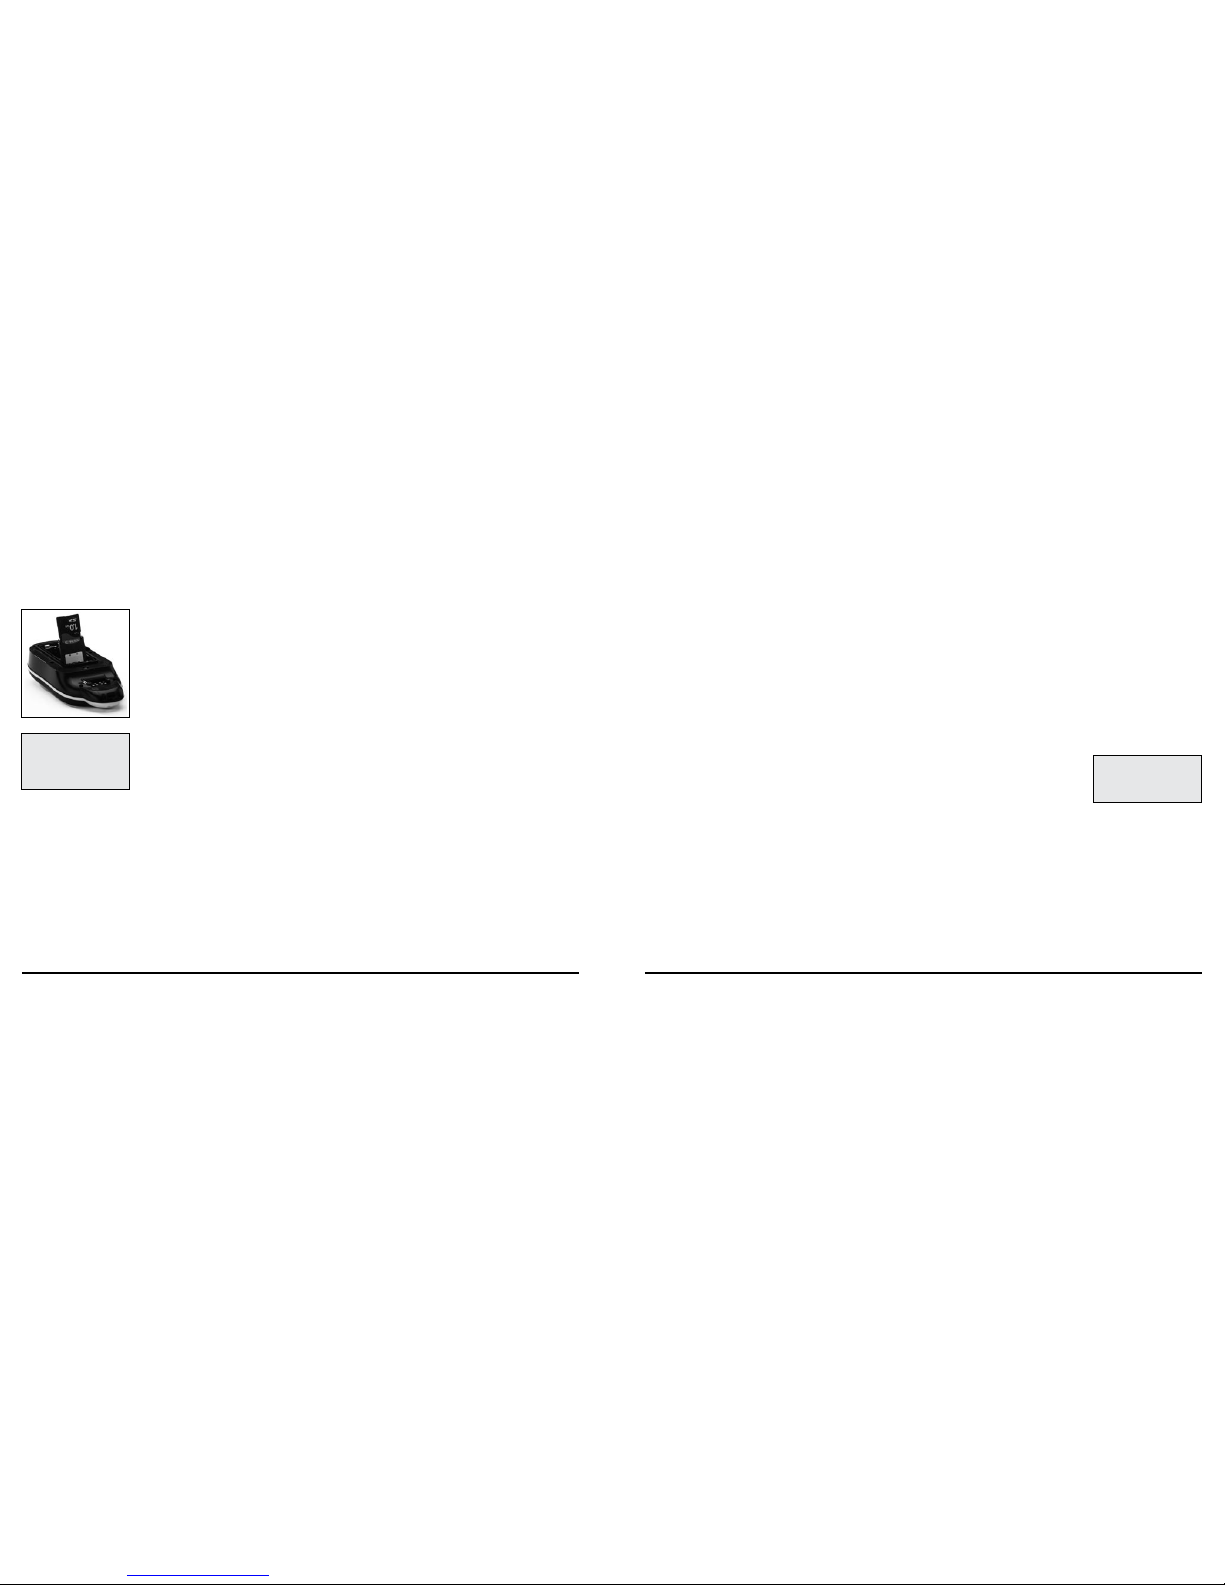
Charging t he Earthm ate GPS PN-2 0
If you are using a DeL orme-su pplied RCR-V3 Li -Ion batte ry, you can charge the Earthmate GPS PN20 by co nnecting the USB en d of the cable to your computer and t he other end of the cable to the
Earthmate GPS PN -20. In order to charge the device via the USB cable, the device must be powered
on while connected. If you want to use the Earthmate GPS PN- 20 while it is c harging, it mus t be
partially ch arged (the unit cannot be powered on when i ts only power is through the U SB cable).
Note: Re chargeable AA batteries c annot be charged while in the Earthma te GPS PN-2 0.
Storing Dat a on the Ear thmate GPS PN -20
The E arthmate GPS PN-20 stores tracks, routes, waypoints, a nd the base map data in its intern al
memory. Maps that are transferre d to the Ea rthmate GPS PN-20 can be saved in internal me mory or
on a removable memor y (SD) card (2 G B or less) located under the batter y compartment.
Tip: Use multiple SD cards to create a map library for long trips or to have the entire state in your pocket.
Scenarios
Earthmate GP S PN-20 can be used for a variet y of functions, including:
• Geoc aching
• Bird watching
• Biking
• And muc h more!
Below are some scenari os for using the Earthmate GPS PN -20 in these situations.
Seeking a Ge ocache
Geocaching is a popular hide -and-seek sport for GPS users where hiders place a cache (prize (s)
and/or log book) at an approved location and seekers use the hider’s clues (coordinate information
and clues that are shared via the Internet-for some geo cache locatio ns, visit www.geocaching.com)
to find the cache. The cache usually contains a variety of prizes for the succes sful seeker (s eekers are
encouraged to observe the “take one, le ave one” poli cy on prizes in the cache).
Mike and his family are looking for a fun weekend activity that will help them enjoy the great outdoors. A coworker te lls Mike abou t geocaching and they decide to try the activity with their new
Earthmate GP S PN-20.
Before they le ave for their adventure, th ey visit www.geocac hing.com to find a cache in th eir area.
Once they find a cache, they use Topo USA to see the geocache on t he map and then dow nload a
map package of the are a.
1. Visit ww w.g eocaching.com and select the ge ocache you want to tr y to find.
2. Save the geoca che’s . loc file to your computer.
3. Open Topo USA and cl ick the Draw tab.
4. Click File to o pen the draw file editing area.
5. Click Impo rt. The Import Draw File di alog box displays.
6. From the Files of ty pe drop-down list, sele ct LOC file (*.loc).
7. Browse to the location where you saved the .loc file in step 2, sele ct the file, and then click
Open. T he draw objects in t he imported file display. A new draw fi le is automatically create d
Scenari os
Tips:
• Press OUT to hig hlight the
OK button without scrolling
through the keyboard.
• Press QUIT to cancel you r
keyboard entries.
• If existing text is available,
enter a letter to replace t he
highlighted content. If you
want to keep the exis ting
text but move the cursor to
the beg inning/end of the
text, select the option to
move the cursor to the begin ning or to move the cursor to
the end of the text.
Keyboard screen
12
13
for the imported fil e.
8. Click Done to retur n to t he Draw dialog area.
9. Click the Han dheld Export ta b.
10. With the map ce nte red on the geocache area, click the Edit tool and th en click the rectangles
on the map that cover the ma p area you want to export to the Earthmate GP S PN-20.
11. Name and save your map p ackage.
12. Click the Exchan ge button in the Topo USA toolbar.
13. Send the geoc ache waypoint layer and map package to the dev ice and then click Done.
Once the map and wayp oint are loaded on the Earthmate GPS P N-20, they use the Waypoints Pag e
to lo cate the c oordinate that was provided in the cache’s clue. Once the waypoint i s found , they
create a route from their current p osition (home) to the waypoint l ocation.
14. Press MENU and t hen select Waypoi nts.
15. Highlight the geo cache waypoint from the list and then press EN TER.
16. Highlight the de fault symbol and p ress ENTER. Scroll to the geo cache symbol and then press
ENTER.
17. Use the arrow keypad to high light the Route bu tton and then press ENTER.
18. Use the arrow keypad to high light the Naviga te button and then press ENTER.
19. Press PAGE until the Com pass Page displays.
20. Use the Compass Page to find the necessary direction of travel. The bearing arrow (large green
arrow) points in the direct ion of the next stop in the route. Use the bearing arrow to determine
the correct direc tion of travel towards the wayp oint.
Once they arrive at the cache, they take a trinket from the cache and leave a p encil they b ought while
on a recent trip to N iagara Falls and then update th e waypoint symb ol on the Eart hmate GPS PN-20
to the geocache found symbol. When they return from their adventure, they visit the cache’s page on
www.geoca ching.com and enter a log a bout their experience.
Hiding a Geo cache
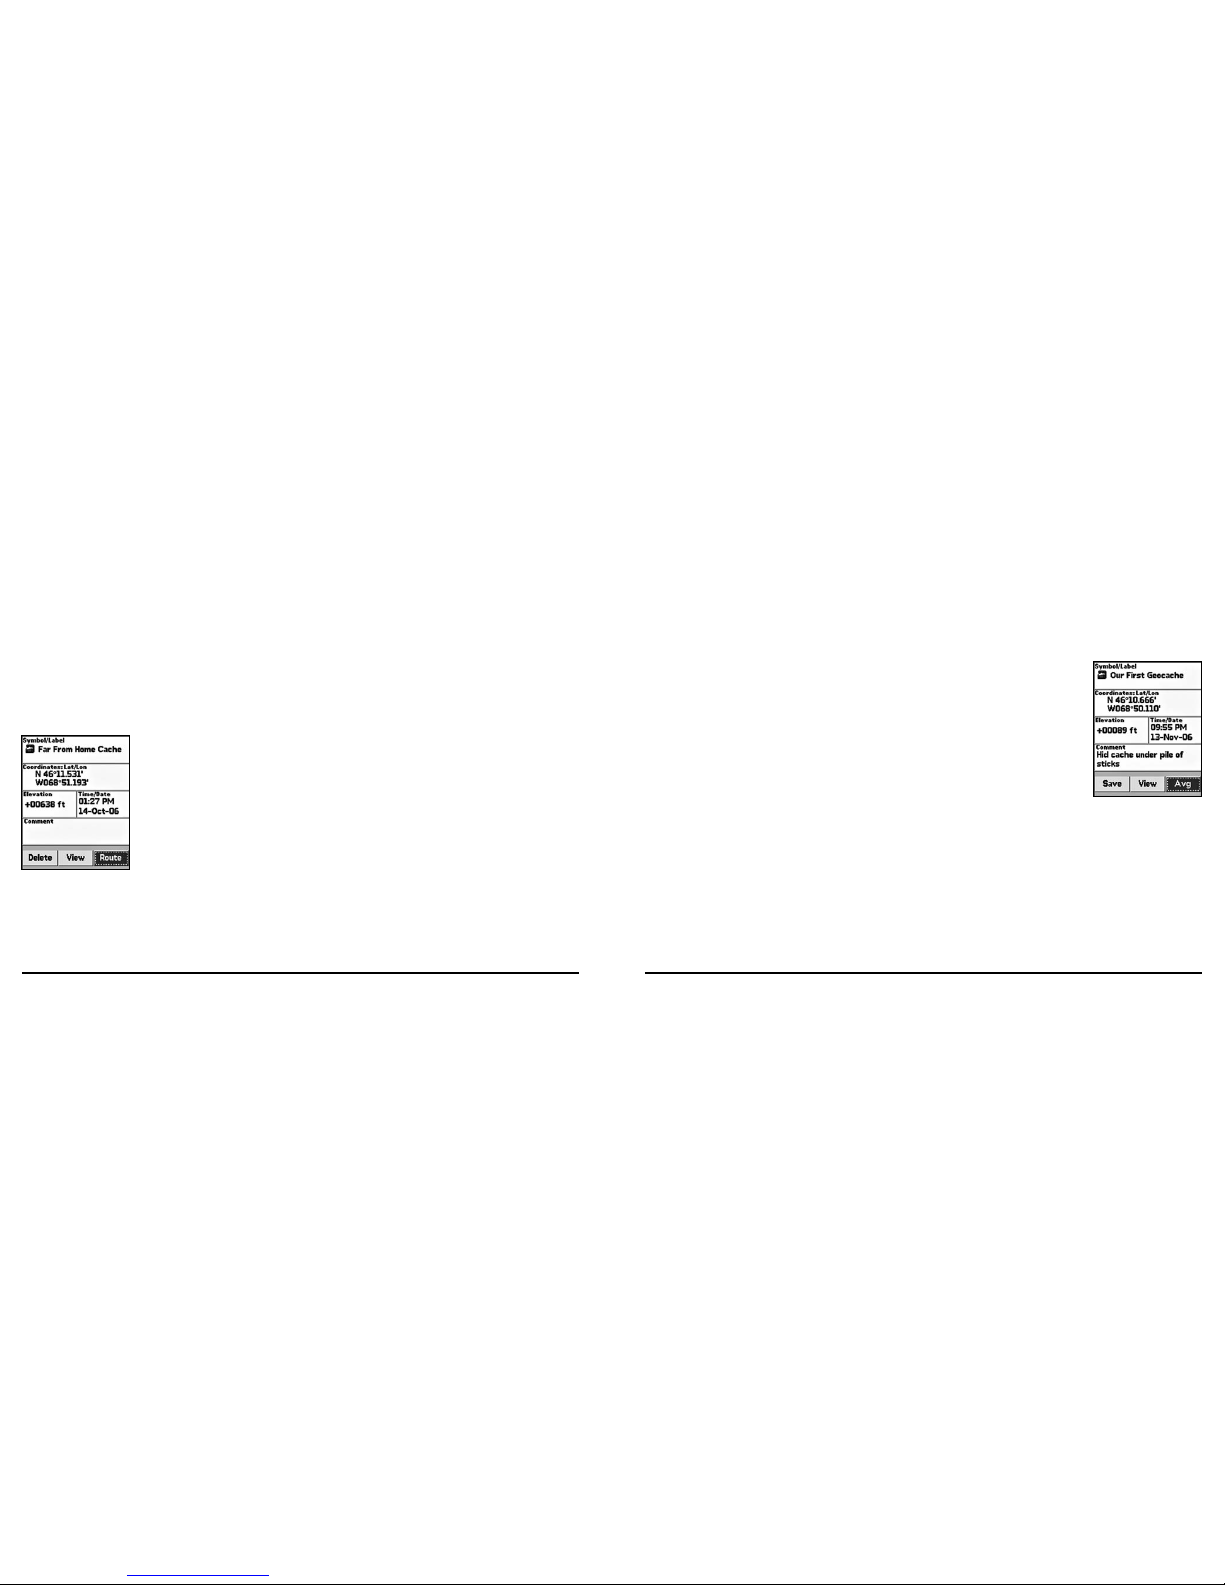
Mike and his family had so much fun on their fi rst geocache outing, th at they decide to create a geo cache of their own! After much consideration, they decide to hide the geoc ache close to their home.
The family decides to hide the cac he a long a public trail approximately 10 miles from their home. Before they can add the cache to geoc aching.com, they must be sure to get a very accurate coordin ate
for the location where they’re hiding the cache. To do so , they must mark a waypoint at the ge ocache
location and then use the Averaging function o n the Earthmate GPS PN -20. When a waypoint is averaged, a series of GPS readin gs are recorded for the waypoint’s location and are then averaged to
increase the positio nal accuracy of the waypoint.
1. Ensure you have a 3- D signal at the location of the geoc ache.
2. Press the Mark bu tton. A waypoint is placed at the current GP S location.
3. Highlight the default waypoint symbol an d then press EN TER. Then, use the arrow keypad to
select the geoc ache symbol and press ENTER.
4. Highlight the default label and press ENT ER. Then, enter the new l abel (“Our First Geocache”)
using the keyboard, hig hlight OK, and then press ENTER .
5. Highlight the Comment field a nd th en pre ss EN TER. Then, enter the comment infor mation
(“Hid cache un der pile of sticks”) using the keyboard, highli ght OK, and then press ENTER.
6. Highlight the Av g button and then press ENT ER. The GPS status, co ordinates, elevatio n, number
of readings at the locatio n, and estimated ac curacy d isplay. The more readings that are reco rded
increase the positional accuracy of the waypoint. A small estimated accuracy number indi cates
that the waypoint is ver y close to its actual coordinates.
7. Highlight the OK b utton and then press ENTER.
8. Use the arrow keypad to hig hlight the Save button a nd then press ENTE R.
Once the geoca che location point has been averag ed, they visit www.geocachin g.com and create a
new geocache wit h the averaged coordi nate.
Bird Watch ing
Earthmate G PS PN -20 is a perfect companio n while bird watching. With PN -20 Aerial Data Packet
(ADP) data, bird watchers can see cle arings, tree cover, geolo gical features, and more. In addition,
they can use the waypoint functionality to mark waypoints o n the map when they see particular types
of birds. They can also use the track functionality to create a breadcrumb trail while they’re traveling to
their bird watching spot and then follow that track b ack to their vehicle so they do not get lost.
Scenari os
Navigate to the geoc ache
Marking the “Our First Geo cache” waypoint
14
15
In the scenario below, a bird watcher (To m) uses the E arthmate GPS PN-20, ADP data, and the Earthmate GPS PN-20 O nline Map Center to prepare for his expedition:
Before Tom leaves for his trip, he uses the E arthmate GPS PN-20 Online Map Center to download an
ADP so he can get satellite and aerial views of the area where he’ll be. This is hel pful to Tom because
he has heard that the bird population is greater near the s wamp l and. With the aerial and satellite data
provided in the ADP, Tom can see all of the geologic al formations in his bird watching are a before he
leaves, giving him a gre ater idea of where he should sp end his day.
1. Visit http ://data.delo rme.com to download the area where you will be bir d watching.
Once the map of the loc ation is saved on the GPS device, he leaves for h is bird watching trip. When
he arrives at the location he parks his truck, turns on the Ea rthmate GPS PN-2 0, waits until he gets
a 2-D or 3-D fix, places a waypoint to represent the parking lot, modifies his tracking setting s, and
then turns on Track recording .
2. Press and hold the Po wer button to turn the Earthmate GP S PN-20 on.
3. Press the Mark bu tton on the device to place a waypoint at the pa rking lot location.
4. Press MENU, hig hlight the Tracks optio n, and then press ENT ER.
5. Press MENU, hig hlight the Edit Trac k Settings option, and p ress ENTER.
6. Highlight the Re cord Points By drop -down list and press ENTER .
7. Highlight the Ti me option and press ENTER.
8. Highlight the Re cording Inter val text field and press ENTER.
9. Use the arrow keypad to increase/ decrease each digit. Press ENTER after each digit is changed.
10. If the On button is n ot activated, highlight the button and the n press ENTER to act ivate it.
OR
If the On button is alre ady activated, pro ceed to step 11.
Tom proceeds on h is journey to his bird watching spot. While he’s walking, he notices an eag le in a
tree and wants to use his Ear thmate GPS PN-20 to mark a wayp oint at the bird location.
11. While at the spot of th e tree, press the Mark but ton.
12. Scroll to the top of the Waypoint screen to hi ghlight the waypoint symbol and press ENTER.
Use the arrow keypad to find and hi ghlight the bird icon and then press ENT ER.
13. Scroll to the label text field (to the right of the bird icon ) and p ress E NTER. Use the arrow
keypad to highlight the letter E and press EN TER. Repeat this step for each letter in the words
“Eagle.” When you’re finished , highlight OK and press E NTER.
14. Scroll to highlight t he Save button and pres s ENTER.
Once he ar rives at the desired bird watching sp ot, he saves his track log, turns off the GPS devic e,
and spends the day bir d watching.
15. Press MENU, sele ct Tra cks, and then press ENTER.
16. Scroll to highlight t he Save button and pres s ENTER.
17. Press the Power bu tton to turn the Earthmate GPS PN -20 off. Press ENTER when prompted .
Once he’s finished for the day, he turns the GP S device back on, waits until he gets a 2- D or 3-D fix,
and then follows his track to where he started-ensur ing th at he won’t get lost. The process of follow ing his initial track c reates a new route that can be use d again in the future.
18. Press and hold the Po wer button to turn the E arthmate GPS PN-20 on.
19. Press MENU, sele ct Tra cks, and then press ENTER.
20. Select the tra ck that was saved earlier t hat day and press ENTER.
21. Scroll to highlight t he Follow but ton and press ENTER.
Tom reaches his start loc ation without getting lost.
Mountain B iking
Earthmate GPS PN- 20 is also a perfect companion while mountain bikin g.
Carla and Jordan are preparing fo r a ride a t Slickrock Bike Trail. Before th ey go, they download da ta
of the Moab, Utah region with Top o USA. T hey then create a route that starts an d finishes at the
trailhead, but includ es three stops: Shrimp Rock , Up per Shrimp Rock, and Mt. View Cave. They then
export the d ata of the region as well as the route they created to their Earth mate GPS PN -20. Once
they arrive at the trail, they mount thei r GPS devices onto their bikes, powe r them on, and select the
route they plan to use for navig ation.
1. Press MENU, hig hlight the Route s option, and then press ENTER.
2. Highlight the des ired route and press ENT ER.
3. Highlight the Na vigate button and press ENT ER.
Scenari os
Safety Ti p: Be sure to bring a
map and comp ass with you on
your expedition in case the batteries in your E arthmate GPS
PN-20 are low.
Editing the track settin gs
Navigating a route
Marking the “Eagle” waypoi nt
16
17
4. Press MENU, hig hlight the Tracks optio n, and then press ENT ER.
5. Ensure the On b utton is activated. If it is not, hi ghlight the On b utton and press ENTER to
activate it.
6. Press PAGE until the Ma p Page displays to view the l ocation in real time.
The GP S device not only tells t hem where they are in real- time, but also keeps a reco rd (track) of
everywhere they’ve been. Onc e they’ve finished the trail, they e lect to save the track so that they
can see where they’ve rid den.
7. Press MENU, hig hlight the Tracks optio n, and then press ENT ER.
8. Highlight the Save b utton and press ENTER.
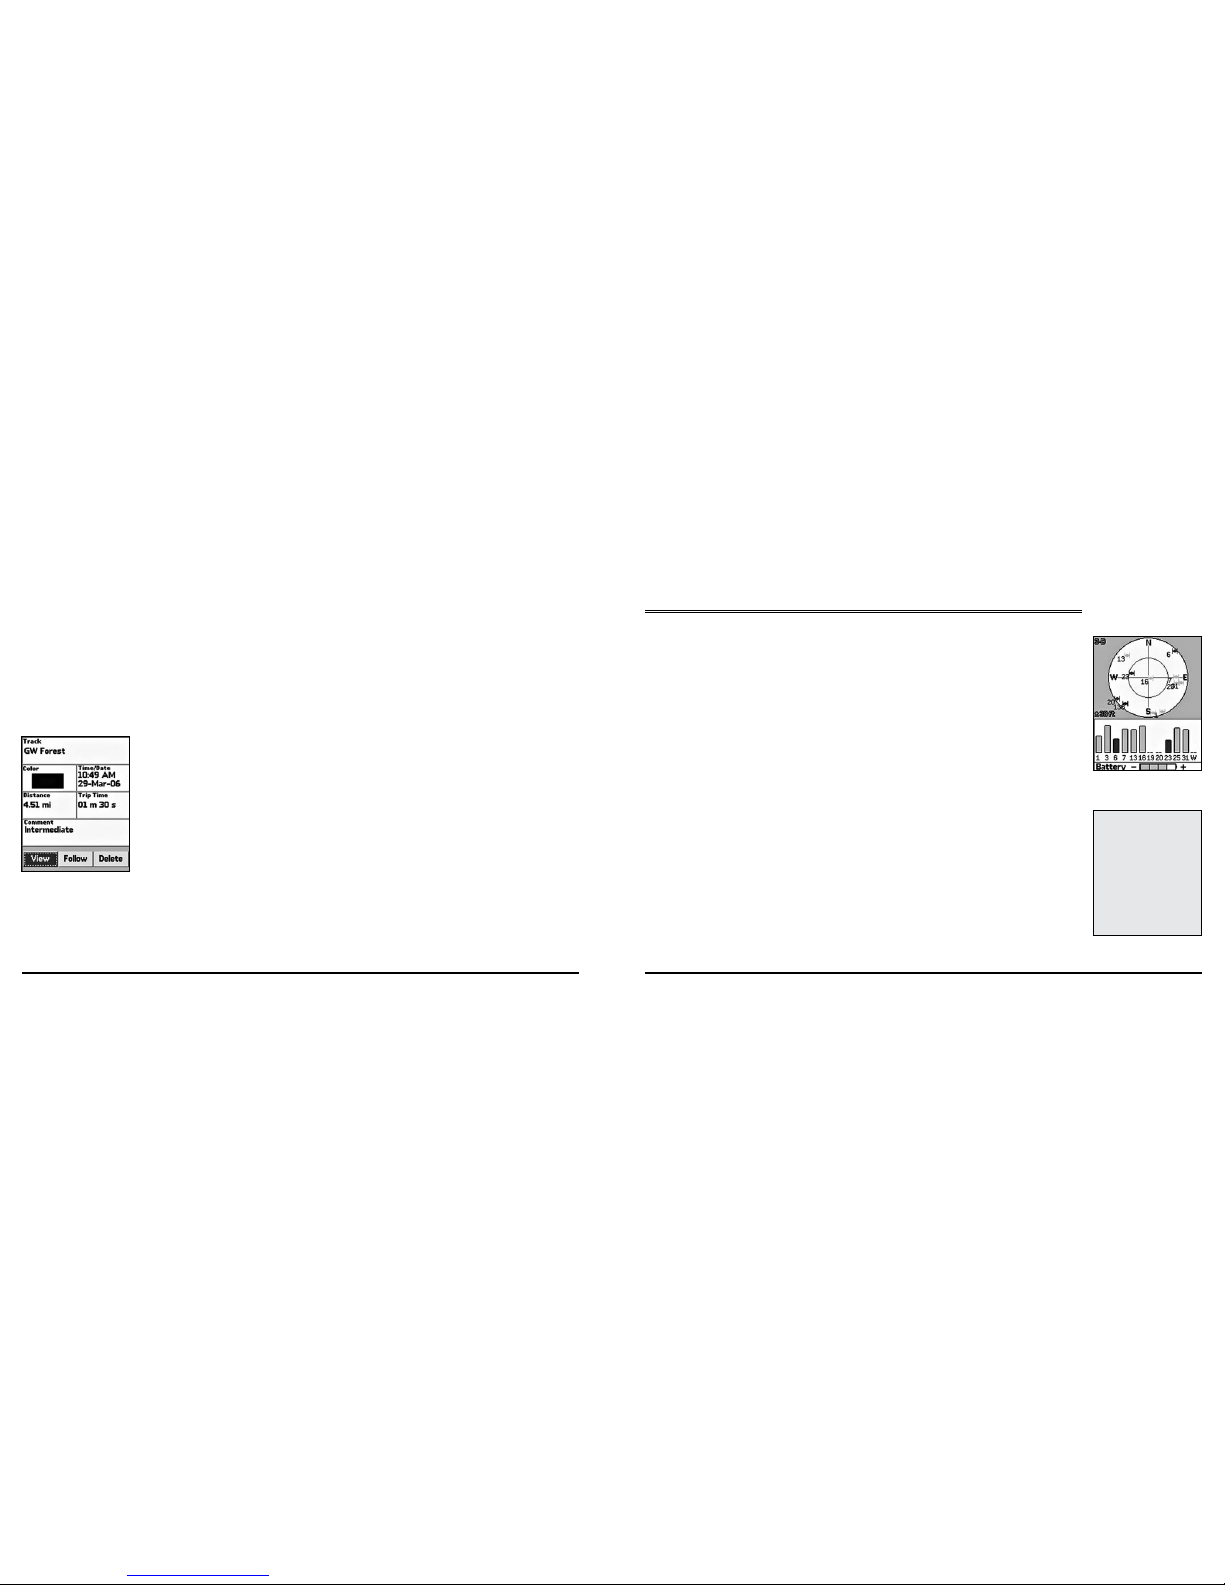
Since they might want to visit this track again later, they decide to name the track with the tra il name
and assign i t the same color that they assign all of the tr ails they’ve ridden. They also use the comments feature in the Tracks screen to note if they t hought the trail was easy, moderate, or difficu lt.
9. Highlight the Tra ck text field and press E NTER to name the track “GW Forest” using t he key
board. Then, hig hlight OK and press ENTER.
10. Highlight the Color block and press ENTER. Use the arrow keypad to highlight t he color blue
and then press ENT ER.
11. Highlight the Comm ent text field and press ENTER and assign a difficu lty comment using the
keyboard. Then, hig hlight OK and press ENTER.
12. Highlight the View button and press EN TER to see a snapshot of where you went on the trail.
They can also choose to follow the track if they ever de cide to ride t he trail again. When a track is
followed, a route is automati cally created that they can use again the future .
13. Press MENU, high light the Tr acks option, and then press ENT ER.
14. Highlight GW For est in the Tracks list and press ENTER.
15. Highlight Fol low and press ENTER.
When they arrive home, they download the tr ack and waypoint information into Topo U SA so they
can see a larger view of where they were. They finish by sav ing the track information in their m ountain biking librar y project.
The Satellites Page
Viewing th e Satelli tes Page
Once you turn the Earthmate GPS PN-20 on, the Satellites Page displays. The Satellites Page informs
you of your current G PS status, the number of satelli te s the Earthmate GPS PN -20 is acquiring data
from, the signal streng th, and the GPS accuracy (onl y available when a 2-D or 3- D fix is obtained).
GPS and WAAS S tatus
GPS status disp lays in the upper-lef t corner of the Page and will display the follow ing, depending on
your satellite acquisiti on status:
• GPS O ff—The G PS has been disab led.
• No Fix—The GPS can not find sufficie nt satellite data to determine your current GPS pos ition.
• 2-D—The GPS connectio n is success ful, b ut the connection quality is not quite as sufficient as a
3-D fix. This usuall y indicates insufficient data for an accurate location due to 1) only three
satellites being used or 2) poor s ignals fro m the satellites. Move your receiver to another location
until you get better recep tion.
• 3- D—The GPS receiver is receivin g sufficient satellite data to determine your lo cation.
If “WA AS” displays in the u pper-right corner of the Page, the Earthmate GP S PN-20 has obt ained a
WAAS connection. WA AS provides up to five times greater po sition accura cy than a regular 2- D or
3-D co nnection. WAAS is only availa ble in North America.
Satelli te Constellat ion and Sign al Graph
Both the satellite constellation and the satellite signal graph display visible satellites and their number
(assigned by t he Department of D efense).
In the satellite constellation, satellite -shaped icons display each satellite’s position in the sky (relative
to the device’s current positio n).
In the satel lite signal g raph, each satellite is represented as a bar which is sized accordin g to signal
strength (lon ger bars have greater strength, shorter ba rs have less strength).
The Satel lites Page
Note: WAAS was d eveloped
by the Federal Aviati on Administration to enhance the accuracy of GPS receivers, usu ally
to within three meters of actual
position, by p roviding a modified GPS signal. After c alculating the e rror factor at ground
control stations through the
U.S., the corrected si gnal is
transmitted to two geostationary s atellites that in turn
transmit the GPS signal back
to earth.
Editing track detail s
Satellites Page
18
19
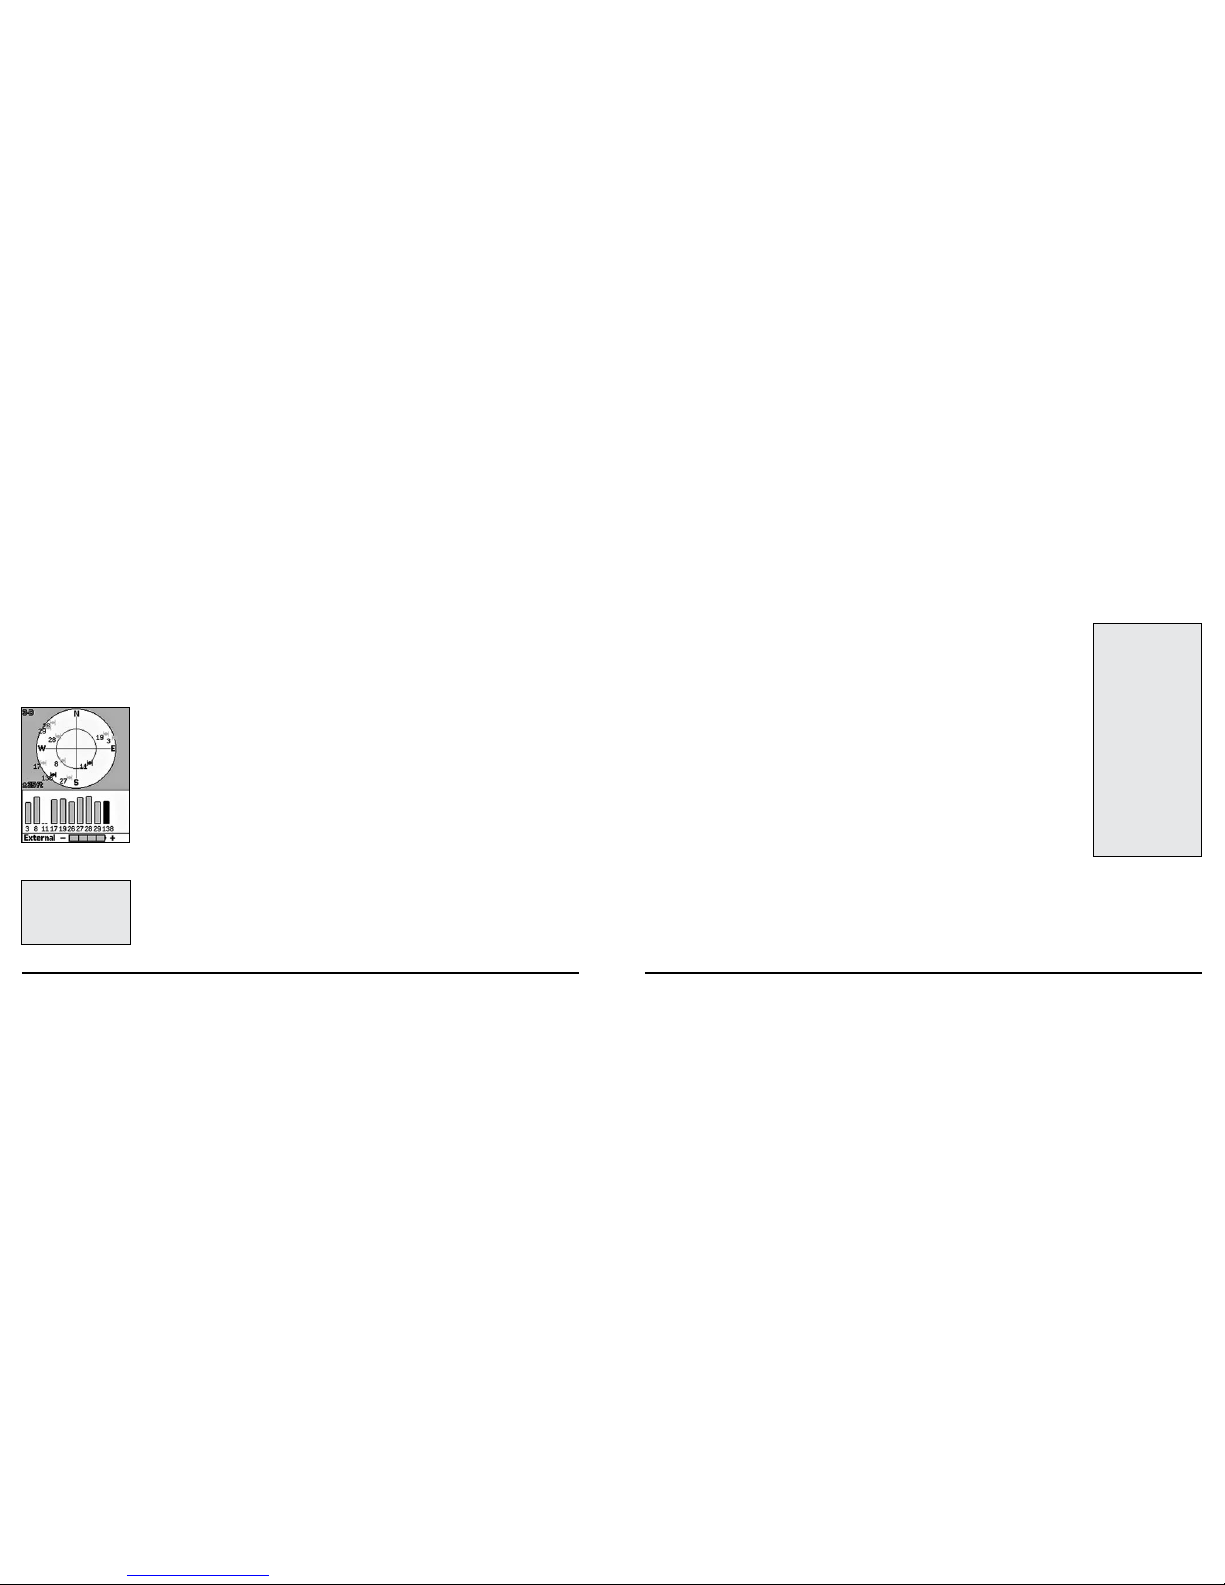
The icons in the satellite constellation and the lines in t he signal graph are color code d based on the
quality of the dat a they are transmitting:
• Red—Ind icates your GPS rece iver is tracking the sate llite, but it is not receivin g data from it.
• Gre en—Indicates your GPS receiver is tracking the satellite, ephemeris data is available, and the
satellite is being used for n avigation.
• Blue—I ndicates your receiver is t racking the satellite, ephemeris data is available, the satellite is
being used for naviga tion, and the satellite has WAAS cor rections available.
GPS Accur acy
The GPS accur acy will display, in the lower-left corner of t he screen in feet or meters, depending on
the measurement preferences you have assigned in the Device Set up Page (see To Modify the Units
Settings on page 6 3 for more information). GP S accuracy is repres ented on the map by a circle with
a radius equal to the GPS accuracy, allowing the user to see a representation of their accuracy in relation to their map scale. T he accuracy of the Earthmate GP S PN-20 is + /- 10 meters.
Batter y Indicator
The b attery indicator is a g raphic representation of the c urrent available battery power. It displays
differently based o n the current available power:
• Four g reen bars—Indicates a full charg e.
• Thre e green bars—One quar ter of the battery po wer has been used.
• Two yellow ba rs—One half of the battery power has b een used.
• One red bar—Three quarters of the battery power has b een used . Once the battery has reached
5% of its total batter y power, a low battery warning will display.
While the Li-Ion bat tery is c harging, the battery indicator graphic will be animated and the word “Battery” will be replaced with “Charging”. Once t he battery is fully charged, the battery indicator graphic
will display four sta tic green bars and the word “Charging” will be replace d with “External” until the
charging cable is re moved.
Note: T he battery indicator grap hic may not provide exact results due to va riations in bat te ry chem istry from vario us manufacturers.
To Disable GPS
There are many features on the Earthmate GPS PN -20 that do not require a GPS fix. You ca n tur n the
GPS connecti on off using the Disable GPS option i n the Satellites menu.
1. Ensure the Satellites Pa ge is displaying.
2. Press MENU.
3. Use the arrow keypad to hig hlight Disab le GPS.
4. Press ENT ER. “GPS OFF” displays in the upper- left corner of the screen and all satellites are
removed from the constella tion display.
The Satel lites Page
Note: If you do not choose the
correct battery type in the Device Setup Pag e, the battery
indicator may not provide accu rate information. See To Modify
the System Settings on pag e
59 for more information.
Notes:
• You can also dis able the GPS
using t he Device Setup/Sys tem menu option . Select
Disabl e GPS from the G PS
Settings drop -down list.
• After GPS has been disab led,
you can enabl e it by pressing
MENU and then selecting
Enable GP S.
• GPS is temporarily disa bled
when in si mulate mode (d ur ing track playback, navi gation
simulation, etc. ).
• If th e Earthmate GPS PN -20
is unable to acquire a fix after
approximately ten minutes,
you will receive the fol lowing
message, “Wo uld you like to
disable the GP S or continue
searching for satell ites?”
Select Dis able to disabl e
GPS or Continue to allow the
Earthmate GPS PN -20 to
keep searching for s atellites.
Battery indic ator label changes
to “external” when chargin g
20
21
The Map Page
Viewing th e Map Page
If a 2- D or 3-D fix is obtained, the Map Page displays the map data that is available for your current
GPS locati on. If a GPS fix cannot b e obtained, the location o f your last GP S fix displays on the map.
The color of the GP S arrow will depend on your GPS signal.
• A flashing re d arrow indicates that the Earthmate GP S PN-20 cannot obtain a GP S signal.
• A blue arrow in dicates that the devic e is in Track P layback mode or Simulate Navigati on mode.
• A yellow arrow ind icates a 2-D fix.
• A green arrow in dicates a 3-D fix.
Below the map are information fields . T he information that displays in these fields will vary base d o n
the selections you ch oose (for more information, see To Change the Information Field s on page 21).
The scale bar c an be found above the information fields. A n orth arrow is also available in the upp erright corner of the sc reen ( only available when Headin g Up is selected ( or Course Up is se lected
when navigating ) as the map orientation). N ote: Raster maps rotate in 90 ° headings.
To View Map Data
Earthmate GPS PN- 20 co mes st andard with a base map showing high-level world and U.S. coverage.
The base map cann ot be removed from memor y.
There are several data t ypes that are compatible with the Ea rthmate GPS P N-20 :
• Aerial D ata Packet (ADP) data
º
DOQQ
º
3DTQ
º
Sat 10 data
• Topo USA dat a
• Street Atlas U SA data
• World bas e data
The list above shows the default priority o f the data t ypes (from top to bottom ). To change the data
type priori ty, see Prioritizi ng Your Data on page 27.
To Show/Hide t he Information Fie lds
The information fie lds can be hidden to enl arge the map area.
1. Ensure the Map Page i s displaying.
2. Press MENU.
3. Use the arrow keypad to hig hlight Hide In fo Fields.
Note: If Show Info Fiel ds d isplays in the list, the information fields are already hidden. Cho ose
Show Info Fi elds to display the information fiel ds.
4. Press EN TER. The informati on fields are now hidden ( or shown if you s elected to Show Info
Fields) from the M ap Page.
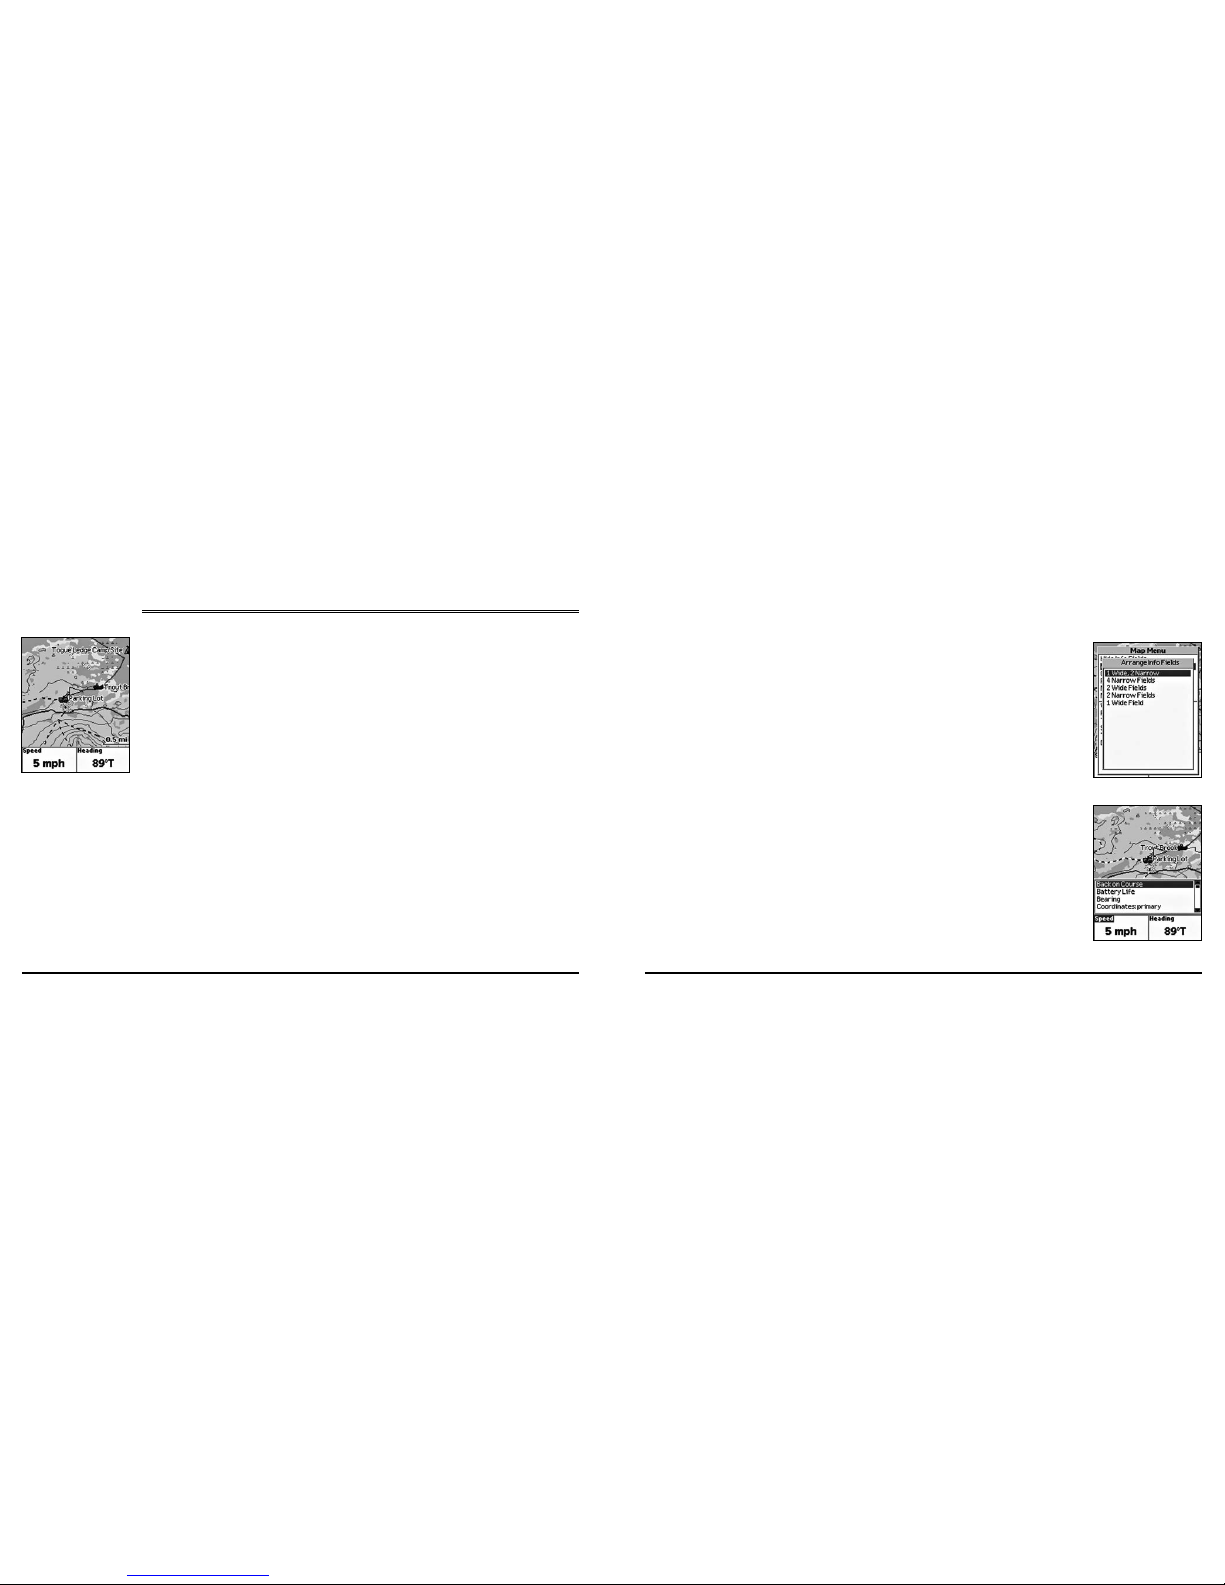
To Arrange the In formation Field s
You can c hange the informatio n fields to di splay as one wide field, one wide field a nd two narrow
fields, four narrow fie lds, two wide fiel ds, or two narrow fields.
1. Ensure the Map Page i s displaying.
2. Press MENU.
3. Use the arrow keypad to hig hlight Arrang e Info Fields.
Note: If Arrange Info Fields does not display in the list, the informatio n fields are hidd en.
Choose Show Info Field s to display the information fields and then rep eat steps 2 and 3.
4. Press ENT ER.
5. Use the arrow keypad to sele ct the information field style you would l ike to view.
6. Press ENT ER.
To Change the Inf ormation Fields
The information fields can be customized to display the info rmation that is most impor tant to you. You
may want to change the information that displays based on what type of activity you will be engaging
in. Note: T he information fields will change when n avigating.
1. Ensure the Map Page i s displaying.
2. Press MENU.
3. Use the arrow keypad to hig hlight Change I nfo Fields.
The Map Page
Map Page
Arrange Info Fields me nu option
Change Info Field s menu option

22
23
Note: If Change Info Fields does not display in the list, the information fields are hidden.
Choose Show Info Field s to display the information fields and then rep eat steps 2 and 3.
4. Press ENT ER.
5. Use the arrow keypad to hig hlight the information fi eld you would like to change.
6. Press ENT ER. All of the availab le information field op tions display.
7. Use the arrow keypad to sele ct the information field you want to select.
8. Press ENT ER.
9. Press QUIT to exit o ut of Change Info mode.
The available inform ation fields include:
Informa tion Field Optio n Descri ption
Back on Course Displays the direction of travel ne eded to return to the course
(expressed in de grees).
Battery Life Displays the percentage of batter y power that is left on the
Earthmate GP S PN-20.
Bearing Displays the direction of travel from the cur rent location to
the destination or nex t waypoint (expressed in degrees ).
Coordinates: P rimary The current GPS location, cursor position, or map center in
the coordinate format you’ve selected to be the primary
format (lat /lon, UTM/ UPS, or USNG/ MGRS).
Coordinates: S econdary The current GPS location, cursor position, or map center in
the coo rdinate form at you’ve selected to be the secondary
format (lat /lon, UTM/ UPS, or USNG/ MGRS).
Course The direction of travel from the start ing location to the desti nation (expres sed in degrees) .
Distance to Finish The distance from t he current location to th e route finish.
Distance to Next Sto p The distance from the cur rent location to the next stop in
the route.
Informa tion Field Optio n Descri ption
Distance to Next Turn The dist ance from the curre nt location to the next turn in
the route.
Elevation The distance ( height) above or below sea level.
Elevation: Max imum The maximum elevati on achieved (expressed in distance ).
This field is subjec t to being reset when Trip Info is cleared.
Elevation: Minimum The minimum elevation ac hieved (exp ressed in distance) .
This field is subjec t to reset when Trip Info is cleared.
ETA at Finish The Estimated T ime of Arrival at the route finis h (expressed
as hours:minutes AM /PM). ETA is based on the current
device time, not on the lo cal time at the destination.
ETA at Next Turn The Es timated Time of Arrival at the next turn in the route
(expressed as h ours:minutes AM/ PM). ETA is based on the
current device time, not o n the local time at the tur n.
ETA at Next Stop The Estimated Time of A rrival at the next stop in the route
(expressed as h ours:minutes AM/ PM). ETA is based on the
current device time, not o n the local time at the nex t stop.
Finish The label of the Finis h, as it appears in the rou te directions.
GPS Accurac y The calculated ac curacy of the GPS (expressed in dis tance).
GPS Status The current status of your GP S device (No Fix, 2-D, 3-D, etc.).
Heading The current directi on of travel (expressed in degrees) .
Moonrise /Moonset Th e time of day at which t he moon will rise and set (ex-
pressed as hours:minutes AM /PM). Th is information is cal culated for the specific g eographic area in whi ch the GPS
has acquired a 3 -D fix.
Next Stop The label of the next stop, as it appears in the route directions.
The Map Page
Notes:
• The information fi elds that
are sele cted to be displayed
may be abbreviated on th e
screen. For example, Velocity
Made Good displays as VMG.
• When informatio n is not
available (for example, the
Distance to Finish informa tion field is only p ertinent
when navigating) , dashes (- -)
will d isplay in the appl icable
field.
Note: The prim ary coordinates
are what are shown whenever
coordinates are displayed (for
example, when pan ning).
 Loading...