

Page 1

De’Longhi Appliances via Seitz, 47 31100 Treviso Italia www.delonghi.com
5711011341_00_0618
Page 2

TRD04 Series
OIL FILLED RADIATOR
Instructions for use
This product is only suitable for well insulated spaces or occasional use
Page 3
A
B
D
C
E
F
1
G
ELECTRICAL CONNECTION
A) If your appliance comes tted with a plug, it will incor-
porate a 13 Amp fuse. If it does not t your socket, the
plug should be cut o from the mains lead, and an appropriate plug tted, as below. WARNING: Very carefully
dispose of the cut o plug after removing the fuse: do
not insert in a 13 Amp socket elsewhere in the house as
this could cause a shock hazard. With alternative plugs
not incorporating a fuse, the circuit must be protected
by a 15 Amp fuse. If the plug is a moulded-on type, the
fuse cover must be re-tted when changing the fuse
using a 13 Amp Asta approved fuse to BS 1362. In the
event of losing the fuse cover, the plug must NOT be
used until a replacement fuse cover can be obtained
from your nearest electrical dealer. The colour of the
correct replacement fuse cover is that as marked on the
base of the plug.
B) If your appliance is not tted with a plug, please follow
the instructions provided below:
WARNING - THIS APPLIANCE MUST BE EARTHED
IMPORTANT
The wires in the mains lead are coloured in accordance with
the following code:
Green and yellow: Earth
Blue: Neutral
Brown: Live
As the colours of the wires in the mains lead may not correspond with the coloured markings identifying the terminals
in your plug, proceed as follows:
The green and yellow wire must be connected to the terminal in the plug marked with the letter E or the earth symbol
or coloured green or green and yellow. The blue wire
must be connected to the terminal marked with the letter N
or coloured black. The brown wire must be connected to the
terminal marked with the letter L or coloured red.
2
Page 4

IMPORTANT WARNINGS
Read all the Instruction for Use carefully before using
the appliance. Keep this Instructions for Use.
Danger!
Failure to observe the warning may result in life threatening
injury by electric shock.
- Do not use the heater in the vicinity of
bathtubs, wash basins, showers, sinks
and swimming pools.
- Never use the heater to dry laundry.
- If the power cable has been damaged,
it must be replaced by the manufacturer or the technical service centre or
by a qualied person so as to avoid all
risks.
Important!
Failure to observe the warning could result in injury or damage to the appliance.
- This appliance can be used by children
aged from 8 years and above and persons with reduced physical, sensory
or mental capabilities or lack of experience and knowledge if they have
been given supervision or instruction
concerning use of the appliance in a
safe way and understand the hazards
involved.
Children shall not play with the appli-
ance. Cleaning and user maintenance
shall not be made by children without
supervision.
- Children of less than 3 years should be
kept away unless continuously supervised.
- Children aged from 3 years and less
than 8 years shall only switch on/o
the appliance provided that it has been
placed or installed in its intended normal operating position and they have
been given supervision or instruction
concerning use of the appliance in a
safe way and understand the hazards
involved. Children aged from 3 years
and less than 8 years shall not plug
in, regulate and clean the appliance or
perform user maintenance.
CAUTION — Some parts of this
product can become very hot and
cause burns. Particular attention
has to be given where children
and vulnerable people are present.
- WARNING: Do not use this heater in
small rooms when they are occupied
by persons not capable of leaving the
room on their own, unless constant
supervision is provided.
-
The body of this radiator is lled with
a precise quantity of special oil, so that
repairs requiring the opening of the
oil body must only be made by the
service agent. Any oil leakage must be
reported to the Customer Experience,
see enclosed guarantee for details.
- When scrapping the heater, follow the
regulations concerning the disposal of
oil.
- T
he appliance must not be located im-
mediately below a xed socket-outlet.
-
CAUTION: in order to avoid any danger caused by an accidental resetting
of the safety system, this appliance
must not be powered through an external timer.
- Do not obstruct the air intake and outlet area (danger of overheating).
Danger of burns!!
Failure to observe the warning could result in burns or scalds.
- WARNING: In order to avoid
overheating, never under any
3
Page 5

circumstances cover the appliances
during operation, as this would lead
to dangerous overheating.
- The use of an extension lead is not
recommended, as overheating of the
extension lead may occur during the
operation of the heater.
- Never place the power cable on top of
the heater while it is hot.
- Do not rest anything on the appliance.
-
WARNING: To reduce the risk of re,
keep textiles, curtains, or any other
ammable material a minimum distance of 1 m from the air outlet.
Please note:
This symbol indicates recommendations and important information for the user.
-
We recommend that you not place the
heater in a draught, because strong
draughts of air may adversely aect
the equipment’s operational eciency.
- Use this heater on a horizontal and stable surface.
- Always use the appliance in an upright
position.
- Do not use this heater if it has been
dropped.
- Do not use if there are visible signs of
damage to the heater.
- The rst time you use the appliance,
operate it of at least 15 minutes at
maximum to eliminate the “new”
smell.
A little smoke due to the protective
substances applied to the heating element before transport may be given
o.
-
Position the appliance so that the plug
and the outlet can be easily reached.
-
Do not use the appliance in rooms less
than 4 m2 in area.
-
The appliance is tted with a safety
device which will switch o it in case
of accidental overheating.
To reset, please contact Customer Ex-
perience, see enclosed guarantee.
- Before putting the appliance away,
make sure it is completely cooled and
unplugged from the mains socket.
Do not store in dusty atmospheres.
- The appliance must not be hung.
For non-EU countries only:
This appliance is not intended for use by
persons (including children) with reduced
physical, sensory or mental capabilities, or
lack of experience and knowledge, unless
they have been given supervision or instruction concerning use of the appliance
by a person responsible for their safety.
Children should be supervised to ensure
that they do not play with the appliance.
Disposing of the appliance
The appliance must not be disposed of with household waste, but taken to an authorised waste separation and recycling centre.
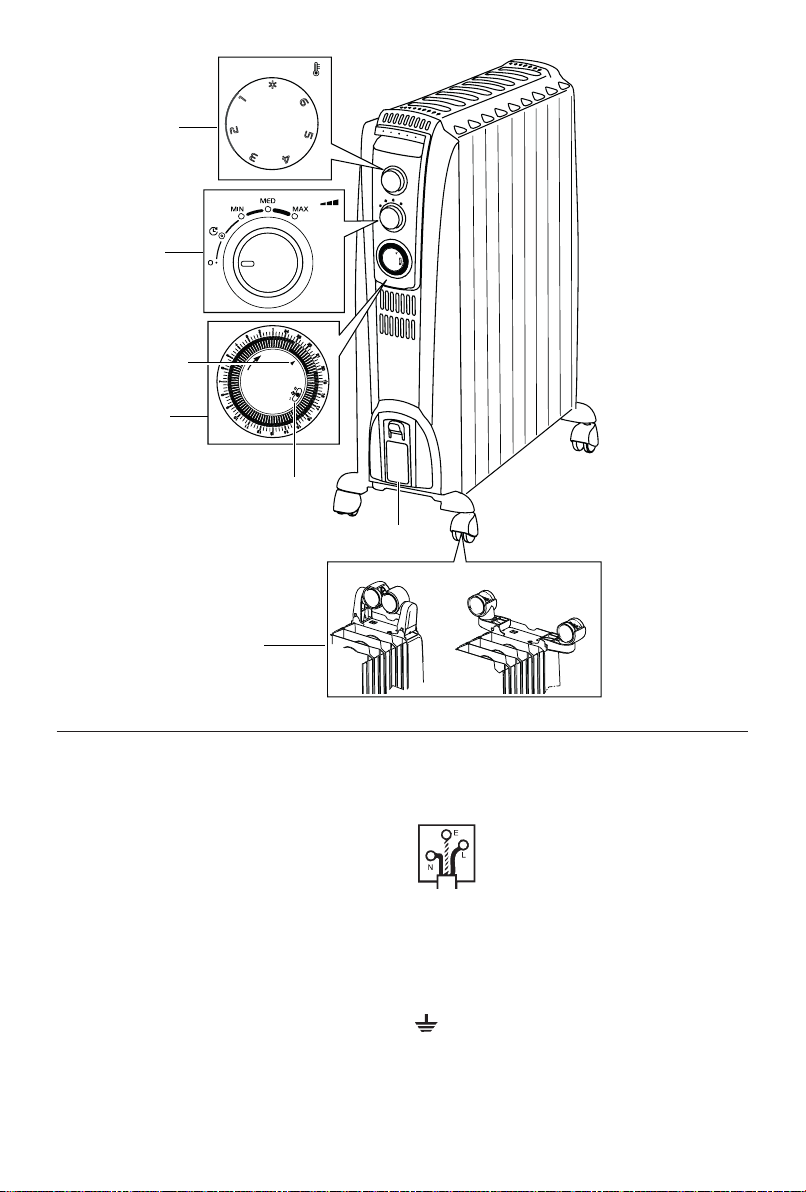
DESCRIPTION
A Thermostat
B Power selector
C Timer
D Timer pointer
E Slide switch
F Cord holder
G Wheel
USE
Fitting the wheels
Turn the radiator upside down on a rug or soft surface to
prevent damaging the paint nish. Fully unfold the wheels
by turning them outwards (Fig. 1). Turn the radiator back to
its upright position.
4
Page 6

Caution
erride)
Always operate the heater in upright position only (wheels
on the bottom, controls on top).
Any other position could create a hazardous situation.
Location
The heater should not be placed immediately below a power
outlet. Do not use this radiator in rooms with a oor area of
less than 4 m2 (43 sq. ft. ).
Connection
- Before using the appliance check that your supply voltage is the same of that shown on the rating label of the
unit and that the power socket and power supply line
correspond to the load specied.
- Check also the current capacity of your fuses. CONNECT
YOUR HEATER TO EARTH PROVIDED SOCKET ONLY.
Turning on
Insert the plug into an electrical outlet, rotate the thermostat
knob (A) to maximum and turn the unit on as follows using
the power selector:
- Turn the power selector dial (B) to the position to
retain the time set only.
- Turn the power selector to position MIN to select
minimum output (the min light will be on).
- Turn the power selector to position MED to select
medium output (the min/med light will be on).
- Turn the power selector to position MAX to select
maximum output (the lights will be on).
Adjusting the thermostat
When the room has reached the desired temperature, turn
the thermostat knob slowly in an anti-clockwise direction
until you hear a "click" and not beyond it. The thermostat
will then adjust the set temperature automatically and
keep it constant. If your unit is a three power version, in
intermediate seasons or on days when temperatures are not
particularly cold, select minimum output to optimize savings
and consumption.
Reminder
To completely shut the appliance o, turn the power selector to
the "0" position and then unplug the appliance from the outlet.
HOW TO USE THE TIMER
To program heating, proceed as follows:
- Look at the time on your clock or watch. If it is 10
p.m., turn the numbered timer disk clockwise until
the number 22 (10 p.m.) on the disk coincides with
the pointer s on the timer. Set the periods of time
when you want the appliance to work by pushing the
teeth inward. Each tooth corresponds to a period of 15
minutes. This will leave visible sectors which correspond
to the periods of operation. When set, the radiator
will operate automatically each day during the times
programmed (important: the radiator must always be
plugged into the socket).
- To change the programming, move the teeth and set the
new periods of operation.
- To turn the appliance o, turn the power selector to "0".
In this position, the time will not be retained. If on the
other hand you want to retain the time set, turn the
power selector (B) to the position.
Important!
CLOCKWISE.
The timer is like an electric clock, and will only work when
plugged into a power supply.
Timer override
If you wish to override the timer settings, push the timer
switch to position I (g.2) manual (timer override). To return
to timed operation push the switch back to the middle
position (g.2).
NOTE: if the timer switch is at the 0 position (g. 2),
the heater is o and will not operate).
DO NOT ROTATE CLOCK DIAL COUNTER-
Fig. 2
Antifreeze function
Turn the thermostat dial to the position and the power
selector to position MAX. The appliance will maintain a
minimum room temperature of approximately 5°C, thus
preventing freezing while conserving energy. In models that
come with a timer, teeth must be set in the inward position.
Heater o
Timer operation
Manual (timer ov
5
Page 7

TIMER IN POSITION
Slide
switch
(E)
Power
selector
(B)
0 • Appliance o.
Min • Programming active.
Med • Programming active.
Max • Programming active.
TIMER IN POSITION
Slide
switch
(E)
Power
selector
(B)
0 • Appliance o.
Min • Programming not active.
Med • Programming not active.
Max • Programming not active.
Operation
• The time is not retained.
• Appliance o.
• The time is retained.
• The appliance operates at low
power.
• The time is retained.
• The appliance operates at
medium power.
• The time is retained.
• The appliance operates at
high power.
• The time is retained.
Operation
• The time is not retained.
• Appliance o.
• The time is retained.
• The appliance operates
continuously at low power.
• The time is retained.
• The appliance operates
continuously at medium
power.
• The time is retained.
• The appliance operates
continuously at high power.
• The time is retained.
TIMER IN POSITION 0
Slide
switch
(E)
Power
selector
(B)
0
0 • Appliance o.
Min • Programming not active.
Med • Programming not active.
Max • Programming not active.
Operation
• The time is not retained.
• Appliance o.
• The time is retained.
• The product does not activate
low power.
• The time is retained.
• The product does not activate
medium power.
• The time is retained.
• The product does not activate
maximum power.
• The time is retained.
6
Page 8

Safety device
A safety device shuts the radiator down in the case of
overheating. To start the radiator up again, contact Customer
Experience. See enclosed guarantee leaet.
MAINTENANCE AND SERVICE
Always unplug the heater from the power outlet and allow
the radiator to cool.
Wipe radiator with a soft damp cloth; do not use detergents
or abrasives. Should the radiator not be in use over a certain
length of time, wind the cord around the holder and store it
in a dry place. This appliance has been built to last for many
years of trouble-free service. In case of malfunction or doubt,
do not try to repair the heater by yourself: this might increase
the risk of re and electric shock. Please refer to the enclosed
guarantee leaet for service and assistance details.
TECHNICAL CHARACTERISTICS
Power supply See rating plate
Absorbed power "
TROUBLESHOOTING
PROBLEM CAUSE SOLUTION
The appliance doesn't work Be sure it is plugged in and that the
electrical outlet is working.
Plug into the power outlet.
Check for any obstruction.
The temperature may be set too low.
7
Remove the obstruction and let the
appliance cool down. If the appliance
doesn't work please contact Customer
Experience.
Set the temperature to a higher position.
 Loading...