


De’Longhi S.p.A.
Via Seitz, 47
31100 TREVISO
Italy
www.delonghi.com
5751020100/07.07
AIR CONDITIONER
CLIMATISATEUR
CLIMATIZADOR
CONDIZIONATORE
T130ARC

2
IMPORTANT SAFEGUARDS
• Use this appliance only as described in this instruction manual. As with all electrical equipment, whilst the instructions aim to cover as many eventualities as possible, caution and
common sense should be applied when operating and installing this appliance.
• This appliance is designed to air condition and heat the home and must not be used for
other purposes.
• It is dangerous to modify or alter the characteristics of the appliance in any way.
• The appliance must be installed in conformity with national legislation regulating electrical
equipment and installations.
• If the appliance requires repair, contact a Service Centre authorised by the manufacturer
only. Repairs carried out by unauthorised personnel may be dangerous.
• This appliance must be used exclusively by adults.
• Never allow the appliance to be used by people (including children) with psychological,
physical or sensory impairments or with insufficient experience and knowledge, unless closely supervised and instructed by someone responsible for their safety. Young children
should be supervised to ensure that they do not play with the appliance.
• The appliance must be connected to an efficient earth system. Have your electrical circuit
checked by a qualified electrician.
• Do not use extension cables.
• Before cleaning or maintenance, always unplug the appliance from the mains socket.
• Never unplug the appliance by pulling on the power cable.
• Do not install the appliance in rooms containing gas, oil or sulphur. Do not install near sources of heat. .
• Keep the appliance at least 50 cm away from flammable substances (alcohol etc) or pressurised containers (eg aerosol cans).
• Do not rest heavy or hot objects on top of the appliance.
• Clean the air filter at least once a week.
• Avoid using heating appliances near the air conditioner.
• Always transport the appliance upright or resting on one side. Before moving the appliance, empty the internal circuit completely of water. After moving the appliance, wait at least
1 hour before starting it
• When putting the appliance away, do not cover with plastic bags.
• The materials used for packaging can be recycled. You are therefore recommended to dispose of them in special differentiated waste collection containers.
• At the end of its working life, consign the appliance to a specialist collection centre.
• If the power cable is damaged, it must be replaced by the manufacturer or an authorised
technical service centre in order to avoid all risk.
• Before transporting the appliance, completely empty the internal circuit of water by pressing the MODE and FAN buttons simultaneously for a few seconds without removing the
tank. Then empty the tank
GB
ELECTRICAL CONNECTIONS
Before plugging the appliance into the mains socket, check that:
• the mains power supply corresponds to the value indicated on the rating plate on the back
of the appliance;
• the power socket and electrical circuit are adequate for the appliance.
• the mains socket matches the plug. If this is not the case, have the plug replaced;
• the mains socket is adequately earthed.
Failure to follow these important safety instructions absolves the manufacturer of all liability.

3
WHAT IS THE PINGUINO
During the summer, you feel comfortable at a temperature of between 24 and 27° C with
a relative humidity of about 50%.
An air conditioner removes excess moisture and heat from the room where it is located.
Compared with installed models, portable air conditioners have the advantage that they can
be moved from one room to another in the home or be transported from one building to another.
Hot air from the room is passed through a coil
cooled by refrigerant gas. Excess heat and
moisture are removed before the air is reemitted into the room.
In single unit models, a small part of this
air is used to cool the refrigerant gas
and then, when hot and damp, is discharged outside.
In the spring and autumn, the
appliance can also be used to
heat.
The efficient heat pump system provides a high heating capacity with
low energy consumption.
All Pinguino models can also be used
in fan-only mode.
4
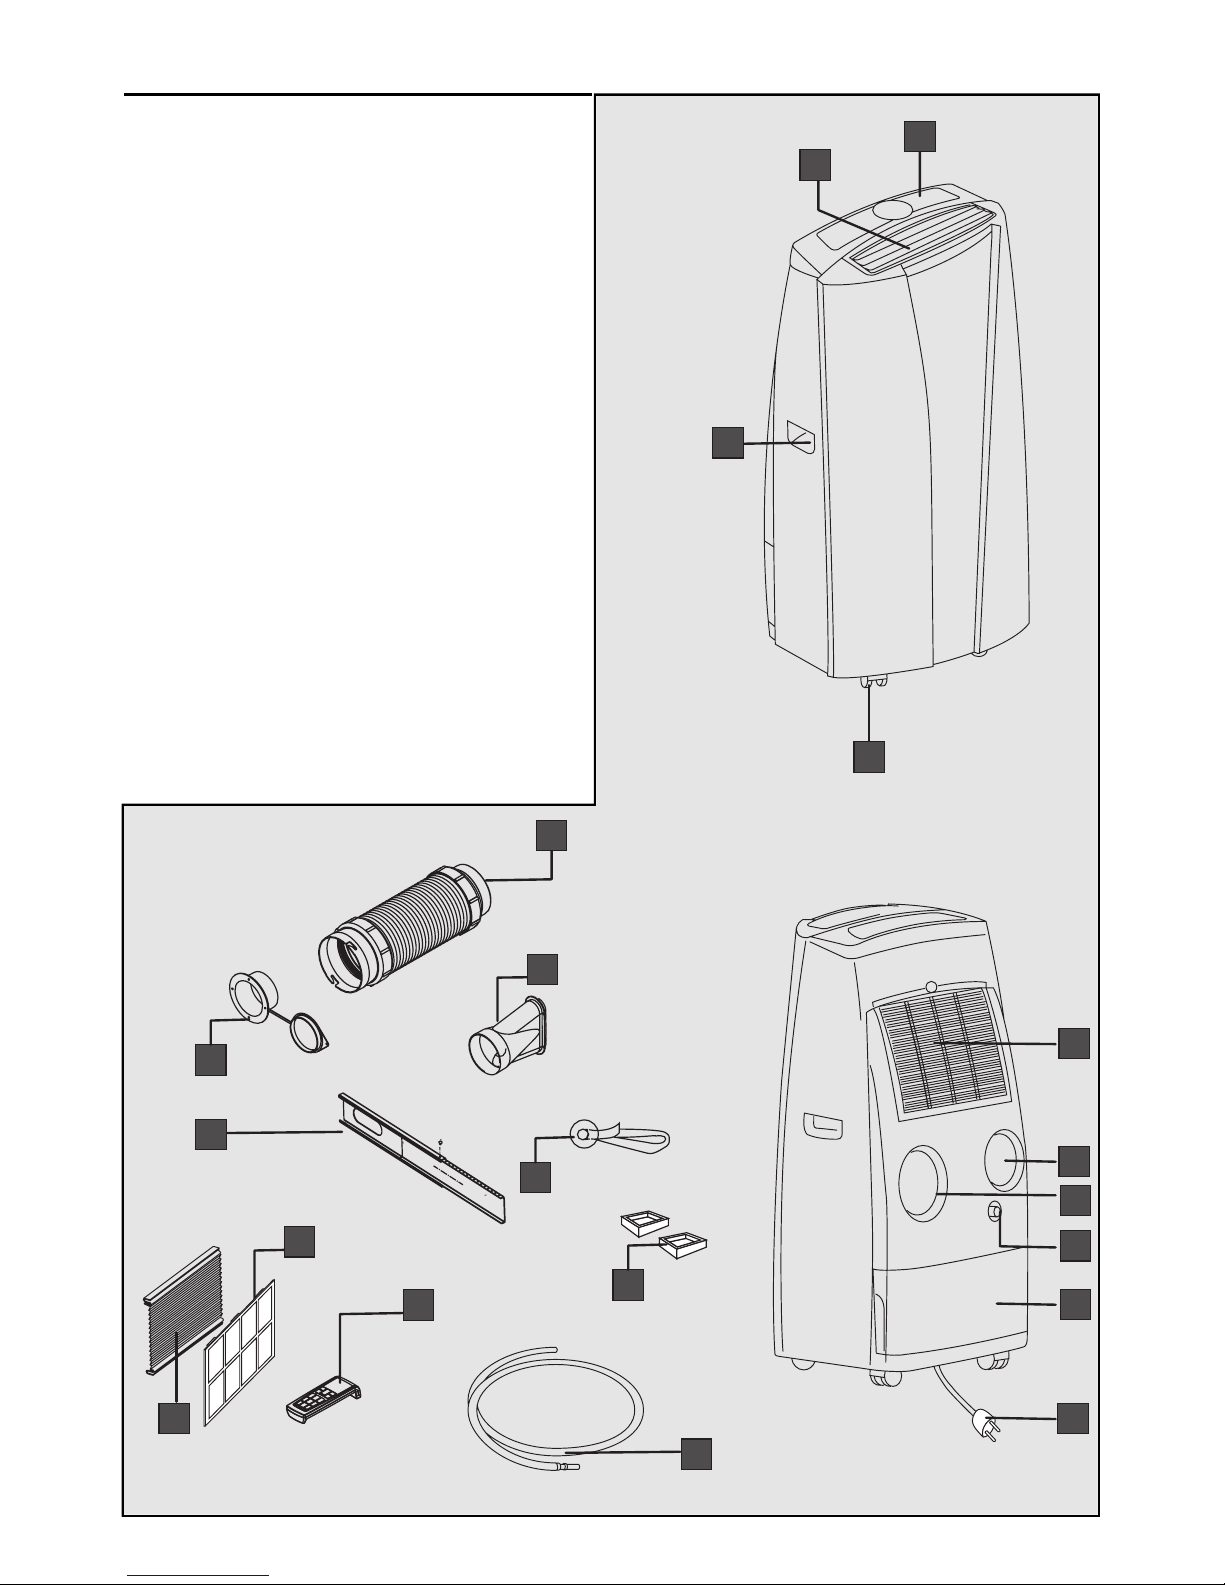
DESCRIPTION
A air outlet grille
B control panel
C rcastors
D handles
E air intake grille with dust filter
F air exhaust hose housing
G air intake grille
H continuous condensate drain connection
I condensate tank
J power cable
K flange cap
L air exhaust hose
M window outlet
N suckers
O castor locks
P continuous drain hose with coupling
Q remote control
R 3M air purifying filter
O silver ion filter (certain models only)
T adjustable bar
LL
QQ
MM
SS
RR
NN
OO
KK
TT
AA
BB
CC
DD
FF
GG
EE
II
HH
JJ
PP
5
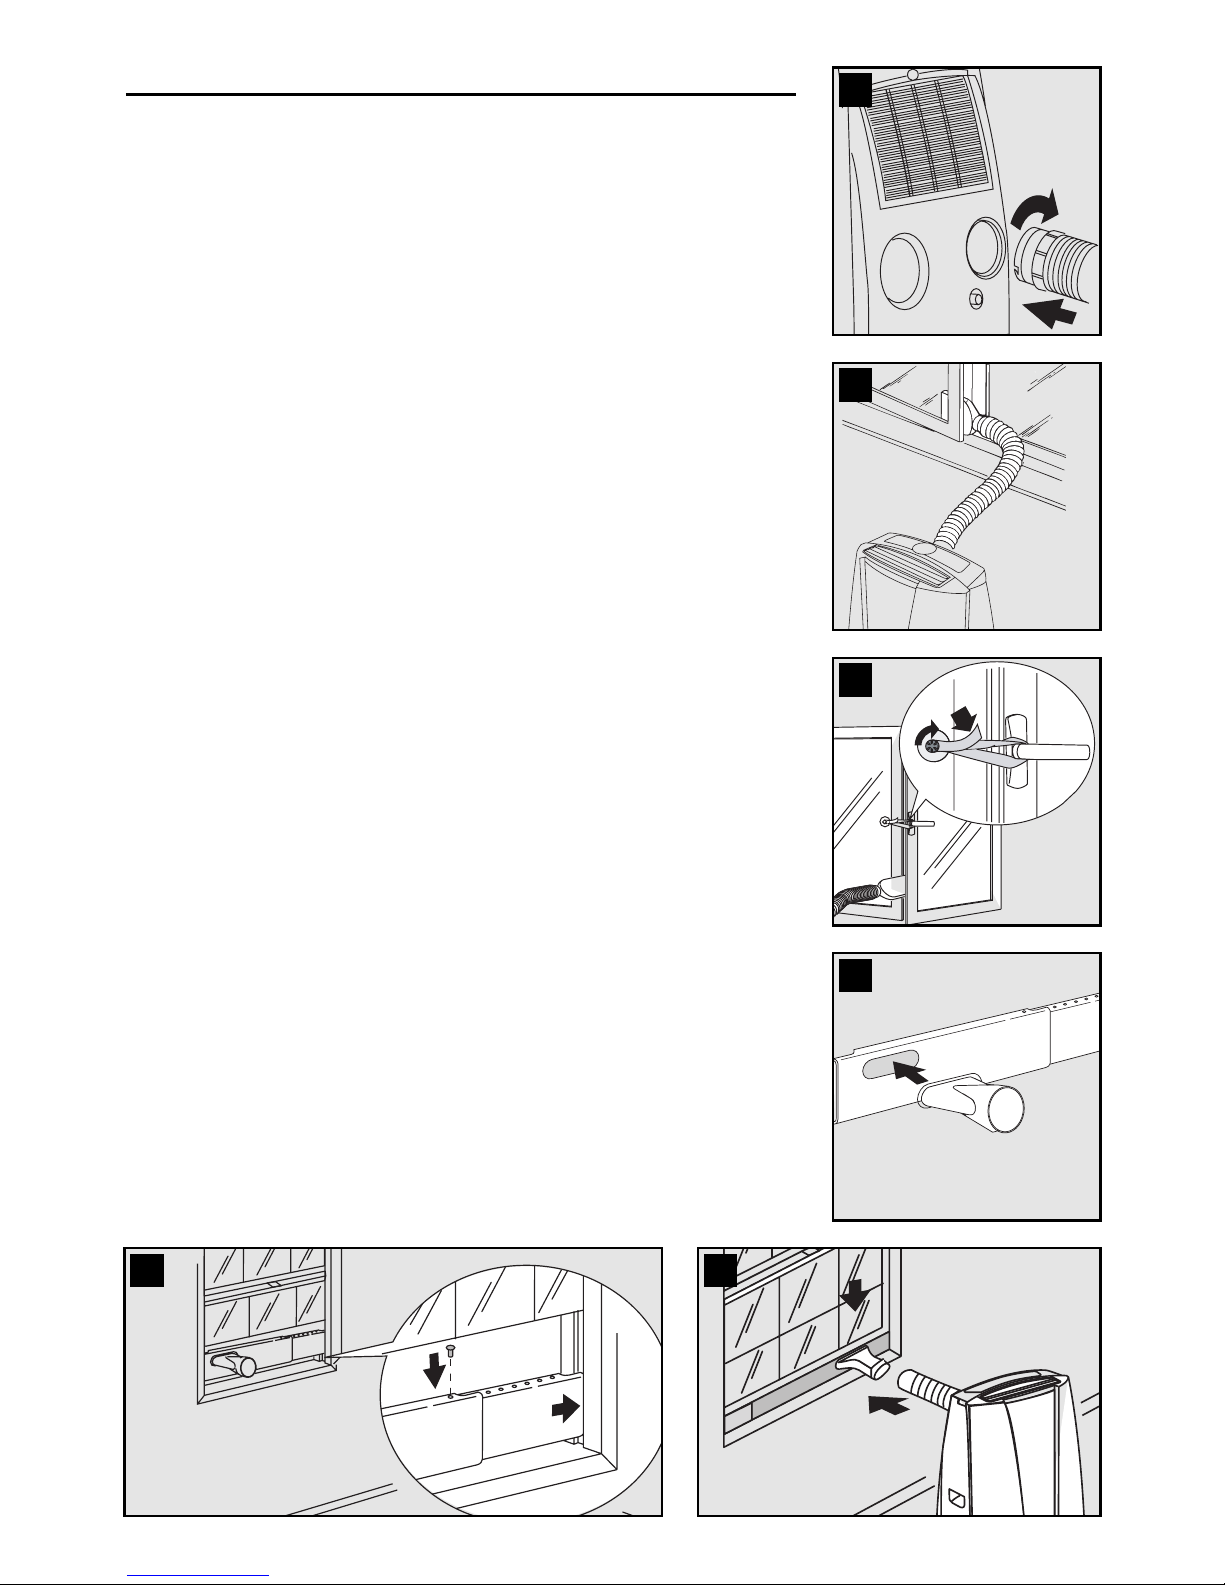
PREPARING FOR USE
The instructions below will enable you to prepare your air conditioner for operation as efficiently as possible.
Before use, make sure the air intake and outlet grilles are unobstructed.
AIR-CONDITIONING WITHOUT INSTALLATION
Just a few simple steps and your comfort is ensured with your
appliance:
• Fit the air exhaust hose in the housing at the back of the
appliance (fig. 1).
• Fit the window outlet to the end of the hose.
• Place the air conditioner near a window or French window.
• Adjust the length of the hose to reach the window.
• Make sure the air exhaust hose is unobstructed.
• Open the window or French window slightly and position the
outlet (fig. 2).
• If you have a double window, use the sucker provided to hold
the two parts of the window together (fig. 3).
You can also use the "adjustable bar" accessory.
- Fit the window outlet in the housing in the bar (fig. 4). Position
the bar on the windowsill and extend it for the complete
width of the window. The required length can be blocked
using the pin provided, then lower the blind or window (fig. 5).
- Fit the air exhaust hose in the housing at the back of the
appliance (fig. 1).
- Place the air conditioner near a window and connect the
end of the hose as shown in figure 6.
Keep the air hose as short and free of curves as possible to avoid
bottlenecks.
1
2
1
2
1
2
3
4
5
1
2
1
2
6
 Loading...