

DeLonghi Lattissima Touch EN560, NESPRESSO LATTISSIMA TOUCH, Nespresso Latissima Touch User Manual
NESPRESSO LATTISSIMA TOUCH COFFEE MACHINE, USER MANUAL
*
* Ma machine
My
Machine
UM_LATTISSIMA_TOUCH_FACELIFT_Z2A_TER.indb 1 06.12.17 15:00

EN - FR 4-31
DE - IT 32-59
UM_LATTISSIMA_TOUCH_FACELIFT_Z2A_TER.indb 2 06.12.17 15:00
3
OVERVIEW
A
B C
23
26
30
31
29
32
33
22
11 12
10
9
1
2
8
7
5
6
4
3
24
25
23
27
28
26
22
13
15 19
20
21
16
17
18
14
UM_LATTISSIMA_TOUCH_FACELIFT_Z2A_TER.indb 3 06.12.17 17:09

/
Touches tactiles de sélection boisson
/
Rapid Cappuccino System (R.C.S.)
/
Vue d’ensemble de la machine
Alert/Alerte
/
Machine sans le Rapid Cappuccino System
/
Machine avec le Rapid Cappuccino System
(pour les Cappuccinos)
/
Machine avec le Rapid Cappuccino System
(pour les Lat te Macchiato et Creamy Lat te)
/Levier
/Interrupteur général (ON/OFF) /Bouton de re trait du couvercle
/
“Descaling”
: alerte détart rage
(se réferer au paragraphe “détartrage”)
/Compartiment à capsule
/Espress o 40 ml /Couvercle du réser voir à lait
/Réser voir d’eau (0.9 L)
/Cappuccino /Indicateur de mousse min.
/
“Clean”
: nettoyage d u système Cappuccino
(se référer au paragraphe “préparer un Cappuccino”)
/Sortie Café
/Latte Macchiato /
Position du bo uton de réglage de la mousse d e lait
(insérer/sortir)
/Bac à capsule s usagées
/Lungo 110 ml
/
Bouton de réglage de la mousse de lait
/
Bac d’égout tage (pousser vers l’ intérieur pour
les verres à Latte Macchiato)
/
Creamy Latt e
/Mousse de lait ch aude
/Grille gauche
/Grille droite
/
Compartiment pour l’embout de détartrage (tirer pour ouvrir)
/Embout de détartrage
/Volet du connecteur vapeur
/Connecteur vapeur
/VUE D’ENSEMBLE
/
CLEAN
: Bouton de rinçage
/Indicateur de mousse max.
/
Connecteur du Rapid Capuccino Sys tem
/Buse à lait
/Levier de la buse à lai t
/Tube d’aspiration du lait
/Réserv oir à lait (0.35 L)
4
A
B
C
1
13 22
14
2
15 23
3
16 24
18
4
17 25
5
19
26
6
20
21
7
8
9
10
11
12
27
28
29
30
31
32
33
EN
FR
OVERVIEW
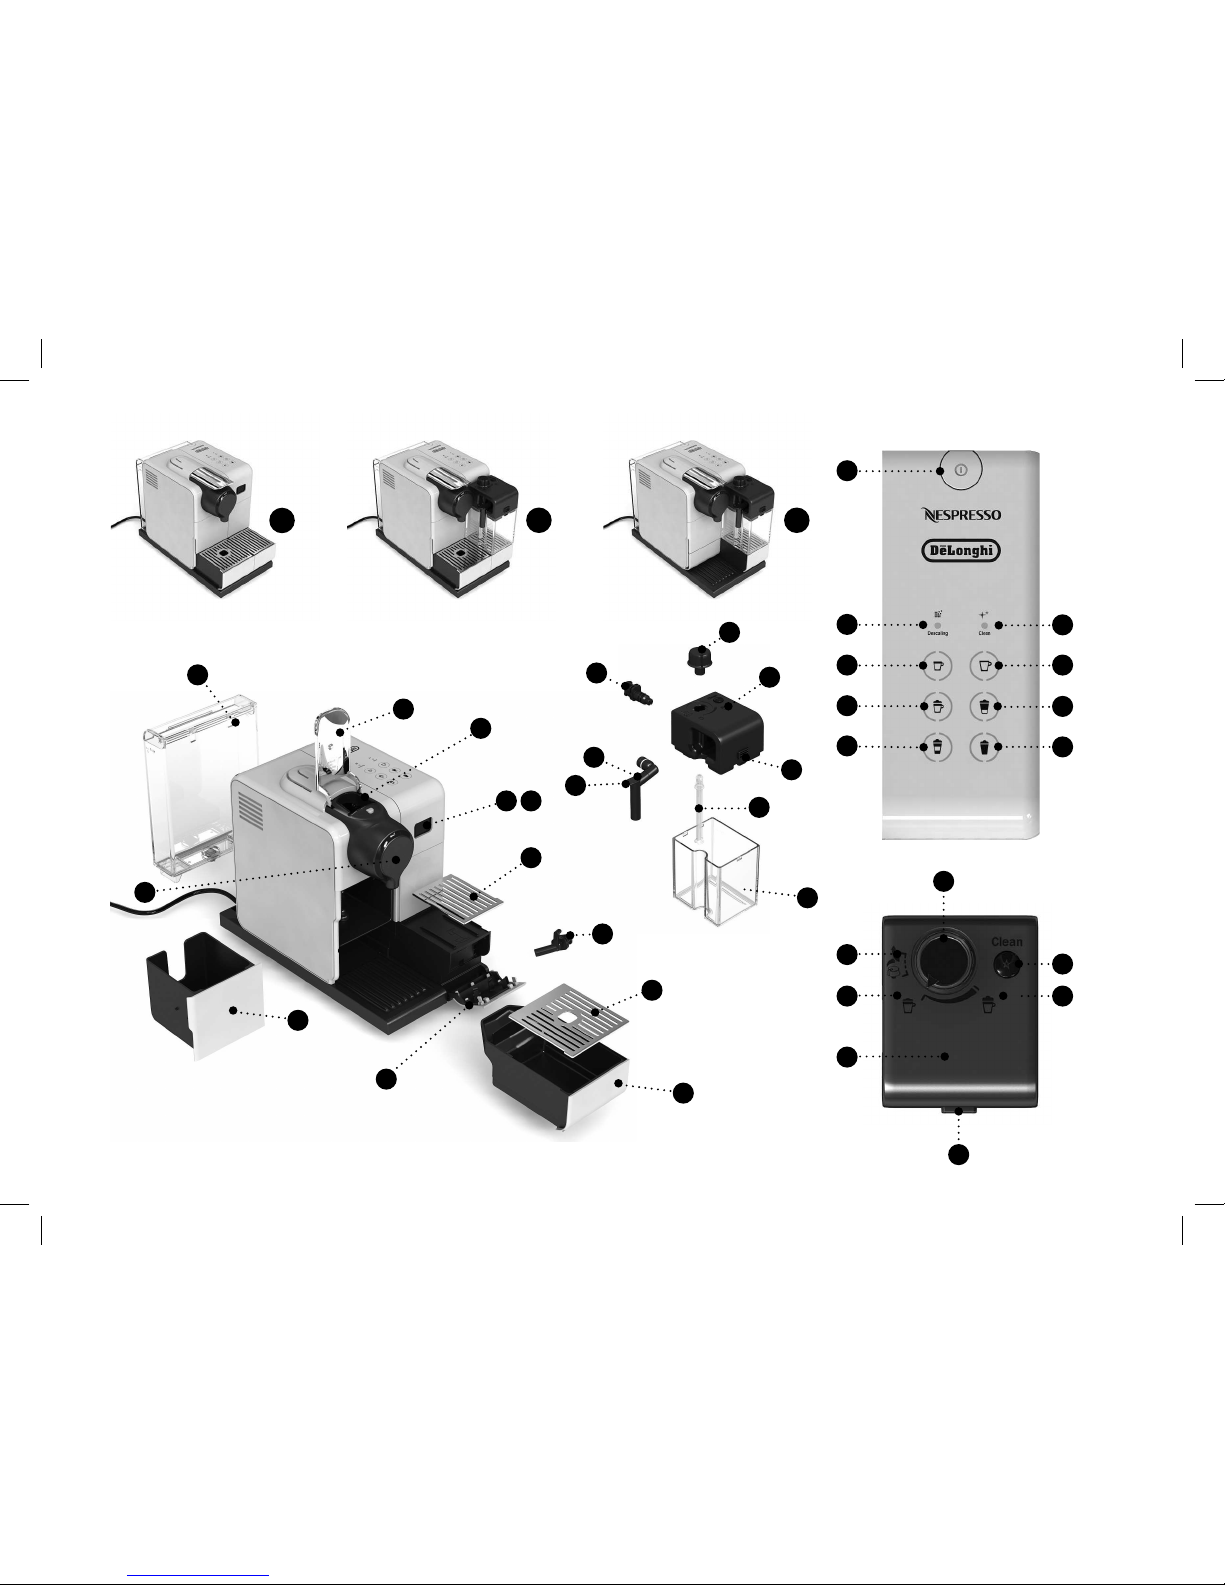
Overview of machine
Machine without Rapid Capp uccino System
Machine with Rapid Cappuccino Sys tem (for Cappuccino)
Machin e with Rapid Cappuccino System
(for Latte Macchiato and Creamy L atte)
Lever
Capsule compartment
Water tank (0.9 L)
Coee out let
Used capsule container
Drip tray (pu sh inside for Latte M acchiato glass)
Left grid
Right grid
Descaling p ipe storage door (pu ll to open)
Descaling pipe
Steam connector door
Steam connector
Tactile beverage buttons
ON/OFF button
Espress o 40 ml
Cappuccino
Latte Macchiato
Lungo 110 ml
Creamy Latt e
Warm milk froth
Alert
“Descaling”
: descaling alert ref er to section “Descaling”
“Clean”
: milk system cleaning alert ref er to section
“Preparing Cappuccino”
Rapid Cappuccino System (R.C.S.)
Lid detach button
Milk container Lid
Milk froth den sity: MIN
Position for m ilk froth regulator kno b (insertion/removal)
Milk froth regulator knob
CLEAN
: Rinsing button
Milk froth den sity: MAX
Rapid Cappuccino System connec tor
Milk spout
Milk Spout Lever
Milk aspiration tube
Milk container (0.35 L)
EN
FR
UM_LATTISSIMA_TOUCH_FACELIFT_Z2A_TER.indb 4 06.12.17 17:09
EN
FR
Nespresso is an exclusive system c reating the ultimate Es presso, time after t ime. Our Nespresso machines are equipped wit h an extract ion system that guarante es up to 19 bar pressure. Each par ameter has been calculate d with
great precisio n to ensure that all the aromas f rom each capsule can be ex tracted, to give th e coee body and create an e xceptionally thick and smoot h crema.
CONTENT
CAUTION: when you see this sign, please refer to the safety precautions to avoid possible harm and damage.
INFORMATION: when you see this sign, please take note of the advice for the correct and safe usage of your coee machine.
OVERVIEW 3
SAFETY PRECAUTIONS 6
PACKAGING CONTENT 12
FIRST USE OR AFTER A LONG PERIOD OF NONUSE
13
COFFEE PREPAR ATION 15
ASSEMBLING DISASSEMBLING OF RAPID CAPPUCCINO SYSTEM R.C.S.
15
PREPARING C APPUCCINOLATTE MACCHIATOCREAMY LATTEWARM MILK FROTH
16
PROGR AMMING COFFEE QUANTITY
19
PROGRAMMING QUANTIT Y FOR CAPPUCCINO LATTE MACCHIATO CREAMY LATTE
WARM MILK FROTH
20
DAILY CARE 21
HAND WASHING OF RAPID CAPPUCCINO SYSTEM R.C.S.
21
RESTORING QUANTITY TO FACTORY SETTINGS 22
FACTORY SETTINGS 23
DESCALING 24
WATER HARDNESS SETTING 26
EMPT YING THE SYSTEM BEFORE A PERIOD OF NONUSE, FOR FROST PROTECTION
OR BEFORE A REPAIR
27
AUTOMATIC POWER OFF 28
TROUBLESHOOTING 29
SPECIFICATIONS 30
DISPOSAL AND ECOLOGICAL CONCERNS
31
CONTACT THE NESPRESSO CL UB 31
WARRANTY 31
5
/
CONTENT
AVERTISSEMENT: lorsque ce symbole apparait, veuillez consulter les consignes de sécurité pour éviter d'éventuels dangers et dommages.
INFORMATION: lorsque ce symbole apparait, veuillez prendre connaissance du conseil pour une utilisation sûre et conforme de votre appareil.
Nespresso est un système inco mparable orant un Esp resso parfait , tasse après tasse. Toutes le s machines Nespresso sont équipées d’un sys tème d’extracti on unique à très haute pressi on (jusqu’à 19bars). Chaque
paramètre e st calculé avec précisi on pour exprimer la totalit é des arômes de chaque capsu le, donner du corps au café et lui o rir une crema* d’une densité et d’une onc tuosité exceptionne lles.
* crema: mousse d e café
/
LAVAGE À LA MAIN DU RAPID CAPPUCCINO SYSTEM R.C.S.
/ RÉTABLIR LES RÉGLAGES USINE
/ RÉGLAGES USINE
/ DÉ TARTR AGE
/ RÉGLAGE DE LA DURETÉ D'EAU
/ VIDANGE DE LA MACHINE AVANT UN TEMPS SANS
UTILISATION, POUR LA PROTECTION CONTRE LE GEL OU AVANT UNE
RÉPA RATIO N
/ ARRÊT AUTOMATIQUE
/ DÉPANNAGE
/ SPÉCIFICATIONS
/ MISE AU REBUT ET PROTECTION DE
L'ENVIRONNEMENT
/ CONTACTE Z LE CLUB NESPRESSO
/ GARANTIE
/ VUE D'ENSEMBLE
/ CONSIGNES DE SÉCURITÉ
/ CONTENU DE L‘EMBALLAGE
/ PREMIÈRE UTILISATION
OU APRÈS UNE LONGUE PÉRIODE DE NONUTILISATION
/ PRÉPARATION CAFÉ
/
MONTAGE/DÉMONTAGE DU R APID CAPPUCCINO S YSTEM R.C.S.
/
PRÉPARATION DU CAPPUCCINOLATTE MACCHIATOCRE AMY LATTEMOUSSE DE
LAIT CHAUDE
/
PROGRAMMER L A QUANTITÉ DE CAFÉ
/ PROGR AMMER LA QUANTITÉ DE CAPPUCCINOLATTE
MACCHIATOCREAMY LATTEMOUSSE DE LAIT CHAUDE
/ ENTRETIEN QUOTIDIEN
UM_LATTISSIMA_TOUCH_FACELIFT_Z2A_TER.indb 5 06.12.17 17:09
EN
SAFETY
PRECAUTIONS
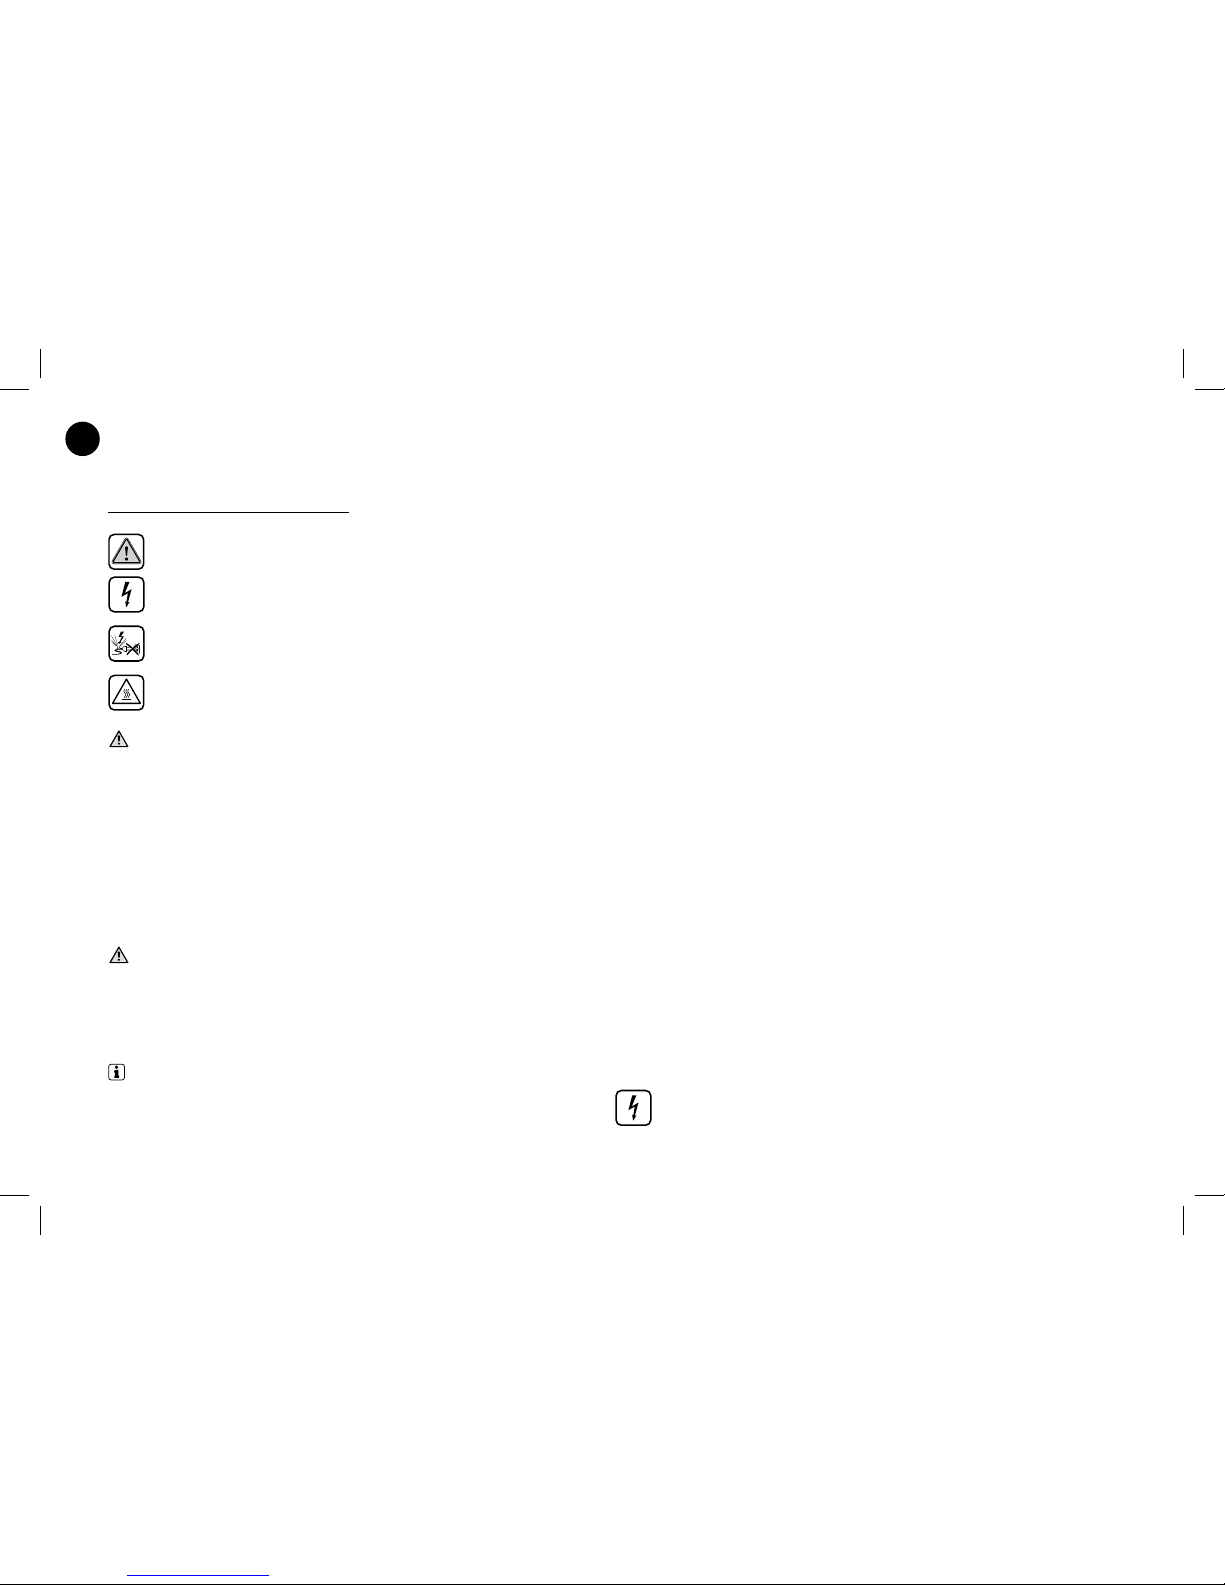
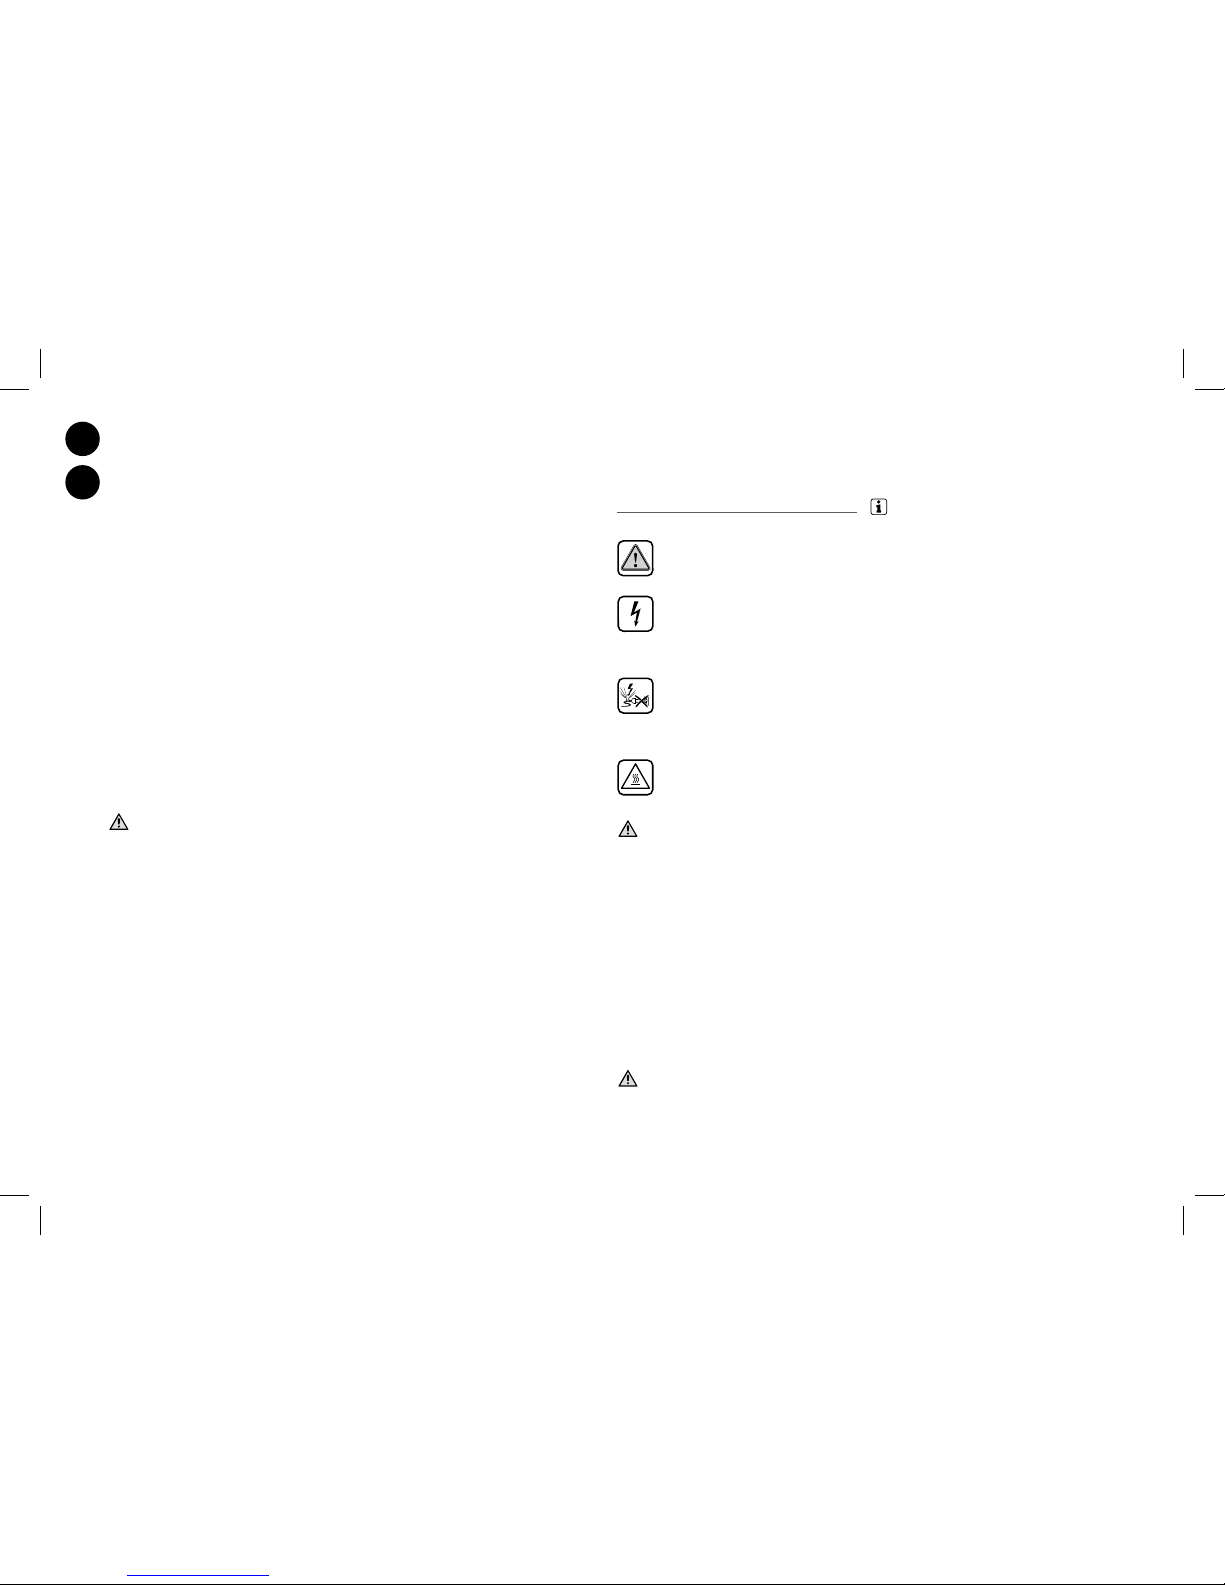
CAUTION / WARNING
ELECTRICAL DANGER
DISCONNECT DAMAGED
SUPPLY CORD
CAUTION HOT SURFACE
CAUTION: the safety
precautions are part of
the appliance. Read them
carefully before using your
new appliance for the rst
time. Keep them in a place
where you can nd and
refer to them later on.
CAUTION: when you see
this sign, please refer to the
safety precautions to avoid
possible harm and damage.
INFORMATION: when you
see this sign, please take
note of the advice for the
correct and safe usage of
your appliance.
• The appliance is intended to
prepare beverages according to
these instructions.
• Do not use the appliance for other
than its intended use.
• This appliance has been designed
for indoor and non-extreme
temperature conditions use only.
• Protect the appliance from direct
sunlight eect, prolonged water
splash and humidity.
• This is a household appliance
only. It is not intended to be
used in: sta kitchen areas in
shops, oces and other working
environments; farm houses; by
clients in hotels, motels and other
residential type environments;
bed and breakfast type
environments.
• This appliance may be used by
children of at least 8 years of age,
as long as they are supervised
and have been given instructions
about using the appliance safely
and are fully aware of the dangers
involved. Cleaning and user
maintenance shall not be made
by children unless they are older
than 8 and they are supervised by
an adult.
• Keep the appliance and its cord
out of reach of children under
8 years of age.
• This appliance may be used by
persons with reduced physical,
sensory or mental capabilities, or
whose experience or knowledge
is not sucient, provided they
are supervised or have received
instruction to use the device
safely and understand the
dangers.
• Children shall not use the device
as a toy.
• The manufacturer accepts no
responsibility and the warranty
will not apply for any commercial
use, inappropriate handling or
use of the appliance, any damage
resulting from use for other
purposes, faulty operation, nonprofessionals’ repair or failure to
comply with the instructions.
Avoid risk of fatal
electric shock and re
• In case of an emergency:
immediately remove the plug
from the power socket.
• Only plug the appliance into
suitable, easily accessible, earthed
mains connections. Make sure
that the voltage of the power
source is the same as that
specied on the rating plate. The
use of an incorrect connection
voids the warranty.
The appliance must only be
connected after installation
• Do not pull the cord over sharp
edges, clamp it or allow it to
hang down.
• Keep the cord away from heat
and damp.
• If the supply cord or the plug are
damaged, they must be replaced
by the manufacturer, its service
agent or similarly qualied
persons, in order to avoid all risks.
• If the supply cord or the plug
are damaged, do not operate
the appliance. Return the
appliance to the Nespresso Club
or to a Nespresso authorized
representative.
• To avoid hazardous damage,
6
UM_LATTISSIMA_TOUCH_FACELIFT_Z2A_TER.indb 6 06.12.17 17:09

EN
never place the appliance on
or beside hot surfaces such as
radiators, stoves, ovens, gas
burners, open ame, or similar.
• Always place it on a horizontal,
stable and even surface.
The surface must be resistant to
heat and uids, like water, coee,
descaler or similar.
• Disconnect the appliance from
the mains when not in use for
a long period. Disconnect by
turning the machine o, pulling
out the plug and not by pulling
the cord itself or the cord may
become damaged.
• Before cleaning and servicing,
remove the plug from the mains
socket and let the appliance cool
down.
• Never touch the cord with wet
hands.
• Never immerse the appliance or
part of it in water or other liquid.
• Never put the appliance or part
of it in a dishwasher, except the
Rapid Cappuccino System (R.C.S.).
• Electricity and water together is
dangerous and can lead to fatal
electrical shocks.
• Do not open the appliance.
Hazardous voltage inside!
• Do not put anything into any
openings. Doing so may cause
re or electrical shock!
• The use of accessory attachments
not recommended by the
manufacture may result in re,
electric shock or injury to persons.
Avoid possible harm when
operating the appliance
• Never leave the appliance
unattended during operation.
• Do not use the appliance if it
is damaged or not operating
perfectly. Immediately remove
the plug from the power
socket. Contact the Nespresso
Club or Nespresso authorized
representative for examination,
repair or adjustment.
•
A damaged appliance can
cause electrical shocks,
burns and re.
• Always completely close the lever
and never lift it during operation.
Scalding may occur.
• Do not put ngers under coee
outlet, risk of scalding.
• Do not put ngers into capsule
compartment or the capsule
shaft. Danger of injury!
•
Do not touch surfaces that
become hot during and
after operation and descaling:
descaling pipe and milk spout.
Use handles or knobs.
• If coee volumes higher than
150 ml are programmed: let the
machine cool down for 5 minutes
before making the next coee.
Risk of overheating!
• Water could ow around a
capsule when not perforated
by the blades and damage the
appliance.
• Never use an already used, a
damaged or deformed capsule.
• If a capsule is blocked in the
capsule compartment, turn the
machine o and unplug it before
any operation. Call the Nespresso
Club or Nespresso authorized
representative.
• Coee-maker shall not be placed
in a cabinet when in use.
•
Heating element surface is
subject to residual heat
after use.
• Fill the water tank only with fresh
and potable water.
• Empty water tank if the appliance
will not be used for an extended
time (holidays, etc.).
• Replace water in water tank when
the appliance is not operated for
a weekend or a similar period of
time.
• Do not use the appliance without
the drip tray and drip grid to
avoid spilling any liquid on
surrounding surfaces.
• Do not use any strong cleaning
agent or solvent cleaner. Use a
damp cloth and mild cleaning
agent to clean the surface of the
appliance.
• To clean machine, use only clean
cleaning tools.
• When unpacking the machine,
remove the plastic lm and
dispose.
• This appliance is designed
for Nespresso coee capsules
available exclusively through the
Nespresso Club or your Nespresso
authorized representative.
• All Nespresso appliances pass
stringent controls. Reliability tests
7
UM_LATTISSIMA_TOUCH_FACELIFT_Z2A_TER.indb 7 06.12.17 17:09
EN
FR
under practical conditions are
performed randomly on selected
units. This can show traces of any
previous use.
• Nespresso reserves the right to
change instructions without prior
notice.
Descaling
• Nespresso descaling agent, when
used correctly, helps ensure
the proper functioning of your
machine over its lifetime and
that your coee experience is as
perfect as the rst day.
CAUTION: the descaling
solution can be harmful. Avoid
contact with eyes, skin and
surfaces. Nespresso descaling agent
has been specically developed for
Nespresso machines; the use of any
other unsuitable descaling agent
may lead to machine component
damage or an insucient descaling
process. For any additional
questions you may have regarding
descaling, please contact your
Nespresso Club.
SAVE THESE
INSTRUCTIONS
Pass them on to any
subsequent user.
This instruction manual is
also available as a PDF at
nespresso.com
8
CONSIGNES DE
SÉCURITÉ
ATTENTION /
AVERTISSEMENT
DANGER
ÉLECTRIQUE
DÉBRANCHER
LE CORDON
D'ALIMENTATION
ENDOMMAGÉ
ATTENTION!
SURFACE CHAUDE
AVERTISSEMENT: les
consignes de sécurité font
partie de l’appareil. Veuillez
les lire attentivement avant
d’utiliser votre nouvel
appareil. Gardez-les dans un
endroit où vous pourrez les
retrouver et vous y référer
utlérieurement.
AVERTISSEMENT: lorsque
ce symbole apparaît,
veuillez consulter les
mesures de sécurité pour
éviter d’éventuels dangers
et dommages.
INFORMATION: lorsque ce
symbole apparaît, veuillez
prendre connaissance du
conseil pour une utilisation
sûre et conforme de votre
appareil.
• Cet appareil est destiné à préparer
des boissons conformément à ces
instructions.
• N’utilisez pas l’appareil pour
d’autres usages que ceux prévus.
• Cet appareil a été conçu
seulement pour un usage
intérieur, pour un usage dans des
conditions de températures non
extrêmes.
• Protégez votre appareil des eets
directs des rayons du soleil,
des éclaboussures d’eau et de
l’humidité.
• Cet appareil est uniquement
destiné à un usage domestique.
Il n’est pas conçu pour être utilisé
dans: les espaces cuisines des
magasins, bureaux et d’autres
environnement de travail; les
fermes; par les clients dans
UM_LATTISSIMA_TOUCH_FACELIFT_Z2A_TER.indb 8 06.12.17 17:09

FR
9
les hôtels, motels ou d’autres
environnements résidentiels;
des environnements type bed &
breakfast.
• Cet appareil peut être utilisé
par des enfants âgés d’au
moins 8 ans, à condition qu’ils
bénécient d’une surveillance
ou qu’ils aient reçu des
instructions quant à l’utilisation
de l’appareil en toute sécurité
et qu’ils comprennent bien les
dangers encourus. Le nettoyage
et l’entretien par l’utilisateur ne
doivent pas être eectués par des
enfants, à moins qu’ils ne soient
âgés de plus de 8 ans et qu’ils
soient sous la surveillance d’un
adulte.
• Conservez l’appareil et son câble
hors de portée des enfants âgés
de moins de 8 ans.
• Cet appareil peut être utilisé par
des personnes dont les capacités
physiques, sensorielles ou
mentales sont réduites ou dont
l’expérience ou les connaissances
ne sont pas susantes, à
condition qu’ils bénécient
d’une surveillance ou qu’ils aient
reçu des instructions quant à
l’utilisation de l’appareil en toute
sécurité et qu’ils comprennent
bien les dangers encourus.
• Les enfants ne doivent pas utiliser
l’appareil comme un jouet.
• Le fabricant décline toute
responsabilité et la garantie ne
s’appliquera pas en cas d’usage
commercial, d’utilisations ou de
manipulations inappropriées, de
dommages résultant d’un usage
incorrect, d’un fonctionnement
erroné, d’une réparation par un
non professionnel ou du non
respect des instructions.
Evitez les risques
d’incendie et de choc
électrique fatal
• En cas d’urgence: débranchez
immédiatement l’appareil de la
prise électrique.
• Branchez l’appareil uniquement
à des prises adaptées, facilement
accessibles et reliées à la terre.
Assurez-vous que la tension de
la source d’énergie soit la même
que celle indiquée sur la plaque
signalétique. L’utilisation d’un
branchement inadapté annule la
garantie.
L’appareil doit être
connecté uniquement après
l’installation
• Ne tirez pas le cordon
d’alimentation sur des bords
tranchants, attachez-le ou
laissez-le pendre.
• Gardez le cordon d’alimentation
loin de la chaleur et de l’humidité.
• Si le cordon d’alimentation ou
la prise sont endommagés, ils
doivent être remplacés par le
fabricant, son service après-vente
ou des personnes de même
qualication, an d’éviter tous
risques.
• Si le cordon d’alimentation ou la
prise sont endommagés, ne faites
pas fonctionner l’appareil, an
d’éviter tout danger. Retournez
votre appareil au Club Nespresso
ou à un revendeur Nespresso
agréé.
• An d’éviter de dangereux
dommages, ne placez jamais
l’appareil sur ou à côté de surfaces
chaudes telles que les radiateurs,
les cuisinières, les fours, les
brûleurs à gaz, les feux nus, ou
des sources de chaleur similaires.
• Placez-le toujours sur une surface
horizontale, stable et régulière.
La surface doit être résistante à
la chaleur et aux uides comme:
l’eau, le café, le détartrant ou
autres.
• Débranchez l’appareil de la
prise électrique lorsqu’il n’est
pas utilisé pendant une période
prolongée. Débranchez la
machine en l'éteignant et en
tirant sur la che et non sur le
cordon d’alimentation an de ne
pas l’endommager.
• Avant le nettoyage et l’entretien
de votre appareil, débranchez-le
de la prise électrique et laissez-le
refroidir.
• Ne touchez jamais le l électrique
avec des mains mouillées.
• Ne plongez jamais l’appareil, en
entier ou en partie, dans l’eau ou
dans d’autres liquides.
• Ne mettez jamais l’appareil ou
une partie de celui-ci dans un
lave-vaisselle, excepté le Rapid
Cappuccino System (R.C.S.)..
UM_LATTISSIMA_TOUCH_FACELIFT_Z2A_TER.indb 9 06.12.17 17:09

FR
10
• L’électricité et l’eau ensemble sont
dangereux et peuvent conduire à
des chocs électriques mortels.
• N’ouvrez pas l’appareil. Voltage
dangereux à l’intérieur.
• Ne mettez rien dans les
ouvertures. Cela pourrait
provoquer un incendie ou un choc
électrique!
• L’utilisation d’accessoires non
recommandés par le fabricant
peut entraîner un incendie, un
choc électrique ou des blessures.
Évitez les dommages
possibles lors de l’utilisation
de l’appareil
• Ne laissez jamais l’appareil
sans surveillance pendant son
fonctionnement.
• N’utilisez pas l’appareil s’il est
endommagé ou ne fonctionne
pas parfaitement. Débranchezle immédiatement de la prise
électrique. Contactez le Club
Nespresso ou un revendeur
Nespresso agréé, pour la
réparation ou le réglage de votre
appareil.
•
Un appareil endommagé
peut provoquer des chocs
électriques, brûlures et incendies.
• Refermez toujours bien
complètement le levier et ne
le soulevez jamais pendant le
fonctionnement, des brûlures
peuvent se produire.
• Ne mettez pas vos doigts sous
la sortie café, il y a un risque de
brûlure.
• Ne mettez pas vos doigts dans
le compartiment à capsules ou
dans le bac de récupération des
capsules. Risque de blessure!
•
Ne touchez pas les surfaces
rendues chaudes durant ou
après une préparation ou un
détartrage: l'embout de
détartrage et la buse à lait.
Utilisez les poignées ou boutons.
• Si la quantité de café
programmée excède 150 ml;
laissez la machine refroidir
pendant 5 minutes avant de
préparer un autre café. Risque de
surchaue!
• L’eau peut s’écouler autour d’une
capsule, quand celle-ci n’a pas
été perforée par les lames, et
endommager l’appareil.
• N'utilisez jamais une capsule
usagée, endommagée ou
déformée.
• Si une capsule est bloquée dans
le compartiment à capsules,
éteignez l’appareil et débranchezle avant toute opération. Appelez
le Club Nespresso ou un revendeur
Nespresso agréé.
• La machine à café ne doit pas
être placée dans un endroit clos
pendant son utilisation.
•
Après utilisation, les
surfaces chaudes peuvent
être soumises à une chaleur
résiduelle.
• Remplissez
toujours le réservoir avec de l'eau
potable et fraîche.
• Videz le réservoir d’eau si
l’appareil n’est pas utilisé pendant
une durée prolongée (vacances
etc...).
• Remplacez l’eau du réservoir
d’eau quand l’appareil n’est pas
utilisé pendant un week-end ou
une période de temps similaire.
• N’utilisez pas l’appareil sans le
bac d’égouttage et sa grille an
d’éviter de renverser du liquide
sur les surfaces environnantes.
• Ne nettoyez jamais votre appareil
avec un produit d’entretien ou
un solvant. Utilisez un chion
humide et un détergent doux
pour nettoyer la surface de
l’appareil.
• Pour nettoyer la machine, utilisez
seulement des chions propres.
• Lors du déballage de l'appareil,
retirez le lm plastique et jetez le.
• Cet appareil est conçu pour
des capsules de café Nespresso
disponibles exclusivement via le
Club Nespresso ou votre revendeur
Nespresso agréé.
• Tous les appareils Nespresso sont
soumis à des contrôles sévères.
Des tests de abilité, dans des
conditions réelles d’utilisation, sont
eectués au hasard sur des unités
sélectionnées. Certains appareils
peuvent donc montrer des traces
d’une utilisation antérieure.
• Nespresso se réserve le droit de
modier sans préavis la notice
d’utilisation.
UM_LATTISSIMA_TOUCH_FACELIFT_Z2A_TER.indb 10 06.12.17 17:09

FR
11
Détartrage
• Lorsqu’il est utilisé correctement,
le détartrant Nespresso, permet
d’assurer le bon fonctionnement
de votre appareil tout au long
de sa vie et vous permet de
maintenir une expérience café
aussi parfaite qu’au premier jour.
AVERTISSEMENT: la
solution de détartrage peut être
nocive. Évitez le contact avec les
yeux, la peau et les surfaces. Le
produit de détartrage Nespresso
est spécialement conçu pour les
machines Nespresso; l’utilisation
de tout autre produit risquerait
d’endommager les composants
de la machine ou de ne pas la
détartrer susamment. Pour
toute autre question relative au
détartrage, veuillez contacter le
Nespresso Club.
CONSERVEZ LES
INSTRUCTIONS
SUIVANTES
Transmettez-les aux
utilisateurs ultérieurs.
Ce manuel d’instruction
est également disponible
en version PDF sur
nespresso.com
UM_LATTISSIMA_TOUCH_FACELIFT_Z2A_TER.indb 11 06.12.17 17:09

4°
4°
1
2
3
4
EN
PTIT HU
FR
CZESDE
SPECIAL CARE FOR YOUR RAPID
CAPPUCCINO SYSTEM R.C.S.
IMPORTANT: refer
to User manual for
complete instructions.
1- For a perfect milk froth, use skimmed
or semi-skimmed milk at refrigerator
temperature (about 4° C).
2- Rinse after each milk based preparation.
Place a recipient under milk outlet, press
and hold the «CLEAN»
button until
machine stops pumping automatically
(approx. 15 sec.).
Machine starts rinsing, stops automatically
( ~15sec.).
3- Place the milk container in the fridge
immediately.
4- Every two days, disassemble the
Rapid Cappuccino System and clean
all components in the upper level of a
dishwasher.
Welcome
EN
FR
PACKAGING CONTENT
Coee machine User manual Care of Rapid Cappuccino System leaet Nespresso capsule tasting gi ft " Welcome to Nespresso folder"
EN
FR
12
Coret de dé gustation
de capsules Nespresso
Machine à café Pochett e de bienvenue NespressoMode d’emploi
/CONTENU DE L‘EMBALLAGE
Instruc tion pour l'entretien du
Rapid Cappuccino System
UM_LATTISSIMA_TOUCH_FACELIFT_Z2A_TER.indb 12 06.12.17 17:09
EN
FR
FIRST USE OR AFTER A LONG PERIOD OF NONUSE
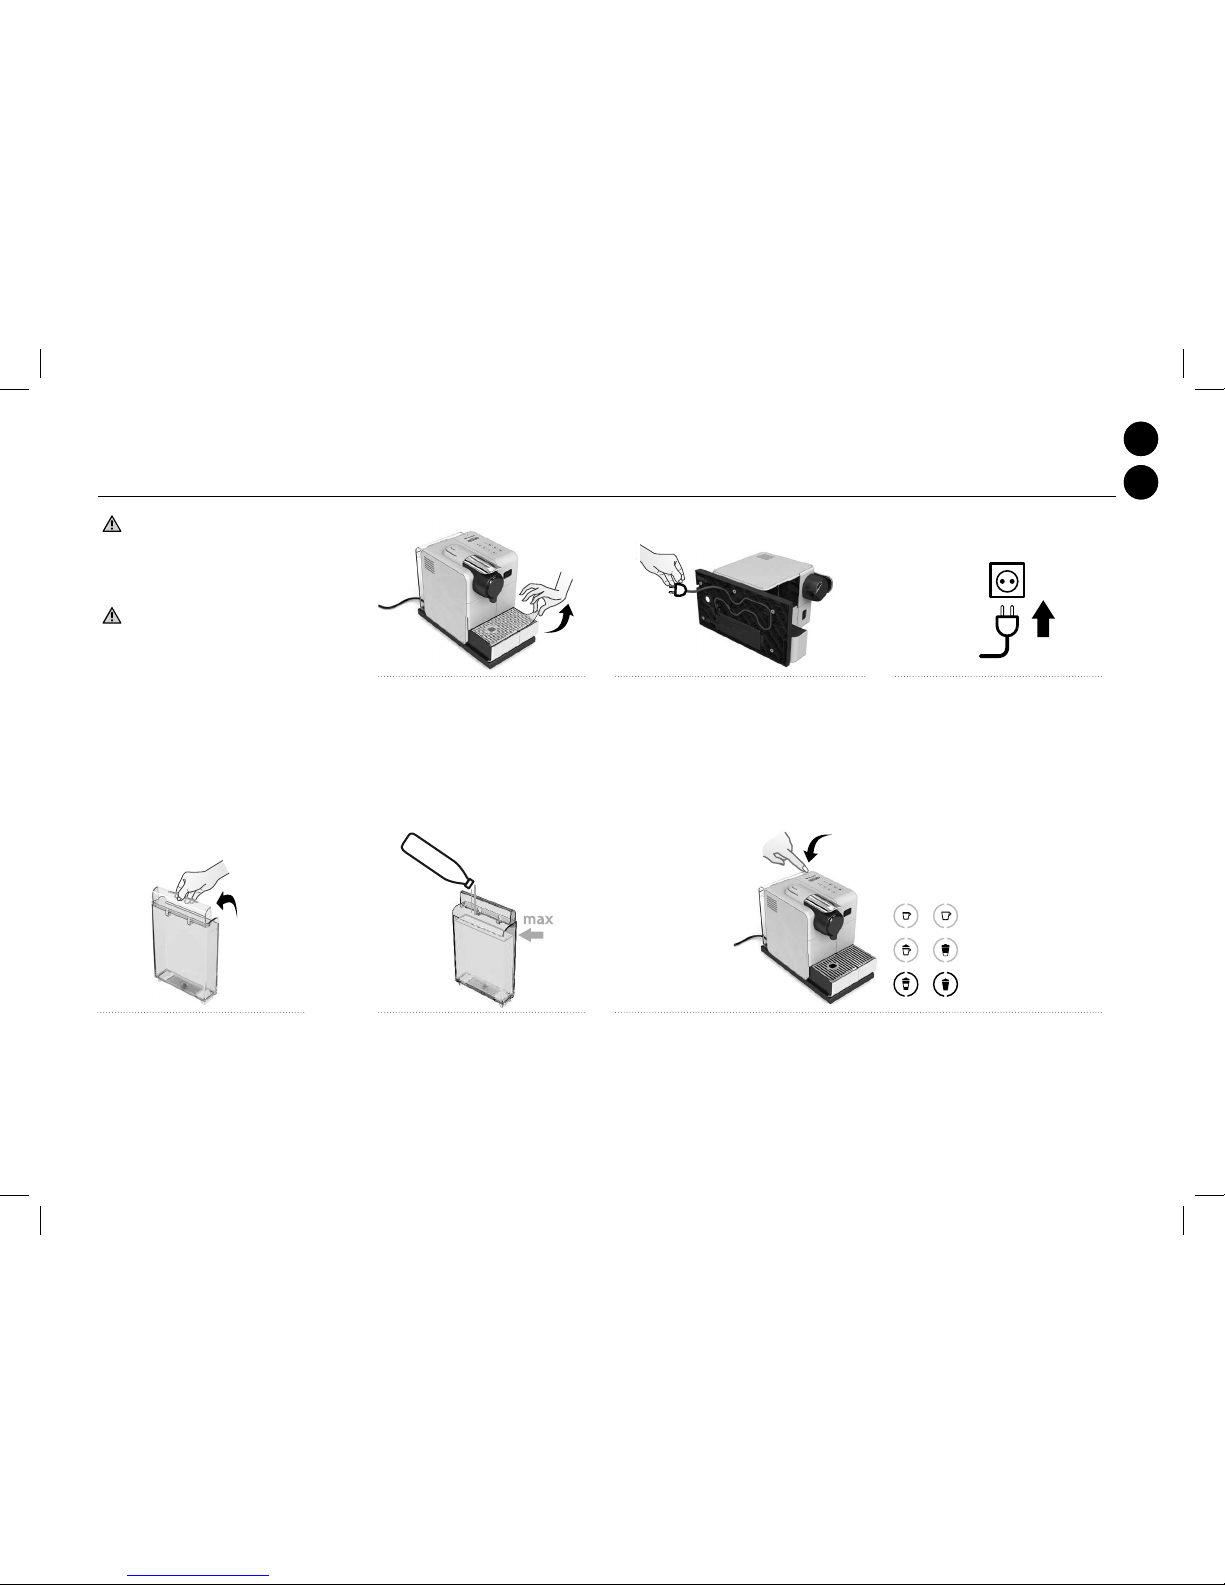
CAUTION: rst read the safety
precautions to avoid risks of fatal
electrical shock and re.
1. W hen unpacking the machine, rem ove
the plastic lm and dispose from both le ft
grid and right gr id, and machine panels.
2. Remove the wa ter tank, drip tray, and capsule
container. Adjust th e cable length and store th e
excess in the c able guide under the machine.
3. Put t he machine in upright positi on,
plug machine into mains.
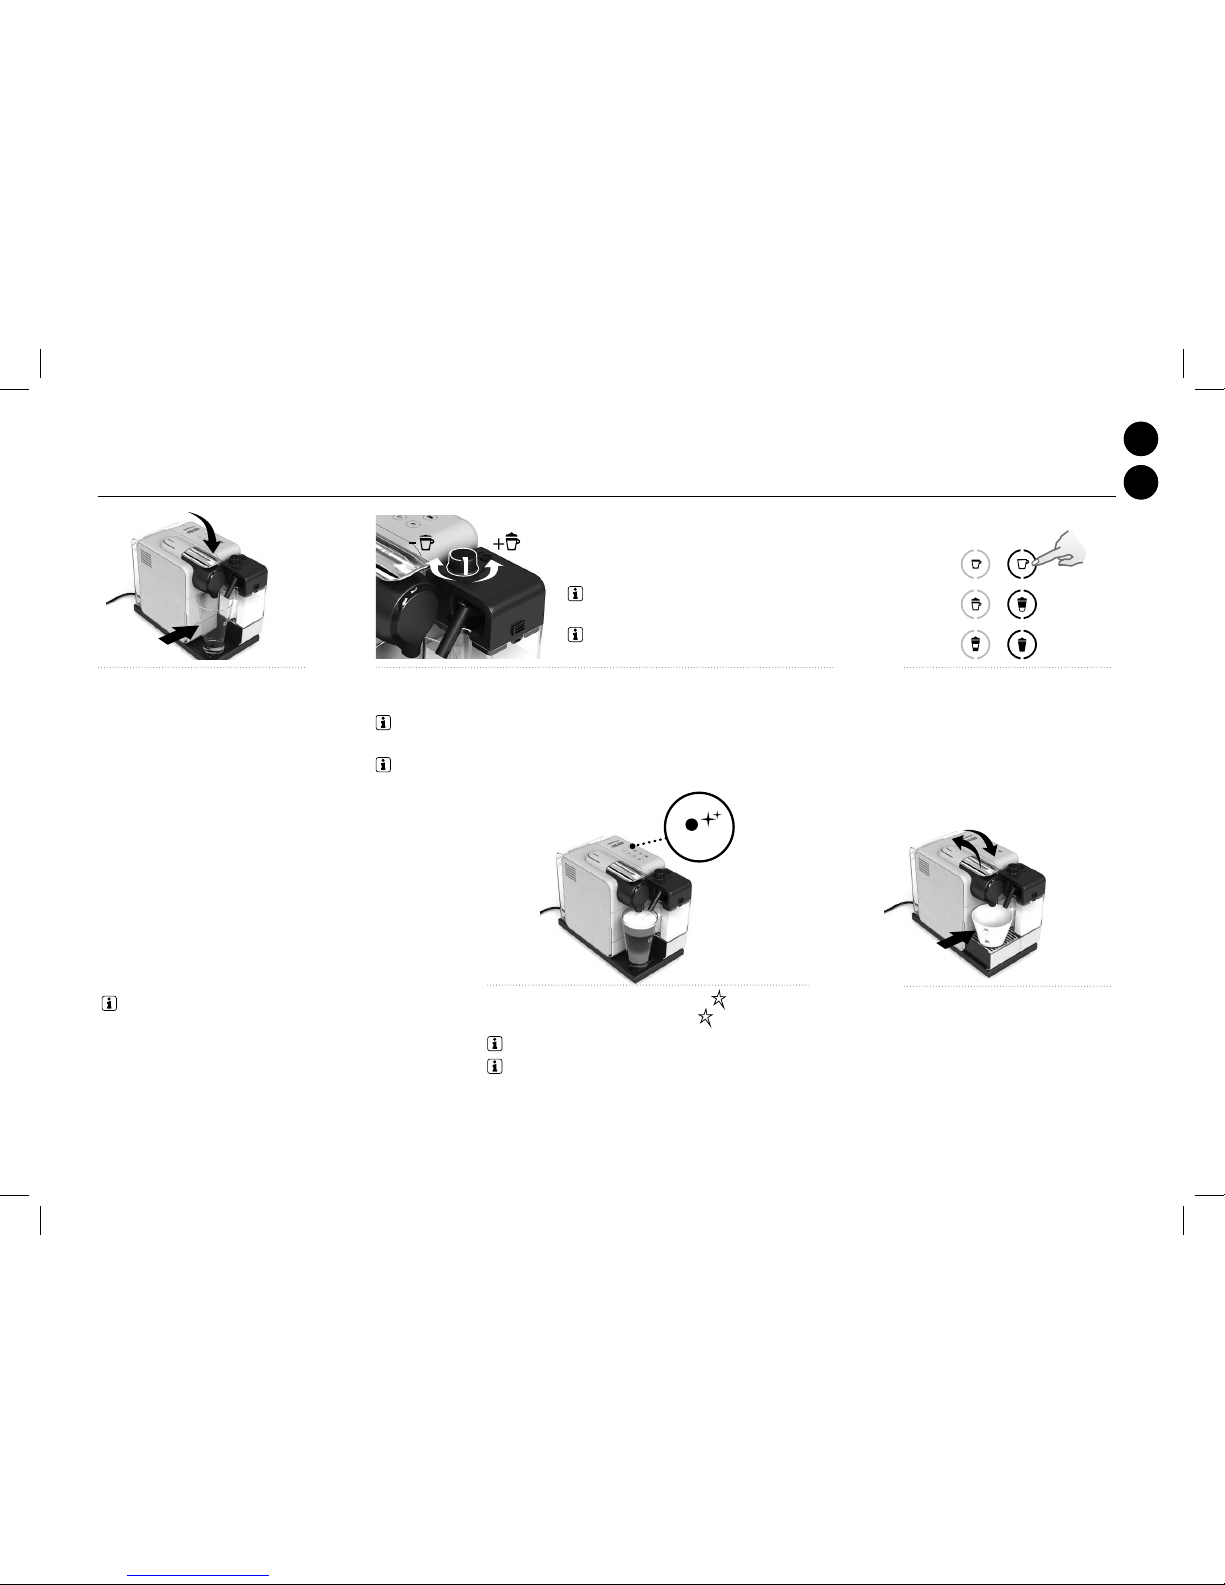
4. The water ta nk can be carried by
its cover.
5. Rins e the water tank before lling w ith
potable water up to maximum level.
6. Switch the mac hine on. For the rst 2 se conds, the automatic power o an d water hardness setti ng
are indicated w ith steady light.
EN
FR
13
PREMIÈRE UTILISATION OU APRÈS UNE LONGUE PÉRIODE DE NONUTILISATION
AVERTISSEMENT: commencez
par lire les consignes de sécurité
pour éviter les risques de décharges
électriques mortelles et d‘incendie.
1. Quand vous d éballez la machine, retirer
le lm plastique d es grilles d'égouttag e
gauche et droit e et des panneaux de la
machine.
6. Allumez la machine. Pen dant les 2 premières second es les touches lumineuse s indiquent les règlages
enregistr és pour l'arrêt automatique et la d ureté d'eau.
3. Placez la machine e n position vertical e,
branchez- la à la prise électrique .
2. Retirez le re servoir d'eau, le bac d'égoutt age et
le bac à capsule s usagées. Réglez la lo ngueur du
câble en utilis ant le logement prévu à cet e et sous
la machine.
4. Le réserv oir d'eau peut êtr e porté par son
couvercle.
5. Rincez le rés ervoir d'eau avant de le
remplir d'eau potable jusqu'au niveau
maximum.
UM_LATTISSIMA_TOUCH_FACELIFT_Z2A_TER.indb 13 06.12.17 17:09
25 sec.
x3
Descaling
Clean
Descaling
Clean
Descaling
Clean
Descaling
Clean
EN
FR
FIRST USE OR AFTER A LONG PERIOD OF NONUSE
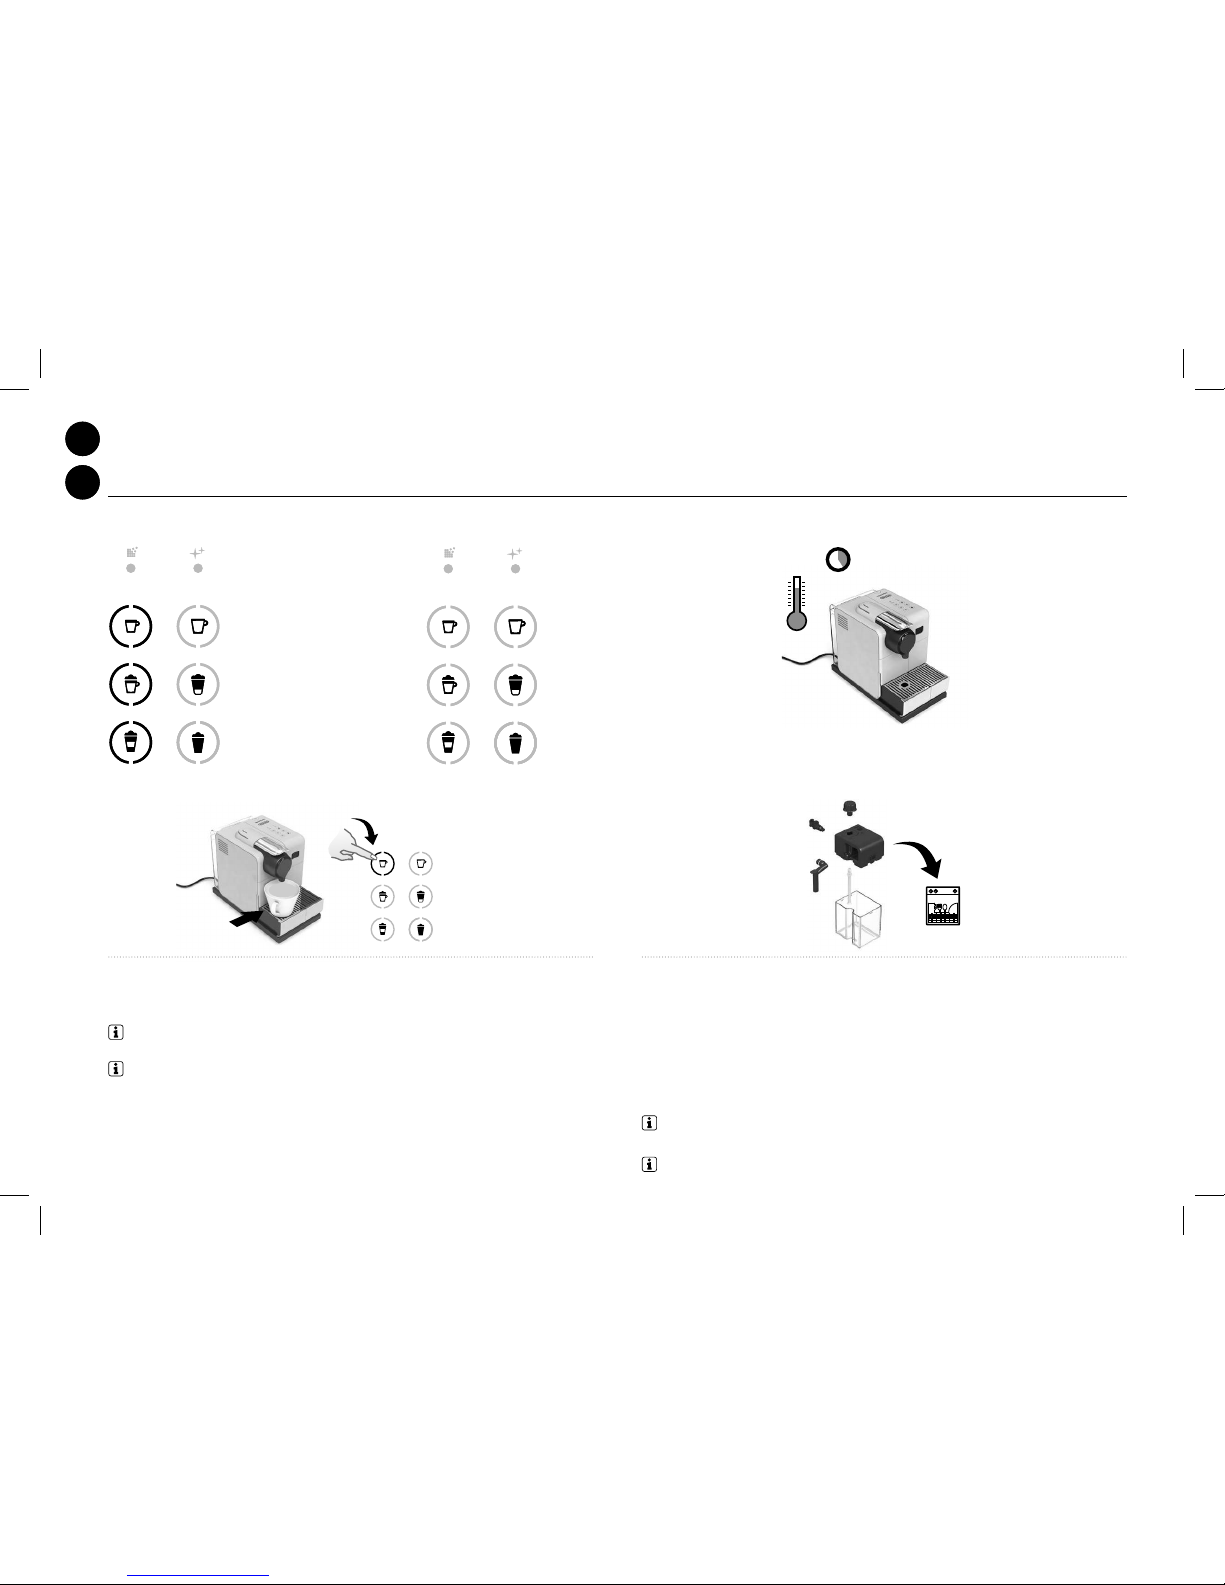
How to read au tomatic power o and wa ter hardness set tings:/
Automati c power o, refer
to page 28
– Espresso for 8 h
– Cappuccino for 30 min
– Latte Macchiato 9 min
Water hardn ess settings,
refer to p age 26
– Lungo: level 0
– Creamy Latt e: level 1
– Warm milk froth: leve l 2
– Warm milk froth + Lun go: level 3
– Warm milk froth + Cr eamy Latte: level 4
After the rst 2 seconds,
the machine heat s up for
approximately 2 5 seconds
(blinking light s). Machine ready is
indicated by steady lights.
7. Rinsing: place a container under co ee outlet and press th e lungo button. Repeat thre e times.
INFORMATION: machines are fully t ested after bein g produced. Some trace s of coee
powder could be found in rinsing water.
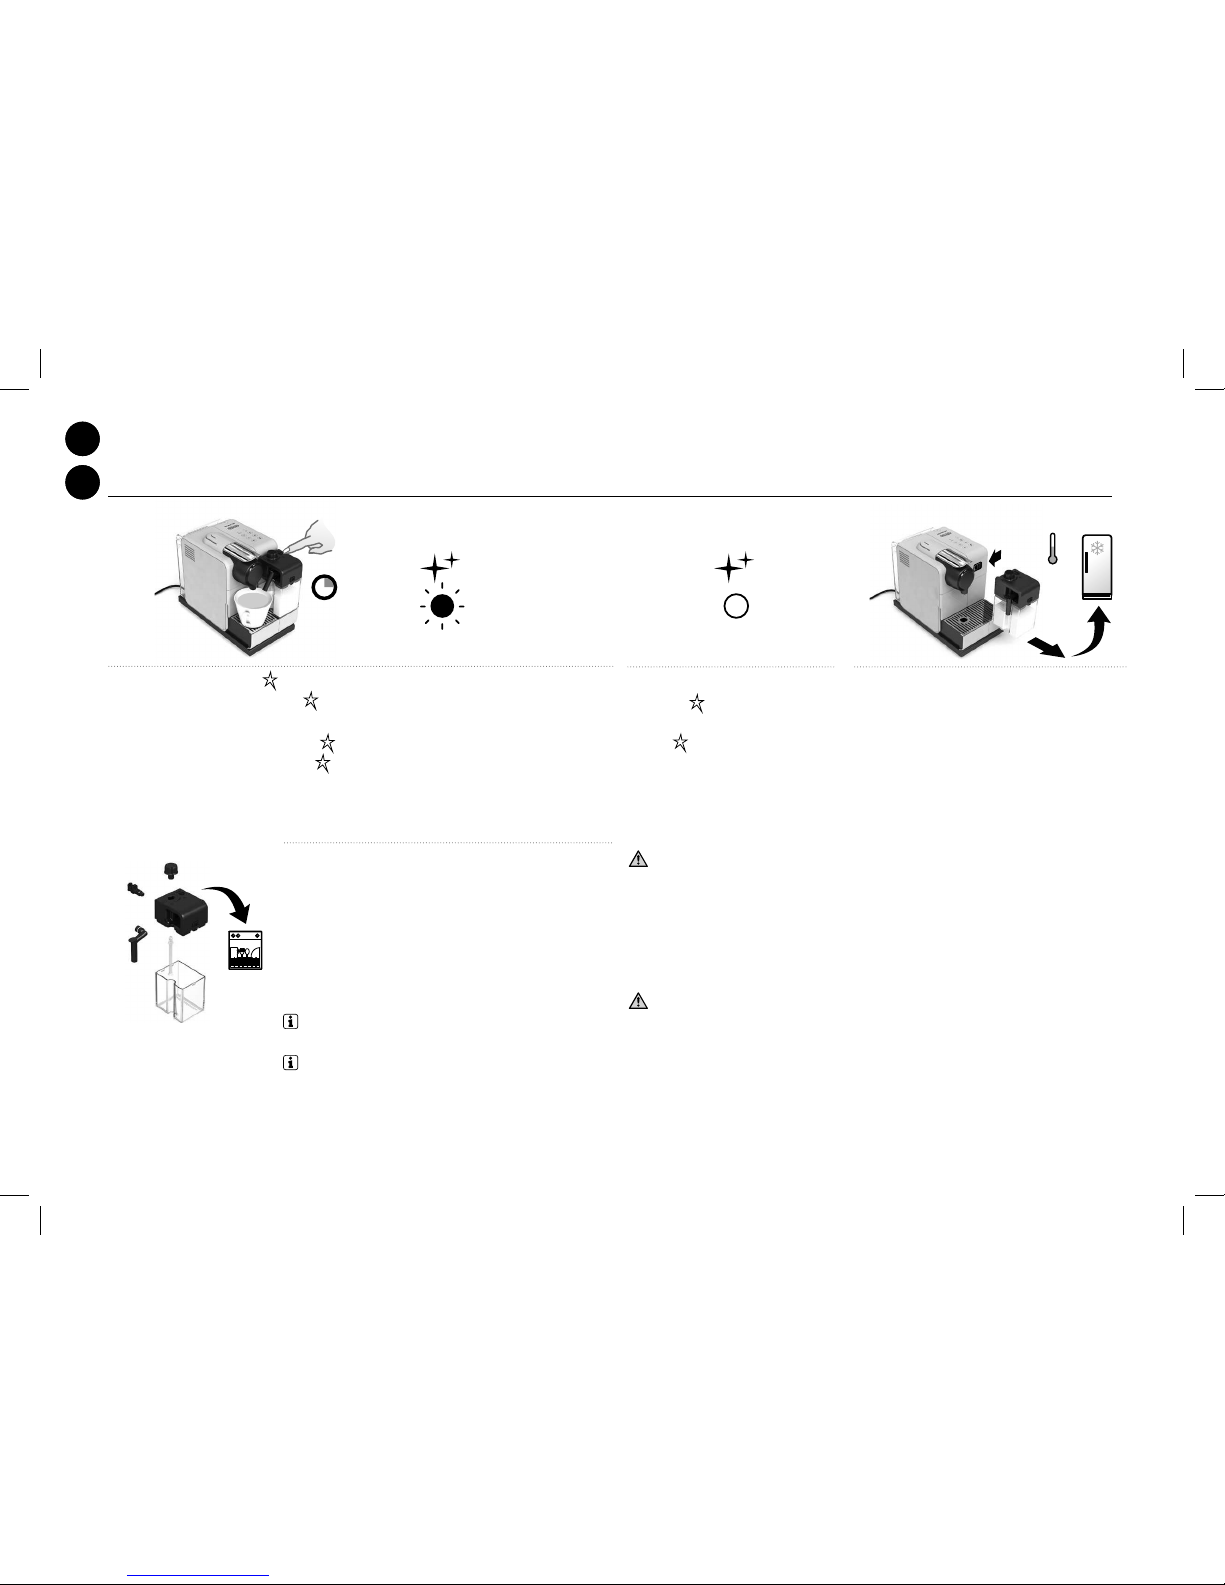
8. Disass emble the Rapid Cappuccino Sys tem (R.C.S.) and clean all 6 component s in the upper level of
your dishwasher. In cas e a dishwater is not available, refer to th e "Hand Washing of Rapid Cappuccino
System (R.C.S.)" sec tion. After reassembl e and re-attach the R.C. S. to the machine, use the "Clean"
button before preparing milk beverage.
INFORMATION: refer to "Assembling/Disassembling of Rapid Cappuccino System" section
(refer to page 15).
EN
FR
14
PREMIÈRE UTILISATION OU APRÈS UNE LONGUE PÉRIODE DE NONUTILISATION
8. Démonter les 6 piè ces du Rapid Cappuccino Sys tem (R.C.S.) et placer tous les élément s dans le tiroir
supérieur du lave -vaisselle. Si vous ne dispos ez pas d'un lave-vaisselle, se réfé rer à la section lavage à
la main du Rapid Capp uccino System (R.C.S.). Après avoir remonté le R .C.S. et l'avoir reconnecté à la
machine, utilis ez le bouton "Clean" avant toute prépar ation à base de lait.
INFORMATION:voir section Montage/Démontage du Rapid Cappuccino System, à la page 15.
7. Rinçage: place z un récipient sous la sor tie café et appuyez sur la to uche Lungo. Répétez troi s fois
cette opér ation.
INFORMATION:toutes nos machines so nt entièrement testées a près avoir été fabriquée s. Des
traces de pou dre de café peuvent être v isibles dans l'eau de rinçage.
Réglage de l 'arrêt
automatique, voir page 28
/Espress o pour 8 h
/
Cappuccino po ur 30 min
/
Latte Macchiato pour 9 min
Comment connaître les réglages enregistés pour l'arrêt automatique et la dureté d'eau:
Réglage de l a dureté de l'eau,
voir page 26
Lungo: niveau 0
/ Creamy Latte: niveau 1
/
Lait chaud: niveau 2
/
Lait chaud + Lung o: niveau 3
/
Lait chaud + Crea my Latte: niveau 4
Après les 2 prem ières secondes, la
machine chaue pendant environ
25 secondes (touches clignotantes).
La machine es t prête lorsque la
lumière des touc hes est xe.
UM_LATTISSIMA_TOUCH_FACELIFT_Z2A_TER.indb 14 06.12.17 17:09

110 ml40 ml
EN
FR
COFFEE PREPARATION
NOTE: during heat u p, you can press any coee bu ttons. The coee wi ll then ow automaticall y when the machine is ready.
1. L ift the lever complete ly and insert the
capsule.
2. Close th e lever and place a cup under the
coee outlet.
3. Press the Espresso (4 0 ml) or the Lungo (110 ml) button. Preparatio n
will stop automa tically. To stop the coee ow or top up yo ur coee, press
again.
4. Take the cup. Lif t and close the lever
to eject th e capsule into the used caps ule
con taine r.
ASSEMBLING DISASSEMBLING OF RAPID CAPPUCCINO SYSTEM R.C.S.
1. R emove the milk container lid and
unplug milk aspiration tube.
2. Remove the milk f roth regulator knob by
turning it unt il
and pulling it up.
3. Remove R apid Cappuccino System conne ctor by
unlocking it f rom
to and pulling it o.
4. Remove the milk s pout by pulling it o.
EN
FR
15
/
PRÉPARATION CAFÉ
MONTAGE/DÉMONTAGE DU RAPID CAPPUCCINO SYSTEM R.C.S.
1. Levez le lev ier complètement et insérez
la capsule.
2. Fermez le lev ier et placez une tasse sous
la sortie c afé.
3. Appuyez la tou che Espresso (40 ml) o u Lungo (110 ml). La préparatio n
s'arrêtera automatiquement. Pour arrêter l'écoulement de votre café ou pour
rallonger votre c afé, appuyez à nouveau .
4. Prenez la tass e. Levez et fermez le
levier pour éje cter la capsule dans le bac à
capsules usagées.
1. Retire z le couvercle du réservoir à lai t et
retirez le tu yau d'aspiration de lait.
4. Retirez la bus e à lait en la tirant.
2. Retirez le bou ton de réglage de mousse
en le tournant jusqu'à
et tirez-le.
3. Retirez le co nnecteur du Rapid Capp uccino
System en le déver rouillant de
à et le tir ant
ensuite.
NOTE: dur ant le chauage de la mach ine, vous pouvez appuyer su r n'impor te quelle touche café. Le c afé s'écoulera automatiq uement dès que la machine s era prête.
UM_LATTISSIMA_TOUCH_FACELIFT_Z2A_TER.indb 15 06.12.17 17:09
4 ° C
15 sec.
EN
FR
PREPARING CAPPUCCINOLATTE MACCHIATOCREAMY LATTEWARM MILK FROTH
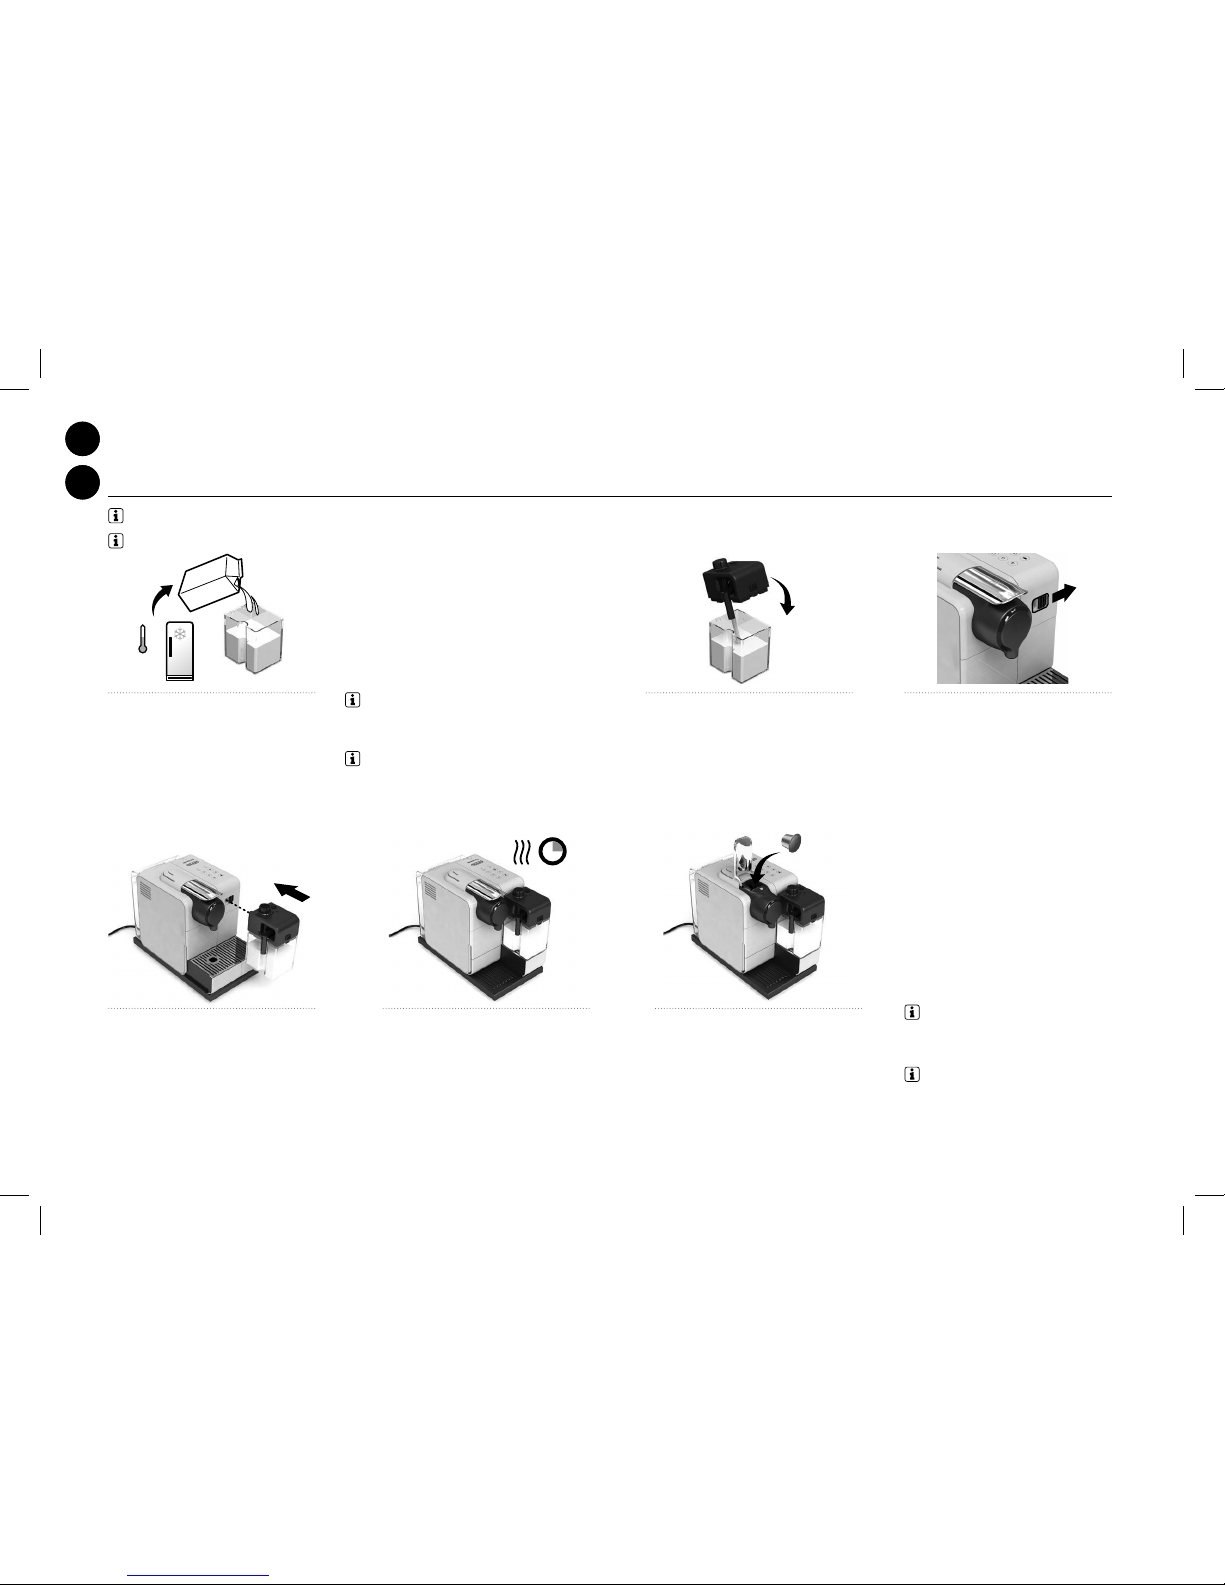
INFORMATION: for a perfect milk froth, use skimmed or semi-skimmed milk at refrigerator temperature (about 4° C).
1. F ill the milk container with desi red
quantity of milk.
INFORMATION: when the milk container is
empty, befo re relling, thorough ly rinse it and the
milk aspirat ion tube with potabl e water.
2. Close the m ilk container. 3. Ope n the steam connector do or by
sliding it to the ri ght.
4. Connec t the Rapid Cappuccino Syst em
to the machine.
5. Machi ne heats up for approximatel y
15 seconds (blinking lights).
6. Lif t the lever completely and inser t the
capsule.
INFORMATION: only for Cappuccin o,
Latte Macchiato and Creamy Latte. Skip t his
step when preparing Warm milk froth only.
EN
FR
16
PRÉPARATION DU CAPPUCCINOLATTE MACCHIATOCREAMY LATTEMOUSSE DE LAIT CHAUDE
1. Rempliss ez le réservoir à lait avec la
quantité de lait souhaité.
2. Fermez le ré servoir à lait.
3. Ouvrez le vo let du connecteur vapeu r en
le faisant couli sser vers la droite.
4. Connectez le Rapid Cappu ccino System
à la machine.
5. La machine chaue pendant
approximative ment 15 sec. (les touches
lumineuses c lignotent).
6. Levez le levier com plètement et insérez
la capsule.
INFORMATION: pour une mousse parfaite, utilisez du lait écrémé ou demi-écrémé à température du réfrigérateur (environ 4° C).
INFORMATION: lorsque le réser voir de lait est vide,
avant de le remp lir, rincez le abondamment ave c de
l'eau potable ain si que le tuyau d'aspirati on de lait.
INFORMATION: seulement en cas de
préparation de Cappuccino, Latte Macchiato
et Creamy Latte. Ignorez c ette étape en ca s
de préparation de mousse de lait chaude.
UM_LATTISSIMA_TOUCH_FACELIFT_Z2A_TER.indb 16 06.12.17 17:09
Clean
EN
FR
PREPARING CAPPUCCINOLATTE MACCHIATOCREAMY LATTEWARM MILK FROTH
7. Close the lever, place a Cap puccino cup
or a Latte Ma cchiato glass under the coee
outlet and adju st milk spout position by
lifting i t up to the right level.
8. Adjust th e milk froth regulator knob accor ding to the volume of froth you wan t.
INFORMATION: recommended settings:
Cappuccino min/Macchiato max/Creamy Latte min.
NOTE: do not overt urn the milk froth regulator. Ove rturned positi on is for inserting/
removing dial for cleaning.
9. P ress the Cappuccino, Macchiato,
Creamy Latt e or Warm milk froth button.
10. At the end of the prepar ation, the "CLEAN" shines orange.
INFORMATION: rinse the milk sys tem after each use.
11. Lif t and close the lever to eje ct the
capsule into the used capsule contain er.
Place a container und er milk spout.
EN
FR
17
PRÉPARATION DU CAPPUCCINOLATTE MACCHIATOCREAMY LATTEMOUSSE DE LAIT CHAUDE
INFORMATION: rincez le sy stème à lait après ch aque
utilisation.
INFORMATION: Réglages recommandés:
Cappuccino min./Macchiato max/Creamy Latte min.
10. A la n de la prépa ration la touche Clean
s'illumine en orang e.
11. Leve z et fermez le levier pour éj ecter
la capsule dans le ba c à capsules usagées.
Placez un récipi ent sous la buse à lait.
7. F ermez le levier et placez une t asse
Cappuccino ou un v erre à Latte Macchiato
sous la sor tie café et ajuster la posi tion de
la buse de lait.
8. Ajustez le bou ton de réglage de la mousse de lai t au volume de mousse souhaité.
NOTE: ne tournez pas com plètement le bouton d e réglage. Cette po sition sert à ret irer le
bouton pour le nettoyage.
9. Presser la touche Capp uccino, Macchiato,
Creamy Latt e ou mousse de lait chaude.
INFORMATION: pour le Cappuccino, le L atte Macchiato
et Creamy Latte, l'écoulement commence après quelques
secondes et s'arrêtera automatiquement. Pour la mousse de
lait chaude, se ulement de la mousse de lai t coulera.
UM_LATTISSIMA_TOUCH_FACELIFT_Z2A_TER.indb 17 06.12.17 17:09
16 sec.
4° C
Clean Clean
EN
FR
12. Press and h old the "CLEAN" button until machine stops pumping automat ically. Rinsing process
lasts appr oximately 16 seconds. "CLEAN"
blinks. Milk s ystem rinsing process s tarts and hot water
combined wit h steam ows through the milk sp out.
13. When the r insing process is nished,
the "CLEAN"
alert is res umed.
14. Disconnec t the R.C.S. from machine an d place it
immediately in the refriger ator. Close the machine steam
connector door.
15. After ea ch use, disassemble the R apid Cappuccino System, and
clean all component s in the upper side of your dishwa sher. In case a
dishwasher is not ava ilable, refer to sectio n Hand washing of Rapid
Cappuccino System (R.C.S.).
INFORMATION: refer to section "Assembling/
Disassembling of Rapid Cappuccino system (R.C.S.)".
CAUTION: this milk should not be kept for more than 2 days
in the refrigerator. In the case the milk container is kept outside
refrigerator for longer than 2 hours, disassemble the R.C.S. and
clean all components (refer to dishwashing or hand washing
recommendations).
PREPARING CAPPUCCINOLATTE MACCHIATOCREAMY LATTEWARM MILK FROTH
EN
FR
18
12. Pr essez et maintenez la touch e «CLEAN» jusqu'à ce que la machine s'arrête automatiquement. Le
rinçage dure e nviron 16 secondes. «CLEA N»
clignote. Le rinç age du système lait commence, de l'eau
chaude et de la vap eur s'écoulent par la b use à lait.
13. Lorsqu e le rinçage est terminé, l'alerte
«CLEAN»
s'éteint.
14. Déco nnectez le R.C.S. de la mach ine et placez-le
immédiatement da ns le réfrigérateur. Ferme z la porte
d'accès au connecte ur vapeur.
INFORMATION: référez-vous à la section «Montage/
Démontage du Rapid Cappuccino System (R.C.S.)».
AVERTISSEMENT: le lait ne doit pas être conservé plus de 2
jours dans le réfrigérateur. Si le réservoir à lait est conservé en dehors
du réfrigérateur pendant plus de 2 heures, démontez le R.C.S. et
nettoyez tous les composants (voir les recommandations de lavage au
lave-vaisselle et lavage à la main).
15. Aprè s chaque utilisation, démo ntez le Rapid Capuccino System,
et lavez tous les co mposants dans le panier sup érieur de votre lavevaisselle. Si vous n e disposez pas d'un lave-vaiss elle, référez-vous à la
sectio n Lavage à la main du Rapid Capuccino Sy stem (R.C.S.).
PRÉPARATION DU CAPPUCCINOLATTE MACCHIATOCREAMY LATTEMOUSSE DE LAIT CHAUDE
UM_LATTISSIMA_TOUCH_FACELIFT_Z2A_TER.indb 18 06.12.17 17:09
3 sec.
EN
FR
PROGRAMMING COFFEE QUANTITY
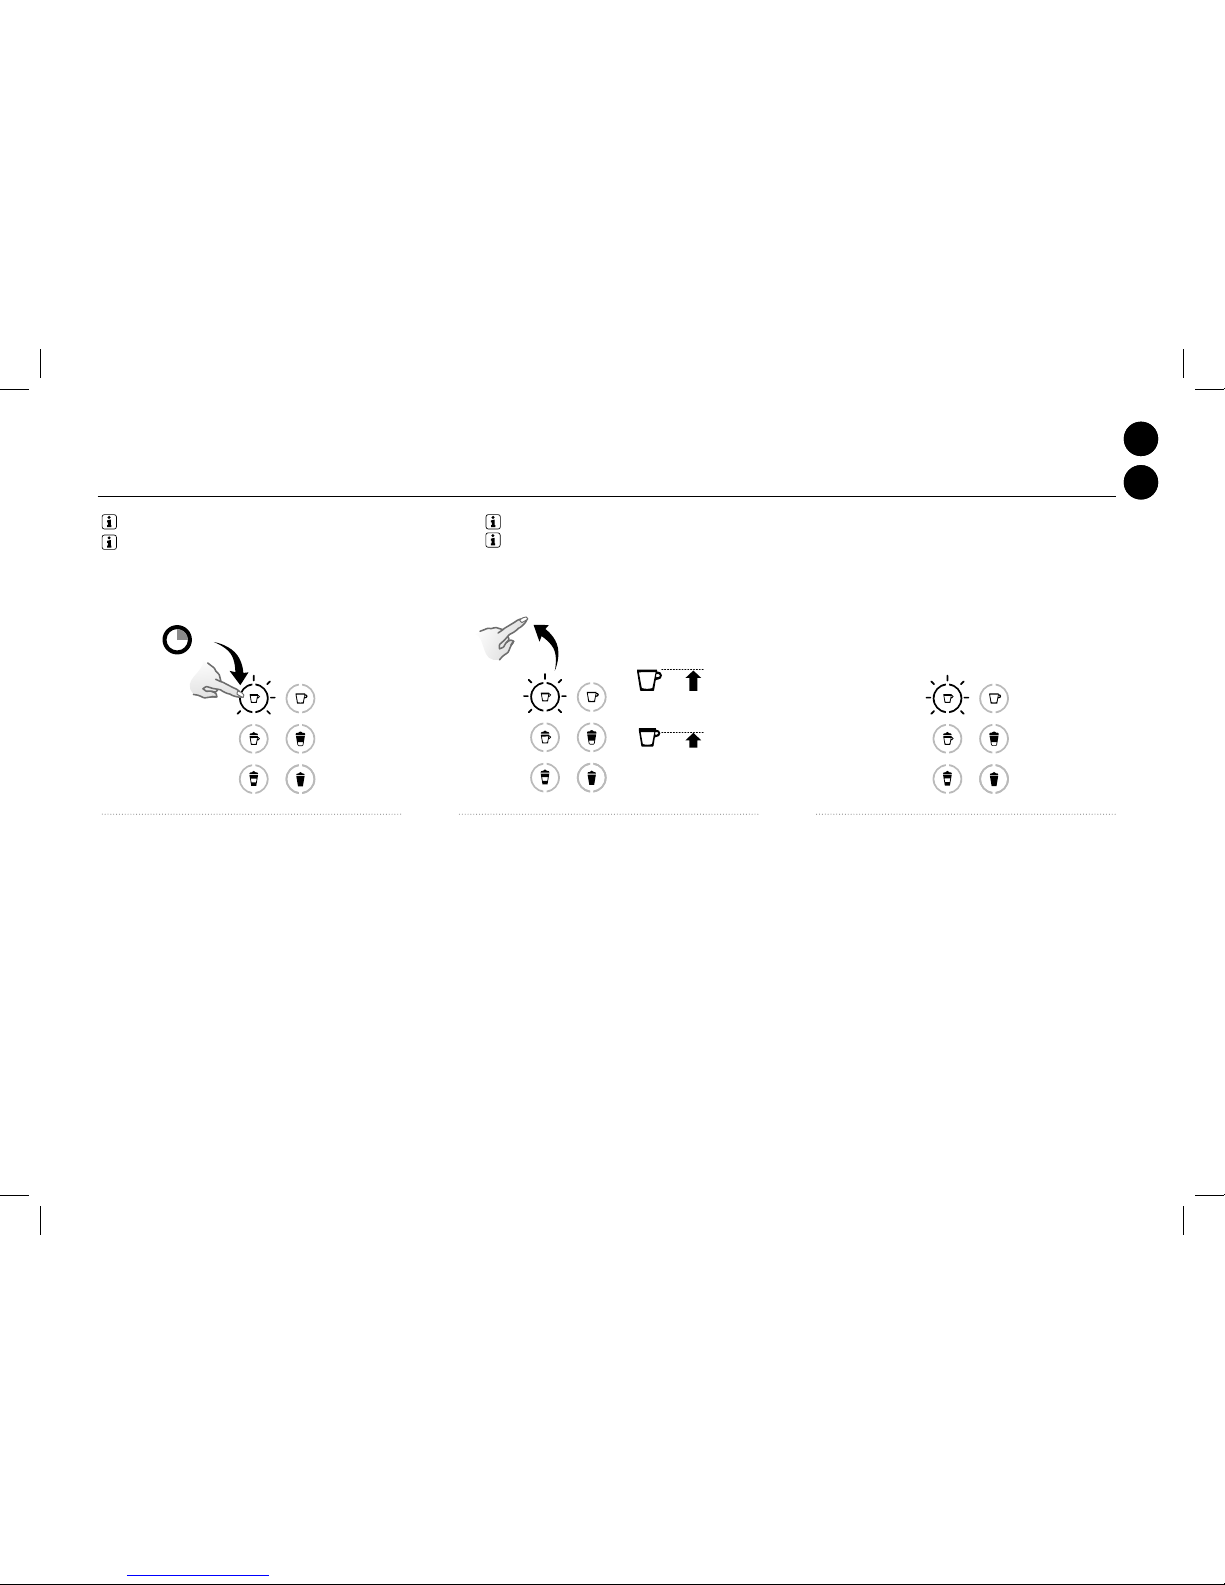
INFORMATION: follow the step 1-2 of section "coe e preparation". NOTE: please ref er to factory se ttings secti on for min/max program mable quantities.
1. Touch an d hold Espresso or Lungo b utton button fo r at least
3 sec to enter the p rogramming mode. Brewing s tarts. But ton
blinks fast: programming mode.
2. Release bu tton when desired volum e is reached. 3. Water volume i s now stored for the nex t coee preparation s.
Button bli nks 3 times to conrm the ne w water volume.
EN
FR
19
PROGRAMMER LA QUANTITÉ DE CAFÉ
INFORMATION: suivre les instruc tions 1-2 du paragraphe
«Préparer un café».
NOTE: référez-vous au p aragraphe «Régla ges usine» pour conna ître les quantité s programmables m in. et max.
1. Appuyez e t maintenez appuyée la touch e Espresso ou
Lungo pendant au mo ins 3 sec. pour entrer dans le m ode
programmation. L'écoulement commence. En mode
programmation les touches clignotent rapidement .
2. Relâchez la touc he lorsque la quantité dés irée est obtenue.
3. Le volume d'eau est maint enant programmé pour les
prochaines p réparations de café. La t ouche programmée
clignote 3 fois p our conrmer la nouvelle progr ammation.
UM_LATTISSIMA_TOUCH_FACELIFT_Z2A_TER.indb 19 06.12.17 17:09
 Loading...