

Page 1
instructions
ELECTRIC CONVECTOR HEATER
HCM Series
Page 2
2
Electric Convector Heating HCM
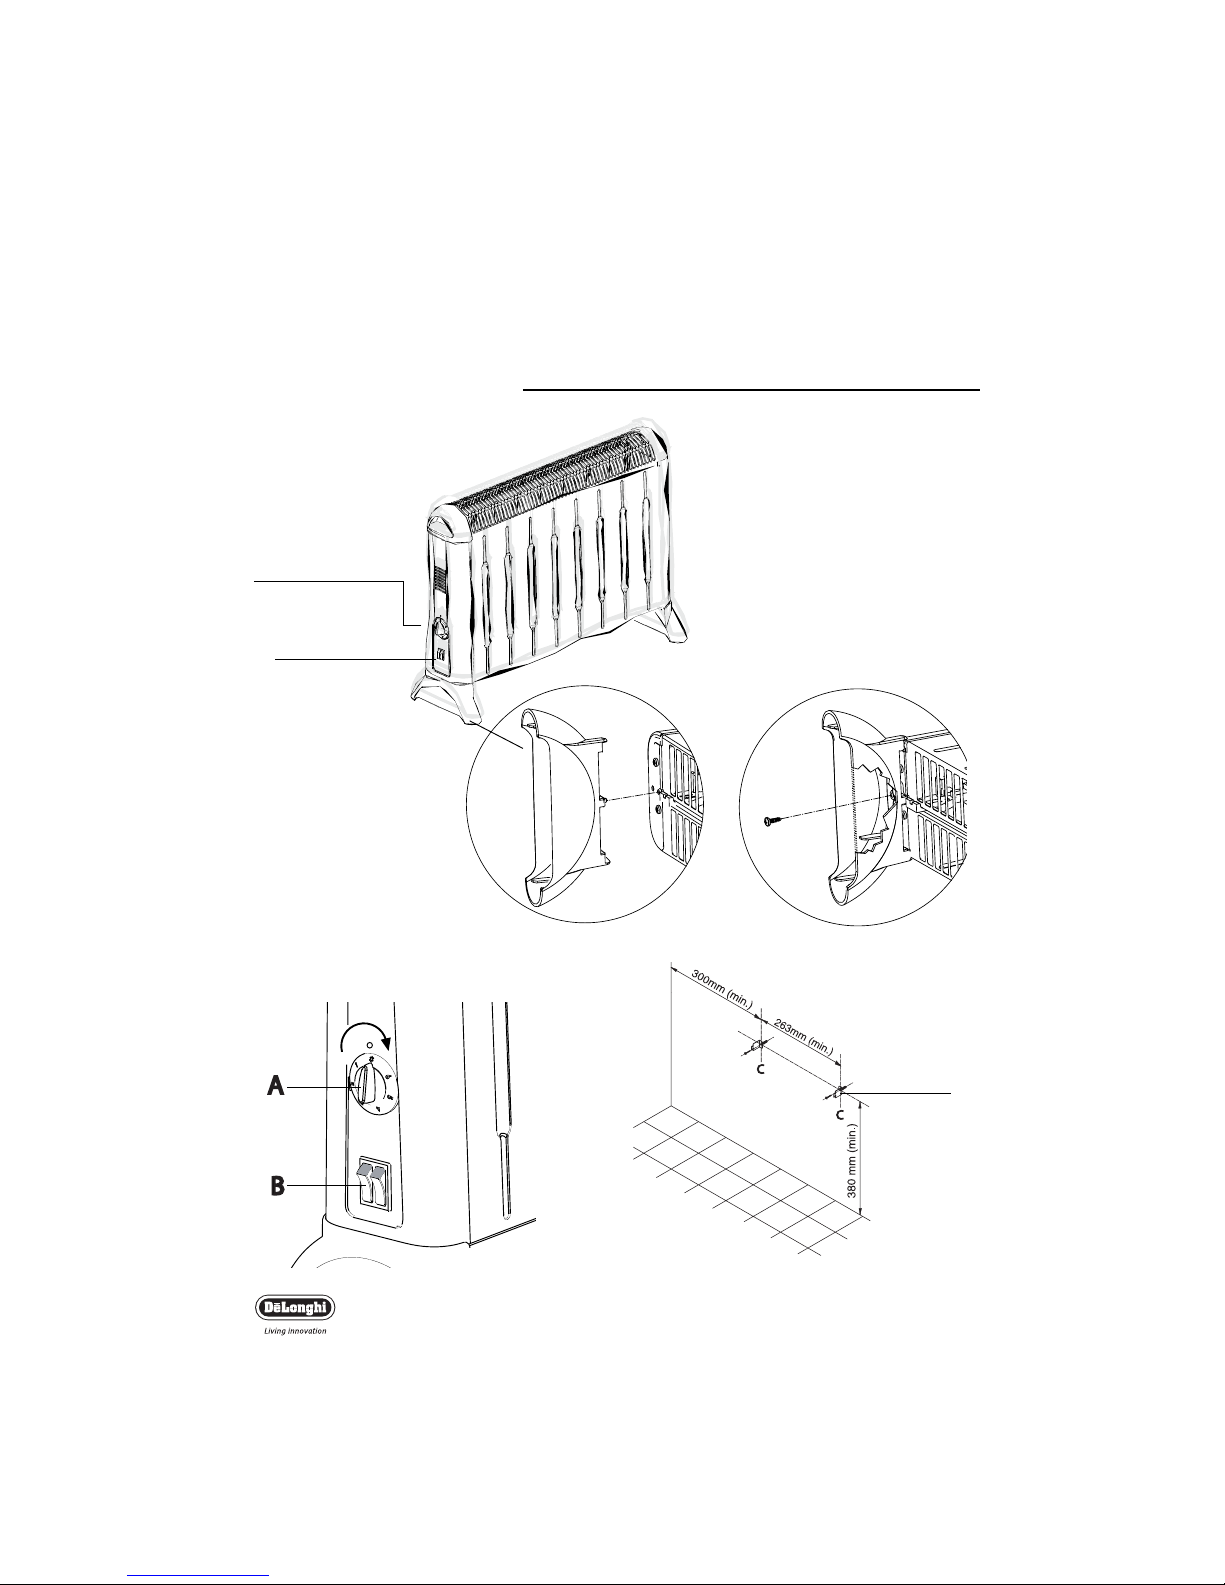
Description of Appliance
The following terms are used throughout the instruction manual
A
Thermostat Knob
Switches (certain
models only)
Brackets
Fig. 1
Fig. 3
B
II
I
Fig.2
Page 3
3
Thank you for choosing this De’Longhi convector. To get
the best results from your new heater please read these
instructions carefully before use. This should ensure optimum results and maximum safety.
SAFETY WARNINGS
Important: to avoid the safety system resetting accidentally, this
appliance must not be powered through an external timer.
• The first time you use the appliance, operate it for at least 15
minutes with the thermostat at maximum to eliminate the “new”
smell. A little smoke due to the protective substances applied to
the heating element before transport may be given off. This is
completely normal and not a cause for concern.
• Do not use the convector heater near bath tubs, showers,
sinks or swimming pools. The appliance must not be placed directly under a fixed socket.
• Do not rest the power cable on the appliance when hot.
• Always use the heater in a vertical position only.
• Do not obstruct the hot air outlet grilles or the air intake grille
on the bottom or top of the appliance.
• The appliance is not intended for use by persons (including children) with reduced physical, sensory or mental capabilities, or lack
of experience and knowledge, unless they have been given supervision or instruction concerning use of the appliance by a person
responsible for their safety. Children should be supervised to
ensure that they do not play with the appliance.
• Heaters should never be used with an extension cord or outlet
strip. Heaters should be plugged directly into an outlet.
• If the power cable is damaged, it must be replaced by the manufacturer, an authorised service centre in order to eliminate all risk.
Please see guarantee leaflet for Customer Service details.
• Do not use this appliance in rooms measuring less than 4m
2
. You
should avoid positioning it in currents of air which could disturb
operation of the heater.
A safety device trips and turns the appliance off in the event of
overheating or if it is placed in strong currents of air. To reset,
unplug the appliance from the mains socket and leave to cool
down (about five minutes), remove the cause of overheating, plug
back into the mains and turn on again.
WARNING: In order to avoid overheating, never under
any circumstances cover the appliance during operation.
CAUTION: In order to avoid a hazard due to inadvertent resetting of the thermal cutout, this appliance must not be supplied
through an external switching device, such as a timer, or connected
to a circuit that is regularly switched on and off by the utility.
Electric Convector Heating HCM
Page 4

Important information for correct disposal of the product
in accordance with EC Directive 2002/96/EC.
At the end of its working life, the product must not be
disposed of as urban waste. It must be taken to a special
local authority differentiated waste collection centre or
to a dealer providing this service. Disposing of a household appliance separately avoids possible negative consequences for the environment and health deriving from
inappropriate disposal and enables the constituent materials to be recovered to obtain significant savings in
energy and resources.As a reminder of the need to dispose of household appliances separately, the product is
marked with a crossed-out wheeled dustbin.
HOW TO USE YOUR CONVECTOR
ASSEMBLING THE FEET
- Fit the feet to the appliance as follows:
- Fasten the feet in position using the screws supplied (see fig. 1).
OPERATION AND USE
Turning the appliance on
Models with thermostat only
This appliance can be turned on by rotating its thermostat knob (A)
clockwise until it stops at the last possible setting (fig. 2). To turn this
appliance off, rotate the knob to its lowest position and remove its
plug from the electrical outlet.
Models with a thermostat and two switches
Turn the thermostat knob clockwise (A) until it reaches its last possible
setting, then press one switch (minimum power) or both switches (B)
(maximum power) so the part of the switch area becomes visible (fig. 2).
Adjusting the thermostat
When the room has reached the desired temperature, turn the
thermostat knob slowly in an anti-clockwise direction until you get
to the setting — and not beyond it — where you hear a click. The
thermostat will then adjust that set temperature automatically and
keep it constant. If your appliance is the type with 2 switches, you
could utilize only one of them during mild seasons and on days not
particularly cold. You will thus use little electrical power and obtain
even greater savings in energy consumption.
Frost protection function (only for models with a thermostat)
Turn the switch (or switches) to make the red area show, then turn
the thermostat knob to the " " setting. When so regulated, this
appliance will keep a room at a temperature of 5° C. while consuming a minimum of energy.
4
Electric Convector Heating HCM
Page 5

Wall-mounting
IMPORTANT: Before drilling into any wall ensure no electrical
cables are present in the area.
In order to wall mount your convector please proceed as follows:
1. Fix two brackets “C” following carefully the dimensions as indicated in description (fig. 3). Use a 6 mm masonry drill and suitable wall plugs and appropriate two screws and two brackets
(provided).
2. Hang the convector on the two brackets fixed to the wall and
insert metal bracket “D” into the bottom rear section of the
base of the convector as indicated in figure 4.
Mark the positions for fixing these brackets to the wall.
(This bracket when fixed retains the base of the convector in a
fixed position, preventing removal.)
3. Remove the convector heater from the hanging brackets and
drill the wall and insert the brackets.
4. Fit the convector to the 2 brackets “C”. Insert Bracket “D” to
the convector base and fix bracket “D” to the wall plug using
the screw (screws and brackets provided).
Your convector is now wall mounted.
The appliances should not be installed directly under a
wall power socket. Do not use your heater in a bathroom.
The appliance should not be installed immediately below a
permanent mains outlet.
Position the appliance so that the plug and the outlet can
be easily reached even after installation.
MAINTENANCE
Always pull the plug out of its electrical outlet before beginning any
cleaning.
This electric convector requires no special maintenance. All you have
to do is dust it off with a soft, dry cloth — but do so only when the
appliance is cold. Never use abrasive powders or solvents.
5
Electric Convector Heating HCM
Fig.4
Page 6

Electric Convector Heating HCM
Important - UK only
• The wires in the cord are coloured as follows:
Green and Yellow = Earth
Blue = Neutral
Brown = Live.
• The appliance must be protected by a 13A approved (BS1362)
fuse.
• warning: this appliance must be earthed.
Note:
• For non-rewireable plugs the fuse cover MUST be refitted when
replacing the fuse. If the fuse cover is lost then the plug must not
be used until a replacement can be obtained. The correct fuse
cover is identified by colour and a replacement may be obtained
from your De’Longhi Authorised Repairer (see guarantee leaflet).
• If a non-rewireable plug is cut off it must be destroyed immedia-
tely. An electric shock hazard may arise if an unwanted non-rewireable plug is inadvertently inserted into a 13A socket outlet.
• This appliance complies with European Economic Community
Directive 2004/108/EEC.
6
Page 7

5711310031/04.08
 Loading...