

Page 1

HBP 20-06-2000 15:43 Pagina 1
GB
F
D
I
NL
E
P
INSTRUCTION MANUAL
MODE D’EMPLOI
BEDIENUNGSANLEITUNG
ISTRUZIONI D’USO
GEBRUIKSVOORSCHRIFTEN
INSTRUCCIONES DE USO
INSTRUÇÕES PARA O USO
GR
DK
S
N
SF
OLHGIES CRHSHS
BRUGSVEJLEDNING
BRUKSANVISNING
BRUKS ANVISNING
KÄYTTÖOHJEET
Page 2
HBP 20-06-2000 15:43 Pagina 2
1 2
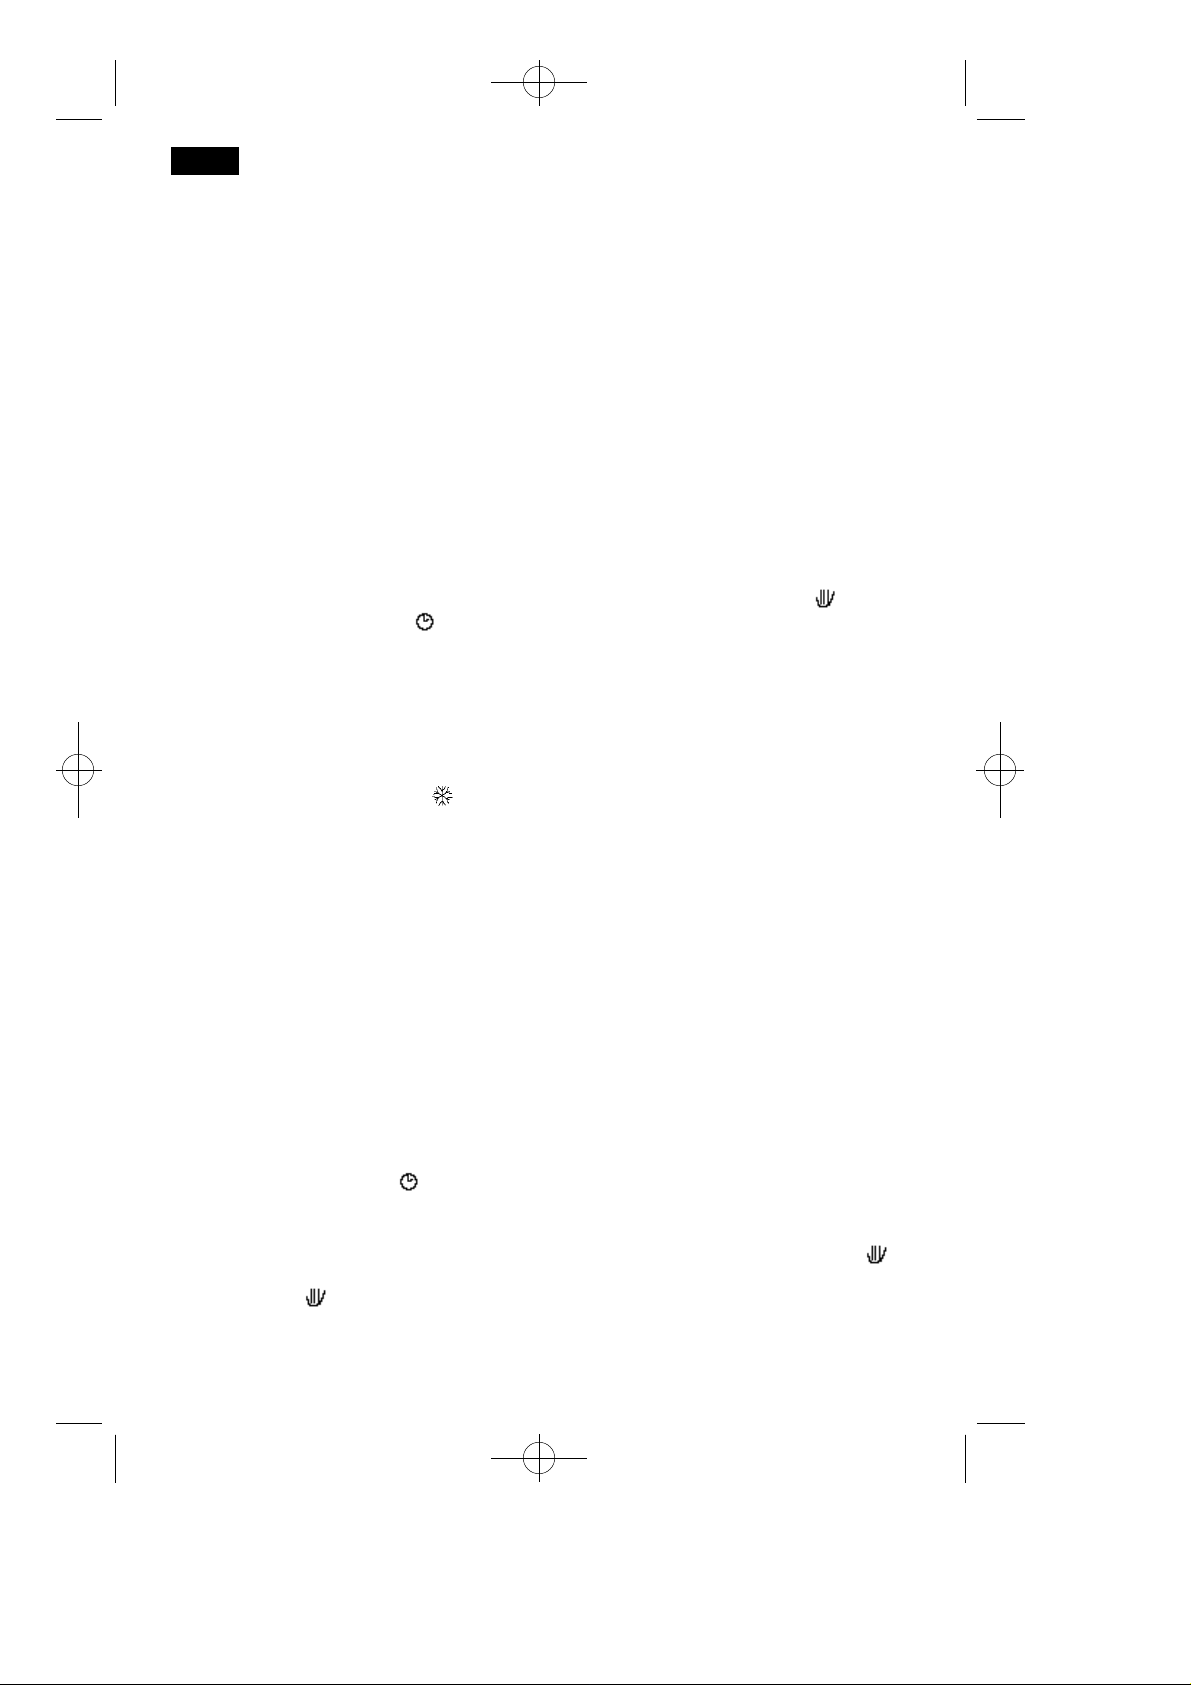
Wall bracket
Support de fixation
W a n d h a l t e r u n g
Staffa di aggancio
O p h a n g b e u g e l
Abrazadera de enganche
3
Programmateur 24 h
2 4 - S t u n d e n - Z e i t s c h a l t u h r
Programmatore 24 ore
Programmering 24 uren
Temporizador 24 horas
Temporizador em 24 H
Crnodiakovpth" 24wvrou
24-timers timer
24-timmars timer
24 timers timer
24-tunnin ajastin
Heating warning light
Témoin de chauffage
K o n t r o l l e u c h t e
Spia riscaldamento
Verklikker verwarming
Luz indicadora de la calefacción
Suporte de fixação
Gavtzo" gia krevmasma ston toivco
Vægophæng
Stöd för montering på väggen
Veggbrakett
Seinään kiinnityshaka
24 hour timer
Luz aquecimiento
Endeiktikh lucnia leitourgia"
Opvarmingssignallampe
Signallampa
Kontroll-lampe
Lämmityksen merkkivalo
Hair dryer
Séche-cheveux
Haartrockner
Asciugacapelli
Haardroger
Secador
Volume di protezione
Safety area
Distances de sécurité
S i c h e r h e i t s a b s t a n d
B e s c h e r m i n g s o p p e r v l a k
Zona de seguridad
Secador de cabelo
Axesouavr
Hårtørrer
Hårtork
Hårtørker
Hiustenkuivaaja
Selector knob
Bouton sélecteur
T h e r m o s t a t - D r e h k n o p f
Manopola selettore
K e u z e s c h a k e l a a r
Mando selector
Botão selector
Diakovpth" epiloghv" leitourgiva"
P r o g r a m v æ l v e r
F u n k t i o n s v ä l j a r e
F u n k s j o n s b r y t e r
Toimintajen valitsin
Distâncias de segurança
Ovuko prostasiva"
S i k k e r h e d s r u m
S k y d d s o m r å d e t
S i k k e r h e t s v o l u m e t
S v i h k u o n e e s e e n
4
Arrow indicator
R e p è r e
M a r k i e r u n g s z e i c h e n
Indice di riferimento
R e f e r e n t i e c i j f e r
Indice de referimiento
Timer lever
Levier du programmateur
P r o g r a m m i e r s c h a l t e r
Levetta del programmatore
P r o g r a m m e e r k n o p
Leveta del programador
2
Indice de referência
Shmavdi tou cronodiakovpth
Indikator
V i s a r e
F u n k s j o n s b r y t e r e
O s o i t i n n u o l i
Manipulo do programador
Monxlov tou cronodiakovpth
Timerkontakt
Programmeringsbrytare
Funksjonsbryter
Ajastimen vipu
Page 3
HBP 20-06-2000 15:43 Pagina 3
VOLTAGE WATTAGE
TENSION PUISSANCE
SPANNUNG LEISTUNG
TENSIONE POTENZA
SPÄNNING EFFEKT
TENSION POTENCIA
HEATING
CHAUFFAGE
HEIZUNG
RISCALDAMENTO
VERWARMING
CALEFACCIÓN
HAIR DRYER
SÉCHE-CHEVEUX
HAARTROCKNER
ASCIUGACAPELLI
HAARDROGER
SECADOR
DIMENSIONS
DIMENSIONS
ABMESSUNGEN
DIMENSIONI
AFMETINGEN
DIMENSIONES
VOLTAGEM POTENCIA
Tavsh Iscuv"
SPÆNDING EFFEKT
SPÄNNING EFFEKT
SPENNING
JÄNNITE WATT
AQUECIMIENTO
Qevrmavsh
OPVARMING
UPPVÄRMING
OPPVARMING
LÄMMITYS
SECADOR DE CABELO
Axesouavr
HÅRTØRRER
HÅRTORK
HÅRTØRKER
HIUSTENKUIVAAJA
DIMENSÕES
Diastavsei"
MÅL
MÅTT
DIMENSJONER
KOOT
See rating label
Voir plaquette données
Siehe Typenschild
Vedi targa caratteristiche
Zie plaatje
Véase placa de características
2000 W
1000 W
39,5 x 16,5 x 26 (27,5) cm
Ver placa de especificações
Blevpe pinakivda me carakthristikav
se typepladen
se märkplåt
se etikett
kts. arvokilpi ominaisuudet
ELECTRICAL CONNECTION (U.K. ONLY)
A) If your appliance comes fitted with a plug, it will incorporate a 13 Amp fuse. If it does not fit your socket, the plug
should be cut off from the mains lead, and an appropriate plug fitted, as below.
WARNING: Very carefully dispose of the cut off plug after removing the fuse: do not insert in a 13 Amp socket
elsewhere in the house as this could cause a shock hazard.
With alternative plugs not incorporating a fuse, the circuit must be re-fitted when changing the fuse using a 13 Amp
Asta approved fuse to BS 1362. In the event of losing the fuse cover, the plug must NOT be used until a replacement fuse cover can be obtained from your nearest electrical dealer. The colour of the correct replacement fuse
cover is that as marked on the base of the plug.
B) If your appliance is not fitted with a plug, please follow the instructions provided below:
WARNING: THIS APPLIANCE MUST BE EARTHED
IMPORTANT
The wires in the mains lead are coloured in accordance with the followin code:
Blue: Neutral
Brown: Live
As the colours of the wires in the mains lead of this ppliance may not correspond with the coloured markings identifying
the terminals in your plug, proceed as follows:
The wire which is coloured blue must be connected to the terminal which is marked with the letter N or coloured black.
The wire which is coloured brown must be connected to the terminal which si marked with the letter L or coloured red.
3
Page 4
HBP 20-06-2000 15:43 Pagina 4
GB
ELECTRICAL CONNECTION
- Before plugging in the heater, check that the voltage of your domestic supply corresponds
to the voltage (V) indicated on the appliance.
- Check that the electrical socket has a rating of 10/16 Amps.
- THIS APPLIANCE CONFORMS TO DIRECTIVE EN 55014 GOVERNING RADIO INTERFERENCE.
INSTALLATION
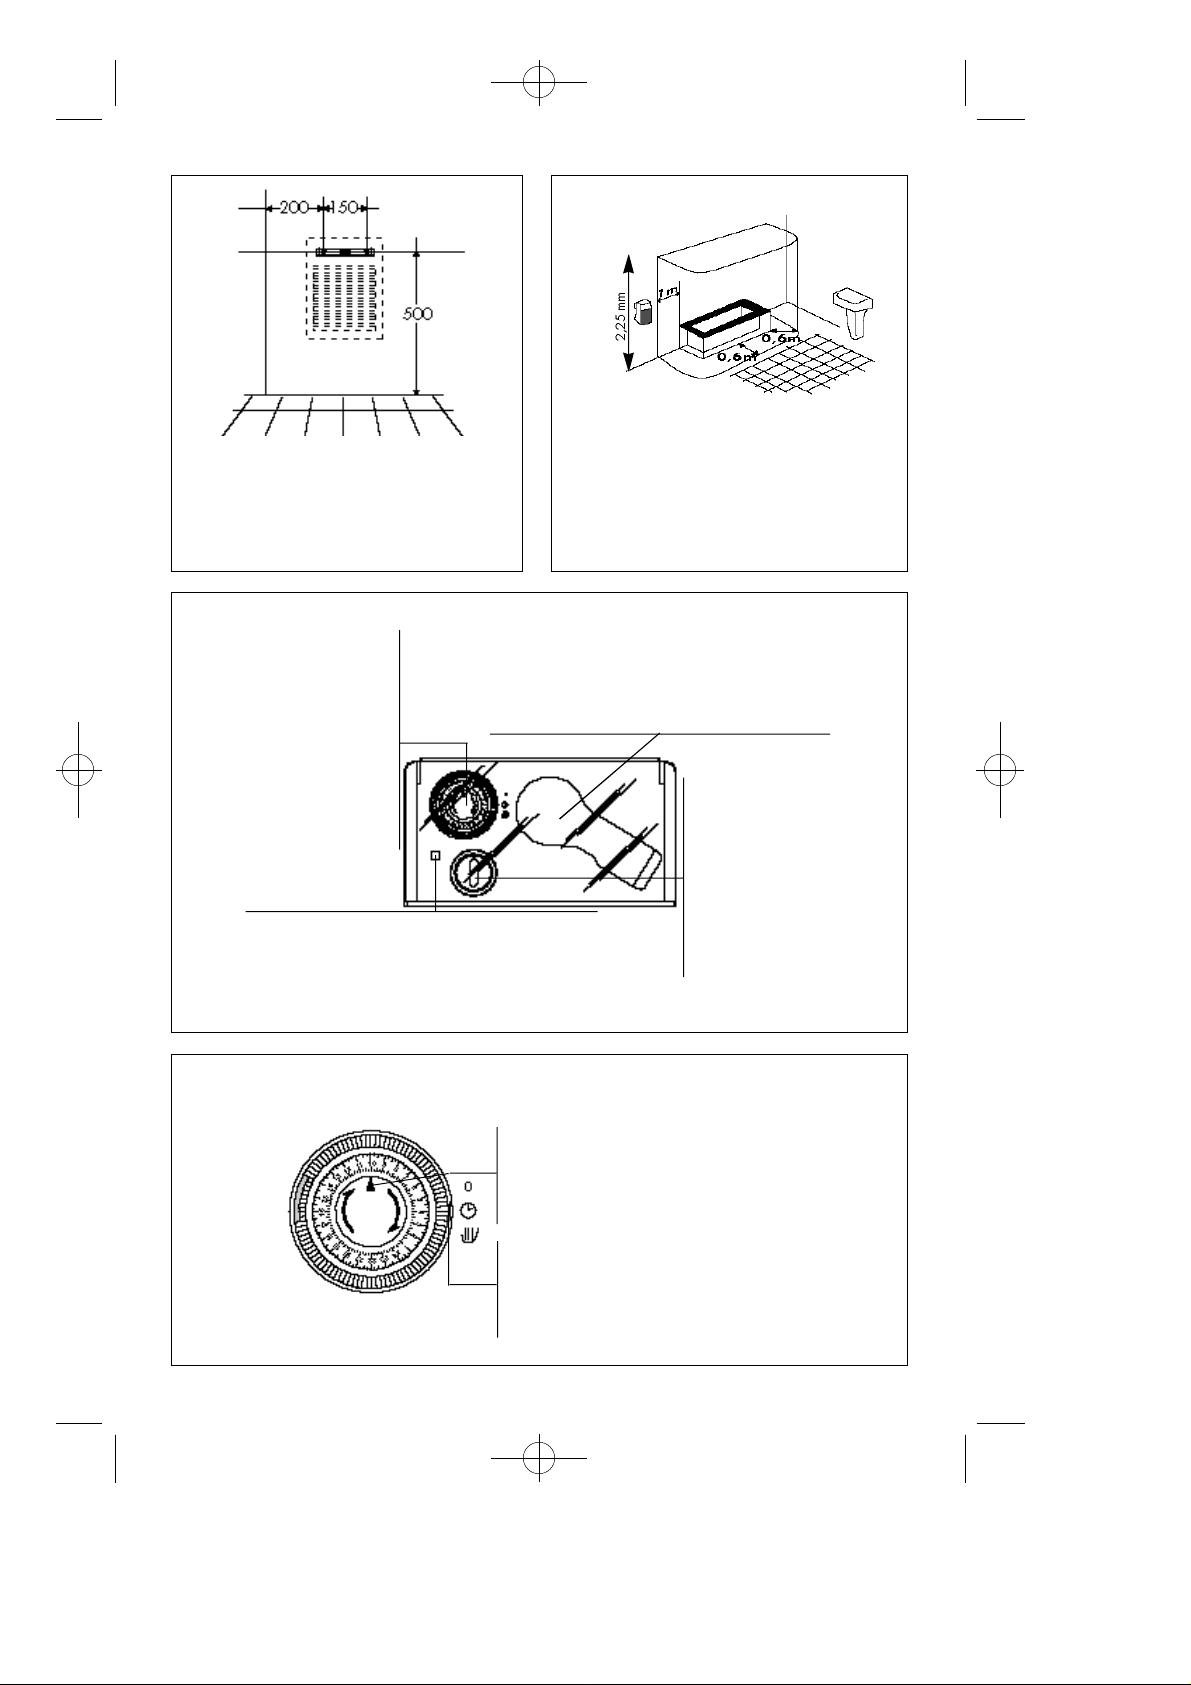
- Fix bracket to wall, complying with minimum measurement specified in fig. 1.
- Remove appliance from stand, by first turning black locking screw on top of stand 1/4
turn.
- Mount appliance on bracket and lock into place by turning black screw on top of bracket
(1/4 turn).
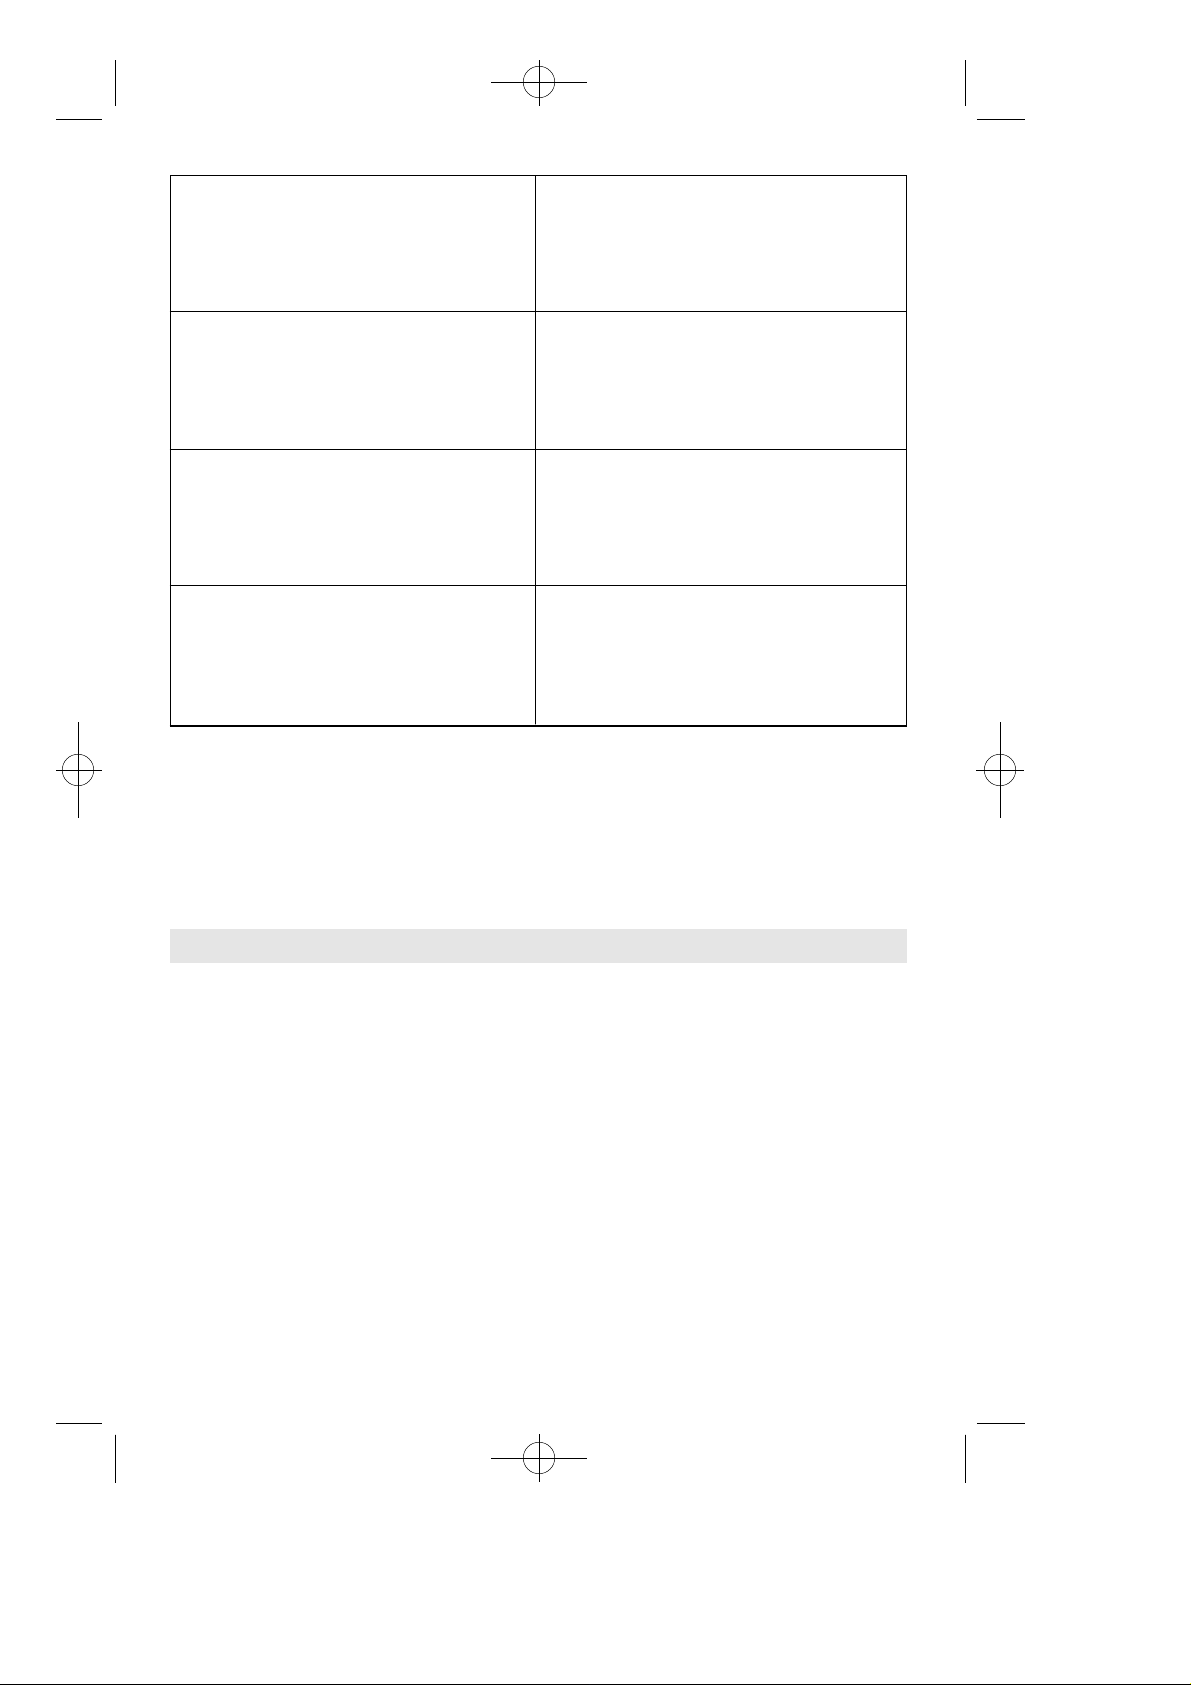
- Should appliance be installed in a bathroom, it must be mounted on the wall outside the
“safety area”, as shown in fig. 2.
- Only use appliance when fixed to a wall or mounted on its stand.
SWITCHING ON AND OFF PROCEDURE
To switch on appliance, whatever the function desired, put timer lever to position for continuous operation, or to position for “programmed” operation (see Timer section).
To switch off appliance, put timer lever to “0”.
SELECTOR KNOB
- Position A: Setting for hair dryer function
- Position B: Setting for hair dryer function + Heating at 1000 W without thermostat
- Position C: Heating at 1000 W without thermostat
- Position D: Heating at 2000 W with thermostat on maximum
- Position E: Anti-freeze function (appliance maintains room temperature at about 5°C, preventing freezing with minimum energy consumption).
THERMOSTAT REGULATION
To regulate room temperature, proceed as follows:
- Put selector knob to position D;
- Wait for room temperature to reach comfort level desired, then slowly rotate selector knob
clockwise until warning light goes off.
The temperature thus set will be automatically maintained by the thermostat. Should further
temperature adjustment changes be required, turn knob clockwise to lower the temperature
and counter clockwise to raise it.
TIMER
For programmed function, appliance must be constantly connected to power supply.
For “programmed” heating, proceed as follows:
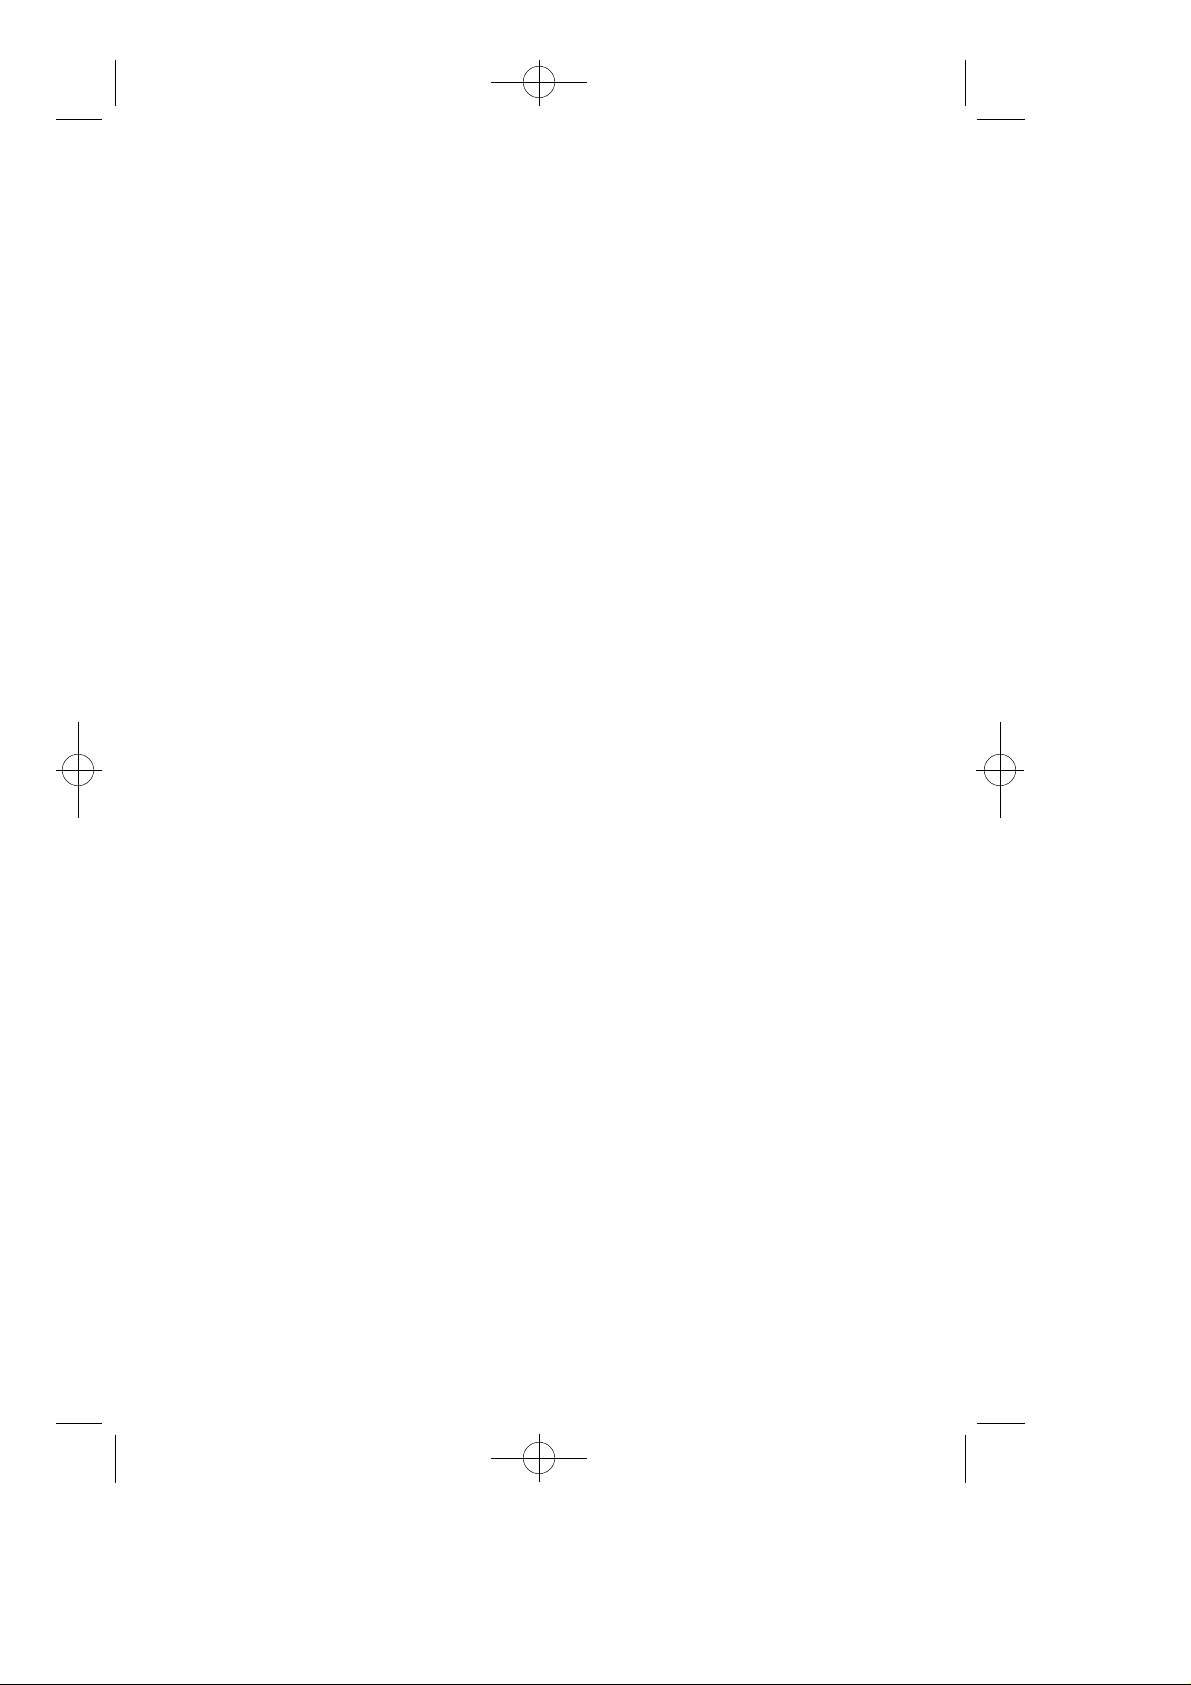
- For example, if time is 6 p.m., turn numbered dial of timer clockwise until number 18 is
aligned with pointer ▲ on timer.
- Set desired operating times by pushing inwards red teeth (fig. 4).
- Put timer lever to position . Appliance is now programmed to function automatically.
- To change programmed operating times, just push teeth back to original position and
reset timer for new functioning period.
- For use of appliance, outside preset timer programme, just put timer lever to position .
HAIR DRYER
Put timer lever to and selector knob to position A (also B = dual function).
Hair dryer works at 500 W with switch on handle set on position I; at 1000 W on position
II .
4
Page 5
HBP 20-06-2000 15:43 Pagina 5
WARNING
- This apparatus and the hair dryer come with a Y-type connection. The electrical feed cord must
be replaced only by officially authorised personnel.
- Always use the heater in an upright position.
- When the appliance is used as a portable heater, do not place it close to walls, furniture,
curtains etc.
- Do not use the heater to dry your laundry. Never obstruct the intake and outlet grilles
(danger of overheating).
- The heater must positioned at least 50 cm from furniture or other objects.
- Do not at any time place hair dryer in its storage space while still in use.
- Should accidental overheating occur, (e.g. obstruction of air intake and outlet grilles,
motor turning slowly or not at all), a safety device stops fan heater. To restart, put timer
lever to position “0” and leave for several minutes. Eliminate cause of overheating, then
return lever to position desired.
- The appliance must not be positioned directly underneath a fixed power point.
- The appliance must be installed so that the switches and other controls cannot be reached
from a person standing in a bathtub or a shower.
- Do not cover the appliance when in operation as this could cause a fire risk.
- Do not use the appliance in rooms less than 4 m2in area.
5
Page 6
HBP 20-06-2000 15:44 Pagina 6
F
BRANCHEMENT ELECTRIQUE
- Avant d’introduire la fiche dans la prise de courant, s’assurer que le voltage du réseau dans
votre maison correspond à la tension en volts indiquée sur l’appareil.
- Contrôler que la prise de courant a une capacité de 10/16 A.
- CET APPAREIL EST CONFORME A LA DIRECTIVE EN 55014 SUR LA SUPPRESSION DES
PARASITES RADIO.
INSTALLATION
L’appareil est présenté dans son emballage déjà monté sur son support pour une utilisation en ver-
sion portative.
Si vous désirez le fixer au mur, procédez de la façon suivante:
- Décrocher l’appareil de son support après avoir dévissé d’un quart de tour la vis noire qui se
trouve dans la partie supérieure du support.
- Fixer au mur l’étrier d’accrochage en respectant les mesures minimum de la figure 1.
- Accrocher l’appareil à l’étrier et visser d‘un quart de tour la vis noir qui se trouve dans la partie
supérieure de l’étrier.
- Si l’appareil est installé dans une salle de bains, il est nécessaire de fixer l’appareil à la paroi
et de respecter les distances de sécurité indiquées dans la figure 2.
- L’appareil doit fonctionner exclusivement sur son support ou fixé à la paroi.
MISE EN MARCHE ET ARRET
Pour la mise en marche de l’appareil, fonction chauffage ou sèche cheveux, amener le levier du
programmateur dans la position pour un fonctionnement continu ou bien dans la position pour
un fonctionnement “programmé” (voir parag. “utilisation du programmateur”).
Pour arrêter l’appareil, amener le levier du programmateur sur le “0”.
UTILISATION DU BOUTON SELECTEUR
- Position A: Fonctionnement du sèche-cheveux.
- Position B: Fonctionnement du sèche-cheveux + chauffage sans réglage du thermostat à 1000 W.
- Position C: Chauffage sans réglage du thermostat à 1000W.
- Position D: Chauffage 2000 W avec réglage du thermostat au maximum.
- Position E: Service anti-gel (l’appareil maintient la température de la pièce à environ 5°C
empêchant ainsi tout risque de congélation avec une consommation de courant minimum).
REGLAGE DU THERMOSTAT
Pour régler la température de la pièce, procédez de la façon suivante: amener le bouton du sélec-
teur en position D; dès que la température de la pièce a atteint le degré désiré, tourner lentement
ce bouton dans le sens des aiguilles d’une montre jusqu’au moment où le témoin s’éteint et arrêter
le bouton dans cette position. Cette température préréglée sera maintenue constante de façon automatique par le thermostat.
Pour choisir d’autres réglages, se rappeler que la rotation dans le sens des aiguilles d’une montre
du bouton entraîne une augmentation de la température.
UTILISATION DU PROGRAMMATEUR
Pour programmer le chauffage, procédez de la façon suivante:
- Regardez l’heure à votre montre. En supposant qu’il est 18h, tournez dans le sens horaire le
disque numéroté du programmateur jusqu’à faire coïncider le nombre 18 avec le repère ▲
gravé sur le programmateur.
- Préréglez les périodes de temps de fonctionnement de l’appareil en enfonçant les crans rouges
vers le centre (fig. 4).
- Amenez le levier du programmateur en position . L’appareil ainsi réglé entrera en fonctionnement tous les jours à l’heure prévue (important: laissez toujours la fiche dans la prise de courant).
- Pour modifier la programmation, il suffit de ramener les crans dans la position initiale et de
prérégler de nouvelles périodes de fonctionnement.
6
Page 7
HBP 20-06-2000 15:44 Pagina 7
- Si vous désirez faire fonctionner l’appareil en dehors des temps programmés, sans modifier pour
autant le programme déjà préréglé, il suffit d’amener le levier du programmateur dans la position
.
UTILISATION DU SECHE-CHEVEUX
Amener le levier du programmateur dans la position et le bouton du sélecteur dans la position A
(ou également B = fonctionnement combiné). Le sèche-cheveux fonctionne à 500 W si l’interrupteur
de la poignée est poussé dans la position I; à 1000 W s’il est poussé dans la position II.
ATTENTION
- L’appareil et le sèche-cheveux sont munis d’une connexion de type Y. Le cordon d’alimentation
doit être remplacé par un personnel qualifié autorisé.
- N’utiliser l’appareil qu’en position verticale.
- En utilisant l’appareil en version portative, ne jamais le mettre en service en faisant reposer la
partie arrière contre les murs, les meubles, les rideaux etc...
- Ne pas utiliser l’appareil pour sécher le linge, ne pas obstruer les grilles d’entrée et de sortie
de l’air (danger de surchauffage).
- Ne laisser aucun meuble ou autre objet à une distance de l’appareil inférieure à 50 cm.
- Ne replacer jamais le sèche-cheveux dans son logement lorsqu’il est en fonctionnement.
- Un dispositif de sécurité interrompt le fonctionnement du thermoventilateur dans le cas de sur-
chauffage accidentel (par ex. obstruction des grilles d’entrée et de sortie de l’air, mauvais fonctionnement du moteur). Pour rétablir le fonctionnement, il est nécessaire d’amener le levier du
programmteur en position “0” pendant quelques minutes, supprimer la cause du surchauffage
et ramener ensuite le levier en position de travail.
- L’appareil doit être installé de façon que les interrupteurs et les autres commandes soient à l’a-
bri de ceux qui utilisent la baignoire ou la douche.
- Cet appareil ne doit pas être placé juste au-dessous d’une prise de courant placée à poste fixe.
- Ne jamais couvrir l’appareil pendant le fonctionnement, pour éviter tout risque d’incendie.
- Ne jamais utiliser cet appareil dans une pièce dont la surface de base est inférieure à 4 m2.
7
Page 8
HBP 20-06-2000 15:44 Pagina 8
D
ELEKTRISCHER ANSCHLUSS
- Sich vor Anschluß des Netzsteckers vergewissern, daß die Netzspannung der Wohnung
mit der am Gerät angegebenen Betriebsspannung übereinstimmt.
- Sich vergewissern, daß die Steckdose eine Stromfestigkeit von 10/16 Ampere hat.
- DIESES GERÄT ENTSPRICHT DEN VORSCHRIFTEN ZUR FUNKENTSTÖRUNG NACH
RICHTLINIE EN 55014.
WANDMONTAGE
Die tragbare Ausführung des Gerätes ist auf einen Unterbau montiert. Soll das Gerät an der
Wand befestigt werden, wird wie folgt vorgegangen:
- Mit einer Vierteldrehung der schwarzen Schraube, die sich oben am Unterbau befindet,
können Sie das Gerät von diesem abschrauben.
- Befestigen Sie dann die Halterung unter Berücksichtigung der in Abb. 1 angegebenen
Abmessungen an der Wand.
- Hängen Sie das Gerät nun in die Halterung ein und schrauben Sie es mit einer
Vierteldrehung der schwarzen Schraube fest, die sich oben an der Halterung befindet.
- Im Badezimmer darf das Gerät nur an der Wand befestigt betrieben werden. Der in Abb.
2 angegebene Sicherheitsabstand muss eingehalten werden.
- Das Gerät darf nur auf dem Unterbau montiert oder an der Wand befestigt in Betrieb
gesetzt werden.
EIN- UND AUSSCHALTEN
Zum Einschalten des Gerätes den Programmierschalter entweder auf Position stellen, um
Dauerfunktion zu erreichen oder auf Position bringen, um vorzuprogrammieren (siehe PROGRAMMIERUNG DES HEIZVORGANGS).
Zur Ausschaltung stellen Sie den Programmierschalter auf position “0”.
WAHL DER BETRIEBSARTEN MIT DEM THERMOSTAT-DREHKNOPF
- Position A: Haartrockner
- Position B: Haartrockner + Heizung ohne Thermostat (1000 W)
- Position C: Heizung ohne Thermostat (1000 W)
- Position D: Heizung mit Thermostat (2000 W) mit Thermostat - Maximalleistung
- Position E: Frostschutzsicherung (mit geringstem Stromverbrauch schützt das Gerät vor
Frost durch eine konstant gehaltene Raumtemperatur von ca. 5°C).
THERMOSTAT REGULIERUNG
- Bringen Sie den Thermostat-Drehknopf auf Position D;
- ist die gewünschte Raumtemperatur erreicht, dann drehen Sie denselben im Uhrzeigersinn
wieder langsam zurück, bis die Kontrolleuchte erlischt (aber bitte nicht weiter!).
Die somit erreichte Raumtemperatur wird nun durch den Thermostat automatisch kontasnt
gehalten. Beachten Sie bitte der Einstellung, daß durch Drehen im Uhrzeigersinn eine
Temperatur verringerung und durch Drehen im Gegenuhrzeigersinn eine
Temperatursteigerung erzielt wird.
PROGRAMMIERUNG DES HEIZVORGANGS
Um die Heizung vorzuprogrammieren, wird wie folgt vorgegangen (wichtig: das Gerät muss
hierfür immer an dem Stromnetz angeschlossen bleiben!).
- Angenommen es ist 18 Uhr, drehen Sie also die Nummernscheibe der Vorwahluhr im
Uhrzeigersinn, bis die Nummer 18 auf dem Markierungszeichen ▲ der Vorwahluhr steht.
- Stellen Sie nun die Zeitintervalle ein, in denen das Gerät in Betrieb sein soll, indem Sie
die roten Zähnchen nach innen drücken (Abb. 4).
- Bringen Sie schliesslich den Programmierschalter in Position . Das Gerät schaltet sich
nun automatisch jeden Tag zu der von Ihnen im voraus bestimmten Zeit ein.
8
Page 9
HBP 20-06-2000 15:44 Pagina 9
- Für Programmänderungen bringen Sie die Zähnchen in ihre Ausgangsstellung zurück und
programmieren Sie die Zeitintervalle neu.
- Soll das Gerät auch ausserhalb der Programmierten Zeit arbeiten, ohne das bereits eingestell-
te Programm zu verändern, genügt es, den Programmierschalter in Position zu bringen.
BETRIEB DES HAARTROCKNERS
Bringen Sie den Programmierschalter auf Position und den Thermostat-Drehknopf auf
Position A (für kombinierten Betrieb wahlweise auch B.
Am Griff des Haartrockners befindet sich ein 2-Stufen-Schalter: Schaltstufe I = 500 W,
Schaltstufe II = 1000 W.
ZUR BEACHTUNG
- Das Gerät und das Haartrockner sind mit einer Y-Verbindung ausgerüstet. Der Austausch
des Versorgungskabels darf nur von autorisierten Technikern durchgeführt werden.
- Das Gerät stets nur in vertikaler Position benutzen.
- Wenn das Gerät in tragbarer Ausführung verwendet wird, darf es nicht hinter Wänden,
Möbeln, Gardinen usw. in Betrieb gesetzt werden.
- Das Gerät nicht für das Trocknen von Wäsche benutzen, die Lufteintritts- und
Luftaustrittsöffnungen nicht verdecken (Überhitzungsgefahr).
- Das Gerät soll von Möbeln und anderen Gegenständen einen Abstand von 50 cm haben.
- Der Haartrockner muss immer abgeschaltet werden, bevor Sie ihn in den Wandhalter zurück-
g e b e n .
- Das Gerät ist gegen Überhitzung gesichert, welche z.B. durch Abdecken der Lüftungsgitter, zu
langsames Laufen oder Blockieren des Motors entstehen kann. Das Gerät schaltet sich in diesem Falle selbsttätig aus. Um das Gerät wieder funktionstüchtig zu machen, muss der
Programmierschalter für einige Minuten auf Position “0” gebracht und die Ursache der
Überhitzung behoben werden, bevor das Gerät wieder eingeschaltet werden kann.
- Das Gerät darf sich nicht unmittelbar unter einer ortsfesten Steckdose befinden.
- Das Gerät ist so zu installieren, daß die Schalter und anderen Schaltelemente nicht von
Personen erreichbar ist, die sich in der Badewanne oder unter der Dusche befinden.
- Das Gerät während des Betriebes nicht abdecken, um Brandgefahren zu vermeiden.
- Das Gerät nicht in Räumen mit einer Bodenfläche unter 4 m2verwenden.
9
Page 10

HBP 20-06-2000 15:44 Pagina 10
I
ALLACCIAMENTO ELETTRICO
- Prima di inserire la spina nella presa di corrente verificare attentamente che il voltaggio della Vostra rete domestica corrisponda al valore in V indicato sull’apparecchio.
- Assicurarsi che la presa di corrente abbia una portata di 10/16 Ampere.
- QUESTO APPARECCHIO È CONFORME ALLA NORMA EN 55014 SULLA SOPPRESSIONE DEI RADIODISTURBI.
INSTALLAZIONE
L’apparecchio è confezionato montato su piedestallo per l’impiego in versione mobile.
Volendolo fissare al muro agire nel seguente modo:
- Sganciare l’apparecchio dal piedestallo svitando prima di 1/4 di giro la vite nera che si
trova nella parte superiore del piedestallo stesso.
- Fissare al muro la staffa di aggancio rispettando le misure minime di fig. 1.
- Agganciare l’apparecchio alla staffa ed avvitare di 1/4 di giro la vite nera che si trova
nella parte superiore della staffa stessa.
- Se l’apparecchio viene installato in una stanza da bagno deve esere fissato a parete al di
fuori del “volume di protezione” illustrato in fig. 2.
- Far funzionare l’apparecchio solamente sul piedestallo o fisso a parete.
ACCENSIONE E SPEGNIMENTO
Per far funzionare l’apparecchio, in qualunque funzione, posizionare la levetta del programmatore in posizione se si vuole il funzionamento continuo, oppure in posizione per il
funzionamento “programmato” (vedi paragrafo “uso del programmatore”).
Per spegnere l’apparecchio posizionare la levetta programmatore sullo “0”.
USO DELLA MANOPOLA SELETTORE
- Posizione A: Predisposizione per funzionamento dell’asciugacapelli.
- Posizione B: Predisposizione per funzionamento dell’asciugacapelli + riscaldamento non
termostatato a 1000 W.
- Posizione C: Riscaldamento non termostatato a 1000 W
- Posizione D: Riscaldamento 2000 W con termostato al massimo
- Posizione E: Servizio antigelo (apparecchio mantiene l’ambiente ad una temperatura
di circa 5°C impedendo il congelamento con un minimo dispendio di energia.
REGOLAZIONE DEL TERMOSTATO
Per regolare la temperatura dell’ambiente procedere nel seguente modo:
- posizionare la manopola selettore in posizione D;
- quando l’ambiente ha raggiunto la temperatura desiderata, ruotare lentamente la manopola selettore in senso orario fino allo spengimento della spia e non oltre.
La temperatura dell’ambiente così fissata verrà automaticamente mantenuta costante dal termostato. Per ulteriori regolazioni tenera presente che ruotando in senso orario si ottiene una
diminuzione della temperatura ambiente, mentre in senso antiorario si ottiene un aumento.
USO DEL PROGRAMMATORE
Per programmare il riscaldamento, procedere nel seguente modo:
- Guardate l’ora del Vostro orologio. Supponendo che siano le 18, ruotare in senso orario
il disco numerato del programmatore fino a far coincidere il numero 18 dello stesso con
l’indice di riferimento ▲ impresso sul programmatore.
- Impostate i periodi di tempo in cui desiderate che l’apparecchio funzioni premendo verso
il centro i dentini rossi (fig. 4).
- Posizionate la levetta del programmatore in posizione . Così predisposto l’apparecchio
funzionerà automaticamente ogni giorno nell’orario programmato. (IMPORTANTE: la
spina deve essere sempre in serita nella presa di corrente).
10
Page 11

HBP 20-06-2000 15:44 Pagina 11
- Per variare la programmazione basta riportare i dentini nella posizione iniziale ed impostare i nuovi periodi di funzionamento.
- Se desiderate far funzionare l’apparecchio al di fuori dei tempi programmati, senza alterare
il programma già impostato, basta portare la levetta del programmatore in posizione .
USO DELL’ASCIUGACAPELLI
Posizionare la levetta del programmatore e la manopola del selettore in posizione A (o
anche B = funzionamento combinato). L’asciugacapelli funziona a 500 W se l’interruttore sull’impugnatura è premuto in posizione I; a 1000 W se premuto in posizione II.
AVVERTENZE
- Sia l’apparecchio che l’asciugacapelli sono provvisti di collegamento tipo Y. La sostituzione
del cavo di alimentazione deve essere perciò fatta da personale autorizzato.
- Usare l’apparecchio sempre e soltanto in posizione verticale.
- Quando l’apparecchio è usato in versione portatile, non farlo funzionare a ridosso di pareti,
mobili, tende ecc.
- Non usare l’apparecchio per asciugare la biancheria, non ostruire le griglie di entrata ed
uscita dell’aria (pericolo di surriscaldamento).
- Per una distanza di 50 cm davanti all’apparecchio non devono esserci mobili od altri oggetti.
- Non riporre mai l’asciugacapelli funzionante dentro il proprio alloggio.
- Un dispositivo di sicurezza interrompe il funzionamento del termoventilatore in caso di surriscaldamento accidentale (es.: ostruzione delle griglie di entrata ed uscita dell’aria, motore
che non gira o gira lento). Per ripristinare il funzionamento, è necessario posizionare la levetta del programmatore in posizione “0” per alcuni minuti, eliminare la causa del surriscaldamento e quindi riportare la levetta in posizione di lavoro.
- L’apparecchio non deve essere posto immediatamente sotto una presa di corrente fissa.
- L’apparecchio deve essere installato in modo che gli interruttori e gli altri comandi non siano
raggiungibili da chi sta utilizzando la vasca da bagno o la doccia.
- Non coprire l’apparecchio durante il funzionamento, onde evitare rischi d’incendio.
- Non usare questo apparecchio in una stanza la cui area di base è inferiore a 4 m2.
11
Page 12
HBP 20-06-2000 15:44 Pagina 12
NL
AANSLUITING OP DE NETSPANNING
- Alvorens de stekker in het stopcontact te steken, dient U er zich van te vergewissen dat het
voltage van het elektriciteitsnet in huis overeenstemt met het voltage dat op het apparaat
staat aangegeven.
- Vergewis U ervan of het stopcontact een kapaciteit van 10 tot 16 Ampère kan verdragen.
- DIT APPARAAT IS VOLLEDIG CONFORM DE RICHTLIJNEN EN 55014 DE ONDERDRUKKING VAN RADIOSTORINGEN.
INSTALLATIE
Het apparaat is gemonteerd op een voetstuk voor gebruik in draagbare versie.
Indien gewenst, kan het op de volgende wijze aan de muur bevestigd worden:
- Het apparaat losmaken van het voetstuk door eerst de zwarte schroef bovenaan het voetstuck zelf een kwartslag los te draaien.
- De ophangebeugel aan de muur bevestigen, rekening houdend met de minimale maten
van figuur 1.
- Het apparaat aan de beugel hangen en de zwarte schroef in de bovenkant van de beugel een kwartslag aandraaien.
- Bij aansluiting van het apparaat in een badkamer moet de ophanging ervan geschieden
buiten het “beschermingsoppervlak” zoals aangegeven in figuur 2. Bij gebruik in de
badkamer is alléén wandmontage toegestaan.
- Het apparaat alléén laten werken als het op het voetstuck staat ofwel opgehangen is aan
de muur.
AAN- EN AFZETTEN
Om het apparaat op een willerkeurige manier te laten werken dient de programmerknop op
stand gezet te worden om een voort-durente werking te verkrijgen en op stand voor een
“geprogrammeerde” werking (zie paragraaf Gebruik van de programmering).
Voor het afzetten van het apparaat de programmeerknop op “0” zetten.
GEBRUIK VAN DE KEUZESCHAKELAAR
- Stand A: Bij gebruik van de haardroger.
- Stand B: Haardroger + verwarming zonder thermostaat op 1000 W
- Stand C: Verwarming zonder thermostaat op 1000 W
- Stand D: Verwarming 2000 Waat met thermostaat op maximum.
- Stand E: Antivries-service (het apparaat houdt de ruimtetemperatuur op circa 5°C en
met een minimum aan energieverbruik wordt bevriezing voorkomen).
HET REGELEN DER THERMOSTAAT
Om de temperatuur in de ruimte te regelen als volgt te werk gaan:
- keuzeschakelaar op stand D zetten;
- wanneer de ruimte de juiste temperatuur verkregen heeft, de knop langzaam kloksgewijze
draaien tot aan het uitgaan van de verklikker en niet verder.
De op die manier afgestelde ruimtetemperatuur zal zo automatisch door de thermostaat konstant gehouden worden.
Voor verdere regelingen en rekening mee houden, dat de temperatuur verlaagd wordt door
kloksgewije te draaien, terwijlhij hoger wordt bij het draaien in tegengestelde richting.
GEBRUIK VAN DE PROGRAMMERING
Voor het programmeren van de verwarming als volgt te werk gaan:
- Kijk op Uw horloge hoe laat het is. Als het bijvoorbeeld 18 uur is, dan de genummerde
schijf van de programmering kloksgewijze draaien tot aan nummer 18, zoals U kunt aflezen op de schaal ▲ van de programmering.
- Op de rode tandjes (fig. 4) naar het middelpunt drukken om de werkingsduur van het
12
Page 13

HBP 20-06-2000 15:44 Pagina 13
apparaat af te stellen.
- De programmeerknop op stand zetten. Op deze manier afgesteld zal het apparaat
automatisch iedere dag gedurende de geprogrammeerde tijd werken. (BELANGRIJK: de
steker moet altijd in het stopkontakt zitten).
- Om de programmering te veranderen is het voldoende de tandjes weer in de oorspronkelijke stand te zetten en de nieuwe werkduur af te stellen.
- Indien U het apparaat buiten de geprogrammeerde tijdsduur wilt laten werken, maar
deze niet wilt veranderen, dan de programmerknop op stand zetten.
GEBRUIK VAN DE HAARDROGER
De programmerknop en de keuzeschakelaar op stand A zetten (of ook B = gekombineerde
werking).
De haardroger werkt op 500 Watt als de drukknop op de handgreep op stand I staat en op
1000 Watt op stand II .
WAARSCHUWINGEN
- Het apparaat en het haardroger zijn voorzien van een type Y verbinding. De vervanging van
de alimentatiekabel moet door gespecialiseerd personeel uitgevoerd worden.
- Gebruik het apparaat altijd slechts in vertikale positie.
- Wanneer het apparaat in de draagbare uitvoering wordt gebruikt, dient het niet dichtbij
wanden, meubels, gordijnen enz. te functioneren.
- Gebruik het apparaat niet om wasgoed te drogen, laat de roosters voor de ingang en uitgang van de lucht niet verstopt raken (gevaar van oververhitting)
- Meubels en andere objekten dienen op tenminste 50 cm afstand van het apparaat te
staan.
- Nooit de in werking zijnde haardroger terug zetten in zijn behuizing.
- Een veiligheidsmechanisme onderbreekt het functioneren van de thermoventilator in geval
dat er per ongeluk oververhitting ontstaat (b.v. verstopping van de roosters voor in- en uitgang van de lucht, niet - of langzaam draaiende motor). Om het apparaat weer in
werking te stellen, is het noodzakelijk de stekker enkele minuten uit het stopcontact te
halen, de oorzaak van de oververhitting weg te nemen, en vervolgens de stekker weer in
het stopcontact te steken.
- Het apparaat moet niet onmiddellijk onder een vast stopcontact worden geplaatst
.- Het apparaat dient zodanig te worden opgesteld, dat de schakelaars en andere comman-
do’s buiten de reikwijdte vallen van personene die de douche of de badkuip gebruiken.
- Bedek het apparaat niet terwijl het werkt, om brandgevaar te voorkomen.
- Gebruik dit apparaat niet in een ruimte waarvan het oppervlak minder dan 4 m2is.
13
Page 14

HBP 20-06-2000 15:44 Pagina 14
E
CONEXION ELECTRICA
- Antes de enchufar el aparato, asegurarse de que la tensión de la red de electricidad
tenga el mismo valor en V (voltios) que se indica en la placa de datos.
- Cerciorarse de que la toma de corriente tenga una capacidad de 10/16 Amperios.
- ESTE APARATO CUMPLE LA DIRECTIVA EN 55014 SOBRE LA ELIMINACION DE INTERFERENCIAS RADIOFONICAS.
INSTALACION
El aparato viene provisto de un soporte para su uso en versiòn portatil.
Si se quiere fijar en la pared obrar del siguiente modo:
- Desenganchàr el aparato del soporte destornillando antes 1/4 de vuelta el tornillo negro
que se encuentra en la parte superior del mismo soporte.
- Fijar en la pared la abrazadera de enganche respetando las medidas minimas de la figura 1.
- Enganchar el aparato a la abrazadera y atornillar 1/4 de vuelta el tornillo negro que se
encuentra en la parte superior de la misma abrazadera.
- Si el aparato se instala en un cuarto de baño debe ser montado en la pared fuera del
volumen de protecciòn dibujado en la figura 2.
- Poner en funcionamiento el aparato sobre el soporte o fijo en la pared.
ENCENDIDO Y APAGADO
Para hacer funcionar el aparato, en cualquier posiciòn, situar la leveta del programador en
posiciòn si se quiere un funcionamiento continuo, o bien en posiciòn para un funcionamiento “programado” (ver paragrafo USO DEL PROGRAMADOR). Para apagar el aparato
situar la leveta del programador a “0”.
USO DEL MANDO DEL SELECTOR
- Posiciòn A: Predisposiciòn para el funcionamiento del secador para cabellos.
- Posiciòn B: Predisposiciòn para el funcionamiento del secador para cabellos + calefacciòn
sin termostato 1000 W
- Posiciòn C: Calefacciòn sin termostato 1000 W
- Posiciòn D: Calefacciòn 2000 W con termostato al màximo
- Posiciòn E: Servicio antihielo (el aparato mantiene el ambiente a una temperatura de
cerca 5°C impidiendo la congelaciòn con un minimo consumo de energìa.
REGULACION DEL TERMOSTATO
Para regular la temperatura del ambiente proceder del siguiente modo:
- situar el mando del selector en posiciòn D;
- cuando el ambiente ha alcanzado la temperatura deseada, girar la misma lentamente en
sentido horario hasta el apagado del indicador luminoso y no màs allà.
La temperatura del ambiente asi fijada vendrà automaticamente mantenida constante por el
termostato.
Para ulteriores regulaciones tener presente que girando en sentido horario se obtiene una
disminuciòn de la temperatura ambiente; mientras que en sentido antihorario se obtiene un
aumento.
USO DEL PROGRAMADOR
Para programar la calefacciòn, proceder del siguiente modo:
- mirar la hora de su reloj. Supongamos que son las 18, girar en sentido horario el disco
numerado del programador hasta hacer coincidir el numero 18 del mismo con el indice
de referimento ▲ impreso en el programador.
- Enfocar los periodos de tiempo en los que desean que el aparato funcione pulsando los
dientes rojos hacia el centro (figura 4).
14
Page 15

HBP 20-06-2000 15:44 Pagina 15
- Situar la leveta del programador en posiciòn Asi predispuesto el aparato funcionarà
automaticamente cada dia en el horario programado. (IMPORTANTE: el enchufe debe
estar siempre introducido en la toma de corriente).
- Para variar la programaciòn basta llevar los dientes en la posicòn inicial y situar los nuevos periodos de funcionamiento.
- Si desean hacer funcionar el aparato fuera de los tiempos programados, sin alterar el programa ya situado, basta llevar la leveta del programador en posiciòn
USO DEL SECADOR PARA CABELLOS
Situar la leveta del programador y el mando del selector en posiciòn A (o también B = funcionamiento combinado). El secador funciona a 500 W si el interruptor de la empuñadura se
pulsa en posiciòn I; a 1000 W si se pulsa en posiciòn II.
ADVERTENCIAS
- El aparato y el secador para cabellos están provistos de conexión tipo Y. La sustitución del
cable de alimentación debe ser realizada por el personal autorizado.
- Usar el aparato siempre y solamente en posición vertical.
- En el uso portátil, no apoyar la parte trasera del aparato contra paredes, muebles, cortinas, etc.
- No emplearlo para secar la ropa ni obstruir las rejas de entrada y salida del aire, para
evitar que el aparato se sobrecaliente.
- No dejar muebles ni otros objetos a menos de 50 cm del frontal del aparato.
- No colocar nunca de nuevo el secador de cabellos en funcionamiento dentro la propria
v i v i e n d a .
- Un dispositivo de seguridad interrumpe el funcionamiento del termoventilador en caso de
sobrecalentamiento accidental (ej.: obstrucciòn de la reja de entrada y salida del aire, motor
que no gira o gira despcio). Para poner de nuevo en funcionamiento, es necesario situar la
leveta del programador en posiciòn “0” durante algunos minutos, eliminar la causa del
sobrecalentamiento, y despuès llevar de nuevo la leveta en posiciòn de trabajo.
- No colocar el aparato inmediatamente debajo de una toma de corriente fija.
- Instalar el aparato de forma que los interruptores y demás mandos queden fuera del
alcance de quien se encuentre en la bañera o la ducha.
- No cubrir el aparato mientras esté funcionando, ya que podría ser causa de incendio.
- No utilizar el aparato en un local cuya planta sea inferior a 4 m2.
15
Page 16

HBP 20-06-2000 15:44 Pagina 16
P
LIGAÇÃO ELÉCTRICA
- Antes de ligar a ficha à tomada de corrente eléctrica, verifique atentamente se a volta-
gem da sua rede corresponde aos valores indicados no aparelho.
- Certifique-se de que a tomada de corrente possua uma capacidade de 10/16 Ampères.
- ESTE APARELHO CUMPRE A DIRECTIVA EN 55014 REFERENTE À LIMITAÇÃO DAS
INTERFERÊNCIAS RADIOELÉCTRICAS.
INSTALAÇÃO
O aparelho encontra-se na sua embalagem já montado sobre o seu suporte uma utilização
portátil. Se desejar fixar à parede, proceda da seguinte forma:
- Retirar o aparelho do seu suporte depois de ter desaparafusado 1/4 de volta o parafuso
negro que se encontra na parte superior do suporte.
- Fixar à parede o suporte de fixação respeitando as medidas minimas da fig. 1.
- Adaptar o aparelho ao suporte um quarto de volta o parafuso preto que se encontra na
parte superior do suporte.
- Se o aparelho for instalado numa casa de banho, é necessário fixar o aparelho na parede e respeitar as distâncias de segurança indicadas na fig. 2.
- O aparelho deve funcionar exclusivamente sobre o seu suporte ou fixo na parede.
FUNCIONAMENTO E PARAGEM
Para pôr a funcionar o aparelho, função aquecimento ou secar-cabelo, coloque o manipulo
do programador na posição para funcionamento continuo ou então na posição para un
funcionamento “programado” (ver parag. UTILIZAÇÃO DO PROGRAMADOR).
Para parar o aparelho, coloque o manipulo do programador na posição “0”.
UTILIZAÇÃO DO BOTÃO SELECTOR
- Posição A: Regular para funcionamento do secador de cabelo.
- Posição B: Regular para funcionamento do secador de cabelo + aquecimento sem regulação do termostato a 1000 W
- Posição C: Aquecimento sem regulação do termostato a 1000 W
- Posição D: Aquecimento a 2000 W com regulação do termostato no máximo
- Posição E: Serviço anti-gelo (o aparelho mantém a temperatura ambiente a cerca de
5°C, evitando assim o risco de congelação com consumo de corrente minima).
REGULAÇÃO DO TERMOSTATO
Para regular a temperatura ambiente, proceda da seguinte forma:
- coloque o botão do selector na posição D;
- assim que o ambiente atinga a temperatura desejada, gire lentamente o botão selector
no sentido horário até que a luz de aquecimento se apage e deixe ficar o botão nessa
posição.
Esta temperatura préregulada será mantida constante automáticamente pelo termostato.
Para seleccionar outras regulaçãoes, lembre-se que a rotação do botão no sentido horário
leva a uma diminuição da temperatura ambiente e a rotação no sentido contrário leva a um
aumento da temperatura.
UTILIZAÇÃO DO PROGRAMADOR
Para programar o aquecimento, proceda da seguinte forma:
- Observe a hora no seu relógio. Supondo que são 18 h, gire no sentido horário o disco
numérico, do programador até fazer coincidir o número 18 com o indice de referência ▲
do programador.
- Préregular os periodos de tempo de funcionamento do aparelho, premindo para o centro
as liguetas vermelhas (fig. 4).
- Colocar o manipulo do programador na posição . O aparelho, assim regulado entrará
16
Page 17

HBP 20-06-2000 15:44 Pagina 17
em funcionamento todos os dias à hora prevista (IMPORTANTE: deixar sempre o aparelho ligado na tomada).
- Para modificar a programação, basta colocar as linguetas vermelhas na posição inicial e
préregular novos periodos de funcionamento.
- Se desejar que o aparelho funcione fora do tempo programado, sem modificar o programa
já préregulado, basta colocar o manipulo do programador na posição .
UTILIZAÇÃO DO SECADOR DE CABELO
Posicione o manipulo do programador na posição e o botâo do selector para a posição A
(ou igualmente B = funcionamento combinado).
ADVERTÊNCIAS
- O aparelho e o secador de cabelo esten dotado de ligação tipo Y. A substituição do
cabo de alimentação deve ser feita por pessoa autorizada.
- O cabo de alimentação do secador de cabelo comporta uma ligação do tipo Y; a substituição portanto só pode ser efectuada pelo serviço pós-venda.
- Utilize o aparelho única e exclusivamente na posição vertical.
- Quando o aparelho for usado na versão portátil, não o faça funcionar encostado a paredes, móveis, cortinas, etc.
- Não utilize o aparelho para secar roupas, não obstrua as grelhas de entrada e de saída
de ar (perigo de sobreaquecimento).
- Não deixe móveis nem outros objectos diante do aparelho a menos de 50 cm.
- Nunca coloque o secador de cabelo no seu local enquanto estiver em funcionamento.
- Um dispositivo de segurançã interrompe o funcionamento do termoventilador no caso de
sobreaquecimento acidental. (Ex: obstrução das grelhas de entrada e saída do ar, mau funcionamento do motor). Para restabelecer o funcionamento, é necessário conduzir o manipulo
do programador para a posição “0” durante alguns minutos, eliminar a causa de sobreaquecimento e levar de seguida o manipulo para a posição de funcionamento.
- Este aparelho não deve ser colocado imediatamente por baixo de uma tomada de corrente fixa.
- O aparelho deve ser instalado de modo que os interruptores e os outros comandos não
possam ser alcançados por quem estiver dentro da banheira ou a utilizar o douche.
- Não cubra o aparelho durante o funcionamento para evitar riscos de incêndio.
- Não utilize o aparelho num aposento cuja área seja inferior a 4 m2.
17
Page 18

HBP 20-06-2000 15:44 Pagina 18
GR
HLEKTRIKH SUNDESH
- Prin bavlete to fi" sthn privza tou reuvmato" bebaiwqeivte ovti h tavsh tou diktuvou
sa" antistoiceiv sthn timhv twn Bovlt pou anagravfontai pavnw sth suskeuhv.
- Bebaiwqeivte ovti h privza tou reuvmato" evcei parochv ivsh me 10-16 Ampevr.
- AUTH H SUSKEUH EINAI SUNFWNH ME THN ODHGIA EN 55014 PANW STHN
KATASTOLH TWN RADIOFWNIKWN PAREMBOLWN.
EGKATASTASH
Anqevlete na topoqethvsete to qermantikov ston toivco, akolouqhvste ti" pio kavtw odhgive"Ú
- Ena cwristov sthvrigma toivcou sumperilambavnetai sto qermantikov sa". Gia na to
crhsimopoihvsete aplwv" topoqethvste to sthvrigma ston toivco me bivda 1/4” x 1 ivntsa.
- Gia na afairevsete to qermantikov apov th bavsh dapevdou (an upavrcei) aposundevste th
suskeuhv apj th bavsh (eik. 1). Crhsimopoihvsete evna novmisma kai gurivste thn mauvrh
bivda sthvrixh" 1/4 strofhv" pro" ta dexiav.
- Pathvste th bavsh kai trabhvxte th suskeuhv apov to sthvrigma.
- Otan topoqeteivte th suskeuhv sto sthvrigma toivcou pavnta na th sterewvnetai sth
qevsh th" crhsimopoiwvnta" th mauvrh bivda sto pavnw mevro" tou sthrivgmato".
- An h suskeuhv provkeitai na egkatastaqeiv sto mpavnio prevpei na mpei ston toivco
sth qevsh asfaleia", ovpw" faivnetai sthn eik. 2.
ANAMMA KAI SBHSIMO
Gia na leitourghvsei h suskeuhv, se opoiadhvpote leitourgiva, bavlte to moclov tou cronodiakovpth sth qevsh an qevlete th sunechv leitourgiva, hv sth qevsh gia mia programmatismevnh leitourgiva (blevpe paravgrafo CRHSH TOU CRONODIAKOPTH).
Gia na sbhvsete th suskeuhv bavlte to moclov tou cronodiakovpth sth qevsh 0.
CRHSH TOU DIAKOPTH EPILOGHS
- Qevsh AÚ Leitourgiva tou axesouavr.
- Qevsh BÚ Leitourgiva tou axesouavr + qevrmansh sta 1000„ cwriv" qermostavth.
- Qevsh ÇÚ Qevrmansh sta 1000„ cwriv" qermostavth.
- Qevsh ÎÚ Qevrmansh sta 2000„ me to qermostavth sto mavximoum.
- Qevsh EÚ Leitourgiva apovyuxh" (h suskeuhv diathreiv to peribavllon se mia qermokrasiva perivpou 5¡Ç empodivzonta" to pavgwma, me mia elavcisth katanavlwsh enevrgeia").
RUQMISH TOU QERMOSTATH
Gia th ruvqmish th" qermokrasiva" tou dwmativou kavnete ta exhv"Ú
bavlte to diakovpth epiloghv" sth qevsh DÚ ovtan to dwmavtio ftavsei sthn epiqumhthv qermokrasiva, gurivste to diakovpth pro" ta aristerav mevcri na sbhvsei h endeiktikhv lucniva
kai ovci parapevra.
Authv h qermokrasiva tou dwmativou qa diathrhqeiv autovmata staqerhv apov to qermostavth.
Gia peraitevrw ruqmivsei" lavbete upovyh ovti gurivzonta" to diakovpth pro" ta dexiav meiwv-
netai h qermokrasiva tou dwmativou, enwv pro" ta dexiav auxavnetai.
MONTELA ME CRONODIAKOPTH 24 WRWN
Gia na programmativsete th qevrmansh kavnete ta exhv"Ú
- Koitavxte thn wvra pou deivcnei to rolovi sa". Upoqevtonta" ovti h wvra eivnai 18, gurivste pro" ta dexiav ton ariqmhmevno divsko tou cronodiakovpth mevcri o ariqmov" 18 na
sumpevsei me to deivkth ▲ pou brivsketai pavnw sto cronodiakovpth.
- Kanonivste th cronikhv diavrkeia pou epiqumeivte na leitourgeiv h suskeuhv piezonta"
ti" egkope" pro" to kevntro (eik. 4).
- Bavlte to moclov tou cronodiakovpth sth qevsh . Etsi h suskeuhv qa anavbei autovmata kavqe mevra katav th diarkeia th" programmatismevnh" periovdou (shmeivwsh. To bivsma prevpei na mevnei pavntote sth privza).
- Gia na allavxete ton programmatismov, prevpei prwvta na fevrete ta dontavkia sthn
18
Page 19

HBP 20-06-2000 15:44 Pagina 19
arcikhv tou" qevsh kai uvstera na ruqmivsete to nevo cronikov diavsthma leitourgiva".
- Gia th leitourgiva th" suskeuhv" evxw apov to crovno programmatismouv, cwriv" me autov
na allavxei to ruqmismevno provgramma, arkeiv na bavlete to moclov tou cronodiakovpth
sth qevsh .
CRHSH TOU AXESOUAR
Bavlte to moclov tou cronodiakovpth kai to diakovpth epiloghv" sth qevsh A (hv BÚ sundiasmov" leitourgiwvn). To axesouavr leitourgeiv sta 500„ ovtan o diakovpth" pavnw sth
ceirolabhv eivnai pathmevno" sth qevsh I, sta 1000„ ovtan eivnai pathmevno" sth qevsh II.
SHMANTIKES ODHGIES
- Gia thn suskeuhv problevpetai h suvndesh tuvpou Y. Opoiadhvpote allaghv tou kalwdivou
parochv" prevpei na givnetai apov exousiodothmevno proswpikov.
- To hlektrikov kalwvdio tou axesouavr eivnai sundedemevno se U, giautov h antikatavstashv tou mporeiv na givnei movno apov to sevrbi" ma".
- Potev mhn bavzete to axesouavr anammevno mevsa sth qhvkh tou.
- Mia diavtaxh asfaleiva" diakovptei th leitourgiva tou aerovqermou se perivptwsh uperqevrmansh" (p.c.Ú fravximo twn persivdwn eisovdou kai exovdou aevra, kinhthvra" pou den
gurivzei hv gurivzei argav). Gia thn epanaleitourgiva th" suskeuhv", prevpei na bavlete
gia merikav leptav to moclov tou cronodiakovpth sth qevsh 0, na diorqwvsete thn aitiva
pou prokaleiv thn uperqevrmansh, kai uvstera na xanabavlete to moclov sth qevsh leitourgiva".
- Mhn topoqeteivte th suskeuhv se ugrouv" cwvrou" hv kontav se ntou", mpanievre", nipthvre", pisivne", klp.
- Na crhsimopoieivte th suskeuhv movno se katakovrufh qevsh.
- Mhn crhsimopoieivte th suskeuhv gia na stegnwvsete rouvca, mhn fravzete ti" persivde" eisovdou kai exovdou tou aevra (kivnduno" uperqevrmansh").
- Se mia apovstash 50 ekat. mprostav apov th suskeuhv den prevpei na upavrcoun evpipla
hv avlla antikeivmena.
- Otan h suskeuhv crhsimopoieivtai san forhthv, den prevpei na leitourgeiv kontav se
toivcou", evpipla, kourtivne", klp.
- H suskeuhv prevpei na egkatastaqeiv me tevtoio trovpo wvste an kavpoio" crhsimopoieiv
th mpanievra hv to ntou" na mhn mporeiv na ftavsei tou" diakovpte".
- H suskeuhv den prevpei na topoqeteivtai kavtw apov mia movnimh privza tou reuvmato".
- Mhn skepavzete th suskeuhv katav th leitourgiva, wvste na apofuvgete ton kivnduno
purkagiav".
- Mhn crhsimopoieivte authv th suskeuhv se evna dwmavtio me embadovn kavtw apov 4 m2.
19
Page 20

HBP 20-06-2000 15:44 Pagina 20
DK
ELEKTRISK TILSLUTNING
- Før stikket sættes i stikkontakten, kontrolleres, at netspændingen svarer til spændingsangi-
velsen på typepladen.
- Kontroller at kontakten er en 10/16 ampere stikkontakt.
- DETTE APPARAT OVERHOLDER DIREKTIV EN 55014 VEDRØRENDE RADIOSTØJ.
INSTALLATION
Apparatet leveres på støttefod og er klar til brug i den transportable version.
Ønsker man at hænge det op på væggen, gås frem på følgende måde:
- Tag støttefoden af ved at dreje de sorte skruer, der befinder sig øverst på foden 1/4
omgang.
- Sæt beslaget til vægophæng fast på muren. Overhold de mindsteafstande, der er angivet
i fig.1.
- Sæt apparatet fast på beslaget, og drej de sorte skruer 1/4 omgang den modsatte vej.
- Hvis apparatet installeres i et badeværelse bør “sikkerhedsområdet” angivet i fig. 2
overholdes.
- Apparatet bør kun bruges med støttefod eller fastgjort på væggen.
TÆNDING OG SLUKNING
Apparatet tændes ved at sætte timerkontakten på for vedvarende drift og på for programmeret drift (se afsnittet BRUG AF TIMEREN).
Apparatet slukkes ved at sætte timerkontakten på “0”.
BRUG AF PROGRAMVÆLGEREN
- Stilling A: Kun hårtørrer
- Stilling B: Hårtørrer + opvarmning ved 1000 W uden termostat
- Stilling C: Opvarmning ved 1000 W uden termostat
- Stilling D: Opvarmning ved 2000 W med termostaten på maks.
- Stilling E: Antifrost program (apparatet vedligeholder rumtemperaturen på ca. 5˚C og
forebygger frostskader med et minimalt energiforbrug).
REGULERING AF TERMOSTATEN
Rumtemperaturen reguleres således: Sæt programvælgeren på D. Når rumtemperaturen har
nået den ønskede værdi, drejes programvælgeren langsomt med uret, indtil signallampen
slukkes - ikke længere.
Termostaten vil nu automatisk regulere og vedligeholde rumtemperaturen på den indstillede værdi.
Ønskes temperaturen herefter sænket, drejes programvælgeren med uret, mens den drejes
mod uret, hvis der ønskes en højere temperatur.
BRUG AF TIMEREN
Opvarmningen kan programmeres på følgende måde:
- Check tiden på Deres ur. Hvis klokken f.eks. er 18, drejes programvælgerens nummererede skive med uret, indtil 18-tallet på skiven står ud for indikatoren ▲.
- Det tidsrum, man ønsker apparatet skal fungere i, indstilles ved hjælp af de røde tappe
(fig.4), der trykkes ind mod midten.
- Stil timerkontakten på Apparatet vil nu fungere hver dag i de indstillede tidsrum. (VIGTIGT: radiatoren skal altid være tilsluttet stikkontakten).
- Ønsker man at ændre driftsperioderne, skal man bare tilbagestille tappene og indstille de
nye perioder, som beskrevet ovenfor.
- Ønsker man opvarmning udenfor de programmerede tidsrum uden i øvrigt at ændre på
programmet, sættes timerkontakten på .
20
Page 21

HBP 20-06-2000 15:44 Pagina 21
BRUG AF HÅRTØRREN
Sæt timerkontakten på og programvælgeren på A (eller B = kombinerede programmer)
Hårtørren virker med 500 W, hvis afbryderen på håndtaget stilles på I, og med 1000 W
hvis afbryderen stilles på II.
VIGTIGT
- Hårtørren er Y-forbundet og må kun udskiftes på et autoriseret servicecenter.
- Apparatet er forsynet med forbindlse af Y-typen. Udskiftningen af fødeledningen skal udføres af autoriseret personale.
- Brug altid kun apparatet i opret stilling.
- Brug aldrig apparatet til at tørre tøj på og tildæk aldrig luftindtaget og -udblæsningen.
- Hvis apparatet bruges i den transportable version, må det aldrig placeres tæt på vægge,
møbler, gardiner o.l.
- Foran apparatet bør der være mindst 50 cms afstand til møbler eller andre genstande.
- Apparatet bør installeres på en sådan måde, at afbryderne og de øvrige kontakter ikke kan
nås fra bruser eller badekar.
- Apparatet må aldrig placeret direkte under en stikkontakt.
- På grund af brandfare må apparatet under ingen omstændigheder tildækkes, mens det er i
brug.
- Brug ikke apparatet i rum med et gulvareal på mindre end 4 m2.
- Sæt aldrig hårtørren på plads, mens den stadig er tændt.
- Apparatet er forsynet med en automatisk overophedningssikring. Hvis apparatet bliver
overophedet (på grund af f.eks. tilstopning af indsugnings- eller udblæsningsåbningerne,
motoren kører for langsomt eller slet ikke), slukker det automatisk. Sæt timerkontakten på
“0” i nogle minutter, fjern årsagen til overophedningen, og stil herefter timerkontakten tilbage.
21
Page 22

HBP 20-06-2000 15:44 Pagina 22
S
ELEKTRISK ANSLUTNING
- Innan ni sticker in stickkontaken i vägguttaget kontrollera noggrant att er nätspänning motsvarar värdet i V angivet på märkplåten.
- Försäkra er om att vägguttaget har en kapacitet av 10/16 A.
- DENNA APPARAT UPPFYLLER DIREKTIVET EN 55014 FÖR RADIOSTÖRNINGAR
INSTALLATION
Apparaten har emballerats och monterats på en piedestal för användning i den bärbara versionen.
Om man vill fästa den på väggen gå till väga på följande sätt:
- Haka av apparaten ifrån piedestalen genom att skruva loss den svarta skruven, som befinner sig på den övre delen av piedestalen, ett 1/4 varv.
- Fäst väggstödet och respektera de minimala skyddsmåtten fig.1.
- Haka fast apparaten på stödet och skruva fast den svarta skruven, som befinner sig på
den övre delen av stödet, ett 1/4 varv.
- Om apparaten installeras i ett badrum måste den sättas fast på väggen och respektera
skyddsavståndet i fig. 2.
- Låt apparaten fungera enbart på piedestalen eller fästad på väggen.
PÅSLAGNING OCH IFRÅNSLAGNING
För att låta apparaten fungera i vilken som helst funktion, för timervisaren till läge “ “ om ni
önskar en kontinuerlig drift, eller till läge “ “ för en programmerad funktion (se paragrafen
beträffande ANVÄNDNING AV PROGRAMMERAREN).
För att slå ifrån apparaten för timervisaren till “0”.
ANVÄNDNING AV VÄLJAREKNAPPEN
- Läge A: Förberedd för funktion av hårtorken.
- Läge B: Förberedd för funktion av hårtorken + 1000 W uppvärmning utan termostat
- Läge C: 1000 W uppvärmning utan termostat
- Läge D: 2000 W uppvärmning med termostat i max. läge.
- Läge E: Frysskyddsfunktion (apparaten bibehåller rumstemperaturen vid cirka 5˚C och
förhindrar frysning med en minimal energiförbrukning).
REGLERING AV TERMOSTATEN
För att reglera rumstemperaturen gå till väga på följande sätt:
placera väljareknappen i läge D; när den önskade rumstemperaturen har uppnåtts, vrid densamme långsamt medurs tills signallamporna släcks och inte mera.
Den så här inställda temperaturen bibehålls konstant av termostaten.
För ytterligare regleringar håll i minnet att genom att vrida den medurs erhåller man en sänkning av rumstemperaturen, medan moturs erhåller man en ökning.
ANVÄNDNING AV PROGRAMMERAREN
För att programmera uppvärmningen gå till väga på följande sätt:
- Titta på hur mycket klockan är. Låt oss säga att den är 18, vrid den numrerade programskivan medurs tills referensmärket “▲“ befinner sig vid siffran 18 på timern.
- Ställ in tidsperioderna under vilka ni önskar att apparaten ska fungera genom att trycka
de röda inställningsklackarna emot centrumet (fig. 4).
- Placera timervisaren i läge “ “. Apparaten inställd på det här sättet kommer att fungera
automatiskt varje dag under den inställda tiden. (VIKTIGT: stickkontakten måste alltid vara
instucken i vägguttaget).
22
Page 23

HBP 20-06-2000 15:44 Pagina 23
- För att ändra programmeringen är det tillräckligt att föra tillbaka inställningsklackarna till
utgångsläget och ställa in nya funktionsperioder.
- Om ni önskar en funktion av apparaten utöver de inställda tiderna, utan att ändra det
redan inställda programmet är det tillräckligt att föra timervisaren till läge “ “.
ANVÄNDNING AV HÅRTORKEN
För timervisaren “ “ och väljareknappen till läge A (eller även B = kombinerad funktion).
Hårtorken fungerar vid 500 W om strömbrytaren på handtaget hålls nedtryckt i läge I; vid
1000 W om den hålls nedtryckt i läge II.
VARNINGAR
- Hårtorkens strömkabel är Y-ansluten, den kan således endast bytas av våra serviceverkstäder.
- Apparaten är utrustad med en anslutning av Y-typ. Utbyte av strömkabeln måste göras av
behörig person.
- Använd apparaten alltid och enbart i vertikalt läge.
- Använd inte apparaten för att torka tvätt, hindra inte luftintags- och luftutsläppsgrillarna.
- När apparaten används i bärbar version låt den inte fungera i närheten av väggar,
möbler, gardiner, etc.
- Möbler och andra föremål får inte befinna sig framför apparaten inom ett avstånd av 50
cm.
- Apparaten måste installeras på så sätt att strömbrytarna och de andra funktionsknapparna inte kan nås av den som använder badkaret eller duschen.
- Apparaten får inte placeras direkt under ett fast vägguttag.
- Täck aldrig apparaten när den fungerar för att undvika risken ör eldsvåda.
- Använd inte den här apparaten i rum med en basyta som understiger 4 m2.
- Lägg inte tillbaka hårtorken i sitt säte när den fungerar.
- Den här fläkten är inte avsedd att användas i hygieniska rum, barnkammare, daghem och
bostadsrum.
- En säkerhetsanordning avbryter funktionen av värmefläkten om den tillfälligtvis skulle
överhettas (ex. luftintags- och luftutsläppsgrillarna hindrade, motorn fungerar inte eller går
långsamt). För att återställa funktionen, är det nödvändigt att placera timervisaren i läge
“0” för några minuter, avlägsna orsaken till överhettningen och därefter föra tillbaka
timervisaren till funktionsläget.
23
Page 24

HBP 20-06-2000 15:44 Pagina 24
N
ELEKTRISK KOBBLING
- Før stikk-kontakten settes inn, kontroller at “V”-verdien på apparatet korrisponderer med
antall volt på strømnettet.
- Kontroller at strømstøpselet har en belastning på 10/16 ampère.
- DETTE APPARATET ER I OVERENSTEMMELSE MED DIREKTIV EN 55014 OM RADIOFORSTYRRELSER.
INSTALLASJON
Apparatet er pakket med sokkler for bærbart bruk. Dersom det ønskes å feste ovnen på murvegg, gjør følgende:
- Demonter sokkelen ved å vri den sorte skruen som befinner seg på oversiden av sokkelen
en 1/4 omdreining.
- Fest hengselet på murveggen og respekter målene i fig.1.
- Hekt apparatet på hengselet og vri den sorte skruen tilbake 1/4 omdreining.
- Dersom apparatet installeres på baderom, må den monteres utenfor sikkerhetsvolumet som
vist i fig.2.
- Start apparatet kun når det er festet på sokkelen eller til murvegg.
AV OG PÅ-TENNING
For at apparatet skal virke, i enhver stilling, sett funksjonsbryteren i stilling for konstant
funksjon, eller i stilling for “programmering” (se paragrafen om bruk av timer).
For å slå apparatet av, sett bryteren i “0” stilling.
BRUK AV FUNKSJONSVELGERBRYTEREN
- Posisjon A: Funksjon for håtørker
- Posisjon B: Funksjon for hårtørker og oppvarming 1000w, ikke termostat.
- Posisjon C: Oppvarming uten termostat 1000w.
- Posisjon D: Oppvarming med maksimum termostat 2000w.
- Posisjon E: Antifrost (apparatet holder romtemperaturen på ca. 5°, for slik å unngå
frost og med et minimum av energiforbruk.
REGULERING AV TERMOSTAT
For å regulere romtemperaturen, gjør følgende: sett bryteren i posisjon D; når den ønskede
romtemperatur er oppnådd, vri termostatkontrollen sakte mot høyre inntil kontroll-lampen
slukkes. Termostaten vil så automatisk holde konstant den valgte temperaturen.
For ytterligere regulasjon vil man ved å vri bryteren mot høyre få en lavere romtemperatur og
ved å vri den mot venstre vil romtemperaturen øke.
BRUK AV TIMER
For programmering av oppvarmingen, gjør følgende:
- Kontroller deres egen klokke. La oss anta at den er 18, vri mot høyre den nummererte programmerings-skiven inntil referansepilen ▲ peker mot nummer 18 på skiven.
- Sett virkeperioden ved å trykke de røde markørene inn mot senter av skiven (fig.4.).
- Sett funksjonsbryteren i stilling. På denne måte vil apparatet virke hver dag på det
bestemmte tidspunktet. (Viktig: stikk-kontakten må alltid være tilkobblet.)
- For å forandre programmasjonen, er det nok å sette markørene tilbake i sin opprinnelige
posisjon, for så å sette dem i deres nye tidsperiode.
- Dersom de ønsker å bruke apparatet utenom den programmerte tiden, uten å slette programmeringen, er det nok å sette funksjonsbryteren i stilling.
RUK AV HÅRTÖRKER
Sett funksjonsbryteren i stilling og valgbryteren i A stilling (eller B =kombinert bruk).
24
Page 25

HBP 20-06-2000 15:44 Pagina 25
Hårtørkeren virker ved 500W dersom bryteren på håndtaket er i stilling I og ved 1000W
dersom i stilling II.
MERKNADER
- Ledningen til hårtørkeren er skjøtet ved en Y. Skifting av ledning kan derfor kun utføres av
våre service-sentere.
- Apparatet er utstyrt med tilkobling type Y. Utskifting av ledningen må kun utføres av autorisert personell.
- Apparatet må kun brukes i vertikal stilling.
- Apparatet må ikke brukes til tørking av undertøy. Dekk aldri til luft inntak eller uttak.
- Når apparatet brukes i bærbar form, sett det ikke i nærheten av vegger, møbler, gardiner
etc.
- Minst 50 cm fra fronten av apparatet må være fri for møbler og andre objekter.
- Laitteen tulee olla kaukana suihkusta tai kylpyammesta, jottei virrankatkaisimia tai muita
näppäimiä ylety koskemaan kylpyammeessa ollessa.
- Laitetta ei saa asettaa suoraan kiinteän pistorasian alapuolelle.
- Laitetta ei saa peittää sen ollessa toiminnassa, jottei tulisi tulipalovaaraa.
- Laitetta ei saa käyttää huoneissa, jonka lattiapinta-ala on alle 4 m2.
- Sett aldri hårtørkeren tilbake på plass sålenge den er i bruk.
- En sikkerhets-dispositiv stenger av apparatet dersom det ved uhell skulle overvarmes
(eksempel: tildekking av luft-inntak) For å få apparatet til å virke på nytt må funksjonsbryteren settes i “0” stilling i noen få minutter. Fjern så årsaken til overvarmen og sett så bryteren tilbake som før.
25
Page 26

HBP 20-06-2000 15:44 Pagina 26
SF
SÄHKÖLIITÄNTÄ
- Ennenkuin laitetta käytetään, on tarkastettava huolellisesti, että verkkojännite on sama kuin
laitteen arvokilvessä ilmoitettu jännite.
- On varmistettava, että pistorasia kantaa 10/16 Ampeeria.
- LAITE ON RADIOHÄIRIÖIDEN ESTÄMISTÄ KOSKEVAN DIREKTIIVIN EN 55014 MUKAINEN.
ASENNUS
Lämmitin on pakattu jalustalle asennettuna kannettavana versiona.
Jos se halutaan kiinnittää seinään, toimitaan seuraavasti:
- Laite irrotetaan jalustasta ruuvaamalla auki 1/4 kierrosta jalustan yläpuolella olevaa
mustaa ruuvia.
- Kiinnityshaka kiinnitetään seinään, ottaen huomioon kuvassa 1 esitetyt minimimitat.
- Laite kiinnitetään hakaan ja mustaa, haan yläpuolella olevaa ruuvia ruuvataan kiinni 1/4
kierrosta.
- Jos laite asennetaan kylpyhuoneeseen, on se kiinnitettävä seinälle “turvallisuusalueen”
ulkopuolelle kuten kuvassa 2.
- Laite saa toimia ainoastaan jalustalla tai kiinnitettynä seinään.
KÄYNNISTYS JA PYSÄYTYS
Kun laite laitetaan käyntiin, mihin tahansa toimintaan, asetetaan ajastimen vipu asentoon
kun halutaan jatkuva toiminta, tai asentoon kun halutaan “ajastettu” toiminta (kts. kohta
AJASTIMEN KÄYTTÖ).
Kun laite pysäytetään, laitetaan ajastimen vipu “0”:lle.
VALITSINNAPPULAN KÄYTTÖ
- Asento A: Hiustenkuivaaja toimintaan
- Asento B: Hiustenkuivaja toimintaan + lämmitys 1000 Watt’in teholla ilman termostaa-
tia.
- Asento C: Lämmitys 1000 Watt’in teholla, ilman termostaattia.
- Asento D: Lämmitys 2000 Watt’in teholla, termostaatti maksimissa.
- Asento E: Jäätymistä estävä toiminta (laite pitää huoneen lämpötilaan 5°C asteessa,
estäen jäätymisen ja kuluttaen näin minimimäärän energiaa).
TERMOSTAATIN SÄÄTÖ
Huoneen lämpötila säädetään seuraavasti: Valitsinnappula asetetaan asentoon D; kun
huone on saavuttanut halutun lämpötilan, kierretään nappulaa hitaasti myötäpäivään kunnes
merkkivalo sammuu, ei enempää.
Näin määrätty lämpötila säätyy automaattisesti. Termostaatti pitää lämpötilan vakiona.
Kun täytyy säätää vielä, on muistettava, että kiertämällä myötäpäivään saadaan huoneen
lämpötilan pieneneminen, kun taas vastapäivään kiertämällä saadaan sen nouseminen.
AJASTIMEN KÄYTTÖ
Kun lämmitys ajastetaan, toimitaan seuraavalla tavalla:
- Tarkistetaan kellon aika. Jos se on esim. 18, ajastimen numerotaulua kierretään
myötäpäivään, kunnes siinä oleva numero 18 sattuu ajastimessa ▲ olevan viitemerkin
kohdalle.
- Aikajaksot, jolloin halutaan laitteen olevan toiminnassa, asetetaan kohdalleen työntämällä
punaiset lovet keskelle (kuva 4).
- Ajastimen vipu asetetaan asentoon , Näin ajastettuna laite toimii automaattisesti joka
päivä toimintaan asetettuna aikajaksona (TARKEÄÄ: pistokkeen tulee aina olla liitetty
26
Page 27
HBP 20-06-2000 15:44 Pagina 27
pistorasiaan).
- Kun ohjelmoitua aikajaksoa halutaan vaihtaa, viedään lovet takaisin alkuperäisille paikoil-
leen, sitten asetetaan uudet toimintajaksot.
- Kun halutaan, että laite toimii ajastettujen aikojen ulkopuolella, ilman että ajastettua aikaa
vaihdetaan, viedään ajastimen vipu asentoon .
HIUSTENKUIVAAJAN KÄYTTÖ
Ajastimen vipu asetetaan ja valitsinnappula asentoon A (tai myös B = yhdistetty toiminta).
Hiustenkuivaaja toimii 500 Watt’lla, jos kädensijassa oleva kytkin on painettu asentoon I;
1000 Watt’lla, jos se on painettu asentoon ll.
TÄRKEÄÄ
- Hiustenkuivaajan virtajohto on Y liitännällä, sen voi vaihtaa vain huoltoliikkeemme.
- Laitteessa on Y-tyyppinen liitäntä. Syöttoökaapelin saa vaihtaa vain valtuutettu henkilö.
- Laitetta tulee käyttää aina pystyasennossa.
- Laitetta ei saa käyttää pyykin kuivaamiseen, eikä ilman poisto- ja sisäänottoristikoita saa
peittää.
- Kun laitetta käytetään kannettavissa olevana versiona, ei sitä saa käyttää seinien, huo-
nekalujen, verhojen läheisyydessä jne.
- Laitteen edessä, 50 cm:ä lähempänä, ei saa olla huonekaluja tai muita kohteita.
- Laitteen tulee olla kaukana suihkusta tai kylpyammesta, jottei virrankatkaisimia tai muita
näppäimiä ylety koskemaan kylpyammeessa ollessa.
- Laitetta ei saa asettaa suoraan kiinteän pistorasian alapuolelle.
- Laitetta ei saa peittää sen ollessa toiminnassa, jottei tulisi tulipalovaaraa.
- Laitetta ei saa käyttää huoneissa, jonka lattiapinta-ala on alle 4 m2.
- Toiminnassa olevaa hiustenkuivaajaa ei saa laittaa koskaan omaan lokeroonsa.
- Varmuuslaite keskeyttää tuuletinlämmittimen toiminnan, jos laite vahingossa kuumenee
liikaa (esim. ilman poisto- ja sisäänottoristikoiden tukkiutuminen, moottori ei pyöri tai pyörii hitaasti). Jotta se käynnistyisi uudelleen, pitää ajastimen vipu asettaa asentoon “0”
muutamaksi minuutiksi, poistaa ylikuumenemisen syy, ja viedä jälleen vipu toiminta-asentoon.
27
Page 28
HBP 20-06-2000 15:44 Pagina 28
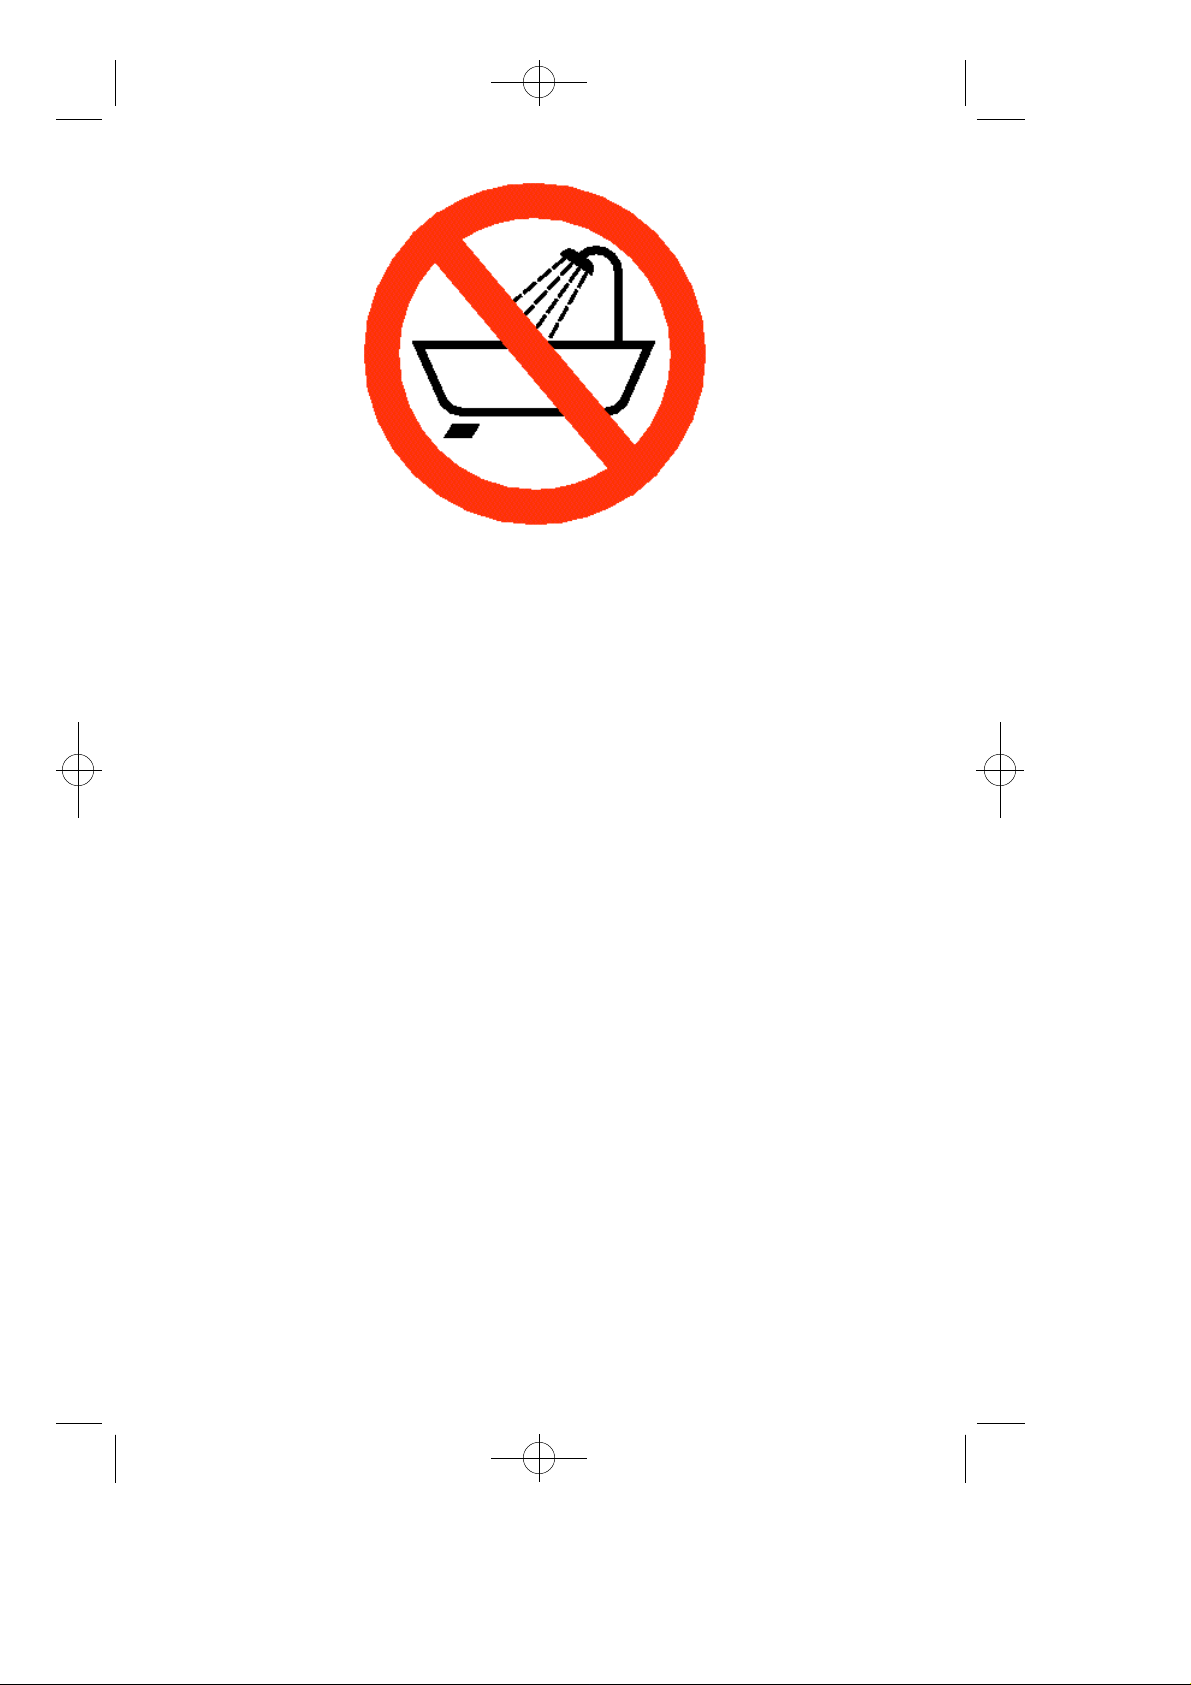
Do not use hair dryer while in bath, under the shower or standingover washbasin with
water in it.
The heater must not be located immediately below a fixed socket-outlet.
Ne pas utiliser le sèche-cheveux lorsque l’on est dans la baignoire, sous la douche ou
au dessus d’un évier rempli d’eau.
Cet appareil de chauffage ne doit pas être juste en dessous d’une prise de courant
placée à poste fixe.
Den Haartrockner nicht in der Badewanne, Dusche oder über mit Wasser gefülltem
Waschbecken benutzen.
Das Heizgerät darf nicht unmittelbar unterhalb einer Wandsteckdose angebracht wer -
den.
Non usare l’asciugacapelli in vasca da bagno, in doccia o sopra un lavandino pieno
d’acqua.
L’apparecchio non deve essere posto immediatamente sotto una presa di corrente.
De haardroger niet gebruiken in het bad, stortbad of in de omgeving van wastafels
gevuld met water.
Dit verwarmingstoestel hoeft niet geplaatst te worden onder een vast stopkontakt.
No utilizar el secador de pelo dentro de la bañera, dentro de la ducha o sobre un lava bo lleno de agua.
El aparato no debe estar colocado immediatamente bajo una toma de corriente fija.
Não usar o secador de cabelo nas imediações da piscina, casas, de banho ou lavanda -
rias.
Este aquecedor não deve ser colocado imediatamente por baixo da tomada fixa de
corrente.
Mhn topoqeteivte th suskeuhv se ugrouv" hv kontav se ntou", mpanievre", nipthvre", pisivne", klp.
H suskeuhv den prevpei na topoqeteivtai kavtw apov mia movnimh privza tou reuvmato".
Installer aldrig apparatet i fugtige lokaler eller i nærheden af badekar, brusere, hånd vaske, svømmebassiner o.l.
Apparatet bør installeres på en sådan måde, at afbryderne og de øvrige kontakter
ikke kan nås fra bruser eller badekar.
Innan någon som helst rengörning dra ut stickkontakten ur väggutaget.
Apparaten får inte placeras direkt under ett fast vägguttag.
Monter aldri apparatet i fuktige lokaler eller i nærheten av badekar, dusj, servanter,
badebasseng etc.
Laitetta ei saa asettaa suoraan kiinteän pistorasian alapuolelle.
Laitetta ei saa asentaa kosteisiin tiloihin tai suihkujen, kylpyammeiden, pesualtaiden,
uima-altaiden jne. läheisyyteen.
Laitetta ei saa laittaa suoraan kiinteän pistorasian alapuolelle.
5714000700/07.94
 Loading...