

Delonghi HBM 12 Instructions Manual
FAN HEATER
RADIATEUR SOUFFLANT
HEIZLÜFTER
TERMOVENTILATORE
TERMOVENTILATOR
TERMOVENTILADOR
TERMOVENTILADOR
AEROQERMO
VARMLUFTSBÆSER
VÄRMEFLÄKT
VIFTE OVN
TUULETINLÄMMITIN
Instruction manual
Mode d'emploi
Bedienungsanleitung
Istruzioni d'uso
Gebruiksvoorschriften
Instrucciones de uso
Instruções para o uso
Olhgies crhshs
Brugsvejledning
Bruksanvisning
Bruks anvisning
Käyttöohjeet
HBM 12 31-01-2001 13:56 Pagina 1
A) If your appliance comes fitted with a plug, it will incorporate a 13 Amp fuse. If it does not fit your socket, the plug
should be cut off from the mains lead, and an appropriate plug fitted, as below.
WARNING: Very carefully dispose of the cut off plug after removing the fuse: do not insert in a 13 Amp socket
elsewhere in the house as this could cause a shock hazard.
With alternative plugs not incorporating a fuse, the circuit must be re-fitted when changing the fuse using a 13 Amp
Asta approved fuse to BS 1362. In the event of losing the fuse cover, the plug must NOT be used until a replacement fuse cover can be obtained from your nearest electrical dealer. The colour of the correct replacement fuse cover
is that as marked on the base of the plug.
B) If your appliance is not fitted with a plug, please follow the instructions provided below:
IMPORTANT
The wires in the mains lead are coloured in accordance with the followin code:
Blue: Neutral
Brown: Live
As the colours of the wires in the mains lead of this ppliance may not correspond with the coloured markings identifying
the terminals in your plug, proceed as follows:
The wire which is coloured blue must be connected to the terminal which is marked with the letter N or coloured black.
The wire which is coloured brown must be connected to the terminal which si marked with the letter L or coloured red.
ELECTRICAL CONNECTION (U.K. ONLY)
HBM 12 31-01-2001 13:56 Pagina 2
1
2
MIN
600 mm
MIN
200 mm
127 mmMIN
200 mm
225 cm
B
C
F
G
L
H
D E
A
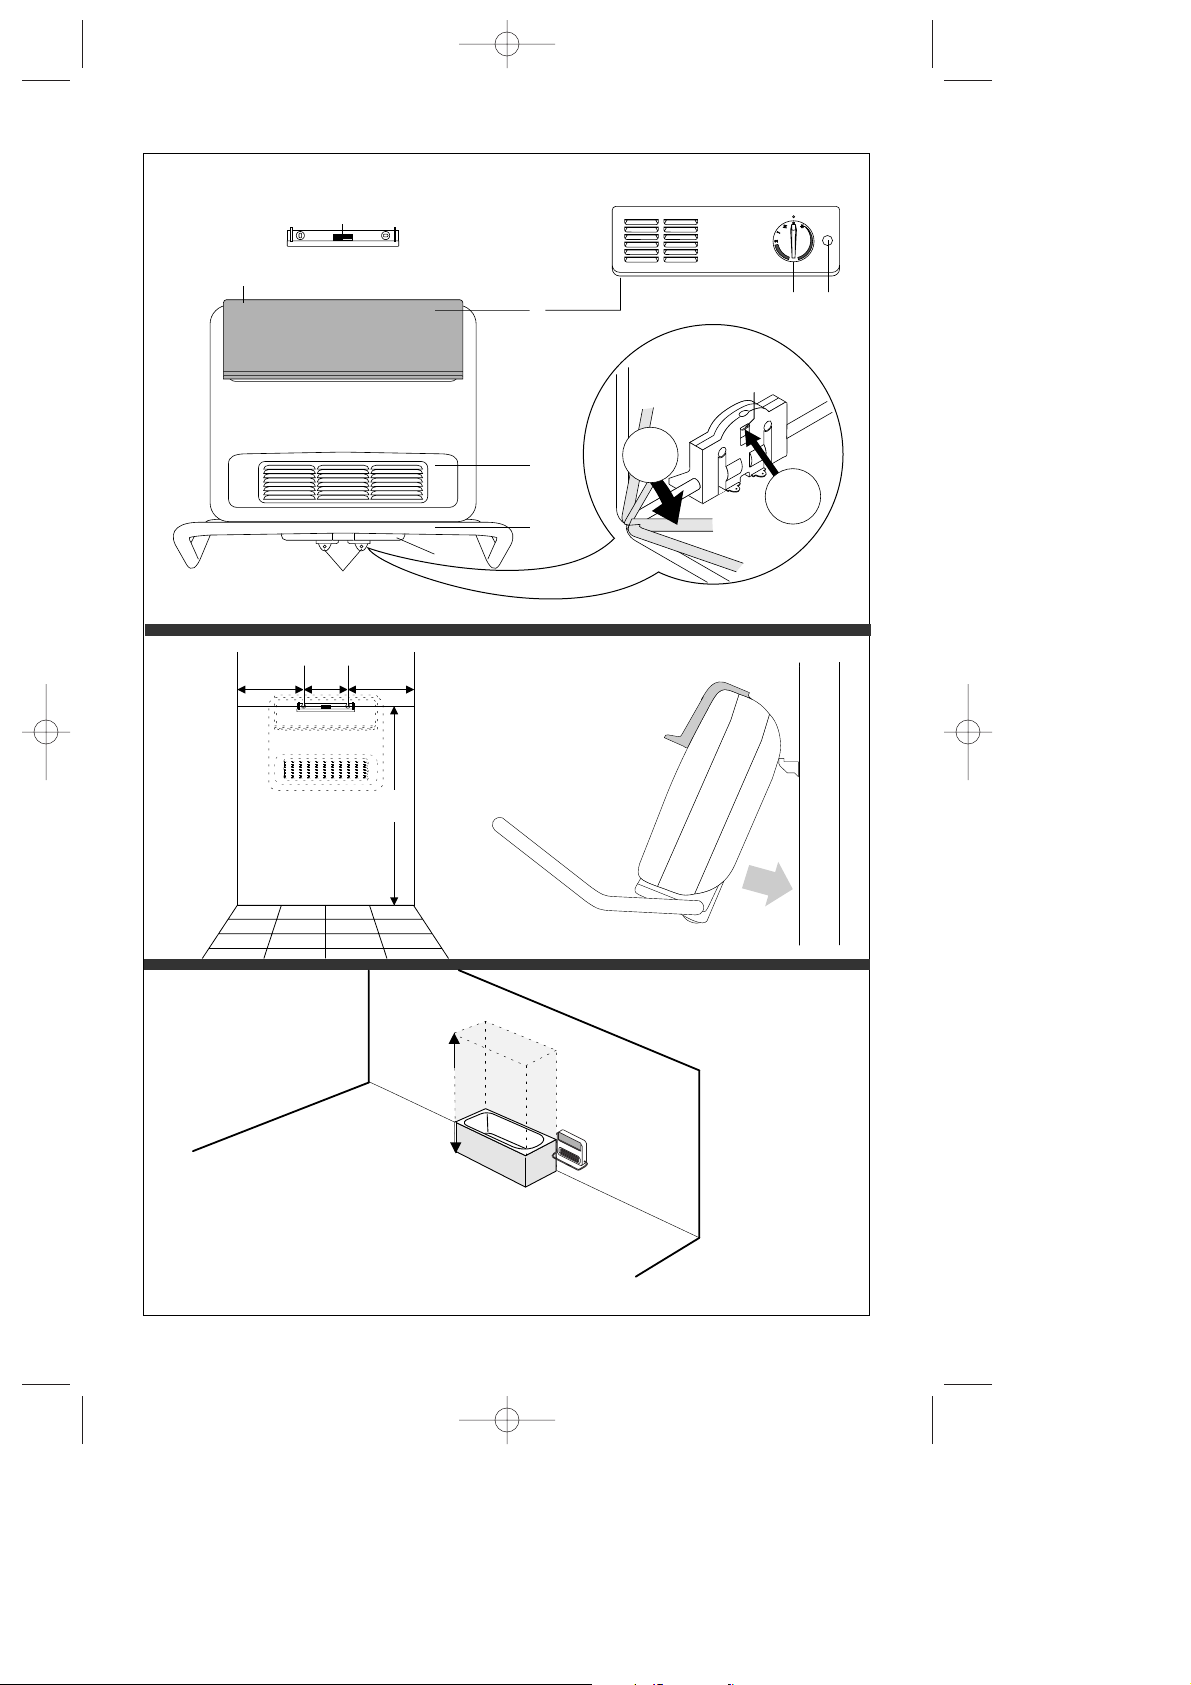
fig. 1
fig. 2
fig. 3
fig. 4
I
HBM 12 31-01-2001 13:56 Pagina 3
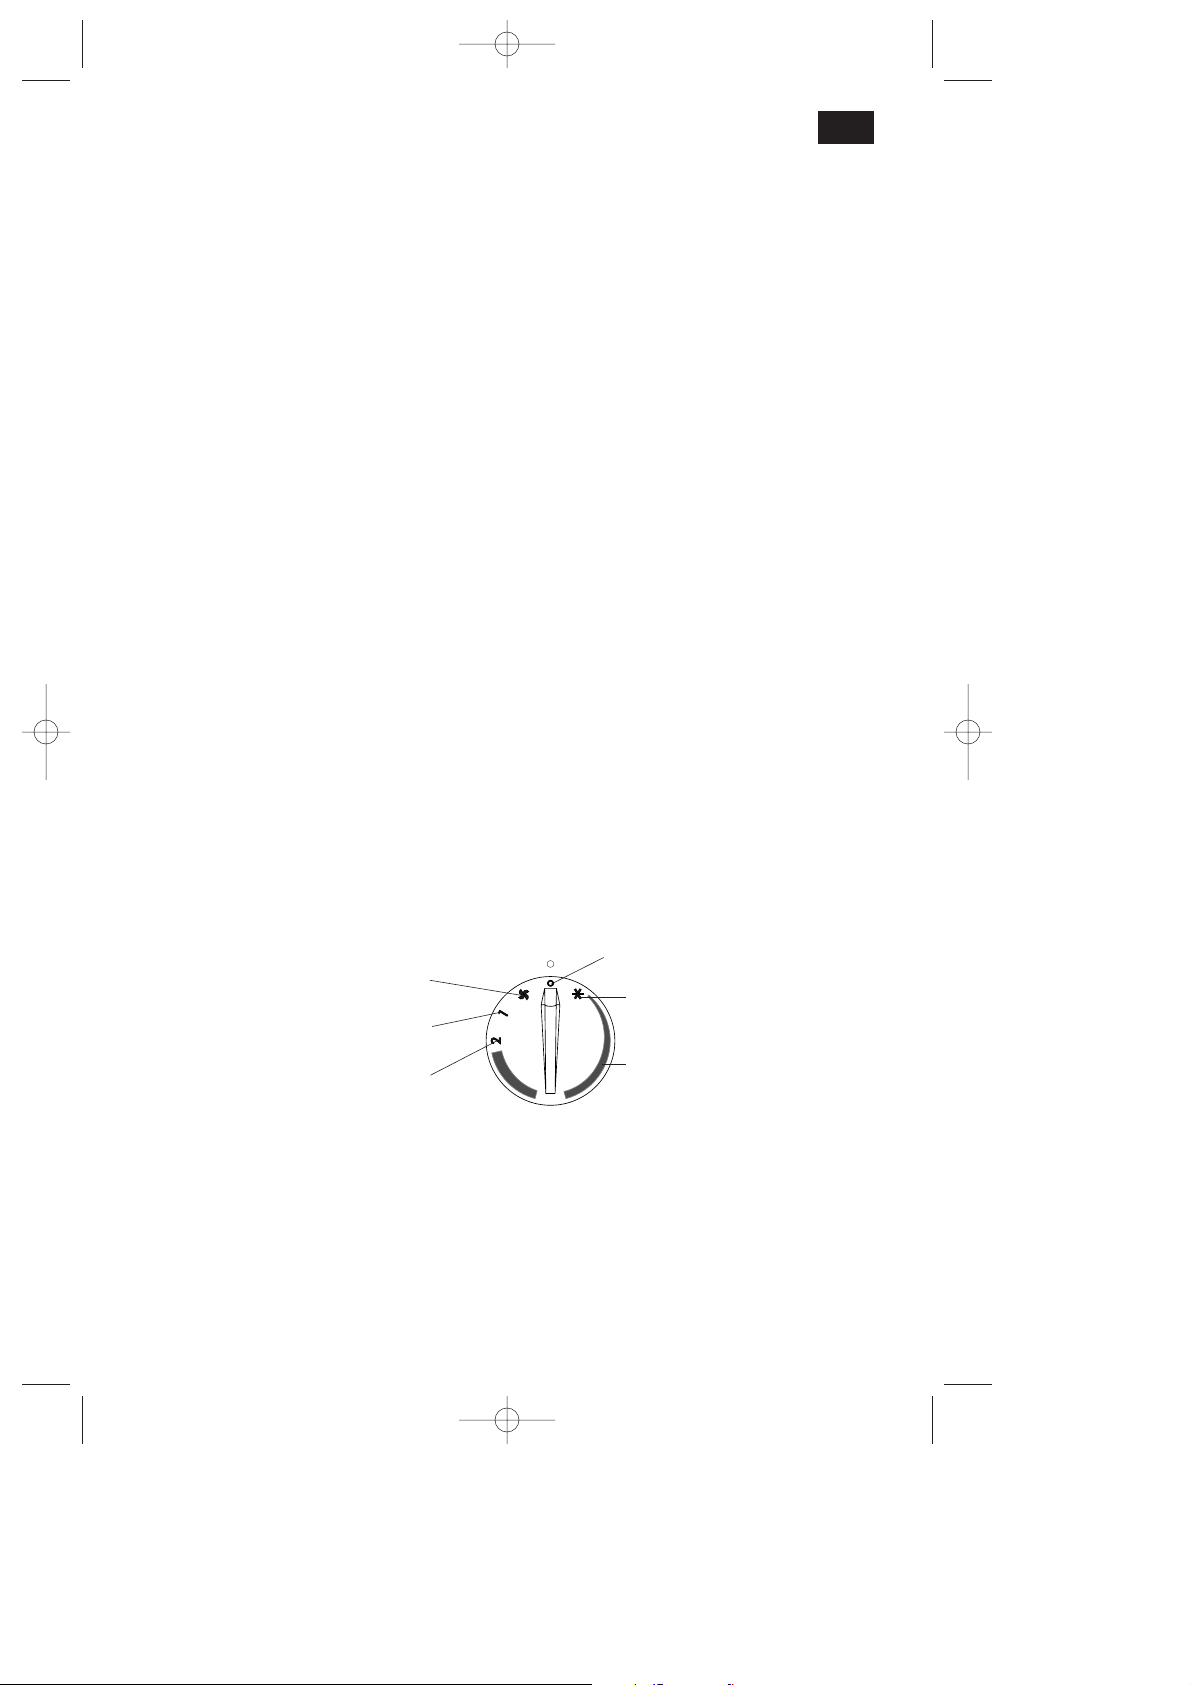
4
Function selectori + thermostat
Heating 2000W
Heating 1000W
Ventilation only
Unit off
Antifreeze function
Thermostat adjustment
DESCRIPTION
A Instrument panel guard
B Wall attachment bracket
C Panel
D Function and thermostat selector
E Thermostat signal lamp
F Air outlet grille
G Hand-towel dryer assembly
H Hand-towel dryer arm
I Arm release slider
L Appliance anchor
IMPORTANT
• Make sure that the appliance is in full working order; it must not be used if damaged.
• The appliance will only work if fitted to a wall.
INSTALLATION
Before drilling holes in the wall, check that there are no electric cables or piping in the area.
Proceed as follows for installation:
• pull the release slider (fig. 1) and turn the hand-towel dryer arm downwards in order to check
the appliance's maximum side-play for correct installation;
• attach the wall attachment bracket with screws and dowels, observing the minimum measurements shown in fig. 2. If it is installed in a bathroom, the fan must be positioned outside the
protection volume shown in fig. 4 in order to guarantee that the controls are not accessible to
anyone using the bath or shower;
• hang the fan on bracket B (fig. 1) and mark anchoring positions L (fig. 1);
• remove the appliance and drill the holes for the dowels;
• hook the fan on the bracket at a slight angle (fig. 3) and fix it by turning the screw in the upper
part of the bracket in a clockwise direction with a screwdriver before completing the clamping
with the anchoring screws in the lower part.
ELECTRIC CONNECTION
• Before fitting the plug in the mains socket, make absolutely sure that the voltage of your mains
electricity supply is the same as the value in V shown on the heater.
• Make sure the mains socket has a capacity of 10/16 Amperes.
• This appliance complies with EEC Directive 89/336, relating to electro-magnetic compatibility.
OPERATION AND USE
Heating and setting the thermostat
• 1000W heating: Turn the knob to position 1
• 2000W heating: Turn the knob to position 2
When the room has reached the temperature desired, set the thermostat by slowly turning the thermostat knob counter-clockwise until you hear the click which switches off the heater. The appliance stops and the indicator H (fig. 1) goes off.
The temperature set in this way will be automatically maintained at a constant level by the thermostat.
GB
fig. 5
HBM 12 31-01-2001 13:56 Pagina 4
Anti-freeze function
Turn the thermostat knob to the anti-freeze position .
When the fan heater has been set in this way it will automatically come on whenever the temperature in the room falls close to five degrees and the room wil thus remain at a temperature of a
few degrees above zero.
Summer use (ventilation only)
Turn the knob clockwise to the position, "summer service" (ventilation only) (fig. 5).
The fan only will be switched on when the fan heater has been set in this way.
Turning off the Appliance
In order to turn the appliance off, turn the function and thermostat selector knob to position "O"
(fig. 5). If the appliance is not used for long periods it is advisable to disconnect the plug from the
power socket.
Drying Function
• Pull release slider 1 (fig. 1) and move the arm to the horizontal position ready for use.
• Hang the hand-towels or the linen on the arm to dry.
• Turn the function selector knob to position 1 (1000W). It is advisable to use only this power
setting in order to dry hand-towels or other linen, particularly if they are of delicate material.
• When the appliance is not used for the drying function, the arm may be moved to rest position by pulling the release slider and turning it downwards.
Important
Be careful not to overload or force the hand-towel holder arm.
The appliance is equipped with a special arm release device (if the latter is overloaded) which
makes it automatically drop to the vertical rest position.
MAINTENANCE
• Always check that the plug has been removed from the mains socket before carrying out any
operations on the fan heater.
• Clean the air intake and outlet grilles with a vacuum cleaner at regular frequent intervals.
• Do not use abrasive powders or solvents.
WARNINGS
• The unit must not be positioned immediately below a fixed power socket.
•
A safety device switches the fan heater off if it accidentally overheats. To reset the unit for
normal operation, remove the plug from the mains socket for a few minutes, eliminate the
cause of the overheating (e.g. air intake or outlet grilles obstructed) and then plug the fan
heater back in again. Contact your nearest Technical Assistance Service if the fan heater
does not start operating normally again.
• Never direct the fan heater's air flow towards furniture, curtains, spray cans and inflammable
material.
• If you need to replace the power supply cable, only ever use H05VV-F type cable with a crosssection area of 2x1 mm
2
.
•
Never cover the appliance while it is operting, to avoid any risk of fire.
5
HBM 12 31-01-2001 13:56 Pagina 5

6
Selecteur fonctions + thermostat
Chauffage 2000W
Chauffage 1000W
Service d’été
Appareil éteint
Fonction hors-gel
Réglage du thermostat
F
DESCRIPTION
A Protection panneau commandes
B Bride de fixation murale
C Panneau commandes
D Sélecteur de fonctions + thermostat
E Lampe témoin du thermostat
F Grille de sortie de l'air
G Groupe sèche-serviettes
H Bras sèche-serviettes
I Curseur de déblocage bras
L Ancrage de l'appareil
IMPORTANT
• Vérifiez que l'appareil soit intact. N'utilisez pas l'appareil s'il est abîmé.
• L'appareil ne peut être utilisé que s'il est installé au mur.
INSTALLATION
Avant de percer le mur, assurez-vous qu'il n'y ait aucun passage de câbles électriques ou de conduits dans cette zone. Pour l'installation, procédez de la manière suivante:
• tirez le curseur de déblocage I (fig. 1) et tournez le bras sèche-serviettes vers le bas de manière à mesurer l'encombrement maximal de l'appareil pour une installation correcte;
• fixez à l'aide de vis et de chevilles la bride de fixation murale en respectant les mesures minimales indiquées à la fig. 2. Dans le cas d'installation dans une salle de bains, le radiateur
soufflant doit être positionné en dehors du volume de protection indiqué à la fig. 4 de sorte
que la personne qui utilise la baignoire ou la douche ne puisse pas avoir accès aux commandes;
• accrochez le radiateur soufflant à la bride B (fig. 1) et marquez les positions d'ancrage L (fig. 1);
• enlevez l'appareil et percez les trous pour les chevilles;
• accrochez le radiateur soufflant à la bride en l'inclinant légèrement (fig. 3) et fixez-le en tournant
dans le sens des aiguilles d'une montre à l'aide d'un tournevis la vis située dans la partie supérieure. Complétez ensuite la fixation au moyen des vis pour l'ancrage dans la partie inférieure.
RACCORDEMENT ELECTRIQUE
• Avant de brancher la fiche dans la prise de courant, vérifier attentivement que le voltage du
secteur correspond bien à la valeur en V indiquée sur l’appareil.
• S’assurer que l’ampérage de la prise de courant est de 10/16 A.
• Cet appareil est conforme à la Directive 89/336 concernant la compatibilité électromagnétique.
FONCTIONNEMENT ET UTILISATION
Chauffage et réglage thermostat
• Chauffage 1000 W: positionner le bouton sur le 1.
• Chauffage 2000 W: positionner le bouton sur le 2.
Pour régler le thermostat lorsque le milieu ambiant a atteint la température désirée, le tourner lentement en sens anti-horaire jusqu’à ce que l’on entende le «clic» de l’extinction de l’appareil et
pas plus.
La température ainsi fixée sera réglée automatiquement et maintenue constante par le thermostat
fig. 5
HBM 12 31-01-2001 13:56 Pagina 6
Fonction hors-gel
Tourner le bouton sur la position antigel .
Ainsi réglé, l’appareil s’allumera automatiquement chaque fois que la température du mileu
descendra en s’approchant de 5°C et le local restera à une température de quelques degrés audessus de zéro.
Service d’été (uniquement ventilation)
Tourner le bouton dans le sens des aiguilles d’une montre sur la position “service d’été” (uniquement ventilation) (fig. 5).
De cette façon seuls les ventilateurs se mettront en marche..
Débranchement de l'appareil
Pour éteindre l'appareil, ramenez la manette du sélecteur des fonctions + thermostat sur la position "O" (fig. 5). Si l'appareil n'est pas utilisé pendant de longues périodes, il est conseillé de
débrancher la fiche de la prise de courant.
Fonction séchage
• Tirez le curseur de déblocage I (fig. 1) et amenez le bras dans la position horizontale d'utilisation.
• Placez les serviettes ou le linge sur le bras pour le séchage.
• Tournez la manette du sélecteur des fonctions sur la position 1 (1000 W). Il est conseillé de
n'utiliser que cette puissance pour sécher les serviettes ou autres vêtements, surtout pour les
tissus délicats.
• Lorsque l'appareil n'est pas utilisé pour la fonction de séchage, le bras peut être ramené en
position de repos en tirant le curseur de déblocage et en le tournant vers le bas.
Important
Si Il est recommandé de ne pas surcharger ni forcer le bras porte-serviettes.
L'appareil est équipé d'un dispositif spécial de décrochage du bras (s'il est trop chargé) qui le
ramène automatiquement dans la position verticale de repos.
ENTRETIEN
• Avant d’effectuer une quelconque opération, vérifier toujours que la fiche est débranchée de
la prise de courant.
• Nettoyer fréquemment les grilles d’entrée et de sortie de l’air avec un aspirateur.
• Ne pas utiliser de poudres abrasives ou de solvants.
AVERTISSEMENTS
• Cet appareil ne doit pas être placé immédiatement sous une prise de courant fixe.
•
Un dispositif de sécurité interrompt le fonctionnement du radiateur soufflant en cas de surchauffe accidentelle. Pour rétablir le fonctionnement, il faut débrancher la fiche de la prise
pendant quelques minutes, éliminer la cause de la surchauffe (ex. obstruction des grilles
d’entrée et de sortie de l’air), puis rebrancher la fiche. Si l’appareil ne se remet pas à fonctionner normalement, s’adresser au Service Après-Vente le plus proche.
• Ne jamais diriger les flux d’air de l’appareil vers des meubles, des rideaux, des bouteilles
aérosols ou des matières inflammables.
• En cas de remplacement du cordon d’alimentation, n’utiliser que des cordons du type H05VVF de 2x1 mm
2
de section.
•
Ne couvrir en aucun cas l’appareil durant son fonctionnement afin d’éviter tout risque d’incendie.
7
HBM 12 31-01-2001 13:56 Pagina 7
8
Funktionsschalter + Thermostat
Heizbetrieb 2000W
Heizbetrieb 1000W
Nur Gebläsebetrieb
Gerät ausgeschaltet
Frostschutzfunktion
Temperaturregelung
D
Abb. 5
BESCHREIBUNG
A Schutzabdeckung Bedienblende
B Bügel für die Wandbefestigung
C Bedienblende
D Funktions- + Thermostatwahlschalter
E Thermostat-Kontrollampe
F Luftaustrittsöffnung
G Gesamtansicht Handtuchtrockner
H Handtuchtrockner-Arm
I Gleitschieber zum Lösen des Arms
L Geräteverankerung
WICHTIGE HINWEISE
• Vergewissern Sie sich von der Unversehrtheit des Gerätes. Im Falle der Beschädigung darf es
auf keinen Fall verwendet werden.
• Das Gerät kann ausschließlich als Wandgerät verwendet werden.
INSTALLATION
Bevor Sie die Wand durchbohren vergewissern Sie sich, daß sich in diesem Bereich keine elektrischen Kabel oder Leitungen befinden.
Verfahren Sie zur Installation wie folgt:
• Ziehen Sie den Gleitschieber I (Abb. 1) und drehen Sie den Handtuchtrockner-Arm nach
unten, damit Ihnen für die korrekte Installation die gesamten Geräteausmaße zur Verfügung
stehen.
• Befestigen Sie den Bügel mit Dübeln und Schrauben an der Wand und halten Sie hierbei die
auf Abb. 2 angegebenen Mindestmaße ein. Wird der Schnellheizer in einem Badezimmer
installiert, muß er sich außerhalb der auf Abb. 4 gezeigten Schutzzone befinden, um demjenigen, der badet oder duscht, den Zugang zu den Schaltern zu gewährleisten.
• Hängen Sie den Schnellheizer am Bügel B (Abb. 1) auf und zeichnen Sie sich die
Verankerungsstellen L vor (Abb. 1).
• Nehmen Sie das Gerät ab und bohren Sie die Löcher für die Dübel.
• Hängen Sie den Schnellheizer etwas geneigt an den Bügel (Abb. 3) und befestigen Sie ihn,
indem Sie die obere Schraube des Bügels mit einem Schraubenzieher im Uhrzeigersinn
anziehen. Ziehen Sie danach die Schrauben am unteren Teil fest.
STROMANSCHLUß
• Vor dem Anschluß des Steckers an eine Steckdose sorgfältig kontrollieren, ob die Spannung
des Haushalts-Stromnetzes mit dem in V ausgedrückten Wert am Gerät übereinstimmt.
• Sicherstellen, daß die Steckdose eine Stromfestigkeit von 10-16 Ampere aufweist.
• Dieses Gerät entspricht der EU-Vorschrift 89/336 in bezug auf die elektromagnetische
Kompatiblität.
FUNZIONAMENTO ED USO
Heizung und Thermostateinstellung
• Heizbetrieb 1000 W: Drehknopf auf Stellung 1 drehen.
• Heizbetrieb 2000 W: Drehknopf auf Stellung 2 drehen.
Zur Einstellung des Thermostats, nachdem der Raum die gewünschte Temperatur erreicht hat, den
Thermostatschalter nur solange langsam gegen den Uhrzeigersinn drehen, bis das “Klicken” der
Apparatabschaltung zu hören ist. Das Gerät schaltet aus erlischt die Betriebskontrollampe H
(Abb. 1).
Die so bestimmte Temperatur wird automatisch reguliert und vom Thermostat konstant gehalten.
HBM 12 31-01-2001 13:56 Pagina 8
9
Frostschutz-Funktion
Drehknopf auf Stellung Frostschutz drehen.
Auf diese Weise schaltet sich das Gerät jedesmal dann automatisch ein, wenn die
Raumtemperatur sich 5 Grad nähert. Sie wird damit stets auf einigen Graden über Null gehalten.
Sommerbetrieb (nur Gebläsebetrieb)
Drehknopf nach rechts auf Stellung “Sommerbetrieb” (nur Gebläsebetrieb) drehen (Abb. 5).
Auf diese Weise werden nur die Lüfterräder aktiviert.
Abschalten des Gerätes
Um das Gerät abzuschalten, drehen Sie den Funktions- + Thermostatwahlschalter auf Position "O"
(Abb. 5). Wird das Gerät über einen längeren Zeitraum nicht verwendet, empfehlen wir, den
Netzstecker zu ziehen.
Trocknerfunktion
• Ziehen Sie den Gleitschieber I (Abb. 1) und bringen Sie den Arm zur Verwendung in die waagerechte Stellung.
• Hängen Sie die Handtücher oder die Wäsche zum Trocknen auf den Arm.
• Drehen Sie den Funktions-Wahlschalter auf Position 1 (1000 W). Es wird empfohlen, zum
Trocknen von Handtüchern oder anderen Kleidungsstücken, insbesondere, wenn es sich um
empfindliche Gewebe handelt, nur diese Leistungsstufe zu verwenden.
• Wird das Gerät nicht zum Trocknen verwendet, kann der Arm durch Ziehen am Gleitschieber
und Drehen das Armes nach unten wieder in die Ruhestellung zurückgebracht werden.
Wichtig
Si Der Handtuchtrockner-Arm darf nicht überlastet bzw. mit Kraftaufwand beansprucht werden.
Das Gerät ist mit einer speziellen Arm-Aushakvorrichtung ausgerüstet, die diesen - im Fall der
Überlastung - automatisch in die senkrechte Ruhestellung gleiten läßt.
REINIGUNG UND PFLEGE
• Vor Ausführung jeglicher Wartungsmaßnahmen stets sicherstellen, daß der Stecker aus der
Steckdose gezogen ist.
• Regelmäßig die Be-und Entlüftungsgitter mit einem Staubsauger reinigen.
• Keine Scheuerpulver oder Lösungsmittel verwenden.
ZUR BEACHTUNG
• Das Gerät darf nicht unmittelbar unter einer festen Steckdose angebracht werden.
•
Eine Sicherheitsvorrichtung unterbricht den Betrieb des Heizlüfters bei Überhitzung. Zur
Wiederaufnahme des Betriebs den Stecker einige Minuten aus der Steckdose ziehen, die
Ursache der Überhitzung (z.B. durch Verstopfung der Be-und Entlüftungsroste) beseitigen
und den Stecker wieder anschließen. Sollte das Gerät nicht wieder normal funktionieren, so
wenden Sie sich bitte an eine Kundendienst-Stelle in Ihrer Nähe.
• Richten Sie nie den Luftstrom des Geräts nach Möbel, Vorhänge, Spraydosen oder entflammbare Materialien
• Beim Ersatz des Netzkabels nur Kabel vom Typ H05VV-F mit Querschnitt 2x1 mm
2
verwen-
den.
•
Wegen Brandgefahr darf das Gerät während des Betriebes nie abgedeckt werden.
HBM 12 31-01-2001 13:56 Pagina 9
 Loading...