


GHS 260
gas hob
Before operating this hob,
please read these instructions carefully
Users Operating Instructions
GB

2
Dear Customer
Thank you for choosing one of our appliances which has been carefully designed
and built by our specialist staff and thoroughly tested to satisfy all your cooking
requirement.
We suggest that you read this Instruction Booklet so that you will understand fully
how to operate the appliances.
Please keep the booklet handy. You may wish to refer to it at a later date.
De Longhi

3
Contents
Model GHS 260
Page Number
How to use your hob . . . . . . . . . . . . . . . . . . . . . . . . . . . . . . . . . . . . . . . . . . . . . . 4
Cleaning and maintenance . . . . . . . . . . . . . . . . . . . . . . . . . . . . . . . . . . . . . . . . . . 5
Important notes . . . . . . . . . . . . . . . . . . . . . . . . . . . . . . . . . . . . . . . . . . . . . . . . . . 5
Do’s and do not’s . . . . . . . . . . . . . . . . . . . . . . . . . . . . . . . . . . . . . . . . . . . . . . . . . 7
For the installer
Gas connection - Important notes . . . . . . . . . . . . . . . . . . . . . . . . . . . . . . . . . . . . 8
Electrical connection . . . . . . . . . . . . . . . . . . . . . . . . . . . . . . . . . . . . . . . . . . . . . . . 8
Hob installation . . . . . . . . . . . . . . . . . . . . . . . . . . . . . . . . . . . . . . . . . . . . . . . . . .10
Ventilation . . . . . . . . . . . . . . . . . . . . . . . . . . . . . . . . . . . . . . . . . . . . . . . . . . . . . . .11
Gas conenction . . . . . . . . . . . . . . . . . . . . . . . . . . . . . . . . . . . . . . . . . . . . . . . . . 11
Connecting to the gas supply . . . . . . . . . . . . . . . . . . . . . . . . . . . . . . . . . . . . . . . 11
4
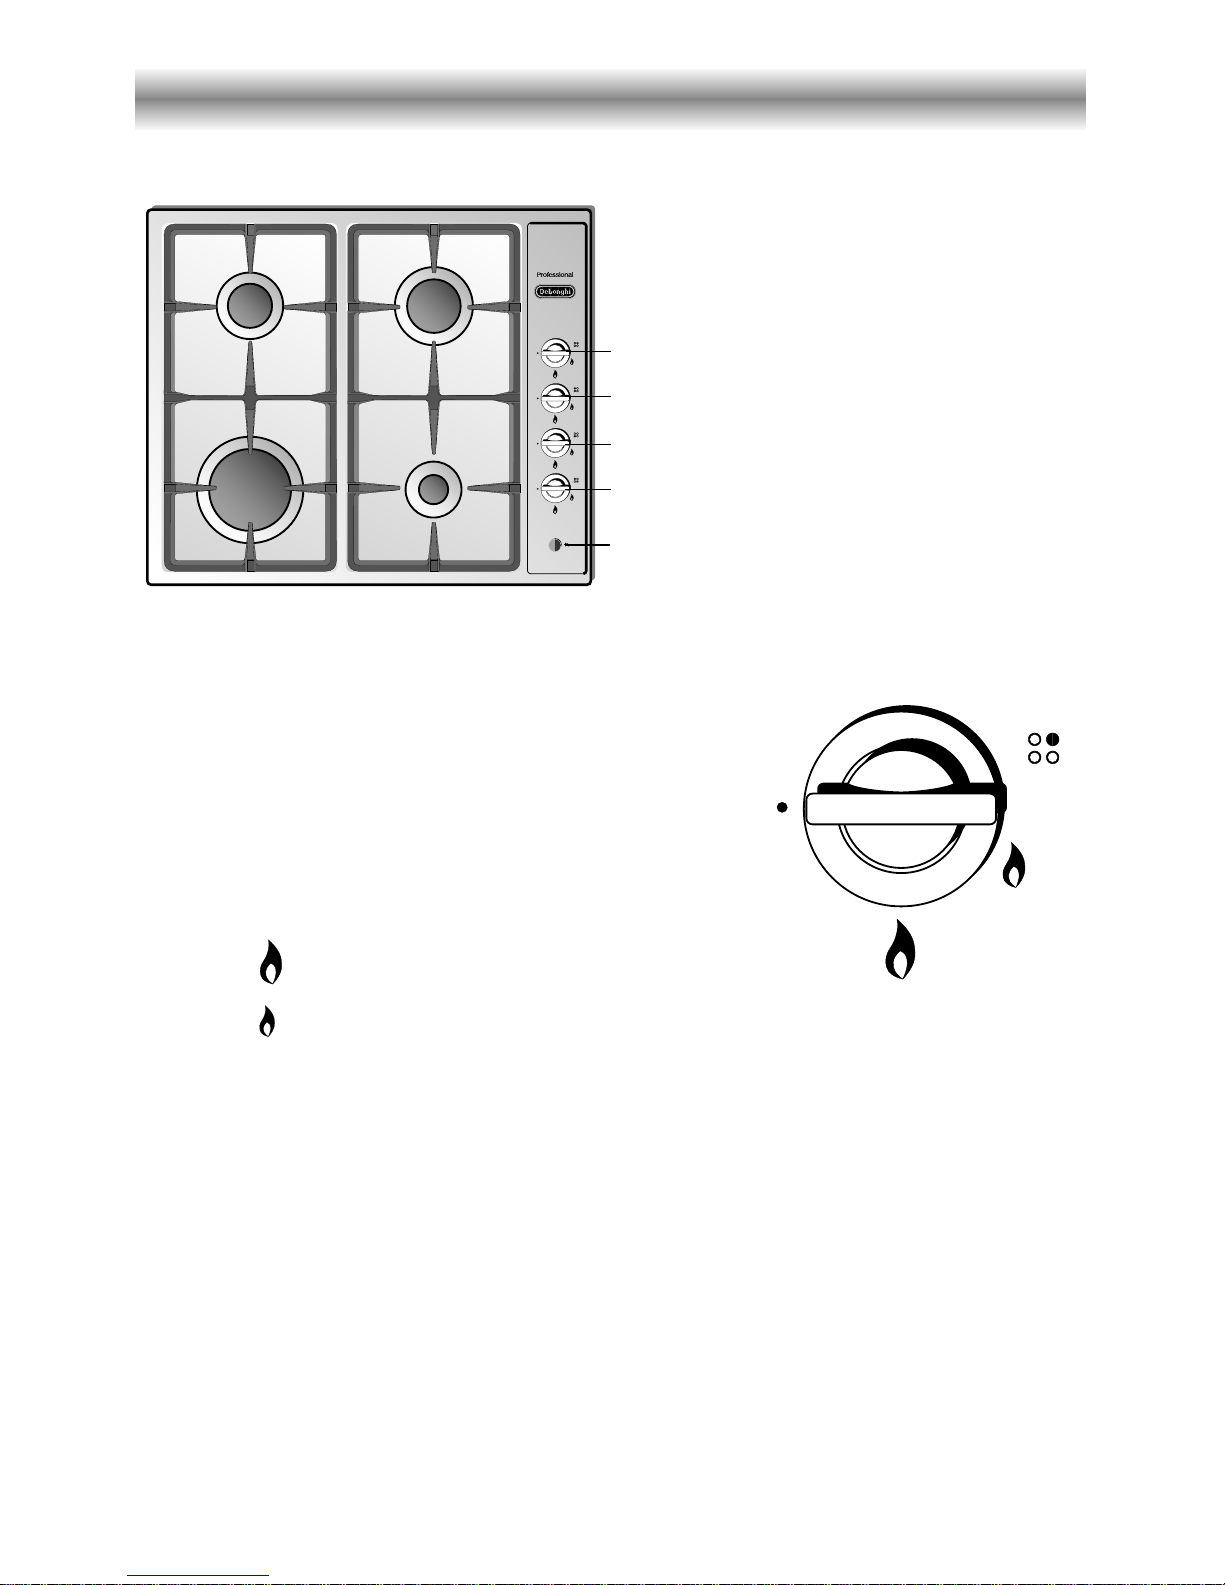
1. Medium burner
2. Medium burner
3. Large burner
4. Small burner
5. Operates burner 2
6. Operates burner 1
7. Operates burner 3
8. Operates burner 4
9. Ignition
Check that the electricity is switched on to allow automatic ignition.
Make sure that all controls are turned to zero.
The gas flow to the burner is controlled by the knob
operating on a safety tap.
You control the flow by turning the control knob indicator
to line up with the folowing symbol.
– symbol
● : off
– symbol : maximum
– symbol : minimum
How to use your gas hob
figure 1
To ignite automatically, simply turn the required knob to maximurn, then press the ignition
button until the burner lights. If the burner does not light first time, press the ignition button
again until it does. (see fig. 2)
To switch off, turn the knob clockwise to the off Position.
Note: If you are using a burner at the minimum setting, you turn the knob clockwise past the
maximurn setting before reaching the off position.
The burners are different sizes and can be used in different ways.
The largest can be used for boiling to seal meat and for all foods that are cooked quickly.
The smallest can be used for stews and sauces.
figure 2
9
8
7
6
5
1
2
3
4

5
figure 3
Always ensure you use the correct size of
saucepan. See fig. 3.
Always ensure that the bottom of the pan you
are using is dry.
Cleaning and Maintenance
General
After use and while the hob is still warm it should be wiped with a damp cloth.
When cleaning care should be taken to avoid water leaking into the control panel as
this way cause damage to the controls.
With regular cleaning the hob will remain in good condition.
It is advisable to disconnect the electrical supply to the hob before cleaning is
undertaken.
To keep the hob looking at its best, wipe, any spills as soon as they occur. This
will prevent them burning on and becoming more difficult to remove.
Stainless steel surfaces
Clean with a suitable product. Always dry accurately.
Dry preferably with a chamois leather.
Note: regular use could cause discolouring around the burners, because of the
high flame temperature.
Cleaning the Burners
They can be removed and washed only with soapy water.
Detergents can be used but must not be abrasive or corrosive.
Do not use abrasive sponges or pads.
Do not put in dishwasher.

6
Important notes
Installation, and any demonstration, information or adjustments are not included in the
warranty and, if requested, the customer must pay the after-sale service according to
the standard fees.
Before calling for assistance
If any burner does not light, check the ignition is working, if not check the 3 amp fuse,
make sure gas is turned on make sure burner caps are in Position correctly.
Please contact a Comet Service Centre in case of assistance.
Attention
The appliance gets very hot, mainly around the cooking areas. It is very
important that children are not left alone in the kitchen when you are cooking.

7
Do’s and do not’s
Do’s and do not’s
• Do read the User Instructions carefully before using the hob for the first time.
• Do remove spills as soon as they occur.
• Do not allow children near the hob when in use.
• Do not clean the hob without first turning off the electricity supply.
• Do not use abrasive cleaners or powders that will scratch the stainless steel surface.
• Do not attemt to repair the internal workings of the hob. Always consult a qualified
installer.
• Do not allow water to enter the control panel when cleaning .
For your safety
The product should only be used for its intended purpose which is for the cooking of
domestic foodstuffs.
Under no circumstances should any external covers be removed for servicing or
maintenance except by suitably qualified personnel.

8
Gas connection - Important note
This appliance is supplied for use on NATURAL GAS only and cannot be used on any
other gas without modification.
The gas hob must be installed by a qualified person in accordance with the Gas Safety
Regulations 1984 and the relevant Building / I.E.E. Regulations.
Failure to install the appliance correctly could lead to prosecution under the Gas Safety
Regulations 1984.
In the U.K. C.O.R.G.I. registered installers undertake to carry out work to a safe and
satisfactory standard.
Electrical connection
For your safety please read the following information:
This appliance is supplied with a moulded 13 amp three pin mains plug with a 3 amp
fuse fitted. Should the fuse require replacement, it must be replaced with a fuse rated
at 3 amp and approved by ASTA or BSI to BS 1362.
The plug contains a removable fuse cover that must be refitted when the fuse is
replaced. In the event of the fuse cover being lost or damaged, the plug must not be
used until a replacement cover has been obtained. Replacement fuse covers can be
purchased from your nearest electrical dealer and must be the sarne colour as the
original.
IF THE MOULDED MAINS PLUG IS UNSUITABLE FOR THE SOCKET OUTLET IN YOUR
HOME OR IS REMOVED FOR ANY OTHER REASON, THEN THE FUSE SHOULD BE
REMOVED AND THE CUT OFF PLUG DISPOSED OF SAFELY TO PREVENT THE HAZARD OF
ELECTRIC SHOCK.
THERE IS A DANGER OF ELECTRICAL SHOCK IF THE CUT OFF PLUG IS INSERTED INTO
ANY 13 AMP SOCKET OUTLET.
If a replacement plug is to be fitted, please observe the wiring code shown below.
For the installer

9
A properly earthed three pin plug (fused at 3 amps, to BS 1362 ASTA approved) must
be used. As the colours of the wires in the mains lead of this appliance may not
correspond with the coloured markings identifying the terminals in your plug, proceed
as follows.
The wire which is coloured GREEN & YELLOW must be connected to the terminal in the
plug which is marked with letter "E" or by the Earth symbol or coloured GREEN &
YELLOW.
The wire which is coloured BLUE must be connected to the terminal which is marked
with the letter "N" or coloured BLACK.
The wire which is coloured BROWN must be connected to the terminal which is
marked with the letter "L" or coloured RED.
Green & Yellow
Earth
3 amp fuse
Blue Neutral Brown Live
figure 4
Warning! This appliance must be earthed

10
The hob requires a space in the kitchen work surface as shown in the diagram Fig. 5.
A partition between the base of the hob and the cupboard below should be fitted
100 mm below the worktop if the cupboard is to be used for storage.
Note that the hob should be positioned 50 mm from the rear of the kitchen worktop.
560
580
500
480
50
figure 5
figure 6
20 mm min.
40 mm max.
B
C
A
• Spread out the gasket “C” over the
workbench at the edge of the cut out
taking care to overlap the gasket at the
corners.
• Slot in the cooking hob into the cut out
of the workbench and locate it correctly.
• Adjust the clamps “A” and tighten the
screws “B” until the hob is firmly
secured.
• Using a sharp tool, trim any excess
gasket which protrudes from the edge of
the hob.
Hob installation

11
room volume air vent necessary (effective area)
6 m3to 9 m
3
65 cm
2
6 m3to 9 m
3
35 cm
2
Greater than 11 m
3
no air vent necessaIy
A room 6 m
3
to 11 m3with a door no air vent necessary
opening to the outside
All rooms require an openable window or equivalent, while some rooms require a permanent
vent in addition to a window that can be opened.
This unit must not be used in a room with less than 6 m3.
Mains gas must be connected by qualified
personnel in compliance with the
regulations in force.
The installer will be responsible for complying with
the safety regulations.
The cooking hob is supplied with an elbow
connection as figure 7 and is
adjusted to work with mains gas.
The above requirements allow also for use of a gas oven and grill but if there
are other gas burning appliances in the same room, consult a qualified engineer.
Connecting to the gas supply
Connect the gas supply pipe to the hob (see Fig. 7) and check that there are no leaks
at any of the joints. Use soapy water. NEVER USE A NAKED FLAME.
figure 7
Ventilation (gas hob)
Gas connection
De Longhi continually strive to improve their products.
For this reason we reserve the right to change speciflcations without prior notice.

Ed. 2 - 1101504
ß5
GHS 260 gas hob
 Loading...