

Page 1

Istruzioni Radiatore elettrico a bagno d’olio. . . . . . . . . . . . . 4
Instructions Electric oil filled radiator . . . . . . . . . . . . . . . . . . . . 7
Mode d’emploi Radiateur électrique à bain d’huile . . . . . . . . 10
Betriebsanleitung Elektro Öl-Radiator . . . . . . . . . . . . . . 13
Gebruiksaanwijzing Elektrische radiator. . . . . . . . . . . . . 16
Instrucciones de uso Radiador Eléctrico de Termofluido. . . 19
Manual de instruções Radiador eléctrico a óleo . . . . 22
OOddhhggii‰‰ee"" xxrrhh‰‰sseeww"" ttoouu kkaalloorriiffee‰‰rr llaaddiioouu‰‰
. . . . . 25
Vejledning i brug af elektrisk olieradiator. . . . . . . . 28
Anvisningar för oljefyllt varmeelement . . . . . . . . . . . . . . 31
Bruksanvisning elektrisk oljefylt radiator . . . . . . . . . . . . . . 34
Ohjeet öljyllä täytetty sähköradiaattori. . . . . . . . . . . . . . . 37
аМТЪЫНˆЛЛ щОВНЪЛ˜ВТНЛИ П‡ТОflМ˚И ‡‰Л‡ЪУ 40
Nstrukcja olejowy kaloryfer elektryczny . . . . . . . . . . . . . . . . 43
Upute Elektriãni uljni radijator . . . . . . . . . . . . . . . . . 46
Kezelési utasítás Elektromos olajradiátor. . . . . . . . 49
Page 2

Page 3

fig. 1
fig. 2
1
2
3
4
5
6
7
8
9
1010
1111
1212
1313
1414
1515
1616
1717
1818
1919
2020
2121
2222
2323
2424
fig.3
P
I
II
T
IHS
A
Page 4

Il radiatore Rapido è una apparecchiatura per il riscaldamento domestico estremamente versatile con
tre livelli di potenza selezionabili. Inoltre, in questo prodotto è stata incorporata una esclusiva funzione
che Vi consentirà di ottenere il miglior comfort in qualsiasi situazione.
Per sfruttare al massimo le potenzialità del prodotto Vi consigliamo di leggere a fondo le istruzioni
sotto riportate.
1. GENERALITA'
Togliere l'apparecchio dalla scatola imballo, e capovolgerlo appoggiandolo sulle cuffie di polistirolo di protezione. Controllare l'integrità del cavo di alimentazione e che l'apparecchio non abbia subito danni durante
il trasporto. Non far funzionare l'apparecchio se danneggiato.
2. MONTAGGIO DEI PIEDINI
Rimuovere i piedini e le rotelle dall'imballo in polistirolo.
Inserire le ruote nel perno del piedino e premere a fondo fino ad udire uno scatto (fig. 1). Assicurarsi tirando, che le ruote siano ben fissate.
Montare il piedino con ruote nella parte inferiore del radiatore inserendo le costole guida fra scatola comandi e primo elemento; incastrare i 2 denti nelle sedi previste e bloccare il piede con le viti ad occhiello avvitandole a fondo (fig. 1).
Montare quindi le ruote posteriori inserendole nel perno in acciaio, incastrare il perno nel supporto posteriore
controllando che le ruote vengano posizionate come in figura 2 . Controllare che le ruote girino liberamente.
Terminate queste operazioni capovolgere il radiatore rimettendolo nella posizione verticale di funzionamento.
3. ALLACCIAMENTO ELETTRICO
- Prima di inserire la spina nella presa di corrente verificare attentamente che il voltaggio della Vostra rete
domestica corrisponda al valore in V indicato sull'apparecchio e che la presa di corrente e la linea di
alimentazione siano dimensionate al carico richiesto.
- COLLEGARE IL RADIATORE SOLAMENTE A PRESE DOTATE DI UNA EFFICIENTE MESSA A TERRA.
- Questo apparecchio è conforme alla direttiva 89/336/CEE e al D.M. 476/92 sulla compatibilità elettromagnetica.
4
I
Page 5

4. FUNZIONAMENTO ED USO
Instant Heating System
Questo prodotto è dotato di una particolare funzione di riscaldamento rapido "Instant Heating System".
La funzione "Instant Heating System" attiva un esclusivo riscaldatore aggiuntivo che permette di riscaldare il
vostro ambiente rapidamente e silenziosamente.
La funzione viene attivata attraverso l'apposito tasto IHS indicato in figura 3.
Accensione
Inserire la spina nella presa di corrente; spostare il termostato fino all'arresto in posizione di massimo; accendere il radiatore mediante gli interruttori secondo le modalità indicate in tabella.
Regolazione del termostato “P”
Quando l'ambiente avrà raggiunto la temperatura desiderata, ruotare lentamente la manopola termostato P
(fig. 3) in senso antiorario fino alla posizione segnalata da un click (o fino allo spegnimento della spia luminosa)e non oltre. La temperatura così fissata verrà automaticamente regolata e mantenuta costante dal termostato.
Funzione antigelo (anti-frost)
Con il termostato in posizione
*
e gli interruttori I e II premuti, l'apparecchio mantiene l'ambiente ad una
temperatura di circa 5°C impedendo il congelamento con un minimo dispendio di energia.
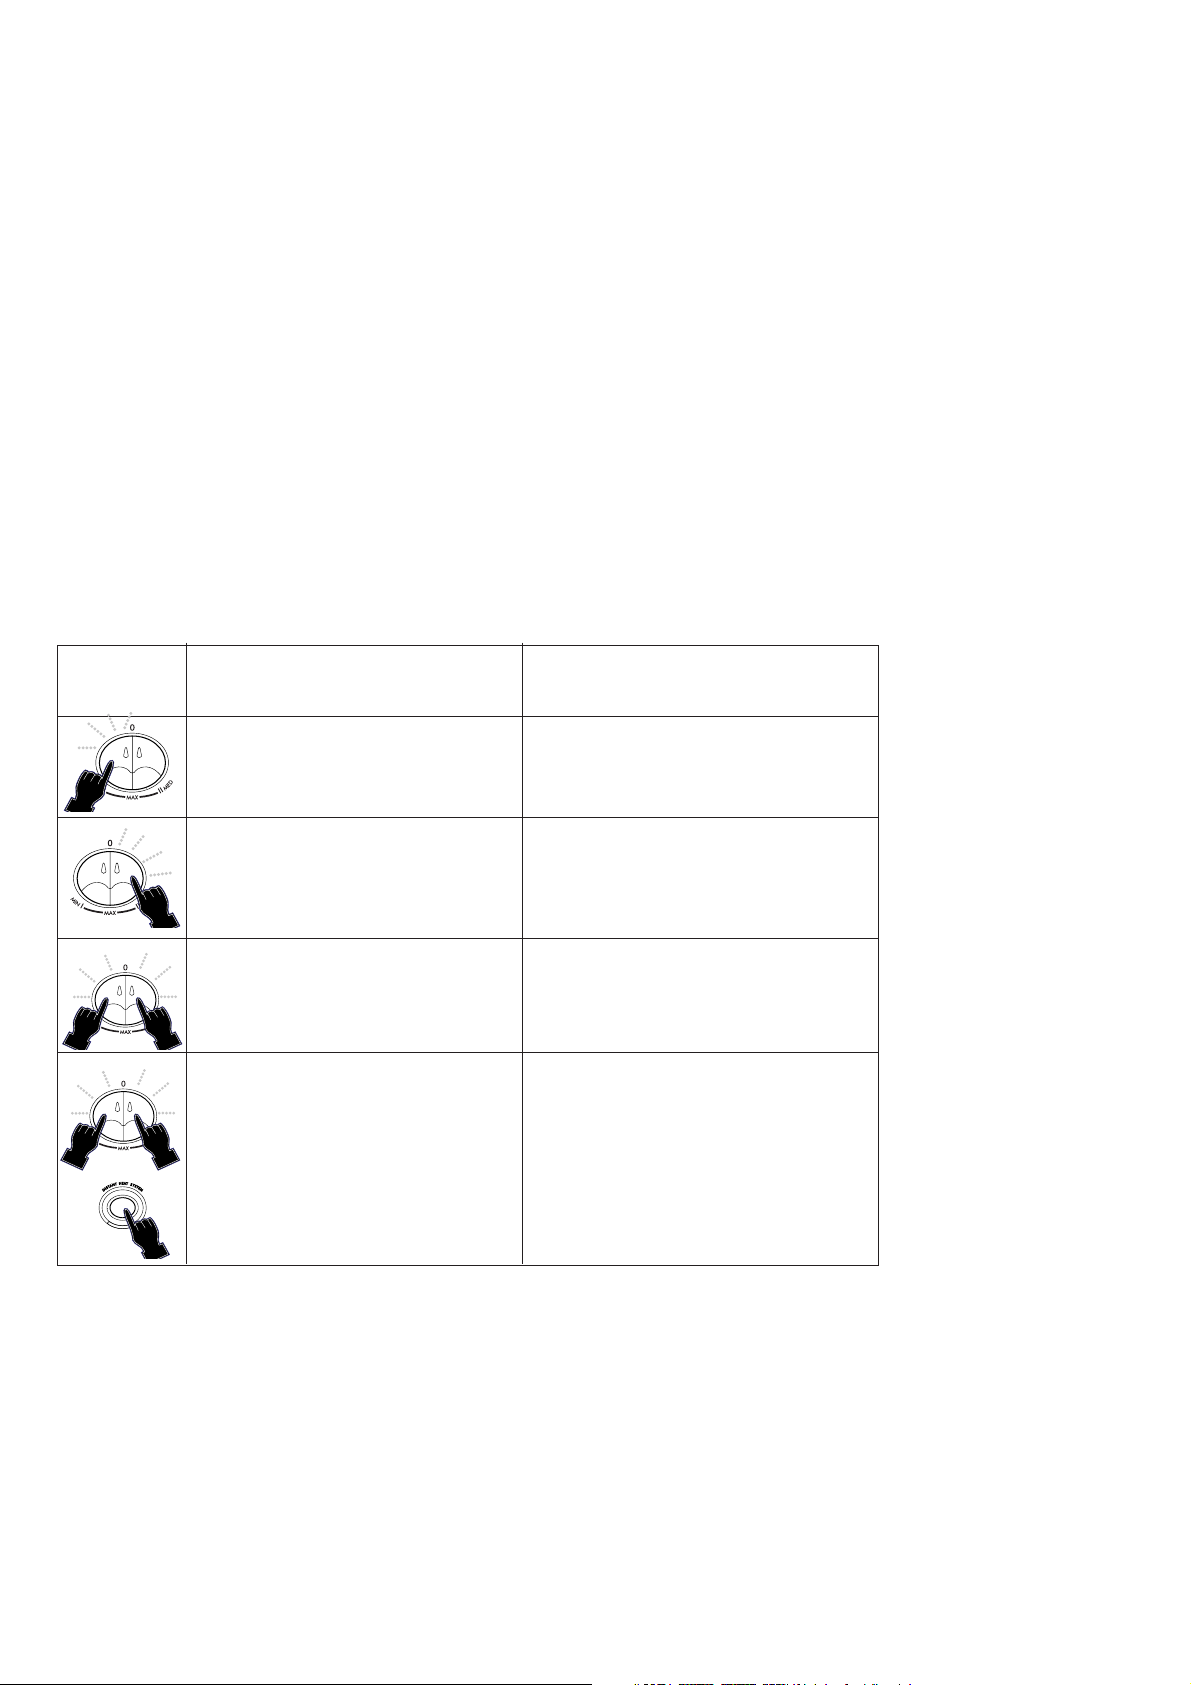
Tasti premuti Funzione Attivata Modalità di funzionamento
Premere il tasto I per il riscaldamento In questa modalità è possibile attivare
Normale a potenza minima la funzione antigelo (Anti-frost)
Premere il tasto II per il riscaldamento In questa modalità è possibile attivare
Normale a potenza media la funzione antigelo (Anti-frost)
Premere i tasti I e II per il riscaldamento In questa modalità è possibile attivare
Normale a potenza massima la funzione antigelo (Anti-frost)
Premere i tasti I, II e Instant Heating In questa modalità non è consigliabile attivare
System IHS per il riscaldamento Rapido la funzione antigelo (Anti-frost)
a potenza massima.
In questa modalità si accendono la spia
luminosa II e la spia Instant Heating System
(A).
5
Page 6

Modelli con programmatore (Timer) 24 ore “T”
Per programmare il riscaldamento procedere nel seguente modo:
- Guardate l'ora del Vostro orologio. Supponendo che siano le 10, ruotate in senso orario il disco numerato del programmatore T fino a far coincidere il numero 10 dello stesso con l'indice di riferimento s
impresso sul programmatore.
-Impostare i periodi di tempo in cui desiderate che l'apparecchio funzioni, spingendo verso il centro i dentini. Ogni dentino corrisponde ad un periodo di tempo di 15 min. Saranno a questo punto visibili dei settori che corrispondono ai periodi di funzionamento.
- Così predisposto il radiatore funzionerà automaticamente ogni giorno nell'orario programmato
(Importante: la spina deve essere sempre inserita nella presa di corrente).
- Per variare la programmazione basta riportare i dentini nella posizione iniziale ed impostare i nuovi
periodi di funzionamento.
- Se desiderate far funzionare l'apparecchio senza programmazione spingete verso il centro tutti i dentini. In questo caso per lo spegnimento totale dell'apparecchio oltre che spegnere gli interruttori è necessario togliere anche la spina dalla presa al fine di evitare un inutile funzionamento del programmatore.
Modelli con dispositivo antiribaltamento
- Alcuni modelli sono dotati di un interruttore antiribaltamento che, in caso di caduta interrompe l’alimentazione. Per ripristinare il funzionamento, basta rimettere l’apparecchio sui piedini in posizione verticale.
(Per identificare se il vostro apparecchio è dotato di questo dispositivo, verificare che sulla targhetta
caratteristiche dopo il type ci sia la scritta “…ex:1”)
5. MANUTENZIONE
Prima di qualunque intervento staccare la spina dalla presa di corrente ed attendere che il radiatore sia freddo.
Il radiatore elettrico ad olio non richiede una particolare manutenzione. E' sufficiente spolverarlo con un
panno soffice ed asciutto. Non usare mai polveri abrasive o solventi. Se necessario rimuovere eventuali concentrazioni di sporcizia servendovi di un aspirapolvere.
6. AVVERTENZE
-Non usare il radiatore nelle immediate vicinanze di vasche da bagno, docce, lavandini o piscine.
-Non usare il radiatore per asciugare la biancheria, non appoggiare il cavo di collegamento sugli elementi caldi.
- Usare il radiatore sempre e soltanto in posizione verticale.
- Se il cavo di alimentazione è danneggiato, esso deve essere sostituito dal costruttore o dal suo servizio assistenza tecnica o comunque da una persona con qualifica similare, in modo da prevenire ogni rischio.
- Al primo avvio, far funzionare l'apparecchio alla massima potenza per almeno 2 ore. Durante questa operazione aerare bene la stanza al fine di eliminare l'odore "di nuovo" che si sprigiona dall'apparecchio.
- E' del tutto normale che l'apparecchio emetta degli "scricchiolii" al primo avvio.
- L'apparecchio non deve essere posto immediatamente sotto una presa di corrente fissa.
- Il contenitore di questo apparecchio è riempito con una esatta quantità di olio e le riparazioni che ne
richiedono l'apertura devono essere eseguite solo dal Centro Assistenza autorizzato. In caso di perdite
di olio deve essere contattato il Centro Assistenza autorizzato.
- Nel caso di rottamazione dell'apparecchio è necessario rispettare le disposizioni relative allo smaltimento
dell'olio.
- Non utilizzare questo apparecchio in stanze, la cui area di base è inferiore a 4 m
2
.
- IMPORTANTE: Non coprire in nessun caso l'apparecchio durante il funzionamento, poiché ciò
provocherebbe surriscaldamenti pericolosi.
Un dispositivo di sicurezza interrompe il funzionamento del termoradiatore in caso di surriscaldamen-
to accidentale. Per ripristinare il funzionamento, è necessario staccare la spina dalla presa per circa 30
minuti, eliminare la causa del surriscaldamento, quindi reinserire la spina.
Attenzione: per evitare pericoli causati da un accidentale ripristino del sistema di sicurezza, questo
apparecchio non deve essere alimentato attraverso un timer esterno.
6
Page 7

7
GB
The Rapido heater is an extremely versatile heating appliance with 3 selectable power levels. The
Rapido also has one exclusive functions to ensure that the optimum comfort level is achieved in any
given situation.
In order to use this heater to its maximum potential we advise you to carefully read the instructions
given here.
1. GENERAL INSTRUCTIONS
Remove the appliance from its box and packaging and turn it over resting it on the protective polystyrene
packaging. Check that the appliance is intact, complete with the power cable and that it hasn't suffered damage during transportation. Do not use the appliance if it is damaged.
2. ASSEMBLY OF THE BASE
Remove the castors, wheels and assemblies from the polystyrene packaging
Insert the castors into the pins of the feet and push them all the way in until a click can be heard (fig1) Make
sure that they are in tightly by pulling the wheels gently. Attach the castor assembly into the base of the control panel by inserting the guiding ridges between the control panel and the first heating element; insert the
two location lugs into their housings and lock the castor assembly to the product by inserting the eye screws,
screwing them in tightly. (fig1) Fit the two rear wheels onto the rear wheel axle (fig 2). Check that the wheels
can turn freely. Finally turn the heater over to its upright position, ensuring you do not damage the wheels.
3. ELECTRICAL CONNECTION
Before inserting the plug into the electrical socket, make sure that the voltage of the socket corresponds to the
voltage requirement indicated on the appliance, and that the electrical socket and the mains supply to the
socket is rated at 13amps. It is important to ensure that the socket is adequately earthed.
This appliance complies with EEC Directive 89/336 relating to electromagnetic compatibility.
ELECTRICAL CONNECTION (U.K. ONLY)
A) If your appliance comes fitted with a plug, it will incorporate a 13 Amp fuse. If it does not fit your socket, the plug should be cut
off from the mains lead, and on appropriate plug fitted, as below. WARNING: Very carefully dispose of the cut off plug after
removing the fuse: do not insert in a 13 Amp socket elsewhere in the house as this could cause a shock hazard. With alternative plugs not incorporating a fuse, the circuit must be protected by a 15 Amp fuse. If the plug is a moulded-on type, the fuse
cover must be re-fitted when changing the fuse using a 13 Amp Asta approved fuse to BS 1362. In the event of losing the fuse
cover, the plug must NOT be used until a replacement fuse cover can be obtained from your nearest electrical dealer. The colour
of the correct replacement fuse cover is that as marked on the base of the plug.
B) If your appliance is not fitted with a plug, please follow the instructins provided below:
WARNING - THIS APPLIANCE MUST BE EARTHED
IMPORTANT
The wires in the mains lead are coloured in accordance
with the following code:
Green and yellow Earth
Blue Neutral
Brown Live
As the colours of the wires in the mains lead may not
correspond with the coloured markings identifying the
terminals in your plug, proceed as follows:
The green and yellow wire must be connected to the
terminal in the plug marked with the letter E or the earth
symbol or coloured green or green and yellow.
The blue wire must be connected to the terminal
marked with the letter N or coloured black.
The brown wire must be connected to the terminal
marked with the letter L or coloured red.
Page 8

4. USING THE FUNCTIONS
INSTANT HEATING SYSTEM
By pressing the I H S button (fig 3) in conjunction with switches l and ll, an exclusive heating function is activated which warms up your room rapidly and silently.
Turning the appliance on
Insert the plug into the electrical socket; turn the thermostat until it stops at the maximum position; turn on the
heater using one or a combination of switches as indicated in the table.
Regulation of the thermostat “P” (fig3)
When the room has reached the desired temperature, turn the thermostat slowly in an anticlockwise direction until it arrives at the position where a click can be heard (or until the warning light turns off) and not
beyond this point.
The temperature selected in this way will be automatically regulated and maintained.
Anti-frost Function
With the thermostat in the
*
position and the l and /or ll switches are pressed, this ensures that the room
temperature is maintained and does not fall below circa 5°C, whilst using minimum energy.
Depressed
Buttons Activated Functions Modes of Functioning
Press the I button for normal heating In this mode, it is possible to activate
at minimum power the Anti-Frost function.
Press the II button for normal heating In this mode, it is possible to activate
at medium power the Anti-Frost function.
Press both the I and II buttons for normal In this mode, it is possible to activate
heating at the maximum power available the Anti-Frost function.
without the instant heat system
Press the I, II and Instant Heating System In this mode, we do not suggest
IHS buttons for Rapid heating at to activate the anti-frost function.
maximum power.
The II pilot light and the Instant Heating
System light will turn on in this mode (A)
8
Page 9

Models with 24 hour timer (T - fig. 3)
To programme the timer;
- Check the time on your watch. If for example it is 10am, turn the number disc of the timer in a clockwise
direction until the number 10 on the disc lines up with the arrow head marker.
The timer is normally supplied with all the teeth pushed into the centre allowing continuous operation. To
set the periods of time you would like the appliance to be off continue as follows;
- Each tooth corresponds to a period of 15 minutes of time. Push the teeth with your thumbnail to the outer
rim of the timer. At this point, the sectors that correspond to the periods to be on and off will be visible.
- The heater will now function automatically everyday, switching on and off according to your selection.
(Important; the plug must always be inserted into the electrical socket)
-To vary the programming times, simply return the teeth to their original position and set new periods of
functioning.
- If you desire to operate the heater without programming it, push all the teeth toward the centre (i.e. in the
mode as normally supplied)
-To completely turn off the heater turn of all the switches and remove the plug from the socket.
Models with “Tilt-switch”
- Some models are fitted with a tilt-switch which turns the appliance off if it should fall over. To restart the
appliance, simply place it upright again.
(Check on the rating plate if “…ex:1” is written after the type to verify if your appliance is provided with
the tilt-switch)
5. MAINTENANCE
Before carrying out any maintenance, remove the plug from the electrical socket and wait until the heater has
cooled down. The heater does not require special maintenance. Simply dust it off with a soft, dry cloth. Never
use abrasive powders or solvents. If necessary, remove concentrated areas of dirt with a vacuum cleaner.
6. WARNINGS
- Do not use the heater in a bathroom or in the vicinity of bathtubs, washbasins, showers or swimming pools.
-Never use the heater to dry laundry.
-Never place the power cable on top of the heater while it is hot.
- Only use the heater in an upright position.
- The heater must be positioned at least 50cm from furniture or other objects.
- If the power cable is damaged, it must be replaced by the manufacturer or an authorised technical service centre.
- On using the appliance for the first time, turn it on to the maximum power setting for at least 2 hours.
This is to eliminate the 'new odour' which is released by the appliance. During this time ensure that the
room is well ventilated.
- It is normal for the heater to make 'crackling' noises during the first time it is switched on (or in the case
of infrequent use)
- The heater must not be placed immediately under a fixed electrical outlet.
- The body of the heater is filled with an exact quantity of oil. If reparations may be necessary which call
for the opening of the heater, they must be done only by the manufacturer or by an authorised service
centre. In the unlikely event of oil leakage, contact the manufacturer or by an authorised service centre.
- Do not use this appliance in rooms which have an area smaller than 4m
2
- The appliance must never be placed immediately under a fixed mains socket.
- When scrapping the appliance, respect legislation on the disposal of oil.
- IMPORTANT: Never for any reason cover the appliance during operation as this could lead to dan-
gerous overheating.
-The use of an extension lead is not recommended, as overheating of the extension lead may occur during the operation of the heater.
The appliance is fitted with a safety device which will switch off it in case of accidental overheating. To reset, disconnect
the plug from the power for 30 minutes, remove the cause of overheating then plug the appliance in again.
ATTENTION: in order to avoid any danger caused by an accidental resetting of the safety system, this
appliance must not be powered through an external timer.
9
Page 10

10
F
Le radiateur à huile rapide est un appareil de chauffage domestique extrêmement versatile permettant
de sélectionner trois niveaux de puissance différents. En outre, ce produit est doté d’une fonction exclusive qui vous permettra d’obtenir le meilleur confort dans toute situation.
Pour profiter de manière optimale de toutes les caractéristiques de votre nouvel appareil, nous vous
conseillons de lire attentivement toutes les instructions présentées ci-après.
1. INFORMATIONS GÉNÉRALES
Enlever l'appareil de sa boîte d’emballage et le retourner en le déposant sur les coquilles en polystyrène de
protection. Contrôler si le cordon d’alimentation est intact et si l'appareil n’a pas subi de dommages au cours
du transport. Ne pas faire fonctionner l'appareil s’il est endommagé.
2. MONTAGE DES PETITS PIEDS
Enlever les petits pieds et les roulettes de l’emballage en polystyrène.
Insérer les roulettes sur l’axe du petit pied et pousser à fond jusqu'au déclic (fig. 1). S’assurer que les roulettes
sont bien fixées en tirant dessus.
Monter le petit pied avec les roulettes dans la partie inférieure du radiateur en insérant les nervures de guide
entre la boîte de commande et le premier élément ; encastrer les 2 dents dans les logements prévus à cet effet
et bloquer le petit pied à l'aide des vis à œillet en les vissant à fond (fig. 1).
Monter ensuite les roulettes arrière en les insérant sur l’axe en acier ; encastrer ensuite l’axe dans le support
arrière en contrôlant que les roulettes sont bien positionnées comme illustré à la figure 2. Contrôler que les
roulettes tournent librement. Une fois ces opérations terminées, retourner le radiateur en le remettant dans la
position verticale de fonctionnement.
3. BRANCHEMENT ÉLECTRIQUE
•Avant de brancher la fiche dans la prise de courant, vérifier attentivement si la tension de secteur correspond bien à la valeur indiquée en Volts sur la plaque signalétique de l'appareil, et si la prise de courant
et la ligne d’alimentation sont dimensionnées pour la charge requise.
• RELIER LE RADIATEUR UNIQUEMENT À DES PRISES DE COURANT MUNIES D’UNE MISE À LA TERRE
EFFICACE.
• Cet appareil est conforme à la directive 89/336/CEE concernant la compatibilité électromagnétique.
Page 11

11
4. MODE DE FONCTIONNEMENT ET UTILISATION
Instant Heating System
Cet appareil est muni d’une fonction spéciale de chauffage rapide “ Instant Heating System ”. Cette fonction
actionne un exclusif système de chauffage supplémentaire qui permet de chauffer votre pièce rapidement et
silencieusement.
La fonction est enclenchée au moyen de la touche correspondante IHS indiquée à la figure 3.
Mise en marche
Brancher la fiche dans la prise de courant ; placer le thermostat sur la position maximale jusqu'à la butée
d’arrêt ; mettre le radiateur en marche à l'aide des interrupteurs selon les modalités décrites dans le tableau
ci-dessous.
Réglage du thermostat “ P ”
Lorsque la pièce a atteint la température souhaitée, tourner lentement le bouton du thermostat P (fig. 3) dans
le sens inverse à celui des aiguilles d'une montre jusqu’à ce que la position signalée par un déclic soit atteinte
(ou jusqu'à ce que le voyant lumineux s’éteigne) et pas au-delà. La température ainsi fixée sera réglée
automatiquement et maintenue constante par le thermostat.
Fonction antigel (anti-frost)
Lorsque le thermostat se trouve sur la position
*
et les interrupteurs I et II sont pressés, l'appareil maintient la
température de la pièce sur environ 5°C en évitant ainsi tout risque de gel avec une consommation minimale
d’énergie.
Touches Fonction Active Mode de fonctionnement
pressées
Appuyer sur la touche I pour le chauffage Dans ce mode de fonctionnement, il est
Normal à puissance minimale. possible d’activer la fonction Anti-frost.
Appuyer sur la touche II pour le chauffage Dans ce mode de fonctionnement, il est
Normal à puissance moyenne. possible d’activer la fonction Anti-frost.
Appuyer sur les touches I et II pour le Dans ce mode de fonctionnement, il est
chauffage Normal à puissance maximale. possible d’activer la fonction Anti-frost.
Appuyer sur les touches I, II et Dans ce mode de fonctionnement, il est
Instant Heating System IHS pour le déconseillé d’activer la fonction Anti-frost.
chauffage Rapide à puissance maximale.
Dans ce mode le voyant lumineux II et le
voyant Instant Heating System s'allument (A)
Page 12

Modèles avec programmateur (Timer) 24 heures “ T ”
Pour programmer les horaires de chauffage, procéder de la manière suivante :
- Regarder l’heure sur une montre. S’il est par exemple 10 heures, tourner dans le sens des aiguilles d'une
montre le disque numéroté du programmateur T de manière à faire coïncider le numéro 10 du disque
avec le repère correspondant imprimé sur le programmateur.
- Sélectionner les périodes de temps souhaitées pour le fonctionnement de l'appareil, en poussant vers le
centre les tétons. Chaque téton correspond à une période de temps de 15 minutes. On peut alors
apercevoir des secteurs qui correspondent aux périodes de fonctionnement.
-Ainsi programmé, le radiateur fonctionnera automatiquement tous les jours à l’horaire programmé
(Important : la fiche doit toujours être branchée à la prise de courant).
-Pour modifier la programmation, il suffit de ramener les tétons dans leur position initiale et de sélectionner des nouvelles périodes de fonctionnement.
- Pour faire fonctionner l'appareil sans programmation, pousser vers le centre tous les tétons. Dans ce cas,
pour éteindre complètement l'appareil il faudra non seulement éteindre tous les interrupteurs, mais aussi
enlever la fiche de la prise de courant afin d’éviter le fonctionnement inutile du programmateur.
Modèles avec dispositif anti-culbutement
- Certains modèles sont munis d’un interrupteur anti-culbutement qui, en cas de chute de l'appareil, coupe
l’alimentation. Pour rétablir le fonctionnement de l'appareil, il suffit de le remettre en position verticale
sur ses petits pieds. (Pour savoir si l’appareil est équipé de ce dispositif, vérifier si l’inscription “ …ex :1 ”
est présente après l’indication type sur la plaque signalétique.
5. ENTRETIEN
Avant d’effectuer toute intervention sur l'appareil, débrancher la fiche de la prise de courant et attendre que
le radiateur soit froid.
Le radiateur électrique à huile ne nécessite pas d’entretien particulier. Il suffit d’enlever la poussière à l'aide
d’un chiffon doux et sec. Ne jamais utiliser de poudres abrasives ou de solvants. Si nécessaire, enlever les
dépôts éventuels de saleté en utilisant d’un aspirateur.
6. AVERTISSEMENTS
- Ne pas utiliser le radiateur à proximité de baignoires, douches, éviers ou piscines.
- Ne pas utiliser le radiateur pour faire sécher le linge, ne pas déposer le cordon d’alimentation sur les éléments chauds.
- Utiliser toujours et exclusivement le radiateur en position verticale.
- Si le cordon d’alimentation est abîmé, le faire remplacer par le fabricant ou par son service technique
après-vente ou de toute façon par un personnel qualifié, de manière à éviter tout danger.
- Lors de la première mise en service, faire fonctionner l'appareil à la puissance maximale pendant au
moins 2 heures. Pendant cette opération, aérer parfaitement la pièce afin d’éliminer l’odeur typique de
“ nouvel appareil ” dégagée par le radiateur.
- Il est tout à fait normal que l'appareil émette des “ craquètements ” lors de la première mise en marche.
- L'appareil ne doit pas être placé juste en dessous d’une prise de courant fixe.
- Le contenant de cet appareil est rempli avec une quantité exacte d’huile et les réparations exigeant son
ouverture doivent être exécutées exclusivement par le fabricant ou par son service après-vente.
- Dans le cas d’élimination de l'appareil, il est nécessaire de respecter les dispositions en vigueur concernant l’élimination de l’huile.
- Ne pas déposer le cordon d’alimentation sur l'appareil encore chaud.
- Ne pas utiliser l'appareil dans des pièces ayant une aire de base inférieure à 4 m
2
.
- IMPORTANT : Ne jamais couvrir l'appareil pendant son fonctionnement, étant donné que cela pourrait
provoquer des surchauffes dangereuses.
Un dispositif de sécurité interrompe le fonctionnement du thermoradiateur en cas de surchauffage accidentel. Pour
rétablir le fonctionnement, il est nécessaire de débrancher la fiche pendant 30 minutes, supprimer la cause du surchauffage et réinsérer la fiche dans la prise de courant.
ATTENTION: pour éviter les risques que provoquerait un enclenchement accidentel du système de sécurité, cet appareil ne doit pas être alimenté à travers un temporisateur externe.
12
Page 13

13
D
Der Öl-Radiator ist ein äußerst vielseitiges Haushaltsgerät zum Heizen mit drei anwählbaren
Heizleistungsstufen. In dieses Gerät wurde außerdem eine exklusive Funktion eingebaut, die es Ihnen
ermöglicht, unter jeder Bedingung allerhöchsten Komfort zu erzielen.
Um die Leistungsfähigkeiten des Gerätes bestens nutzen zu können, empfehlen wir Ihnen, die nachstehenden Anweisungen vollständig durchzulesen.
1. ALLGEMEINES
Nehmen Sie das Gerät aus der Verpackung, stellen Sie es auf den Kopf und auf die Schutzkufen aus
Polystyrol. Kontrollieren Sie das Versorgungskabel auf seine Unversehrtheit und vergewissern Sie sich, daß
das Gerät keine Transportschäden erlitten hat. Ist das Gerät beschädigt, verwenden Sie es auf gar keinen
Fall.
2. MONTAGE DER STELLFÜßE
Nehmen Sie die Stellfüße und die Rollen aus der Polystyrolverpackung.
Führen Sie die Rollen in den Stift des Stellfußes ein und drücken Sie nach unten, bis Sie ein Einrastgeräusch
vernehmen (Abb. 1). Ziehen Sie an den Rollen, um sich zu vergewissern, daß sie richtig festsitzen.Montieren
Sie den Fuß mit Rolle an die Unterseite des Schnellheizers, indem Sie die Führungsrippe zwischen
Schalteinheit und dem ersten Element einführen; rasten Sie die beiden Zähne in die vogesehenen Stellen ein
und stellen Sie den Fuß mit den Augenschrauben fest, die Sie ganz festziehen (Abb. 1).
Montieren Sie jetzt die hinteren Rollen, indem Sie sie in den Stahlstift einsetzen, den Stift in die hintere
Halterung einrasten lassen und kontrollieren, daß die Rollen so positioniert werden, wie auf Abbildung 2
gezeigt. Prüfen Sie, ob die Rollen ungehindert drehen. Bringen Sie nach Beendigung dieser Arbeitsgänge
den Schnellheizer wieder in die senkrechte Betriebsposition.
3. ELEKTRISCHER ANSCHLUß
- Bevor Sie den Netzstecker an der Steckdose anschließen prüfen Sie sorgfältig, ob die Spannung Ihres
Hausstromnetzes mit der in V auf dem Gerät angegebenen übereinstimmt und ob die Steckdose und die
Versorgungsleitung für die geforderte Belastung ausgelegt sind.
- Schließen Sie den Öl-Radiator nur an eine ordnungsgemäß geerdete Steckdose an.
- Dieses Gerät entspricht der Richtlinie 89/336/EU hinsichtlich der elktromagnetischen Kompatibilität.
Page 14

4. BETRIEB UND GEBRAUCH
Instant Heating System
Dieses Gerät ist mit einer besonderen Schnellheizfunktion "Instant Heating System" ausgerüstet. Die Funktion
"Instant Heating System" aktiviert einen exklusiven Zusatzheizer, der Ihren Raum schnell und geräuschlos
heizt.
Die Funktion wird mit der entsprechenden Taste IHS aktiviert, die auf Abbildung 3 dargestellt ist.
Einschalten
Schließen Sie den Netzstecker an der Steckdose an, verstellen Sie den Thermostat bis zum Anschlag auf die
höchste Einstellposition. Schalten Sie den Öl-Radiator mit den Schaltern und gemäß den Angaben in der
nachstehenden Tabelle ein.
Thermostatregulierung "P"
Hat der Raum die gewünschte Temperatur erreicht, drehen Sie den Drehknopf des Thermostats P (Abb. 3)
langsam entgegen dem Uhrzeigersinn bis auf die Position, die durch ein Klick angezeigt wird (oder bis zum
Erlöschen der Kontrollampe) und nicht weiter. Die so festgelegte Temperatur wird durch den Thermostat
automatisch reguliert und konstant beibehalten.
Frostschutzfunktion (anti-frost)
Steht der Thermostat auf Position
*
und sind die Schalter I und II gedrückt, hält das Gerät die
Raumtemperatur auf etwa 5°C, wodurch mit einem geringen Energieaufwand die Frostgefahr ausgeschlossen
wird.
Gedrückte Aktivierte Funktion Betriebsart
Tasten
Drücken Sie die Taste I für normales In dieser Betriebsart kann die
Heizen auf der niedrigsten Leistungsstufe Anti-frost-Funktion aktiviert werden
Drücken Sie die Taste II für das normale In dieser Betriebsart kann die
Heizen auf mittler Leistungsstufe Anti-frost-Funktion aktiviert werden
Drücken Sie die Tasten I und II für das In dieser Betriebsart kann die
normale Heizen auf höchster Leistungsstufe Anti-frost-Funktion aktiviert werden
Drücken Sie die Tasten I, II und In dieser Betriebsart sollte die
Instant Heating System IHS für schnelles Anti-Frost-Funktion nicht aktiviert werden.
Heizen auf höchster Leistungsstufe.
In dieser Betriebsart leuchte sich nur die
Kontrolllampe II und die Lampe IHS (A).
14
Page 15

Modelle mit Programmiervorrichtung (Timer) 24 Stunden "T"
Um den Öl-Radiator zu programmieren, verfahren Sie wie folgt:
- Entnehmen Sie Ihrer Uhr die genaue Uhrzeit. Nehmen wir an es sei 10 Uhr, drehen Sie die numerierte
Scheibe der Programmiervorrichtung T im Uhrzeigersinn bis die Nummer 10 derselben mit dem
Bezugszeiger s übereinstimmt, der auf der Programmvorrichtung eingeprägt ist.
- Stellen Sie die für den Gerätebetrieb gewünschten Zeitspannen ein, indem Sie die Zähnchen in Richtung
Mitte drücken. Jedes Zähnchen entspricht einer Zeitspanne von 15 Minuten. Jetzt werden die Sektoren
sichtbar, die mit den Betriebszeiten übereinstimmen.
- So eingestellt, funktioniert der Öl-Radiator automatisch jeden Tag zur programmierten Zeit. (Wichtig: Der
Netzstecker muß stets an der Steckdose angeschlossen sein).
- Um die Programmierung zu verändern, bringen Sie einfach die Zähnchen in ihre Ausgangsstellung
zurück und stellen die neuen Betriebszeiten ein.
-Möchten Sie das Gerät ohne Programmierung betreiben, drücken Sie sämtliche Zähnchen in Richtung
Mitte. Möchten Sie in diesem Fall das Gerät gänzlich abschalten, müssen Sie nicht nur die Schalter ausschalten, sondern auch den Netzstecker aus der Steckdose ziehen, um den unnötigen Betrieb der
Programmiervorrichtung zu vermeiden.
Modelle mit Umkippschutzvorrichtung
- Einige Modelle sind mit einem Umkippschutzschalter ausgerüstet, der die Stromversorgung unterbricht,
falls das Gerät umfallen sollte. Um den Betrieb wieder aufnehmen zu können, müssen Sie das Gerät nur
erneut in die vertikale Position auf die Stellfüße bringen. (Um festzustellen, ob Ihr Gerät mit dieser
Vorrichtung ausgerüstet ist, prüfen Sie, ob auf dem Typen-/Leistungsschild nach der Typenbezeichnung
die Schrift "...ex:1" steht).
5. WARTUNG
Bevor Sie mit irgendwelchen Wartungsarbeiten beginnen, ziehen Sie stets den Netzstecker aus der Steckdose
und warten Sie ab, bis der Öl-Radiator abgekühlt ist. Der elektrische Öl-Radiator erfordert keine besondere
Wartung. Er sollte regelmäßig mit einem weichen und trockenen Tuch abgestaubt werden. Verwenden Sie
zur Reinigung niemals Scheuer- oder Lösungsmittel. Falls erforderlich, entfernen Sie eventuelle
Schmutzansammlungen mit Hilfe eines Staubsaugers.
6. WICHTIGE HINWEISE
-Verwenden Sie den Öl-Radiator nicht in unmittelbarer Nähe von Badewannen, Duschen, Waschbecken
oder Schwimmbädern.
-Verwenden Sie den Öl-Radiator nicht, um Wäsche zu trocknen, legen Sie die Versorgungsleitung nicht
auf die heißen Elemente.
-Verwenden Sie den Öl-Radiator immer und ausschließlich in vertikaller Stellung.
- Sollte das Versorgungskabel beschädigt sein, muß es vom Hersteller selbst oder seinem technischen
Kundendienst ausgewechselt werden, jedoch in jedem Fall von einem Fachmann, um jedes Risiko
auszuschließen.
- Schließen Sie das Gerät erstmals an, lassen Sie es mindestens 2 Stunden auf der höchsten Leistungsstufe
arbeiten. Lüften Sie während dieser Zeit den Raum gut durch, um den Geruch "des Neuen" zu beseitigen, der aus dem Gerät austritt.
- Es ist völlig normal, daß aus dem Gerät beim ersten Einschalten "Knistergeräusche" austreten.
- Stellen Sie das Gerät nicht direkt unter eine feststehende Steckdose.
- Der Behälter dieses Gerätes ist mit der exakten Menge an Öl aufgefüllt und Reparaturen, die das Öffnen erforderlich machen, dürfen ausschließlich vom Hersteller selbst oder von dessen Kundendienst
durchgeführt werden. Sollten Ölverluste auftreten, wenden Sie sich an den Hersteller oder an dessen
Kundendienst.
- Möchten Sie das Gerät endgültig ausrangieren, halten Sie sich an die für die Entsorgung von Öl geltenden Vorschriften.
- Legen Sie das Versorgungskabel nicht auf das Gerät, solange dies noch heiß ist.
-Verwenden Sie das Gerät nicht in Räumen, die kleiner als 4 m2 sind.
-WICHTIG: Decken Sie das Gerät während dem Betrieb auf gar keinen Fall ab, da dies zu einer
gefährlichen Überhitzung führen würde.
Eine Sicherheitseinrichtung unterbricht den Betrieb des Heizlüfters bei Überhitzung. Für die Wiederherstellung des
Gerätebetriebes sind der Netzstecker zu ziehen und 30 Minuten abzuwarten. Die Störungsursache beseitigen und den
Netzstecker wieder anschließen.
Achtung: Um eine Gefährdung durch ein unbeabsichtigtes Rücksetzen des Schutzschalters zu vermeiden, darf das
Gerät nicht über eine externe Zeitschaltuhr versorgt werden.
15
Page 16

16
De radiator Rapido is een zeer veelzijdig apparaat voor de huiselijke verwarming met drie instelbare
vermogensniveau’s. Bovendien is in dit produkt een exclusieve functie aangebracht die het mogelijk
maakt het grootst mogelijke comfort te verkrijgen onder alle omstandigheden.
Om maximaal gebruik te kunnen maken van het vermogen van het produkt, raden wij u aan de volgende instructies nauwkeurig door te lezen.
1. ALGEMEEN
Het apparaat uit de verpakkingsdoos halen, hierna het apparaat omkeren en hem op de polystyreen
beschermingshulsen laten rusten. Controleren of het electriciteitssnoer in goede staat verkeert en of het apparaat geen schade opgelopen heeft tijdens het transport. Het apparaat niet laten functioneren indien het
beschadigd mocht blijken te zijn.
2. MONTAGE VAN DE VOETSTEUNEN
De voetsteunen en de wieltjes uit de polystyreen verpakking halen.
De wieltjes op de pin van de voetsteun schuiven en goed doordrukken totdat men een klik hoort (fig. 1).
Controleren, door eraan te trekken, of de wieltjes goed vastzitten.
De voetsteun met wieltje aan de onderkant van de radiator monteren door de staven tussen bedieningsdoos
en eerste element te steken; de 2 tandjes in de hiervoor aangebrachte openingen schuiven en de voetsteun
blokkeren door de oogschroeven helemaal vast te draaien (fig. 1).
Hierna de achterste wieltjes monteren door deze in de stalen pin te steken, de pin in de achterste steun te
schuiven en te controleren dat de wieltjes geplaatst worden op de manier zoals aangegeven in figuur 2.
Controleren of de wieltjes vrij kunnen draaien. Na deze handelingen de radiator weer omkeren en in de verticale stand terugzetten.
3. ELECTRISCHE AANSLUITING
-Voordat de stekker in het stopcontact gestoken wordt nauwkeurig nagaan of het voltage van uw electriciteitsnet overeenkomt met de waarde aangegeven in V op het apparaat en of het stopcontact en de
electricitietsleiding de juiste afmeting hebben voor de gevraagde belasting.
- DE RADIATOR ALLEEN AALSUITEN OP STOPCONTACTEN VOORZIEN VAN EEN GOED FUNCTIONERENDE AARDLEIDING.
- Dit apparaat is overeenkomstig de EEG richtlijn 89/336 aangaande de electromagnetische verenigbaarheid.
NL
Page 17
4. FUNCTIONERING EN GEBRUIK
Instant Heating System
Dit produkt is voorzien van een bijzondere functie voor snelle verwarming “Instant Heating System”.
De functie “Instant Heating System” stelt een exclusief extra verwarmingselement in werking waardoor de
ruimte snel en geruisloos verwarmd wordt.
De functie treedt in werking door op de toets IHS te drukken die aangegeven staat in figuur 3.
Het aanzetten
De stekker in het stopcontact steken; de thermostaat verplaatsen tot deze niet verder kan dus tot op de maximale stand; de radiator aanzetten door de toetsen te bedienen op de manier zoals aangegeven in de tabel.
Regulering van de thermostaat “P”
Wanneer in de ruimte de gewenste temperatuur bereikt is, langzaam de thermostaatknop P draaien (fig. 3)
tegen de wijzers van de klok in tot op het punt waarop men een klik hoort (of totdat het controlelampje uitgaat) en niet verder. De op deze manier ingestelde temperatuur zal automatisch gereguleerd en constant
gehouden worden door de thermostaat.
Antivries functie (anti-frost)
Met de thermostaat op stand
*
en de toetsen I en II ingedrukt, zal het apparaat de temperatuur in de ruimte
constant houden op ongeveer 5°C waardoor bevriezing voorkomen wordt met een minimaal energieverbruik.
Ingedrukte In werking gestelde functie Functioneringsgesteldheid
oetsen
Toets I indrukken voor Normale In deze positie is het mogelijk de
verwarming op minimum vermogen. antivries functie (anti-frost) aan te zetten.
Toets II indruken voor Normale In deze positie is het mogelijk de
verwarming op gemiddeld vermogen. antivries functie (anti-frost) aan te zetten.
De toesten I en II indrukken voor Normale In deze positie is het mogelijk de
verwarming op maximum vermogen. antivries functie (anti-frost) aan te zetten.
De toets I, II en Instant Heating System In deze positie is het niet raadzaam
HS indrukken voor Snelle verwarming de antivries functie (anti-frost) aan te zetten.
op maximum vermogen. Op die manier branden de controlelampjes
II en Instant Heating System (A).
17
Page 18

Modellen met 24 uur programmering (Timer) “T”
Voor het programmeren van de verwarming als volgt te werk gaan:
- Kijk op uw horloge hoe laat het is. Laten we aannemen dat het 10 uur is, de genummerde schijf van de
programmeerknop T kloksgewijs draaien totdat het nummer 10 overeenkomt met het referentieteken s
aangegeven op de programmeerknop.
- De tijden instellen waarop men wenst dat het apparaat functioneert, door de tandjes naar het midden te
drukken. Elke tandje komt overeen met een tijdsduur van 15 min. Op deze manier zullen sectoren zichtbaar worden die overeenkomen met de functioneringsperioden.
- Op deze manier ingesteld zal de radiator automatisch elke dag functioneren gedurende de geprogrammeerde tijden. (Belangrijk: de stekker moet altijd in het stopcontact gestoken blijven).
- Om de programmering te wijzigen is het voldoende de tandjes terug te brengen in de beginstand en de
nieuwe functioneringstijden in te stellen.
- Indien u wenst dat het apparaat functioneert zonder programmering, dienen alle tandjes naar het midden gedrukt te worden. In dit geval om het apparaat af te zetten zal het nodig zijn, behalve het afzetten
van de bediening, ook de stekker uit het stopcontact te halen om te voorkomen dat de programmeerknop
nodeloos functioneert.
Modellen met anti-omval mechanisme
- Enkele modellen zijn voorzien van een anti-omval mechanisme dat, mocht het apparaat omvallen
automatisch de electriciteitstoevoer onderbreekt. Om het apparaat weer normaal te laten functioneren, is
het voldoende het apparaat weer op de voetsteunen in verticale stand te zetten.
(Om na te gaan of uw apparaat voorzien is van dit mechanisme, controleren of op het kenmerkenplaatje na het type het woord “...ex:1” geschreven staat.)
5. ONDERHOUD
Voordat men overgaat tot welke handeling dan ook, eerst altijd de stekker uit het stopcontact halen en wachten tot de radiator afgekoeld is. De electrische olie radiator vraagt geen bijzonder onderhoud. Het is voldoende hem af te stoffen met een zachte en droge doek. Nooit schuur- of oplosmiddelen gebruiken. Indien
nodig eventuele vuilophopingen verwijderen met behulp van een stofzuiger.
6. WAARSCHUWINGEN
- De radiator niet gebruiken in de buurt van ligbaden, douches, wastafels of zwembaden.
- De radiator niet gebruiken voor het drogen van wasgoed, het snoer niet op de warme elementen laten liggen.
- De radiator altijd en uitsluitend gebruiken in verticale stand.
- Indien het electriciteitssnoer beschadigd is, dient dit vervangen te worden door de fabrikant of door zijn
technische assistentie service of in ieder geval door een persoon met een overeenkomende vakbekwaamheid, opdat elk risico uitgesloten wordt.
- De eerste keer dat de radiator aangezet wordt, het apparaat gedurende minstens 2 uur op het maximale
vermogen laten functioneren. Tijdens deze handeling de ruimte goed luchten teneinde de geur van
“nieuwigheid” te verwijderen, die door het apparaat afgegeven wordt.
-Het is helemaal normaal dat het apparaat tijdens de eerste functionering een beetje “kraakt”.
- Het apparaat dient niet rechtstreeks onder een vast stopcontact geplaatst te worden.
- De container van dit apparaat is gevuld met de juiste hoeveelheid olie en de reparaties waarvoor deze
geopend zou moeten worden, dienen uitsluitend uitgevoerd te worden door de Fabrikant of door zijn
Assistentie Service. Indien het apparaat olie verliest dient contact opgenomen te worden met de Fabrikant
of met zijn Assistentie Service.
-Het snoer niet op het nog warme apparaat leggen.
- Dit apparaat niet gebruiken in kamers met een basis oppervlakte van minder dan 4m
2
.
- BELANGRIJK: Het apparaat nooit bedekken tijdens het functioneren, omdat dit gevaarlijke oververhitting
teweeg zou brengen.
Een veiligheidsmechanisme onderbreekt het functioneren van de thermoradiator in geval dat er per ongeluk over-
verhitting ontstaat. Om het apparaat weer in werking te stellen, is het noodzakelijk de stekker 30 minuten uit het stopcontact te halen, de oorzaak van de oververhitting weg te nemen, en vervolgens de stekker weer in het stopcontact te
steken.
OPGELET: om de gevaren te vermijden als gevolg van een toevallig herstel van het veiligheidssysteem, mag dit apparaat nooit gevoed worden met een externe timer.
18
Page 19

19
El radiador Rápido es un aparato sumamente versátil para la calefacción de la casa con tres niveles
de potencia seleccionables. Además, en este producto ha sido incorporada un función exclusiva que
permite obtener el máximo confort en cualquier situación.
Para aprovechar al máximo las potencialidades del producto sugerimos una detallada lectura de las
instrucciones de uso.
1. GENERALIDADES
Desembalar el aparato, volcar el mismo apoyándolo sobre las cofias de poliestireno de protección. Controlar
la integridad del cable de alimentación y que el aparato no haya sufrido daños durante el transporte. Si el
aparato presenta daños no debe ser activado.
2. MONTAJE DE LAS PATAS
Quitar las patas y las ruedas y apretar a fondo hasta oír un salto (fig.1). Asegurarse, tirando, que las ruedas
estén bien fijadas.
Montar la pata con ruedas en la parte inferior del radiador introduciendo el realzo guía entre caja de mando
y primer elemento; encastrar los dos dientes en los alojamientos previstos y bloquear el pie con los tornillos
atornillando a fondo. (fig.1).
Montar a continuación las ruedas posteriores introduciéndolas en el perno de acero, encastrar el perno en
el soporte posterior controlando que las ruedas sean colocadas como indicado en la figura 2. Controlar que
las ruedas giren libremente.
Concluidas estas operaciones volcar el radiador colocándolo es la posición vertical de funcionamiento.
3. CONEXIÓN ELECTRICA
- Antes de conectar el enchufe al toma corriente verificar cuidadosamente que el voltaje de la red doméstica corresponda al valor en voltios (V) indicado en el aparato y que el toma corriente y la línea de alimentación estén dimensionadas para la carga solicitada.
- CONNECTE EL RADIADOR A UN ENCHUFE COM TOMA DE TIERRA EFECTIVA.
- Este aparato se ajusta a la directiva CEE 89/336 relativa a la compatibilidad electromagnética.
E
Page 20

4. FUNCIONAMIENTO Y USO
Instant Heating System
Este producto está dotado de una particular función de calentamiento rápido “Instant Heating System”.
La función “Instant Heating System” activa un calefactor adjunto exclusivo que permite calefaccionar el ambiente rápida y silenciosamente.
La función se activa por medio del apropiado pulsador IHS indicado en la figura 3.
Encendido
Introducir el enchufe en el toma corriente, mover el termostato hasta la parada en posición de máximo;
encender el radiador por medio de los interruptores según las modalidades indicadas en la tabla.
Regulación del termostato “P”
Cuando el ambiente alcanza la temperatura deseada, girar lentamente la manopla del termostato P (fig. 3)
en sentido contrario a las agujas del reloj hasta la posición indicada por un click (o bien hasta que se apaga
la señal luminosa), no se debe superar este límite. La temperatura fijada de esta manera será regulada y
mantenida constante por el termostato.
Función antihielo (Anti-frost)
Con el termostato en posición
*
y los interruptores I y II accionados, el aparato mantiene el ambiente a
una temperatura de aprox. 5°C impidiendo el congelamiento con un consumo de energía mínimo.
Pulsadores Función activada Modalidad de funcionamiento
activados
Apretar el pulsador I para la calefacción En esta modalidad es posible activar
normal a potencia mínima la función antihielo (Anti-frost).
Apretar el pulsador I para la calefacción En esta modalidad es posible activar
normal a potencia media la función antihielo (Anti-frost).
Apretar los pulsadores I y II para la En esta modalidad es posible activar
calefacción normal a potencia máxima la función antihielo (Anti-frost).
Apretar los pulsadores I , II y Instant En esta modalidad no es aconsejable
Heating System IHS para la calefacción activar la función antihielo (Anti-frost).
Rápida a potencia máxima
En esta modalidad se encienden el piloto
luminoso II y el piloto Instant Heating System
(A)
20
Page 21

Modelos con programador (Temporizador) 24 horas “T”
Para programar la calefacción proceder en el siguiente modo:
- Controle la hora en su reloj, suponiendo que son las 10, girar en sentido de las agujas del reloj el disco
numerado del programador T hasta hacer coincidir el numero 10 del mismo con el índice de referencia
S estampado en el programador.
- Plantear los periodos temporales en los cuales se desea que funcione el aparato, empujando hacia el
centro los dientes. Cada diente corresponde a un período de 15 minutos. A este punto serán visibles de
los sectores que corresponden a los períodos de funcionamiento.
-Predispuesto de esta manera el radiador funcionará automáticamente todos los días en los horarios programados (importante: el enchufe debe estar siempre conectado).
- Para variar la programación es suficiente volver a colocar los dientes en la posición inicial y plantear
nuevos períodos de funcionamiento.
- Si se desea hacer funcionar el aparato sin programación empujar hacia el centro todos los dientes, en
este caso para el apagado total del aparato además de apagar los interruptores es necesario desenchufar el aparato para evitar un inútil funcionamiento del programador.
Modelos con dispositivos antivuelco
- Algunos modelos están dotados de un interruptor antivuelco, que en caso de caída interrumpe la alimentación. Para restablecer el funcionamiento es suficiente poner al aparato sobre las patitas en posición vertical.(Para verificar su aparato está dotado de este dispositivo, verificar en la chapa indicadora de las características después de type exista la frase “...ex:1)
5. MANTENIMIENTO
Antes de cualquier intervención desenchufar el aparato y esperar que el radiador este frío. El radiador eléctrico a aceite no requiere particular mantenimiento. Es suficiente quitar el polvo con un paño suave y seco.
No usar nunca polvos abrasivos o solventes. Si fuera necesario sacar eventuales concentraciones de
suciedad, usar una aspiradora.
6. ADVERTENCIAS
- No usar el radiador en las cercanías de bañeras, duchas, piletas o piscinas.
-No usar el radiador para secar lencería, no apoyar el cable de conexión sobre los elementos calientes.
-Usar el radiador siempre y solamente en posición vertical
- Si el cable de alimentación esta dañado, el mismo debe ser sustituido por el constructor o por el centro
de asistencia técnica o bien por personal calificado, de manera de prevenir cualquier riesgo.
-A la primera activación, hacer funcionar el aparato a la potencia máxima por lo menos por dos horas.
Durante esta operación airear bien la habitación para eliminar el olor “a nuevo” que emana el aparato.
- Es completamente normal que el aparato emita crujidos durante el primer funcionamiento.
- El depósito de este aparato está cargado con una cantidad exacta de aceite y las reparaciones que
requieren la apertura deben ser efectuadas sólo por el Fabricante o por el Servicio de Asistencia.
- En caso de eliminación del aparato es necesario respetar las disposiciones relativas al escurrimiento del aceite
- No apoyar el cable sobre el aparato aún caliente
- No utilizar este aparato en habitaciones con superficie inferior a 4m
2
.
- IMPORTANTE: no cubrir en ningún caso el aparato durante el funcionamiento, ya que esto puede provocar recalentamientos peligrosos.
Un dispositivo de seguridad interrumpe el funcionamiento del termo
radiador
en caso de sobrecalentamiento
accidental. Para restablecer el funcionamiento, desenchufar el aparato por 30 minutos, eliminar la causa del
sobrecalentamiento y volverlo a enchufar.
ATENCIÓN: para evitar peligros causados por una reposición accidental del sistema de seguridad, este aparato no debe ser alimentado mediante un programador externo.
21
Page 22

22
O radiador de óleo rápido é um aparelho extremamente versátil para o aquecimento doméstico. Possui
três níveis de potência. Para além disso, neste produto foi incorporado uma função exclusiva que lhes
permitirá obter o máximo conforto em qualquer situação.
Para utilizar da melhor maneira as capacidades do produto, deve-se ler com atenção as instruções
dadas a seguir.
1. GENERALIDADES
Retirar o aparelho da caixa de embalagem e invertê-lo e apoiá-lo nos elementos de poliestireno de protecção. Controlar que o cabo de alimentação eléctrica esteja íntegro e que o aparelho não tenho sofrido
avarias durante o transporte. Não ligar o aparelho se estiver avariado.
2. MONTAGEM DOS PÉS
Retirar os pés e as rodinhas da embalagem em poliestireno.
Colocar as rodas no perno do pé e pressionar até ao fundo até ouvir o engate (fig. 1). Certificar-se de que
as rodas estejam bem fixadas a puxá-las.
Montar o pé com as rodas na parte inferior do radiador, e inserir as faixas de guia entre a caixa de comandos e o primeiro elemento; encaixar os 2 pés nas sedes existentes e bloquear o pé com os parafusos de argola aparafusando-os a fundo (fig. 1).
Montar as rodas posteriores inserindo-as no perno de aço, encaixar o perno no suporte posterior e controlar que as rodas fiquem posicionadas conforme ilustrado na fig. 2. Controlar que as rodas girem livremente.
Terminadas tais operações, inverter o radiador e recolocá-lo na posição vertical de funcionamento.
3. LIGAÇÃO ELÉCTRICA
- Antes de ligar a ficha na tomada de corrente, controlar com atenção que a voltagem da sua rede eléctrica doméstica corresponda ao valor em Volts indicado no aparelho e que a tomada de corrente e a
linha de alimentação sejam dimensionadas para a carga necessária.
- LIGAR O RADIADOR SOMENTE EM TOMADAS QUE TENHAM UMA LIGAÇÃO À TERRA EFICIENTE.
- Este aparelho está em conformidade com a directriz 89/336/CEE sobre a compatibilidade electromagnética.
P
Page 23

4. FUNCIONAMENTO E USO
Instant Heating System
Este produto é dotado de uma função especial de aquecimento rápido “Instant Heating System”. Esta função
activa um aquecimento adicional exclusivo que permite aquecer o ambiente de forma rápida e silenciosa.
A função é activada mediante a respectiva tecla IHS indicada na figura 3.
Como ligar o aparelho
Ligar a ficha na tomada de corrente; deslocar o termóstato até à posição máxima; ligar o radiador mediante os interruptores segundo as modalidades indicadas na tabela.
Regulação do termóstato “P”
Quanto o ambiente alcançar a temperatura desejada, girar lentamente o botão do termóstato P (fig. 3) no
sentido anti-horário até à posição indicada por um clique (ou até que a luz avisadora se apague) e não
além. A temperatura, que desta maneira foi programada, será automaticamente regulada e mantida constante pelo termóstato.
Função antigelo (anti-frost)
Com o termóstato na posição
*
e os interruptores I e II pressionados, o aparelho mantém a temperatura
do ambiente em cerca de 5ºC e impede, desta maneira, a congelação com um gasto mínimo de energia.
Teclas Função activada Modalidade de funcionamento
pressionadas
Carregar na tecla I para o aquecimento Nesta modalidade é possível activar
normal com potência mínima a função anti-gelo (Anti-frost)
Carregar na tecla II para o aquecimento Nesta modalidade é possível activar
normal com potência média a função anti-gelo (Anti-frost)
Carregar nas teclas I e II para o Nesta modalidade é possível activar
aquecimento normal com potência máxima a função anti-gelo (Anti-frost)
Carregar nas teclas I, II e Instant Nesta modalidade não é aconselhável
Heating System IHS para o aquecimento activar a função anti-gelo
rápido com potência máxima.
Nesta modalidade acendem-se a luz piloto II
e o indicador luminoso Instant Heating System
(A).
23
Page 24

Modelos com programador (temporizador) de 24 horas “T”
Para programar o aquecimento, seguir as instruções abaixo:
-Ver a hora actual. A supor que sejam 10:00, girar no sentido horário o disco numerado do programador T até que o número 10 do mesmo coincida com o índice de referência s impresso no programador.
- Ajustar os intervalos em que se deseja obter o funcionamento do aparelho, a pressionar para o centro
os dentes do programador. Cada um dos dentes corresponde a um intervalo de 15 minutos. Então,
pode-se ver os sectores que correspondem aos intervalos de funcionamento.
-Programado desta maneira, o radiador funcionará automaticamente todos os dias no horário programado (importante: a ficha deve ficar sempre ligada na tomada de corrente eléctrica).
-Para variar a programação, é suficiente recolocar os dentes na posição inicial e programar os novos
intervalos de funcionamento.
- Se desejar que o aparelho funcione sem programação, empurrar para o centro todos os dentes. Neste
caso, para desligar completamente o aparelho, desligar os interruptores e também retirar a ficha da
tomada a fim de evitar um funcionamento inútil do programador.
Modelos com dispositivo antiinversão
-Alguns modelos são dotados de um interruptor antiinversão que – se o aparelho cair – interrompe a
alimentação. Para restabelecer o funcionamento, basta recolocar o aparelho sobre os pés na posição
vertical. (Para saber se o seu aparelho possui tal dispositivo, verificar na placa de características se
após o type está escrito “…ex:1”).
5. MANUTENÇÃO
Antes de fazer qualquer operação no aparelho, desligar a ficha da tomada de corrente e aguardar que o
radiador arrefeça-se. O radiador eléctrico de óleo não necessita de manutenção especial. Basta tirar a
poeira com um pano macio e seco. Nunca utilizar pós abrasivos ou solventes. Se for necessário, retirar as
concentrações de sujidade com um aspirador de pó.
6. ADVERTÊNCIAS
- Não usar o radiadores nas proximidades imediatas de banheiras, duches, lavabos ou piscinas.
- Não usar o radiador para secar as roupas, não apoiar o cabo de ligação nos elementos quentes.
- Usar o radiador sempre e somente na posição vertical.
- Se o cabo de alimentação estiver avariado, este deve ser substituído pelo fabricante ou pelo seu serviço
de assistência técnica, ou, todavia, por uma pessoa com qualificação semelhante, de modo a prevenir
todo e qualquer risco.
-Ao ligar o aparelho pela primeira vez, deixá-lo funcionar com a potência máxima por pelo menos 2
horas. Durante esta operação, arejar bem a divisão a fim de eliminar o odor “de novo” que se libera
do aparelho.
-É completamente normal que o aparelho emita alguns “estalos” quando for ligado pela primeira vez.
-O aparelho não deve ser colocado imediatamente numa tomada de corrente fixa.
-O recipiente deste aparelho possui uma quantidade exacta de óleo e as reparações que necessitarem
da abertura devem ser feitas somente pelo fabricante ou pelo seu serviço de assistência técnica. Em caso
de fugas de óleo, recorrer ao fabricante ou ao seu serviço de assistência técnica.
-Em caso de desmancho do aparelho, é necessário respeitar as disposições relativas ao tratamento do
óleo.
- Não apoiar o cabo sobre o aparelho quente.
- Não utilizar este aparelho em divisões cuja área for inferior a 4 m
2
.
- IMPORTANTE: não cobrir, em caso algum, o aparelho durante o funcionamento, pois isto provocaria
sobreaquecimentos perigosos.
Este aparelho tem um dispositivo de segurança que interrompe o funcionamento do termoradiador no caso
de sobreaquecimento acidental. Para restabelecer o funcionamento, é necessário desligar a ficha da toma-
da de corrente por 30 minutos, suprimir a causa do sobreaquecimento e de seguida ligar de novo a ficha.
ATENÇÃO: para evitar perigos causados por um restabelecimento acidental do sistema de segurança, este
aparelho não deve ser alimentado por um temporizador externo.
24
Page 25

25
∆Ф О·ПФЪИК¤Ъ Rapido В›У·И МИ· ВН·ИЪВЩИО¿ В‡¯ЪЛЫЩЛ Ы˘ЫОВ˘‹ ФИОИ·О‹˜ ı¤ЪМ·УЫЛ˜ МВ
‰˘У·ЩfiЩЛЩ· ВИПФБ‹˜ ЩЪИТУ ВИ¤‰ˆУ ИЫ¯‡Ф˜. ∆Ф ЪФ˚fiУ ·˘Щfi, ‰И·ı¤ЩВИ О·И М›· ·ФОПВИЫЩИО‹
ПВИЩФ˘ЪБ›· Ф˘ Ы·˜ ВИЩЪ¤ВИ У· ‰ЛМИФ˘ЪБ‹ЫВЩВ Ы˘Уı‹ОВ˜ ¿УВЫЛ˜ ЫВ fiПВ˜ ЩИ˜ О·Щ·ЫЩ¿ЫВИ˜.
°И· У· ¯ЪЛЫИМФФИ‹ЫВЩВ МВ ЩФУ О·П‡ЩВЪФ ЩЪfiФ ЩФ ЪФ˚fiУ, Ы·˜ Ы˘УИЫЩФ‡МВ У· ‰И·‚¿ЫВЩВ
ЪФЫВОЩИО¿ ЩИ˜ ·Ъ·О¿Щˆ Ф‰ЛБ›В˜.
1. °∂¡π∫∞
µБ¿ПЩВ ЩЛ Ы˘ЫОВ˘‹ ·fi ЩЛ Ы˘ЫОВ˘·Ы›·, ·У·Ф‰ФБ˘Ъ›ЫЩВ ЩЛУ О·И ЩФФıВЩ‹ЫЩВ ЩЛУ ЫЩ·
ЪФЫЩ·ЩВ˘ЩИО¿ О·П‡ММ·Щ· ·fi КВПИ˙fiП. µВ‚·ИˆıВ›ЩВ fiЩИ ЩФ ЛПВОЩЪИОfi О·ПТ‰ИФ О·И Л Ы˘ЫОВ˘‹ В›У·И
·У¤·К· О·И fiЩИ ‰ВУ ¤¯Ф˘У ˘ФЫЩВ› ‚П¿‚В˜ О·Щ¿ ЩЛ МВЩ·КФЪ¿. ªЛ ¯ЪЛЫИМФФИВ›ЩВ ЩЛ Ы˘ЫОВ˘‹ ·У
·ЪФ˘ЫИ¿˙ВИ ‚П¿‚В˜.
2. ∆√¶√£∂∆∏™∏ ∆ø¡ ¶√¢πø¡
µБ¿ПЩВ Щ· fi‰И· О·И ЩИ˜ Ъfi‰В˜ ·fi ЩЛ Ы˘ЫОВ˘·Ы›· ЩФ˘ КВПИ˙fiП.
∆ФФıВЩ‹ЫЩВ ЩИ˜ Ъfi‰В˜ ЫЩФ ЫЩЪФК¤· ЩФ˘ Ф‰ИФ‡ О·И И¤ЫЩВ ‰˘У·Щ¿ М¤¯ЪИ У· ·ОФ‡ЫВЩВ ЩФ ОФ‡МˆМ·
(ВИО. 1). ∆Ъ·‚‹НЩВ ЩИ˜ Ъfi‰В˜ БИ· У· ‚В‚·ИˆıВ›ЩВ fiЩИ ЩФФıВЩ‹ıЛО·У ЫˆЫЩ¿.
∆ФФıВЩ‹ЫЩВ ЩФ fi‰И МВ ЩФ˘˜ ЩЪФ¯Ф‡˜ ЫЩФ О¿Щˆ М¤ЪФ˜ ЩФ˘ О·ПФЪИК¤Ъ ЪФЫ·ЪМfi˙ФУЩ·˜ ЩФ˘˜
Ф‰ЛБФ‡˜ ·У¿МВЫ· ЫЩ· ¯ВИЪИЫЩ‹ЪИ· О·И ЩФ ЪТЩФ ЫЩФИ¯В›Ф. ¶ЪФЫ·ЪМfiЫЩВ Щ· ‰‡Ф ‰fiУЩИ· ЫЩИ˜ ВИ‰ИО¤˜
¤‰ЪВ˜ О·И МПФО¿ЪВЩВ ЩФ fi‰И МВ ЩФ˘˜ ОЪИОˆЩФ‡˜ ОФ¯П›В˜ ‚И‰ТУФУЩ·˜ М¤¯ЪИ Щ¤ЪМ· (ВИО. 1).
∆ФФıВЩ‹ЫЩВ ЫЩЛ Ы˘У¤¯ВИ· ЩФ˘˜ ›Ыˆ ЩЪФ¯Ф‡˜ ЩФФıВЩТУЩ·˜ ЩФ˘˜ ЫЩФУ ·ЩЫ¿ПИУФ ЫЩЪФК¤· О·И
ЪФЫ·ЪМfi˙ФУЩ·˜ ЩФ ЫЩЪФК¤· ЫЩЛУ ›Ыˆ ‚¿ЫЛ МВ ЩФ˘˜ ЩЪФ¯Ф‡˜ ЩФФıВЩЛМ¤УФ˘˜ fiˆ˜ ЫЩЛУ ВИОfiУ·
2. ∂П¤БНЩВ ·У ФИ ЩЪФ¯Ф› ВЪИЫЩЪ¤КФУЩ·И ВПВ‡ıВЪ·. ªВЩ¿ ЩЛУ ЩФФı¤ЩЛЫЛ, ·У·Ф‰ФБ˘Ъ›ЫЩВ ЩФ
О·ПФЪИК¤Ъ ЩФФıВЩТУЩ·˜ ЩФ ЫЩЛУ О¿ıВЩЛ ı¤ЫЛ ПВИЩФ˘ЪБ›·˜.
3. ∏§∂∫∆ƒπ∫∏ ™À¡¢∂™∏
- ¶ЪИУ ¯ЪЛЫИМФФИ‹ЫВЩВ ЩЛ Ы˘ЫОВ˘‹ ‚В‚·ИˆıВ›ЩВ fiЩИ ЩФ ‰›ОЩ˘Ф ·ЪФ¯‹˜ ЪВ‡М·ЩФ˜ ¤¯ВИ ЩЛУ ›‰И·
Щ¿ЫЛ МВ ·˘Щ‹ Ф˘ ·У·БЪ¿КВЩ·И ЫЩЛУ ВУ‰ВИОЩИО‹ ВЩИО¤Щ· ЩЛ˜ Ы˘ЫОВ˘‹˜ О·И fiЩИ Л Ъ›˙· ЩФ˘
ЪВ‡М·ЩФ˜ О·И Л БЪ·ММ‹ ЩЪФКФ‰ФЫ›·˜ В›У·И О·Щ¿ППЛПВ˜ БИ· ЩФ ··ИЩФ‡МВУФ КФЪЩ›Ф.
- ™À¡¢∂™∆∂ ∆√ ∫∞§√ƒπº∂ƒ ª√¡√ ™∂ °∂πøª∂¡∂™ ¶ƒπ∑∂™.
- ∞˘Щ‹ Л Ы˘ЫОВ˘‹ Ы˘ММФЪКФ‡Щ·И МВ ЩЛУ Ф‰ЛБ›· 89/336/∂√∫ Ы¯ВЩИО¿ МВ ЩЛУ ЛПВОЩЪФМ·БУЛЩИО‹
Ы˘М‚·ЩfiЩЛЩ·.
GR
Page 26

4. §∂π∆√Àƒ°π∞ ∫∞π Ã∏™∏
Instant Heating System
∆Ф ЪФ˚fiУ ·˘Щfi ‰И·ı¤ЩВИ ЩЛУ ВИ‰ИО‹ ПВИЩФ˘ЪБ›· Щ·¯В›·˜ ı¤ЪМ·УЫЛ˜ "Instant Heating System".
∏ ПВИЩФ˘ЪБ›· "Instant Heating System" ВУВЪБФФИВ› ¤У·У ВИ‰ИОfi ЪfiЫıВЩФ ıВЪМ·УЩ‹Ъ· Ф˘ ВИЩЪ¤ВИ
ЩЛ ı¤ЪМ·УЫЛ ЩФ˘ ‰ˆМ·Щ›Ф˘ БЪ‹БФЪ· О·И ·ıfiЪ˘‚·.
∏ ПВИЩФ˘ЪБ›· ВУВЪБФФИВ›Щ·И МВ ЩФ ВИ‰ИОfi П‹ОЩЪФ π∏S Ô˘ Ê·›ÓÂÙ·È ÛÙËÓ ÂÈÎ. 3.
∞Ó·ÌÌ·
∆ФФıВЩ‹ЫЩВ ЩФ ЪВ˘М·ЩФП‹ЩЛ ЫЩЛ Ъ›˙·, Б˘Ъ›ЫЩВ ЩФ ıВЪМФЫЩ¿ЩЛ М¤¯ЪИ ЩЛУ ·УТЩ·ЩЛ ‚·ıМ›‰·.
∞У¿„ЩВ ЩФ О·ПФЪИК¤Ъ МВ ЩФ˘˜ ‰И·ОfiЩВ˜ ·У¿ПФБ· Ы‡МКˆУ· МВ ЩИ˜ Ф‰ЛБ›В˜ ЩФ˘ ›У·О·.
ƒ‡ıМИЫЛ ЩФ˘ ıВЪМФЫЩ¿ЩЛ "ƒ"
ŸЩ·У ЩФ ‰ˆМ¿ЩИФ ·ФОЩ‹ЫВИ ЩЛУ ВИı˘МЛЩ‹ ıВЪМФОЪ·Ы›·, Б˘Ъ›ЫЩВ ·ЪБ¿ ЩФ ‰И·ОfiЩЛ ЩФ˘ ıВЪМФЫЩ¿ЩЛ
ƒ ·ЪИЫЩВЪfiЫЩЪФК· М¤¯ЪИ У· ·ОФ‡ЫВЩВ ЩФ ¯·Ъ·ОЩЛЪИЫЩИОfi "ОПИО" (‹ М¤¯ЪИ У· Ы‚‹ЫВИ Л ВУ‰ВИОЩИО‹
П˘¯У›·) ¯ˆЪ›˜ У· НВВЪ¿ЫВЩВ ЩЛ ı¤ЫЛ ·˘Щ‹. ∏ ıВЪМФОЪ·Ы›· ·˘Щ‹ ‰И·ЩЛЪВ›Щ·И ЫЩ·ıВЪ‹ ·fi ЩФ
ıВЪМФЫЩ¿ЩЛ.
∞УЩИ„˘ОЩИО‹ ПВИЩФ˘ЪБ›· (anti-frost)
ªВ ЩФ ıВЪМФЫЩ¿ЩЛ ЫЩЛ ı¤ЫЛ
*
Î·È Ì ÙÔ˘˜ ‰È·ÎfiÙ˜ π Î·È ππ ·ЩЛМ¤УФ˘˜, Л Ы˘ЫОВ˘‹ ‰И·ЩЛЪВ› ЩФ
‰ˆМ¿ЩИФ ЫВ ıВЪМФОЪ·Ы›· ВЪ›Ф˘ 5ЖC ВМФ‰›˙ФУЩ·˜ ЩЛУ „‡НЛ МВ ЩЛУ ВП¿¯ИЫЩЛ О·Щ·У¿ПˆЫЛ
ВУ¤ЪБВИ·˜.
¶Ï‹ÎÙÚ· §ÂÈÙÔ˘ÚÁ›· ∆ЪfiФ˜ ПВИЩФ˘ЪБ›·˜
¶È¤ÛÙ ÙÔ Ï‹ÎÙÚÔ π БИ· ∫·УФУИО‹ ªВ ЩЛ ПВИЩФ˘ЪБ›· ·˘Щ‹ МФЪВ›ЩВ У·
ı¤ЪМ·УЫЛ ЫЩЛУ ВП¿¯ИЫЩЛ ИЫ¯‡ ВУВЪБФФИ‹ЫВЩВ ЩЛ ПВИЩФ˘ЪБ›· Anti-frost
¶È¤ÛÙ ÙÔ Ï‹ÎÙÚÔ ππ БИ· ∫·УФУИО‹ ªВ ЩЛ ПВИЩФ˘ЪБ›· ·˘Щ‹ МФЪВ›ЩВ У·
ı¤ЪМ·УЫЛ ЫВ М¤ЫЛ ИЫ¯‡ ВУВЪБФФИ‹ЫВЩВ ЩЛ ПВИЩФ˘ЪБ›· Anti-frost
¶È¤ÛÙ ٷ Ï‹ÎÙÚ· π Î·È ππ БИ· ∫·УФУИО‹ ªВ ЩЛ ПВИЩФ˘ЪБ›· ·˘Щ‹ МФЪВ›ЩВ У·
ı¤ЪМ·УЫЛ ЫЩЛ М¤БИЫЩЛ ИЫ¯‡ ВУВЪБФФИ‹ЫВЩВ ЩЛ ПВИЩФ˘ЪБ›· Anti-frost
¶È¤ÛÙ ٷ Ï‹ÎÙÚ· π, ππ Î·È IHS ªВ ЩЛ ПВИЩФ˘ЪБ›· ·˘Щ‹ ‰ВУ Ы˘УИЫЩ¿Щ·И
БИ· Щ·¯В›· ı¤ЪМ·УЫЛ ЫЩЛ М¤БИЫЩЛ ИЫ¯‡ Л ВУВЪБФФ›ЛЫЛ ЩЛ˜ ПВИЩФ˘ЪБ›·˜ Anti-frost
™ ·˘Щ‹ ЩЛ ПИЩФ˘ЪБ›· ·У¿‚И Л У‰ИОЩИО‹
П˘¯У›· ππ Î·È Ë Ï˘¯Ó›· Instant Heating
System (A).
26
Page 27

ªÔÓ٤Ϸ Ì ¯ÚÔÓԉȷÎfiÙË (Timer) 24 ˆÚÒÓ "∆"
°И· У· ЪФБЪ·ММ·Щ›ЫВЩВ ЩЛ ı¤ЪМ·УЫЛ ВУВЪБ‹ЫЩВ ˆ˜ ВН‹˜:
- ∂П¤БНЩВ ЩЛУ ТЪ·. ∂¿У БИ· ·Ъ¿‰ВИБМ· Л ТЪ· В›У·И 10, Б˘Ъ›ЫЩВ ‰ВНИfiЫЩЪФК· ЩФУ ·ЪИıМЛМ¤УФ
‰›ЫОФ ЩФ˘ ¯ЪФУФ‰И·ОfiЩЛ ∆ ¤ˆ˜ fiÙÔ˘ ÙÔ ÓÔ‡ÌÂÚÔ 10 Û˘Ì¤ÛÂÈ Ì ÙÔ ‰Â›ÎÙË ·Ó·ÊÔÚ¿˜ s.
- ƒ˘ıМ›ЫЩВ ЩЛ ¯ЪФУИО‹ ‰И¿ЪОВИ· Ф˘ ВИı˘МВ›ЩВ У· ПВИЩФ˘ЪБВ› Л Ы˘ЫОВ˘‹ И¤˙ФУЩ·˜ Щ· ‰ФУЩ¿ОИ·
ЪФ˜ ЩФ О¤УЩЪФ. ∫¿ıВ ‰ФУЩ¿ОИ ·УЩИЫЩФИ¯В› ЫВ ¯ЪФУИОfi ‰И¿ЫЩЛМ· 15 ПВЩТУ. ªВЩ¿ ЩЛУ ВУ¤ЪБВИ·
·˘Щ‹ ВМК·У›˙ФУЩ·И ОfiООИУ· ЩМ‹М·Щ· Ф˘ ·УЩИЫЩФИ¯Ф‡У ЫЩИ˜ ВЪИfi‰Ф˘˜ ПВИЩФ˘ЪБ›·˜.
- ªВ ЩЛ Ъ‡ıМИЫЛ ·˘Щ‹ Л Ы˘ЫОВ˘‹ ı· ·У¿‚ВИ ·˘ЩfiМ·Щ· О¿ıВ ЛМ¤Ъ· ЫЩЛУ ЪФБЪ·ММ·ЩИЫМ¤УЛ ТЪ·.
(™ЛМ·УЩИОfi: ЩФ КИ˜ Ъ¤ВИ У· М¤УВИ ¿УЩФЩВ ЫЩЛ Ъ›˙·).
- °И· ·ПП·Б‹ ЩЛ˜ ЪФБЪ·ММ·ЩИЫМ¤УЛ˜ ВЪИfi‰Ф˘ ·ЪОВ› У· В·У·К¤ЪВЩВ Щ· ‰ФУЩ¿ОИ· ЫЩЛУ ·Ъ¯ИО‹
ЩФ˘˜ ı¤ЫЛ О·И У· ЪФБЪ·ММ·Щ›ЫВЩВ ЩЛ У¤· ВЪ›Ф‰Ф ПВИЩФ˘ЪБ›·˜.
- ∂¿У ı¤ПВЩВ Л Ы˘ЫОВ˘‹ У· ПВИЩФ˘ЪБВ› ¯ˆЪ›˜ ЪФБЪ·ММ·ЩИЫМ¤УЛ ТЪ·, И¤ЫЩВ fiП· Щ· ‰fiУЩИ· ЪФ˜
ЩФ О¤УЩЪФ. ™В ·˘Щ‹ ЩЛУ ВЪ›ЩˆЫЛ ЩФ КИ˜ У· ·ФЫ˘У‰¤ВЩ·И ·fi ЩЛУ Ъ›˙· БИ· У· ·ФКВ‡БВЩВ ЩЛУ
¿ЫОФЛ ПВИЩФ˘ЪБ›· ЩФ˘ ¯ЪФУФ‰И·ОfiЩЛ.
ªÔÓ٤Ϸ Ì ‰È·ÎfiÙË ·Ó·ÙÚÔ‹˜
- ªВЪИО¿ МФУЩ¤П· ‰И·ı¤ЩФ˘У ‰И·ОfiЩЛ ·У·ЩЪФ‹˜ Ф˘, ЫВ ВЪ›ЩˆЫЛ ЩТЫЛ˜, ‰И·ОfiЩВИ ЩЛУ
ЩЪФКФ‰ФЫ›·. °И· У· ·ФО·Щ·ЫЩ·ıВ› Л ПВИЩФ˘ЪБ›·, ·ЪОВ› У· ЫЩЛЪ›НВЩВ ЩЛ Ы˘ЫОВ˘‹ ЫЩ· fi‰И· ЩЛ˜,
ЫВ О·Щ·ОfiЪ˘КЛ ı¤ЫЛ. (°И· У· ‰И·ИЫЩТЫВЩВ ·У Л Ы˘ЫОВ˘‹ Ы·˜ ‰И·ı¤ЩВИ ·˘Щ‹У ЩЛ ‰И¿Щ·НЛ, ВП¤БНЩВ
·У ЫЩЛУ ИУ·О›‰· ¯·Ъ·ОЩЛЪИЫЩИОТУ МВЩ¿ ЩФУ Щ‡Ф ˘¿Ъ¯ВИ Л ¤У‰ВИНЛ "...ex:1").
5. ™À¡∆∏ƒ∏™∏
¶ЪИУ ·fi ФФИ·‰‹ФЩВ В¤М‚·ЫЛ, ·ФЫ˘У‰¤ЫЩВ ЩФ КИ˜ ·fi ЩЛУ Ъ›˙· ЩФ˘ ЪВ‡М·ЩФ˜ О·И ВЪИМ¤УВЩВ У·
ОЪ˘ТЫВИ ЩФ О·ПФЪИК¤Ъ. ∆Ф ЛПВОЩЪИОfi О·ПФЪИК¤Ъ П·‰ИФ‡ ‰ВУ ··ИЩВ› И‰И·›ЩВЪЛ Ы˘УЩ‹ЪЛЫЛ. ∞ЪОВ› У· ЩФ
НВЫОФУ›˙ВЩВ МВ ¤У· М·П·Оfi О·И ЫЩВБУfi ·У›. ªЛ ¯ЪЛЫИМФФИВ›ЩВ ФЩ¤ ·ФЪЪ˘·УЩИО¿ ЫВ ЫОfiУЛ О·И
‰И·П‡ЩВ˜. ∂У ·У¿БОЛ, ·К·ИЪ¤ЫЩВ Щ˘¯fiУ Ы˘БОВУЩЪˆМ¤УФ˘˜ Ъ‡Ф˘˜ ¯ЪЛЫИМФФИТУЩ·˜ ЛПВОЩЪИО‹ ЫОФ‡·.
6. ¶ƒ√∂π¢√¶√π∏™∂π™
- ªЛ ¯ЪЛЫИМФФИВ›ЩВ ЩЛ Ы˘ЫОВ˘‹ ОФУЩ¿ ЫВ УЩФ˘ЫИ¤ЪВ˜, М·УИ¤ЪВ˜, УИЩ‹ЪВ˜ ‹ ИЫ›УВ˜.
- ªЛУ ¯ЪЛЫИМФФИВ›ЩВ ЩФ О·ПФЪИК¤Ъ БИ· ЩФ ЫЩ¤БУˆМ· ЪФ‡¯ˆУ, МЛУ ·ОФ˘М¿ЩВ ЩФ ЛПВОЩЪИОfi
О·ПТ‰ИФ ¿Уˆ ЫЩ· ˙ВЫЩ¿ ЫТМ·Щ· ЩФ˘ О·ПФЪИК¤Ъ.
- ГЪЛЫИМФФИВ›ЩВ ЩФ О·ПФЪИК¤Ъ ¿УЩ· О·И МfiУФ ЫВ fiЪıИ· ı¤ЫЛ.
- ∂¿У ЩФ ЛПВОЩЪИОfi О·ПТ‰ИФ Кı·ЪВ›, Ъ¤ВИ У· ·УЩИО·Щ·ЫЩ·ıВ› ·fi ЩФУ О·Щ·ЫОВ˘·ЫЩ‹ ‹ ·fi ЩФ
™¤Ъ‚И˜ ЩФ˘ ‹ ·fi ВИ‰ИОВ˘М¤УФ ЩВ¯УИОfi, БИ· У· ·ФКВ‡БВЩ·И О¿ıВ Иı·Уfi˜ О›У‰˘УФ˜.
- ∆ЛУ ЪТЩЛ КФЪ¿ Ф˘ ı· ¯ЪЛЫИМФФИ‹ЫВЩВ ЩЛ Ы˘ЫОВ˘‹, ·К‹ЫЩВ ЩЛУ У· ПВИЩФ˘ЪБ‹ЫВИ ЫЩЛ М¤БИЫЩЛ
ИЫ¯‡ ЩФ˘П¿¯ИЫЩФУ БИ· 2 ТЪВ˜. ∫·Щ¿ ЩЛ ‰И¿ЪОВИ· ЩЛ˜ ПВИЩФ˘ЪБ›·˜ КЪФУЩ›ЫЩВ БИ· ЩФУ О·Пfi ·ВЪИЫМfi
ЩФ˘ ‰ˆМ·Щ›Ф˘ БИ· У· ВН·ПВИКıВ› Л ФЫМ‹ ЩФ˘ "О·ИУФ‡ЪБИФ˘" Ф˘ ВПВ˘ıВЪТУВИ Л Ы˘ЫОВ˘‹.
- ∆Ф ЩЪ›НИМФ Ф˘ ·ОФ‡БВЩ·И О·Щ¿ ЩЛУ ЪТЩЛ ¯Ъ‹ЫЛ ЩЛ˜ Ы˘ЫОВ˘‹˜ В›У·И ·fiП˘Щ· К˘ЫИФПФБИОfi.
- ∏ Û˘Û΢‹ ‰ÂÓ Ú¤ÂÈ Ó· Û˘Ó‰¤ÂÙ·È Î¿Ùˆ ·fi ÌÈ· ÌfiÓÈÌË Ú›˙·.
- ∆Ф ‰Ф¯В›Ф ЩЛ˜ Ы˘ЫОВ˘‹˜ ВЪИ¤¯ВИ ЫЩ·ıВЪ‹ ФЫfiЩЛЩ· П·‰ИФ‡ О·И ФИ ВИЫОВ˘¤˜ Ф˘ ··ИЩФ‡У ЩФ
¿УФИБМ¿ ЩФ˘ Ъ¤ВИ У· ВОЩВПФ‡УЩ·И МfiУФ ·fi ЩФУ О·Щ·ЫОВ˘·ЫЩ‹ ‹ ·fi ЩФ ™¤Ъ‚И˜ ЩФ˘. ™В
ВЪ›ЩˆЫЛ ‰И·ЪЪФ‹˜ П·‰ИФ‡ ·В˘ı˘УıВ›ЩВ ЫЩФУ О·Щ·ЫОВ˘·ЫЩ‹ ‹ ЫЩФ ™¤Ъ‚И˜.
- ™Â ÂÚ›ÙˆÛË ‰È¿Ï˘Û˘ Ù˘ Û˘Û΢‹˜ ÙËÚ›ÛÙ ÙȘ ‰È·Ù¿ÍÂȘ Û¯ÂÙÈο Ì ÙË ‰È¿ıÂÛË ÙÔ˘ Ï·‰ÈÔ‡.
- ªËÓ ·ÎÔ˘Ì¿Ù ÙÔ Î·ÏÒ‰ÈÔ ¿Óˆ ÛÙË Û˘Û΢‹ fiÙ·Ó Â›Ó·È ·ÎfiÌ· ˙ÂÛÙ‹.
- ªЛУ ¯ЪЛЫИМФФИВ›ЩВ ·˘Щ‹ ЩЛ Ы˘ЫОВ˘‹ ЫВ ‰ˆМ¿ЩИ· МВ ВМ‚·‰fiУ МИОЪfiЩВЪФ ·fi 4 mЗ.
- ™∏ª∞¡∆π∫√: ªЛУ О·П‡ЩВЩВ ФЩ¤ ЩЛ Ы˘ЫОВ˘‹ О·Щ¿ ЩЛ ‰И¿ЪОВИ· ЩЛ˜ ПВИЩФ˘ЪБ›·˜, БИ· У·
·ÔʇÁÂÙ ÂÈΛӉ˘ÓË ˘ÂÚı¤ÚÌ·ÓÛË.
27
Page 28

28
Rapido radiatoren er et multifunktionelt apparat til opvarmning i almindeligt husholdningsbrug med
mulighed for valg af tre styrker. I dette apparat er der desuden indbygget en særlig funktion, der giver
størst mulig komfort i enhver situation.
For at få det størst mulige udbytte af apparatet anbefales det at læse nedenstående vejledninger
grundigt.
1. GENERELT
Fjern emballagen fra apparatet. Vend apparatet om, og lad det støtte på beskyttelseshætterne i polystyren.
Kontroller, at hverken forsyningsledningen eller apparatet er blevet beskadiget under transporten. Apparatet
må ikke tages i brug, hvis det er beskadiget.
2. MONTERING AF STØTTEFØDDER
Fjern polystyrenpakningen fra støttefødder og hjul.
Indsæt hjulene i den tap, der sidder på støttefoden, og tryk dem helt i bund, til der høres et klik (fig.1). Træk
herefter i hjulene for at sikre, at de sidder ordentligt fast.
Monter støttefoden med hjul på varmeapparatets nederste del ved at indsætte glideskinnerne mellem betjeningspanelet og det første element. Fastgør de to tapper i de respektive sæder, og fastlås støttefoden med
øjeskruerne ved at skrue dem helt i bund (fig.1).
Påsæt derefter de bageste hjul ved at indsætte dem i ståltappen. Fastlås tappen i den bageste holder, og kontroller, at hjulene sidder som vist på figur 2. Kontroller, at hjulene drejer frit. Efter endt montering af støttefødderne, skal radiatoren vendes om igen i opret stilling.
3. ELEKTRISK TILSLUTNING
- Før stikket sættes i stikkontakten, kontrolleres omhyggeligt, at spændingsangivelsen på apparatet svarer
til den lokale netspænding, og at stikkontakten og strømlinien passer til den krævede belastning.
-SLUT KUN VARMEAPPARATET TIL ET STIK MED JORDFORBINDELSE.
-Dette apparat er i overensstemmelse med EU Direktivet 89/336/ vedrørende den elektromagnetiske
kompatibilitet.
DK
Page 29

4. FUNKTION OG BRUG
Instant Heating System
Dette apparat er udstyret med en særlig hurtig opvarmningsfunktion "Instant Heating System". Denne funktion aktiverer et ekstra enestående varmeapparat, der gør det muligt at få en hurtig og lydløs opvarmning af
rummet.
Denne funktion aktiveres ved hjælp af knappen IHS, som vist på figur 3.
Tænding
Sæt stikket i stikkontakten, sæt termostaten på maks., og tænd for apparatet ved hjælp af kontakterne, som
vist i tabellen.
Regulering af termostaten "P"
Når rummet har opnået den ønskede temperatur, drejes termostaten "P"s håndtag (fig.3) langsomt i urets retning, indtil der høres et klik (eller indtil signallampen slukkes), håndtaget må ikke drejes ud over dette punkt.
Temperaturen bliver således reguleret automatisk og holdt konstant af termostaten.
Antifrost program
Termostaten drejes til
*
, og der trykkes på kontakterne I og II. Apparatet vil nu holde rumtemperaturen på
ca. 5°C og sikre mod frostskader med et minimalt energiforbrug.
Tr yk på Aktiveret funktion Funktioner
knapperne
Tryk på kontakten I for normal I denne funktion er det muligt at
opvarmning ved min. styrke aktivere Antifrost programmet
Tryk på kontakten II for normal I denne funktion er det muligt at
opvarmning ved mellemstyrke aktivere Antifrost programmet
Tryk på kontakterne I og II for normal I denne funktion er det muligt at
opvarmning ved maks. styrke aktivere Antifrost programmet
Tryk på kontakterne I,II og Instant Heating II denne funktion er det muligt at
System IHS for hurtig opvarmning aktivere Antifrost programmet
ved maks. styrke
På denne måde tændes den lysende
kontrollampe II og kontrollampen Instant
Heating System (A).
29
Page 30

Modeller med et 24-timers program (Timer) "T"
Opvarmningen kan programmeres på følgende måde:
-Se hvad klokken er på Deres ur. Hvis klokken f.eks. er 10, drejes programvælgeren T's nummererede
skive i urets retning, indtil 10-tallet på skiven står ud for s på programvælgeren.
-Det tidsrum, man ønsker varmeapparatet skal fungere i, indstilles ved at trykke de små tappe ind mod
midten. Hver enkelt tap svarer til et tidsrum på 15 minutter. Man kan således se de områder, der svarer
til driftsperioderne.
-Varmeapparatet vil herefter hver dag fungere automatisk i de indstillede tidsrum (Vigtigt: varmeapparatet
skal altid være tilsluttet stikkontakten).
- Hvis driftsperioderne ønskes ændret, er det tilstrækkeligt at tilbagestille tappene i startpositionen og indstille de nye driftsperioder.
- Hvis man ikke ønsker at benytte timer'en, trykkes alle tappene ind mod midten. I dette tilfælde er det ikke
nok at slukke for apparatet på afbryderne, man er også nødt til at tage stikket ud af stikkontakten for at
undgå unødigt brug af timer'eren.
Modeller med anordning, der sikrer, at apparatet slukkes, hvis det vælter
- Nogle modeller er udstyret med en afbryder, der sikrer, at apparatet afbrydes fra forsyningsnettet, hvis
det vælter. For at få apparatet til at fungere igen, er det nok at rejse det op på støttefødderne i opret stilling. ( For at finde ud af om Deres apparat er udstyret med denne sikkerhedsanordning, skal De se om
der på apparatets typeplade står "…ex:1" efter typeangivelsen).
5. VEDLIGEHOLDELSE
Afbryd apparatet fra forsyningsnettet, og vent indtil apparatet er kølet af, før der foretages nogen former for
vedligeholdelsesindgreb. Den elektriske olieradiator behøver ingen særlig vedligeholdelse. Det er nok at støve
den af med en tør, blød klud. Brug aldrig skurepulver eller opløsningsmidler. Hvis det er nødvendigt at fjerne
mere koncentreret snavs, kan anvendes en støvsuger.
6. ADVARSLER
- Apparatet må ikke anvendes i nærheden af badekar, brusebade, kummer eller svømmebassiner.
-Brug ikke radiatoren til at tørre tøj på, og læg ikke ledningen på de varme elementer.
-Brug altid kun radiatoren i opret stilling.
- Hvis forsyningsledningen er beskadiget, skal denne udskiftes af producenten eller af et af producentens
servicecentre eller af en person med lignende kvalifikationer, så enhver form for risiko forebygges.
- Lad radiatoren fungere ved maksimal styrke i mindst 2 timer, første gang den tændes. Udluft rummet godt
imens for at fjerne den lugt, der hænger ved radiatoren, mens den er ny.
- Det er helt normalt, at radiatoren udsender knirkende lyde første gang, den startes.
- Radiatoren må ikke placeres direkte under en fastsiddende stikkontakt.
- Radiatorens beholder indeholder en præcist afmålt mængde olie. Enhver reparation, der indebærer en
åbning af beholderen, må kun udføres af producenten eller af et af producentens servicecentre. Hvis radiatoren taber olie, bør man henvende sig til producenten eller til et af producentens servicecentre.
-I forbindelse med skrotning af apparatet er det nødvendigt at overholde forskrifterne vedrørende bortskaffelse af olie.
- Anbring ikke ledningen på apparatet, såfremt det stadig er varmt.
- Benyt ikke dette apparat i rum, hvis gulvareal er under 4m
2
.
- VIGTIGT: Radiatoren må under ingen omstændigheder tildækkes, mens den er i brug, da dette vil kunne
bevirke en kritisk overophedning.
Apparatet er forsynet med en automatisk overophedningssikring. Hvis apparatet bliver overophedet, slukker
det automatisk. Tag stikket ud af stikkontakten, og lad apparatet køle af. Fjern årsagen til overophedningen,
og sæt herefter stikket tilbage i stikkontakten.
ADVARSEL: for at undgå farer forårsaget af uheldige genoprettelser af sikkerhedssystemet, må dette apparat ikke fødes ved hjælp af en timer udenfor apparatet.
30
Page 31

31
Värmeelementet Rapido är en extremt allsidig apparat för hemmets uppvärmning med tre valmöjligheter för effekt. Dessutom är produkten försedd med en unik funktion som tillåter dig att erhålla
högsta möjliga komfort i alla situationer.
För att på bästa sätt dra nytta av produktens kapacitet rekommenderar vi dig att läsa följande anvisningar noggrant.
1. ALLMÄNT
Ta ur apparaten ur emballaget och vänd den upp och ned och stöd den på emballeringsmaterialet i polystyren. Kontrollera att nätsladden är hel och att apparaten inte har skadats under transporten. Använd inte
apparaten om den är skadad.
2. MONTERING AV BEN
Ta ur fötterna och hjulen från polystyrenemballaget.
Stick in hjulen på fotens sprint och tryck tills du hör ett klick (fig. 1). Vrid på hjulen för att försäkra dig om
att de är ordentligt fastsatta.
Montera fast foten med hjulen på den nedre delen av värmeelementet genom att sticka in de böjda
styrskenorna mellan manöverlådan och det första elementet. Kila fast de två tänderna i de avpassade platserna och lås fast foten genom att skruva skruvöglorna till botten (fig. 1).
Montera sedan fast de bakre hjulen genom att sticka in dem på stålsprinten.
Kila fast sprinten på det främre stödet och kontrollera att hjulen hamnar som i figur 2. Kontrollera att hjulen
rullar fritt. När du är klar vänder du på värmeelementet vertikalt och det är klart för användning.
3. ELANSLUTNING
- Innan du sticker in stickkontakten i vägguttaget ska du kontrollera att spänningen i ditt hem överensstämmer med spänningen som är angiven på apparaten och att vägguttaget och nätet är dimensionerat för
den belastning som apparaten kräver.
-ANSLUT ENDAST APPARATEN TILL VÄGGUTTAG SOM ÄR FÖRSETT MED EN FUNGERANDE JORDNING.
- Denna apparat är i överensstämmelse och italiensk lag 476/92 angående elektromagnetisk kompatibilitet.
S
Page 32

4. FUNKTION OCH ANVÄNDNING
Instant Heating System
Denna produkt är utrustad med en speciell snabbvärmningsfunktion “Instant Heating System”. Funktionen
“Instant Heating System” aktiverar ett exklusivt extra värmeelement som snabbt och tyst värmer upp din
omgivning.
Funktionen aktiveras med IHS-knappen som du kan se i figur 3.
Påslag
Sätt in stickkontakten i vägguttaget och vrid termostaten så långt det går till max. läge. Slå på värmeelementet
med brytarna i det läge som önskas, se tabellen.
Inställning av termostat “P”
När önskad omgivningstemperatur har uppnåtts vrider du långsamt på termostaten P (fig. 3) moturs tills du
hör ett klick (eller tills kontrollampan slocknar) och inte längre. Denna fastställda temperatur kommer att hållas konstant automatiskt med hjälp av termostaten.
Antifrostfunktion (anti-frost)
Med termostaten i läge \ och I- och II-knapparna intryckta håller apparaten en omgivningstemperatur på
cirka 5° C för att förhindra tillfrysning med minimal effektförbrukning.
Intryckt knapp Aktiverad funktion Funktionskombinationer
Tryck in I-knappen för normal I detta läge är det möjligt att
uppvärmning med lägsta effekt. aktivera Anti-frostfunktionen.
Tryck in II-knappen för normal I detta läge är det möjligt att
uppvärmning med mellaneffekt. aktivera Anti-frostfunktionen.
Tryck in I- och II-knappen för normal I detta läge är det möjligt att
uppvärmning med högsta effekt. aktivera Anti-frostfunktionen.
Tryck in I- och II-knappen och I detta läge rekommenderas
Instant Heating System IHS-knappen för det att inte använda anti-frostfunktionen.
snabb uppvärmning med högsta effekt.
I detta funktionssätt tänds signallampan II
och lampan Instant Heating System (A).
32
Page 33

Modeller som är programmerbara 24 tim. “T” (Timer)
För att programmera värmeelementet gör du på detta vis:
- Se vad klockan är. Vi förmodar att klockan är 10, vrid den numrerade skivan på timern T medurs så att
nummer 10 sammanfaller med det ingraverade mätstrecket på timern.
- Ställ in de perioder som du önskar att apparaten ska fungera genom att trycka tänderna mot mitten. Varje
tand motsvarar 15 min. På detta vis ser du när apparaten kommer att vara på- och avslagen.
- På detta vis fungerar värmeelementet automatiskt varje dag och följer det programmerade schemat
(Viktigt! Stickkontakten måste vara ansluten till vägguttaget).
- För att ändra programmeringen flyttar du bara tillbaka tänderna och sedan ställer du in nya funktionsperioder.
- Om du önskar använda apparaten utan programmering trycker du in alla tänderna mot mitten. Förutom
att slå av brytarna för att slå av apparaten, är det i detta läge även nödvändigt att dra ur stickkontakten
ur vägguttaget för att undvika att timern fungerar i onödan.
Modeller med tippskydd
-Vissa modeller är utrustade med ett tippskydd som avbryter elförsörjningen till apparaten om den tippar.
För att återställa funktionen räcker det med att ställa upp apparaten på sina fötter i vertikalt läge. (För att
kontrollera om din apparat är försedd med denna anordning kan du se om det står “....ex.1” efter type,
på märkplåten med tekniska data)
5. UNDERHÅLL
Innan något ingrepp utförs ska du dra ur stickkontakten ur vägguttaget och vänta tills värmeelementet har
svalnat. Det elektriska värmeelementet med olja kräver inget särskilt underhåll. Det räcker med att damma av
det med en mjuk och torr trasa. Använd aldrig slipande medel eller lösningsmedel. Om det är nödvändigt
kan du avlägsna hopsamlat smuts med en dammsugare.
6. FÖRSIKTIGHETSÅTGÄRDER
- Använd inte värmeelementet i omedelbar närhet av badkar, duschar, diskhoar eller swimmingpooler.
- Använd aldrig värmeelementet för att torka tvätt. Vila inte nätkabeln på de varma elementen.
- Använd alltid och endast värmeelementet stående vertikalt.
- Om nätkabeln är skadad får den endast bytas ut av tillverkaren, av din serviceverkstad eller av en person med liknande kvalifikationer, för att förhindra risk för olycka.
- Första gången som apparaten slås på ska den vara igång i minst två timmar. Vid detta moment ska rummet vädras ordentligt för att ta bort lukt som kan frigöras från apparaten när den är ny.
-Det är helt normalt om det hörs “knäpp”-ljud från apparaten vid det första användningstillfället.
- Apparaten ska inte placeras direkt under ett vägguttag.
- Apparatens behållare är fylld med en exakt mängd med olja och reparationer som kräver att behållaren
öppnas ska endast utföras av tillverkaren eller dennes serviceverkstad. Vid läckage av olja ska tillverkaren
eller dennes serviceverkstad kontaktas.
-Vid skrotning av apparaten ska gällande föreskrifter för kassering av olja respekteras.
- Använd inte denna apparat i rum med en yta mindre än 4 m
2
.
- VIKTIGT! Täck aldrig över apparaten när den används, då det kan orsaka farlig överhettning.
En säkerhetsanordning avbryter funktionen av värmefläkten om den tillfälligtvis skulle överhettas. För att återställa funktionen, är det nödvändigt att dra ut stickkontakten ur vägguttaget för 30 minuter, avlägsna orsaken
till överhettningen och därefter sticka in stickkontakten på nytt.
OBSERVERA: För att undvika faror orsakade av en tillfällig återställning av säkerhetssystemet får denna
apparat inte matas via en extern timer.
33
Page 34

34
Varmeapparatet Rapido er et apparat for oppvarming av hjemmet. Det er veldig allsidig og har tre
effektnivåer. I tillegg er dette produktet utstyrt med en spesiell funksjon som gir maks. komfort i alle
situasjoner.
For å utnytte produktets effekt best mulig anbefaler vi at instruksjonene nedenfor leses nøye.
1. GENERELT
Pakk ut apparatet, snu det opp ned og sett det ned på skumplastbeskyttelsen. Kontroller at nettkabelen og
apparatet er hele, og at de ikke har blitt skadet under transporten. Ikke start opp apparatet dersom det er
skadet.
2. MONTERING AV FØTTENE
Ta føttene og hjulene ut av emballasjen.
Sett hjulene inn på pinnen på foten, og trykk helt til du hører et klikk (fig. 1). Trekk i hjulene, og kontroller at
de sitter skikkelig fast.
Monter foten med hjulene nederst på varmeapparatet, og sett styretappen inn mellom kontrollboksen og det
første elementet. Fest de 2 tennene i de bestemte åpningene, og blokker foten ved å stramme øyeskruene helt
til (fig. 1).
Monter deretter de bakerste hjulene på stålpinnen. Fest pinnen i den bakerste støtten, og kontroller at hjulene
plasseres som vist på figur 2 og at de dreier fritt. Snu varmeapparatet opp ned etterpå i vertikal driftsposisjon.
3. ELEKTRISK TILKOPLING
- Kontroller at husets spenning tilsvarer verdien i V oppgitt på apparatet, og at stikkontakten og tilførselsledningen er dimensjonerte for belastningen som kreves før støpslet settes inn i stikkontakten.
- ARMEAPPARATET MÅ KUN KOPLES TIL JORDETE STIKKONTAKTER.
- Dette apparatet er i overensstemmelse med EU-direktivet 89/336 om elektromagnetisk kompatibilitet.
N
Page 35

4. FUNKSJON OG BRUK
Instant Heating System
Dette produktet er utstyrt med en spesiell funksjon for rask oppvarming; “Instant Heating System”.
Funksjonen “Instant Heating System” aktiverer et ekstra varmeapparat som varmer opp rommet på en rask
og rolig måte.
Funksjonen aktiveres med knappen IHS, vist på figur 3.
Å slå på apparatet
Sett støpslet inn i stikkontakten. Flytt termostaten helt til den stopper i maks. posisjon. Slå på varmeapparatet
med bryterne i henhold til funksjonsmåtene oppgitt i tabellen.
Regulering av termostaten “P”
Når ønsket temperatur har blitt nådd i rommet, drei termostatbryteren P (fig. 3) forsiktig mot klokken, helt til
posisjonen hvor du hører et klikk (eller til varsellampen slukkes), og ikke lenger. Temperaturen som innstilles
på denne måten holdes automatisk konstant av termostaten.
Antifrost-funksjon
Med termostaten i posisjon
*
, eller med bryterne I og II trykket, holder apparatet en temperatur på ca. 5°C
i rommet og hindrer frost med et minimum av energisløsing.
Knapper som Aktivert funksjon Funksjonsmåte
ar blitt trykket
Trykk på knapp I for normal I denne funksjonsmåten er det mulig
oppvarming med min. effekt å aktivere antifrost-funksjonen
Trykk på knapp II for normal I denne funksjonsmåten er det mulig
oppvarming med middels effekt å aktivere antifrost-funksjonen
Trykk på knappene I og II for normal I denne funksjonsmåten er det mulig
oppvarming med maks. effekt å aktivere antifrost-funksjonen
Trykk på knappene I, II og Instant I denne funksjonsmåten anbefales
Heating System IHS for en rask det ikke å aktivere antifrost-funksjonen.
oppvarming med maks. effekt
I denne driftsmåten tennes varsellampen II
og varsellampen Instant Heating System (A).
35
Page 36

Modeller med programmerer (Timer) 24 timer “T”
Gå frem på følgende måte for å programmere oppvarmingen:
- Finn ut hvor mye klokken er. La oss si at den er 10; drei nummerskiven på programmereren T med
klokken, helt til nummer 10 faller sammen med referansepekeren på programmereren.
- Still inn tidsperiodene når du ønsker at apparatet skal fungere ved å skyve tennene mot midten. Hver tann
tilsvarer en tidsperiode på 15 minutter. Sektorene som indikerer driftsperiodene vil nå være synlige.
- Hver dag vil varmeapparatet fungere automatisk i den programmerte tidsperioden (Viktig: støpslet må
alltid være satt inn i stikkontakten).
- For å endre programmeringen er det nok å flytte tennene til startposisjon, og stille inn de nye driftsperiodene.
- Dersom det er ønskelig at apparatet skal fungere uten programmering flyttes alle tennene mot midten. For
å slå apparatet helt av er det i tillegg til å slå av bryterne nødvendig å trekke støpslet ut av stikkontakten
for å unngå en unødig funksjon av programmereren.
Modeller med anordning mot velting
- Noen modeller er utstyrte med en bryter som avbryter strømtilførselen dersom apparatet velter. For å
tilbakestille funksjonen er det nok å sette apparatet opp på benene igjen i vertikal posisjon. (For å undersøke
om ditt apparat er utstyrt med denne anordningen, se om det står “ex:1” etter type på merkeplaten).
5. VEDLIKEHOLD
Trekk støpslet ut av stikkontakten og vent til varmeapparatet har kjølt seg ned før det utføres inngrep på apparatet.
Det elektriske varmeapparatet med olje krever ikke noe spesielt vedlikehold. Det er nok å fjerne støvet med
en myk og tørr klut. Aldri bruk slipende midler eller løsningsmidler. Fjern eventuelt vanskelig skitt med en støvsuger dersom det er nødvendig.
6. ADVARSLER
- Ikke bruk varmeapparatet i nærheten av badekar, dusj, vask eller svømmebasseng.
- Ikke bruk varmeapparatet for å tørke tøy, og ikke legg nettkabelen ned på de varme elementene.
-Varmeapparatet må alltid, og kun, brukes i vertikal posisjon.
- Dersom nettkabelen er skadet må den skiftes ut av produsenten, servicesenteret eller en autorisert person
for å unngå risikoer.
- Første gang apparatet startes må det være i funksjon ved maks. effekt i minst 2 timer. I denne perioden
må rommet luftes godt slik at lukten fjernes.
- Det er helt normalt at det høres noen knirkelyder fra apparatet første gang det startes.
- Apparatet må ikke plasseres like under en fast stikkontakt.
- Beholderen til dette apparatet er fylt opp med en nøyaktig oljemengde, og reparasjoner som krever at
denne beholderen må åpnes må kun utføres av produsenten eller servicesenteret. Kontakt produsenten
eller servicesenteret ved oljelekkasjer.
-Ved kassering av apparatet er det nødvendig å respektere gjeldende bestemmelser for avsetting av olje.
- Ikke legg kabelen ned på det varme apparatet.
- Ikke bruk dette apparatet i rom som er mindre enn 4 m
2
.
- VIKTIG: Apparatet må ikke under noen omstendigheter åpnes mens det er i funksjon, fordi det kan føre
til farlige overopphetinger.
En sikkerhets-dispositiv stenger av apparatet dersom det ved uhell skulle overvarmes. For å få apparatet til å virke
på nytt, dra ut stikk-kontakten 30 minutter, fjern så årsaken til overvarmen og sett stikk-kontakten inn igjen.
VIKTIG: for å forebygge farer som kan oppstå på grunn av en tilfeldig gjenoppretting av sikkerhetsanlegget,
må dette apparatet ikke tilføres strøm via en ekstern tidsprogrammerer.
36
Page 37

37
Rapido on erittäin monipuolinen kotitalousten lämmitykseen tarkoitettu lämpöpatteri, jossa on kolme
eri tehotasoa. Tämän lisäksi lämpöpatterissa on erityinen toiminta, joka takaa parhaan mahdollisen
käyttömukavuuden kaikissa olosuhteissa.
Lue käyttöopas huolellisesti, jotta osaat käyttää lämpöpatteria parhaalla mahdollisella tavalla.
1. YLEISTÄ
Poista lämpöpatteri pakkauksestaan ja aseta se ylösalaisin suojana käytettyjen polystyreenikappaleiden
päälle. Tarkista, että sähköjohto on moitteettomassa kunnossa ja ettei laite ole vahingoittunut kuljetuksen
aikana. Älä käytä vahingoittunutta lämpöpatteria.
2. JALKOJEN ASENNUS
Poista jalat ja pyörät polystyreenipakkauksesta.
Aseta pyörät jalan tappiin ja paina loppuun saakka, kunnes kuulet naksahduksen (kuva 1). Varmista
vetämällä, että pyörät ovat tukevasti paikoillaan.
Kiinnitä pyörillä varustetut jalat lämpöpatterin alaosaan asettamalla ohjaimet säätötaulun ja ensimmäisen
elementin väliin. Aseta kaksi hammasta tarkoitusta varten oleville paikoilleen ja lukitse jalat paikoilleen ruuvaamalla silmukkaruuvit aina loppuun saakka (kuva 1).
Kiinnitä takapyörät tämän jälkeen terästappiin. Aseta tappi tämän jälkeen takatukeen ja varmista, että pyörät
asettuvat kuvan 2 osoittamalla tavalla ja että ne pyörivät vapaasti. Käännä lämpöpatteri ympäri tämän
toimenpiteen suorittamisen jälkeen siten, että se asettuu toiminta-asentoonsa.
3. SÄHKÖKYTKENTÄ
-Tarkista huolellisesti ennen pistokkeen sijoittamista pistorasiaan, että asennuspaikan verkkojännite vastaa
lämpöpatterin arvokyltin V:llä ilmaistua jännitearvoa ja että virta on mitoitettu oikein lämpöpatterin käyttämälle virralle.
- KYTKE LÄMPÖPATTERI AINOASTAAN RIITTÄVÄN MAADOITETTUUN PISTORASIAAN.
- Tämä laite vastaa sähkömagneettista yhteensopivuutta käsittelevän EU- direktiivin 89/336 vaatimuksia.
SF
Page 38

4. TOIMINTA JA KÄYTTÖ
Instant Heating System
Tämä lämpöpatteri on varustettu erityisellä nopealla lämmitystoiminnolla “Instant Heating System”. Tätä järjestelmää käytettäessä käynnistyy erityinen lisälämmitin ja lämmittää koko huoneen nopeasti ja hiljaisesti.
Toiminta käynnistetään tarkoitukseen olevan, kuvassa 3 esitellyn IHS kytkimen avulla.
Lämpöpatterin käynnistys
Aseta pistoke pistorasiaan. Käännä termostaattia, kunnes se pysähtyy maksimiasentoon. Käynnistä lämpöpatteri kytkimillä taulukossa olevien ohjeiden avulla.
Termostaatin “P” säätö
Kun huoneisto on saavuttanut halutun lämpötilan, käännä termostaatin nuppia P (kuva 3) hitaasti
vastapäivään kunnes kuulet naksahduksen (tai kunnes merkkivalo sammuu). Älä käännä nuppia tätä enempää. Termostaatti säätää ja pitää lämpötilan automaattisesti tässä lämpötilassa.
Jäätymistä estävä toiminta (anti-frost)
Termostaatin ollessa
*
- asennossa ja virrankytkimien I ja II ollessa painettuina, laite
säilyttää huoneistossa noin 5°C asteen lämpötilan, jolloin se estää jäätymisen ja sähkönkulutus säilyy erittäin
pienenä.
Painetut Käynnistetty toiminto Toimintatapa
kytkimet
Paina kytkintä I, kun haluat minimiteholla Tätä toimintatapaa käyttäessäsi voit
tapahtuvan tavallisen lämmityksen käynnistää Anti-Frost toiminnan
Paina kytkintä II, kun haluat keskiteholla Tätä toimintatapaa käyttäessäsi voit
tapahtuvan tavallisen lämmityksen käynnistää Anti-Frost toiminnan
Paina kytkimiä I ja II, kun haluat Tätä toimintatapaa käyttäessäsi voit
maksimiteholla tapahtuvan tavallisen käynnistää Anti-Frost toiminnan
lämmityksen
Paina kytkimiä I, II ja Instant Heating Emme suosittele Anti-Frost toiminnan
System IHS, kun haluat maksimiteholla käyttöä tätä toimintatapaa käytettäessä.
tapahtuvan Rapido (nopean) lämmityksen
Tässä toimintatavassa syttyvät palamaan
merkkivalot II ja Instant Heating System (A).
38
Page 39

24- tunnin ajastimella “T” (Timer) varustetut mallit
Ohjelmoi lämmitys seuraavasti:
-Tarkista kellon aika. Jos kello on esim. 10, kierrä ajastimen T numerolevyä myötäpäivään, kunnes siinä
oleva numero 10 asettuu ajastimessa olevan viitemerkin kohdalle.
- Laitteen toiminnan aikajaksot asetetaan työntämällä kyseiset hammaslovet numerolevyn keskelle.
Jokainen hammas vastaa 15 minuutin aikajaksoa. Tämän jälkeen voit nähdä punaiset sektorit, jotka vastaavat toimintajaksoja.
- Tällä tavalla asetettuna lämpöpatteri toimii automaattisesti joka päivä asetettuna aikajaksona.
(Tärkeää: pistokkeen tulee aina olla kytkettynä pistorasiaan).
- Kun haluat vaihtaa ohjelmoitua aikajaksoa, vie hammaslovet takaisin alkuperäisille paikoilleen, jonka jälkeen voit asettaa ne tarvittaessa uusille, halutuille toimintajaksoille.
- Jos haluat että laite toimii ilman ohjelmoituja toimintajaksoja, työnnä kaikki hammaslovet keskelle. Tässä
tapauksessa laitteen sammutuksen yhteydessä on välttämätöntä kytkeä kytkimet pois päältä ja ottaa
tämän lisäksi pistoke pois pistorasiasta, jottei ajastin toimisi turhaan.
Kaatumissuojakytkimellä varustetut mallit
- Jotkin lämpöpatterimallit on varustettu kaatumissuojakytkimellä, joka katkaisee sähkövirran tulon lämpöpatterin
kaatuessa. Voit käynnistää toiminnan tämän jälkeen yksinkertaisesti asettamalla lämpöpatterin uudelleen jaloilleen
pystyasentoon.
(Tällä toiminnalla varustettujen lämpöpattereiden arvokyltissä tyyppimerkinnän jälkeen on kirjoitus “... ex:1”).
5. HUOLTO
Irrota pistoke pistorasiasta ja odota, että lämpöpatteri jäähtyy aina ennen minkään huoltotoimenpiteen aloittamista. Öljyllä täytetty lämpöpatteri ei kaipaa mitään erityistä huoltoa. Poista sen päälle kerääntynyt pöly
yksinkertaisesti kuivalla ja pehmeällä kankaalla. Älä käytä pesu- tai hankausaineita. Poista kerääntynyt lika
tarvittaessa pölynimurilla.
6. VAROITUKSET
- Älä käytä lämpöpatteria suihkun, kylpyammeen, pesualtaan tai uima-altaan välittömässä läheisyydessä.
- Älä kuivaa pyykkiä lämpöpatterin päällä ja varmista ettei sähköjohto kosketa kuumia pintoja.
- Käytä lämpöpatteria ainoastaan pystyasennossa.
- Anna vahingoittuneet sähköjohdon vaihto valmistajan tai sen valtuuttaman teknisen huoltoliikkeen tai
muun ammattihenkilön suoritettavaksi. Väärin suoritettu korjaus voi aiheuttaa onnettomuuksia.
- Anna lämpöpatterin käydä maksimiteholla vähintään 2 tunnin ajan ensimmäisen käytön yhteydessä.
Tuuleta huone tämän toimenpiteen aikana hyvin, jolloin laitteen sisälle kehittynyt epämiellyttävä “uuden”
tuoksu saadaan poistettua.
- Ensimmäisen käytön aikana laitteesta kuuluva “natina” ääni on täysin normaalia.
- Älä aseta lämpöpatteria suoraan pistorasian alapuolelle.
- Tämän lämmittimen säiliö on täytetty tarkalla öljymäärällä. Tämän vuoksi kaikki säiliön avaamista vaativat korjaukset saa tehdä ainoastaan valmistaja tai sen valtuuttama huoltoliike. Jos öljyä vuotaa, ota
yhteys valmistajaan tai sen valtuuttamaan huoltoliikkeeseen.
- Noudata lämpöpatterin romutuksen yhteydessä öljyn hävitystä koskevia määräyksiä.
-Älä aseta virtajohtoa vielä kuuman laitteen päälle
- Älä käytä lämpöpatteria tiloissa, joiden pinta-ala on alle 4 m
2
.
- TÄRKEÄÄ: Älä peitä laitetta sen toimiessa, sillä tällöin lämpöpatterin lämpötila saattaa nousta liian
korkealla.
Varmuuslaite keskeyttää tuuletinlämmittimen toiminnan, jos laite vahingossa kuumenee liikaa. Jotta se käynnistyisi uudelleen, on pistoke irrotettava pistorasiasta 30 minuutiksi, ja poistettava ylikuumenemisen syy, sen
jälkeen voidaan pistoke työntää uudelleen pistorasiaan.
HUOMIO: Tahattoman käynnistyksen aiheuttamien vaarojen estämiseksi tämän laitteen kytkennässä ei saa
käyttää ulkoista ajastinta
39
Page 40

40
Hflvfbjh Rapido – àbj rhfqyt uvmrvq msbjdjq jbjgvbtknysq ghvmjh x bhtc< htuekvhetcscv ehjdy<cv
cjoyjxbv. Rhjct bjuj, jy xyfmòty àrxrkùpvdyjq aeyrwvtq, rjbjhf< gjpdjkvb Dfc ljmvbnx< yfvmjkni
tuj rjyajhbf d kùmjq xvbefwvv.
Lk< cfrxvcfknyjuj vxgjknpjdfyv< djpcjòyjxbtq ghvmjhf htrjctyletc Dfc dyvcfbtknyj ghjztxbn yvòt
ghvdtltyyst vyxbherwvv.
1. JMOVT GJKJçTYV>
Dsyebn ghvmjh vp egfrjdjzyjq rjhjmrv v gjkjòvbn tuj yf mjr, jxbjhjòyj gjxbfdvd yf ghtljèhfyvbtknyst
àktctybs vp gjkvxbvhjkf. Ghjdthvbn wtkjxbyjxbn ghjdjlf gvbfyv<, f bfròt yt msk kv ghvmjh gjdhtòlty
dj dhtc< bhfyxgjhbvhjdrv. Yt drkùzfbn d hfmjbe ghvmjh, txkv jy msk gjdhtòlty.
2. CJYBFç YJçTR
Dsyebn yjòrv v rjk\xvrv vp gjkvxbvhjknyjq egfrjdrv.
Yfltbn rjktxf yf jxn yjòrv v yfòfbn lj btè gjh, gjrf yt gjxksivbx< otkzjr (hvxeyjr 1). Emtlvbnx<,
gjb<yed, zbj rjktxf èjhjij pfrhtgktys.
Cjybvhjdfbn yjòre x rjktxfcv d yvòytq zfxbv hflvfbjhf, dxbfdvd yfghfdk<ùovt htmhf ctòle rjhjmrjq
eghfdktyv< v gthdsc àktctybjc; dxbfdvbn ldf pemf d ghtlexcjbhtyyst uytplf v pfavrxvhjdfbn yjòre mfh
firjdscv dvybfcv, pfb<yed vè rj rjywf (Hvx. 1).
Pfbtc cjybvhjdfbn pflyvt rjktxf, yfltd vè yf xbfknyeù jxn. Dxbfdvbn jxn d pflyùù jgjhe, ghjxktl< pf btc,
zbjms rjktxf exbfyjdvkvxn d gjkjòtyvt, gjrfpfyyjt yf hvxeyrt 2. Emtlvbnx< d bjc, zbj rjktxf xdjmjlyj
dhfofùbx<. Pfrjyzvd àbv jgthfwvv gthtdthyebn hflvfbjh, ghvdtl< tuj d dthbvrfknyjt hfmjztt gjkjòtyvt.
3. °KTRBHVZTXRJT XJTLVYTYVT
- Gthtl btc rfr dxbfdk<bn dvkre d hjptbre dyvcfbtknyj ghjrjybhjkvhjdfbn xjjbdtbxbdetb kv djknbfò
Dfitq ljcfiytq xtbv pyfztyvù d Djknbfè, erfpfyyjce yf ghvmjht, f bfròt hfxzvbfys kv yf bhtmetceù
yfuhepre hjptbrf v kvyv< gvbfyv<.
- GJLXJTLVY>BN HFLVFBJH BJKNRJ R HJPTBRFC, XYFMçTYYSC VXGHFDYSC
PFPTCKTYVTC.
- Lfyysq ghvmjh xjjbdtbxbdetb gjkjòtyvù 89/336/T°X jm àktrbhjcfuyvbyjq xjdctxbvcjxbv..
SU
Page 41

4. HFMJBF V °RXGKEFBFWV>
Instant Heating System
°bjb ghvmjh xyfmòty jxjmjq aeyrwvtq msxbhjuj jbjgktyv< “Instant Heating System”. Aeyrwv<
“Instant Heating System” frbvdvhetb àrxrkùpvdysq ljgjkyvbtknysq yfuhtdfbtkn, rjbjhsq
jmtxgtzvdftb mtxiecyjt v msxbhjt jbjgktyvt Dfituj gjctotyv<.
Aeyrwv< drkùzftbx< x gjcjonù xgtwvfknyjq rkfdviv IHS, gjrfpfyyjq yf hvxeyrt 3.
Drkùztyvt
Dxbfdvbn dvkre d hjptbre, gthtctxbvbn bthcjxbfb lj jxbfyjdrv d cfrxvcfknyjc gjkjòtyvv; drkùzvbn hflvf
bjh x gjcjonù dsrkùzfbtktq xjukfxyj ghvdtltyysc d bfmkvwt htòvcfc.
Htuekvhjdrf bthcjxbfbf P
Rjulf btcgthfbehf ljxbvuytb òtkftcjq, ctlktyyj gjdthyebn herj<bre bthcjxbfbf ? (hvx. 1) ghjbvd zfxjdjq
xbhtkrv lj gjkjòtyv<, jbctztyyjuj otkzrjc (lj dsrkùztyv< vylvrfbjhyjq kfcgjzrv) v yt mjktt.
Pfavrxvhjdfyyf< bfrvc jmhfpjc btcgthfbehf meltb fdbjcfbvztxrv htuekvhjdfbnx< v gjllthòvdfbnx<
gjxbj<yyjq bthcjxbfbjc.
GHJBVDJJMKTLTYVBTKNYF> AEYRWV> (antifrost)
X bthcjxbfbjc d gjkjòtyvv
*
v yfòfbscv dsrkùzfbtk<cv I v II, ghvmjh gjllthòvdftb btcgthfbehe d gjc
totyvv jrjkj 5°C, ghtg<bxbde< pfcjhfòvdfyvù, ghv cvyvcfknyjc hfxèjlt àythuvv.
Yfòfbst Drkùztyyf< aeyrwv< Htòvcs hfmjbs
ryjgrv
Yfòfbn ryjgre I lk< Yjhcfknyjuj D àbjc htòvct cjòyj drkùzvbn
jbjgktyv< cvyvcfknyjq cjoyjxbv aeyrwvù antifrost.
Yfòfbn ryjgre II lk< Yjhcfknyjuj D àbjc htòvct cjòyj drkùzvbn
jbjgktyv< xhtlytq cjoyjxbv. aeyrwvù antifrost.
Yfòfbn ryjgrv I v II lk< Yjhcfknyjuj D àbjc htòvct cjòyj drkùzvbn
jbjgktyv< cfrxvcfknyjq cjoyjxbv. aeyrwvù antifrost.
Yfòfbn ryjgrv I, II v Istant D àbjc htòvct yt htrjctyletbx<
Heating System IHS lk< msxbhjuj drkùzfbn aeyrwvù antifrost.
jbjgktyv< cfrxvcfknyjq cjoyjxbv.
З˝ЪУП ТОЫ˜‡ Б‡„У‡ЪТfl ЛМ‰ЛН‡ЪУМ‡fl
О‡ПФ‡ IIЛ О‡ПФ‡ лЛТЪП˚ е„МУ‚ММУ„У
燄‚‡ Instant Heating System (A)
41
Page 42

Cjltkv x ghjuhfccvheùovc exbhjqxbdjc (bfqcthjc) yf 24 zfxf T
Lk< ghjuhfccvhjdfyv< jbjgktyv< ltqxbdjdfbn xktleùovc jmhfpjc:
- Gjxcjbhvbt xrjknrj dhtctyv yf Dfivè zfxfè. Ghtlgjkjòvc, zbj 10 zfxjd, gjdjhfzvdfqbt gj zfxjdjq
xbhtkrt yecthjdfyysq lvxr ghjuhfccvheùotuj exbhjqxbdf T lj btè gjh, gjrf wvahf 10 yt xjqltbx< xj
pyfrjc s, jbctztyysc yf ghjuhfccvheùotc exbhjqxbdt.
- Pflfbn gthvjls dhtctyv d btztyvv rjbjhsè òtkftbt, zbjms ghvmjh yfèjlvkx< d hfmjbt, gthtldvuf< d
wtybh pemws. Rfòlsq pemtw xjjbdtbxbdetb jbhtpre dhtctyv hfdyjce 15 cvy. Gjxkt ztuj xbfyeb dvlys
jbhtprv, xjjbdtbxbdeùovt zfxfc hfmjbs ghvmjhf.
- Bfrvc jmhfpjc pfghjuhfccvhjdfyysq hflvfbjh meltb fdbjcfbvztxrv hfmjbfbn rfòlsq ltyn d pflfyyst
zfxs (Dfòyj: dvkrf dxtulf ljkòyf msbn dxbfdktyf d hjptbre).
- Lk< vpctytyv< ghjuhfccvhjdfyv< ljxbfbjzyj ghvdtxbv pemws d yfzfknyjt gjkjòtyvt v pflfbn yjdst
zfxs hfmjbs.
- Txkv Ds èjbvbt, zbjms ghvmjh hfmjbfk mtp ghjuhfccvhjdfyv<, gthtdtlvbt d wtybh dxt pemws. D bfrjc
xkezft, lk< gjkyjuj dsrkùztyv< ghvmjhf ytjmèjlvcj yt bjknrj dsrkùzvbn dsrkùzfbtkv, yj v dsyebn
dvkre vp hjptbrv d wtk<è vpmtòfyv< mtxgjktpyjq hfmjbs ghjuhfccvheùotuj exbhjqxbdf.
Cjltkv x exbhjqxbdjc ghjbvd jghjrvlsdfyv<
- Ytrjbjhst cjltkv xyfmòtys dsrkùzfbtktc ghjbvd jghjrvlsdfyv<, rjbjhsq ghtrhfoftb gvbfyvt d
xkezft gfltyv<. Lk< djpjmyjdktyv< hfmjbs ljxbfbjzyj pfyjdj gjxbfdvbn ghvmjh yf yjòrv d dthbvr
fknyjt gjkjòtyvt. (Lk< bjuj, zbjms hfxgjpyfbn xyfmòty kv Dfi ghvmjh bfrvc exbhjqxbdjc, gjxcjbhvbt
vcttbx< kv yflgvxn “…ex: 1” gjxkt “type” yf bfmkvzrt x èfhfrbthvxbvrfcv.)
5. EéJL
Gthtl ghjdtltyvtc kùmjq jgthfwvv gj eèjle dsyebn dvkre vp hjptbrv v gjljòlfbn gjrf hflvfbjh jèk
flvbx<. °ktrbhvztxrvq cfxk<ysq hflvfbjh yt bhtmetb jxjmjuj eèjlf. Ljxbfbjzyj elfk<bn x ytuj gskn xeèjq
v c<urjq bh<gjzrjq. Yv d rjtc xkezft yt gjknpjdfbnx< fmhfpvdyscv gjhjirfcv vkv hfxbdjhvbtk<cv. Ghv
ytjmèjlvcjxbv elfk<bn djpcjòyst xrjgktyv< gskv, gjknpe<xn gsktxjxjc.
6. GHTLEGHTçLTYV>
- Yt gjknpjdfbnx< hflvfbjhjc d ytgjxhtlxbdtyyjq mkvpjxbv jb dfyy, leitq, hfrjdvy vkv mfxxtqyjd.
- Yt gjknpjdfbnx< hflvfbjhjc lk< xeirv mtkn<. Yt ghvxkjy<bn xjtlvyvbtknysq ghjdjl r ujh<zvc àktctybfc.
- Gjknpjdfbnx< hflvfbjhjc dxtulf v vxrkùzvbtknyj d dthbvrfknyjc gjkjòtyvv.
- Txkv gjdhtòlty ghjdjl gvbfyv<, d wtk<è ghtleghtòltyv< jgfxyjxbv jy ljkòty msbn pfctyty
Vpujbjdvbtktc, tuj btèyvztxrjq xthdvxyjq xkeòmjq vkv, dj dx<rjc xkezft, kvwjc x fyfkjuvzyjq rdfk
vavrfwvtq.
- Ghv gthdjc drkùztyvv jxbfdvbn ghvmjh d hfmjbt ghv cfrxvcfknyjq cjoyjxbv rfr cvyvcec yf ldf zfxf.
Dj dhtc< àbjq jgthfwvv èjhjij ghjdtbhvdfbn gjctotyvt lk< elfktyv< dsltk<tcjuj hflvfbjhjc pfgfèf
“yjdjuj”.
- °bj xjdthityyj yjhcfknyj, zbj ghvmjh vplftb “xrhvgs” ghv gthdjc drkùztyvv.
- Ghvmjh yt ljkòty exbfyfdkvdfbnx< ytgjxhtlxbdtyyj gjl avrxvhjdfyyeù hjptbre.
- Mfr lfyyjuj ghvmjhf yfgjkyty bjzysc rjkvztxbdjc cfxkf v htcjyb, bhtmeùovq tuj dxrhsbv<, ljkòty
ghjvpdjlvbnx< bjknrj Vpujbjdvbtktc vkv tuj Xthdvxyjq Xkeòmjq. D xkezft ebtzrv cfxkf ytjmèjlvcj
xd<pfbnx< x Vpujbjdvbtktc vkv x tuj Xthdvxyjq Xkeòmjq.
- Ghv jbghfdrt ghvmjhf d ctbfkkjkjc ytjmèjlvcj ghvlthòvdfbnx< gjkjòtyvq gj ebvkvpfwvv cfxkf.
- Yt ghvxkjy<bn ghjdjl r to\ ujh<ztce ghvmjhe.
- Yt gjknpjdfbnx< lfyysc ghvmjhjc d gjctotyv<è x gkjoflnù ctytt 4 c2.
- DFçYJ: Yv d rjtc xkezft yt yfrhsdfbn ghvmjh dj dhtc< hfmjbs, gjxrjknre àbj dspdfkj ms jgfxysq
gthtuhtd.
иВ‰Уı‡МЛЪВО¸МУВ ЫТЪУИТЪ‚У УТЪ‡М‡‚ОЛ‚‡ВЪ ‡·УЪЫ ЪВПУ‚ВМЪЛП‡ТОflМ˚И ‚ ТОЫ˜‡В ТОЫ˜‡ИМУ„У
ФВ„‚‡. СОfl ‚УТТЪ‡МУ‚ОВМЛfl В„У ‡·УЪ˚ МВУ·ıУ‰ЛПУ ‚˚МЫЪ¸ ‚ЛОНЫ ЛБ УБВЪНЛ, ‰УК‰‡Ъ¸Тfl 30 ПЛМЫЪ,
ЫТЪ‡МЛЪ¸ ФЛ˜ЛМЫ ФВ„‚‡ ФЛ·У‡ Л ТМУ‚‡ ‚ТЪ‡‚ЛЪ¸ ‚ЛОНЫ ‚ УБВЪНЫ.
ÇÇççààååÄÄççààÖÖ::
‚У ЛБ·ВК‡МЛВ УФ‡ТМУТЪЛ, ‚˚Б‚‡ММУИ ТОЫ˜‡ИМ˚П Т·УТУП ТЛТЪВП˚ ·ВБУФ‡ТМУТЪЛ, ФЛЪ‡МЛВ
˝ЪУ„У ФЛ·У‡ МВ ‰УОКМУ УТЫ˘ВТЪ‚ОflЪ¸Тfl ˜ВВБ М‡ЫКМ˚И Ъ‡ИПВ.
42
Page 43

43
Grzejnik Rapido jest wyjàtkowo wszechstronnym urzàdzeniem do ogrzewania pomieszczeƒ
domowych, umo˝liwiajàcym wybór jednego z trzech poziomów mocy. Wyrób ten zosta∏ poza tym
wyposa˝ony w dodatkowà funkcj´, dzi´ki której jest Wam w stanie zapewniç maksymalny komfort w
ka˝dej sytuacji.
Aby jak najpe∏niej wykorzystaç mo˝liwoÊci tego produktu radzimy uwa˝nie przeczytaç poni˝szà
instrukcj´.
1. UWAGI OGÓLNE
Urzàdzenie nale˝y wyjàç z kartonu i odwróciç opierajàc na podstawkach ze styropianu. Sprawdziç, czy
przewód zasilajàcy i urzàdzenie nie uleg∏y uszkodzeniu w czasie transportu. W przypadku stwierdzenia
jakiegokolwiek uszkodzenia, urzàdzenia nie nale˝y uruchamiaç.
2. MONTA˚ NÓ˚EK
Z styropianowego opakowania wyjàç nó˝ki i kó∏ka.
UmieÊciç kó∏ka na sworzniu nó˝ki i docisnàç do oporu (rys. 1). Pociàgnàç, aby upewniç si´, czy kó∏ka
zosta∏y dobrze zamocowane.
Zamontowaç nó˝k´ z kó∏kami w dolnej cz´Êci kaloryfera wprowadzajàc prowadnic´ mi´dzy puszk´ sterujàcà a pierwszy element. Zamocowaç dwa z´by w przewidzianych do tego miejscach i zablokowaç nó˝k´
przy pomocy wkr´tów z oczkiem dokr´cajàc je do oporu (rys. 1).
Nast´pnie zamontowaç tylne kó∏ka, nak∏adajàc je na stalowy sworzeƒ, zaczepiç sworzeƒ na tylnej podporze, sprawdzajàc, czy ko∏a zosta∏y umieszczone w takiej pozycji jak na rysunku 2. Sprawdziç, czy kó∏ka
obracajà si´ swobodnie. Nast´pnie umieÊciç grzejnik w pozycji pionowej.
3. POD¸ÑCZENIE DO INSTALACJI ELEKTRYCZNEJ
- Przed w∏o˝eniem wtyczki do gniazdka sprawdziç, czy napi´cie w domowej instalacji elektrycznej
odpowiada napi´ciu podanemu na urzàdzeniu, a tak˝e czy gniazdko i linia zasilajàca sà dostosowane
do wymaganego obcià˝enia.
- GRZEJNIK MO˚NA POD¸ÑCZAå JEDYNIE DO GNIAZDEK WYPOSA˚ONYCH W SPRAWNE UZIEMIENIE
- Urzàdzenie jest zgodne z dyrektywà Wspólnoty Europejskiej nr 89/336/CEE na temat kompatybilnoÊci
elektromagnetycznej.
PL
Page 44
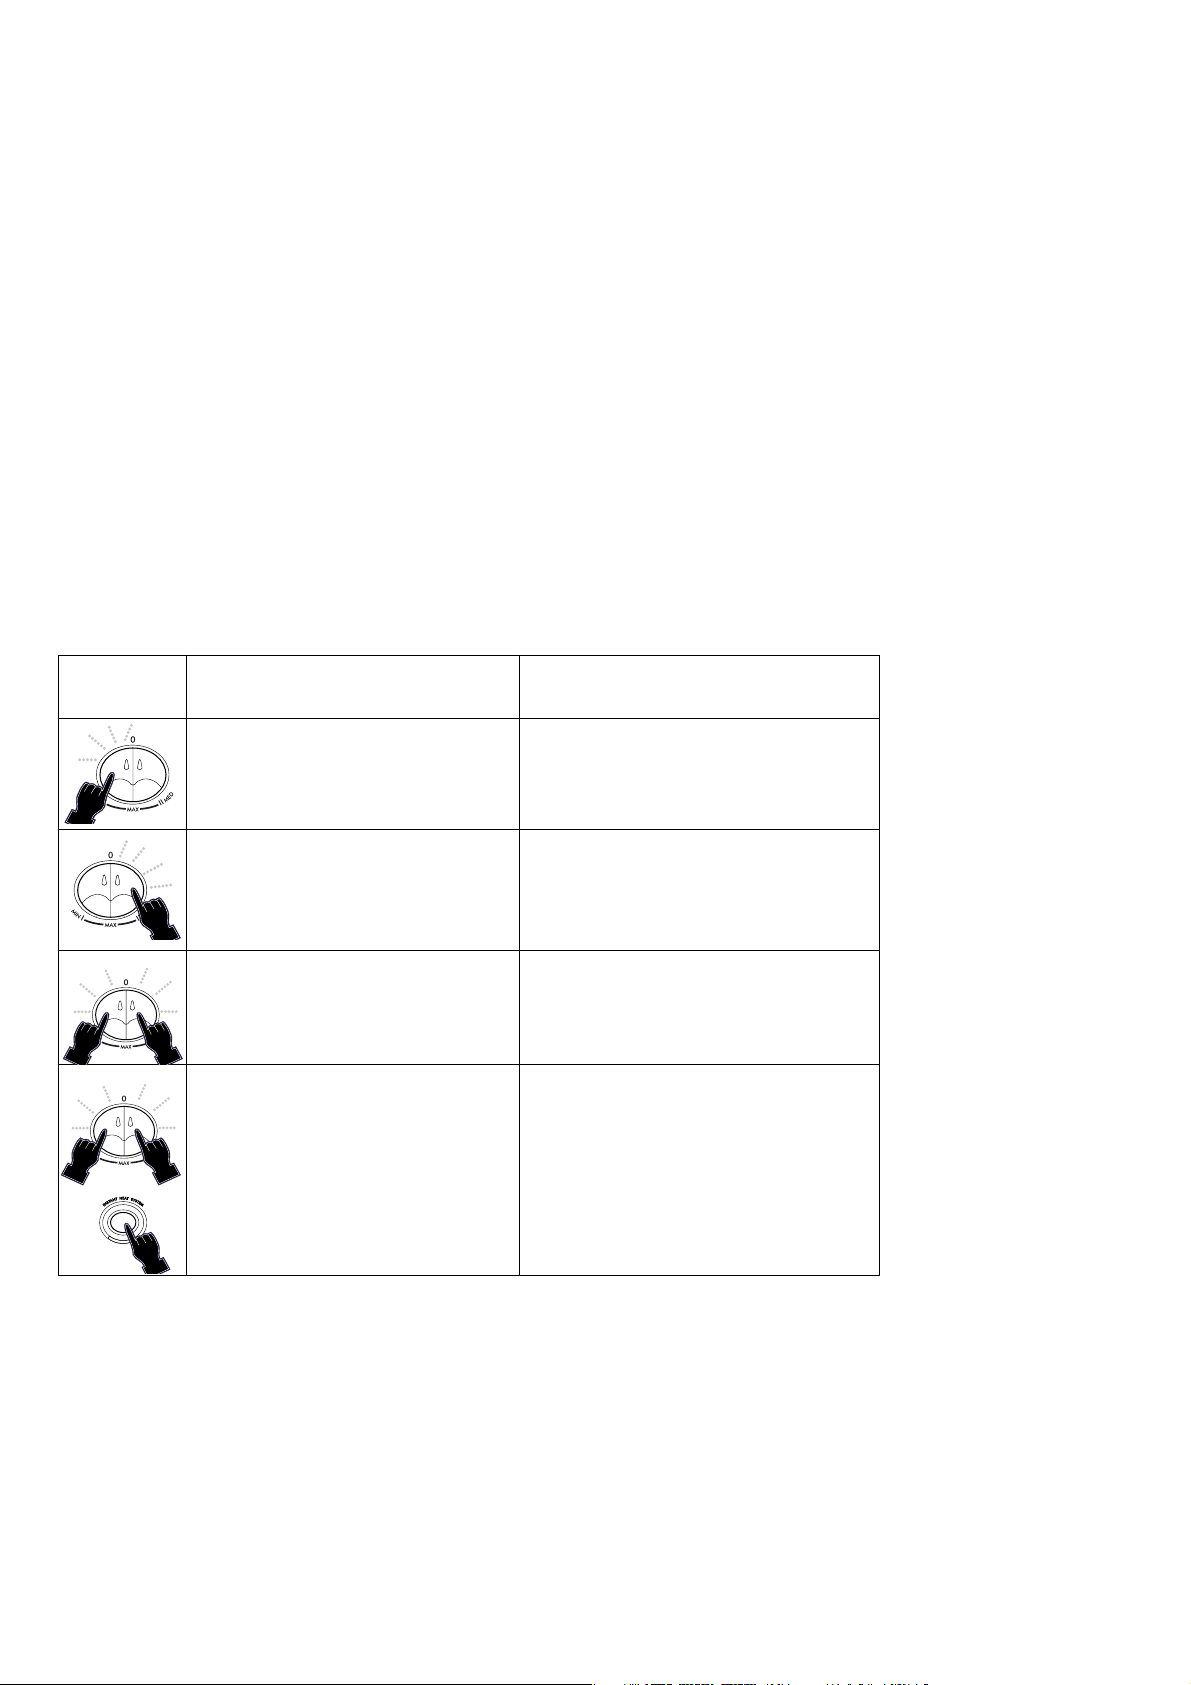
4. DZIA¸ANIE I U˚YTKOWANIE
Instant Heating System
Produkt ten posiada specjalnà funkcj´ o nazwie „Instant Heating System”, która umo˝liwia natychmiastowe
ogrzanie pomieszczenia. Uruchamiany jest specjalny system grzejny, który pozwala ogrzaç pomieszczenie
szybko i cicho.
Funkcj´ „Instant Heating System” uruchamia si´ za pomocà wy∏àcznika IHS pokazanego na rys. 3.
W∏àczanie
W∏o˝yç wtyczk´ do gniazdka. Przesunàç termostat do chwili po∏o˝enia maksimum. W∏àczyç grzejnik za
pomocà wy∏àczników zgodnie z instrukcjà przedstawionà w tabeli.
Regulacja termostatu „P”
Kiedy temperatura w pomieszczeniu osiàgnie ˝àdanà wartoÊç, nale˝y powoli przekr´ciç pokr´t∏o termostatu
P (rys. 3) w kierunku przeciwnym do ruchu wskazówek zegara, a˝ do po∏o˝enia, w którym us∏yszymy dêwi´k
(albo do momentu zgaÊni´cia lampki kontrolnej). Dalej pokr´t∏a nie przekr´caç. Termostat umo˝liwi
automatycznà regulacj´ i utrzymywanie tak ustawionej temperatury.
System przeciwzamarzajàcy - anti-frost
JeÊli termostat jest ustawiony w pozycji
*
, a wy∏àczniki I i II sà wciÊni´te, urzàdzenie utrzymuje w
pomieszczeniu temperatur´ mniej wi´cej 5°C, przeciwdzia∏ajàc zamarzaniu przy minimalnym zu˝yciu
energii.
WciÊni´te Funkcja Dzia∏anie
wy∏àczniki
Wcisnàç wy∏àcznik I do ogrzewania Przy tej funkcji mo˝liwe jest
Dzia∏anie normalne z minimalnym uruchomienie systemu „anti-frost”
poborem mocy
Wcisnàç wy∏àcznik II do ogrzewania Przy tej funkcji mo˝liwe jest
Dzia∏anie normalne ze uruchomienie systemu „anti-frost”
Êrednim poborem mocy
Wcisnàç wy∏àczniki I i II do ogrzewania Przy tej funkcji mo˝liwe jest
Dzia∏anie normalne z maksymalnym uruchomienie systemu „anti-frost”
poborem mocy
Wcisnàç wy∏àczniki I i II i Instant Heating Przy tej funkcji nie zaleca si´
System IHS w celu natychmiastowego uruchamiania systemu „anti-frost”
ogrzania z poborem wykorzystaniem mocy
W trybie tym zapala si´ lampka kontrolna II
oraz lampka Instant Heating System (A).
44
Page 45

Modele programowalne (Timer) na 24 godziny „T”
W celu zaprogramowania ogrzewania nale˝y wykonaç nast´pujàce czynnoÊci:
- Sprawdê, która jest godzina. Zak∏adajàc, ˝e jest 10, obróç wyposa˝one w podzia∏k´ pokr´t∏o programatora T zgodnie z ruchem wskazówek zegara, a˝ do chwili, gdy cyfra 10 na pokr´tle znajdzie si´
w pozycji s oznaczonej na programatorze.
- OkreÊl czas przez jaki chcesz, aby urzàdzenie pracowa∏o, przesuwajàc zàbki do Êrodka. Ka˝dy zàbek
oznacza 15 minut. W ten sposób b´dà widoczne sektory odpowiadajàce okresom, w których urzàdzenie b´dzie funkcjonowa∏o.
- Ustawiony w ten sposób grzejnik b´dzie dzia∏a∏ codziennie w zaprogramowanym czasie. (Uwaga: wtyczka musi przez ca∏y czas pozostawaç w gniazdku elektrycznym).
- Aby zmieniç program wystarczy umieÊciç zàbki w pozycji wyjÊciowej, a nast´pnie ustawiç nowy czas
dzia∏ania.
- JeÊli chcesz, aby urzàdzenie dzia∏a∏o bez programowania, przesuƒ wszystkie zàbki do Êrodka. W tym
przypadku w celu ca∏kowitego wy∏àczenia urzàdzenia trzeba nie tylko wy∏àczyç wy∏àczniki, ale tak˝e
wyciàgnàç wtyczk´ z gniazdka, co zapobiegnie niepotrzebnemu dzia∏aniu programatora.
Modele z roz∏àcznikiem
- Niektóre modele wyposa˝one sà w specjalny wy∏àcznik, który w przypadku wywrócenia kaloryfera odcina zasilanie. W celu ponownego uruchomienia wystarczy ponownie umieÊciç grzejnik na nó˝kach w
pozycji pionowej. (Aby przekonaç si´, czy Twój grzejnik jest wyposa˝ony w taki wy∏àcznik, sprawdê,
czy na tabliczce znamionowej po „type” jest napis: „..ex.1”).
5. KONSERWACJA
Przed wykonaniem jakichkolwiek prac konserwacyjnych nale˝y wyciàgnàç wtyczk´ z gniazdka i poczekaç,
a˝ grzejnik ostygnie. Elektryczny grzejnik olejowy nie wymaga ˝adnych szczególnych zabiegów konserwacyjnych. Wystarczy go odkurzaç przy pomocy mi´kkiej, suchej szmatki. Do czyszczenia nie nale˝y u˝ywaç
proszków ani rozpuszczalników, które mog∏yby uszkodziç powierzchni´. W razie koniecznoÊci usunàç
ewentualne zabrudzenia przy pomocy odkurzacza.
6. UWAGA!
- Kaloryfera nie nale˝y umieszczaç w pobli˝u wanny, prysznica, umywalki czy basenu.
- Kaloryfera nie nale˝y u˝ywaç do suszenia bielizny. Nale˝y uwa˝aç, aby przewód zasilajàcy nie le˝a∏
na goràcym pod∏o˝u.
- Kaloryfera nale˝y u˝ywaç tylko i wy∏àcznie w pozycji pionowej.
- Uszkodzony przewód zasilajàcy powinien byç wymieniony przez producenta, serwis producenta lub
osob´ posiadajàcà odpowiednie kwalifikacje, co pozwoli uniknàç jakiegokolwiek ryzyka.
- Przy uruchomieniu po raz pierwszy nale˝y w∏àczyç grzejnik na maksimum na co najmniej dwie godziny.
W tym czasie dobrze wywietrzyç pomieszczenie, aby pozbyç si´ charakterystycznego zapachu „fabrycznie nowego wyrobu” wydzielajàcego si´ z urzàdzenia.
- Mo˝liwe jest „skrzypienie” urzàdzenia po pierwszym rozruchu.
- Urzàdzenie nie mo˝e byç umieszczone pod sta∏ym (Êciennym) gniazdem wtykowym.
- Pojemnik tego urzàdzenia jest wype∏niony odpowiednià iloÊcià oleju, a zatem wszelkie naprawy wyma-
gajàce jego otwarcia winny byç wykonane przez producenta lub serwis techniczny producenta. W przypadku wycieku oleju nale˝y skontaktowaç si´ z producentem lub z punktem serwisowym.
- W przypadku z∏omowania kaloryfera nale˝y przestrzegaç przepisów dotyczàcych likwidowania
odpadów takich jak olej.
- Nie zawieszaç przewodu na urzàdzeniu, które jest jeszcze ciep∏e.
- Nie korzystaç z urz⁄dzenia w pomieszczeniach o powierzchni mniejszej ni˘ 4 m
2
.
- UWAGA: W ˝adnym wypadku nie nale˝y przykrywaç dzia∏ajàcego urzàdzenia, poniewa˝
spowodowa∏oby to niebezpieczne przegrzanie.
W razie przypadkowego przegrzania interweniuje urzàdzenie bezpieczeƒstwa, które przerywa dzia∏anie
elektryczny grzejnik. Aby ponownie go uruchomiç nale˝y wyjàç na 30 minut wtyczk´ z gniazdka, usunàç
przyczyn´ przegrzania, po czym wstawiç wtyczk´ z powrotem do gniazdka.
UWAGA: w celu unikni´cia niebezpieczeƒstwa spowodowanego przypadkowym w∏àczeniem systemu zabezpieczania, urzàdzenie nie mo˝e byç zasilane przez zewn´trzny programator (timer).
45
Page 46

46
A “Gyorsmelegíto” a lakás bemelegítésének sokoldalú készüléke, háromszintu kiválasztható teljesítménnyel. Ezenkívül, egy egyedüli muködési lehetoség lett a készülékbe beépítve, mely a körülményektol függetlenül a legjobb kényelmet biztosítja. Akészülék maximális kihasználásának érdekében java-
soljuk, hogy a lentiekben leírt használati utasítást olvassák el.
1. ÁLTALÁNOS TUDNIVALÓK
Vegyék ki a dobozból és helyezzék a polisztirol védokre a megfordított készüléket. Ellenorizzék azt, hogy a szállítás közben a villanyvezeték és a készülék nem hibásodott meg. Ha a készülék meghibásodott, ne müködtessék
a készüléket.
2. TARTÓLÁBAK BESZERELÉSE
Vegyék ki a tartólábakat és a kerekeket a polisztirol csomagolásból.
Helyezzék be a tartólábak tengelyébe a kerekeket és addíg nyomják, amíg egy pattanóhangot nem hallanak
(1.ábra). Kifelé húzva ellenorizzék a kerekek helyes rögzítését.
Szereljék fel a kerekes tartólábakat úgy, hogy a melegíto alsó részébe helyezzék be a vezérsineket, azaz a vezérlodoboz és az elso elem között; az eloirányzott helyre helyezzék be a 2 fogat és a fülescsavarokkal jól rögzítsék
be (1 ábra).
Ezután az acélcsapágyba behelyezve szereljék fel a hátsókerekeket úgy, hogy rögzítsék a tengelyt a hátsó csapágyba és ellenorizzék, hogy a kerekek a 2. ábra szerint legyenek behelyezve. Ellenorizzék a kerekek szabad-
mozgását. Az elobbi müveletek befejezése után helyezzék függoleges muködési helyzetbe a melegítot.
3. ELEKTROMOS BEKÖTÉS
- Mielott a dugót a konektorba behelyeznék, ellenorizzék figyelmesen azt, hogy az Önök házi árama a
készüléken a V-vel jelzett értéknek feleljen meg és azt, hogy a villanyvezeték a terhelés mértékének feleljen
meg.
- CSAK KIVÁLÓAN MUKÖDO FÖLDELT KONEKTORBA KÖSSÉK BE A MELEGÍTOT
- Ez a készülék az elektromágneses összeférhetoségrol szóló CEE 1989/33 utasításainak felel meg.
H
Page 47
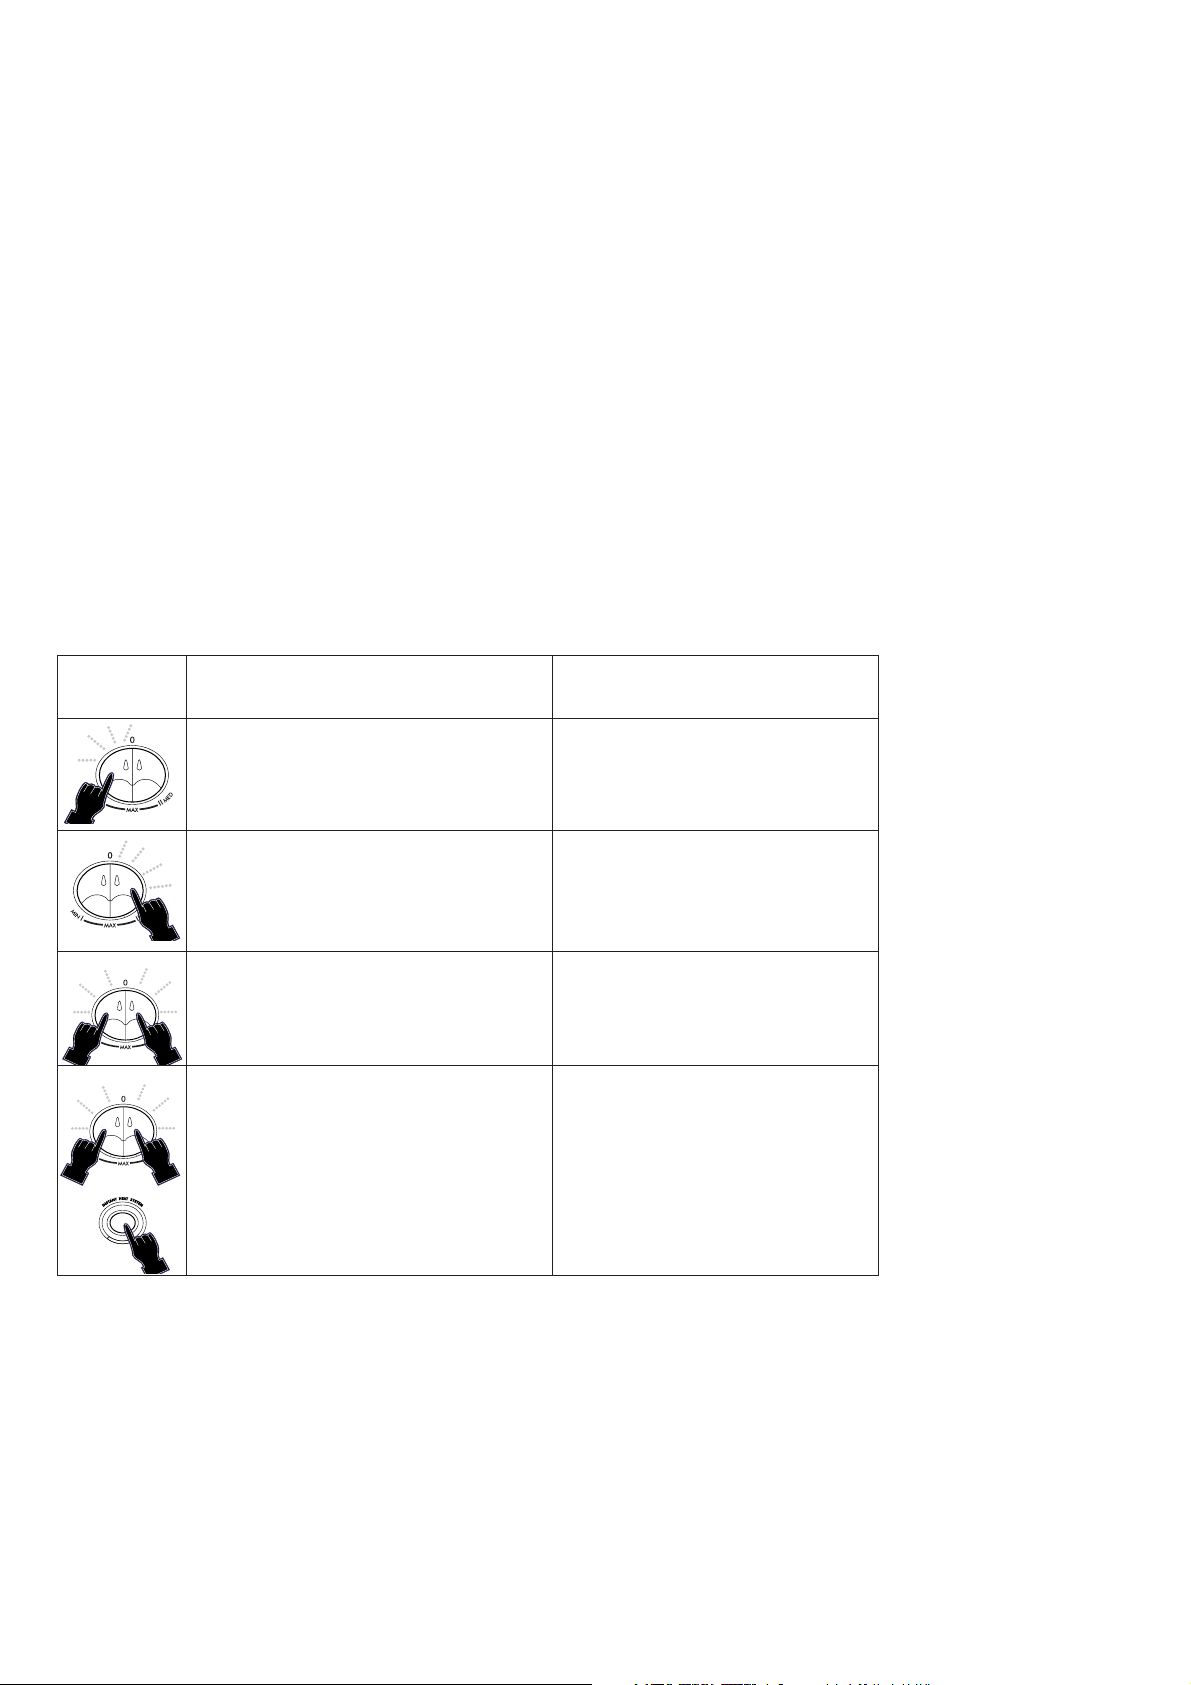
4. MÜKÖDÉSI ÉS HASZNÁLATI UTASÍTÁS
Instant Heating System
A készülék egy különleges gyorsmelegíto funkcióval van ellátva, mely a “Instant Heating System”.
Az “Instant Heating System” müködésbe helyez egy járulékos exkluzív melegítot, mely lehetové teszi az Önök
környezetének gyors és zaj nélküli bemelegítését.
A 3. ábrán jelzett rajz szerint, az IHS gomb benyomásával lehet ezt a funkciót müködésbe helyezni.
Bekapcsolás
Helyezzék a villanydugót a konektorba; maximális helyzetbe csavarják el a hofokszabályzót, azaz addíg amíg meg
nem áll; az ábrán jelzett módon kapcsolják be a kapcsolókkal a melegítot.
A „P” hofokszabályzó beállítása
Amikor a környezetük elérte a kívánt homérsékletet, akkor lassan csavarják el a P hofokszabályzó gombját (3.
ábra) az óramutató járásával ellenes irányban, addíg amíg egy kattanó hangot hallanak (azaz addíg, amíg az égo
jelzo kikapcsolódik), de vigyázzanak ne csavarják tovább a kapcsolót! Az így beállított homérséklet automatikusan rögzítodik és a hofokszabályzó állanandóan megtartja ezt a helyzetet.
Fagyáselleni muködés (anti-frost)
A
*
helyzetu hofokszabályzóval és az I és II kapcsolót benyomva, a készülék körülbelül 5°C-on tartja a
környezet homérsékletét és minimális energiával gátolja a fagyasztást.
Kapcsoló Aktív müködés Muködési módszer
helyzet
A normális bemelegítéshez minimális Ebben a helyzetben lehetoség van az
teljesítménnyel az I gombot kell benyomni Anti-frost muködés bekapcsolására
A normális bemelegítéshez minimális Ebben a helyzetben lehetoség van az
teljesítménnyel a II gombot kell benyomni Anti-frost muködés bekapcsolására
A normális bemelegítéshez maximális Ebben a helyzetben lehetoség van az
teljesítménnyel az I és II gombot kell benyomni Anti-frost muködés bekapcsolására
A Gyors bemelegítéshez maximális Ebben a helyzetben nem ajánlatos
teljesítménnyel az I, II és a Instant Heating az Anti-frost muködést bekapcsolni
System IHS gombjait kell benyomni
Ebben a be·llÌt·sban kigyullad a II
fÈnyjel Ès az Instant Heating System
fÈnyjele (A).
47
Page 48

”T” 24 órára (Timer) programozott tipusok
A bemelegítés programozásának érdekben, a követezoben leírtak szerint kell eljárni:
- Ellenorizzék hány óra van órájukon. Tegyük fel, hogy 10 óra van, a T programozó számozott tárcsáját csavar-
ják el az óramutató járásával megegyezo irányban, addíg amíg a 10-es szám nem esik egybe a programozón
található jelzéssel.
- A fogakat a központ felé nyomva tudják beállítani a készülék különbözo és kívánt muködtetési idejét.
Minden egyes fog 15 perc idonek felel meg. A müvelet elvégzése után szektorok válnak láthatóvá, melyek a
muködési idoknek felelnek meg.
- Az így beállított melegíto minden nap beprogramozott órájában fog muködni (Fontos: a villanydugót állandó
jelleggel kell a konektorban hagyni).
- A program megváltoztatásához elég az, hogy a fogakat az eredeti állásukba viszik és csak ezután állítják be az
új muködési idot.
- Abban az esetben, ha a készüléket programozás nélkül akarják muködtetni, akkor nyomják be a kör közepe
felé az összes fogat. Ebben az esetben a készülék teljes kikapcsolásához nem elegendo a kapcsolókat kikapcsolni, hanem szükséges az is, hogy a konektorból húzzák ki a villanydugót is, már csak azért, hogy a programozó ne muködjön hiába.
Felbillenés elleni berendezés
- Néhány tipus felbillenés elleni kapcsolóval van ellátva, mely felbillenés esetében megszakítja a vil-
lanyáramot. A muködés visszaállításához elegendo az, hogy vertikális állapotba lábra állítsák a készüléket.
(Azért, hogy meg tudják állapítani azt, hogy az Önök készülékének van-e, vagy nincs ilyen berendezése elég
az, hogy ellenorizzék a gép leírásáról szóló kisérocédulát, melyen a a type szó után az „…ex:1” szöveg kell,
hogy legyen).
5. KARBANTARTÁS
Bármilyen jellegu beavatkozás elott húzzák ki a villanydugót a konektorból és várják meg, hogy a melegíto
kihüljön. Az olajjal muködo villanymelegíto nem igényel különös karbantartást. Elegendo az, hogy egy száraz és
puha portörloruhával letöröljék. A tisztításhoz soha ne használjanak karcoló port (Vim), vagy oldószert.
Amennyiben nagyobb mennyiségu szennyezodéstol kellene letisztítani, akkor porszívót használhatnak.
6. HASZNÁLATI UTASÍTÁS
- Soha ne használják fürdokád, zuhanyozó, mosdókagyló, vagy uszoda közelében.
- Ne használják ruhaszárításra, az összeköto villanyvezetéket ne tegyék meleg közelébe.
- A melegítot mindíg és csak vertikális állásban használják.
- Amennyiben a villanyvezeték megsérült, ezt csak a gyártó, vagy a Gyártó Cég hivatalos Szervize, de minden
estre egy hasonló képesítéssel bíró személy cserélheti ki, ezáltal minden fellépheto veszélyt elkerülnek.
- Az elso bekapcsolás alkalmából, legalább 2 óráig és a maximális energiával muködtessék. Ez alatt a muvelet
alatt jól szelloztessék a szobát, mert csak így tudják eltávolítani a készülékbol áradó „új szag”-ot.
- Teljesen normális az, hogy az elso bekapcsolás alkalmából a készülék „recsego-ropogó” hangot ad.
- A készüléket soha nem szabad közvetlenül falikonektor alá állítani.
- A készülék edénye szükséges mennyiségu olajjal van megtöltve és az olyan jellegu karbantarási munkák,
melyek ennek kinyitását igénylik, csak a Gyártó vagy a saját Szervíz szolgálata által végezheto el.
Olajveszteség esetében a Gyártó Céget vagy a saját Szerviz szolgálatát kell kihívniuk.
- A készülék kiselejtezése alkalmából az olaj megsemmisítésére vonatkozó utasításokat kell betartaniuk.
- Ne helyezzék a villanyvezetéket a még meleg készülékre.
- 4 m
2
- es területnél kissebb területu szobában ne használják a készüléket.
- FIGYELMEZTETÉS: Muködés közben soha ne takarják le a készüléket, mivel ez veszélyes begyulladáshoz
vezethetne.
Egy biztonsági berendezés a olajradiátor működését megszakítja véletlen túlhevülés esetén. Ismét
beindíthatja a készüléket, ha pár percre a hálózati dugót kihúzza az aljzatból, megszünteti a leállás
okát, majd a dugót ismét csatlakoztatja.
FIGYELEM: a biztonsági rendszer véletlen bekapcsolásából eredő veszély elhárítása érdekében ezt a
készüléket tilos egy külső programozóval vezérelni.
48
Page 49

49
Radiátor RAPIDO je mnohostrann vytápûcí pfiístroj ur en pro použití v domácnosti, jeho
použití je velice snadné a má tfii stupnû v konu. Sou ástí pfiístroje je dále funkce umožÀující
maximální komfort v jakékoliv situaci.
Abyste mohli maximálnû využít možností, které Vám tento pfiístroj nabízí, doporu ujeme
pfie íst podrobnû zde uveden návod k použití.
1. V·EOBECNÉ ÚDAJE
Vyndat pfiístroj z krabice a otoãit jej vzhÛru nohama tak, aby byl opfien˘ o polystyrénové desky
tvofiící ochrann˘ obal. Zkontrolovat, zdali napájecí kabel a pfiístroj nebyl poru‰en pfii pfievozu. V
pfiípadû po‰kození pfiístroje neuvádût jej do provozu.
2. NAMONTOVÁNæ NOÎIâEK
Vyndat noÏiãky a koleãka z polystyrénového obalu.
Nasadit koleãka na noÏiãky a tlaãit dokud se nezacvaknou (obr. 1). Tahem ovûfiit, zdali koleãko
je dobfie upevnûné v noÏiãce.
NoÏiãku s koleãkem nasadit do spodní ãásti radiátoru, do dráÏky mezi první blok a ovládací
panel; oba zuby nasadit do pfiíslu‰n˘ch otvorÛ a upevnit noÏiãku utaÏením pfiíslu‰ného ‰roubu
(obr. 1).
Zadní koleãka nasadit na ocelov˘ ãep a ãep zasunout do zadní ãásti; zkontrolovat, zdali koleãka
jsou v poloze znázornûné na obr. 2. a ovûfiit, zdali se koleãka volnû otáãí. Uvést radiátor zpût do
pÛvodní polohy, ve které bude uveden do provozu.
3. NAPOJENæ NA ELEKTRICKOU SæË
- Pfied zapojením zástrãky do zásuvky elektrického proudu ovûfiit, zdali napûtí v síti odpovídá hodnotû V
uvedené na pfiístroji a zdali napájecí síÈ a zásuvka jsou vhodné pro napojení.
- RADIÁTOR NAPOJIT POUZE DO ZÁSUVKY VYBAVENÉ UZEMNùNæM.
- Tento pfiístroj odpovídá nafiízení CEE 89/336 o elektromagnetické kompatibilitû.
CZ
Page 50
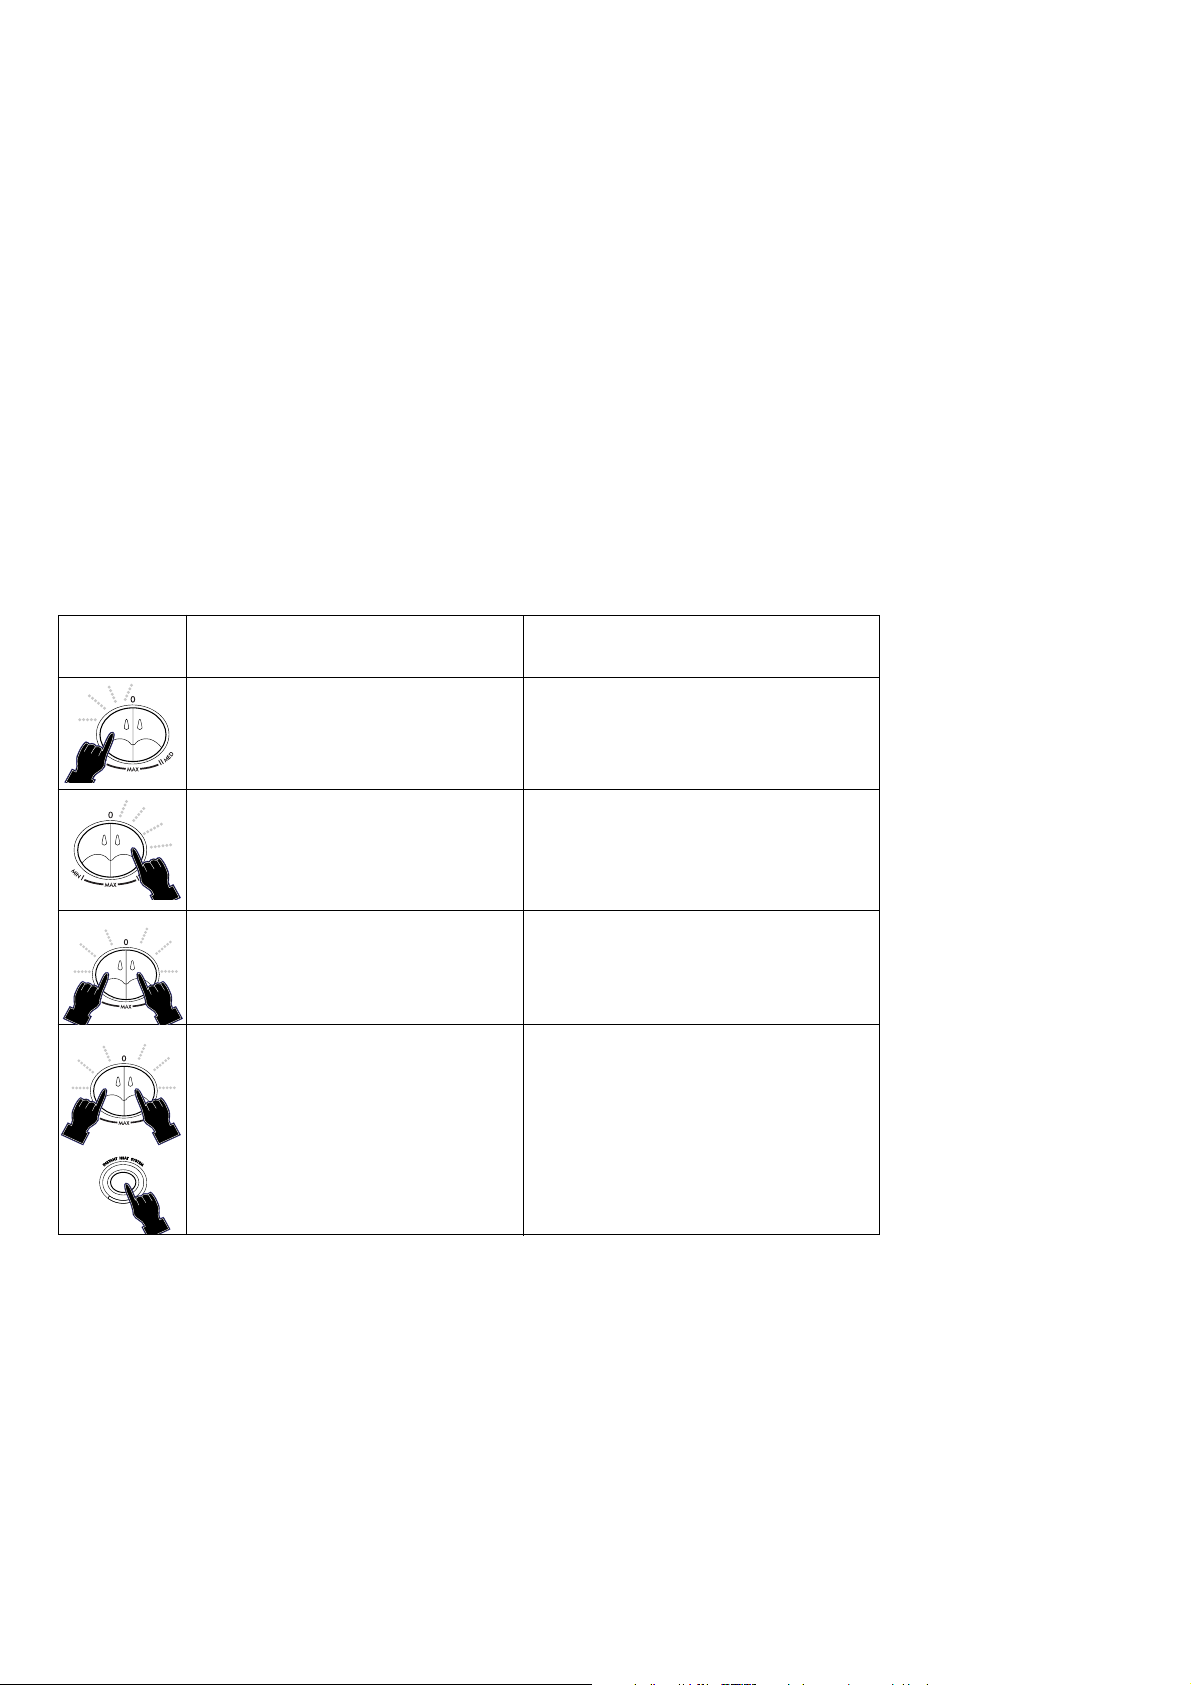
4. PROVOZ A POUÎITæ
Instant Heating System
Tento pfiístroj je vybaven funkcí rychlého vytápûní „Instant Heating System".
Tato funkce uvede do chodu pfiídavn˘ radiátor, pomocí kterého jsou prostory vytopeny rychle a potichu.
Funkce je uvedena do chodu pomocí pfiíslu‰ného tlaãítka IHS, viz obr. 3.
Zapnutí
Zapojit zástrãku do zásuvky elektrického proudu; otoãit termostatem aÏ do levé krajní polohy (max.); zapnout radiátor pomocí pfiíslu‰n˘ch vypínaãÛ podle návodu uvedeného v tabulce.
Nastavení termostatu „P"
KdyÏ jsou prostory vytopeny na poÏadovanou teplotu, otáãet pomalu koleãkem termostatu „P" (obr. 3) proti
smûru hodinov˘ch ruãiãek aÏ do okamÏiku, kdy je sly‰et cvaknutí (vypne se signalizaãní svûtlo). Takto nastavená teplota bude pak termostatem udrÏována po celou dobu chodu.
Funkce anti-frost
Pfii termostatu nastaveném do polohy
*
a stisknut˘ch tlaãítkách I a II, pfiístroj udrÏuje teplotu 5°C tak, aby
bylo zamezeno pfiípadnému zamrznutí pfii minimální spotfiebû energie.
Stisknutá Uvedení do provozu Funkce
tlaãítka
Stisknout tlaãítko I - normální Pfii této funkci je moÏné nastavit
vytápûní, minimální v˘kon funkci Anti-frost
Stisknout tlaãítko II - normální vytápûní, Pfii této funkci je moÏné nastavit
stfiední v˘kon funkci Anti-frost
Stisknout tlaãítka I a II - normální vytápûní, Pfii této funkci je moÏné nastavit
maximální v˘kon funkci Anti-frost
Stisknout tlaãítka I,II a IHS-rychlé Pfii této funkci se nedoporuãuje
vytápûní, maximální v˘kon nastavit funkci Anti-frost
Pfii tomto reÏimu se rozsvítí kontrolka II a
kontrolka Instant Heating System (A).
50
Page 51

Modely vybavené ãasov˘m spínaãem „T" (Timer) - 24 hodin
Naprogramovat vytápûní následujícím zpÛsobem:
- Podívejte se na va‰e hodinky. Pfiedpokládejme, Ïe je 10 hodin, otáãejte ãíselníkem ãasového spínaãe T
ve smûru hodinov˘ch ruãiãek tak, aby poloha ãísla 10 odpovídala poloze pfiíslusné znaãky na spínaãi.
- Nastavte ãasové intervaly, ve kter˘ch chcete aby pfiístroj byl v provozu, posunováním zoubkÛ smûrem do
stfiedu. KaÏd˘ zoubek odpovídá intervalu 15 minut. Intervaly, ve kter˘ch bude pfiístroj fungovat, jsou
jasnû viditelné.
- Takto nastaven˘ radiátor bude fungovat automaticky kaÏd˘ den v naprogramovan˘ch intervalech.
(Pozor: pfiístroj musí b˘t nepfietrÏitû zapojen do elektrické sítû.)
- Chcete-li zmûnit naprogramování, staãí uvést zoubky do pÛvodní polohy a znovu nastavit poÏadované
intervaly provozu.
- Chcete-li aby pfiístroj pracoval bez naprogramování, nastavte do stfiedu v‰echny zoubky. V tomto
pfiípadû je pfii vypnutí radiátoru tfieba vypnout v‰echny vypínaãe a vytáhnout ze sítû napájecí kabel. Tímto
zpÛsobem se zamezí zbyteãnému chodu ãasového spínaãe.
Modely vybavené ochrann˘m dispozitivem proti spadnutí
- Nûkteré modely jsou vybaveny jistiãem, kter˘ pfieru‰í napájení v pfiípadû spadnutí. Pfiístroj je uveden
automaticky znovu do chodu po postavení do vertikální polohy. (Zda je vበpfiístroj vybaven tímto jistiãem
zjistíte zkontrolováním destiãky s indikacemi parametrÛ pfiístroje, kde musí b˘t indikace: „…ex:1")
5. ÚDRÎBA
Pfied jakoukoliv manipulací odpojit pfiístroj z elektrické sítû a poãkat aÏ vychladne. Elektrick˘ olejov˘ radiátor nevyÏaduje zvlá‰tní údrÏbu. Prach utírat suchou prachovkou. NepouÏívat abrasivní prá‰ky a
rozpou‰tûdla. V pfiípadû potfieby odstranit ‰pínu za pomoci vysavaãe.
6. UPOZORNùNæ
- NepouÏívat radiátor v bezprostfiední blízkosti koupelnov˘ch van, sprch, umyvadel a bazénÛ.
- NepouÏívat radiátor k su‰ení prádla, nepokládat napájecí kabel na teplá místa.
- PouÏívat radiátor vÏdy ve vertikální poloze.
- V pfiípadû poru‰ení napájecího kabelu jej nechat vymûnit u v˘robce nebo v jeho servisu, v kaÏdém
pfiípadû musí b˘t v˘mûna provedena kvalifikovanou osobou tak, aby se zamezilo jakémukoliv riziku.
- Pfii prvním uvedení do provozu nechat radiátor v chodu na maximální v˘kon alespoÀ dvû hodiny. Bûhem
této doby dobfie vûtrat vytápûné prostory za úãelem odstranûní „nového" zápachu pfiístroje.
- Radiátor mÛÏe pfii prvním uvedení do provozu „skfiípat", tento zvuk je normální.
- Pfiístroj nesmí b˘t umístûn v bezprostfiední blízkosti elektrické zásuvky.
- NádrÏka radiátoru je naplnûna urãen˘m mnoÏstvím oleje a jakékoliv opravy, pfii kter˘ch je tfieba nádrÏku
otevfiít, musí b˘t provedeny v˘robcem nebo jeho servisem. V pfiípadû úniku oleje kontaktovat v˘robce
nebo jeho servis.
- V pfiípadû vyhození radiátoru do ‰rotu je tfieba dodrÏet pfiedpisy o zpÛsobu vyhození oleje.
- Nepokládat kabel na rozehfiát˘ radiátor.
- NepouÏívat radiátor v místnostech o plo‰e men‰í neÏ 4m
2
.
- UPOZORNùNæ: V Ïádném pfiípadû nezakr˘vat radiátor v provozu, pfiípadné zahfiátí by mohlo b˘t
nebezpeãné.
Bezpeãnostní zafiízení vypne provoz tepelného radiátor, v pfiípadû náhodného pfiehfiátí. K obnovení provozu spotfiebiãe je nutné vytáhnout na nûkolik 30 minut zástrãku ze zásuvky el. sítû, odstranit závadu která
zpÛsobila pfiehfiátí a znovu zapojit zástrãku do zásuvky.
POZOR: tento spotfiebiã nesmí b˘t napájen vnûj‰ím ãasov˘m spínaãem. Neúmysln˘m obnovením bezpeãnostního systému by mohlo dojít k nebezpeãn˘m situacím.
51
Page 52

5786001500/11.02
 Loading...