

Page 1
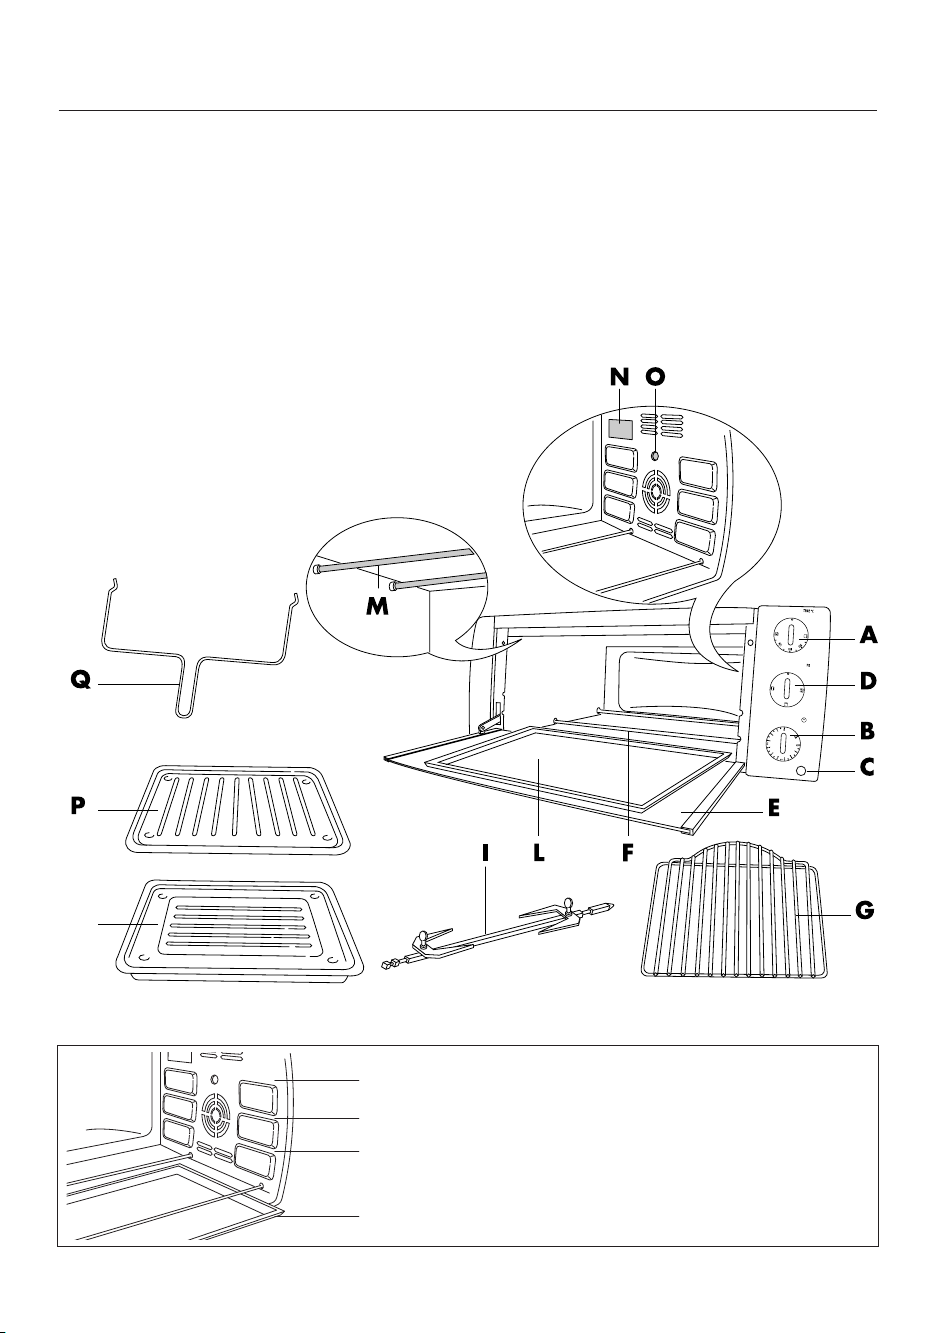
L Crumb tray
M Top heating element
N Interior light (if supplied)
O Turnspit mount (if supplied)
P Broil rack (if supplied)
Q Handgrip for spit (if supplied)
2
guide 1
guide 2
guide 3
crumb tray
The crumb tray (L) should always
be inserted as shown for perfect
results.
DESCRIPTION OF THE APPLIANCE
A Thermostat knob
B Timer knob
C Indicator light
D Function selector knob
E Glass door
F Bottom heating element
G Wire rack
H Bake pan
I Spit (if supplied)
H
Page 2

3
SPECIFICATIONS
Operating voltage . . . . . . . . . . . . . . . . . . . . . . . . . . . . . . . . . . . . . . . . . . .see rating label
Maximum power absorbed . . . . . . . . . . . . . . . . . . . . . . . . . . . . . . . . . . . .see rating label
POWER CONSUMPTION (CENELEC STANDARD HD 376)
To reach 200°C . . . . . . . . . . . . . . . . . . . . . . . . . . . . . . . . . . . . . . . . . . . . .0,09 KWh
To maintain 200°C for one hour . . . . . . . . . . . . . . . . . . . . . . . . . . . . . . . . .0,58 KWh
Total . . . . . . . . . . . . . . . . . . . . . . . . . . . . . . . . . . . . . . . . . . . . . . . . . . . . .0,67 KWh
WARNINGS
• Read all the instructions carefully before using the appliance.
• This oven has been designed to cook food. It must never be used for other purposes, modified or tampered with in any way.
• Place the appliance on a horizontal surface at a height of at least 85 cm and out of reach of children.
• Before using the appliance, move it 5/10 cm (2”) away from the wall and any other object that is on the
same surface. Remove any objects located above the appliance. Do not use on surfaces that may be
damaged by the heat.
• Wash all accessories thoroughly before use.
• Before plugging into the mains, make sure that:
- the mains voltage corresponds to the voltage indicated on the rating plate;
- the mains socket has a minimum rating of 16A and an earth wire.
The manufacturer declines all liability in the event that this important accident-prevention rule is not
respected.
• Before using the oven for the first time, remove any paper and other material inside the oven such as protective cardboard, booklets, plastic bags, etc.
• Before using for the first time, operate the oven empty with the thermostat at maximum for at least 15
minutes to eliminate the "new" smell and any smoke caused by the presence of protective substances
applied to the elements before transport.
During this operation, ventilate the room.
• IMPORTANT: when you have unpacked the appliance, make sure the door is undamaged and working
correctly. The door is made from glass and is therefore fragile. If it is visibly chipped, scored or scratched,
it should be replaced. While using, cleaning or moving the appliance, avoid slamming or knocking the
door violently. Do not pour cold liquid onto the glass while the appliance is hot.
• When in operation, the door and accessible external surfaces could become very hot. Always use the
knobs, handles and buttons. Never touch metal parts or the glass. Use oven gloves if necessary.
• This electrical appliance operates at high temperatures which could cause burns.
• Accessible parts may become hot during use. Young children should be kept away.
• The appliance is not intended for use by persons (including children) with reduced physical,
sensory or mental capabilities, or lack of experience and knowledge, unless they have been
given supervision or instruction concerning use of the appliance by a person responsible for
their safety. Children should be supervised to ensure that they do not play with the appliance.
• Do not move the appliance while in use.
• Do not use the appliance if…
- the power cable is faulty,
- the appliance has been dropped, is visibly damaged or malfunctions.
Should this occur, to avoid all risk take the appliance to your nearest authorised service centre.
• Do not let the power cable dangle and avoid touching hot parts of the oven. Never unplug the appliance
by pulling on the power cable.
Page 3

4
• If you intend to use an extension, make sure it is in good condition, that the plug is earthed and that the
cross section of the wires is at least equal to that of the power cable provided with the appliance.
• To avoid all risk of electric shock, never immerse the power cable, plug or appliance itself in water or
other liquid.
• Never position the appliance near heat sources.
• Do not leave inflammable products near the oven or under the work surface where it is located.
• Bread may burn. Never leave the oven unattended during toasting or grilling. Never operate the appliance under a wall cupboard or shelf or near inflammable materials such as curtains, blinds, etc.
• Do not use the appliance as a heat source.
• Never place paper, cardboard or plastic inside the oven and never rest anything on top of the appliance
(utensils, wire racks, other objects).
• Never insert anything into the ventilation openings. Make sure they are unobstructed.
• If food or other parts of the oven catch fire, never try and put out the flames with water. Close the
door, unplug from the mains and smother the flames with a damp cloth.
• This oven is not designed for built-in installation.
• When the door is open, remember:
- never exert excessive pressure with overly heavy objects or pull the handle downwards;
- never rest heavy containers or boiling saucepans just out of the oven on the open door.
• Given the differences in legislation in force, if the appliance is used in a country other than that where it
was bought, have it checked by an authorised service centre.
• For your personal safety, never take the appliance to pieces on your own. Always contact an authorised
service centre.
• This appliance is designed for domestic, indoor use only. Professional or inappropriate use, or failure to
observe the instructions absolves the manufacturer from all responsibility and invalidates the guarantee.
• To switch the appliance off turn the timer to position“0”.
• When not in use and before cleaning, always unplug the appliance.
• If the supply cord is damaged, it must be replaced by the manufacturer, its service agent or similarly qualified persons in order to avoid a hazard.
• Do not use harsh abrasive cleaners or sharp metal scrapers to clean the oven door glass since they can
scratch the surface, which may result in shattering of the glass.
• Appliance is not intended to be operated by means of an external timer or separate remote-control system.
• The appliance must be placed to work with the rear side approached to the wall.
Keep these instructions
Page 4
5
100°C-220°C
100°C-220°C
100°C-220°C
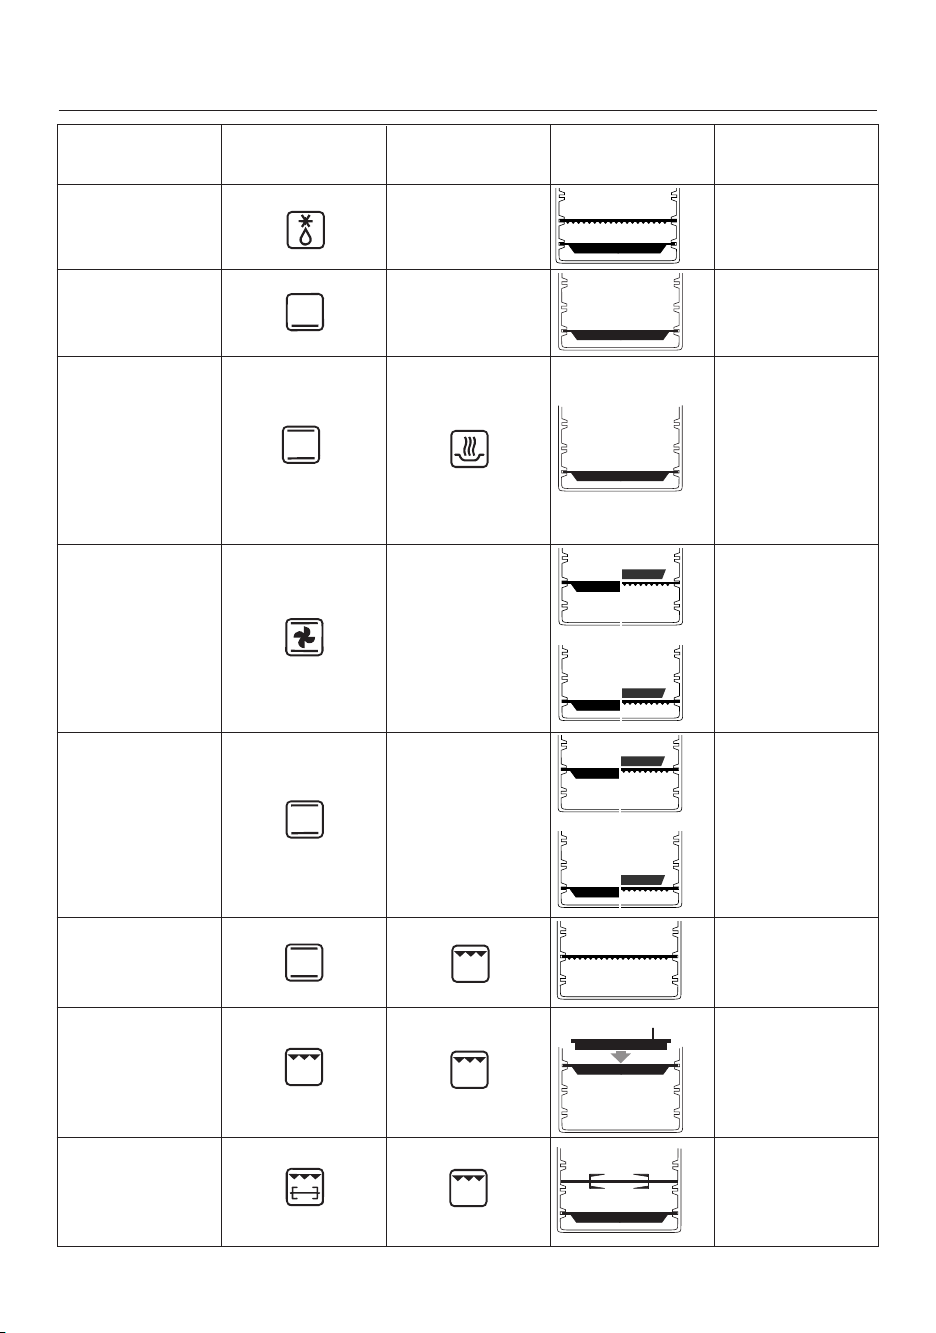
SUMMARY TABLE
Program
Function selector
knob position
Thermostat knob
position
Wire rack and
accessory position
Notes/Tips
Defrost (
only on
some models
)
•
Place the food directly on the wire rack
inserted in the guide
2.
Keeping warm
Convection oven
cooking
(
only on some
models
)
Ideal for lasagna, meat,
pizza, cakes in general,
foods that should be
crunchy on the surface
(“au gratin”) and bread.
For details on how to use
the accessories, refer to
the tips in the table on
pages 18.
Traditional oven
cooking
Ideal for cooking stuffed vegetables, fish,
plum cakes and small
poultry. For details on
how to use the accessories, refer to the
table on page 18.
Grilling
Put the broil rack (P) (if
supplied) on the bake
pan (H); place the food on
the pan and insert into
guide 1. Ideal for broiling
meat, fish and vegetables.
Delicate cooking
Use the bake pan
inserted directly in
the guide 3.
Toas t
Ideal for toasting slices of bread.
or
Select this function to
keep hot food warm.
Do not hold food for
longer than one hour
or rewarm cold food
at this setting. If food
is not hot enough for
serving turn temperature dial up.
P
or
Grilling with the
turnspit (
only on
some models
)
Insert the spit in the
turn-
spit mount
(O) as
described on page 20.
Insert the bake pan in
guide 3. Ideal for
poultry, beef, etc.
1
2
3
1
2
3
1
2
3
1
2
3
1
2
3
1
2
3
1
2
3
1
2
3
1
2
3
1
2
3
Page 5
6
USING THE CONTROLS
Thermostat knob (A)
Select the desired temperature, as follows:
• To defrost (
only on some models
) (see page 17): . . .Thermostat knob in the “•” position.
• To keep food warm (see page 17): . . . . . . . . . . . . .Thermostat knob in the position.
• For convection oven cooking (
only on some models
)
or traditional oven cooking (see page 17-18): . . . . .Thermostat knob from 100°C - 220°C..
• To toast (see page 19): . . . . . . . . . . . . . . . . . . . . . . .Thermostat knob in the position.
• For all types of grilling (see page 20): . . . . . . . . . . . .Thermostat knob in the position.
Timer knob (B)
• To switch the oven on: . . . . . . . . . . . . . . . . . . . . . .Rotate the knob to the "ON" position.
• To set the toasting function: . . . . . . . . . . . . . . . . . . .Select from 1 to 10.
• To switch the oven off: . . . . . . . . . . . . . . . . . . . . . .Turn the knob back to the "0" position.
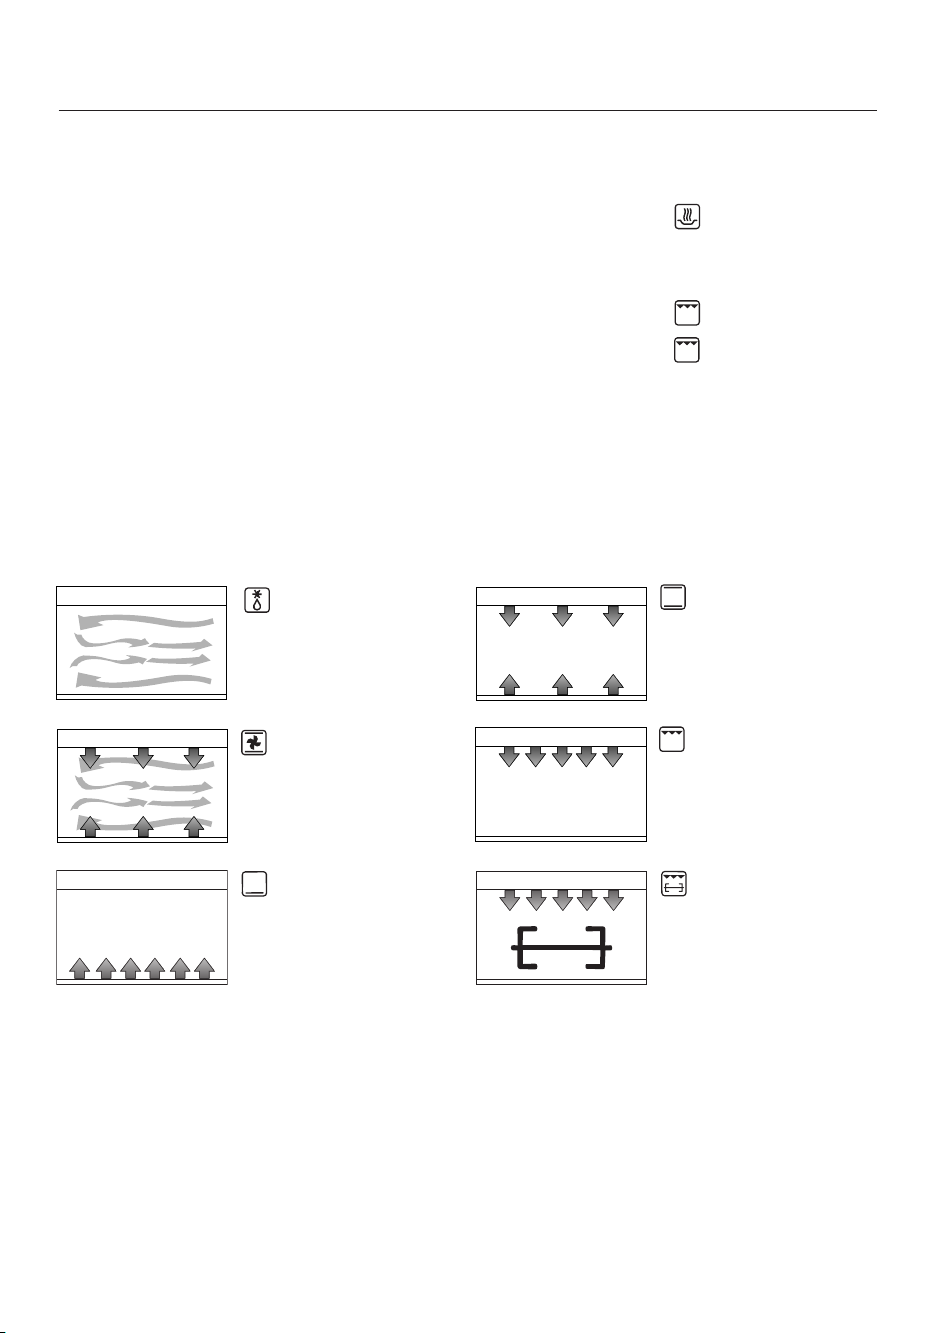
Function selector knob (D)
This knob is used to select the cooking functions available, which are:
(
only on some models
)
(ventilation only)
(only top heating element
and bottom heating element
on)
(
only on some models
)
(top heating element, bottom heating element and ventilation on)
(only top heating element on
at maximum power)
(only bottom heating element
on)
Interior light (N) (
only on some models
) and Indicator light (C)
When the oven is in function, the indicator light (C) and the interior light (N) (only on some models) stay on.
(
only on some models
)
(only top heating element on
at maximum power + turnspit)
Page 6

7
USING THE OVEN
General tips
• When cooking with the convection oven, traditional oven and grilling, always preheat the oven for 5
minutes to the set temperature.
• The cooking times depend on the quality of the products, on the temperature of the food and on personal tastes. The times indicated in the table are subject to variation, and do not include the time required
to preheat the oven.
• To cook frozen foods refer to the recommended times on the product packaging.
Defrost (
only on some models
)
For proper defrosting in a short time, proceed as follows:
• Turn the function selector knob (D) to the position.
• Turn the thermostat knob (A) to the “•” position.
• Rotate the timer knob (B) to the "ON" position.
• Place the bake pan (H) in guide 3, the wire rack (G) in the guide 2 and rest the food to be defrosted, then
close the door.
• After defrosting, turn the Timer knob (B) back to “0” position.
Example of defrosting: 1 kg of meat, 80-90 minutes without turning it over.
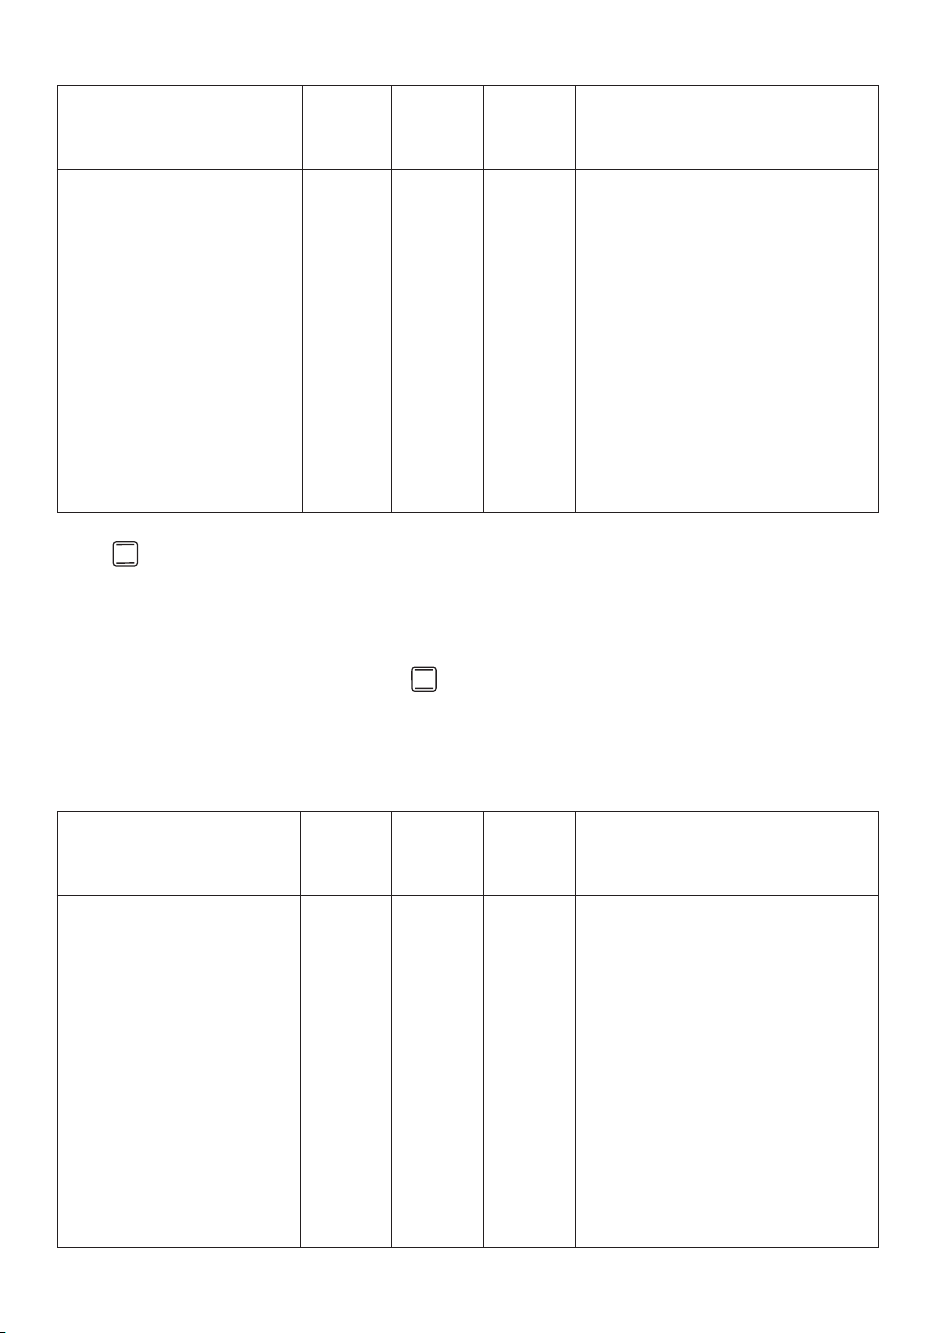
Slow bake
Ideal for pastry and cakes. Good results are also achieved when completing the cooking of the bottom of the
foods or for cooking that requires heat above all at the bottom.
• Place the bake pan (H) in guide 3, as shown in the table on page 15.
• Turn the function selector knob (D) to the position.
• Select the required temperature using the thermostat knob (A).
• Turn the Timer knob (B) to the "ON" position; after cooking, manually turn the Timer knob (B) back to “0"
position.
Keep warm
• Turn the thermostat knob (A) to the position.
• Turn the function selector knob (D) to the position.
• Rotate the timer knob (B) to the "ON" position.
• Place the bake pan (H) in guide 3 and rest the food on the bake pan.
• To end the operation, manually turn the Timer knob (B) back to “0" position.
It is recommended not to leave the foods in the oven for too long, as these may dry out.
Convection oven cooking (
only on some models
)
This function is ideal for baking excellent pizzas, lasagna, “au gratin” dishes, all types of meat dishes (apart
from small poultry), roast potatoes, cakes in general and bread.
Proceed as follows:
• Place the wire rack (G) or the bake pan (H) in the position shown in the table on page 15.
• Turn the function selector knob (D) to the position.
• Select the required temperature by turning the thermostat knob (A).
• Rotate the timer knob (B) to the "ON" position.
• After having pre-heated the oven for 5 minutes, place the food to be cooked inside.
• After cooking, manually turn the Timer knob (B) back to “0" position.
Page 7
8
Quiche 700 g
Chicken 1 kg
Roast pork 900 g
Meatballs 650 g
Roast potatoes 500 g
Jam tarts 700 g
Strudel 1 kg
Margherita cakes 800 g
Biscuits (shortbread) 100 g
Bread 500 g
Use the bake pan.
Use the bake pan, turn after around
38 min.
Use the bake pan, turn after around
30 min.
Use the bake pan, turn after around
20 min.
Use the bake pan, mix twice.
Use a cake dish.
Use the bake pan.
Use a cake dish.
Use the bake pan.
Use the bake pan greased with oil.
200°C
200°C
200°C
200°C
200°C
180°C
200°C
180°C
180°C
200°C
30-35 min.
60-70 min.
50-60 min.
35-40 min.
40-50 min.
35-40 min.
35-40 min.
25-30 min.
15-20 min.
20-25 min.
3
3
3
3
2
3
2
3
2
3
Thermostat
knob
Times
wire rack/
bake pan
position
Comments and tips
Program
Bake
This function is ideal for all types of fish, stuffed vegetables, cakes with whipped egg-whites and cakes that
require long cooking times (over 60 min.).
Proceed as follows:
• Place the wire rack (G) or the bake pan in the position shown in the table.
• Turn the function selector knob (D) to the position.
• Select the required temperature by turning the thermostat knob (A).
• Rotate the timer knob (B) to the "ON" position.
• After having pre-heated the oven for 5 minutes, place the food inside.
• After cooking, manually turn the Timer knob (B) back to “0" position.
Macaroni “au gratin” 1 kg
Lasagna 1 kg
Pizza 500 g
Trout 500 g
Stuffed calamari 450 g
Tomatoes “au gratin” 550 g
Zucchini with tuna 750 g
Plum cakes 1 kg
Use an ovenproof dish.
Use an ovenproof dish.
Use the bake pan.
Use the bake pan, turn after 16 minutes.
Use an ovenproof dish, turn halfway
through cooking.
Use the bake pan greased with oil and
turn after 20 min.
Use the bake pan; add oil, the tomatoes and water; turn the bake pan
after 20 min.
Use a mold and turn halfway through
cooking.
200°C
200°C
200°C
180°C
180°C
180°C
180°C
180°C
25-30 min.
25-30 min.
30-35 min.
30-35 min.
35-30 min.
35-40 min.
35-40 min.
65-75 min.
2
2
3
3
3
2
2
3
Program
Thermostat
knob
Times
wire rack/
bake pan
position
Comments and tips
Page 8
9
Toast
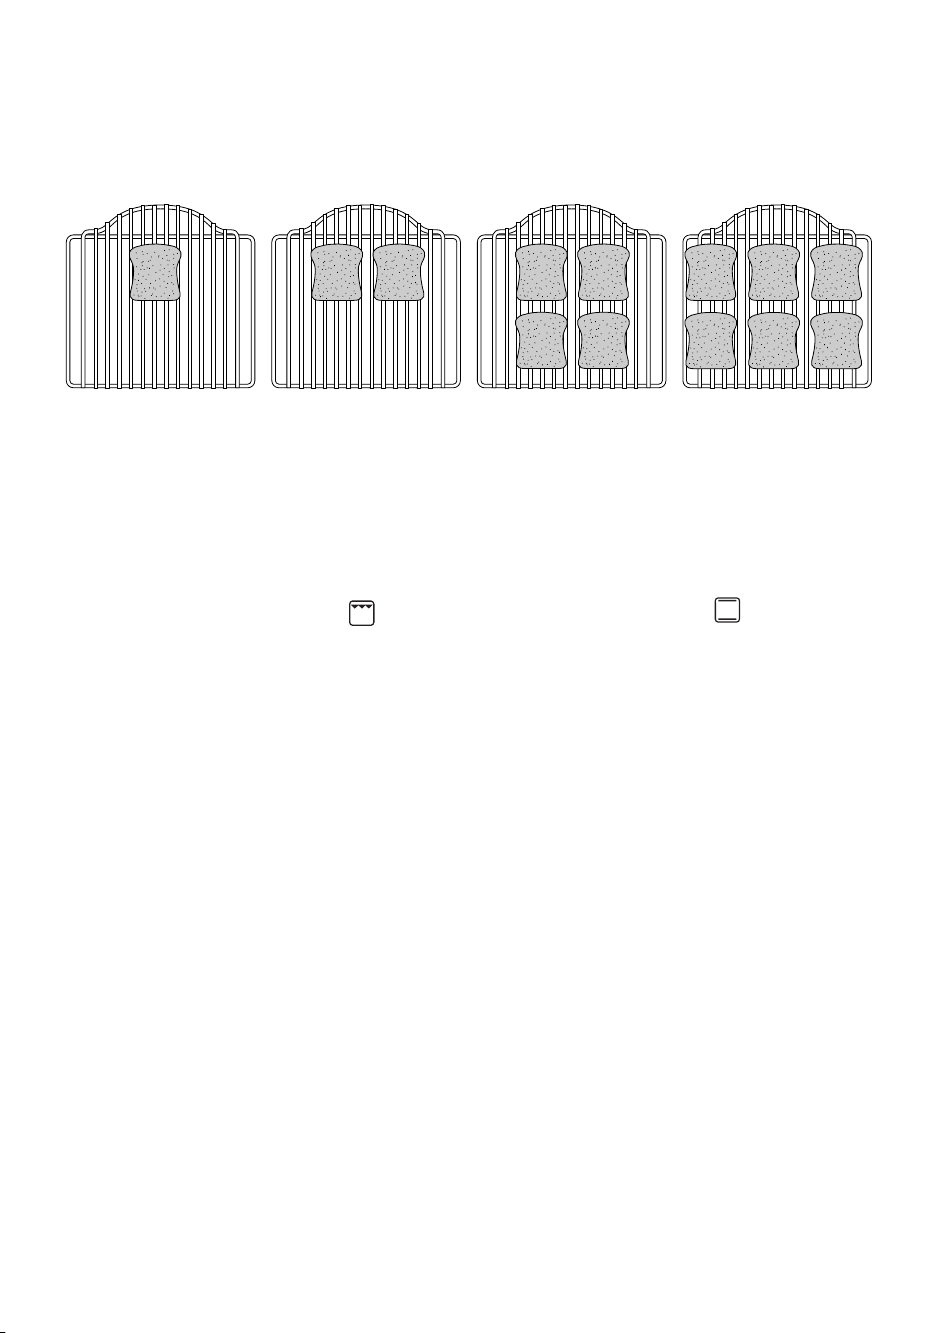
• The dimensions of the wire rack (G) allow six slices of bread to be toasted at the same time. Best results
are achieved, however, with four slices at a time.
• To toast the bread, place the slices as shown below:
Toasting one slice Toasting two slices Toasting four slices Toasting six slices
For consecutive uses, reduce the set toasting time.
Instructions for toasting bread
To automatically toast frozen bread, sandwiches, muffins and waffles, always use the wire rack.
1. Place the wire rack in the guide 2.
2. Place the food to be toasted in the center of the wire rack. Close the door.
3. Turn the thermostat knob (A) to the position and the function selector (D) to the position.
4. The Timer knob (B) should be turned clockwise. In general, to obtain medium toasting, set the Timber
knob (B) on 4-5 minutes. Toast a few pieces of bread to verify the time.
5. When toasting bread, both the top and bottom heating elements are on to toast both sides at the same
time. A little condensation may form on the inside of the glass door. This is normal. It will disappear
during toasting.
6. An audible signal indicates the end of the set time. The toasting is complete and the heating elements
automatically switch off. Turn the thermostat knob (A) to the “•” position.
Note:
If you prefer lighter toasting, it is sufficient to interrupt the automatic cycle by turning the Timer knob (B) to
“0” to switch off the oven , causing no damage.
For darker toasting re-start the cycle by turning the Timer (B) clockwise until reaching the desired level.
Then manually turn the thermostat knob and the toast timer knob off, as described previously.
The best positions for each type of bread can be identified when using the oven regularly.
Tips for good toasting:
Larger pieces of bread and frozen bread take longer to toast. Just one slice of bread requires a lower setting
than for multiple slices.
Page 9
Grilling with the turnspit (
only on some models
)
This function is ideal for cooking chickens on the spit, fowl in general, roast pork and veal.
The rotisserie function can be used for a load up to 2 kg.
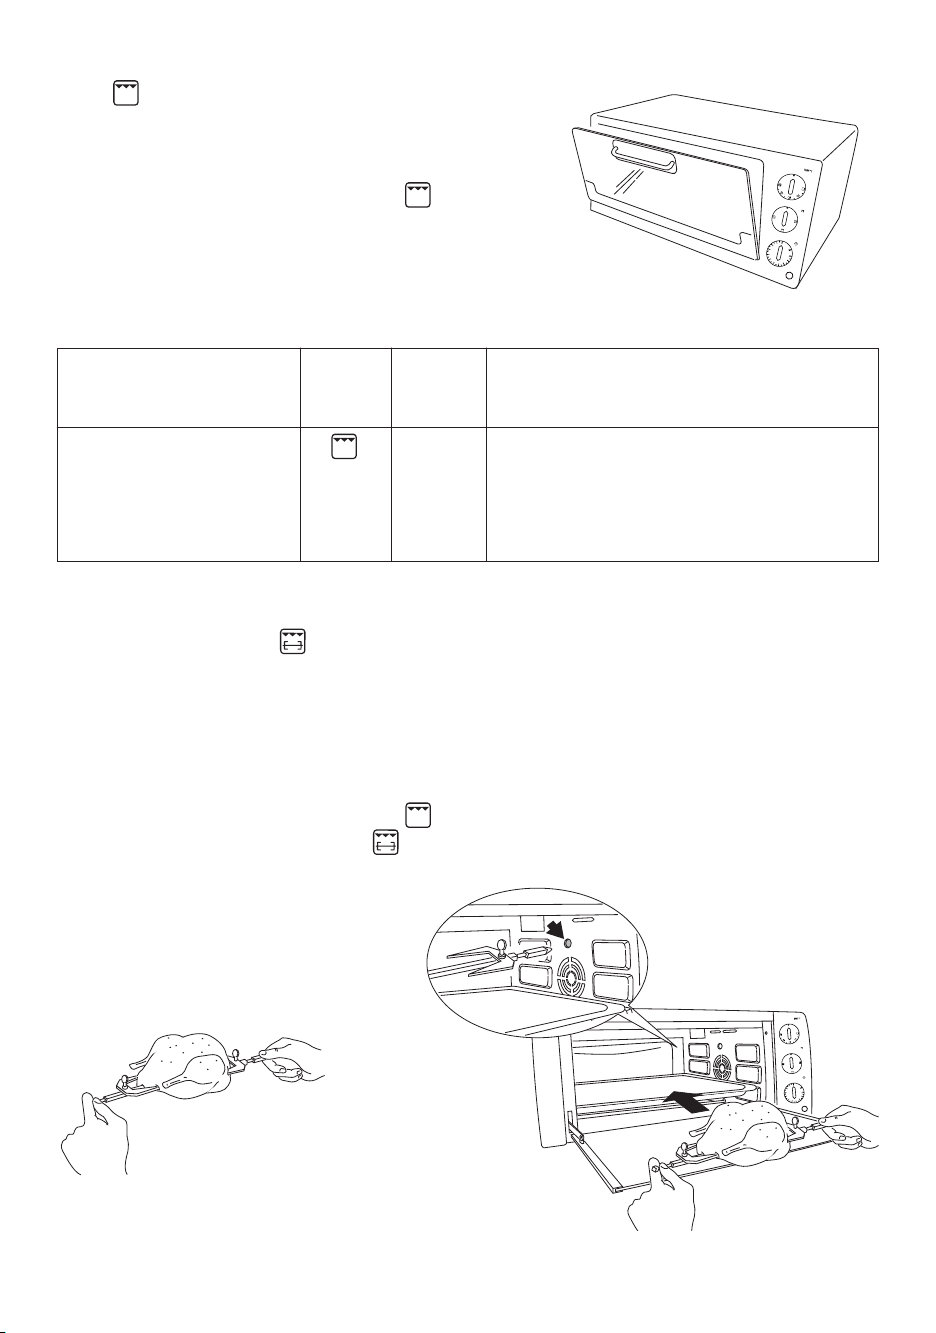
• Place the food on the spit (I) and hold it firm using forks (fig. 2) (for best results, tie the meat using kitchen
string).
• Insert the bake pan (H) in the guide 3 and the spit (I) in the turnspit mount (fig. 3).
• Close the door until you hear a “click” (see figure 1).
• Turn the thermostat knob (A) to position .
• Turn the function knob (D) to position .
• Rotate the timer knob (B) to the "ON" position.
Broil (
only on some models
)
• Place the food to be grilled on the broil rack (P) inserted on
the bake pan (H), and place them together in the guide 1.
• Close the door until you hear a “click” (see figure 1).
• Turn the function selector knob (D) to the position.
• Rotate the timer knob (B) to the "ON" position.
• After cooking, manually turn the Timer knob (B) back to “0"
position.
• Turn halfway through cooking.
10
fig. 2
fig. 3
fig. 1
Pork chops (2)
Hot dogs (3)
Hamburgers (2)
Sausages (4)
Kebabs 500 g
Turn after 16 minutes.
Turn after 11 minutes.
Turn after 13 minutes.
Turn after 14 minutes.
Turn after 8, 15 and 21 minutes.
“
“
“
“
30 min.
20 min.
25 min.
26 min.
26 min.
Program
Thermostat
knob
Times Comments and tips
Page 10
11
CLEANING AND MAINTENANCE
Frequent cleaning prevents the formation of smoke and bad odors
during cooking. Do not let fat accumulate inside the appliance.
Before any maintenance or cleaning operation, unplug the oven and
wait for it to cool down.
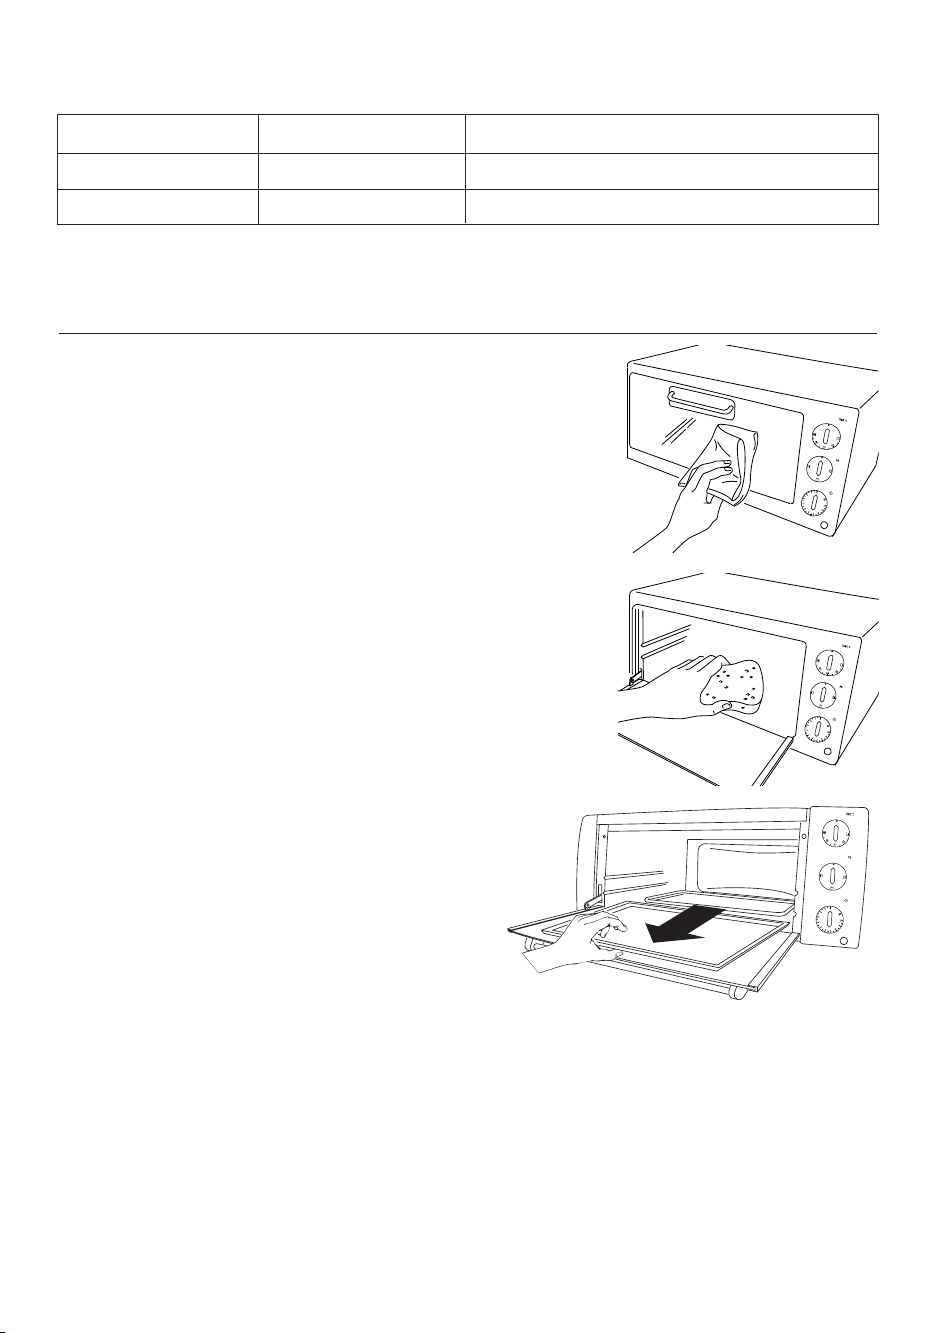
Clean the door, the inside walls and the enamel or painted surfaces of
the oven with a soap and water solution; dry thoroughly.
To clean the surfaces on the inside of the oven, never use products that
corrode aluminum (detergents in spray cans) and never scrape the
walls with sharp objects to avoid damage to the non-stick coat.
To clean the outside surface always use a damp sponge.
Avoid using abrasive products that may damage the exterior.
Make sure water or liquid soap does not seep into the vents on the top
of the oven.
Do not attempt to push forks, knives or sharp objects into the openings on
the right-hand side and the rear of the oven.
Never immerse the appliance in water; never wash it under a jet of
water.
All the accessories are washed like normal dishes, either by hand or in
the dishwasher.
Slide the crumb tray out from under the bottom of your
oven. Wash by hand. Should the soilage be difficult to
remove, rinse the crumb tray with hot soapy water and if
necessary, scour it delicately, without scratching it.
FOOD
WEIGHT
APPROX. TIME
Chicken
1-2 Kg
120 min.
Rost pork
0,8-1,7 Kg
90 min.
For larger foods, we recommend the convection oven cooking mode.
For information on the cooking times, refer to the instructions in the table below.
Page 11

12
WARRANTY
Everyone opening the box containing the De'Longhi product should read the entire instruction manual carefully before performing any operation involving the product. Most importantly, you should make sure the voltage of the appliance is compatible with the voltage of the mains socket.All De'Longhi electrical appliances
are guaranteed free of all material and manufacturing defects.
According to the terms of this Guarantee, our obligations are limited to replacement or repair free of charge at one of our authorised service centres of parts or assemblies with fabrication defects or damaged during
transport to the shop of your choice. The date considered will always be the date of sale to the consumer.
Improper use of the product invalidates the guarantee. This De'Longhi product is designed and produced for
domestic use only. Its use on commercial premises is not recommended and will invalidate the Guarantee.
With the exception of authorised De'Longhi centres, no person or company is authorised to repair our products. No third party is authorised to assume responsibility for our products on our behalf.
This guarantee is valid for a twelve month (one year) period from the date of sale to the first consumer. The
tax code or number of an alternative identity document of the purchaser must be given on the official receipt.
IMPORTANT: the OFFICIAL RECEIPT must be attached to the guarantee in order to take advantage of your
rights.
DE'LONGHI BRASIL
Rua Alexandre Dumas Nº 1658
Cep 04717-004
São Paulo -S.P.
Brasil
Sac 51886650 - Fax 51886651
SAC 11.51886650
 Loading...