

CAFFETTIERA ELETTRICA
ELECTRIC MOKA COFFEE MAKER
MOKA ÉLECTRIQUE
ELEKTRISCHER ESPRESSOKOCHER
KOFFIE-APPARAAT
CAFETERA
CAFETEIRA
∏ПВОЩЪИО‹ О·КВЩИ¤Ъ·
ELEKTRISK KAFFEMASKINE
ELEKTRISK ESPRESSOBRYGGARE
ELEKTRISK KAFFEMASKIN
SÄHKÖKAHVINKEITIN
ùùããÖÖääííêêààóóÖÖëëääÄÄüü ääééîîÖÖÇÇÄÄêêääÄÄ
ELEKTRICK¯ MOKA KÁVOVAR
ELEKTRYCZNY EKSPRES DO KAWY
ELEKTROMOS KÁVÉFŐZŐ
ISTRUZIONI PER L’USO
OPERATING INSTRUCTIONS
MODE D’EMPLOI
BEDIENUNGSANLEITUNG
GEBRUIKSAANWIJZINGEN
INSTRUCCIONES PARA EL USO
INSTRUÇÕES
√‰ËÁ›Â˜ ¯Ú‹Û˘
BRUGSANVISNING
BRUKSANVISNING
BRUKSANVISNING
KÄYTTÖOHJEET
ààççëëííêêììääññàààà èèéé ùùääëëèèããììÄÄííÄÄññàààà
NÁVOD K POUÎITÍ
2
A) If your appliance comes fitted with a plug, it will incorporate a 13
Amp fuse. If it does not fit your socket, the plug should be cut off
from the mains lead, and an appropriate plug fitted, as below.
WARNING: Very carefully dispose of the cut off plug after removing the fuse: do not insert in a 13 Amp socket elsewhere in the
house as this could cause a shock hazard.
With alternative plugs not incorporating a fuse, the circuit must be
protected by a 15 Amp fuse.
If the plug is a moulded-on type, the fuse cover must be re-fitted
when changing the fuse using a 13 Amp Asta approved fuse to BS
1362. In the event of losing the fuse cover, the plug must NOT be
used until a replacement fuse cover can be obtained from your
nearest electrical dealer. The colour of the correct replacement fuse
cover is that as marked on the base of the plug.
B) If your appliance is not fitted with a plug, please follow the
instructions provided below:
WARNING - THIS APPLIANCE MUST BE EARTHED
IMPORTANT
The wires in the mains lead are coloured in accordance with the following code:
Green and yellow: Earth
Blue: Neutral
Brown: Live
As the colours of the wires in the mains lead may not correspond with
the coloured markings identifying the terminals in your plug, proceed
as follows:
The green and yellow wire must be connected to the terminal in the
plug marked with the letter E or the earth symbol or coloured
green or green and yellow.
The blue wire must be connected to the terminal marked with the letter
N or coloured black.
The brown wire must be connected to the terminal marked with the letter L or coloured red.
N
E
L
ELECTRICAL CONNECTION (UK ONLY)
4
5
7
6 8
9 10 11
X
321
A
I
F
K
G
M
D
E
B
J
C
L
H

4
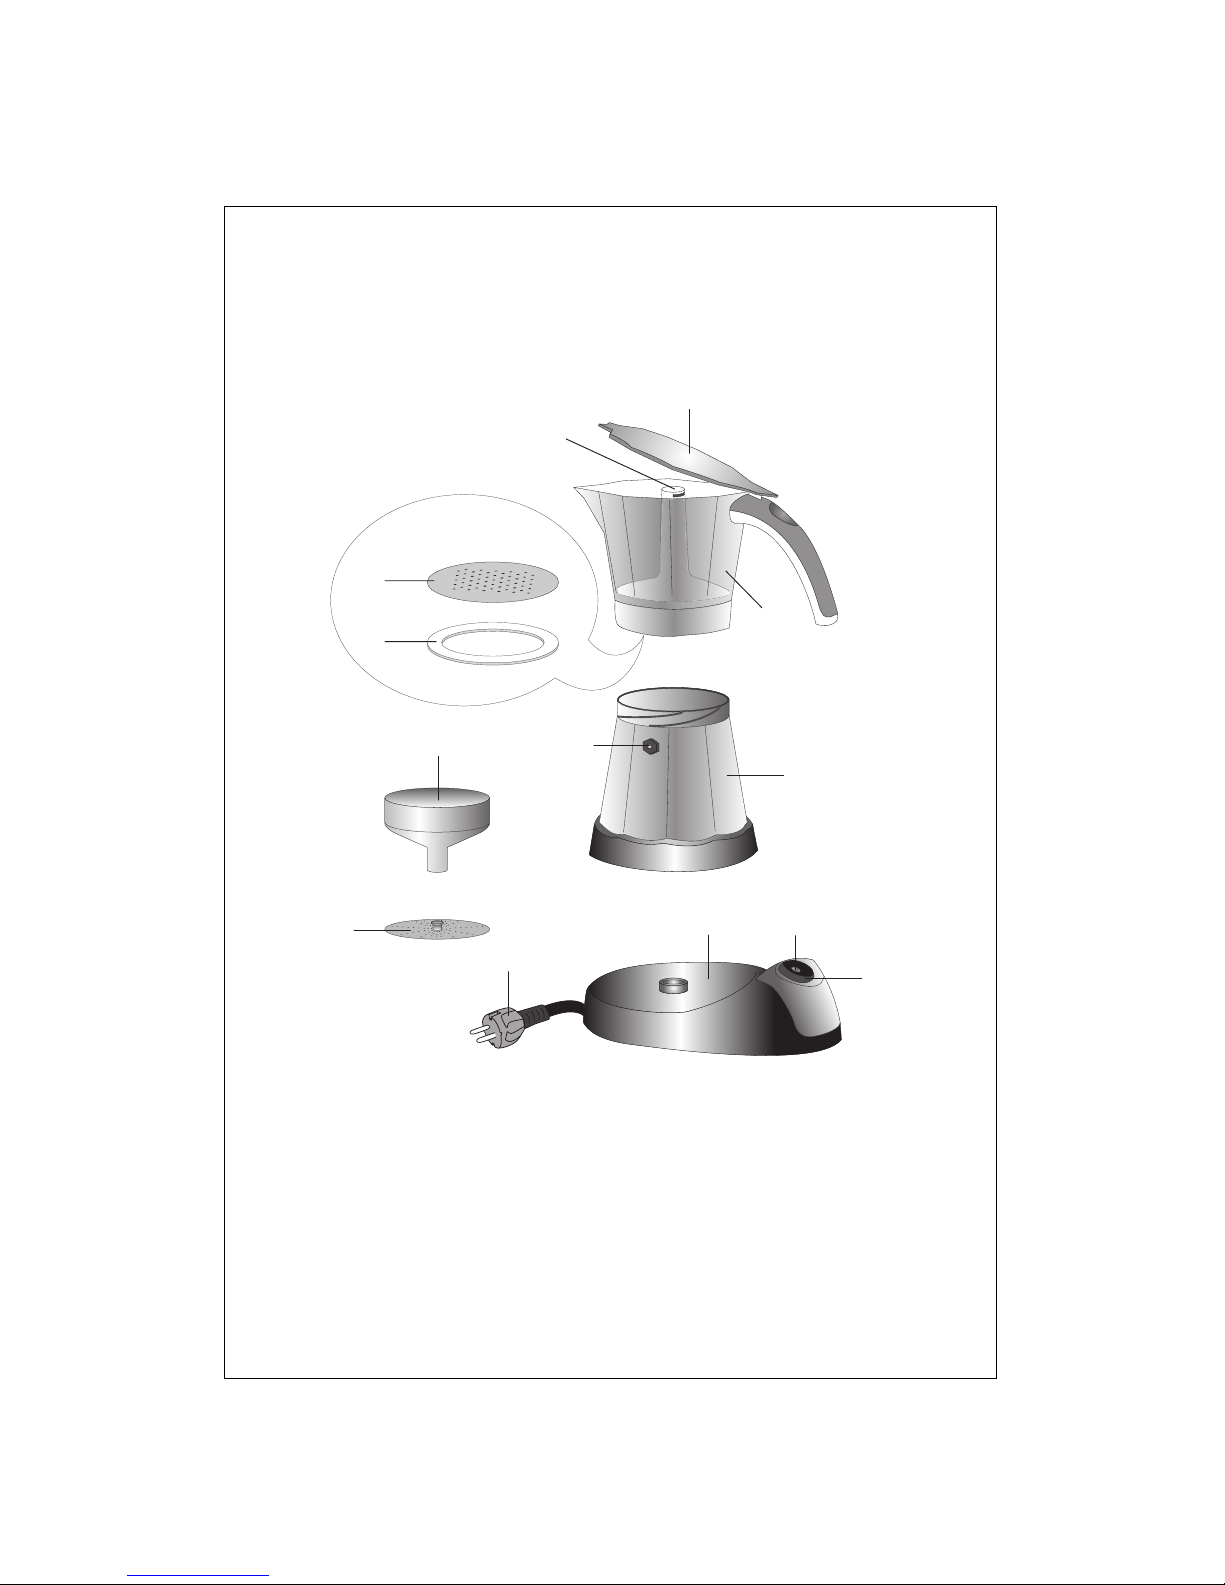
DESCRIZIONE DELL’APPARECCHIO
La seguente terminologia sarà continuamente
usata nelle pagine successive.
A. Coperchio raccoglitore
B. Caraffa
C. Caldaia
D. Filtro a disco
E. Guarnizione
F. Base di appoggio
G. Cavo di alimentazione
H. Interruttore acceso/spento
I. Lampada spia
J. Valvola di sicurezza
K. Filtro a imbuto
L. Disco adattatore per metà caffettiera
M. Colonnina
AVVERTENZA DI SICUREZZA
• Questa macchina é costruita per “fare il caffè”.
Non utilizzare mai altri estratti, polveri di
cacao, camomille, altri infusi o solubili: potrebbero otturare i fori del filtro.
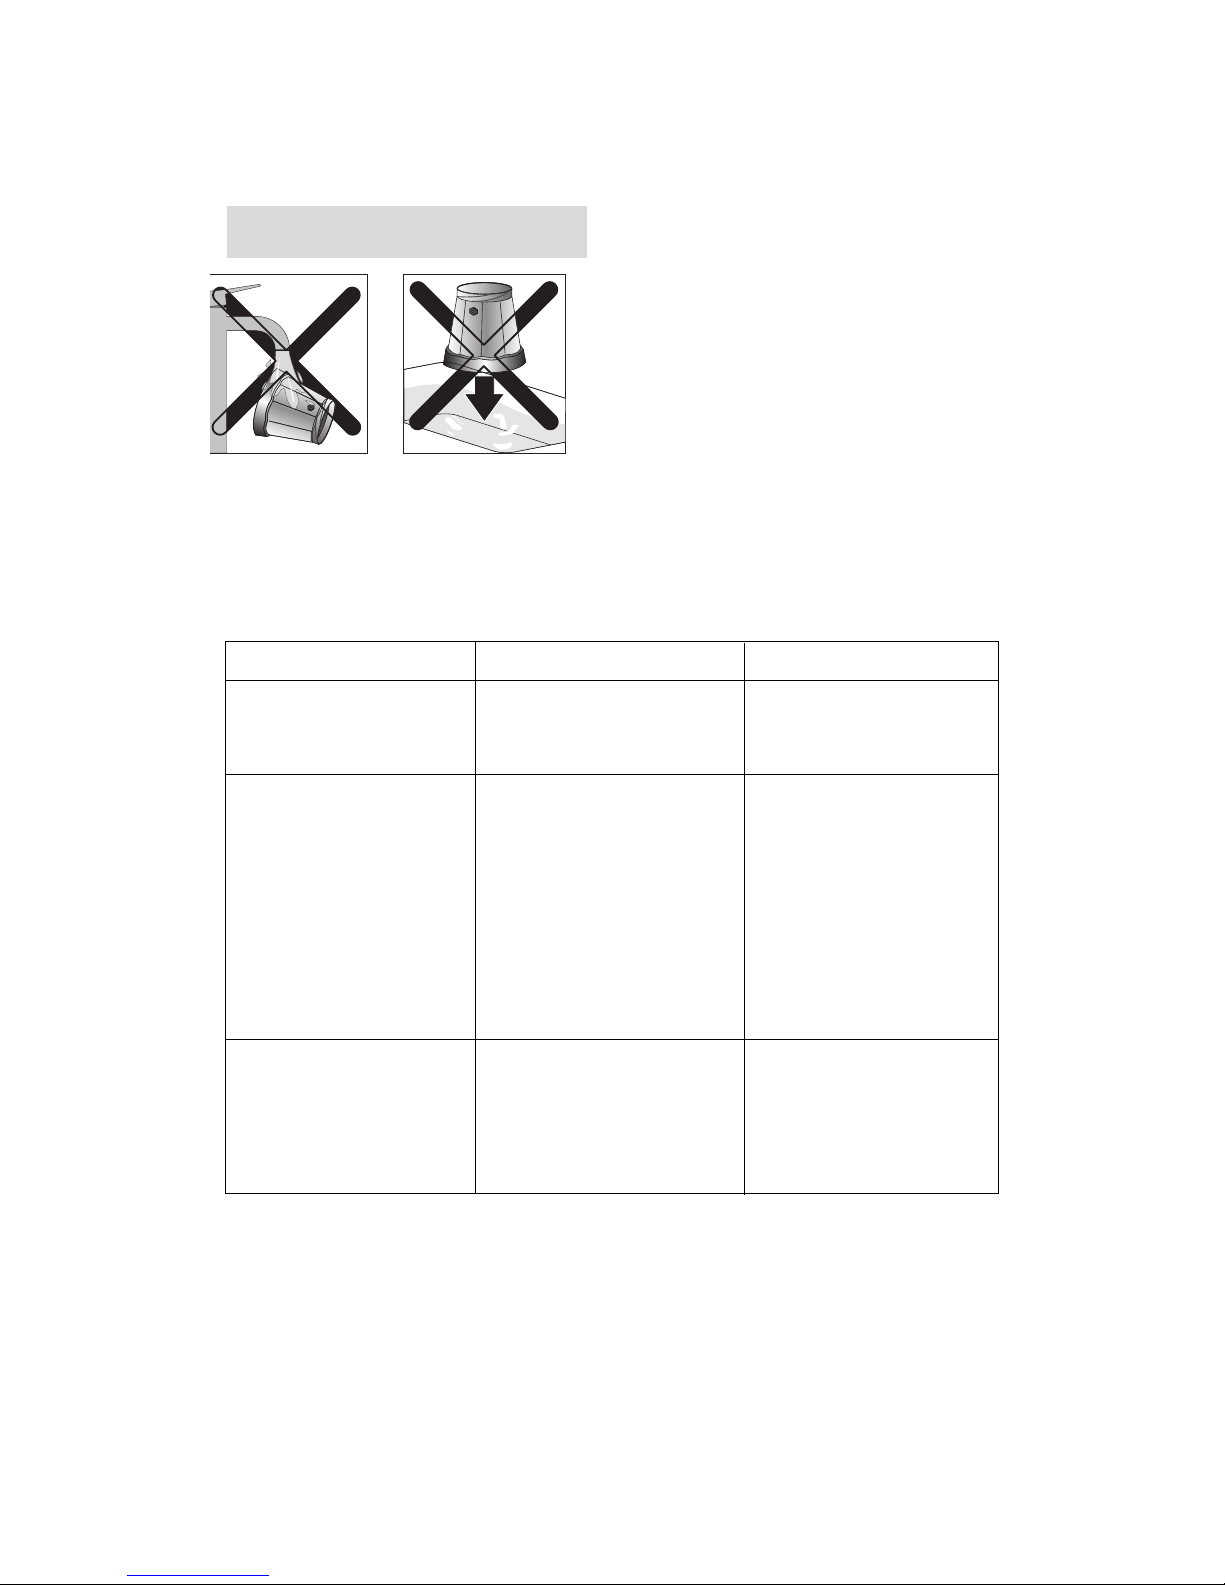
• Durante la pulizia, non immergere mai la base
di appoggio e la caldaia nell’acqua: é un
apparecchio elettrico.
• Fare attenzione a non scottarvi con getti d’acqua o di vapore o con un uso improprio della
stessa.
• Durante l’uso non toccare le superfici calde dell’apparecchio. Utilizzare i tasti o manici.
• Dopo aver tolto l’imballaggio, assicurarsi dell’integrità dell’apparecchio. In caso di dubbio,
non utilizzare l’apparecchio e rivolgersi a personale professionalmente qualificato.
• Gli elementi dell’imballaggio (sacchetti di plastica, polistirolo espanso, ecc.) non devono essere
lasciati alla portata dei bambini in quanto
potenziali fonti di pericolo.
• Quest’apparecchio deve essere impiegato solo
per uso domestico. Ogni altro uso è da considerarsi improprio e quindi pericoloso.
• Il costruttore non può essere considerato
responsabile per eventuali danni derivanti da
usi impropri, erronei ed irragionevoli.
• La caffettiera deve essere fatta funzionare esclusivamente collegata alla rete elettrica e non
deve essere mai fatta funzionare su fornelli o
piani di cottura accesi.
• Non toccare mai l’apparecchio con mani o
piedi bagnati o umidi.
• Non permettere mai che l’apparecchio sia
usato senza sorveglianza da bambini o da
incapaci.
• Assicurarsi che i bambini non giochino con
l’apparecchio.
• In caso di guasto o di cattivo funzionamento
dell’apparecchio, spegnerlo e non manometterlo. Per eventuali riparazioni, rivolgersi solamente ad un Centro di Assistenza Tecnica autorizzato dal costruttore e richiedere l’utilizzo di
ricambi originali. Il mancato rispetto di quanto
sopra può compromettere la sicurezza dell’apparecchio.
• Il cavo d’alimentazione di quest’apparecchio
non deve essere mai sostituito dall’utente in
quanto la sostituzione richiede l’impiego d’utensili speciali. In caso di danneggiamento del
cavo, o per la sua sostituzione, rivolgersi esclusivamente ad un Centro d’Assistenza autorizzato dal costruttore in modo da prevenire ogni
rischio.
INSTALLAZIONE
• Posizionare l’apparecchio sopra un piano di
lavoro lontano da rubinetti dell’acqua e lavelli.
• Verificare che la tensione della rete elettrica
corrisponda a quella indicata nella targa dati
dell’apparecchio. Collegare l’apparecchio solo
ad una presa di corrente avente una portata
minima di 6 A e dotata d’efficiente messa a
terra. Il costruttore non può essere considerato
responsabile per eventuali incidenti causati
dalla mancanza di messa a terra dell’impianto.
• In caso di incompatibilità tra la presa e la spina
dell’apparecchio, fare sostituire la presa con
altra di tipo adatto, da personale qualificato.
Leggere con attenzione questo libretto istruzioni prima di installare ed usare l’apparecchio. Solo così potrete ottenere i migliori
risultati e la massima sicurezza d’uso.
ITALIANO

5
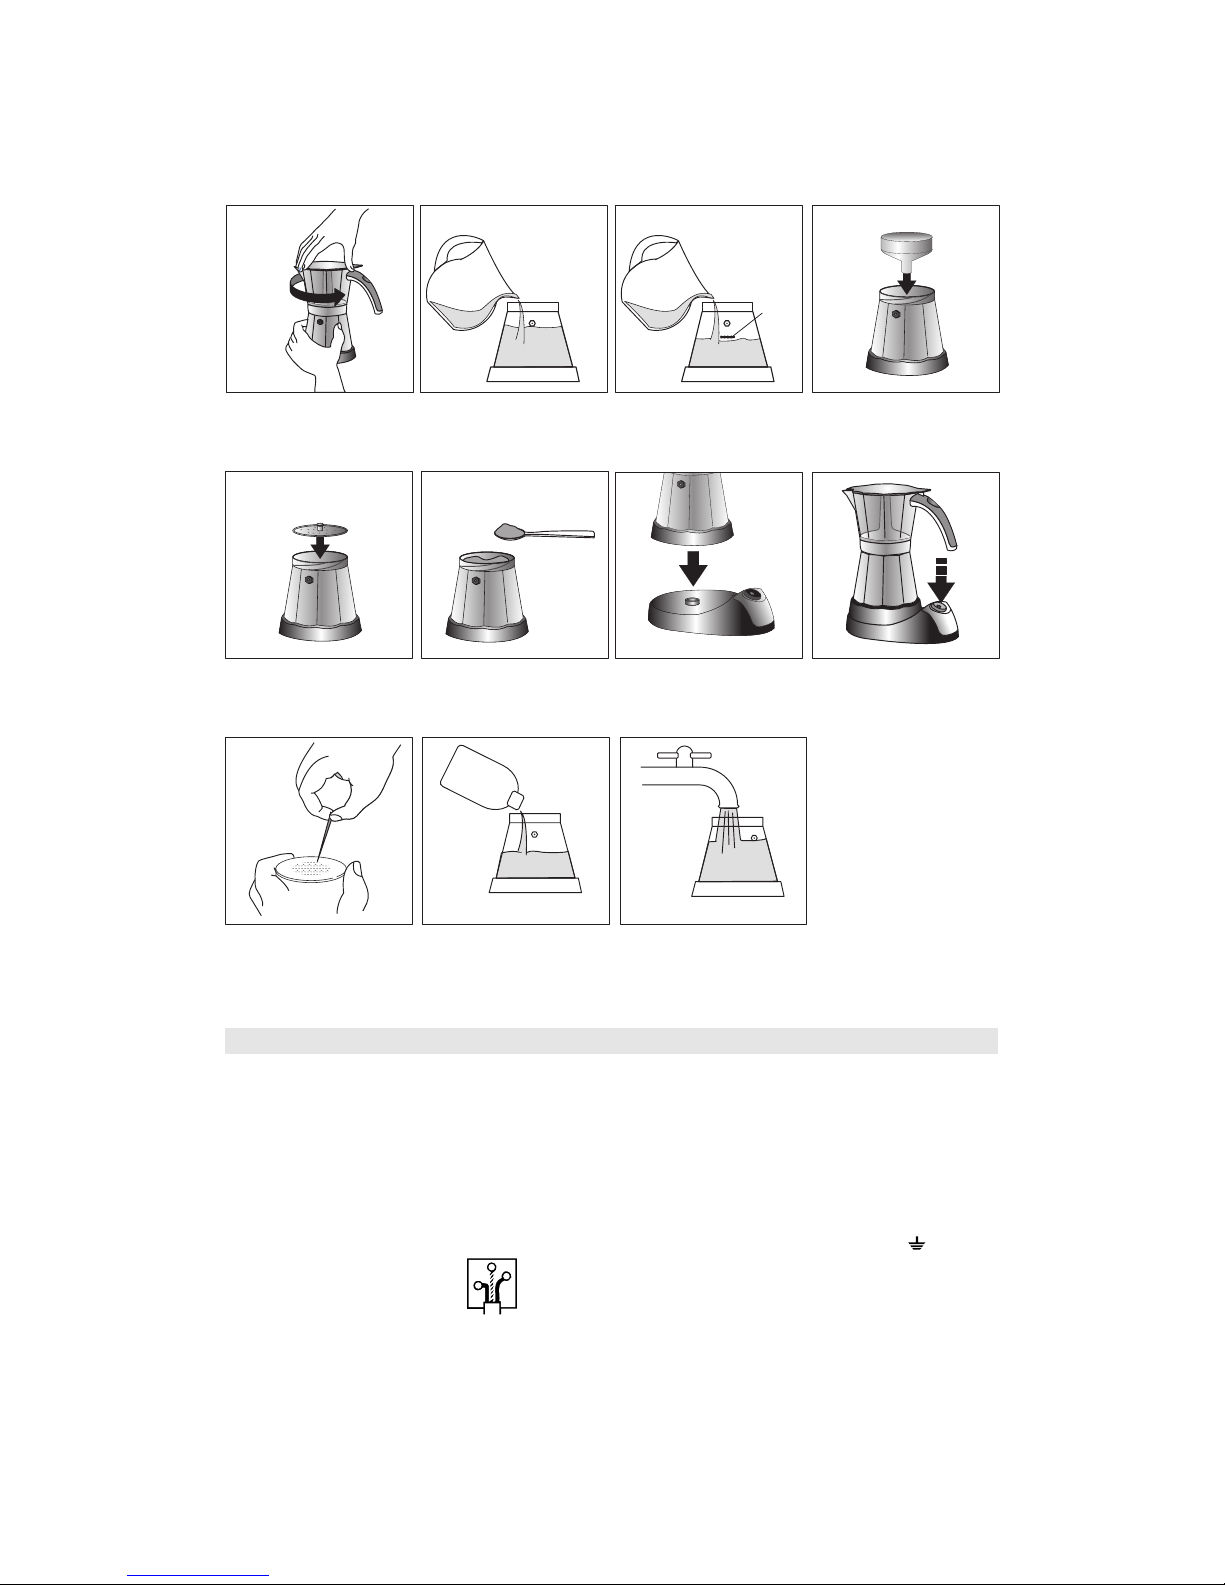
COME PREPARARE IL CAFFÈ
1) Assicurarsi che la caffettiera sia fredda e svitarla tenendo la caldaia con una mano e con l’altra ruotare il raccoglitore in senso antiorario
(fig. 1).
2) Togliere il filtro a imbuto e, se si desidera preparare l’intera caffettiera, riempire la caldaia
con acqua fresca fino a raggiungere la valvola
di sicurezza (visibile all’interno della caldaia)
senza superarla (fig. 2).
Se, invece, si desidera preparare metà caffettiera, riempire di acqua la caldaia fino al
segno circolare sotto la valvola di sicurezza
(fig. 3 - X).
CONSIGLIO: si consiglia di utilizzare acqua fresca
e leggera. Le acque salmastre o ricche di calcare
affievoliscono il sapore.
IMPORTANTE: non utilizzare la macchina da
caffè senza acqua nella caldaia oppure con
acqua calda per fare più in fretta.
3) Inserire il filtro ad imbuto nella caldaia (fig. 4).
Se si desidera preparare metà caffettiera, inserire anche il disco adattatore (L) nel filtro ad
imbuto (fig. 5).
4) Riempire il filtro ad imbuto di caffè macinato
senza pressarlo (fig. 6). Riempirlo un po’ alla
volta per evitare che il caffè macinato trabocchi.
5) Distribuire uniformemente il caffè macinato e
togliere l’eventuale eccedenza di caffè dal
bordo del filtro.
IMPORTANTE: Utilizzare caffè macinato di
buona qualità, di macinatura media e confezionato per moka. Non utilizzare la caffettiera
con caffè d’orzo.
6) Avvitare la caffettiera con decisione, ma
senza esagerare, tenendo la caldaia con una
mano e con l’altra ruotare il raccoglitore in
senso orario evitando di fare leva sul manico.
IMPORTANTE: per evitare pericolosi spruzzi di
acqua bollente, non fare mai funzionare la
caffettiera se il filtro a disco (D) non è correttamente inserito.
7) Appoggiare la caffettiera sulla base (fig. 7).
Chiudere il coperchio.
8) Premere l'interruttore acceso/spento (fig. 8).
La lampada spia indica che la caffettiera è in
funzione.
9) Il caffè inizierà a fuoriuscire dopo qualche
minuto.
10)Quando l’infusione è completata, rimescolare
il caffè prima di servirlo per uniformare la
corposità.
Se si prepara solo metà caffettiera, è consigliabile lasciare appoggiata la moka sulla
base per circa 5 munuti dopo la fine dell’
infusione perché raggiunga la temperatura
ottimale.
11)Una volta terminata l'infusione, inizia la funzione keep warm (mantenimento della temperatura) e la caffettiera continua a riscaldare il
caffè per circa mezzora. Solo dopo che è trascorso questo tempo, la caffettiera si spegne
automaticamente.
IMPORTANTE: la prima volta che si usa la caffettiera, è necessario lavare tutti gli accessori
ed i circuiti interni solo con acqua calda e fare
alcuni caffè a perdere.
FUNZIONE KEEP-WARM (MANTENIMENTO
DELLA TEMPERATURA)
Grazie al dispositivo keep warm, il caffè può
essere bevuto caldo alla giusta temperatura fino a
mezzora dopo l’accensione della macchina.
Questo dispositivo è automaticamente disabilitato,
quando si toglie la caffettiera dalla base di
appoggio appena è terminata l’infusione.
Se la caffettiera è appoggiata sulla base con
ancora del caffè nel raccoglitore, si può ancora
mantenerlo in caldo per un'altra mezzora premendo l’interruttore acceso/spento .
In ogni caso terminata l’infusione, si può spegnere immediatamente la caffettiera, premendo l’interruttore acceso/spento.
PULIZIA E MANUTENZIONE
• Prima di procedere alle operazioni di pulizia,
attendere che la caffettiera sia ben raffreddata
dopo l’uso.
• Periodicamente pulire l’interno della colonnina.
• Col tempo guarnizione ed imbuto invecchia-
no: quando presentano segni d’usura o deterioramento, devono essere sostituite. Utilizzare
guarnizione ed imbuto acquistabili presso i
centri assistenza tecnica autorizzati o comunque uguali a quelle date in dotazione.
• Di tanto in tanto, controllare che i forellini del
filtro a disco non siano ostruiti altrimenti pulirli
con l’aiuto di uno spillo (fig. 9).
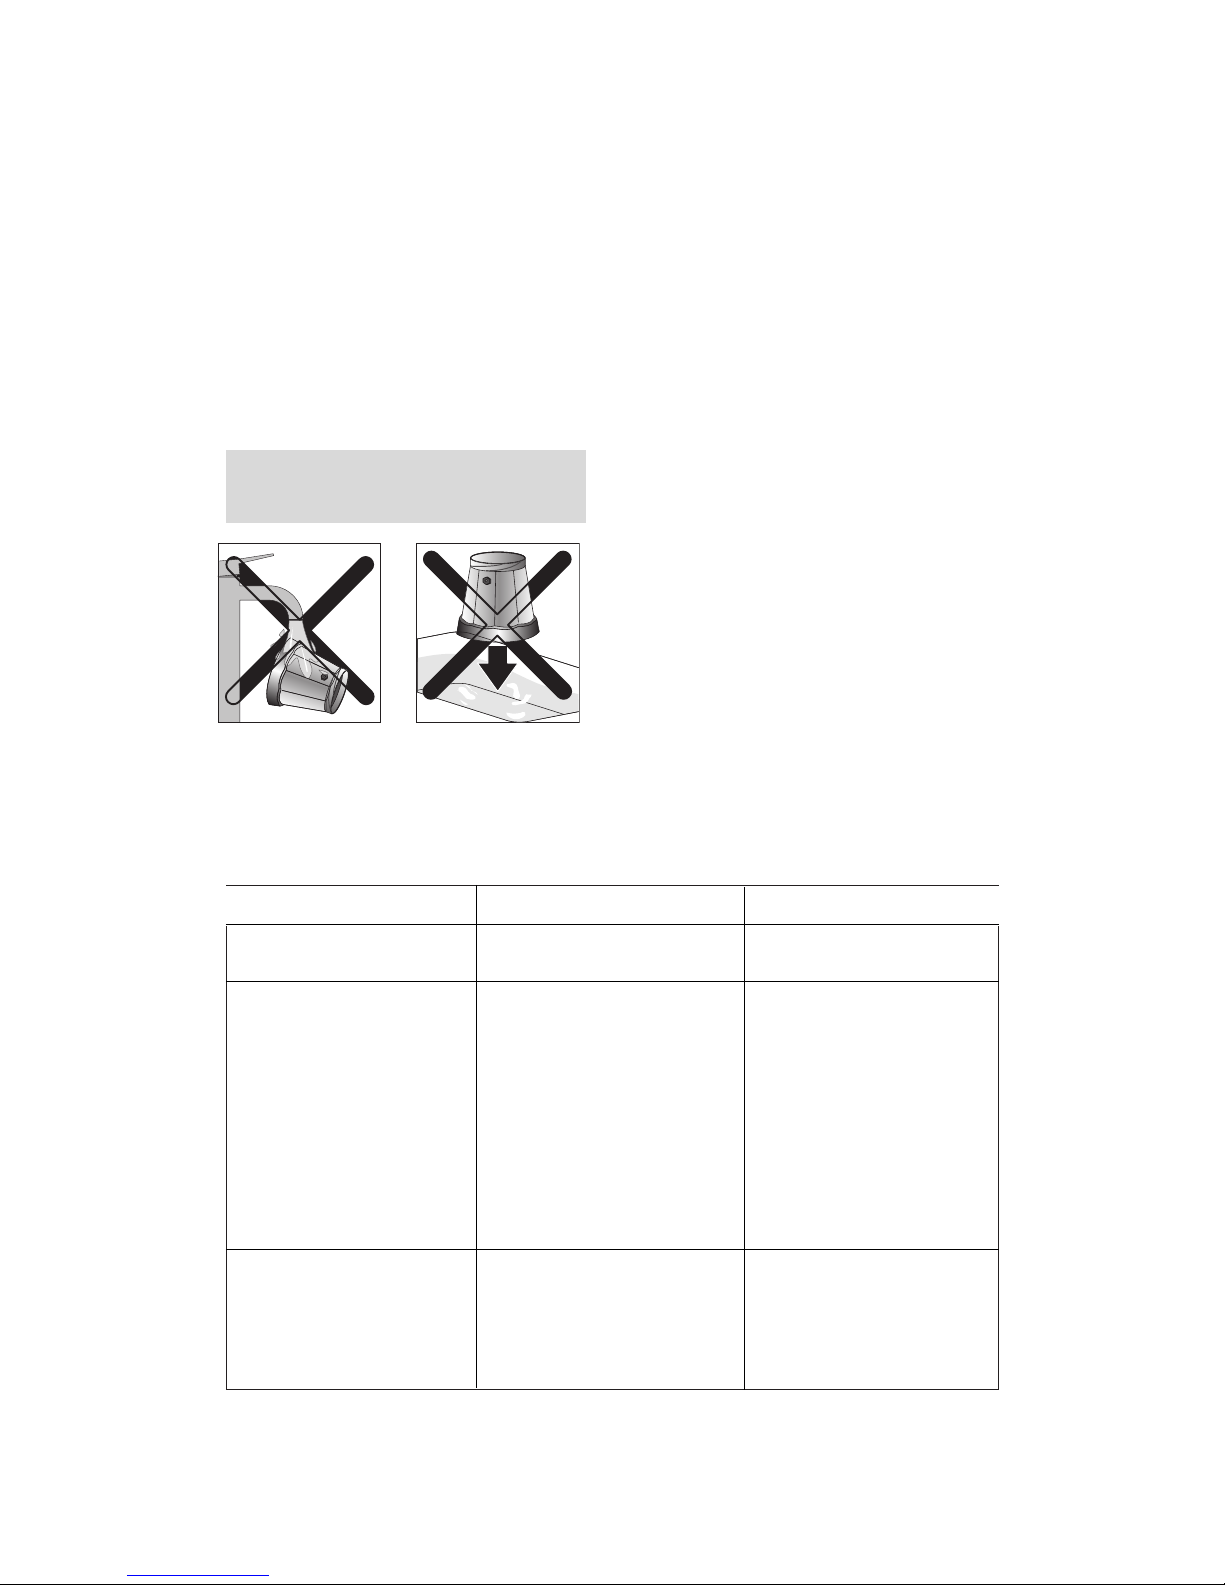
• NON LAVARE LA CAFFETTIERA IN LAVASTO-
VIGLIE.
6
PROBLEMI DI FUNZIONAMENTO
PROBLEMA CAUSE PROBABILI SOLUZIONE
Il caffè non esce
Il caffè impiega molto tempo
prima di fuoriuscire
Il caffè esce dai bordi della caldaia
Mancanza acqua in caldaia
Il caffè utilizzato non è del tipo
giusto
Il filtro a disco è ostruito
Il caffè è stato pressato
Nel fondo interno della caldaia si
è formato del calcare
Il filtro a disco è ostruito
La guarnizione è bruciata o lacerata
Riempire la caldaia con acqua
fresca
Utilizzare caffè macinato espressamente per moka
Pulire il filtro a disco come indicato nel paragrafo “Pulizia e manutenzione”
Non pressare il caffè macinato
Eseguire la decalcificazione come
indicato nel capitolo “DECALCIFICAZIONE”
Pulire il filtro a disco come indicato nel paragrafo “Pulizia e manutenzione”
Sostituire la guarnizione.
Non risciacquare mai la caldaia sotto il
rubinetto e non immergere mai nell’acqua.
• Per la pulizia della caldaia e della base di
appoggio, non usare solventi o detergenti
abrasivi. È sufficiente pulirle con una spugna,
facendo attenzione che l’acqua non bagni le
parti
Nota: quando si toglie il filtro a disco per operazioni di pulizia o per sostituzione della guarnizione, ricordarsi poi (prima di utilizzare la caffettiera) di re-inserirlo correttamente per evitare
pericolosi spruzzi di acqua calda.
DECALCIFICAZIONE
Può verificarsi nel tempo che, dopo numerosi
caffè, nel fondo della caldaia si formi uno strato
di calcare; questo può rendere il tempo di percolazione molto più lungo. Per ovviare a questo
inconveniente è necessario ogni tanto eliminare
questo strato di calcare effettuando una decalcificazione. Utilizzare i prodotti specifici per la
decalcificazione delle macchine da caffè reperibili in commercio (es. acido citrico).
Per la decalcificazione procedere nel seguente
modo:
1. Assicurarsi che la caffettiera sia fredda e svitarla (fig.1).
2. Riempire la caldaia con il prodotto decalcificante (fig. 10) e attendere mezz'ora.
Assicurarsi di aver effettuato la completa pulizia interna della caldaia.
L’operazione deve essere fatta con la caldaia a freddo e NON inserita nella base.
3. Trascorsa mezz’ora svuotare e risciacquare
l’interno della caldaia (fig. 11). Non immer-
gere la caldaia in acqua.
4. Fare almeno 3 caffè a perdere.
Il costruttore declina ogni responsabilità dal malfunzionamento nel caso in cui non sia stata eseguita l’operazione descritta.

7
DESCRIPTION OF THE APPLIANCE
The following terminology will be used repeatedly
on the following pages.
A. Pitcher lid
B. Pitcher
C. Boiler
D. Disk filter
E. Gasket
F. Support base
G. Power cable
H. On/off switch
I. Pilot light
J. Safety valve
K. Funnel filter
L. Half pot adapter disk
M. Tube
SAFETY WARNINGS
• This machine has been manufactured to “make
coffee”. Never use other extracts, cocoa powder, camomile, other infusions or soluble substances: these may block the holes in the filter.
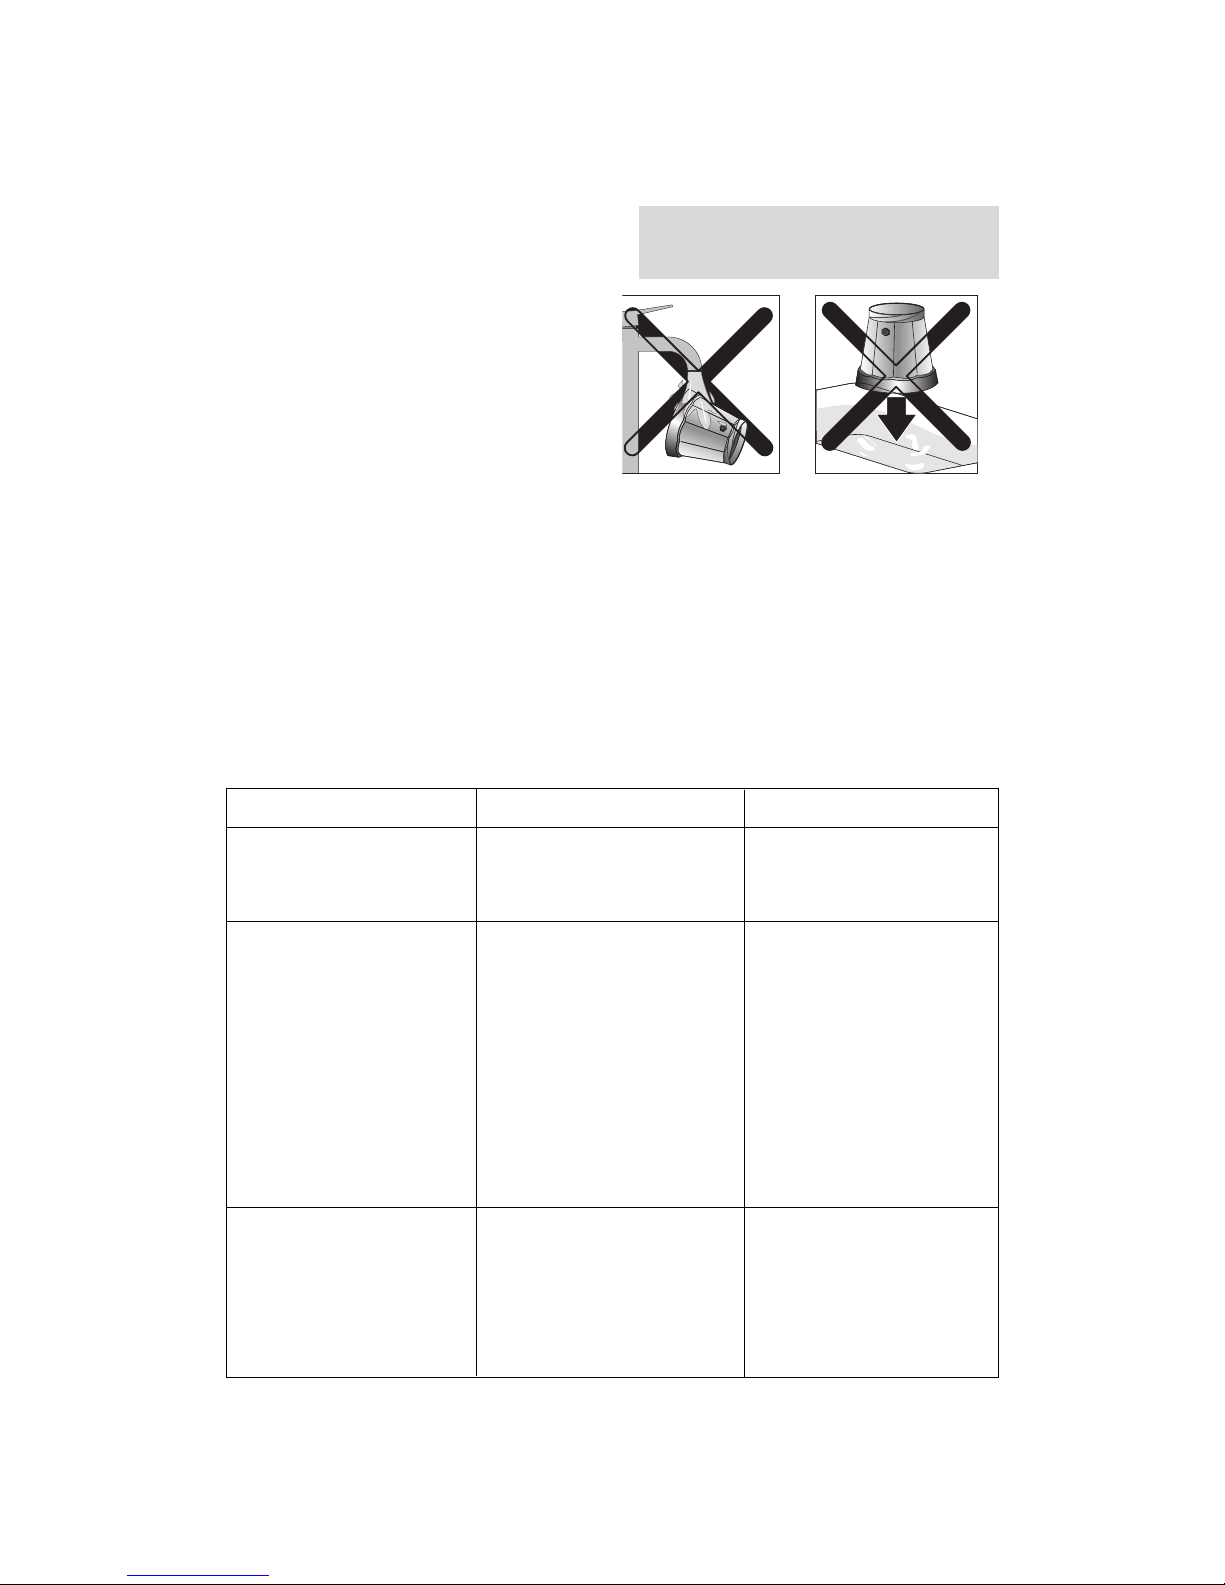
• During cleaning, never immerse the base and
the boiler in water: this is an electrical
appliance.
• Be careful to avoid being scalded by spraying
water or steam or due to the improper use of
the appliance.
• When using the appliance do not touch the hot
surfaces. Use the buttons or handles.
• After having removed the packaging, check that
the appliance is in tact. If in doubt, do not use
the appliance and contact a professionally qualified person.
• The parts of the packaging (plastic bags, polystyrene foam, etc.) not must be left within the
reach of children, as they are potential sources
of danger.
• This appliance must only be used for household
purposes. All other uses are considered improper and as a result dangerous.
• The manufacturer declines all liability for any
damage deriving from improper, erroneous
and unreasonable use of the appliance.
• The appliance must work only connected to a
power outlet; never use it directly on flames.
• Never touch the appliance with wet or damp
hands or feet.
• Never allow the appliance to be used without
supervision by children or incapable persons.
• Make sure that children do not play with the
appliance.
• In the event of faults or malfunctioning of the
appliance, switch it off and not tamper with it.
For any repairs, only contact service centres
that are authorised by the manufacturer and
insist on the use of original spare parts. Failure
to observe the above warnings may compromise the safety of the appliance.
• The power cable for this appliance must not be
replaced by the user, in that this operation
requires the use of special tools. In the event of
damage, only contact a service centre authorised by the manufacturer so as to avoid any
risks.
INSTALLATION
• Place the appliance on a bench away from
water taps and sinks.
• Check that the voltage of the mains power supply corresponds to the value indicated on the
appliance’s rating plate. Only connect the
appliance to a power outlet with a minimum
rating of 6A that is properly earthed. The
manufacturer declines all liability for any accidents caused if the system is not correctly
earthed.
• If the power outlet does not match the plug on
the appliance, have the outlet replaced with a
suitable type by qualified personnel.
Carefully read this instruction booklet before installing and using the appliance. This is
the only way to ensure the best results and
maximum safety for the user.
ENGLISH

HOW TO PREPARE THE COFFEE
1) Check that the coffee maker is cold, and then
unscrew it by holding the boiler with one hand
and turning the pitcher anticlockwise with the
other (Fig. 1).
2) Remove the funnel filter and, to prepare a full
pot of coffee, fill the boiler with fresh water until
reaching the safety valve (visible inside the boiler), without exceeding it (Fig. 2).
On the other hand, to prepare half a pot of coffee maker, fill the boiler with water to the circular mark under the safety valve (Fig. 3 - X).
TIP: use fresh and soft water. Salty or hard water
will weaken the flavour.
IMPORTANT: do not use the coffee maker
without water in the boiler or alternatively
using hot water for faster operation.
3) Insert the funnel filter in the boiler (Fig. 4).
When preparing half a pot, also place the
adapter disk (L) into the funnel filter (Fig. 5).
4) Fill the funnel filter with ground coffee, without
pressing it (Fig. 6). Fill it a little at a time to prevent spilling the ground coffee.
5) Distribute the ground coffee uniformly and remove any excess coffee from the edge of the filter.
IMPORTANT: Use good quality, mediumground coffee, for Moka coffee makers.
6) Tighten the coffee maker securely, without
exaggerating, holding the boiler with one
hand and turning the pitcher clockwise with
the other, without pushing on the handle.
IMPORTANT: to avoid dangerous splashes of
boiling water, never use the coffee maker
unless the disk filter (D) is correctly in position.
7) Rest the coffee maker on the base (Fig. 7).
Close the lid.
8) Press the on/off switch (Fig. 8).
The pilot light indicates that the coffee maker
is on.
9) The coffee will start to be released after a few
minutes.
10)When the coffee has brewed, stir the coffee
for uniformity before serving it.
When preparing just half a pot, the coffee
maker should be left on the base for around 5
minutes after brewing, to allow it to reach the
ideal temperature.
11)When the coffee has brewed, the "keep
warm" function will start and the coffee maker
will continue to keep the coffee warm for
around half an hour. After this period the coffee maker will switch off automatically.
IMPORTANT: the first time that the coffee
maker is used, all the accessories and the
internal circuits should be washed with hot
water. Then make a few batches of coffee to
throw away.
KEEP-WARM FUNCTION
Using the keep warm device, the coffee can be
drunk hot at the right temperature up to half an
hour after starting the machine.
This device is automatically disabled when the
coffee maker is removed from the support base
after the coffee has brewed.
If the coffee maker is rested on the base with coffee
still in the pitcher, it can be kept warm for another
half an hour by pressing the on/off switch .
In any case, once the coffee has brewed, the coffee maker can be switched off by pressing the
on/off switch.
CLEANING AND MAINTENANCE
• Before performing the cleaning operations,
wait for the coffee maker to have cooled down
after use.
• Clean the inside of the tube periodically.
• Regularly check the funnel and the gasket:
replace if there are signs of wear or deterioration. Gaskets can be purchased from authori-
sed technical service centres. Alternatively,
use gaskets the same size as those supplied.
• Every so often check that the holes in the disk
filter are not blocked; if necessary, clean using
a pin (Fig. 9).
• DO NOT WASH THE COFFEE MAKER IN THE
DISHWASHER.
• When cleaning do not use solvents or abrasive
detergents. Simply clean it with a sponge, keeping attention not to wet the electrical parts.
NB: when you remove the disk filter for cleaning
or to replace the gasket, remember to replace it
correctly before using the coffee maker to avoid
dangerous splashes of hot water.
8
9
TROUBLESHOOTING
PROBLEM CAUSE SOLUTION
No coffee is released
The coffee takes a long time to
be released
Coffee leaks from the edges of
the boiler
No water in the boiler
The coffee used is not the right
type
The disk filter is blocked
The coffee has been pressed
The disk filter is blocked
The gasket is burned or torn
Fill the boiler with fresh water
Use ground coffee expressly
for Moka coffee makers
Clean the disk filter as described in the paragraph
“Cleaning and maintenance”
Do not press the ground coffee
Clean the disk filter as described in the paragraph
“Cleaning and maintenance”
Replace the gasket.
Never rinse the boiler under the tap water
and never immerse it in water.

10
DESCRIPTION DE L’APPAREIL
Les termes suivants seront utilisés dans la suite de
la notice
A. Couvercle du compartiment supérieur
B. Compartiment supérieur
C. Chaudière
D. Disque filtre
E. Joint
F. Base d’appui
G. Cordon d’alimentation
H. Interrupteur marche/arrêt
I. Lampe témoin
J. Valve de sécurité
K. Filtre entonnoir
L. Disque adaptateur pour demi-cafetière
M. Colonne
CONSIGNES DE SÉCURITÉ
• Cette machine est fabriquée pour ‘faire du
café’. Ne jamais utiliser d’autres extraits, poudre de cacao, camomille, autres infusions ou
produits solubles : ils pourraient boucher le filtre.
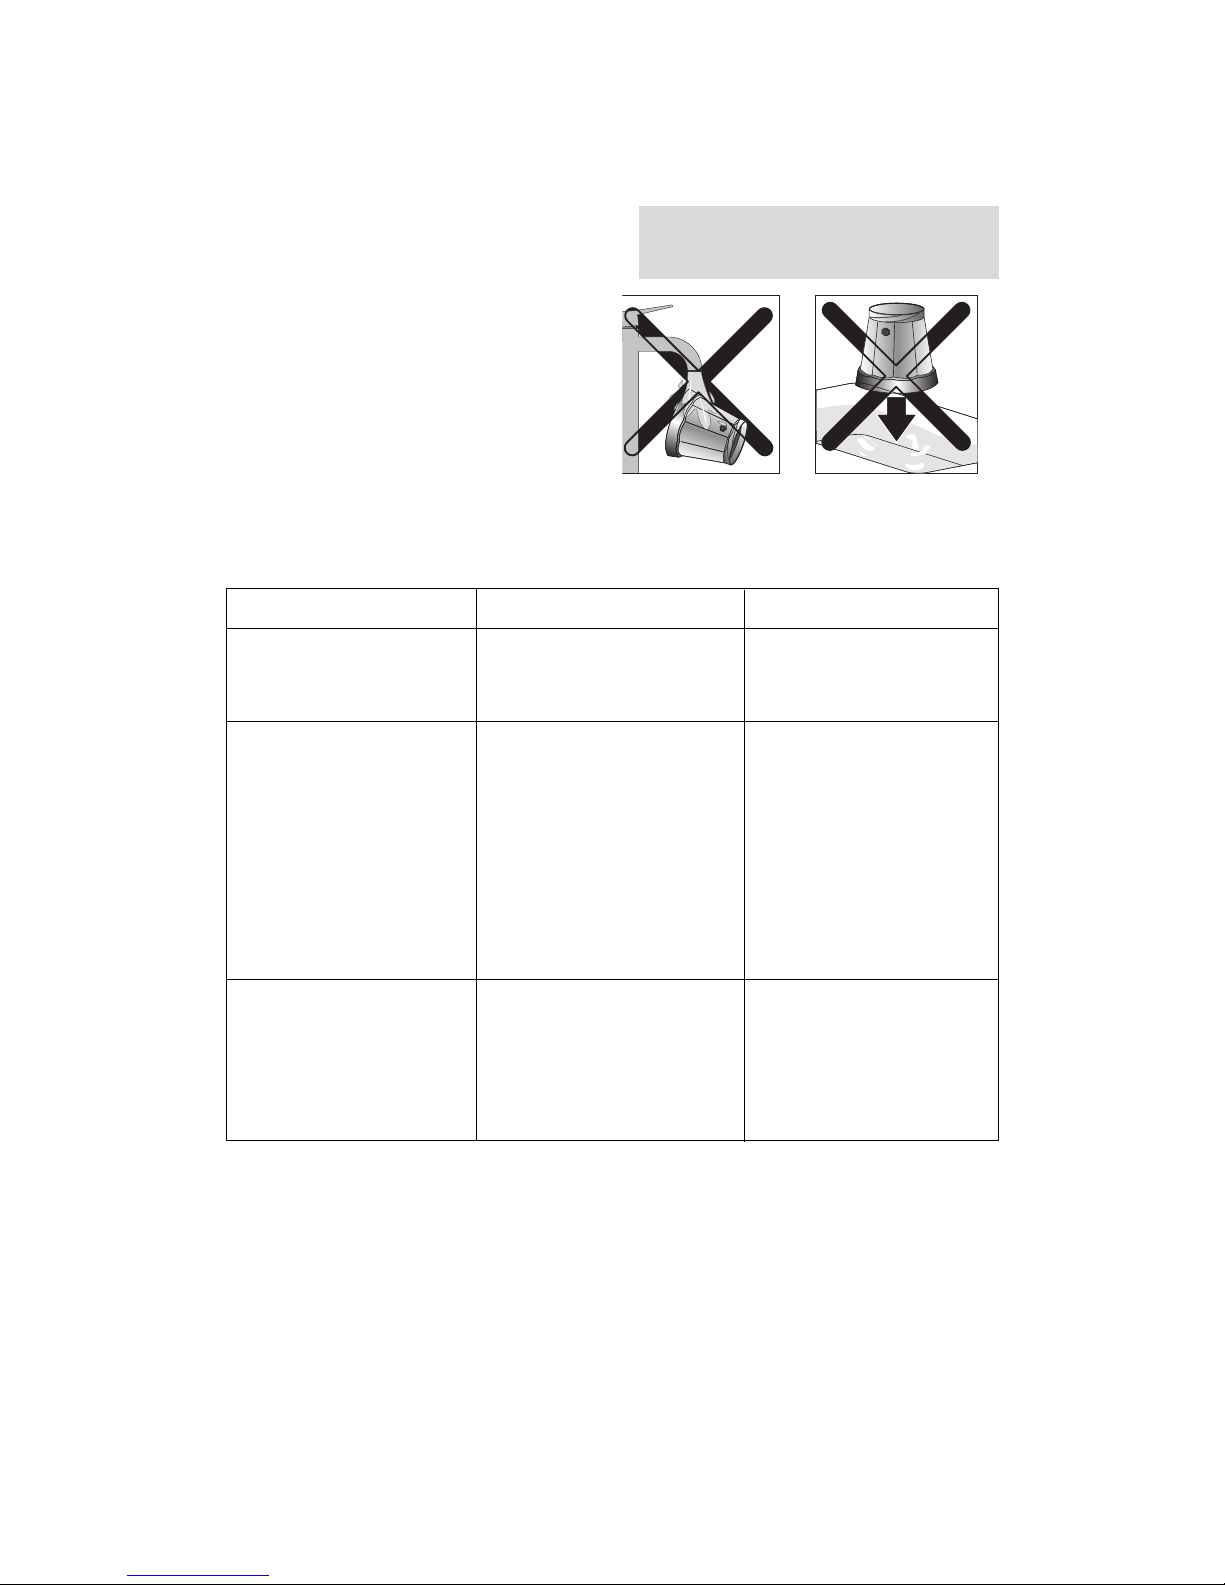
• Ne plongez jamais la base d’appui ni la chau-
dière de l’appareil dans l'eau : c'est un appareil électrique !
•Attention aux brûlures causées par les jets
d’eau chaude ou de vapeur ou par un usage
impropre de l’appareil !
• Éviter de toucher les surfaces chaudes de l’appareil. Utiliser les poignées et les manches.
• Après avoir déballé l’appareil, s’assurer qu’il
est en bon état. En cas de doute, ne pas utiliser
l’appareil et contacter un technicien qualifié.
• Les emballages de cet appareil (sacs en plastique, polystyrène expansé, etc.) peuvent être
dangereux. Ne pas les laisser à la portée des
enfants !
• Cet appareil ne doit être utilisé que pour un
usage domestique. Toute autre utilisation est jugée
impropre et, par conséquent, dangereuse.
• Le fabricant ne peut être tenu pour responsable
d’éventuels dégâts découlant d’usages impropres, erronés et irraisonnés.
• L’appareil doit fonctionner seulement branché à
une prise electrique; ne jamais le faire fonctionner directement sur flammes.
• Ne jamais toucher l’appareil les mains ou les
pieds mouillés ou humides.
• Ne jamais laisser les enfants ni les personnes
inaptes se servir de l'appareil sans surveillance.
• Ne pas laisser les enfants jouer avec l'appareil.
•Si l’appareil tombe en panne ou s’il fonctionne
mal, l’arrêter et ne plus y toucher.
Pour toute réparation, s’adresser à un Centre
après-vente agréé par le Fabricant et exiger
des pièces détachées d’origine. L’inobservation
de ces règles risque de compromettre la sécurité
de l’appareil.
• Le cordon d'alimentation de cet appareil ne doit
jamais être remplacé par l'utilisateur car cette
opération exige des outils spéciaux. Si le cordon est abîmé ou doit être remplacé, s’adresser
exclusivement à un Centre de Service Aprèsvente agréé par le fabricant afin d'éviter tout
risque.
INSTALLATION
• Placez l'appareil sur un plan de travail éloigné
des robinets d'eau et des éviers.
• Vérifiez si la tension du secteur correspond à
celle indiquée sur la plaque signalétique de
l’appareil. Branchez l’appareil exclusivement
sur une prise de courant présentant une intensité minimale de 6 A et munie d’une terre efficace. Le fabricant décline toute responsabilité
en cas d’accidents causés par l’absence de
mise à la terre.
• En cas d'incompatibilité entre la prise de courant et la fiche de l'appareil, appelez un électricien pour qu’il remplace la prise.
Lisez attentivement ce mode d’emploi avant
d’installer et d’utiliser votre appareil. Vous
pourrez ainsi en tirer les meilleurs résultats
et l’utiliser en toute sécurité.
FRANÇAIS

11
COMMENT PRÉPARER LE CAFÉ
1) Assurez-vous que la cafetière est froide. Tenez
le bas d’une main et, de l’autre, dévissez le
haut (fig. 1).
2) Retirez le filtre entonnoir et, pour préparer une
cafetière entière, remplissez la chaudière d’eau
fraîche jusqu’à la valve de sécurité (à l’intérieur
de la chaudière) sans la dépasser (fig. 2).
Pour préparer, en revanche, une demi-cafetière
remplissez la chaudière jusqu’au signe rond
sous la valve de sécurité (fig. 3 - X).
CONSEIL : utilisez de l’eau fraîche et légère. Les
eaux saumâtres ou très dures enlèvent du goût au
café.
IMPORTANT : évitez d’utiliser la cafetière sans
eau ou avec de l’eau chaude pour aller plus
vite.
3) Introduisez le filtre entonnoir dans la chaudière
(fig. 4). Pour préparer une demi-cafetière,
introduisez également l’adaptateur (L) dans le
filtre entonnoir (fig. 5).
4) Remplissez le filtre entonnoir de mouture, sans
tasser (fig. 6) et peu à peu pour que la mouture
ne déborde pas.
5) Répartissez la mouture uniformément dans le
filtre et éliminez du bord l’éventuel excédent.
IMPORTANT : utilisez de la mouture de bonne
qualité, moyennement fine et spéciale moka.
6) Vissez la cafetière à bloc sans exagérer, en
tenant la chaudière d’une main et en tournant
le compartiment supérieur dans le sens des
aiguilles d’une montre, sans faire levier sur le
manche.
IMPORTANT : afin d’éviter les éclaboussures
d’eau bouillante, ne faites jamais marcher la
cafetière si le disque filtre (D) n’est pas correctement monté.
7) Posez la cafetière sur la base (fig. 7).
Fermer le couvercle.
8) Appuyez sur l’interrupteur marche/arrêt (fig.
8). La lampe témoin indiquera que la cafetière
est en marche.
9) Le café commencera à sortir au bout de quelques minutes.
10)Quand le café est prêt, mélangez-le avant de
le servir pour uniformiser sa densité.
Si vous préparez seulement une demi-cafetière, il est conseillé de laisser la moka sur sa
base environ 5 minutes pour obtenir une
température idéale.
11)Quand le café a fini de passer, la fonction
‘keep warm’ démarre (maintien de la température) et la cafetière chauffe encore le café
pendant une demi-heure environ, après quoi
elle s’arrête automatiquement.
IMPORTANT : lors de la première mise en service de la cafetière, lavez tous les accessoires
et les circuits intérieurs à l’eau chaude et préparez plusieurs cafés que vous jetterez.
FONCTION MAINTIEN AU CHAUD
Ce dispositif permet de maintenir le café à la
bonne température une demi-heure après la mise
en marche de la cafetière.
Ce dispositif s’arrête automatiquement quand la
cafetière quitte sa base d’appui, une fois que le
café est recueilli dans le compartiment supérieur.
Si la cafetière est posée sur sa base et contient
encore du café, vous pourrez le maintenir au
chaud encore une demi-heure en pressant l’interrupteur marche/arrêt.
Une fois que le café est fait, vous pouvez arrêter
la cafetière en pressant l’interrupteur marche/
arrêt.
NETTOYAGE ET ENTRETIEN
• Avant de procéder au nettoyage, laissez
refroidir la cafetière.
• Nettoyez périodiquement l’intérieur de la
colonne.
• Contrôlez périodiquement l’entonnoir et le
joint en caoutchouc : dès qu’ils présentent des
signes d’usure ou de détérioration, remplacezles. Utilisez les joints en vente dans les cen-
tres de service agréés et toujours de la même
taille que ceux fournis avec l’appareil.
• Contrôlez de temps en temps les trous du
disque filtre : ils ne doivent pas être obturés.
Éventuellement, débouchez-les avec une épingle (fig. 9).
• NE PAS LAVER LA CAFETIERE AU LAVE-VAIS-
SELLE
• Pour nettoyer votre cafetière, évitez les solvants et les détergents abrasifs. Lavez-la avec
une éponge, sans jeter de l’eau sur les elemts
electriques.
Remarque : quand vous retirez le disque filtre
pour effectuer un nettoyage ou remplacer le
joint, n’oubliez pas (avant d’utiliser la cafetière)
de le repositionner correctement afin d’éviter les
éclaboussures d’eau chaude.

12
PROBLÈMES DE FONCTIONNEMENT
PROBLÈME CAUSES PROBABLES SOLUTION
Le café ne sort pas
Le café est très long à sortir
Le café coule des bords de la
chaudière
Manque d’eau dans la chaudière
La mouture utilisée ne va pas
Le disque filtre est bouché
La mouture a été tassée
Le disque filtre est bouché
Le joint est déchiré ou il a
brûlé
Remplir la chaudière d’eau
fraîche
Utiliser de la mouture spéciale
moka
Nettoyer le disque filtre de la
manière indiquée au paragraphe “Nettoyage et entretien”
Ne pas tasser la mouture
Nettoyer le disque filtre de la
manière indiquée au paragraphe “Nettoyage et entretien”
Remplacer le joint.
Ne jamais rincer la chaudière sous l’eau
courant et ne pas la plonger dans l’eau.

13
BESCHREIBUNG DES GERÄTES
Die folgende Terminologie gilt für alle darauf folgenden Seiten.
A. Deckel des Oberteils
B. Oberteil
C. Wasserbehälter
D. Scheibensieb
E. Dichtung
F. Untersatz
G. Netzkabel
H. EIN/AUS-Taste
I. Kontrolllampe
J. Sicherheitsventil
K. Trichtersieb
L. Zwischenscheibe für halbe
Espressokochermenge
M. Säule
SICHERHEITSHINWEISE
• Diese Maschine ist für die Zubereitung von
Kaffee ausgelegt. Verwenden Sie niemals andere Extrakte, Kakaopulver, Kamillentee bzw.
andere Tees: Diese könnten die Löcher des
Filters verstopfen.
• Während der Reinigung niemals den
Untersatz und den Wasserbehälter in Wasser
eintauchen: Es handelt sich um ein
Elektrogerät.
• Passen Sie auf, sich nicht durch Wasser – bzw.
Dampfspritzer oder durch unsachgemäßen
Gebrauch des Gerätes zu verbrennen.
•Während des Gebrauchs der Maschine das
Berühren aller heißen Stellen vermeiden. Benutzen
Sie die entsprechenden Tasten oder Henkel.
• Überzeugen Sie sich nach dem Auspacken, dass
das Gerät keine Beschädigungen aufweist. Im
Zweifelsfall das Gerät auf keinen Fall verwenden
und sich an einen Fachmann wenden.
• Das Verpackungsmaterial (Plastikbeutel,
Polystyrolschaum, usw.) nicht in Reichweite von
Kindern lassen, da dies eine Gefahrenquelle
darstellt.
• Dieses Gerät darf ausschließlich als
Haushaltsgerät verwendet werden. Jeder andere zweckentfremdete Gebrauch ist daher
gefährlich.
• Der Hersteller kann für eventuelle Schäden, die
durch einen zweckentfremdeten, unsachgemäßen oder unvernünftigen Gebrauch verursacht werden, nicht haftbar gemacht werden.
• Um das Gerät zu verwerten, muß es ausschließlich an eine Steckdose angeschließt sein. Das
Gerät niemals mit angezündete Herden oder
Kochplatten verwerten.
• Das Gerät niemals mit feuchten oder nassen
Händen bzw. Füßen berühren.
• Das Gerät darf niemals unbeaufsichtigt von
Kindern oder Personen, die mit dem Betrieb desselben nicht vertraut sind, gebraucht werden.
• Achten Sie darauf, dass die Kinder nicht an
dem Gerät herumspielen.
• Bei Defekten oder Betriebsstörungen des
Gerätes, dieses ausschalten und nicht versuchen
es selbst zu reparieren.
Wenden Sie sich für eventuelle Reparaturen
ausschließlich an vom Hersteller autorisierte
Kundendienststellen und verlangen Sie stets den
Gebrauch von Original-Ersatzteilen. Die
Nichtbeachtung der o.g. Sicherheitshinweise
kann die Sicherheit des Geräts beeinträchtigen.
• Das Netzkabel dieses Geräts darf niemals vom
Benutzer selbst ausgewechselt werden, da hierzu Spezialwerkzeug erforderlich ist. Wenn das
Kabel repariert oder ausgewechselt werden
muss, wenden Sie sich ausschließlich an eine
vom Hersteller autorisierte Kundendienststelle,
um jedes Risiko auszuschließen.
INSTALLATION
• Stellen Sie das Gerät auf eine Arbeitsfläche entfernt von Wasserhähnen oder Spülbecken.
• Vergewissern Sie sich, dass die Netzspannung
mit der auf dem Typenschild des Gerätes angegebenen Spannung übereinstimmt. Schließen
Sie das Gerät nur an eine vorschriftsmäßig
geerdete Steckdose mit einer Mindestleistung
von 6 A an. Der Hersteller haftet nicht für eventuelle Unfälle, die durch die nicht vorhandene
Erdung der Anlage verursacht werden.
• Sollte die Steckdose nicht für den Stecker Ihres
Gerätes geeignet sein, lassen Sie diese von
einem Fachmann auswechseln.
Lesen Sie vor Installation und Gebrauch des
Gerätes die vorliegende
Bedienungsanleitung aufmerksam durch.
Sie erzielen dadurch optimale Ergebnisse
und höchste Betriebssicherheit.
DEUTSCH

ZUBEREITUNG VON ESPRESSOKAFFEE
1) Stellen Sie sicher, dass der Espressokocher kalt
ist und drehen Sie diesen auf, indem Sie mit
einer Hand den Wasserbehälter festhalten und
mit der anderen das Oberteil, in dem sich der
gebrühte Kaffee sammelt, gegen den
Uhrzeigersinn, d.h. nach links, aufdrehen
(Abb.1).
2) Das Trichtersieb entnehmen. Zur Zubereitung
des ganzen Espressokochers, den
Wasserbehälter mit frischem Wasser bis zum
Sicherheitsventil (innen im Wasserbehälter
sichtbar) füllen (Abb.2).
Zur Zubereitung des halben Espressokochers
reicht es hingegen, den Wasserbehälter bis zur
Markierungslinie unter dem Sicherheitsventil
(Abb.3 – X) zu füllen.
TIPP: Wir empfehlen frisches, weiches Wasser zu
verwenden. Sehr kalk- bzw. salzhaltiges Wasser
beeinträchtigt das Kaffeearoma.
WICHTIG: Verwenden Sie den Espressokocher
nicht mit leerem Wasserbehälter oder mit
warmem Wasser, um so die
Kaffeezubereitung zu beschleunigen.
3) Setzen Sie das Trichtersieb in den
Wasserbehälter ein (Abb. 4). Für die
Zubereitung des halben Espressokochers ist
zudem die Zwischenscheibe (L) in das
Trichtersieb einzulegen (Abb.5).
4) Füllen Sie das Trichtersieb mit Kaffeepulver,
ohne das Pulver zu pressen (Abb.6). Geben Sie
das Kaffeepulver löffelweise bzw. in kleinen
Mengen in das Sieb, um so zu vermeiden, dass
zuviel Kaffeepulver eingefüllt wird und dies
heraus fällt.
5) Verteilen Sie das Kaffeepulver gleichmäßig und
streichen Sie eventuell zu viel eingefülltes
Kaffeepulver vom Rand des Siebs.
WICHTIG: Verwenden Sie qualitativ hochwertiges und eigens für Espressokocher geeignetes Kaffeepulver von mittlerem Mahlungsgrad.
6) Drehen Sie den Espressokocher fest zu, indem
Sie mit einer Hand den Wasserbehälter
festhalten und mit der anderen das Oberteil,
in dem sich der gebrühte Kaffee sammelt, im
Uhrzeigersinn, d.h. nach rechts, zudrehen.
Nicht auf den Griff drücken.
WICHTIG: Zum Vermeiden von
Heißwasserspritzern, den Espressokocher niemals in Betrieb setzen, wenn das Scheibensieb
(D) nicht korrekt eingesetzt ist.
7) Stellen Sie den Espressokocher auf den
Untersatz (Abb.7). Schließen den Deckel.
8) Drücken Sie den EIN/AUS-Schalter (Abb. 8).
Die Kontrolllampe zeigt an, dass der
Espressokocher in Betrieb ist.
9) Der Kaffee beginnt nach einigen Sekunden
hervorzuquellen.
10)Bei abgeschlossenem Brühvorgang, den
Kaffee vor dem Servieren umrühren, damit
das Kaffeearoma gleichmäßig verteilt wird.
Für die Zubereitung des halben
Espressokochers empfehlen wir, den
Espressokocher nach dem Brühvorgang noch
etwa 5 Minuten lang auf dem Untersatz
stehen zu lassen, damit der Kaffee die optimale Temperatur erreicht.
11)Nach abgeschlossenem Brühvorgang schaltet
sich die „Keep-Warm“-Funktion
(Warmhaltefunktion) ein und der
Espressokocher hält den Kaffee bis zu einer
halben Stunde weiter warm. Nach Ablauf dieser Zeit schaltet sich der Espressokocher automatisch ab.
WICHTIG: Vor dem ersten Gebrauch des
Espressokochers sämtliche Zubehörteile und
interne Leitungen mit warmem Wasser reinigen und einige Kaffees zubereiten, die Sie
dann wegschütten.
WARMHALTEFUNKTION – KEEP WARM
FUNKTION
Dank der ‚Keep Warm’ – Vorrichtung kann der
Espressokaffee bis zu einer halben Stunde nach der
Zubereitung warm gehalten werden.
Diese Vorrichtung wird automatisch abgeschaltet,
wenn der Espressokocher sofort nach dem
Brühvorgang vom Untersatz genommen wird.
Steht der Espressokocher mit noch mit Kaffee gefülltem Oberteil auf dem Sockel, kann der Kaffee durch
Drücken des EIN/AUS-Schalters eine weitere halbe
Stunde warm gehalten werden.
Nach dem abgeschlossenen Brühvorgang kann der
Espressokocher sofort ausgeschaltet werden, indem
Sie einfach den EIN/AUS-Schalter drücken.
REINIGUNG UND WARTUNG
• Vor jedem Reinigungseingriff abwarten, bis
der Espressokocher nach dem Gebrauch vollkommen abgekühlt ist.
• Regelmäßig das Innere der Säule reinigen.
14

15
BETRIEBSSTÖRUNGEN
PROBLEM MÖGLICHE URSACHEN ABHILFE
Der Kaffee tritt nicht heraus
Es braucht zu viel Zeit bis der
Kaffee heraustritt
Der Kaffee tritt über die
Ränder des Wasserbehälters
heraus.
Kein Wasser im
Wasserbehälter
Der verwendete Kaffee eignet
sich nicht für dieses Gerät.
Der Scheibenfilter ist verstopft
Das Kaffeepulver wurde
gepresst
Der Scheibenfilter ist verstopft
Die Dichtung ist durchgebrannt oder beschädigt
Den Wasserbehälter mit frischem Wasser füllen
Ausschließlich für
Espressokocher geeignetes
Kaffeepulver verwenden
Den Scheibenfilter wie im
Abschnitt “Reinigung und
Wartung” angegeben reinigen.
Das Kaffeepulver nicht anpressen
Den Scheibenfilter wie im
Abschnitt “Reinigung und
Wartung” angegeben reinigen.
Die Dichtung auswechseln.
Spülen Sie niemals den Wasserbehälter und
tauchen Sie Den niemals in Wasser.
• Regelmäßig das Trichtersieb und die Dichtung
überprüfen: Bei Zeichen von Abnutzung oder
Beschädigung sind diese Teile auszuwechseln.
Verwenden Sie die in den autorisierten
Kundendienststellen erhältlichen Dichtungen,
die unbedingt von der gleichen Größe wie
die mitgelieferten Dichtungen sein müssen.
• Ab und an überprüfen, dass die Löcher des
Scheibensiebs nicht verstopft sind.
Bei Verstopfungen die Löcher mit einer Nadel
reinigen (Abb.9).
• DEN ESPRESSOKOCHER NICHT IM
GESCHIRRSPÜLER REINIGEN.
• Für die Reinigung keine Lösungsmittel oder
scheuernde Spülmittel verwenden. Es reicht,
den Espressokocher mit einem Schwamm
abzuwaschen.
HINWEIS: Sollten Sie für die Reinigung oder den
Austausch der Dichtung das Scheibensieb entnehmen müssen, denken Sie vor einem erneuten
Gebrauch des Espressokochers daran, dass dieses wieder korrekt einzusetzen ist, um gefährliche Heißwasserspritzer zu vermeiden.

16
BESCHRIJVING VAN HET APPARAAT
De volgende termen worden voortdurend gebruikt
op de hiernavolgende pagina’s.
A. Deksel reservoir
B. Reservoir
C. Verwarmingselement
D. Schijffilter
E. Pakking
F. Steunbasis
G. Voedingssnoer
H. Schakelaar aan/uit
I. Controlelampje
J. Veiligheidsventiel
K. Trechtervormige filter
L. Passchijf voor helft koffiezetapparaat
M. Kolom
VEILIGHEIDSVOORSCHRIFTEN
• Dit apparaat is bestemd om “koffie te zetten”.
Maak nooit gebruik van andere extracten,
cacaopoeder, kamillethee en andere kruidendranken of oplossingen: deze kunnen de
gaatjes van de filter verstoppen.
• Dompel de basis en het verwarmingselement
tijdens de reiniging nooit onder in water: het
is een elektrisch apparaat.
• Let erop u niet te verbranden aan water of
stoom of door een oneigenlijk gebruik ervan.
• Raak tijdens het gebruik de hete oppervlakken
van het apparaat niet aan. Gebruik de knoppen of handgrepen.
• Verwijder de verpakking en controleer of het
apparaat intact is. Ingeval van twijfel, het
apparaat niet in gebruik nemen en u wenden
tot vakbekwaam personeel.
• De onderdelen van de verpakking (plastic
zakken, piepschuim, enz.) dienen buiten het
bereik van kinderen te worden gehouden,
omdat zij gevaarlijk kunnen zijn.
• Dit apparaat is uitsluitend bestemd voor een
huishoudelijk gebruik. Elk ander gebruik dient
bijgevolg als oneigenlijk en gevaarlijk te worden beschouwd.
• De fabrikant kan niet aansprakelijk worden
gesteld voor eventuele schade voortvloeiend uit
een oneigenlijk, verkeerd of onredelijk gebruik.
• Het apparaat nooit aanraken wanneer u natte
of vochtige handen of voeten hebt.
• Laat kinderen of onbekwamen niet onbewaakt
gebruik maken van het apparaat.
• Zorg ervoor dat kinderen niet kunnen spelen
met het apparaat.
• Ingeval het apparaat defect is of niet goed
werkt, het uitzetten en er verder niet aan
knoeien.
Voor eventuele reparaties, u uitsluitend wenden
tot een Servicecentrum erkend door de
fabrikant en het gebruik van originele wisselonderdelen eisen. Indien dit voorschrift niet in acht
wordt genomen, kan dit de veiligheid van het
apparaat in het gedrang brengen.
• Het voedingssnoer van dit apparaat dient nooit
door de gebruiker zelf te worden vervangen,
omdat hier speciaal gereedschap voor nodig is.
Indien het voedingssnoer beschadigd is, of voor
de vervanging ervan, u uitsluitend wenden tot
een Servicecentrum erkend door de fabrikant,
om elk risico te vermijden.
INSTALLATIE
• Zet het apparaat op een horizontaal werkvlak,
ver van kranen en spoelbakken.
• Controleer of de spanning van het elektriciteitsnet overeenkomt met de spanning aangeduid
op het gegevensplaatje van het apparaat. Sluit
het apparaat alleen aan op een stopcontact met
een minimaal vermogen van 6 A en voorzien
van een doeltreffende aardleiding. De fabrikant
kan niet aansprakelijk worden gesteld voor
eventuele schade voortvloeiend uit de afwezigheid van een dergelijke aardleiding.
• Ingeval de contactdoos en de stekker van het
apparaat niet overeenkomen, dient de contactdoos te worden vervangen door vakbekwaam
personeel.
Lees aandachtig deze gebruiksaanwijzingen
alvorens het apparaat te installeren en in
gebruik te nemen. Alleen op die manier
staat u borg voor de beste resultaten en een
veilig gebruik.
NEDERLANDS

17
HOE KOFFIE TE ZETTEN
1) Zorg ervoor dat het koffiezetapparaatje koud
is. Schroef het open door het verwarmingselement vast te houden en het reservoir tegen de
wijzers van de klok in te draaien (fig. 1).
2) Verwijder de trechtervormige filter en, ingeval u
het hele koffiezetapparaat wilt zetten, vul het
verwarmingselement met fris water tot aan het
niveau van het veiligheidsventiel (zichtbaar aan
de binnenkant van het verwarmingselement),
zonder dit niveau te overschrijden (fig. 2).
Indien u maar de helft van het koffiezetapparaat wilt zetten, wordt het verwarmingselement
met water gevuld tot aan het cirkelvormig teken
onder het veiligheidsventiel (fig. 3 – X).
RAADGEVING: het is raadzaam fris en licht water te
gebruiken. Met zoutig water bekomt u slappere koffie.
BELANGRIJK: gebruik het koffiezetapparaat
niet met een leeg verwarmingselement en
gebruik geen warm water om sneller koffie te
zetten.
3) Breng de trechtervormige filter in het verwarmingselement (fig. 4). Indien u de helft van het
koffiezetapparaat wilt zetten, brengt u ook de
passchijf (L) aan in de trechtervormige filter (fig.
5).
4) Vul de trechtervormige filter met gemalen koffie
zonder aan te drukken (fig. 6). Doe dit beetje
bij beetje, om te voorkomen dat de koffie over
de rand heen gaat.
5) Verdeel de gemalen koffie gelijkmatig en
verwijder eventuele overtollige koffie van de
rand van de filter.
BELANGRIJK: Gebruik gemalen koffie van
goede kwaliteit, met een middelgrote korrel
en speciaal voor Italiaanse koffiezetapparaatjes.
6) Schroef het apparaat stevig dicht, door het
verwarmingselement vast te houden en het
reservoir in wijzerzin te draaien, met behulp
van de handgreep.
BELANGRIJK: om gevaarlijke spatten heet
water te voorkomen, het koffiezetapparaatje
nooit aanzetten wanneer de schijffilter (D)
niet correct geplaatst is.
7) Plaats het apparaat op de basis (fig. 7). De
decksel uitsluiten.
8) Druk op de schakelaar aan/uit (fig. 8).
Het controlelampje geeft aan dat het apparaat
in werking is.
9) De koffie begint na enkele minuten op te borrelen.
10)Na het koffiezetten, de koffie omroeren alvorens hem te schenken, om een gelijkmatige
smaakverdeling te bekomen.
Indien u de helft van het koffiezetapparaat wilt
zetten, is het raadzaam het apparaat ongeveer
5 minuten op de steunbasis te laten staan, om
de optimale temperatuur te bekomen.
11)Na het koffiezetten, treedt de functie keep warm
in werking (in stand houden temperatuur) en
wordt de koffie nog een half uurtje warm gehouden. Pas na deze periode, wordt het koffiezetapparaat automatisch uitgeschakeld.
BELANGRIJK: de eerste keer dat het apparaat
gebruikt wordt, dienen alle accessoires en de
interne circuits met warm water te worden
gespoeld en zet u enkele kopjes die u weggooit.
FUNCTIE KEEP-WARM (IN STAND HOUDEN
VAN DE TEMPERATUUR)
Dankzij de inrichting keep-warm, kan de koffie
op de juiste temperatuur worden geserveerd, tot
een half uur na het aanzetten van het apparaat.
Deze inrichting wordt automatisch uitgeschakeld,
wanneer het apparaat na het koffiezetten van de
basis wordt gehaald.
Wanneer koffie overblijft in het apparaat en dit
laatste op de basis wordt gezet, kan de koffie nog
een half uurtje worden warm gehouden door te
drukken op de schakelaar aan/uit.
Na het koffiezetten kan het apparaat in ieder
geval worden uitgezet, door te drukken op de
schakelaar aan/uit.
REINIGING EN ONDERHOUD
•Alvorens het apparaat te reinigen, dient het
na het gebruik volledig te zijn afgekoeld.
• De binnenkant van de kolom af en toe reinigen.
• De trechter en pakking dienen regelmatig te
worden gecontroleerd: wanneer sporen van
slijtage of beschadigingen worden vastgesteld, moet worden overgegaan tot de vervanging. Gebruik de pakkingen die aangekocht
kunnen worden in een erkend servicecentrum of die in ieder geval dezelfde afmetingen hebben als de bijgeleverde schijffilters.
• HET KOFFIEZETAPPARAATJE NIET IN DE
VAATWASMACHINE WASSEN.
• Controleer af en toe of de gaatjes van de
schijffilter niet verstopt zijn. Maak ze eventueel
vrij met een naald (fig. 9).
18
WERKINGSPROBLEMEN
PROBLEEM MOGELIJKE OORZAKEN OPLOSSING
Er borrelt geen koffie op
Het duurt lang vóór de koffie
opborrelt
De koffie gaat over de rand
van het verwarmingselement
heen
Geen water in het verwarmingselement
De gebruikte soort koffie is
niet geschikt
De schijffilter is verstopt
De koffie werd aangedrukt
De schijffilter is verstopt
De pakking is verbrand of
gescheurd
Het verwarmingselement vullen met fris water
Gebruik koffie die speciaal
bestemd is voor Italiaanse koffiezetapparaatjes
Reinig de schijffilter zoals
aangegeven in de paragraaf
“Reiniging en onderhoud”.
De gemalen koffie niet aandrukken
Reinig de schijffilter zoals
aangegeven in de paragraaf
“Reiniging en onderhoud”.
Vervang de pakking.
Dompel de basis en het verwarmingselement
tijdens de reiniging nooit onder in water: het
is een elektrisch apparaat.
• Maak voor de reiniging geen gebruik van
oplosmiddelen of schurende reinigingsproducten. Het volstaat een spons te gebruiken.
Opmerking: wanneer de schijffilter verwijderd
wordt voor de reiniging of vervanging van de
pakking, wordt niet vergeten deze (vóór het koffiezetapparaatje aan te zetten) correct terug te
plaatsen, om gevaarlijke spatten heet water te
voorkomen.

19
DESCRIPCIÓN DEL APARATO
La siguiente terminología se repetirá continuamente en las páginas sucesivas.
A. Tapadera del recipiente
B. Cuerpo superior
C. Caldera
D. Filtro en forma de disco
E. Goma
F. Base de apoyo
G. Cable de alimentación
H. Botón encendido/apagado
I. Lámpara piloto
J. Válvula de seguridad
K. Filtro en forma de embudo
L. Disco adaptador para media cafetera
M. Tubo pequeño
ADVERTENCIAS DE SEGURIDAD
• Esta máquina ha sido construida para “prepa-
rar el café”. No debe utilizar nunca otros
extractos, polvos de cacao, manzanillas, otras
infusiones o solubles: podrían obstruir los orificios del filtro.
• Durante la limpieza, no introduzca nunca la
base ni la caldera en el agua pues se trata de
un aparato eléctrico.
• Tenga cuidado de no quemarse con los chorros
de agua o de vapor o por un uso impropio de
la cafetera.
• Durante la utilización, no toque las partes
calientes del aparato. Use los botones o las
empuñaduras.
• Tras haber desembalado el aparato, asegúrese
de su integridad. En caso de duda, no use el
aparato y póngase en contacto con personal
profesional cualificado.
•No deje nunca los elementos que componen el
embalaje (bolsas de plástico, poliestireno
expandido, etc) al alcance de los niños ya que
son fuentes potenciales de peligro.
•Use este aparato exclusivamente para el uso
doméstico. Cualquier otro uso se considera
impropio y por lo tanto peligroso.
• El fabricante no puede ser considerado responsable por los eventuales daños derivados de
usos impropios, incorrectos e irrazonables.
• El aparato tiene que ser usado sólo conectado
a la red eléctrica; no se debe usar sobre las llamas.
• No toque nunca el aparato con las manos o los
pies mojados o húmedos.
• No permita nunca que niños o incapaces puedan utilizar el aparato sin vigilancia.
• Asegúrese de que los niños no puedan jugar
con el aparato.
• En caso de avería o de un funcionamiento
incorrecto del aparato, apague el aparato y no
intente forzarlo.
• Para las eventuales reparaciones, póngase en
contacto exclusivamente con un Centro de
Asistencia Técnica autorizado por el fabricante
y solicite la utilización de recambios originales.
El incumplimiento de lo anteriormente especificado puede perjudicar la seguridad del aparato.
• El usuario no debe sustituir nunca el cable de
alimentación de este aparato, ya que su sustitución requiere el uso de herramientas especiales.
Si el cable resultase estropeado o si fuese necesario sustituirlo, póngase en contacto únicamente con un Centro de Asistencia autorizado
por el fabricante para evitar cualquier tipo de
riesgo.
INSTALACIÓN
• Coloque el aparato sobre una superfice de trabajo, alejada de grifos del agua y de pilas.
• Compruebe que la tensión de la red eléctrica
corresponde a la tensión indicada en la placa
de datos del aparato. Enchufe el aparato solamente a una toma de corriente con una capacidad mínima de 6 A y equipada con una puesta
a tierra adecuada. El fabricante no será
responsable de los eventuales accidentes, causados por la ausencia de la puesta a tierra del
equipo.
• Si la toma y el enchufe del aparato son incompatibles, haga sustituir la toma por otra adecuada por personal cualificado.
Lea detenidamente este manual de instrucciones antes de instalar y usar el aparato.
Sólo así podrá obtener los mejores resultados y la máxima seguridad durante el uso.
ESPAÑOL

20
CÓMO PREPARAR EL CAFÉ
1) Asegúrese de que la cafetera esté fría. Debe
desenroscarla sujetando con una mano la caldera y con la otra debe darle vueltas al cuerpo
superior en el sentido contrario de las agujas
del reloj (fig. 1).
2) Extraiga el filtro en forma de embudo y para
preparar la cafetera entera, llene la caldera
con agua fresca hasta la válvula de seguridad
(visible en el interior de la caldera) sin superarla (fig. 2).
Sin embargo, para preparar media cafetera,
llene con agua la caldera hasta la marca circular situada bajo la válvula de seguridad (fig. 3
– X).
CONSEJO: le aconsejamos utilizar agua fría y
ligera. Las aguas salobres o ricas en calcáreo
debilitan el sabor.
IMPORTANTE: no use la cafetera sin agua en
la caldera o con agua caliente para que la
preparación sea más rápida.
3) Coloque el filtro en forma de embudo en la caldera (fig. 4). Para preparar media cafetera,
coloque también el disco adaptador (L) en el filtro en forma de embudo (fig. 5).
4) Llene el filtro en forma de embudo con café
molido sin prensarlo (fig. 6). Debe llenarlo gradualmente para evitar que el café molido
pueda derramarse.
5) Distribuya de forma uniforme el café molido y
elimine el eventual café en exceso del borde del
filtro.
IMPORTANTE: use café molido de buena calidad, de molienda mediana y envasado para
cafetera Moka.
6) Enrosque la cafetera enérgicamente, pero no
excesivamente, sujetando la caldera con una
mano, y con la otra dándole vueltas al cuerpo
superior en el sentido de las agujas del reloj
sin ejercer presiones en la empuñadura.
IMPORTANTE: para evitar salpicaduras peligrosas de agua hirviendo, no haga funcionar nunca la cafetera con el filtro en forma
de disco (D) colocado incorrectamente.
7) Apoye la cafetera sobre la base (fig. 7).
8) Pulse el interruptor encendido/apagado (fig.
8). La lámpara piloto indica que la cafetera
está funcionando.
9) El café empezará a salir tras algunos minutos.
10)Cuando la infusión acabe, mezcle de nuevo el
café antes de servirlo para uniformar su densidad.
Si prepara solamente media cafetera, le aconsejamos dejar apoyada la cafetera sobre la
base, durante 5 minutos aproximadamente,
después del final de la infusión, para alcanzar la temperatura óptima.
11)Tras acabar la infusión, empieza la función
“KEEP WARM” (mantenimiento de la temperatura) y la cafetera sigue calentando el café
durante media hora aproximadamente.
Únicamente cuando transcurre este tiempo, la
cafetera se apaga automáticamente.
IMPORTANTE: antes de utilizar por primera
vez la cafetera, deberá lavar todos los accesorios y los circuitos interiores solamente con
agua caliente y preparar algunos cafés que
tirará.
FUNCIÓN KEEP-WARM (MANTENIMIENTO
DE LA TEMPERATURA)
Gracias al dispositivo keep warm, podrá beberse
el café caliente a la temperatura ideal incluso
media hora después de encender la máquina.
Este dispositivo se inhabilita automáticamente
cuando se retira la cafetera de la base de apoyo
al terminar la infusión.
Si la cafetera está apoyada sobre la base y contiene café en el cuerpo superior, el café puede
mantenerse caliente durante otra media hora pulsando el botón encendido/apagado.
De todas formas, al terminar la infusión, puede
apagar inmediatamente la cafetera pulsando el
botón encendido/apagado.
LIMPIEZA Y MANTENIMIENTO
•Antes de pasar a realizar las operaciones de
limpieza, espere hasta que la cafetera se
haya enfriado del todo después del uso.
• Periódicamente limpie la parte interior del
tubo pequeño.
• Controle periódicamente el filtro en forma de
embudo y la goma: cuando detecte marcas de
desgaste o de deterioro deberá sustituirlos.
Utilice las juntas en venta en centros de asistencia autorizados y con las mismas dimensiones que las de las juntas incluidas en el
equipamiento.
• NO LAVE LA CAFETERA EN EL LAVAVAJILLAS.

No sale café.
El café tarda mucho rato antes
de salir.
El café sale por los bordes de
la caldera
Ausencia de agua en la caldera
El café utilizado no es el correcto.
El filtro en forma de disco está
obstruido.
El café ha sido prensado.
El filtro en forma de disco está
obstruido.
La goma está quemada o
desgarrada.
Llene la caldera con agua fría.
Use café molido expresamente
para cafetera Moka.
Limpie el filtro en forma de
disco siguiendo las indicaciones contenidas en el párrafo
“Limpieza y mantenimiento”.
No prense el café molido
Limpie el filtro en forma de
disco siguiendo las indicaciones contenidas en el párrafo
“Limpieza y mantenimiento”.
Sustituya la goma
21
PROBLEMAS DE FUNCIONAMIENTO
PROBLEMA CAUSAS PROBABLES SOLUCIÓN
Durante la limpieza, no introduzca nunca la
base ni la caldera en el agua pues se trata
de un aparato eléctrico.
•De vez en cuando, controle que los orificios
del filtro en forma de disco no estén obstruidos, en caso contrario deberá limpiarlos con
un alfiler (fig. 9).
• No use disolventes o detergentes abrasivos
para la limpieza. Será suficiente lavarla con
una esponja.
Nota: cuando quite el filtro en forma de disco
para efectuar la limpieza o sustituir la junta, no
se olvide después (antes de utilizar la cafetera)
de colocarlo de nuevo correctamente para evitar
salpicaduras peligrosas de agua caliente.

22
DESCRIÇÃO DO APARELHO
A seguinte terminologia será continuamente utilizada nas páginas seguintes.
A. Tampa do colector;
B. Colector;
C. Caldeira;
D. Filtro de disco
E. Vedação
F. Base de apoio;
G. Cabo de alimentação;
H. Interruptor ligado/desligado;
I. Luz piloto;
J. Válvula de segurança;
K. Filtro de funil;
L. Disco adaptador para metade da cafeteira;
M. Coluna
ADVERTÊNCIAS DE SEGURANÇA
• Esta máquina foi concebida para “fazer café”.
Nunca utilize outros extractos, cacau em pó,
camomila, outras infusões ou soluções solúveis:
poderão obstruir os orifícios do filtro.
• Durante a limpeza, nunca mergulhe a base e
a caldeira na água: trata-se de um aparelho
eléctrico.
• Tenha cuidado para não se queimar com jactos
de água ou de vapor ou devido a uma utilização inadequada da máquina.
• Durante a utilização, não toque nas superfícies
quentes do aparelho. Utilize os botões ou as
pegas.
• Após a remoção da embalagem, certifique-se
da integridade do aparelho. Em caso de dúvida, não o utilize. Contacte um técnico qualificado.
• Os elementos da embalagem (sacos de plástico,
polistireno expandido, etc.) não devem ser
deixados ao alcance das crianças, pois constituem potenciais fontes de perigo.
• Este aparelho só deve ser utilizado para fins
domésticos. Qualquer outra utilização é considerada inadequada e, logo, perigosa.
• O fabricante declina toda e qualquer responsabilidade por eventuais danos provocados por
uma utilização inadequada, errónea e irracional do aparelho.
• Nunca toque no aparelho com as mãos ou os
pés molhados ou húmidos.
• Nunca permita que o aparelho seja utilizado
sem vigilância por crianças ou pessoas incapazes.
• Certifique-se de que as crianças não brincam
com o aparelho.
• Em caso de avaria ou mau funcionamento do
aparelho, desligue-o e não tente repará-lo.
Para eventuais reparações, contacte única e
exclusivamente um Centro de Assistência
Técnica autorizado pelo fabricante e solicite a
utilização de peças sobresselentes originais. A
não observância desta norma poderá comprometer a segurança do aparelho.
• O cabo de alimentação deste aparelho nunca
deverá ser substituído pelo utilizador, dado que
a sua substituição requer a utilização de ferramentas especiais. Em caso de dano do cabo,
ou para a sua substituição, contacte única e
exclusivamente um Centro de Assistência autorizado pelo fabricante de modo a evitar todo e
qualquer risco.
INSTALAÇÃO
• Coloque o aparelho sobre uma superfície,
longe de torneiras e de bancadas.
• Certifique-se de que a tensão da rede eléctrica
corresponde à indicada na chapa de características do aparelho. Ligue o aparelho apenas a
uma tomada de alimentação com uma capacidade mínima de 6 A e dotada de uma ligação
à terra eficaz. O fabricante declina toda e
qualquer responsabilidade por eventuais acidentes provocados pela falta de ligação à terra
do sistema.
• Em caso de incompatibilidade entre a tomada e
a ficha do aparelho, mande substituir a tomada
por outra de tipo adequado, recorrendo a pessoal qualificado.
Leia atentamente este manual de instruções
antes de instalar e utilizar o aparelho. Só
assim poderá obter os melhores resultados
e a máxima segurança de utilização.
PORTOGHESE

23
COMO PREPARAR O CAFÉ
1) Certifique-se de que a cafeteira está fria e
desenrosque-a. Segure a caldeira com uma
mão e, com a outra, rode o colector no sentido
contrário ao dos ponteiros do relógio (fig. 1).
2) Retire o filtro de funil e, se desejar preparar
toda a cafeteira, encha a caldeira com água
fresca até atingir a válvula de segurança (visível no interior da caldeira), sem a ultrapassar
(fig. 2).
Se, no entanto, desejar preparar metade da
cafeteira, encha a caldeira de água até ao
sinal circular situado sob a válvula de segurança (fig. 3 - X).
CONSELHO: é aconselhável utilizar água fresca e
leve. As águas salobras ou ricas em calcário diminuem o sabor.
IMPORTANTE: não utilize a máquina de café
sem água na caldeira ou com água quente
para acelerar a operação.
3) Insira o filtro de funil na caldeira (fig. 3). Se
desejar preparar metade da cafeteira, insira
também o disco adaptador (L) no filtro de funil
(fig. 5).
4) Encha o filtro de funil com café moído, sem o
comprimir (fig. 6). Encha-o adicionando um
pouco de cada vez para evitar que o café
moído transborde.
5) Distribua o café moído uniformemente e retire
os eventuais excedentes do rebordo do filtro.
IMPORTANTE: Utilize café moído de boa qualidade, de moagem média e confeccionado
para cafeteiras do tipo “moka”.
6) Enrosque a cafeteira com firmeza, mas sem
exagerar, segurando a caldeira com uma
mão e, com a outra, rodando o colector no
sentido dos ponteiros do relógio. Evite pressionar a pega.
IMPORTANTE: para evitar perigosos salpicos
de água a ferver, nunca utilize a cafeteira se
o filtro de disco (D) não estiver correctamente
inserido.
7) Pouse a cafeteira na base (fig. 7). Cerrar a
tampa.
8) Prima o interruptor ligado/desligado (fig. 8).
A lâmpada piloto indica que a cafeteira está
a funcionar.
9) O café começará a sair após alguns minutos.
10)Quando a infusão estiver completa, mexa o
café antes de o servir, a fim de o uniformizar
Se preparar apenas metade da cafeteira, é
aconselhável deixar a cafeteira tipo “moka”
pousada sobre a base, durante cerca de 5
minutos após o fim da infusão, para que o
café atinja a temperatura óptima.
11)Uma vez terminada a infusão, começa a
função “keep warm” (manutenção da temperatura). A cafeteira continua a aquecer o café
durante cerca de meia hora. Só depois de
decorrido este espaço de tempo é que a cafeteira se desliga automaticamente
IMPORTANTE: na primeira vez que se utilizar
a cafeteira, é necessário lavar todos os acessórios e os circuitos internos só com água
quente e fazer alguns cafés não destinados a
serem bebidos.
FUNÇÃO KEEP-WARM (MANUTENÇÃO DA
TEMPERATURA)
Graças ao dispositivo “keep warm”, o café pode
ser bebido quente à temperatura certa até meia
hora depois do acendimento da máquina.
Este dispositivo é automaticamente desactivado
quando se retira a cafeteira da base de apoio,
logo que termina a infusão.
Se a cafeteira estiver pousada na base e o colector ainda contiver café, este ainda pode ser mantido quente por mais meia hora, premindo o
interruptor ligado/desligado.
De qualquer forma, terminada a infusão, pode
desligar-se imediatamente a cafeteira, premindo
o interruptor ligado/desligado.
LIMPEZA E MANUTENÇÃO
• Antes de proceder às operações de limpeza,
aguarde que a cafeteira arrefeça bem após a
sua utilização.
• Limpe periodicamente o interior da coluna.
• Controle periodicamente o funil e a vedação:
substitua-os quando apresentarem sinais de
desgaste ou deterioramento. Utilize os anéis
de vedação disponíveis nos centros de assistência técnica autorizados; certifique-se de
que adquire anéis de vedação iguais aos fornecidos..
• De vez em quando, certifique-se de que os
orifícios do filtro de disco não estão obstruídos. Se necessário, limpe-os com o auxílio de
um alfinete (fig. 9).
• NÃO LAVE A CAFETEIRA NA MÁQUINA DE
LAVAR LOIÇA.
• Para a limpeza, não utilize solventes nem
24
PROBLEMAS DE FUNCIONAMENTO
PROBLEMA CAUSAS PROVÁVEIS SOLUÇÃO
O café não sai
O café demora muito tempo a
sair
O café sai pelos rebordos da
caldeira
Falta de água na caldeira
O café utilizado não é do tipo
adequado
O filtro de disco está obstruído
O café foi comprimido
O filtro de disco está obstruído
A vedação está queimada ou
danificada
Encha a caldeira com água
fresca
Utilize café moído expressamente para cafeteiras do tipo
“moka”
Limpe o filtro de disco conforme indicado no parágrafo
“Limpeza e manutenção”
Não comprima o café moído
Limpe o filtro de disco conforme indicado no parágrafo
“Limpeza e manutenção”
Substitua a vedação.
Durante a limpeza, nunca mergulhe a base e
a caldeira na água: trata-se de um aparelho
eléctrico.
detergentes abrasivos. Será suficiente lavá-la
com uma esponja, enxaguá-la com água
quente e secá-la com um pano húmido e
macio.
Nota: quando retirar o filtro de disco para operações de limpeza ou para a substituição do
anel de vedação, insira-o correctamente (antes
de utilizar a cafeteira) para evitar perigosos salpicos de água quente.

25
¶∂ƒπ°ƒ∞º∏ ∆∏™ ™À™∫∂À∏™
√И ·ОfiПФ˘ıФИ fiЪФИ ¯ЪЛЫИМФФИФ‡УЩ·И ЫЩИ˜
ВfiМВУВ˜ ЫВП›‰В˜.
A. ∫·¿ОИ ‰Ф¯В›Ф˘ Ы˘ППФБ‹˜
B. ¢Ф¯В›Ф Ы˘ППФБ‹˜
C. §¤‚ЛЩ·˜
D. ¢›ЫОФ˜ К›ПЩЪФ˘
E. §¿ЫЩИ¯Ф
F. µ¿ЫЛ ЫЩ‹ЪИНЛ˜
G. ∏ПВОЩЪИОfi О·ПТ‰ИФ
H. ¢И·ОfiЩЛ˜ ON/OFF
I. ∂У‰ВИОЩИО‹ П˘¯У›·
J. µ·П‚›‰· ·ЫК·ПВ›·˜
K. ГˆУ› К›ПЩЪФ˘
L. ∞УЩ¿ЩФЪ·˜ БИ· МИЫ‹ О·КВЩИ¤Ъ·
M. ∫ФПfiУ·
¶ƒ√∂π¢√¶√π∏™∂π™ ∞™º∞§∂π∞™
с ∏ ·ЪФ‡Ы· Ы˘ЫОВ˘‹ О·Щ·ЫОВ˘¿ЫЩЛОВ БИ·
ЩЛУ "·Ъ·ЫОВ˘‹ О·К¤". ªЛ ¯ЪЛЫИМФФИВ›ЩВ
ФЩ¤ ¿ПП· ЫОВ˘¿ЫМ·Щ·, О·О¿Ф, ¯·МФМ‹ПИ,
¿ПП· ·КВ„‹М·Щ· ‹ ‰И·П‡М·Щ·: МФЪФ‡У У·
‚Ф˘ПТЫФ˘У ЩИ˜ ЩЪ‡В˜ ЩФ˘ К›ПЩЪФ˘.
ñ K·Щ¿ ЩЛ ‰И¿ЪОВИ· ЩФ˘ О·ı·ЪИЫМФ‡, МЛ
‚˘ı›˙ВЩВ ФЩ¤ ЩЛ ‚¿ЫЛ О·И ЩФ П¤‚ЛЩ· ЫВ
УВЪfi: Л Ы˘ЫОВ˘‹ В›У·И ЛПВОЩЪИО‹.
с ГЪЛЫИМФФИВ›ЩВ ЪФЫВОЩИО¿ ЩЛ Ы˘ЫОВ˘‹ БИ·
Ó· ·ÔʇÁÂÙ ÂÁη‡Ì·Ù· ·fi ÓÂÚfi ‹ ·ÙÌfi.
ñ ∫·Ù¿ ÙË ‰È¿ÚÎÂÈ· Ù˘ ¯Ú‹Û˘ ÌËÓ ·ÁÁ›˙ÂÙÂ
ЩИ˜ ıВЪМ¤˜ ВИК¿УВИВ˜ ЩЛ˜ Ы˘ЫОВ˘‹˜.
ГЪЛЫИМФФИВ›ЩВ Щ· П‹ОЩЪ· ‹ ЩИ˜
¯ВИЪФП·‚¤˜.
ñ ∞ÊÔ‡ ·Ê·ÈÚ¤ÛÂÙ ÙË Û˘Û΢·Û›·,
‚В‚·ИˆıВ›ЩВ fiЩИ Л Ы˘ЫОВ˘‹ В›У·И ·У¤·КЛ.
™В ВЪ›ЩˆЫЛ ·МКИ‚ФП›·˜, МЛ
¯ЪЛЫИМФФИВ›ЩВ ЩЛ Ы˘ЫОВ˘‹ О·И
·Â˘ı˘Óı›Ù Û ÂÍÂȉÈÎÂ˘Ì¤ÓÔ ÚÔÛˆÈÎfi.
ñ ∆· ÛÙÔȯ›· Ù˘ Û˘Û΢·Û›·˜ (Ï·ÛÙÈΤ˜
Ы·ОФ‡ПВ˜, КВПИ˙fiП ОП.) Ъ¤ВИ У·
К˘П¿ЫЫФУЩ·И М·ОЪИ¿ ·fi Щ· ·И‰И¿ БИ·Щ›
·ФЩВПФ‡У Иı·У¤˜ ВЫЩ›В˜ ОИУ‰‡УФ˘.
ñ∏ ·ÚÔ‡Û· Û˘Û΢‹ Ú¤ÂÈ Ó·
¯ЪЛЫИМФФИВ›Щ·И МfiУФ БИ· ФИОИ·О‹ ¯Ъ‹ЫЛ.
∫¿ıВ ¿ППЛ ¯Ъ‹ЫЛ Ъ¤ВИ У· ıВˆЪВ›Щ·И
·О·Щ¿ППЛПЛ О·И О·Щ¿ Ы˘У¤ВИ· ВИО›У‰˘УЛ.
ñ √ ηٷÛ΢·ÛÙ‹˜ ‰ÂÓ Ê¤ÚÂÈ Î·Ì›· ¢ı‡ÓË
БИ· ВУ‰В¯fiМВУВ˜ ‚П¿‚В˜ ·fi ·О·Щ¿ППЛПЛ,
П·Уı·ЫМ¤УЛ ‹ ·ПfiБИЫЩЛ ¯Ъ‹ЫЛ.
ñ ªËÓ ·ÁÁ›˙ÂÙ ÔÙ¤ ÙË Û˘Û΢‹ Ì ‚ÚÂÁ̤ӷ
‹ ˘ÁÚ¿ ¯¤ÚÈ· ‹ fi‰È·.
ñ ªËÓ ÂÈÙÚ¤ÂÙ·È ÔÙ¤ ÙË ¯Ú‹ÛË Ù˘
Û˘Û΢‹˜ Û ·È‰È¿ ‹ ·Ó‹ÌÔÚ· ¿ÙÔÌ·.
ñ µÂ‚·Èˆı›Ù fiÙÈ Ù· ·È‰È¿ ‰ÂÓ
¯ЪЛЫИМФФИФ‡У БИ· ·И¯У›‰И ЩЛ Ы˘ЫОВ˘‹.
с ™В ВЪ›ЩˆЫЛ ‚П¿‚Л˜ ‹ О·О‹˜ ПВИЩФ˘ЪБ›·˜
ЩЛ˜ Ы˘ЫОВ˘‹˜, Ы‚‹ЫЩВ ЩЛУ О·И МЛУ
ВИ¯ВИЪ‹ЫВЩВ У· ЩЛУ ВИЫОВ˘¿ЫВЩВ.
°И· ВУ‰В¯fiМВУВ˜ ВИЫОВ˘¤˜ ·В˘ı˘УıВ›ЩВ
МfiУФ ЫЩФ ВНФ˘ЫИФ‰ФЩЛМ¤УФ ™¤Ъ‚И˜ ЩФ˘
О·Щ·ЫОВ˘·ЫЩ‹ О·И ˙ЛЩ‹ЫЩВ ЩЛ ¯Ъ‹ЫЛ
БУ‹ЫИˆУ ·УЩ·ПП·ОЩИОТУ. ∏ МЛ Щ‹ЪЛЫЛ ЩˆУ
·Ъ·¿Уˆ Ф‰ЛБИТУ МФЪВ› У· ВЛЪВ¿ЫВИ
ЩЛУ ·ЫК¿ПВИ· ЩЛ˜ Ы˘ЫОВ˘‹˜.
с ∆Ф ЛПВОЩЪИОfi О·ПТ‰ИФ ЩЛ˜ Ы˘ЫОВ˘‹˜ ‰ВУ
Ú¤ÂÈ Ó· ·ÓÙÈηı›ÛÙ·Ù·È ÔÙ¤ ·fi ÙÔ ¯Ú‹ÛË
ÁÈ·Ù› Ë ·ÓÙÈηٿÛÙ·ÛË ··ÈÙ› ÙË ¯Ú‹ÛË
ÂȉÈÎÒÓ ÂÚÁ·Ï›ˆÓ. ™Â ÂÚ›ÙˆÛË ÊıÔÚ¿˜
ÙÔ˘ ηψ‰›Ô˘ ‹ ÁÈ· ÙËÓ ·ÓÙÈηٿÛÙ·Û‹ ÙÔ˘,
·Â˘ı˘Óı›Ù ÛÙÔ ÂÍÔ˘ÛÈÔ‰ÔÙË̤ÓÔ ™¤Ú‚Ș
ÙÔ˘ ηٷÛ΢·ÛÙ‹ ¤ÙÛÈ ÒÛÙ ӷ ·ÔʇÁÂÙÂ
οı Èı·Ófi ΛӉ˘ÓÔ.
∂°∫∞∆∞™∆∞™∏
ñ ∆ÔÔıÂÙ‹ÛÙ ÙË Û˘Û΢‹ Û ÂÈÊ¿ÓÂÈ·
ÂÚÁ·Û›·˜ Ì·ÎÚÈ¿ ·fi ‚Ú‡Û˜ ÓÂÚÔ‡ ηÈ
ÓÂÚÔ¯‡Ù˜.
с µВ‚·ИˆıВ›ЩВ fiЩИ Л Щ¿ЫЛ ЩФ˘ ЛПВОЩЪИОФ‡
‰ИОЩ‡Ф˘ ·УЩИЫЩФИ¯В› ЫЩЛУ ЩИМ‹ Ф˘
·У·БЪ¿КВЩ·И ЫЩЛУ ИУ·О›‰·
¯·Ъ·ОЩЛЪИЫЩИОТУ ЩЛ˜ Ы˘ЫОВ˘‹˜. ™˘У‰¤ЫЩВ
ЩЛ Ы˘ЫОВ˘‹ МfiУФ ЫВ Ъ›˙· ЪВ‡М·ЩФ˜ МВ
ВП¿¯ИЫЩЛ ·ЪФ¯‹ 6 A О·И ·ФЩВПВЫМ·ЩИО‹
БВ›ˆЫЛ. √ О·Щ·ЫОВ˘·ЫЩ‹˜ ‰ВУ К¤ЪВИ О·М›·
В˘ı‡УЛ БИ· ВУ‰В¯fiМВУ· ·Щ˘¯‹М·Щ· Ф˘
ФКВ›ПФУЩ·И ЫЩЛУ ¤ППВИ„Л БВ›ˆЫЛ˜ ЩЛ˜
ВБО·Щ¿ЫЩ·ЫЛ˜.
ñ ™Â ÂÚ›ÙˆÛË ·Û˘Ì‚·ÙfiÙËÙ·˜ ÌÂٷ͇ Ù˘
Ú›˙·˜ Î·È ÙÔ˘˜ ÊȘ Ù˘ Û˘Û΢‹˜,
·Â˘ı˘Óı›Ù Û ÂÍÔ˘ÛÈÔ‰ÔÙË̤ÓÔ
ÚÔÛˆÈÎfi ÁÈ· ÙËÓ ·ÓÙÈηٿÛÙ·ÛË Ù˘
Ú›˙·˜.
¢И·‚¿ЫЩВ ЪФЫВОЩИО¿ ЩФ ·ЪfiУ
ВБ¯ВИЪ›‰ИФ Ф‰ЛБИТУ ЪИУ ВБО·Щ·ЫЩ‹ЫВЩВ
О·И ¯ЪЛЫИМФФИ‹ЫВЩВ ЩЛ Ы˘ЫОВ˘‹. ªfiУФУ
¤ЩЫИ ı· ВН·ЫК·П›ЫВЩВ Щ· О·П‡ЩВЪ·
·ФЩВП¤ЫМ·Щ· О·И ЩЛ М¤БИЫЩЛ ·ЫК¿ПВИ·
¯Ъ‹ЫЛ˜.
∂§§∏¡π∫∞

¶ø™ ¡∞ º∆π∞•∂∆∂ ∫∞º∂
1) µВ‚·ИˆıВ›ЩВ fiЩИ Л О·КВЩИ¤Ъ· В›У·И ОЪ‡· О·И
НВ‚И‰ТЫЩВ ЩЛУ ОЪ·ЩТУЩ·˜ ЩФ П¤‚ЛЩ· МВ ЩФ
¤У· ¯¤ЪИ О·И Б˘ЪУТУЩ·˜ ·ЪИЫЩВЪfiЫЩЪФК· МВ
ЩФ ¿ППФ ¯¤ЪИ ЩФ ‰Ф¯В›Ф Ы˘ППФБ‹˜ (ВИО. 1).
2) µБ¿ПЩВ ЩФ ¯ˆУ› К›ПЩЪФ˘ О·И, ·У ı¤ПВЩВ У·
КЩИ¿НВЩВ fiПЛ ЩЛУ О·КВЩИ¤Ъ·, БВМ›ЫЩВ ЩФ
П¤‚ЛЩ· МВ КЪ¤ЫОФ УВЪfi ¤ˆ˜ ЩФ ‡„Ф˜ ЩЛ˜
‚·П‚›‰·˜ ·ЫК·ПВ›·˜ (ЫЩФ ВЫˆЩВЪИОfi ЩФ˘
П¤‚ЛЩ·) ¯ˆЪ›˜ У· ЩФ ˘ВЪ‚В›ЩВ (ВИО. 2).
∞ÓÙ›ıÂÙ·, ·Ó ı¤ÏÂÙ ӷ ÊÙÈ¿ÍÂÙ ÌÈÛ‹
ηÊÂÙȤڷ, ÁÂÌ›ÛÙ Ì ÓÂÚfi ÙÔ Ï¤‚ËÙ· ¤ˆ˜
ÙÔ Î˘ÎÏÈÎfi ÛËÌ¿‰È οو ·fi ÙË ‚·Ï‚›‰·
·ÛÊ·Ï›·˜ (ÂÈÎ. 3 - Ã).
™Àªµ√À§∏: Û˘ÓÈÛÙ¿Ù·È Ë ¯Ú‹ÛË ÊÚ¤ÛÎÔ˘ ηÈ
ÂÏ·ÊÚÔ‡ ÓÂÚÔ‡. ∆· ˘Ê¿ÏÌ˘Ú· ‹ ÏÔ‡ÛÈ· ÛÂ
¿Ï·Ù· ÓÂÚ¿, ÂÍ·ÛıÂÓÔ‡Ó ÙÔ ¿ÚˆÌ·.
™∏ª∞¡∆π∫√: МЛ ¯ЪЛЫИМФФИВ›ЩВ ЩЛ
Ы˘ЫОВ˘‹ ¯ˆЪ›˜ УВЪfi ЫЩФ П¤‚ЛЩ· ‹ МВ
˙ВЫЩfi УВЪfi БИ· Щ·¯‡ЩВЪЛ ·Ъ·БˆБ‹ ЩФ˘
О·К¤.
3) ∆ÔÔıÂÙ‹ÛÙ ÙÔ ¯ˆÓ› Ê›ÏÙÚÔ˘ ÛÙÔ Ï¤‚ËÙ·
(ÂÈÎ. 4). ∞Ó ı¤ÏÂÙ ӷ ÊÙÈ¿ÍÂÙ ÌÈÛ‹
ηÊÂÙȤڷ, ÙÔÔıÂÙ‹ÛÙÂ Î·È ÙÔÓ ·ÓÙ¿ÙÔÚ·
(L) ÛÙÔ ¯ˆÓ› Ê›ÏÙÚÔ˘ (ÂÈÎ. 5).
4) °ÂÌ›ÛÙ ÙÔ ¯ˆÓ› Ê›ÏÙÚÔ˘ Ì ·ÏÂṲ̂ÓÔ Î·Ê¤
¯ˆÚ›˜ Ó· ÙÔÓ È¤ÛÂÙ (ÂÈÎ. 6). °ÂÌ›ÛÙ ÙÔ
Ê›ÏÙÚÔ ÛÈÁ¿-ÛÈÁ¿ ÁÈ· Ó· ÌË ¯˘ı› Ô Î·Ê¤˜.
5) ∞ПТЫЩВ ФМФИfiМФЪК· ЩФУ ·ПВЫМ¤УФ О·К¤
О·И ·К·ИЪ¤ЫЩВ ЩФ ВУ‰В¯fiМВУФ ПВfiУ·ЫМ·
·fi Ù· ¯Â›ÏË ÙÔ˘ Ê›ÏÙÚÔ˘.
™∏ª∞¡∆π∫√: ГЪЛЫИМФФИВ›ЩВ ·ПВЫМ¤УФ
О·К¤ О·П‹˜ ФИfiЩЛЩ·˜, М¤ЫЛ˜ ¿ПВЫЛ˜ О·И
ЫВ Ы˘ЫОВ˘·Ы›· БИ· О·КВЩИ¤Ъ·.
6) µИ‰ТЫЩВ ЩЛУ О·КВЩИ¤Ъ· ЫКИ¯Щ¿, ·ПП¿ fi¯И
˘ВЪ‚ФПИО¿, ОЪ·ЩТУЩ·˜ ЩФ П¤‚ЛЩ· МВ ЩФ
¤У· ¯¤ЪИ О·И Б˘ЪУТУЩ·˜ ‰ВНИfiЫЩЪФК· МВ ЩФ
¿ППФ ¯¤ЪИ ЩФ ‰Ф¯В›Ф Ы˘ППФБ‹˜ ¯ˆЪ›˜ У·
И¤˙ВЩВ ЩЛ ¯ВИЪФП·‚‹.
™∏ª∞¡∆π∫√: БИ· У· ·ФК‡БВЩВ
ВИО›У‰˘У· ИЩЫИП›ЫМ·Щ· ‚Ъ·ЫЩФ‡ УВЪФ‡,
ФЩ¤ МЛ ¯ЪЛЫИМФФИВ›ЩВ ЩЛУ О·КВЩИ¤Ъ· ·У
Ф ‰›ЫОФ˜ К›ПЩЪФ˘ (D) ‰ВУ ¤¯ВИ ЩФФıВЩЛıВ›
ЫˆЫЩ¿.
7) ™ÙËÚ›ÍÙ ÙËÓ Î·ÊÂÙȤڷ ÛÙË ‚¿ÛË (ÂÈÎ. 77).
8) ¶И¤ЫЩВ ЩФ ‰И·ОfiЩЛ ON/OFF (ВИО. 8).
∏ ·У·ММ¤УЛ П˘¯У›· ˘Ф‰ВИОУ‡ВИ fiЩИ Л
О·КВЩИ¤Ъ· ПВИЩФ˘ЪБВ›.
9) √ ηʤ˜ ·Ú¯›˙ÂÈ Ó· ÙÚ¤¯ÂÈ ÌÂÙ¿ ·fi Ï›Á·
ÏÂÙ¿.
10) ŸЩ·У Л ВО¯‡ПИЫЛ ФПФОПЛЪˆıВ›,
·У·О·Щ¤„ЩВ ЩФУ О·К¤ ЪИУ ЩФУ ЫВЪ‚›ЪВЩВ
БИ· У· ·ФОЩ‹ЫВИ ФМФИФБ¤УВИ·
∞У ı¤ПВЩВ У· КЩИ¿НВЩВ МfiУФ МИЫ‹
О·КВЩИ¤Ъ·, Ы˘УИЫЩ¿Щ·И У· ·К‹ЫВЩВ ЩЛУ
О·КВЩИ¤Ъ· ¿Уˆ ЫЩЛ ‚¿ЫЛ ВЪ›Ф˘ БИ· 5
ПВЩ¿ МВЩ¿ ЩФ Щ¤ПФ˜ ЩЛ˜ ВО¯‡ПИЫЛ˜ ТЫЩВ
Щ· КЩ¿ЫВИ ЫЩЛУ И‰·УИО‹ ıВЪМФОЪ·Ы›·.
11)∞КФ‡ ФПФОПЛЪˆıВ› Л ВО¯‡ПИЫЛ, ·Ъ¯›˙ВИ Л
ПВИЩФ˘ЪБ›· keep warm (‰И·Щ‹ЪЛЫЛ ЩЛ˜
ıВЪМФОЪ·Ы›·˜) О·И Л О·КВЩИ¤Ъ· Ы˘УВ¯›˙ВИ
У· ˙ВЫЩ·›УВИ ЩФУ О·К¤ БИ· ВЪ›Ф˘ МИЫ‹
ТЪ·. ªfiУФ МВЩ¿ ЩЛУ ¿ЪФ‰Ф ·˘ЩФ‡ ЩФ˘
¯ЪfiУФ˘, Л О·КВЩИ¤Ъ· Ы‚‹УВИ ·˘ЩfiМ·Щ·
™∏ª∞¡∆π∫√: ЩЛУ ЪТЩЛ КФЪ¿ Ф˘
¯ЪЛЫИМФФИВ›ЩВ ЩЛУ О·КВЩИ¤Ъ·, Ъ¤ВИ У·
П‡УВЩВ fiП· Щ· ВН·ЪЩ‹М·Щ· О·И Щ·
ВЫˆЩВЪИО¿ О˘ОПТМ·Щ· МfiУФ МВ ˙ВЫЩfi УВЪfi
О·И У· КЩИ¿НВЩВ МВЪИОФ‡˜ О·К¤‰В˜ Ф˘ ‰ВУ
ı· О·Щ·У·ПТЫВЩВ.
§∂π∆√Àƒ°π∞ KEEP-WARM (¢π∞∆∏ƒ∏™∏
∆∏™ £∂ƒª√∫ƒ∞™π∞™)
Г¿ЪЛ ЫЩФ Ы‡ЫЩЛМ· keep warm, Ф О·К¤˜
МФЪВ› У· ‰И·ЩЛЪЛıВ› ЫЩЛ ЫˆЫЩ‹ ıВЪМФОЪ·Ы›·
¤ˆ˜ О·И МИЫ‹ ТЪ· МВЩ¿ ЩФ ¿У·ММ· ЩЛ˜
Ы˘ЫОВ˘‹˜.
∆Ф Ы‡ЫЩЛМ· ·˘Щfi ·ВУВЪБФФИВ›Щ·И ·˘ЩfiМ·Щ·,
fiЩ·У ·ФМ·ОЪ‡УВЩВ ЩЛУ О·КВЩИ¤Ъ· ·fi ЩЛ
‚¿ЫЛ ЫЩ‹ЪИНЛ˜ МfiПИ˜ ЩВЪМ·ЩИЫЩВ› Л ВО¯‡ПИЫЛ.
∞У Л О·КВЩИ¤Ъ· ЫЩЛЪ›˙ВЩ·И ЫЩЛ ‚¿ЫЛ О·И
ВЪИ¤¯ВИ ·ОfiМ· О·К¤ ЫЩФ ‰Ф¯В›Ф, МФЪВ›ЩВ У·
‰И·ЩЛЪ‹ЫВЩВ ЩФУ О·К¤ ˙ВЫЩfi БИ· МИЫ‹ ·ОfiМЛ
ТЪ· И¤˙ФУЩ·˜ ЩФ ‰И·ОfiЩЛ ON/OFF.
™В О¿ıВ ВЪ›ЩˆЫЛ, МВЩ¿ ЩФУ ЩВЪМ·ЩИЫМfi ЩЛ˜
ВО¯‡ПИЫЛ˜, МФЪВ›ЩВ У· Ы‚‹ЫВЩВ ·М¤Ыˆ˜ ЩЛУ
О·КВЩИ¤Ъ· И¤˙ФУЩ·˜ ЩФ П‹ОЩЪФ ON/OFF.
∫∞£∞ƒπ™ª√™ ∫∞π ™À¡∆∏ƒ∏™∏
ñ ¶ÚÈÓ ÙÔÓ Î·ı·ÚÈÛÌfi Ù˘ Û˘Û΢‹˜,
ÂÚÈ̤ÓÂÙ ӷ ÎÚ˘ÒÛÂÈ Î·Ï¿ Ë Î·ÊÂÙȤڷ
ÌÂÙ¿ ÙË ¯Ú‹ÛË.
с ∫·ı·Ъ›ЫВЩВ ВЪИФ‰ИО¿ ЩФ ВЫˆЩВЪИОfi ЩЛ˜
ÎÔÏfiÓ·˜.
ñ ∂ϤÁ¯ÂÙ ÂÚÈÔ‰Èο ÙÔ ¯ˆÓ› Î·È ÙÔ
Ï¿ÛÙȯÔ: fiÙ·Ó ·ÚÔ˘ÛÈ¿˙Ô˘Ó ›¯ÓË ÊıÔÚ¿˜
‹ ‚Ï¿‚˜ Ú¤ÂÈ Ó· ·ÓÙÈηı›ÛÙ·ÓÙ·È.
ñ ГЪЛЫИМФФИВ›ЩВ Щ· П¿ЫЩИ¯· Ф˘ ¤¯ВЩВ
·ÁÔÚ¿ÛÂÈ ·fi ÙÔ ÂÍÔ˘ÛÈÔ‰ÔÙË̤ÓÔ Û¤Ú‚È˜,
ÔÈ ‰È·ÛÙ¿ÛÂȘ ÙˆÓ ÔÔ›ˆÓ Ú¤ÂÈ Ó· ›ӷÈ
›‰È˜ Ì ÂΛӘ ÙˆÓ ·Ú¯fiÌÂÓˆÓ.
26

27
¶ƒ√µ§∏ª∞∆∞ §∂π∆√Àƒ°π∞™
¶ƒ√µ§∏ª∞ ¶π£∞¡∂™ ∞π∆π∂™ §À™∏
¢ÂÓ ÙÚ¤¯ÂÈ Î·Ê¤˜
√ ηʤ˜ ·ÚÁ› Ó· ÙÚ¤ÍÂÈ
√ ηʤ˜ ÙÚ¤¯ÂÈ ·fi Ù·
¯Â›ÏË ÙÔ˘ Ϥ‚ËÙ·
ŒÏÏÂÈ„Ë ÓÂÚÔ‡ ÛÙÔ Ï¤‚ËÙ·
ÃÚ‹ÛË Ï·Óı·Ṳ̂ÓÔ˘ Ù‡Ô˘
ηʤ
√ ‰›ÛÎÔ˜ Ê›ÏÙÚÔ˘ ›ӷÈ
‚Ô˘ÏˆÌ¤ÓÔ˜
√ О·К¤˜ ¤¯ВИ Ы˘МИВЫЩВ›
√ ‰›ÛÎÔ˜ Ê›ÏÙÚÔ˘ ›ӷÈ
‚Ô˘ÏˆÌ¤ÓÔ˜
∆Ô Ï¿ÛÙÈ¯Ô Â›Ó·È Î·Ì¤ÓÔ ‹
Êı·Ṳ́ÓÔ
°ÂÌ›ÛÙ ÙÔ Ï¤‚ËÙ· ÌÂ
ÊÚ¤ÛÎÔ ÓÂÚfi
ГЪЛЫИМФФИВ›ЩВ О·К¤ БИ·
О·КВЩИ¤ЪВ˜
∫·ı·Ú›ÛÙ ÙÔ ‰›ÛÎÔ Ê›ÏÙÚÔ˘
Û‡Ìʈӷ Ì ÙȘ Ô‰ËÁ›Â˜ Ù˘
·Ú·ÁÚ¿ÊÔ˘ "∫·ı·ÚÈÛÌfi˜
Î·È Û˘ÓÙ‹ÚËÛË"
ªË Û˘ÌȤ˙ÂÙ ÙÔÓ
·ÏÂṲ̂ÓÔ Î·Ê¤
∫·ı·Ú›ÛÙ ÙÔ ‰›ÛÎÔ Ê›ÏÙÚÔ˘
Û‡Ìʈӷ Ì ÙȘ Ô‰ËÁ›Â˜ Ù˘
·Ú·ÁÚ¿ÊÔ˘ "∫·ı·ÚÈÛÌfi˜
Î·È Û˘ÓÙ‹ÚËÛË"
∞ÓÙÈηٷÛÙ‹ÛÙ ÙÔ Ï¿ÛÙȯÔ.
K·Щ¿ ЩЛ ‰И¿ЪОВИ· ЩФ˘ О·ı·ЪИЫМФ‡, МЛ
‚˘ı›˙ÂÙ ÔÙ¤ ÙË ‚¿ÛË Î·È ÙÔ Ï¤‚ËÙ· ÛÂ
УВЪfi: Л Ы˘ЫОВ˘‹ В›У·И ЛПВОЩЪИО‹.
ñ ∂ϤÁ¯ÂÙ ÂÚÈÔ‰Èο ÙȘ Ùڇ˜ ÙÔ˘ ‰›ÛÎÔ˘
К›ПЩЪФ˘ О·И ·У ¤¯Ф˘У ‚Ф˘ПТЫВИ О·ı·Ъ›ЫЩВ
ЩИ˜ МВ М›· ‚ВПfiУ· (ВИО. 9).
с °И· ЩФУ О·ı·ЪИЫМfi, МЛ ¯ЪЛЫИМФФИВ›ЩВ
‰È·Ï‡Ù˜ ‹ ·ÔÚÚ˘·ÓÙÈο Û ÛÎfiÓË.
∞ÚΛ Ó· ÙËÓ Ï‡ÓÂÙ Ì ¤Ó· ÛÊÔ˘ÁÁ¿ÚÈ,
Ó· ÙËÓ Í‚Á¿ÏÂÙ Ì η˘Ùfi ÓÂÚfi Î·È Ó·
ÙËÓ ÛÎÔ˘›ÛÂÙ Ì ¤Ó· ˘ÁÚfi Î·È Ì·Ï·Îfi
·Ó›.
™ЛМВ›ˆЫЛ: fiЩ·У ·К·ИЪВ›ЩВ ЩФ ‰›ЫОФ К›ПЩЪФ˘
БИ· ЩФУ О·ı·ЪИЫМfi ‹ БИ· ЩЛУ ·УЩИО·Щ¿ЫЩ·ЫЛ
ЩФ˘ П¿ЫЩИ¯Ф˘, ı˘МЛıВ›ЩВ ЫЩЛ Ы˘У¤¯ВИ· (ЪИУ
¯ЪЛЫИМФФИ‹ЫВЩВ ЩЛУ О·КВЩИ¤Ъ·) У· ЩФ
Н·У·‚¿ПВЩВ ЫˆЫЩ¿ ТЫЩВ У· ·ФК‡БВЩВ
ВИО›У‰˘У· ИЩЫИП›ЫМ·Щ· ˙ВЫЩФ‡ УВЪФ‡.

28
 Loading...