

DeLonghi DEDW60S, DEDW60W User Manual
De’Longhi Dishwasher
USER GUIDE
Please read this user guide carefully and retain for future reference
Model
DEDW60S / DEDW60W
© 2010 De’Longhi Australia Pty Ltd.

Contents Warranty Information
Page 23
The De’Longhi Dishwasher is warranted against faults
resulting from manufacturing or material defects. The
warranty period for normal domestic installation and use is
three years from the date of purchase. In non-domestic
use De’Longhi limits the voluntary warranty to 6 months.
De’Longhi undertakes to repair or replace the Dishwasher
at our discretion if the product is found to be defective due
to a manufacturing fault during the warranty period.
This warranty excludes any damage caused by misuse,
neglect, shipping accident, or incorrect installation.
Normal wear and tear is also expressly excluded. The
warranty claim is void if no fault is found with the product
or if work is carried out by anyone other than an authorised
De’Longhi Service Agent.
In Australia, this warranty is additional to the conditions
and guarantees which are mandatory as implied under the
Trade Practices Act 1974 and State and Territory
legislation.
NOTE: Warranty is determined by unit serial number and
date of purchase.
How to contact us about a warranty claim
Talk to a De’Longhi representative for further warranty
or product information please call the number in your
country:
Australia
www.delonghi.com.au
Phone: 1800 126 659
New Zealand
www.delonghi.co.nz
Phone: 0508 200 300
Page 2
Parts and Features . . . . . . . . . . . . . . . . . . . . . . . . . . . . . . . . . . 03
De’Longhi Safety Precautions. . . . . . . . . . . . . . . . . . . . . . . . . . . 04
Dishwasher Safety Precautions . . . . . . . . . . . . . . . . . . . . . . . . . 05
Installation Safety Precautions . . . . . . . . . . . . . . . . . . . . . . . . . . 07
Installation . . . . . . . . . . . . . . . . . . . . . . . . . . . . . . . . . . . . . . . . 08
- Cold Water Connection
- Drain Hose Connection
- Positioning the Appliance
Using your Dishwasher . . . . . . . . . . . . . . . . . . . . . . . . . . . . . . . 09
- Before Starting the Dishwasher
- Prior to using for the first time
- Loading the Dishwasher Basket
- Starting a Washing Program
- Control Panel
- Turning on the Appliance
- Change the Program
- Forget to add a Dish?
- At the end of the Wash Cycle
Care and Cleaning. . . . . . . . . . . . . . . . . . . . . . . . . . . . . . . . . . . 18
- Filtering System
- Filter Assembly
- Cleaning the Filter
- Caring for the Dishwasher
- Protect against Freezing
- Cleaning the Spray Arms
- How to keep your Dishwasher in shape
Troubleshooting . . . . . . . . . . . . . . . . . . . . . . . . . . . . . . . . . . . . 20
Error Codes . . . . . . . . . . . . . . . . . . . . . . . . . . . . . . . . . . . . . . . 21
Help us Help You. . . . . . . . . . . . . . . . . . . . . . . . . . . . . . . . . . . . 22
Warranty Information . . . . . . . . . . . . . . . . . . . . . . . . . . . . . . . . . 23
Help us Help You Parts and Features
Model: DEDW60S / DEDW60W
Read this guide carefully, it is intended to help you
operate and maintain your new Dishwasher properly.
Keep it handy to answer your questions. If you don't
understand something or you need more assistance,
please call the De’Longhi Helpline.
To help us provide prompt answers to your queries,
please record your Dishwasher model and serial
numbers. You’ll find them on a plate located on the
rear outside wall of the Dishwasher.
Dishwasher details
Before you call for service
Check the Troubleshooting Section on page 20. It lists
causes of minor operating problems that you can
correct yourself.
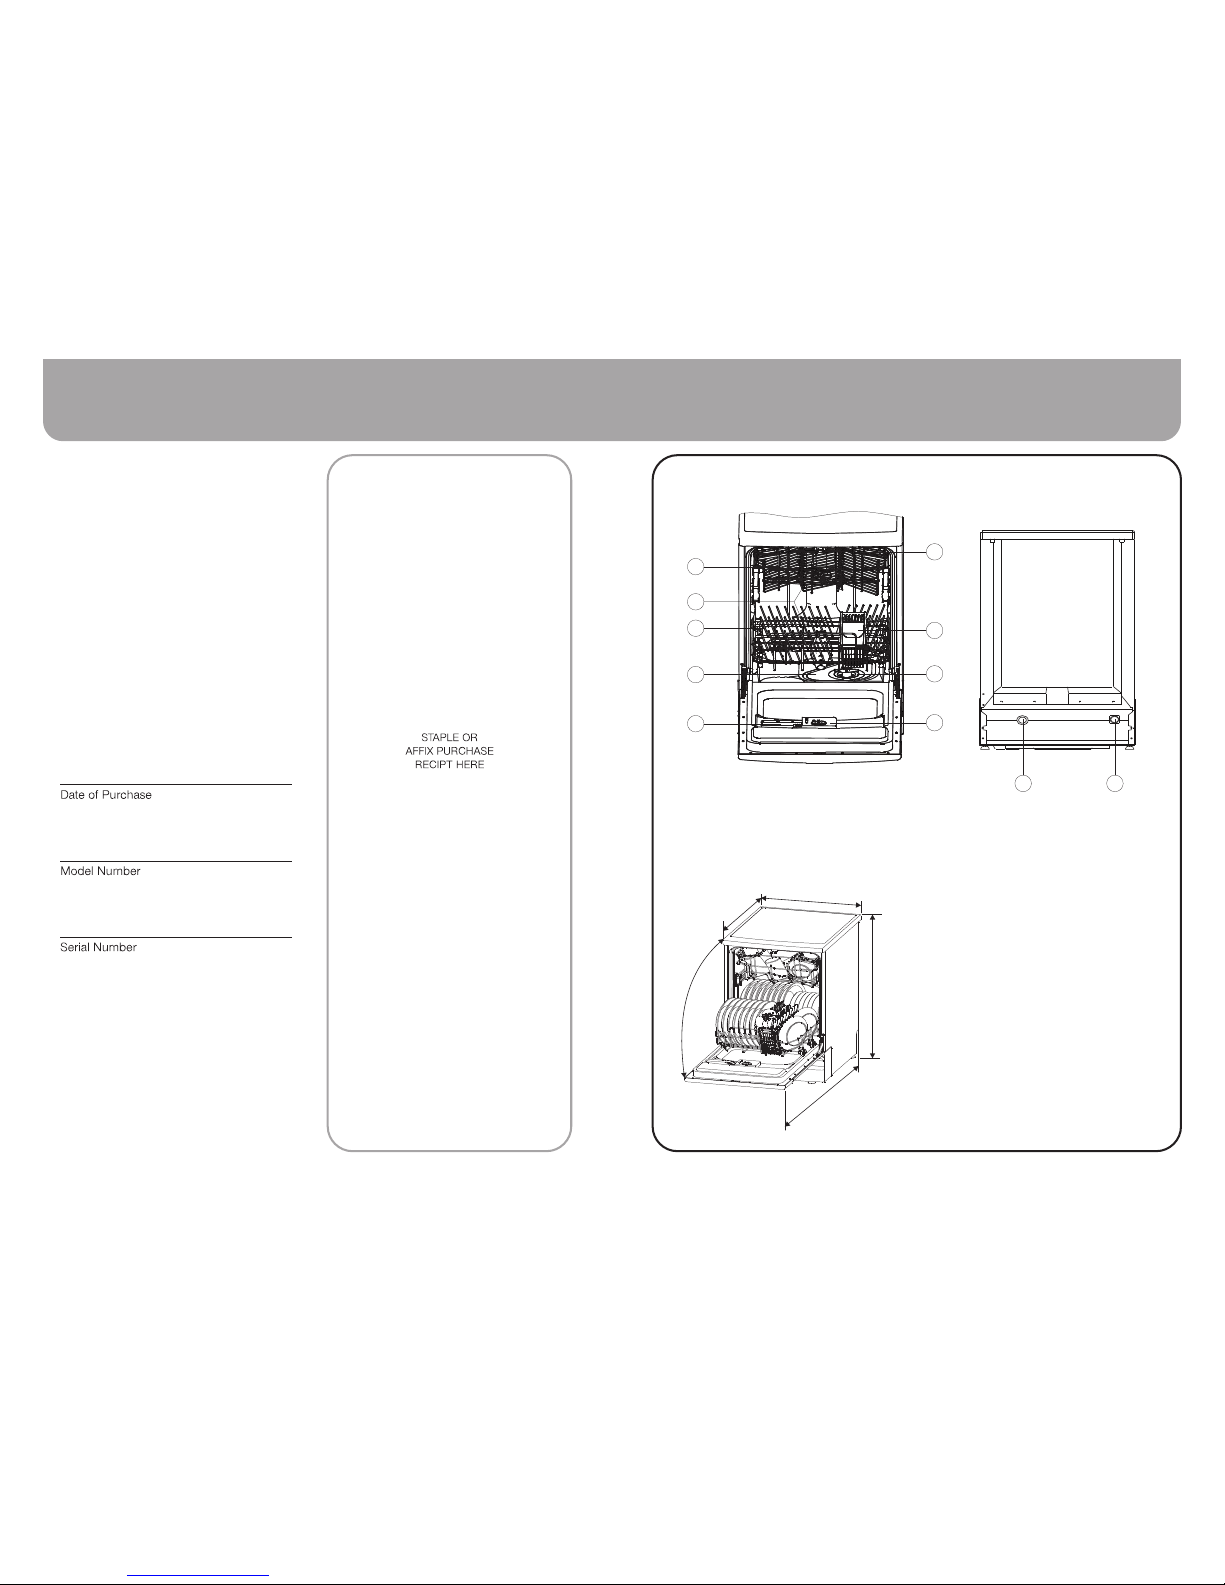
Components:
1. Upper Basket 7. Cutlery Basket
2. Spray Arms 8. Coarse Filter
3. Lower Basket 9. Rinse Aid Dispenser
4. Main Filter 10. Drain Pipe Connector
5. Detergent Dispenser 11. Inlet Pipe Connector
6. Cup Shelf
Dimensions:
Height 850mm
Width 600mm
Depth 580mm
Voltage connected Load: see rating label
Water pressure: 0.04-1.0MPa
Hot water connection: max 60°C
Power supply: see rating label
Capacity: 12 place settings
1
3
2
5
Page 3Page 22
4
10 11
6
7
8
9
600
058
850
1
1
5
3

De’Longhi’s Safety Precautions Troubleshooting
De’Longhi pride themselves on their innovative range
of the highest quality consumer products.
De’Longhi ensures all of its products are 100% safe
through quality design and manufacture. All products
meet or exceed stringent laboratory-tested safety
requirements.
It is necessary for anyone using an electrical appliance
to be safety conscious. The following precautions are
essential for the safe use of an electrical appliance.
Carefully read all of the instructions provided with your
appliance:
Always turn the power off at the power outlet before
Ÿ
you insert or remove a plug. Remove by grasping
the plug, do not pull on the cord.
Do not use your appliance with an extension cord
Ÿ
unless this cord has been checked and tested by a
qualified technician or service person. The
extension cord must be a VDE-Listed, 3-wire
grounding extension cord that has a grounding
plug and outlet and that the electrical rating of the
cord is 220-240 volts and at least 10 amperes.
Always use your appliance from a power outlet of
Ÿ
the voltage (A.C. only) marked on the appliance.
Do not use an appliance for any purpose other than
Ÿ
its intended use.
Do not attempt to repair an electrical appliance.
Ÿ
Return a damaged or malfunctioning appliance to a
qualified service centre for adjustment or repair if
required.
The appliance must be positioned so the AC plug is
Ÿ
accessible.
This appli ance is designed exclu sively f or
Ÿ
household use. All other uses are strictly forbidden.
The appliance is not intended for use by persons
Ÿ
(including children) with reduced physical, sensory
or mental capabilities, or lack of experience and
know ledge, unle ss the y have been give n
supervision or instruction concerning use of the
appliance by a person responsible for their safety.
Children should be supervised to ensure that they
do not play with the appliance.
If the power cable is damaged, it must be replaced
Ÿ
by the manufacturer, an authorised service centre
or a qualified electrician in order to eliminate all risk.
Page 21Page 4
The d ishes w ere not
loa ded cor rectl y.
See n otes in " L oadin g the Di shwas her Bas kets ".
Sel ect a mor e inten sive pr ogram .
See " Wash Cy cle Table " .
Use m ore det ergen t, or cha nge you r dete rgent .
Rea rrang e the ite ms so th at the sp ray can r otate f reely.
Cle an and/ or fit th e filt er comb inati on corr ectly.
Cle an the sp ray arm j ets. S ee "Cle aning t he Spra y
Arm s".
Use l ess det ergen t if you h ave sof t water a nd sele ct
a sho rtest c ycle to w ash th e glass ware an d to get
the m clean .
Use a m ild abr asive c lean er to eli minat e those m arks.
Re- loadi ng the di shes p roperl y.
Loa d the dis hwash er as su ggest ed in the d irect ions.
Inc rease t he amou nt of rin se-ai d/ref ill th e rinse -aid
dis pense r.
Do no t empty y our dis hwas her imm ediat ely aft er
was hing. O pen the d oor sl ightl y so that t he stea m can
esc ape. Be gin unl oadi ng the di shwas her onl y once t
he di shes ar e barel y warm to t he touc h. Empt y the lo w
bas ket fir st. Thi s preve nts wat er for m dropp ing off
dis hes in th e upper b aske t.
In sh ort pro gram th e washi ng temp erat ure is lo wer.
Thi s also lo wers cl eani ng perf orman ce. Cho ose
a pro gram wi th a long w ashin g time .
Wate r drain age is m ore diff icult w ith th ese ite ms.
Cut lery or d ishes o f this t ype are n ot suit able fo r
was hing in t he dish wash er.
The p rogra m was
not p owerf ul enou gh.
Not e nough d eterg ent
was d ispen sed.
Ite ms are bl ockin g
the p ath of sp ray arm s.
The f ilter c ombin atio n
in th e base of w ash
cab inet is n ot clea n or
is no t corre ctly fi tted.
Thi s may cau se
the s pray ar m jets
to ge t block ed.
Com binat ion of so ft
wat er and to o much
det ergen t.
Alu minum u tensi ls hav e
rub bed aga inst di shes .
Dis hes blo ck
det ergen t cups.
Imp roper l oadin g
Too lit tle rin se-ai d
Dis hes are r emove d
too s oon
Wron g progr am
has b een sel ected
Use o f cutle ry with
a low -qual ity coa ting
Unsatis factory washing result
Unsatis factory
drying resu lts
Pro blem Possib le C auses S olution
The d ishes
are n ot clea n
Clo udine ss
on gl asswar e
Bla ck or gray
mar ks on dis hes
Det ergen t left in
dis pense r cups
The d ishes a re
not d ryin g
ERROR CODES
When some malfunctions occur, the appliance will display error codes to warn you:
Codes Meanings Possible Causes
E1 Longer inlet time. Faucets is not opened, or water intake is restricted, or water
pressure is too low.
E3 Longer heating time, but not Malfunction of temperature sensor or of heating element.
reaching required temperature.
E4 Overfilled. Too much inlet water.
E6 Failure of temperature sensor. Open circuit or break of temperature sensor.
E7 Failure of temperature sensor. Short circuit or break of temperature sensor.
WARNING!
If overflow occurs, turn off the main water supply before calling a service.
Ÿ
If there is water in the base pan because of an overfill or small leak, the water should be removed before restarting
Ÿ
the dishwasher.
 Loading...