

Page 1
BISTECCHIERA
BARBECUE
GRIL A BIFTECK
BARBECUE-TISCHGRILL
ELEKTRISCHE BARBECUE
ASADOR
GRELHADOR
BARBEQUE
ùùããÖÖääííêêééÜÜÄÄêêééÇÇççüü
Istruzioni per l’uso
Instructions for use
Mode d’emploi
Gebrauchsanleitung
Gebruiksaanwijzingen
Instrucciones de uso
Instruções
√‰ËÁ›Â˜ ¯Ú‹Û˘
аМТЪЫНˆЛЛ ФУ ˝НТФОЫ‡Ъ‡ˆЛЛ
BG30 6-02-2002 9:01 Pagina 1
Page 2
DESCRIZIONE
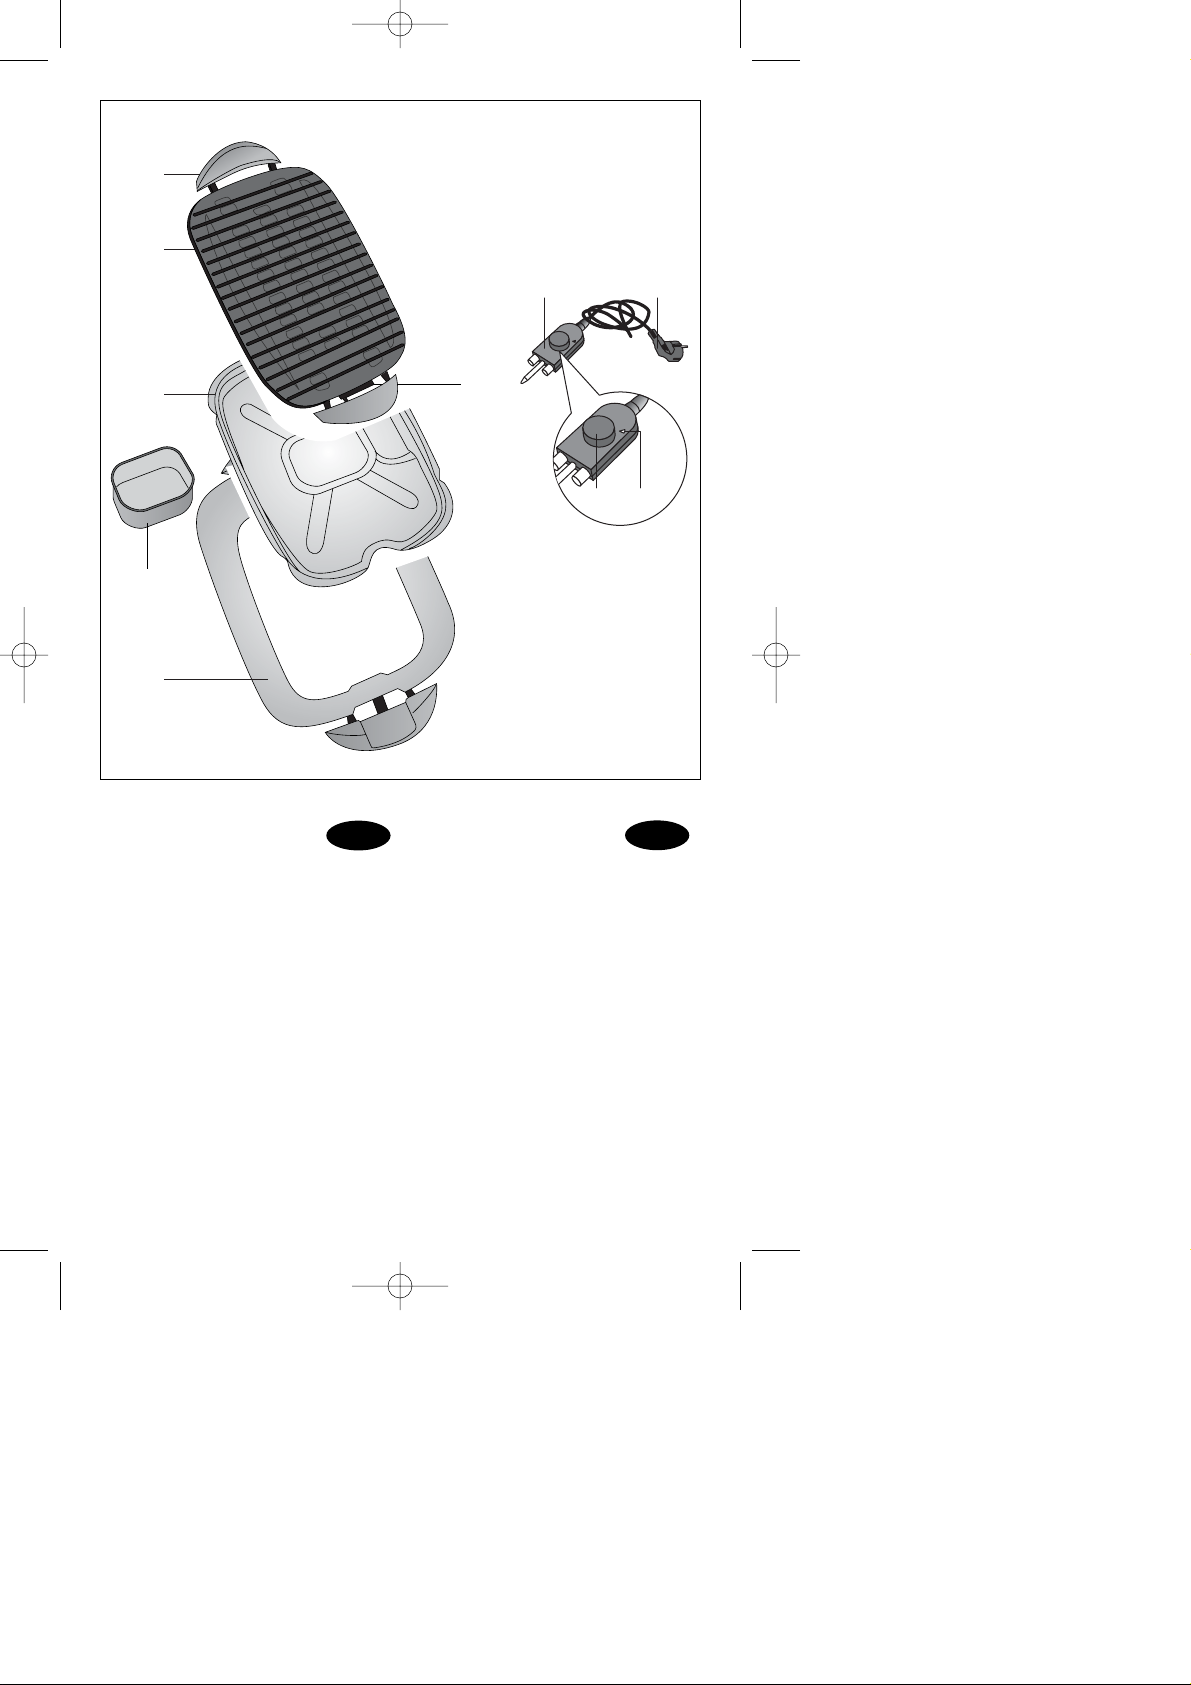
1. Maniglia
2. Griglia di cottura
3. Sede connettore
4. Leccarda raccogli-grasso
5. Diffusore di aroma
6. Corpo bistecchiera
7. Connettore
8. Spina
9. Manopola regolazione
termostato
10.Spia luminosa
DESCRIPTION
1. Grill handle
2. Cooking grill
3. Connector housing
4. Dripping pan
5. Flavour diffuser
6. Barbecue body
7. Connector
8. Plug
9. Thermostat setting knob
10.Pilot light
I
GB
BG30 6-02-2002 9:01 Pagina 2
1
2
7 8
4
5
6
3
910
Page 3

DESCRIPTION
1. Poignée grille
2. Grille cuisson
3. Logement connecteur
4. Lèchefrite (pour récolter la graisse)
5. Diffuseur d’arômes
6. Corps barbecue
7. Connecteur
8. Fiche
9. Bouton réglage thermostat
10. Voyant
DESCRIZIONE
1. Tragegriffe
2. Grillrost
3. Verbinderanschluss
4. Fettauffangpfanne
5. Gewürz-Diffusor
6. Barbecue-Schale
7. Verbinder
8. Stecker
9. Thermostatdrehknopf
10. Kontrolllampe
F
D
BESCHRIJVING
1. Handgrepen gril
2. Bakgril
3. Zitting aansluitstekker
4. Druippan bakvet
5. Aromaverspreider
6. Onderstel barbecue
7. Aansluitstekker
8. Verbinderanschluss
9. Regelknop thermostaat
10. Kontrolllampe
DESCRIPCIÓN
1. Asas parrilla
2. Parrilla de cocción
3. Alojamiento conector
4. Grasera recogegrasa
5. Difusor de aroma
6. Cuerpo barbacoa
7. Conector
8. Clavija
9. Mando regulación termostato
10. Testigo luminoso
NL
E
DESCRIÇÃO
1. Asas da gralha
2. Grelha de cozedura
3. Base da tomada
4. Tabuleiro de recolha da gordura
5. Difusor de tempero
6. Corpo do Barbecue (Grelhador)
7. Tomada
8. Ficha
9. Botão de regulação do termóstato
10. Lâmpada-piloto
¶∂ƒπ°ƒ∞º∏
1. ГВИЪФП·‚¤˜ Ы¯¿Ъ·˜
2. ™¯¿Ú· „Ë̷ۛÙÔ˜
3. ÀÔ‰Ô¯‹ ÊȘ
4. §ÈÔÛ˘ÏϤÎÙ˘
5. ¢È·ÛÎÔÚÈÛÙ‹˜ ·ÚÒÌ·ÙÔ˜
6. ™ÒÌ· barbeque
7. £ËÏ˘Îfi ÊȘ
8. ∞ЪЫВУИОfi КИ˜
9. ¢И·ОfiЩЛ˜ Ъ‡ıМИЫЛ˜ ıВЪМФЫЩ¿ЩЛ
10. ∂У‰ВИОЩИО‹ П˘¯У›·
P
GR
ééèèààëëÄÄççààÖÖ
1. ê͇ۘ
2. ê¯ÂÚ͇ ‰Îfl ʇÍË
3. ÉÌÂÁ‰Ó ‡Á˙Âχ ÔÓ‚Ó‰‡
˝ÎÂÍÚÓÔËÚ‡ÌËfl
4. èÓÚË‚Â̸ ‰Îfl Ò·Ó‡ Êˇ
5. Difusor de tempero
6. äÓÔÛÒ Ê‡Ó‚ÌË
7. ê‡Á˙ÂÏ ÔÓ‚Ó‰‡ ˝ÎÂÍÚÓÔËÚ‡ÌËfl
8. ÇËÎ͇ ˝ÎÂÍÚÓÔËÚ‡ÌËfl
9. кЫ˜Н‡ В„ЫОЛУ‚НЛ ЪВПФВ‡ЪЫ˚
10. à̉Ë͇ÚÓ̇fl ·ÏÔ‡
SU
BG30 6-02-2002 9:01 Pagina 3
Page 4

AVVERTENZE IMPORTANTI
• Prima di usare la bistecchiera elettrica, per evitare errori ed ottenere i migliori
risultati, leggere attentamente le avvertenze.
• Questo apparecchio é adatto alla cottura di cibi. Non deve essere perciò
utilizzato per altri fini né modificato o manomesso in alcun modo.
• Quando l’apparecchio è in funzione, la temperatura delle superfici
accessibili potrebbe essere elevata.
• Non utilizzare carbone o materiali combustibili simili con questo apparecchio.
• Prima dell’uso, pulire con cura la griglia antiaderente con un panno umido.
• Non lasciare l’apparecchio alla portata dei bambini, né lasciatelo in
funzione senza sorveglianza.
• Non utilizzare mai l’apparecchio senza l’apposita base d’appoggio e la
leccarda raccogligrasso.
• Fare attenzione che il cavo di alimentazione non sia in contatto con le parti
calde dell’apparecchio quando questo è in funzione.
• Non utilizzare l’apparecchio all’esterno.
• Utilizzare solo prolunghe conformi alle vigenti norme di sicurezza.
• Il cavo alimentazione di questo apparecchio non deve essere sostituito
dall’utente in quanto la sua sostituzione richiede l’impiego di utensili speciali.
In caso di danneggiamento rivolgersi esclusivamente ad un centro assistenza
autorizzato dal costruttore.
• In caso di sostituzione usare solo cavo con spina e presa disponibile presso
il costruttore e i suoi centri autorizzati.
• Non immergere mai la griglia e il connettore in acqua o in altro liquido. Per
pulirlo è sufficiente un panno umido.
• Non disinserire mai la spina dalla presa di corrente tirando il cavo.
• Riporre l’apparecchio solo quando si è raffreddato completamente.
• Non toccare la griglia con utensili metallici, per non rovinare il rivestimento.
• Conservare con cura queste istruzioni.
INSTALLAZIONE
• Prima dell’uso, controllare che l’apparecchio non abbia subito danni durante
il trasporto.
• Installare l’apparecchio su un piano orizzontale, fuori dalla portata dei
bambini in quanto alcune parti dell’apparecchio durante l’uso raggiungono
temperature elevate.
• Prima di inserire la spina nella presa di corrente, verificare che:
- il voltaggio della vostra rete corrisponda al valore indicato nella targa
caratteristiche, applicata al connettore.
-la presa di corrente abbia una portata minima di 10A.
-la presa sia del tipo adatto alla spina, altrimenti farla sostituire.
-la presa sia collegata ad un’ efficace messa a terra. La casa costruttrice
declina ogni responsabilità nel caso questa norma non venga rispettata.
- far funzionare l’apparecchio per almeno 5 min e aerare la stanza, questo
per eliminare “l‘odore di nuovo”.
• Pulire la griglia con una spugna o un panno umido quindi asciugare con
molta cura.
•Prima di ogni uso per rendere più facile la cottura, trattare la griglia con un
lieve strato di olio o grasso vegetale.
I
4
BG30 6-02-2002 9:01 Pagina 4
Page 5

UTILIZZO
• Inserire il connettore (7) nella sede prevista (3).
• Assicurarsi che il connettore sia inserito a fondo.
• Inserire la spina (8) nella presa di corrente.
• Regolare la manopola termostato (9) nella posizione “MAX”. La spia
luminosa (10) posizionata sul connettore (7) si accende ad indicare che
l’elemento riscaldante é in funzione.
• Quando l’apparecchio ha raggiunto la temperatura, la spia luminosa (10) si
spegne.
• Adagiare sulla griglia gli alimenti e regolare la manopola termostato nella
posizione desiderata.
Usare solo utensili in plastica o legno. Non usare mai oggetti taglienti o in
metallo per non rovinare la superficie antiaderente.
•Al termine della grigliatura posizione la manopola termostato (9) nella pos.
“O” e rimuovere la spina dalla presa di corrente ed il connettore (7) dalla
sua sede.
TERMOSTATO REGOLABILE:
L’apparecchio è dotato di un termostato regolabile a 3 posizioni: MIN, MED,
MAX.
Pos. O: apparecchio spento
Pos. MIN: per mantenere in caldo
Pos. MED: per cotture lente
Pos. MAX: per preriscaldamento e cotture veloci (mantenendo la consistenza
ideale dei cibi).
DIFFUSORE DI AROMA (5):
• Posizionare il diffusore nell’apposita sede situata sulla base del corpo
barbecue.
• Mettere nel diffusore le erbe aromatiche di vostro piacimento.
• Posizionare la griglia di cottura facendo attenzione a ben inserire i 2
elementi scaldanti nel diffusore.
•Al termine della grigliatura posizionare il termostato nella pos. O e rimuovere
la spina dalla presa di corrente ed il connettore dalla sua sede.
USO DEL DIFFUSORE DI AROMA:
Questo accessorio vi consentirà di aromatizzare i vostri cibi. Di seguito sono
riportati alcuni suggerimenti su come utilizzare questo accessorio:
•Versare mezza tazzina d’acqua nel diffusore.
• Aggiungere le seguenti spezie all’acqua per ottenere l’aroma desiderato:
-2 spicchi d’aglio tritati
- alcune foglie di melissa
-2 cucchiaini di curry
-2 rametti di rosmarino
- alcune foglie di salvia
5
BG30 6-02-2002 9:01 Pagina 5
Page 6

CONSIGLI PER UN’OTTIMA GRIGLIATURA
Seguite i seguenti suggerimenti per ottenere una buona grigliatura:
• Usare solamente utensili di plastica o legno: il metallo può rovinare la
superficie antiaderente della vostra griglia.
•Preriscaldare la griglia con termostato in posizione “MAX” fino allo
spegnimento della spia.
•Marinare la carne prima della grigliatura per ottenerla più tenera e saporita.
• Prima di grigliare verdura, pesce, o carne magra, ungere la griglia.
Se si griglia carne grassa, o se la carne é stata preventivamente marinata,
non c’é bisogno di ungere la griglia.
• Girare il cibo almeno una volta durante la grigliatura, se non diversamente
specificato.
• Negli ultimi 6-10 minuti di grigliatura, se lo desiderate, cospargere il cibo
con della salsa per barbecue o altre salse.
• Quando grigliate del pesce, per girarlo agevolmente, usate una spatola
larga e piatta o delle pinze da cucina.
TEMPI INDICATIVI DI GRIGLIATURA
CIBO POSIZIONE TEMPI
TERMOSTATO DI COTTURA
Pesce
pesce intero MED 8 - 10
filetto di pesce MED 5 - 7
cotolette di pesce MED 15 - 20
gamberi MAX 3 - 6
Pollo
disossato, senza pelle MED-MAX 15 - 20
crocchette di pollo MED-MAX 25 - 30
ali di pollo MED-MAX 10 - 15
Carne
bistecca spessa MED-MAX 10 - 15
“ sottile MED-MAX 8 - 12
hamburger MED-MAX 8 - 10
hot dogs MED-MAX 7 - 9
Maiale
braciola spessa MED-MAX 12 - 15
“ sottile MED-MAX 10 - 12
costicine MED-MAX 20 - 25
pancetta MED-MAX 4 - 6
salsicce MED-MAX 12 - 15
Verdura MAX 5 - 10
I tempi e le quantità sopra elencate, sono da considerarsi puramente indicativi.
Per i modelli senza termostato, attenersi ai tempi più lunghi riportati in tabella.
6
BG30 6-02-2002 9:01 Pagina 6
Page 7

PULIZIA E MANUTENZIONE
• Scollegando la spina dalla presa, la griglia si raffredderà. Assicurarsi di
rimuovere il connettore dalla sua sede nella griglia.
• Maneggiare con cura.
• Lasciare raffreddare l’apparecchio prima di pulirlo.
• Non immergere mai la griglia, il connettore e il resto dei componenti in
acqua o in altri liquidi. Per pulirli è sufficiente un panno umido.
• Se necessario il cavo può essere pulito con un panno morbido. Mai
immergere il cavo in acqua o in altri liquidi.
7
BG30 6-02-2002 9:01 Pagina 7
Page 8

IMPORTANT INSTRUCTIONS
• Before using the electric barbecue, carefully read the instructions, so as to
obtain best results and avoid mistakes.
• This appliance is suitable for cooking foods. It must not therefore be used for
other purposes or altered or tampered with in any way.
• The temperature of accessible surfaces may be high when the appliance is
operating.
• Do not use charcoal or similar fuels with this appliance.
• Before using, carefully clean the non-stick grill with a damp cloth.
• Do not leave the appliance within the reach of children, nor leave it in
operation unattended.
• Never use the appliance without the support base or the dripping pan.
• Make sure that the power cable is not in contact with the hot parts of the
appliance when in operation.
• Do not use the appliance outdoors.
• Only use extension cords which comply with the safety standards in force.
• The power cable for this appliance must not be replaced by the user, as this
operation requires the use of special tools. In the event of damage, only
contact a service centre authorised by the manufacturer.
• When replacing, only use cables with plugs and jacks supplied by the
manufacture or its authorised centres.
•Never immerse the grill and the connector in water or other liquids. To clean
it simply use a damp cloth.
• Never disconnect the plug from the power point by pulling on the cable.
• Store the appliance only when it has cooled down completely.
• Do not touch the grill with metallic utensils, to avoid ruining the coating.
• Keep these instructions with care.
INSTALLATION
• Before using, check that the appliance has not been damaged during transport.
• Install the appliance on a horizontal surface, and out of the reach of children,
as some parts of the appliance reach very high temperatures during
operation.
• Before inserting the plug in the power point, check that:
- the local mains voltage corresponds to the value indicated on the rating
plate applied to the connector.
- the power point has a minimum rating of 10A.
- the power point is suitable for the plug, otherwise replace it.
- the power point is suitably earthed. The manufacturer declines all liability
if this instruction is not respected.
• Operate the appliance for at least 5 minutes and air the room, in order to
eliminate the "new smell"
• Before using, carefully wash the non-stick grill.
• Before barbecuing grease the grill.
OPERATION
• Insert the connector (7) in the relative housing (3).
• Ensure that the connector is fully inserted.
GB
8
BG30 6-02-2002 9:01 Pagina 8
Page 9

• Plug (8) the appliance into the power outlet.
•Turn the thermostat knob (9) to the “MAX” position.
• The pilot light (10) on the connector (7) will light up, indicating that the
heating element is on.
• When the appliance has reached the desired temperature, the pilot light (10)
will go off.
• Place the food on the grill and turn the thermostat knob to the desired
position.
Only use plastic or wooden utensils. Never use sharp or metal utensils, as
these may ruin the non-stick surface of the grill.
• When grilling is complete, turn the thermostat knob (9) to position “O”,
unplug the appliance from the power outlet and the connector (7) from its
jack.
ADJUSTABLE THERMOSTAT
The appliance is fitted with an adjustable thermostat, featuring 3 positions:
MIN, MED, MAX.
Pos. O: appliance off
Pos. MIN: to keep food warm
Pos. MED:for slow cooking
Pos. MAX: for preheating and rapid cooking (maintaining the ideal consistency
of the food).
FLAVOUR DIFFUSER (5):
• Install the diffuser in the relative housing, situated on the base of the barbecue
body.
• Place the herbs and spices of your choice in the diffuser.
• Fit the cooking grill, making sure the 2 heating elements are properly inserted
in the diffuser.
• On completion of the barbecuing, place the thermostat in pos. O, then
remove the plug from the power point and the connector from its housing.
USING THE FLAVOUR DIFFUSER:
This accessory allows flavours to be added to the food. Following are some tips
on how to use this accessory:
• Pour half a cup of water in the diffuser.
• Add the following herbs and spices to the water to obtain the desired
flavour:
- 2 cloves of garlic, crushed
- some lemon-balm leaves
- 2 teaspoons of curry
- 2 branches of rosemary
- some sage leaves
9
BG30 6-02-2002 9:01 Pagina 9
Page 10

TIPS FOR IDEAL BARBECUING
Follow these tips for ideal barbecuing:
• Only use plastics utensils, as metal may ruin the non-stick surface of the grill.
•Preheat the grill with the thermostat in the “MAX” position, until the pilot light
goes off.
• Marinate the meat before barbecuing, to make it tender and tasty.
• Before barbecuing vegetables, fish or meat on the bone, grease the grill.
If barbecuing fatty meats, or if the meat has been marinated, the grill
does not need to be greased.
•Turn the food at least once during cooking, if not otherwise specified.
• In the last 6-10 minutes of cooking, if desired, sprinkle the food with
barbecue sauce or other types of sauce.
•When barbecuing fish, for best results use a wide and flat spatula or kitchen
tongs to turn it over more easily.
TYPICAL BARBECUING TIMES
FOOD THERMOSTAT COOKING
POSITION TIMES
Fish
whole fish MED 8 - 10
fish fillets MED 5 - 7
fish cutlets MED 15 - 20
crayfish MAX 3 - 6
Chicken boned, without the skin MED-MAX 15 - 20
chicken croquettes MED-MAX 25 - 30
chicken wings MED-MAX 10 - 15
Meat thick steak MED-MAX 10 - 15
thin steak MED-MAX 8 - 12
hamburger MED-MAX 8 - 10
hot dogs MED-MAX 7 - 9
Pork thick chops MED-MAX 12 - 15
thin chops MED-MAX 10 - 12
ribs MED-MAX 20 - 25
bacon MED-MAX 4 - 6
sausage MED-MAX 12 - 15
Vegetable MAX 5 - 10
The times and quantities listed above are purely indicative. For models without
thermostat, observe the longer times reported in the chart. .
CLEANING AND MAINTENANCE
• Disconnect the cable from the plug and let the grill cool down. Make sure the
connector is removed from its jack on the grill.
• Maneggiare con cura.
10
BG30 6-02-2002 9:01 Pagina 10
Page 11

• Let the appliance cool down before cleaning it.
•Never immerse the grill and the connector in water or other liquids. To clean
it simply use a damp cloth. The other components can be cleaned using a
sponge and soapy water.
•If necessary, the cable can be cleaned with a soft cloth. Never immerse the
cable in water or other liquids.
11
WARNING - THIS APPLIANCE MUST BE
EARTHED
IMPORTANT
The wires in the mains lead are coloured in
accordance with the following code:
Green and yellow: Earth
Blue: Neutral
Brown: Live
As the colours of the wires in the mains lead may
not correspond with the coloured markings
identifying the terminals in your plug, proceed as
follows:
The green and yellow wire must be connected to
the terminal in the plug marked with the letter E or
the earth symbol or coloured green or green
and yellow.
The blue wire must be connected to the terminal
marked with the letter N or coloured black.
The brown wire must be connected to the terminal
marked with the letter L or coloured red.
N
E
L
ELECTRICAL CONNECTION (UK ONLY)
A) If your appliance comes fitted with a plug, it
will incorporate a 13 Amp fuse. If it does not
fit your socket, the plug should be cut off
from the mains lead, and an appropriate
plug fitted, as below.
WARNING: Very carefully dispose of the cut
off plug after removing the fuse: do not insert
in a 13 Amp socket elsewhere in the house
as this could cause a shock hazard.
With alternative plugs not incorporating a
fuse, the circuit must be protected by a 15
Amp fuse.
If the plug is a moulded-on type, the fuse
cover must be re-fitted when changing the
fuse using a 13 Amp Asta approved fuse to
BS 1362. In the event of losing the fuse
cover, the plug must NOT be used until a
replacement fuse cover can be obtained
from your nearest electrical dealer. The
colour of the correct replacement fuse cover
is that as marked on the base of the plug.
B) If your appliance is not fitted with a plug,
please follow the instructions provided
below:
BG30 6-02-2002 9:01 Pagina 11
Page 12

MISES EN GARDE IMPORTANTES
• Pour éviter les erreurs et obtenir les meilleurs résultats, lire attentivement la
notice avant d’utiliser le barbecue électrique.
• Cet appareil est prévu pour cuire des aliments. Ne pas l’utiliser pour d’autres
fins ni le modifier d’aucune façon.
• Lorsque l’appareil est en marche, les surfaces accessibles peuvent être très chaudes.
• Ne pas utiliser de charbon ni autres combustibles similaires avec cet appareil.
•Avant de l'utiliser, nettoyer soigneusement la grille avec un linge humide.
•Ne pas laisser l’appareil à portée des enfants ; ne pas l’abandonner allumé.
• Ne jamais utiliser l'appareil sans sa base d'appui et sa lèchefrite.
•Veiller à éviter tout contact entre le cordon et les parties chaudes de l’appareil
quand celui-ci est en marche.
• Ne pas utiliser l’appareil en plein air.
• Utiliser exclusivement des rallonges conformes aux normes de sécurité en vigueur.
• L'utilisateur ne doit pas changer lui-même le câble d'alimentation de cet
appareil car l'opération exige des outils spéciaux. En cas de détérioration,
s'adresser exclusivement à un centre agréé par le Fabricant.
• En cas de remplacement, utiliser exclusivement un câble avec fiche et prise,
en vente chez le Fabricant et dans ses centres agréés.
• Ne jamais plonger la grille et le connecteur dans l'eau ni aucun autre liquide.
Pour la nettoyer, un linge humide suffit.
• Ne jamais débrancher la fiche en tirant sur le fil.
• Attendre que l’appareil ait complètement refroidi avant de le ranger.
•Ne pas toucher la grille avec des ustensiles métalliques pour ne pas abîmer
le revêtement antiadhésif.
• Conserver soigneusement ces instructions.
MONTAGE
•Avant de l’utiliser, s’assurer que l’appareil n’a pas subi de dégâts pendant le
transport.
• Installer l’appareil à l’horizontale, hors de la portée des enfants car pendant
le fonctionnement, certaines parties atteignent des températures très élevées.
•Avant d’introduire la fiche dans la prise de courant vérifier si:
- le voltage du secteur correspond à celui indiqué sur la plaque appliquée
au connecteur,
- la prise de courant a une intensité minimale de 10 A,
- la prise est adaptée à la fiche, autrement, la faire remplacer,
- la prise est reliée à une mise à la terre efficace . Le fabricant décline toute
responsabilité en cas d’inobservation de cette règle.
• Faire fonctionner l’appareil au moins 5 minutes et aérer la pièce pour
éliminer l’odeur de neuf.
• Laver la grille et le corps du barbecue dans de l’eau chaude savonneuse. .
•Avant de griller les aliments, graisser la grille.
UTILISATION
• Introduire le connecteur (7) dans le logement prévu (3).
• S’assurer que le connecteur est bien enfoncé.
F
12
BG30 6-02-2002 9:01 Pagina 12
Page 13

• Introduire la fiche (8) dans la prise de courant.
• Régler le bouton thermostat (9) sur “MAX”.
• Le voyant (10) sur le connecteur (7) s'allume pour indiquer que l'élément
chauffant est en marche.
•Dès que l'appareil atteint la température souhaitée, le voyant (10) s'éteint.
• Poser les aliments sur la grille et mettre le bouton thermostat dans la position
souhaitée.
Utiliser exclusivement des ustensiles en plastique ou en bois. Ne jamais utiliser
d'objets coupants ni en métal pour ne pas abîmer la surface téflonisée.
• La grillade étant terminée, mettre le bouton thermostat (9) sur “O”, enlever la
fiche de la prise de courant et le connecteur (7) de son logement.
THERMOSTAT REGLABLE
Certains appareils sont dotés de thermostat à 3 positions : MIN/ MED/ MAX
Pos. O: appareil éteint
Pos. MIN: pour garder au chaud
Pos. MED: pour les cuissons lentes
Pos. MAX: pour le préchauffage et les cuissons rapides (en maintenant la
consistance idéale des aliments).
DIFFUSEUR D’AROMES (5):
• Placer le diffuseur dans le logement prévu dans la base de l’appareil.
•Mettre les herbes aromatiques choisies dans le diffuseur.
• Placer la grille en veillant à bien insérer les deux éléments chauffants dans
le diffuseur.
• Quand la grillade est terminée, mettre le thermostat sur O, enlever la fiche de
la prise de courant et le connecteur de son logement.
UTILISATION DU DIFFUSEUR D’AROMES
Cet appareil permet d’aromatiser les aliments. Voici quelques conseils sur
l’utilisation de cet accessoire.
Verser une demi- tasse d’eau dans le diffuseur.
• Ajouter les épices suivants pour obtenir l’arôme souhaité :
- 2 gousses d’ail
- quelques feuilles de mélisse
- 2 cuillerées de curry
- 2 brins de romarin
- quelques feuilles de sauge
CONSEILS POUR UNE EXCELLENTE GRILLADE
Pour obtenir une bonne grillade, suivre ces quelques conseils :
• Utiliser exclusivement des ustensiles en plastique car le métal peut abîmer la
surface antiadhésive de la grille..
• Préchauffer la grille, le thermostat sur “MAX” jusqu'à ce que le voyant
s'éteigne.
13
BG30 6-02-2002 9:01 Pagina 13
Page 14

• Mariner la viande à griller pour qu’elle soit plus tendre et plus relevée.
•Avant de griller les légumes verts , le poisson ou la viande maigre, graisser
la grille.
Pour cuire de la viande grasse ou de la viande marinée, la grille n’a pas
besoin d’être graissée.
• Sauf indications contraires, retourner l’aliment au moins une fois pendant sa
cuisson.
• Dans les 6 – 10 dernières minutes de cuisson, éventuellement étaler de la
sauce à barbecue ou d’autres sauces.
• Pour les grillades de poisson, utiliser une spatule ou des pinces pour retourner
le poisson plus facilement.
TEMPS DE CUISSON
ALIMENTS POSITION TEMPS
THERMOSTAT DE CUISSON
Poisson
poisson entier MED 8 - 10
filet de poisson MED 5 - 7
côtelettes de poisson MED 15 - 20
écrevisses MAX 3 - 6
Poulet désossé, sans la peau MED-MAX 15 - 20
croquettes MED-MAX 25 - 30
ailes MED-MAX 10 - 15
Viande Entrecôte (chateaubriand) MED-MAX 10 - 15
steak MED-MAX 8 - 12
steak haché MED-MAX 8 - 10
hot dogs MED-MAX 7 - 9
Porc côte de porc épaisse MED-MAX 12 - 15
côte de porc fine MED-MAX 10 - 12
travers de porc MED-MAX 20 - 25
petit lard MED-MAX 4 - 6
saucisses MED-MAX 12 - 15
Légumes verts MAX 5 - 10
Les temps et les quantités exprimés sont purement indicatifs. Pour les modèles
sans thermostat, suivre les temps les plus longs indiqués dans le tableau.
NETTOYAGE ET ENTRETIEN
• Débrancher la grille pour qu'elle refroidisse. S'assurer d'enlever le
connecteur de son logement dans la grille.
•Manipuler avec prudence
• Laisser refroidir l'appareil avant de le nettoyer.
• Ne jamais plonger la grille ni le connecteur dans l'eau ni aucun autre liquide.
Pour la nettoyer, un linge humide suffit. Les autres composants peuvent se
laver à l'eau chaude avec du savon et une éponge.
14
BG30 6-02-2002 9:01 Pagina 14
Page 15

•Si besoin est, nettoyer le cordon avec un linge doux. Ne jamais plonger le
cordon dans aucun liquide.
15
BG30 6-02-2002 9:01 Pagina 15
Page 16

WICHTIGE HINWEISE
• Lesen Sie vor Benutzung des Elektrogrills unbedingt die Gebrauchsanleitung, um
einen unsachgemäßen Gebrauch zu vermeiden und beste Resultate zu erzielen.
• Dieses Gerät eignet sich für das Garen von Speisen. Die Verwendung für andere
Zwecke, sowie seine Veränderung oder sonstige Eingriffe sind untersagt.
•Während des Betriebs des Geräts können sich die zugänglichen Oberflächen
stark erhitzen.
•Verwenden Sie mit diesem Gerät keine Holzkohle o.ä.
•Vor dem Gebrauch ist der antihaftbeschichtete Grillrost mit einen feuchten
Tuch sorgfältig zu säubern.
• Lassen Sie das Gerät nie in der Reichweite von Kindern, und lassen Sie es
nicht unbeaufsichtigt in Betrieb.
• Benutzen Sie das Gerät niemals ohne die eigens dafür vorgesehene
Tragplatte und die Fettauffangpfanne.
• Achten Sie darauf, dass das Versorgungskabel keine heißen Geräteteilen
berührt, solange das Gerät in Betrieb ist.
• Das Gerät darf nicht im Freien benutzt werden.
• Benutzen Sie nur Verlängerungskabel, die den geltenden
Sicherheitsvorschriften entsprechen.
• Das Netzkabel dieses Gerätes darf nicht vom Benutzer ausgewechselt
werden, da dazu spezielles Werkzeug erforderlich ist. Wir bitten Sie
deshalb, bei Beschädigung des Kabels sich ausschließlich an eine vom
Hersteller autorisierte Kundendienststelle zu wenden.
• Bei Ersatz des Kabels benutzen Sie bitte nur das beim Hersteller, bzw. dessen
Vertragshändlern, erhältliche Kabel mit Stecker und Steckdose.
•Tauchen Sie den Grillrost und den Verbinder nicht in Wasser oder in andere
Flüssigkeiten. Für dessen Reinigung reicht ein feuchtes Tuch vollkommen aus.
• Ziehen Sie den Netzstecker nicht am Kabel aus der Steckdose
• Räumen Sie das Gerät erst auf, wenn es ganz abgekühlt ist.
• Berühren Sie niemals den Grillrost mit Utensilien aus Metall, um die
Beschichtung nicht zu beschädigen.
•Diese Gebrauchsanweisung mit Sorgfalt aufbewahren.
INSTALLATION
•Vergewissern Sie sich vor Gebrauch, dass das Gerät keine Transportschäden
aufweist.
• Stellen Sie das Gerät auf einer ebenen Fläche auf. Es darf nicht in Reichweite
von Kindern aufgestellt werden, da einige Geräteteile während des
Gebrauchs hohe Temperaturen erreichen.
• Bevor der Netzstecker in die Steckdose gesteckt wird, muss überprüft werden:
- ob die Spannung des Stromnetzes mit den auf dem Typenschild am
Verbinder angegebenen Werten übereinstimmt.
- ob die Steckdose eine Stromfestigkeit von mindestens 10A aufweist.
- ob die Steckdose für den Stecker geeignet ist, ansonsten muss sie
ersetzt werden.
- ob die Steckdose geerdet ist. Der Hersteller ist nicht haftbar, falls
diese Vorschrift nicht eingehalten wird.
• Das Gerät in einem gut gelüfteten Raum mindestens 5 Minuten lang
D
16
BG30 6-02-2002 9:01 Pagina 16
Page 17

eingeschaltet lassen, um den unangenehmen Geruch vor erstmaligem
Gebrauch zu beseitigen.
• Benutzen Sie einen weichen Schwarm und ein nicht scheuerndes
Reinigungsmittel.
•Vor dem Grillen sollte der Grillrost gefettet werden.
GEBRAUCH
• Stecken Sie den Verbinder (7) in den dafür vorgesehenen Anschluss (3).
•Vergewissern Sie sich, dass der Verbinder ganz im Anschluss steckt.
• Den Stecker (8) in die Steckdose stecken.
• Den Thermostatdrehknopf (9) auf die Position „MAX.“ drehen.
• Mit dem Aufleuchten der am Verbinder (7) angebrachten Kontrolllampe (10)
wird angezeigt, dass das Heizelement in Betrieb ist.
• Sobald das Gerät die gewünschte Temperatur erreicht hat, schaltet sich die
Kontrolllampe (10) aus.
• Legen Sie das Grillgut auf den Grillrost und stellen Sie den Thermostat auf die
gewünschte Position.
Schneidende Gegenstände oder Gegenstände aus Metall beschädigen die
antihaftbeschichtete Oberfläche. Verwenden Sie deshalb ausschließlich
Utensilien aus Kunststoff oder Holz.
• Bei Ende des Grillvorgangs den Thermostat (9) auf „O“ stellen, den Netzstecker
aus der Steckdose und den Verbinder (7) aus seinem Anschluss ziehen.
TEMPERATURREGLER:
Das Gerät ist mit einem regelbaren Thermostat ausgestattet, der auf 3
Leistungsstufen eingestellt werden kann: MIN., MED., MAX..
Pos. O: Gerät ausgeschaltet
Pos. MIN: zum Warmhalten
Pos. MED: für langsames Garen
Pos. MAX.: zum Vorheizen und für schnelles Garen (dadurch wird die ideale
Konsistenz der Speisen beibehalten).
GEWÜRZ-DIFFUSOR (5):
• Bringen Sie den Diffusor an der Halterung an der Barbecue-Schale an.
• Füllen Sie den Diffusor mit Kräutern nach Belieben.
• Setzen Sie den Grillrost ein. Die 2 Heizelemente müssen gut im Diffusor
sitzen.
• Stellen Sie den Temperaturregler nach dem Grillen auf O, ziehen Sie den
Netzstecker aus der Steckdose und den Verbinder aus seinem Anschluss.
GEBRAUCH DES GEWÜRZ-DIFFUSORS:
Dank diesem Zubehörteil erhält Ihr Grillgut ein feines Kräuteraroma.
Nachstehend einige Tipps zum Gebrauch dieses Zubehörs:
• Füllen Sie den Diffusor mit einer halben Tasse Wasser.
•Geben Sie folgende Kräuter und Gewürze in das Wasser, um das
gewünschte Aroma zu erzielen:
17
BG30 6-02-2002 9:01 Pagina 17
Page 18

- 2 gehackte Knoblauchzehen
- ein paar Blätter Melisse
- 2 Teelöffel Curry
- 2 Zweige Rosmarin
- ein paar Blätter Salbei
TIPPS FÜR EIN OPTIMALES GRILLEN
Befolgen Sie die folgenden Ratschläge, damit Ihre gegrillten Speisen optimal
gelingen:
•Verwenden Sie ausschließlich Utensilien aus Kunststoff. Mit Metall kann die
antihaftbeschichtete Oberfläche Ihres Grills beschädigt werden.
• Die Grillplatte mit Thermostat auf Pos. „MAX.“ solange vorheizen, bis die
Kontrolllampe erlischt.
• Um ein zarteres und schmackhafteres Fleisch zu erhalten, sollte es vor dem
Grillen eingelegt werden.
•Vor dem Grillen von Gemüse, Fisch oder magerem Fleisch sollte der Grillrost
gefettet werden.
Wenn fettes Fleisch gegrillt wird, oder wenn das Fleisch vor dem Grillen
eingelegt wurde, braucht der Grillrost nicht gefettet zu werden.
•Drehen Sie das Grillgut mindestens einmal während des Grillens um, sofern
nicht anders angegeben.
• In den letzten 6-10 Minuten Grillzeit kann das Grillgut nach Belieben mit
einer Barbecue-Sauce oder sonstigen Saucen gewürzt werden.
• Fisch lässt sich am einfachsten mit einem breiten, flachen Wender oder mit
einer Küchenzange umdrehen.
UNGEFÄHRE GRILLZEITEN
SPEISE STELLUNG DES UNGEFÄHRE
TEMPERATURREGLERS GRILLZEITEN
Fisch
Ganzer Fisch MED 8 - 10
Fischfilet MED 5 - 7
Fischscheiben MED 15 - 20
Garnelen MAX 3 - 6
Hähnchen Entbeint, ohne Haut MED-MAX 15 - 20
Hähnchenkroketten MED-MAX 25 - 30
Hähnchenflügel MED-MAX 10 - 15
Fleisch Dickes Steak MED-MAX 10 - 15
Dünnes Steak MED-MAX 8 - 12
Hamburger MED-MAX 8 - 10
Hot Dogs MED-MAX 7 - 9
Schwein Dickes Kotelett MED-MAX 12 - 15
Dünnes Kotelett MED-MAX 10 - 12
Schälrippchen MED-MAX 20 - 25
Bauchspeck MED-MAX 4 - 6
18
BG30 6-02-2002 9:01 Pagina 18
Page 19

Bratwürste MED-MAX 12 - 15
Gemüse MAX 5 - 10
Die obengenannten Zeiten und Mengen sind reine Richtwerte. Für die Modelle ohne
Temperaturregler sind die in der Tabelle angegebenen längeren Zeiten einzuhalten.
REINIGUNG UND PFLEGE
• Nachdem Sie den Stecker aus der Steckdose gezogen haben, kühlt die Platte
ab. Vergessen Sie nicht, den Verbinder vom Anschluss am Grill
herauszuziehen.
• Maneggiare con cura.
•Lassen Sie das Gerät abkühlen, bevor Sie es säubern.
•Tauchen Sie die Grillplatte und den Verbinder niemals in Wasser oder andere
Flüssigkeiten, sondern reinigen Sie einfach nur mit einem feuchten Tuch. Die
übrigen Komponenten können Sie in warmem Seifenwasser oder mit einem
Schwamm reinigen.
• Falls notwendig kann das Kabel mit einem weichen Tuch gesäubert werden.
Tauchen Sie das Kabel niemals in Wasser oder sonstige Flüssigkeiten.
19
BG30 6-02-2002 9:01 Pagina 19
Page 20

BELANGRIJKE AANWIJZINGEN
• Vóór u de elektrische barbecue in gebruikt neemt, neemt u aandachtig de gebruiks-
aanwijzingen door, om fouten te voorkomen en de beste resultaten te bekomen.
• Dit apparaat is geschikt voor het bakken van voedingsmiddelen en wordt
derhalve voor geen andere doeleinden gebruikt, noch gewijzigd of
opengemaakt.
•Wanneer het apparaat in werking is, kunnen de aanraakbare onderdelen
ervan heel warm worden.
• Gebruik geen houtskool of gelijkaardig brandbaar materiaal met dit apparaat.
• Vóór de ingebruikname, maakt u de anti-aanbakgril zorgvuldig schoon met
een vochtige doek.
• Houd het apparaat buiten het bereik van kinderen, en laat het apparaat in
werking niet onbewaakt achter.
• Gebruik het apparaat nooit zonder het bijhorende onderstel en de druippan
om vetdruppeltjes op te vangen.
• Let erop dat het stroomsnoer niet in contact komt met de warme delen van het
apparaat tijdens de werking.
• Gebruik het apparaat niet buiten.
• Gebruik uitsluitend verlengdraden die conform de veiligheidsnormen zijn.
• Het stroomsnoer van dit apparaat dient niet te worden vervangen door de
gebruiker, omdat voor de vervanging speciaal gereedschap vereist is. Als het
stroomsnoer beschadigd is, wendt u zich uitsluitend tot een centrum erkend
door de fabrikant.
• Bij een vervanging, gebruikt u uitsluitend een stroomsnoer met stekker en
stopcontact geleverd door de fabrikant of zijn erkende centra.
• Dompel de gril en de aansluitstekker nooit onder in water of een andere
vloeistof. Een vochtige doek volstaat om schoon te maken.
• Haal de stekker nooit uit het stopcontact door aan het snoer te trekken.
• Berg het apparaat op als het volledig afgekoeld is.
• Raak de gril niet aan met metalen voorwerpen, om de anti-aanbaklaag niet
te beschadigen.
• Bewaar deze gebruiksaanwijzingen zorgvuldig.
INSTALLATIE
• Vóór het gebruik, controleert u of het apparaat bij het vervoer niet werd
beschadigd.
• Installeer het apparaat op een horizontaal vlak, buiten het bereik van
kinderen, aangezien sommige onderdelen tijdens de werking hoge
temperaturen kunnen halen.
• Alvorens de stekker in het stopcontact te steken, controleert u of:
- de spanning van het stroomnet overeenkomt met de waarde
aangeduid op het typeplaatje op de aansluitstekker.
- het stopcontact een bereik heeft van minstens 10A.
- het stopcontact geschikt is voor het type stekker, zoniet moet deze worden
vervangen.
- het stopcontact naar behoren geaard is. De fabrikant wijst elke
verantwoordelijkheid af indien deze norm niet wordt nageleefd.
NL
20
BG30 6-02-2002 9:01 Pagina 20
Page 21

• laat het apparaat minstens 5 minuten werken en verlucht de kamer, om de
"geur van het nieuwe" te evacueren.
• Een vochtige doek om schoon de gril maken.
• Vóór u bakt, vet u de gril in.
GEBRUIK
• Steek de aansluitstekker (7) in de voorziene zitting (3).
• Zorg ervoor dat de aansluitstekker volledig in de zitting wordt geduwd.
• Steek de stekker (8) in het stopcontact.
• Regel de thermostaatknop (9) op de stand “MAX”.
• Het controlelampje (10) op de aansluitstekker (7) brandt om aan te duiden
dat het verwarmingselement in werking is.
•Wanneer het apparaat de gewenste temperatuur bereikt heeft, dooft het
controlelampje (10).
• Leg de voedingsmiddelen op de gril en regel de thermostaatknop op de
gewenste stand.
Gebruik uitsluitend instrumenten in pastic of hout. Raak de gril niet aan met
scherpe of metalen voorwerpen, om de anti-aanbaklaag niet te beschadigen.
• Zet de thermostaatknop (9) na het bakken op de stand “O”, trek de stekker
uit het stopcontact en haal de aansluitstekker (7) uit zijn zitting.
REGELBARE THERMOSTAAT
Het apparaat is voorzien van een regelbare thermostaat met 3 standen: MIN,
MED, MAX.
Stand O apparaat uit
Stand MIN: om warm te houden
Stand MED: om traag te bakken
Stand MAX: om op te warmen en snel te bakken (en de ideale consistentie van
de voedingsmiddelen te behouden).
AROMAVERSPREIDER (5):
•Plaats de verspreider in de voorziene zitting op het onderstel van de
barbecue.
•Vul de verspreider naar believen met tuinkruiden.
• Plaats de bakgril en let hierbij op dat de 2 verwarmende elementen goed in
de verspreider worden geplaatst.
• Na het bakken zet u de thermostaat op de stand O, haalt u de stekker uit het
stopcontact en de aansluitstekker uit zijn zitting.
GEBRUIK VAN DE AROMAVERSPREIDER:
Met dit accessoire kunt u de voedingsmiddelen die u bakt kruiden. Hierna
volgen enkele suggesties voor het gebruik van dit accessoire:
•Giet een halve kop water in de verspreider.
•Voeg de volgende kruiden toe aan het water om het gewenste aroma te
bekomen:
- 2 fijngemalen teentjes look
- enkele blaadjes melisse
21
BG30 6-02-2002 9:01 Pagina 21
Page 22

- 2 theelepeltjes curry
- 2 takjes rozemarijn
- enkele blaadjes salie
TIPS VOOR EEN OPTIMAAL GEBRUIK
Volg onderstaande tips om optimale bakresultaten te bekomen:
• Gebruik uitsluitend instrumenten in plastic, metalen voorwerpen kunnen de
anti-aanbaklaag van de gril beschadigen.
• Zet de thermostaat op de stand “MAX” om de gril voor te verwarmen, tot het
controlelampje dooft.
•Marineer het vlees voor u het bakt, zodat het mals en smakelijk wordt.
• Vóór u groenten, vis of mager vlees bakt, vet u de gril in.
Als u vet vlees bakt, of als het vlees vooraf gemarineerd werd, hoeft u de gril
niet in te vetten.
• Keer tijdens het bakken de voedingsmiddelen minstens één keer om, behalve
indien anders aangeduid.
•Tijdens de laatste 6-10 minuten van het bakken, kunt het de
voedingsmiddelen als u dat wenst op smaak brengen met barbecuesaus of
andere sauzen.
• Om vis makkelijker te bakken, gebruikt u een brede en platte spatel of een
keukentang om de vis makkelijk om te draaien.
BAKTIJDEN
VOEDINGSMIDDELEN STAND BAKTIJD
THERMOSTAAT
Vis
volledige vis MED 8 - 10
visfilet MED 5 - 7
viskotelet MED 15 - 20
scampi's MAX 3 - 6
Kip ontbeend, zonder vel MED-MAX 15 - 20
kipkroketten MED-MAX 25 - 30
kippenvleugels MED-MAX 10 - 15
Rood vlees dikke biefstuk MED-MAX 10 - 15
dunne biefstuk MED-MAX 8 - 12
hamburger MED-MAX 8 - 10
hot dogs MED-MAX 7 - 9
Varkensvlees dikke karbonade MED-MAX 12 - 15
dunne karbonade MED-MAX 10 - 12
ribbetje MED-MAX 20 - 25
spek MED-MAX 4 - 6
worsten MED-MAX 12 - 15
Groenten MAX 5 - 10
Bovenvermelde hoeveelheden en baktijden zijn zuiver indicatief. Voor modellen
zonder thermostaat, houdt u rekening met de langste baktijden in de tabel.
22
BG30 6-02-2002 9:01 Pagina 22
Page 23

REINIGING EN ONDERHOUD
• Als u het stroomsnoer loskoppelt van de stekker koelt de gril af. Vergeet niet
de aansluitstekker uit zijn zitting in de gril te halen..
•Voorzichtig hanteren.
• Laat het apparaat afkoelen alvorens het te reinigen.
• Dompel de gril en de aansluitstekker nooit onder in water of een andere
vloeistof. Een vochtige doek volstaat om schoon te maken. De andere
componenten mogen in een warm zeepsopje en met een spons worden
schoongemaakt.
• Indien nodig kan het stroomsnoer schoongemaakt worden met een vochtige
doek. Het stroomsnoer nooit in water of in andere vloeistoffen
onderdompelen.
23
BG30 6-02-2002 9:01 Pagina 23
Page 24

ADVERTENCIAS IMPORTANTES
• Antes de usar la barbacoa eléctrica, se ruega leer atentamente las
advertencias para evitar cometer errores y obtener los mejores resultados.
• Este aparato es apto para la cocción de alimentos. Por ello no debe ser utilizado
para otras finalidades, ni modificado o abierto bajo ningún concepto.
• Cuando el aparato está encendido, la temperatura de las superficies
accesibles podría ser alta.
• No utilizar carbón o materiales combustibles de naturaleza similar con este
aparato
• Antes del uso, limpiar meticulosamente la parrilla antiadherente con un paño
húmedo.
• No dejar el aparato al alcance de los niños, ni en funcionamiento sin
vigilancia.
• No utilizar nunca el aparato sin la base de soporte específica y la grasera
recogegrasa.
• Asegurarse de que el cable de alimentación no esté en contacto con las
partes calientes del aparato con éste en funcionamiento.
• No utilizar el aparato en el exterior.
• Utilizar solamente alargadores conformes a las normas de seguridad en
vigor.
• El usuario no debe sustituir el cable de alimentación de este aparato ya que
para ello se requiere el uso de herramientas especiales. Si se estropea el
cable, dirigirse exclusivamente a un centro de asistencia autorizado por el
fabricante.
• En caso de sustitución, utilizar solamente un cable con clavija y toma del
fabricante y de sus centros autorizados.
• No sumergir nunca la parrilla y el conector en agua o en otros líquidos. Para
su limpieza es suficiente usar un paño húmedo.
• No desenchufar nunca el aparato de la corriente tirando del cable.
• Guardar el aparato solamente cuando se haya enfriado completamente.
•No tocar la parrilla con instrumentos metálicos para no estropear el
revestimiento.
• Conservar meticulosamente estas instrucciones.
INSTALACIÓN
• Antes de usarlo, controlar que el aparato no haya sufrido daños durante el
transporte.
• Instalar el aparato sobre una superficie horizontal fuera del alcance de los
niños ya que algunas partes del aparato alcanzan temperaturas elevadas
durante su utilización.
• Antes de enchufar el aparato a la corriente, comprobar que:
-el voltaje de la red corresponde al valor indicado en la placa de las
características, aplicada al conector.
-a toma de corriente tenga una capacidad mínima de 10A.
-la toma de corriente sea del tipo adecuado para la clavija, en caso
contrario sustituirla.
- la toma esté conectada a una puesta a tierra eficaz. El fabricante declina
toda responsabilidad si no se respeta esta norma.
E
24
BG30 6-02-2002 9:01 Pagina 24
Page 25

• hacer funcionar el aparato durante al menos 5 minutos y ventilar la
habitación para eliminar “el olor de nuevo”.
• Limpiar meticulosamente la parrilla antiadherente con un paño húmedo.
• Antes de asar untar la parrilla.
UTILIZACIÓN
• Introducir el conector (7) en el alojamiento previsto (3).
•Asegurarse de que el conector está insertado del todo.
• Enchufar la clavija (8) en la toma de corriente.
• Regular el mando termostato (9) en la posición “MAX”.
• El testigo luminoso (10) situado en el conector (7) se enciende para indicar
que el elemento calentador está funcionando.
• Cuando el aparato ha alcanzado la temperatura deseada, el testigo
luminoso (10) se apaga.
•Colocar en la parrilla los alimentos y regular el mando termostato en la
posición deseada.
Usar solamente utensilios de plástico o de madera. No usar nunca objetos
cortantes o de metal para no estropear la superficie antiadherente.
• Al final del asado, colocar el mando termostato (9) en la posición “O”,
desenchufar el aparato de la corriente y sacar el conector (7) de su
alojamiento.
TERMOSTATO REGULABLE
El aparato está equipado con un termostato regulable de 3 posiciones: MIN,
MED, MAX.
Pos. O: aparato apagado
Pos. MIN: para mantener caliente
Pos. MED: para cocciones lentas
Pos. MAX: para calentar previamente y cocciones rápidas (manteniendo la
consistencia ideal de los alimentos).
DIFUSOR DE AROMA (5):
• Colocar el difusor de aroma en el alojamiento específico situado en la base
del cuerpo barbacoa.
• Poner en el difusor las hierbas aromáticas a gusto.
• Colocar la parrilla de cocción, teniendo cuidado de introducir correctamente
los 2 elementos que calientan en el difusor.
• Al final del tiempo de asado colocar el termostato en la posición O y
desenchufar el aparato de la corriente y el conector de su alojamiento.
USO DEL DIFUSOR DE AROMA
Este accesorio permite aromatizar los alimentos. A continuación, facilitamos
algunas sugerencias para utilizar este accesorio:
•Verter media taza de agua en el difusor.
• Añadir las siguientes especias en el agua para obtener el aroma deseado.
- 2 dientes de ajo picados
- algunas hojas de melisa
25
BG30 6-02-2002 9:01 Pagina 25
Page 26

- 2 cucharaditas de curry
- 2 ramas de romero
- unas hojas de salvia
CONSEJOS PARA UN ASADO ÓPTIMO
Seguir las siguientes indicaciones para obtener un asado en su punto:
• Usar solamente instrumentos de plástico pues el metal podría estropear la
superficie antiadherente de la parrilla.
• Calentar la parrilla previamente, con el termostato en la posición “MAX”
hasta que se apague el testigo luminoso.
• Adobar la carne antes del asarla para que esté más tierna y sabrosa.
• Antes de asar la verdura, pescado o carne magra untar la parrilla.
Si se asa carne grasa, o si la carne ha sido previamente adobada no hay
que untar la parrilla.
• Dar la vuelta a los alimentos al menos una vez durante mientras que se están
asando, si no se especifica de forma diferente.
• Durante los últimos 6-10 minutos del tiempo de asado; si se desea, rociar con
salsa para barbacoa u otras salsas.
• Cuando se asa pescado, para asarlo ágilmente, usar una espátula larga y
plana o pinzas de cocina para darle la vuelta fácilmente.
TIEMPOS INDICATIVOS DE ASADO
ALIMENTO POSICIÓN TIEMPOS
TERMOSTATO DE COCCIÓN
Pescado
Pescado entero MED 8 - 10
Filete de pescado MED 5 - 7
Rodajas de pescado MED 15 - 20
Gambas MAX 3 - 6
Pollo Sin hueso, sin pellejo MED-MAX 15 - 20
Croquetas de pollo MED-MAX 25 - 30
Alas de pollo MED-MAX 10 - 15
Carne Bistec grueso MED-MAX 10 - 15
Bistec fino MED-MAX 8 - 12
Hamburguesa MED-MAX 8 - 10
Perritos calientes MED-MAX 7 - 9
Cerdo Chuleta gruesa MED-MAX 12 - 15
Chuleta fina MED-MAX 10 - 12
Costilla MED-MAX 20 - 25
Tocino MED-MAX 4 - 6
Salchichas MED-MAX 12 - 15
Verdura MAX 5 - 10
Los tiempos y las cantidades indicadas anteriormente, deben considerarse
puramente indicativas. Para los modelos sin termostato, los tiempos son
mayores de los indicados en la tabla.
26
BG30 6-02-2002 9:01 Pagina 26
Page 27

LIMPIEZA Y MANTENIMIENTO
• Al desenchufar el aparato de la corriente, la parrilla se enfriará. Asegurarse
de haber quitado el conector de su alojamiento en la parrilla.
• Manipular con cuidado.
•Dejar que el aparato se enfríe antes de limpiarlo.
• No sumergir nunca la parrilla y el conector en agua o en otros líquidos. Para
su limpieza es suficiente usar un paño húmedo. Para los demás componentes
utilizar agua caliente con jabón y una esponja.
• Si es necesario limpiar el cable con un paño suave. No introducir nunca el
cable en agua u otros líquidos.
27
BG30 6-02-2002 9:01 Pagina 27
Page 28

ADVERTÊNCIAS IMPORTANTES
• Antes de usar o barbecue (grelhador) eléctrico, para evitar erros e se
obterem os melhores resultados, ler atentamente as advertências.
• Este aparelho destina-se a grelhar alimentos. Portanto não deve ser utilizado
para outros fins nem deve ser modificado ou manuseado de modo nenhum.
• Quando o aparelho está ligado, a temperatura das superfícies acessíveis
poderá ser muito alta.
• Não utilizar carvão ou materiais combustíveis semelhantes com este aparelho.
•Antes de usar, limpar bem a grelha antiaderente com um pano húmido.
• Non lasciare l’apparecchio alla portata dei bambini, nè lasciatelo in
funzione senza sorveglianza.
• Nunca utilizar o aparelho sem a respectiva base de apoio e o tabuleiro de
recolha da gordura.
• Fer atenção que o cabo de alimentação não entre em contacto com as partes
quentes do aparelho quando este está ligado.
• Não utilizar o aparelho no exterior.
•Utilizar somente extensões que estejam em conformidade com as normas de
segurança em vigor.
•O cabo de alimentação deste aparelho não deverá ser substituído pelo
utilizador pois é necessário utilizar ferramentas especiais. Em caso de danos
contactar exclusivamente um centro de assistência autorizado pelo fabricante.
• Em caso de substituição usar somente um cabo com ficha e tomada que
poderá ser adquirido ao fabricante ou aos seus centros autorizados.
• Nunca mergulhar a grelha e a ficha em água ou noutros líquidos. Para o
limpar basta um pano húmido.
• Nunca retirar a ficha da tomada de corrente puxando pelo cabo de
alimentação.
• Guardar o aparelho somente quando estiver completamente frio.
• Não tocar na grelha com utensílios metálicos para não danificar o seu
revestimento.
• Conservar estas instruções.
INSTALAÇÃO
•Antes de usar o aparelho, verificar se este não sofreu danos durante o
transporte.
• Instalar o aparelho numa superfície horizontal e fora do alcance das
crianças pois durante o uso algumas das suas partes atingem temperaturas
elevadas.
• Antes de ligar a ficha à tomada de corrente, verificar se:
-a voltagem da instalação eléctrica corresponde ao valor indicado na
chapa das características, aplicada na tomada do aparelho.
- la tomada de corrente tem a capacidade mínima de 10A.
-a tomada é do tipo adequado à ficha, caso contrário substituí-la.
-a tomada está ligada a uma ligação à terra eficiente. O fabricante
não se responsabiliza no caso em que esta regra não seja respeitada.
• pôr o aparelho a funcionar durante pelo menos 5 minutos e arejar o
local, de modo a eliminar o “cheiro a novo”.
P
28
BG30 6-02-2002 9:01 Pagina 28
Page 29

• Limpar bem a grelha antiaderente com um pano húmido.
• Untar a grelha antes de grelhar.
UTILIZAÇÃO
• Introduzir a tomada (7) na base existente (3).
• Certificar-se que a tomada está encaixada a fundo.
• Introduzir a ficha (8) na tomada de corrente.
• Regular o botão do termóstato (9) para a posição “MAX”.
•A lâmpada-piloto (10) que se encontra na ficha (7) acende-se indicando que
o elemento de aquecimento está ligado.
• Quando o aparelho alcança a temperatura desejada, a lâmpada-piloto (10)
apaga-se.
•Colocar os alimentos na grelha e regular o botão do termóstato na posição
desejada.
Usar apenas utensílios de plástico ou de madeira. Nunca usar utensílios
cortantes ou em metal para não estragar a superfície antiaderente.
•No final do grelhado levar o botão do termóstato (9) para a posição “O”,
retirar a ficha da tomada de corrente e a ficha (7) da sua tomada.
TERMÓSTATO REGULÁVEL
O aparelho está equipado com um termóstato regulável com 3 posições: MIN,
MED, MAX.
Pos. O: aparelho desligado
Pos. MIN: para manter os alimentos quentes
Pos. MED: para cozeduras lentas
Pos. MAX: para pré-aquecimento e grelhados rápidos (mantendo a
consistência ideal dos alimentos).
DIFUSOR DE TEMPERO (5):
• Colocar o difusor na respectiva base do corpo do barbecue (grelhador)
• Colocar no difusor os temperos do vosso agrado.
• Colocar a grelha de cozedura tomando atenção em introduzir os 2
elementos de aquecimento no difusor.
• Depois de terminada a cozedura, girar o termóstato para a pos. O e retirar
a ficha da tomada de corrente e a tomada do cabo de alimentação da sua
base.
UTILIZAÇÃO DO DIFUSOR DE TEMPERO
Este acessório permite aromatizar os vossos alimentos. Abaixo damos algumas
sugestões em como utilizar este acessório:
• Deitar meia taça de água no difusor.
• Juntar as seguintes especiarias à água para se obter o aroma desejado:
- 2 dentes de alho triturados
- algumas folhas de erva-cidreira
- 2 colheres de sobremesa de caril
- 2 raminhos de rosmaninho
- algumas folhas de sálvia
29
BG30 6-02-2002 9:01 Pagina 29
Page 30

CONSELHOS PARA UM ÓPTIMO GRELHADO
Seguir estas sugestões para se obter um excelente grelhado
• Usar somente utensílios de plástico pois o metal pode danificar a superfície
antiaderente da vossa grelha.
• Aquecer previamente a grelha com o termóstato na posição “MAX” até que
se apague a lâmpada-piloto.
•Marinar a carne antes de grelhar para que fique mais tenra e saborosa.
• Untar a grelha antes de grelhar legumes, peixe ou carne magra.
Se a carne a grelhar tiver gordura ou se esteve a marinar, não é necessário
untar a grelha.
•Girar os alimentos pelo menos uma vez durante a cozedura, se não for
indicado em contrário.
•Nos últimos 6 a 10 minutos de grelha, se desejar, espalmar nos alimentos um
molho para barbecue (grelhados) ou outros.
•Quando se está a grelhar peixe, para ser mais fácil girá-lo, utilizar uma
espátula larga e achatada ou pinças de cozinha.
TEMPOS INDICATIVOS DE COZEDURA
ALIMENTO POSIÇÃO TIEMPOS
DO TERMÓSTATO DE COZEDURA
Peixe
peixe inteiro MED 8 - 10
filetes de peixe MED 5 - 7
postas de peixe MED 15 - 20
camarões MAX 3 - 6
Frango sem osso, sem pele MED-MAX 15 - 20
panados de frango MED-MAX 25 - 30
asas de frango MED-MAX 10 - 15
Carne costoleta grossa MED-MAX 10 - 15
costoleta fina MED-MAX 8 - 12
hambúrguer MED-MAX 8 - 10
carrochos-quentes MED-MAX 7 - 9
Porco febras grossas MED-MAX 12 - 15
febras finas MED-MAX 10 - 12
entrecosto MED-MAX 20 - 25
bacon MED-MAX 4 - 6
salsichas MED-MAX 12 - 15
Legumes MAX 5 - 10
Os tempos e as quantidades acima indicadas devem ser consideradas como
puramente indicativas. Para os modelos sem termóstato, seguir os tempos mais
prolongados indicados na tabela.
30
BG30 6-02-2002 9:01 Pagina 30
Page 31

LIMPEZA E MANUTENÇÃO
• Desligando a ficha da tomada, a grelha arrefece. Retirar sempre a ficha da
sua tomada na grelha.
• Manusear com cuidado.
• Deixar o aparelho arrefecer antes de o limpar.
• Nunca mergulhar a grelha e a ficha em água ou outros líquidos. Para limpá-
la basta um pano húmido. O resto dos componentes podem ser lavados em
água quente e sabão com uma esponja.
•Se necessário, o cabo de alimentação pode ser limpo com um pano macio.
Nunca mergulhar o cabo de alimentação em água ou noutros líquidos.
31
BG30 6-02-2002 9:01 Pagina 31
Page 32

™∏ª∞¡∆π∫∂™ ¶ƒ√∂π¢√¶√π∏™∂π™
• ¶ЪИУ ¯ЪЛЫИМФФИ‹ЫВЩВ ЩФ ЛПВОЩЪИОfi barbeque, БИ· У· ·ФК‡БВЩВ ЫК¿ПМ·Щ·
О·И БИ· У· ¤¯ВЩВ Щ· О·П‡ЩВЪ· ·ФЩВП¤ЫМ·Щ·, ‰И·‚¿ЫЩВ ЪФЫВОЩИО¿ ЩИ˜
Ф‰ЛБ›В˜.
• ∏ Ы˘ЫОВ˘‹ В›У·И О·Щ¿ППЛПЛ БИ· ЩФ „‹ЫИМФ К·БЛЩТУ. ¢ВУ Ъ¤ВИ Ы˘УВТ˜ У·
¯ЪЛЫИМФФИВ›Щ·И БИ· ¿ППФ ЫОФfi ‹ У· МВЩ·ЩЪ¤ВЩ·И МВ ФФИФУ‰‹ФЩВ ЩЪfiФ.
• ŸЩ·У Л Ы˘ЫО˘‹ ›У·И Ы ПИЩФ˘ЪБ›·, Л ıЪМФОЪ·Ы›· ЩˆУ ЪФЫ‚¿ЫИМˆУ ИК·УИТУ
ÌÔÚ› Ó· ›Ó·È ˘„ËÏ‹.
• ªЛ ¯ЪЛЫИМФФИВ›ЩВ О¿Ъ‚Ф˘У· ‹ ¿ПП· О·‡ЫИМ· ˘ПИО¿ МВ ЩЛ Ы˘ЫОВ˘‹.
• ¶ЪИУ ЩЛ ¯Ъ‹ЫЛ, О·ı·Ъ›ЫЩВ ЪФЫВОЩИО¿ ЩЛУ ·УЩИОФППЛЩИО‹ Ы¯¿Ъ· МВ ¤У· ˘БЪfi
·Ó›.
• ªЛУ ВИЩЪ¤ВЩВ ЫЩ· ·И‰И¿ У· ¯ЪЛЫИМФФИФ‡У ЩЛ Ы˘ЫОВ˘‹ О·И МЛУ ЩЛУ
·К‹УВЩВ ЫВ ПВИЩФ˘ЪБ›· ¯ˆЪ›˜ ВИЩ‹ЪЛЫЛ.
• ªЛ ¯ЪЛЫИМФФИВ›ЩВ ФЩ¤ ЩЛ Ы˘ЫОВ˘‹ ¯ˆЪ›˜ ЩЛУ ВИ‰ИО‹ ‚¿ЫЛ ЫЩ‹ЪИНЛ˜ О·И ЩФ
ÏÈÔÛ˘ÏϤÎÙË.
• ¶ЪФЫ¤НЩВ ТЫЩВ ЩФ ЛПВОЩЪИОfi О·ПТ‰ИФ У· МЛУ ¤Ъ¯ВЩ·И ЫВ В·К‹ МВ ıВЪМ¿
ЫЛМВ›· ЩЛ˜ Ы˘ЫОВ˘‹˜ О·Щ¿ ЩЛ ‰И¿ЪОВИ· ЩЛ˜ ПВИЩФ˘ЪБ›·˜.
• ªЛ ¯ЪЛЫИМФФИВ›ЩВ ЩЛ Ы˘ЫОВ˘‹ ЫВ ВНˆЩВЪИОФ‡˜ ¯ТЪФ˘˜.
• ГЪЛЫИМФФИВ›ЩВ МfiУФ ЪФВОЩ¿ЫВИ˜ Ы‡МКˆУ· МВ ЩФ˘˜ ИЫ¯‡ФУЩВ˜ О·УФУИЫМФ‡˜
·ÛÊ·Ï›·˜.
• ∆Ф ЛПВОЩЪИОfi О·ПТ‰ИФ ЩЛ˜ Ы˘ЫОВ˘‹˜ ‰ВУ Ъ¤ВИ У· ·УЩИО·ı›ЫЩ·Щ·И ·fi ЩФ
¯Ú‹ÛÙË ÁÈ·Ù› Ë ·ÓÙÈηٿÛÙ·Û‹ ÙÔ˘ ··ÈÙ› ÙË ¯Ú‹ÛË ÂȉÈÎÒÓ ÂÚÁ·Ï›ˆÓ. ™Â
ÂÚ›ÙˆÛË ÊıÔÚ¿˜, ·Â˘ı˘Óı›Ù ÌfiÓÔ ÛÙÔ ÂÍÔ˘ÛÈÔ‰ÔÙË̤ÓÔ ™¤Ú‚Ș ÙÔ˘
ηٷÛ΢·ÛÙ‹.
• ™В ВЪ›ЩˆЫЛ ·УЩИО·Щ¿ЫЩ·ЫЛ˜, ¯ЪЛЫИМФФИ‹ЫЩВ МfiУФ О·ПТ‰ИФ МВ КИ˜ О·И
˘Ô‰Ô¯‹ Ô˘ ‰È·Ù›ıÂÙ·È ·fi ÙÔÓ Î·Ù·Û΢·ÛÙ‹ Î·È ÙÔ ™¤Ú‚Ș ÙÔ˘.
• ªË ‚˘ı›˙ÂÙ·È ÔÙ¤ ÙË Û¯¿Ú· Î·È ÙÔ ıËÏ˘Îfi ÊȘ Û ÓÂÚfi ‹ ¿ÏÏÔ ˘ÁÚfi. °È· ÙÔÓ
ηı·ÚÈÛÌfi, ·ÚΛ ¤Ó· ˘ÁÚfi ·Ó›.
• ªËÓ ·ÔÛ˘Ó‰¤ÂÙ ÔÙ¤ ÙÔ ÊȘ ·fi ÙËÓ Ú›˙· ÙÔ˘ Ú‡̷ÙÔ˜ ÙÚ·‚ÒÓÙ·˜ ÙÔ
ηÏÒ‰ÈÔ.
• º˘Ï¿ÍÙ ÙË Û˘Û΢‹ ÌfiÓÔÓ ·ÊÔ‡ ÎÚ˘ÒÛÂÈ Î·Ï¿.
• ªËÓ ·ÁÁ›˙ÂÙ ÙË Û¯¿Ú· Ì ÌÂÙ·ÏÏÈο ÂÚÁ·Ï›·, ÁÈ· Ó· ÌËÓ Î·Ù·ÛÙÚ¤„ÂÙÂ
ÙËÓ Â¤Ó‰˘ÛË.
• º˘П¿НЩВ ЩФУ ·ЪfiУ ВБ¯ВИЪ›‰ИФ Ф‰ЛБИТУ.
∂°∫∞∆∞™∆∞™∏
• ¶ÚÈÓ ÙË ¯Ú‹ÛË, ‚‚·Èˆı›Ù fiÙÈ Ë Û˘Û΢‹ ‰ÂÓ ¤¯ÂÈ ˘ÔÛÙ› ‚Ï¿‚˜
ηٿ ÙË ÌÂÙ·ÊÔÚ¿.
• ∂ÁηٷÛÙ‹ÛÙ ÙË Û˘Û΢‹ Û ÔÚÈ˙fiÓÙÈ· ÂÈÊ¿ÓÂÈ·, Û ÛËÌ›Ô
·ЪФЫ¤П·ЫЩФ ЫЩ· ·И‰И¿, БИ·Щ› ФЪИЫМ¤У· ЫЛМВ›· ЩЛ˜ Ы˘ЫОВ˘‹˜
КЩ¿УФ˘У ЫВ ˘„ЛП¤˜ ıВЪМФОЪ·Ы›В˜ О·Щ¿ ЩЛ ‰И¿ЪОВИ· ЩЛ˜ ¯Ъ‹ЫЛ˜.
• ¶ÚÈÓ Û˘Ó‰¤ÛÂÙ ÙÔ ÊȘ ÛÙËÓ Ú›˙· ÙÔ˘ Ú‡̷ÙÔ˜, ÂϤÁÍÙÂ:
- ·У Л Щ¿ЫЛ ЩФ˘ ‰ИОЩ‡Ф˘ ·УЩИЫЩФИ¯В› ЫЩЛУ ЩИМ‹ Ф˘ ·У·БЪ¿КВЩ·И ЫЩЛУ
ВЩИО¤Щ· ¯·Ъ·ОЩЛЪИЫЩИОТУ, ¿Уˆ ЫЩФ ıЛП˘Оfi КИ˜.
- ·Ó Ë Ú›˙· ÙÔ˘ Ú‡̷ÙÔ˜ ¤¯ÂÈ ÂÏ¿¯ÈÛÙË ·ÚÔ¯‹ 10∞.
- ·У Л Ъ›˙· В›У·И О·Щ¿ППЛПЛ БИ· ЩФ КИ˜. ¢И·КФЪВЩИО¿ ·УЩИО·Щ·ЫЩ‹ЫЩВ ЩЛУ.
- ·Ó Ë Ú›˙· Â›Ó·È Û˘Ó‰Â‰Â̤ÓË Ì ÂÁηٿÛÙ·ÛË Á›ˆÛ˘. √
ηٷÛ΢·ÛÙ‹˜ ‰ÂÓ Ê¤ÚÂÈ Î·Ì›· ¢ı‡ÓË Û ÂÚ›ÙˆÛË ÌË Ù‹ÚËÛ˘
GR
32
BG30 6-02-2002 9:01 Pagina 32
Page 33

·˘ÙÔ‡ ÙÔ˘ ηÓfiÓ·.
• ·К‹ЫЩВ ЩЛ Ы˘ЫОВ˘‹ У· ПВИЩФ˘ЪБ‹ЫВИ ЩФ˘П¿¯ИЫЩФУ БИ· 5 ПВЩ¿ О·И
·ÂÚ›ÛÙ ÙÔ ‰ˆÌ¿ÙÈÔ ÁÈ· Ó· ʇÁÂÈ Ë ÔÛÌ‹ ÙÔ˘ "ηÈÓÔ‡ÚÁÈÔ˘".
• ¶ЪИУ ЩЛ ¯Ъ‹ЫЛ, О·ı·Ъ›ЫЩ ЪФЫОЩИО¿ ЩЛУ ·УЩИОФППЛЩИО‹ Ы¯¿Ъ· М ¤У·
˘БЪfi ·У›.
• §·‰ÒÛÙ ÙË Û¯¿Ú· „¿ÚÈ· ‹ ¿·¯Ô ÎÚ¤·˜.
Ã∏™∏
• ∆ÔÔıÂÙ‹ÛÙ ÙÔ ıËÏ˘Îfi ÊȘ (7) ÛÙËÓ ÂȉÈ΋ ˘Ô‰Ô¯‹ (3).
• µÂ‚·Èˆı›Ù fiÙÈ ÙÔ ÊȘ Û˘Ó‰¤ıËÎÂ
• ™˘Ó‰¤ÛÙ ÙÔ ÊȘ (8) ÛÙËÓ Ú›˙· ÙÔ˘ Ú‡̷ÙÔ˜.
• ƒ˘ıМ›ЫЩВ ЩФ ‰И·ОfiЩЛ ЩФ˘ ıВЪМФЫЩ¿ЩЛ (9) ЫЩЛ ı¤ЫЛ "MAX".
• ∏ ВУ‰ВИОЩИО‹ П˘¯У›· (10) Ф˘ ‚Ъ›ЫОВЩ·И ЫЩФ ıЛП˘Оfi КИ˜ (7) ·У¿‚ВИ
˘Ф‰ВИОУ‡ФУЩ·˜ fiЩИ ЩФ ıВЪМ·ИУfiМВУФ ЫЩФИ¯В›Ф ПВИЩФ˘ЪБВ›.
• ŸЩ·У Л Ы˘ЫОВ˘‹ КЩ¿ЫВИ ЫЩЛУ ВИı˘МЛЩ‹ ıВЪМФОЪ·Ы›·, Л ВУ‰ВИОЩИО‹
Ï˘¯Ó›· (10) Û‚‹ÓÂÈ.
• ∆ÔÔıÂÙ‹ÛÙ ÛÙË Û¯¿Ú· Ù· ÙÚfiÊÈÌ· Î·È Ú˘ıÌ›ÛÙ ÙÔ ‰È·ÎfiÙË ÙÔ˘
ıВЪМФЫЩ¿ЩЛ ЫЩЛУ ВИı˘МЛЩ‹ ı¤ЫЛ.
ГЪЛЫИМФФИВ›ЩВ МfiУФУ П·ЫЩИО¿ ‹ Н‡ПИУ· ВЪБ·ПВ›·. ªЛ ¯ЪЛЫИМФФИВ›ЩВ
ФЩ¤ ·И¯МЛЪ¿ ‹ МВЩ·ППИО¿ ·УЩИОВ›МВУ· БИ· У· МЛУ О·Щ·ЫЩЪ¤„ВЩВ ЩЛУ
·УЩИОФППЛЩИО‹ ВИК¿УВИ·.
• ™ЩФ Щ¤ПФ˜ ЩФ˘ „ЛЫ›М·ЩФ˜, Б˘Ъ›ЫЩВ ЩФ ‰И·ОfiЩЛ ЩФ˘ ıВЪМФЫЩ¿ЩЛ (9) ЫЩЛ
ı¤ÛË "O", ·ÔÛ˘Ó‰¤ÛÙ ÙÔ ÊȘ ·fi ÙËÓ Ú›˙· ÙÔ˘ Ú‡̷ÙÔ˜ Î·È ÙÔ
ıËÏ˘Îfi ÊȘ (7) ·fi ÙËÓ ˘Ô‰Ô¯‹ ÙÔ˘.
ƒÀ£ªπ∑√ª∂¡√ £∂ƒª√™∆∞∆∏:
∏ Ы˘ЫОВ˘‹ ‰И·ı¤ЩВИ Ъ˘ıМИ˙fiМВУФ ıВЪМФЫЩ¿ЩЛ 3 ı¤ЫВˆУ: MIN, MED, MAX.
£¤ЫЛ O: barbeque Û‚ËÛÙfi
£¤ÛË MIN: Û˘ÓÙ‹ÚËÛË
£¤ÛË MED: ·ÚÁfi „‹ÛÈÌÔ
£¤ÛË MAX: БИ· ЪФı¤ЪМ·УЫЛ О·И БЪ‹БФЪФ „‹ЫИМФ (‰И·ЩЛЪТУЩ·˜ ЩЛ
УФЫЩИМ¿‰· ЩˆУ К·БЛЩТУ).
¢π∞™∫√ƒ¶π™∆∏ ∞ƒøª∞∆√™ (5):
ñ ∆ÔÔıÂÙ‹ÛÙ ÙÔ ‰È·ÛÎÔÚÈÛÙ‹ ·ÚÒÌ·ÙÔ˜ ÛÙËÓ ÂȉÈ΋ ¤‰Ú· Ô˘
‚Ъ›ЫОВЩ·И ЫЩЛ ‚¿ЫЛ ЩФ˘ ЫТМ·ЩФ˜ ЩФ˘ barbeque.
с ∆ФФıВЩ‹ЫЩВ ЫЩФ ‰И·ЫОФЪИЫЩ‹ Щ· ·ЪˆМ·ЩИО¿ К˘Щ¿ ЩЛ˜ ·ЪВЫОВ›·˜ Ы·˜.
с ∆ФФıВЩ‹ЫЩВ ЩЛ Ы¯¿Ъ· „ЛЫ›М·ЩФ˜ МВ ЩЪfiФ ТЫЩВ ФИ ‰‡Ф ·УЩИЫЩ¿ЫВИ˜
У· ‚Ъ›ЫОФУЩ·И ЫЩФ ВЫˆЩВЪИОfi ЩФ˘ ‰И·ЫОФЪИЫЩ‹.
с ™ЩФ Щ¤ПФ˜ ЩФ˘ „ЛЫ›М·ЩФ˜ ЩФФıВЩ‹ЫЩВ ЩФ ıВЪМФЫЩ¿ЩЛ ЫЩЛ ı¤ЫЛ √ ηÈ
·ÔÛ˘Ó‰¤ÛÙ ٷ ÊȘ ·fi ÙËÓ Ú›˙· Î·È ·fi ÙËÓ ˘Ô‰Ô¯‹ Û‡Ó‰ÂÛ˘.
Ã∏™∏ ∆√À ¢π∞™∫√ƒ¶π™∆∏ ∞ƒøª∞∆√™:
∆Ф ·НВЫФ˘¿Ъ ·˘Щfi Ы·˜ ВИЩЪ¤ВИ У· ·ЪˆМ·Щ›˙ВЩВ Щ· К·БЛЩ¿ Ы·˜. ™ЩЛ
Ы˘У¤¯ВИ· ·ОФПФ˘ıФ‡У МВЪИО¤˜ Ф‰ЛБ›В˜ БИ· ЩЛ ЫˆЫЩ‹ ¯Ъ‹ЫЛ ЩФ˘:
33
BG30 6-02-2002 9:01 Pagina 33
Page 34

ñ ∞‰ÂÈ¿ÛÙ ÌÈÛfi ÊÏÈÙ˙·Ó¿ÎÈ ÓÂÚfi ÛÙÔ ‰È·ÛÎÔÚÈÛÙ‹.
ñ ¶ÚÔÛı¤ÛÙ ٷ ·ÎfiÏÔ˘ı· ·ÚˆÌ·ÙÈο ÁÈ· Ó· ¤¯ÂÙ ÙÔ ÂÈı˘ÌËÙfi ¿ÚˆÌ·:
- 2 ЫОВП›‰В˜ ЫОfiЪ‰Ф „ИПФОФММ¤УФ
- П›Б· К‡ПП· МВПИЫЫfi¯ФЪЩФ˘
- 2 ÎÔ˘Ù·Ï¿ÎÈ· οÚÈ
- 2 ОПˆУ·Ъ¿ОИ· ‰ВУЩЪФП›‚·УФ
- Ï›Á· ʇÏÏ· Ê·ÛÎfiÌËÏÔ
™Àªµ√À§∂™ °π∞ ™ø™∆√ æ∏™πª√
∞ÎÔÏÔ˘ı‹ÛÙ ÙȘ ·Ú·Î¿Ùˆ Û˘Ì‚Ô˘Ï¤˜ ÁÈ· ηÏfi „‹ÛÈÌÔ:
• ГЪЛЫИМФФИВ›ЩВ МfiУФ П·ЫЩИО¿ ВЪБ·ПВ›·. ∆Ф М¤Щ·ППФ МФЪВ› У· КıВ›ЪВИ
ЩЛУ ·УЩИОФППЛЩИО‹ ВИК¿УВИ· ЩЛ˜ Ы¯¿Ъ·˜.
• ¶ЪФıВЪМ¿УВЩВ ЩЛ Ы¯¿Ъ· МВ ЩФ ıВЪМФЫЩ¿ЩЛ ЫЩЛ ı¤ЫЛ "MAX" ¤ˆ˜ fiЩФ˘
Ы‚‹ЫВИ Л ВУ‰ВИОЩИО‹ П˘¯У›·.
• ª·ЪИУ¿ЪВЩВ ЩФ ОЪ¤·˜ ЪИУ ЩФ „‹ЫИМФ БИ· У· М·П·ОТЫВИ О·И У·
УФЫЩИМ›ЫВИ.
• §·‰ÒÛÙ ÙË Û¯¿Ú·, ÚÈÓ „‹ÛÂÙ Ϸ¯·ÓÈο, „¿ÚÈ· ‹ ¿·¯Ô ÎÚ¤·˜. ∞Ó
„‹ЫВЩВ ·¯‡ ОЪ¤·˜, ‹ ·У ЩФ ОЪ¤·˜ ¤¯ВИ М·ЪИУ·ЪИЫЩВ›, ‰ВУ В›У·И
·У·БО·›Ф У· П·‰ТЫВЩВ ЩЛ Ы¯¿Ъ·.
• °˘Ъ›ЫЩВ Щ· К·БЛЩ¿ ЩФ˘П¿¯ИЫЩФУ МИ· КФЪ¿ О·Щ¿ ЩФ „‹ЫИМФ, ·У ‰ВУ
˘¿Ъ¯Ф˘У ‰И·КФЪВЩИО¤˜ Ф‰ЛБ›В˜.
• ™Ù· ÙÂÏÂ˘Ù·›· 6-10 ÏÂÙ¿ ÙÔ˘ „Ë̷ۛÙÔ˜, ·Ó ÙÔ ÂÈı˘Ì›ÙÂ, ÌÔÚ›ÙÂ
Ó· ·Û·Ï›ÛÂÙ ÙÔ Ê·ÁËÙfi Ì ۈ˜ ÁÈ· barbeque ‹ ¿ÏϘ Ûˆ˜
• ŸЩ·У „‹УВЩВ „¿ЪИ, БИ· У· ЩФ Б˘Ъ›ЫВЩВ В‡ОФП·, ¯ЪЛЫИМФФИ‹ЫЩВ П·ЩИ¿
Î·È Â›Â‰Ë Û¿ÙÔ˘Ï· ‹ Ï·‚›‰Â˜ ÎÔ˘˙›Ó·˜.
∂¡¢∂π∫∆π∫√π Ã√¡√π æ∏™πª∞∆√™
∂π¢√™ £∂™∏ Ã√¡√™
£∂ƒª√™∆∞∆∏ æ∏™πª∞∆√™
æ¿ÚÈ ФПfiОПЛЪФ MED 8 - 10
ÊÈϤÙÔ MED 5 - 7
ʤÙ˜ MED 15 - 20
Á·Ú›‰Â˜ MAX 3 - 6
∫ÔÙfiÔ˘ÏÔ ¯ˆÚ›˜ ÎfiηϷ & ¤ÙÛ· MED-MAX 15 - 20
ÎÚÔΤÙ˜ MED-MAX 25 - 30
КЩВЪФ‡БВ˜ MED-MAX 10 - 15
∫Ú¤·˜ ÌÚÈ˙fiÏ· ¯ÔÓÙÚ‹ MED-MAX 10 - 15
ÌÚÈ˙fiÏ· ÏÂÙ‹ MED-MAX 8 - 12
ÌÈÊÙ¤ÎÈ MED-MAX 8 - 10
hot dogs MED-MAX 7 - 9
ГФИЪИУfi ÌÚÈ˙fiÏ· ¯ÔÓÙÚ‹ MED-MAX 12 - 15
ÌÚÈ˙fiÏ· ÏÂÙ‹ MED-MAX 10 - 12
·˚‰¿ÎÈ· MED-MAX 20 - 25
34
BG30 6-02-2002 9:01 Pagina 34
Page 35

·ÓÙÛ¤Ù· MED-MAX 4 - 6
ÏÔ˘Î¿ÓÈη MED-MAX 12 - 15
§·¯·ÓÈο MAX 5 - 10
√И ¯ЪfiУФИ О·И ФИ ФЫfiЩЛЩВ˜, Ъ¤ВИ У· ıВˆЪФ‡УЩ·И ·П¿ ВУ‰ВИОЩИО¤˜. °И·
Щ· МФУЩ¤П· ¯ˆЪ›˜ ıВЪМФЫЩ¿ЩЛ, ИЫ¯‡Ф˘У ФИ МВБ·П‡ЩВЪФИ ¯ЪfiУФИ ЩФ˘
›У·О·.
∫∞£∞ƒπ™ª√™ ∫∞π ™À¡∆∏ƒ∏™∏
• ∞ÔÛ˘Ó‰¤ÔÓÙ·˜ ÙÔ ÊȘ ·fi ÙËÓ Ú›˙· Ë Û¯¿Ú· ÎÚ˘ÒÓÂÈ. µÂ‚·Èˆı›Ù fiÙÈ
·ÔÛ˘Ó‰¤Û·Ù ÙÔ ıËÏ˘Îfi ÊȘ ·fi ÙËÓ ˘Ô‰Ô¯‹ ÛÙË Û¯¿Ú·.
• ∂УВЪБ‹ЫЩВ ЪФЫВОЩИО¿.
• ∞Ê‹ÛÙ ÙË Û˘Û΢‹ Ó· ÎÚ˘ÒÛÂÈ ÚÈÓ ÙËÓ Î·ı·Ú›ÛÂÙÂ.
• ªË ‚˘ı›˙ÂÙ·È ÔÙ¤ ÙË Û¯¿Ú· Î·È ÙÔ ıËÏ˘Îfi ÊȘ Û ÓÂÚfi ‹ ¿ÏÏÔ ˘ÁÚfi. °È·
ÙÔÓ Î·ı·ÚÈÛÌfi, ·ÚΛ ¤Ó· ˘ÁÚfi ·Ó›. ∆· ˘fiÏÔÈ· ÂÍ·ÚÙ‹Ì·Ù· ÌÔÚÔ‡Ó
Ó· Ï˘ıÔ‡Ó Ì ·ÔÚÚ˘·ÓÙÈÎfi Î·È ÛÊÔ˘ÁÁ·Ú¿ÎÈ.
• ∂Ó ·Ó¿ÁÎË, ÌÔÚ›Ù ӷ ηı·Ú›ÛÂÙ ÙÔ Î·ÏÒ‰ÈÔ Ì ¤Ó· Ì·Ï·Îfi ·Ó›. ªË
‚˘ı›˙ÂÙ ÔÙ¤ ÙÔ Î·ÏÒ‰ÈÔ Û ÓÂÚfi ‹ ¿ÏÏ· ˘ÁÚ¿.
35
BG30 6-02-2002 9:01 Pagina 35
Page 36

ååÖÖêêõõ èèêêÖÖÑÑééëëííééêêééÜÜççééëëííàà
• СУ ЛТФУО¸БУ‚‡МЛfl ˝ОВНЪУК‡У‚МЛ ‰Оfl ЪУ„У, ˜ЪУ·˚ МВ ‰УФЫТЪЛЪ¸
ӯ˷ÓÍ Ë ÔÓÎÛ˜ËÚ¸ ̇ËÎÛ˜¯Ë ÂÁÛθڇÚ˚, ‚ÌËχÚÂθÌÓ ËÁÛ˜ËÚÂ
ПВ˚ ФВ‰УТЪУУКМУТЪЛ.
• щЪУЪ ФЛ·У ФВ‰М‡БМ‡˜ВМ ‰Оfl ФЛ„УЪУ‚ОВМЛfl ФЛ˘Л. йМ МВ ‰УОКВМ
ЛТФУО¸БУ‚‡Ъ¸Тfl ‰Оfl ‰Ы„Лı ˆВОВИ Л МЛ ‚ НУВП ТОЫ˜‡В МВ ПУКВЪ ·˚Ъ¸
ÌË ÏÓ‰ËÙˈËÓ‚‡Ì, ÌË ‚ÒÍ˚Ú.
• иЛ ‡·УЪ ФЛ·У‡ ‰УТЪЫФМ˚ ФУ‚ıМУТЪЛ ПУ„ЫЪ ЛПЪ¸ ФУ‚˚¯ММЫ˛
ÚÏÔ‡ÚÛÛ.
• иЛ ˝НТФОЫ‡Ъ‡ˆЛЛ ˝ЪУ„У ФЛ·У‡ МВ ФЛПВМflИЪВ Ы„Оfl ЛОЛ ‰Ы„Лı
ÔÓ‰Ó·Ì˚ı „Ó˛˜Ëı χÚ¡ÎÓ‚.
• СУ М‡˜‡О‡ ˝НТФОЫ‡Ъ‡ˆЛЛ ‚О‡КМУИ ЪН‡М¸˛ Ъ˘‡ЪВО¸МУ У˜ЛТЪЛЪВ
ÔÓÚË‚ÓÔË„‡ÌÛ˛ ¯ÂÚÍÛ.
• зВ УТЪ‡‚ОflИЪВ ФЛ·У ‚ ФВ‰ВО‡ı ‰УТfl„‡ВПУТЪЛ ‰ВЪ¸ПЛ, ‡ Ъ‡НКВ
·ВБ М‡‰БУ‡ ‚ ‡·УЪ‡˛˘ВП ТУТЪУflМЛЛ.
• зЛ ‚ НУВП ТОЫ˜‡В МВ ЛТФУО¸БЫИЪВ ФЛ·У ·ВБ ТФВˆЛ‡О¸МУИ УФУ˚ Л
ÔÓÚË‚Ìfl ‰Îfl Ò·Ó‡ Êˇ.
• ì·Â‰ËÚÂÒ¸, ˜ÚÓ ÔÓ‚Ó‰ ˝ÎÂÍÚÓÔËÚ‡ÌËfl Ì ÍÓÌÚ‡ÍÚËÛÂÚ Ò
̇„ÂÚ˚ÏË ˜‡ÒÚflÏË ÔË·Ó‡ ‚Ó ‚ÂÏfl Â„Ó ‡·ÓÚ˚.
•
çç ËËÒÒÔÔÓÓÎθ¸ÁÁÛÛÈÈÚÚ ÔÔËË··ÓÓ ‚‚ÌÌ ÔÔÓÓÏÏ¢˘ÂÂÌÌËËÈÈ..
• аТФУО¸БЫИЪВ Ы‰ОЛМЛЪВОЛ, НУЪУ˚В ТУУЪ‚ВЪТЪ‚Ы˛Ъ ‰ВИТЪ‚Ы˛˘ЛП
МУП‡П ·ВБУФ‡ТМУТЪЛ.
• иУ‚У‰ ФЛЪ‡МЛfl ФЛ·У‡ МВ ПУКВЪ ·˚Ъ¸ Б‡ПВМВМ Т‡ПЛП
ФУО¸БУ‚‡ЪВОВП, Ъ‡Н Н‡Н Ъ‡НУИ ВПУМЪ ЪВ·ЫВЪ ЛТФУО¸БУ‚‡МЛfl
ТФВˆЛ‡О¸М˚ı ЛМТЪЫПВМЪУ‚.
• Ç ÒÎÛ˜‡Â ÔÓ‚ÂʉÂÌËfl ÔÓ‚Ó‰‡ ˝ÎÂÍÚÓÔËÚ‡ÌËfl Ó·‡˘‡ÈÚÂÒ¸ ÚÓθÍÓ ‚
‡‚ЪУЛБЛУ‚‡ММ˚И ФУЛБ‚У‰ЛЪВОВП ФЛ·У‡ ТВ‚ЛТМ˚И ˆВМЪ.
• З ТОЫ˜‡В Б‡ПВМ˚ ЛТФУО¸БЫИЪВ ЪУО¸НУ ФУ‚У‰‡ ˝ОВНЪУФЛЪ‡МЛfl Т
‚ЛОНУИ Л ‡Б˙ВПУП, НУЪУ˚В ‚‡П ПУКВЪ ФВ‰УТЪ‡‚ЛЪ¸
ÔÓËÁ‚Ó‰ËÚÂθ Ë Â„Ó ‡‚ÚÓËÁËÓ‚‡ÌÌ˚ Ò‚ËÒÌ˚ ˆÂÌÚ˚.
• ç ÔÓ„ÛʇÈÚ ¯ÂÚÍÛ Ë ˝ÎÂÍÚÓ‡Á˙ÂÏ ‚ ‚Ó‰Û ËÎË ‰Û„ËÂ
КЛ‰НУТЪЛ. СОfl У˜ЛТЪНЛ ‚УТФУО¸БЫИЪВТ¸ ‚О‡КМУИ ЪН‡М¸˛.
• зЛ ‚ НУВП ТОЫ˜‡В МВ ‚˚МЛП‡ИЪВ ‚ЛОНЫ ЛБ УБВЪНЛ ˝ОВНЪУФЛЪ‡МЛfl,
ÔÓÚflÌÛ‚ Á‡ ÔÓ‚Ó‰.
• иВВМУТЛЪВ ФЛ·У ‚ ПВТЪУ ı‡МВМЛfl ЪУО¸НУ НУ„‰‡ УМ ФУОМУТЪ¸˛
ÓÒÚ˚ÌÂÚ.
• зВ ФЛН‡Т‡ИЪВТ¸ Н В¯ВЪНВ ПВЪ‡ООЛ˜ВТНЛПЛ ФВ‰ПВЪ‡ПЛ, УМЛ
ÏÓ„ÛÚ Ôӂ‰ËÚ¸ ÔÓÍ˚ÚËÂ.
• ÅÂÂÊÌÓ ı‡ÌËÚ ˝ÚË ËÌÒÚÛ͈ËË.
ììëëííÄÄççééÇÇääÄÄ èèêêààÅÅééêêÄÄ
• СУ ˝НТФОЫ‡Ъ‡ˆЛЛ Ы·В‰ЛЪВТ¸, ˜ЪУ ФЛ·У ‚У ‚ВПfl Ъ‡МТФУЪЛУ‚НЛ
Ì ÔÓÎÛ˜ËÎ ÔÓ‚ÂʉÂÌËÈ.
• мТЪ‡МУ‚ЛЪВ ФЛ·У М‡ „УЛБУМЪ‡О¸МУИ ФУ‚ВıМУТЪЛ ‚МВ
‰УТfl„‡ВПУТЪЛ ‰ВЪ¸ПЛ, Ъ‡Н Н‡Н В„У МВНУЪУ˚В ˜‡ТЪЛ ‚У ‚ВПfl
ЛТФУО¸БУ‚‡МЛfl М‡„В‚‡˛ЪТfl ‰У ‚˚ТУНУИ ЪВПФВ‡ЪЫ˚.
• СУ ЪУ„У, Н‡Н ‚ТЪ‡‚ЛЪ¸ ‚ЛОНЫ ‚ УБВЪНЫ ˝ОВНЪУФЛЪ‡МЛfl, Ы·В‰ЛЪВТ¸, ˜ЪУ:
- М‡ФflКВМЛВ ФЛЪ‡МЛfl ‚ ‚‡¯ВИ ТВЪЛ ТУУЪ‚ВЪТЪ‚ЫВЪ БМ‡˜ВМЛ˛
SU
36
BG30 6-02-2002 9:01 Pagina 36
Page 37

ЫН‡Б‡ММУПЫ М‡ Ъ‡·ОЛ˜НВ Т ı‡‡НЪВЛТЪЛН‡ПЛ, ФЛНВФОВММУИ Н
‡Б˙ВПЫ;
- ПЛМЛП‡О¸М˚И ‰УФЫТЪЛП˚И ЪУН УБВЪНЛ ˝ОВНЪУФЛЪ‡МЛfl – 10 Д.
- УБВЪН‡ ФУ ЪЛФЫ ФУ‰ıУ‰ЛЪ Н ‚ЛОНВ;
- УБВЪН‡ ФУ‰НО˛˜ВМ‡ Н ˝ЩЩВНЪЛ‚МУПЫ Б‡БВПОВМЛ˛.
иУЛБ‚У‰ЛЪВО¸ МВ МВТВЪ МЛН‡НУИ УЪ‚ВЪТЪ‚ВММУТЪЛ ‚ ТОЫ˜‡В, ВТОЛ
˝Ъ‡ МУП‡ МВ ТУ·О˛‰‡ВЪТfl.
• ÑÎfl ÚÓ„Ó, ˜ÚÓ·˚ Û‰‡ÎËÚ¸ "Á‡Ô‡ı ÌÓ‚Ó„Ó ÔË·Ó‡", ‚Íβ˜ËÚÂ Â„Ó ÌÂ
ПВМВВ ˜ВП М‡ 5 ПЛМЫЪ Л ФУ‚ВЪЛЪВ НУПМ‡ЪЫ.
• ЗО‡КМУИ ЪН‡М¸˛ ЛОЛ „Ы·НУИ У˜ЛТЪЛЪВ ‡МЪЛФЛ„‡МЫ˛ В¯ВЪНЫ Л
Á‡ÚÂÏ Ú˘‡ÚÂθÌÓ ÔÓÒÛ¯ËÚÂ.
• иВВ‰ Н‡К‰˚П ‚НО˛˜ВМЛВП ‰Оfl У·ОВ„˜ВМЛfl К‡НЛ М‡МВТЛЪВ М‡
ФУ‚ВıМУТЪ¸ В¯ВЪНЛ ЪУМНЛИ ТОУИ ‡ТЪЛЪВО¸МУ„У П‡ТО‡.
ùùääëëèèããììÄÄííÄÄññààüü
• ЗТЪ‡‚¸ЪВ ‡Б˙ВП 7 ‚ ФВ‰ЫТПУЪВММУВ „МВБ‰У 3.
• ì·Â‰ËÚÂÒ¸, ˜ÚÓ ‡Á˙ÂÏ ‚ÒÚ‡‚ÎÂÌ ‰Ó ÛÔÓ‡.
• ЗТЪ‡‚¸ЪВ ‚ЛОНЫ 8 ‚ УБВЪНЫ ˝ОВНЪУФЛЪ‡МЛfl.
• мТЪ‡МУ‚ЛЪВ Ы˜НЫ В„ЫОflЪУ‡ ЪВПФВ‡ЪЫ˚ 9 ‚ ФУОУКВМЛВ "еДп".
• ÇÍβ˜ËÚÒfl ·ÏÔ‡ ÔÓ‰Ò‚ÂÚÍË 10, ̇ıÓ‰fl˘‡flÒfl ̇ ‡Á˙ÂÏ 7,
ЫН‡Б˚‚‡fl М‡ ЪУ, ˜ЪУ ‡·УЪ‡ВЪ М‡„В‚‡˛˘ЛИ ˝ОВПВМЪ.
• дУ„‰‡ ФЛ·У ‰УТЪЛ„МВЪ ЪВ·ЫВПУИ ЪВПФВ‡ЪЫ˚, ЛМ‰ЛН‡ЪУМ‡fl
·ÏÔ‡ 10 ÔÓ„‡ÒÌÂÚ.
• к‡БПВТЪЛЪВ М‡ В¯ВЪНВ ФУ‰ЫНЪ˚ ФЛЪ‡МЛfl Л ЫТЪ‡МУ‚ЛЪВ Ы˜НЫ
В„ЫОЛУ‚НЛ ЪВПФВ‡ЪЫ˚ ‚ МЫКМУВ ФУОУКВМЛВ.
аТФУО¸БЫИЪВ НЫıУММ˚В ФЛМ‡‰ОВКМУТЪЛ ЪУО¸НУ ЛБ ФО‡ТЪЛН‡ ЛОЛ
‰Â‚‡. óÚÓ·˚ Ì Ôӂ‰ËÚ¸ ÔÓ‚ÂıÌÓÒÚ¸, ÌË ‚ ÍÓÂÏ ÒÎÛ˜‡Â ÌÂ
ЛТФУО¸БЫИЪВ ВКЫ˘ЛВ ЛОЛ ПВЪ‡ООЛ˜ВТНЛВ ФВ‰ПВЪ˚.
• иУ Б‡‚В¯ВМЛЛ К‡НЛ ЫТЪ‡МУ‚ЛЪВ Ы˜НЫ В„ЫОЛУ‚НЛ ЪВПФВ‡ЪЫ˚
9 ‚ ФУОУКВМЛВ "й", ‚˚М¸ЪВ ‚ЛОНЫ ЛБ УБВЪНЛ ˝ОВНЪУФЛЪ‡МЛfl Л
‡Á˙ÂÏ 7 ËÁ Â„Ó „ÌÂÁ‰‡.
êêÖÖÉÉììããààêêééÇÇääÄÄ ííÖÖååèèÖÖêêÄÄííììêêõõ::
иЛ·У УТМ‡˘ВМ В„ЫОflЪУУП ЪВПФВ‡ЪЫ˚, ЫТЪ‡М‡‚ОЛ‚‡ВП˚П ‚ 3
ФУОУКВМЛfl: MIN (ПЛМЛП‡О¸М‡fl), MED (ТВ‰Мflfl), MAX (П‡НТЛП‡О¸М‡fl).
з‡ıУК‰ВМЛВ В„ЫОflЪУ‡ ‚ ФУОУКВМЛЛ "й" УБМ‡˜‡ВЪ, ˜ЪУ ФЛ·У
‚˚НО˛˜ВМ.
з‡ıУК‰ВМЛВ В„ЫОflЪУ‡ ‚ ФУОУКВМЛЛ "MIN" УБМ‡˜‡ВЪ, ˜ЪУ ФЛ·У
М‡ıУ‰ЛЪТfl ‚ ВКЛПВ ФУ‰У„В‚‡.
иУОУКВМЛВ В„ЫОflЪУ‡ "MED" ФВ‰М‡БМ‡˜ВМУ ‰Оfl ПВ‰ОВММУИ К‡НЛ
иУОУКВМЛВ В„ЫОflЪУ‡ "MAX" ФВ‰М‡БМ‡˜ВМУ ‰Оfl ФВ‰‚‡ЛЪВО¸МУ„У
‡БУ„В‚‡ Л ·˚ТЪУИ К‡НЛ (ФУ‰‰ВКЛ‚‡ВЪ Л‰В‡О¸МУВ ТУТЪУflМЛВ
ФУ‰ЫНЪУ‚).
ÄÄêêééååÄÄííààááÄÄííééêê 55
• мТЪ‡МУ‚ЛЪВ ‡УП‡ЪЛБ‡ЪУ М‡ ФВ‰ЫТПУЪВММУВ ПВТЪУ ‚ НУФЫТВ
χ̄‡Î‡.
37
BG30 6-02-2002 9:01 Pagina 37
Page 38

• иУОУКЛЪВ ‚ ‡УП‡ЪЛБ‡ЪУ М‡‚fl˘ЛВТfl ‚‡П ‡УП‡ЪЛ˜ВТНЛВ Ъ‡‚˚.
• мОУКЛЪВ В¯ВЪНЫ ‰Оfl К‡НЛ, ‚ТЪ‡‚Л‚ Н‡Н ТОВ‰ЫВЪ ‚ ‡УП‡ЪЛБ‡ЪУ
2 М‡„В‚‡˛˘Лı ˝ОВПВМЪ‡.
• иУТОВ Б‡‚В¯ВМЛfl К‡НЛ ЫТЪ‡МУ‚ЛЪВ Ы˜НЫ В„ЫОflЪУ‡ ‚
ФУОУКВМЛВ "й", ‚˚М¸ЪВ ‚ЛОНЫ ЛБ УБВЪНЛ ˝ОВНЪУФЛЪ‡МЛfl Л ‡Б˙ВП
ËÁ Â„Ó „ÌÂÁ‰‡.
ààëëèèééããúúááééÇÇÄÄççààÖÖ ÄÄêêééååÄÄííààááÄÄííééêêÄÄ::
щЪУ ФЛТФУТУ·ОВМЛВ ФУБ‚УОЛЪ ‚‡П ФЛ‰‡Ъ¸ ФЛ˘В ‡УП‡Ъ. зЛКВ
ФЛ‚В‰ВМ˚ МВНУЪУ˚В ТУ‚ВЪ˚ ФУ ЛТФУО¸БУ‚‡МЛ˛ ˝ЪУ„У
ФЛТФУТУ·ОВМЛfl:
• з‡ОВИЪВ ‚ ‡УП‡ЪЛБ‡ЪУ ФУОУ‚ЛМЫ ˜‡¯НЛ ‚У‰˚.
• СОfl ФУОЫ˜ВМЛfl КВО‡ВПУ„У ‡УП‡Ъ‡ ‚ ‚У‰Ы ПУКМУ ‰У·‡‚ЛЪ¸
ÒÎÂ‰Û˛˘Ë ÒÔˆËË:
- 2 ‰УО¸НЛ ЪВЪУ„У ˜ВТМУН‡,
- МВТНУО¸НУ ОЛТЪУ‚ ОЛПУММУИ ПflЪ˚,
- 2 ˜‡ИМ˚В ОУКНЛ Н˝Л,
- 2 ‚ÂÚÓ˜ÍË ÓÁχË̇,
- МВТНУО¸НУ ОЛТЪУ‚ ¯‡ОЩВfl.
êêÖÖääééååÖÖççÑÑÄÄññàààà ÑÑããüü ããììóóòòÖÖââ ÜÜÄÄêêääàà
ÑÎfl ÚÓ„Ó, ˜ÚÓ·˚ ÔË„ÓÚÓ‚ËÚ¸ ıÓӯ ʇÍÓÂ, ÔˉÂÊË‚‡ÈÚÂÒ¸
ÒÎÂ‰Û˛˘Ëı ÒÓ‚ÂÚÓ‚:
• аТФУО¸БЫИЪВ ЪУО¸НУ ФО‡ТЪЛНУ‚˚В НЫıУММ˚В ФЛМ‡‰ОВКМУТЪЛ.
• èÓ„ÂÈÚ ¯ÂÚÍÛ ‰Ó ‚˚Íβ˜ÂÌËfl Ë̉Ë͇ÚÓÌÓÈ Î‡ÏÔ˚,
ЫТЪ‡МУ‚Л‚ В„ЫОflЪУ ЪВПФВ‡ЪЫ˚ ‚ ФУОУКВМЛВ "MAX".
• СОfl ЪУ„У, ˜ЪУ·˚ ПflТУ ·˚ОУ Пfl„˜В Л ‚НЫТМВВ, ‰У К‡НЛ Б‡П‡ЛМЫИЪВ
„Ó.
• СОfl К‡НЛ БВОВМЛ, ˚·˚ ЛОЛ МВКЛМУ„У ПflТ‡ ТП‡К¸ЪВ В¯ВЪНЫ.
ÖÒÎË Ê‡ËÚÒfl ÊËÌÓ ÏflÒÓ ËÎË ÂÒÎË ÏflÒÓ Ô‰‚‡ËÚÂθÌÓ
Б‡П‡ЛМУ‚‡МУ, ТП‡Б˚‚‡Ъ¸ В¯ВЪНЫ МВЪ МВУ·ıУ‰ЛПУТЪЛ.
• ÖÒÎË ÂˆÂÔÚ Ì Ô‰ÛÒχÚË‚‡ÂÚ ËÌÓ„Ó, ‚Ó ‚ÂÏfl ʇÍË
Ô‚ÂÌËÚ ÔË˘Û ÔÓ Í‡ÈÌÂÈ Ï ӉËÌ ‡Á.
• З ФУТОВ‰МЛВ 6-10 ПЛМЫЪ, ВТОЛ Б‡ıУЪЛЪВ, ФУОВИЪВ ФЛ˘Ы ТУЫТУП ‰Оfl
χ̄‡ÎÓ‚ ËÎË ‰Û„ËÏ.
• иЛ К‡НВ ˚·˚ ‰Оfl ·˚ТЪУ„У ФВВ‚У‡˜Л‚‡МЛfl ЛТФУО¸БЫИЪВ
¯ЛУНЫ˛ Л ФОУТНЫ˛ ОУФ‡ЪНЫ ЛОЛ НЫıУММ˚В ˘ЛФˆ˚.
èèêêààååÖÖêêççééÖÖ ÇÇêêÖÖååüü ÜÜÄÄêêääàà
èèêêééÑÑììääíí èèééããééÜÜÖÖççààÖÖ ÇÇêêÖÖååüü
êêÖÖÉÉììããüüííééêêÄÄ ÜÜÄÄêêääàà
êê˚˚··‡‡
˚·‡ ˆВОЛНУП MED 8 - 10
˚·ÌÓÂ ÙËÎÂ MED 5 - 7
˚·М˚В НУЪОВЪ˚ MED 15 - 20
‡ÍË MAX 3 - 6
38
BG30 6-02-2002 9:01 Pagina 38
Page 39

ääÛÛËˈˆ‡‡
·ВБ НУТЪВИ Л НУКЛ MED-MAX 15 - 20
ÍÛËÌ˚Â ÍÓÍÂÚ˚ MED-MAX 25 - 30
ÍÛËÌ˚ Í˚Î˚¯ÍË MED-MAX 10 - 15
ååflflÒÒÓÓ
ЪУОТЪ˚И ·ЛЩ¯ЪВНТ MED-MAX 10 - 15
ÚÓÌ͇fl Óڷ˂̇fl MED-MAX 8 - 12
„‡Ï·Û„ MED-MAX 8 - 10
ıÓÚ-‰Ó„ MED-MAX 7 - 9
ëë‚‚ËËÌÌËËÌ̇‡
ЪУОТЪ‡fl УЪ·Л‚М‡fl MED-MAX 12 - 15
ÚÓÌ͇fl Óڷ˂̇fl MED-MAX 10 - 12
·˚¯ÍË MED-MAX 20 - 25
„Û‰ËÌ͇ MED-MAX 4 - 6
¯ÔË͇˜ÍË MED-MAX 12 - 15
ááÂÂÎÎÂÂÌ̸¸
MAX 5 - 10
ЗВПfl Л ВКЛП˚ ЛПВ˛Ъ ЫН‡Б‡ЪВО¸М˚В БМ‡˜ВМЛfl.
СОfl ПУ‰ВОВИ ·ВБ В„ЫОЛУ‚НЛ ЪВПФВ‡ЪЫ˚ ФЛ‰ВКЛ‚‡ИЪВТ¸ ·УОВВ
‰ОЛЪВО¸МУ„У ‚ВПВМЛ, ˜ВП ЫН‡Б‡ММУВ ‚ Ъ‡·ОЛˆВ.
óóààëëííääÄÄ àà ììïïééÑÑ
• кВ¯ВЪН‡ УТЪ˚МВЪ ФУТОВ ЪУ„У, Н‡Н ‚ЛОН‡ ·Ы‰ВЪ ‚˚МЫЪ‡ ЛБ УБВЪНЛ.
ì·Â‰ËÚÂÒ¸, ˜ÚÓ ‡Á˙ÂÏ ËÁ‚ΘÂÌ ËÁ Ò‚ÓÂ„Ó „ÌÂÁ‰‡ ‚ ¯ÂÚÍÂ.
• й·‡˘‡ИЪВТ¸ Т ФЛ·УУП Т УТЪУУКМУТЪ¸˛.
• СУ У˜ЛТЪНЛ УıО‡‰ЛЪВ ФЛ·У.
• ç ÔÓ„ÛʇÈÚ ¯ÂÚÍÛ Ë ˝ÎÂÍÚÓ‡Á˙ÂÏ ‚ ‚Ó‰Û ËÎË ‰Û„ËÂ
КЛ‰НУТЪЛ. СОfl У˜ЛТЪНЛ ‚УТФУО¸БЫИЪВТ¸ ‚О‡КМУИ ЪН‡М¸˛.
йТЪ‡О¸М˚В ˜‡ТЪЛ ПУ„ЫЪ ·˚Ъ¸ ФУП˚Ъ˚ ФЛ ФУПУ˘Л „Ы·НЛ ‚ ЪВФОУИ
Ï˚θÌÓÈ ‚Ó‰Â.
• иЛ МВУ·ıУ‰ЛПУТЪЛ ФУ‚У‰ ˝ОВНЪУФЛЪ‡МЛfl ПУКВЪ ·˚Ъ¸ ФУЪВЪ
‚·ÊÌÓÈ Ú̸͇˛. çË ‚ ÍÓÂÏ ÒÎÛ˜‡Â Ì ÔÓ„ÛʇÈÚ ÔÓ‚Ó‰
˝ОВНЪУФЛЪ‡МЛfl ‚ ‚У‰Ы ЛОЛ ‰Ы„ЛВ КЛ‰НУТЪЛ.
39
BG30 6-02-2002 9:01 Pagina 39
 Loading...