

Dell XPS DCDR01, XPS PP521, XPS 630, XPS 630i Owner's Manual

Dell™ XPS™ 630i Owner’s Manual
Model DCDR01
www.dell.com | support.dell.com

Notes, Notices, and Cautions
NOTE: A NOTE indicates important information that helps you make better use of
your computer.
NOTICE: A NOTICE indicates either potential damage to hardware or loss of data
and tells you how to avoid the problem.
CAUTION: A CAUTION indicates a potential for property damage, personal injury,
or death.
____________________
Information in this document is subject to change without notice.
© 2007–2008 Dell Inc. All rights reserved.
Reproduction in any manner whatsoever without the written permission of Dell Inc. is strictly forbidden.
Trademarks used in this text: Dell, the DELL logo, XPS, and Y OURS IS HERE are trademarks of Dell
Inc.; Bluetooth is a registered trademark owned by Bluetooth SIG, Inc. and is used by Dell under
license; Intel is a registered trademark and Core is a trademark of Intel Corporation; Microsoft, Windows,
Windows Vista, and Windows Vista start button logo are either trademarks or registered trademarks of
Microsoft Corporation in the United States and/or other countries; Blu-ray Disc is a trademark of the
Blu-ray Disc Association; Nvidia is a registered trademark of Nvidia Corporation in the United States
and/or other countries.
Other trademarks and trade names may be used in this document to refer to either the entities claiming
the marks and names or their products. Dell Inc. disclaims any proprietary interest in trademarks and
trade names other than its own.
Model DCDR01
April 2008 P/N PP521 Rev. A01

Contents
Finding Information . . . . . . . . . . . . . . . . . . . 11
1 About Your Computer. . . . . . . . . . . . . . . . 17
Front View of the Computer . . . . . . . . . . . . . . . 17
Back View of the Computer
Front-Panel Connectors
Back-Panel Connectors
. . . . . . . . . . . . . . . 19
. . . . . . . . . . . . . . . . . 20
. . . . . . . . . . . . . . . . . 21
2 Setting Up Your Computer . . . . . . . . . . . . 25
Installing Your Computer in an Enclosure. . . . . . . . 25
Connecting to the Internet
Setting Up Your Internet Connection
Transferring Information to a New Computer
Microsoft
Windows Vista
Setting Up a Printer
®
Windows® XP . . . . . . . . . . . . . 30
. . . . . . . . . . . . . . . . . . . 33
. . . . . . . . . . . . . . . . . . . 33
. . . . . . . . . . . . . . . . 27
. . . . . . . . 28
. . . . . . 29
Printer Cable
. . . . . . . . . . . . . . . . . . . . 34
Connecting a USB Printer
. . . . . . . . . . . . . 34
Contents 3

Connecting Two Monitors . . . . . . . . . . . . . . . . 35
Connecting Two Monitors With
VGA Connectors
. . . . . . . . . . . . . . . . . . 35
Connecting One Monitor With a VGA Connector
and One Monitor With a DVI Connector
. . . . . . 36
Connecting a TV
Changing the Display Settings
Power Protection Devices
Surge Protectors
Line Conditioners
Uninterruptible Power Supplies
Power Management
. . . . . . . . . . . . . . . . . . . 37
. . . . . . . . . . . 37
. . . . . . . . . . . . . . . . 37
. . . . . . . . . . . . . . . . . . 37
. . . . . . . . . . . . . . . . . . 38
. . . . . . . . . . 38
. . . . . . . . . . . . . . . . . . . 38
Power Management Options in
Windows XP
. . . . . . . . . . . . . . . . . . . . 38
Power Management Options in
Windows Vista
. . . . . . . . . . . . . . . . . . . 42
3 Using Multimedia . . . . . . . . . . . . . . . . . . 43
Playing CDs or DVDs . . . . . . . . . . . . . . . . . . . 43
Copying CDs and DVDs
How to Copy a CD or DVD
Using Blank CDs and DVDs
Helpful Tips
Adjusting the Picture
Connecting Your Computer to a TV or
Audio Device
S-Video and Standard Audio
S-Video and S/PDIF Digital Audio
Composite Video and Standard Audio
Composite Video and S/PDIF Digital Audio
4 Contents
. . . . . . . . . . . . . . . . . . 45
. . . . . . . . . . . . . . 45
. . . . . . . . . . . . . 46
. . . . . . . . . . . . . . . . . . . . . 47
. . . . . . . . . . . . . . . . . . . 47
. . . . . . . . . . . . . . . . . . . . . . . 48
. . . . . . . . . . . . 50
. . . . . . . . . . 51
. . . . . . . 53
. . . . . 55

Component Video and Standard Audio. . . . . . . 57
Component Video and S/PDIF Digital Audio
Setting Up the Cyberlink (CL) Headphones
Enabling the Display Settings for a TV
Using a Media Card Reader (Optional)
. . . . . . . . . 64
. . . . 59
. . . . . 62
. . . . . . . 63
Instructions for Setting Up a Device With
Bluetooth Wireless Technology
. . . . . . . . . . 66
4 About RAID Configurations . . . . . . . . . . . 67
RAID Level 0 Configuration . . . . . . . . . . . . . . . 67
RAID Level 1 Configuration
Configuring Your Hard Drives for RAID
Setting Your Computer to RAID-Enabled Mode
. . . . . . . . . . . . . . . 68
. . . . . . . . . 69
. . . . . 69
Using the Nvidia MediaShield ROM Utility
Using Nvidia MediaShield
Creating a RAID Array
Deleting a RAID Array
. . . . . . . . . . . . . . . 71
. . . . . . . . . . . . . . . 71
. . . . . . . . . . . . . . . 72
. . . . . . . 70
Converting From One RAID Configuration to
Another RAID Configuration
Rebuilding a RAID Configuration
. . . . . . . . . . . . 73
. . . . . . . . . . 74
5 Cleaning Your Computer . . . . . . . . . . . . . 75
Computer, Keyboard, and Monitor. . . . . . . . . . . . 75
Mouse (Non-Optical)
Floppy Drive
CDs and DVDs
. . . . . . . . . . . . . . . . . . . . . . . 76
. . . . . . . . . . . . . . . . . . . . . . 76
. . . . . . . . . . . . . . . . . . 75
Contents 5

6 System Setup . . . . . . . . . . . . . . . . . . . . . 77
Overview . . . . . . . . . . . . . . . . . . . . . . . . . 77
Entering System Setup
System Setup Screens
System Setup Options
Boot Sequence
. . . . . . . . . . . . . . . . . . . . . . 82
Option Settings
. . . . . . . . . . . . . . . . . . 77
. . . . . . . . . . . . . . . 77
. . . . . . . . . . . . . . . . . . 79
. . . . . . . . . . . . . . . . . . . 82
Changing Boot Sequence for the
Current Boot
. . . . . . . . . . . . . . . . . . . . 82
Changing Boot Sequence for
Future Boots
. . . . . . . . . . . . . . . . . . . . 83
7 Clearing Passwords and
CMOS Settings
Clearing Passwords . . . . . . . . . . . . . . . . . . . 85
. . . . . . . . . . . . . . . . . . . . 85
8 Troubleshooting Tools . . . . . . . . . . . . . . 89
6 Contents
Clearing CMOS Settings
Flashing the BIOS
. . . . . . . . . . . . . . . . . . . . 88
. . . . . . . . . . . . . . . . . 87
Power Lights . . . . . . . . . . . . . . . . . . . . . . . 89
Beep Codes
System Messages
Hardware Troubleshooter
. . . . . . . . . . . . . . . . . . . . . . . . 90
. . . . . . . . . . . . . . . . . . . . 93
. . . . . . . . . . . . . . . . 95

Dell Diagnostics . . . . . . . . . . . . . . . . . . . . . 95
When to Use the Dell Diagnostics
. . . . . . . . . 95
Starting the Dell Diagnostics From Your
Hard Drive
. . . . . . . . . . . . . . . . . . . . . 96
Starting the Dell Diagnostics From the
Drivers and Utilities Media
Dell Diagnostics Main Menu
. . . . . . . . . . . . . 97
. . . . . . . . . . . . 98
9 Troubleshooting. . . . . . . . . . . . . . . . . . . 101
Battery Problems . . . . . . . . . . . . . . . . . . 101
Drive Problems
Error Messages
IEEE 1394 Device Problems
Keyboard Problems
Lockups and Software Problems
Memory Problems
Mouse Problems
. . . . . . . . . . . . . . . . . . . 102
. . . . . . . . . . . . . . . . . . . 103
. . . . . . . . . . . . . 104
. . . . . . . . . . . . . . . . . 105
. . . . . . . . . . 106
. . . . . . . . . . . . . . . . . 108
. . . . . . . . . . . . . . . . . . 108
Network Problems
Power Problems
Printer Problems
Scanner Problems
Sound and Speaker Problems
Video and Monitor Problems
Overclocking Problems
Power Lights
. . . . . . . . . . . . . . . . . 109
. . . . . . . . . . . . . . . . . . 110
. . . . . . . . . . . . . . . . . . 110
. . . . . . . . . . . . . . . . . 111
. . . . . . . . . . . 112
. . . . . . . . . . . . 113
. . . . . . . . . . . . . . . 115
. . . . . . . . . . . . . . . . . . . . 115
10 Reinstalling Software . . . . . . . . . . . . . . 117
Drivers . . . . . . . . . . . . . . . . . . . . . . . . . . 117
What Is a Driver?
Identifying Drivers
Reinstalling Drivers and Utilities
Using the Drivers and Utilities Media
. . . . . . . . . . . . . . . . . . 117
. . . . . . . . . . . . . . . . . 117
. . . . . . . . . . 118
. . . . . . . 119
Contents 7

Troubleshooting Software and Hardware
®
Problems in the Microsoft
®
Windows Vista
Operating Systems . . . . . . . . . 121
Windows® XP and
Restoring Your Operating System
Using Microsoft
Windows System Restore. . . . 122
. . . . . . . . . . . 122
Using Dell™ PC Restore and
Dell Factory Image Restore
Using the Operating System Media
. . . . . . . . . . . . 124
. . . . . . . . 127
11 Specifications . . . . . . . . . . . . . . . . . . . . 129
12 Getting Help
Obtaining Assistance . . . . . . . . . . . . . . . . . 135
Technical Support and Customer Service
DellConnect
Online Services
AutoTech Service
. . . . . . . . . . . . . . . . . . . . . . 135
. . . . 136
. . . . . . . . . . . . . . . . . . . . 136
. . . . . . . . . . . . . . . . . . 136
. . . . . . . . . . . . . . . . . 137
8 Contents
Automated Order-Status Service
Problems With Your Order
Product Information
. . . . . . . . . . . . . . . . . . 138
. . . . . . . . . . . . . . . 137
. . . . . . . . . 137
Returning Items for Warranty Repair or Credit
Before You Call
Contacting Dell
. . . . . . . . . . . . . . . . . . . . . 139
. . . . . . . . . . . . . . . . . . . . . 141
. . . . 138

A Appendix . . . . . . . . . . . . . . . . . . . . . . . . 143
FCC Notice (U.S. Only) . . . . . . . . . . . . . . . . . . 143
FCC Class B
Macrovision
. . . . . . . . . . . . . . . . . . . . . 143
. . . . . . . . . . . . . . . . . . . . . . . 144
Glossary . . . . . . . . . . . . . . . . . . . . . . . . . . . . 145
Index
. . . . . . . . . . . . . . . . . . . . . . . . . . . . . . 163
Contents 9

10 Contents
Finding Information
NOTE: Some features or media may be optional and may not ship with your
computer. Some features or media may not be available in certain countries.
NOTE: Additional information may ship with your computer.
What Are You Looking For? Find It Here
• A diagnostic program for my computer
• Drivers for my computer
• Desktop System Software (DSS)
Drivers and Utilities Media
NOTE: The Drivers and Utilities media may
be optional and may not ship with your
computer.
Documentation and drivers are already
installed on your computer. You can use
the media to reinstall drivers (see
"Reinstalling Drivers and Utilities" on
page 118). To run the Dell Diagnostics,
see "Dell Diagnostics" on page 95.
Readme files may be included on your
media to provide last-minute updates
about technical changes to your computer
or advanced technical-reference material
for technicians or experienced users.
NOTE: Drivers and documentation updates
can be found at support.dell.com.
Finding Information 11
What Are You Looking For? Find It Here
• Warranty information
• Terms and Conditions (U.S. only)
• Safety instructions
• Regulatory information
• Ergonomics information
• End User License Agreement
• How to set up my computer
Dell™ Product Information Guide
Setup Diagram
12 Finding Information
What Are You Looking For? Find It Here
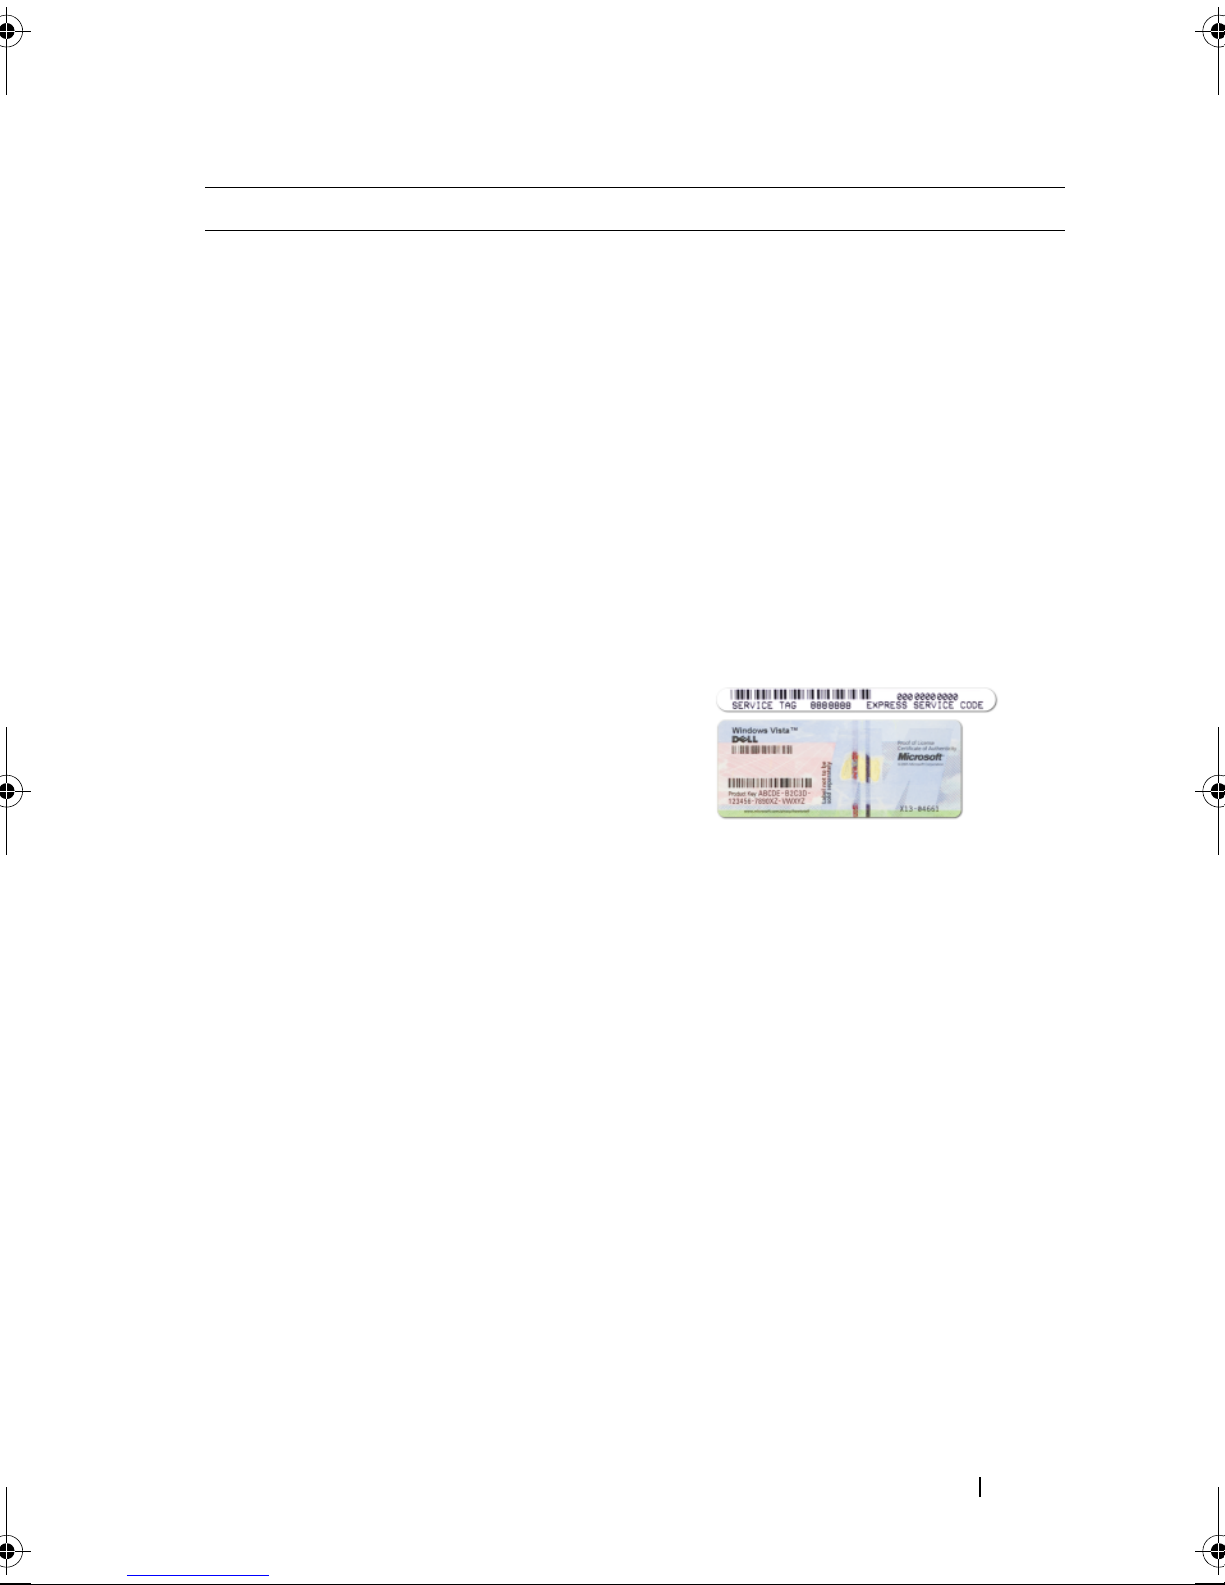
• Service Tag and Express Service Code
• Microsoft Windows License Label
Service Tag and Microsoft® Windows®
License
NOTE: Your computer’s Service Tag and
®
Microsoft
located on your computer.
Your computer’s Service Tag contains
both a Service Tag number and an Express
Service Code.
• Use the Service Tag to identify your
computer when you use
support.dell.com
• Enter the Express Service Code to direct
your call when contacting support.
Windows® License labels are
or contact support.
• Use the product key on the License
Label if you need to reinstall your
operating system.
NOTE: As an increased security measure,
the newly designed Microsoft Windows
license label incorporates a missing portion
or "hole" to discourage removal of the label.
Finding Information 13

What Are You Looking For? Find It Here
• Solutions — Troubleshooting hints and
tips, articles from technicians, and online
courses, frequently asked questions
• Community — Online discussion with
other Dell customers
• Upgrades — Upgrade information for
components, such as memory, the hard
drive, and the operating system
• Customer Care — Contact information,
service call and order status, warranty,
and repair information
• Service and support — Service call status
and support history, service contract,
online discussions with technical support
• Dell Technical Update Service —
Proactive e-mail notification of software
and hardware updates for your computer
• Reference — Computer documentation,
details on my computer configuration,
product specifications, and white papers
Dell Support Website — support.dell.com
NOTE: Select your region or business
segment to view the appropriate support
site.
• Downloads — Certified drivers, patches,
and software updates
• Desktop System Software (DSS)— If
you reinstall the operating system for
your computer, you should also reinstall
the DSS utility. DSS provides critical
updates for your operating system and
support for processors, optical drives,
USB devices, and so on. DSS is
necessary for correct operation of your
Dell computer. The software
automatically detects your computer
and operating system and installs the
updates appropriate for your
configuration.
14 Finding Information
To download Desktop System Software:
1
Go to
Drivers and Downloads
2
Click
3
Select your product model and click
Confirm
Go
4
Click
5
Click
Dell - Utility
6
Click
support.dell.com
and click
.
Select Model
.
, or enter a service tag and click
.
System Utilities
.
Desktop System Software
, and click
Run
to run the driver, or
Download Now
under
Save
to
save the driver to your computer.
NOTE: The support.dell.com user interface
may vary depending on your selections.
.

What Are You Looking For? Find It Here
• How to find information about my
computer and its components
• How to connect to the Internet
• How to add user accounts for different
people
• How to transfer files and settings from
another computer
• How to use Microsoft Windows XP or
Windows Vista
®
• How to work with programs and files
• How to personalize my desktop
Windows Welcome Center
The Windows Welcome Center
automatically appears when you use the
computer for the first time. You can
choose to have it appear every time you
start your Tablet-PC by placing a check in
the Run at startup checkbox. Another
method of accessing the Welcome Center
is to click the Windows Vista Start button
™, and then click Welcome Center.
Windows Help and Support
Microsoft Windows XP:
1
Click the
and Support
2
Either select one of the topics listed, or
Start
button and click
.
Help
type a word or phrase that describes your
problem into the
Search
box, click the
arrow icon, and then click the topic that
describes your problem.
3
Follow the instructions on the screen.
Windows Vista:
1
Click the Windows Vista Start button
, and then click
2
In
Search Help
Help and Support
, type a word or phrase that
describes your problem, and then press
<Enter> or click the magnifying glass.
3
Click the topic that describes your
problem.
4
Follow the instructions on the screen.
.
Finding Information 15
What Are You Looking For? Find It Here
• How to reinstall my operating system
Operating System Media
The operating system is already installed
on your computer. To reinstall your
operating system, use the Operating
System media. See "Restoring Your
Operating System" on page 122 in your
User’s Guide or Owner’s Manual.
After you reinstall your operating system,
use the Drivers and Utilities media to
reinstall drivers for the devices that came
with your computer.
16 Finding Information
Your operating system product key label is
located on your computer.
NOTE: The color of your CD varies based
on the operating system you ordered.
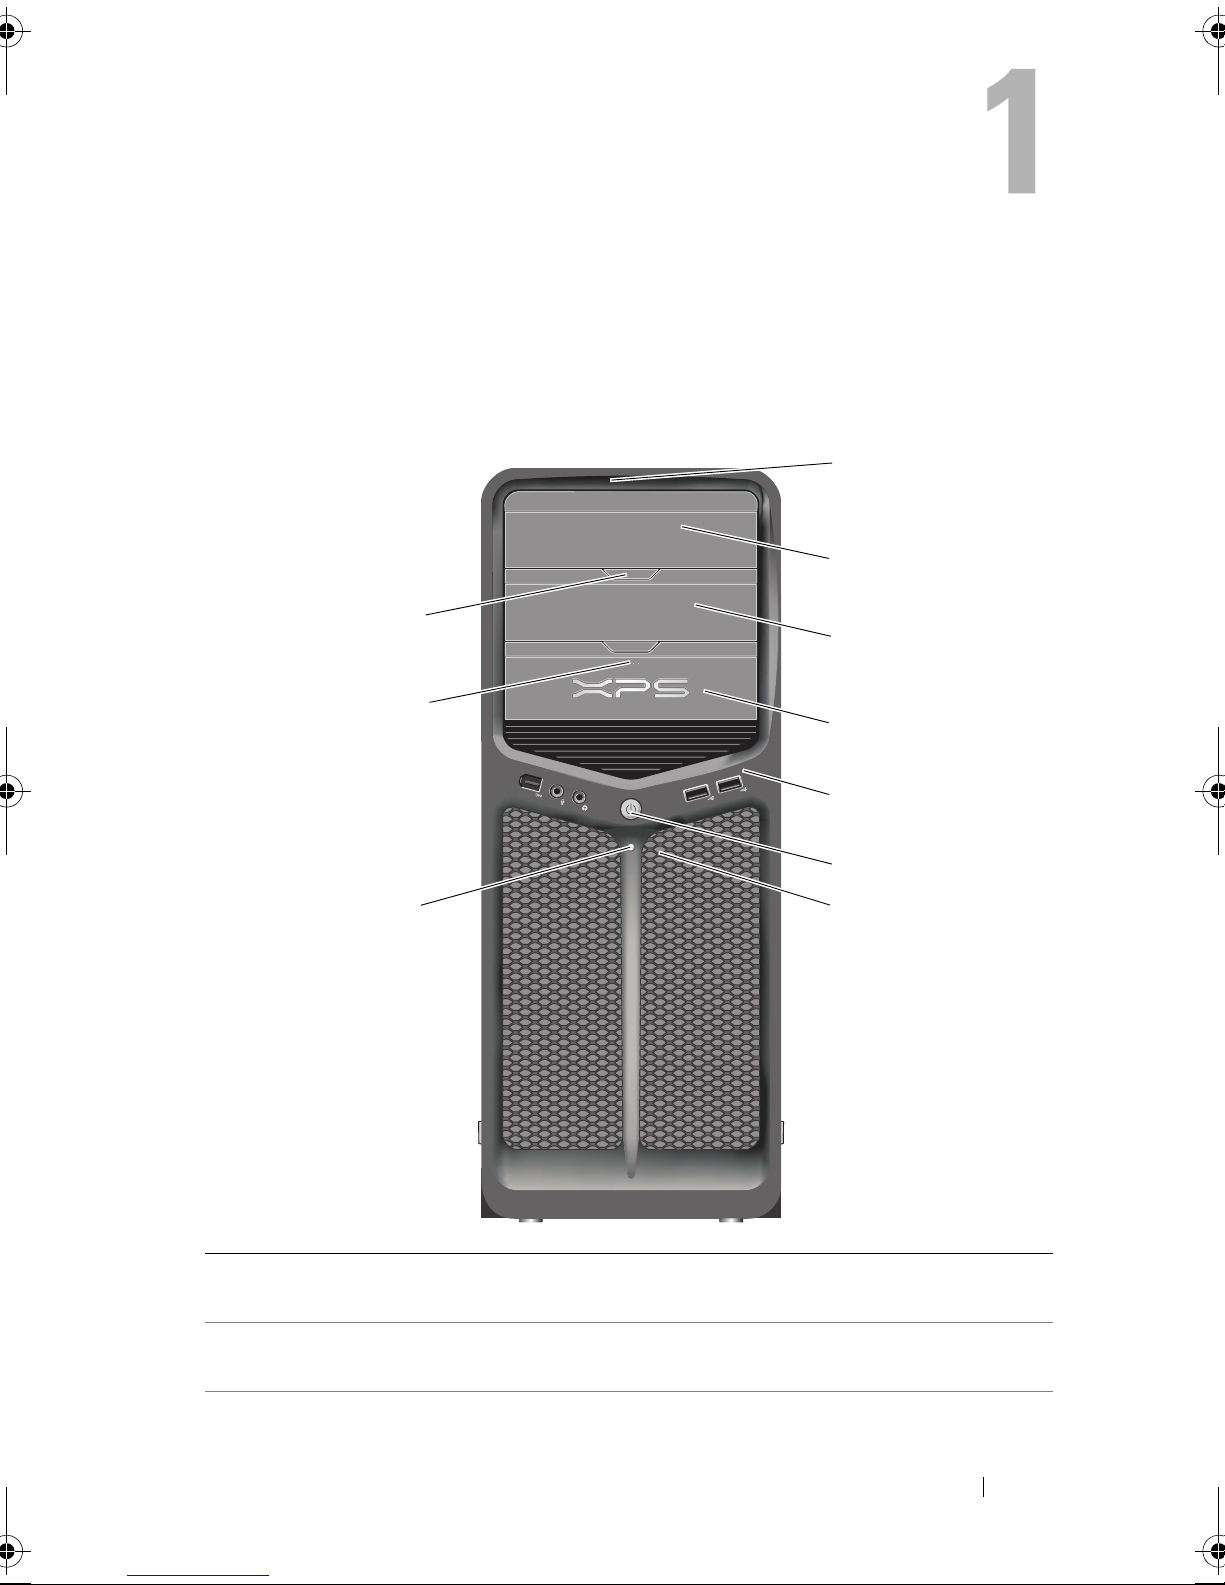
About Your Computer
Front View of the Computer
1
2
10
3
9
4
5
6
8
7
1 front-panel LEDs (3) Multi-colored lights provide illumination for the front of
2 optical-drive panel This panel covers the optical drive. Use the optical
the computer.
drive to play a CD/DVD.
About Your Computer 17
3 optional optical-drive
bay
4 FlexBay drive Supports a floppy drive, a Media Card Reader, or an
5 front I/O connectors Plug USB and other devices into the appropriate
6 power button Press to turn on the computer.
Supports an optical drive.
additional hard drive.
connectors (see "Front-Panel Connectors" on page 20).
NOTICE: To avoid losing data, do not use the
power button to turn off the computer. Instead,
perform an operating system shutdown.
NOTICE: If your operating system has ACPI
enabled, when you press the power button the
computer will perform an operating system
shutdown.
NOTE: The power button can also be used to wake the
system or to place it into a power-saving state (see
"Power Management" on page 38 for more information).
7 front-panel LEDs (4) Multi-colored lights provide illumination for the front of
the computer.
8 power light The power light illuminates or remains solid to
indicate different states:
• No light — The computer is turned off.
• White light— The computer is in a normal
operating state.
• Blinking white light— The computer is in a
power-saving state.
To exit from a power-saving state, press the power
button or use the keyboard or mouse if it is configured
as a wake device in the Windows Device Manager. For
more information about sleep states and exiting from a
power-saving state, see "Power Management" on
page 38.
9 FlexBay drive eject
button
10 optical drive panel
eject button (2)
Press here to open or close the floppy/media card
reader panel.
Press here to open/close the optical drive.
18 About Your Computer
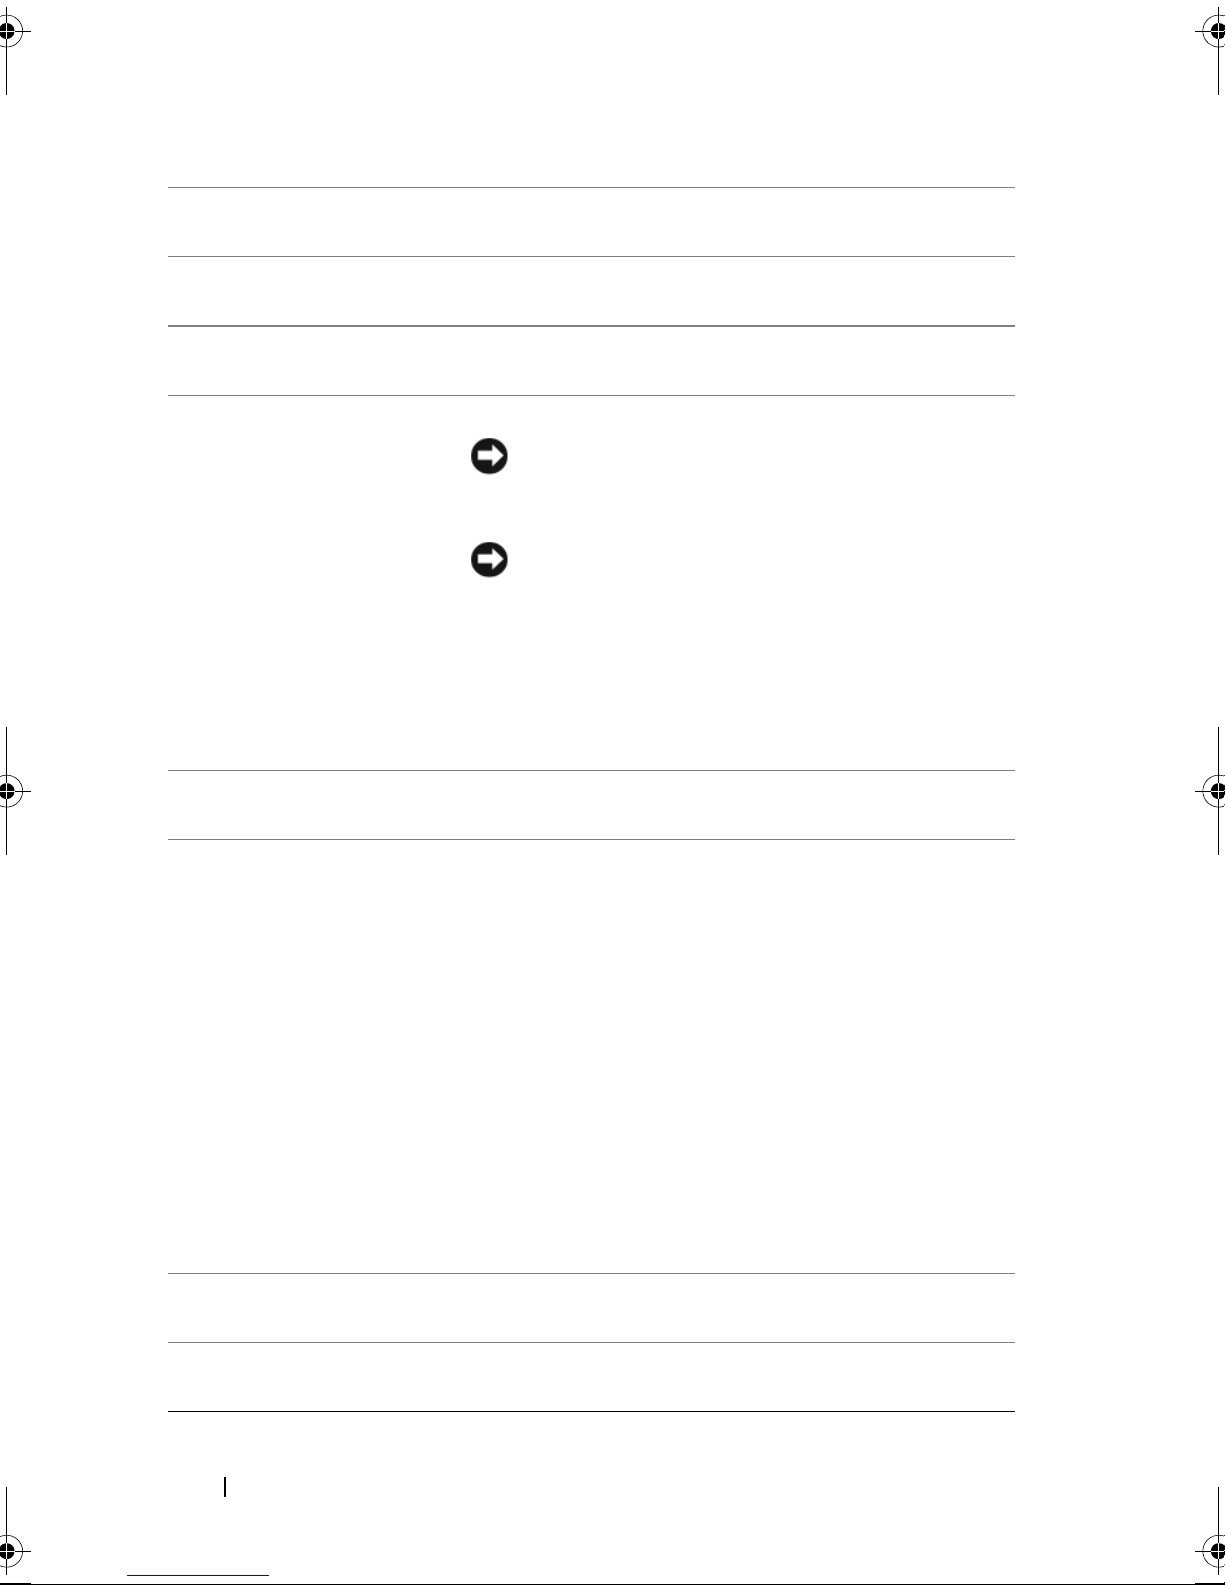
Back View of the Computer
5
1
2
3
4
About Your Computer 19
1 power supply test
switch
Used to test the power supply.
2 power supply
diagnostic LED
3 card slots Access connectors for any installed PCI or PCI Express cards.
Indicates power availability for power supply.
• Green light — Indicates power availability for power supply.
• No light — Indicates no power available for the power
supply or the power supply is not working. For more
information, see "Power Lights" on page 89.
NOTE: Some connector slots support full-length cards.
4 back I/O
connectors
5 power connector Insert the power cable. The appearance of this connector
Plug USB and other devices into the appropriate
connectors (see "Back-Panel Connectors" on page 21).
may differ from what is pictured.
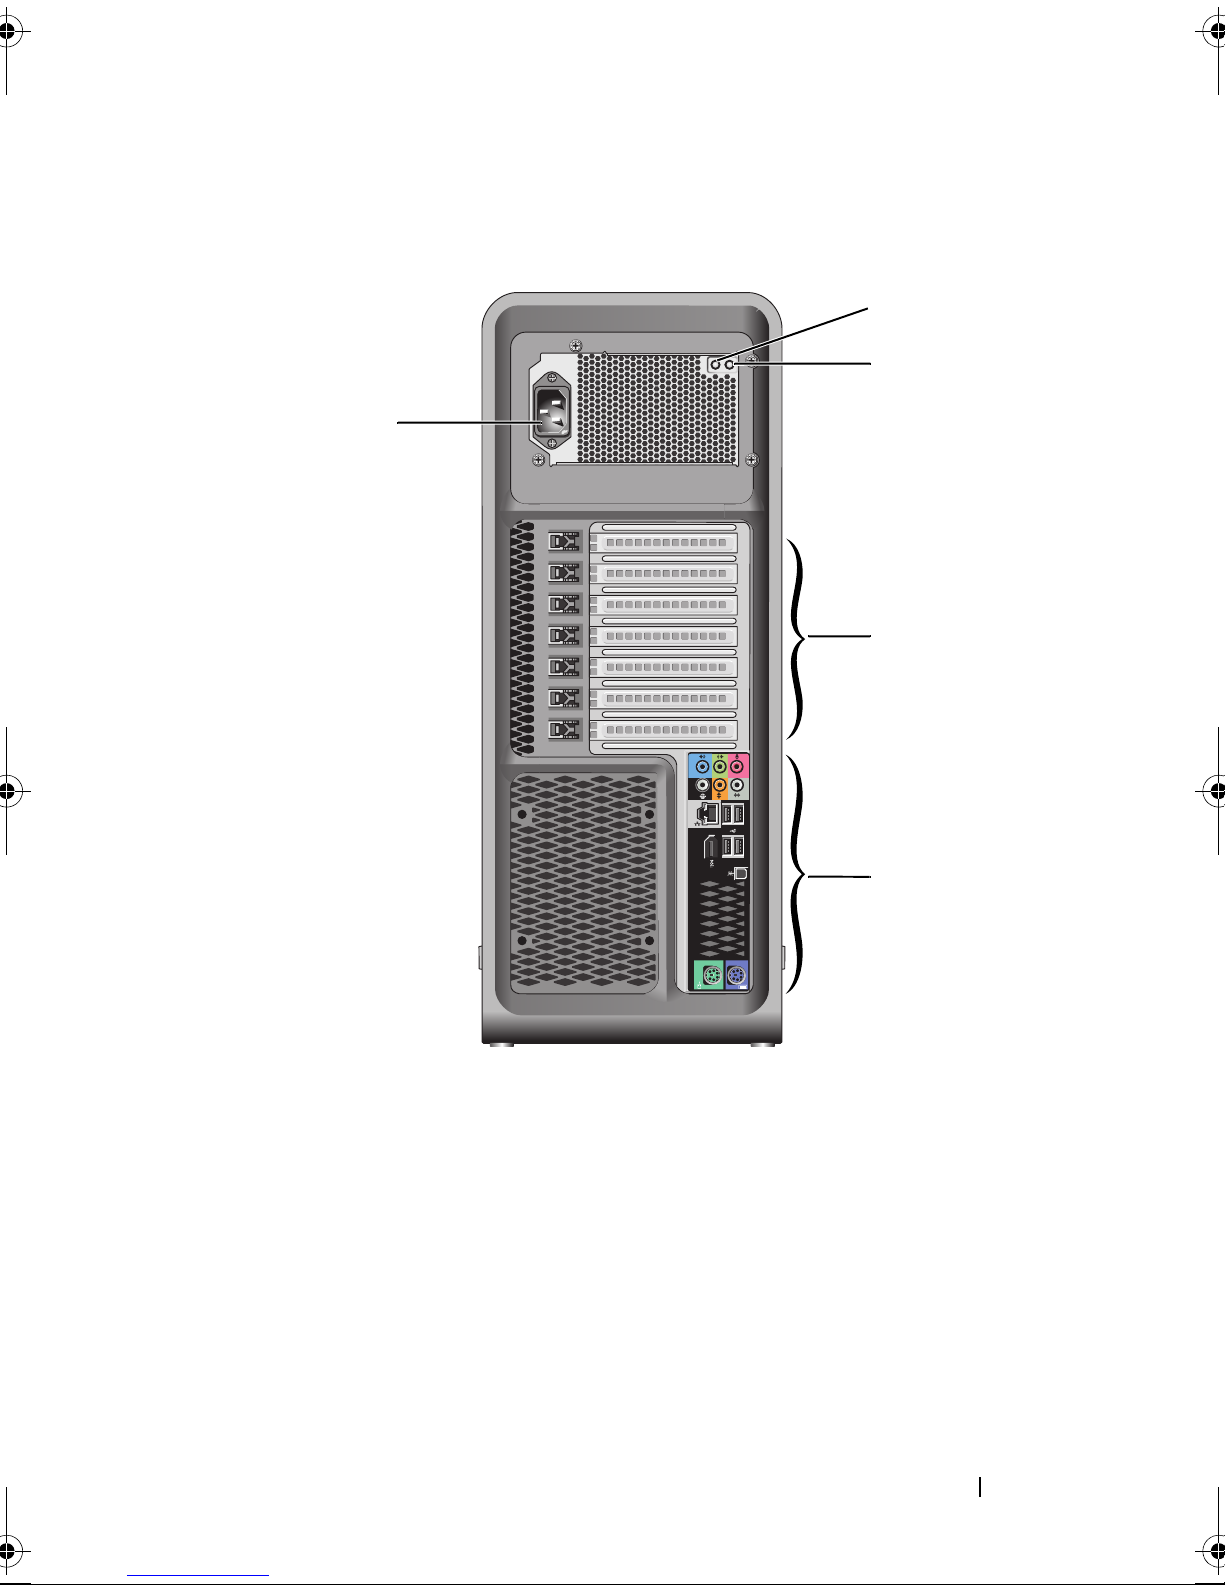
Front-Panel Connectors
12
3
4
20 About Your Computer
1 IEEE 1394 connector Use the optional IEEE 1394 connector for high-speed
data devices such as digital video cameras and external
storage devices.
2 microphone connector Use the microphone connector to attach a personal
computer microphone for voice or musical input into a
sound or telephony program.
3 headphone connector Use the headphone connector to attach headphones or
external speakers.
4 USB 2.0 connectors (2) Use the front USB connectors for devices that you
connect occasionally, such as flash memory keys or
cameras, or for bootable USB devices (see "System
Setup" on page 77 for more information on booting to
a USB device).
NOTE: It is recommended that you use the back USB
connectors for devices that typically remain connected,
such as printers and keyboards.
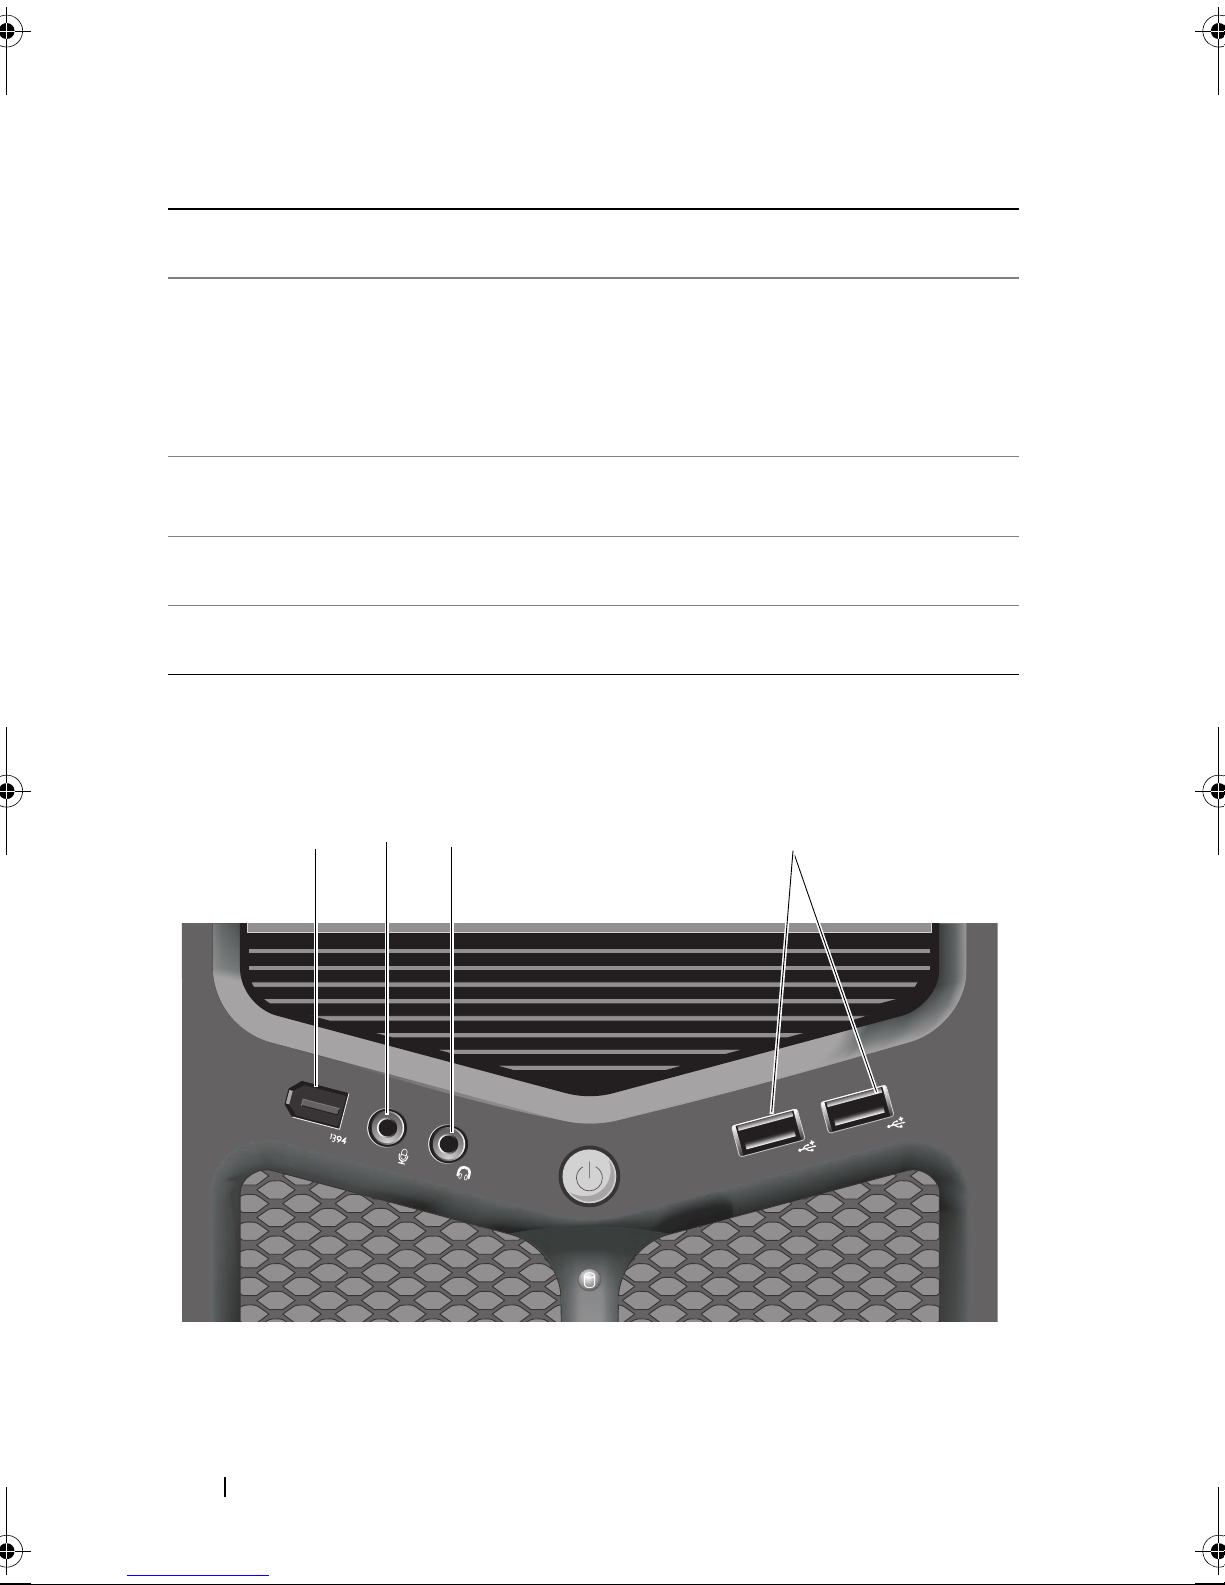
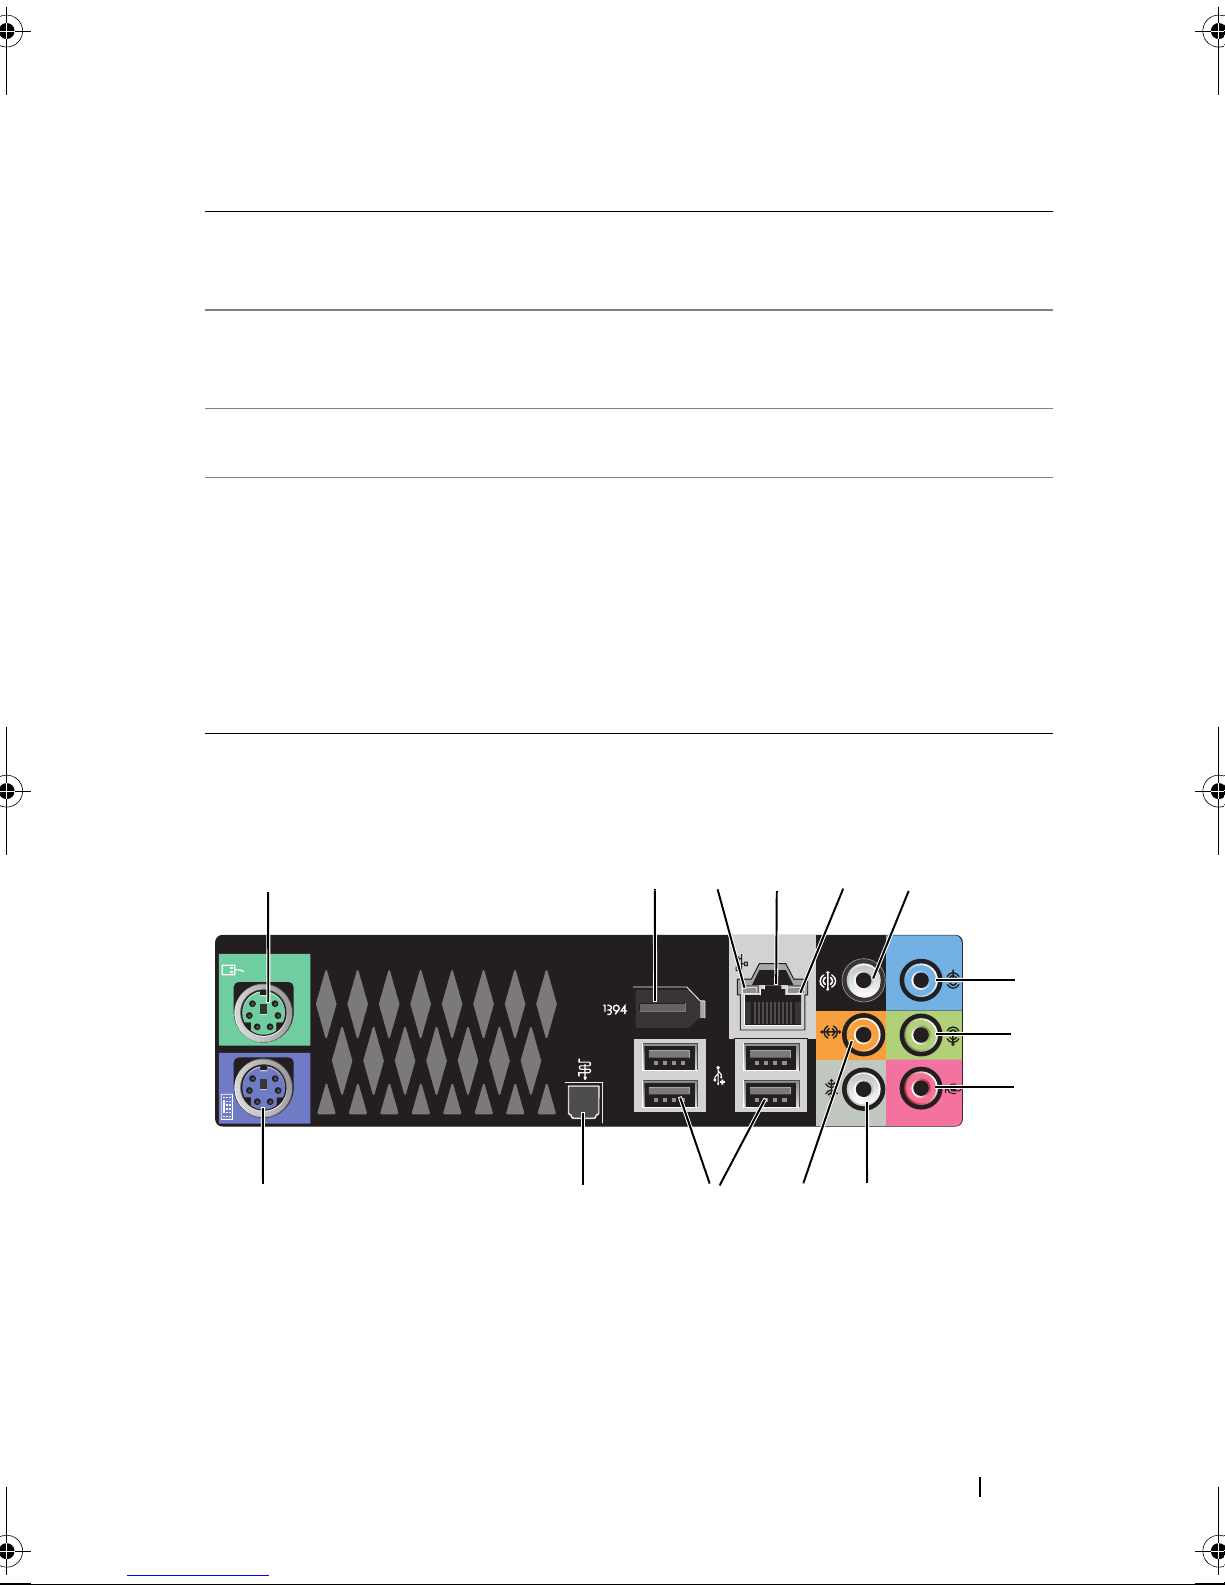
Back-Panel Connectors
14
1
13
2
12
3
4
11
5
6
7
8
9
10
About Your Computer 21

1 mouse connector Plug a standard PS/2 mouse into the green mouse connector.
Turn off the computer and any attached devices before you
connect a mouse to the computer. If you have a USB mouse,
plug it into a USB connector.
2 IEEE 1394
connector
3 network activity
light
4 network adapter
connector
Use the IEEE 1394 connector for high-speed data devices
such as digital video cameras and external storage devices.
The network activity light is on (flashing) when the
computer is transmitting or receiving network data. A high
volume of network traffic may make this light appear to be
in a steady on state.
To attach your computer to a network or broadband device,
connect one end of a network cable to either a network jack
or your network or broadband device. Connect the other
end of the network cable to the network adapter connector
on your computer. A click indicates that the network cable
has been securely attached.
NOTICE: Do not plug a telephone cable into the network
connector.
On computers with an additional network connector card,
use the connectors on the card and on the back of the
computer when setting up multiple network connections
(such as a separate intra- and extranet).
It is recommended that you use Category 5 wiring and
connectors for your network. If you must use Category 3
wiring, force the network speed to 10 Mbps to ensure
reliable operation.
5 link integrity light
• Green — A good connection exists between a 10-Mbps
network and the computer.
• Orange — A good connection exists between a 100-Mbps
network and the computer.
• Yellow — A good connection exists between a 1000-Mbps
(or 1-Gbps) network and the computer.
• Off — The computer is not detecting a physical
connection to the network.
6 surround sound
connector
Use the (black) surround sound connector to attach
multichannel-capable speakers.
22 About Your Computer

7 line-in connector Use the (blue) line-in connector to attach a record/playback
device such as a cassette player, CD player, or VCR. On
computers with a sound card, use the connector on the card.
8line-
out/headphone
connector
9 microphone
connector
10 side surround
sound connector
11 center
subwoofer/LFE
connector
12 USB 2.0
connectors (4)
Use the (green) line-out connector to attach headphones
and speakers with integrated amplifiers. On computers with
a sound card, use the connector on the card.
Use the (pink) microphone connector to attach a personal
computer microphone for voice or musical input into a
sound or telephony program.
Use the (silver) side surround connector to attach additional
speakers.
Use the (orange) subwoofer connector to attach a single
subwoofer.
NOTE: The LFE (Low Frequency Effects) Audio channel, found
in digital surround sound audio schemes, carries only low
frequency information of 80 Hz and below. The LFE channel
drives a subwoofer to provide extremely low bass extension.
Systems not using subwoofers can shunt the LFE information
to the main speakers in the surround sound setup.
Use the back USB connectors for devices that typically
remain connected, such as printers and keyboards.
13 optical S/PDIF
connector
14 keyboard
connector
NOTE: It is recommended that you use the front USB
connectors for devices that you connect occasionally, such as
flash memory keys or cameras, or for bootable USB devices.
Use the optical S/PDIF connector to transmit digital audio
without going through an analog audio conversion process.
Plug a standard PS/2 keyboard into the purple keyboard
connector. Turn off the computer and any attached devices
before you connect a keyboard to the computer. If you have
a USB keyboard, plug it into a USB connector.
About Your Computer 23

24 About Your Computer

Setting Up Your Computer
Installing Your Computer in an Enclosure
Installing your computer in an enclosure can restrict the airflow and impact
your computer’s performance, possibly causing it to overheat. Follow the
guidelines below when installing your computer in an enclosure:
NOTICE: The operating temperature specifications indicated in this manual
reflects the maximum ambient operating temperature. The room ambient
temperature needs to be a consideration when installing your computer in an
enclosure. For example, if the ambient room temperature is at 25°C (77°F),
depending on your computer’s specifications, you only have 5° to 10°C (9° to 18°F)
temperature margin before you reach your computer’s maximum operating
temperature. For details about your computer’s specifications, see "Specifications"
on page 129.
• Leave a 10.2 cm (4 inches) minimum clearance on all vented sides of the
computer to permit the airflow required for proper ventilation.
• If your enclosure has doors, they need to be of a type that allows at least
30 percent airflow through the enclosure (front and back).
Setting Up Your Computer 25
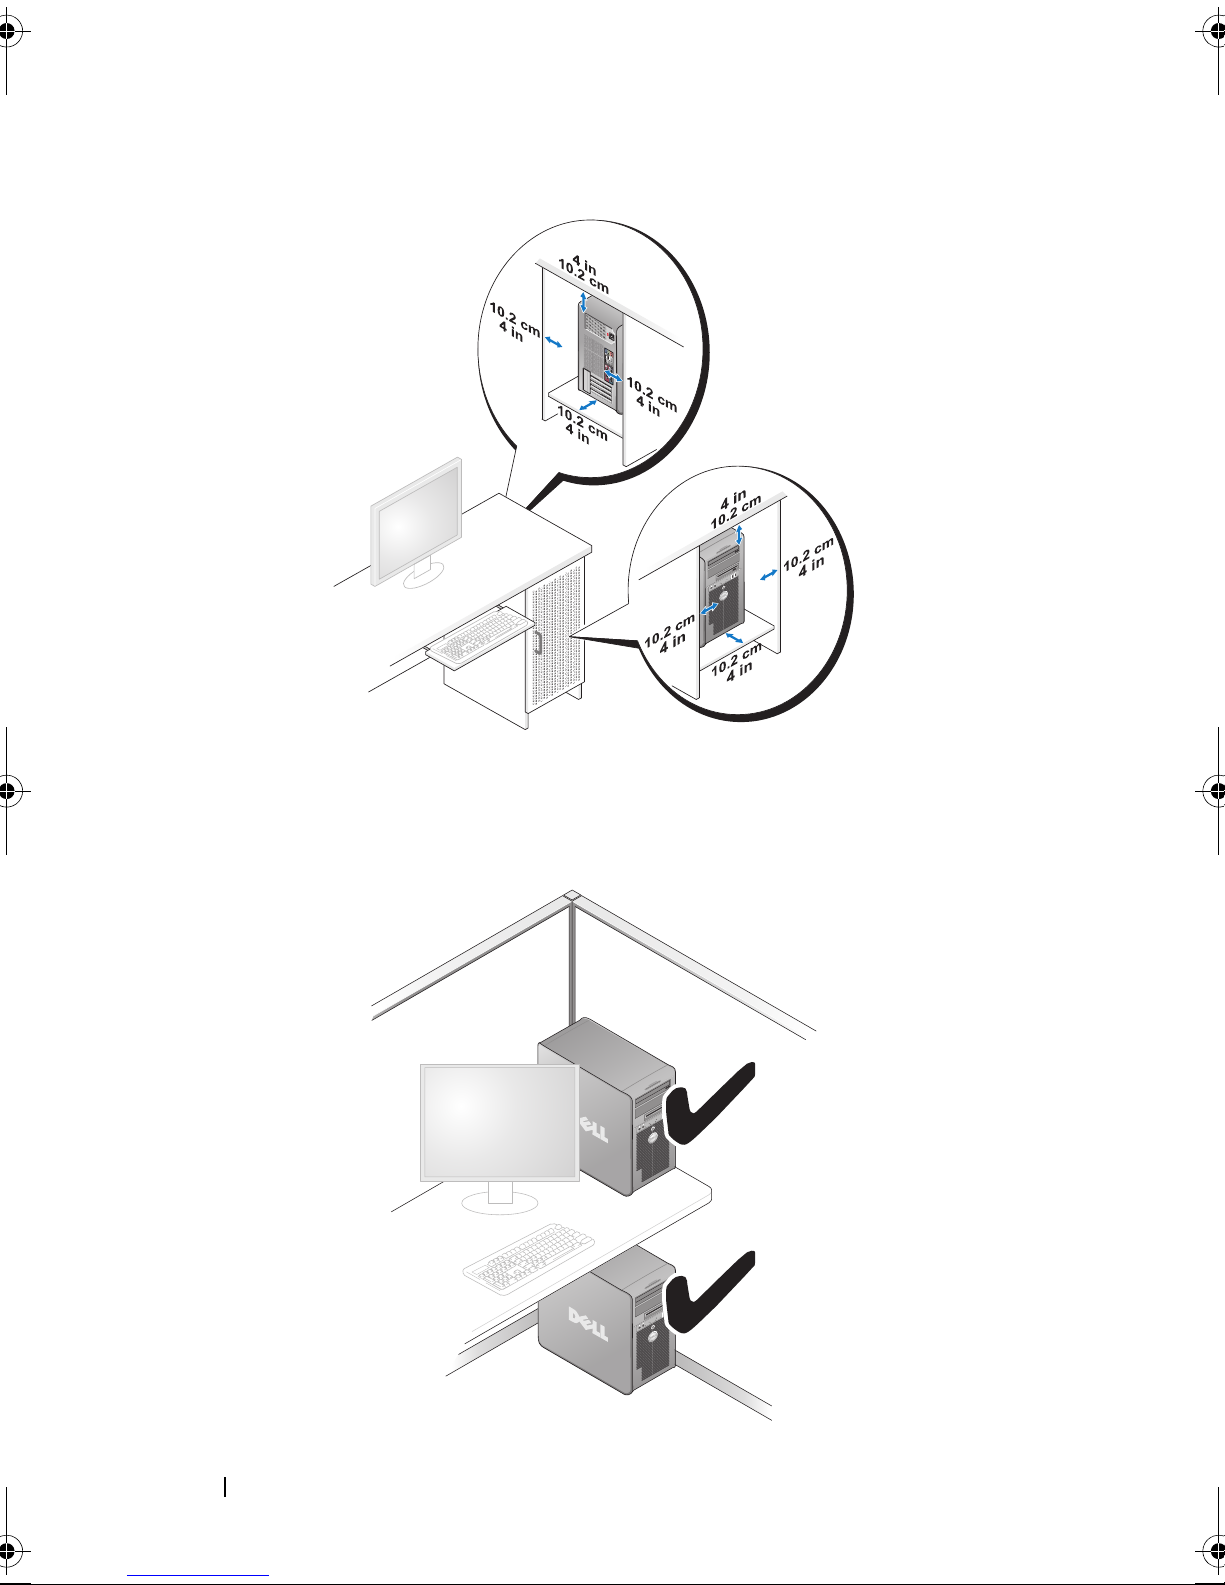
• If your computer is installed in a corner on a desk or under a desk, leave at
least 5.1 cm (2 in) clearance from the back of the computer to the wall to
permit the airflow required for proper ventilation.
26 Setting Up Your Computer
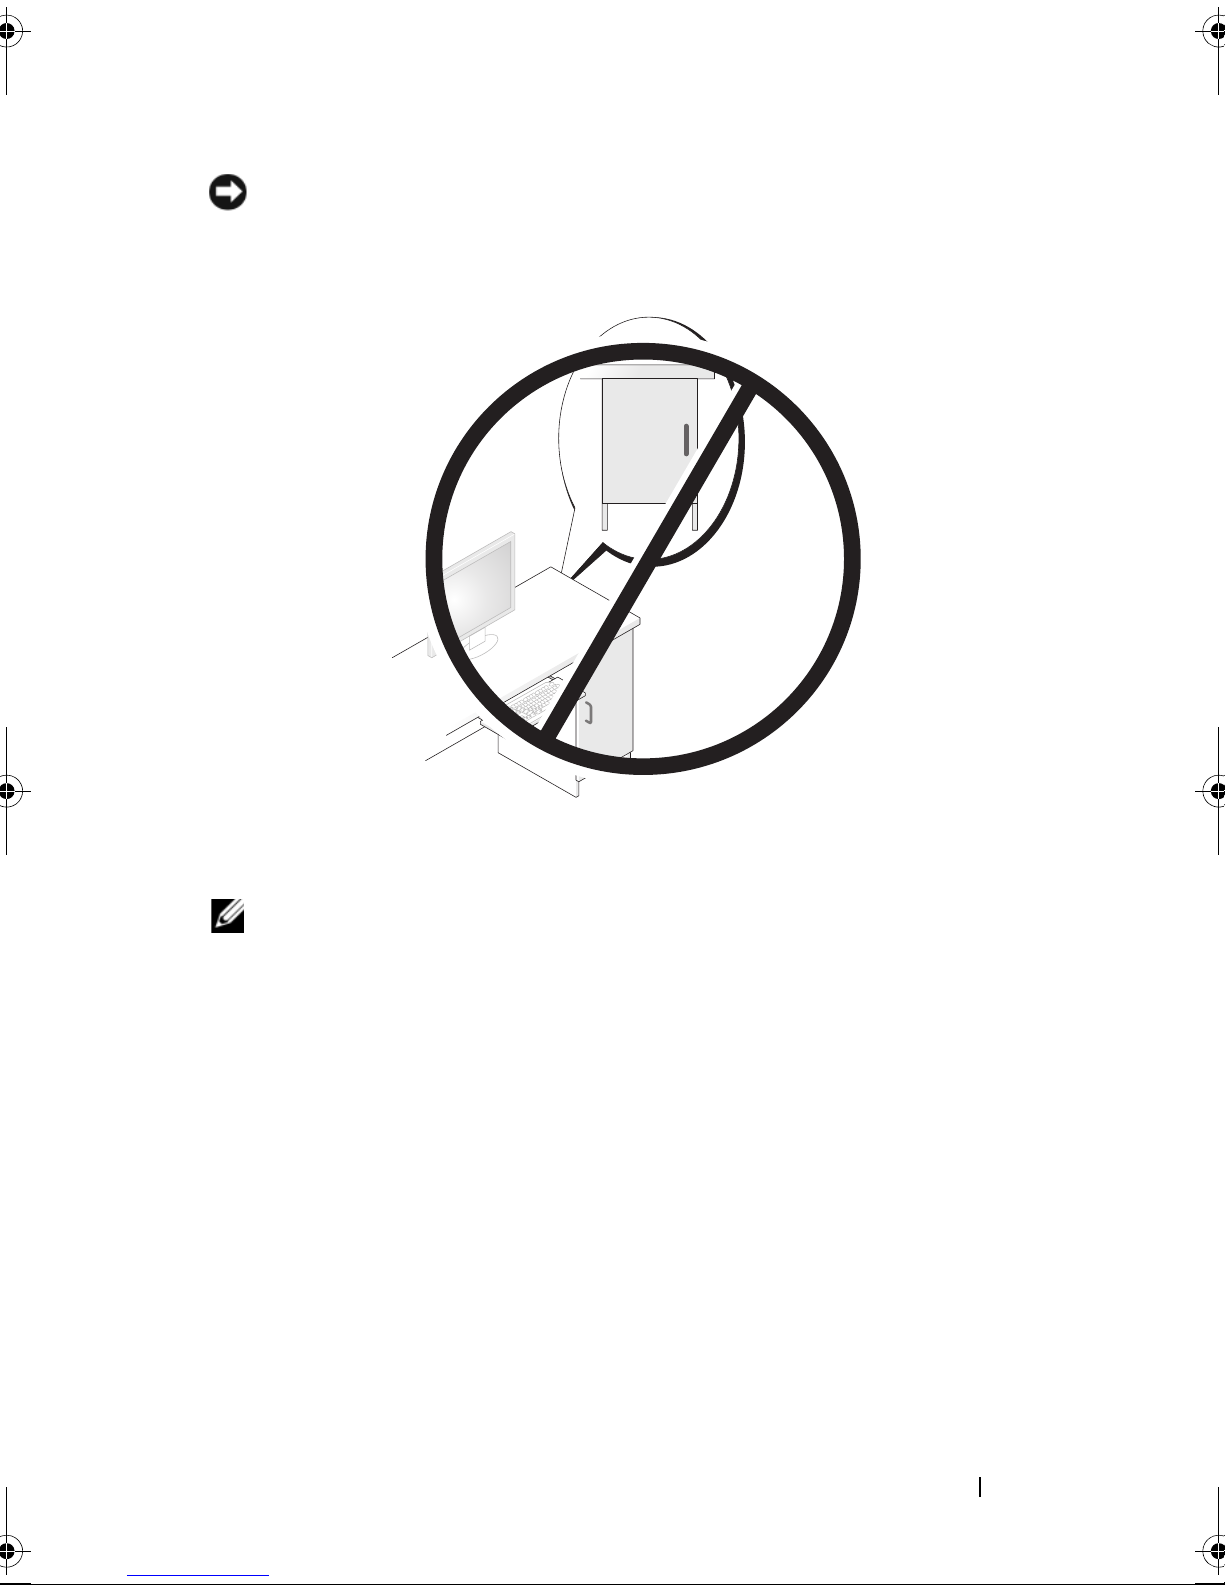
NOTICE: Do not install your computer in an enclosure that does not allow airflow.
Restricting the airflow impacts your computer’s performance, possibly causing it to
overheat.
Connecting to the Internet
NOTE: ISPs and ISP offerings vary by country.
To connect to the Internet, you need a modem or network connection and an
Internet service provider (ISP). Your ISP will offer one or more of the
following Internet connection options:
• DSL connections that provide high-speed Internet access through your
existing telephone line or cellular telephone service. With a DSL
connection, you can access the Internet and use your telephone on the
same line simultaneously.
• Cable modem connections that provide high-speed Internet access
through your local cable TV line.
• Satellite modem connections that provide high-speed Internet access
through a satellite television system.
Setting Up Your Computer 27

• Dial-up connections that provide Internet access through a telephone line.
Dial-up connections are considerably slower than DSL and cable (or satellite)
modem connections.
• Wireless LAN connections that provide Internet access using Bluetooth
®
wireless technology.
If you are using a dial-up connection, connect a telephone line to the modem
connector on your computer and to the telephone wall jack before you set up
your Internet connection. If you are using a DSL or cable/satellite modem
connection, contact your ISP or cellular telephone service for setup instructions.
Setting Up Your Internet Connection
To set up an Internet connection with a provided ISP desktop shortcut:
1
Save and close any open files, and exit any open programs.
2
Double-click the ISP icon on the Microsoft® Windows® desktop.
3
Follow the instructions on the screen to complete the setup.
If you do not have an ISP icon on your desktop or if you want to set up an
Internet connection with a different ISP, perform the steps in the following
section that corresponds to the operating system your computer is using.
NOTE: If you are having problems connecting to the Internet, see "Error Messages"
on page 103. If you cannot connect to the Internet but have successfully connected
in the past, the ISP might have a service outage. Contact your ISP to check the
service status, or try connecting again later.
Windows XP
1
Save and close any open files, and exit any open programs.
2
Click
The
3
Click
4
In the next window, click the appropriate option:
• If you do not have an ISP and want to select one, click
Start→
New Connection Wizard
Connect to the Internet
Internet Explorer
.
.
appears.
list of Internet service providers (ISPs)
Choose from a
.
• If you have already obtained setup information from your ISP but you
did not receive a setup CD, click
• If you have a CD, click
Use the CD I got from an ISP
Set up my connection manually
.
.
28 Setting Up Your Computer

5
Click
Next
.
If you selected
Set up my connection manually
, continue to step 6.
Otherwise, follow the instructions on the screen to complete the setup.
NOTE: If you do not know which type of connection to select, contact your ISP.
6
Click the appropriate option under
Internet?
7
Use the setup information provided by your ISP to complete the setup.
Windows Vista
NOTE: Have your ISP information ready. If you do not have an ISP, the Connect to
the Internet wizard can help you get one.
1
Save and close any open files, and exit any open programs.
2
Click the Windows Vista Start button , and click
3
Under
The
4
Click either
, and then click
®
Network and Internet,
Connect to the Internet
Broadband (PPPoE)
Next
window appears.
How do you want to connect to the
.
Control Panel
click
Connect to the Internet
or
Dial-up
, depending on how you want
.
to connect:
•Choose
Broadband
if you will use a DSL, satellite modem, cable TV
modem, or Bluetooth wireless technology connection.
• Chose
NOTE: If you do not know which type of connection to select, click Help me choose
or contact your ISP.
5
Follow the instructions on the screen and use the setup information
Dial-up
if you will use a dial-up modem or ISDN.
provided by your ISP to complete the setup.
Transferring Information to a New Computer
You can use your operating system "wizards" to help you transfer files and
other data from one computer to another—for example, from an old
computer to a new computer. For instructions, see the following section that
corresponds to the operating system that your computer is running.
Setting Up Your Computer 29

Microsoft® Windows® XP
The Microsoft Windows XP operating system provides the Files and Settings
Transfer Wizard to move data from a source computer to a new computer.
You can transfer data, such as:
• E-mail messages
• Toolbar settings
• Window sizes
• Internet bookmarks
You can transfer the data to the new computer over a network or serial
connection, or you can store it on removable media, such as a writable CD,
for transfer to the new computer.
NOTE: You can transfer information from an old computer to a new computer by
directly connecting a serial cable to the input/output (I/O) ports of the two
computers. To transfer data over a serial connection, you must access the Network
Connections utility from the Control Panel and perform additional configuration
steps, such as setting up an advanced connection and designating the host
computer and the guest computer.
For instructions on setting up a direct cable connection between two computers,
see Microsoft Knowledge Base Article #305621, titled How to Set Up a Direct Cable
Connection Between Two Computers in Windows XP. This information may not be
available in certain countries.
For transferring information to a new computer, you must run the Files and
Settings Transfer Wizard. You can use the optional Operating System media
for this process or you can create a wizard disk with the Files and Settings
Transfer Wizard.
Running the Files and Settings Transfer Wizard With the Operating System Media
NOTE: This procedure requires the Operating System media.
To prepare a new computer for the file transfer:
1
Open the Files and Settings Transfer Wizard: click
Accessories→ System Tools→
2
When the
click
Next
Files and Settings Transfer Wizard
.
Files and Settings Transfer Wizard
Start→
All Programs→
.
welcome screen appears,
30 Setting Up Your Computer
 Loading...