

Page 1

Dell XC430 Web-Scale Converged Appliance
Solutions Guide
Page 2

Notes, cautions, and warnings
NOTE: A NOTE indicates important information that helps you make better use of your computer.
CAUTION: A CAUTION indicates either potential damage to hardware or loss of data and tells you
how to avoid the problem.
WARNING: A WARNING indicates a potential for property damage, personal injury, or death.
Copyright © 2015 Dell Inc. All rights reserved. This product is protected by U.S. and international copyright and
intellectual property laws. Dell™ and the Dell logo are trademarks of Dell Inc. in the United States and/or other
jurisdictions. All other marks and names mentioned herein may be trademarks of their respective companies.
2015-09
Rev. A00
Page 3

Contents
1 About Dell Web-Scale Converged Appliance solution.................................. 5
2 Supported hardware, firmware, and software................................................ 6
3 Documentation matrix.........................................................................................7
Dell documentation...............................................................................................................................7
Nutanix documentation........................................................................................................................ 8
4 Licensing overview.............................................................................................10
Starter license...................................................................................................................................... 10
Pro and Ultimate licenses................................................................................................................... 10
Setting up Nutanix Customer Portal...................................................................................................10
License management...........................................................................................................................11
5 Deploying your system...................................................................................... 12
Before you begin................................................................................................................................. 12
Setting up your Dell XC430 for first use............................................................................................. 12
Boot error message for missing SD card......................................................................................13
Deployment outline.......................................................................................................................13
Default cluster credentials...................................................................................................................15
6 Downloading and installing Software applications..................................... 17
OpenManage Essentials.......................................................................................................................17
Installing Dell OpenManage Essentials on a separate server.............................................................17
Dell Nautilus ........................................................................................................................................18
7 Monitoring............................................................................................................19
Monitoring software............................................................................................................................19
8 Updating firmware..............................................................................................21
Updating drive firmware with Dell Nautilus........................................................................................21
9 Replacing hardware........................................................................................... 23
Replacing components with no cluster data.....................................................................................23
Replacing failed front HDD and SSD components that contain cluster data...................................23
10 Recovering system........................................................................................... 25
11 Getting help....................................................................................................... 26
3
Page 4

Contacting Dell................................................................................................................................... 26
Locating Service Tag...........................................................................................................................26
Quick Resource Locator ....................................................................................................................26
4
Page 5
1
About Dell Web-Scale Converged Appliance solution
Dell provides a web-scale converged appliance solution that includes the Dell XC430 server and software
from Nutanix (used as a virtual appliance), which simplifies virtualization by converging computer,
storage, and network into a single appliance that is deployed in a clustered environment. The following
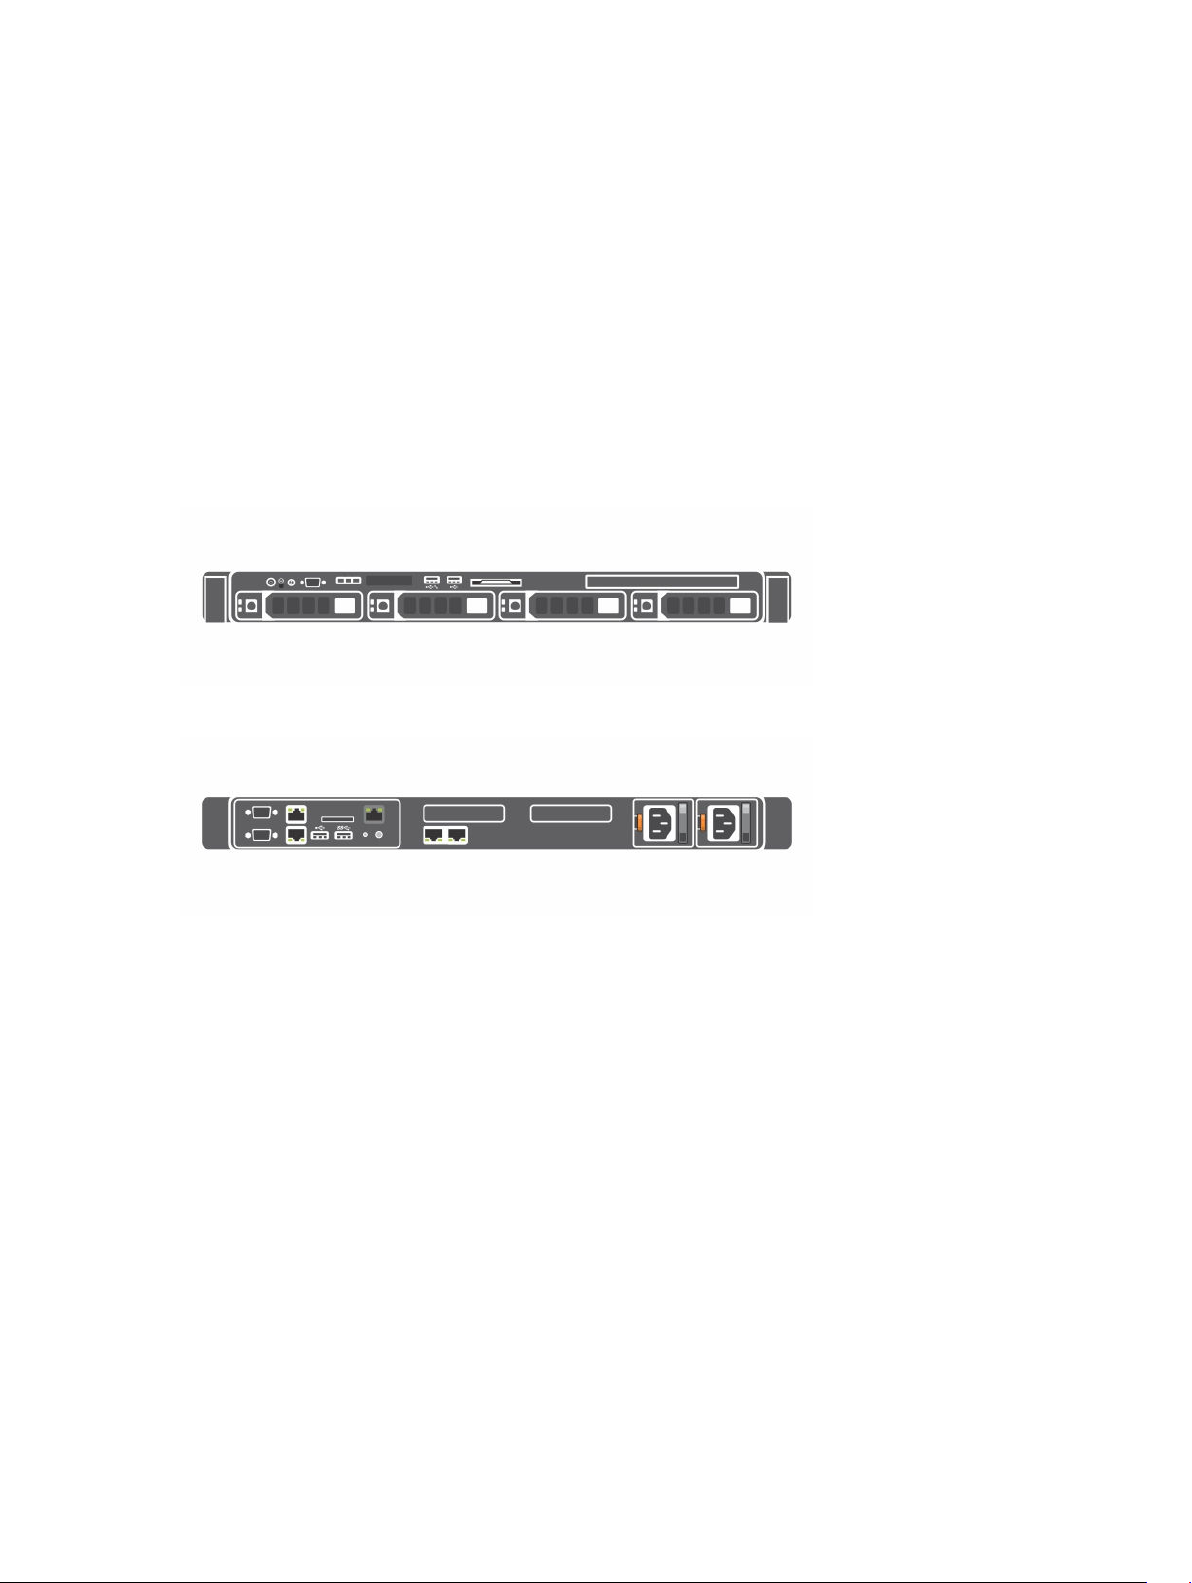
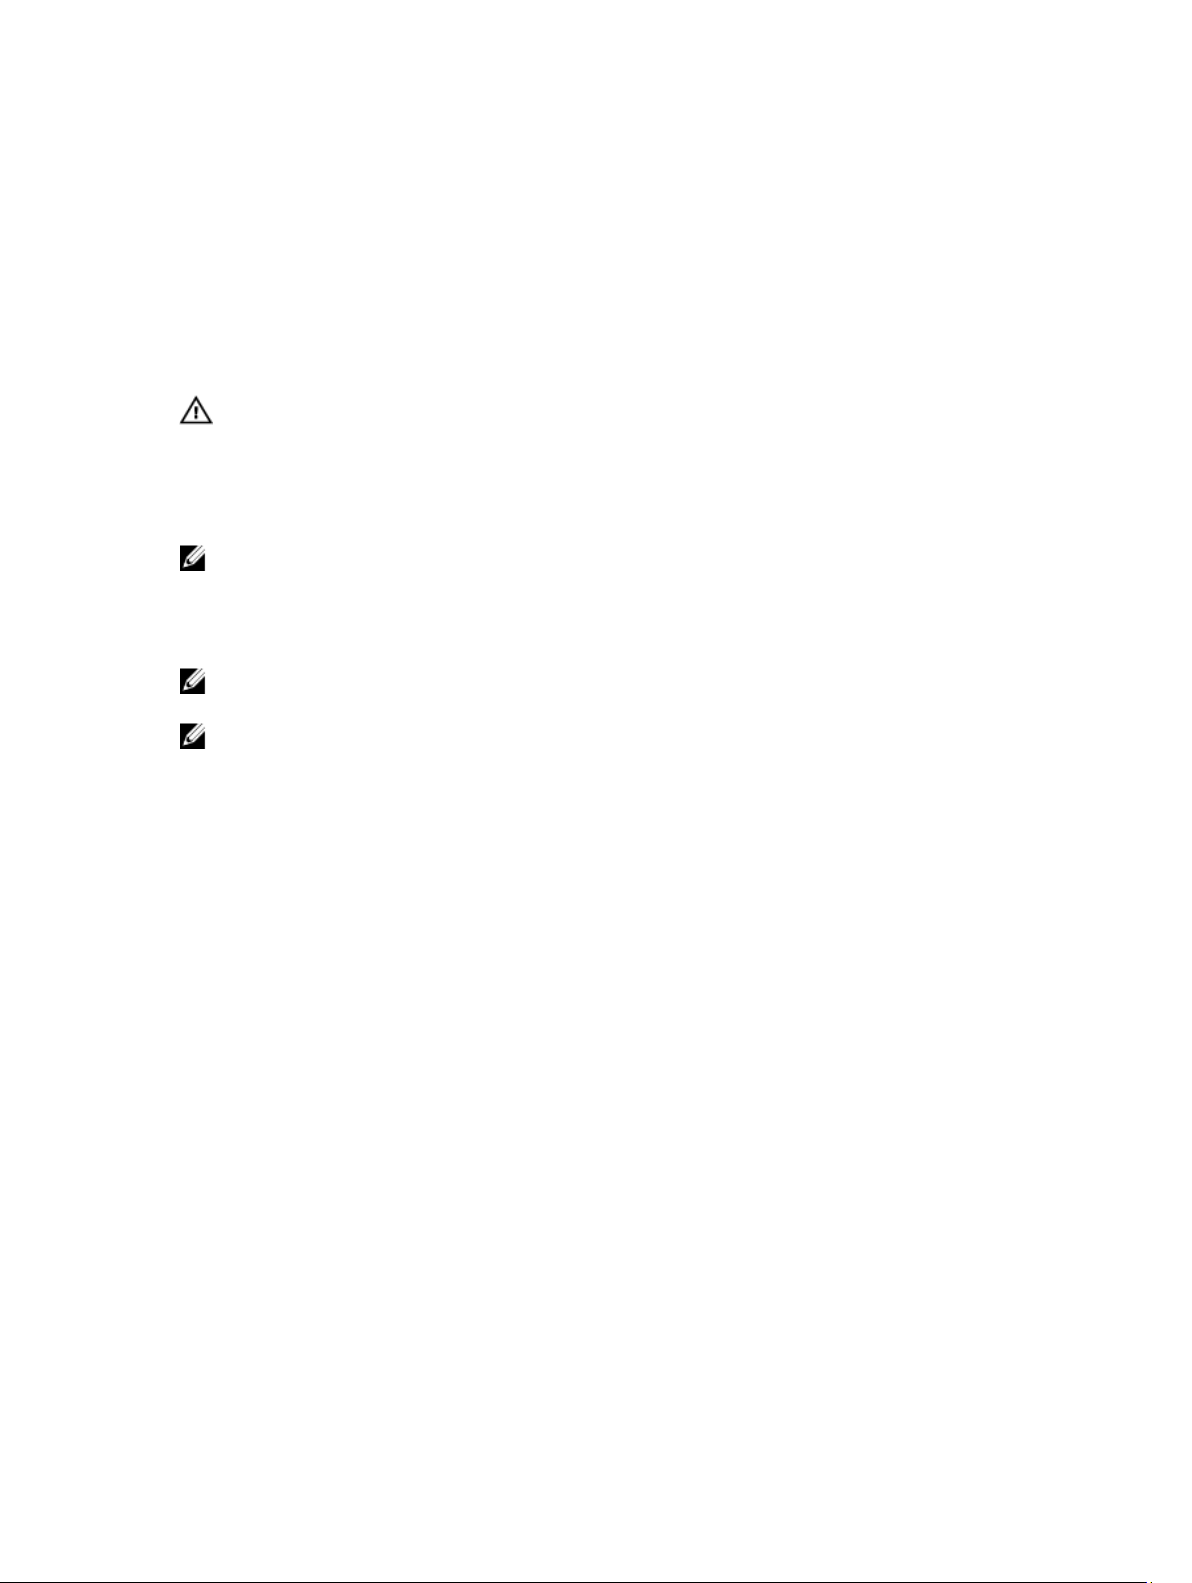
figures show Dell XC430. For more information about the Dell XC430 system, see Dell XC430 Owner’s
Manual available at Dell.com/xcseriesmanuals.
Figure 1. Front view of Dell XC430—four slots
Figure 2. Rear view of Dell XC430
5
Page 6

2
Supported hardware, firmware, and software
For a list of the most up-to-date supported hardware, firmware, and software, see the Dell XC430 WebScale Converged Appliance Support Matrix available at Dell.com/xcseriesmanuals.
6
Page 7
3
Documentation matrix
The documentation matrix provides information about the documents you use to configure and deploy
the Dell web-scale converged appliance solution.
WARNING: See the safety and regulatory information that shipped with your system. Warranty
information may be included with this document or as a separate document.
Make sure that you read through any media that ships with your system that provides documentation and
tools for configuring and managing your system, including those pertaining to the OS, system
management software, system updates, and system components that you purchased with your system.
NOTE: URLs such as Dell.com/support or Dell.com/support/home, are not active, because you
must type the URL from your location to access your specific language.
For the full name of an abbreviation or acronym used in this document, see the Glossary at Dell.com/
support/home.
NOTE: Always check for updates on Dell.com/support/home and read through the updates first,
because they often supersede information in other documents.
NOTE: While upgrading your system, Dell recommends that you download and install the latest
BIOS, driver, and systems management firmware on your system from Dell.com/support/home.
Dell documentation
Dell documentation is either included with your shipment or available at Dell.com/xcseriesmanuals.
Dell documentation for:
• Dell iDRAC (integrated Dell Remote Access Controller) is available at Dell.com/esmmanuals.
• Dell OpenManage Essentials is available at Dell.com/openmanagemanuals.
To access Dell documentation:
1. Go to Dell.com/support/home.
2. Click View Products, and then click Servers, Storage & Networking.
3. Click Engineered Solutions → Dell XC Web-Scale Converged Appliances, and then select the
documentation you require.
7
Page 8

Table 1. Dell reference documentation for the Dell XC430 Web-Scale Converged Appliance
To learn about… See…
Set up instructions of your Dell XC430,
including the technical specifications
Hardware details of your Dell XC430 Owner’s Manual
Getting Started Guide
Installing your Dell XC430 in a rack
Deploying and setting up this solution
Setting up and using Dell iDRAC8 Dell iDRAC8 Quick Start Guide
Using OpenManage Essentials to
monitor, perform updates, view
hardware, and view inventory on your
system
List the supported hardware, firmware,
and software for the Dell XC430 Series
appliances.
Dell Rack Install Guide
Solutions Guide
Dell OpenManage Essentials User’s Guide
Dell XC430 Web-Scale Converged Appliance Support Matrix
Nutanix documentation
Most Nutanix documentation is available at https://portal.nutanix.com/#/page/docs on the Nutanix
Documents page. However, two documents are available behind the Nutanix document portal. Nutanix
documentation is listed by version, category, and type. Make sure that you select the appropriate version
of documentation for this release, which is 4.1 or later. Or, see the Nutanix OS to find corresponding
documentation support.
To access most Nutanix documentation:
1. Go to https://portal.nutanix.com/#/page/docs.
2. Select the documentation you require from the list specified in Table 10.
NOTE: To access the Hardware Replacement Documentation by using the open document portal,
use the
this document.
To view the NOS Advanced Administration Guide and Advanced Setup Guide:
1. Go to https://portal.nutanix.com/#login.
2. Log in to your portal and select Documentation.
3. On the Nutanix Documents page, select the documentation you require.
8
Filter By controls in the upper-right corner of the page. Select NOS, 4.1, and XC430 to view
Page 9

Table 2. Nutanix reference documentation
To learn about… See…
Set up instructions for your solution. Setup Guide
Set up instructions for environments with special
requirements and restrictions
Instructions and reference for administering the
Nutanix Operation System (NOS) outside the
Nutanix Prism UI (such as cluster start/stop,
manual upgrade, changing passwords,
reconfiguring IP addresses, and troubleshooting
tools).
Comprehensive instructions and references for the
Nutanix UI, including overview information.
Managing KVM Nutanix Acropolis hosts that run
NOS.
Managing KVM Nutanix Acropolis hosts that run
NOS.
Managing KVM Nutanix Acropolis hosts that run
NOS.
Managing Hyper-V hosts that run NOS, including
domain requirements.
Comprehensive references for the Nutanix REST
API.
Advanced Setup Guide
NOS Advanced Administration Guide
Web Console Guide
Acropolis Virtualization Administration Guide
Acropolis Virtualization Administration Guide
Acropolis Virtualization Administration Guide
Hyper-V Administration Guide
API Reference
Comprehensive references for Controller Virtual
Machine (CVM) utilities, nCLI commands, and
Nutanix PowerShell cmdlet.
Software instructions for hardware components
that are not functioning.
Command Reference
Hardware Replacement Documentation
9
Page 10

4
Licensing overview
The Nutanix virtual computing platform includes various features to enable you to administer your
environment according to your current and future requirements. You can use the default feature set of
Nutanix Operating System (NOS), upgrade to an enhanced feature set, update your license for a longer
term, or reassign existing licenses to nodes or clusters as required.
Starter license
Each Nutanix node and block is delivered with a default Starter license, which is issued for a six-year term
that begins at the shipping date for your Dell XC430 order. You are not required to register this license on
the Nutanix Customer Portal account assigned to you when you purchased your nodes.
Pro and Ultimate licenses
The Pro and Ultimate license types require you to download a license file from the Nutanix Customer
Support Portal and install it on your cluster. When you upgrade to a Pro or Ultimate license, or add nodes
or clusters to your environment with these licensed features, you must generate the license file,
download it, and then install it.
NOTE: The most current information about your license is available at the Nutanix Customer
Support Portal. You can view information about license types, expiration dates, and any free license
inventory (that is, unassigned available licenses).
Setting up Nutanix Customer Portal
If you are new to Nutanix Support, create a personal profile on the Nutanix Customer Portal. Creating a
personal profile allows you to manage your licenses.
NOTE: The Nutanix Customer Portal is also required to access some of the advanced Nutanix
documentation.
To set up your Nutanix Customer Portal, complete the following tasks:
1. Go to the Nutanix Customer Portal at http://portal.nutanix.com and click Register Now.
2. Register by typing data in appropriate boxes.
3. In the Serial Number box, type the Service Tag number of your Dell XC430 system.
NOTE: To find the Service Tag of your Dell XC430, see the Locating The Service Tag section in
this document.
4. After the Customer Portal account is created, you can manage your licenses.
10
Page 11

License management
For more information about license management, complete the following tasks:
1. On the Nutanix Documentation portal, see the Web Console Guide (for access details, see the
Documentation matrixsection in this document).
2. In the Nutanix Web Console Guide, see the License Management section.
3. Perform the relevant licensing tasks for your system.
11
Page 12

Deploying your system
Before you deploy your system, ensure that you read through this document and have yourself
familiarized with the process and required materials.
WARNING: Before you set up and operate your Dell XC430, review the safety instructions that
shipped with your storage enclosure.
WARNING: The weight of your system without the physical disk drives installed (empty weight) is
16.73 kg (36.88 lb).
WARNING: Your system must be installed by Dell certified service technicians.
CAUTION: Before installing your system in the rack, make sure that the weight of the system does
not exceed the weight limit of the rack. For more information, see the Rack Installation
instructions that shipped with your system.
NOTE: For weight stability, always load the rack by using bottom-up approach.
NOTE: This solution is deployed by Dell Services. The following deployment steps provide an outline
of what Dell Services accomplishes during the deployment process.
Before you begin
5
CAUTION: It is important that you perform all the steps in this guide prior to doing other
configuration steps.
Make sure that the following items are available:
• Power cables
• Network cables — optical and/or copper (Intel SFP+ or Category 6 Ethernet)
• Rail kit
• Nutanix documentation — Setup Guide and Advanced Setup Guide
• Dell Documentation — Dell XC430 Web-Scale Converged Appliance getting Started Guide, Dell
XC430 Web-Scale Converged Appliance Solutions Guide, Rack Installation Instructions, and Safety
Instructions, and Dell XC430 Web-Scale Converged Appliance Support Matrix.
NOTE: For information about locating required documents, see the Documentation matrixsection in
this document.
Setting up your Dell XC430 for first use
1. Make sure that your system components are properly installed.
12
Page 13

Your system is shipped with physical disk drives, power supply units (PSUs), and fan components
already installed. Ensure that all components are properly seated and have not become dislodged
and/or damaged during shipping.
2. Install the Dell XC430 in a rack.
The Dell XC430 requires a compatible rack and a rack installation kit. For information about installing
the rails for the Dell XC430, see the Rack Installation Instructions Guide that shipped with your
system.
3. Cable your solution based on best practices cabling diagram shown here.
NOTE: At a minimum, there are three Dell XC430 servers in a cluster. Each Dell XC430 is seen
as a node.
Figure 3. Cabling a system
1. Management Network 2. Host Network
NOTE: The preferred (best practice) setup is to connect the management port across all three
nodes to the same switch (management network).
Boot error message for missing SD card
The XC430 system has only one SD card. When you start the system, the following error message is
displayed:
The secondary SD card is missing, not responding, or in write-protected mode.
Do one of the following:
1. Install an SD card media in the secondary SD card slot.
2. Reseat or replace the SD card media.
3. If the secondary SD card is intentionally not installed or write-protected
mode is expected, then no response is required.
The message is a known issue and you must ignore it.
Deployment outline
The flow of tasks in deploying the XC Series Web-Scale Converged Appliance is shown here.
13
Page 14

Figure 4. Deployment workflow process.
First time boot scripts
Nutanix Acropolis nodes have been pre-configured and do not require additional first time boot
configuration. These nodes boot to the hypervisor and are ready to be clustered once the CVM has all
services up.
Run the VMware vSphere first boot scripts on every node after they are properly racked and cabled. The
first time boot scripts accomplish the following tasks:
NOTE: These first time boot scripts run automatically upon the first boot of the system and include
multiple reboots.
• Creates vSwitch Nutanix, internal and external port groups and vmkernal interface with address on
internal portgroup.
• Activates vMotion and management on the default external vmkernel interface (vmk0).
• Enables TSM-SSH and TSM and allows sshClient, nfsClient, and ntpClient through the firewall.
• Denies vprobeServer through the firewall.
• Sets advanced ESXi parameters.
• Enables auto-start, sets the default RAM, and number of vCPU for the CVM.
• Elects applicable data-disk storage controller for PCI pass-through.
• Disables drivers associated with pass-through storage controllers.
• Installs the following VIBs: Nutanix VAAI, updated ixgbe and igb driver, and GPU VIBs (if applicable).
• Renames local VMFS datastore to standard naming convention: NTNX-local-ds-<block id><node_position>.
• Starts CVM and check for the existence of /tmp/svm_boot_succeeded.
• Restart host.
Complete the Micorsoft Hyper-V First boot scripts on every node after they are properly racked and
cabled. The first time boot scripts accomplish the following tasks:
NOTE: These first time boot scripts are run from a first time boot scripts wizard and require
minimal user intervention.
• Sets up vSwitch or LBFO NIC Team
• Installs NIC drivers (Intel), Cygwin, ipmiutil, and Python
• Registers CVM as a VM
• Attaches Disks to CVM
• Enables auto-start, sets the default RAM and number of vCPU for the CVM.
• Starts CVM and checks for the existence of /tmp/svm_boot_succeeded
• Restarts host
14
Page 15

Create Nutanix storage cluster
• Use the Nutanix web-based clustering application to create Nutanix storage cluster from all locally
discovered nodes ready to be clustered. During this process, the following parameters are set:
– Cluster name
– Set cluster IPs (iDRAC, Hypervisor, and CVM)
– Cluster virtual external IP
– Subnet mask and default gateway, and cluster virtual external IP
– DNS and NTP (hypervisor NTP N/A for Hyper-V) servers
• Option to create Nutanix storage cluster manually, if IPv6 link-local is not enabled
Configure Nutanix storage cluster using hypervisor management GUI
KVM Nutanix Acropolis:
• Create storage pool and containers through Nutanix web console.
• Create, deploy, and manage virtual machines through Nutanix web console.
• For more information, see the Acropolis Virtualization Administration Guide.
VMware vSphere:
• Create storage pool through Nutanix web console.
• Create and mount containers as NFS datastores on appropriate hosts through Nutanix web console.
• Manually add and configure vSphere cluster by using the Nutanix guidelines. For more information,
refer to the vSphere Administration Guide.
Microsoft Hyper-V:
• Create storage pool and containers through Nutanix web console.
• Run Hyper-V setup script from any CVM to join hosts to domain, create Hyper-V failover cluster, and
register storage cluster as SMB share.
• Optionally, add cluster to System Center Virtual Machine Manager with Hyper-V setup script or
manually.
Default cluster credentials
The default cluster credentials for the system differ from those provided at the starting of all Nutanix
documentation. See Table 3 for default cluster credentials, which are specific to the system.
NOTE: The default password is not set for ESXi hosts.
Table 3. Default Cluster Credentials
Interface Target Username Password
Web management
console
Remote desktop or
console
iDRAC root Calvin
Hyper-V host
Administrator
nutanix/4u
15
Page 16

Interface Target Username Password
SSH client or console KVM host
root
nutanix/4u
SSH client or console ESXi host
SSH client Nutanix Controller VM
Nutanix Web Console PRISM Interface (after
cluster configuration)
NOTE: Default password applies for Nutanix Web Console prior to NOS 4.1.3. For 4.1.3 and later,
you must set a new admin password on first login.
root
nutanix
admin admin
nutanix/4u
16
Page 17

6
Downloading and installing Software applications
OpenManage Essentials
OpenManage Essentials is a hardware management application on a separate server that provides a
comprehensive view of the Dell XC430 and its components. OpenManage Essentials enables you to:
• Discover and list the system inventory
• Monitor the health of a system
• Perform system updates and remote tasks
• View hardware inventory and compliance reports
For information about the supported OpenManage Essentials versions, see the Supported hardware,
firmware, and software section in this document.
To download OpenManage Essentials management software, go to Dell.com/support/home or the Dell
TechCenter website at DellTechCenter.com/OME.
To download the OpenManage Essentials User’s Guide, go to Dell.com/openmanagemanuals.
NOTE: To install OpenManage Essentials, you must have local system administrator privileges, and
the system you are using must meet the criteria mentioned in the Installation Prerequisites and
Minimum Requirements section of the OpenManage Essentials User’s Guide.
NOTE: OpenManage Essentials must be installed on the management network or a network that
has access to the IMPI or iDRAC ports.
Installing Dell OpenManage Essentials on a separate server
To install OpenManage Essentials:
1. Go to Dell.com/openmanagemanuals and open the OpenManage Essentials User’s Guide.
2. Go to the Installation Prerequisites and Minimum Requirements section and complete the tasks as
described.
3. Go to the Installing OpenManage Essentials section and complete the tasks as described.
4. Install the following optional software applications:
• Dell OpenManage Essentials
• Dell Repository Manager
17
Page 18

NOTE: Install Dell Repository Manager only if you want to customize the Firmware Bundles
and Update Packages.
• Documentation
Dell Nautilus
Dell Nautilus is a general maintenance release utility for updating firmware for SAS and SATA drives (or
disks).
For information about the supported Dell Nautilus version number, see the Supported hardware,
firmware, and software section in this document.
To download the Dell Nautilus Firmware Update Utility for SAS and SATA disk Solid State Drives (SSDs):
1. Go to Dell.com/support/drivers.
2. Under the Customized support section, in the Enter your Service Tag or Express Service Code box,
type the Service Tag of your Dell XC430, and then click Submit.
NOTE: If you do not have a Service Tag, select Detect My Product to allow the system to
automatically detect your Service Tag, or select Choose from a list of all Dell products to select
your product from the Product Selection page.
3. On the Product Support page, click Drivers & downloads.
4. From the Operating System drop-down menu, select Not Applicable.
5. Go to the SAS Drive section.
6. Search for Dell Nautilus Firmware Utility for SAS and SATA disk and SSDs.
7. Click Download. Click Download again to download the .exe file. In your Download folder, locate
the latest version of Dell Nautilus and click to expand the compressed files.
8. In the extracted folder, run the USBMake Utility.
9. Create the bootable Nautilus package and perform one of the following tasks:
• To create a bootable CD or DVD image (ISO), click Create Bootable CD Image and follow
instructions. Burn the .iso image file to CD or save the bootable ISO on a management
workstation.
• Connect a USB flash drive to the system and follow instructions to create a bootable USB flash
drive.
18
Page 19

Monitoring
Table 4. System component monitoring guide
System Components Monitor Utility
System memory Dell OpenManage Essentials
Cooling fans Dell OpenManage Essentials
Network Daughter Card Dell OpenManage Essentials
Processors Dell OpenManage Essentials
PSUs Dell OpenManage Essentials
NIC Dell OpenManage Essentials
7
H730 Mini
Front HDDs Nutanix web console
Front SSDs Nutanix web console
NOTE: For instructions about using Dell OpenManage Essentials to monitor the Dell XC430 system,
do the following:
1. See the OpenManage Essentials User’s Guide.
2. For information about discovering components of a Dell XC430 system, see the Discovering
and Inventorying Devices section.
3. To use the functionality of OMSA preinstalled on each node, configure it by using the
OpenManage Essentials User's Guide.
4. To add Dell XC430 to the discovered list of systems, discover Dell XC430 by using an IP range.
Dell OpenManage Essentials
Monitoring software
To monitor the health of a cluster, VMs, performance, and alerts and events, the Nutanix web console
provides a range of status-check features.
For more information about monitoring with the Nutanix web console, view the Web Console Guide
document on the Nutanix documentation portal (for more information, see Documentation matrix
section in this document).
In the Nutanix Web Console Guide document, see the following sections:
19
Page 20

• Health Monitoring
• Virtual Machine Monitoring
• Performance Monitoring
• Alert and Event Monitoring
20
Page 21

Updating firmware
Table 5. System component update guide
System components Utility
Network Daughter Card Dell OpenManage Essentials
PSUs Dell OpenManage Essentials
NIC Dell OpenManage Essentials
BIOS Dell OpenManage Essentials
iDRAC Dell OpenManage Essentials
Dell PERC Dell OpenManage Essentials
Front HDDs Nutanix web console
Front SSDs Nutanix web console
SATADOM Contact Dell Support
8
Use Dell OpenManage Essentials to update the firmware of the discovered system components. For
instructions about using Dell OpenManage Essentials to monitor and update the discovered components
of the Dell XC430 system, see Updating Server BIOS, Firmware, Drivers, and Applications in the
OpenManage Essentials User’s Guide.
NOTE: Dell Nautilus may be used as an alternative to the Nutanix web console for updating
firmware of the front HDDs and SSDs.
Updating drive firmware with Dell Nautilus
To update disk firmware with Dell Nautilus:
1. Turn off Controller Virtual Machine (CVM).
For information about how to turn off a node, see the Nutanix Hardware Replacement document.
2. Put hypervisor in Maintenance mode.
3. Access system GUI, and do one of the following:
• Connect the physical keyboard or monitor or mouse to the ports on the Dell XC430.
• Connect to the iDRAC GUI.
21
Page 22

NOTE: For information about configuring and accessing the iDRAC GUI, see the iDRAC
Quick Start Guide at Dell.com/support/home.
4. Mount the Dell Nautilus ISO or the USB key to the system using virtual media.
5. While restarting the server, press F11 to open BIOS boot manager.
6. From the list, select EFI Boot Manager.
7. From the EFI boot list, select Virtual CD or the USB drive.
8. To update drive firmware, click Update Firmware.
NOTE: Dell Nautilus updates all HDD and SSD firmware for all HDDs and SSDs connected to the
system.
22
Page 23

9
Replacing hardware
This section describes high-level tasks to replace components correctly within the Dell XC430 solution.
Before you begin, for information about downloading the following required documents for the three
hardware replacement tasks, see the Documentation matrixsection in this document. The documents
are:
• Hardware Replacement Documentation
• Dell XC430 Owner’s Manual
After you have these documents, you are ready to proceed with any of these hardware replacement
tasks. To complete these tasks, you must see both the documents.
Replacing components with no cluster data
The hardware you can replace that involve no cluster data includes:
• System memory
• Cooling fans
• Network Daughter Cards or Network Interface Cards
• PSUs
NOTE: Use the hot-swap tasks in task 2 in this section (if only one PSU stops functioning).
1. In the Nutanix Hardware Replacement Guide, see the Failure of Components that do not Contain
Cluster Data section and turn off the node for the relevant hypervisor.
2. In the Dell XC430 Owner’s Manual, see the Installing and removing system components section and
replace the failed component.
3. See the Nutanix Hardware Replacement Documentation, see the Failure of Components that do not
Contain Cluster Data section, and then restart the node of the relevant hypervisor.
Replacing failed front HDD and SSD components that contain cluster data
To replace the failed front HDDs and SSDs that contain cluster data, do the following:
1. In the Nutanix Hardware Replacement Documentation, see the Data Drive Failure section and
identify the failed HDD or SDD.
2. In the Dell XC430 Web-Scale Converged Appliance Owner’s Manual, see the Installing and removing
system components, HDDs, Removing a hot-swap hard drive, and Installing a hot-swap HDD
sections.
23
Page 24

NOTE: New HDDs and SSDs being installed must have any foreign RAID configuration removed
before being added to the system. Otherwise, they will not be recognized by the CVM.
3. See the Nutanix Hardware Replacement Documentation again, see the Completing Data Drive
Replacement section and complete the replacement of the failed HDD or SSD.
24
Page 25

Recovering system
For information about recovering your system, contact Dell Support.
10
25
Page 26

11
Getting help
Contacting Dell
Dell provides several online and telephone-based support and service options. If you do not have an
active internet connection, you can find contact information on your purchase invoice, packing slip, bill,
or Dell product catalog. Availability varies by country and product, and some services may not be
available in your area. To contact Dell for sales, technical assistance, or customer-service issues:
1. Go to Dell.com/support.
2. Select your country from the drop-down menu on the bottom right corner of the page.
3. For customized support:
a. Enter your system Service Tag in the Enter your Service Tag field.
b. Click Submit.
The support page that lists the various support categories is displayed.
4. For general support:
a. Select your product category.
b. Select your product segment.
c. Select your product.
The support page that lists the various support categories is displayed.
Locating Service Tag
Your system is identified by a unique Express Service Code and Service Tag number. This information is
used by Dell to route support calls to the appropriate service provider.
Figure 5. Locating service tag
Quick Resource Locator
Use the Quick Resource Locator (QRL) to get immediate access to system information and how-to
videos. This can be done by visiting Dell.com/QRL or by using your smartphone or tablet and a model
26
Page 27

specific Quick Resource (QR) code located on your Dell system. To try out the QR code, scan the
following image.
Figure 6. Quick Resource Locator
27
 Loading...