

Page 1

Dell Precision™ Workstation
370 Systems
Quick Reference Guide
Models DHM and WHM
www.dell.com | support.dell.com
Page 2

Notes, Notices, and Cautions
NOTE: A NOTE indicates important information that helps you make better use of your computer.
NOTICE: A NOTICE indicates either potential damage to hardware or loss of data and tells you how to avoid
the problem.
CAUTION: A CAUTION indicates a potential for property damage, personal injury, or death.
Abbreviations and Acronyms
For a complete list of abbreviations and acronyms, see the Glossary in your
If you purchased a Dell™ n Series computer, any references in this document to Microsoft
User’s Guide
.
®
Windows®
operating systems are not applicable.
____________________
Information in this document is subject to change without notice.
© 2004 Dell Inc. All rights reserved.
Reproduction in any manner whatsoever without the written permission of Dell Inc. is strictly forbidden.
Trademarks used in this text: Dell, the DELL logo, and Dell Precision are trademarks of Dell Inc.;
Microsoft and Windows are registered trademarks of Microsoft Corporation.
Other trademarks and trade names may be used in this document to refer to either the entities claiming the marks and names
or their products. Dell Inc. disclaims any proprietary interest in trademarks and trade names other than its own.
Models DHM and WHM
April 2004 P/N X3157 Rev. A00
Page 3

Contents
Finding Information and Assistance . . . . . . . . . . . . . . . . . . . . 5
Setting Up Your Mini-Tower Computer
Setting Up Your Desktop Computer
Locating Your User’s Guide
. . . . . . . . . . . . . . . . . . . . . . . . . 19
Opening Your Mini-Tower Computer
The Card Cooling Fan
. . . . . . . . . . . . . . . . . . . . . . . . . . . 22
Opening Your Desktop Computer
Caring for Your Computer
Solving Problems
Troubleshooting Tips
. . . . . . . . . . . . . . . . . . . . . . . . . . 24
. . . . . . . . . . . . . . . . . . . . . . . . . . . . . 25
. . . . . . . . . . . . . . . . . . . . . . . . . 25
. . . . . . . . . . . . . . . . . . . 9
. . . . . . . . . . . . . . . . . . . . . 14
. . . . . . . . . . . . . . . . . . . . 20
. . . . . . . . . . . . . . . . . . . . . . 23
Resolving Software and Hardware Incompatibilities
Using Microsoft Windows XP System Restore
Using Last Known Good Configuration
Dell Diagnostics
Before You Start Testing
Beep Codes
Error Messages
Diagnostic Lights
Frequently Asked Questions
. . . . . . . . . . . . . . . . . . . . . . . . . . . . 28
. . . . . . . . . . . . . . . . . . . . . . . . 30
. . . . . . . . . . . . . . . . . . . . . . . . . . . . . . . . 30
. . . . . . . . . . . . . . . . . . . . . . . . . . . . 31
. . . . . . . . . . . . . . . . . . . . . . . . . . . . . 31
. . . . . . . . . . . . . . . . . . . . . . . . 36
. . . . . . . . . . . . . . . . . 28
. . . . . . . . . . 25
. . . . . . . . . . . . . 26
Index . . . . . . . . . . . . . . . . . . . . . . . . . . . . . . . . . . . . 39
Contents 3
Page 4

4 Contents
Page 5

Finding Information and Assistance
What Are You Looking For? Find it Here
• A diagnostic program for my computer
• Drivers for my computer
• My device documentation
• System board connectors
• Location of system board components
Drivers and Utilities CD (also known as the ResourceCD)
Documentation and drivers are already installed on your
computer. You can use the CD to reinstall drivers, run the
Dell Diagnostics (see page 28), or access your device
documentation.
NOTE: The latest drivers and documentation updates
can be found at support.dell.com.
System Information Label
Located on the inside cover of your computer.
Readme files may be
included on your CD
to provide last-minute
updates about technical
changes to your
computer or advanced
technical-reference
material for technicians
or experienced users.
Quick Reference Guide 5
Page 6
What Are You Looking For? Find it Here
• Warranty information
Dell™ Product Information Guide
• Safety instructions
• Regulatory information
• Ergonomics information
• End User License Agreement
www.dell.com | support.dell.com
• How to remove and replace parts
• Technical specifications
• How to configure system settings
• How to troubleshoot and solve problems
• Service Tag and Express Service Code
• Microsoft Windows License Label
Dell Precision User’s Guide
Microsoft
1
2
Service Tag and Microsoft Windows License
These labels are located on your computer.
• Use the Service Tag
• Enter the Express
®
Windows® XP Help and Support Center
Click the
Click
Start
button and click
User’s and system guides
Help and Support.
and click
User’s guides
to identify your
computer when you
support.dell.com
use
or contact technical
support.
Service Code to direct your call when contacting
technical support. The Express Service Code is not
available in all countries.
.
6 Quick Reference Guide
Page 7

What Are You Looking For? Find it Here
• Latest drivers for my computer
• Answers to technical service and support questions
• Online discussions with other users and technical
support
• Documentation for my computer
Dell Support Website — support.dell.com
NOTE: Select your region to view the appropriate support
site.
The Dell Support website provides several online tools,
including:
• Solutions — Troubleshooting hints and tips, articles
from technicians, and online courses
• Community — Online discussion with other Dell
customers
• Upgrades — Upgrade information for components, such
as memory, the hard drive, and the operating system
• Customer Care — Contact information, order status,
warranty, and repair information
• Downloads — Drivers, patches, and software updates
• Reference — Computer documentation, product
specifications, and white papers
• Service call status and support history
• Top technical issues for my computer
• Frequently asked questions
• File downloads
Dell Premier Support Website — premiersupport.dell.com
The Dell Premier Support website is customized for
corporate, government, and education customers. This
website may not be available in all regions.
• Details on my computer configuration
• Service contract for my computer
• How to use Windows XP
• Documentation for my computer
• Documentation for devices (such as a modem)
Windows Help and Support Center
1
Click the
2
Type a word or phrase that describes your problem
and click the arrow icon.
3
Click the topic that describes your problem.
4
Follow the instructions on the screen.
• How to use Linux
• E-mail discussions with Dell Precision and Linux users
• Additional information regarding Linux and my Dell
Precision computer
Dell Supported Linux Sites
• http://linux.dell.com
• http://lists.us.dell.com/mailman/listinfo/linuxprecision
• http://docs.us.dell.com/docs/software/oslinux/
• http://docs.us.dell.com/docs/software/OSRHEL3/
Start
button and click
Help and Support
.
Quick Reference Guide 7
Page 8

What Are You Looking For? Find it Here
• How to reinstall my operating system
www.dell.com | support.dell.com
Operating System CD
The operating system is already installed on your
computer. To reinstall your operating system, use the
Operating System CD. See your Precision User’s Guide
for instructions.
NOTE: The color of your CD varies based on the operating
system you ordered.
After you reinstall your
operating system, use the
Drivers and Utilities CD
to reinstall drivers for the
devices that came with
your computer.
Your operating system
product key label is
located on your
computer.
8 Quick Reference Guide
Page 9
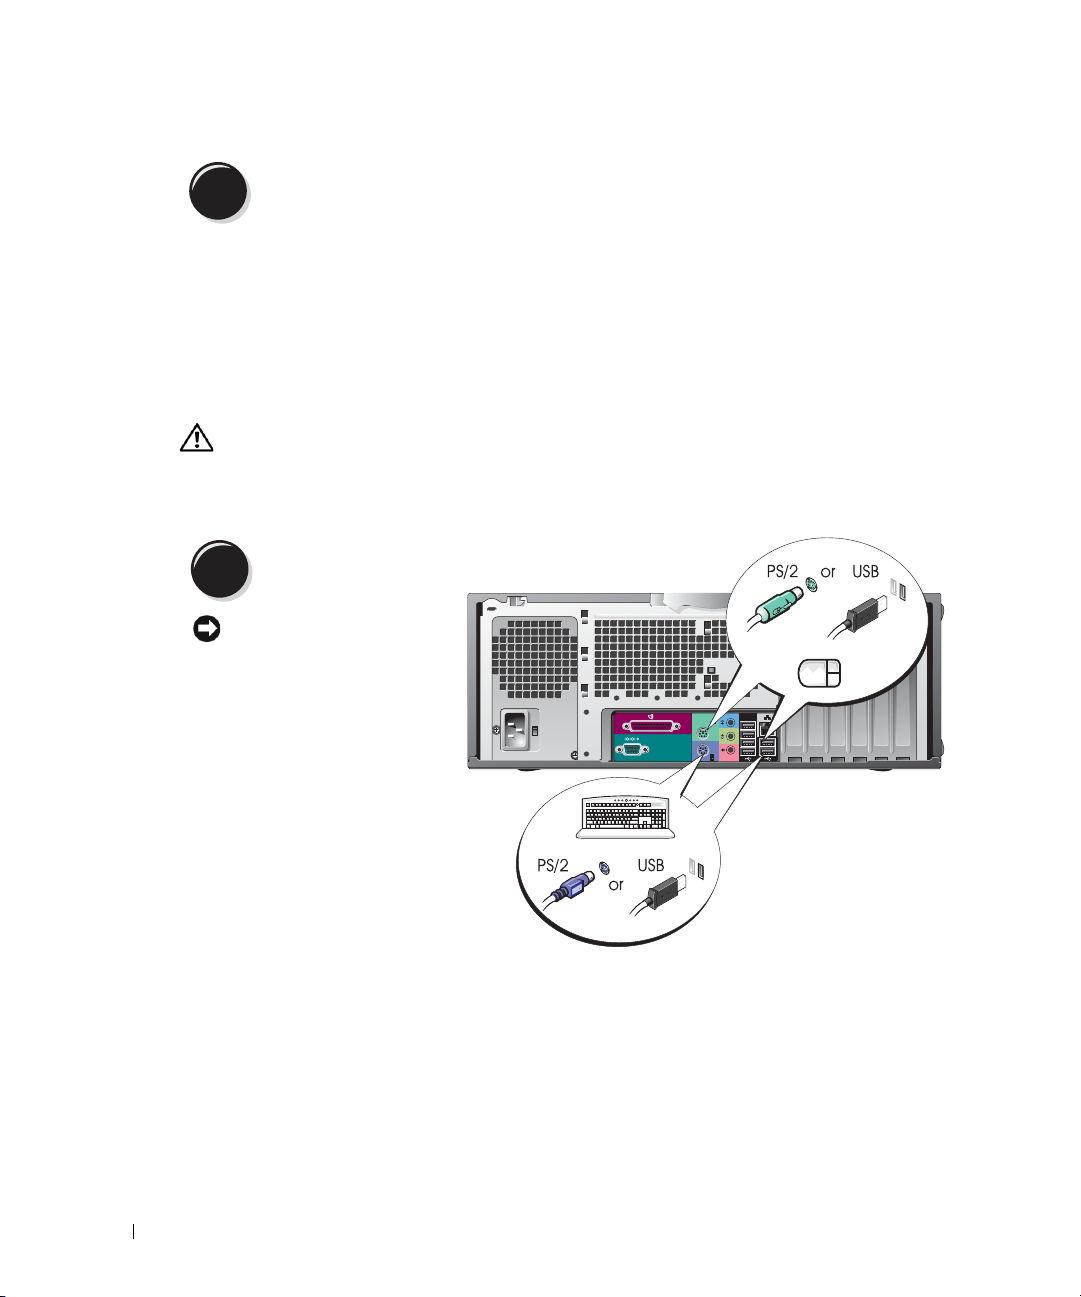
Setting Up Your Mini-Tower Computer
CAUTION: Before you begin any of the procedures in this section, follow the safety instructions
located in the Product Information Guide.
You must complete all steps to properly set up your computer.
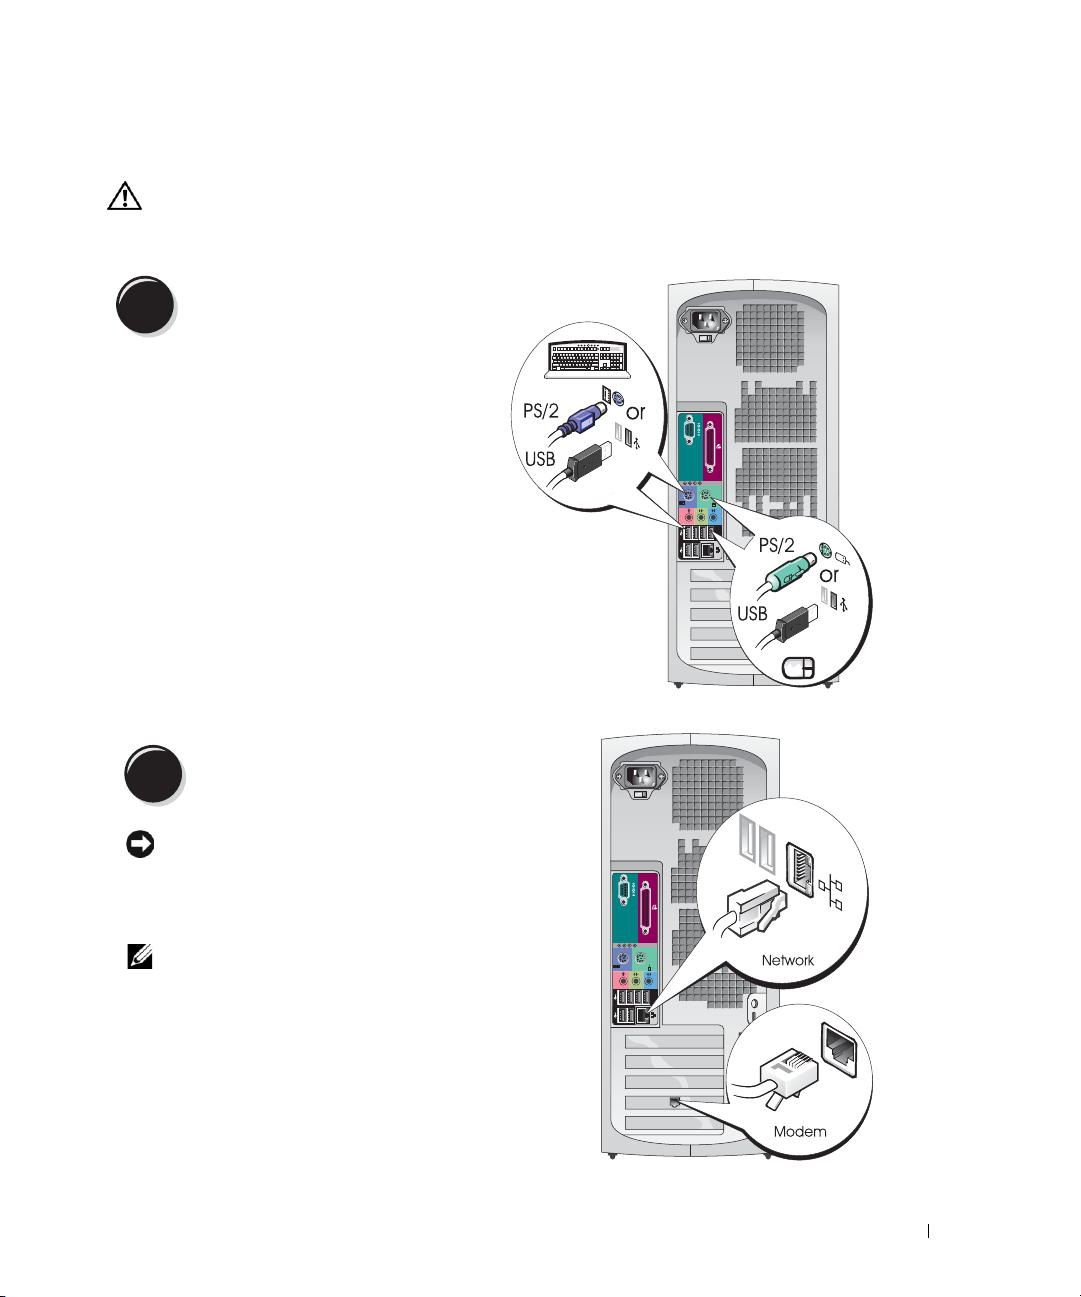
Connect the keyboard and the mouse.
1
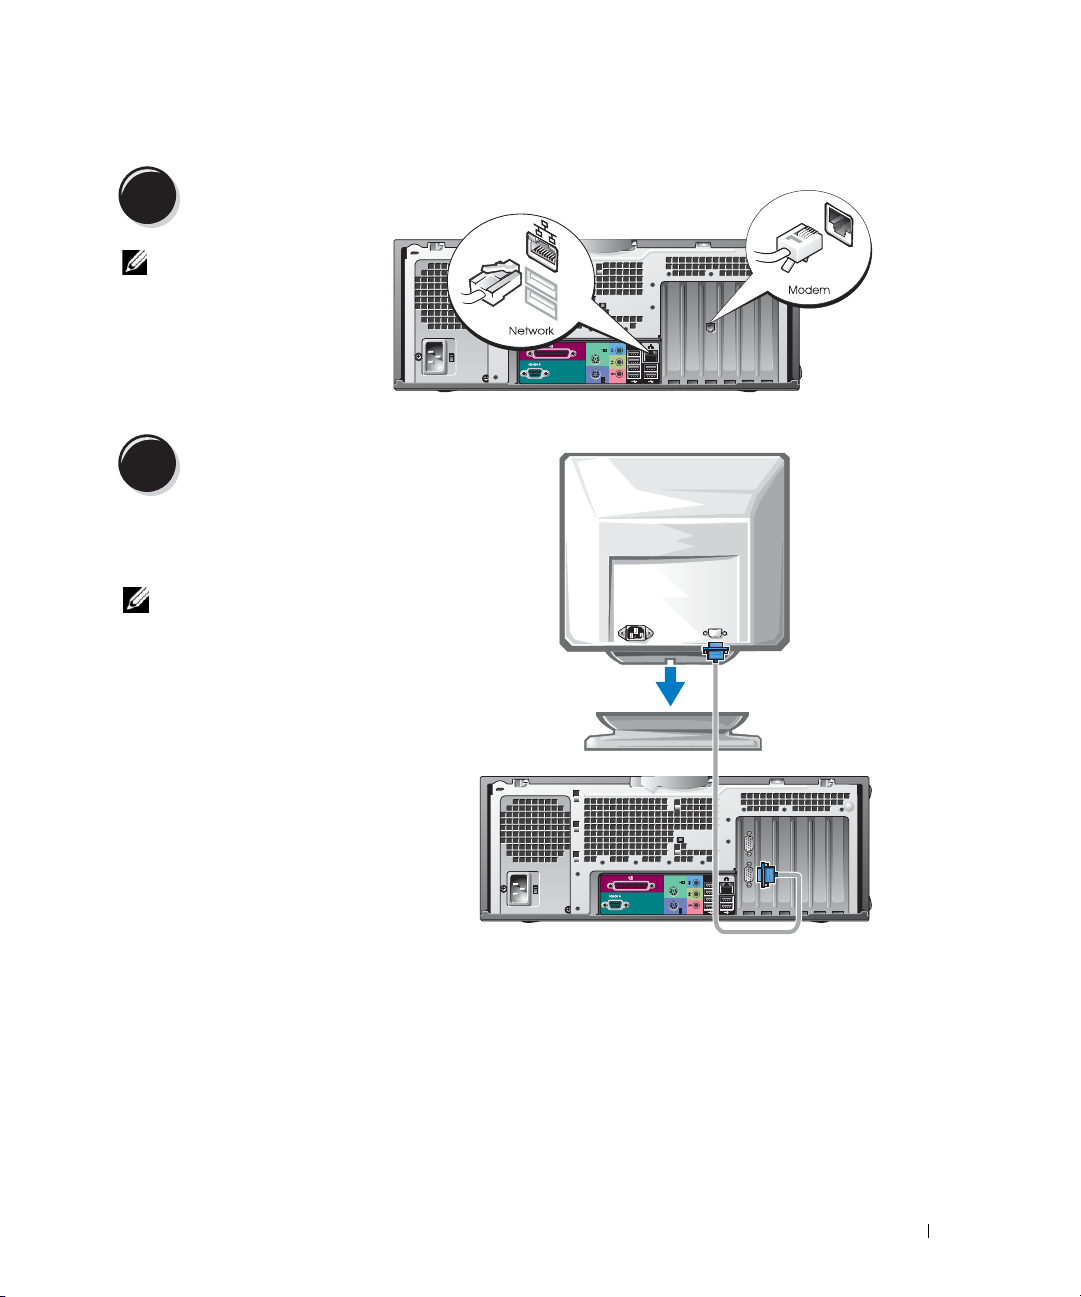
Connect the modem or the network cable.
2
NOTICE: Do not connect a modem cable to the
network adapter. Voltage from telephone
communications can damage the network adapter.
NOTE: If your computer has a network card installed,
connect the network cable to the card.
Quick Reference Guide 9
Page 10

Connect the monitor.
3
Depending on your graphics
card, you can connect your
monitor in various ways.
NOTE: You may need to use
the provided adapter or
www.dell.com | support.dell.com
cable to connect your
monitor to the computer.
10 Quick Reference Guide
Page 11
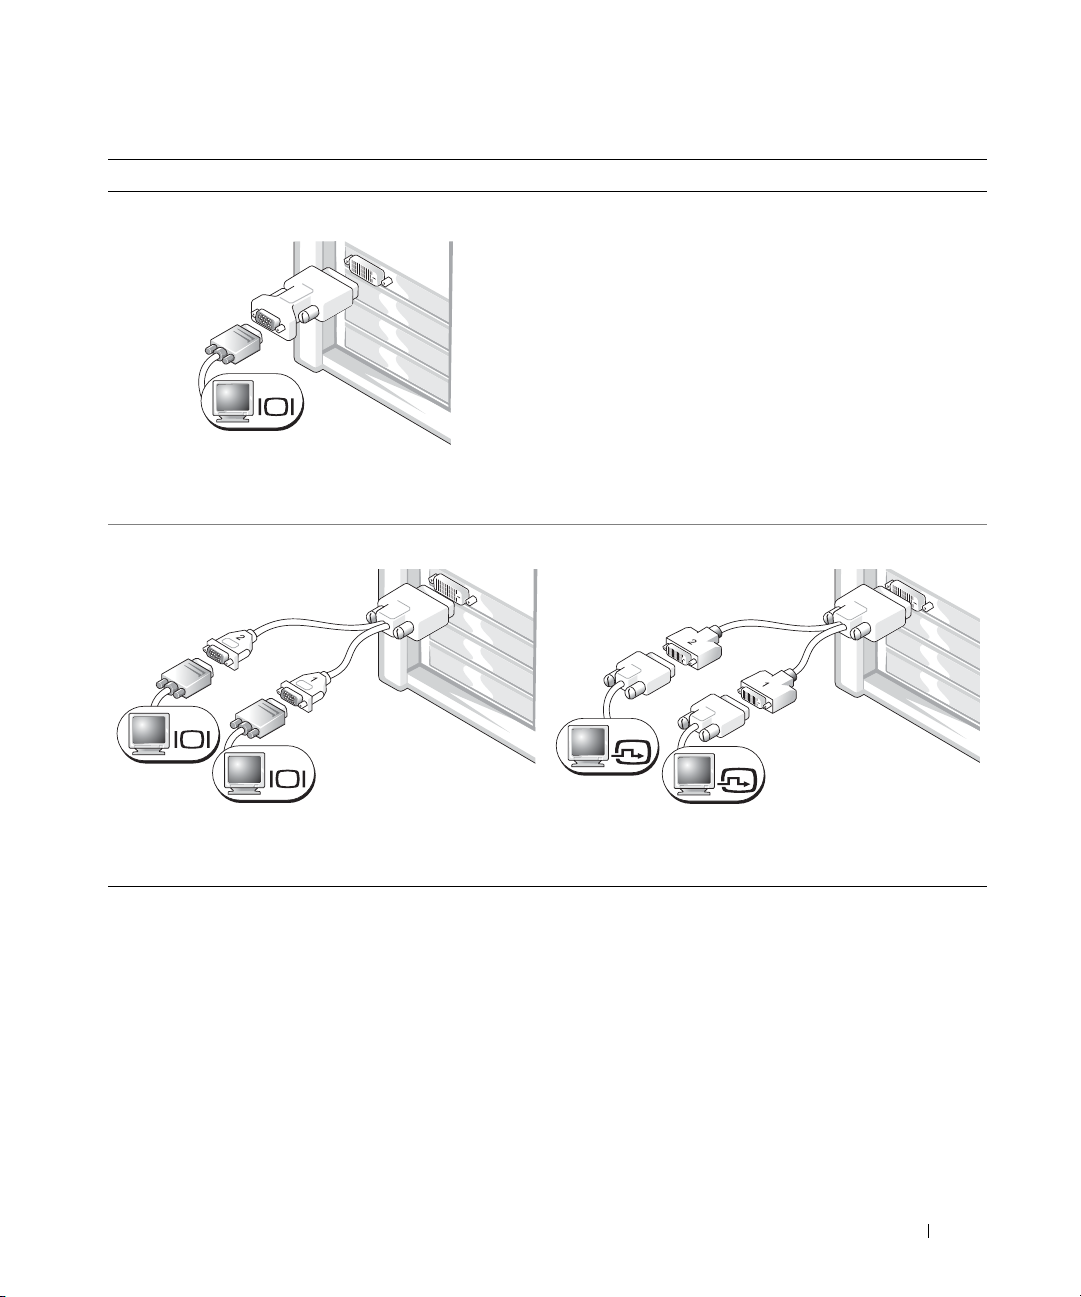
For single- and dual-monitor capable cards with a single connector
VGA Adapter
VGA
Use the VGA adapter when you have a single monitor
graphics card and you want to connect your computer
to a VGA monitor.
Dual VGA Y Cable Adapter
Dual DVI Y Cable Adapter
VGA
VGA
Use the appropriate Y cable when your graphics card has a
single connector and you want to connect your computer
to one or two VGA monitors.
Use the appropriate Y cable when your graphics card has a
single connector and you want to connect your computer
to one or two DVI monitors.
DVI
DVI
The dual-monitor cable is color coded; the blue connector is for the primary monitor, and the black
connector is for the secondary monitor. To enable dual-monitor support, both monitors must be
attached to the computer when it starts.
Quick Reference Guide 11
Page 12

For dual-monitor capable cards with 1 DVI and 1 VGA connector
Single DVI/Single VGA
DVI
VGA
www.dell.com | support.dell.com
Use the appropriate connector(s) when you want
to connect your computer to one or two monitors.
For dual-monitor capable cards with 2 DVI connectors
Dual DVI
Dual DVI With One VGA Adapter
Dual VGA With VGA Adapter
VGA
VGA
Use the VGA adapter when you want to connect
your computer to two VGA monitors.
Dual DVI With Two VGA Adapters
DVI
DVI
Use the DVI connectors to connect
your computer to one or two DVI
monitors.
12 Quick Reference Guide
DVI
VGA
Use the VGA adapter to connect a
VGA monitor to one of the DVI
connector.s on your computer
VGA
VGA
Use two VGA adapters to connect two
VGA monitors to the DVI connectors
on your computer.
Page 13
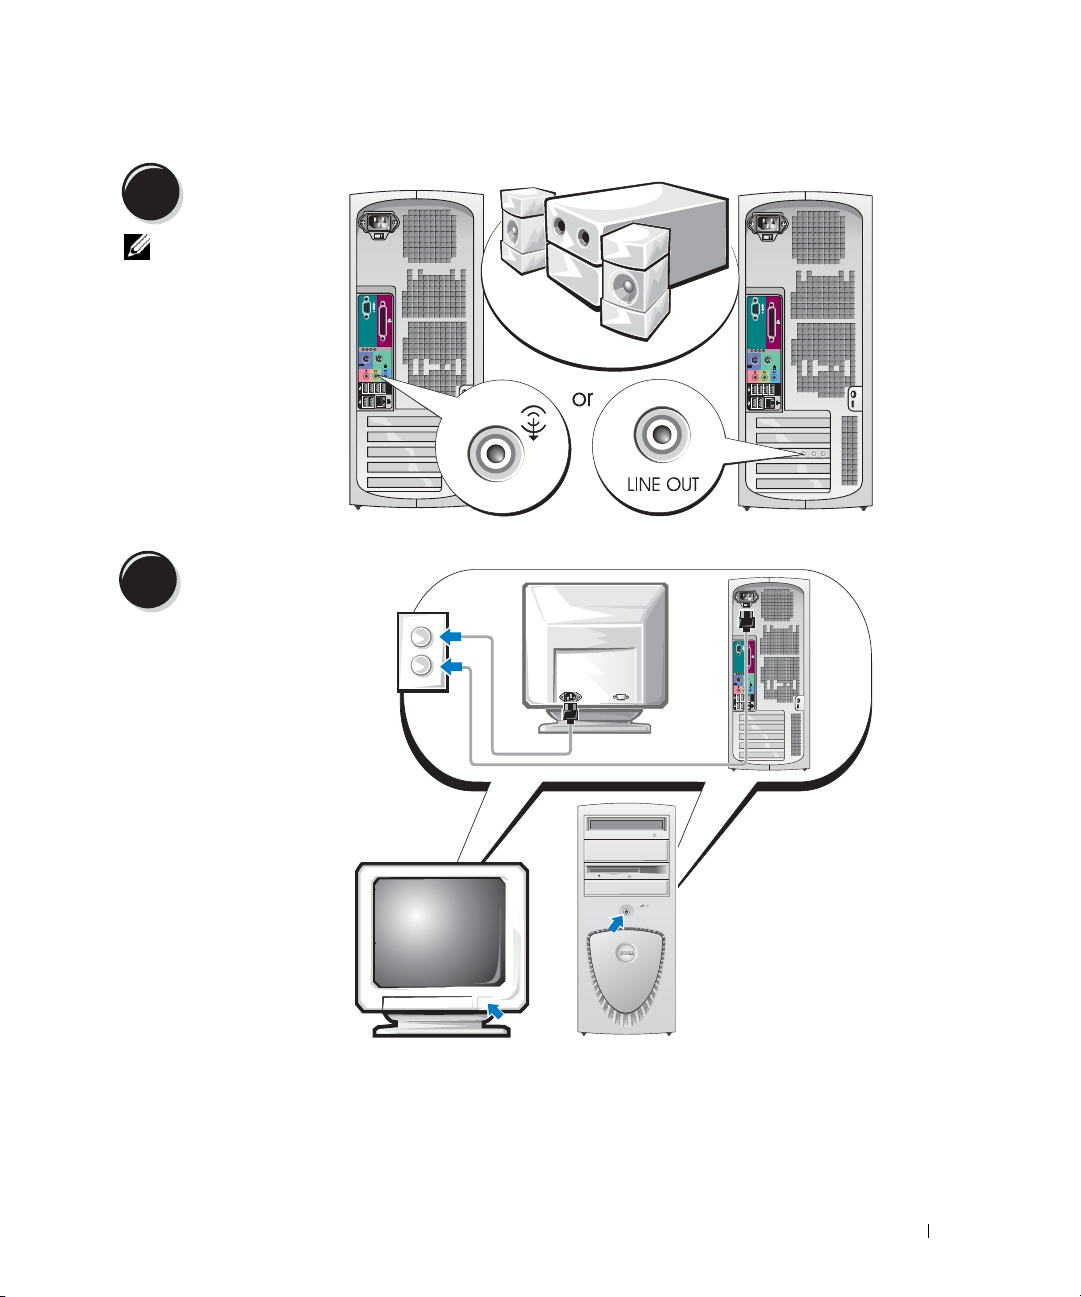
Connect the
4
speakers.
NOTE: If your
computer has an audio
card installed, connect
the speakers to the
card.
Connect the power
5
cables and turn on
the computer and
monitor.
Quick Reference Guide 13
Page 14
Install additional software or devices.
6
Before you install any devices or software that did not come with your computer, read the
documentation that came with the software or device or contact the vendor to verify that
the software or device is compatible with your computer and operating system.
Congratulations! You have completed the setup for your mini-tower computer.
Setting Up Your Desktop Computer
www.dell.com | support.dell.com
CAUTION: Before you begin any of the procedures in this section, follow the safety instructions
located in the Product Information Guide.
You must complete all steps to properly set up your computer.
Connect the keyboard and the mouse.
1
NOTICE: Do not connect a
modem cable to the network
adapter. Voltage from
telephone communications
can damage the network
adapter.
14 Quick Reference Guide
Page 15
Connect the modem
2
or the network cable.
NOTE: If your computer
has a network card
installed, connect the
network cable to the card.
Connect the monitor.
3
Depending on your graphics card, you
can connect your monitor in various
ways.
NOTE: You may need to use the
provided adapter or cable to connect
your monitor to the computer.
Quick Reference Guide 15
Page 16

For single- and dual-monitor capable cards with a single connector
VGA Adapter
VGA
www.dell.com | support.dell.com
Use the VGA adapter when you have a single monitor
graphics card and you want to connect your computer
to a VGA monitor.
Dual VGA Y Cable Adapter
Dual DVI Y Cable Adapter
VGA
VGA
Use the appropriate Y cable when your graphics card has a
single connector and you want to connect your computer
to one or two VGA monitors.
The dual-monitor cable is color coded; the blue connector is for the primary monitor, and the black
connector is for the secondary monitor. To enable dual-monitor support, both monitors must be
attached to the computer when it starts.
16 Quick Reference Guide
DVI
DVI
Use the appropriate Y cable when your graphics card has a
single connector and you want to connect your computer
to one or two DVI monitors.
Page 17

For dual-monitor capable cards with 1 DVI and 1 VGA connector
Single DVI/Single VGA
DVI
VGA
Dual VGA With VGA Adapter
VGA
VGA
Use the appropriate connector(s) when you want
to connect your computer to one or two monitors.
For dual-monitor capable cards with 2 DVI connectors
Dual DVI
DVI
DVI
Use the DVI connector(s) to connect
your computer to one or two DVI
monitors.
Dual DVI With One VGA Adapter
DVI
Use the VGA adapter to connect
a VGA monitor to one of the DVI
connectors on your computer.
Use the VGA adapter when you want to connect
your computer to two VGA monitors.
Dual DVI With Two VGA Adapters
VGA
VGA
VGA
Use two VGA adapters to connect
two VGA monitors to the DVI
connectors on your computer.
Quick Reference Guide 17
Page 18

Connect the speakers.
4
www.dell.com | support.dell.com
NOTE: If your computer has an audio card installed, connect the speakers to the card.
Connect the power cables
and turn on the computer
5
and monitor.
Your desktop computer has an
optional front IEEE 1394
connector. This connector is only
available if you purchased an addin IEEE 1394 card. To purchase a
card, contact Dell. For more
information on the add-in card,
see your
User’s Guide
.
Install additional software or devices.
6
Before you install any devices or software that did not come with your computer, read the
documentation that came with the software or device or contact the vendor to verify that
the software or device is compatible with your computer and operating system.
Congratulations! You have completed the setup for your desktop computer.
18 Quick Reference Guide
Page 19

Locating Your User’s Guide
Your
Dell Precision™ Workstation 370 User’s Guide
your computer such as:
• Technical specifications
• Front and back views of your computer, including all of the available connectors
• Inside views of your computer, including a detailed graphic of the system board
and the connectors
• Instructions for cleaning your computer
• Information on software features, such as LegacySelect Technology control, using a password,
and system setup options
• Tips and information for using the Microsoft Windows XP operating system
• Instructions for removing and installing parts, including memory, cards, drives,
the microprocessor, and the battery
• Information for troubleshooting various computer problems
• Instructions for using the Dell Diagnostics and reinstalling drivers
• Information on how to contact Dell
You can access the
support.dell.com
at
To access the User’s Guide from your hard drive:
Click the
Start
User’s Guide
.
button and click
from your hard drive or the Dell Support website
Help and Support
contains additional information about
.
To access your User’s Guide from the Dell Support Site:
1
Go to
support.dell.com
2
Follow the prompts on the website that ask you for information specific to your computer.
3
At the Dell Support website home page, click
and then select your Dell Precision computer.
.
Reference
, click
User’s Guides
Quick Reference Guide 19
, click
Systems
,
Page 20

Opening Your Mini-Tower Computer
CAUTION: Before you begin any of the procedures in this section, follow the safety instructions
located in the Product Information Guide.
CAUTION: To guard against electrical shock, always unplug your computer from the electrical outlet
before opening the cover.
NOTICE: To avoid losing data, save and close any open files and exit any open programs before you turn
off your computer.
Shut down the operating system:
1
a
Save and close any open files, exit any open programs, click the
www.dell.com | support.dell.com
2
3
4
5
6
then click
b
In the
The computer turns off after the operating system shutdown process finishes.
Ensure that the computer and any attached devices are turned off. If your computer and
attached devices did not automatically turn off when you shut down your operating system,
turn them off now.
If you have installed a padlock through the padlock ring on the back panel, remove the
padlock.
NOTICE: Ensure that sufficient space exists to support the open cover—at least 30 cm (1 ft) of desk top
space.
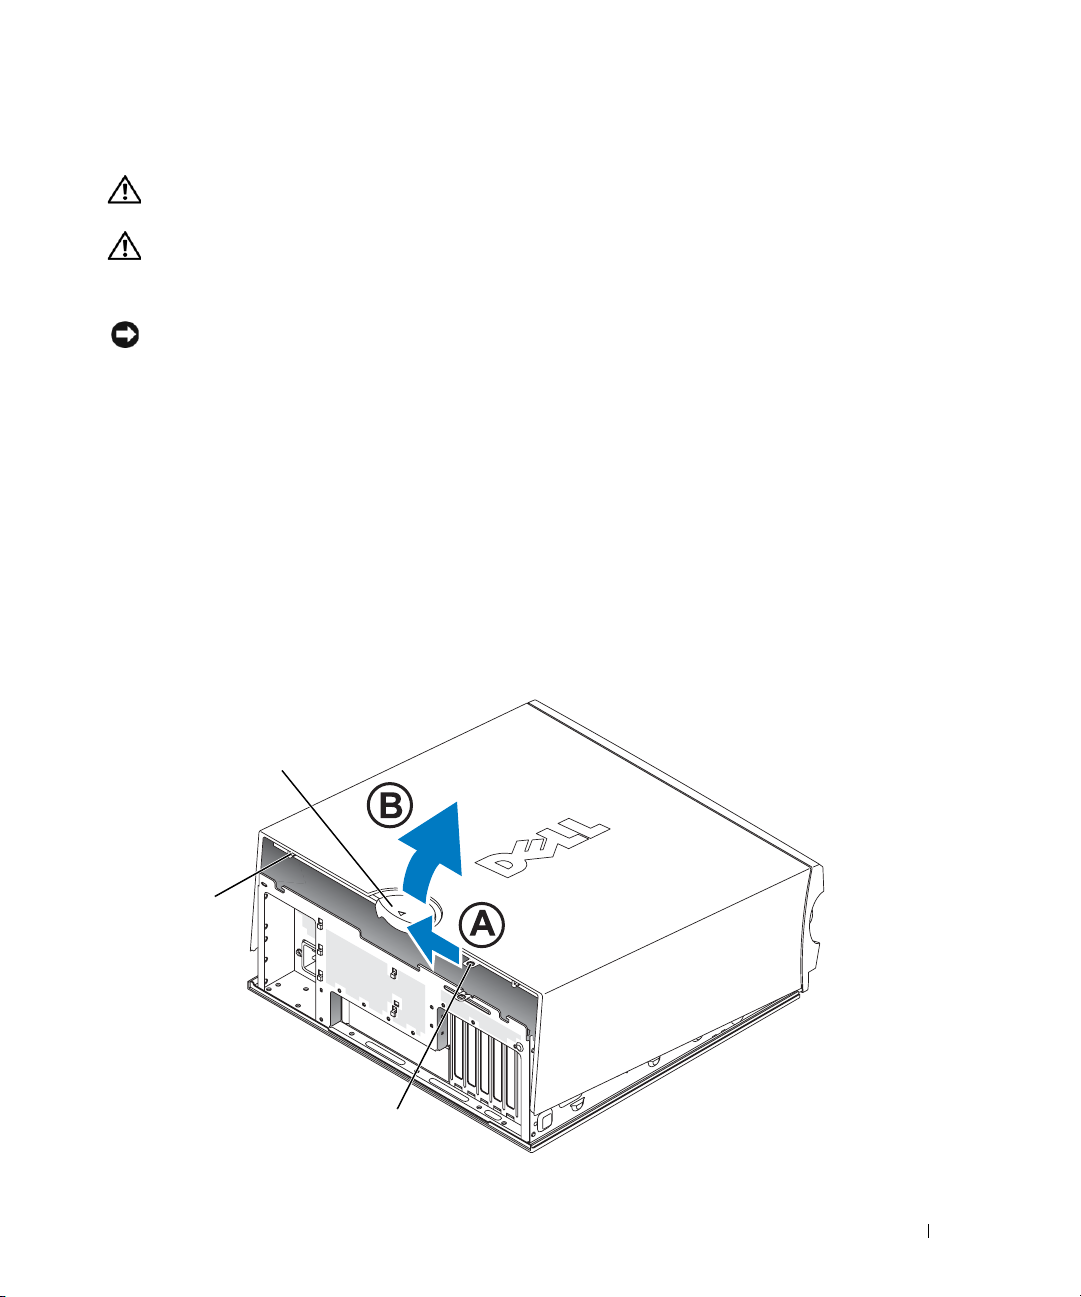
Lay the computer on its side as shown in the following illustration.
Open the cover:
a
Facing the back of the computer, press the release button on the right side of the
computer with one hand while pulling up on the top of the cover with the other hand.
b
Press the release button on the left side of the computer with one hand while pulling up
on the top of the cover with the other hand.
Hold the bottom of the computer with one hand, and then pull open the cover with the other
hand.
Turn Off Computer
Turn off computer
.
window, click
Turn off
Start
button, and
.
20 Quick Reference Guide
Page 21
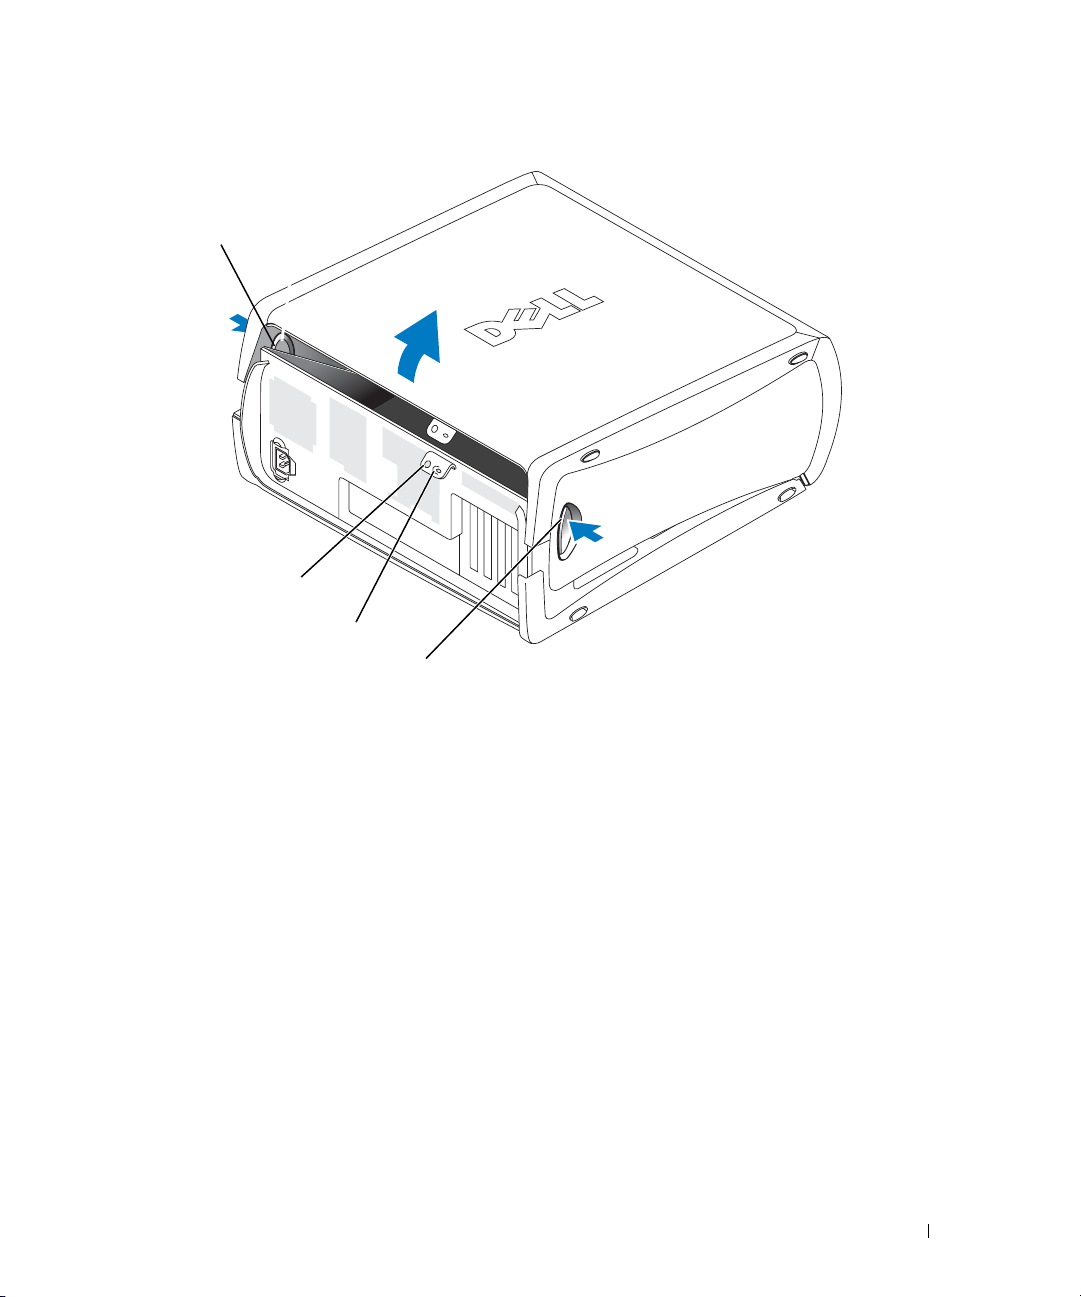
release button
security cable slot
padlock ring
release button
Quick Reference Guide 21
Page 22
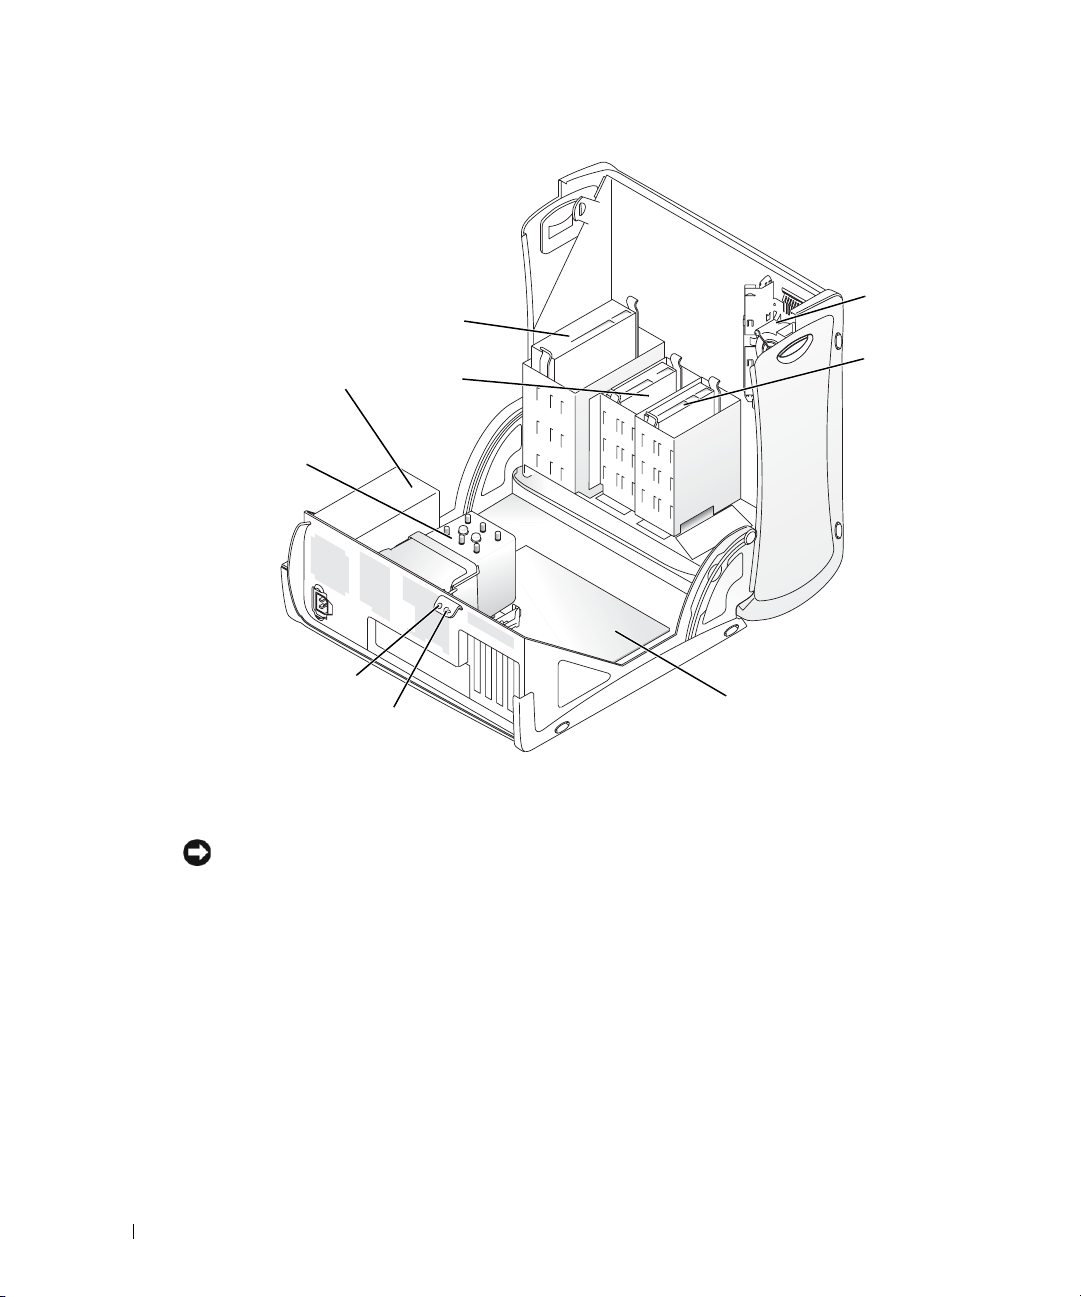
CD/DVD drive
card fan
power supply
www.dell.com | support.dell.com
processor
airflow shroud
and fan
security cable slot
The Card Cooling Fan
NOTICE: PCI Express graphics cards that run higher than 75 watts (W) require an additional cooling fan
installed. Otherwise, your card could overheat and damage your computer.
If you ordered your computer with a graphics card that requires the fan, the fan is included. If a
card fan is not present in your computer and you are installing a graphics card that runs higher than
75 W, contact Dell to purchase a card fan.
If the computer detects that you have installed a card that requires a fan, an error message appears.
For Dell contact information, see your
Contact Us
.
padlock ring
floppy drive
(optional)
User's Guide
or go to
system board
support.dell.com
hard drive
and click
22 Quick Reference Guide
Page 23
Opening Your Desktop Computer
CAUTION: Before you begin any of the procedures in this section, follow the safety instructions
located in the Product Information Guide.
CAUTION: To prevent static damage to components inside your computer, discharge static electricity
from your body before you touch any of your computer’s electronic components. You can do so by
touching an unpainted metal surface on the computer.
NOTICE: To avoid losing data, save and close any open files and exit any open programs before you turn
off your computer.
Shut down the operating system:
1
a
Save and close any open files, exit any open programs, click the
click
b
Turn Off Computer
In the
Turn off computer
.
window, click
Turn off
.
The computer turns off after the operating system shutdown process finishes.
2
Ensure that the computer and any attached devices are turned off. If your computer and
attached devices did not automatically turn off when you shut down your operating system,
turn them off now.
3
Slide the cover release latch to the left.
4
Raise the cover, and pivot it toward the front of the computer.
Start
button, and then
cover latch release
security
cable slot
padlock ring
Quick Reference Guide 23
Page 24

power supply
s
www.dell.com | support.dell.com
ecurity
cable slot
processor airflow
shroud and fan
CD/DVD drive
floppy drive (optional)
hard drive
padlock ring
Caring for Your Computer
To help maintain your computer, follow these suggestions:
• To avoid losing or corrupting data, never turn off your computer when the hard drive light is
on.
• Schedule regular virus scans using virus software.
24 Quick Reference Guide
• Manage hard drive space by periodically deleting unnecessary files and defragmenting
the drive.
• Back up files on a regular basis.
• Periodically clean your monitor screen, mouse, and keyboard (see your
User’s Guide
for more
information).
Page 25

Solving Problems
Troubleshooting Tips
Follow the following tips when you troubleshoot your computer:
• If you added or removed a part before the problem started, review the installation procedures
and ensure that the part is correctly installed.
• If a peripheral device does not work, ensure that the device is properly connected.
• If an error message appears on the screen, write down the exact message. The message may
help technical support personnel diagnose and fix the problem(s).
• If an error message occurs in a program, see the program’s documentation.
• If the recommended action in the troubleshooting section is to see a section in your
Guide
, go to
support.dell.com (on another computer if necessary) to access your
Guide.
Resolving Software and Hardware Incompatibilities
If a device is either not detected during the operating system setup or is detected but incorrectly
configured, you can use the Hardware Troubleshooter to resolve the incompatibility. In the
Microsoft
incompatibilities.
Windows XP
To resolve incompatibilities using the Hardware Troubleshooter:
1
2
3
4
®
Windows® 2000 operating system, you can also use Device Manager to resolve
Click the
Ty p e
Start
button and click
Help and Support
hardware troubleshooter
in the
.
Search
field and click the arrow to start
the search.
Click
Hardware Troubleshooter
In the
Hardware Troubleshooter
on my computer
, and click
Next
in the
Search Results
list, click
.
list.
I need to resolve a hardware conflict
User’s
User’s
Windows 2000
To resolve incompatibilities using Device Manager:
1
Click the
2
In the
3
Click the
4
Click
5
Click
Start
button, point to
Control Panel
Hardware
tab.
Device Manager
View
and click
Resources by connection
Settings
, and then click
window, double-click
.
System
Control Panel
.
.
.
Quick Reference Guide 25
Page 26

6
Double-click
Incorrectly configured devices are indicated by a yellow exclamation point (
the device has been disabled.
7
Double-click any device marked with an exclamation point to display the
The
Device status
reconfigured.
8
Reconfigure the devices or remove the devices from the Device Manager. See the
documentation that came with the device for information on configuring the device.
To resolve incompatibilities using the Hardware Troubleshooter:
1
www.dell.com | support.dell.com
Click the
2
Click
Troubleshooting and Maintenance
troubleshooters
3
In the
Hardware Troubleshooter
computer
Using Microsoft Windows XP System Restore
The Microsoft Windows XP operating system provides System Restore to allow you to return
your computer to an earlier operating state (without affecting data files) if changes to the
hardware, software, or other system settings have left the computer in an undesirable operating
state. See the Windows Help and Support Center (see "Finding Information and Assistance"
on page 5) for information about using System Restore.
Interrupt request (IRQ)
area in the
Start
button and click
, and then click
and click
Next
.
.
Properties
Help
.
Hardware
list, click
!
) or a red X if
Properties
window.
window reports the cards or devices that need to be
on the
Contents
tab, click
Windows 2000
.
I need to resolve a hardware conflict on my
NOTICE: Make regular backups of your data files. System Restore does not monitor your data files
or recover them.
Creating a Restore Point
1
Click the
2
Click
3
Follow the instructions on the screen.
Restoring the Computer to an Earlier Operating State
NOTICE: Before you restore the computer to an earlier operating state, save and close any open files
and exit any open programs. Do not alter, open, or delete any files or programs until the system
restoration is complete.
Click the
1
Start
System Restore
Start
System Restore
2
Ensure that
26 Quick Reference Guide
button and click
Help and Support
.
.
button, point to
All Programs→
Accessories→
.
Restore my computer to an earlier time
System Tools
is selected and click
, and then click
Next
.
Page 27

3
Click a calendar date to which you want to restore your computer.
The
Select a Restore Point
screen provides a calendar that allows you to see and select restore
points. All calendar dates with available restore points appear in boldface type.
4
Select a restore point and click
Next
.
If a calendar date has only one restore point, then that restore point is automatically selected.
If two or more restore points are available, click the restore point that you prefer.
5
Click
Next
.
Restoration Complete
The
screen appears after System Restore finishes collecting data and
then the computer restarts.
6
After the computer restarts, click OK.
To change the restore point, you can either repeat the steps using a different restore point, or you
can undo the restoration.
Undoing the Last System Restore
NOTICE: Before you undo the last system restore, save and close all open files and exit any open
programs. Do not alter, open, or delete any files or programs until the system restoration is complete.
Click the
1
System Restore
2
Click
3
Click
The
Start
button, point to
.
Undo my last restoration
Next
.
System Restore
screen appears and the computer restarts.
All Programs→ Accessories→ System Tools
and click
Next
.
, and then click
4
After the computer restarts, click OK.
Enabling System Restore
If you reinstall Windows XP with less than 200 MB of free hard-disk space available,
System Restore is automatically disabled. To see if System Restore is enabled:
1
Click the
2
Click
3
Click
4
Click the
5
Ensure that
Start
button and click
Control Panel
Performance and Maintenance
System
.
System Restore
tab.
Turn off System Restore
.
.
is unchecked.
Quick Reference Guide 27
Page 28

Using Last Known Good Configuration
1
Restart your computer and press <F8> when the message Please select the
operating system to start
2
Highlight Last Known Good Setting, press <Enter>, press <l>, and then select
your operating system when prompted.
Other Options to Help Resolve Additional Device or Software Conflicts
NOTICE: The following processes erase all of the information on your hard drive.
• Reinstall your operating system using the operating system installation guide and operating
system CD.
www.dell.com | support.dell.com
During the operating system reinstallation, you can select to delete the existing partitions
and reformat your hard drive.
• Reinstall all drivers, beginning with the chipset, using the
Dell Diagnostics
CAUTION: Before you begin any of the procedures in this section, follow the safety instructions
located in the Product Information Guide.
When to Use the Dell Diagnostics
If you experience a problem with your computer, perform the checks in "Solving Problems"
on page 25 and run the Dell Diagnostics before you contact Dell for technical assistance.
It is recommended that you print these procedures before you begin.
appears.
Drivers and Utilities
CD
.
NOTICE: The Dell Diagnostics works only on Dell™ computers. Using this program with other computers
can cause incorrect computer responses or result in error messages.
The Dell Diagnostics allow you to:
• Perform quick checks or extensive tests on one or all devices
• Choose how many times a test is run
• Display or print test results or save them in a file
• Suspend testing if an error is detected or terminate testing if a certain number of errors occur
• Access online
• Read status messages that tell you whether tests completed successfully
• Receive error messages if problems are detected
28 Quick Reference Guide
Help
screens that describe the tests and how to run them
Page 29

Starting the Dell Diagnostics From Your Hard Drive
1
Turn on (or restart) your computer.
2
When the DELL™ logo appears, press <F12> immediately.
NOTE: If you see a message stating that no diagnostics utility partition has been found,
see "Starting the Dell Diagnostics From the Drivers and Utilities CD" on page 29.
If you wait too long and the operating system logo appears, continue to wait until you see
the Microsoft Windows desktop. Then shut down your computer and try again. For more
information on shutting down your computer, see your
3
When the boot device list appears, highlight
4
When the Dell Diagnostics
information on the tests, see your
Starting the Dell Diagnostics From the Drivers and Utilities CD
1
Insert the
2
Shut down and restart the computer. For more information on shutting down your computer,
see your
3
When the DELL logo appears, press <F12> immediately.
Drivers and Utilities
User’s Guide.
Main Menu
User’s Guide.
CD.
Boot to Utility Partition
appears, select the test you want to run. For more
User’s Guide.
and press <Enter>.
If you wait too long and the Windows logo appears, continue to wait until you see the
Windows desktop. Then shut down your computer and try again. For more information
on shutting down your computer, see your
NOTE: The next steps change the boot sequence for one time only. On the next start-up, the computer
boots according to the devices specified in system setup.
When the boot device list appears, highlight
4
5
Select the
6
Select the
7
Ty p e 1 to start the ResourceCD menu.
8
Ty p e 2 to start the Dell Diagnostics.
9
Select
IDE CD-ROM Device
Boot from CD-ROM
option from the CD boot menu.
option from the menu that appears.
Run the 32 Bit Dell Diagnostics
User’s Guide.
IDE CD-ROM Device
and press <Enter>.
from the numbered list. If multiple versions are listed,
select the version appropriate for your computer.
10
When the Dell Diagnostics
information on the tests, see your
Main Menu
User’s Guide.
appears, select the test you want to run. For more
Quick Reference Guide 29
Page 30

Before You Start Testing
CAUTION: Before you begin any of the procedures in this section, follow the safety instructions
in the Product Information Guide.
• Turn on your printer if one is attached.
• Enter system setup, review your computer’s configuration information, and enable all of your
computer’s components and devices, such as connectors.
Beep Codes
Your computer might emit a series of beeps that can identify a problem. One possible series
www.dell.com | support.dell.com
(code 1-3-1) consists of one beep, a burst of three beeps, and then one beep. This series tell you
that the computer encountered a memory problem.
If a beep code is emitted, write it down and look it up in the following table.
Code Cause
1-1-2 Microprocessor register failure
1-1-3 NVRAM read/write failure
1-1-4 ROM BIOS checksum failure
1-2-1 Programmable interval timer failure
1-2-2 DMA initialization failure
1-2-3 DMA page register read/write failure
1-3 Video Memory Test failure
1-3-1 through 2-4-4 Memory not being properly identified or used
3-1-1 Slave DMA register failure
3-1-2 Master DMA register failure
3-1-3 Master interrupt mask register failure
3-1-4 Slave interrupt mask register failure
3-2-2 Interrupt vector loading failure
3-2-4 Keyboard Controller Test failure
3-3-1 NVRAM power loss
3-3-2 Invalid NVRAM configuration
3-3-4 Video Memory Test failure
3-4-1 Screen initialization failure
3-4-2 Screen retrace failure
3-4-3 Search for video ROM failure
30 Quick Reference Guide
Page 31

Code Cause
4-2-1 No timer tick
4-2-2 Shutdown failure
4-2-3 Gate A20 failure
4-2-4 Unexpected interrupt in protected mode
4-3-1 Memory failure above address 0FFFFh
4-3-3 Timer-chip counter 2 failure
4-3-4 Time-of-day clock stopped
4-4-1 Serial or parallel port test failure
4-4-2 Failure to decompress code to shadowed memory
4-4-3 Math-coprocessor test failure
4-4-4 Cache test failure
Error Messages
NOTE: If the message is not listed, see the documentation for either the operating system or the program
that was running when the message appeared.
If an error occurs during start-up, a message may be displayed on the monitor identifying the
problem. See "Error Messages" in the
User’s Guide
for suggestions on resolving any problems.
Diagnostic Lights
CAUTION: Before you begin any of the procedures in this section, follow the safety instructions
located in the Product Information Guide.
To help you troubleshoot a problem, your computer has four lights labeled "A," "B," "C," and "D" on
the front or back panel. The lights can be yellow or green. When the computer starts normally, the
lights flash. After the computer starts, all four lights display solid green. If the computer
malfunctions, the color and sequence of the lights identify the problem.
Quick Reference Guide 31
Page 32

Light Pattern Problem Description Suggested Resolution
ABCD
ABCD
www.dell.com | support.dell.com
ABCD
A possible BIOS failure has occurred; the
computer is in the recovery mode.
Run the BIOS Recovery utility, wait for
recovery completion, and then restart
the computer.
A possible processor failure has occurred. Reinstall the processor and restart the
computer. For more information on
reinstalling the processor, see your
User’s Guide.
Memory modules are detected, but
a memory failure has occurred.
1
Reseat the memory modules.
2
Restart the computer.
3
Run the Dell Diagnostics.
4
If the problem persists, contact Dell.
ABCD
= yellow
= green
= off
A possible expansion card failure has
occurred.
1
Determine if a conflict exists by
removing a card (not the graphics
card) and then restarting the
computer. For more information
on removing a card, see your
.
Guide
2
If the problem persists, reinstall the
User’s
card that you removed, remove a
different card, and then restart the
computer.
3
Repeat this process for each card.
If the computer starts normally,
troubleshoot the last card you
removed for resource conflicts (see
"Resolving Software and Hardware
Incompatibilities").
4
If the problem persists, contact Dell.
For more information on contacting
Dell, see your
User’s Guide
.
32 Quick Reference Guide
Page 33

Light Pattern Problem Description Suggested Resolution
A possible graphics card failure has
occurred.
ABCD
A possible floppy or hard drive failure
has occurred.
• If the computer has a graphics card,
remove the card, reinstall it, and then
restart the computer. For more
information on reinstalling the
graphics card, see your
• If the problem still exists, install a
graphics card that you know works and
restart the computer.
• If the problem persists or the
computer has integrated graphics,
contact Dell. For more information on
contacting Dell, see your
Reseat all power and data cables and
restart the computer.
ABCD
A possible USB failure has occurred. Reinstall all USB devices, check cable
connections, and then restart the
computer.
ABCD
User’s Guide
User’s Guide
.
.
= yellow
= green
= off
Quick Reference Guide 33
Page 34

Light Pattern Problem Description Suggested Resolution
ABCD
www.dell.com | support.dell.com
ABCD
No memory modules are detected.
System board failure has occurred.
• If you have one memory module
installed, reinstall it and restart the
computer. For more information on
memory modules, see your
.
Guide
• If you have two or more memory
modules installed, remove the
modules, reinstall one module, and
then restart the computer. If the
computer starts normally, reinstall an
additional module. Continue until
you have identified a faulty module or
reinstalled all modules without error.
For more information on memory
modules, see your
• If available, install properly working
memory of the same type into your
computer. For more information on
memory modules, see your
.
Guide
• If the problem persists, contact Dell.
For more information on contacting
Dell, see your
Contact Dell
For more information on contacting
Dell, see your User’s Guide.
for technical assistance.
User’s Guide
User’s Guide
User’s
.
User’s
.
ABCD
= yellow
= green
= off
34 Quick Reference Guide
Memory modules are detected, but a
memory configuration or compatibility
error exists.
• Ensure that no special memory
module/memory connector placement
requirements exist.
• Verify that the memory modules that
you are installing are compatible with
your computer.
• Reinstall the memory modules and
restart the computer.
• If the problem persists, contact Dell.
For more information on contacting
Dell, see your
User’s Guide
.
Page 35

Light Pattern Problem Description Suggested Resolution
A possible system board resource and/or
hardware failure has occurred.
ABCD
A possible expansion card failure has
occurred.
ABCD
Another failure has occurred.
ABCD
The computer is in a normal operating
condition after POST.
Perform the procedures in
Software and Hardware
Incompatibilities"
If the problem persists,
more information on contacting Dell,
see your User’s Guide.
1
Determine if a conflict exists by
removing a card (not a graphics card)
and restarting the computer. For more
information on removing a card, see
ser’s Guide
your U
2
If the problem persists, reinstall
the card that you removed, remove
a different card, and then restart
the computer.
3
Repeat this process for each card.
If the computer starts normally,
troubleshoot the last card removed
from the computer for resource
conflicts (see "Resolving Software
and Hardware Incompatibilities" on
page 25).
4
If the problem persists, contact Dell.
For more information on contacting
Dell, see your
• Ensure that the cables are properly
connected to the system board from
the hard drive, CD drive, and DVD
drive.
• If the problem persists, contact Dell.
For more information on contacting
Dell, see your
None.
(see
User’s Guide
User’s Guide
"Resolving
page 25).
contact Dell
.
. For
.
.
ABCD
= yellow
= green
= off
Quick Reference Guide 35
Page 36

Frequently Asked Questions
How Do I... Solution Where to Find Additional Information
Set up my computer to use
two monitors?
www.dell.com | support.dell.com
Connect my monitor when the
monitor cable connector doesn’t
seem to fit the connector on the
back of my computer?
Install a card fan? If you have installed a new graphics
Connect my speakers? If you have a sound card installed,
If your computer has the required
graphics card to support dualmonitor setup, then look in your box
for a Y-cable. The Y-cable has a single
connector on one end (plug this
connector into the back panel) and
branches into two connectors (plug
these connectors into the monitor
cables). For the mini-tower
computer, see "Connect the monitor"
on page 10 and for the desktop
computer, see "Connect the monitor"
on page 15.
If your graphics card has a DVI
connector but your monitor has a
VGA connector, then you need to use
an adapter. An adapter should be
included in the box.
card that runs higher than 75 W, you
need to install a card cooling fan. To
order a card cooling fan, contact
Dell. Contact information is located
in your User's Guide and at
support.dell.com.
connect the speakers to the
connectors on the card. For the minitower computer, see "Connect the
speakers" on page 13 and for the
desktop computer, see "Connect the
speakers" on page 18.
To locate additional information
about using dual monitors, see the
graphics card documentation on the
Drivers and Utilities CD.
Contact Dell for more information.
For information on installing a card
fan or a card, see your User's Guide.
See the documentation that came
with your speakers for more
information.
36 Quick Reference Guide
Page 37

How Do I... Solution Where to Find Additional Information
Find the right connectors for my
USB or IEEE 1394 devices?
Locate information about the
hardware and other technical
specifications for my computer?
Find documentation
for my computer?
Your mini-tower computer has
eight USB connectors (two on
the front and six on the back).
Your Desktop computer has eight
USB connectors (two on the front
and six on the back) and an optional
front IEEE 1394 connector. This
connector is only available if you
purchased an add-in IEEE 1394 card.
To purchase a card, contact Dell. For
more information on the add-in card,
see your User’s Guide.
Yo u r User’s Guide has a
specifications table that provides
more detailed information about
your computer and the hardware.
To locate your User’s Guide,
see "Finding Information and
Assistance" on page 5.
The following documentation is
available for your computer:
• User’s Guide
• Product Information Guide
• System Information Label
To locate these documents,
see "Finding Information and
Assistance" on page 5.
See the front and back view graphics
of your computer in your User’s
Guide. For help locating your User’s
Guide, see "Finding Information and
Assistance" on page 5.
Go to the Dell Support website at
support.dell.com and use one of the
following support tools: read white
papers on the latest technology or
communicate with other Dell users
at the Dell forum chat room.
If you lose your documentation, it is
available on the Dell Support website
at support.dell.com.
Quick Reference Guide 37
Page 38

www.dell.com | support.dell.com
38 Quick Reference Guide
Page 39

Index
C
computer
restore to previous state, 26
conflicts
software and hardware
incompatibilities, 25
D
Dell
premier support website, 7
support site, 7
Dell Diagnostics, 28
Dell Premier Support
website, 6-7
Device Manager, 25
diagnostic lights, 31
diagnostics
Dell, 28
Drivers and Utilities CD, 5
lights, 31
documentation, 14
device, 5
online, 7
Product Information Guide, 6
ResourceCD, 5
User’s Guide, 6
drivers
ResourceCD, 5
Drivers and Utilities CD, 5
E
error messages
diagnostic lights, 31
F
finding information, 5
H
hardware
conflicts, 25
Dell Diagnostics, 28
Hardware Troubleshooter, 25
Help and Support Center, 7
I
installing parts
turning off your
computer, 20, 23
IRQ conflicts, 25
L
labels
Microsoft Windows, 6
Service Tag, 6
lights
back of computer, 31
diagnostic, 31
M
Microsoft Windows label, 6
O
Operating System CD, 8
P
problems
conflicts, 25
Dell Diagnostics, 28
diagnostic lights, 31
restore to previous state, 26
R
reinstalling
Drivers and Utilities CD, 5
ResourceCD, 5
ResourceCD
Dell Diagnostics, 28
Index 39
Page 40

S
U
safety instructions, 6
Service Tag, 6
software
conflicts, 25
system board, 5
system information label, 5
System Restore, 26
T
troubleshooting
conflicts, 25
Dell Diagnostics, 28
diagnostic lights, 31
Hardware Troubleshooter, 25
Help and Support Center, 7
restore to previous state, 26
User’s Guide, 6
W
warranty, 6
Windows 2000
Device Manager, 25
Hardware Troubleshooter, 25
Windows XP
Hardware Troubleshooter, 25
Help and Support Center, 7
System Restore, 26
40 Index
Page 41

Dell Precision™ Workstation
370-systemer
Naslagswerk
Modellerne DHM og WHM
www.dell.com | support.dell.com
Page 42

BEMÆRK, BEMÆRKNING og FORSIGTIG
BEMÆRK: BEMÆRK angiver, at der findes vigtige oplysninger, der kan være til hjælp, når du anvender computeren.
BEMÆRKNING: BEMÆRKNING angiver enten mulig risiko for beskadigelse af hardware eller tab af data,
og fortæller hvordan du undgår problemet.
FORSIGTIG: FORSIGTIG angiver mulig risiko for ejendomsskade, personskade eller død.
Forkortelser og akronymer
For en fuldstændig liste over forkortelser og akronymer kan du se i Ordliste i din
Hvis du har købt en Dell™-computer i n-serien, gælder referencerne i dette dokument til
Microsoft
®
Windows®-operativsystemer ikke.
Brugervejledning
.
____________________
Oplysningerne i dette dokument kan ændres uden varsel.
© 2004 Dell Inc. Alle rettigheder forbeholdes.
Enhver form for reproduktion uden skriftlig tilladelse fra Dell Inc. er strengt forbudt.
Anvendte varemærker i denne tekst: Dell, DELL-logoet og Dell Precision er varemærker tilhørende Dell Inc.;
Microsoft og Windows er registrerede varemærker tilhørende Microsoft Corporation.
Andre varemærker og mærkenavne kan være anvendt i dette dokument til at referere til enten de enheder, der gør krav på mærkerne og navnene,
eller til deres produkter. Dell Inc. frasiger sig al ejerinteresse i andre virksomheders varemærker og navne.
Modellerne DHM og WHM
April 2004 P/N X3157 Rev. A00
Page 43

Indholdsfortegnelse
Her finder du oplysninger og hjælp . . . . . . . . . . . . . . . . . . . . . 5
Klargøring af minitower-computeren
Klargøring af den stationære computer
Her finder du din brugervejledning
Åbning af minitower-computeren
Kortventilatoren
. . . . . . . . . . . . . . . . . . . . . . . . . . . . . . 22
Åbning af den stationære computer
Pleje af computeren
Problemløsning
Fejlfindingstip
. . . . . . . . . . . . . . . . . . . . . . . . . . . . 24
. . . . . . . . . . . . . . . . . . . . . . . . . . . . . . 25
. . . . . . . . . . . . . . . . . . . . . . . . . . . . . 25
. . . . . . . . . . . . . . . . . . . . 9
. . . . . . . . . . . . . . . . . . . 14
. . . . . . . . . . . . . . . . . . . . . 19
. . . . . . . . . . . . . . . . . . . . . . 20
. . . . . . . . . . . . . . . . . . . . . 23
Afhjælpning af software- og hardwareinkompatibilitetsproblemer
Brug af Microsoft Windows XP Systemgendannelse
Brug af Sidste kendte fungerende konfiguration
Dell Diagnostics
Før du begynder at teste
Bip-koder
. . . . . . . . . . . . . . . . . . . . . . . . . . . . . . . . . 30
Fejlmeddelelser
Lysdioder for diagnosticering
Ofte stillede spørgsmål
. . . . . . . . . . . . . . . . . . . . . . . . . . . . 28
. . . . . . . . . . . . . . . . . . . . . . . . 30
. . . . . . . . . . . . . . . . . . . . . . . . . . . . 31
. . . . . . . . . . . . . . . . . . . . . . . 32
. . . . . . . . . . . . . . . . . . . . . . . . . . 37
. . . . . . . . . . 26
. . . . . . . . . . . . 28
. . . . 25
Indeks . . . . . . . . . . . . . . . . . . . . . . . . . . . . . . . . . . . . 39
Indholdsfortegnelse 3
Page 44

4 Indholdsfortegnelse
Page 45

Her finder du oplysninger og hjælp
Hvad søger du? Find det her
• Et diagnosticeringsprogram til min computer
• Drivere til min computer
• Dokumentationen til min enhed
• Systemkortstik
• Placering af systemkortkomponenter
Cd'en Drivere og hjælpeprogrammer
(også kendt som ResourceCD)
Dokumentation og drivere er allerede installeret på din
computer. Du kan bruge cd'en til at geninstallere drivere,
køre Dell Diagnostics (se side 28) eller til at få adgang
til enhedsdokumentationen.
BEMÆRK: De nyeste drivere og dokumentations-
opdateringer findes på support.dell.com.
Systeminformationsmærkat
Placeret på computerens indvendige dæksel.
Der kan være inkluderet
Readme-filer på
din cd med de nyeste
opdateringer om
tekniske ændringer
på computeren eller
med avanceret teknisk
referencemateriale
til teknikere eller
erfarne brugere.
Naslagswerk 5
Page 46

Hvad søger du? Find det her
• Oplysninger om garanti
Dell™ Produktinformationsvejledning
• Sikkerhedsanvisninger
• Lovgivningsmæssige oplysninger
• Oplysninger om ergonomi
• Slutbrugerlicensaftale
www.dell.com | support.dell.com
• Sådan fjernes og genmonteres dele
• Tekniske specifikationer
• Sådan konfigureres systemindstillinger
• Sådan udføres fejlfinding og løses problemer
• Servicemærkat og ekspres-servicekode
• Microsoft Windows-licensmærkat
Dell Precision – Brugervejledning
Microsoft
1
2
Servicemærkat og Microsoft Windows-licens
Disse mærkater findes på din computer.
• Anvend service-
• Indtast ekspres-servicekoden for at viderestille dit
®
Windows® XP Hjælp og supportcenter
Klik på knappen
Klik på
Bruger- og systemvejledninger
og klik på
Start
, og klik på
Brugervejledninger
Hjælp og support.
,
.
mærkatet til at
identificere din
computer, når du
kontakter
support.dell.com
eller teknisk support.
opkald, når du kontakter teknisk support. Ekspresservicekoden er ikke tilgængelig i alle lande.
6 Naslagswerk
Page 47

Hvad søger du? Find det her
• Nyeste drivere til min computer
• Svar på spørgsmål til teknisk service og support
• Online-diskussioner med andre brugere
og teknisk support
• Dokumentationen til min computer
Webstedet for Dell Support – support.dell.com
BEMÆRK: Vælg dit område for at se det relevante
websted for support.
Webstedet for Dell Support indeholder adskillige
online-værktøjer, herunder:
• Løsninger – Tip til fejlfinding, artikler fra teknikere
og online-kurser
• Forum – Online-debat med andre Dell-kunder
• Opgraderinger – Opgraderingsoplysninger
om komponenter, som f.eks. hukommelse,
harddisk og operativsystem
• Kundepleje – Kontaktoplysninger, ordrestatus,
garanti og reparationsoplysninger
• Download – Drivere, patches og softwareopdateringer
• Reference – Computerdokumentation,
produktspecifikationer og hvidbøger
• Historik for serviceopkaldsstatus og support
• Vigtige tekniske emner vedrørende min computer
• Ofte stillede spørgsmål (OSS)
• Fildownload
• Detaljer om min computerkonfiguration
• Servicekontrakt for min computer
• Sådan anvendes Windows XP
• Dokumentationen til min computer
• Dokumentation til enheder
(som f.eks. et modem)
• Sådan anvendes Linux
• E-mail-diskussioner med Dell Precision- og
Linux-brugere
• Yderligere oplysninger vedrørende Linux
og min Dell Precision-computer
Websted for Dell Premier-support –
premiersupport.dell.com
Webstedet for Dell Premier-support er tilpasset
til kunder fra firmaer, offentlig administration
og uddannelsessektoren. Dette websted er ikke
nødvendigvis tilgængeligt i alle områder.
Windows Hjælp og supportcenter
1
Klik på knappen
2
Skriv et ord eller et udtryk, der beskriver dit problem,
og klik på pileikonet.
3
Klik på det emne, der beskriver dit problem.
4
Følg anvisningerne på skærmen.
Dell-understøttede Linux-websteder
• http://linux.dell.com
• http://lists.us.dell.com/mailman/listinfo/
linux-precision
• http://docs.us.dell.com/docs/software/oslinux/
• http://docs.us.dell.com/docs/software/OSRHEL3/
Start
, og klik på
Hjælp og support
.
Naslagswerk 7
Page 48

Hvad søger du? Find det her
• Sådan geninstalleres operativsystemet
www.dell.com | support.dell.com
Operativsystem-cd
Operativsystemet er allerede installeret på din computer.
For at geninstallere operativsystemet skal du bruge
Operativsystem-cd'en. Se i brugervejledningen til
Precision for anvisninger.
BEMÆRK: Farven på cd'en varierer, afhængigt af hvilket
operativsystem, du bestilte.
Når du har installeret
operativsystemet,
skal du bruge cd'en
Drivere og
hjælpeprogrammer
til at geninstallere drivere
til de enheder, der
fulgte med computeren.
Mærkatet med
produktnøglen
til operativsystemet
findes på computeren.
8 Naslagswerk
Page 49

Klargøring af minitower-computeren
FORSIGTIG: Før du går i gang med procedurerne i dette afsnit, skal du følge sikkerhedsanvisningerne,
som findes i Produktinformationsvejledningen.
Du skal udføre alle trin for at opsætte computeren korrekt.
Tilslut tastaturet og musen.
1
Tilslut modem- eller netværkskablet.
2
BEMÆRKNING: Du må ikke slutte et modemkabel
til netværksadapteren. Spændingen fra
telefonkommunikation kan beskadige
netværksadapteren.
BEMÆRK: Hvis der er installeret et netværkskort i
din computer, skal du slutte netværkskablet til kortet.
Naslagswerk 9
Page 50

Tilslut skærmen.
3
Du kan tilslutte din skærm
på forskellige måder,
afhængigt af dit grafikkort.
BEMÆRK: Du skal
muligvis bruge den
www.dell.com | support.dell.com
medfølgende adapter
eller det medfølgende
kabel til at slutte skærmen
til computeren.
10 Naslagswerk
Page 51

For enkelt- og dobbeltskærmskompatible kort med et enkelt stik
VGA-adapter
VGA
Brug VGA-adapteren, hvis du har et
enkeltskærmsgrafikkort og vil slutte computeren
til en VGA-skærm.
Y-kabeladapter til dual-VGA
Y-kabeladapter til dual-DVI
VGA
VGA
Brug det relevante Y-kabel, hvis dit grafikkort har
et enkelt stik, og du vil slutte computeren til én
eller to VGA-skærme.
Brug det relevante Y-kabel, hvis dit grafikkort har
et enkelt stik, og du vil slutte computeren til én
eller to DVI-skærme.
DVI
DVI
Dobbeltskærmskablet er farvekodet. Det blå stik er til den primære skærm, og det sorte stik
er til den sekundære skærm. For at muliggøre dobbeltskærmsunderstøttelse skal begge skærme
være sluttet til computeren, når der tændes for den.
Naslagswerk 11
Page 52

For dobbeltskærmskompatible kort med ét DVI-stik og ét VGA-stik
Enkelt DVI/enkelt VGA
DVI
VGA
www.dell.com | support.dell.com
Brug de relevante stik, hvis du vil slutte
computeren til én eller to skærme.
For dobbeltskærmskompatible kort med to DVI-stik
Dual-DVI
Dual-DVI med én VGA-adapter
Dual-VGA med VGA-adapter
VGA
VGA
Brug VGA-adapteren, hvis du vil slutte computeren
til to VGA-skærme.
Dual-DVI med to VGA-adaptere
DVI
DVI
Brug DVI-stikkene til at slutte
computeren til én eller to
DVI-skærme.
12 Naslagswerk
DVI
VGA
Brug VGA-adapteren til at slutte
en VGA-skærm til et af DVI-stikkene
på computeren
VGA
VGA
Brug to VGA-adaptere til at slutte
to VGA-skærme til DVI-stikkene
på computeren.
Page 53

Tilslut højttalerne.
4
BEMÆRK: Hvis der
er installeret et lydkort
i din computer,
skal du slutte
højttalerne til kortet.
Slut strømkablerne
5
til, og tænd
for computeren
og skærmen.
Naslagswerk 13
Page 54

Installér yderligere software eller enheder.
6
Før du installerer enheder eller software, der ikke fulgte med computeren, skal du læse
dokumentationen, der fulgte med softwaren eller enheden eller kontakte leverandøren for
at sikre dig, at softwaren eller enheden er kompatibel med computeren og operativsystemet.
Tillykke! Du er nu færdig med at klargøre din minitower-computer.
Klargøring af den stationære computer
www.dell.com | support.dell.com
FORSIGTIG: Før du går i gang med procedurerne i dette afsnit, skal du følge sikkerhedsanvisningerne,
som findes i Produktinformationsvejledningen.
Du skal udføre alle trin for at opsætte computeren korrekt.
Tilslut tastaturet og musen.
1
BEMÆRKNING: Du må
ikke slutte et modemkabel
til netværksadapteren.
Spændingen fra
telefonkommunikation
kan beskadige
netværksadapteren.
14 Naslagswerk
Page 55

Tilslut modem-
2
eller netværkskablet.
BEMÆRK: Hvis der er
installeret et netværkskort
i din computer, skal du
slutte netværkskablet
til kortet.
Tilslut skærmen.
3
Du kan tilslutte din skærm
på forskellige måder, afhængigt
af dit grafikkort.
BEMÆRK: Du skal muligvis
bruge den medfølgende adapter
eller det medfølgende kabel til
at slutte skærmen til computeren.
Naslagswerk 15
Page 56

For enkelt- og dobbeltskærmskompatible kort med et enkelt stik
VGA-adapter
VGA
www.dell.com | support.dell.com
Brug VGA-adapteren, hvis du har et enkeltskærmsgrafikkort og vil slutte computeren til en VGA-skærm.
Y-kabeladapter til dual-VGA
Y-kabeladapter til dual-DVI
VGA
VGA
Brug det relevante Y-kabel, hvis dit grafikkort har
et enkelt stik, og du vil slutte computeren til én
eller to VGA-skærme.
Dobbeltskærmskablet er farvekodet. Det blå stik er til den primære skærm, og det sorte stik
er til den sekundære skærm. For at muliggøre dobbeltskærmsunderstøttelse skal begge skærme
være sluttet til computeren, når der tændes for den.
16 Naslagswerk
DVI
DVI
Brug det relevante Y-kabel, hvis dit grafikkort har
et enkelt stik, og du vil slutte computeren til én eller
to DVI-skærme.
Page 57

For dobbeltskærmskompatible kort med ét DVI-stik og ét VGA-stik
Enkelt DVI/enkelt VGA
DVI
VGA
Dual-VGA med VGA-adapter
VGA
VGA
Brug de relevante stik, hvis du vil slutte
computeren til én eller to skærme.
For dobbeltskærmskompatible kort med to DVI-stik
Dual-DVI
DVI
DVI
Brug DVI-stikket eller (-stikkene)
til at slutte computeren til én eller
to DVI-skærme.
Dual-DVI med én VGA-adapter
DVI
Brug VGA-adapteren til at slutte
en VGA-skærm til et af DVI-stikkene
på computeren.
Brug VGA-adapteren, hvis du vil slutte computeren
til to VGA-skærme.
Dual-DVI med to VGA-adaptere
VGA
VGA
VGA
Brug to VGA-adaptere til at slutte
to VGA-skærme til DVI-stikkene
på computeren.
Naslagswerk 17
Page 58

Tilslut højttalerne.
4
www.dell.com | support.dell.com
BEMÆRK: Hvis der er installeret et lydkort i din computer, skal du slutte højttalerne til kortet.
Slut strømkablerne til,
og tænd for computeren
5
og skærmen.
Din stationære computer
har et valgfrit IEEE 1394-stik
på forsiden. Dette stik er kun
tilgængeligt, hvis du har købt
et IEEE 1394-tilføjelseskort.
Kontakt Dell, hvis du vil købe
et kort. Yderligere oplysninger
om tilføjelseskortet findes
i din
Brugervejledning
.
6
Før du installerer enheder eller software, der ikke fulgte med computeren, skal du læse
dokumentationen, der fulgte med softwaren eller enheden eller kontakte leverandøren for
at sikre dig, at softwaren eller enheden er kompatibel med computeren og operativsystemet.
Tillykke! Du er nu færdig med at klargøre din stationære computer.
18 Naslagswerk
Installér yderligere software eller enheder.
Page 59

Her finder du din brugervejledning
Din
Dell Precision™ Workstation 370-brugervejledning
om computeren, som f.eks.:
• Tekniske specifikationer
• Computeren set forfra og bagfra, inklusive alle de tilgængelige stik
• Computeren set indvendigt, inklusive en detaljeret grafisk illustration af systemkortet
og stikkene
• Anvisninger vedrørende rengøring af computeren
• Oplysninger om software-funktioner, som f.eks. administration af LegacySelect Technology,
brug af adgangskode samt systemopsætningsindstillinger
• Tip og oplysninger vedrørende brug af Microsoft Windows XP-operativsystemet
• Anvisninger til fjernelse og installation af dele, inklusive hukommelse, kort, drev,
mikroprocessoren samt batteriet
• Oplysninger vedrørende fejlfinding ved forskellige computerproblemer
• Anvisninger til brug af Dell Diagnostics og geninstallation af drivere
• Oplysninger om, hvordan du kontakter Dell
Du kan få adgang til
support.dell.com
på
Adgang til Brugervejledningen fra harddisken:
Klik på knappen
Brugervejledningen
.
Start
, og klik på
fra harddisken eller webstedet for Dell Support
Hjælp og support
indeholder yderligere oplysninger
.
Adgang til Brugervejledningen fra webstedet for Dell Support:
1
Gå til
support.dell.com
2
Følg prompterne på webstedet, der beder om oplysninger, der er specifikke for din computer.
3
På Dell Support-startsiden skal du klikke på
klikke på
Systemer
.
Reference
og derefter vælge din Dell Precision-computer.
, klikke på
Brugervejledninger
,
Naslagswerk 19
Page 60

Åbning af minitower-computeren
FORSIGTIG: Før du går i gang med procedurerne i dette afsnit, skal du følge sikkerhedsanvisningerne,
som findes i Produktinformationsvejledningen.
FORSIGTIG: For at sikre dig imod elektriske stød skal du altid koble computeren fra stikkontakten,
før du åbner dækslet.
BEMÆRKNING: For at undgå at miste data skal du gemme og lukke alle åbne filer og afslutte
alle åbne programmer, før du slukker for computeren.
Luk operativsystemet ned:
1
a
Gem og luk alle åbne filer, afslut alle åbne programmer, klik på knappen
www.dell.com | support.dell.com
2
3
4
5
6
og klik derefter på
b
I vinduet
Computeren slukkes, når nedlukningen af operativsystemet er færdig.
Kontrollér, at der er slukket for computeren og eventuelt tilsluttede enheder. Hvis computeren
og tilsluttede enheder ikke blev slukket automatisk, da du lukkede operativsystemet ned,
skal du slukke for dem nu.
Hvis du har monteret en hængelås i hængelåsringen på bagpanelet, skal du fjerne den.
BEMÆRKNING: Kontrollér, at der er tilstrækkelig plads til det åbne dæksel – mindst 30 cm plads
på skrivebordet.
Læg computeren på siden som vist i følgende illustration.
Åbn dækslet:
a
Stående ved computerens front skal du med den ene hånd trykke på frigørelsesknappen
i højre side af computeren, samtidigt med at du med den anden hånd trækker
op i det øverste af dækslet.
b
Tryk med den ene hånd på frigørelsesknappen i venstre side af computeren,
samtidigt med at du med den anden hånd trækker op i det øverste af dækslet.
Hold i bunden af computeren med den ene hånd, og åbn derefter dækslet
med den anden hånd.
Luk computeren...
Luk computeren
.
skal du klikke på
Luk
Start
,
.
20 Naslagswerk
Page 61

frigørelsesknap
sikkerhedskabelstik
ring til hængelås
frigørelsesknap
Naslagswerk 21
Page 62

cd/dvd-drev
kortventilator
strømforsyning
www.dell.com | support.dell.com
luftstrømsbeskyttelse
splade og ventilator
til processor
sikkerhedskabelstik
ring til hængelås
Kortventilatoren
BEMÆRKNING: PCI Express-grafikkort med en kapacitet over 75 watt (W) kræver installation
af en ekstra ventilator til afkøling. Ellers kan kortet blive overophedet og beskadige computeren.
Hvis du bestilte computeren med et grafikkort, der kræver en sådan ventilator, er denne inkluderet.
Hvis der ikke findes en kortventilator i computeren, og du installerer et grafikkort med en kapacitet
over 75 W, skal du kontakte Dell for at købe en kortventilator.
Hvis computeren opdager, at du har installeret et kort, der kræver en ventilator,
vises en fejlmeddelelse.
Dell-kontaktoplysninger finder du i
og klikke på
Kontakt os
diskettedre
v (valgfrit)
.
Brugervejledningen
systemkort
, eller du kan gå til
harddisk
support.dell.com
22 Naslagswerk
Page 63

Åbning af den stationære computer
FORSIGTIG: Før du går i gang med procedurerne i dette afsnit, skal du følge sikkerhedsanvisningerne,
som findes i Produktinformationsvejledningen.
FORSIGTIG: For at undgå at beskadige komponenter inden i computeren skal du aflade dig selv for
statisk elektricitet, før du berører computerens elektroniske komponenter. Du kan aflade dig selv ved
at berøre en umalet metaloverflade på computeren.
BEMÆRKNING: For at undgå at miste data skal du gemme og lukke alle åbne filer og afslutte
alle åbne programmer, før du slukker for computeren.
Luk operativsystemet ned:
1
a
Gem og luk alle åbne filer, afslut alle åbne programmer, klik på knappen
og klik derefter på
b
I vinduet
Luk computeren
Luk computeren...
skal du klikke på
.
Luk
.
Computeren slukkes, når nedlukningen af operativsystemet er færdig.
2
Kontrollér, at der er slukket for computeren og eventuelt tilsluttede enheder. Hvis computeren
og tilsluttede enheder ikke blev slukket automatisk, da du lukkede operativsystemet ned, skal
du slukke for dem nu.
3
Skyd dækslets frigørelsesknap til venstre.
4
Løft dækslet, og drej det mod fronten af computeren.
Start
,
frigørelsesknap
til dæksel
sikkerhed
skabelstik
ring til hængelås
Naslagswerk 23
Page 64

strømforsyning
www.dell.com | support.dell.com
ikkerhed
kabelstik
luftstrømsbeskyttelsesplade
og ventilator til processor
ring til hængelås
cd/dvd-drev
diskettedrev (valgfrit)
harddisk
Pleje af computeren
Følg nedenstående forslag som en hjælp til vedligeholdelse af computeren:
• Hvis du vil undgå at miste eller beskadige data, må du aldrig slukke for computeren,
når lysdioden for harddisken er tændt.
• Planlæg regelmæssige virusscanninger ved hjælp af virussoftware.
• Administrér harddiskpladsen ved jævnligt at slette unødige filer og defragmentere drevet.
• Sikkerhedskopiér filer med jævnlige mellemrum.
• Rengør jævnligt skærmen, musen og tastaturet
(se i
24 Naslagswerk
Brugervejledningen
for yderligere oplysninger).
Page 65

Problemløsning
Fejlfindingstip
Følg nedenstående tip ved fejlfinding på computeren:
• Hvis du tilføjede eller fjernede en del, før problemet opstod, skal du gennemgå
installationsprocedurerne og sikre, at delen er installeret korrekt.
• Hvis en ekstern enhed ikke fungerer, skal du sikre, at enheden er sluttet korrekt til.
• Hvis der vises en fejlmeddelelse på skærmen, skal du skrive den ned (nøjagtigt).
Meddelelsen kan hjælpe teknisk support-personale med at diagnosticere og afhjælpe
problemet eller problemerne.
• Hvis der forekommer en fejlmeddelelse i et program, skal du se i dokumentationen
til programmet.
• Hvis den anbefalede handling i fejlfindingsafsnittet henviser til et afsnit i din
Brugervejledning
for at få adgang til din
Afhjælpning af software- og hardwareinkompatibilitetsproblemer
Hvis en enhed enten ikke findes under operativsystemopsætningen eller findes, men er forkert
konfigureret, kan du bruge Hardware Troubleshooter til at afhjælpe inkompatibilitetsproblemet.
I Microsoft
at afhjælpe inkompatibilitetsproblemer.
®
Windows® 2000-operativsystemet kan du desuden bruge Enhedshåndtering til
, skal du gå til
Brugervejledning.
support.dell.com (på en anden computer, om nødvendigt)
Windows XP
Sådan afhjælpes inkompatibilitetsproblemer ved hjælp af Hardware Troubleshooter:
1
Klik på knappen
2
Skriv
hardware troubleshooter
3
Klik på
4
På listen
on my computer
Windows 2000
Hardware Troubleshooter
Hardware Troubleshooter
Start
, og klik på
Hjælp og support
i feltet
på listen
skal du klikke på
og derefter klikke på
Søg
Søgeresultater
Next
.
.
, og klik på pilen for at starte søgningen.
.
I need to resolve a hardware conflict
Sådan løses inkompatibilitetsproblemer ved hjælp af Enhedshåndtering:
1
Klik på knappen
2
I vinduet
3
Klik på fanen
4
5
Klik på
Klik på
Enhedshåndtering
Vis
Start
, peg på
Kontrolpanel
Hardware
, og klik på
Indstillinger
, og klik derefter på
skal du dobbeltklikke på
.
.
Ressourcer pr. forbindelse
System
.
.
Kontrolpanel
.
Naslagswerk 25
Page 66

6
Dobbeltklik på
Forkert konfigurerede enheder angives med et gult udråbstegn (
hvis enheden er blevet deaktiveret.
7
Dobbeltklik på en enhed, der er markeret med et udråbstegn, for at åbne vinduet
Området
der skal omkonfigureres.
8
Omkonfigurér enhederne, eller fjern dem fra Enhedshåndtering. Se dokumentationen,
der fulgte med enheden, for oplysninger om konfigurering af enheden.
Sådan afhjælpes inkompatibilitetsproblemer ved hjælp af Hardware Troubleshooter:
1
www.dell.com | support.dell.com
Klik på knappen
2
Klik på
Fejlfinding og vedligeholdelse
og klik derefter på
3
På listen
on my computer
Brug af Microsoft Windows XP Systemgendannelse
Microsoft Windows XP-operativsystemet indeholder en systemgendannelsesfunktion, der gør
det muligt at gendanne operativsystemet til en tidligere tilstand (uden at datafiler påvirkes),
hvis ændringer i hardware, software eller andre systemindstillinger har medført, at computeren
er i en uønsket driftstilstand. Se Windows Hjælp og supportcenter (se "Her finder du oplysninger
og hjælp" på side 5) for oplysninger om brug af Systemgendannelse.
Interrupt request (IRQ)
Enhedsstatus i
Start
vinduet
, og klik på
Hardware
Hjælp
.
Hardware Troubleshooter
og derefter klikke på
.
Egenskaber
viser de kort eller enheder,
.
på fanen
Indhold
skal du klikke på
Next
.
!
) eller et rødt X,
Egenskaber
, klik på
Fejlfinding i Windows 2000
I need to resolve a hardware conflict
.
,
BEMÆRKNING: Tag jævnligt sikkerhedskopier af dine datafiler. Systemgendannelse overvåger
eller gendanner ikke dine datafiler.
Oprettelse af et gendannelsespunkt
1
Klik på knappen
2
Klik på
3
Følg anvisningerne på skærmen.
Gendannelse af computeren til en tidligere driftstilstand
BEMÆRKNING: Før du gendanner en tidligere driftstilstand på computeren, skal du gemme og lukke
alle åbne filer og lukke alle åbne programmer. Du må ikke ændre, åbne eller slette filer eller programmer,
før systemgendannelsen er udført.
Klik på knappen
1
derefter på
2
Kontrollér, at
26 Naslagswerk
Start
, og klik på
Systemgendannelse
Start
, peg på
Systemgendannelse
Hjælp og support
.
Alle programmer→
.
Gendan min computer til et tidligere tidspunkt
.
Tilbehør→
Systemværktøjer
, og klik
er markeret, og klik på
Næste
.
Page 67

3
Klik på en kalenderdato, som computeren skal gendannes til.
Skærmen
Vælg et gendannelsespunkt
indeholder en kalender, der gør det muligt at
se og vælge gendannelsespunkter. Alle kalenderdatoer med mulige gendannelsespunkter
vises med fed skrift.
4
Vælg et gendannelsespunkt, og klik på
Næste
.
Hvis en kalenderdato kun har ét gendannelsespunkt, vælges dette automatisk.
Hvis der er to eller flere gendannelsespunkter, kan du vælge dét, du foretrækker.
5
Klik på
Skærmen
Næste
.
Gendannelsen er udført
vises, når Systemgendannelse er færdig med at indsamle
data, og computeren genstarter derefter.
6
Klik på OK, når computeren er genstartet.
For at ændre gendannelsespunktet kan du enten gentage trinnene med et andet
gendannelsespunkt, eller du kan fortryde gendannelsen.
Fortryd sidste systemgendannelse
BEMÆRKNING: Inden du fortryder den sidste systemgendannelse, skal du gemme og lukke alle
åbne filer og lukke alle åbne programmer. Du må ikke ændre, åbne eller slette filer eller programmer,
før systemgendannelsen er udført.
Klik på knappen
1
og klik derefter på
2
3
Klik på
Klik på
Fortryd sidste gendannelse
Næste
Skærmen
Start
, peg på
Systemgendannelse
.
Systemgendannelse
Alle programmer→ Tilbehør→ Systemværktøjer
.
, og klik på
Næste
.
vises, og computeren genstarter.
,
4
Klik på OK, når computeren er genstartet.
Aktivering af Systemgendannelse.
Hvis du geninstallerer Windows XP med mindre end 200 MB ledig harddiskplads,
deaktiveres Systemgendannelse automatisk. Hvis du vil se, om Systemgendannelse
er deaktiveret, kan du gøre følgende:
1
Klik på knappen
2
Klik på
3
Klik på
4
Klik på fanen
5
Kontrollér, at
Ydelse og vedligeholdelse
System
Start
, og klik på
Kontrolpanel
.
.
Systemgendannelse
.
Deaktiver Systemgendannelse
.
ikke er markeret.
Naslagswerk 27
Page 68

Brug af Sidste kendte fungerende konfiguration
1
Genstart computeren, og tryk på <F8>, når meddelelsen
der skal startes
2
Fremhæv Sidste kendte fungerende konfiguration, tryk på <Enter>, tryk på <l>,
og vælg derefter operativsystem, når du bliver bedt om det.
Andre valgmuligheder til løsning af øvrige enheds- eller softwarekonflikter
BEMÆRKNING: Følgende processer sletter alle data på harddisken.
• Følg installationsvejledningen, og anvend operativsystem-cd'en for at geninstallere
operativsystemet.
www.dell.com | support.dell.com
Under geninstallation af operativsystemet kan du vælge at slette de eksisterende
partitioner og omformatere harddisken.
• Geninstallér alle drivere, startende med chipsættet, ved hjælp af cd'en
Drivere og hjælpeprogrammer
Dell Diagnostics
FORSIGTIG: Før du går i gang med procedurerne i dette afsnit, skal du følge sikkerhedsanvisningerne,
som findes i Produktinformationsvejledningen.
Hvornår anvendes Dell Diagnostics
Hvis du har problemer med computeren, kan du udføre kontrol som anført i "Problemløsning"
på side 25 og køre Dell Diagnostics, før du kontakter Dell for teknisk assistance.
Det anbefales, at du udskriver disse procedurer, før du begynder.
vises.
Vælg operativsystem,
.
BEMÆRKNING: Dell Diagnostics fungerer kun på Dell™-computere. Hvis programmet anvendes
på andre computere, kan det medføre fejlagtige computerreaktioner eller udløse fejlmeddelelser..
Dell Diagnostics gør det muligt at:
• Udføre hurtig kontrol eller omfattende test på én eller alle enheder
• Vælge, hvor mange gange en test skal køres
• Få vist eller udskrive testresultater eller gemme dem i en fil
• Midlertidigt afbryde testen, hvis der findes en fejl, eller helt afbryde testen,
hvis der forekommer et vist antal fejl
• Få adgang til online
• Læse statusmeddelelser, der fortæller, om testene er blevet gennemført korrekt
• Modtage fejlmeddelelser, hvis der findes problemer
28 Naslagswerk
Hjælp-skærmbilleder,
der beskriver testene, og hvordan de køres
Page 69

Start Dell Diagnostics fra harddisken
1
Tænd for (eller genstart) computeren.
2
Når DELL™-logoet vises, skal du omgående trykke på <F12>.
BEMÆRK: Hvis der vises en meddelelse om, at der ikke er fundet nogen
diagnosticeringsprogrampartition, henvises du til "Start af Dell Diagnostics fra cd'en Drivere og
hjælpeprogrammer" på side 29.
Hvis du venter for længe, og operativsystemlogoet vises, skal du fortsætte med at vente,
indtil du ser Skrivebordet i Microsoft Windows. Luk derefter computeren ned, og forsøg igen.
Yderligere oplysninger om nedlukning af computeren findes i din
3
Når listen over opstartsenheder vises, skal du fremhæve
Boot to Utility Partition
Brugervejledning.
og trykke på <Enter>.
4
Når
hovedmenuen
Yderligere oplysninger om testene findes i din
Start af Dell Diagnostics fra cd'en Drivere og hjælpeprogrammer
1
Indsæt cd'en
2
Luk computeren ned, og genstart den. Yderligere oplysninger om nedlukning af computeren
findes i din
3
Når DELL-logoet vises, skal du omgående trykke på <F12>.
for Dell Diagnostics vises, skal du vælge den test, du vil køre.
Brugervejledning.
Drivere og hjælpeprogrammer
.
Brugervejledning.
Hvis du venter for længe, og Windows-logoet fremkommer, skal du fortsætte med at vente,
indtil du ser Skrivebordet i Windows. Luk derefter computeren ned, og forsøg igen.
Yderligere oplysninger om nedlukning af computeren findes i din
Brugervejledning.
BEMÆRK: De næste trin ændrer kun opstartsrækkefølgen for denne ene gang. Ved næste opstart vil
computeren opstarte i henhold til de enheder, der er specificeret i Systemopsætning.
Når listen over opstartsenheder vises, skal du fremhæve
4
IDE CD-ROM Device
og trykke på <Enter>.
5
Væ lg
IDE CD-ROM Device
6
Vælg punktet
7
Ta s t 1 for at starte menuen ResourceCD.
8
Ta s t 2 for at starte Dell Diagnostics.
9
Væ lg
Run the 32 Bit Dell Diagnostics (Kør 32-bit Dell Diagnostics)
Boot from CD-ROM
fra cd-opstartsmenuen.
i den menu, der fremkommer.
fra den nummererede
liste. Hvis der er flere versioner på listen, skal du vælge den, der passer til din computer.
10
Når
hovedmenuen
Yderligere oplysninger om testene findes i din
for Dell Diagnostics vises, skal du vælge den test, du vil køre.
Brugervejledning.
Naslagswerk 29
Page 70

Før du begynder at teste
FORSIGTIG: Før du går i gang med procedurerne i dette afsnit, skal du følge sikkerhedsanvisningerne
i Produktinformationsvejledningen.
• Tænd for printeren, hvis en sådan er tilsluttet.
• Åbn Systemopsætning, gennemgå computerens konfigurationsoplysninger,
og aktivér alle computerens komponenter og enheder, som f.eks. stik.
Bip-koder
Din computer afgiver muligvis en række bip, der kan identificere et problem. Én mulig serie
www.dell.com | support.dell.com
(kode 1-3-1) består af et bip, tre hurtige bip, og derefter et bip. Denne serie fortæller,
at der er et hukommelsesproblem i computeren.
Hvis der afgives en bip-kode, skal du skrive den ned og slå den op i følgende tabel.
Kode Årsag
1-1-2 Fejl ved mikroprocessorregistrering
1-1-3 NVRAM-læse-/skrivefejl
1-1-4 Fejl ved ROM BIOS-kontrolsum
1-2-1 Fejl ved programmérbar intervaltimer
1-2-2 Fejl ved DMA-initialisering
1-2-3 Læse-/skrivefejl ved DMA-sideregistrering
1-3 Fejl ved videohukommelsestest
1-3-1 til og med 2-4-4 Hukommelse identificeres eller anvendes ikke korrekt
3-1-1 Fejl ved slave-DMA-registrering
3-1-2 Fejl ved master-DMA-registrering
3-1-3 Fejl ved master-interrupt-maskeregistrering
3-1-4 Fejl ved slave-interrupt-maskeregistrering
3-2-2 Fejl ved interrupt-vektorindlæsning
3-2-4 Fejl ved test af tastaturcontroller
3-3-1 NVRAM-strømsvigt
3-3-2 Ugyldig NVRAM-konfiguration
3-3-4 Fejl ved videohukommelsestest
3-4-1 Fejl ved skærminitialisering
3-4-2 Fejl ved skærmsporing
3-4-3 Fejl ved søgning efter video-ROM
30 Naslagswerk
Page 71

Kode Årsag
4-2-1 Ingen timermarkering
4-2-2 Nedlukningsfejl
4-2-3 Gate A20-fejl
4-2-4 Uventet afbrydelse i beskyttet tilstand
4-3-1 Hukommelsesfejl over adressen 0FFFFh
4-3-3 Fejl ved timer-chip, tæller 2
4-3-4 Tidsur er stoppet
4-4-1 Fejl ved test af seriel eller parallel port
4-4-2 Kunne ikke dekomprimere kode til skyggehukommelse
4-4-3 Fejl ved test af matematisk coprocessor
4-4-4 Fejl ved cache-test
Fejlmeddelelser
BEMÆRK: Hvis meddelelsen ikke findes på listen, kan du se i dokumentationen til enten
operativsystemet eller det program, der kørte, da meddelelsen forekom.
Hvis der forekommer en fejl ved opstart, vises der eventuelt en meddelelse på skærmen,
der identificerer problemet. Se "Fejlmeddelelser" i
af problemer.
Brugervejledningen
for forslag til afhjælpning
Naslagswerk 31
Page 72

Lysdioder for diagnosticering
FORSIGTIG: Før du går i gang med procedurerne i dette afsnit, skal du følge sikkerhedsanvisningerne,
som findes i Produktinformationsvejledningen.
Som en hjælp til fejlfinding ved problemer er computeren forsynet med fire lysdioder,
der er mærket "A", "B", "C" og "D" på for- eller bagpanelet. Lysdioder kan være gule eller grønne.
Når computeren starter normalt op, blinker lysdioderne. Når computeren er startet op,
lyser alle fire lysdioder konstant grønt. Hvis computeren svigter, identificerer lysdiodernes
farve og rækkefølge problemet.
Lysdiodemønster Beskrivelse af problem Foreslået afhjælpning
www.dell.com | support.dell.com
ABCD
ABCD
Der er muligvis opstået en BIOS-fejl.
Computeren er i gendannelsestilstand.
Der er muligvis opstået en processorfejl. Geninstallér processoren, og genstart
Kør hjælpeprogrammet
BIOS Recovery (gendannelse),
vent, indtil gendannelsen er udført,
og genstart derefter computeren.
computeren. Yderligere oplysninger
om geninstallation af processoren
findes i din Brugervejledning.
ABCD
= gul
= grøn
= slukket
32 Naslagswerk
Hukommelsesmoduler findes,
men der er opstået en hukommelsesfejl.
1
Genanbring hukommelsesmodulerne.
2
Genstart computeren.
3
Kør Dell Diagnostics.
4
Hvis problemet varer ved,
skal du kontakte Dell.
Page 73

Lysdiodemønster Beskrivelse af problem Foreslået afhjælpning
Der er muligvis opstået en fejl
med udvidelseskortet.
ABCD
Der er muligvis opstået en fejl
med grafikkortet.
ABCD
1
Find ud af, om der er en konflikt
ved at fjerne et kort (ikke grafikkortet)
og derefter genstarte computeren.
Yderligere oplysninger om fjernelse
af et kort findes i din
2
Hvis problemet varer ved, skal
du geninstallere det kort, du fjernede,
og i stedet fjerne et andet kort,
og derefter genstarte computeren.
3
Gentag denne procedure for hvert
kort. Hvis computeren starter
på normal vis, skal du undersøge
det sidste kort, du fjernede,
for ressourcekonflikter
(se "Afhjælpning af software- og
hardwareinkompatibilitetsproblemer")
.
4
Hvis problemet varer ved,
skal du kontakte Dell. Yderligere
oplysninger om, hvordan du kontakter
Dell, findes i din
• Hvis computeren indeholder
et grafikkort, skal du fjerne kortet,
geninstallere det og derefter genstarte
computeren. Yderligere oplysninger
om geninstallation af grafikkortet
findes i din
• Hvis problemet varer ved,
skal du installere et grafikkort,
du ved fungerer, og genstarte
computeren.
• Hvis problemet varer ved, eller hvis
computeren har integreret grafik,
skal du kontakte Dell. Yderligere
oplysninger om, hvordan du kontakter
Dell, findes i din
Brugervejledning
Brugervejledning
Brugervejledning
.
Brugervejledning
.
.
.
= gul
= grøn
= slukket
Naslagswerk 33
Page 74

Lysdiodemønster Beskrivelse af problem Foreslået afhjælpning
Der er muligvis opstået
en diskettedrev- eller harddiskfejl.
Genanbring alle net- og datakabler,
og genstart computeren.
ABCD
Der er muligvis opstået en USB-fejl. Geninstallér alle USB-enheder,
kontrollér kabelforbindelser,
og genstart derefter computeren.
ABCD
www.dell.com | support.dell.com
ABCD
Hukommelsesmodulerne blev
ikke fundet.
• Hvis der er installeret
ét hukommelsesmodul,
skal du geninstallere det og genstarte
computeren. Yderligere oplysninger
om hukommelsesmoduler findes
Brugervejledning
idin
• Hvis der er installeret to eller flere
hukommelsesmoduler, skal du fjerne
modulerne, geninstallere det
ene modul og derefter genstarte
computeren. Hvis computeren starter
på normal vis, kan du geninstallere
yderligere et modul. Fortsæt, indtil
du har fundet et defekt modul eller
har geninstalleret alle moduler uden
at finde fejl. Yderligere oplysninger
om hukommelsesmoduler findes
Brugervejledning
idin
• Hvis du har en sådan, kan du installere
en korrekt fungerende hukommelse af
samme type i computeren. Yderligere
oplysninger om hukommelsesmoduler
findes i din
• Hvis problemet varer ved,
skal du kontakte Dell. Yderligere
oplysninger om, hvordan du kontakter
Dell, findes i din
Brugervejledning
.
.
.
Brugervejledning
.
= gul
= grøn
= slukket
34 Naslagswerk
Page 75

Lysdiodemønster Beskrivelse af problem Foreslået afhjælpning
Der er opstået en fejl med systemkortet.
ABCD
Kontakt Dell
Yderligere oplysninger om,
hvordan du kontakter Dell, findes
idinBrugervejledning.
for teknisk assistance.
ABCD
ABCD
= gul
= grøn
= slukket
Hukommelsesmodulerne findes,
men der er opstået en
hukommelseskonfigurationseller kompatibilitetsfejl.
Der er muligvis opstået
en systemkortressourceog/eller hardwarefejl.
• Kontrollér, at der ikke findes
specielle krav til placeringen
af hukommelsesmodulet/
hukommelsesstik.
• Kontrollér, at de
hukommelsesmoduler, du installerer,
er kompatible med computeren.
• Geninstallér hukommelsesmodulerne,
og genstart computeren.
• Hvis problemet varer ved, skal
du kontakte Dell. Yderligere
oplysninger om, hvordan du kontakter
Dell, findes i din
Udfør procedurerne i
"Afhjælpning af software- og
hardwareinkompatibilitetsproblemer"
(se
side 25).
Hvis problemet varer ved, skal
du
kontakte Dell
om, hvordan du kontakter Dell,
findes i din Brugervejledning.
Brugervejledning
. Yderligere oplysninger
.
Naslagswerk 35
Page 76

Lysdiodemønster Beskrivelse af problem Foreslået afhjælpning
ABCD
www.dell.com | support.dell.com
ABCD
Der er muligvis opstået en fejl
med udvidelseskortet.
Der er opstået en anden fejl.
Computeren er i normal
driftstilstand efter POST.
1
Find ud af, om der er en konflikt
ved at fjerne et kort (ikke et
grafikkort) og genstarte computeren.
Yderligere oplysninger om fjernelse af
et kort findes i din
2
Hvis problemet varer ved, skal du
geninstallere det kort, du fjernede,
og i stedet fjerne et andet kort,
og derefter genstarte computeren.
3
Gentag denne procedure for hvert
kort. Hvis computeren starter på
normal vis, skal du undersøge det kort,
der sidst blev fjernet fra computeren,
for ressourcekonflikter
(se "Afhjælpning af software- og
hardwareinkompatibilitetsproblemer"
på side 25).
4
Hvis problemet varer ved, skal du
kontakte Dell. Yderligere oplysninger
om, hvordan du kontakter Dell,
findes i din
• Kontrollér, at kablerne er sluttet
korrekt til systemkortet fra harddisken,
cd-drevet og dvd-drevet.
• Hvis problemet varer ved,
skal du kontakte Dell. Yderligere
oplysninger om, hvordan du kontakter
Dell, findes i din
Ingen.
Brugervejledning
Brugervejledning
Brugervejledning
.
.
.
ABCD
= gul
= grøn
= slukket
36 Naslagswerk
Page 77

Ofte stillede spørgsmål
Hvordan gør jeg følgende... Løsning Hvor finder jeg yderligere oplysninger
Opsætter min computer
til at anvende to skærme?
Tilslutter skærmen,
når skærmkabelstikket
tilsyneladende ikke passer
til stikket bag på min computer?
Installerer en kortventilator? Hvis du har installeret et nyt
Tilslutter mine højttalere? Hvis der er installeret et lydkort,
Hvis computeren har det nødvendige
grafikkort til at understøtte
dobbeltskærmsopsætning, skal
du se i kassen efter et Y-kabel.
Y-ablet har et enkelt stik i den
ene ende (slut dette stik til på
bagpanelet) og deler sig i to stik
(slut disse stik til skærmkablerne).
Vedrørende minitower-computeren
kan du se i "Tilslut skærmen"
på side 10, og vedrørende den
stationære computer kan du
se i "Tilslut skærmen" på side 15.
Hvis dit grafikkort har et DVI-stik,
men din skærm har et VGA-stik,
skal du bruge en adapter. Der skal
være medleveret en adapter i kassen.
grafikkort med en kapacitet
over 75 W, skal du installere en
kortventilator. Kontakt Dell,
hvis du vil bestille en kortventilator.
Kontaktoplysninger findes
idinBrugervejledning og
på support.dell.com.
skal du slutte højttalerne til stikkene
på kortet. For minitower-computeren
kan du se i "Tilslut højttalerne"
på side 13, og for den stationære
computer kan du se i
"Tilslut højttalerne" på side 18.
Yderligere oplysninger om
brug af dobbeltskærme findes
i grafikkortdokumentationen
på cd'en Drivere og
hjælpeprogrammer.
Kontakt Dell for yderligere
oplysninger.
Oplysninger om installation
af en kortventilator eller et kort
findes i din Brugervejledning.
Se dokumentationen, der fulgte
med højttalerne, for yderligere
oplysninger.
Naslagswerk 37
Page 78

Hvordan gør jeg følgende... Løsning Hvor finder jeg yderligere oplysninger
Finder de rigtige stik til mine
USB- eller IEEE 1394-enheder?
www.dell.com | support.dell.com
Finder oplysninger om
hardware- og andre tekniske
specifikationer til min computer?
Finder dokumentationen
til min computer?
Din minitower-computer har otte
USB-stik (to foran og seks bagpå).
Din stationære computer har otte
USB-stik (to foran og seks bagpå)
samt et valgfrit IEEE 1394-stik
på forsiden. Dette stik er kun
tilgængeligt, hvis du har købt
et IEEE 1394-tilføjelseskort.
Kontakt Dell, hvis du vil købe
et kort. Yderligere oplysninger
om tilføjelseskortet findes
idinBrugervejledning.
Din Brugervejledning indeholder en
tabel med detaljerede specifikationer
til din computer og dens hardware.
For at finde din Brugervejledning,
se "Her finder du oplysninger og
hjælp" på side 5.
Følgende dokumentation er
tilgængelig for din computer:
• Brugervejledning
• Produktinformationsvejledning
• Systeminformationsmærkat
For at finde disse dokumenter, se
"Her finder du oplysninger og hjælp"
på side 5.
Se billederne af computerens forside
og bagside i din Brugervejledning.
Som en hjælp til at finde
din Brugervejledning kan du
se "Her finder du oplysninger og
hjælp" på side 5.
Besøg webstedet for Dell Support
på support.dell.com , og benyt dig
af et af følgende supportværktøjer:
Læs hvidbøger om den nyeste
teknologi, eller snak med andre
Dell-brugere i Dells chatrum.
Hvis du mister dokumentationen,
er den tilgængelig på webstedet for
Dell Support på support.dell.com.
38 Naslagswerk
Page 79

Indeks
B
Brugervejledning, 6
C
Cd'en Drivere og
hjælpeprogrammer, 5
computer
gendan til tidligere tilstand, 26
D
Dell
websted for Premier-support, 7
websted for support, 7
Dell Diagnostics, 28
Diagnostics
Cd'en Drivere og
hjælpeprogrammer, 5
Dell, 28
lysdioder, 32
dokumentation, 14
Brugervejledning, 6
enhed, 5
online, 7
Produktinformations-
vejledning, 6
ResourceCD, 5
E
Enhedshåndtering, 25
F
fejlfinding
Dell Diagnostics, 28
gendan til tidligere tilstand, 26
Hardware Troubleshooter, 25
Hjælp og supportcenter, 7
konflikter, 25
lysdioder for
diagnosticering, 32
fejlmeddelelser
lysdioder for
diagnosticering, 32
finde oplysninger og
dokumentation, 5
G
garanti, 6
geninstallation
Cd'en Drivere og
hjælpeprogrammer, 5
ResourceCD, 5
H
hardware
Dell Diagnostics, 28
Hardware Troubleshooter, 25
Hjælp og supportcenter, 7
I
installere dele
slukke for computeren, 20, 23
IRQ-konflikter, 25
K
konflikter
software- og hardware-
inkompatibilitetsproblemer, 25
L
lysdioder
bagsiden af computeren, 32
diagnosticering, 32
drivere
ResourceCD, 5
Indeks 39
Page 80

M
S
mærkater
Microsoft Windows, 6
Servicemærkat, 6
O
Operativsystem-cd, 8
P
problemer
Dell Diagnostics, 28
gendan til tidligere tilstand, 26
lysdioder for
diagnosticering, 32
R
ResourceCD
Dell Diagnostics, 28
Servicemærkat, 6
sikkerhedsanvisninger, 6
Systemgendannelse, 26
systeminformationsmærkat, 5
systemkort, 5
W
webstedet for
Dell Premier-support, 6-7
Windows 2000
Enhedshåndtering, 25
Hardware Troubleshooter, 25
Windows XP
Hardware Troubleshooter, 25
Hjælp og supportcenter, 7
Systemgendannelse, 26
40 Indeks
Page 81

Dell Precision™ Workstation
370 -järjestelmät
Pikaopas
DHM- ja WHM-mallit
www.dell.com | support.dell.com
Page 82

Huomautukset, varoitukset ja vaarailmoitukset
HUOMAUTUS: HUOMAUTUS viittaa tärkeisiin tietoihin, jotka helpottavat tietokoneen käyttöä.
VAROITUS: VAROITUS viittaa laitevaurion mahdollisuuteen tai tietojen menetykseen ja sisältää neuvoja,
joiden avulla voit välttää ongelman.
VAARA: VAARA viittaa mahdolliseen omaisuuden vaurioitumiseen, henkilövahinkoon tai kuolemaan.
Lyhenteet ja kirjainlyhenteet
Lyhenteet ja kirjanlyhenteet on selitetty
Jos hankit Dell™ n-sarjan tietokoneen, tämän oppaan viittaukset Microsoft
Käyttöoppaan
Sanasto-osassa.
®
Windows® -käyttöjärjestelmään
eivät koske sinua.
____________________
Tässä asiakirjassa olevia tietoja voidaan muuttaa ilman erillistä ilmoitusta.
© 2004 Dell Inc. Kaikki oikeudet pidätetään.
Kaikenlainen jäljentäminen ilman Dell Inc:n kirjallista lupaa on ehdottomasti kielletty.
Tässä tekstissä käytetyt tavaramerkit: Dell, DELL-logo ja Dell Precision ovat Dell Inc:n tavaramerkkejä,
ja Microsoft ja Windows ovat Microsoft Corporationin rekisteröityjä tavaramerkkejä.
Muut tässä asiakirjassa käytetyt tavaramerkit ja tuotenimet viittaavat joko niiden omistajiin tai omistajien tuotteisiin.
Dell Inc. ei vaadi mitään oikeuksia muihin kuin omiin tavaramerkkeihinsä tai tuotenimiinsä.
DHM- ja WHM-mallit
Huhtikuu 2004 P/N X3157 Rev. A00
Page 83

Sisällysluettelo
Tietojen ja ohjeiden etsiminen . . . . . . . . . . . . . . . . . . . . . . . 5
Minitornitietokoneen asentaminen
Pöytätietokoneen asentaminen
Käyttöoppaan etsiminen
. . . . . . . . . . . . . . . . . . . . . . . . . . 19
Minitornitietokoneen avaaminen
Kortin jäähdytystuuletin
. . . . . . . . . . . . . . . . . . . . . . . . . . 22
Pöytätietokoneen avaaminen
Tietokoneen käsitteleminen
Ongelmien ratkaiseminen
Vianmääritysvihjeitä
. . . . . . . . . . . . . . . . . . . . . . . . . 25
. . . . . . . . . . . . . . . . . . . . . . . . . . 25
. . . . . . . . . . . . . . . . . . . . . 9
. . . . . . . . . . . . . . . . . . . . . . . 14
. . . . . . . . . . . . . . . . . . . . . . 20
. . . . . . . . . . . . . . . . . . . . . . . . 23
. . . . . . . . . . . . . . . . . . . . . . . . 24
Ohjelmiston ja laitteiston yhteensopivuusongelmien ratkaiseminen
Microsoft Windows XP:n järjestelmän palautustoiminnon käyttäminen
Viimeisen toimivan kokoonpanon käyttäminen
Dell Diagnostics
Ennen testausta
Merkkiäänet
Virheilmoitukset
Diagnostiikan merkkivalot
Usein kysyttyjä kysymyksiä
. . . . . . . . . . . . . . . . . . . . . . . . . . . . 28
. . . . . . . . . . . . . . . . . . . . . . . . . . . . 30
. . . . . . . . . . . . . . . . . . . . . . . . . . . . . . . . 30
. . . . . . . . . . . . . . . . . . . . . . . . . . . . 31
. . . . . . . . . . . . . . . . . . . . . . . . . 32
. . . . . . . . . . . . . . . . . . . . . . . . . 37
. . . . . . . . . . . . . 28
. . . 25
. . 26
Hakemisto . . . . . . . . . . . . . . . . . . . . . . . . . . . . . . . . . 39
Sisällysluettelo 3
Page 84

4 Sisällysluettelo
Page 85

Tietojen ja ohjeiden etsiminen
Mistä haluat tietää enemmän? Etsimäsi löytyy täältä
• Tietokoneen diagnostiikkaohjelma
• Tietokoneen ohjaimet
• Oheislaitteen käyttöohjeet
• Emolevyn liittimet
• Emolevyn osien sijainti
Drivers and Utilities -CD-levy
(josta käytetään myös nimeä ResourceCD)
Käyttöohjeet ja ohjaimet on asennettu valmiiksi
tietokoneeseen. Jos joudut asentamaan ohjaimet
uudelleen CD-levyltä, suorita Dell Diagnostics ohjelma (katso sivu 28) tai lue laitteen ohjeet.
HUOMAUTUS: Uusimmat ohjaimet ja päivitykset
ovat osoitteessa support.dell.com.
Järjestelmätietotarra
Sijaitsee tietokoneen sisäkannessa.
CD-levyllä voi olla
Readme-tiedostoja,
jotka sisältävät uusimpia
tietoja tietokoneeseen
tehdyistä teknisistä
muutoksista tai
huoltohenkilöille
tai kokeneille
käyttäjille tarkoitettuja
yksityiskohtaisia
teknisiä ohjeita.
Pikaopas 5
Page 86

Mistä haluat tietää enemmän? Etsimäsi löytyy täältä
• Takuutiedot
Dell™-tuotetieto-opas
• Turvallisuusohjeet
• Viranomaisten ilmoitukset
• Ergonomiaa koskevat tiedot
• Loppukäyttäjän käyttöoikeussopimus
www.dell.com | support.dell.com
• Osien irrottaminen ja vaihtaminen
• tekniset tiedot
• Järjestelmän asetusten määrittäminen
• Vianmääritys ja ongelmien ratkaiseminen
Dell Precision -käyttöopas
Microsoft
®
Windows® XP:n Ohje ja tuki -ohjelma
(Help and Support Center)
1
Napsauta
2
Va li t se
User’s and system guides (Käyttö- ja
järjestelmäoppaat)
• Service Tag -huoltotarra ja Express Service -koodi
• Microsoft Windows -käyttöoikeustarra
Service Tag -huoltotarra ja Microsoft Windows käyttöoikeustarra
Tarrat on kiinnitetty tietokoneeseen.
• Tarvitset Service
Tag -huoltotarraa
tietokoneesi
tunnistusta varten,
kun käytät sivustoa
support.dell.com
tai otat yhteyttä
tekniseen tukeen.
• Tarvitset Express Service -koodia, kun soitat tekniseen
tukeen. Express Service -koodi ei ole käytössä kaikissa
maissa/kaikilla alueilla.
Käynnistä
-painiketta ja valitse
ja
User’s guides (Käyttöoppaat)
Ohje ja tuki.
.
6 Pikaopas
Page 87

Mistä haluat tietää enemmän? Etsimäsi löytyy täältä
• Tietokoneen uusimmat ohjaimet
• Vastauksia teknistä tukea ja asiakastukea koskeviin
kysymyksiin
• Online-keskusteluja muiden käyttäjien ja teknisen
tuen kanssa
• Tietokoneen käyttöohjeet
Dellin tukisivusto — support.dell.com
HUOMAUTUS: Valitse oma alueesi ja tarkastele
sitä vastaavaa tukisivustoa.
Dellin tukisivusto sisältää useita työkaluja, kuten
• Solutions — Vianmääritysvihjeitä, huoltohenkilöiden
artikkeleja ja verkkokursseja
• Community — Online-keskusteluja Dellin muiden
asiakkaiden kanssa
• Upgrades — Tietoa järjestelmän osien, kuten muistin,
kiintolevyn ja käyttöjärjestelmän, päivittämistä varten
• Customer Care — Yhteystietoja ja tilauksen tilatietoja
sekä takuu- ja korjaustietoja
• Downloads — Ohjaimia, korjaustiedostoja
ja ohjelmistopäivityksiä
• Reference — Tietokoneen käyttöohjeita,
tuotemäärityksiä ja tuoteasiakirjoja
• Palvelupyynnön tila ja aiemmat tukitapahtumat
• Tietokonettasi koskevat tärkeimmät tekniset seikat
• Usein kysyttyjä kysymyksiä
• Tiedostojen lataaminen
• Yksityiskohtaisia tietoja tietokoneen kokoonpanosta
Dellin Premier Support -sivusto —
premiersupport.dell.com
Dellin Premier Support -sivusto on tarkoitettu yritys-,
viranomais- ja oppilaitosasiakkaille. Tätä sivustoa
ei ehkä ole saatavana kaikissa maissa.
• Tietokoneen palvelusopimus
• Windows XP:n käyttöohjeet
• Tietokoneen käyttöohjeet
• Oheislaitteiden, kuten modeemin, käyttöohjeet
Windowsin Ohje ja tukipalvelut -ohjelma
1
Napsauta
2
Kirjoita selvitettävää ongelmaa kuvaava sana tai
Käynnistä
lauseke ja napsauta nuolikuvaketta.
3
Napsauta ongelmaa koskevaa aihetta.
4
Noudata näyttöön tulevia ohjeita.
• Linuxin käyttöohjeet
• Dell Precision- ja Linux-käyttäjien
sähköpostikeskustelut
• Lisätietoja Linuxista ja Dell Precision -tietokoneesta
Dellin tukemat Linux-sivustot
• http://linux.dell.com
• http://lists.us.dell.com/mailman/listinfo/
linux-precision
• http://docs.us.dell.com/docs/software/oslinux/
• http://docs.us.dell.com/docs/software/OSRHEL3/
-painiketta ja valitse
Ohje ja tuki.
Pikaopas 7
Page 88

Mistä haluat tietää enemmän? Etsimäsi löytyy täältä
• Käyttöjärjestelmän asentaminen uudelleen
www.dell.com | support.dell.com
Operating System (Käyttöjärjestelmä)-CD-levy
Käyttöjärjestelmä on asennettu valmiiksi tietokoneeseen.
Voit asentaa käyttöjärjestelmän uudelleen
Operating System -CD-levyltä. Katso ohjeita
Precision -käyttöoppaasta.
HUOMAUTUS: CD-levyn väri vaihtelee tilatun
käyttöjärjestelmän mukaisesti.
Kun olet asentanut
käyttöjärjestelmän
uudelleen, asenna
uudelleen tietokoneen
mukana tulleiden
laitteiden ohjaimet
Drivers and Utilities CD-levyltä.
Käyttöjärjestelmän
tuotetunnustarra
on kiinnitetty
tietokoneeseen.
8 Pikaopas
Page 89

Minitornitietokoneen asentaminen
VAARA: Tutustu Tuotetieto-oppaan turvallisuusohjeisiin ennen tässä esitettyjen toimenpiteiden
suorittamista.
Tietokoneen oikea käyttöönotto edellyttää kaikkien vaiheiden suorittamista.
Liitä näppäimistö ja hiiri tietokoneeseen.
1
Kytke modeemi- tai verkkokaapeli.
2
VAROITUS: Älä liitä modeemijohtoa verkkoliitäntään.
Puhelinlinjan jännite voi vaurioittaa verkkokorttia.
HUOMAUTUS: Jos tietokoneessasi on verkkokortti,
kytke verkkokaapeli korttiin.
Pikaopas 9
Page 90

Liitä näyttö.
3
Näytönohjaimen tyyppi
vaikuttaa siihen, miten
näyttö voidaan liittää.
HUOMAUTUS:
Saatat tarvita näytön
www.dell.com | support.dell.com
tai näytönohjaimen
mukana tullutta sovitinta
tai kaapelia, kun liität
näytön tietokoneeseen.
10 Pikaopas
Page 91

Yhden ja kahden näytön näytönohjaimet, joissa on yksi liitin
VGA-sovitin
VGA
Käytä VGA-sovitinta, kun sinulla on yhden näytön
näytönohjain ja haluat liittää tietokoneesi VGA-näyttöön.
Kahden VGA-näytön Y-kaapelisovitin
Kahden DVI-näytön Y-kaapelisovitin
VGA
VGA
Käytä sopivaa Y-kaapelia, kun näytönohjaimessa on liitin
yhdelle näytölle ja haluat liittää tietokoneen yhteen tai
kahteen VGA-näyttöön.
Käytä sopivaa Y-kaapelia, kun näytönohjaimessa on liitin
yhdelle näytölle ja haluat liittää tietokoneen yhteen tai
kahteen DVI-näyttöön.
DVI
DVI
Kahden näytön kaapeli on värikoodattu. Sininen liitin on tarkoitettu ensisijaista näyttöä varten
ja musta liitin on toissijaiselle näytölle. Jotta kahden näytön tuki olisi käytössä, molempien
näyttöjen on oltava kytkettyinä tietokoneeseen, kun se käynnistyy.
Pikaopas 11
Page 92

Kahden näytön näytönohjaimet, joissa on DVI- ja VGA-liitin
Yksi DVI ja yksi VGA
DVI
VGA
www.dell.com | support.dell.com
Käytä oikeita liittimiä, kun haluat liittää tietokoneesi
yhteen tai kahteen näyttöön.
Kahden näytön näytönohjaimet, joissa on kaksi DVI-liitintä
Kaksois-DVI Kaksi DVI-näyttöä ja yksi
VGA-sovitin
Kaksois-VGA VGA-sovittimella
VGA
VGA
Käytä VGA-sovitinta, kun haluat liittää tietokoneesi
kahteen VGA-näyttöön.
Kaksi DVI-näyttöä ja kaksi
VGA-sovitinta
DVI
DVI
Liitä tietokoneesi yhteen tai kahteen
DVI-näyttöön DVI-liittimien avulla.
12 Pikaopas
DVI
VGA
Liitä VGA-näyttö tietokoneesi
jompaan kumpaan DVI-liittimeen
VGA-sovittimen avulla.
VGA
VGA
Liitä kaksi VGA-näyttöä tietokoneesi
DVI-liittimiin kahden
VGA-sovittimen avulla.
Page 93

Liitä kaiuttimet.
4
HUOMAUTUS:
Jos tietokoneessasi
on äänikortti, kytke
kaiuttimet korttiin.
Liitä virtakaapelit
5
ja kytke virta
tietokoneeseen
ja näyttöön.
Pikaopas 13
Page 94

Asenna muita ohjelmia tai laitteita.
6
Jos asennat tietokoneeseen myöhemmin uusia lisälaitteita tai ohjelmistoja, tutustu lisälaitteen
tai ohjelmiston käyttöohjeeseen. Voit myös tarkistaa myyjältä, että ohjelmisto tai lisälaite on
yhteensopiva tietokoneesi ja käyttöjärjestelmäsi kanssa.
Onneksi olkoon! Minitornitietokoneesi asennus on valmis.
Pöytätietokoneen asentaminen
www.dell.com | support.dell.com
VAARA: Tutustu Tuotetieto-oppaan turvallisuusohjeisiin ennen tässä esitettyjen
toimenpiteiden suorittamista.
Tietokoneen oikea käyttöönotto edellyttää kaikkien vaiheiden suorittamista.
Liitä näppäimistö ja hiiri tietokoneeseen.
1
VAROITUS:
Älä liitä modeemijohtoa
verkkoliitäntään.
Puhelinlinjan jännite voi
vaurioittaa verkkokorttia.
14 Pikaopas
Page 95

Kytke modeemi-
2
tai verkkokaapeli.
HUOMAUTUS:
Jos tietokoneessasi
on verkkokortti, kytke
verkkokaapeli korttiin.
Liitä näyttö.
3
Näytönohjaimen tyyppi vaikuttaa
siihen, miten näyttö voidaan liittää.
HUOMAUTUS: Saatat tarvita
näytön tai näytönohjaimen mukana
tullutta sovitinta tai kaapelia,
kun liität näytön tietokoneeseen.
Pikaopas 15
Page 96

Yhden ja kahden näytön näytönohjaimet, joissa on yksi liitin
VGA-sovitin
VGA
www.dell.com | support.dell.com
Käytä VGA-sovitinta, kun sinulla on yhden näytön
näytönohjain ja haluat liittää tietokoneesi VGA-näyttöön.
Kahden VGA-näytön Y-kaapelisovitin
Kahden DVI-näytön Y-kaapelisovitin
VGA
VGA
Käytä sopivaa Y-kaapelia, kun näytönohjaimessa on
liitin yhdelle näytölle ja haluat liittää tietokoneen
yhteen tai kahteen VGA-näyttöön.
Kahden näytön kaapeli on värikoodattu. Sininen liitin on tarkoitettu ensisijaista näyttöä
varten ja musta liitin on toissijaiselle näytölle. Jotta kahden näytön tuki olisi käytössä,
molempien näyttöjen on oltava kytkettyinä tietokoneeseen, kun se käynnistyy.
16 Pikaopas
DVI
DVI
Käytä sopivaa Y-kaapelia, kun näytönohjaimessa on
liitin yhdelle näytölle ja haluat liittää tietokoneen
yhteen tai kahteen DVI-näyttöön.
Page 97

Kahden näytön näytönohjaimet, joissa on DVI- ja VGA-liitin
Yksi DVI ja yksi VGA
DVI
VGA
Kaksois-VGA VGA-sovittimella
VGA
VGA
Käytä oikeita liittimiä, kun haluat liittää tietokoneesi
yhteen tai kahteen näyttöön.
Käytä VGA-sovitinta, kun haluat liittää tietokoneesi
kahteen VGA-näyttöön.
Kahden näytön näytönohjaimet, joissa on kaksi DVI-liitintä
Kaksois-DVI Kaksi DVI-näyttöä ja yksi
VGA-sovitin
DVI
DVI
Liitä tietokoneesi yhteen tai kahteen
DVI-näyttöön DVI-liittimien avulla.
DVI
VGA
Liitä VGA-näyttö tietokoneesi
jompaan kumpaan DVI-liittimeen
VGA-sovittimen avulla.
Kaksi DVI-näyttöä ja kaksi
VGA-sovitinta
VGA
VGA
Liitä kaksi VGA-näyttöä
tietokoneesi DVI-liittimiin
kahden VGA-sovittimen avulla.
Pikaopas 17
Page 98

Liitä kaiuttimet.
4
www.dell.com | support.dell.com
HUOMAUTUS: Jos tietokoneessasi on äänikortti, kytke kaiuttimet korttiin.
Liitä virtakaapelit ja kytke
virta tietokoneeseen
5
ja näyttöön.
Pöytätietokoneessa on
lisävarusteena IEEE 1394 -liitin
laitteen etuosassa. Liitin on
käytettävissä vain, jos hankit
IEEE 1394 -lisäkortin.
Jos haluat hankkia kortin,
ota yhteyttä Delliin.
Lisätietoja kortista on
Käyttöoppaassa
.
Jos asennat tietokoneeseen myöhemmin uusia lisälaitteita tai ohjelmistoja, tutustu lisälaitteen
tai ohjelmiston käyttöohjeeseen. Voit myös tarkistaa myyjältä, että ohjelmisto tai lisälaite
on yhteensopiva tietokoneesi ja käyttöjärjestelmäsi kanssa.
Onneksi olkoon! Pöytätietokoneesi asennus on valmis.
18 Pikaopas
Asenna muita ohjelmia tai laitteita.
6
Page 99

Käyttöoppaan etsiminen
Dell Precision™ Workstation 370 -tietokoneen Käyttöopas
• tekniset tiedot
• näkymät tietokoneen edestä ja takaa sekä kaikki käytettävissä olevat liittimet
• sisäkuvat tietokoneesta ja tarkat kuvat emolevystä sekä liittimistä
• ohjeet tietokoneen puhdistamiseksi
• tietoja ohjelmisto-ominaisuuksista, kuten LegacySelect Technology -ohjaimesta,
salasanan käyttämisestä ja järjestelmän asetusvaihtoehdoista
• vihjeitä ja ohjeita Microsoft Windows XP -käyttöjärjestelmän käyttöä varten
• ohjeita osien, kuten muistin, korttien, ohjainten, asemien, suorittimen ja akun
irrottamisesta ja asentamisesta
• tietoja erilaisten vikojen määrityksestä
• ohjeita Dell Diagnostics -ohjelman käytöstä ja ohjainten uudelleenasennuksesta
• tietoja yhteyden ottamisesta Delliin.
Voit käyttää
Kiintolevyllä olevan käyttöoppaan käyttäminen:
Napsauta
Dellin tukisivustossa olevan käyttöoppaan käyttäminen:
1
2
3
käyttöopasta
Käynnistä
Mene osoitteeseen
Vastaa sivuston esittämiin kysymyksiin tietokoneestasi.
Valitse Dellin tuen sivuston kotisivulta
ja valitse Dell Precision -tietokoneesi.
kiintolevyltäsi tai Dellin tukisivustosta osoitteessa
-painiketta ja valitse
support.dell.com
Ohje ja tuki.
.
Reference
sisältää lisätietoja tietokoneestasi, kuten:
support.dell.com
, valitse
User’s Guides
, valitse
Systems
.
Pikaopas 19
Page 100

Minitornitietokoneen avaaminen
VAARA: Tutustu Tuotetieto-oppaan turvallisuusohjeisiin ennen tässä esitettyjen toimenpiteiden
suorittamista.
VAARA: Estä sähköiskut irrottamalla tietokone aina virtalähteestä ennen kotelon avaamista.
VAROITUS: Tallenna ja sulje avoimet tiedostot ja sulje avoimet ohjelmat ennen
kuin sammutat tietokoneen.
Tietokoneen sammuttaminen käyttöjärjestelmästä:
1
a
Tallenna ja sulje avoimet tiedostot ja lopeta avoimet ohjelmat, valitse
Sammuta tietokone
b
www.dell.com | support.dell.com
2
3
4
5
6
Valitse
Tietokone sammutetaan, kun käyttöjärjestelmä on suorittanut sammutusvaiheen.
Varmista, että virta on katkaistu tietokoneesta ja sen oheislaitteista. Jos tietokoneen
ja sen oheislaitteiden virta ei katkennut automaattisesti sammutettaessa tietokonetta,
katkaise niistä virta nyt.
Irrota mahdollinen takapaneelin riippulukkorenkaassa oleva lukko.
VAROITUS: Varmista, että pöydällä on kannen avaamiseksi riittävästi tilaa, eli vähintään 30 senttiä.
Aseta tietokone kyljelleen seuraavassa kuvassa näkyvällä tavalla.
Avaa kansi:
a
Kun tietokoneen takaosa on itseesi päin, paina tietokoneen oikeassa sivussa olevaa
vapautuspainiketta yhdellä kädellä ja nosta kannen yläosaa ylöspäin toisella kädellä.
b
Paina tietokoneen vasemmassa sivussa olevaa vapautuspainiketta yhdellä kädellä
ja nosta kannen yläosaa ylöspäin toisella kädellä.
Pidä kiinni tietokoneen pohjasta yhdellä kädellä ja vedä kansi auki toisella kädellä.
.
Sammuta tietokone
-ikkunasta
Sammuta
Käynnistä
ja valitse
.
20 Pikaopas
 Loading...