

Page 1

Dell Docking Station WD19DCS Dual Cable
User Guide
Reg ula tor y M ode l: K20 A
Reg ula tor y T ype : K 20A 001
Feb rua ry 202 1
Rev . A 00
Page 2

Notes, cautions, and warnings
NOTE: A NOTE indicates important information that helps you make better use of your product.
CAUTION: A CAUTION indicates either potential damage to hardware or loss of data and tells you how to avoid
the problem.
WARNING: A WARNING indicates a potential for property damage, personal injury, or death.
© 2021 Dell Inc. or its subsidiaries. All rights reserved. Dell, EM C, and other trademarks are trademarks of Dell Inc. or its subsidiaries. Oth er
trademarks may be trademarks of their respective owners.
Page 3

Contents
Chapter 1: Introduction................................................................................................................. 4
Chapter 2: Package contents ....................................................................................................... 5
Chapter 3: Hardware requirements................................................................................................ 7
Chapter 4: Identifying Parts and Features .................................................................................... 8
Chapter 5: Important Information................................................................................................ 12
Chapter 6: Quick Setup of Hardware ........................................................................................... 13
Chapter 7: Setup of External Monitors......................................................................................... 18
Updating the graphics drivers for your computer......................................................................................................18
Configuring your Monitors............................................................................................................................................... 18
Display bandwidth.............................................................................................................................................................. 19
Display Resolution Table................................................................................................................................................... 19
Chapter 8: Removing the USB Type-C cable module ....................................................................21
Chapter 9: Technical specifications.............................................................................................25
LED Status Indicators..................................................................................................................................................25
Power Adapter LED................................................................................................................................................. 25
Docking Status Indicator...................................................................................................................................... 25
Docking specifications..................................................................................................................................................... 25
Input/Output (I/O) Connectors.............................................................................................................................. 26
Dell ExpressCharge and ExpressCharge boost overview........................................................................................ 27
Chapter 10: Dell docking station firmware update .......................................................................28
Chapter 11: Frequently asked questions....................................................................................... 31
Chapter 12: Troubleshooting the Dell Performance Docking Station WD19DCS ........................... 33
Symptoms and solutions..................................................................................................................................................33
Chapter 13: Getting help............................................................................................................. 36
Contacting Dell.................................................................................................................................................................. 36
Contents 3
Page 4

Introduction
The Dell Performance Docking Station WD19DCS is a device that links all your electronic devices to your system using a
dual USB Type-C cable interface. Connecting the system to the docking station allows you to access all peripherals (mouse,
keyboard, stereo speakers, external hard drive, and large-screen displays) without having to plug each one into the system.
CAUTION: Update your system’s BIOS, graphic drivers and the Dell Performance Docking Station WD19DCS
drivers to the latest versions available at www.dell.com/support BEFORE using the docking station. Older BIOS
versions and drivers could result your system not recognizing the docking station or not functioning optimally.
Always check if any recommended firmware is available for your docking station at www.dell.com/support.
1
4 Introduction
Page 5
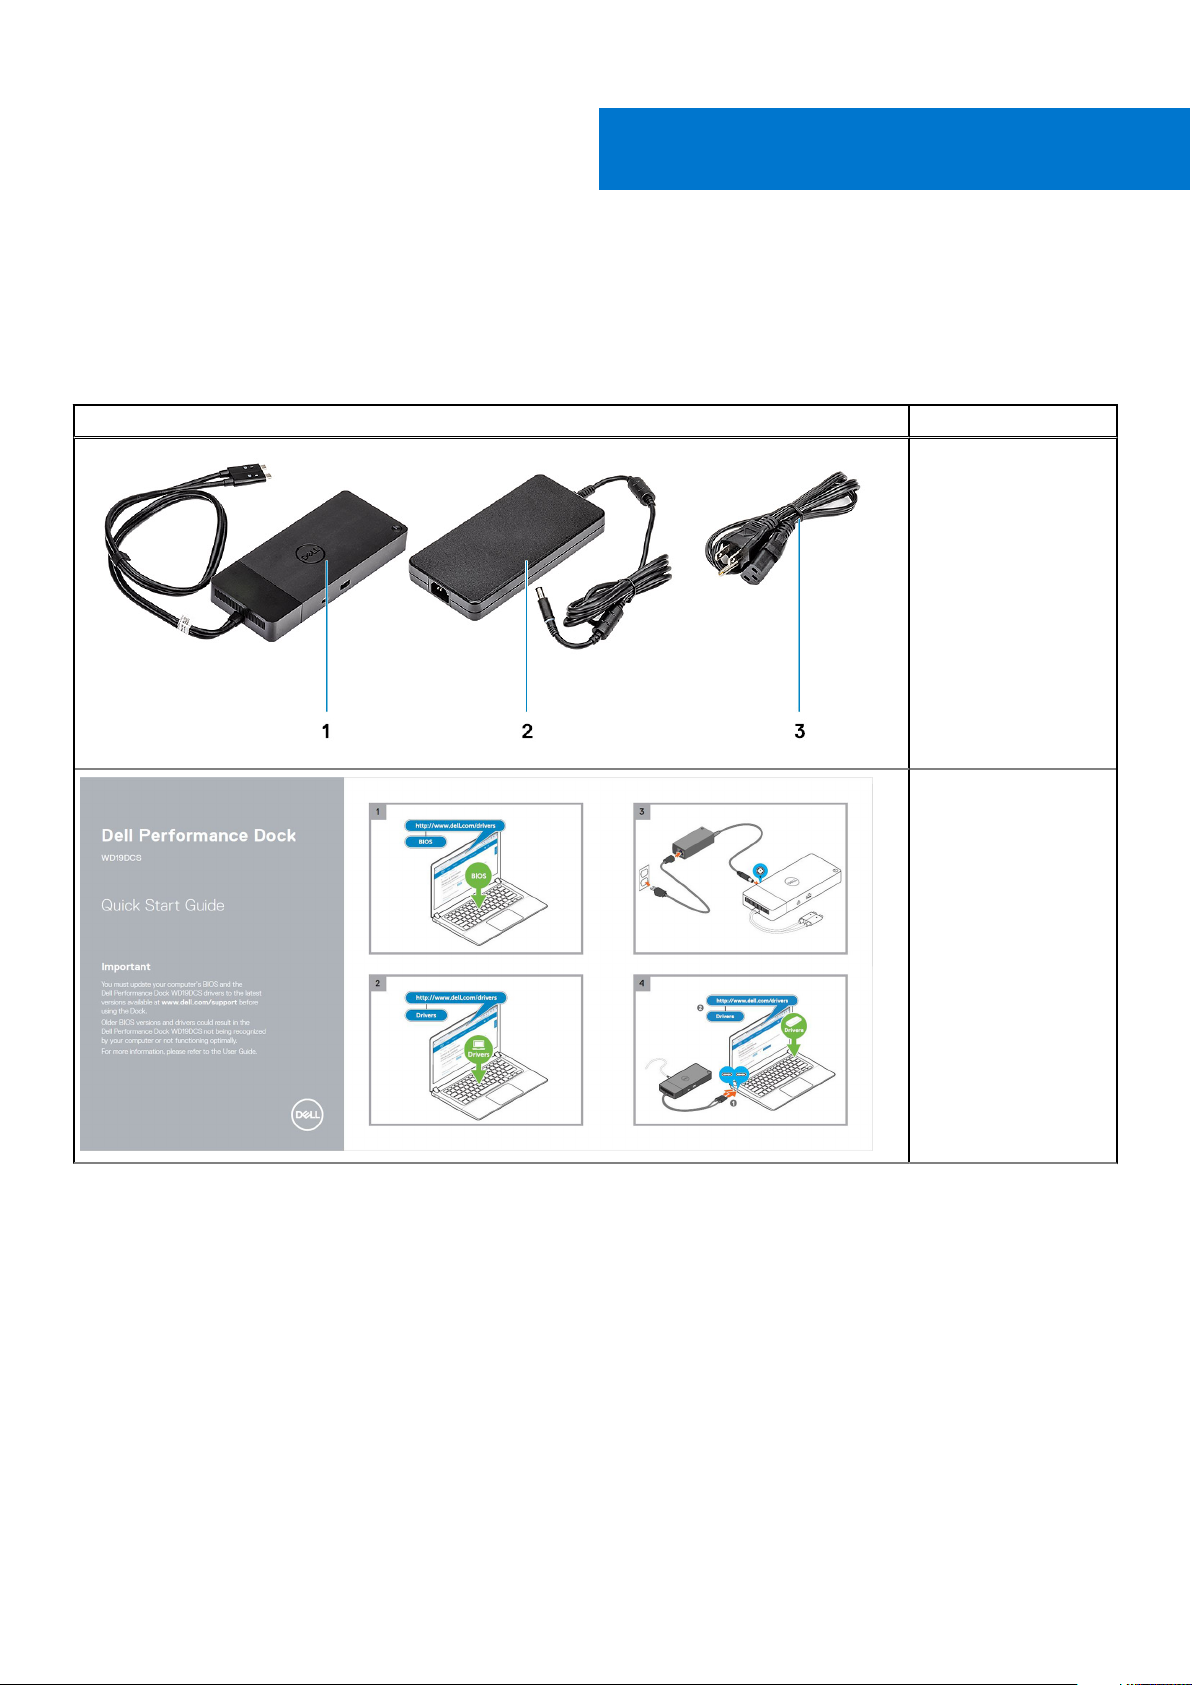
Package contents
Your docking station ships with the components shown below. Ensure that you have received all the components and contact
Dell (see your invoice for contact information) if something is missing.
Table 1. Package contents
Contents Specifications
1. Docking station
with USB Type-C
cable
2. Power adapter
3. Power cord
2
Quick Setup Guide
(QSG)
Package contents 5
Page 6
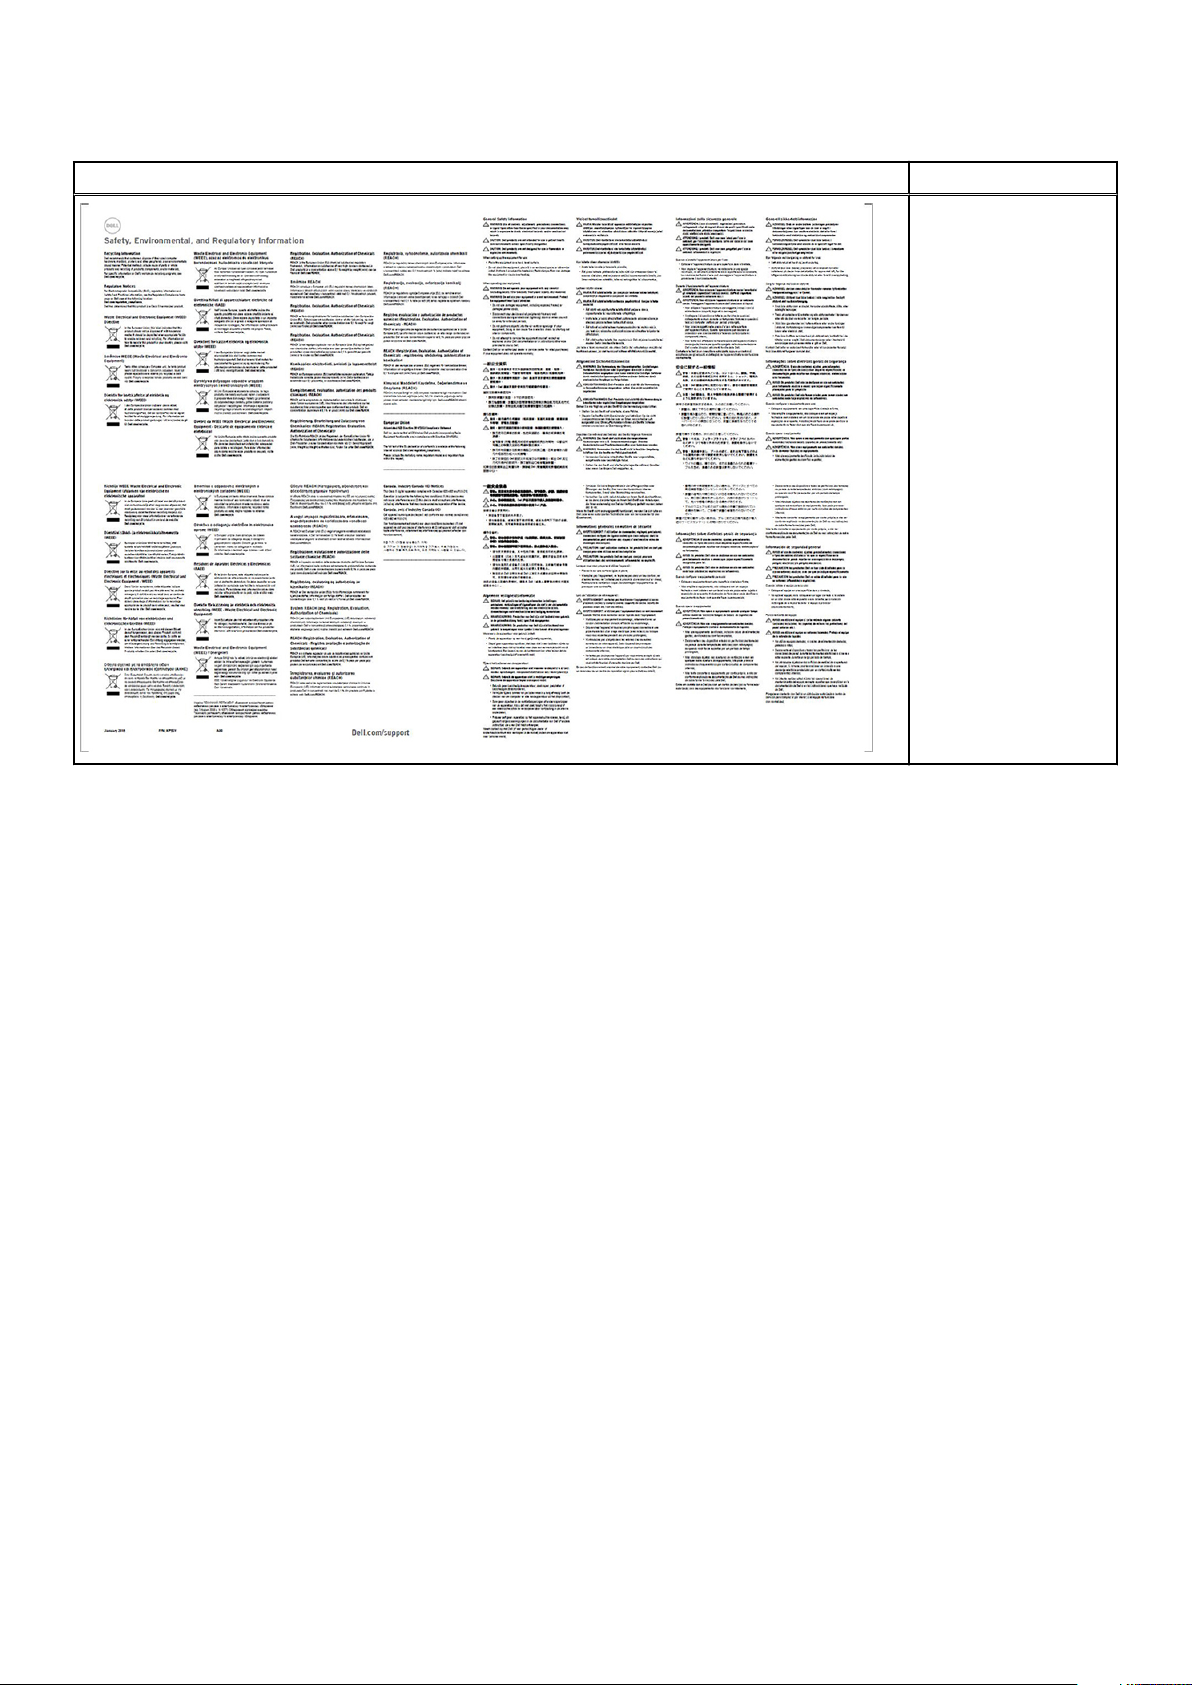
Table 1. Package contents (continued)
Contents Specifications
Safety, Environmental,
and Regulatory
Information
6 Package contents
Page 7

Hardware requirements
Before using the docking station, ensure that your system has a DisplayPort over dual USB Type-C designed to support the
docking station.
NOTE: Dell Docking stations are supported with select Dell systems. See the Dell Commercial Docking Compatibility Guide
for the list of supported systems and recommended docking.
3
Hardware requirements 7
Page 8
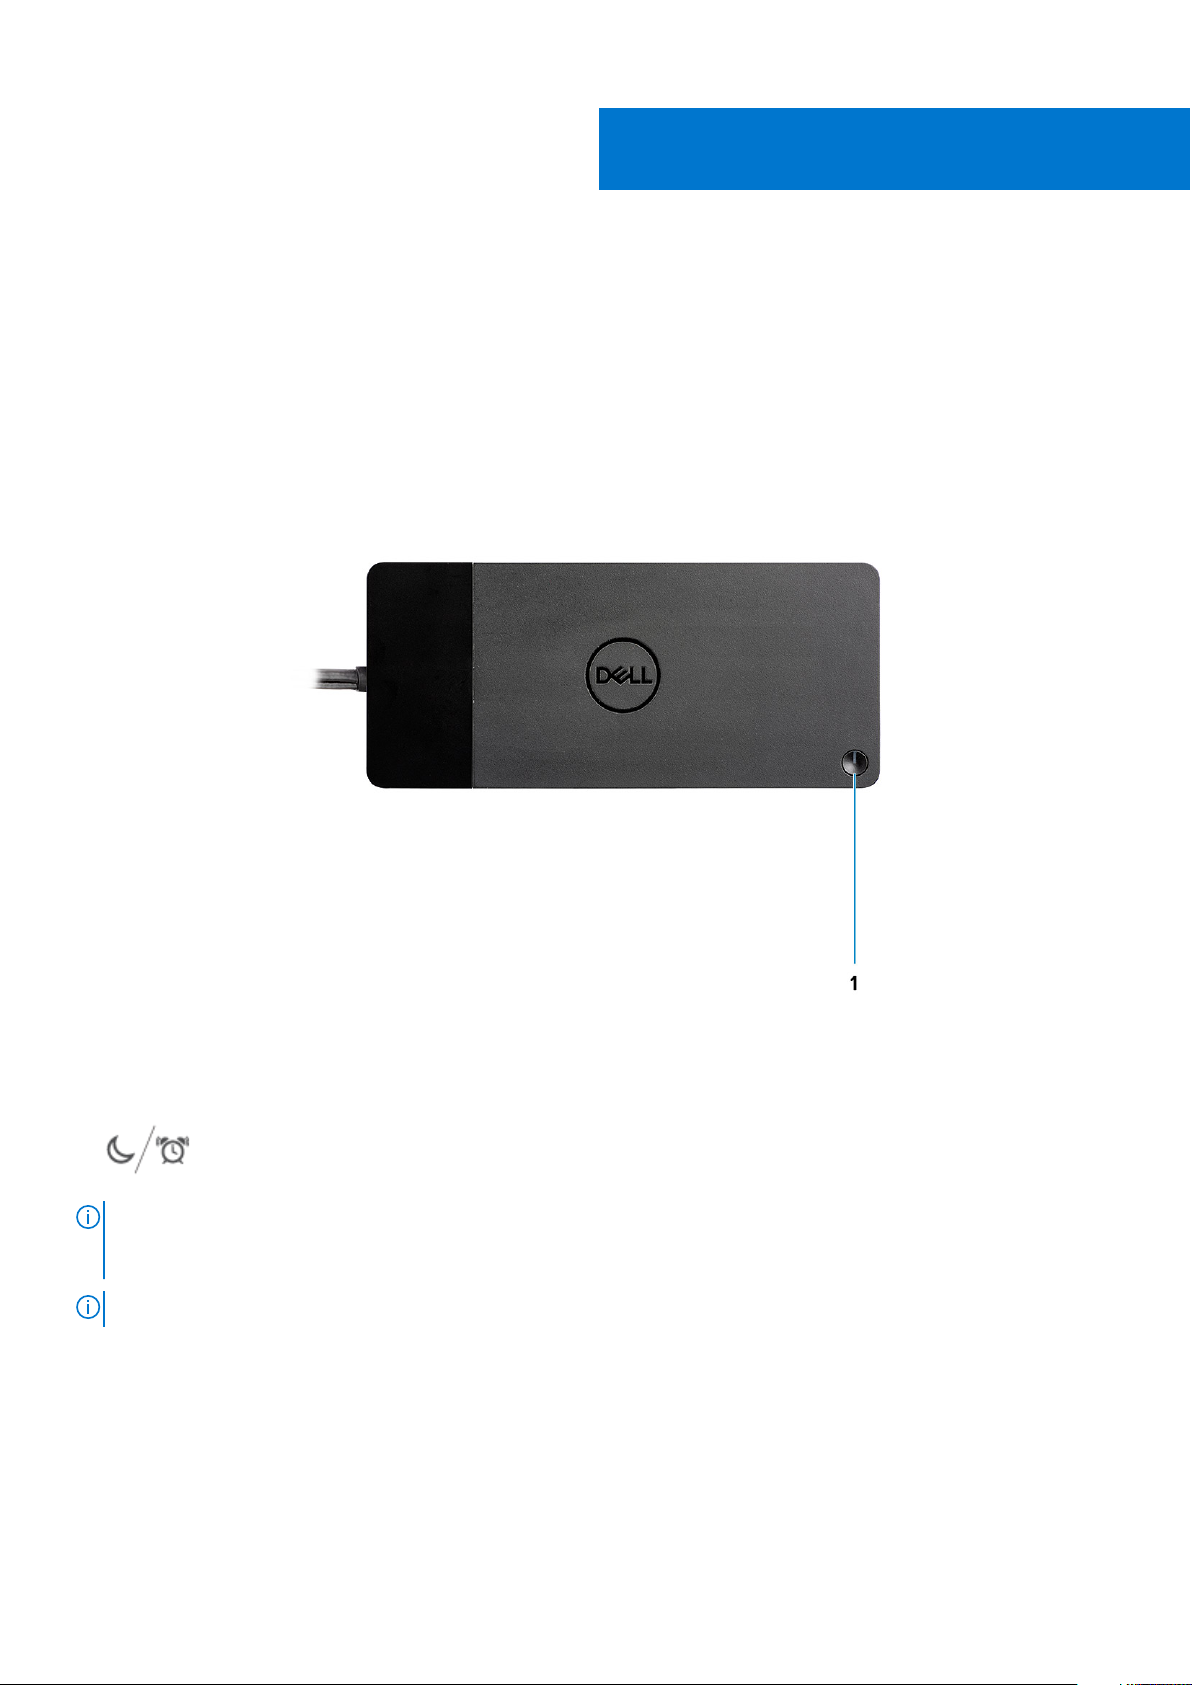
4
Identifying Parts and Features
Figure 1. Top view
1.
NOTE:
Station WD19DCS to supported Dell systems, the dock button works like your system's power button and you can use it to
power on/sleep/force shutdown the system.
NOTE: The dock button is not functional when connected to unsupported Dell systems or non-Dell systems.
8 Identifying Parts and Features
Sleep/Wake up/Power button
The dock button is designed to replicate your system's power button. If you connect the Dell Performance Docking
Page 9
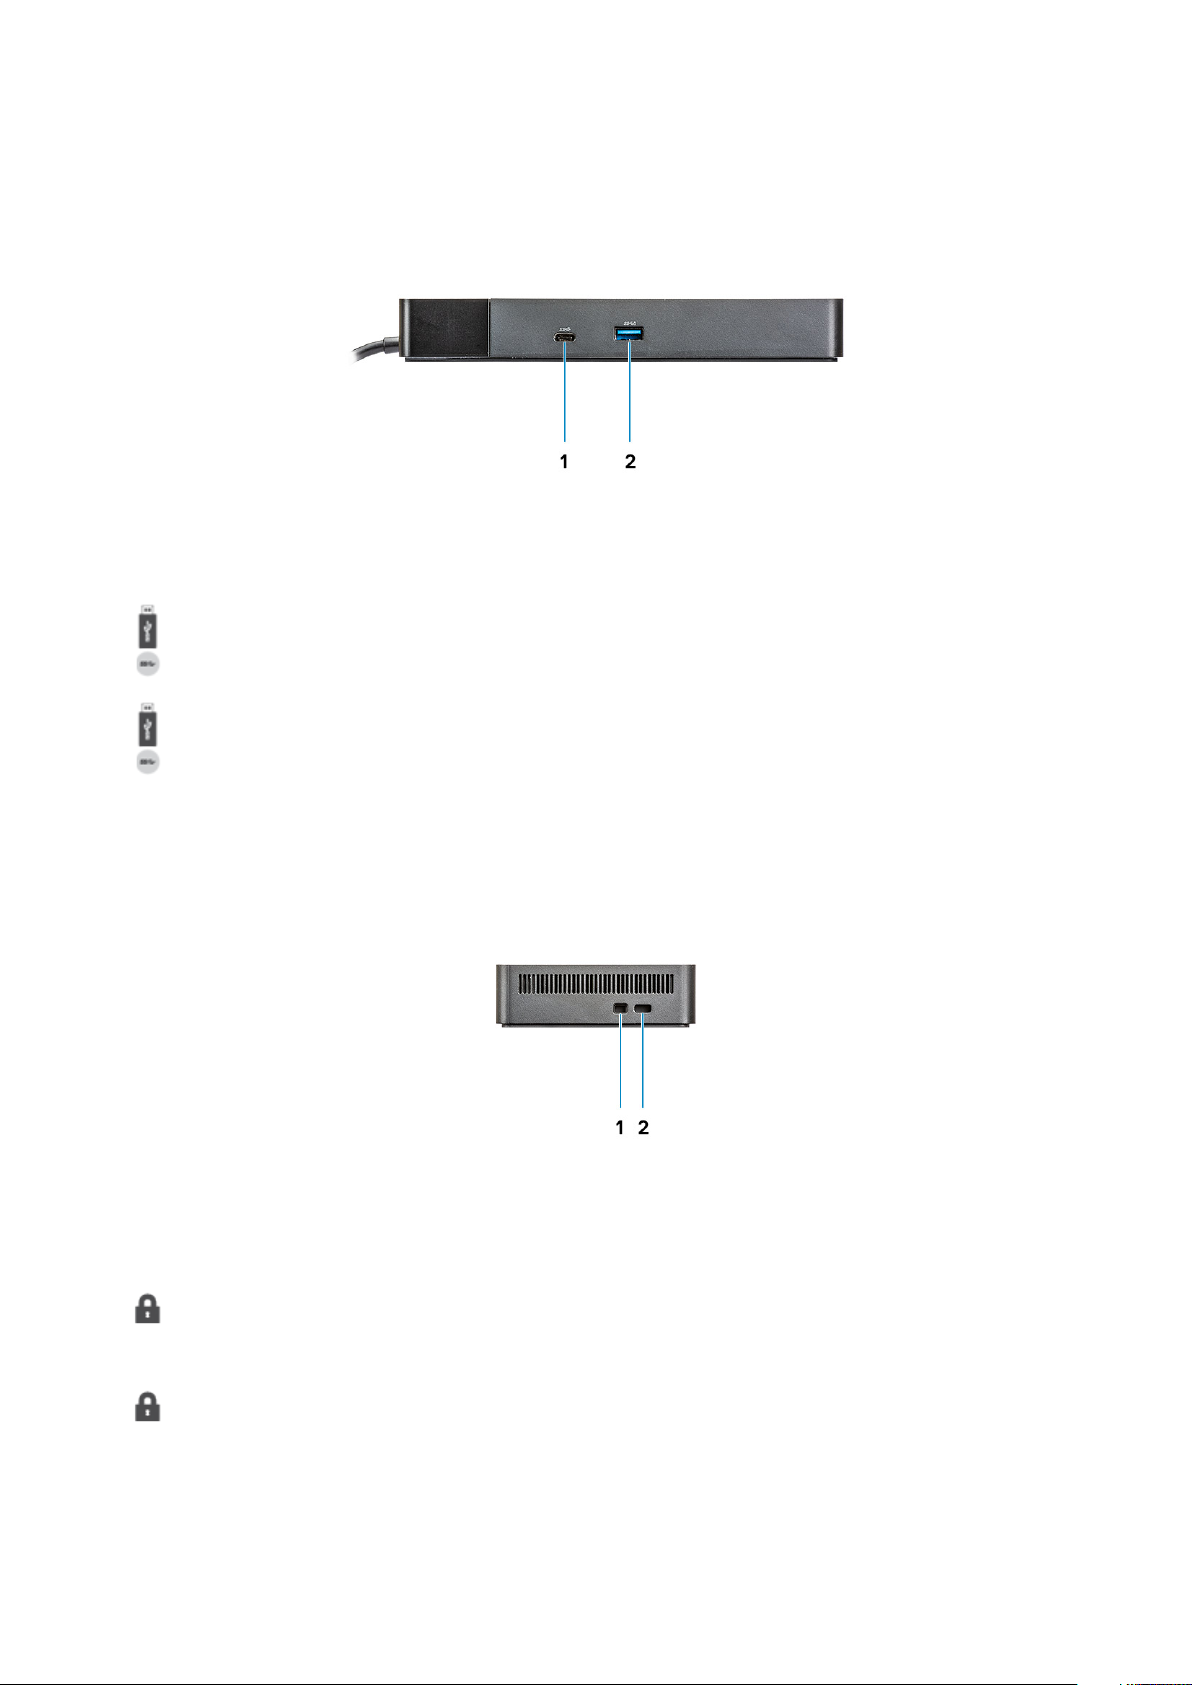
Figure 2. Front view
1. USB 3.1 Gen1/Gen2 Type-C port
2. USB 3.1 Gen1 port with PowerShare
Figure 3. Left view
1. Wedge-shaped lock slot
2. Kensington lock slot
Identifying Parts and Features
9
Page 10
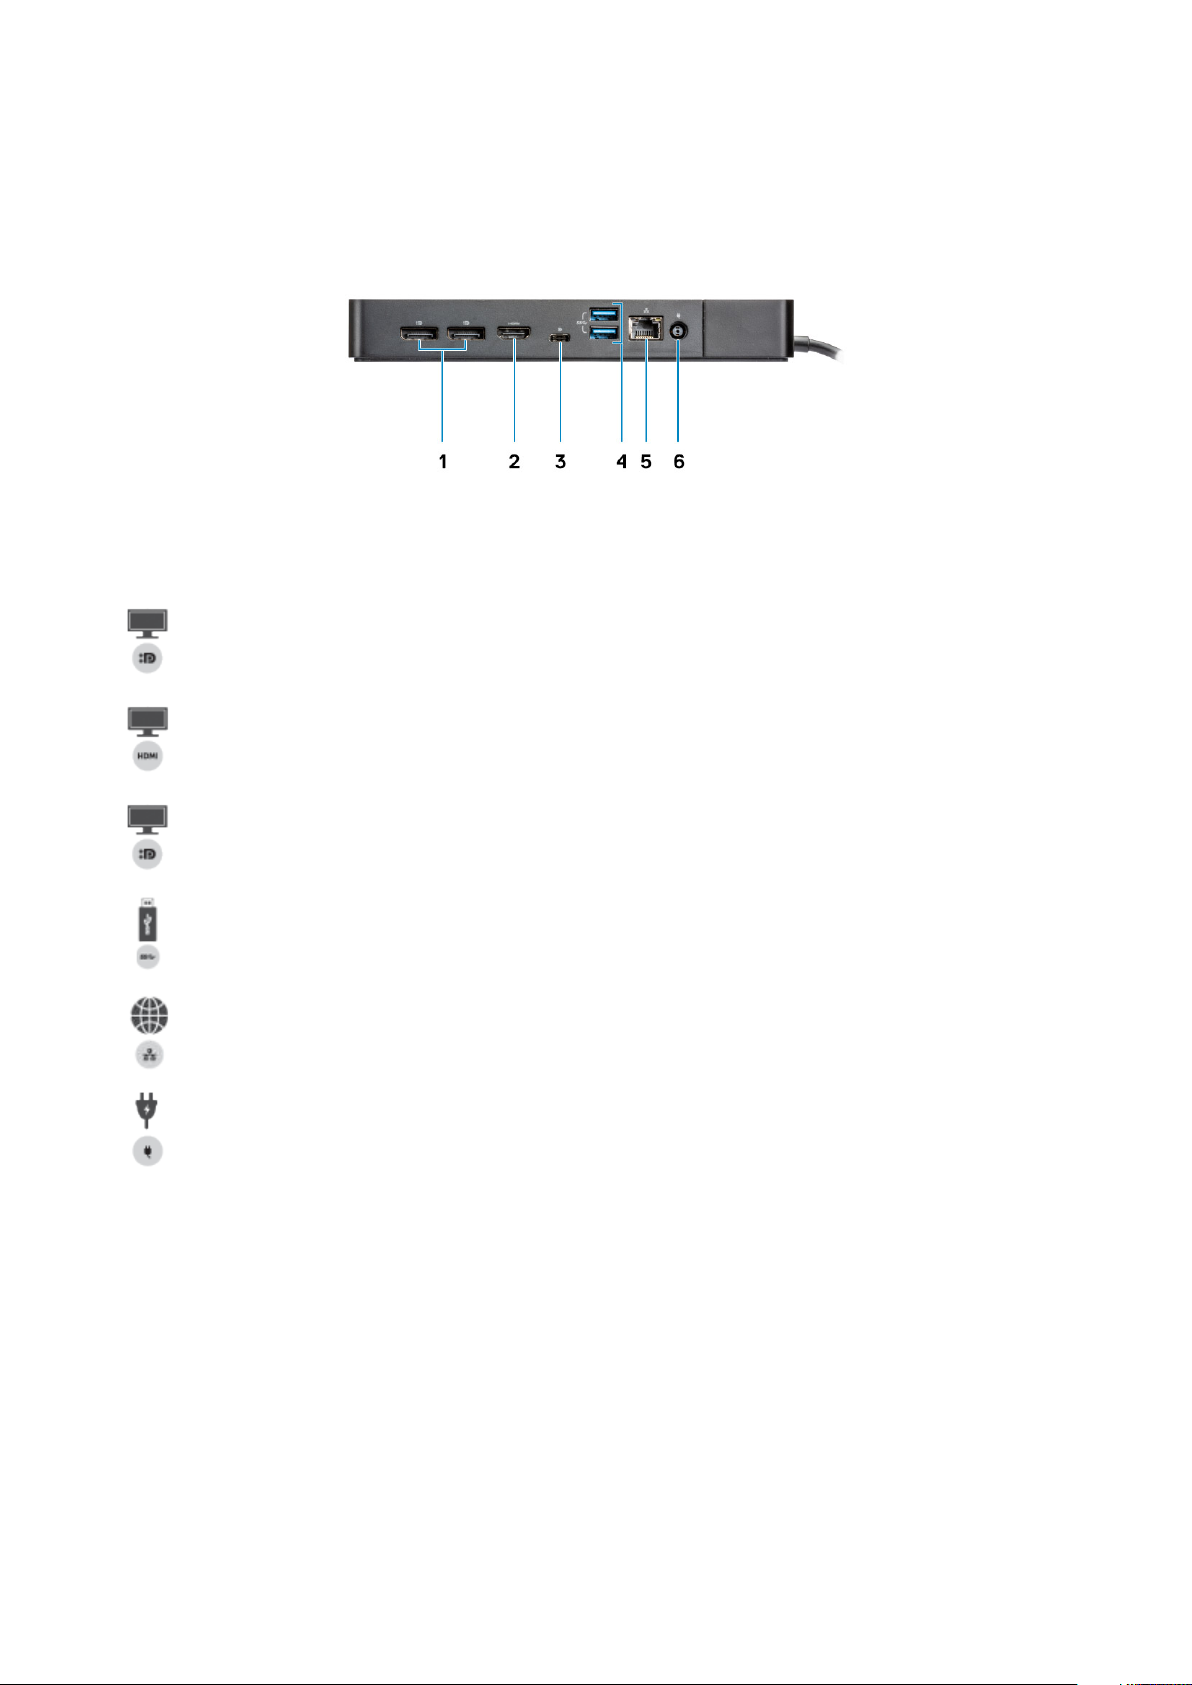
Figure 4. Back view
1. DisplayPort 1.4 (2)
2. HDMI2.0 port
3. USB 3.1 Gen1/Gen2 Type-C port with DisplayPort 1.4
4. USB 3.1 Gen1 port (2)
5.
6.
10
Network connector (RJ-45)
Power connector
Identifying Parts and Features
Page 11
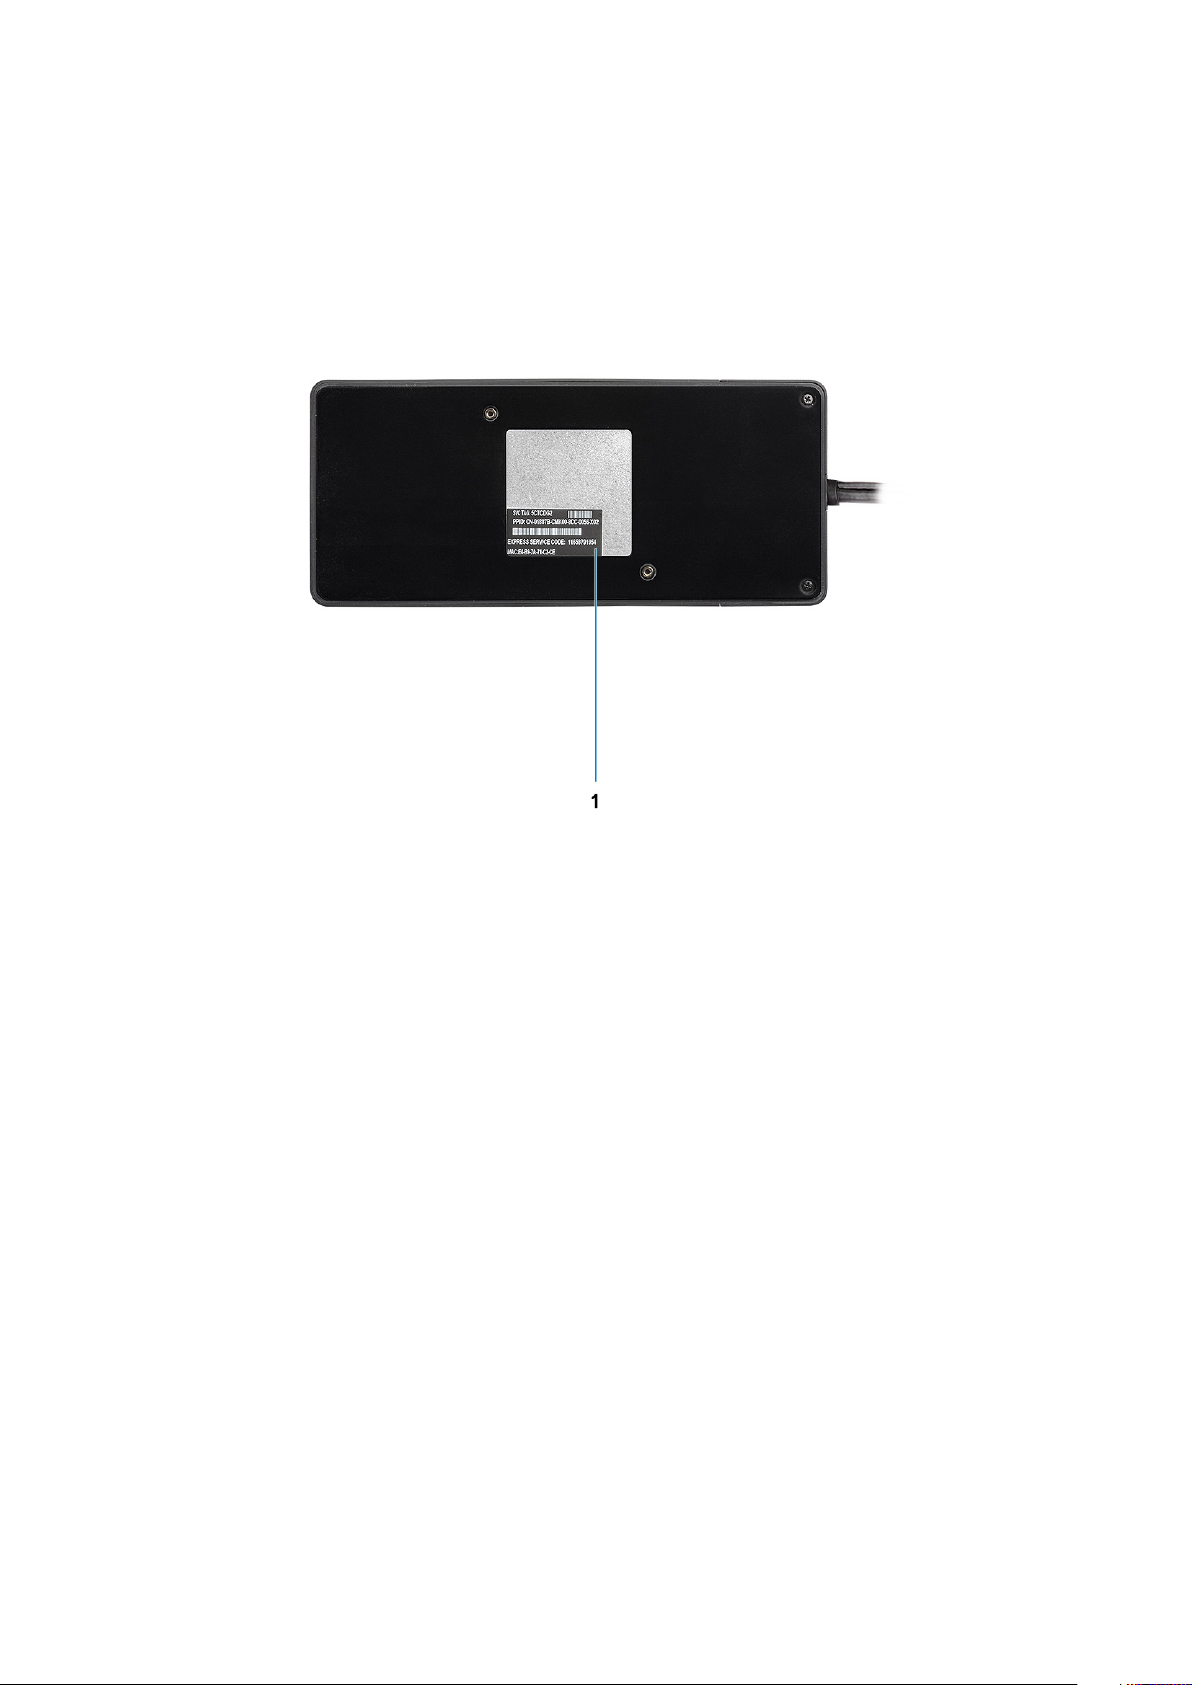
Figure 5. Bottom view
1. Service tag label
Identifying Parts and Features
11
Page 12

5
Important Information
Dell Docking Station drivers (Realtek USB GBE Ethernet Controller Driver) are required to be installed before using the docking
station for full functionality. Dell recommends updating the system BIOS and graphics driver to the latest version before using
the docking station. Older BIOS versions and drivers could result in the docking station not being recognized by your system or
not functioning optimally.
Dell highly recommends the following applications to automate the installation of BIOS, firmware, driver, and critical updates
specific to your system and docking station:
● Dell | Update - for Dell XPS systems only.
● Dell Command | Update - for Dell Latitude, Dell Precision, or XPS systems.
These applications are available for download on the Drivers & Downloads page for your product at www.dell.com/support
Updating the Dell Docking Station WD19DCS driver set
To fully support the new generation Dell Docking Station WD19DCS, it is highly recommended to install the following BIOS/
Drivers on a 64–bit Windows operating system:
1. Go to www.dell.com/support and click Detect Product to Autodefect your product, or enter your system’s Service Tag in
the Enter a Service Tag or Express Service Code field, or click View Products to browse to your system model.
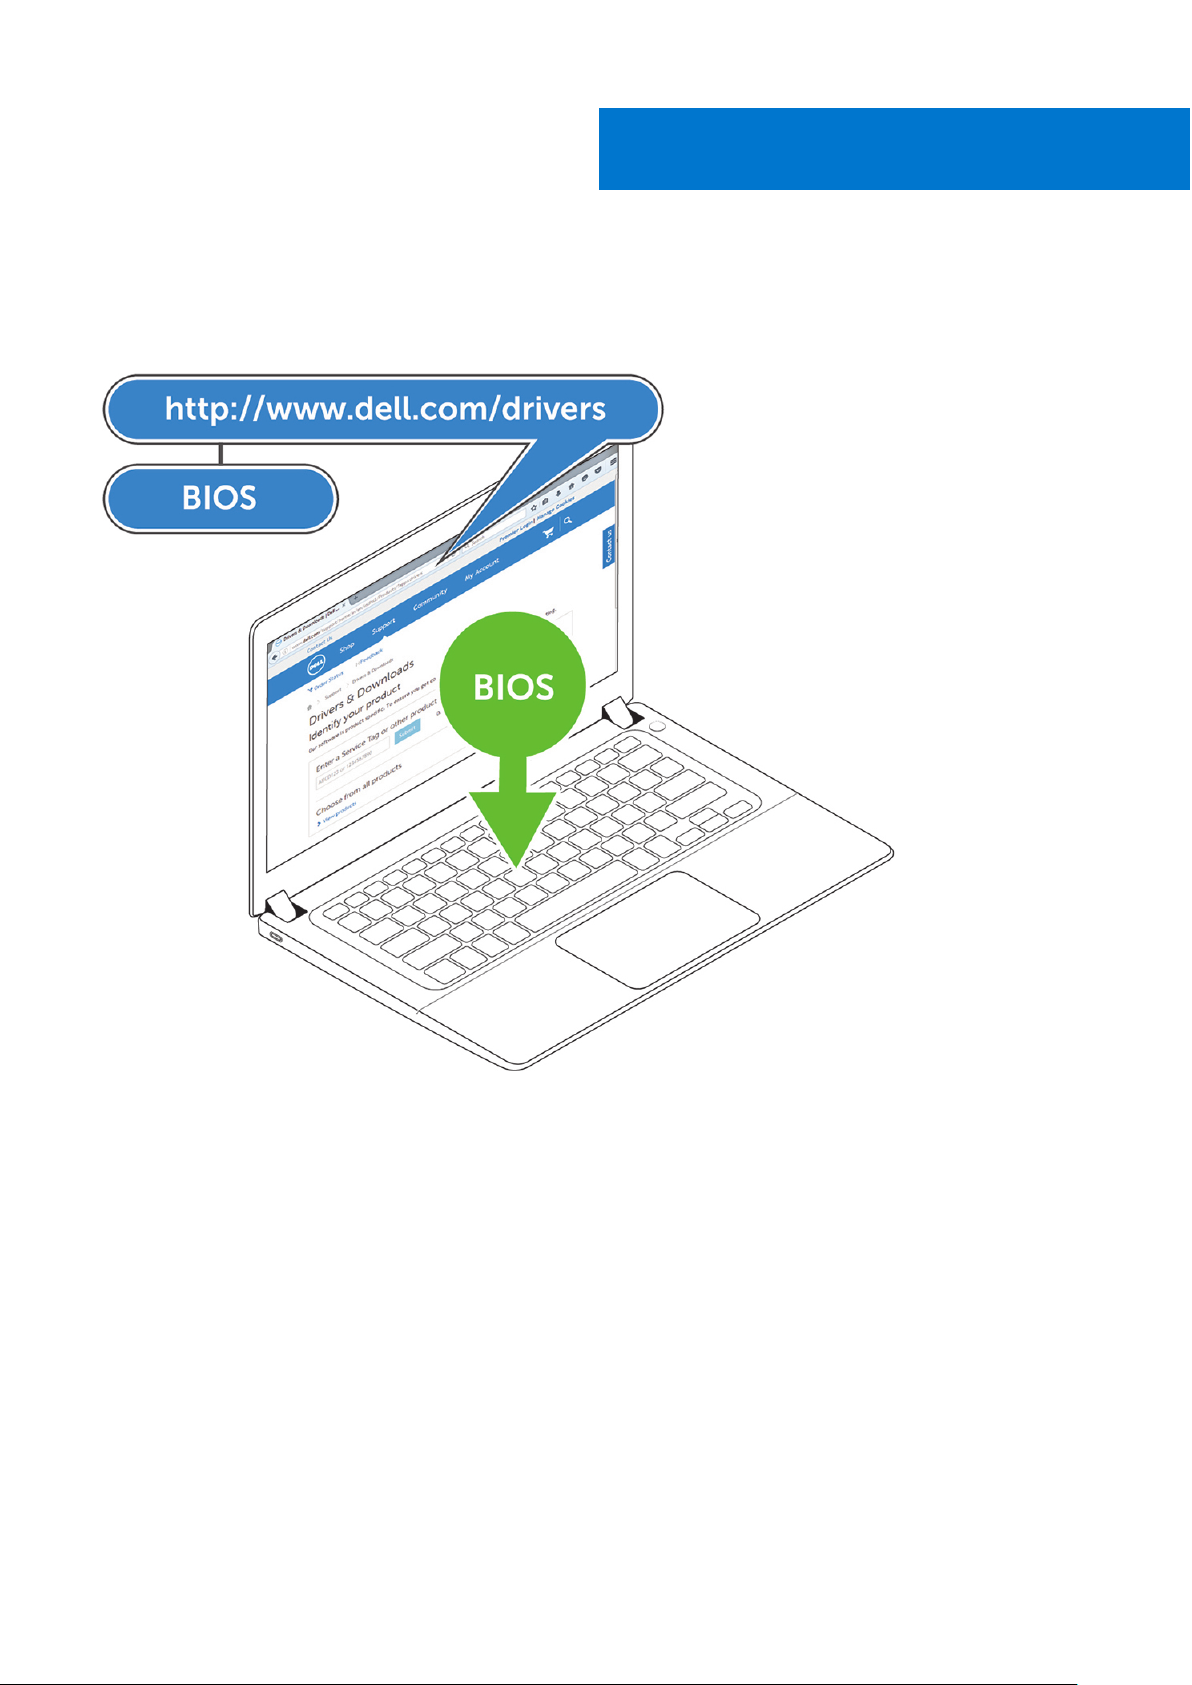
2. Flash the latest BIOS available for the system. This is available for download at dell.com/support under the “BIOS” section.
Restart the system before the next step.
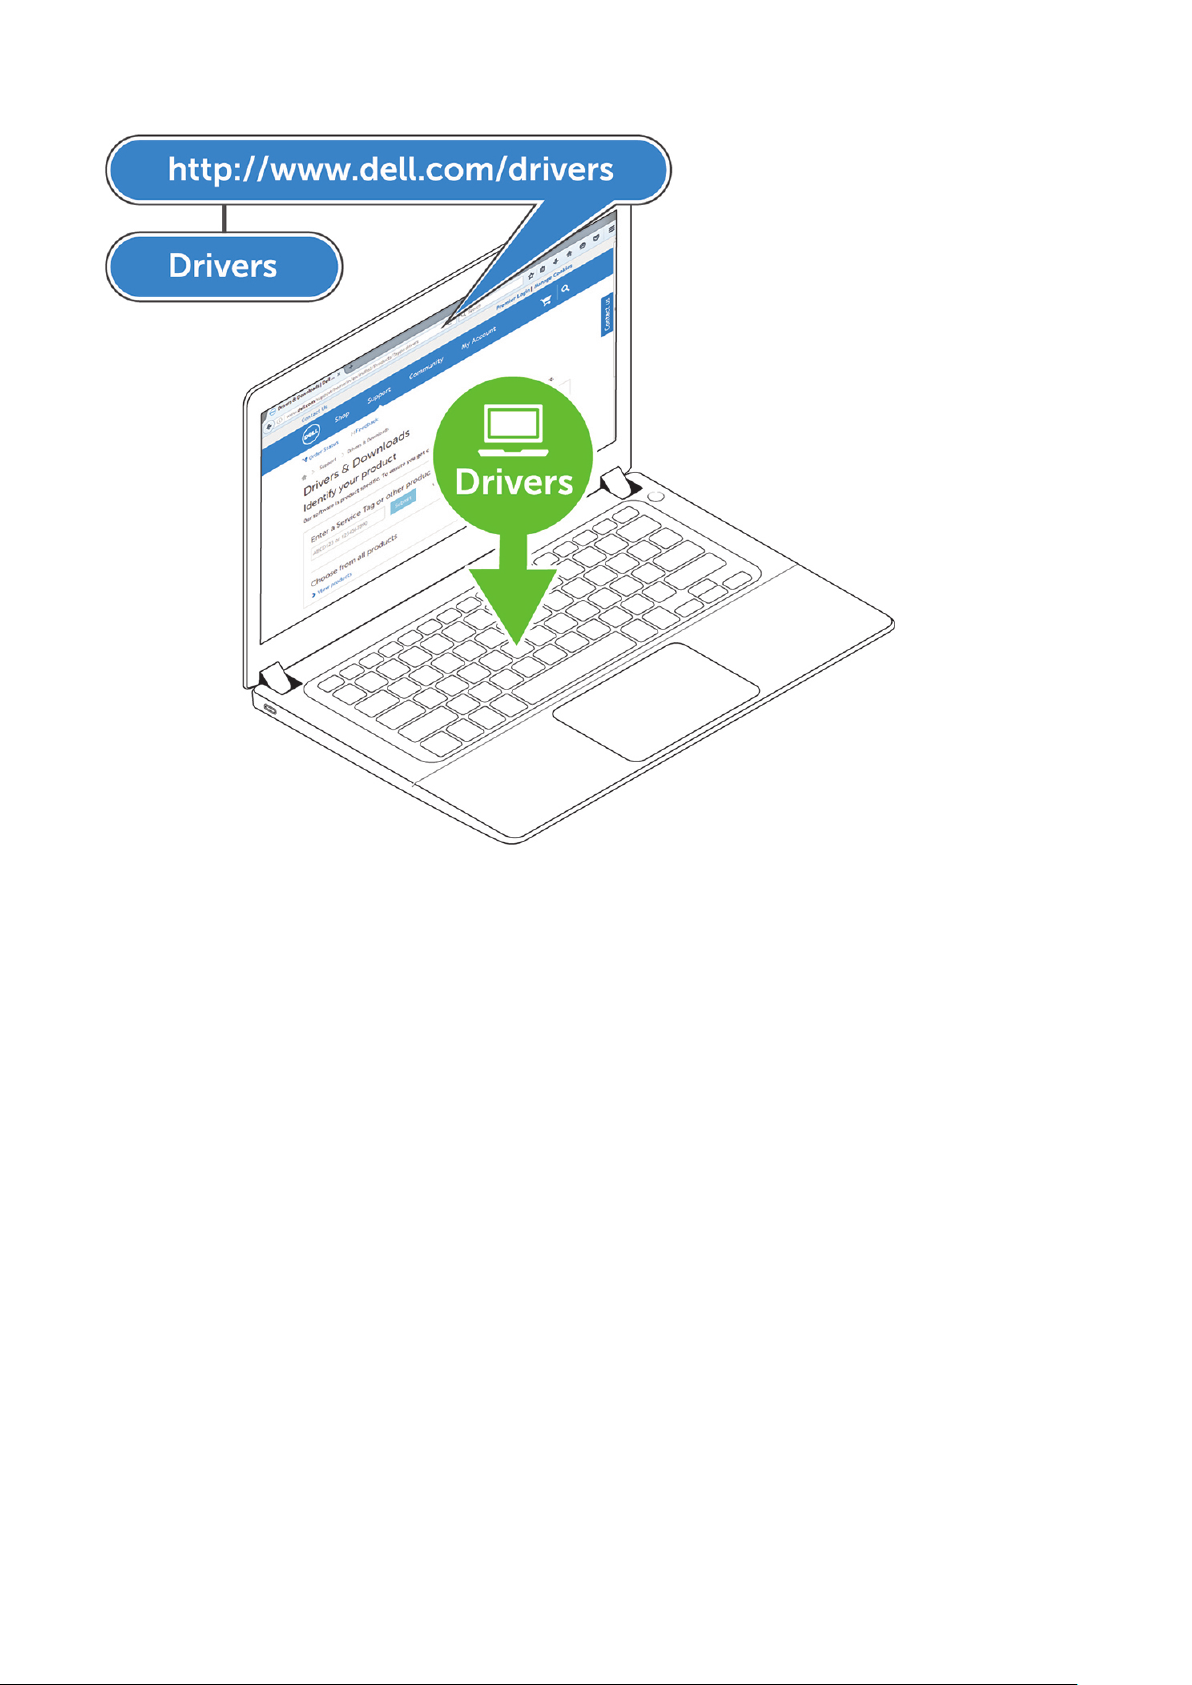
3. Install the latest Intel HD/NVIDIA/AMD Graphics drivers available for the system. This is available for download at
www.dell.com/support/drivers. Restart the system before the next step.
4. Install the Realtek USB GBE Ethernet Controller Driver for Dell Dock WD19DCS available for your system. This is
available for download at dell.com/support under the “Docks/Stand” section.
12 Important Information
Page 13
Quick Setup of Hardware
Steps
1. Update your system's BIOS, graphics and drivers from www.dell.com/support/drivers.
6
Quick Setup of Hardware 13
Page 14
2. Connect the AC adapter to a power outlet. Then, connect the AC adapter to the 7.4 mm DC-in power input on the Dell
Performance Docking Station WD19DCS .
14
Quick Setup of Hardware
Page 15
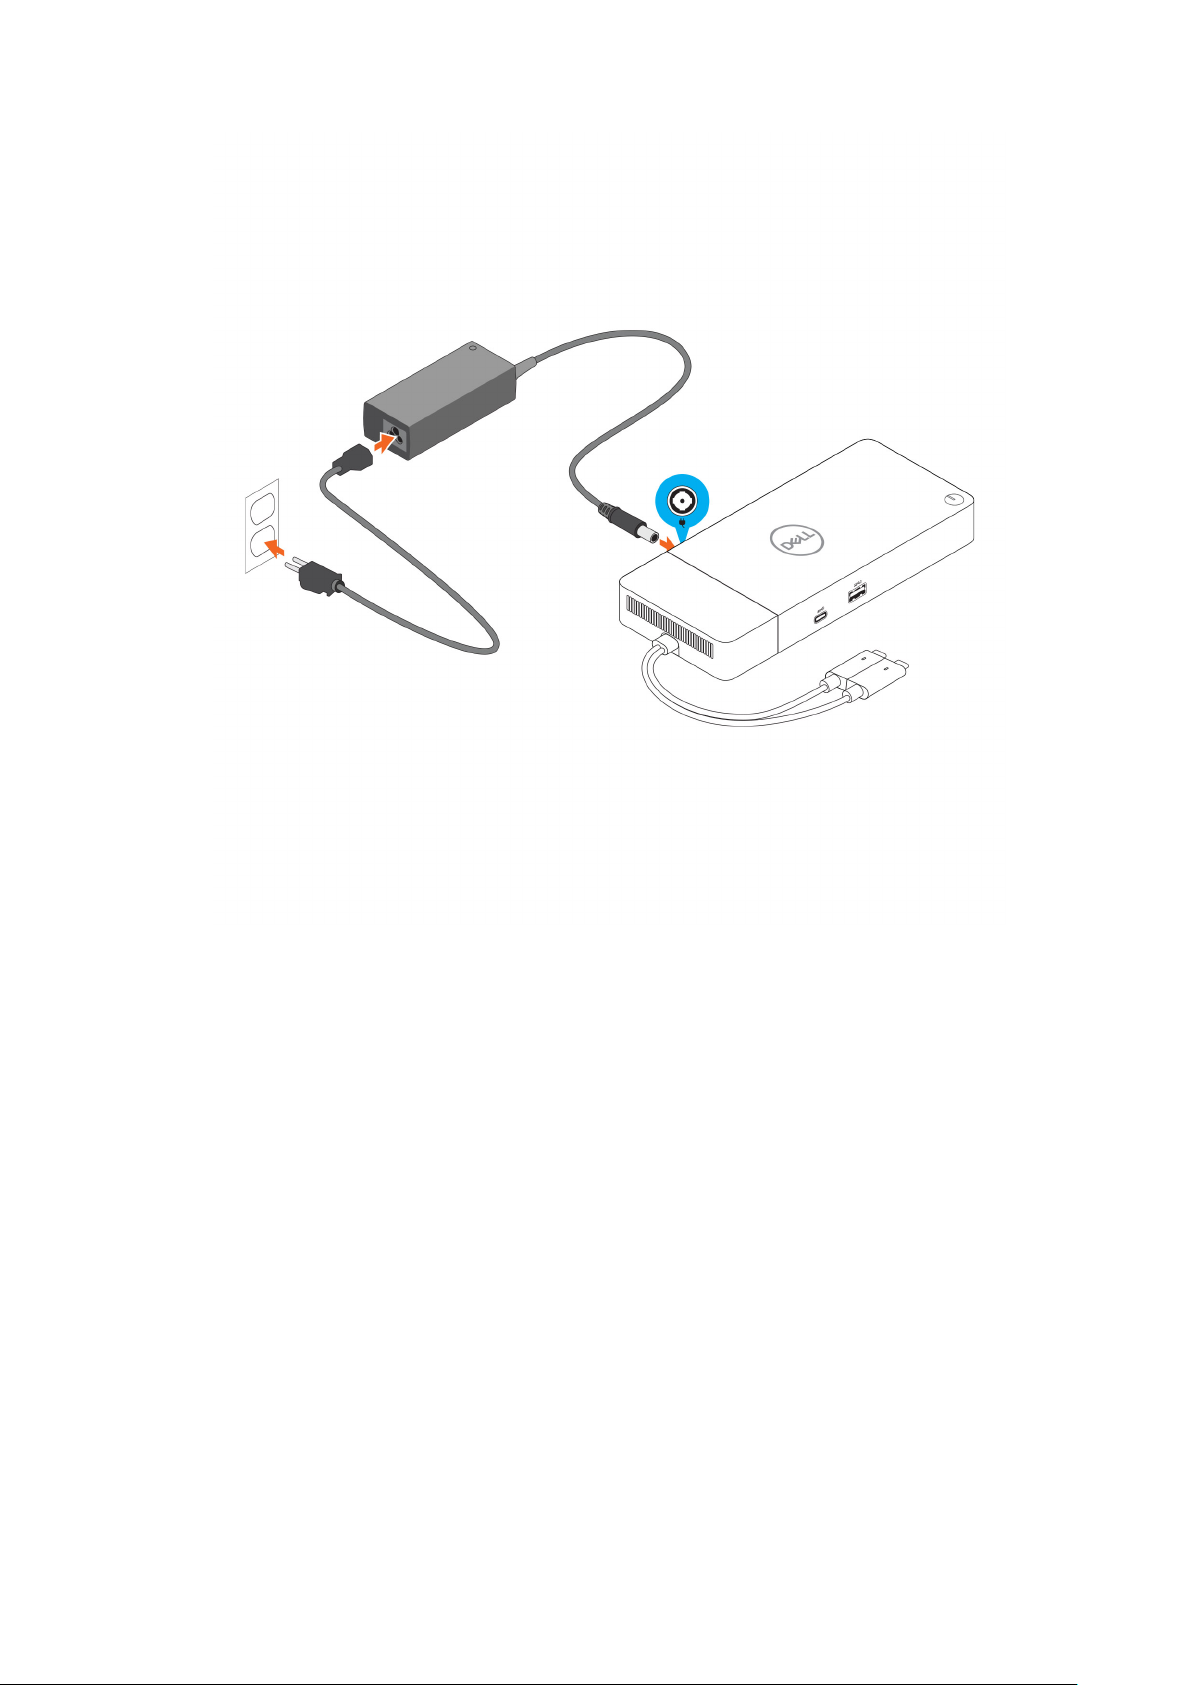
Figure 6. Connecting the AC Adapter
3. Connect the USB Type-C connector to the system.
Update the Dell Performance Docking Station WD19DCS firmware from www.dell.com/support/drivers.
Quick Setup of Hardware
15
Page 16
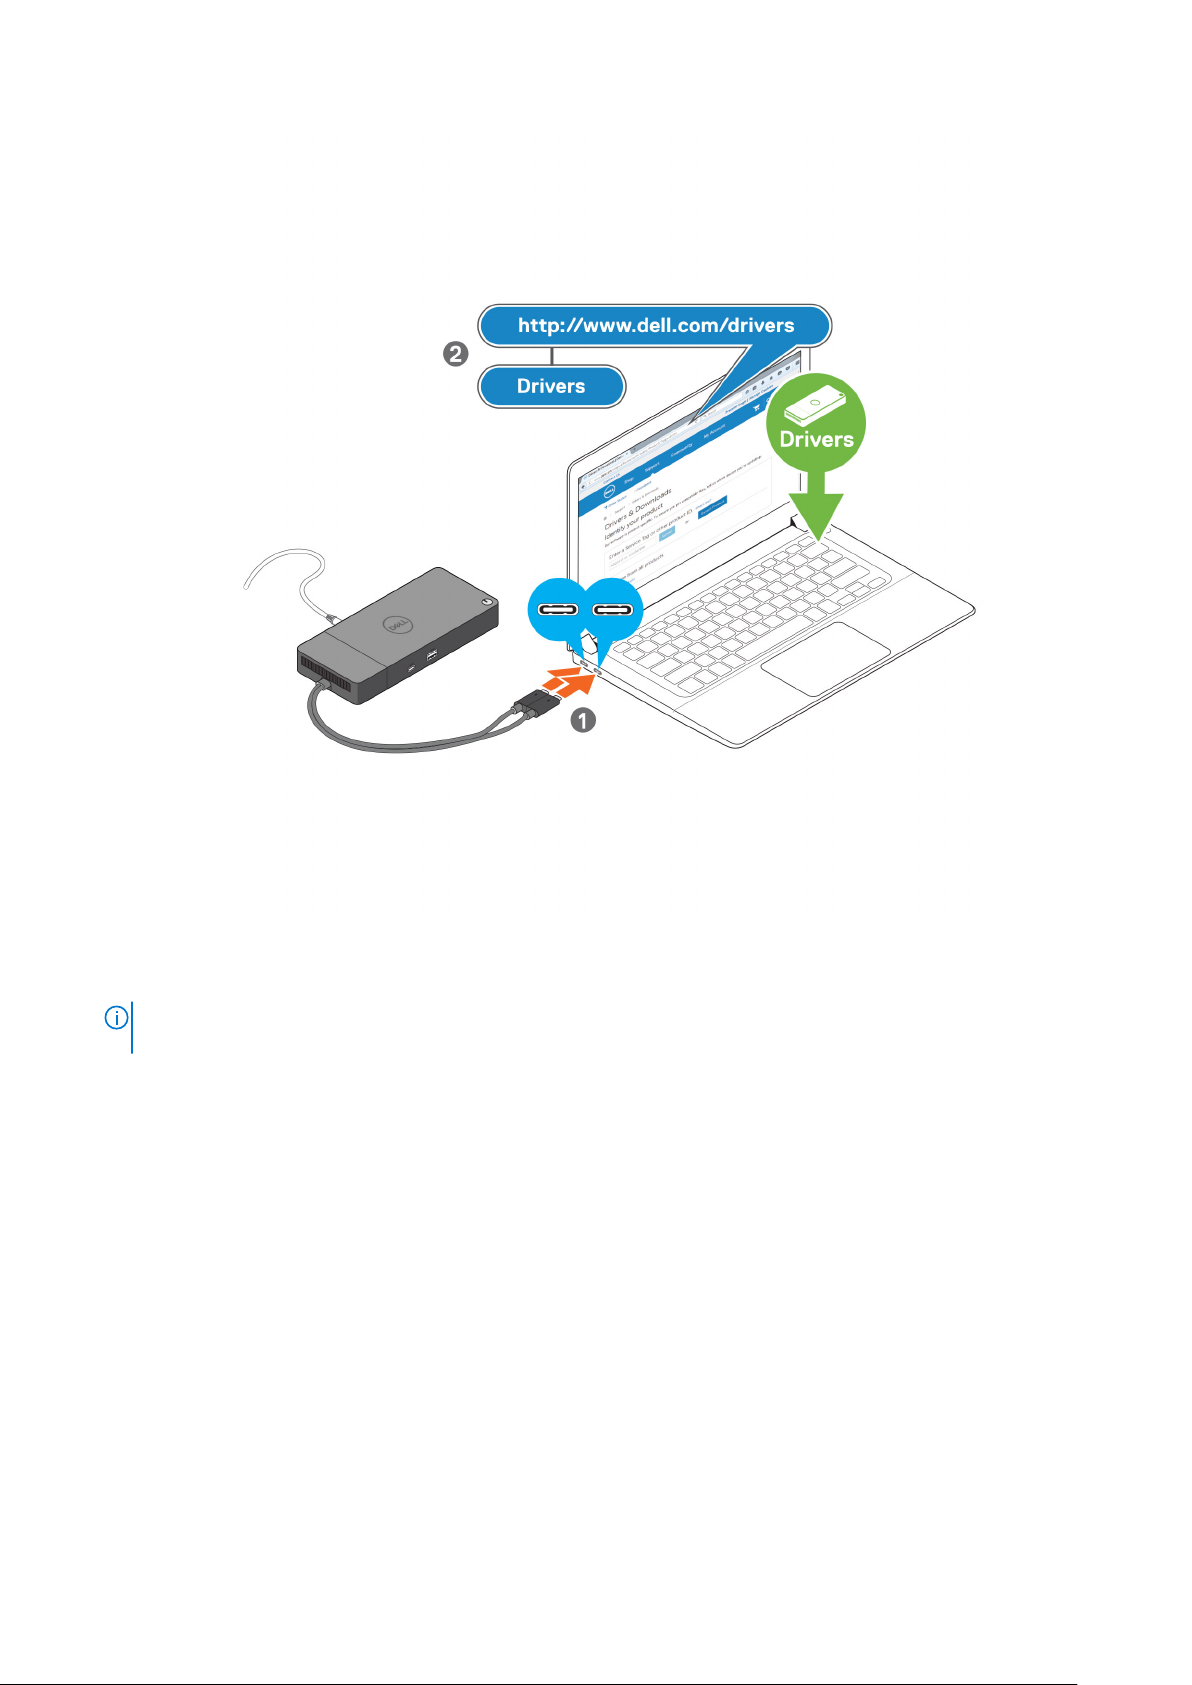
Figure 7. Connecting the dual USB Type-C connector
NOTE:
On supported systems use a single USB Type-C cable to connect the docking station. The other USB Type-C
cable of the docking station can only be used as a power deliverable cable for smartphone or tablet up to 15 W.
4. Connect multiple displays to the docking station, as needed.
16
Quick Setup of Hardware
Page 17
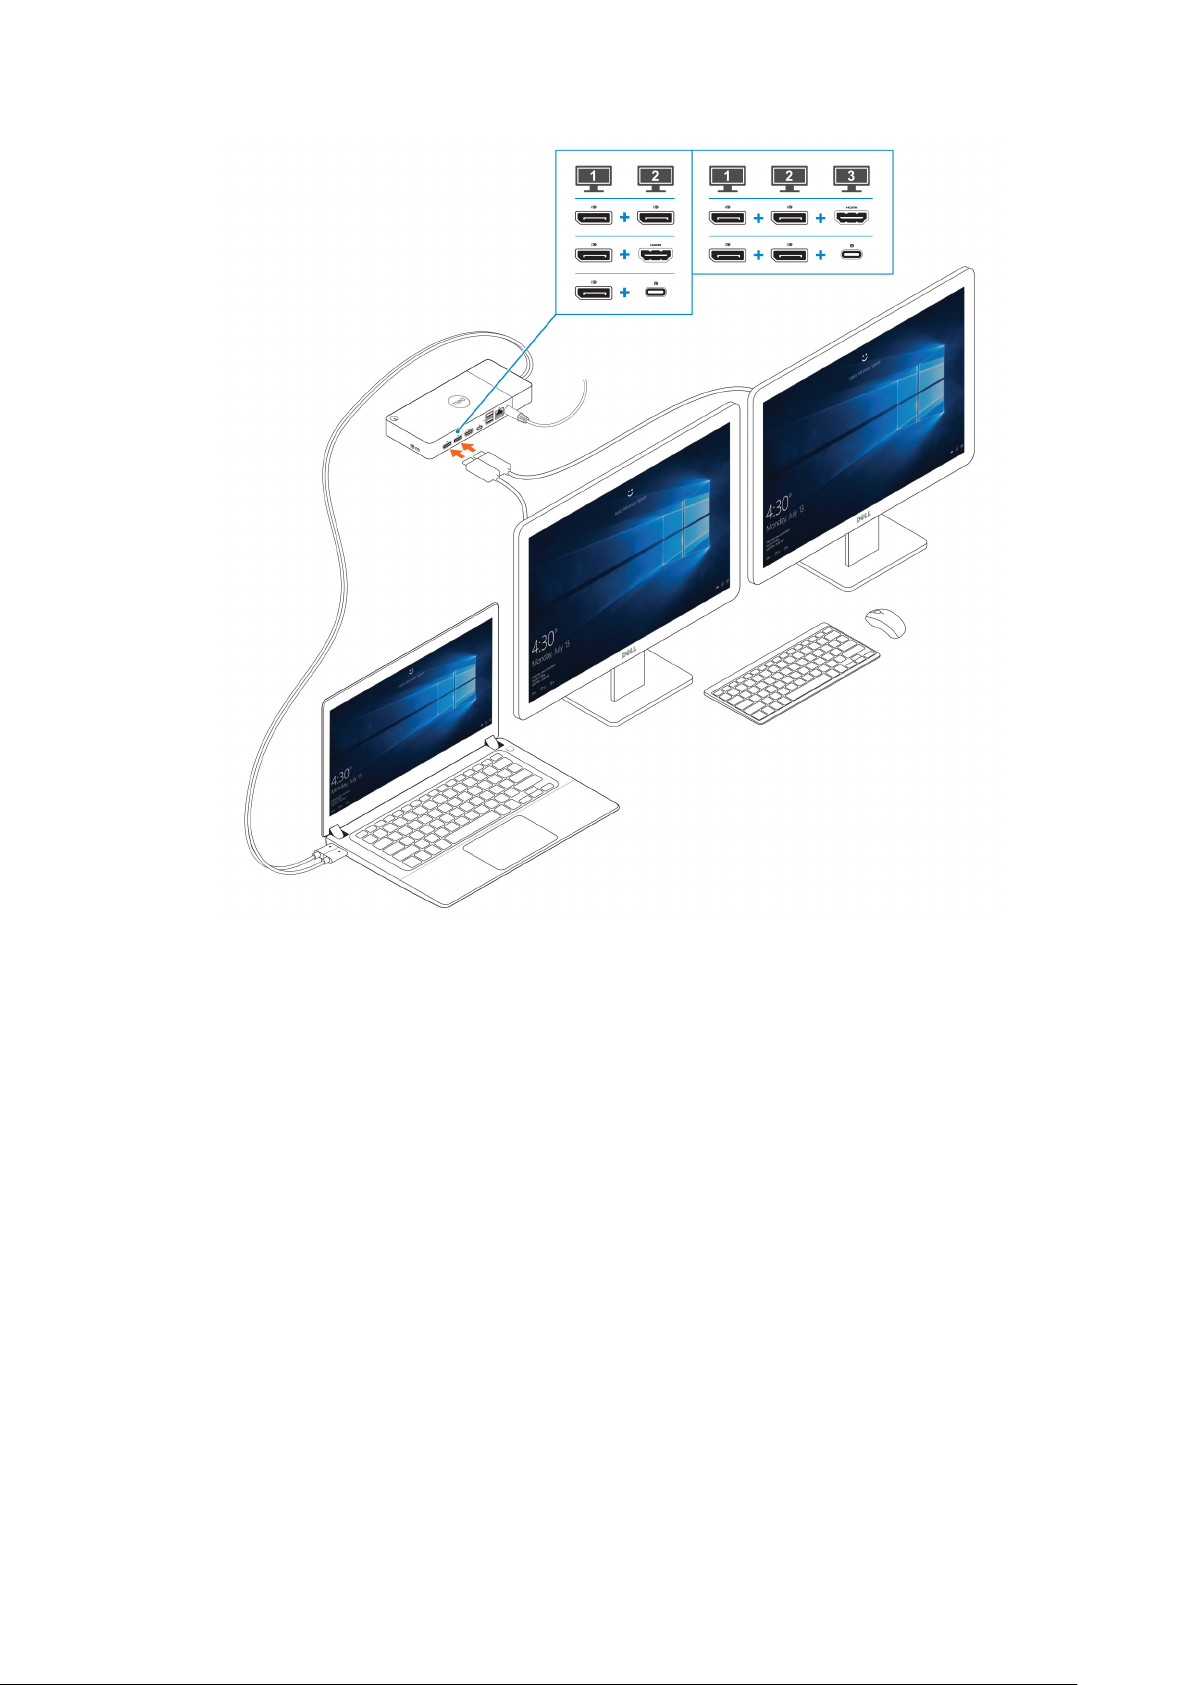
Figure 8. Connecting the multiple displays
Quick Setup of Hardware
17
Page 18

7
Setup of External Monitors
Topics:
• Updating the graphics drivers for your computer
Configuring your Monitors
•
• Display bandwidth
• Display Resolution Table
Updating the graphics drivers for your computer
The Microsoft Windows operating systems include the VGA graphics drivers only. Therefore, for optimum graphics performance,
it is recommended that Dell graphics drivers applicable for your computer be installed from dell.com/support under the “Video”
section
NOTE:
1. For nVidia Discrete Graphics solutions on the supported Dell systems:
a. First, install the Intel Media Adapter Graphics Driver applicable to your computer.
b. Second, install the nVidia Discrete Graphics Driver applicable to your computer.
2. For AMD Discrete Graphics solutions on the supported Dell systems:
a. First, install the Intel Media Adapter Graphics driver applicable to your computer.
b. Second, install the AMD Discrete Graphics driver applicable to your computer.
Configuring your Monitors
If connecting two displays, follow these steps:
Steps
1. Click the Start button, and then select Settings.
2. Click System and select Display.
18 Setup of External Monitors
Page 19
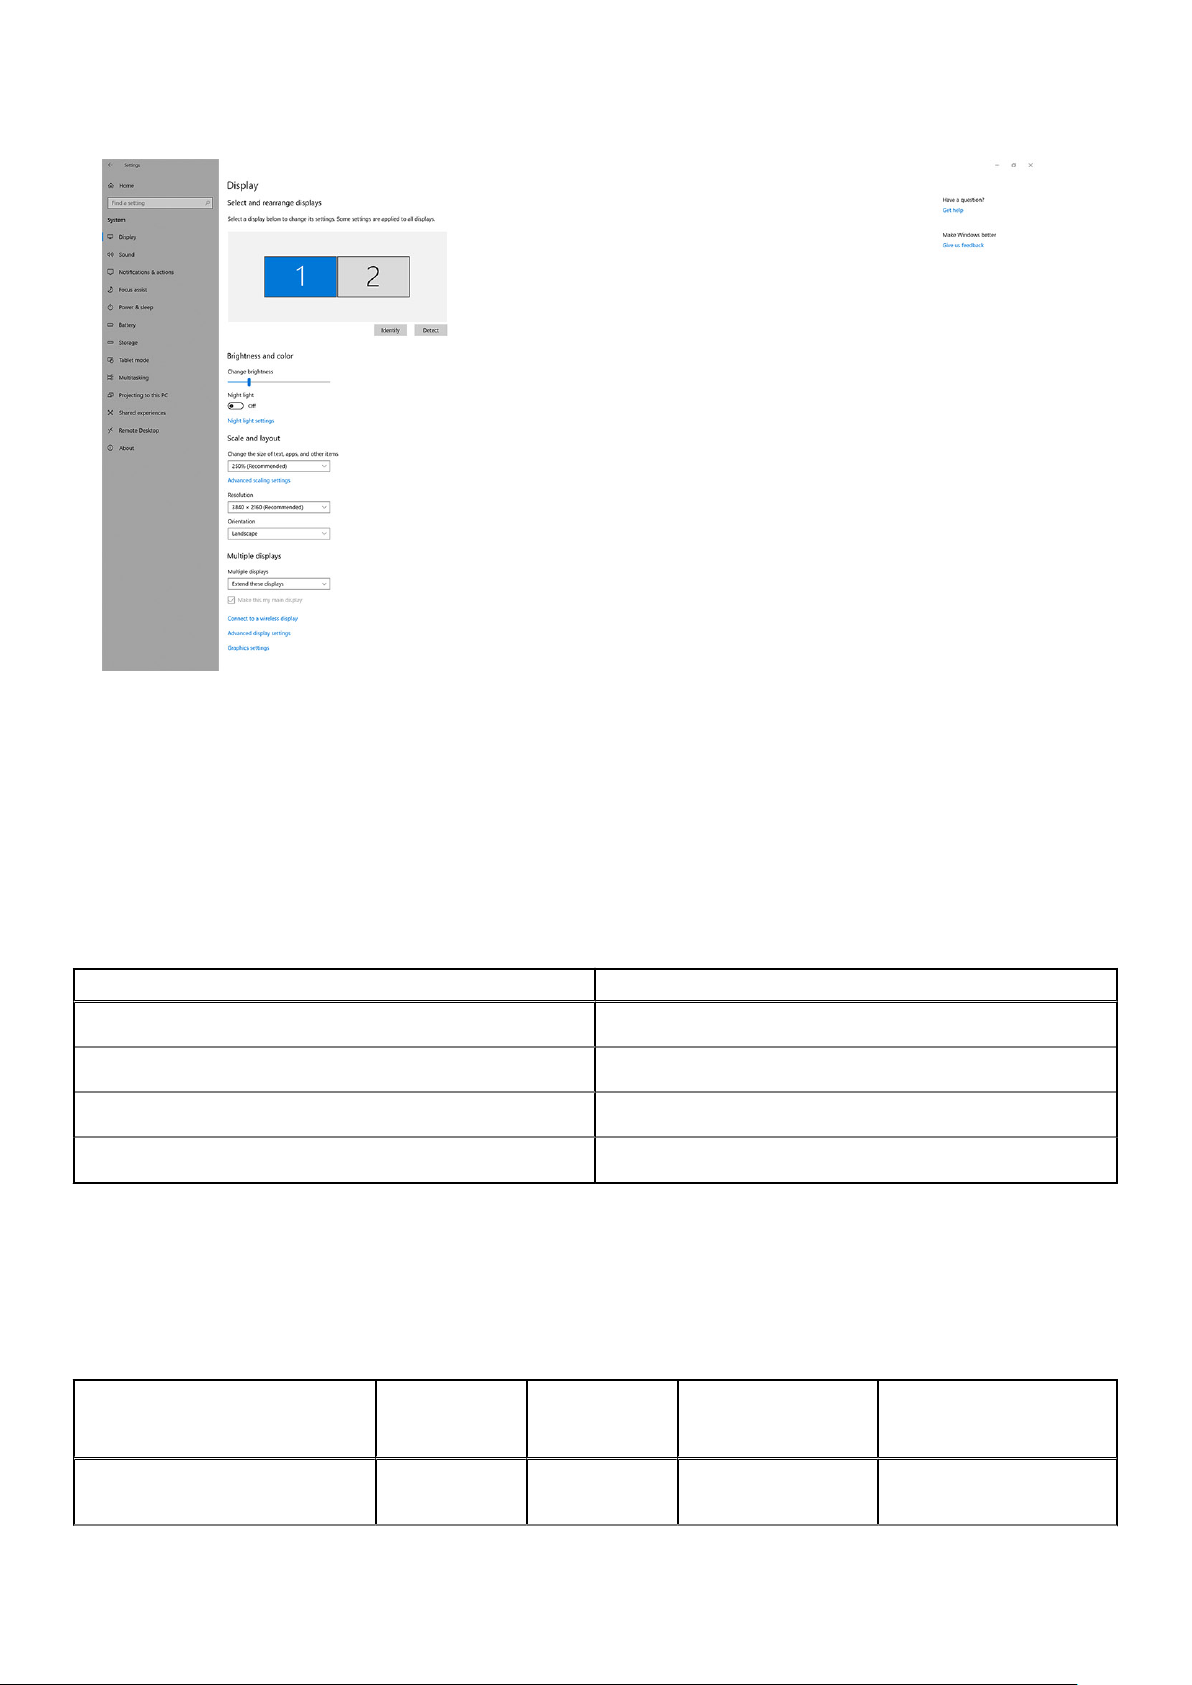
3. Under the Multiplay displays section, select Extend these displays.
Display bandwidth
External monitors require a certain amount of bandwidth to work properly. Monitors with higher resolution require more
bandwidth.
● DisplayPort High Bit Rate 2 (HBR2) is DP 1.2 (5.4 Gbps maximum link rate per lane). With DP overhead, the effective data
rate is 4.3 Gbps per lane.
● DisplayPort High Bit Rate 3 (HBR3) is DP 1.4 (8.1 Gbps maximum link rate per lane). With DP overhead, the effective data
rate is 6.5 Gbps per lane.
Table 2. Display bandwidth
Resolution Minimum bandwidth required
1 x FHD (1920 x 1080) display @60 Hz 3.2 Gbps
1 x QHD (2560 x 1440) display @60 Hz 5.6 Gbps
1 x 4K (3840 x 2160) display @30 Hz 6.2 Gbps
1 x 4K (3840 x 2160) display @60 Hz 12.5 Gbps
Display Resolution Table
Only for Recommended Systems from Dell Commercial Docking Compatibility Guide. The following table only addresses the
dual-cable connection and does not support systems that use single Type-C cable.
Table 3. WD19DCS
Display Port Available
Bandwidth
HBR2 (HBR2 x4 lanes - 17.2 Gbps) DP1.4/HDMI2.0/
Single Display
(maximum
resolution)
MFDP Type-C:
Dual Display
(maximum
resolution)
● DP1.4 +
DP1.4: QHD
Triple Display
(maximum
resolution)
● DP1.4 + DP1.4 +
HDMI2.0:
Setup of External Monitors 19
Quad Display (maximum
resolution)
N/A
Page 20
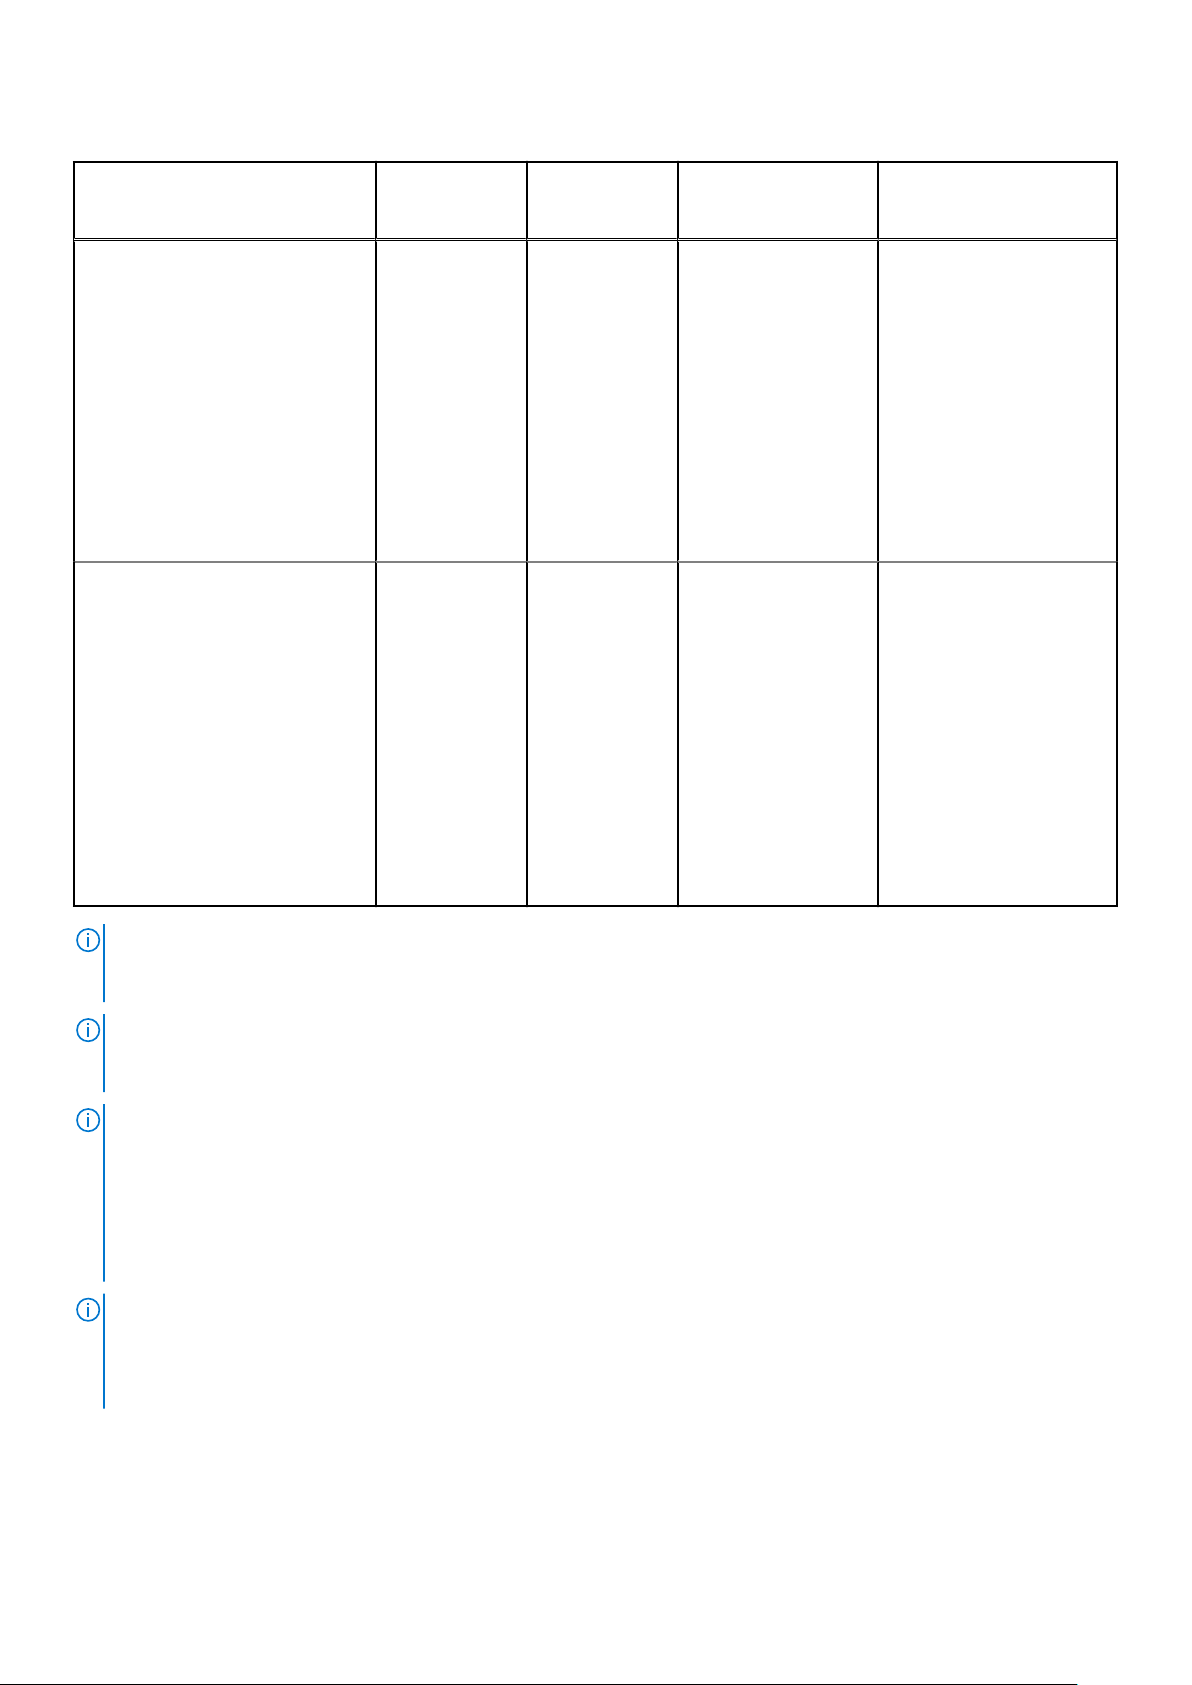
Table 3. WD19DCS (continued)
Display Port Available
Bandwidth
HBR3 (HBR3 x4 lanes - 25.9 Gbps)
With discrete graphics card
See recommended models in
hardware requirements
Single Display
(maximum
resolution)
4K (3840 x
2160) @60 Hz
DP1.4/HDMI2.0/
MFDP Type-C:
8K (7689x4320)
@30 Hz
Dual Display
(maximum
resolution)
(2560 x
1440) @60
Hz
● DP1.4 +
HDMI2.0:
QHD (2560 x
1440) @60
Hz
● DP1.4 +
MFDP TypeC: QHD
(2560 x
1440) @60
Hz
● DP1.4 +
DP1.4: 4K
(3840 x
2160) @60
Hz
● DP1.4 +
HDMI2.0: 4K
(3840 x
2160) @60
Hz
● DP1.4 +
MFDP TypeC: 4K (3840
x 2160) @60
Hz
Triple Display
(maximum
resolution)
○ 2 x QHD (2560
x 1440) @60
Hz
○ 1 x FHD (1920 x
1080)
● DP1.4 + DP1.4 +
MFDP Type-C:
○ 2 x QHD (2560
x 1440) @60
Hz
○ 1 x FHD (1920 x
1080)
● DP1.4 + DP1.4
+ HDMI2.0: QHD
(2560 x 1440) @60
Hz
● DP1.4 + DP1.4
+ MFDP Type-C:
QHD (2560 x 1440)
@60 Hz
Quad Display (maximum
resolution)
Using Daisy-chain:
● DP1.4 (Daisy-chain 2 x
QHD 2560 x 1440 @30
Hz) + DP1.4 + HDMI2.0:
○ QHD (2560 x 1440)
@60 Hz
● DP1.4 (Daisy-chain 2
x QHD 2560 x 1440
@30Hz) + DP1.4 +
MFDP type-C:
○ QHD (2560 x 1440)
@60 Hz
NOTE: HDMI2.0 and MFDP (Multi-Function DisplayPort) Type-C ports on the back of all docks in the WD19S family are
toggled. HDMI2.0 and MFDP Type-C cannot support dual monitors simultaneously. Only one of these ports can be used as a
display device at a time.
NOTE: If higher resolution monitors are used, the Graphics driver makes a judgment based on monitor specifications and
display configurations. Some resolutions may not be supported and so will be removed from the Windows Display Control
Panel.
NOTE: Configuration that is supported with AMD and Nvidia in special-graphics mode. This mode is listed in the BIOS for
the Dell Precision mobile workstations 7530/7730 will require enabling special-graphics mode when Switchable is enabled.
Precision 7530 and Precision 7730 with AMD Graphics can only support dual 4K@60 Hz non-HDR monitors when, both
monitors are plugged to the two DP ports (not HDMI).
Precision 7540 and Precision 7740 with AMD Graphics can support up to six displays dependent on GPU capability. With
Nvidia Graphics, it can support up to four displays.
NOTE: Linux operating system is unable to physically turn-off built-in display, the external display numbers will be one less
than the display numbers listed in above tables.
If the Display Port Data Rate is HBR2, then, the maximum resolution that Linux supports is 8192 x 8192 (counted with
built-in display plus external display).
20 Setup of External Monitors
Page 21
8
Removing the USB Type-C cable module
Prerequisites
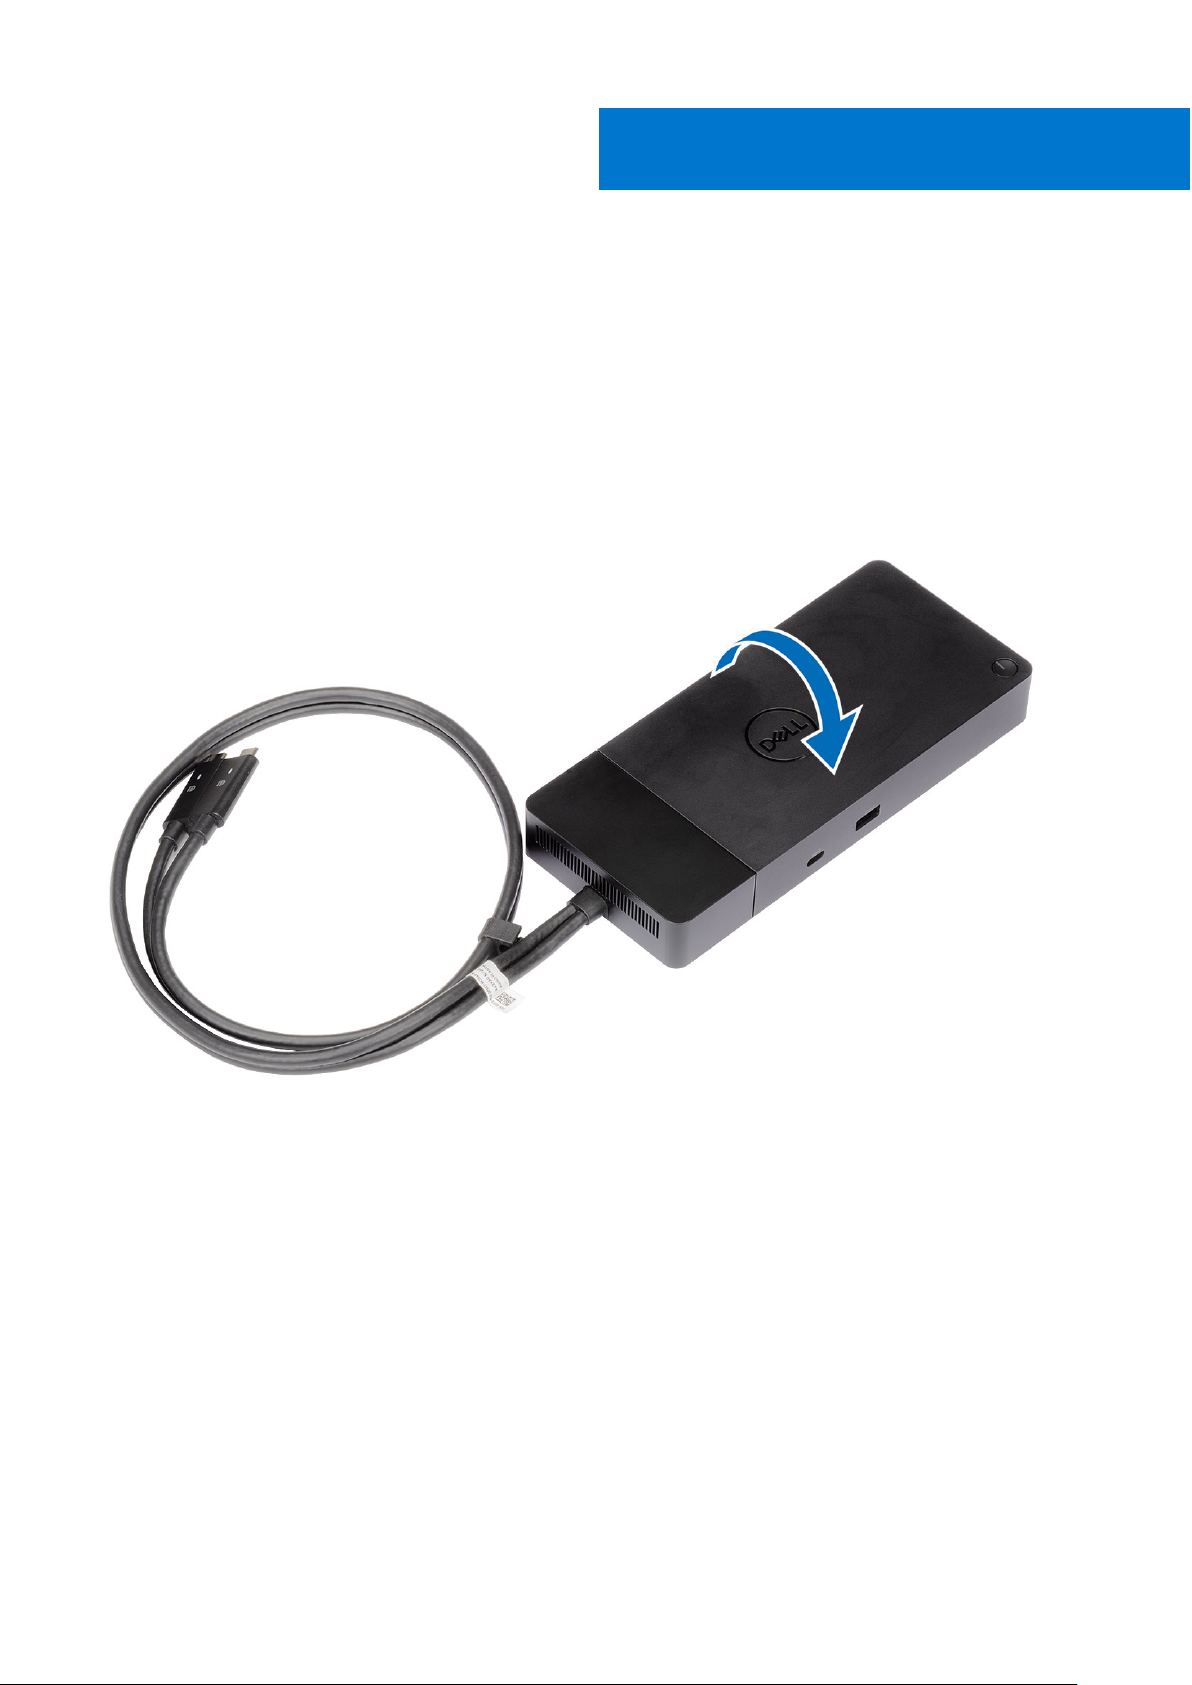
The Dell Performance Docking Station WD19DCS is shipped with the USB Type-C cable attached. To remove/change the cable
module, follow these steps:
Steps
1. Turn over the docking station.
Removing the USB Type-C cable module 21
Page 22
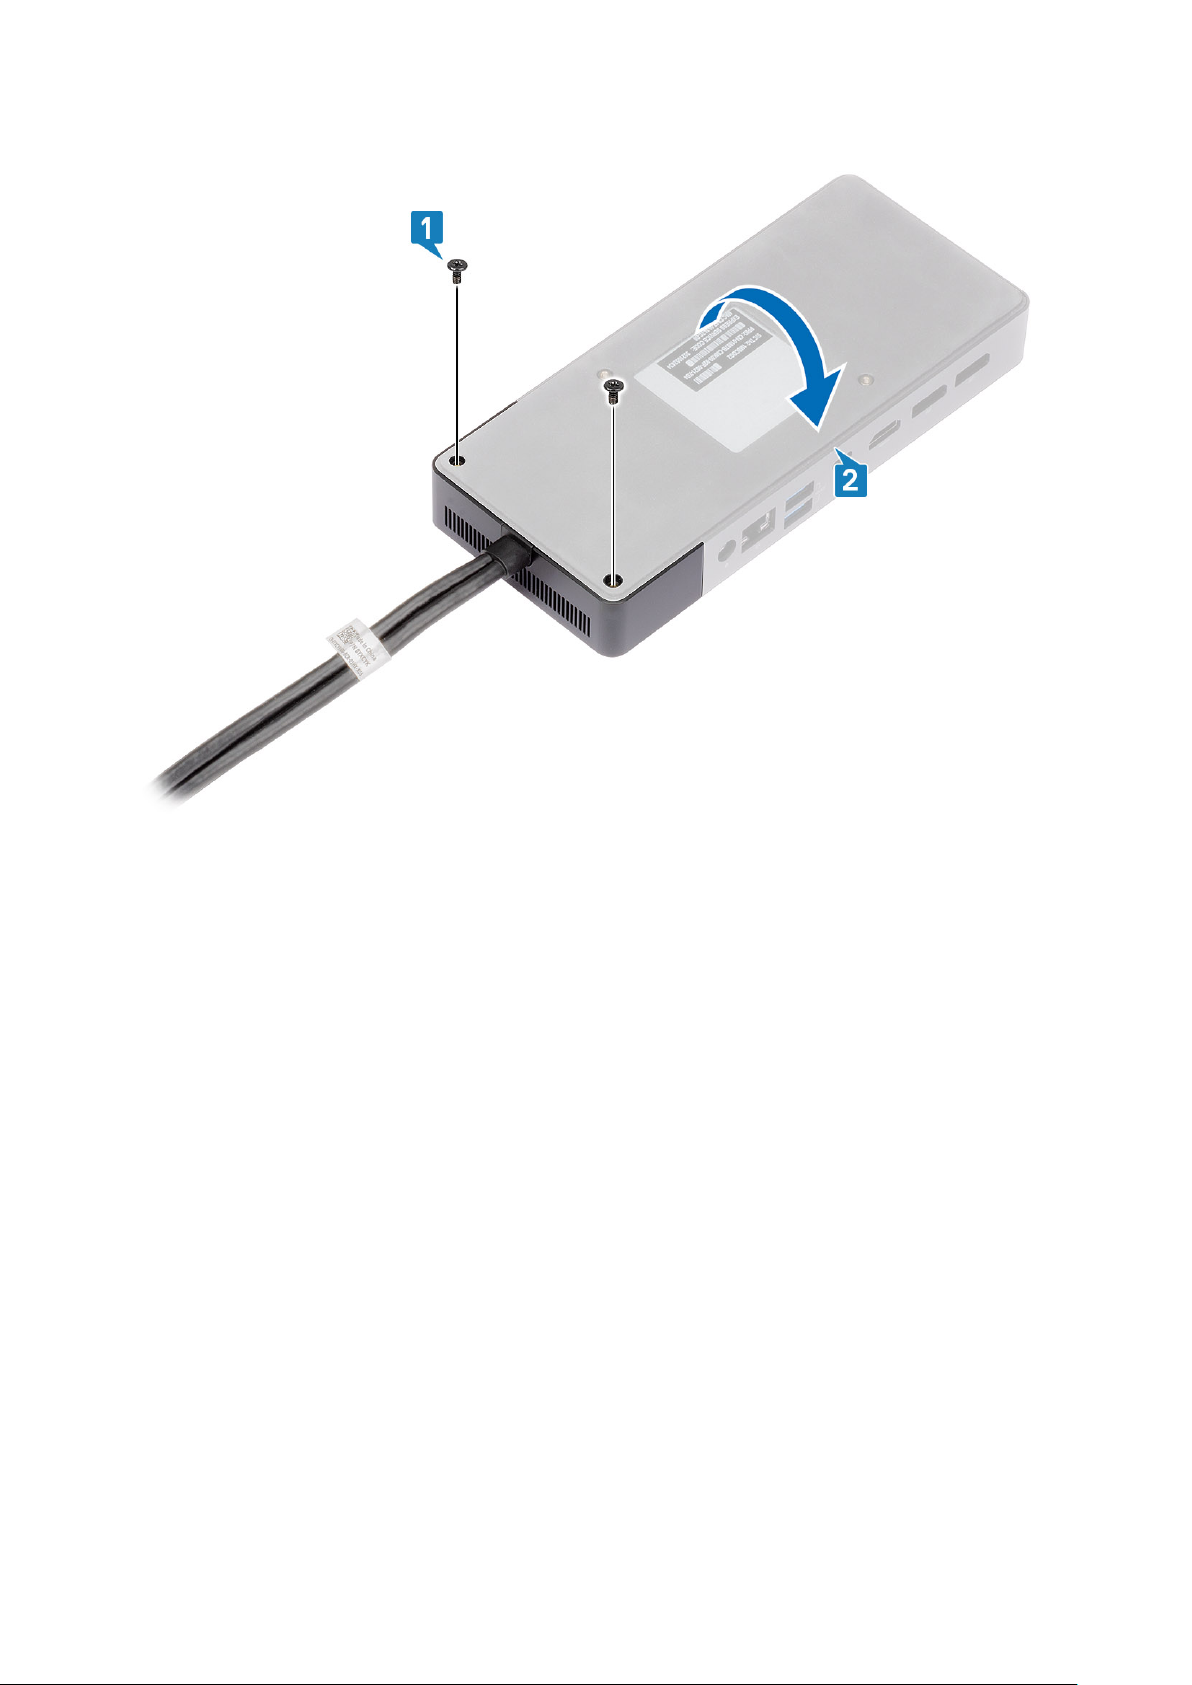
2. Remove the two M2.5 x 5 screws [1], and turn over the docking station [2].
22 Removing the USB Type-C cable module
Page 23
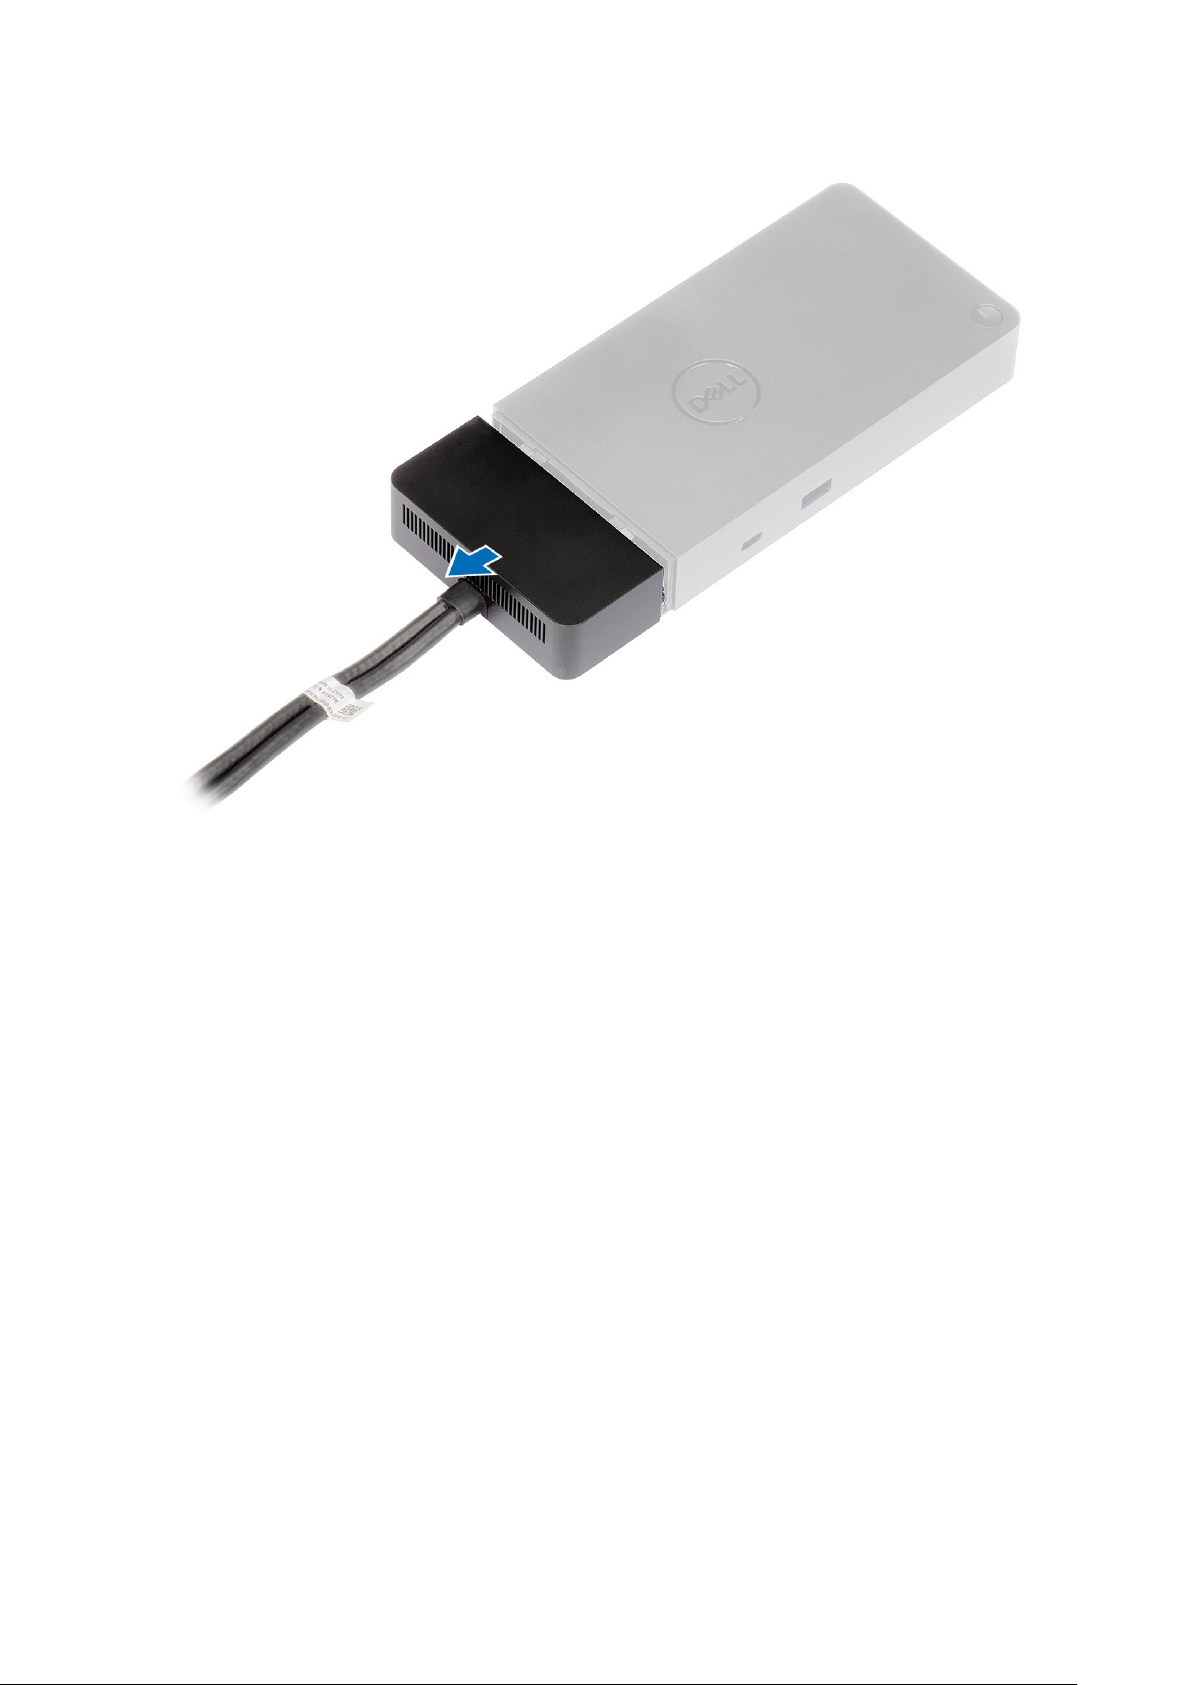
3. Gently pull the cable module away from the docking station.
Removing the USB Type-C cable module 23
Page 24
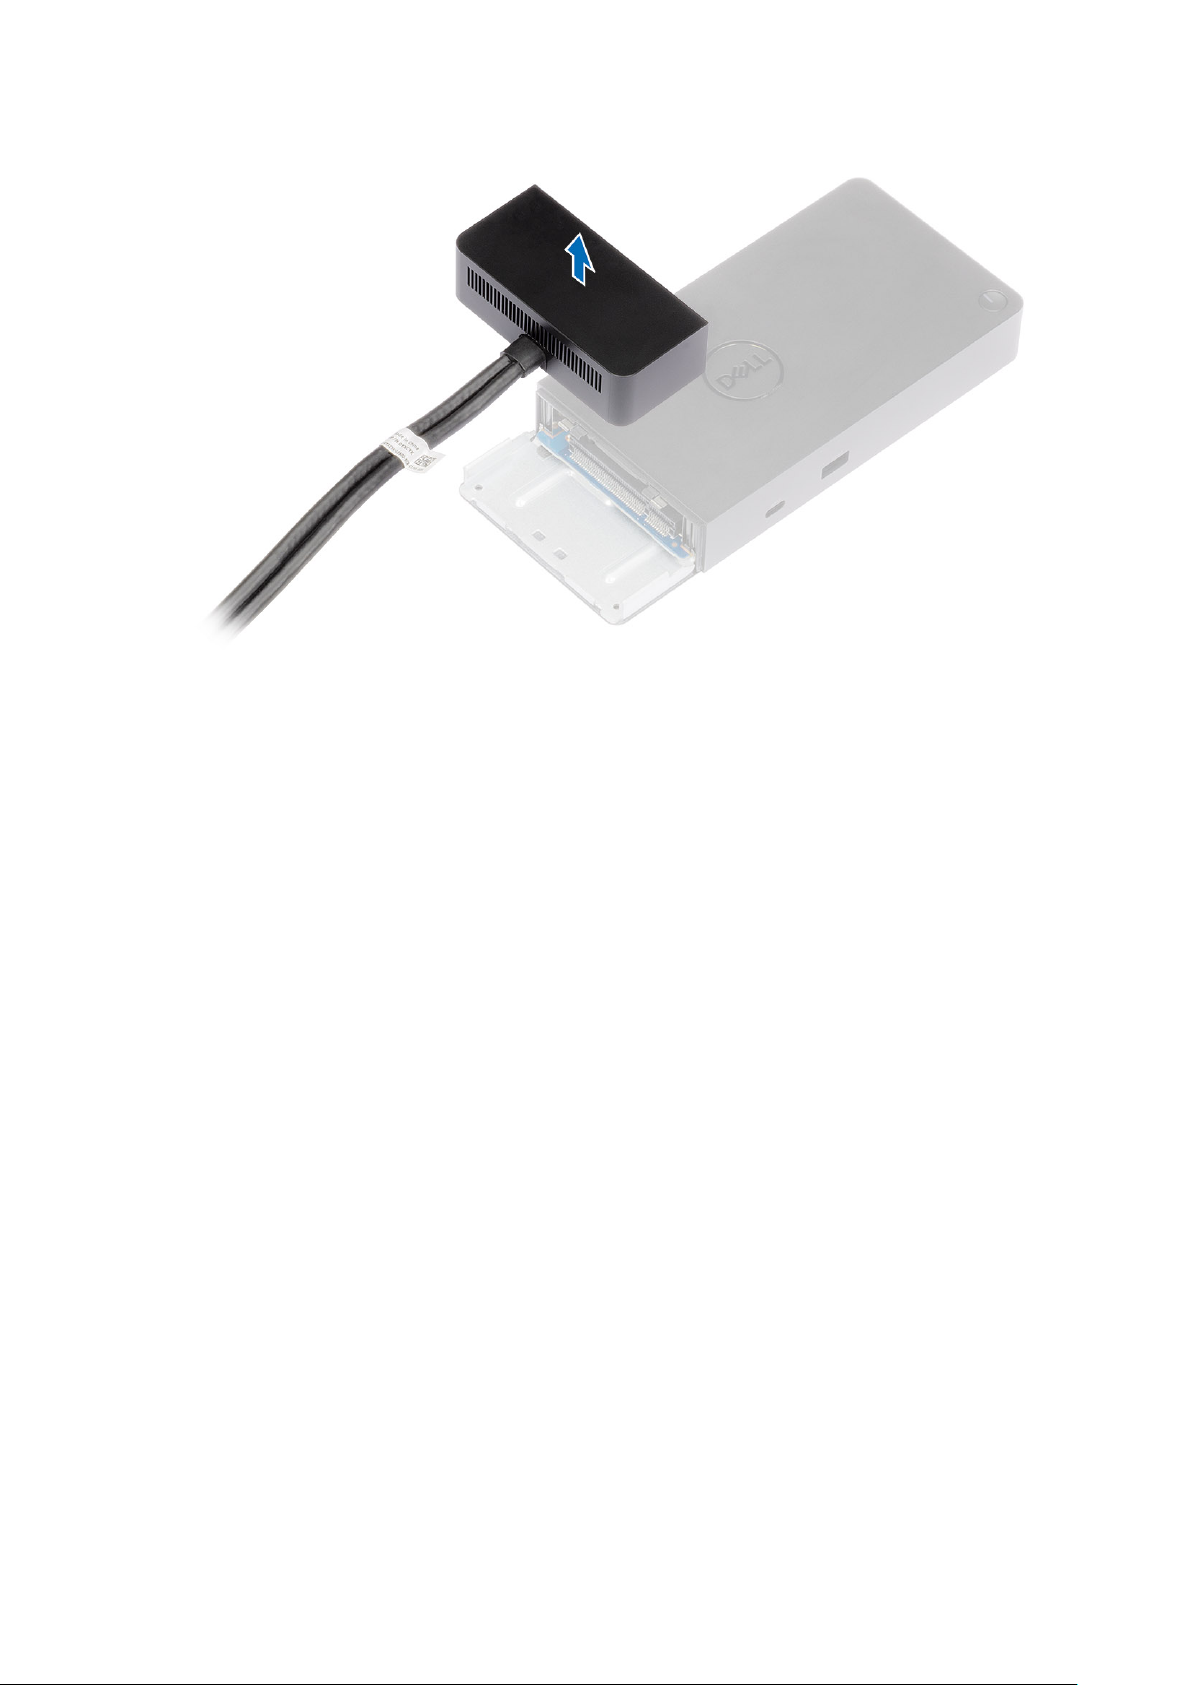
4. Lift and remove the USB Type-C cable module from its connector inside the docking station.
24 Removing the USB Type-C cable module
Page 25
Technical specifications
Topics:
• LED Status Indicators
Docking specifications
•
• Input/Output (I/O) Connectors
• Dell ExpressCharge and ExpressCharge boost overview
LED Status Indicators
Power Adapter LED
Table 4. Power Adapter LED indicator
State LED Behavior
Power Adapter is plugged into wall socket Flash three times
9
Docking Status Indicator
Table 5. Docking Station LED Indicators
State LED Behavior
Docking station is receiving power from power adapter Flash three times
Table 6. Cable LED Indicators
State LED Behavior
USB Type-C host supports video + data + power On
USB Type-C host does not support video + data + power Off (will not illuminate)
Table 7. RJ-45 LED Indicators
Link Speed Indicators Ethernet Activity Indicator
10 Mb = Green Amber Flashing
100 Mb = Amber
1 Gb = Green + Orange
Docking specifications
Table 8. Docking Specifications
Features Specifications
Standard Dual USB 3.1 Gen1/Gen2 Type-C
Video Ports
● USB 3.1 Gen1/Gen2 Type-C with DisplayPort 1.4 or HDMI2.0 x1
Technical specifications 25
Page 26
Table 8. Docking Specifications (continued)
Features Specifications
● DisplayPort++ 1.4 x2
Network Port
USB Ports
DC-in Port 7.4 mm DC-in port x1
USB Type-C cable length 0.8 m
Power delivery Dell systems
Button
● Gigabit Ethernet (RJ-45) x1
● Support Wake On LAN from S3, S4, or S5 sleep state with select Dell systems.
See platform setup guide for more details.
● Support MAC Address Pass-Through with select Dell systems. See platform
setup guide for more details.
● Front USB 3.1 Gen1 x1: Dell PowerShare BC1.2; 2 A @ 5 V (max 10 W)
● Front USB 3.1 Gen1/Gen2 Type-C: 1.5 A @ 5 V (max 7.5 W)
● Rear USB 3.1 Gen1 x2: 0.9 A @ 5 V (max 4.5 W)
● Rear USB 3.1 Gen1/Gen2 Type-C with DisplayPort 1.4 x1: 3 A @ 5 V (max 15 W)
● 210 W to Dell Precision mobile workstations 7000 series with 240 W AC-adapter
● 130 W to Dell systems (single cable plugged in) with 240 W AC-adapter
Non-Dell systems
● 90 W support for USB Power Delivery 3.0 (single cable plugged in).
● Sleep/Wakeup/Power button
Table 9. Environment specifications
Feature Specifications
Temperature range Operating: 0°C–35°C (32°F–95°F)
Non-operating:
● Storage: -20°C to 60°C (-4°F to 140°F)
● Shipping: -20°C to 60°C (-4°F to 140°F)
Relative humidity Operating: 10% to 80% (non-condensing)
Non-operating:
● Storage: 5% to 90% (non-condensing)
● Shipping: 5% to 90% (non-condensing)
Dimension 205 mm x 90 mm x 29 mm
Weight 450 g (0.99 lb)
VESA Mounting options Yes—using Dell Docking station mounting kit
Input/Output (I/O) Connectors
The Dell Performance Docking Station WD19DCS has the following I/O connectors:
Table 10. I/O connectors
Ports Connectors
Video Ports
26 Technical specifications
● DisplayPort++ 1.4 x2
● USB 3.1 Gen1/Gen2 with DisplayPort 1.4 or HDMI2.0 x1
Page 27
Table 10. I/O connectors (continued)
Ports Connectors
Input/Output Ports
● USB 3.1 Gen1 x 2
● USB 3.1 Gen1 with PowerShare x 1
● USB 3.1 Gen1/Gen2 Type-C
● 7.4 mm DC-in x 1
● Gigabit Ethernet (RJ–45) x 1
Dell ExpressCharge and ExpressCharge boost overview
● Dell ExpressCharge enables an empty battery to charge to 80% in about one hour when the system is turned off and to
100% in approximately two hours.
● Dell ExpressCharge Boost enables an empty battery to charge to 35% in 15 minutes.
● Metrics are created for system off given charge time with the system on has varied results.
● Customers must enable ExpressCharge mode in the BIOS or through Dell Power Manager to take advantage of these
features.
● Check your Dell Latitude or Dell Precision system for the battery size using the table to determine compatibility.
Table 11. Dell ExpressCharge compatibility
Power Delivery to System Max Battery Size for
ExpressCharge
90 W with 130 W adapter 92 Whr 53 Whr
Max Battery Size for
ExpressCharge Boost
130 W with 180 W adapter 100 Whr 76 Whr
Technical specifications 27
Page 28
10
Dell docking station firmware update
Standalone Dock Firmware Update utility
NOTE: Information that is provided is for Windows users running the executable tool. For other operating systems or
further detailed instructions see the WD19 admin guide available on www.dell.com/support.
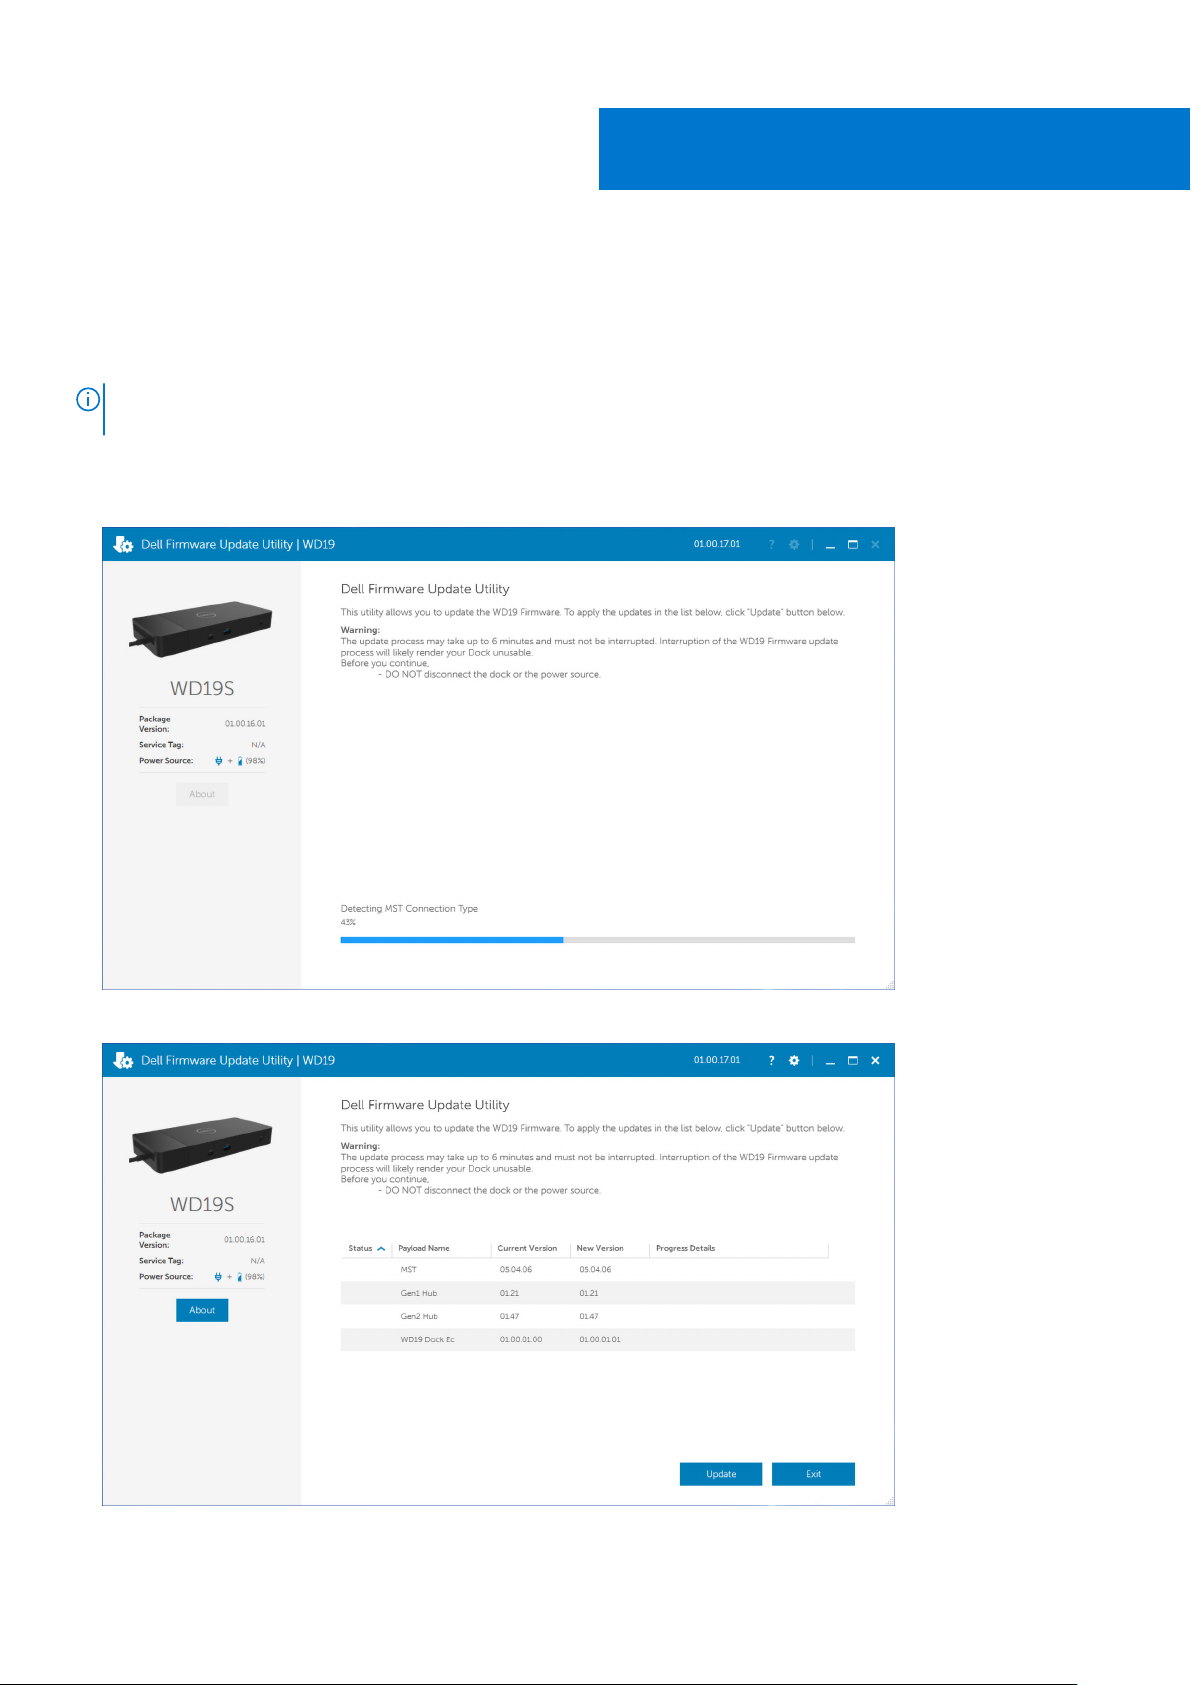
Download the DCS driver and firmware update from www.dell.com/support. Connect the dock to the system and start the tool
in administrative mode.
1. Wait for all the information to be entered in the various Graphical User Interface (GUI) panes.
2. Update and Exit buttons are displayed in the bottom-right corner. Click the Update button.
28 Dell docking station firmware update
Page 29
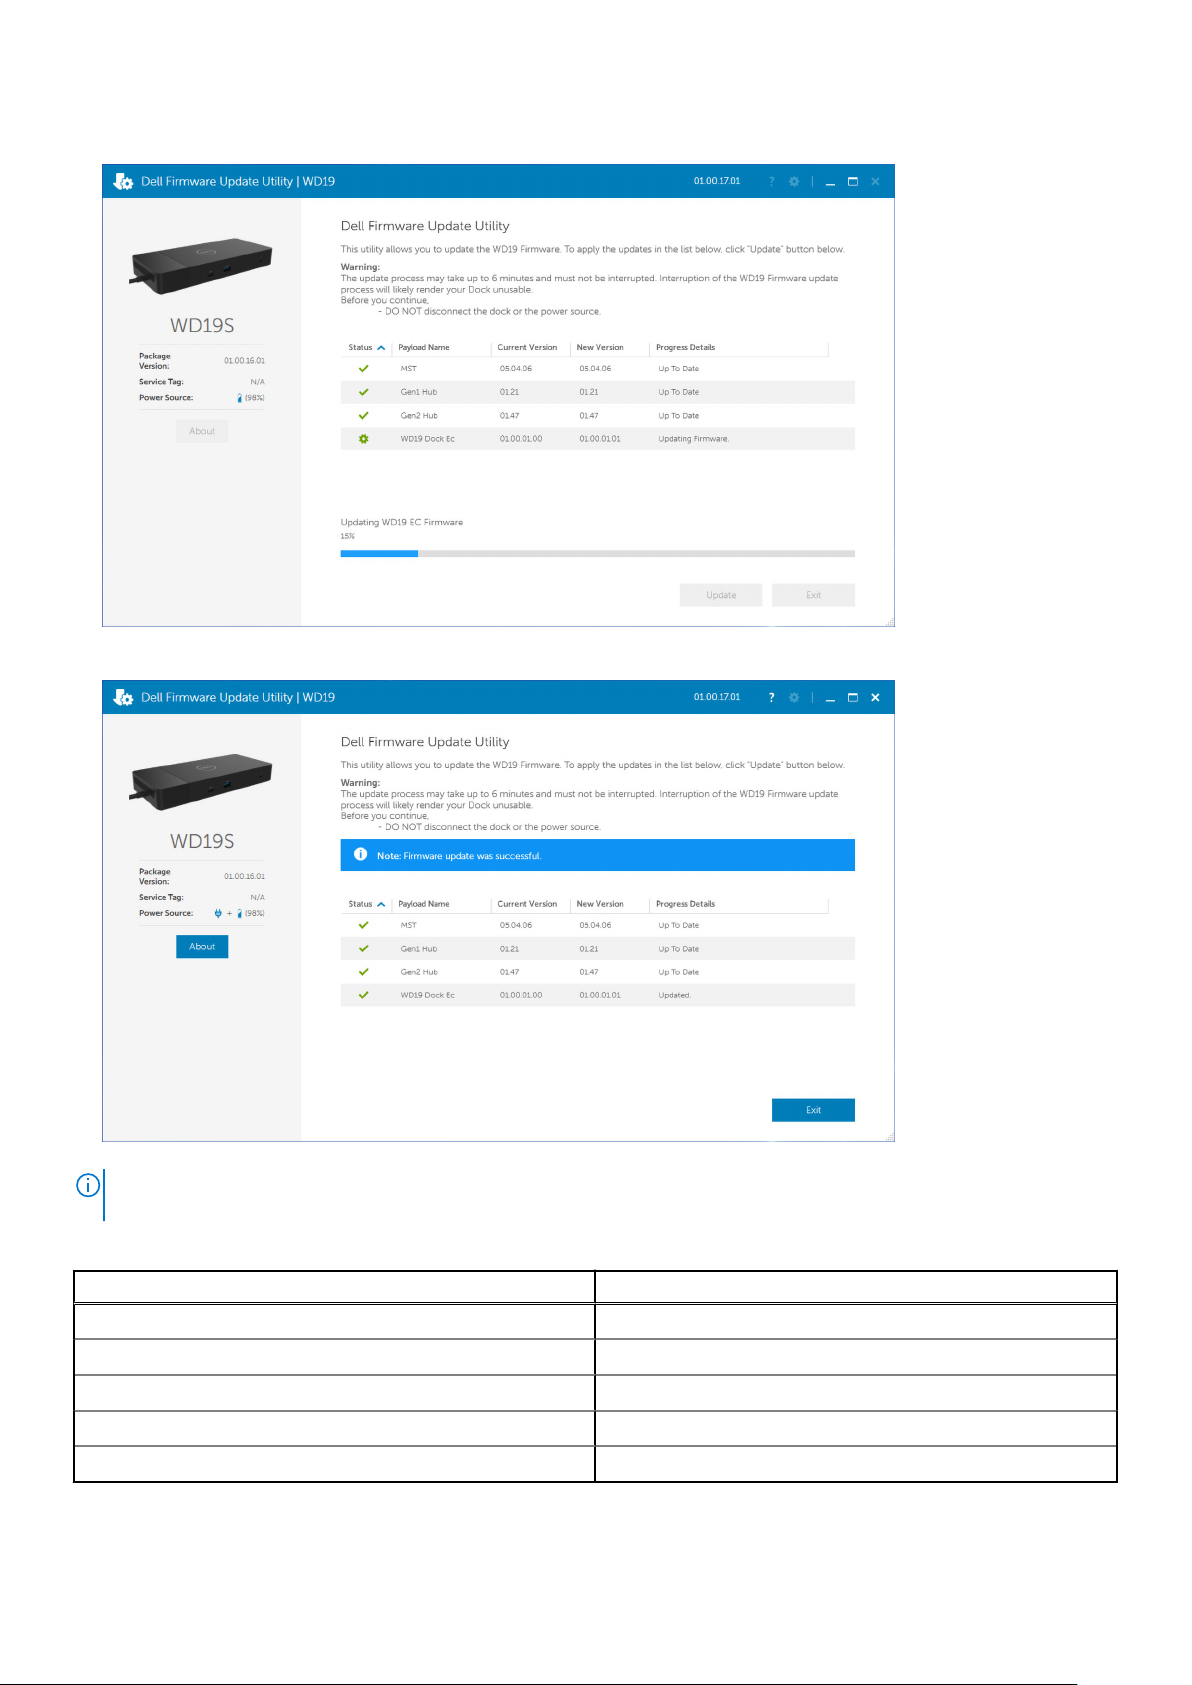
3. Wait for all the component firmware update to complete. A progress bar is displayed in the bottom.
4. The update status is displayed above the payload information.
NOTE:
While the model number appearing in the Dell Firmware Update Utility images above shows WD19S, the same steps
are applicable for WD19DCS as well.
Table 12. Command-Line Options
Command lines Function
/? or /h Usage.
/s Silent.
/l=<filename> Log file.
/verflashexe Display utility version.
/componentsvers Display current version of all dock firmware components.
Dell docking station firmware update 29
Page 30

For IT professionals and engineers, to get more information about the following technical topics, see the Dell Docking Station
DCS Administrator's Guide:
● Step-by-step stand-alone DFU (Dock Firmware Update) and driver update utilities.
● Using DCU (Dell Command | Update) for driver download.
● Dock asset management locally and remotely through DCM (Dell Command | Monitor) and SCCM (System Center
Configuration Manager).
30 Dell docking station firmware update
Page 31
Frequently asked questions
1. The fan is not working after connecting with the system.
● The fan is triggered by temperature. The dock fan will not rotate until the dock is hot enough to trigger a thermal
threshold.
Vice versa, if your dock is not cool enough, the fan will not stop even when you disconnect the dock from the system.
●
2. The dock does not work after high-speed fan noise.
● When you hear a loud fan noise, it is warning you that the dock is in some kind of a hot condition. For example, the
vent in the dock may be blocked or the dock is working in a high working-temperature environment (> 35C), etc,.
Please eliminate these abnormal conditions from the dock. If you do not eliminate the abnormal condition, in a worst-case
situation, the dock will shut down through the over-temperature protection mechanism. Once this happens, please
un-plug the Type-C cable from the system and remove the dock’s power. Then wait 15 seconds and plug in the dock
power to recover the dock back online.
3. I hear a fan noise when I plug in the dock’s AC adapter.
● This is a normal condition. First time plugging in of the dock’s AC adapter will trigger the fan to rotate, but it will
subsequently turn off very soon.
4. I hear a loud fan noise. What’s wrong?
● The dock fan is designed with five different rotate speeds. Normally, the dock will work on low fan speed. If you put the
dock in a heavy loading, or in a high working-temperature environment, the dock fan may have a chance to work at a
high speed. But, this is normal and the fan will work at a low/high speed depending on the work loading.
11
Table 13. Fan states
State State name Fan speed (rpm)
0 Fan off Off
1 Fan minimum 1900
2 Fan low 2200
3 Fan medium 2900
4 Fan medium-high 3200
5 Fan high 3600
5. What is the charging station feature?
● The Dell Performance Docking Station WD19DCS can charge your mobile or power bank even without being connected to
the system. Just make sure your dock is connected to external power. The dock fan will rotate automatically if the dock
gets too warm. This is normal working condition.
6. Why does it take a long time for the system to recognize all the peripheral devices which are attached to the
docking station?
● Security is always Dell’s highest priority. We ship our systems with “Security level - User Authorization” setting by
default. This allows our customers to review the Thunderbolt security conditions of their systems so they can make
selections accordingly. However, this also means the Thunderbolt dock and the devices attached to it will need to pass
Thunderbolt driver security permission checking to get it connected and initialized. This normally means some extra time
is needed before these devices can be accessed by users.
7. Why does the hardware installation window show up when I plug in a USB device to the docking stations ports?
● When a new device is plugged in, the USB hub driver notifies the Plug and Play (PnP) manager that a new device was
detected. The PnP manager queries the hub driver for all of the device's hardware IDs and then notifies the Windows OS
that a new device needs to be installed. In this scenario, the user will see a hardware installation window.
https://msdn.microsoft.com/en-us/windows/hardware/drivers/install/step-1--the-new-device-is-identified
https://msdn.microsoft.com/en-us/windows/hardware/drivers/install/identifiers-for-usb-devices
8. Why do the peripheral devices, which are connected to the dock station, become unresponsive after recovering
from a power loss?
● Our Dell dock is designed to operate on AC power only and it does not support system power source back (powered by
system Type-C port). A power loss event will make all devices on the dock fail to work. Even when you restore the AC
Frequently asked questions 31
Page 32

power, the dock may still not function properly because the dock still needs to negotiate proper power contract with the
system's Type-C port and establish a system EC-to-dock-EC connection.
32 Frequently asked questions
Page 33

Troubleshooting the Dell Performance
Docking Station WD19DCS
Topics:
• Symptoms and solutions
Symptoms and solutions
Table 14. Symptoms and solutions
Symptoms Suggested solutions
12
No video on the monitors that are attached to the High
Definition Multimedia Interface (HDMI), or DisplayPort (DP)
port on the docking station.
● Ensure that the latest BIOS and drivers for your system
and the docking station are installed on your system.
● Ensure that your system is connected to the docking
station securely. Try to disconnect and reconnect the
docking station to the notebook system.
● Disconnect both ends of the video cable and check for
damaged/bent pins. Securely re-connect the cable to the
monitor and docking station.
● Ensure the video cable (HDMI, or DisplayPort) is
connected properly to the monitor and the docking station.
Ensure to select the correct video source on your monitor
(see your monitor’s documentation for more information
about changing the video source).
● Check the resolution settings on your system. Your
monitor may support higher resolutions than what the
docking station can support. See the Display Resolution
Table for more information about maximum resolution
capacity.
● If your monitor is connected to the docking station, the
video output on your system may be disabled. You can
enable the video output using the Windows Control Panel
or see the User Guide of your system.
● If only one monitor is shown, while the other is not, go to
Windows Display Properties, and under Multiple Displays,
select the output for the second monitor.
● Using Intel graphics and using the system LCD, only two
additional displays can be supported.
● For NVIDIA or AMD discrete graphics, the dock supports
three external displays plus the system LCD.
● Try with a different monitor and cable that is known to be
good, if possible.
The video on the attached monitor is distorted or flickering.
Troubleshooting the Dell Performance Docking Station WD19DCS 33
● Reset the monitor to Factory Defaults. See the User Guide
of your monitor for more information about how to reset
the monitor to factory defaults.
● Ensure that the video cable (HDMI, or DisplayPort) is
connected securely to the monitor and the docking
station.
● Disconnect and reconnect the monitor/s from the docking
station.
Page 34
Table 14. Symptoms and solutions (continued)
Symptoms Suggested solutions
● First power off the docking station by disconnecting
the Type-C cable and then removing the power adapter
from the dock. Then, power on the docking station by
connecting power adapter to the dock before connecting
the Type-C cable to your system.
● Undock and reboot the system if, the above steps do not
work.
The video on the attached monitor is not displaying as an
Extended Monitor.
The USB ports are not functioning on the docking station.
The High-Bandwidth Digital Content Protection (HDCP)
content is not displayed on the attached monitor.
● Ensure that the Intel HD Graphics driver is installed in the
Windows Device Manager.
● Ensure that the nVidia or AMD Graphics driver is installed
in the Windows Device Manager.
● Open the Windows Display Properties and go to Multiple
Displays control to set the display to the extended mode.
● Ensure that the latest BIOS and drivers for your system
and the docking station are installed on your system.
● If your BIOS Setup has a USB Enabled/Disabled option,
ensure it is set to Enabled.
● Verify if the device is detected in Windows Device
Manager and that the correct device drivers are installed.
● Ensure that the docking station is connected securely to
the notebook system. Try to disconnect and reconnect the
docking station to the system.
● Check the USB ports. Try plugging the USB device into
another port.
● First power off the docking station by disconnecting
the Type-C cable and then removing the power adapter
from the dock. Then, power on the docking station
by connecting the power adapter to the dock before
connecting the Type-C cable to your system.
● Dell Dock supports HDCP up to HDCP 2.2.
NOTE: User's monitor/display must support HDCP 2.2
The LAN port is not functioning.
Cable LED is not ON after it is connected to your host.
USB port has no function in a pre-OS environment.
● Ensure that the latest BIOS and drivers for your system
and the docking station are installed on your system.
● Ensure that the RealTek Gigabit Ethernet Controller is
installed in the Windows Device Manager.
● If your BIOS Setup has a LAN/GBE Enabled/Disabled
option, ensure it is set to Enabled
● Ensure that the Ethernet cable is connected securely on
the docking station and the hub/router/firewall.
● Check the status LED of the Ethernet cable to confirm
connectivity. Re-connect both ends of the Ethernet cable
if the LED is not lit.
● First power off the docking station by disconnecting
the Type-C cable and then removing the power adapter
from the dock. Then, power on the docking station
by connecting the power adapter to the dock before
connecting the Type-C cable to your system.
● Ensure the WD19DCS is connected to AC power.
● Ensure that the system is connected with the docking
station. Try to disconnect and re-connect again with the
docking station.
● If your BIOS has an USB Configuration page, ensure that
the following options are checked:
● 1. Enable USB Boot Support
34 Troubleshooting the Dell Performance Docking Station WD19DCS
Page 35
Table 14. Symptoms and solutions (continued)
Symptoms Suggested solutions
● 2. Enable External USB Port
PXE boot on dock does not function.
USB Boot does not function.
AC Adapter is displayed as “Not Installed” in the Battery
Information page of the Dell BIOS Setup when the Type-C
cable is connected.
Peripherals connected to the docking station do not work in a
pre-OS environment.
Alert message “You have attached an undersized power
adapter to your system” is displayed when the docking station
is connected to your system.
● If your BIOS has an integrated NIC page, select Enabled
w/PXE.
● If your BIOS Setup on your system has an USB
Configuration page, ensure that the following options are
checked:
● 1. Enable USB Boot Support
● If your BIOS has an USB Configuration page, ensure that
the following options are checked:
● 1. Enable USB Boot Support
● 2. Enable External USB Port
● 1. Ensure the Dell Performance Docking Station WD19DCS
is connected properly to its own adapterUSB (240 W).
● 2. Ensure the cable LED of your docking station is ON.
● 3. Disconnect and re-connect the (Type-C) cable to your
system.
● If the BIOS Setup on your system has an USB
Configuration page, check the following option to enable
docking station function in a pre-OS environment:
● Enable External USB Port
● Ensure that the docking station is connected properly to
its own power adapter. Computer requiring more than 130
W power input must also be connected to their own power
adapter for charging and operating at full performance.
● First power off the docking station by disconnecting the
Type-C cable and then removing power adapter from the
dock. Then, power on the docking station by connecting
the power adapter to the dock before connecting the
Type-C cable to your system.
Undersized power adapter warning message that is displayed
and cable LED are off.
No external display. USB or data and cable LED is off.
When system or dock is moved the cable LED turns off.
With Ubuntu 18.04, WIFI will be turned off when the docking
station is connected to the system and the WIFI turns On
again after rebooting the system.
● The docking connector has disconnected from the
system's USB ports. Reconnect the docking cable from
the system, wait for 15 seconds or more, and then dock
again.
● The docking connector has disconnected from the
system's USB ports. Reconnect the docking connector.
● Undock and reboot the system if the above steps do not
work.
● Avoid moving the system/dock when the docking cable is
connected to the system.
● Please uncheck the option Control WLAN radio in BIOS.
● Option is available in - Settings -> Power Management ->
Wireless Radio Control.
Troubleshooting the Dell Performance Docking Station WD19DCS 35
Page 36

13
Getting help
Topics:
• Contacting Dell
Contacting Dell
Prerequisites
NOTE: If you do not have an active Internet connection, you can find contact information on your purchase invoice, packing
slip, bill, or Dell product catalog.
About this task
Dell provides several online and telephone-based support and service options. Availability varies by country and product, and
some services may not be available in your area. To contact Dell for sales, technical support, or customer service issues:
Steps
1. Go to Dell.com/support.
2. Select your support category.
3. Verify your country or region in the Choose a Country/Region drop-down list at the bottom of the page.
4. Select the appropriate service or support link based on your need.
36 Getting help
 Loading...