

Page 1

Dell™ W1900 LCD 電視顯示器
擁有者手冊
型號 W1900
www.dell.com | support.dell.com
Page 2
註、注意事項及警告
註: 「註」會提供您更有效使用電視顯示器的重要資訊。
注意事項:「注意事項」會提醒您可能會對硬體造成傷害或導致資料遺失的動作,並告訴您如何避免發生這
類問題的方法。
警告: 「警告」則會告知使用者可能會導致財產損失、人員傷亡等重大傷害的動作或原因。
____________________
對本文件中所含資訊之修正恕不另行通知。
© 2004 Dell Inc. 版權 所有, 翻印必究。
未經 Dell Inc. 之書面許可,不得以任何方式重製。
本文中使用的商標:Dell 及 DELL 徽標為 Dell Inc. 的商標; TruSurround XT、SRS 及 標記為 SRS Labs, Inc. 的商標。
本文件所述及之其他商標或品牌名稱,均各自分屬其商標或產品名稱之申請者或擁有者所擁有。Dell Inc. 並不擁有商標及商標名
稱中所包含之專利相關權利,商標之相關專利權應屬其擁有者所擁有。
2004 年 11 月 Rev. A01
Page 3

目錄
1 關於電視顯示器
2 安裝電視顯示器
3 遙控器
前視圖 . . . . . . . . . . . . . . . . . . . . . . . . . . . . . . . . . . 3
右側視圖 . . . . . . . . . . . . . . . . . . . . . . . . . . . . . . . . . 4
左側視圖 . . . . . . . . . . . . . . . . . . . . . . . . . . . . . . . . . 5
底部視圖 . . . . . . . . . . . . . . . . . . . . . . . . . . . . . . . . . 6
包裝內容 . . . . . . . . . . . . . . . . . . . . . . . . . . . . . . . . . 7
適合安裝電視顯示器的位置 . . . . . . . . . . . . . . . . . . . . . . . 9
連接電視顯示器 . . . . . . . . . . . . . . . . . . . . . . . . . . . . . 9
連接電腦與電視顯示器 . . . . . . . . . . . . . . . . . . . . . . . . . . 11
安裝電池 . . . . . . . . . . . . . . . . . . . . . . . . . . . . . . . . . 17
使用遙控器 . . . . . . . . . . . . . . . . . . . . . . . . . . . . . . . . 18
使用通用型遙控器或學習型遙控器來操控電視顯示器 . . . . . . . . . . 20
4 使用螢幕顯示
使用遙控器來操縱 OSD . . . . . . . . . . . . . . . . . . . . . . . . . . 21
選擇 OSD 語言 . . . . . . . . . . . . . . . . . . . . . . . . . . . . . . 22
Input Select ( 輸入選擇 ) 功能表. . . . . . . . . . . . . . . . . . . . . . 22
Picture ( 畫面 ) 功能表 . . . . . . . . . . . . . . . . . . . . . . . . . . 23
Audio ( 音訊 ) . . . . . . . . . . . . . . . . . . . . . . . . . . . . . . . 23
PIP/POP/PBP . . . . . . . . . . . . . . . . . . . . . . . . . . . . . . . 24
DELL CONFIDENTIAL – PRELIMINARY 11/17/04 – FOR PROOF ONLY
目錄 1
Page 4

FILE LOCATION: D:\Dell_ASG\ASG_OM\ASG_OM_FM\W1900chtTOC.fm
Channel Setup ( 頻道設定 ) . . . . . . . . . . . . . . . . . . . . . . . . 26
Sleep Timer ( 睡眠定時器 ) . . . . . . . . . . . . . . . . . . . . . . . . 26
OSD Setup (OSD 設定 ) . . . . . . . . . . . . . . . . . . . . . . . . . . 26
Teletext ( 電視文字廣播 ) . . . . . . . . . . . . . . . . . . . . . . . . . 27
5 電視顯示器疑難排解
疑難排解秘訣. . . . . . . . . . . . . . . . . . . . . . . . . . . . . . . 29
一般問題 . . . . . . . . . . . . . . . . . . . . . . . . . . . . . . . . . 30
OSD 訊息 . . . . . . . . . . . . . . . . . . . . . . . . . . . . . . . . . 33
遙控器問題 . . . . . . . . . . . . . . . . . . . . . . . . . . . . . . . . 33
電視顯示器連接電腦時使用自我測試功能 . . . . . . . . . . . . . . . . 34
使用電視顯示器當做監視器時遇到問題 . . . . . . . . . . . . . . . . . 34
6 電視顯示器規格
2 目錄
索引 . . . . . . . . . . . . . . . . . . . . . . . . . . . . . . . . . . . . . 41
DELL CONFIDENTIAL – PRELIMINARY 11/17/04 – FOR PROOF ONLY
Page 5
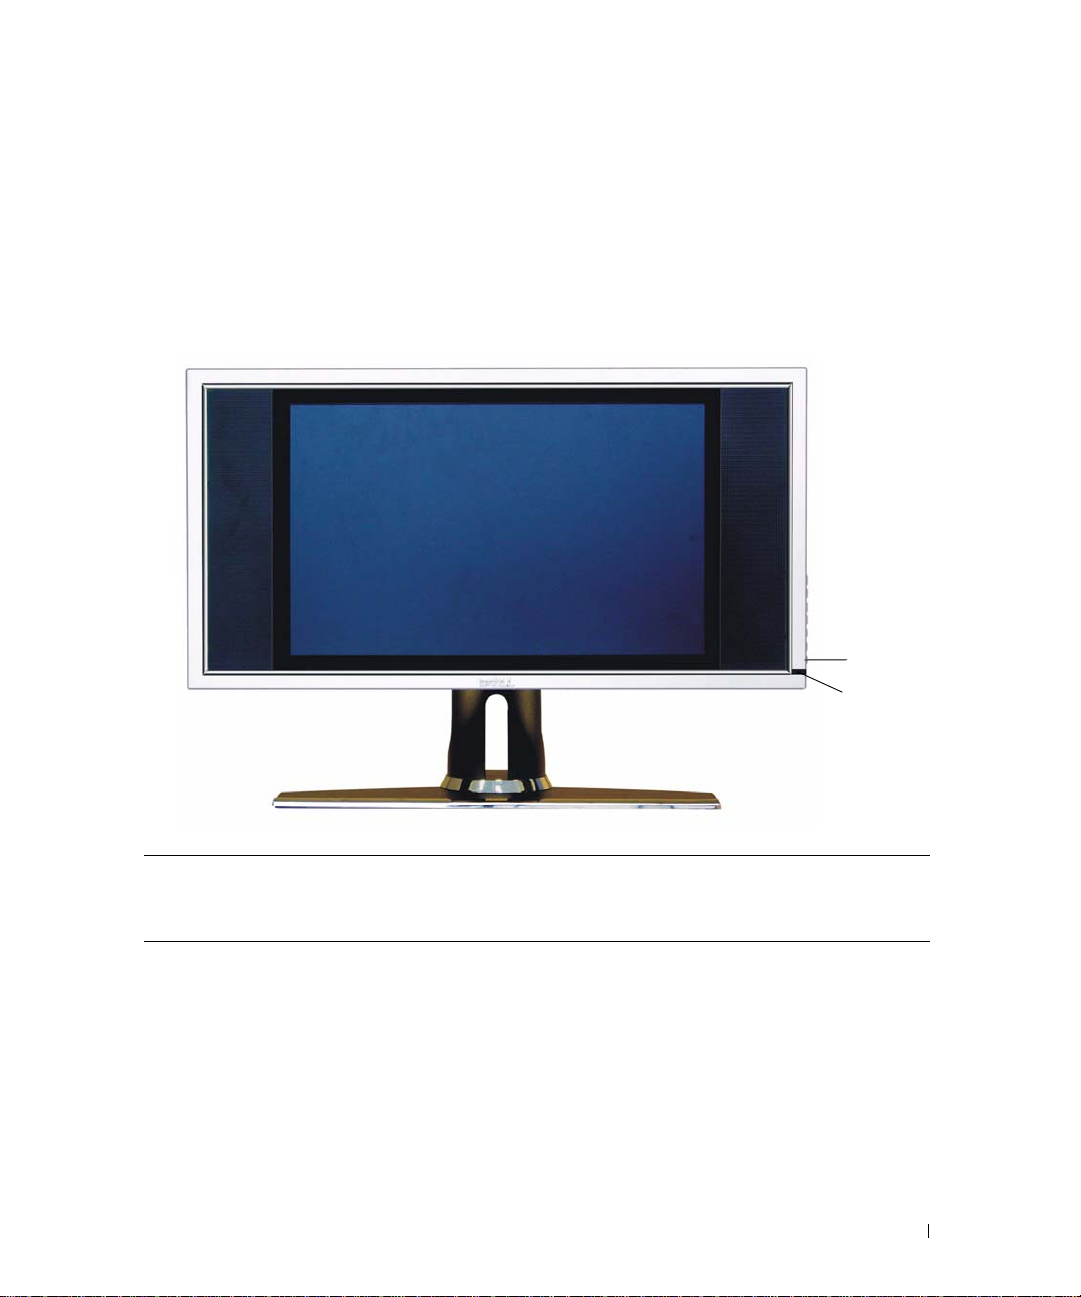
關於電視顯示器
前視圖
1
2
1
1
IR 接收器 感應遙控器訊號
2
電源指示燈 (LED) 如果電視顯示器已開機,電源指示燈會亮藍燈;如果電視顯
示器處於省電模式狀態,電源指示燈會亮黃燈
關於電視顯示器 3
Page 6
右側視圖
7
www.dell.com | support.dell.com
1
2
3
4
5
電源按鈕 按下電源按鈕就可開啟及關閉電視顯示器。如果電視顯示器
已開機,電源按鈕會亮藍燈;如果電視顯示器處於省電模式
狀態,電源按鈕會亮黃燈。
OSD 功能表按鈕 按下此按鈕就可開啟螢幕顯示 (OSD)
音量按鍵 按下此按鍵就可降低音量
音量按鍵 按下此按鍵就可調高音量
頻道按鍵 按下此按鍵就可選擇前一頻道或瀏覽整個 OSD
6
5
4
3
2
1
6
7
4 關於電視顯示器
頻道按鍵 按下此按鍵就可選擇下一個頻道或瀏覽整個 OSD
Input Select( 輸入選擇 )按鈕按下此按鈕就可顯示 Input Select ( 輸入選擇 ) 功能表
Page 7
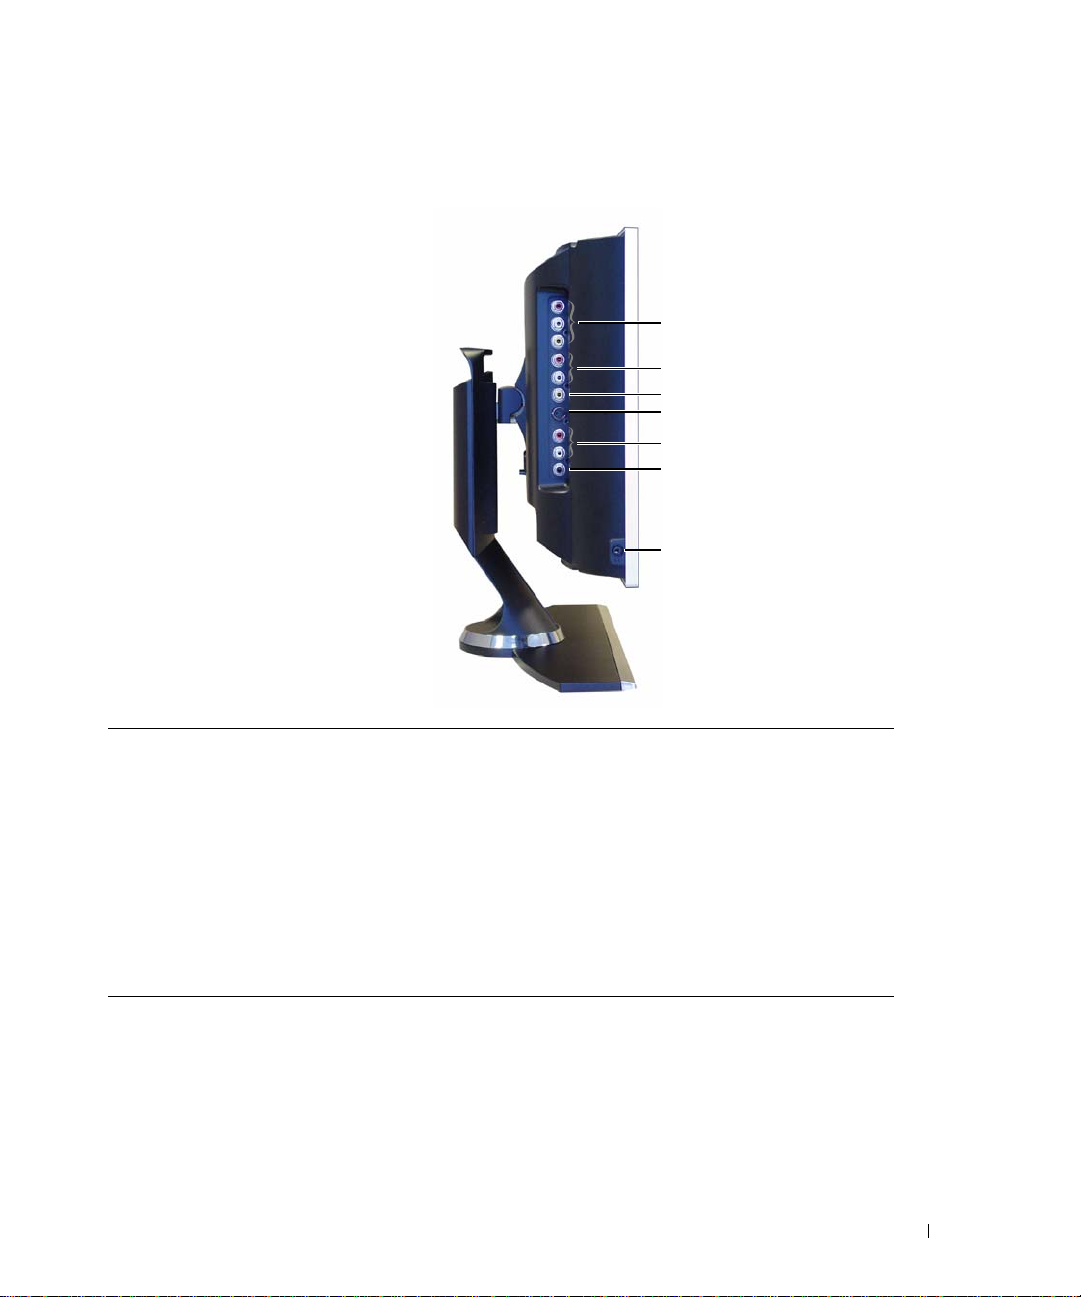
左側視圖
1
2
3
4
5
6
7
1
合成式訊號輸出 / 視訊輸出 連接 VCR
2
合成式音訊連接器 如果已有裝置連接至合成式訊號連接器 (AV1),請使用音訊
連接器
3
合成式訊號連接器 (AV1) 連接如 VCR 或 DVD 播放機之類的裝置
4
S-Video 連接器 (AV2) 連接如視訊遊戲系統或 VCR 之類的裝置
5
S-Video 音訊連接器 如果已有裝置連接至 S-Video 連接器 (AV2),請使用音訊
連接器
6
次低音喇叭輸出連接器 連接次低音喇叭
7
耳機連接器 連接耳機
關於電視顯示器 5
Page 8
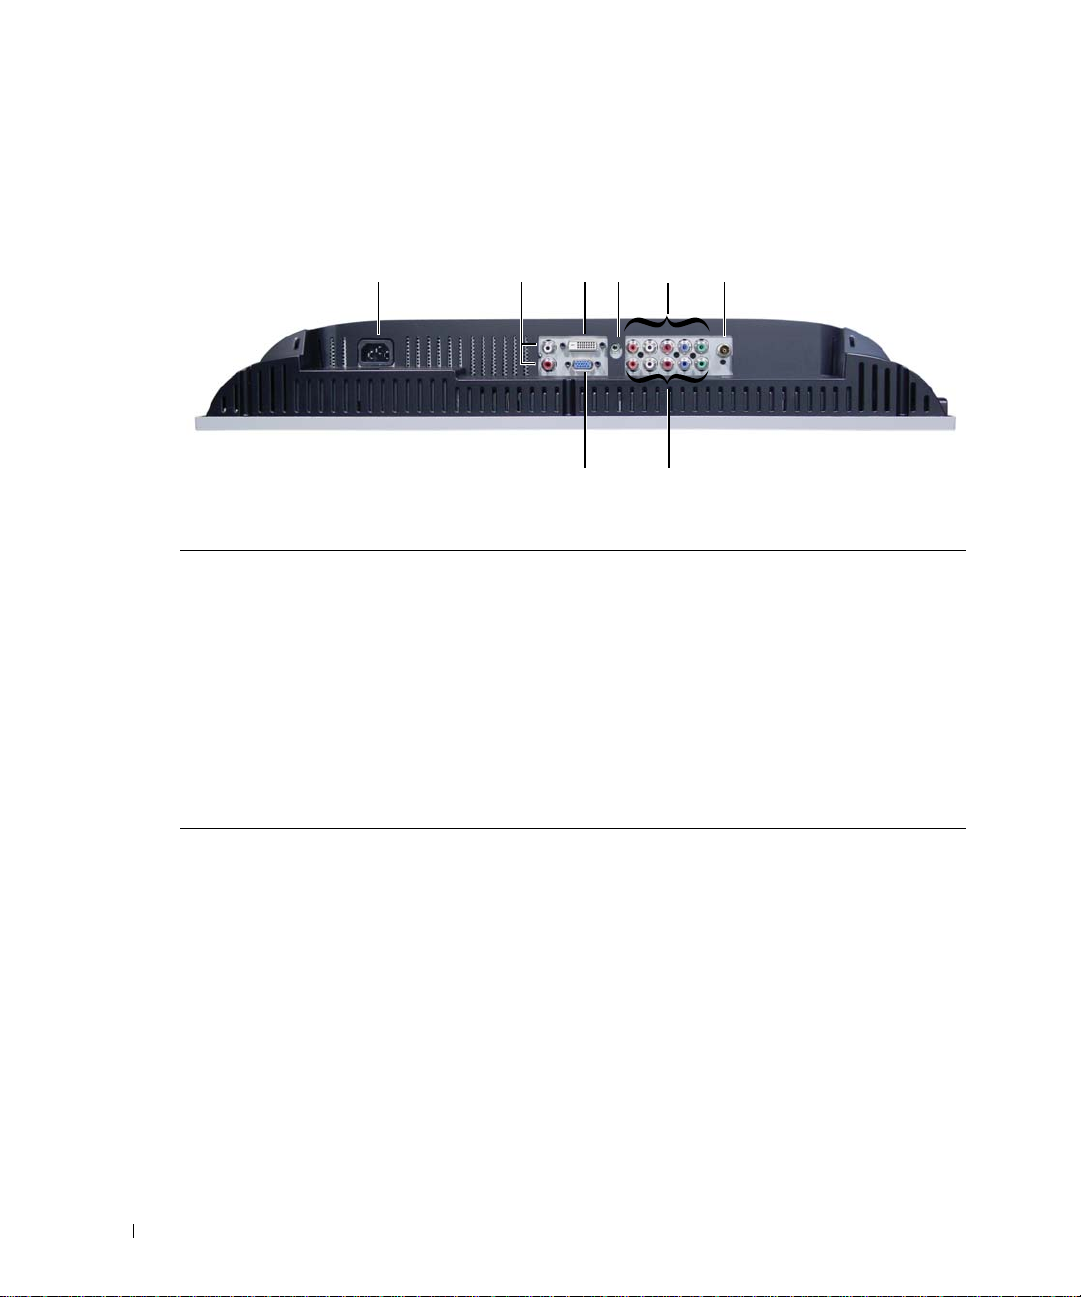
底部視圖
6
1
www.dell.com | support.dell.com
2
3
5
4
8
1
電源連接器 連接電源線
2
DVI 音訊連接器 (L / R) 如果已有如 DVD 播放機之類的裝置連接至 DVI 連接器,
請使用 DVI 音訊連接器
3
DVI 連接器 連接電腦或如 DVD 播放機之類的視訊裝置
4
VGA 或 DVI 的音訊連接器 從電腦連接音源線至電視顯示器
5
色差影像及音訊連接器 (AV3) 連接如 DVD 播放機或有線電視轉接器之類的裝置
6 ANT/Cable
7
色差影像及音訊連接器 (AV4) 連接如 DVD 播放機或有線電視轉接器之類的裝置
8 VGA
連接有線電視轉接器或天線
連接電腦
7
6 關於電視顯示器
Page 9
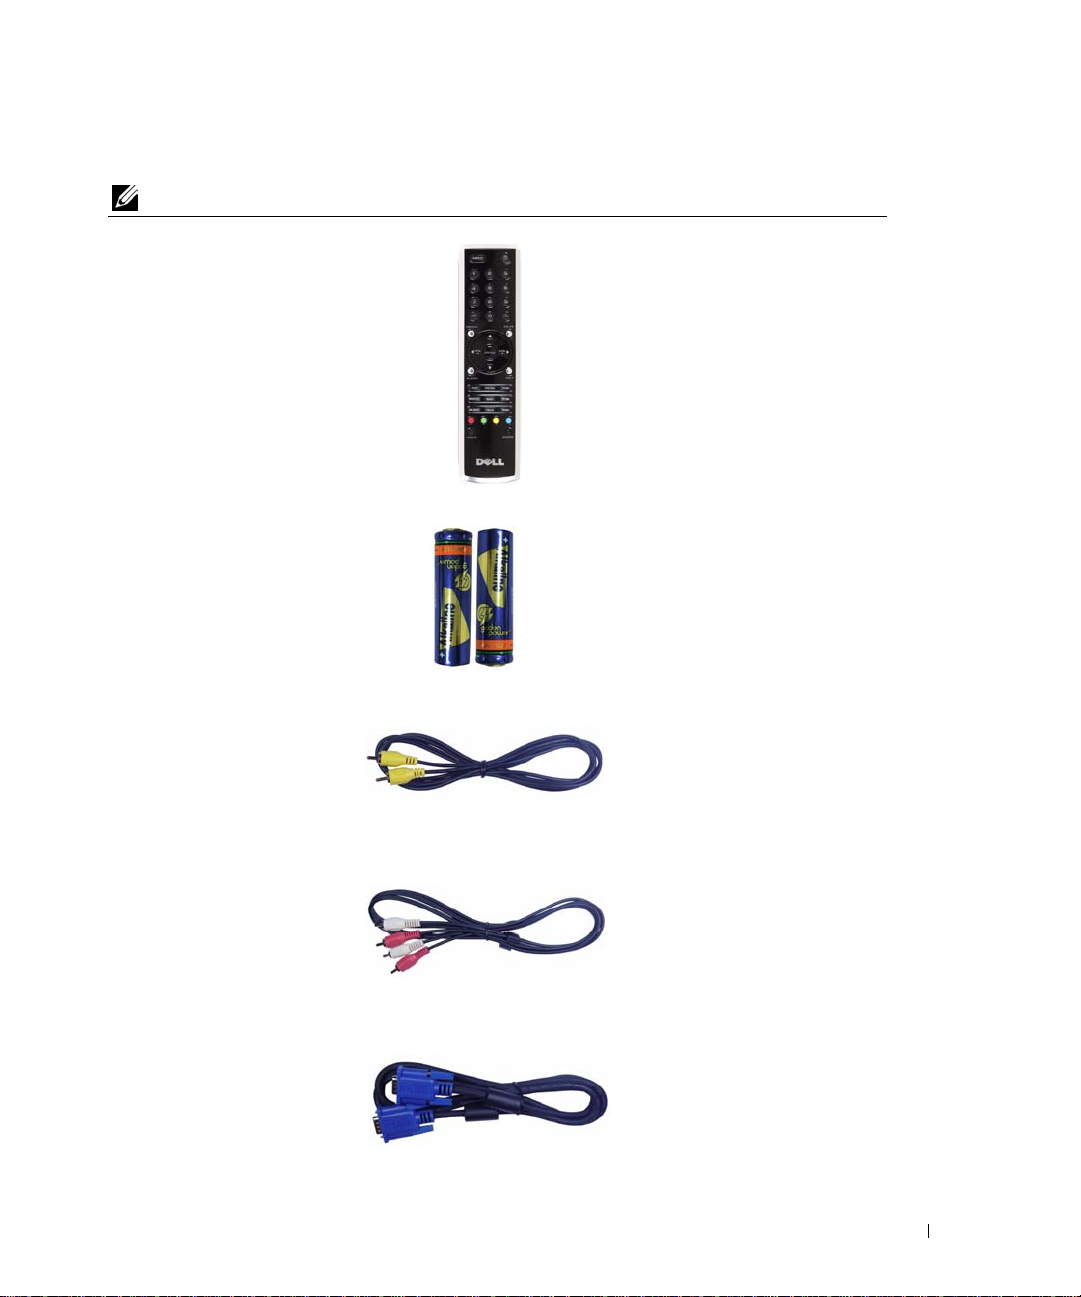
包裝內容
如果您需要額外的纜線,請與 Dell 聯繫。
遙控器
AAA 電池 (2)
合成式影像纜線
音訊訊號線 (2)
VGA 纜線
關於電視顯示器 7
Page 10
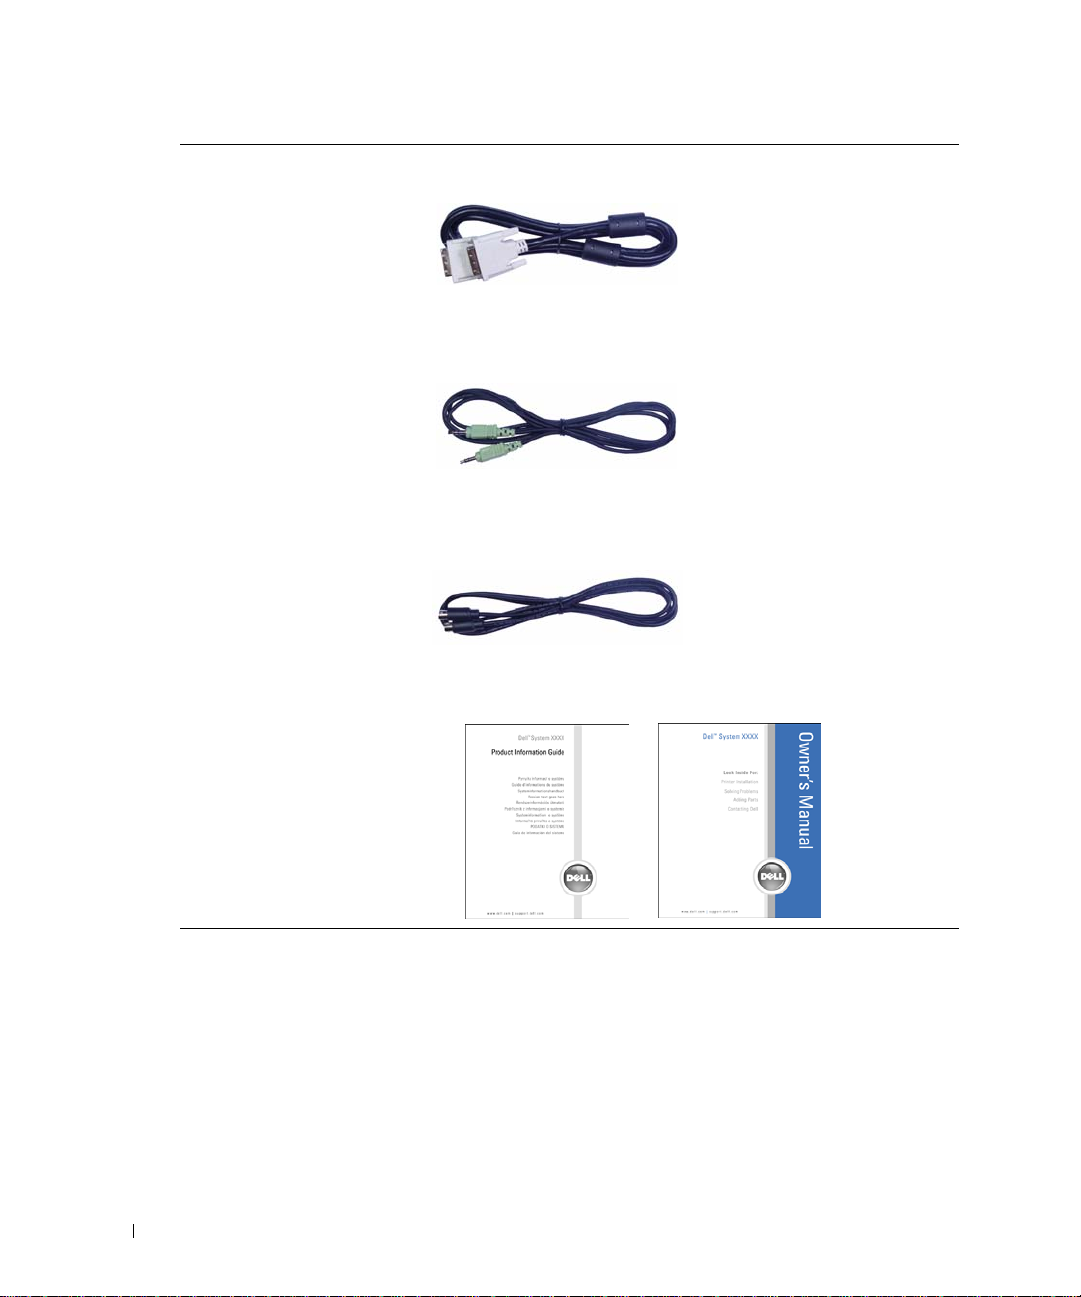
DVI 纜線
電腦音源線
www.dell.com | support.dell.com
S-Video 纜線
說明文件
8 關於電視顯示器
Page 11

安裝電視顯示器
警告:在開始進行本章節中的程序之前,請先遵循 〈產品資訊指南〉中的安全性指示。
適合安裝電視顯示器的位置
決定放置電視顯示器的位置時,請考慮到下列的環境條件:
•
請勿在接觸到高熱、直接日曬或極冷的位置放置或使用電視顯示器。
•
避免移動電視顯示器至溫差極大的不同位置。如需詳細資訊,請參閱第
•
請勿使電視顯示器承受到劇烈的振動或高撞擊。請勿將電視顯示器置放於汽車行李箱
內。
•
請勿在高濕度或灰塵彌漫的環境中放置或使用電視顯示器。
•
請勿在有水或其他液體會濺到電視顯示器的位置放置電視顯示器。
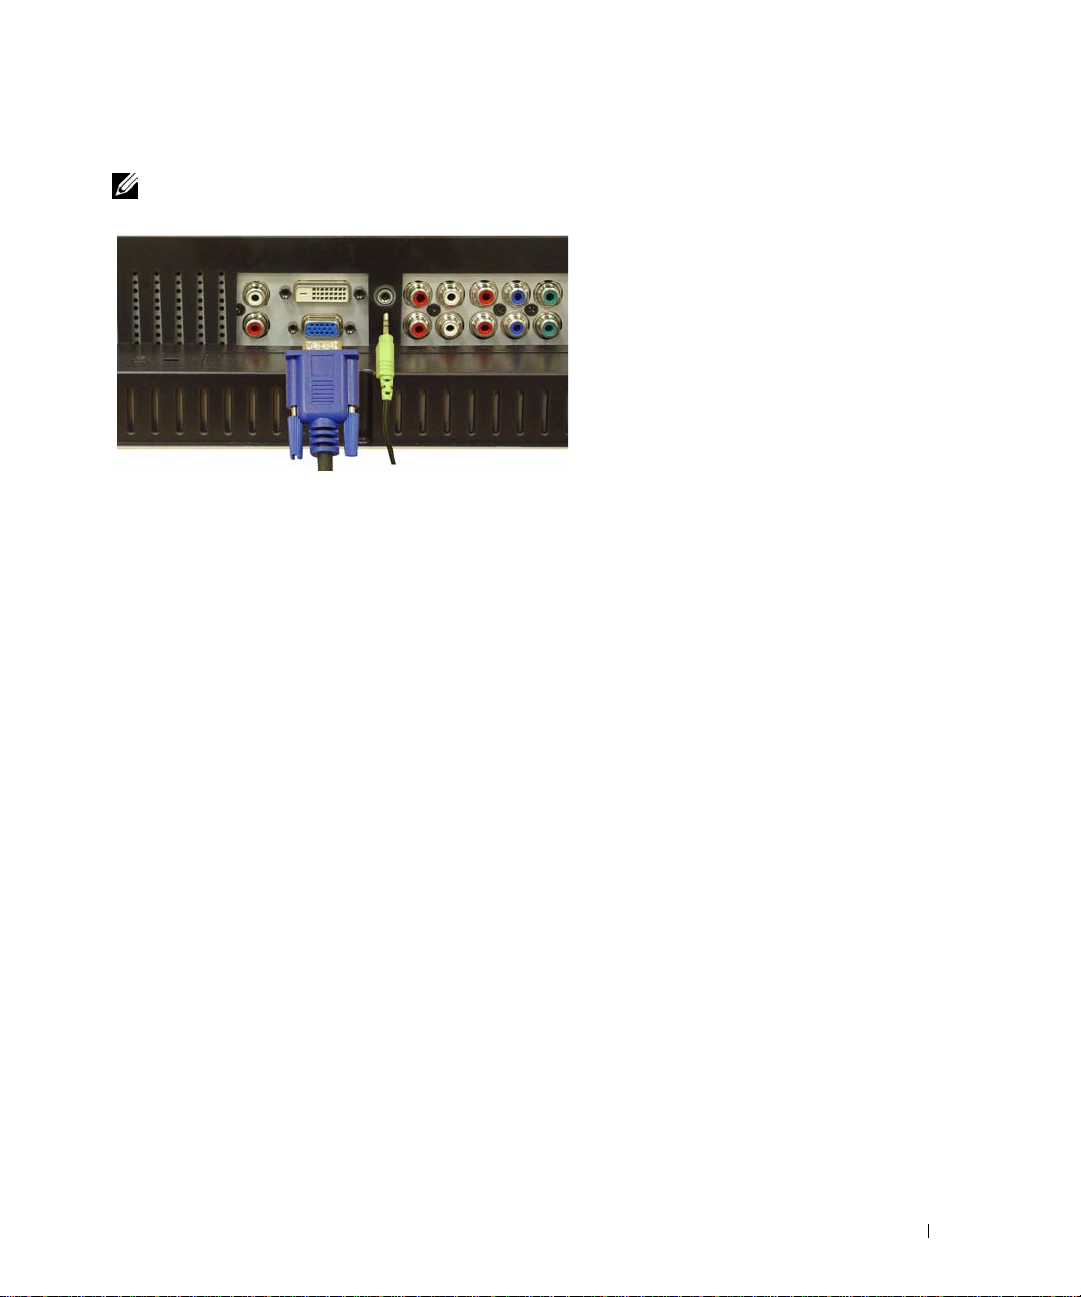
連接電視顯示器
電視顯示器有四個可連接裝置的標準連接器。
註: 連接電視顯示器之前,請先確定是否有所有適用的纜線。您要連接的裝置可能隨附某些纜
線。如需電視顯示器的纜線清單,請參閱第 7 頁的 〈包裝內容〉。如果您需要訂購額外的纜
線,請與 Dell 聯繫。
37
頁 〈規格〉。
2
品質 纜線及連接器 使用說明
良好 同軸電纜 (RF) 載送來自一條纜線的視訊及
音訊。電視顯示器上使用 ANT/Cable 來標
示同軸電纜連接器。如果要確認連接器的
位置,請參閱第 6 頁。
安裝電視顯示器 9
Page 12
品質 纜線及連接器 使用說明
良好 Composite ( 合成式訊號連接器 ) 透過 單
一插腳來載送影像訊號。如果您正在使用
合成式影像連接器,則必須也連接合成式
音訊連接器。如果要確認連接器的位置,
請參閱第 5 頁。
www.dell.com | support.dell.com
較佳 S-Video 將影像訊號分割成黑白訊號及彩色
訊號。如果要確認連接器的位置,請參閱
第 5 頁。
最佳 Component ( 色差 ) 將影像訊號分割成兩個
10 安裝電視顯示器
彩色訊號及一個黑白訊號。如果要確認連
接器的位置,請參閱第 6 頁。
Page 13
連接電腦與電視顯示器
電視顯示器具備兩個可連接電腦的標準連接器。
註: 請依據電腦支援的圖形卡來選用連接器類型。如需圖形卡的其它資訊,請參閱電腦說明文
件。
品質 纜線及連接器 使用說明
良好 屬於標準電腦圖形顯示系統,使用類比訊
號且可支援最高 1280 x 768 解析度。
較佳 屬於數位訊號,可支援數位訊號並且將類
比訊號轉換成數位訊號。DVI 適用於高解
析度顯示器,並且可支援最高 1280 x 768
解析度。
安裝電視顯示器 11
Page 14
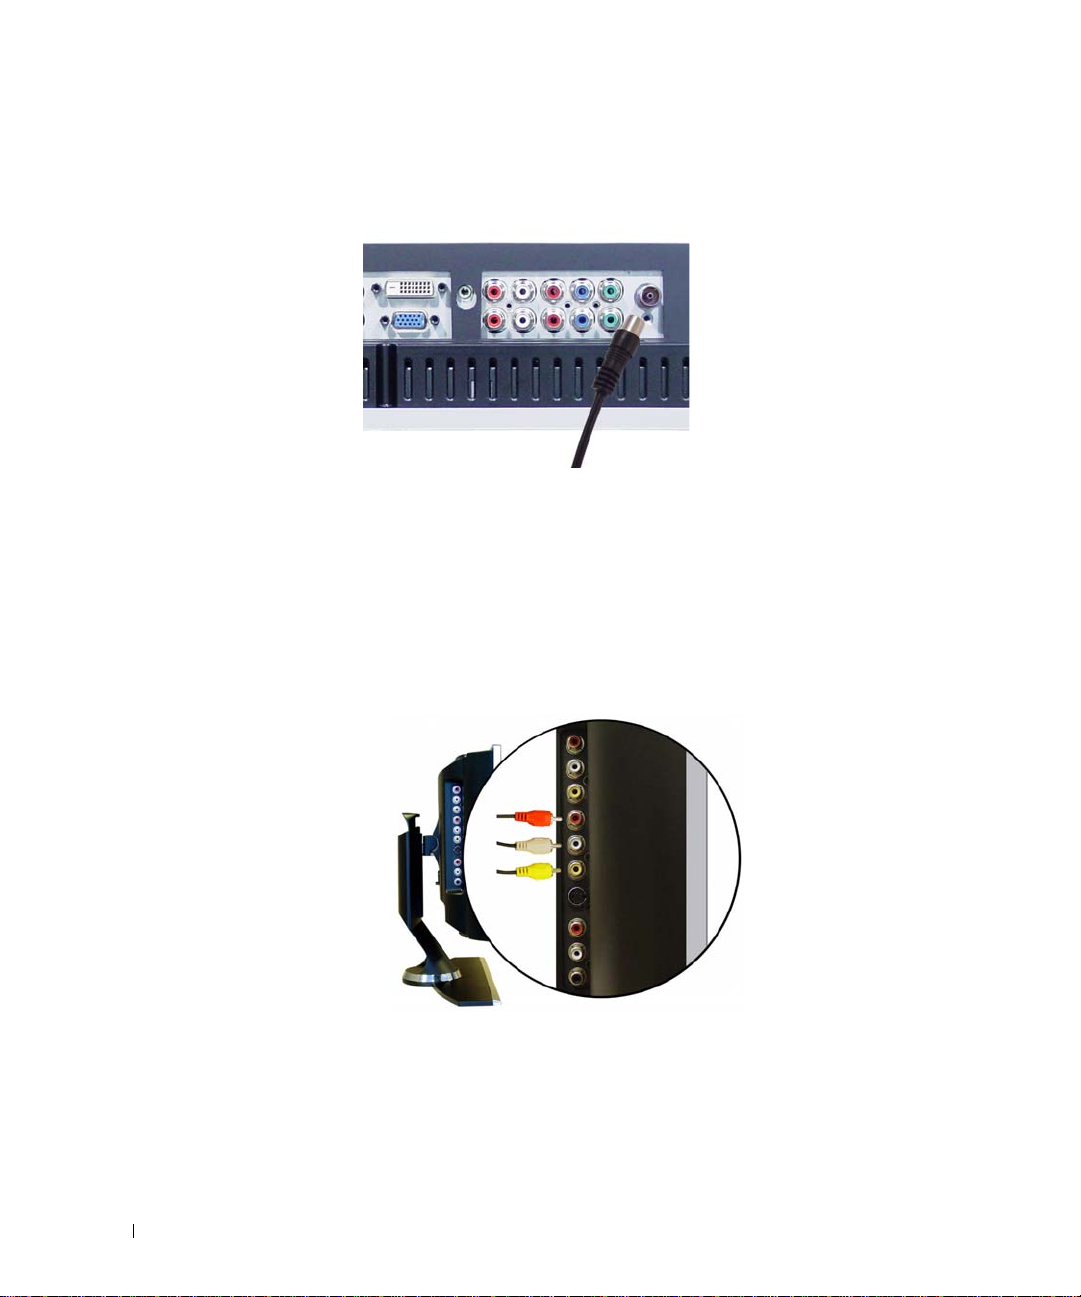
使用 ANT/Cable ( 同軸電纜 ) 連接器
www.dell.com | support.dell.com
1
關閉電視顯示器並且拔除電源線。
2
連接同軸電纜線與電視顯示器的
3
接上電視顯示器的電源線,然後開啟電視顯示器電源。
4
進入螢幕顯示
請參閱第
22
(OSD)
頁。
並且選擇 TV
ANT/Cable
。如需
Input Select (
連接器。
輸入選擇) 功能表的進一步資訊,
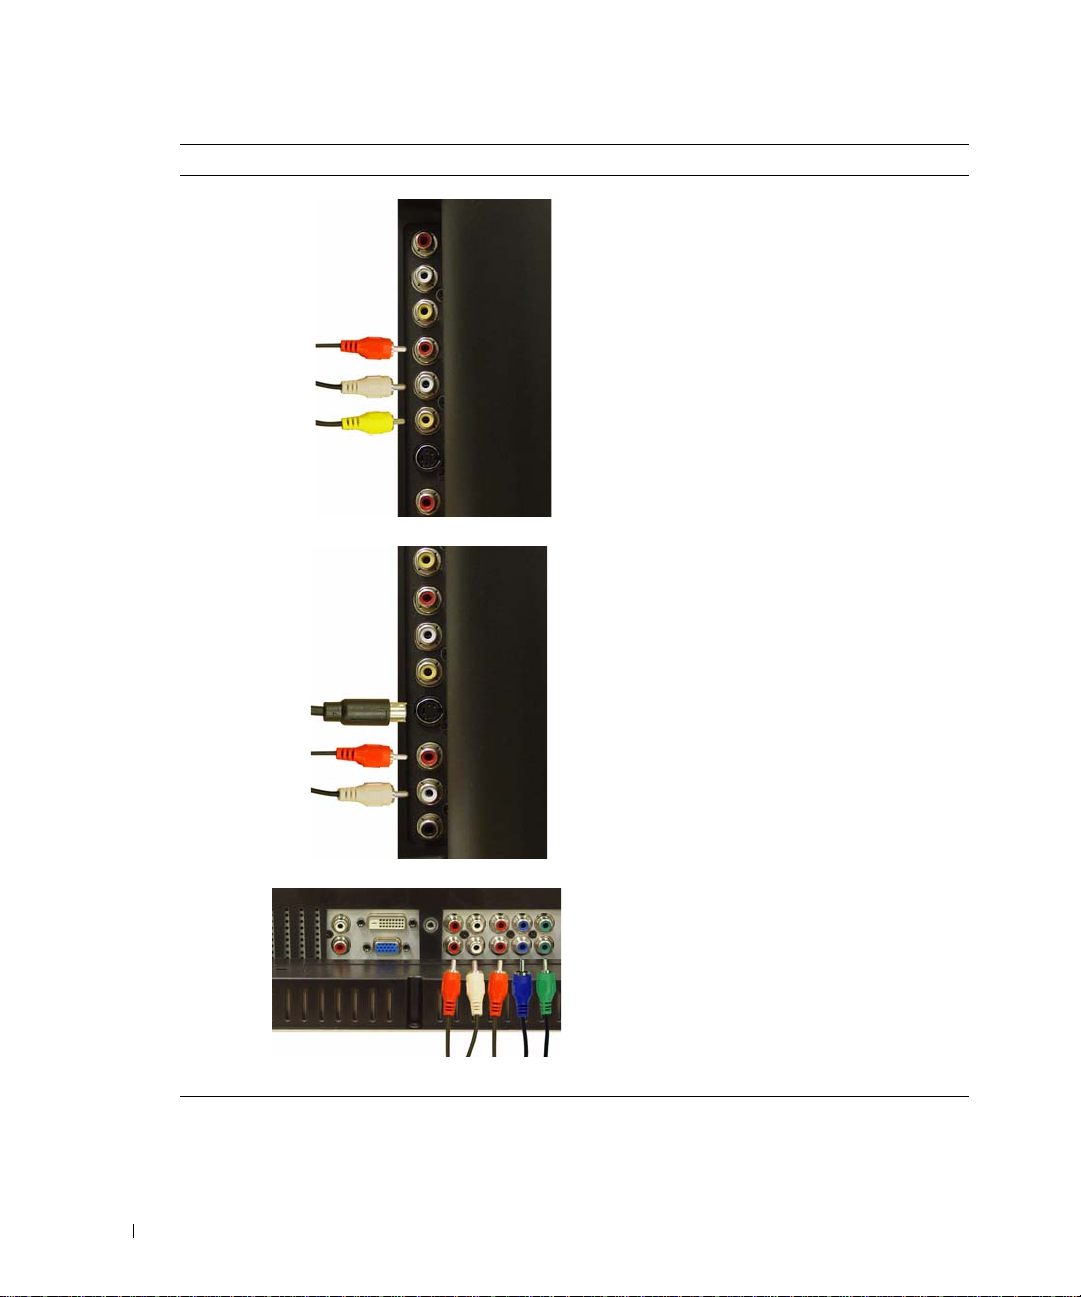
使用合成式訊號 (Composite) 連接器
1
關閉電視顯示器並且拔除電源線。
2
連接附有音訊訊號線的裝置。
3
接上電視顯示器及裝置的電源線,然後開啟電視顯示器及裝置電源。
4
進入
OSD
訊,請參閱第
12 安裝電視顯示器
並且選擇 AV1 (Composite)
22
頁。
。如需
Input Select (
輸入選擇) 功能表的進一步資
Page 15
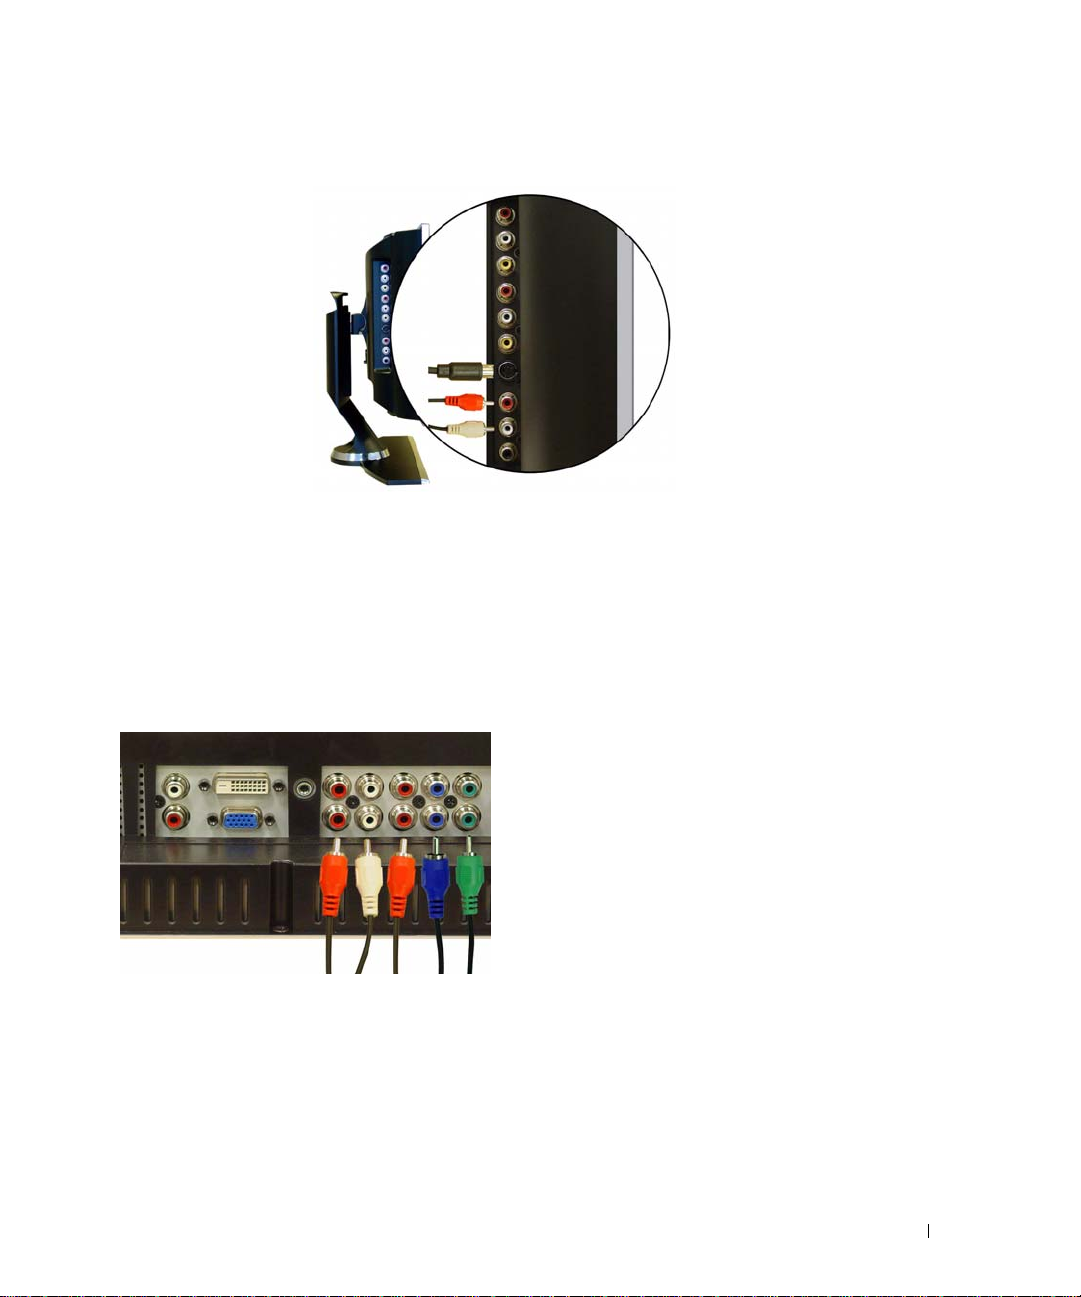
使用 S-Video 連接器
1
關閉電視顯示器並且拔除電源線。
2
連接附有音訊訊號線的裝置。
3
接上電視顯示器及裝置的電源線,然後開啟電視顯示器及裝置電源。
4
進入
OSD
請參閱第
並且選擇 AV2 (S-Video)
22
頁。
。如需
Input Select (
輸入選擇) 功能表的進一步資訊,
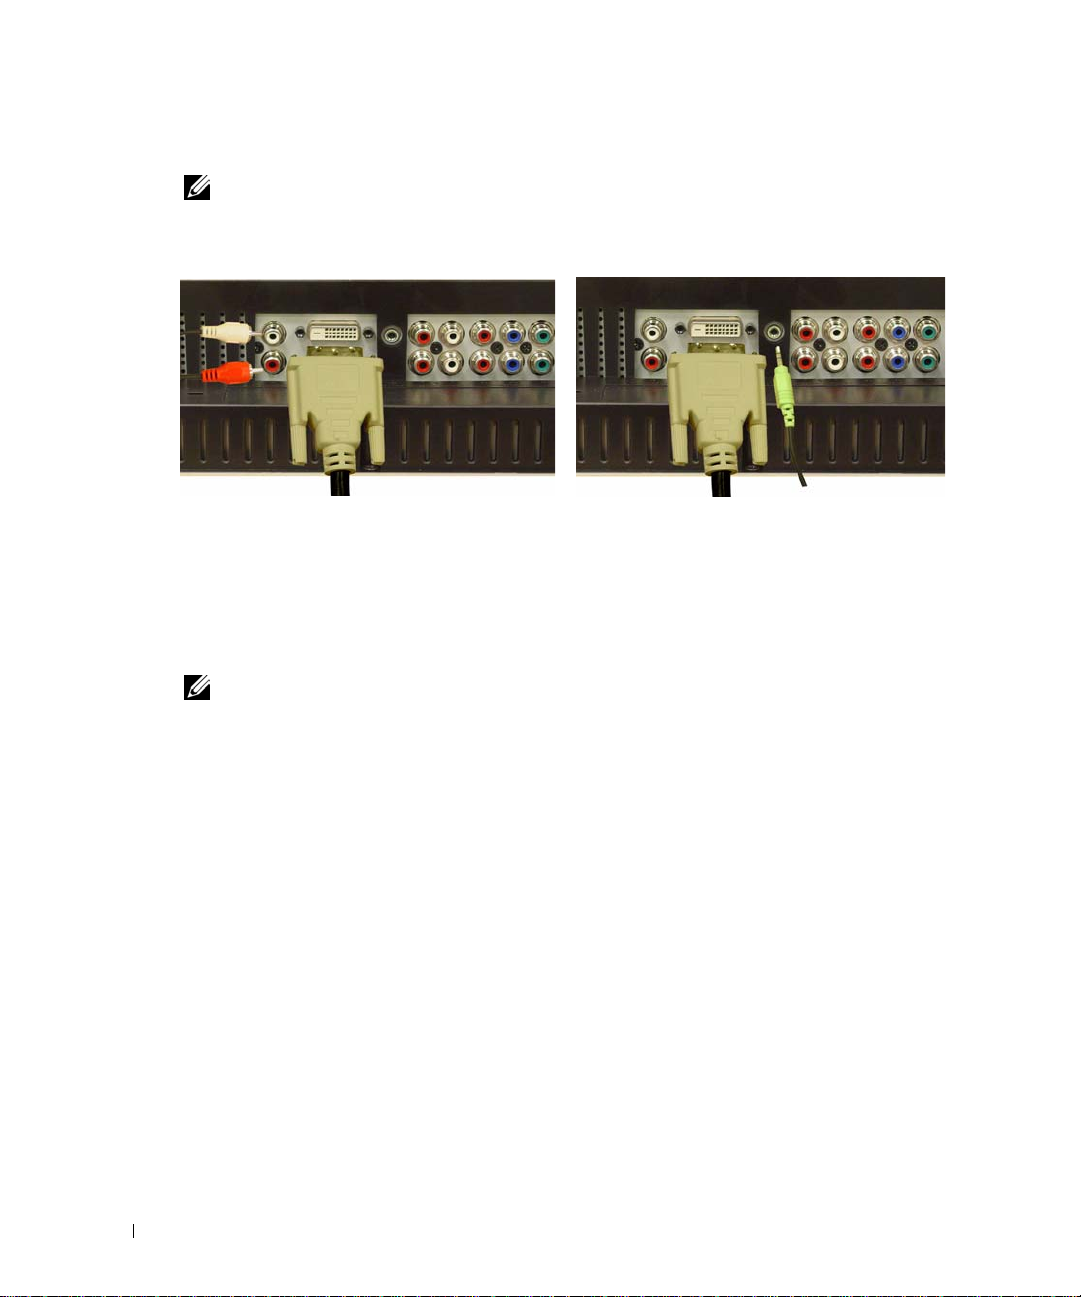
使用色差 (Component) 連接器
1
關閉電視顯示器並且拔除電源線。
2
連接附有音訊訊號線的裝置。
3
接上電視顯示器及裝置的電源線,然後開啟電視顯示器及裝置電源。
4
進入
OSD
並且選擇 AV3 (
選擇
)
功能表的進一步資訊,請參閱第
Component
1) 或 AV4 (
22
頁。
Component
2)
。如需
Input Select (
安裝電視顯示器 13
輸入
Page 16
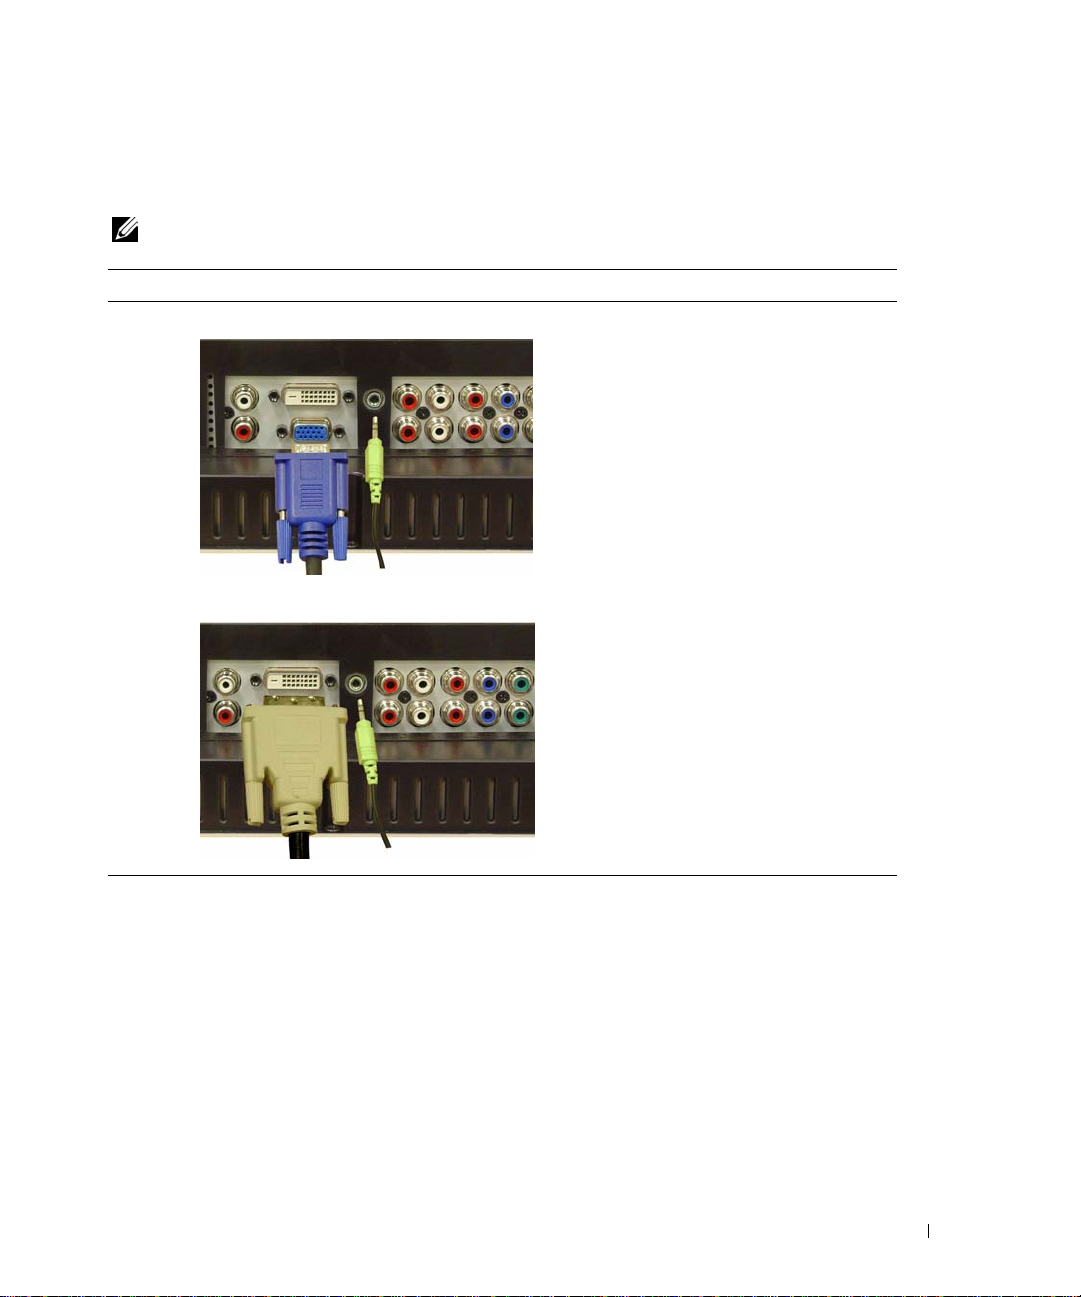
使用 DVI 連接器
註: 僅可以使用一個連接器 (VGA 或 DVI) 來連接電腦。
連接視訊裝置 連接電腦
www.dell.com | support.dell.com
關閉電視顯示器並且拔除電源線。
1
2
連接裝置。
3
連接白色
如果您正在連接視訊裝置,請使用音訊連接器 (紅色及白色);如果您正在連接電腦,請
使用立體聲連接器
註: 某些有線電視轉接器可能配有 DVI 連接器,但是不支援使用 DVI 連接。如需詳細資訊,請
聯繫有線電視公司。
4
接上電視顯示器及裝置的電源線,然後開啟電視顯示器及裝置電源。
5
進入
第
22
DVI
OSD
並且選擇 DVI
頁。
纜線及音訊訊號線。
(
綠色)。
。如需
Input Select (
輸入選擇) 功能表的進一步資訊,請參閱
14 安裝電視顯示器
Page 17
使用 VGA 連接器
註: 僅可以使用一個連接器 (VGA 或 DVI) 來連接電腦。
1
關閉電視顯示器並且拔除電源線。
2
連接藍色
3
連接綠色音訊訊號線至電視顯示器的連接器及電腦。
4
接上電視顯示器及裝置的電源線,然後開啟電視顯示器及裝置電源。
5
進入
第
22
VGA
OSD
並且選擇 VGA
頁。
纜線至電視顯示器及電腦。
。如需
Input Select (
輸入選擇) 功能表的進一步資訊,請參閱
安裝電視顯示器 15
Page 18

www.dell.com | support.dell.com
16 安裝電視顯示器
Page 19

遙控器
安裝電池
3
使用遙控器之前,請先安裝兩個
1
滑動並打開電池蓋。
2
安裝電池。請確定電池上的
3
裝回電池蓋。
AAA
+ 及 -
電池。
正負極位置符合標記電池盒中的
+ 及 -
正負極位置。
遙控器 17
Page 20
使用遙控器
26
www.dell.com | support.dell.com
25
24
23
22
21
20
19
18
17
16
15
1
2
3
4
5
6
7
8
9
10
11
12
18 遙控器
14
13
Page 21

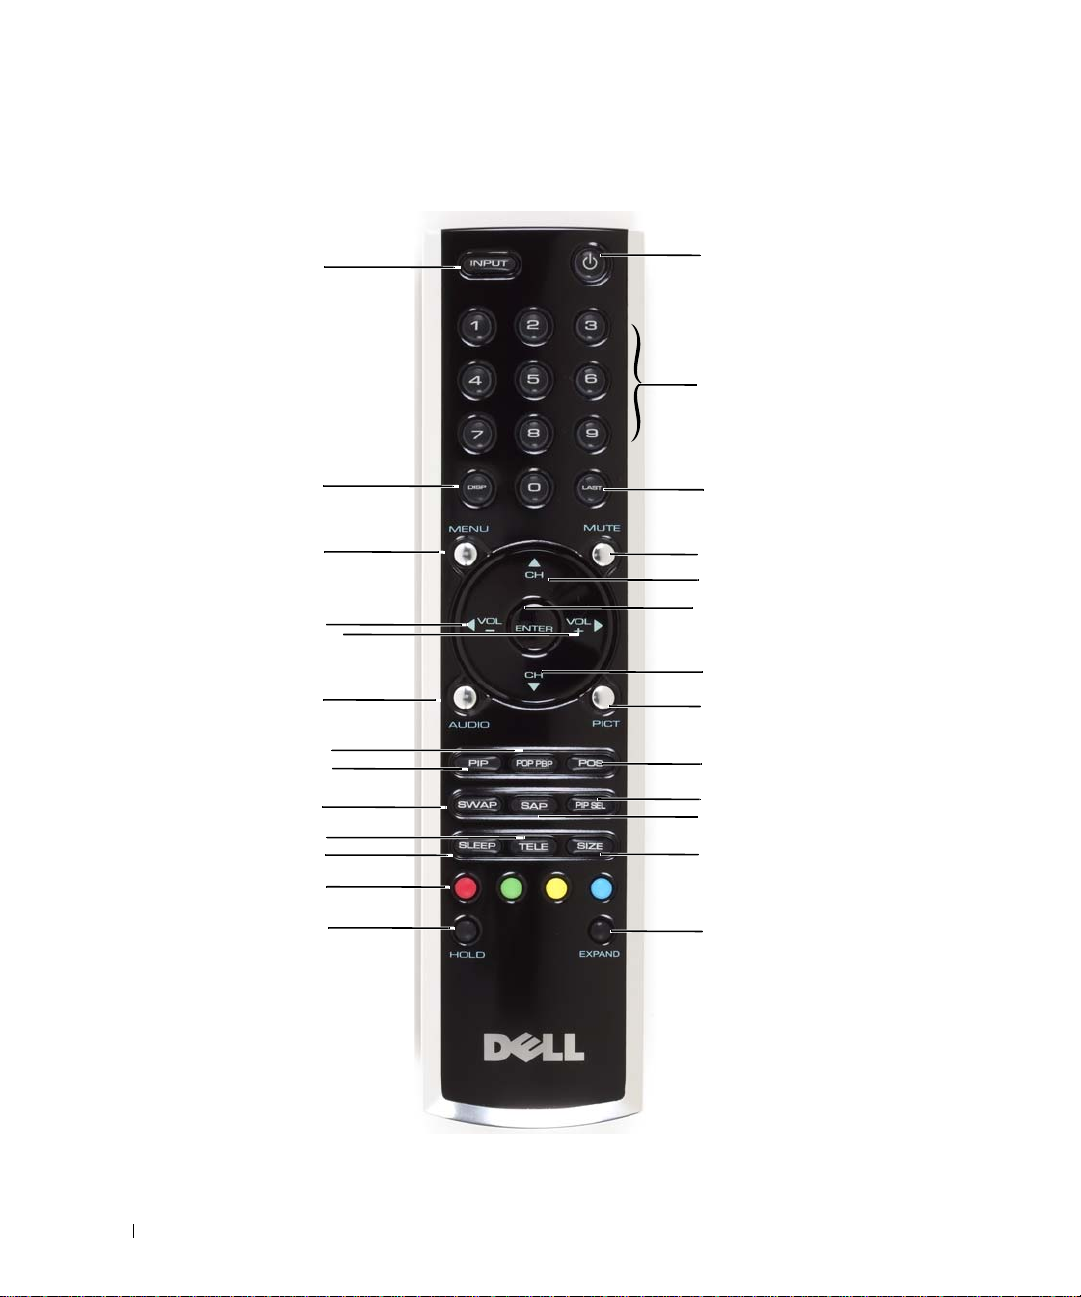
1
Power ( 電源 )
按鈕
2
數字按鍵 按下數字按鍵就可以選擇頻道
3 Last
4 Mute
5
CH ( 向上箭號
圖式 )
6 Enter
7
CH ( 向下箭號
圖式 )
8 Pict
9 Pos
10 PIP Sel
11 SAP
12 Size
13 Expand
14 Hold
15
Te le t ex t 按鍵 四個標準電視文字廣播按鍵
16 Sleep
17 Tel e
開啟及關閉電視電源
按下此按鍵可以回到您上次觀賞的頻道
按下此按鍵可以關閉聲音。再次按下此按鍵就可以開啟聲
音。
按下此按鍵可以調到下一頻道。
在 OSD 中,可以使用頻道按鍵來瀏覽整個螢幕顯示 (OSD)
功能表
選擇 OSD 選項;確認頻道選擇;在讀卡機模式中選擇影像
按下此按鍵可以調到前一頻道。
在 OSD 中,可以使用頻道按鍵來瀏覽整個螢幕顯示 (OSD)
功能表
輪換 Picture ( 畫面 ) 功能表的預設選項
變更畫中畫 (Picture-In-Picture,PIP) 視窗位置
如果您使用畫中畫 (Picture-In-Picture,PIP)、畫外畫
(Picture-Outside-Picture,POP) 或雙畫面並排播放 (PictureBy-Picture,PBP),按下此按鍵便可以切換視窗。
開啟
Second Audio Program (SAP)
輪換 Picture ( 畫面 ) 功能表的大小選項
輪換三種放大模式:
•
在畫面上半部顯示較大的文字。
在畫面下半部顯示較大的文字。
•
定期檢視
•
多畫面設定會在指定時間後自動翻轉到下一畫面。按下此
按鍵可以在下列模式之間切換:
•
凍結畫面
•
回到自動翻轉模式
開啟睡眠定時器
輪換三種 Teletext 模式:
•On (開啟)
18 Swap
19 PIP
•Mix (
•Off (
使用 PIP、POP 或 PBP 時切換畫面
進入及結束 PIP 模式
同時顯示電視文字廣播及節目
關閉
)
( 次要音效節目 )
)
遙控器 19
Page 22
20 POP PBP
21 Audio
22 Vol +
23 Vol -
24 Menu
25 Disp
www.dell.com | support.dell.com
26 Input
進入及結束 POP 或 PBP 模式
輪換預設 Audio ( 音訊 ) 選項
調高音量
在 OSD 中,可以使用音量鍵來瀏覽整個功能表。
降低音量
在 OSD 中,可以使用音量鍵來瀏覽整個功能表。
進入及結束 OSD 主功能表。
顯示電視相關資訊 ( 例如,如果在 TV Mode ( 電視模式 )
中,則會顯示正在觀看的頻道 )
進入及結束 Input Select ( 輸入選擇 ) 主功能表。
使用通用型遙控器或學習型遙控器來操控電視顯示器
預先程式化的通用型遙控器可以控制下列
•
電源
•
下一個頻道
•
上一個頻道
•
調高音量
•
降低音量
•
靜音
•
輸入選擇
註:
(+)
(-)
(+)
(-)
未來預先程式化的通用型遙控器能夠控制更多功能。
您可以設定通用型遙控器以下列方式來使用
•
如果製造商有在遙控器手冊中列出程式碼,請使用
•
如果遙控器具有搜尋功能,就可以使用此功能來尋找正確的程式碼。
•
如果遙控器具有學習功能,除了前面列出的按鍵以外,您還可以使用
特定按鍵。
註:
如需其他資訊,請參閱通用型遙控器或學習型遙控器隨附的說明文件。
Dell
電視顯示器功能:
Dell
電視顯示器:
Philips
程式碼。
Dell
遙控器來設定
20 遙控器
Page 23
使用螢幕顯示
4
電視顯示器提供螢幕顯示
設定、選擇觀看畫中畫
放
(Picture-By-Picture)。
(OSD)
(Picture-In-Picture)
,您可以使用
OSD
、畫外畫
來選擇適用的輸入來源、調整影像及音訊
(Picture-Outside-Picture)
及雙畫面並排播
使用遙控器來操縱 OSD
註: 您可以使用電視顯示器側面板上的音量按鍵及頻道按鍵來操縱及選擇 OSD,也可以使用遙
控器來操縱及選擇 OSD。本節說明如何使用遙控器來操縱 OSD,惟特別註明除外。
1
若要進入
螢幕下方會顯示七個圖示。
2
請使用向左鍵和向右鍵 (音量按鍵) 來選擇圖示。
按向左鍵和向右鍵
3
當反白顯示圖示時,按下 Menu (功能表) 按鍵就可以選取選項。
4
畫面上會顯示所選取之選項的新功能表。請使用向上鍵和向下鍵 (頻道按鍵) 來選擇各項
設定。
註: 使用向上鍵和向下鍵 ( 頻道按鍵 ) 瀏覽選項時,會在設定項的旁邊顯示紅色箭頭。如果您已
選取選項,則所選取之選項旁邊會出現核取標記。
5
請使用向左鍵和向右鍵 (音量按鍵) 及 Enter 按鍵來調整或選擇設定值。
註: 您可以隨時選擇 Exit ( 結束 ) 或按下 Menu ( 功能表 ) 按鍵,返回主功能表。
6
完成選擇後,請按 Menu (功能表) 按鍵返回主功能表。
7
若要結束
OSD
,請按下 Menu (功能表) 按鍵。
(
音量按鍵) 時會反白顯示所選擇的圖示。
OSD
,請選擇 Exit (結束) 圖示並按 Enter
。
檔案位置: D:\Dell_ASG\ASG_OM\ASG_OM_FM\W1900cht40.fm
使用螢幕顯示 21
Page 24
檔案位置: D:\Dell_ASG\ASG_OM\ASG_OM_FM\W1900cht40.fm
選擇 OSD 語言
1
按 Menu (功能表) 就會進入
2
選擇 Setup (設定)。
3
在 Setup (設定) 功能表中,選擇 Language (語言) 並且選出
OSD
。
OSD
中要使用的語言。
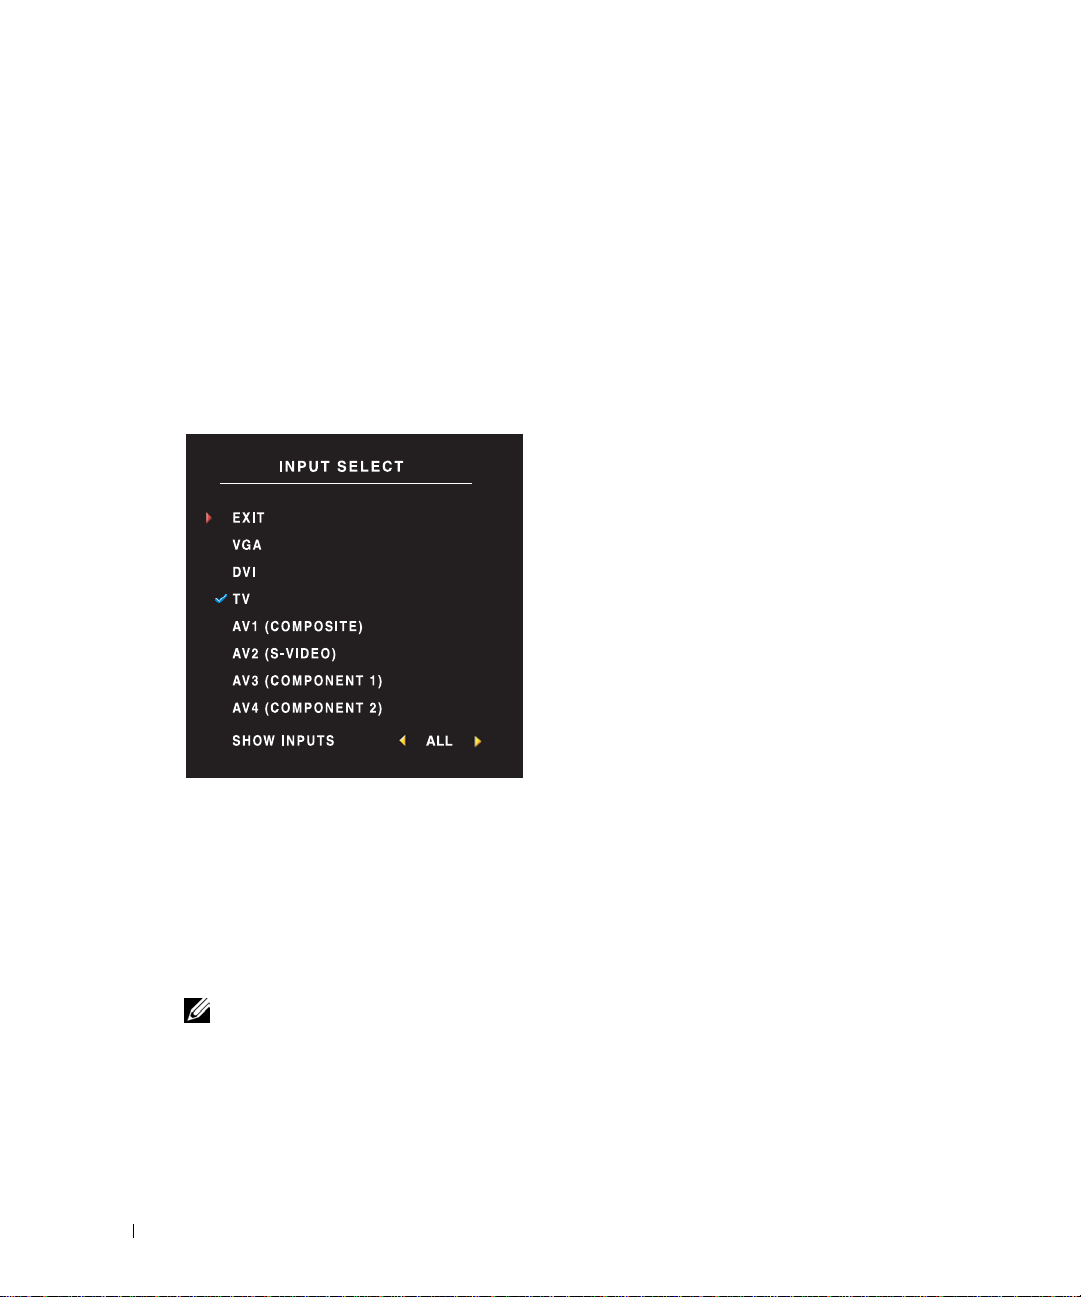
Input Select ( 輸入選擇 ) 功能表
Input Select (輸入選擇) 功能表允許您依據電視顯示器與視訊設備的連接方式來選用適合的
來源。按下遙控器上的
Menu (功能表) 並且從主功能表選擇 Input Select (輸入選擇)。
以按
www.dell.com | support.dell.com
如果要確認 S-Video 連接器的位置,請參閱第 5 頁的 「左側視圖」。
AV3 (COMPONENT 1)—如果已將如 DVD 播放機之類的視訊裝置連接至色差 (component) 連接器,請
選取此選項。如果要確認色差連接器的位置,請參閱第 6 頁的 「底部視圖」。
AV4 (COMPONENT 2)—如果已將如 DVD 播放機之類的視訊裝置連接至色差 (component) 連接器,請
選取此選項。如果要確認色差連接器的位置,請參閱第 6 頁的 「底部視圖」。
SHOW INPUTS—Show Inputs ( 顯示輸入 ) 允許您選擇 Active 或 All。Active 會搜尋使用中的連接器。
可用的輸入來源會顯示為白色,而不可用的輸入來源會顯示為灰色。All 會顯示所有輸入來源,並且
允許您選擇所有輸入來源,即使您尚未連接裝置。
註: 在 Setup ( 設定 ) 功能表中,您可以在 OSD Settings (OSD 設定 ) 中設定 Input Select ( 輸入選
擇 ) 顯示已連接的裝置。例如,當您檢視 Input Select ( 輸入選擇 ) 功能表時,AV2 會顯示 DVD。
Input (輸入) 就會直接進入 Input Select (輸入選擇) 功能表。您也可
VGA—如果您將電視顯示器當做電腦監視器,並且已使
用 VGA 纜線連接電腦,請選取此選項。如果要確認
VGA 連接器的位置,請參閱第 6 頁的 「底部視圖」。
DVI—如果您將電視顯示器當做電腦監視器,並且已使
用 DVI 纜線連接電腦,或是連接如 DVD 播放機之類的
裝置,請選取此選項。如果要確認 DVI 連接器的位
置,請參閱第 6 頁的 「底部視圖」。
TV—如果已將天線或有線電視轉接器連接至
ANT/Cable 連接器,請選取此選項。如果要確認同軸
電纜連接器的位置,請參閱第 6 頁的 「底部視圖」。
AV1 (COMPOSITE)—如果已將如視訊遊戲系統之類的視
訊裝置連接至電視顯示器側面的合成式訊號
(composite) 連接器,請選取此選項。如果要確認合成
式訊號連接器的位置,請參閱第 5 頁的 「左側視圖」。
AV2 (S-VIDEO)—如果已將如 VCR 之類的視訊裝置連接
至電視顯示器側面的 S-Video 連接器,請選取此選項。
22 使用螢幕顯示
DELL 機密等級 ñ 初級 11/17/04 ñ 僅供審稿
Page 25

檔案位置: D:\Dell_ASG\ASG_OM\ASG_OM_FM\W1900cht40.fm
Picture ( 畫面 ) 功能表
Picture (
畫面) 功能表允許您調整畫面的外觀,包括顏色及亮度。
如果您選擇下列其中一項預設畫面設定,就會
自動更新個別設定。
•Movies (
•Sports (
•Weak Signal (
•Multimedia (
如果您選擇 Personal (個人),您可以調整個別
設定,例如,
色
色溫預設值為:
自然:
正常:原始面板溫度
藍色:
紅色:
Audio ( 音訊 )
Audio (
使用
節目
音訊) 功能表允許您設定音訊,使音質完美配合觀看中的節目類型。
Midnight Mode - 語音與動作場景之間大幅的
均等音量變化。
SRS TruSurround XT -
實現虛擬環繞音效,呈現出有低音音效的更廣
音場。
如果您選擇下列其中一項預設
(
•Music (
•Theater (
•Voice (
如果您選擇
音量,例如,
Audio Program (音效節目) 來選擇 Stereo (立體聲)、
)
。
電影
)
運動
)
弱訊號
多媒體
Brightness (亮度) 及 Color (顏
)
。
6500K
9300K
5700K
等化模式) 設定,就會自動更新個別音量:
音樂
)
劇院
語音
)
Personal (個人),您可以調整個別
Bass (低音) 及 Tre bl e (高音)。
Mono (單音) 或 SAP (次要音效
)
)
使用任何來源的喇叭來
Equalizer Mode
)
DELL 機密等級 ñ 初級 11/17/04 ñ 僅供審稿
使用螢幕顯示 23
Page 26
檔案位置: D:\Dell_ASG\ASG_OM\ASG_OM_FM\W1900cht40.fm
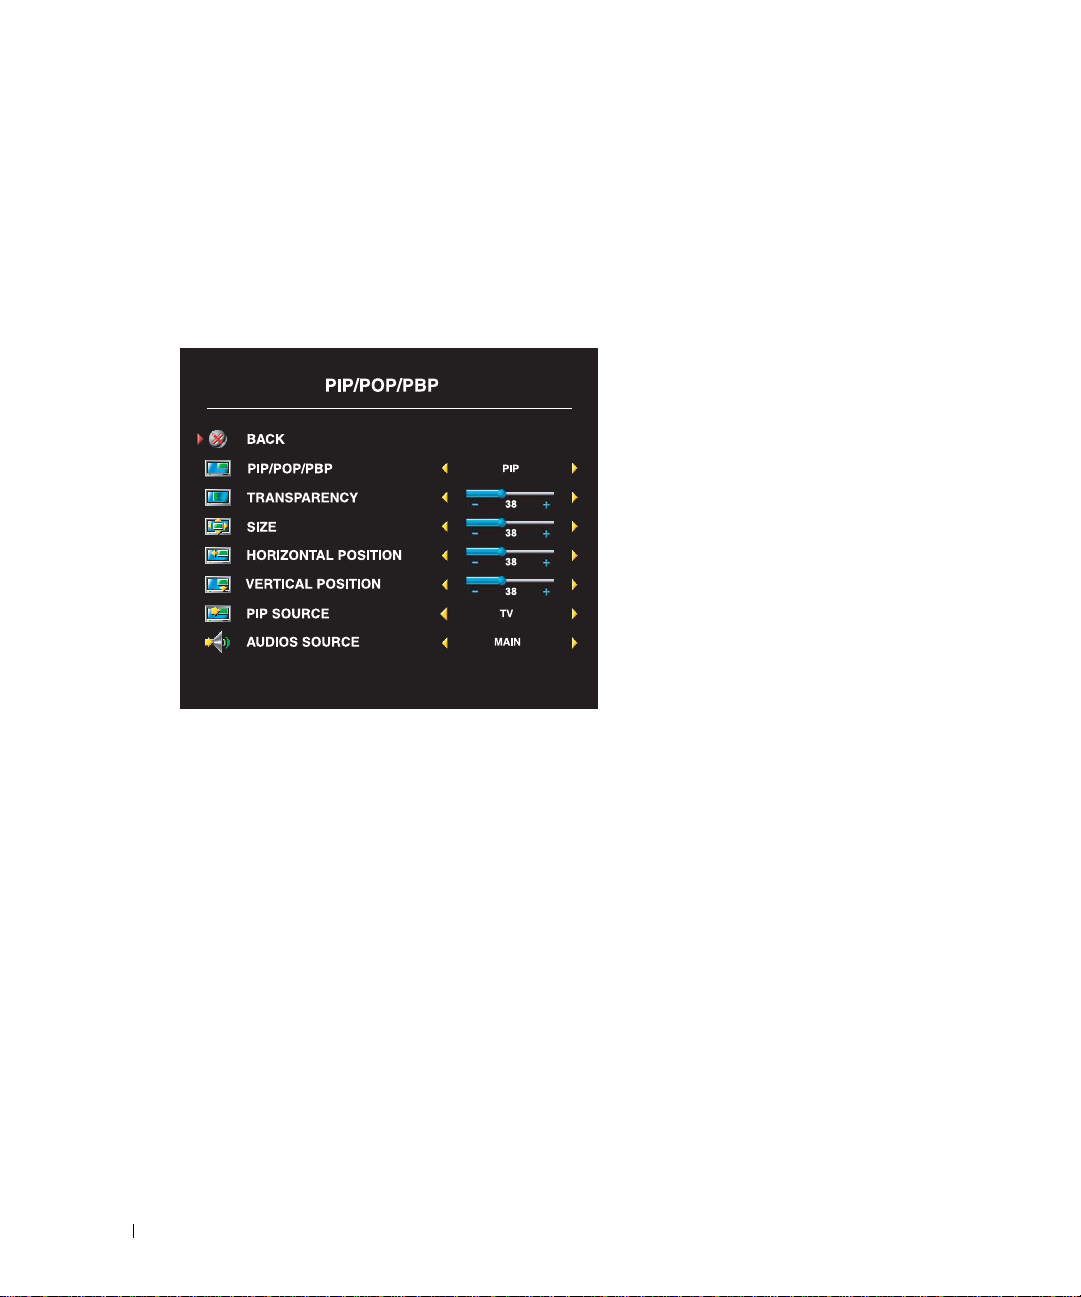
PIP/POP/PBP
您可以使用畫中畫
如果使用
•POP1 -
•POP3 -
• POP12 -
www.dell.com | support.dell.com
POP Scan Mode (POP
視窗中顯示的頻道來源。
可用頻道之後,才會再次從最小頻道開始。
POP
(PIP)
、畫外畫
,您可以選擇三種不同
會在螢幕左方顯示大
會在螢幕左方顯示大
會在螢幕中央顯示大
掃描模式) 允許您選擇
Sequential
(POP)
POP
或雙畫面並排播放
POP
選項之一:
視窗,並且在右方中間顯示較小視窗。
POP
視窗,並且在右方顯示三個較小且垂直對齊的視窗。
POP
視窗,並且大
遙控器提供下列
•
鍵,就可以開啟或關閉
•
遙控器上的
窗。
•
顯示
在
窗的
及 H (水平) 和 V (垂直) 位置。當選擇水
平方位時,按
使視窗向右移。當調整垂直方位時,選擇
0
視窗移到螢幕底端。
Sequential 或 Float。Float
會旋轉每個視窗,並且播放所有預選的頻道。在旋轉所有
(PBP)
,同時觀看兩個可用來源。
POP
視窗四周環繞十二個較小的視窗。
PIP/POP/PBP
使用遙控器上的
如果已在
使用遙控器上的
PIP
視窗的位置。
OSD
中,您可以調整
Transparency (透明度)、
會使視窗移到螢幕頂端,選擇
PIP
按鍵或
PIP、POP 及 PBP
PIP、POP 或 PBP
SWAP
按鍵,就可以切換視
POS
按鍵,就可以變更
PIP/POP/PBP
-
會使視窗向左移,按
模式會播放所選擇在
選項:
POP PBP
模式中,使用
Size (大小
100
按
視
+
會使
。
)
會
24 使用螢幕顯示
DELL 機密等級 ñ 初級 11/17/04 ñ 僅供審稿
Page 27
檔案位置: D:\Dell_ASG\ASG_OM\ASG_OM_FM\W1900cht40.fm
PIP/POP/PBP
下列表格列出可在
相容性
PIP/POP/PBP
模式中使用的輸入來源 (假設已連接裝置)。
主要來源
電視
AV1 AV2 AV3 AV4 VGA DVI
電視 否 否 否 是 是 是 是
次要來源
AV1
(Composite)
AV2
(S-Video)
AV3
(
色差
1)
AV4
(
色差
2)
VGA
DVI
否否否是是是是
否否否是是是是
是
是
是
是
是是否否是 是
是是否否是 是
是是是是否是
是是是是是否
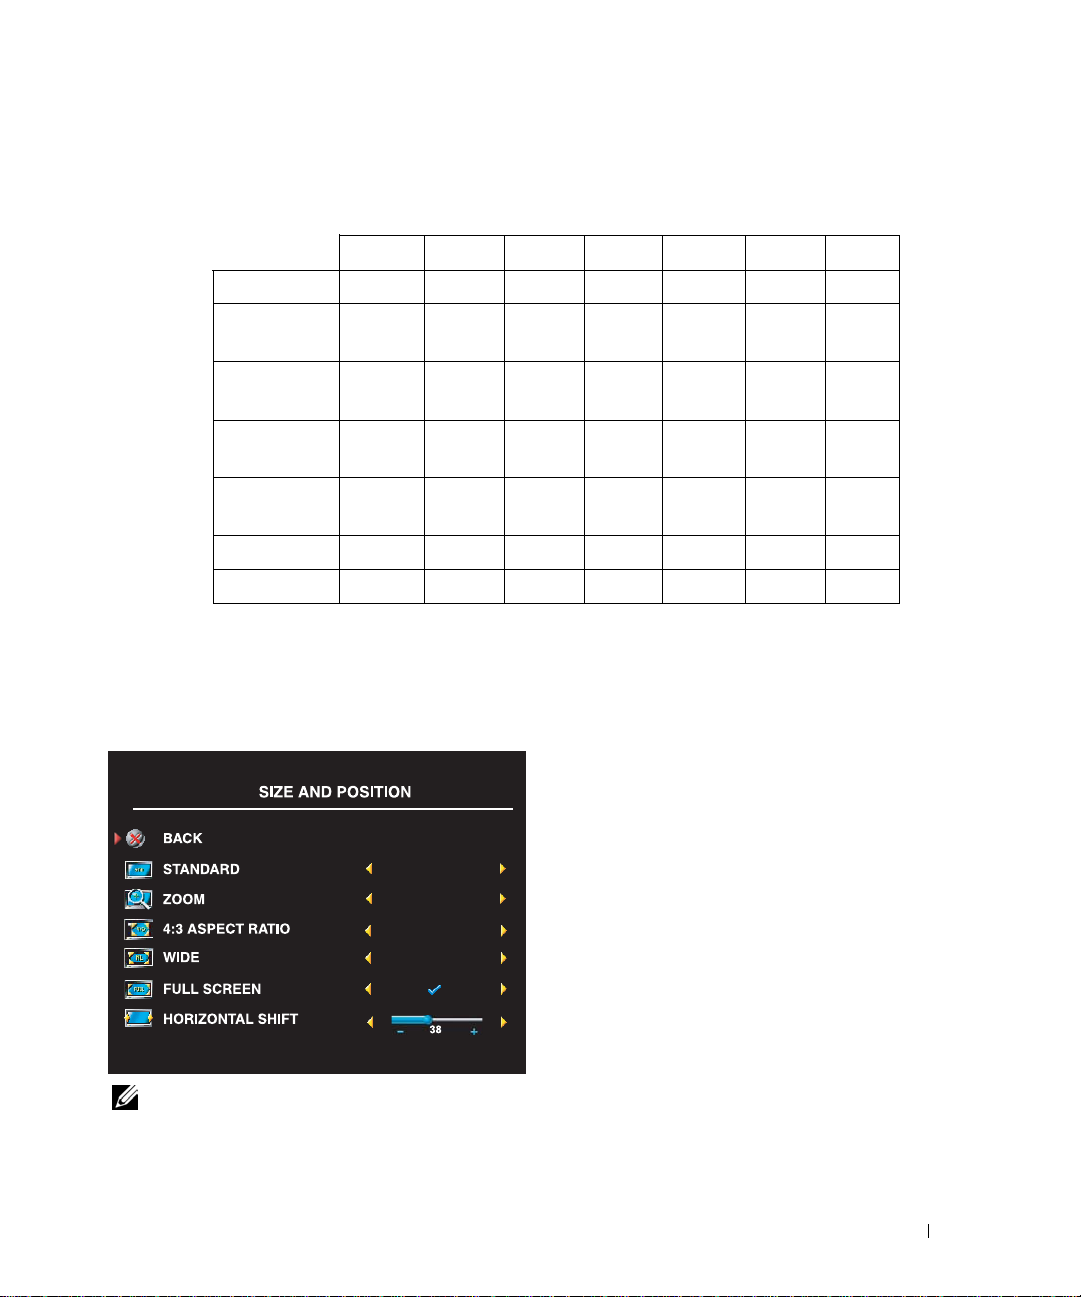
Size ( 大小 )
Size (大小) 允許您調整影像外觀。使用 H. Position 及 V. Po s i t i o n 來調整影像的水平及垂直位
置。
使用下列設定來調整寬高比:
ON OFF
ON OFF
ON OFF
Standard (
或
22:9 DVD
Zoom (
DVD
4:3 (
影片的最佳選擇。
Wide (
22:9 DVD
Full screen (
16:9 DVD
標準
)-
觀看數位
影片的最佳選擇。
縮放
) -
觀看電視、
影片的最佳選擇。
寬高比
寬螢幕
)-
觀看電視、
)-
觀看數位
影片的最佳選擇。
全螢幕
)-
影片的最佳選擇。
HDTV、16:9
VCR 或 4:3
VCR 或 4:3 DVD
HDTV、16:9 及
觀看數位
HDTV 或
註:
大部分
DVD
都會在包裝盒上提供關於支援的寬高比資訊。
DELL 機密等級 ñ 初級 11/17/04 ñ 僅供審稿
使用螢幕顯示 25
Page 28

檔案位置: D:\Dell_ASG\ASG_OM\ASG_OM_FM\W1900cht40.fm
Channel Setup ( 頻道設定 )
如果您正在使用
進入
Channel Setup (頻道設定) 並且選
擇正確的地區。
$86 75$/,$%+
www.dell.com | support.dell.com
ANT/Cable
連接器,請
Sleep Timer ( 睡眠定時器 )
Sleep Timer (睡眠定時器) 允許您選擇自動關閉電視顯示器的計時。定時器的計時時間設定範
圍為
10
分鐘到
3
小時。
OSD Setup (OSD 設定 )
OSD
設定允許您調整
用的語言
及回復出廠設定。
使用
或縮短顯示
您可以在
(OSD
鍵鎖定
項時,僅有電源按鈕才有作用。
使用側面板按鈕解除
1
按一下
會顯示
2
螢幕上出現此訊息時,請同時按下側面板上的上一
個頻道與降低音量按鈕。
會顯示
如果您使用
Source (
有顯示正確的影像,您可以依據使用中的裝置來選擇來源:
Color (
DVI
來源)-
顏色)-
連接器,您必須確認下列設定:
預設值為
預設值為 RGB
Auto
。電視會自動偵測是否正在使用電腦
。如果沒有顯示正確的顏色,您可以變更設定為 YUV。
(
請參閱第
OSD Hold Time
OSD
Setup (
設定), 然後選取 TV Button Lock (電視機按
)
,就可以鎖定側面板上的按鍵。當啟用此選
Menu (
OSD
與按鈕已鎖定的訊息。
OSD
與按鈕已解除鎖定的訊息。
OSD
的外觀、變更
22
頁的「選擇
(OSD
持續顯示時間) 來延長
的時間長度。最長時間為
設定)
功能表中,選擇 OSD Setup
OSD
鎖定與側面板按鈕功能:
功能表) 按鈕。
(PC)
PC (
電腦)或 Video (
OSD
或視訊裝置。如果沒
OSD
中使
語言」) 以
60
秒。
影像)。
26 使用螢幕顯示
DELL 機密等級 ñ 初級 11/17/04 ñ 僅供審稿
Page 29

檔案位置: D:\Dell_ASG\ASG_OM\ASG_OM_FM\W1900cht40.fm
Teletext ( 電視文字廣播 )
使用
OSD
視文字廣播
Tel e tex t (
開啟或關閉
)
。使用遙控器來選擇
電視文字廣播) 模式。
Tel e tex t (
電
DELL 機密等級 ñ 初級 11/17/04 ñ 僅供審稿
使用螢幕顯示 27
Page 30

檔案位置: D:\Dell_ASG\ASG_OM\ASG_OM_FM\W1900cht40.fm
www.dell.com | support.dell.com
28 使用螢幕顯示
DELL 機密等級 ñ 初級 11/17/04 ñ 僅供審稿
Page 31

電視顯示器疑難排解
疑難排解秘訣
註: 有些問題可能與裝置相關。如果有任何連接至電視顯示器的裝置,請參閱裝置的說明文
件。
大部分的電視顯示器問題可能是因為選擇不適用的輸入來源所造成。電視顯示器上的每個連
接器都有相關聯的輸入來源,在
•
AV1
-
位於電視顯示器側面的合成式訊號
•
AV2
-
位於電視顯示器側面的
•
AV3
-
位於電視顯示器底端的色差連接器
•
AV4
-
位於電視顯示器底端的色差連接器
您也可以選擇下列輸入來源:
•
TV
-
位於電視顯示器底端的
•
VGA
-
位於電視顯示器底端的
•
DVI
-
位於電視顯示器底端的
Input Select (輸入選擇) 功能表中會標示 AV1 到 AV4。
S-Video
ANT/Cable
VGA
DVI
連接器
連接器
連接器
(Composite)
連接器
連接器
5
電視顯示器疑難排解 29
Page 32

一般問題
問題 可能的解決方案
觀看電視時的畫面不良,並且有使用
如 DVD 播放機或 VCR 之類的裝置。
www.dell.com | support.dell.com
使用連接至 ANT/Cable ( 同軸電纜 )
連接器的裝置時畫面不良。
1
請檢查
OSD
中的寬高比設定。按遙控器上的 Menu (功能表
按鍵並且選擇 Size (大小)。如需有關使用
訊,請參閱第
2
使用同類型連接器來重新連接裝置。例如,如果您正在使用
電視顯示器底端的合成式訊號
21
頁的 「使用螢幕顯示」。
(composite)
連接位於電視顯示器側面的合成式訊號
OSD
的詳細資
連接器,請嘗試
(composite)
連接器。
如果要確認連接器的位置,請參閱第 3 頁的 「關於電視顯示
器」。
連接裝置後,請變更
請參閱第
3
使用其它連接器來連接裝置。例如,如果您使用合成式訊號
(composite)
22
連接器時遇到問題,請嘗試使用色差訊號連接
頁的 「
OSD
中的輸入來源。如需詳細資訊,
Input Select (
輸入選擇) 功能表」。
器。
註:您必須具有其它連接器所適用的纜線,才能進行連接。
如需裝置所支援連接的清單,請參閱裝置的說明文件。
連接裝置後,請變更
請參閱第
4
重設原始工廠預設值。按遙控器上的 Menu (功能表),選擇
22
頁的 「
OSD
中的輸入來源。如需詳細資訊,
Input Select (
輸入選擇) 功能表」。
Setup (設定),再選擇 Factory Reset (重設為出廠值)。
5
調整色溫。按遙控器上的 Menu (功能表),選擇 Picture (畫
面),再選擇 Color Temperature (色溫)。
註:有些視訊轉換器 (set top box) 提供寬高比。如需詳細資
訊,請參閱裝置的說明文件。
1
請確定 Input Select (輸入選擇) 功能表中已選擇電視顯示器
當做輸入來源。如需詳細資訊,請參閱第
Select (
輸入選擇) 功能表」。
2
按遙控器上的 Menu (功能表),選擇 Setup (設定),再選擇
Channel Setup (頻道設定)。此動作會重設按遙控器上的頻
道。
3
請檢查
OSD
中的寬高比設定。按遙控器上的 Menu (功能表
按鍵並且選擇 Size (大小)。如需有關使用
21
訊,請參閱第
4
重設原始工廠預設值。按遙控器上的 Menu (功能表),選擇
頁的 「使用螢幕顯示」。
Setup (設定),再選擇 Factory Reset (重設為出廠值)。
5
調整色溫。按遙控器上的 Menu (功能表),選擇 Picture (畫
面),再選擇 Color Temperature (色溫)。
6
可能是裝置的問題,請聯絡服務供應商。
22
OSD
頁的 「
的詳細資
Input
)
)
30 電視顯示器疑難排解
Page 33

問題 可能的解決方案
電視顯示器沒有出現任何影像 1
請確定已開啟電視顯示器電源。
2
確認所有纜線都有正確連接至電視顯示器,包括電源線。
3
請檢查電視顯示器右下角是否有亮藍燈或黃燈。藍燈表示已
開啟 電視顯示器電源。黃燈表示電視顯示器處於省電模式。
4
請確定 Input Select (輸入選擇) 功能表中已選擇正確的輸入
來源。如需詳細資訊,請參閱第
)
入選擇
5
如果目前有任何連接至電視顯示器的裝置,請重新連接。如
功能表」。
果您正在使用多台裝置,請逐一連接及測試裝置。
6
連接其它正常運作的裝置。
7
重設原始工廠預設值。按遙控器上的 Menu (功能表),選擇
Setup (設定),再選擇 Factory Reset (重設為出廠值)。
無聲音 1
請確定沒有開啟靜音。按遙控器上的 Mute (靜音) 按鍵並且
開啟及關閉靜音功能。
2
如果僅有某些電視頻道才沒有聲音,則必須到
(
輸入選擇) 功能表中選擇正確的設定 (請參閱第
Select
頁的 「
Input Select (
3
請確認音訊訊號線已緊緊連接至電視顯示器上的音訊輸入連
接器及裝置上的音訊輸出連接器。請確定纜線的顏色符合連
接器的顏色。
4
還必須確定音訊訊號線與影像纜線都是連接至同一列。如果
要確認連接器的位置,請參閱第 3 頁的 「關於電視顯示
器」。
5
使用同類型連接器來重新連接裝置。例如,如果您正在使用
電視顯示器底端的合成式訊號
連接位於電視顯示器側面的合成式訊號
如果要確認連接器的位置,請參閱第 3 頁的 「關於電視顯示
器」。
連接裝置後,請變更
請參閱第
6
使用其它連接器來連接裝置。例如,如果您使用合成式訊號
22
(composite)
器。
註:您必須具有其它連接器所適用的纜線,才能進行連接。
如需裝置所支援連接的清單,請參閱裝置的說明文件。
連接裝置後,請變更
請參閱第
7
使用另一台電視機來測試裝置。
8
如果您使用
Source (音訊來源)。按遙控器上的 Menu (功能表) 按鍵並
且選擇 PIP/POP/PBP
22
PIP/POP/PBP
22
頁的 「
Input Select (
OSD 的
Input
輸入選擇) 功能表」)。
頁的 「
(composite)
OSD
中的輸入來源。如需詳細資訊,
Input Select (
輸入選擇) 功能表」。
連接器,請嘗試
(composite)
連接器。
連接器時遇到問題,請嘗試使用色差訊號連接
OSD
中的輸入來源。如需詳細資訊,
頁的 「
Input Select (
輸入選擇) 功能表」。
,請確定已選擇正確的 Audio
。
輸
22
電視顯示器疑難排解 31
Page 34

問題 可能的解決方案
使用 DVD 時出現雙重影像或沒有影
像出現
關閉 DVD 播放機上的漸進式掃描。Dellô 電視顯示器配備內
建的 deinterlacer ( 非交錯式掃描晶片 ),品質與 DVD 播放機
上的 deinterlacer 同等級或更佳。如需關於 DVD 播放機上的
漸進式掃描詳細資訊,請參閱 DVD 播放機的說明文件
請更新
OSD
畫面太暗或太亮
鍵並且選擇
畫面不是位於正確的中央位置 1
請更新
按鍵並且選擇 Size (大小)。
2
重設原始工廠預設值。按遙控器上的 Menu (功能表),選擇
中的顏色設定。按遙控器上的 Menu (功能表) 按
Picture (畫面)。
OSD
中的大小設定。按遙控器上的 Menu (功能表
)
Setup (設定),再選擇 Factory Reset (重設為出廠值)。
www.dell.com | support.dell.com
螢幕出現線條 1
請檢查
OSD
中的寬高比設定。按遙控器上的 Menu (功能表
按鍵並且選擇 Size (大小)。如需有關使用
訊,請參閱第
2
請確定 Input Select (輸入選擇) 功能表中已選擇正確的輸入
來源。如需詳細資訊,請參閱第
入選擇
3
請嘗試連接其它裝置。請確定已正確連接纜線,並且更新
OSD
中的輸入來源。
4
請更新
OSD
按鍵並且選擇 Size (大小)。
5
重設原始工廠預設值。按遙控器上的 Menu (功能表),選擇
21
頁的 「使用螢幕顯示」。
22
)
功能表」。
中的大小設定。按遙控器上的 Menu (功能表
頁的 「
OSD
的詳細資
Input Select (
)
輸
)
Setup (設定),再選擇 Factory Reset (重設為出廠值)。
側面板按鍵沒有作用。 請檢查 OSD 中是否有設定鎖定按鍵。按遙控器上的 Menu
( 功能表 ) 按鍵並且選擇 Setup ( 設定 )。
如果無法使用遙控器,請同時按下側面板上的上一個頻道與
降低音量按鈕。 會顯示 OSD 與按鈕已解除鎖定的訊息。
1
畫面太小
請調整大小設定。按遙控器上的 Menu (功能表) 按鍵並且選
擇 Size (大小)。
2
有可能是裝置的問題。請參閱裝置的說明文件。
32 電視顯示器疑難排解
Page 35

OSD 訊息
使用電視顯示器過程中可能會出現下列訊息。
訊息 可能的解決方案
Auto Adjust ( 自動調整 ) 不需要任何動作,電視顯示器會執行自動調整。
Out of Range ( 超出範圍 ) 請檢查最佳的解析度設定。
您可能需要下載新的視訊驅動程式。如需詳細資訊,請至
support.dell.com。
No Video Input ( 沒有視訊輸入 ) 1
TV Button Lock ( 電視機按鍵鎖定 ) 若要解除鎖定,按遙控器上的 Menu ( 功能表 ) 按鍵並且選擇
In Power Save Mode ( 省電模式中 )
請按下鍵盤上的按鍵或移動滑鼠。
In Power Save Mode ( 省電模式中 )
Please Check Video Signal ( 請檢查影
像訊號 )
Self Test ( 自我測試 ) 當未插接電腦來源時會出現此訊息。請從 Input Select ( 輸入
請檢查是否有正確連接所有纜線。
2
請確定 Input Select (輸入選擇) 功能表中已選擇正確的輸入
22
頁的 「
來源。如需詳細資訊,請參閱第
入選擇) 功能表」。
Setup ( 設定 )。
如果無法使用遙控器,請同時按下側面板上的上一個頻道與
降低音量按鈕。 會顯示 OSD 與按鈕已解除鎖定的訊息。
如果電腦已連接至電視顯示器,並且未偵測到訊號,電視顯
示器就會進入休眠模式。當電視顯示器進入休眠模式時,電
源燈會亮黃燈。
按下鍵盤上的按鍵或移動滑鼠,都可以喚醒電視顯示器。
如果您使用視訊裝置並且閒置時間長達 30 分鐘,電視顯示器
會進入省電模式。當電視顯示器進入省電模式時,電源燈會
亮黃燈。
選擇 ) 功能表選擇 VGA 或 DVI。將電腦接上 VGA 或 DVI。
Input Select (
輸
遙控器問題
問題 可能的解決方案
1
使用遙控器時電視顯示器沒有反應
請將遙控器直接對準電視顯示器的右下角。確定電視顯示器
前面沒有任何障礙物。如果要確認
的 「前視圖」。
2
確認是否有正確安裝電池。
3
如果使用舊電池,請安裝新電池。
註:明亮的光線或其他紅外線裝置都會干擾遙控器及電視顯
示器上的 IR。
IR
的位置,請參閱第 3 頁
電視顯示器疑難排解 33
Page 36

電視顯示器連接電腦時使用自我測試功能
如果您利用
VGA 或 DVI
來連接電腦至電視顯示器,就可以使用自我測試功能來檢查電視顯示
器是否有正常運作。如果有正確連接電視顯示器與電腦,但是電視顯示器螢幕仍然沒有出現
畫面,請採取下列步驟來執行電視顯示器自我測試:
1
關閉電腦及電視顯示器的電源。
2
從電腦背面拔除影像纜線。
3
開啟電視顯示器電源。
如果電視顯示器無法感應影像訊號並且正常運作中,則螢幕上會出現 「
Feature Check
www.dell.com | support.dell.com
在自我測試模式中,電源指示燈會維持亮藍燈,並且整個螢幕會持續顯示捲動的自我測
」
(Dell
自我測試功能檢查) 對話方塊 (而不是出現黑色背景)。
Dell - Self-Test
試圖案。在正常系統運作期間,如果影像纜線斷線或受損,也會出現此訊息。
4
關閉電視顯示器的電源並且重新連接影像纜線;接著開啟電腦及電視顯示器的電源。如
果電視顯示器螢幕仍然沒有出現畫面,則可能是電腦或圖形介面卡的問題。
如需詳細資訊,請參閱電腦的說明文件。
使用電視顯示器當做監視器時遇到問題
註: 您僅能使用 VGA 連接器來將電腦連接至電視顯示器。
問題 可能的解決方案
畫面不是在螢幕中央或太小
沒有聲音 1
1
請使用 Auto Adjust (自動調整) 來檢查 Image Settings (影像
)。按
設定
Settings (影像設定),再選擇 Auto Adjust (自動調整)。
2
請檢查最佳的解析度設定。
您可能需要下載新的視訊驅動程式。如需詳細資訊,請至
support.dell.com
Menu (功能表) 就會進入
。
OSD
,請選擇 Image
註:某些舊型視訊卡可能不支援電視顯示器的解析度設定。
請確定綠色音訊訊號線已連接至電視顯示器的音訊連接器及
電腦。如果要確認電視顯示器連接器的位置,請參閱第
頁的 「使用
請參閱電腦的說明文件。
請勿將音訊訊號線連接至耳機插座。
2
請確定電腦音量未設定成靜音。
3
請檢查喇叭來確定電腦聲音是否正常。如需電腦疑難排解資
訊,請參閱電腦的說明文件。
4
拆除電視顯示器與電腦之間的連接,並且測試電視顯示器的
音量是否正常。
VGA
連接器」。如果要確認電腦連接器的位置,
15
34 電視顯示器疑難排解
Page 37

問題 可能的解決方案
無法使用 PIP/POP/PBP 1
請確定
OSD
中的設定是否正確。按 Menu (功能表) 進入
,並且選擇 PIP/POP/PBP
OSD
2
切換視訊及音計來源
。
沒有畫面 註:如果出現自我測試訊息,這表示視訊介面卡有問題,或
您使用錯誤的輸入來源。
1
請確定已開啟電視顯示器電源。
2
確認所有纜線都有正確連接至電視顯示器,包括電源線。
3
請檢查電視顯示器右下角是否有亮藍燈或黃燈。藍燈表示已
開啟電視顯示器電源。黃燈表示電視顯示器處於省電模式。
4
請確定 Input Select (輸入選擇) 功能表中已選擇 VGA
22
頁的 「
詳細資訊,請參閱第
Input Select (
輸入選擇) 功
。如需
能表」。
5
重新連接電腦。
6
連接其它正常運作的裝置。
7
重設原始工廠預設值。按遙控器上的 Menu (功能表),選擇
Setup (設定),再選擇 Factory Reset (重設為出廠值)。
電視顯示器疑難排解 35
Page 38

www.dell.com | support.dell.com
36 電視顯示器疑難排解
Page 39

電視顯示器規格
6
一般
型號 W1900 LCD 電視顯示器
顯示器類型 TFT 彩色正規黑色 PVA-Premium LCD
螢幕尺寸 19 吋面板 (19 吋可視畫面大小 )
可視區域 412.80
影像寬高比 寬螢幕
視訊顯示功能
其它功能:
具備 SAP 功能
具備 Teletext ( 電視文字廣播 ) 功能是是
W1900
x
247.68 毫米
(16.25 x 9.75 吋 )
15:9
解析度
16:9
寬高比
480i
480p
720p
1080i
576i ( 如果適用 )
576p ( 如果適用 )
(
如果適用
)
電視顯示器規格 37
Page 40

實際尺寸
W1900
顯示器 ( 含基座 , 最大值 ) 418 x 603.7 x 167.85 毫米
(16.5 x 23.8 x 6.6 吋 )
顯示器 ( 含基座 , 最小值 ) 333 x 603.7 x 167.85 毫米
(13.1 x 23.8 x 6.6 吋 )
顯示器 ( 不含基座 ) 311 x 603.7 x 95.2 毫米
(12.2 x 23.8 x 3.75 吋 )
附喇叭 非分離式
重量 ( 含基座 ) 10 公斤 /22.05 磅 ( 估計值 )
www.dell.com | support.dell.com
俯仰 +5/-15 度
迴旋 +/-45 度
原生解析度
1280 x 768 (WXGA)
具備 HDTV 功能 是
畫中畫 (Picture-In-Picture)
畫中畫 (Picture-In-Picture,PIP) 是
畫外畫 (Picture-Outside-Picture,POP) 是
雙畫面並排播放 (Picture-By-Picture,PBP) 是
調諧器數量 一個類比
亮度 ( 典型 ) 450 nits ( 典型 )
對比度 600:1 ( 典型 )
回應時間 (Tr:Tf) 16 毫秒,9 毫秒 ( 典型 )
視角
水平 +/- 85 度
垂直 +/- 85 度
38 電視顯示器規格
Page 41

輸入
視訊
Composite (CVBS)
S-Video
色差
電視輸入 (同軸電纜
音訊
(L+R)
DVI (
影像播放機使用
電腦
VGA (
當做電腦監視器
DVI (
當做電腦監視器
音訊 (迷你立體聲插座
輸出
視訊
合成式
(CVBS)
音訊
(L+R)
耳機
音訊
音效 SRS TruSurround XT ( 虛擬環繞音效 )
喇叭 ( 內建式 )7 瓦 / 聲道
)
)
)
)
)
一個 ( 側面 )
一個 ( 側面 )
兩個 ( 底部 )
一個 ( 底部 )
五對
一個 ( 底部 )
一個 ( 底部 )
一個 ( 底部 )
一個 ( 底部 )
一個 ( 側面 )
一對
一個 ( 側面 )
Midnight Mode ( 午夜模式 )
總計 7 +7 瓦
其它功能
視訊
合成式
音訊
耳機
(CVBS)
(L+R)
一個 ( 底部 )
一對
一個 ( 側面 )
電視顯示器規格 39
Page 42

www.dell.com | support.dell.com
40 電視顯示器規格
Page 43

索引
四畫
天線 12
三畫
包裝內容 7
六畫
出廠設定
回復 26
耳機 5
色差 13
七畫
同軸電纜 12
八畫
定 26
按鈕
音量 4, 18
側面板 4
電源 4
頻道 18
頻道按鍵 4
遙控器 18
Enter 18
輸入來源 4
OSD 4
PIP 18
OSD
外 ý 26
十畫
問題
電視 29
遙控器 33
十一畫
OSD
外 ý 26
十二畫
通用型遙控器 20
連接天線 12
連接有線電視
同軸電纜 12
連接裝置
有線電視轉接器 9
電腦 9
DVD 播放機 9
數位攝錄影機 9
VCR 9
連接器 5
色差 6, 9, 13
位置 6
同軸電纜 6, 9
合成式 9
品質 9
側面板 5
電源 6
AV1 5
AV2 5
AV3 6
AV4 6
AV5 6
DVI 6, 9, 14
S-Video 9, 13
VGA 6
規格 37
十四畫
電視
位置 9
安裝 9
連接器 9
電源指示燈
黃燈 3
藍燈 3
疑難排解 29
一般問題 30
電腦 34
監視器 34
遙控器 33
OSD 33
Self Test ( 自我測試 ) 34
監視器 15
睡眠定時器 26
調整 23
亮度 23
顏色 23
索引 41
Page 44

十七畫
OSD
外 ý 26
頻道設定 26
I
IR 接收器 3
M
24
播放 )
Picture-In-Picture ( 畫中畫 ) 24
Picture-Outside-Picture ( 畫外畫
24
)
十九畫
關於
側面板按鈕 3
側面板連接器 3
電視 3
二十四畫
纜線 7
A
遙控器 21
使用 17
按鈕 18
問題 33
電池 17
學習型遙控器 20
十五畫
Audio ( 音訊 ) 23
D
DVI 14
Midnight Mode ( 午夜模式 ) 23
O
螢幕顯示 21
輸入來源 18
OSD
外 ý 26
輸入選擇
輸入來源 22
寬高比 25
OSD 18, 21
外 ý 26
主功能表 21
使用 21
訊息 33
設定 26
睡眠定時器 26
頻道設定 26
遙控器 21
Audio ( 音訊 ) 23
語言 22
輸入選擇 22
PBP 24
Picture ( 畫面 ) 23
PIP 24
POP 24
S
Self Test ( 自我測試 ) 34
SRS 23
S-Video 13
T
Teletext ( 電視文字廣播 )
遙控器 27
OSD 27
teletext ( 電視文字廣播 )
OSD 27
V
VGA 15
42 索引
P
Picture-By-Picture ( 雙畫面並排
Page 45

Dell™ W1900 LCD TV Display
Owner’s Manual
Model W1900
www.dell.com | support.dell.com
Page 46

Notes, Notices, and Cautions
NOTE: A NOTE indicates important information that helps you make better use of your TV display.
NOTICE: A NOTICE indicates either potential damage to hardware or loss of data and tells you how to avoid the
problem.
CAUTION: A CAUTION indicates a potential for property damage, personal injury, or death.
____________________
Information in this document is subject to change without notice.
© 2004 Dell Inc. All rights reserved.
Reproduction in any manner whatsoever without the written permission of Dell Inc. is strictly forbidden.
Trademarks used in this text: Dell and the DELL logo are trademarks of Dell, Inc.; TruSurround XT, SRS, and symbol are
trademarks of SRS Labs, Inc.
Other trademarks and trade names may be used in this document to refer to either the entities claiming the marks and names or their products.
Dell Inc. disclaims any proprietary interest in trademarks and trade names other than its own.
November 2004 Rev. A01
Page 47

Contents
1 About Your TV Display
Front View. . . . . . . . . . . . . . . . . . . . . . . . . . . . . . . . . 47
Right Side View . . . . . . . . . . . . . . . . . . . . . . . . . . . . . . 48
Left Side View . . . . . . . . . . . . . . . . . . . . . . . . . . . . . . . 49
Bottom View. . . . . . . . . . . . . . . . . . . . . . . . . . . . . . . . 50
Package Contents . . . . . . . . . . . . . . . . . . . . . . . . . . . . . 51
2 Setting Up Your TV Display
Proper Location for Your TV Display . . . . . . . . . . . . . . . . . . . . 53
Connecting Your TV Display . . . . . . . . . . . . . . . . . . . . . . . . 53
Connecting Your Computer to the TV Display . . . . . . . . . . . . . . . . 55
3 Your Remote Control
Installing Batteries . . . . . . . . . . . . . . . . . . . . . . . . . . . . 61
Using Your Remote Control. . . . . . . . . . . . . . . . . . . . . . . . . 62
Using Your TV Display With a Universal or Learning Remote Control . . . . . 64
4 Using the On-Screen Display
Using Your Remote Control With the OSD . . . . . . . . . . . . . . . . . . 65
Selecting Your OSD Language . . . . . . . . . . . . . . . . . . . . . . . 66
Input Select Menu . . . . . . . . . . . . . . . . . . . . . . . . . . . . . 66
Picture Menu . . . . . . . . . . . . . . . . . . . . . . . . . . . . . . . 67
Audio . . . . . . . . . . . . . . . . . . . . . . . . . . . . . . . . . . . 67
PIP/POP/PBP . . . . . . . . . . . . . . . . . . . . . . . . . . . . . . . 68
Contents 45
Page 48

Channel Setup . . . . . . . . . . . . . . . . . . . . . . . . . . . . . . . 70
Sleep Timer . . . . . . . . . . . . . . . . . . . . . . . . . . . . . . . . 70
OSD Setup. . . . . . . . . . . . . . . . . . . . . . . . . . . . . . . . . 70
Teletext . . . . . . . . . . . . . . . . . . . . . . . . . . . . . . . . . . 71
5 Troubleshooting Your TV Display
Troubleshooting Tips. . . . . . . . . . . . . . . . . . . . . . . . . . . . 73
General Problems . . . . . . . . . . . . . . . . . . . . . . . . . . . . . 74
OSD Messages . . . . . . . . . . . . . . . . . . . . . . . . . . . . . . 78
Remote Control Problems . . . . . . . . . . . . . . . . . . . . . . . . . 79
Using the Self-Test Feature When Your TV Display is
Connected to Your Computer . . . . . . . . . . . . . . . . . . . . . . . . 79
Problems When Using the TV Display as a Monitor . . . . . . . . . . . . . 79
6 Specifications for Your TV Display
Index . . . . . . . . . . . . . . . . . . . . . . . . . . . . . . . . . . . . 85
46 Contents
Page 49

About Your TV Display
Front View
1
2
1
1 IR receiver Senses the signal from the remote control
2 Power indicator light (LED) The light is blue when the TV display is on and amber when the
TV display is in power save mode
About Your TV Display 47
Page 50

Right Side View
7
www.dell.com | support.dell.com
1 Power button
2
3
4 Volume button Push to increase the volume
5 Channel button
OSD menu button Push to enable the on-screen display (OSD)
Volume button Push to decrease the volume
Push to turn the TV display on and off. The power button is
blue when it is on and amber when it is in power saving mode.
Push to select the previous channel or navigate through the
OSD
6
5
4
3
2
1
6
7
Channel button Push to select the next channel or navigate through the OSD
Input Select button Push to display the Input Select menu
48 About Your TV Display
Page 51

Left Side View
1
2
3
4
5
6
7
1 Composite out / Video out Connect a VCR
2 Composite audio connector Use the audio connector if you have connected a device to
composite connector (AV1)
3 Composite connector (AV1) Connect devices such as a VCR or DVD player
4 S-Video connector (AV2) Connect devices such as a video game system or a VCR
5 S-Video audio connector Use the audio connector if you have connected a device to
S-Video connector (AV2)
6 Subwoofer out connector Connect a Subwoofer
7 Headphone connector Connect headphones
About Your TV Display 49
Page 52

Bottom View
5
1
www.dell.com | support.dell.com
2
3
4
6
8
1 Power connector Connect your power cord
2 DVI audio connector (L / R) Use the DVI audio connector if you have connected a device
such as a DVD player to the DVI connector
3 DVI connector Connect your computer or video devices such as a DVD player
4 Audio connector for VGA or DVI Connect the audio cable from your computer to the TV display
5 Component video and audio
connectors (AV3)
6 ANT/Cable Connect cable TV box or an antenna
7 Component video and audio
connectors (AV4)
8 VGA Connect your computer
Connect devices such as a DVD player or cable TV box
Connect devices such as a DVD player or cable TV box
7
50 About Your TV Display
Page 53

Package Contents
If you need additional cables, contact Dell.
Remote control
AAA batteries (2)
Composite video cable
Audio cables (2)
VGA cable
About Your TV Display 51
Page 54

DVI cable
Computer audio cable
www.dell.com | support.dell.com
S-Video cable
Documentation
52 About Your TV Display
Page 55

Setting Up Your TV Display
CAUTION: Before you begin any of the procedures in this section, follow the safety instructions
located in the
Product Information Guide
Proper Location for Your TV Display
Consider the following environmental factors when you are deciding where to put your TV display:
• Do not store or use the TV display in locations that are exposed to high heat, direct sunlight,
or extreme cold.
• Avoid moving the TV display between locations with extreme temperature differences. For
more information, see Specifications on page 81.
• Do not subject the TV display to severe vibration or high impact conditions. Do not place the
TV display inside a car trunk.
• Do not store or use the TV display in locations where the TV display would be exposed to
high humidity or dusty environment.
• Do not place the TV display in a location where water or other liquids could spill on or into
the TV display.
.
2
Connecting Your TV Display
Your TV display has four standard connectors that can be used to connect devices.
NOTE: Before you connect your TV display, ensure you have all the proper cables. Some cables may
come with the device you are connecting. For a list of cables that came with your TV display, see
Package Contents on page 51. To order additional cables, contact Dell.
Quality Cable and Connector When to Use
Good Coaxial (RF) carries the video and audio
from one cable. The coaxial connector is
labeled, ANT/Cable on your TV display. To
locate the connector, see page 50.
Setting Up Your TV Display 53
Page 56

Quality Cable and Connector When to Use
Good Composite carries the video signal through
a single pin. If you are using a composite
video connector you also need to connect
composite audio connectors. To locate the
connector, see page 49.
www.dell.com | support.dell.com
Better S-Video splits the video signal into two
signals, black-and-white and color. To locate
the connector, see page 49.
Best Component splits the video signal into three
54 Setting Up Your TV Display
signals, two color and one black-and-white.
To locate the connector, see page 50.
Page 57

Connecting Your Computer to the TV Display
Your TV display has two standard connectors that can be used to connect your computer.
NOTE: The type of connector you use depends on the graphics card your computer supports.
For additional information about graphic cards, see your computer documentation.
Quality Cable and Connector When to Use
Good
A standard graphic display system for
computers that uses an analog signal and
can support resolutions up to 1280 x 768.
Better
A digital signal that can support digital
and convert analog to digital. DVI can be
used for high resolution display and can
support resolutions up to 1280 x 768.
Setting Up Your TV Display 55
Page 58

Using the ANT/Cable (Coaxial) Connector
www.dell.com | support.dell.com
1
Turn off the TV display and unplug the power cord.
2
Connect the coaxial cable to the ANT/Cable connector of the TV display.
3
Plug in the power cord for the TV display and turn on the TV display.
4
Enter the on-screen-display (OSD) and select TV. For additional information about the Input
Select menu, see page 66.
Using the Composite Connector
1
Turn off the TV display and unplug the power cord.
2
Connect your device including the audio cables.
3
Plug in the power cords for the TV display and devices and turn them on.
4
Enter the OSD and select the
Select menu, see page 66.
56 Setting Up Your TV Display
AV1 (Composite)
. For additional information about the Input
Page 59

Using the S-Video Connector
1
Turn off the TV display and unplug the power cord.
2
Connect your device including the audio cables.
3
Plug in the power cords for the TV display and devices and turn them on.
4
Enter the OSD and select the
AV2 (S-Video)
. For additional information about the Input
Select menu, see page 66.
Using the Component Connectors
1
Turn off the TV display and unplug the power cord.
2
Connect your device including the audio cables.
3
Plug in the power cords for the TV display and devices and turn them on.
4
Enter the OSD and select the
AV3 (
Component
1)
or
AV4 (
Component
information about the Input Select menu, see page 66.
2)
. For additional
Setting Up Your TV Display 57
Page 60

Using the DVI Connector
NOTE: Only one connector can be used for a computer, either VGA or DVI.
Connecting a Video Device Connecting a Computer
www.dell.com | support.dell.com
Turn off the TV display and unplug the power cord.
1
2
Connect the device.
3
Connect the white DVI cable and the audio cables.
If you are connecting a video device, use the audio connectors (red and white) or if you are
connecting a computer use the stereo connector (green).
NOTE: Some cable TV boxes may have DVI connectors, but do not support using a DVI connection. For
more information, contact your cable TV company.
Plug in the power cords for the TV display and devices and turn them on.
4
5
Enter the OSD and select the
see page 66.
DVI
. For additional information about the Input Select menu,
58 Setting Up Your TV Display
Page 61

Using the VGA Connector
NOTE: Only one connector can be used for a computer, either VGA or DVI.
1
Turn off the TV display and unplug the power cord.
2
Connect the blue VGA cable to your TV display and to your computer.
3
Connect the green audio cable to the connector on the TV display and to your computer.
4
Plug in the power cords for the TV display and devices and turn them on.
5
Enter the OSD and select the
see page 66.
VGA
. For additional information about the Input Select menu,
Setting Up Your TV Display 59
Page 62

www.dell.com | support.dell.com
60 Setting Up Your TV Display
Page 63

Your Remote Control
Installing Batteries
Before you can use your remote control, install two-AAA batteries.
1
Slide open the battery cover.
2
Install the batteries. Make sure that you match the + and - on the batteries with the + and symbols in the battery compartment.
3
Replace the battery cover.
3
Your Remote Control 61
Page 64

Using Your Remote Control
26
www.dell.com | support.dell.com
25
24
23
22
21
20
19
18
17
16
15
1
2
3
4
5
6
7
8
9
10
11
12
62 Your Remote Control
14
13
Page 65

1 Power Button Turns the TV on and off
2 Number buttons Press to select a channel
3 Last Returns you to the previously viewed channel
4 Mute Press to turn off the sound. Press again to turn on the sound
5 CH (up icon) Push to view the next channel
In the OSD, use the channel button to navigate through the
menus in the on-screen display (OSD)
6 Enter Select an OSD option, confirms a channel selection, selects an
image when in card reader mode
7 CH (down icon) Push to view the previous channel
In the OSD, use the channel button to navigate through the
menus in the on-screen display (OSD)
8 Pict Cycles through the preset options for the Picture menu
9 Pos Changes the position of the Picture-In-Picture (PIP) window
10 PIP Sel Toggles between windows when you use Picture-In-Picture
(PIP), Picture-Outside-Picture (POP), or Picture-By-Picture
(PBP)
11 SAP Turns on
12 Size Cycles through the size options from the Picture menu
13 Expand Cycles through three enlargement modes:
• Top half of page in larger letters.
• Bottom half of page larger letters.
• Regular viewing
14 Hold A multi-page set automatically flips to the next page after a
specified time. This button toggles between:
• Freeze the page
• Return to automatic flipping mode
15 Teletext buttons The four standard teletext buttons
16 Sleep Turns on the sleep timer
17 Tele Cycles through three Teletext modes:
Second Audio Program (SAP)
•On
• Mix (Teletext and program simultaneously)
•Off
18 Swap Swaps images when using PIP, POP, or PBP
19 PIP Enters and exits PIP mode
Your Remote Control 63
Page 66

20 POP PBP Enters and exits POP or PBP mode
21 Audio Cycles through the preset Audio options
22 Vol + Increases the volume
In the OSD, use the volume button to navigate through the
menus.
23 Vol - Decreases the volume
In the OSD, use the volume button to navigate through the
menus.
24 Menu Enters and exits the OSD main menu
25 Disp Displays information about your TV (for example, in TV
www.dell.com | support.dell.com
26 Input Enters and exits the Input Select menu
Mode displays the channel you are watching)
Using Your TV Display With a Universal or Learning Remote Control
Preprogrammed universal remote controls can be programmed to control the following
functions on your Dell TV display:
•Power
• Channel Up (+)
• Channel Down (-)
• Volume Up (+)
•Volume Down (-)
•Mute
• Input Select
NOTE:
Future preprogrammed universal remote controls may be able to control more
functions.
You can program universal remote controls to work with your Dell TV display in the following ways:
• If the remote control manual lists codes by manufacturer, use the Philips codes.
• If the remote control has a search function, this function may be used to find the
correct code.
• If the remote control has a learning function, you can program specific buttons on it from
the Dell remote control, in addition to those buttons listed above.
NOTE: For additional information, see the documentation that came with your universal or learning
remote control.
64 Your Remote Control
Page 67

Using the On-Screen Display
Your TV display has an on-screen display (OSD) that allows you to select the proper input source,
make adjustments to the image and audio settings, select to view Picture-In-Picture, PictureOutside-Picture, and Picture-By-Picture.
Using Your Remote Control With the OSD
NOTE: You can access and make selections to the OSD using the volume and channel buttons on the
side panel of the TV display or you can use the remote control. Except where noted, this section
describes how to use the OSD with the remote control.
To enter the OSD, press the
1
Seven icons appear along the bottom of the screen.
Menu
button.
4
2
Use the left and right buttons (volume buttons) to move between the icons.
The icon appears highlighted as you move through the menu.
3
To select an option, push the
4
A new menu appears for that selected option. Use the up and down buttons (channel
buttons) to move through the various settings.
NOTE: A red arrow appears next to the setting as you navigate through the options. A check mark
appears next to the option that you have selected.
Use the left and right buttons (volume buttons) and the
5
settings.
NOTE: You can select Exit or press the Menu button at any time to return to the main menu.
6
After you have made your selections, push the
7
To exit the OSD, select the
FILE LOCATION: D:\Dell_ASG\ASG_OM\ASG_OM_FM\W1900e40.fm
DELL CONFIDENTIAL – PRELIMINARY 11/17/04 – FOR PROOF ONLY
Menu
button when the icon is highlighted.
Exit
icon and press
Enter
button to adjust or select
Menu
button to return to the main menu.
Enter
.
Using the On-Screen Display 65
Page 68

FILE LOCATION: D:\Dell_ASG\ASG_OM\ASG_OM_FM\W1900e40.fm
Selecting Your OSD Language
1
Press
Menu
to enter the OSD.
2
Select
Setup
.
3
In the
Setup
menu, select
Language
and select the language that you want the OSD to
appear in.
Input Select Menu
The
Input Select
display and video equipment connected. Press
Select
www.dell.com | support.dell.com
menu. You can also press
AV2 (S-VIDEO) — Select when you have a video device, such as a VCR, connected to the S-Video
connector on the side of the TV display. See "Left Side View" on page 49 for the location of the S-Video
connector.
AV3 (COMPONENT 1) — Select when you have a video device, such as a DVD player, connected to the
component connector. See "Bottom View" on page 50 for the location of the component connector.
AV4 (COMPONENT 2) — Select when you have a video device, such as a DVD player, connected to the
component connector. See "Bottom View" on page 50 for the location of the component connector.
SHOW INPUTS — Show Inputs allows you to select Active or All. Active searches for which connectors
are being used. The available input sources appear in white and input sources that are not available appear
in grey. All shows all the input sources and allows you to select all the input sources even if you do not have
a device connected.
menu allows you to select the proper source based on how you have your TV
Input
Menu
on the remote to go directly to the
and select
Input Select
VGA — Select when your TV display is being used as a
computer monitor and you have connected the computer
using a VGA cable. See "Bottom View" on page 50 for the
location of the VGA connector.
DVI — Select when your TV display is being used as a
computer monitor and you have connected the computer
or when you have connected a device, such as a DVD
player using the DVI cable. See "Bottom View" on page 50
for the location of the DVI connector.
TV — Select when you have your antenna or cable TV
box connected to the ANT/Cable connector. See "Bottom
View" on page 50 for the location of the coaxial connector.
AV1 (COMPOSITE) — Select when you have a video
device, such as a video game system, connected to the
composite connector on the side of the TV display. See
"Left Side View" on page 49 for the location of the
composite connector.
from the main menu.
Input
NOTE: In OSD Settings, located in the Setup menu, you can set the Input Select to display the device
that you have attached. For example, AV2 would say DVD when you view the Input Select menu.
DELL CONFIDENTIAL – PRELIMINARY 11/17/04 – FOR PROOF ONLY
66 Using the On-Screen Display
Page 69

FILE LOCATION: D:\Dell_ASG\ASG_OM\ASG_OM_FM\W1900e40.fm
Picture Menu
The Picture Menu allows you to adjust the appearance of the image including color and brightness.
If you select one of the following preset image
settings the individual settings are automatically
updated.
•Movies
•Sports
•Weak Signal
•Multimedia
If you select
individual settings, such as
The color temperature presets are:
Natural: 6500K
Normal: the native panel temperature
Blue: 9300K
Red: 5700K
Personal
, you can adjust the
Brightness
and
Color
.
Audio
The Audio Menu allows you to set the audio to best fit the type of show you are watching.
Midnight Mode — Evens out the large volume
variations between voice and action scenes.
SRS TruSurround XT— Delivers virtual
surround sound over two speakers from any
source, which creates a wider sound with deep
rich bass.
If you select one of the following preset
If you select
Use
Audio Program
Personal
Equalizer Mode
levels are automatically updated:
•Music
• Theater
•Voice
, you can adjust the individual audio levels, such as
to select
Stereo, Mono
DELL CONFIDENTIAL – PRELIMINARY 11/17/04 – FOR PROOF ONLY
, or
SAP
(Second Audio Program).
settings, the individual audio
Bass
and
Tr eb le
Using the On-Screen Display 67
.
Page 70

FILE LOCATION: D:\Dell_ASG\ASG_OM\ASG_OM_FM\W1900e40.fm
PIP/POP/PBP
You can view two active sources simultaneously using Picture-In-Picture (PIP), Picture-OutsidePicture (POP), or Picture-By-Picture (PBP).
For POP, you can select from three different POP options:
•
POP1
— One large POP window to the left and a smaller, centered window on the right.
•
POP3
— One large POP window to the left and three smaller, vertically-aligned windows on
the right.
•
POP12
— One large, centered POP window surrounded by twelve smaller windows.
The remote control offers the following
www.dell.com | support.dell.com
windows. When you are selecting the horizontal orientation, - moves the window left and + moves
the window to the right. When you are adjusting the vertical orientation, 0 is at the top of the
screen and 100 is at the bottom of the screen.
POP Scan Mode
channels that appear in the windows.
preselected channels. The rotation runs through all the available channels before it starts again at
the lowest channel.
allows you to select
Sequential
Sequential
PIP/POP/PBP options:
•Use the PIP button or the POP PBP button
on the remote control to turn on and off PIP,
POP, and PBP.
•If you are in PIP, POP, or PBP mode, use the
SWAP button on the remote control to
switch between the two windows.
•Use the
change which corner of the screen the PIP
window appears.
In the OSD, you can adjust the
Transparency
and
or
Float. Float
rotates through each window and plays all of the
POS
button on the remote to
, the
Size
, and H (horizontal)
V
(vertical) position of the PIP/POP/PBP
mode plays the source for selected
DELL CONFIDENTIAL – PRELIMINARY 11/17/04 – FOR PROOF ONLY
68 Using the On-Screen Display
Page 71

FILE LOCATION: D:\Dell_ASG\ASG_OM\ASG_OM_FM\W1900e40.fm
PIP/POP/PBP Compatibility
The table below shows which inputs sources (when a device is connected) can be used when in
PIP/POP/PBP mode.
Primary Source
TV AV1 AV2 AV3 AV4 VGA DVI
Secondary
source
TV
AV1 (Composite)
AV2
(S-Video)
AV3
(Component 1)
AV4
(Component 2)
VGA
DVI
No No No Yes Yes Yes Yes
No No No Yes Yes Yes Yes
No No No Yes Yes Yes Yes
Yes Yes Yes No No Yes Yes
Yes Yes Yes No No Yes Yes
Yes Ye s Yes Yes Yes N o Ye s
Yes Ye s Yes Yes Yes Yes No
Size
Size
allows you to adjust the appearance of the image. Use
the horizontal and vertical placement of the image.
ON OFF
ON OFF
ON OFF
H. Position
and
V. Po si ti on
to adjust
Use the following settings to adjust the
aspect ratio:
Standard
— Best selection for viewing digital
HDTV, 16:9 or 22:9 DVD movies.
Zoom
— Best selection for viewing TV, VCR
or 4:3 DVD movie.
4:3
— Best selection for viewing TV, VCR or
4:3 DVD movie.
Wide
— Best selection for viewing digital
HDTV, 16:9 and 22:9 DVD movies.
Full screen
— Best selection for viewing
digital HDTV or 16:9 DVD movies.
NOTE:
Most DVDs have information about the supported aspect ratio on the case.
DELL CONFIDENTIAL – PRELIMINARY 11/17/04 – FOR PROOF ONLY
Using the On-Screen Display 69
Page 72

FILE LOCATION: D:\Dell_ASG\ASG_OM\ASG_OM_FM\W1900e40.fm
Channel Setup
If you are using the ANT/Cable connector,
enter
Channel Setup
region.
$86 75$/,$%+
www.dell.com | support.dell.com
and select the correct
Sleep Timer
Sleep Timer
automatically. You can select from 10 minutes to 3 hours.
allows you to select an increment of time after which the TV display turns off
OSD Setup
OSD setup allows you to adjust the appearance of the
OSD, to change the language of the OSD (see
"Selecting Your OSD Language" on page 66) and to
restore factory settings.
Use
OSD Hold Time
amount of time the OSD appears. The maximum
amount of time is 60 seconds.
In the Setup menu you can select TV Button lock to
lock the OSD and the side panel buttons. When this
option is enabled, only the power button functions. To
unlock the OSD and side panel buttons:
1. Press the Menu button on the TV.
A message appears stating that the TV is locked.
2. While the message is on the TV, press the channel up
and volume decrease button simultaneously.
If you are using the DVI connector, you may need to verify the following settings:
Source
— The default setting is Auto. The T V automatically detects if a computer (PC) or video
device is being used. If the image does not display correctly, you can select the source,
Video
, depending on the device you are using.
to increase or decrease the
PC
or
DELL CONFIDENTIAL – PRELIMINARY 11/17/04 – FOR PROOF ONLY
70 Using the On-Screen Display
Page 73

Color
— The default color space is
the setting to
YUV
.
Teletext
FILE LOCATION: D:\Dell_ASG\ASG_OM\ASG_OM_FM\W1900e40.fm
RGB
. If the colors are not displaying correctly, you can change
Turn Teletext on or off using OSD.
Use your remote control to select
Teletext modes.
DELL CONFIDENTIAL – PRELIMINARY 11/17/04 – FOR PROOF ONLY
Using the On-Screen Display 71
Page 74

FILE LOCATION: D:\Dell_ASG\ASG_OM\ASG_OM_FM\W1900e40.fm
www.dell.com | support.dell.com
DELL CONFIDENTIAL – PRELIMINARY 11/17/04 – FOR PROOF ONLY
72 Using the On-Screen Display
Page 75

Troubleshooting Your TV Display
Troubleshooting Tips
NOTE: Some problems may be related to your device. See the documentation for any devices connected
to your TV display.
Most problems with your TV display may be caused by not having the correct input source
selected. Each connector on the TV display is associated with an input source, which are labeled
AV1
through
•
AV1
•
AV2
•
AV3
•
AV4
You can also select the following input sources:
•
TV
•
VGA
•
DVI
AV4
in the
Input Select
— Composite connector on the side of the TV display
— S-Video connector on the side of the TV display
— Component connector on the bottom of the TV display
— Component connector on the bottom of the TV display
— ANT/Cable connector on the bottom of the TV display
— VGA connector on the bottom of the TV display
— DVI connector on the bottom of the TV display
menu.
5
Troubleshooting Your TV Display 73
Page 76

General Problems
Problem Possible Solution
Poor picture quality while watching TV
and using a device such as a DVD
player or a VCR
www.dell.com | support.dell.com
1
Check the aspect ratio settings in the OSD. Press the
Size
button on the remote control and select
information on using the OSD, see "Using the On-Screen
Display" on page 65.
2
Reconnect the device using the same type of connector. For
example, if you are using the composite connector on the
bottom, try connecting the device to the composite connector
on the side of the TV display. See "About Your TV Display" on
page 47 for the location of the connectors.
After you connect the device, change the input source in the
OSD. See "Input Select Menu" on page 66 for more
information.
3
Connect the device using a different connector. For example, if
you are experiencing the problem using a composite connector,
try using the component connector.
. For more
Menu
NOTE: To connect to a different connector, you need the
appropriate cables for that connector. See your device
documentation for a list of supported connections.
After you connect the device, change the input source in the
OSD. See "Input Select Menu" on page 66 for more
information.
4
Reset the original factory defaults. Press
Setup
control, select
5
Adjust the color temperature. Press
control, select
, and then select
Picture
, and then select
Menu
on the remote
Factory Reset
Menu
on the remote
Color Temperature
.
NOTE: Some set top boxes offer aspect ratio. See your device
documentation for more information.
.
74 Troubleshooting Your TV Display
Page 77

Problem Possible Solution
Poor picture quality when using a
device connected to the ANT/Cable
(coaxial) connector
1
Ensure TV display is selected as the input source in the
menu. See "Input Select Menu" on page 66 for more
Select
information.
2
Press
Menu
on the remote control, select
Channel Setup
3
Check the aspect ratio settings in the OSD. Press the
button on the remote control and select
information on using the OSD, see "Using the On-Screen
Display" on page 65.
4
Reset the original factory defaults. Press
control, select
5
Adjust the color temperature. Press
control, select
6
The problem may be with your device, contact your service
provider.
Nothing appears on my TV display 1
Ensure the TV display is turned on.
2
Verify that all the cables are properly connected to the TV
display, including the power cable.
3
Check to see if there is a blue or amber light on the lower, righthand corner of the TV display. A blue light indicates the TV
display is on. An amber light, means the TV display is in power
save mode.
4
Ensure the proper source is selected in the
See "Input Select Menu" on page 66 for more information.
5
Reconnect any devices that are currently connected to the TV
display. If you are using multiple devices, connect and test one
device at a time.
6
Connect another device that you know is working properly.
7
Reset the original factory defaults. Press
control, select
Setup
, and then select
. This resets the channels on your remote.
Menu
Size
. For more
Menu
on the remote
Setup
, and then select
Picture
, and then select
Factory Reset
Menu
on the remote
Color Temperature
.
Input Select
Menu
on the remote
Setup
, and then select
Factory Reset
.
Input
.
menu.
Troubleshooting Your TV Display 75
Page 78

Problem Possible Solution
No sound 1
Ensure mute is not turned on. Pressing the
Mute
button on
the remote control turns the mute function on and off.
2
If only certain TV channels do not have sound, then you need to
correct the
Input Select
menu in the OSD (see "Input Select
Menu" on page 66).
3
Verify that the audio cables are firmly connected to both the
audio input connectors on your TV display and audio output
connectors on your devices. Ensure that the cable colors match
the connectors colors.
4
Also, ensure that the audio cables are connected to the same
www.dell.com | support.dell.com
row as the video cables. See "About Your TV Display" on page 47
for the location of the connectors.
5
Reconnect the device using the same type of connector. For
example, if you are using the composite connector on the
bottom, try connecting the device to the composite connector
on the side of the TV display. See "About Your TV Display" on
page 47 for the location of the connectors.
After you connect the device, change the input source in the
OSD. See "Input Select Menu" on page 66 for more
information.
6
Connect the device using a different connector. For example,
if you are experiencing the problem using a composite
connector, try using the component connector.
NOTE: To connect to a different connector, you need the
appropriate cables for that connector. See your device
documentation for a list of supported connections.
After you connect the device, change the input source in the
OSD. See "Input Select Menu" on page 66 for more
information.
7
Test the device on a different TV.
8
If you are using PIP/POP/PBP, ensure the proper
selected. Press
Menu
on your remote control, and select
PIP/POP/PBP.
Double image or no image with DVD Turn off the progressive scan on the DVD player. Your Dell™
TV display offers built-in deinterlacer that is equal to or better
quality than the deinterlacer on your DVD player. For more
information about progressive scan on your DVD player, see the
documentation for your DVD player
Picture is too dim or too bright
Update the color settings in the OSD. Press
control and select
Picture
.
Audio Source
Menu
on the remote
is
76 Troubleshooting Your TV Display
Page 79

Problem Possible Solution
The screen is not centered correctly 1
Screen has one or more lines 1
Update the size settings in the OSD. Press
Size
control and select
2
Reset the original factory defaults. Press
control, select
.
Setup
, and then select
Menu
Menu
on the remote
Factory Reset
Check the aspect ratio settings in the OSD. Press the
Size
button on the remote control and select
. For more
on the remote
.
Menu
information on using the OSD, see "Using the On-Screen
Display" on page 65.
2
Ensure the proper source is selected in the
Input Select
menu.
See "Input Select Menu" on page 66 for more information.
3
Try connecting a different device. Ensure that you properly
connect the cables and update the input source in the OSD.
4
Update the size settings in the OSD. Press
control and select
5
Reset the original factory defaults. Press
control, select
Size
.
Setup
, and then select
Menu
on the remote
Menu
on the remote
Factory Reset
.
The side panel buttons do not work Check the OSD to see if the buttons have been locked. Press
Menu on your remote control, select Setup.
Use the side panel buttons to unlock the OSD and side panel
buttons:
1
Press the Menu button.
A message appears stating that the OSD and buttons are locked.
2
While the message is on the screen, press the volume decrease
and channel up buttons on the side panel simultaneously.
A message appears stating that the OSD and buttons are
unlocked.
The picture is too small 1
Adjust the size settings. Press
select
Size
.
2
This may be a problem with your device. See the
Menu
on the remote control, and
documentation for the device.
Troubleshooting Your TV Display 77
Page 80

OSD Messages
While using your TV display, the following messages may appear.
Message Possible Solution
Auto Adjust No action required, the TV display is performing an auto
adjustment.
Out of Range Check the optimal resolution settings.
You may need to download a new video driver. For more
information, go to support.dell.com.
1
www.dell.com | support.dell.com
No Video Input
TV Button Lock To unlock, press Menu on your remote control, select Setup.
In Power Save Mode
Press any key on keyboard or
move mouse
In Power Save Mode
Please Check Video Signal
Self Test Appears for computer source when there is nothing plugged in.
Check all cables are properly connected.
2
Ensure the proper source is selected in the
See "Input Select Menu" on page 66 for more information.
Use the side panel buttons to unlock the OSD and side panel
buttons:
1
Press the Menu button.
A message appears stating that the OSD and buttons are locked.
2
While the message is on the screen, press the volume decrease
and channel up buttons on the side panel simultaneously.
A message appears stating that the OSD and buttons are
unlocked.
If you have a computer connected to the TV display and there
is no signal detected, the TV display goes in to sleep mode.
The power light is amber when the TV display in is sleep mode.
Press any key on the keyboard or move the mouse to wake the
TV display.
If you are using a video device and it has been inactive for
30 minutes the TV display goes in to power save mode. The
power light is amber when the TV display is in power save mode.
Select VGA or DVI from Input Select menu and nothing is
plugged in. Plug a computer in to the VGA or DVI.
Input Select
menu.
78 Troubleshooting Your TV Display
Page 81

Remote Control Problems
Problem Possible Solution
The TV display does not respond when
using the remote control
1
Point the remote control directly at the lower right corner of the
TV display. Be sure that nothing is blocking the front of the TV
display. For the location of the IR, see "Front View" on page 47.
2
Verify that the batteries are properly installed.
3
If the batteries are old, install new batteries.
NOTE: Bright lights or other infrared devices may interfere with
your remote control and IR on the TV display.
Using the Self-Test Feature When Your TV Display is Connected to Your Computer
When your computer is connected to the TV display through DVI or VGA connector you can use
the self-test feature to check whether your TV display is functioning properly. If your TV display
and computer are properly connected but the TV display screen remains dark, run the TV display
self-test by performing the following steps:
1
Turn off both your computer and the TV display.
2
Unplug the video cable from the back of the computer.
3
Tu r n o n t h e T V d i sp la y.
If the TV display cannot sense a video signal and is working correctly, the floating "Dell - SelfTest Feature Check" dialog box appears on the screen (against a black background).
While in self-test mode, the power light remains blue and the self-test pattern scrolls through
the screen continually. This box also appears during normal system operation if the video
cable becomes disconnected or damaged.
4
Turn off your TV display and reconnect the video cable; then turn on both your computer and
the TV display. If your TV display screen remains blank, the problem may be with your
computer or graphic card.
See your computer documentation for more information.
Problems When Using the TV Display as a Monitor
NOTE: You can only connect your computer to the TV display using a VGA connector.
Troubleshooting Your TV Display 79
Page 82

Problem Possible Solution
The picture is off-centered or too small 1
Use
Auto Adjust
enter the OSD, select
Adjust
.
2
Check the optimal resolution settings.
to check the
Image Settings
Image Settings
. Press
Menu
, and then select
to
Auto
You may need to download a new video driver. For more
information, go to
support.dell.com
.
NOTE: Some older video cards may not support the resolution
settings for the TV display.
No audio 1
www.dell.com | support.dell.com
PIP/POP/PBP not working 1
No video NOTE: If you see a self-test, it means there is a problem with
Ensure the green audio cable is connected to audio connector
on the TV display and on the computer. For the location of the
connector on the TV display, see "Using the VGA Connector" on
page 59. See your computer documentation for the location of
connectors on your computer.
Do not connect the audio cable to the headphone jack.
2
Ensure the volume on the computer is not muted.
3
Verify that sound on your computer is working by checking the
speakers. See your computer documentation for information on
troubleshooting your computer.
4
Disconnect the TV display from the computer and test to see if
the TV display volume works.
Ensure the settings in the OSD are properly set. Press
enter the OSD, and select
2
Swap the video and audio source.
PIP/POP/PBP
.
Menu
your video card or you are using the wrong input source.
1
Ensure the TV display is turned on.
2
Verify that all the cables are properly connected to the TV
display, including the power cable.
3
Check to see if there is a blue or amber light on the lower, righthand corner of the TV display. A blue light indicates the TV
display is on. An amber light, means the TV display is in power
save mode.
4
Ensure
VGA
is selected in the
Input Select
menu. See "Input
Select Menu" on page 66 for more information.
5
Reconnect the computer.
6
Connect another device that you know is working properly.
7
Reset the original factory defaults. Press
control, select
Setup
, and then select
Menu
on the remote
Factory Reset
.
to
80 Troubleshooting Your TV Display
Page 83

Specifications for Your TV Display
General W1900
Model number W1900 LCD TV display
Display type TFT COLOR Normally Black PVA-Premium LCD
Screen size 19 inch panel (19-inch viewable image size)
Viewable area 412.80
Image aspect ratio Wide screen
Video Display Capabilities 480i
Additional Features:
SAP capable
Teletext capable
x
247.68 mm
(16.25inches x 9.75 inches)
15:9 resolution
16:9 aspect ratio
480p
720p
1080i
576i (where available)
576p (where available)
Ye s
(where available)
Ye s
6
Specifications for Your TV Display 81
Page 84

Physical Dimension W1900
Display (with stand (max.)) 418 x 603.7 x 167.85 mm
(16.5 x 23.8 x 6.6 inches)
Display (with stand (min.)) 333 x 603.7 x 167.85 mm
(13.1 x 23.8 x 6.6 inches)
Display (no stand) 311 x 603.7 x 95.2 mm
(12.2 x 23.8 x 3.75inches)
With Speakers Non-detachable
Weight (with stand) 10 kg/22.05lbs (est)
www.dell.com | support.dell.com
Tilt +5/-15 degrees
Swivel +/- 45 degrees
Native Resolution 1280 x 768 (WXGA)
HDTV Capable Yes
Picture-In-Picture
Picture-In-Picture (PIP) Yes
Picture-Outside-Picture (POP) Yes
Picture-By-Picture (PBP) Yes
Number of Tuners one analog
Brightness (typical) 450 nits (typical)
Contrast Ratio 600:1 (typical)
Response time (Tr:Tf) 16 ms, 9ms (typical)
Viewing Angle
Horizontal +/- 85 degrees
Vertical +/- 85 degrees
Inputs
Video
Composite (CVBS)
S-Video
Component
TV In (coaxial)
Audio (L+R)
82 Specifications for Your TV Display
one (side)
one (side)
two (bottom)
one (bottom)
five pair
Page 85

Inputs
DVI (for use with a video device)
Computer
VGA (for use as computer monitor)
DVI(for use as computer monitor)
Audio (mini stereo jack)
Outputs
Video
Composite (CVBS)
Audio (L+R)
Headphone
Audio
Effects SRS TruSurround XT
Speakers (integrated) 7 watts/channel
Additional Features
Video
Composite (CVBS)
Audio (L+R)
Headphone
one(bottom)
one (bottom)
one (bottom)
one (bottom)
one (side)
one pair
one (side)
Midnight Mode
7 +7 watts total
one (bottom)
one pair
one (side)
Specifications for Your TV Display 83
Page 86

www.dell.com | support.dell.com
84 Specifications for Your TV Display
Page 87

Index
A
About
side connectors 47
side panel buttons 47
TV 47
Adjust 67
brightness 67
color 67
Antenna 56
aspect ratio 69
Audio 67
B
Button
lock 70
unlock 70
Buttons
channel up and down 48
channels 62
Enter 62
Input Source 48
OSD 48
PIP 62
power 48
remote control 62
Side panel 48
volume 48, 62
C
Cables 51
Channel 70
Channel Setup 70
Coaxial 56
Component 57
Connecting an Antenna 56
Connecting Cable TV
coaxial 56
Connecting devices
Cable TV box 53
camcorder 53
computer 53
DVD player 53
VCR 53
Connectors 49
AV1 49
AV2 49
AV3 50
AV4 50
AV5 50
coaxial 50, 53
component 50, 53, 57
composite 53
DVI 50, 53, 58
location of 50
power 50
quality 53
side panel 49
S-Video 53, 57
VGA 50
D
DVI 58
F
Factory settings
restore 70
H
headphones 49
I
Input Select
Input sources 66
Input Source 62
rename 70
IR receiver 47
M
Midnight Mode 67
Monitor 59
O
On-Screen Display 65
OSD 62, 65
appearance of 70
Audio 67
Channel Setup 70
Input Select 66
language 66
Main Menu 65
Index 85
Page 88

messages 78
PBP 68
Picture 67
PIP 68
POP 68
remote control 65
setup 70
sleep timer 70
using 65
S
Self Test 79
setup 70
Sleep Timer 70
Specifications 81
SRS 67
S-Video 57
P
Package contents 51
Picture-By-Picture 68
Picture-In-Picture 68
Picture-Outside-Picture 68
Power indicator
amber light 47
blue light 47
Power light
amber 47
blue 47
Problems
remote control 79
TV 73
R
Remote control 65
batteries 61
buttons 62
Learning remote 64
problems with 79
using 61
T
Teletext
OSD 71
remote control 71
teletext
OSD 71
Troubleshooting 73
computer 79
general problems 74
monitor 79
OSD 78
remote control 79
self test 79
TV
connectors 53
location 53
set up 53
U
Universal remote 64
V
86 Index
VGA 59
 Loading...