

Dell Vostro V131 User Manual [sr]

Dell Vostro V131 Owner's Manual
Regulatory Model P18S
Regulatory Type P18S001
Napomene, oprez i upozorenja
NAPOMENA: NAPOMENA ukazuje na važne informacije koje će vam pomoći da iskoristite
računar na bolji način.
OPREZ: OPREZ ukazuje na potencijalno oštećenje hardvera ili gubitak podataka u slučaju
nepoštovanja uputstava.
UPOZORENJE: UPOZORENJE ukazuje na potencijalno oštećenje imovine, telesne povrede i
smrtni ishod.
Informacije u ovoj brošuri podložne su promenama bez prethodne najave.
© 2011. Dell Inc. Sva prava zadržana.
Umnožavanje ovih materijala na bilo koji način bez prethodne pismene dozvole kompanije Dell Inc. je strogo
zabranjeno.
Trgovačke oznake korišćene u ovom tekstu:
ExpressCharge™, Latitude™, Latitude ON™, OptiPlex™, Vostro™ i Wi-Fi Catcher™ su trgovačke oznake
kompanije Dell Inc. Intel®, Pentium®, Xeon®, Core™, Atom™, Centrino® i Celeron® su registrovane
trgovačke oznake ili trgovačke oznake kompanije Intel Corporation u SAD-u i drugim državama. AMD® je
registrovana trgovačka oznaka i AMD Opteron™, AMD Phenom™, AMD Sempron™, AMD Athlon™,
ATI Radeon™ i ATI FirePro™ su trgovačke oznake kompanije Advanced Micro Devices, Inc. Microsoft®,
Windows
ili registrovane trgovačke oznake kompanije Microsoft Corporation u Sjedinjenim Državama i/ili drugim
zemljama.
licencirana je za upotrebu na diskovima i plejerima.
vlasništvu kompanije
na osnovu licence.
Alliance, Inc.
Ostale trgovačke oznake i trgovački nazivi mogu se koristiti u ovom dokumentu da označe pravna lica
vlasnike oznaka i naziva ili njihove proizvode. Dell Inc. se odriče bilo kakvih vlasničkih interesa za navedene
trgovačke oznake i nazive, osim vlastitih.
®
,
MS-DOS
Blu-ray Disc
®
,
Windows Vista
™
je trgova
Bluetooth
Wi-Fi
®
®
je registrovana trgova
čka oznaka u vlasništvu kompanije Blu-ray Disc Association (BDA) i
SIG, Inc. i svako koriš
Dell™, DELL logotip, Dell Precision™, Precision ON™,
®
, Windows Vista start dugme i
Bluetooth
ćenje takve oznake od strane kompanije Dell Inc. je
čka oznaka kompanije Wireless Ethernet Compatibility
Office Outlook
®
oznaka je registrovana trgova
®
su trgovačke oznake
čka oznaka u
2011 – 8
Rev. A00

Contents
Napomene, oprez i upozorenja...................................................................2
Poglavlje 1: Rad na računaru......................................................................7
Pre rada u unutrašnjosti računara....................................................................................7
Preporučeni alati...............................................................................................................8
Isključivanje računara.......................................................................................................9
Posle rada u unutrašnjosti računara.................................................................................9
2 Removing The Secure Digital (SD) Card...............................................11
Installing The Secure Digital (SD) Card...........................................................................11
3 Removing The Battery.............................................................................13
Installing The Battery......................................................................................................14
4 Removing The Subscriber Identity Module (SIM) Card.....................15
Installing The Subscriber Identity Module (SIM) Card...................................................16
5 Removing The Keyboard.........................................................................17
Installing The Keyboard..................................................................................................18
6 Removing The Base Cover......................................................................19
Installing The Base Cover...............................................................................................20
7 Removing The Memory...........................................................................21
Installing The Memory.....................................................................................................22
8 Removing The Hard Drive.......................................................................23
Installing The Hard Drive.................................................................................................24

9 Removing The Palm Rest........................................................................25
Installing The Palm Rest..................................................................................................26
10 Removing The Wireless Local Area Network (WLAN) Card...........29
Installing The Wireless Local Area Network (WLAN) Card............................................30
11 Removing The Wireless Wide Area Network (WWAN) Card.........31
Installing The Wireless Wide Area Network (WWAN)...................................................32
12 Removing The Display Assembly.........................................................33
Installing The Display Assembly.....................................................................................35
13 Removing The Display Bezel................................................................37
Installing Display Bezel...................................................................................................38
14 Removing The Display Panel................................................................39
Installing the Display Panel.............................................................................................41
15 Removing The Camera..........................................................................43
Installing The Camera.....................................................................................................44
16 Removing The Display Hinges..............................................................45
Installing The Display Hinges..........................................................................................47
17 Removing The Thermal Fan..................................................................49
Installing The Thermal Fan..............................................................................................50
18 Removing The System Board...............................................................51
Installing The System Board...........................................................................................53
19 Removing The Coin-Cell Battery..........................................................55
Installing The Coin-Cell Battery.......................................................................................56
20 Removing The Heat Sink.......................................................................57
Installing The Heat Sink..................................................................................................59

21 Removing The HDMI Board..................................................................61
Installing The High-Definition Multimedia Interface (HDMI) Board...............................62
22 Removing The Speakers.......................................................................63
Installing The Speakers...................................................................................................64
23 Removing The Input/Output (I/O) Board.............................................65
Installing The Input/Output (I/O) Board...........................................................................66
24 Removing the DC-In Port.......................................................................67
Installing The DC-In Port.................................................................................................69
25 Removing The LVDS Cable...................................................................71
Installing The Low-Voltage Differential Signalling (LVDS) Cable....................................72
Poglavlje 26: Podešavanje sistema.........................................................73
System Setup Overview..................................................................................................73
Entering System Setup....................................................................................................73
System Setup Screens....................................................................................................73
System Setup Menu Options...........................................................................................75
Poglavlje 27: Dijagnostika.........................................................................79
Device Status Lights........................................................................................................79
LED Status.......................................................................................................................79
Diagnostic Beep Codes...................................................................................................80
Keyboard Status Lights...................................................................................................82
28 Technical Specifications......................................................................83
Poglavlje 29: Kontakt sa Dell-om.............................................................89
Kontakt s Dell-om............................................................................................................89

6
Rad na računaru 1
Pre rada u unutrašnjosti računara
Koristite sledeće mere predostrožnosti kako biste svoj računar zaštitili od
mogućih oštećenja i kako osigurali svoju ličnu bezbednost. Osim ako nije
drugačije navedeno, svaka procedura u ovom dokumentu pretpostavlja da su
ispunjeni sledeći uslovi:
• Izvršili ste korake navedene u odeljku Rad na računaru.
• Pročitali ste bezbednosne informacije koje ste dobili uz računar.
• Komponenta se može zameniti ili, ako je kupljena odvojeno, instalirati
izvođenjem procedure uklanjanja u obrnutom redosledu.
UPOZORENJE: Pre rada u unutrašnjosti računara, pročitajte bezbednosne
informacije koje ste dobili uz računar. Za dodatne informacije o najboljim praksama
pogledajte početnu stranu za usklađenost za propisima na www.dell.com/
regulatory_compliance.
OPREZ: Mnoge popravke mogu da obavljaju isključivo ovlašćeni servisni tehničari.
Lično bi trebalo da obavljate samo rešavanje problema i sitne popravke, prema
ovlašćenjima iz dokumentacije proizvoda ili u skladu sa uputstvima službe i tima za
podršku na mreži ili putem telefona. Garancija ne pokriva štetu nastalu kao
posledica servisiranja koje nije ovlašćeno od strane kompanije Dell. Pročitajte
bezbednosna uputstva koja ste dobili sa proizvodom i pridržavajte ih se.
OPREZ: Da biste izbegli elektrostatičko pražnjenje, uzemljite se pomoću trake za
uzemljenje ili povremeno dodirujte neobojenu metalnu površinu, kao što je konektor
na zadnjem delu računara.
OPREZ: Komponentama i karticama rukujte pažljivo. Ne dirajte komponente ili
kontakte na kartici. Karticu držite za ivice ili za njen metalni držač. Držite
komponentu kao što je procesor za ivice, a ne za pinove.
OPREZ: Kada odspajate kabl, povucite njegov konektor ili jezičak za povlačenje, a ne
sam kabl. Neki kablovi imaju konektore sa držačima za zaključavanje; ako
isključujete ovu vrstu kabla, pritisnite držače za zaključavanje pre nego što odspojite
kabl. Kada razdvajate konektore držite ih poravnate i izbegavajte krivljenje bilo
kojeg pina konektora. Takođe, pre nego što priključite kabl, pobrinite se da su oba
konektora pravilno okrenuta i poravnata.
7
NAPOMENA: Boja vašeg računara i nekih komponenata može izgledati drugačije u
odnosu na one prikazane u ovom dokumentu.
Da biste izbegli oštećenje računara, prođite kroz sledeće korake pre nego što
počnete sa radom u unutrašnjosti računara.
1. Uverite se da je vaša radna površina ravna i čista da biste sprečili grebanje
poklopca računara.
2. Isključite računar (pogledajte odeljak
Isključivanje računara
).
3. Ako je uređaj priključen na priključnu stanicu, kao što je opcionalna
medijska baza ili rezervna baterija, odspojite ga.
OPREZ: Da biste odspojili mrežni kabl, prvo isključite kabl iz računara a zatim
isključite kabl iz mrežnog uređaja.
4. Odspojite sve mrežne kablove iz računara.
5. Isključite računar i sve priključene uređaje iz pripadajućih električnih
utičnica.
6. Zatvorite ekran i okrenite računar naopako na ravnoj radnoj površini.
NAPOMENA: Da biste izbegli oštećenje matične ploče, pre servisiranja računara
morate ukloniti glavnu bateriju.
7. Uklonite glavnu bateriju.
8. Okrenite računar tako da gornja strana bude gore.
9. Otvorite ekran.
10. Pritisnite taster za napajanje da biste uzemljili matičnu ploču.
OPREZ: Da biste se zaštitili od električnog udara, pre otvaranja ekrana uvek
isključujte računar iz električne utičnice.
OPREZ: Pre nego što dodirnete unutrašnjost računara, uzemljite se dodirivanjem
neobojene metalne površine, kao što je metal na zadnjoj strani računara. Dok radite,
povremeno dodirujte neobojenu metalnu površinu kako biste odstranili statički
elektricitet koji bi mogao da ošteti unutrašnje komponente.
11. Uklonite instalirane ExpressCard kartice ili "smart" kartice iz odgovarajućih
slotova.
Preporučeni alati
Za procedure u ovom dokumentu mogu se zahtevati sledeći alati:
• Mali odvrtač sa ravni vrhom
• #0 Phillips odvrtač
8
• #1 Phillips odvrtač
• Malo plastično šilo
• CD sa programom za ažuriranje flešovanja BIOS-a
Isključivanje računara
OPREZ: Da bi se izbegao gubitak podataka, sačuvajte i zatvorite sve otvorene
datoteke i zatvorite sve otvorene programe pre nego što isključite računar.
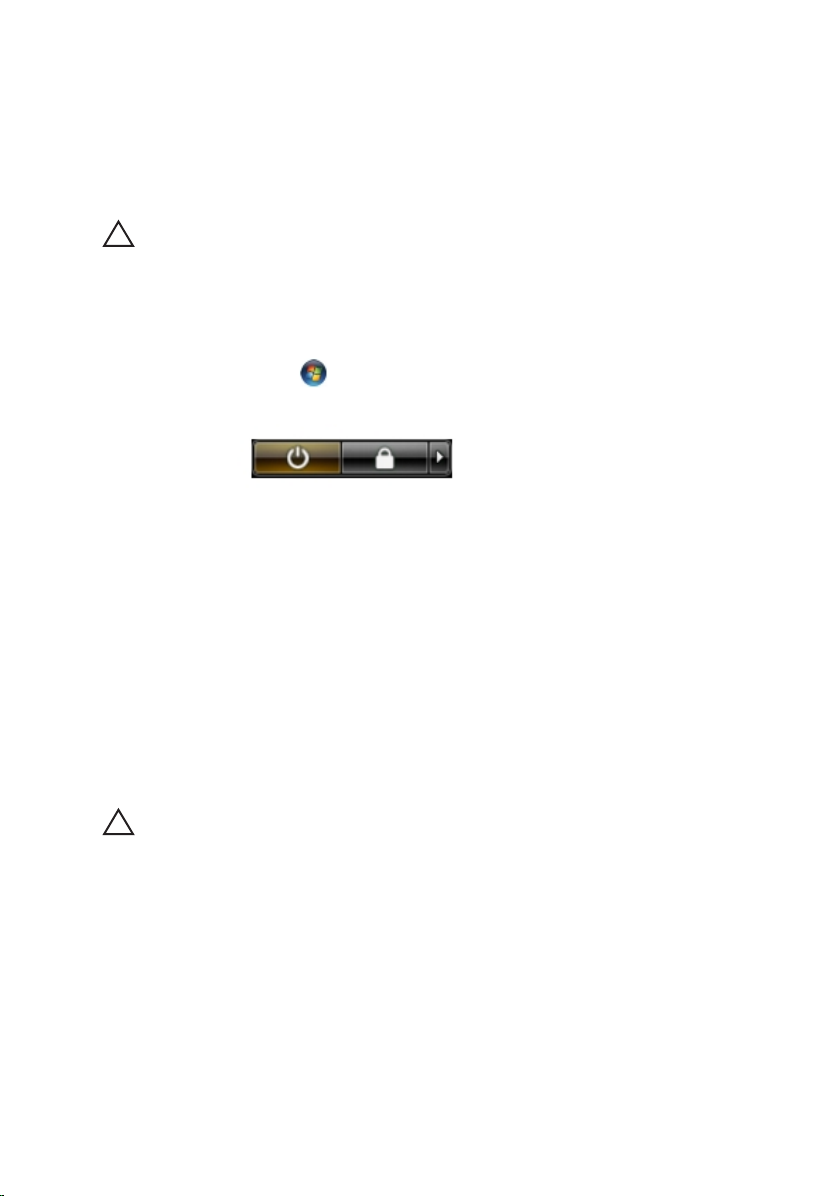
1. Isključite operativni sistem:
• Za Windows Vista :
Kliknite na Start
, zatim kliknite na strelicu u donjem desnom uglu
Start menija, kao što je dole prikazano, a zatim kliknite na Isključenje.
• Za Windows XP:
Kliknite na Start → Isključi računar → Isključi . Računar se isključuje
nakon završetka procesa isključivanja operativnog sistema.
2. Uverite se da su računar i svi povezani uređaji isključeni. Ako se računar i
povezani uređaji nisu automatski isključili kada ste isključili operativni
sistem, pritisnite i zadržite taster za napajanje otprilike 4 sekundi da biste ih
isključili.
Posle rada u unutrašnjosti računara
Nakon što završite bilo koju proceduru zamene, a pre nego što uključite računar,
uverite se da su svi eksterni uređaji, kartice i kablovi povezani.
OPREZ: Da bi se izbeglo oštećenje računara, koristite baterije dizajnirane samo za
ovaj tip Dell računara. Ne koristite baterije dizajnirane za druge Dell računare.
1. Povežite eksterne uređaje, kao što je replikator portova, rezervna baterija ili
medijska baza, i zamenite kartice, kao što je ExpressCard.
2. Povežite telefonske ili mrežne kablove sa računarom.
9

OPREZ: Da biste povezali mrežni kabl, prvo priključite kabl u mrežni uređaj a zatim
ga priključite u računar.
3. Zamenite bateriju.
4. Priključite računar i sve povezane uređaje u odgovarajuće električne
utičnice.
5. Uključite računar.
10
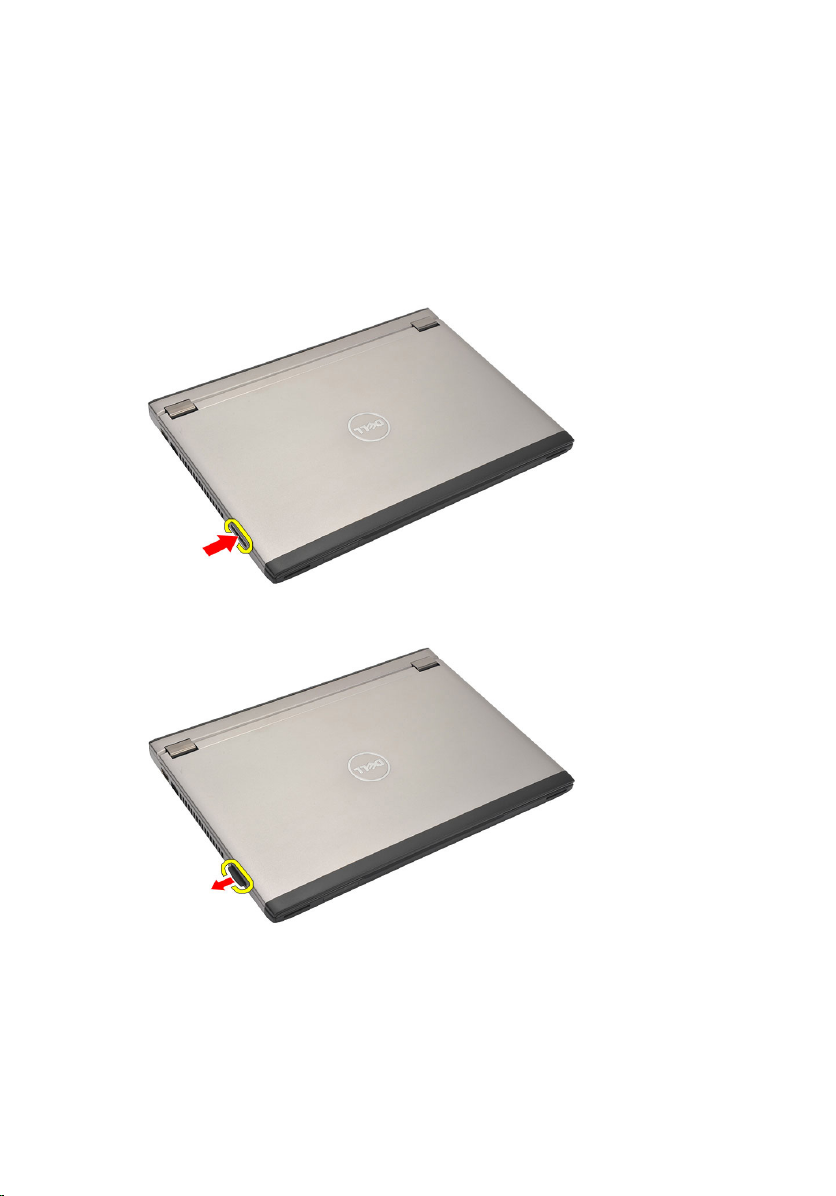
Removing The Secure Digital (SD)
Card 2
1. Follow the procedures in
2. Press in on the SD card to release it from the computer.
3. Grasp the SD card and pull out to release from the computer.
Before Working On Your Computer.
Installing The Secure Digital (SD) Card
1. Slide the SD card into its slot and press until it clicks into place.
2. Follow the procedures in
After working inside your computer
.
11

12
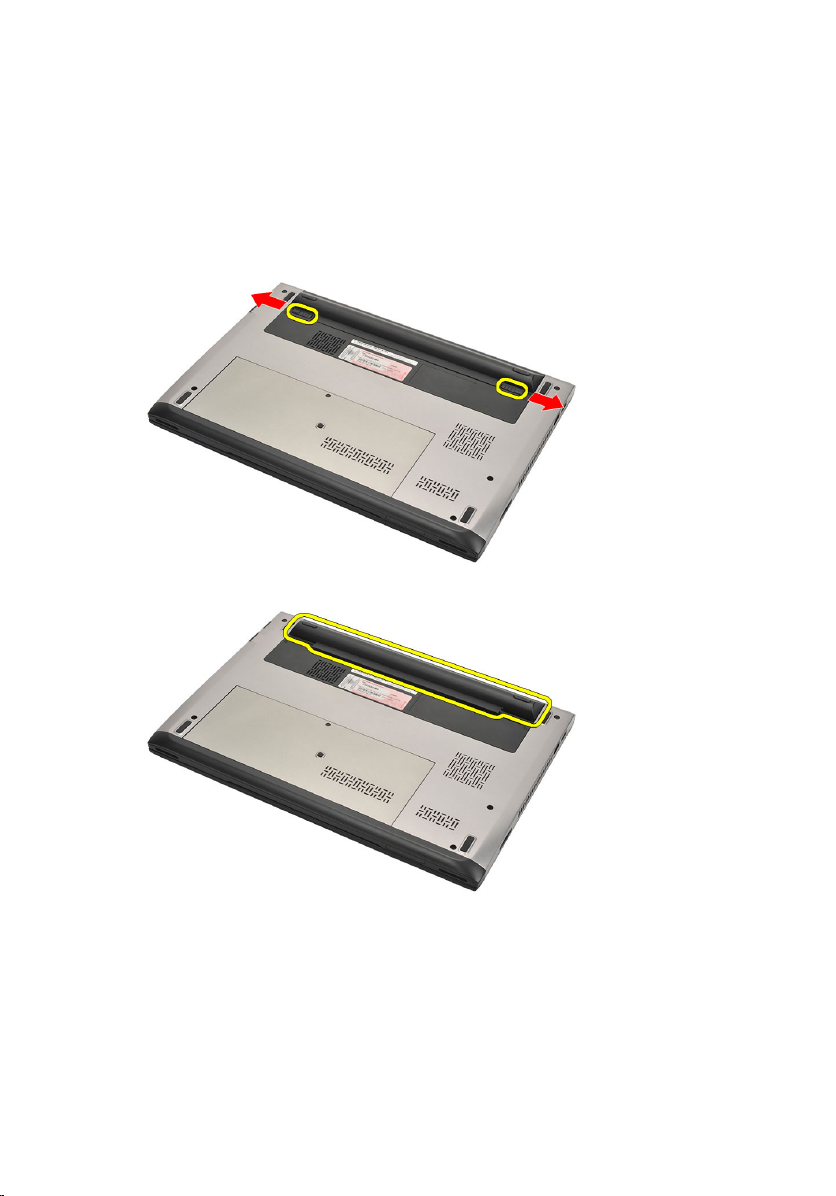
Removing The Battery 3
1. Follow the procedures in
2. Remove the
3. Slide the release latches to unlock the battery.
4. Remove the battery from the computer.
Secure Digital (SD) Card.
Before Working On Your Computer.
13

Installing The Battery
1. Insert the battery into its compartment.
2. Slide the battery into its slot until it clicks into place.
3. Install the
4. Follow the procedures in
Secure Digital (SD) Card
After Working Inside Your Computer
.
.
14
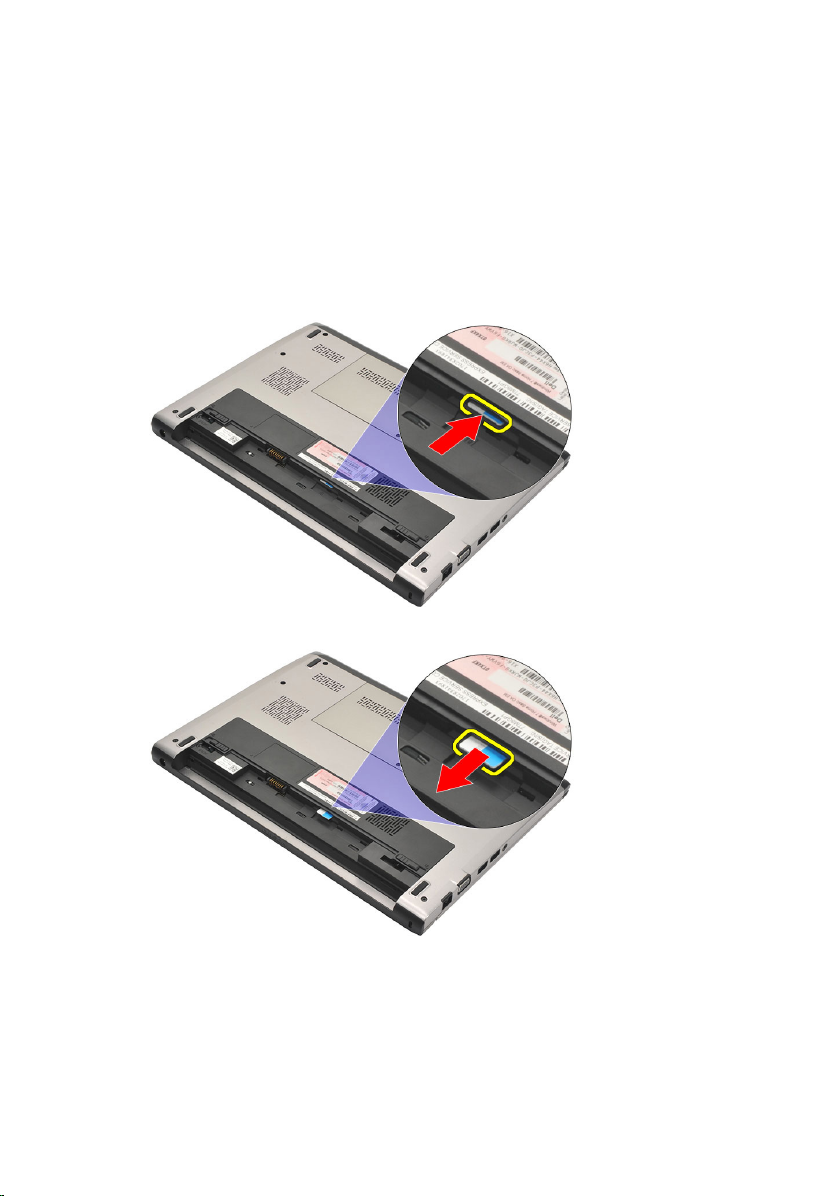
Removing The Subscriber Identity
Module (SIM) Card 4
1. Follow the procedures in
2. Remove the
3. Press in on the SIM card to release it from the computer.
4. Grasp the SIM card and pull out to release from the computer.
battery
Before Working On Your Computer.
.
15

Installing The Subscriber Identity Module (SIM) Card
1. Insert the SIM card into the slot.
2. Install the
3. Follow the procedures in
battery
.
After Working Inside Your Computer.
16
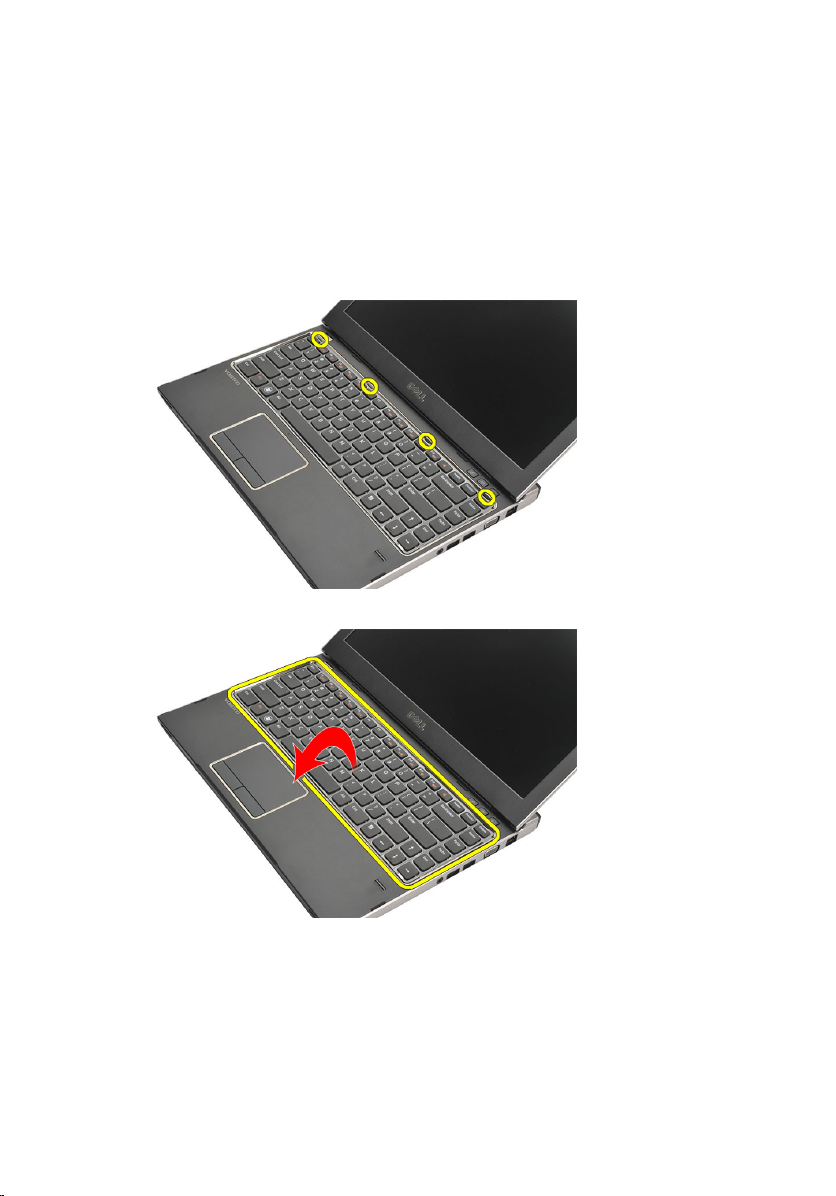
Removing The Keyboard 5
1. Follow the procedures in
2. Remove the
3. Pry the keyboard using a flat-head screw driver to remove the keyboard
retainers that secure keyboard to the computer.
4. Flip the keyboard over and lay it on the palm rest.
battery
Before Working On Your Computer
.
.
5. Lift the clip to release the keyboard cable and disconnect it from the system
board.
17
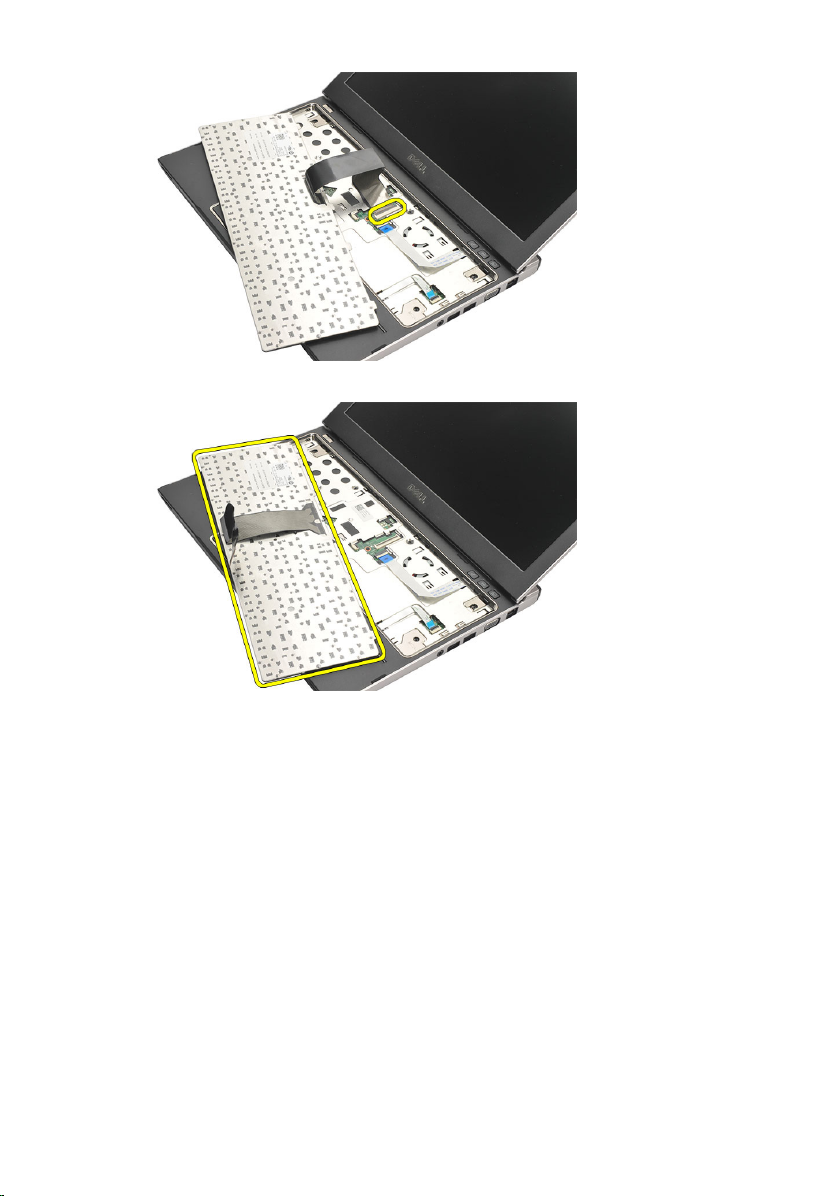
6. Lift the keyboard up and away from the computer.
Installing The Keyboard
1. Connect the keyboard cable to the system board.
2. Insert the keyboard in its compartment.
3. Press down until the keyboard clicks into place in the computer.
4. Install the
5. Follow the procedures in
battery
.
After Working Inside Your Computer
.
18
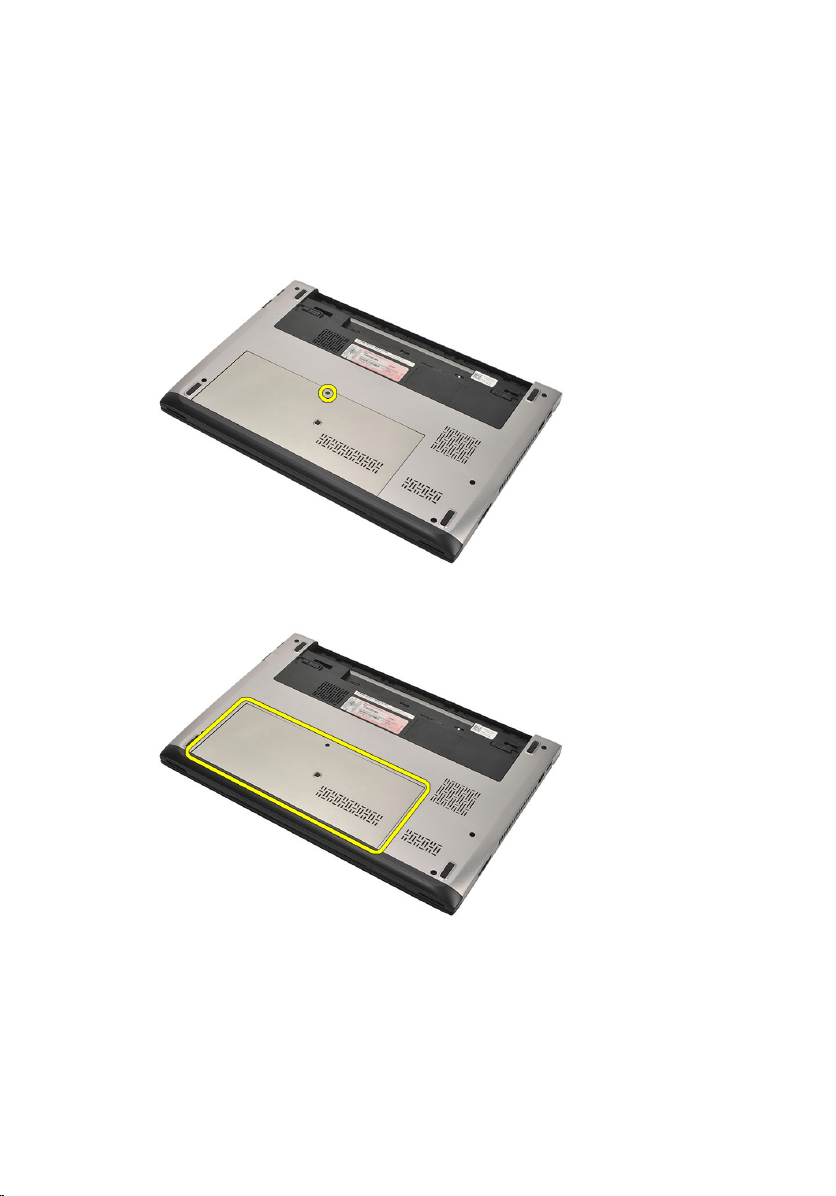
Removing The Base Cover 6
1. Follow the procedures in
2. Remove the
3. Remove the screw that secures the base cover to the computer.
4. Slide the base cover towards the back of the computer. Lift it up and away
from the computer.
battery
Before Working On Your Computer
.
.
19

Installing The Base Cover
1. Align the edge of the base cover on the computer and slide it on the
computer.
2. Tighten the screw to secure the base cover to the computer.
3. Install the
4. Follow the procedures in
battery
After Working Inside Your Computer
.
20
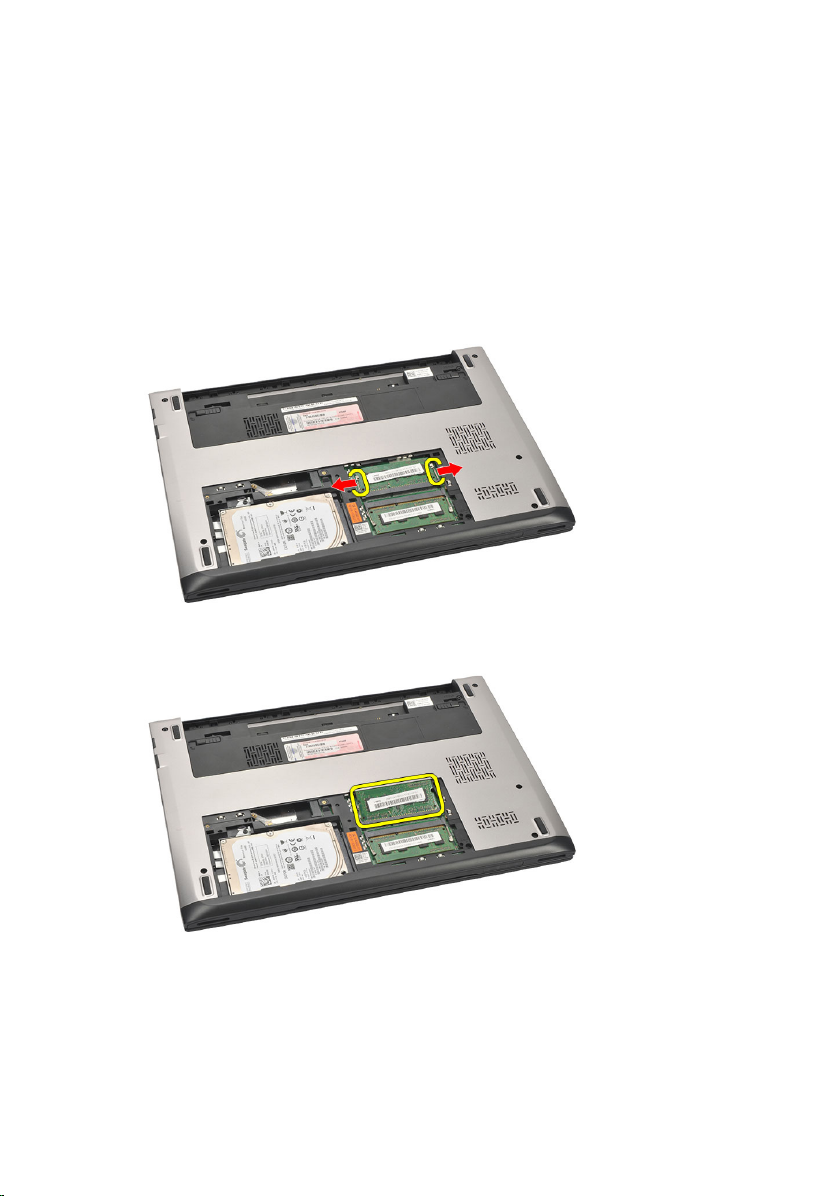
Removing The Memory 7
1. Follow the procedures in
2. Remove the
3. Remove the
4. Pry the retention clips away from the memory module till the memory
module pops up.
5. Remove the memory module from the computer.
battery
base cover
Before Working On Your Computer
.
.
.
21

Installing The Memory
1. Insert the memory module into the memory socket.
2. Press the clips to secure the memory module to the system board.
3. Install the
4. Install the
5. Follow the procedures in
base cover
battery
.
.
After Working Inside Your Computer
.
22
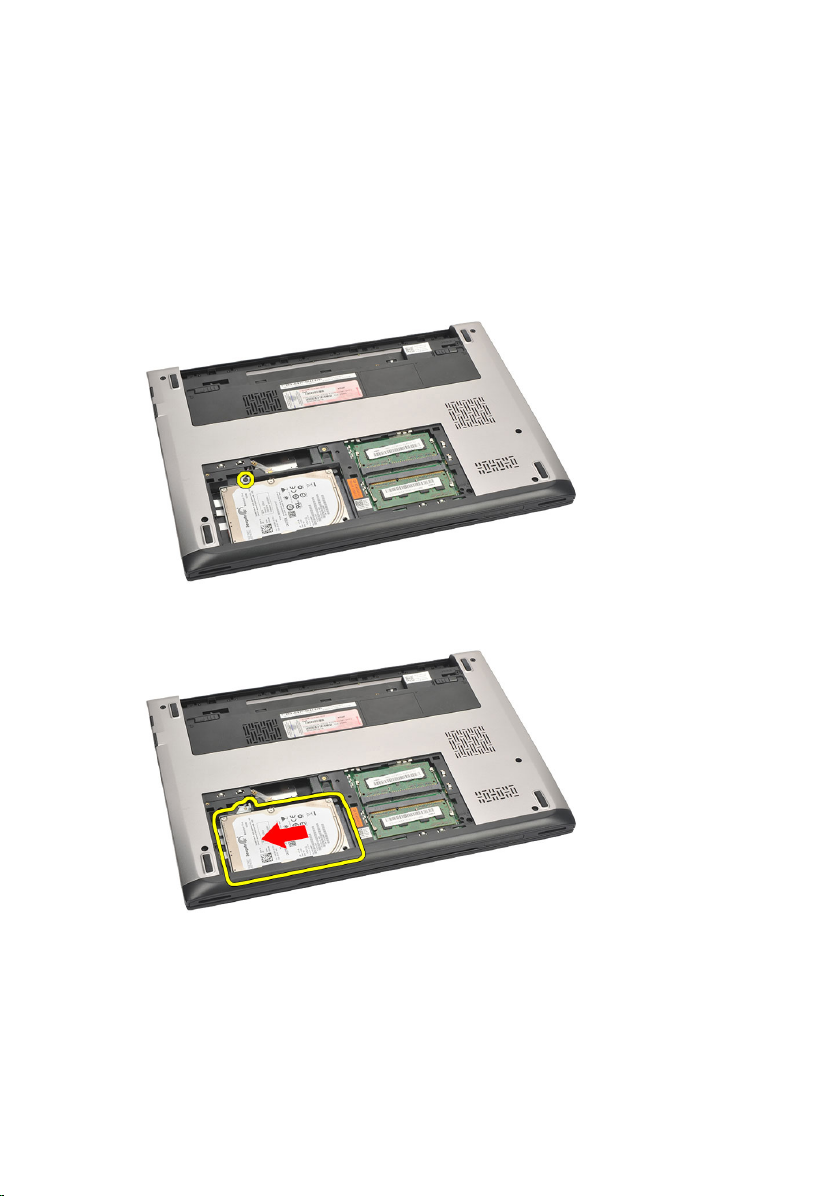
Removing The Hard Drive 8
1. Follow the procedures in
2. Remove the
3. Remove the
4. Remove the screw that secures the hard drive in place.
5. Slide the hard drive module to the left.
battery
base cover
Before Working On Your Computer
.
.
.
6. Carefully pry up and remove the hard drive from the computer.
23
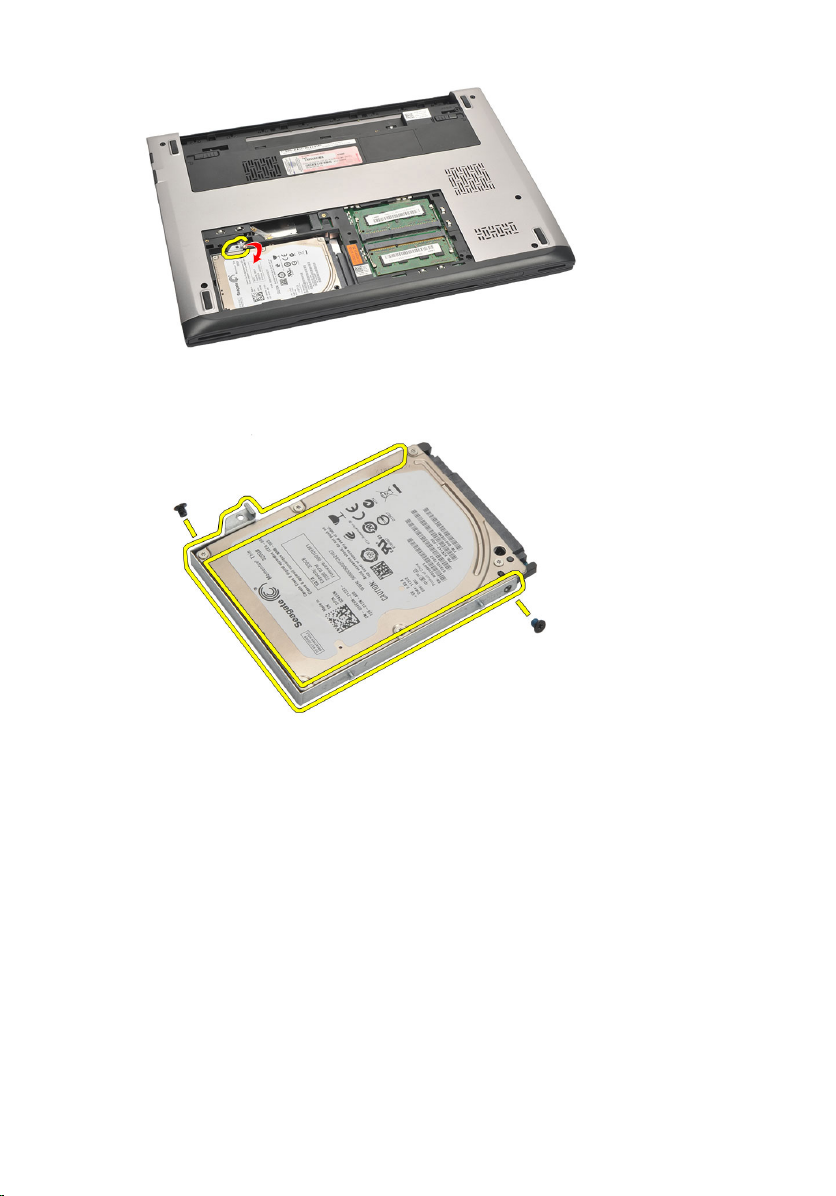
7. Remove the screws which secure the hard-drive bracket to the hard drive.
Separate the hard drive bracket from the hard drive.
Installing The Hard Drive
1. Align the hard-drive bracket with the hard drive.
2. Tighten the screws on the hard drive to secure the hard drive bracket to the
hard drive.
3. Slide the hard drive into the bay on the system board.
4. Replace and tighten the screw to secure the hard drive to the computer.
5. Install the
6. Install the
7. Follow the procedures in
24
base cover
battery
.
.
After Working Inside Your Computer
.

Removing The Palm Rest 9
1. Follow the procedures in
2. Remove the
3. Remove the
4. Remove the
5. Removing the
6. Remove the screws from the bottom of the computer, that secures the palm
rest.
7. Remove the screws on the palm rest.
battery
base cover
keyboard
hard drive
Before Working On Your Computer
.
.
.
.
.
8. Disconnect the following cables:
• fingerprint reader (1)
25
• media board (2)
• touch pad (3)
9. Using a plastic scribe, gently pry the sides of the palm rest and remove it
from the computer.
Installing The Palm Rest
1. Align the palm rest to its original position in the computer and gently snap it
into place.
2. Connect the following cables to the palm rest:
• fingerprint reader (1)
• media board (2)
26

• touch pad (3)
3. Tighten the screws on the palm rest to secure the palm rest in place.
4. Tighten the screws at the bottom base of the computer that secures the
palm rest.
5. Install the
6. Install the
7. Install the
8. Install the
9. Follow the procedures in
hard drive
keyboard
.
base cover
battery
.
.
.
After Working Inside Your Computer
.
27
 Loading...