

Page 1
Dell Vostro 360
Setup And Features Information
About Warnings
WARNING: A WARNING indicates a potential for property damage, personal injury,
or death.
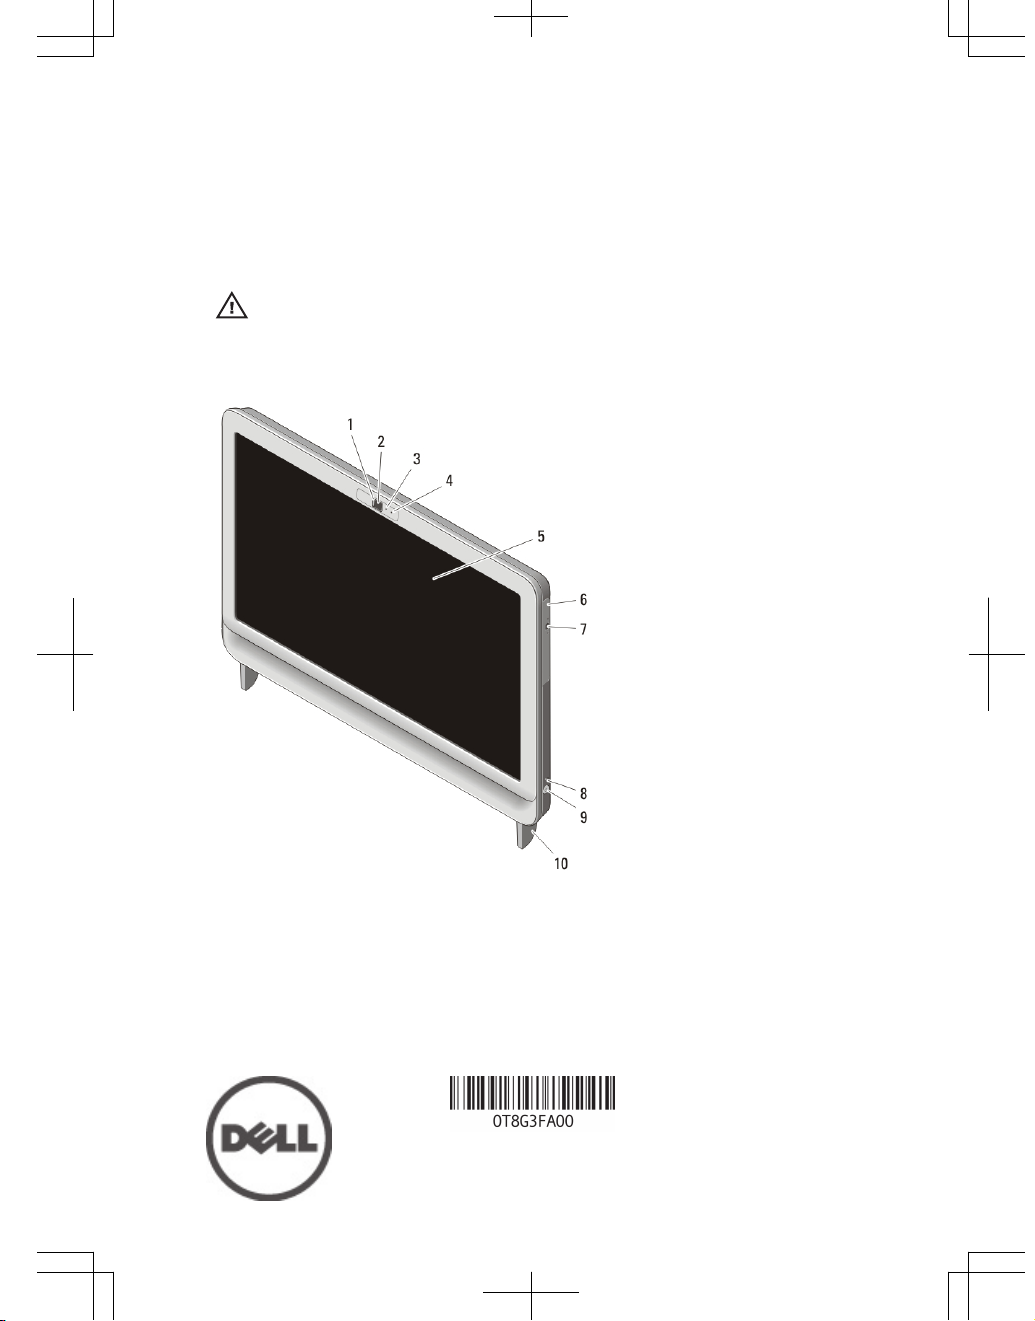
Front View
Figure 1. Front View
1. camera privacy cover
2. camera
3. camera activity light
4. microphone
5. display
6. optical drive
7. optical-drive eject button
8. drive activity light
9. power button
10. stand
Regulatory Model : W03C
Regulatory Type : W03C001
2011 – 05
Page 2

Back View
Figure 2. Back View
1. security cable slot
2. rear stand
3. power connector
4. VGA-out connector
5. network connector
6. line-out connector
7. USB 2.0 connectors (4)
8. 8-in-1 media card reader
9. USB 2.0 connectors (2)
10. headphone and microphone
connectors
11. volume decrease button
12. volume increase button
13. brightness decrease button
14. brightness increase button
Quick Setup
WARNING: Before you begin any of the procedures in this section, read the safety
information that shipped with your computer. For additional best practices
information, see www.dell.com/regulatory_compliance.
NOTE: Some devices may not be included if you did not order them.
2
Page 3
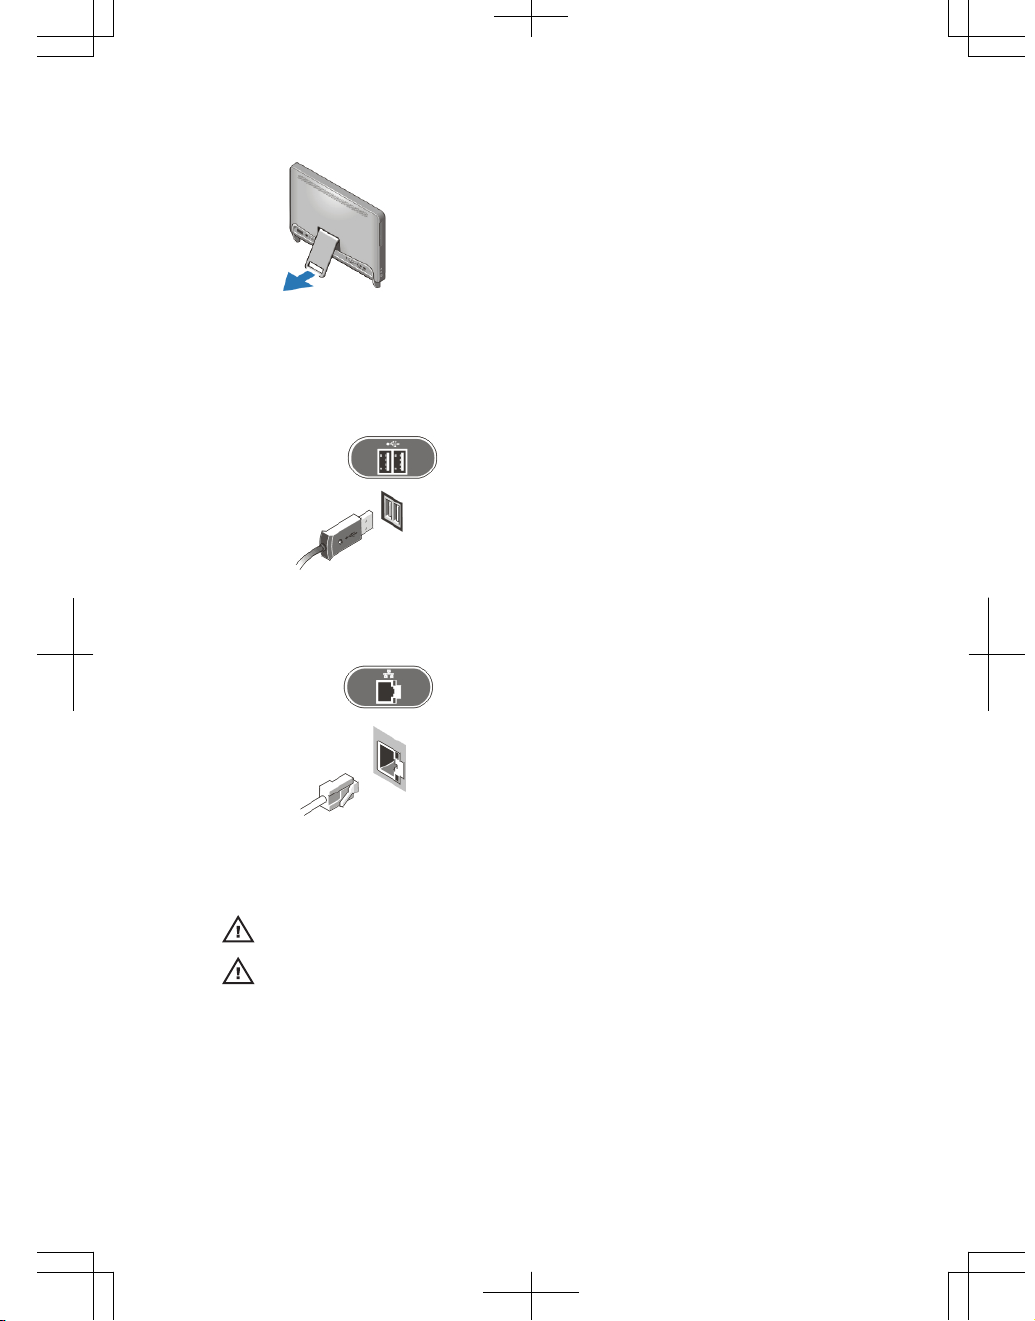
1. Set up the rear stand.
Figure 3. Rear Stand setup
2. Connect the USB keyboard or mouse. To connect a wireless keyboard
and mouse, see Setting Up Your Dell Cordless Mouse, Keyboard, and USB
Receiver tech sheet that shipped with your wireless keyboard and mouse.
Figure 4. USB Connection
3. Connect the network cable (optional).
Figure 5. Network Connection
4. Connect the power cable.
WARNING: Connect the power adapter to the nearest power outlet.
WARNING: Extension cords or power strips should never be used as a substitute
for permanent electrical wiring.
3
Page 4

Figure 6. Connecting Power
5. Press the power button on the computer.
Figure 7. Turning On Power
Specifications
NOTE: The following specifications are only those required by law to ship with your
computer. For a complete and current listing of the specifications for your
computer, go to support.dell.com.
System Information
Chipset Intel H61 Express Chipset
Processor
• Intel Core i3
• Intel Core i5
• Intel Core i7
• Intel Pentium Dual Core
Total Cache up to 8 MB cache depending on processor type
Video
Video type:
Integrated Intel HD / HD 2000 / HD 3000 Graphics
(depending on processor type)
Discrete NVIDIA GeForce GT 525M
4
Page 5

Video
Video memory:
Integrated Up to 384 MB of shared video memory
Discrete up to 1 GB
Memory
Memory module connector two SO-DIMM slots
Memory module capacity 1 GB, 2 GB, and 4 GB
Memory type DDR3 with 1333 MHz
Minimum memory 2 GB
Maximum memory 8 GB
Drives
Externally accessible:
5.25–inch drive bays one
Internally accessible:
3.5–inch SATA drive bays one
Control Lights And Diagnostic
Lights
Power light White light — Solid white light indicates power-
on state.
Amber light — The computer is in sleep/standby
mode or there might be an issue with the system
board or the power supply. Blinking amber light
indicates that the computer has detected an error
during the Power-on self-test (POST).
Drive activity light White light — Blinking white light indicates that
the computer is reading data from or writing data
to the hard drive.
Network connectivity light Green light — A good connection exists between
the network and the computer.
Off (no light) — The computer is not detecting a
physical connection to the network.
5
Page 6

Physical
Height 430.00 mm (16.93 inches)
Width 568.00 mm (22.36 inches)
Depth:
Touchscreen 79.00 mm (3.11 inches)
Non-touchscreen 75.50 mm (2.97 inches)
Weight:
Touchscreen 9.35 kg (20.61 lb)
Non-touchscreen 8.65 kg (19.07 lb)
AC Adapter
Input voltage 100 VAC to 240 VAC
Input current 2.3 A/2.5 A
Input frequency 50 Hz to 60 Hz
Output power 130 W/150 W
Output current:
130 W 6.70 A
150 W 7.70 A
Rated output voltage 19.5 +/- 1 VDC
Dimensions: 130 W 150 W
Height 25.40 mm (1.00 inch) 25.40 mm (1.00 inch)
Width 154.00 mm (6.06
inches)
154.70 mm (6.09
inches)
Depth 76.20 mm (3.00 inches) 76.20 mm (3.00 inches)
Temperature range:
Operating 0 °C to 40 °C (32 °F to 104 °F)
Storage –40 °C to 70 °C (–40 °F to 158 °F)
Environmental
Temperature:
Operating 10 °C to 35 °C (50 °F to 95 °F)
6
Page 7

Environmental
Storage -40 °C to 65 °C (-40 °F to 149 °F)
Relative humidity 20% to 80% (noncondensing)
Altitude:
Operating -15.20 m to 3048 m (-50 ft to 10,000 ft)
Storage -15.20 m to 10,668 m (-50 ft to 35,000 ft)
Airborne contaminant level G1 as defined by ISA-S71.04–1985
Finding More Information and Resources
See the safety and regulatory documents that shipped with your computer
and the regulatory compliance website at www.dell.com/
regulatory_compliance for more information on:
• Safety best practices
• Regulatory certification
• Ergonomics
See www.dell.com for additional information on:
• Warranty
• Terms and Conditions (U.S. only)
• End User License Agreement
Information in this publication is subject to change without notice.
© 2011 Dell Inc. All rights reserved.
Reproduction of these materials in any manner whatsoever without the written permission of
Dell Inc. is strictly forbidden.
Trademarks used in this text: Dell™, the DELL logo, Dell Precision™, Precision ON™,
ExpressCharge™, Latitude™, Latitude ON™, OptiPlex™, Vostro™, and Wi-Fi Catcher™ are
trademarks of Dell Inc. Intel®, Pentium®, Xeon®, Core™, Atom™, Centrino®, and Celeron® are
registered trademarks or trademarks of Intel Corporation in the U.S. and other countries. AMD
®
is a registered trademark and AMD Opteron™, AMD Phenom™, AMD Sempron™,
AMD Athlon™, ATI Radeon™, and ATI FirePro™ are trademarks of Advanced Micro Devices,
Inc. Microsoft®, Windows®, MS-DOS®, Windows Vista®, the Windows Vista start button, and
Office Outlook® are either trademarks or registered trademarks of Microsoft Corporation in the
United States and/or other countries. Blu-ray Disc™ is a trademark owned by the Blu-ray Disc
Association (BDA) and licensed for use on discs and players. The Bluetooth® word mark is a
registered trademark and owned by the Bluetooth® SIG, Inc. and any use of such mark by Dell
Inc. is under license. Wi-Fi® is a registered trademark of Wireless Ethernet Compatibility
Alliance, Inc.
7
Page 8

Other trademarks and trade names may be used in this publication to refer to either the entities
claiming the marks and names or their products, Dell Inc. disclaims any proprietary interest in
trademarks and trade names other than its own.
8
 Loading...