Dell Vostro 270s Owner's Manual [th]

Dell Vostro 270s

Owner’s Manual

Regulatory Model: D06S

Regulatory Type: D06S001

Notes, Cautions, and Warnings

NOTE: A NOTE indicates important information that helps you make better use of your computer.

CAUTION: A CAUTION indicates either potential damage to hardware or loss of data and tells you how to avoid the problem.

WARNING: A WARNING indicates a potential for property damage, personal injury, or death.

© 2012 Dell Inc.

: Dell, DELL, Dell Precision, Precision ON,ExpressCharge, Latitude, Latitude ON, OptiPlex, VostroWi-Fi CatcherDell Inc. Intel®, Pentium®, Xeon®, Core, Atom, Centrino® Celeron®

Intel Corporation AMD® AMD Opteron, AMD Phenom, AMD Sempron, AMD Athlon, ATI RadeonATI FireProAdvanced Micro Devices, Inc. Microsoft®,

Windows®, MS-DOS®, Windows Vista®, Windows Vista Office Outlook® Microsoft Corporation / Blu-ray DiscBlu-ray Disc Association (BDA)Bluetooth® Bluetooth® SIG, Inc. Dell Inc.

Wi-Fi® Wireless Ethernet Compatibility Alliance, Inc.

2012 - 10

Rev. A00

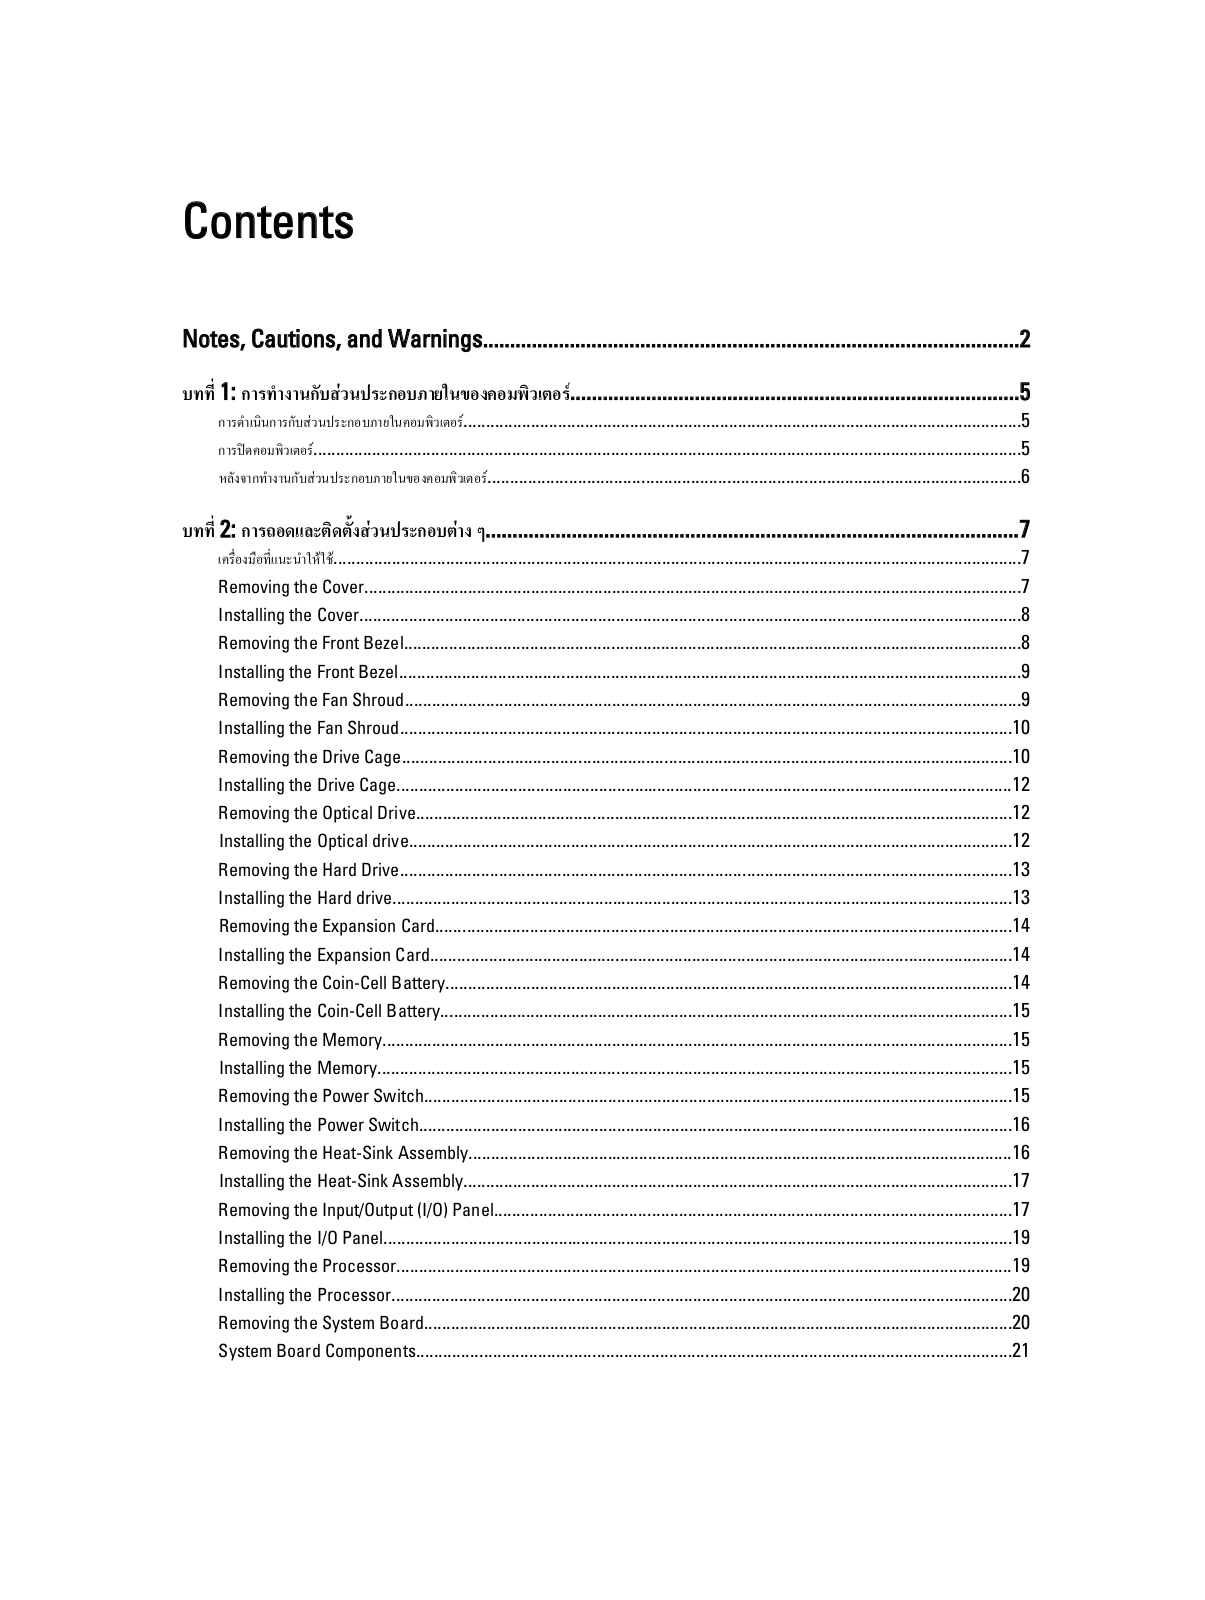
Contents

Notes, Cautions, and Warnings...................................................................................................

2

1: ...................................................................................

5

............................................................................................................................

5

.............................................................................................................................................................

5

......................................................................................................................

6

2: ...................................................................................................

7

.........................................................................................................................................................

7

Removing the Cover..................................................................................................................................................

7

Installing the Cover...................................................................................................................................................

8

Removing the Front Bezel.........................................................................................................................................

8

Installing the Front Bezel..........................................................................................................................................

9

Removing the Fan Shroud.........................................................................................................................................

9

Installing the Fan Shroud........................................................................................................................................

10

Removing the Drive Cage.......................................................................................................................................

10

Installing the Drive Cage.........................................................................................................................................

12

Removing the Optical Drive....................................................................................................................................

12

Installing the Optical drive......................................................................................................................................

12

Removing the Hard Drive........................................................................................................................................

13

Installing the Hard drive..........................................................................................................................................

13

Removing the Expansion Card................................................................................................................................

14

Installing the Expansion Card.................................................................................................................................

14

Removing the Coin-Cell Battery..............................................................................................................................

14

Installing the Coin-Cell Battery...............................................................................................................................

15

Removing the Memory............................................................................................................................................

15

Installing the Memory.............................................................................................................................................

15

Removing the Power Switch...................................................................................................................................

15

Installing the Power Switch....................................................................................................................................

16

Removing the Heat-Sink Assembly.........................................................................................................................

16

Installing the Heat-Sink Assembly..........................................................................................................................

17

Removing the Input/Output (I/O) Panel...................................................................................................................

17

Installing the I/O Panel............................................................................................................................................

19

Removing the Processor.........................................................................................................................................

19

Installing the Processor..........................................................................................................................................

20

Removing the System Board...................................................................................................................................

20

System Board Components....................................................................................................................................

21

Installing the System Board....................................................................................................................................

21

Removing the Power-Supply Unit...........................................................................................................................

22

Installing the Power-Supply Unit............................................................................................................................

22

3: System Setup ( )...............................................................................................

25

Boot Sequence ( )......................................................................................................................................

25

.............................................................................................................................................................

25

System Setup Overview..........................................................................................................................................

26

Enter System Setup................................................................................................................................................

26

System Setup Screens............................................................................................................................................

26

System Setup Options.............................................................................................................................................

27

Exit....................................................................................................................................................................

29

BIOS ...........................................................................................................................................................

29

Clearing Forgotten Password.................................................................................................................................

30

Clearing CMOS.......................................................................................................................................................

31

............................................................................................................................................

32

.........................................................................................................................

32

/ .....................................................................................................

33

...........................................................................................................................................

33

4: .........................................................................................................................

35

(ePSA)................................................................................................

35

5 Technical Specification...........................................................................................................

37

6: Dell......................................................................................................................

41

1

:

: www.dell.com/regulatory_compliance

: Dell

:

:

:

:

2.( )

:

:

:

5

Windows 7:

Start ( ) Shut Down ( )

Windows Vista :

Start ( ) Start ( ) Shut Down ( )

Windows XP:

Start Turn Off Computer Turn Off

2.6

:

5.Dell Diagnostics

6

2

:

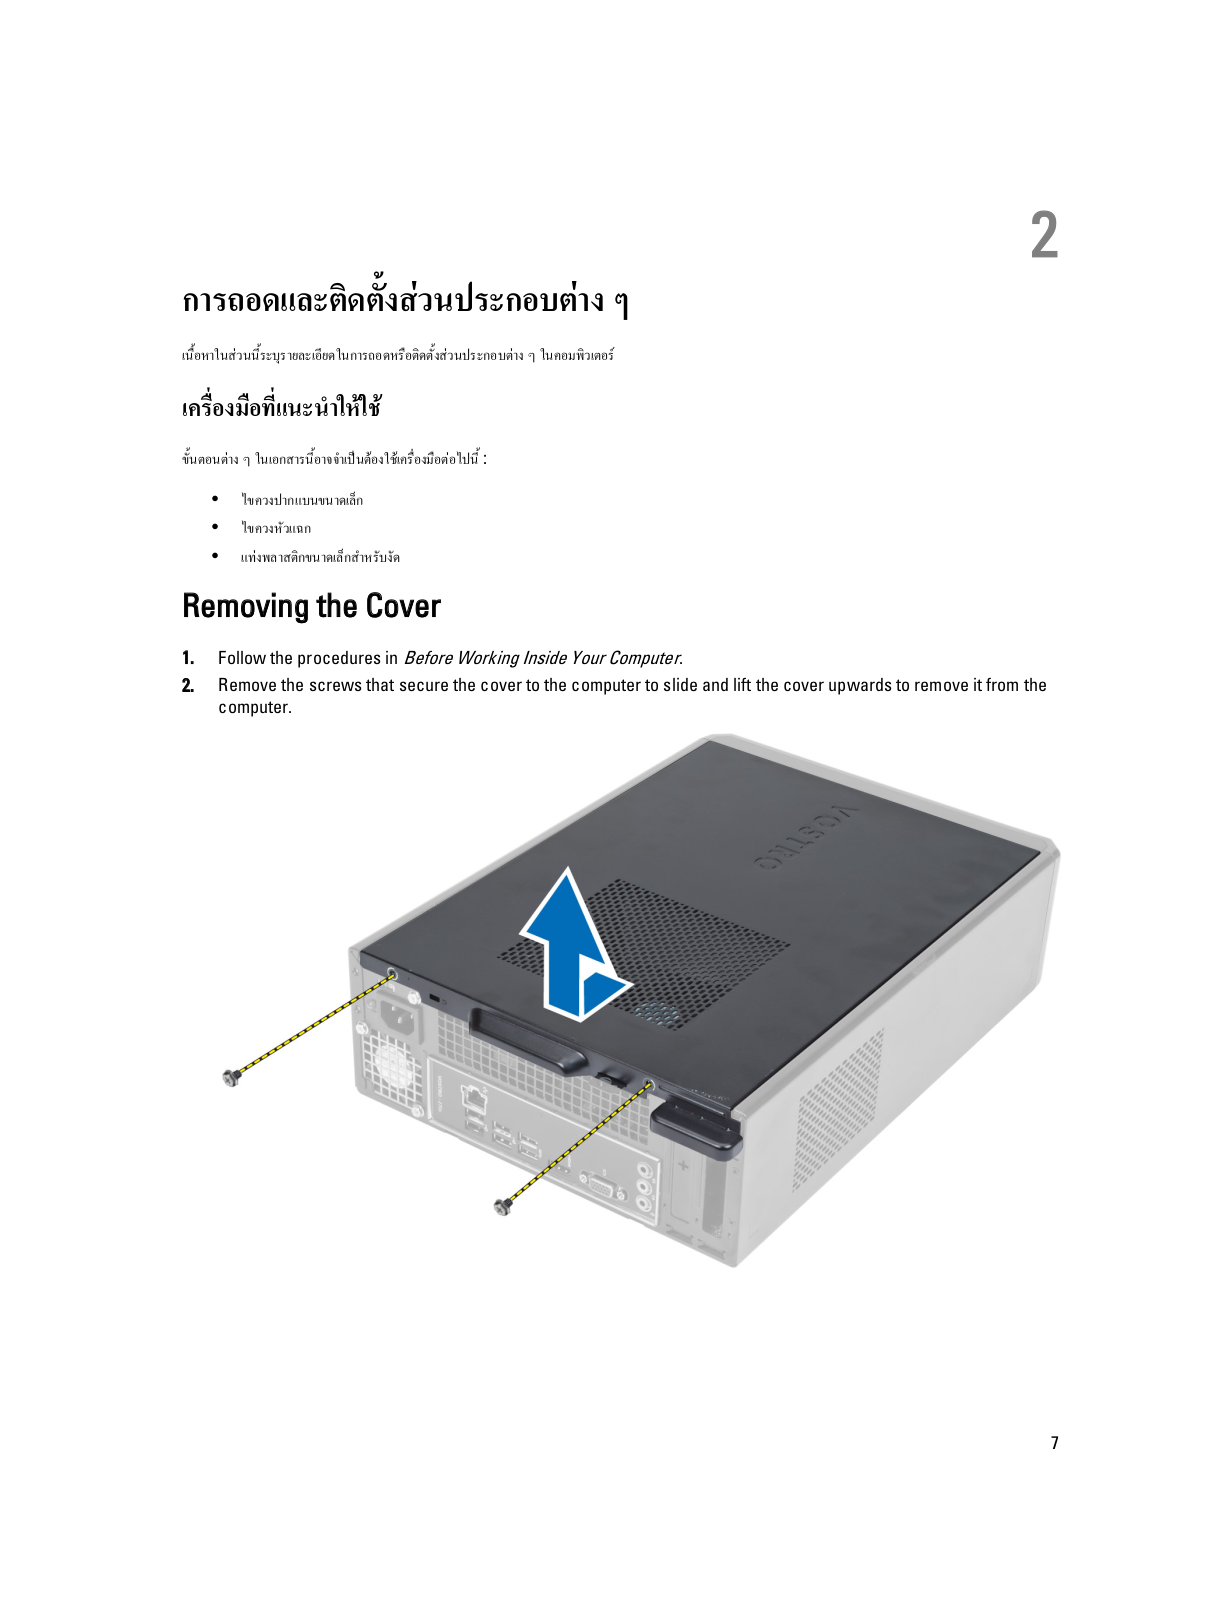
Removing the Cover

1.Follow the procedures in Before Working Inside Your Computer.

2.Remove the screws that secure the cover to the computer to slide and lift the cover upwards to remove it from the computer.

7

Installing the Cover

1.Align the cover along its tabs on the chassis and slide the cover to its original position.

2.Tighten the screws to secure the cover to the computer.

3.Follow the procedures in After Working Inside Your Computer.

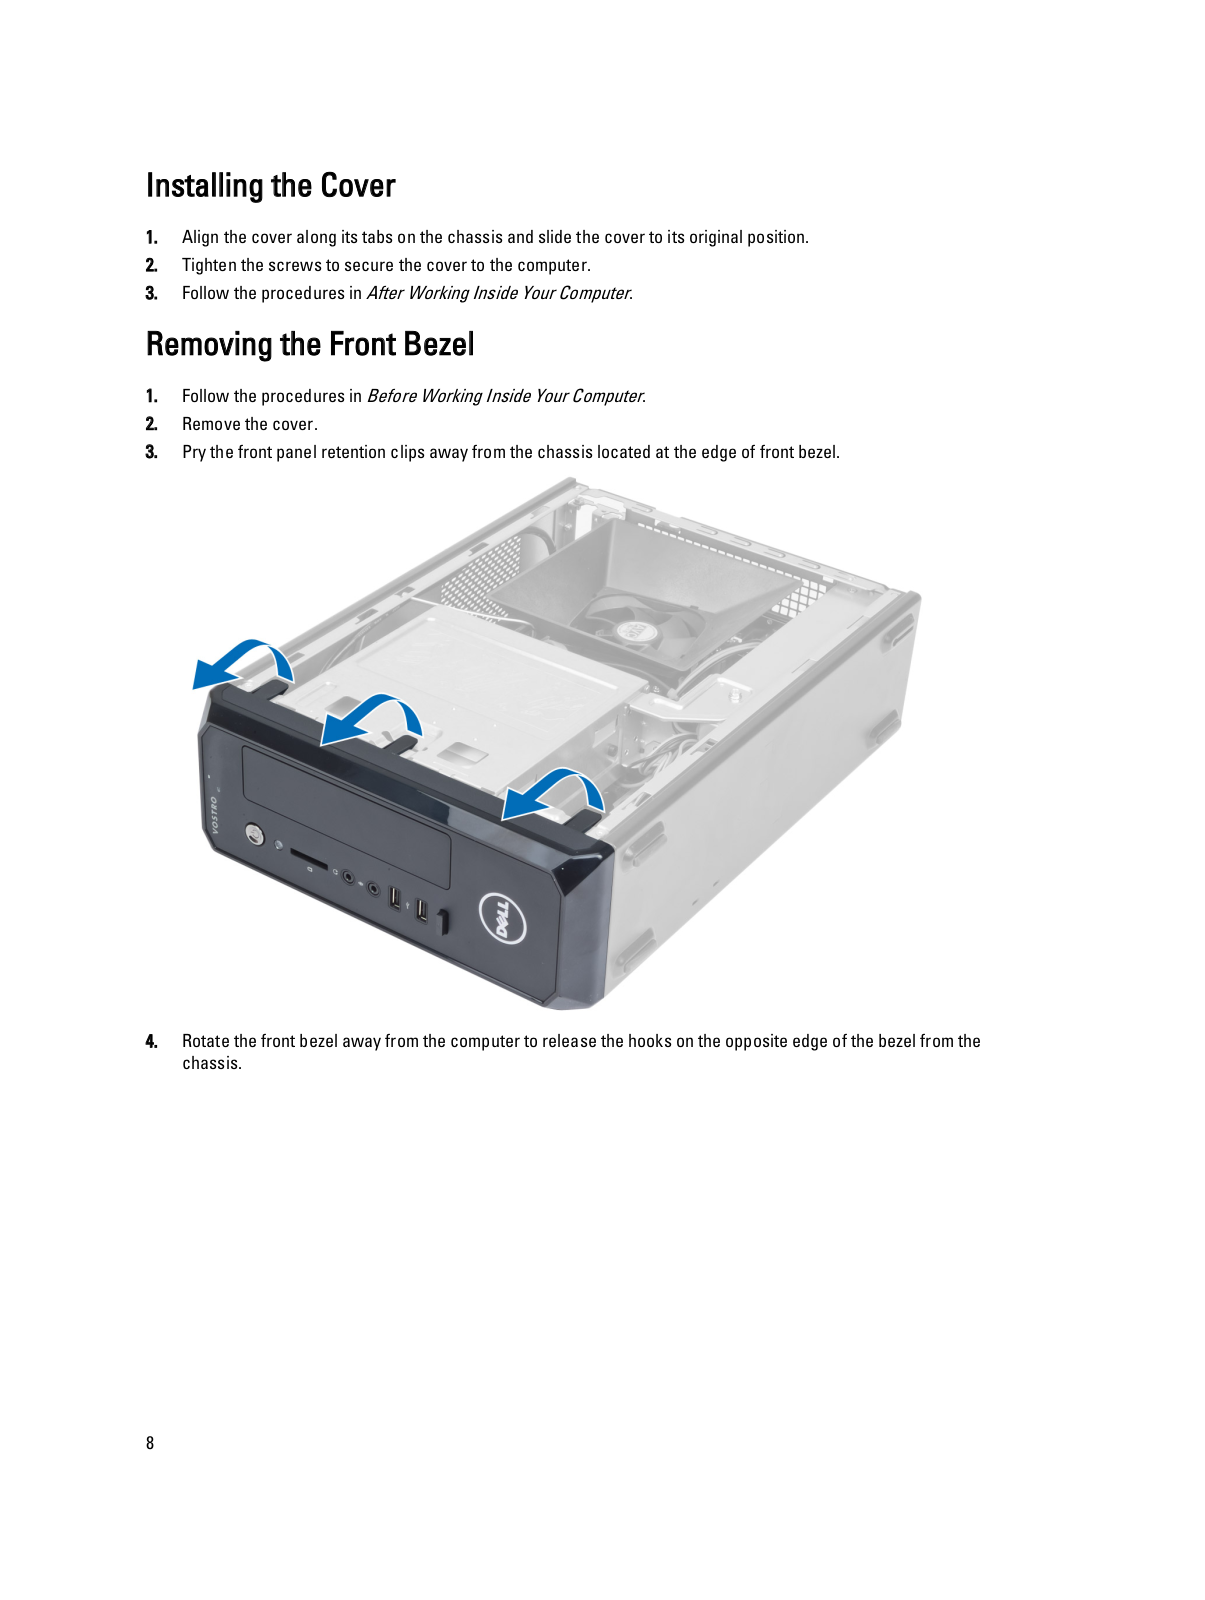
Removing the Front Bezel

1.Follow the procedures in Before Working Inside Your Computer.

2.Remove the cover.

3.Pry the front panel retention clips away from the chassis located at the edge of front bezel.

4.Rotate the front bezel away from the computer to release the hooks on the opposite edge of the bezel from the chassis.

8

Installing the Front Bezel

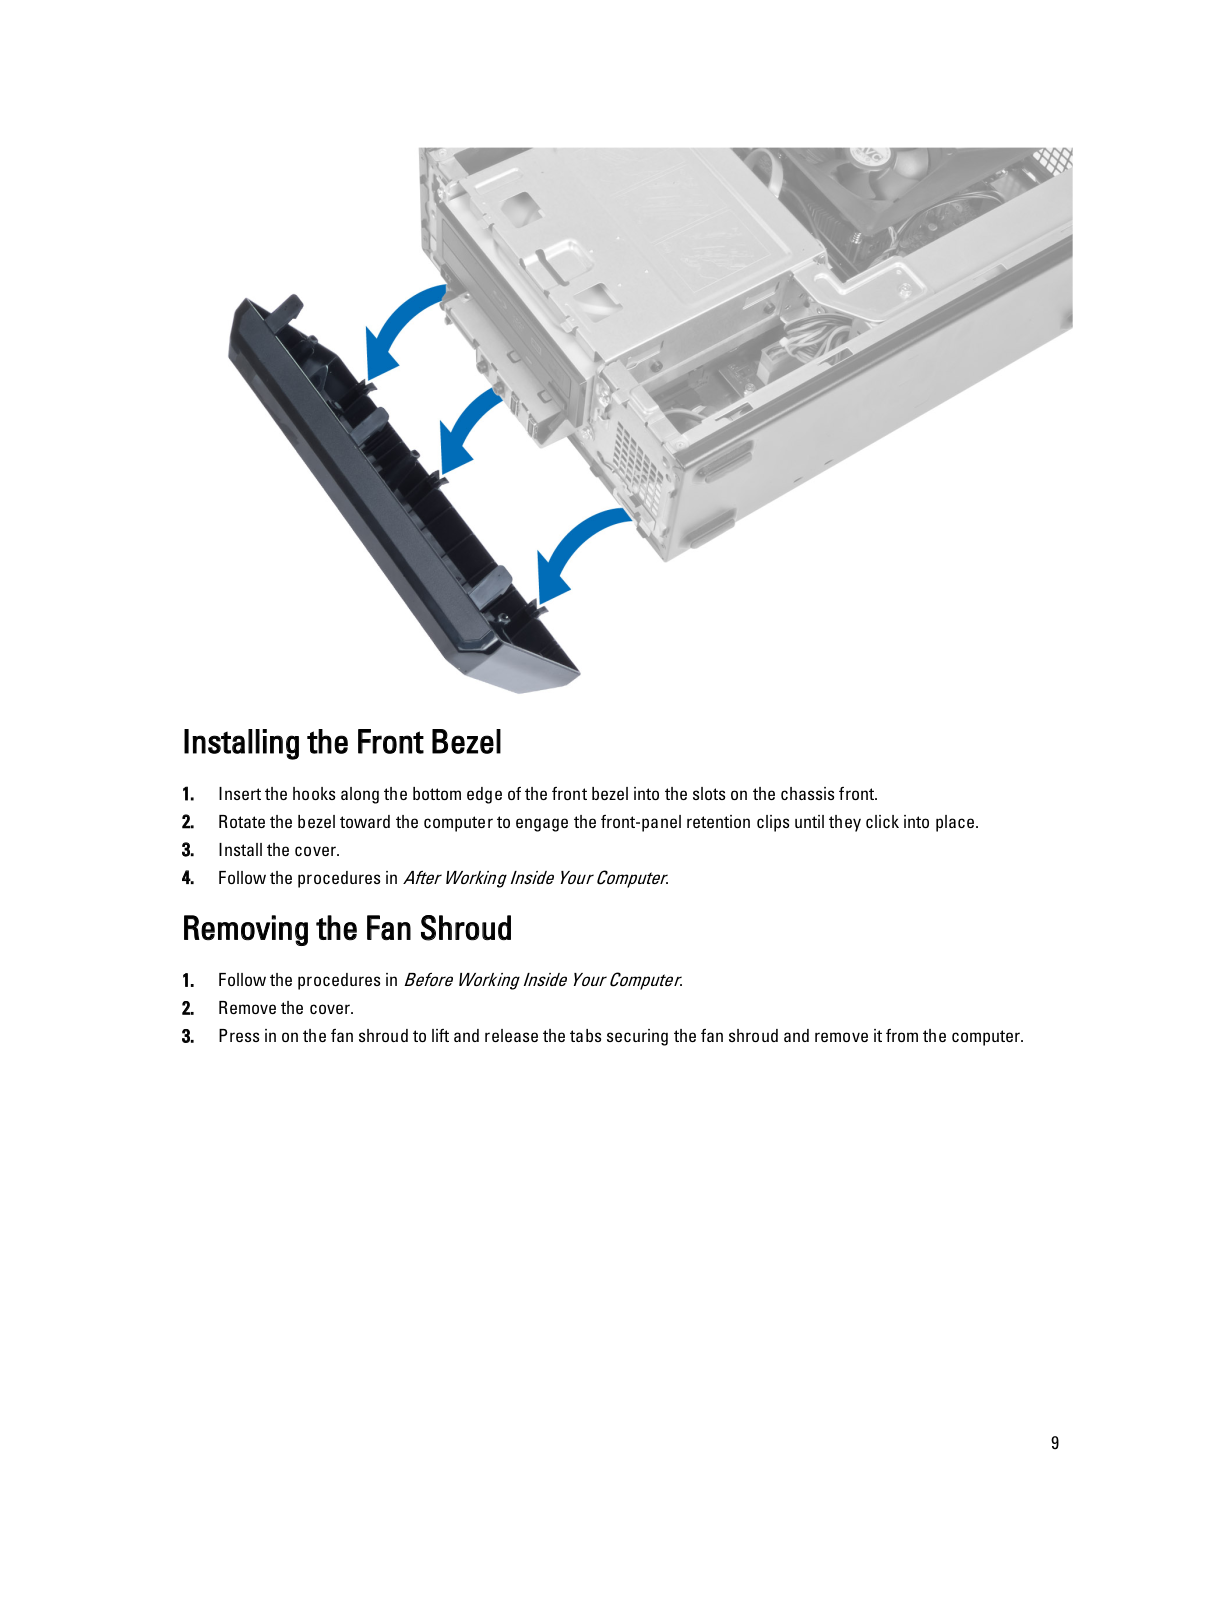
1.Insert the hooks along the bottom edge of the front bezel into the slots on the chassis front.

2.Rotate the bezel toward the computer to engage the front-panel retention clips until they click into place.

3.Install the cover.

4.Follow the procedures in After Working Inside Your Computer.

Removing the Fan Shroud

1.Follow the procedures in Before Working Inside Your Computer.

2.Remove the cover.

3.Press in on the fan shroud to lift and release the tabs securing the fan shroud and remove it from the computer.

9

Installing the Fan Shroud

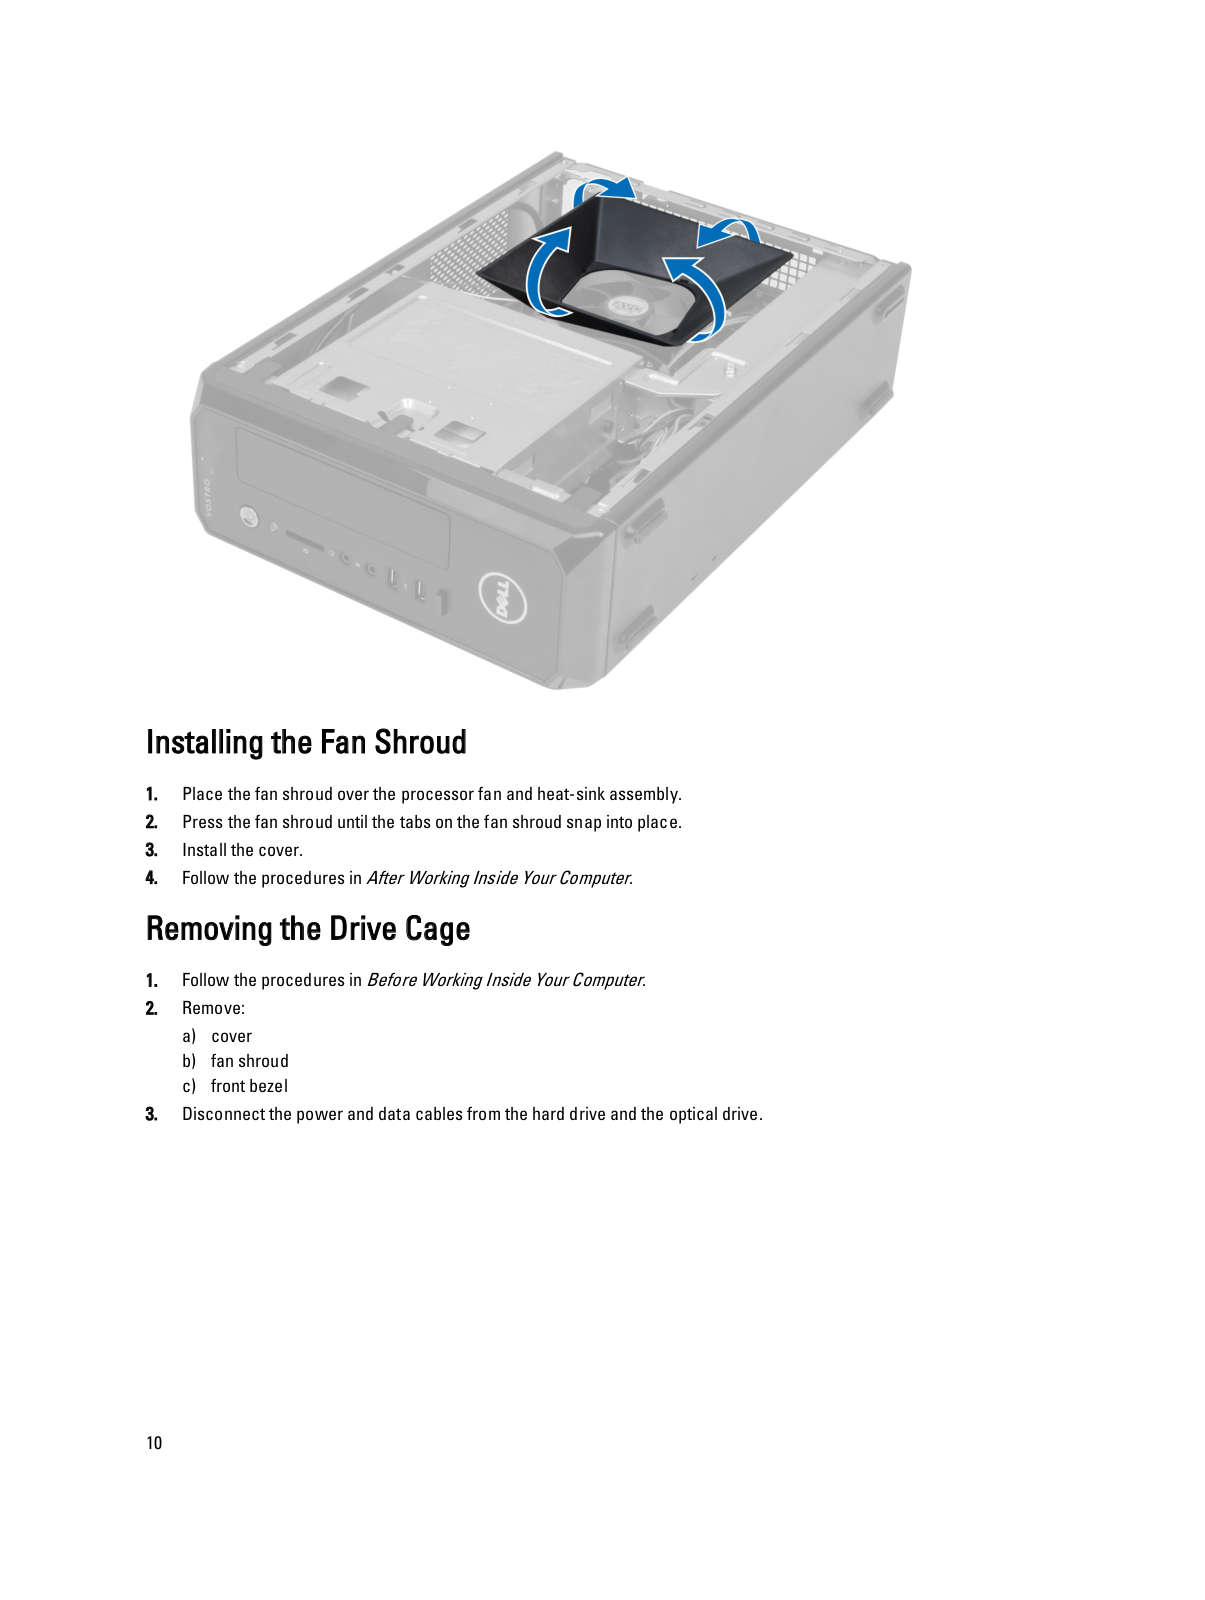
1.Place the fan shroud over the processor fan and heat-sink assembly.

2.Press the fan shroud until the tabs on the fan shroud snap into place.

3.Install the cover.

4.Follow the procedures in After Working Inside Your Computer.

Removing the Drive Cage

1.Follow the procedures in Before Working Inside Your Computer.

2.Remove:

a)cover

b)fan shroud

c)front bezel

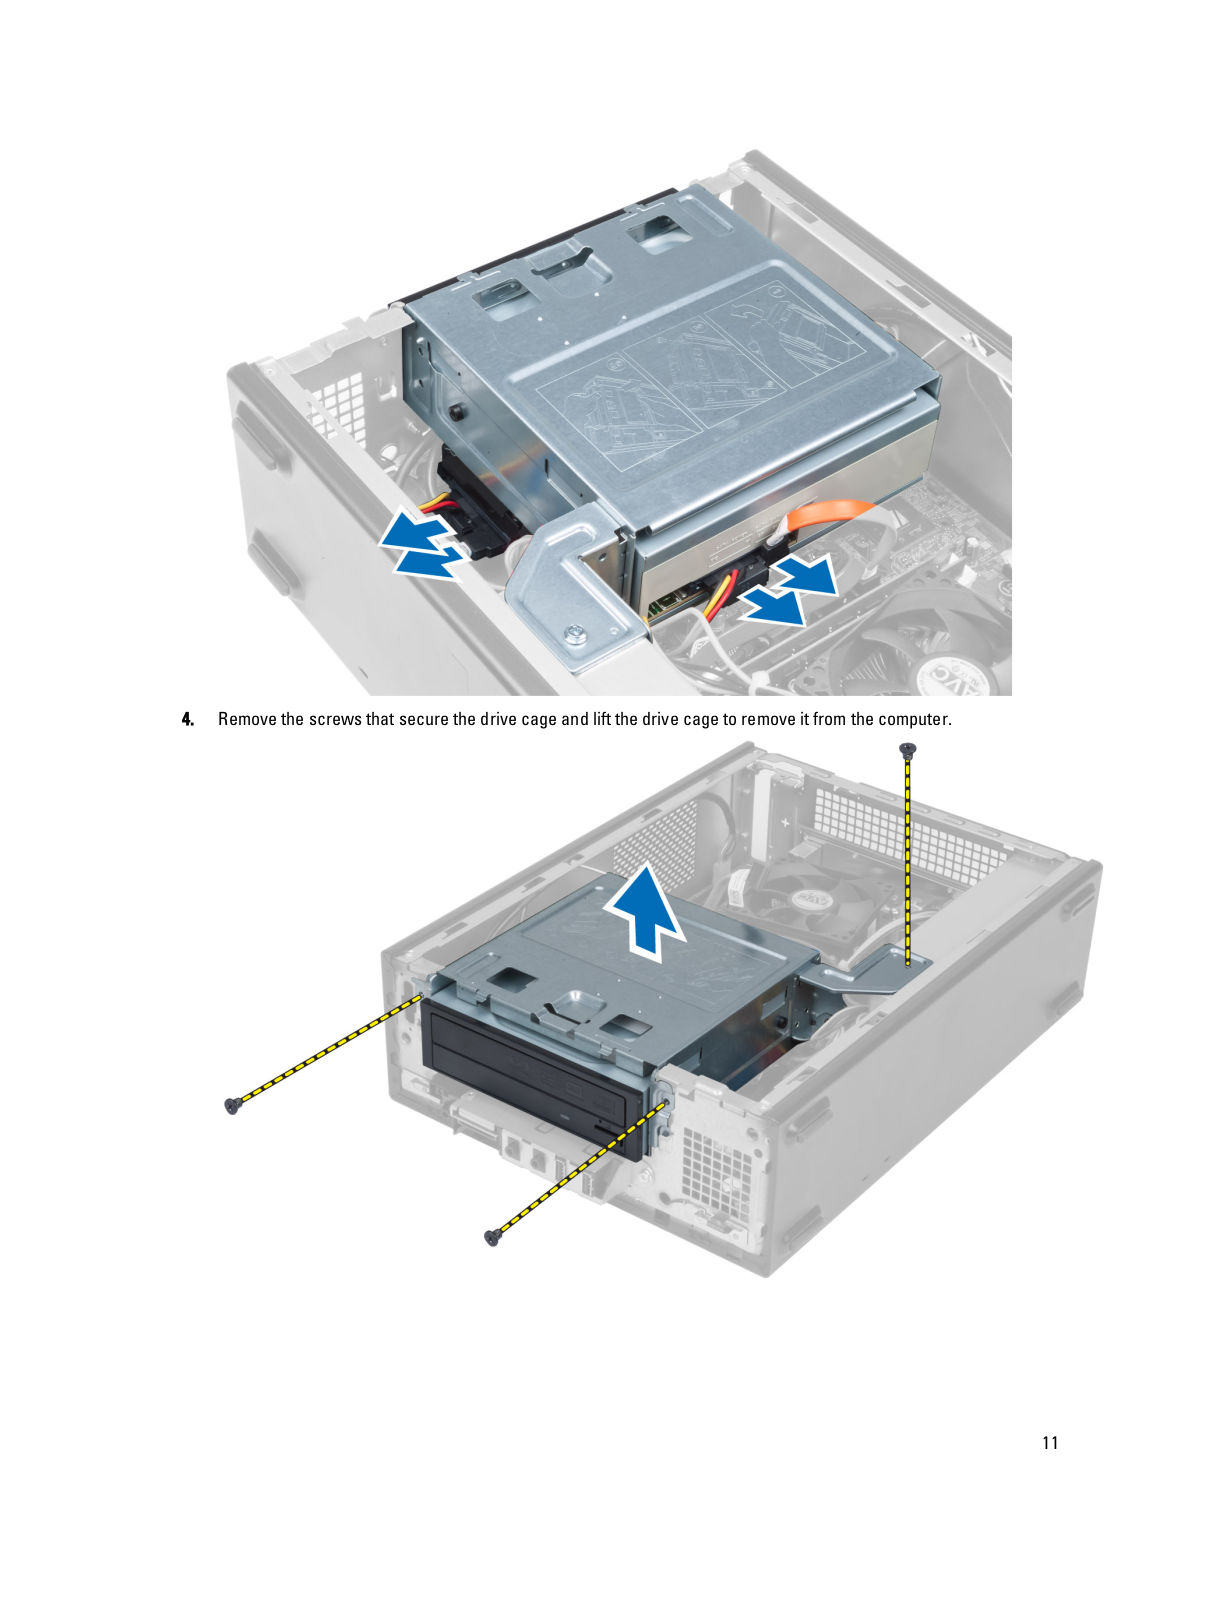
3.Disconnect the power and data cables from the hard drive and the optical drive.

10

Dell Vostro 270s Owner's Manual

4.Remove the screws that secure the drive cage and lift the drive cage to remove it from the computer.

11

Installing the Drive Cage

1.Tighten the screws to secure the drive cage to the computer.

2.Connect the data cable and power cable to the back of the hard drive and the optical drive.

3.Install:

a)front bezel

b)fan shroud

c)cover

4.Follow the procedures in After Working Inside Your Computer.

Removing the Optical Drive

1.Follow the procedures in Before Working Inside Your Computer.

2.Remove:

a)cover

b)fan shroud

c)front bezel

d)drive cage

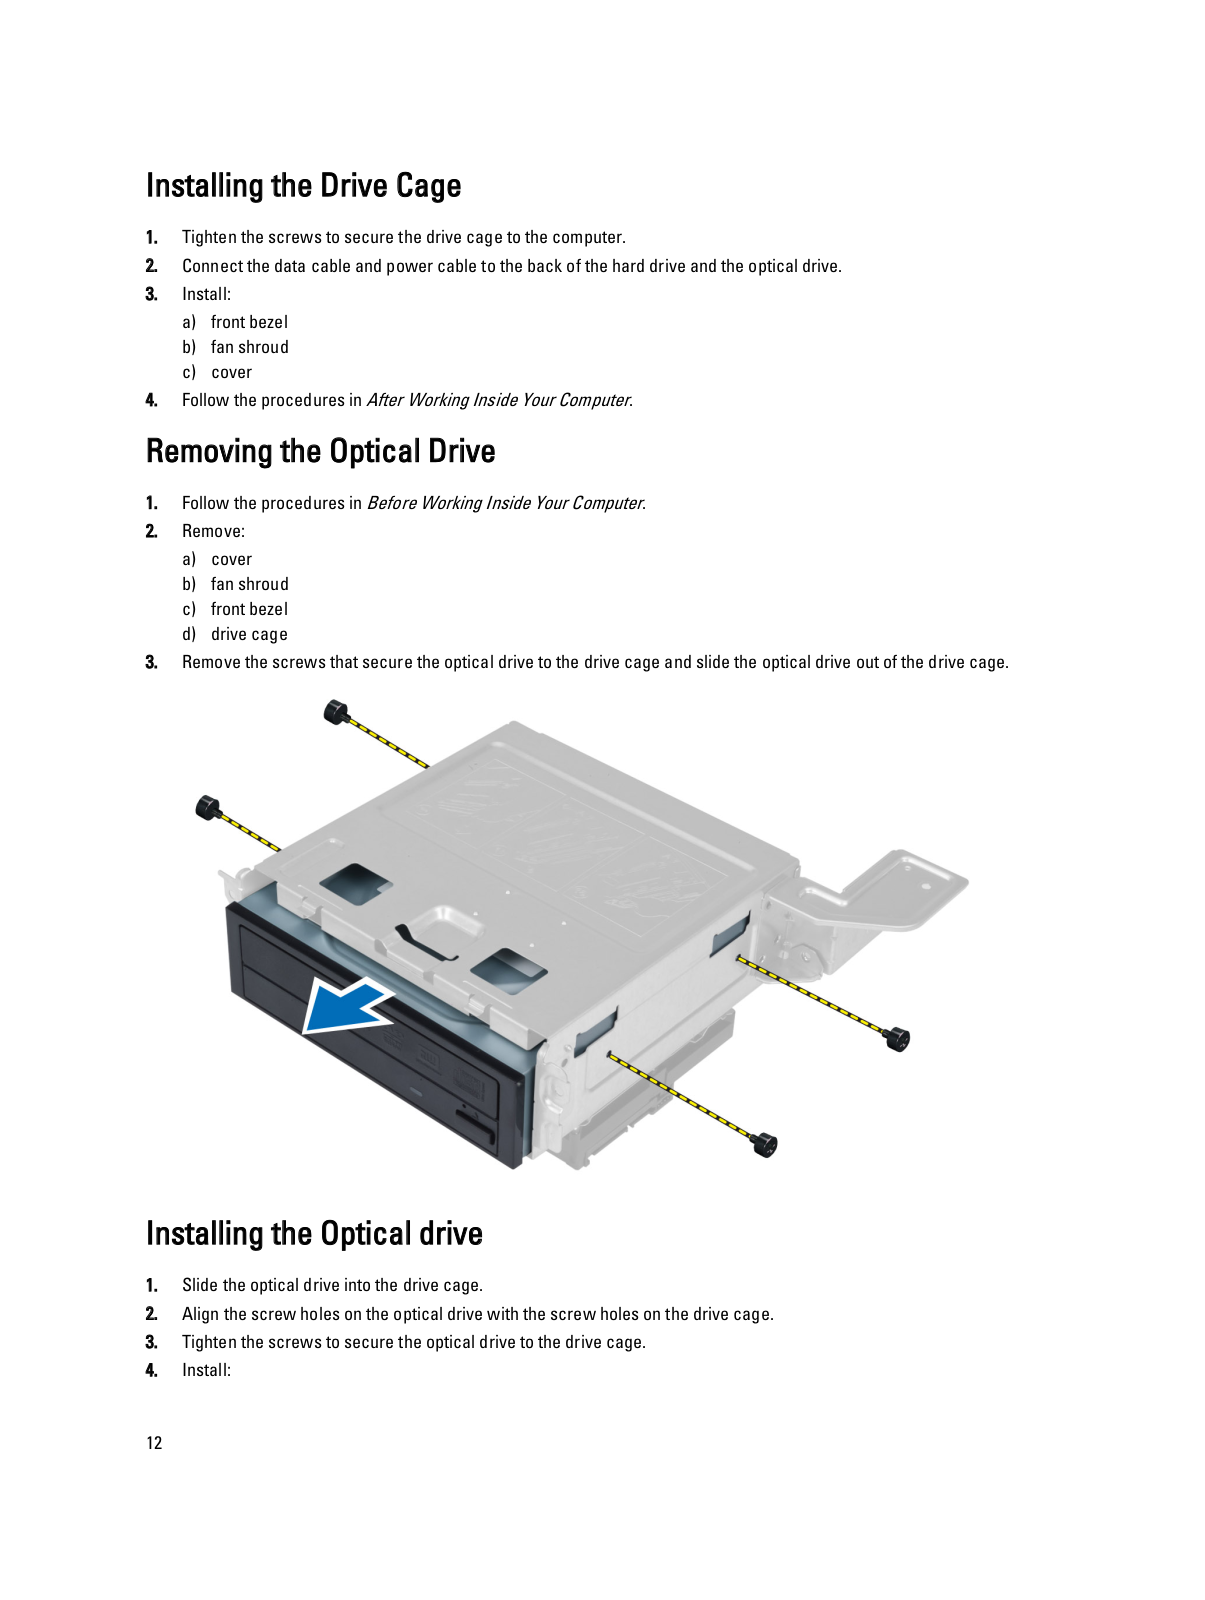
3.Remove the screws that secure the optical drive to the drive cage and slide the optical drive out of the drive cage.

Installing the Optical drive

1.Slide the optical drive into the drive cage.

2.Align the screw holes on the optical drive with the screw holes on the drive cage.

3.Tighten the screws to secure the optical drive to the drive cage.

4.Install:

12

a)drive cage

b)front bezel

c)fan shroud

d)cover

5.Follow the procedures in After Working Inside Your Computer.

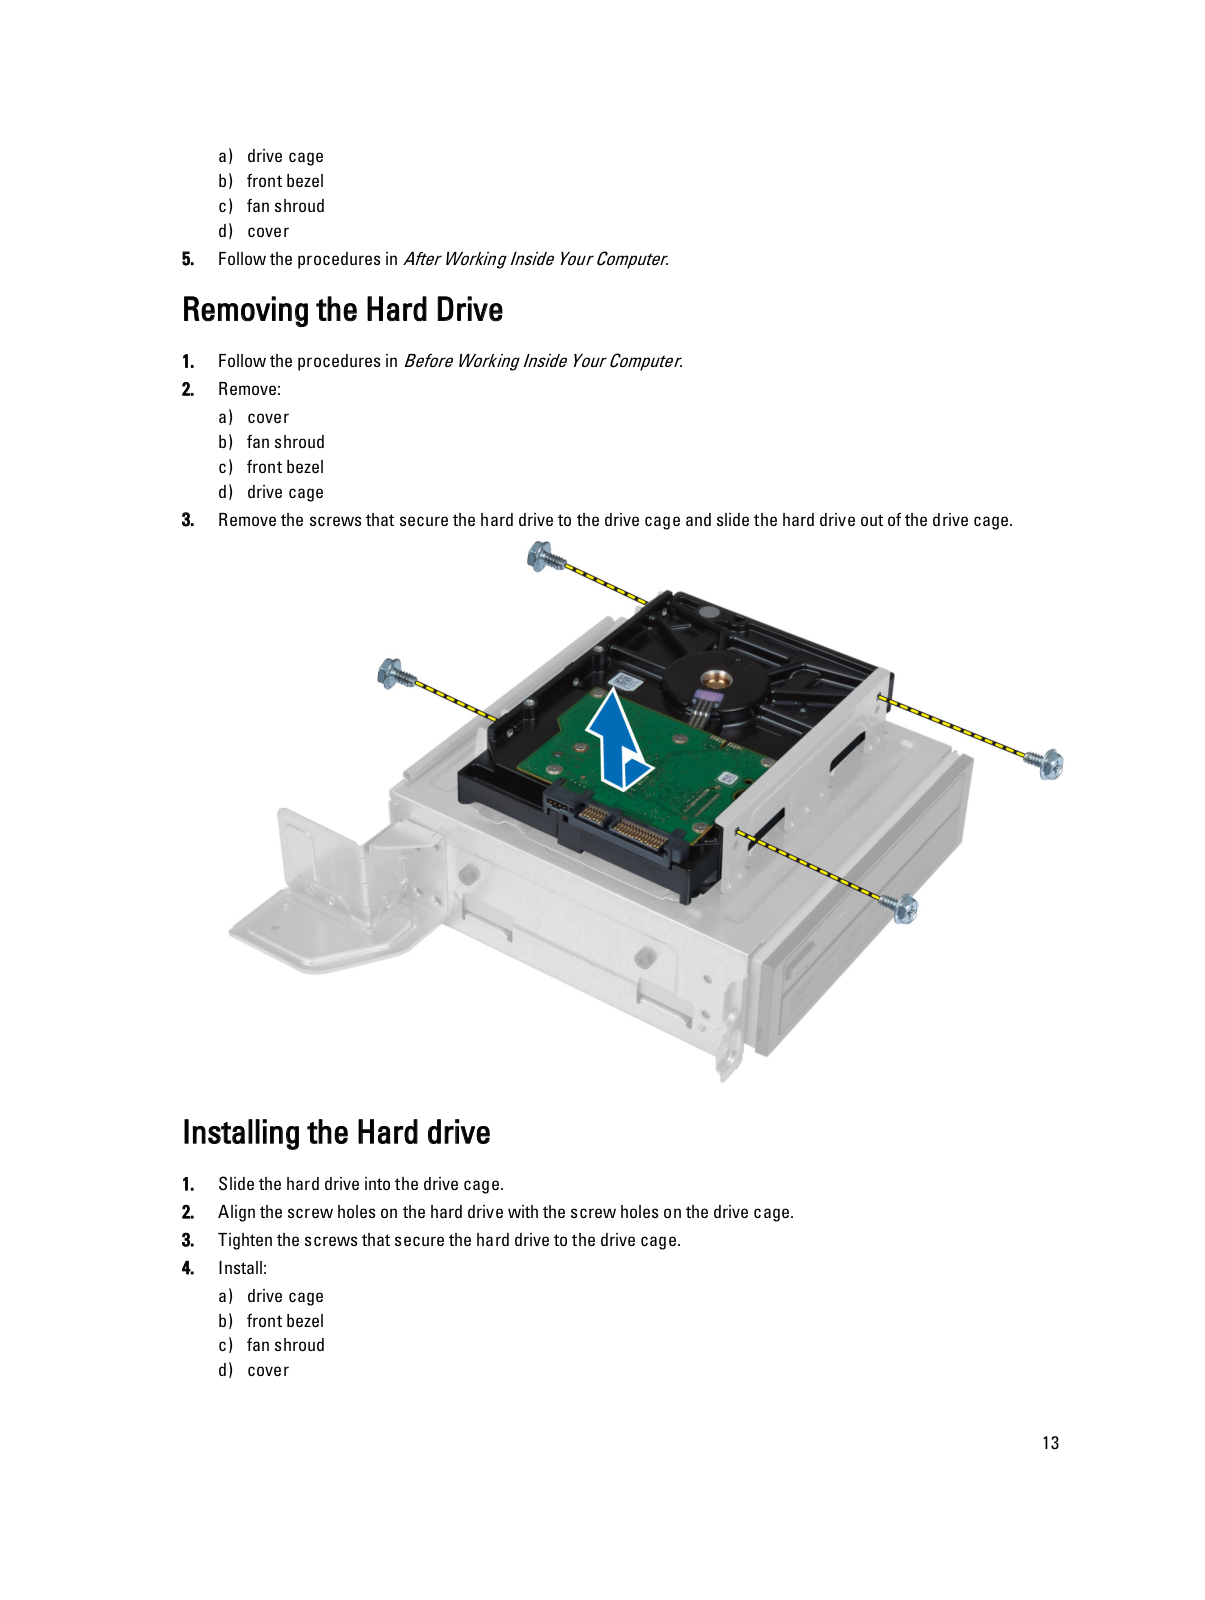
Removing the Hard Drive

1.Follow the procedures in Before Working Inside Your Computer.

2.Remove:

a)cover

b)fan shroud

c)front bezel

d)drive cage

3.Remove the screws that secure the hard drive to the drive cage and slide the hard drive out of the drive cage.

Installing the Hard drive

1.Slide the hard drive into the drive cage.

2.Align the screw holes on the hard drive with the screw holes on the drive cage.

3.Tighten the screws that secure the hard drive to the drive cage.

4.Install:

a)drive cage

b)front bezel

c)fan shroud

d)cover

13

Loading...
+ 28 hidden pages