

Dell PowerVault MD3060e, PowerVault MD3260, PowerVault MD3260i, PowerVault MD3660f, PowerVault MD3660i Installation And Configuration Manual
...
Dell™ PowerVault™ MD Storage A rray
®
VMware
vCenter Plug-in
Installation and Configuration Guide

Notes and Cautions
NOTE:
A NOTE indicates impo rtant information that helps you make b etter use of
your computer
CAUTION: A CAUTION indicates potential damage to hardware or loss of data if
instructions are not followed.
Information in this publication is subject to change without notice.
© 2012 Dell Inc. All rights reserved.
Reproduction of these materials in any manner whatsoever without the written permission of Dell Inc. is strictly forbidden.
Trademar ks us e d i n thi s text: Dell™, the DELL logo and PowerVault™ are trademarks of Dell Inc. Microsoft® and Windows® are either
trademarks or registered trademarks of Microsoft Corporation in the United States and/or other countries. VMware®, vCenter®, and vSphere®
are registered trademarks or trademarks of VMware, Inc. in th e U nited States or o ther countries.
Other trademarks and t r ade names may be used in this p u blication to refer to either the entities claimi ng the marks an d names or their products.
Dell Inc. disclaims any proprietary interest in trademarks and trade names other than its own.
August 2012 Rev. A06

Dell MD Storage Array vCenter Plug-in | 3
Contents
Overview..................................................................................................................................... 5
Installation Prerequisites ...................................................................................................................................... 6
Configurat ion Limitations ...................................................................................................................................... 6
Localizat ion Support ............................................................................................................................................. 6
Downloading the MD vCenter Plug-in .................................................................................................................... 6
Application Server Requirements ........................................................................................................................... 6
Before You Install the MD vCenter Plug-in ............................................................................................................. 7
Installing the MD vCenter Plug-in .......................................................................................................................... 8
Configuring the Application Server and MD vCenter Plug-in .................................................... 9
Configuring Storage Administrator Roles ............................................................................................................... 10
Adding an Existing User to the Storage Administrator Role .................................................................................... 12
Configuring SAS Support on ESX and ESXi Hosts ................................................................................................... 13
Installing the SAS Provider Upgrade ..................................................................................................................... 14
MD vCenter Plug-in Security ................................................................................................................................ 16
MD vCenter Plu g -in Features ................................................................................................... 21
MD vCenter Plug-in Features ............................................................................................................................... 21
Configuring Storage Arrays .................................................................................................................................. 21
Adding a Storage Array ....................................................................................................................................... 22
Removing a Storage Array ................................................................................................................................... 23
Editing System Properties .................................................................................................................................... 23
Storage Array Configuration Backup ..................................................................................................................... 23

Dell MD Storage Array vCenter Plug-in | 4
ESX/ESXi Host SAN Configuration ........................................................................................... 27
Networking Configuration for Fibre Channel and iSCSI Storage (ESX/ESXi 4.x only) ................................................ 31
ESX/ESXi Host Configuration Wizard ...................................................................................... 35
Storage Array Summary ...................................................................................................................................... 39
Create Disk Group ............................................................................................................................................... 41
Formatting Virtual Disks ...................................................................................................................................... 42
Decision-making Schemes ................................................................................................................................... 43
Creating a Virtual Disk ......................................................................................................................................... 44
Snapshots Premium Feature ................................................................................................................................ 44
Creating a Virtual Disk Copy ................................................................................................................................ 46
Remote Repli cation ............................................................................................................................................. 48
Mapping a Virtual Disk ......................................................................................................................................... 51
Datastores View .................................................................................................................................................. 53
Storage Array Event Log ...................................................................................................................................... 54
Manually Unregistering the MD vCenter Plug-in ..................................................................................................... 55
Troubleshooting MD vCenter Plug-in Issues ........................................................................... 57
Application Server Logs ....................................................................................................................................... 57
I Receive an Error When Attempting to Register the vCenter Plug-in ...................................................................... 57
I Cannot Communicate with the Application Server ............................................................................................... 58
I Cannot Create or Delete Objects ........................................................................................................................ 58
How Can I Maximize Client Performance............................................................................................................... 58
How Do I Suppress Slow Script Warning Messages ............................................................................................... 58
Why Can I Not Make Changes to the Storage Array? ............................................................................................. 58
The MD vCenter Plug-in Does Not Show the New Storage Array Name
after a Clear Configuration Operation in MDSM ..................................................................................................... 58
Getting Help ............................................................................................................................. 62
Contacting Dell ................................................................................................................................................... 62

Dell MD Storage Array vCenter Plug-in | 5
1
Overview
The Dell™ PowerVault™ MD Storage Array vCenter Plug-in allows integrated management of Dell MDseries storage arrays from a VMware
®
vSphere™ client. Enabling a single vSphere-based management
interface eliminates the need to instal l, maintain and learn to use proprietary storage array-based
management tools.
Using the MD vCenter Plug-in, an administrator can:
»
configure ESX/ESXi hosts to connect to MD storage arrays and
»
create, map and delete virtual disks,
»
view the vCenter datastores available to Dell MD storage array virtual disks, and
»
create snapshots, virtual disk copies, and remote replication between arrays (if premium features
activated).
The MD vCenter Plug-in uses an application server interface between the vSphere Client and MD storage
array and fully supports role-based user authentication.
NOTE:
The MD vCenter Plug-in requires that a vCe nter S erver b e ins talled withi n the environm ent . The
MD vCenter Plug-in do es not fu nctio n in a vSphe re clie nt and ESX/ESXi host-only configuration.
Figure 1. MD vCenter Plug-in a VMwar e Environment

Dell MD Storage Array vCenter Plug-in | 6
Installation Prerequisites
The MD vCenter Plug-in requires the following:
•
VMware vC enter Server 4.1 or 5.0 (installed on host server)
•
One of the following servers operating systems to host t he application server:
• Windows 2003 Server with Service Pack 2
• Windows 2003 R2 Server
• Windows 2008 R2 Server (32 or 64 bit)
•
Make sure your MD storage has the latest RAID controller firmware version installed.
For information on installing the co r r ect MD-series firmware version for your specific storage array, see
the MD-Series Support Matrix at
support.dell.com
.
Configuration Limitations
The number of managed storage arrays, number of virtual disks, and number of physical disks on each storage
array impact the overall performance of the MD vCenter Plug-in. Therefore, limit the number of managed
system components u nder the MD vCenter Plug-in to no more than:
•
35 Dell MD-series storage arrays
•
256 objects per storage array (such as virtual disks, virtual disk copies, and snapshots)
•
16 remote replications
Localization Support
The MD vCenter Plug-in supports the following language sets:
•
English
•
French
•
German
•
Japanese
•
Simplified Chinese
Logs, Warnings and Error Messages
On-screen logs, warnings and error messages support the language sets shown above. However, any messages or log
files written to the file system are English only.
Downloading the MD vCenter Plug-in
From the application server, download the latest version of the MD vCenter Plug-in from the Download and
Drivers page at
support.dell.com
by selecting your specific MD storage array model. See the MD-Series
Support Matrix at
support.dell.com/manuals
for information on supported firmware levels, operating system
versions and other supported hardware components.
NOTE:
If you cannot access
support.dell.com
from your application server, do wnload the MD vC enter
Plug-in installer to another host, then copy the installer files to the application server. The Plug-in installer
must be run from t he app licatio n serv er its elf.
Upgrading from a Previous Vers ion
If you are upgrading from a previous vers ion of the MD vCenter Plug-in but plan to use the same host server as
the application server, run the latest installer on the curr en t application server. The installation wizard will
prompt for an administr a t or pas sword before unregistering and upgrading your MD vCenter Plug-in version.

Dell MD Storage Array vCenter Plug-in | 7
Application Server Requirements
The Windows-based application server configured with vCenter Client should be installed on a separate server
installation than the one running vCenter Server. While it is possible to install the app lication server and
vCenter Server on the same host, it is not recommended.
Before You Install the MD vCenter Plug-in
Before installing the MD vCenter Plug-in, you need to know some specific information about your storage
array and network configuration. The following table shows the information you will need.
Table 2. Storage Array and Netw ork Information
Gather this information about your specific environment before installing the MD vCenter P lug -in:
Component
Information Needed
vCenter Server
Host Name:
DNS Names:
IP Addresses:
vCenter Administrator
Storage Administrator
Username:
Password:
Username:
Password:
Application Server
Host Name:
DNS Names:
IP Addresses:
MD Storage Array
Array Name:
Password:
IP Addresses:
MD Storage Array
Array Name:
Password:
IP Addresses:

Dell MD Storage Array vCenter Plug-in | 8
Installing the MD vCenter Plug-in
NOTE:
The MD vCenter Plug-in must b e install ed on the app licatio n se rver. If you do wnload ed the
installer package to a different location, copy the installer files to th e application server before p erforming
the steps s hown h ere.
From the application server:
1
Launch the MD vCenter Plug-in installer and review the introduction screens. When complete, click
Next
.
2
Read and accept the license agreement. Click
Next
.
3
Select an installation directory on the application server, or accept the default location.
4
Review the installation summary and click
Install
.
5
When prompted, either change the port number of the Jetty server or accept the defaults (
8084
and
8081
)
and click
Next
.
NOTE:
If the MD vCenter Pl ug-in will b e inst alled on the sam e syst em as a n a ctiv e vC en ter S erv er with
VMware Update Manager installed, port number
8084
must b e cha nged to an un used p ort n umb er.
6
Change the IP address of the application server, if desired. The default IP address shown the installer
will be the IP address of the system it is running on. Click
Next
.
7
Enter the IP address of the host containing the vCenter Server installation (see Table 1: Storage Array
and Network Configuration). Then, click
Next
.
8
If you want to enable email aler ts , e n ter the vCenter Server administrator email address and click
Next
.
NOTE:
The MD vCenter Plug-in does not requi re a domain or domain controller configuration. Wh en
installing the Plug-in, do not qualify your administrator user name with an alias (for example, localhost).
If you specify a full y quali fied p athn ame, us e the host name instea d (fo r example, hostname/username).
9
Enter the vCenter Server administrator user ID, then click
Next
.
10
Enter the vCenter Server administrator password, then click
Next
.
11
When the installation completes, click
Done
to close the installation wiz a r d.
The installation automatically installs a Jetty application ser ver and associated
.jar
files on your
application server and registers th e MD vCenter Plug-in with the vCenter Server.
Dell MD Storage Array vCenter Plug-in | 9
2
Configuring the Application Server and
MD vCenter Plug-in
Once the application ser ver and MD vCenter Plug-in are installed, verify that the MD vCenter Plug-in is
successfully registered with the vCenter server:
•
Open the vSphere Client
•
From the vSphere Client menu bar, select
Plug-ins > Manage Plug-ins
•
The Dell MD Storage Array vCenter Plug-in should be listed as
Enabled
If the MD vCenter Plug-in is listed as disabled with an error me ssage indicating that it cannot communicate
with the application server, verify the port number defined for the Jetty server is enabled to pass through any
firewalls in use. The default Jet t y TCP port numbers are
8084
and
8081
.
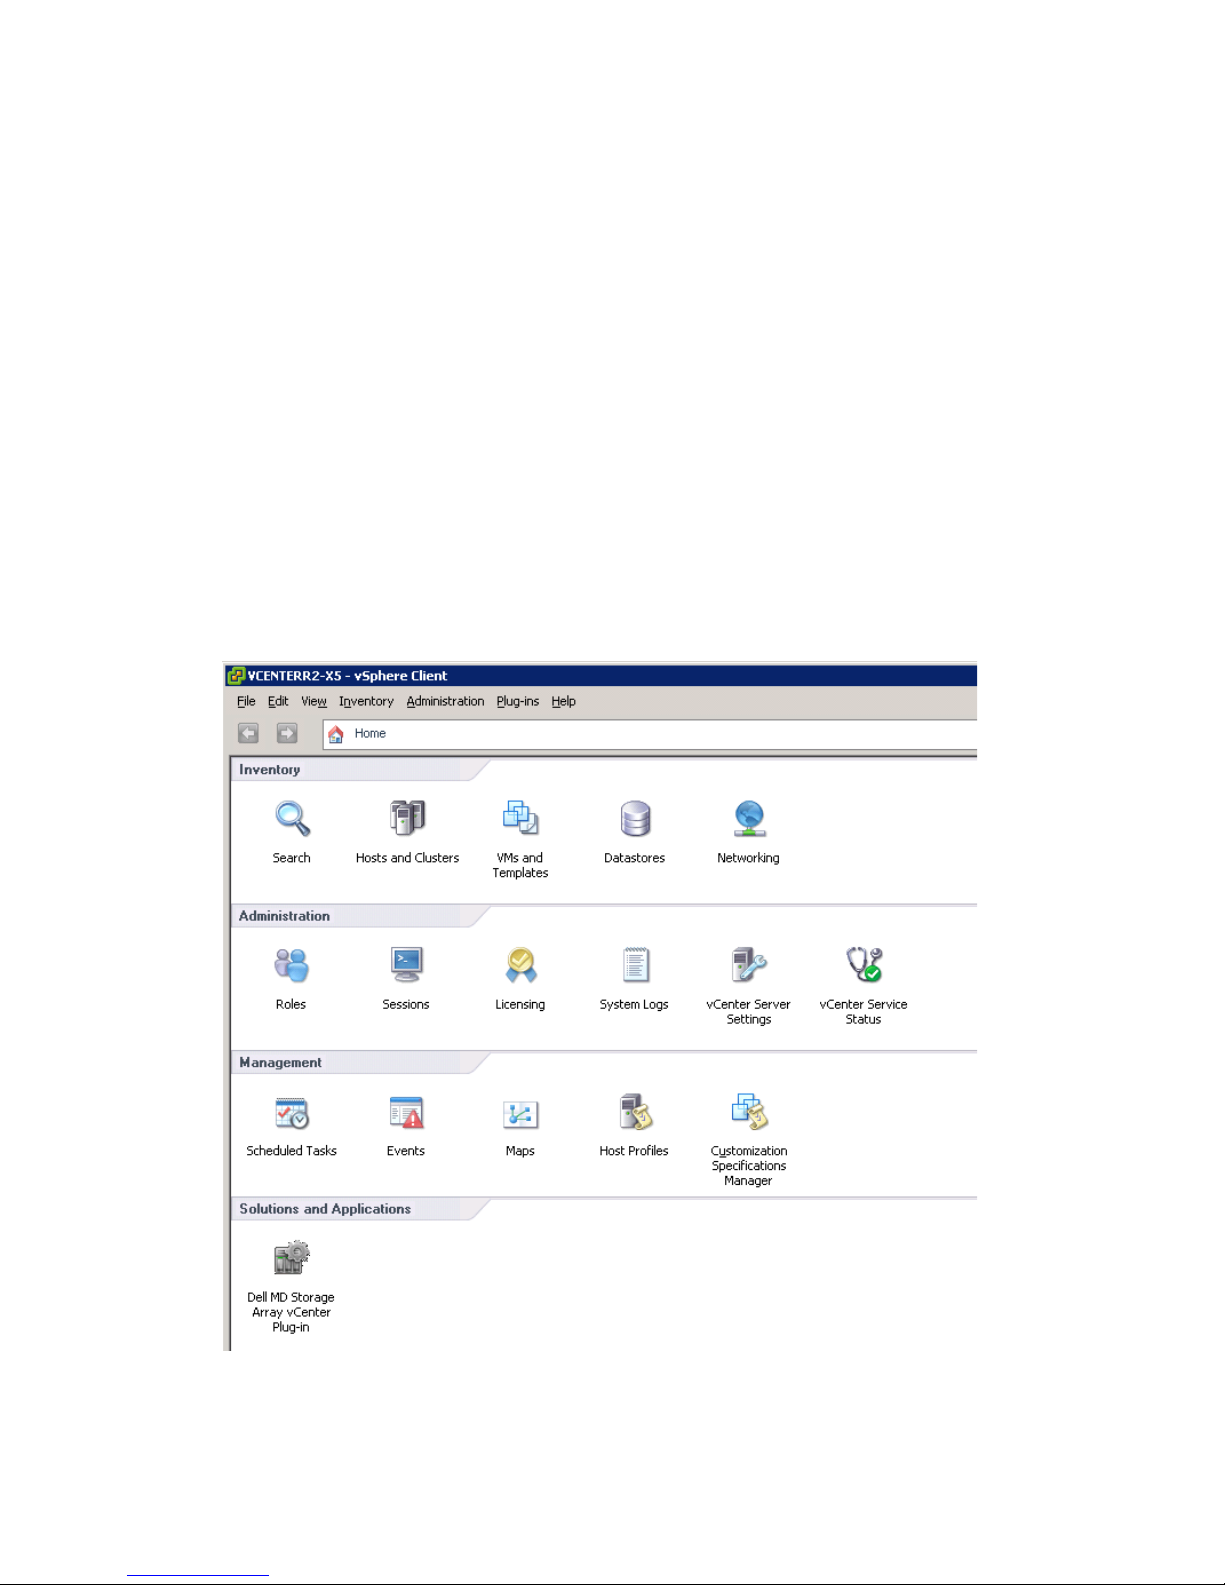
The MD vCenter plug-in icon should also appear in the Solution and Application section of the vSphere Client
home page.
Figure 2. vSphere Client H ome Page
Dell MD Storage Array vCenter Plug-in | 10
Configuring Storage Administrator Roles
By default, any previously defined vCenter users will have no access to MD storage arrays. To create either
read or read/write permi s s ions to the storage arrays via the MD vCenter Plug-in, the user’s role must be
modified.
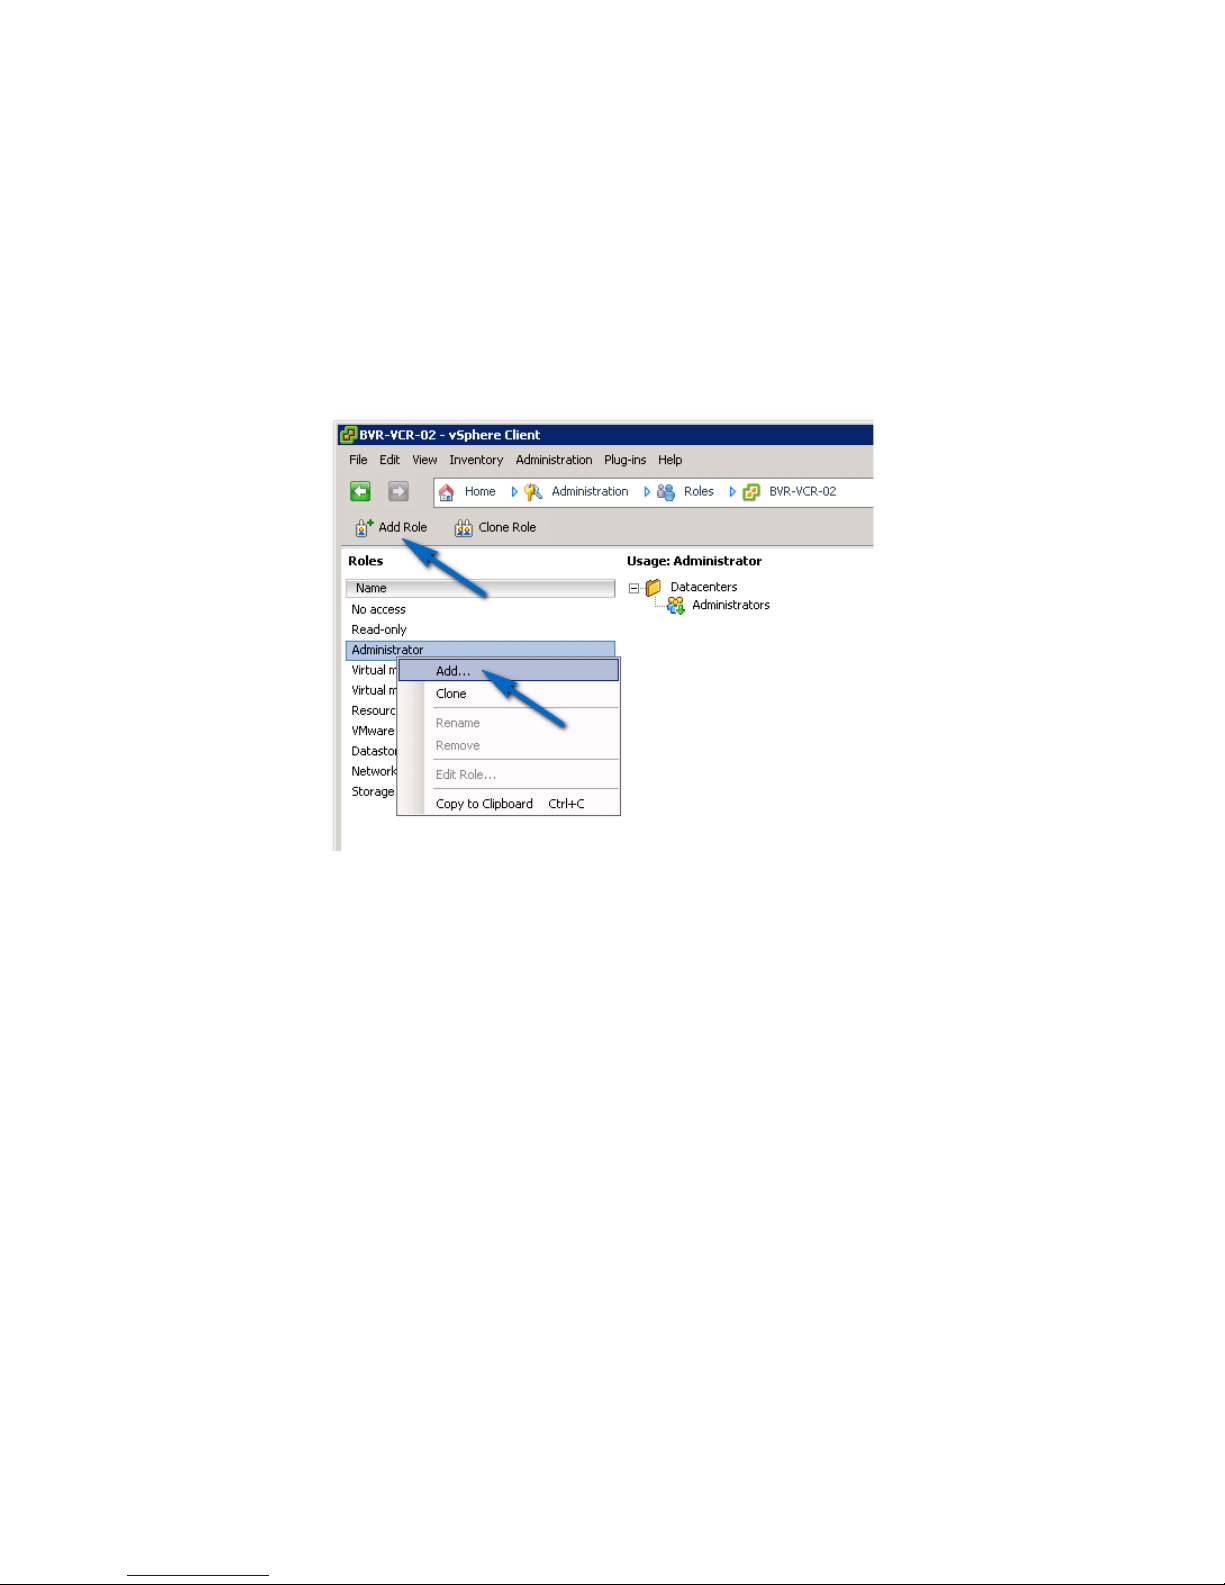
Creating a Storage Administrator Role
1
In the
Administration
area on the vSphere Client home page, click
Roles
.
A list of roles and usages appears.
Figure 3. MD vCenter Plug-in Roles List
2
Click the
Add Role
icon in the menu bar, or right-click and select
Add
from the pop-up menu.
The
Add New Role
window opens.

Dell MD Storage Array vCenter Plug-in | 11
Figure 4. Add New Role
3
In the
Name
text box, enter a name for the new role.
4
From the
Privileges
list, select the access permissions you want to assign to this role.
NOTE:
An administrator role is not editable. Therefore, if the administrator user will be used to manage
storage, a new role must be created and all necessary privileges add ed to that role. The administrator
user must then be added to this role, as d esc rib ed i n th e nex t se ctio n.
5
To assign Read Only or Read Write access permissions to the storage arrays, select the appropriate
permission.
6
When finished, click OK.
NOTE:
Existing non-administrator roles may be modified to include the new Storage Administrator
privileges created. However, an existing administrator role cannot be modified.
Dell MD Storage Array vCenter Plug-in | 12
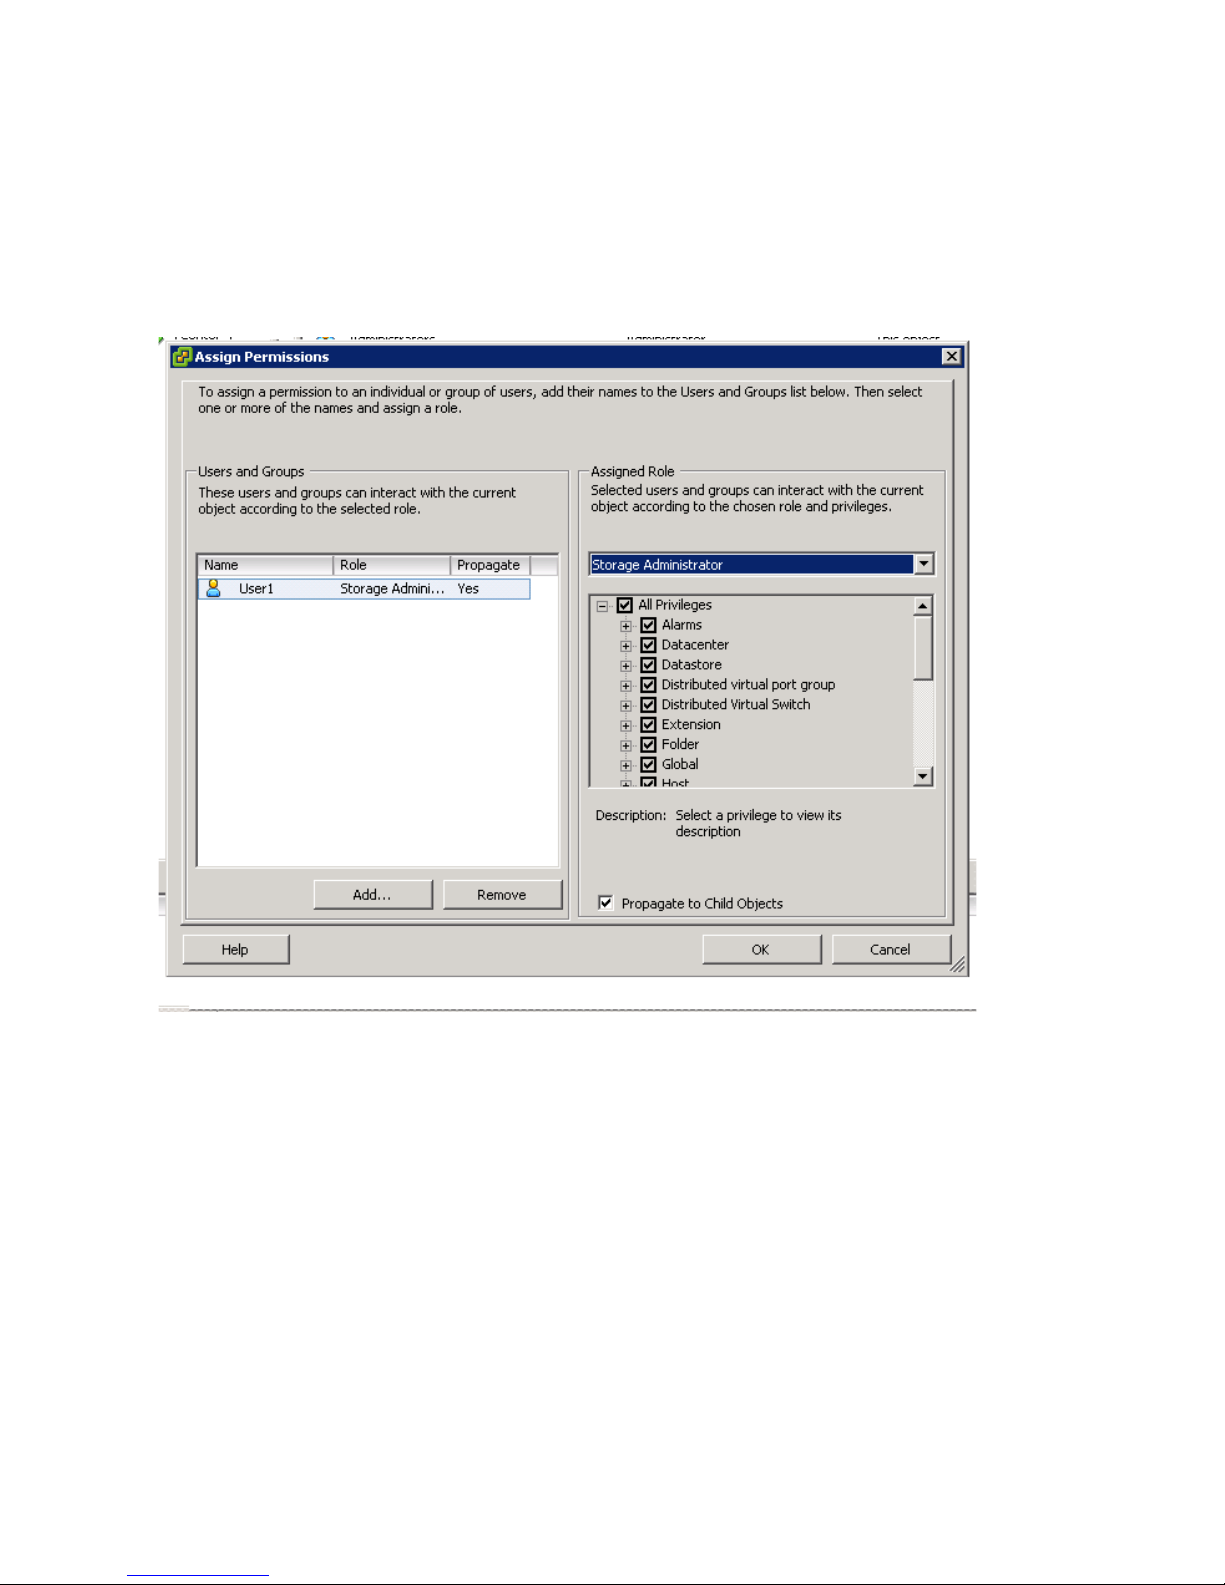
Adding an Existing User to the Storage Administrator Role
Use these steps to add existing users to the Storage Administrator role you created previously.
1
From the
Inventory
area on the vSphere Client home screen, select
Hosts and Clusters
.
2
Select the vCenter Server element and click the
Permissions
tab.
3
Right-click and select
Add Permission
to add users to the role.
Figure 5. Assign Sto ra ge Administrator Role
4
Click
Add
to select the users need access to the storage arrays.
5
Select the role you want to assign them from the drop-down box under
Assigned Role
.
6
Click OK to apply the permissions.
Dell MD Storage Array vCenter Plug-in | 13
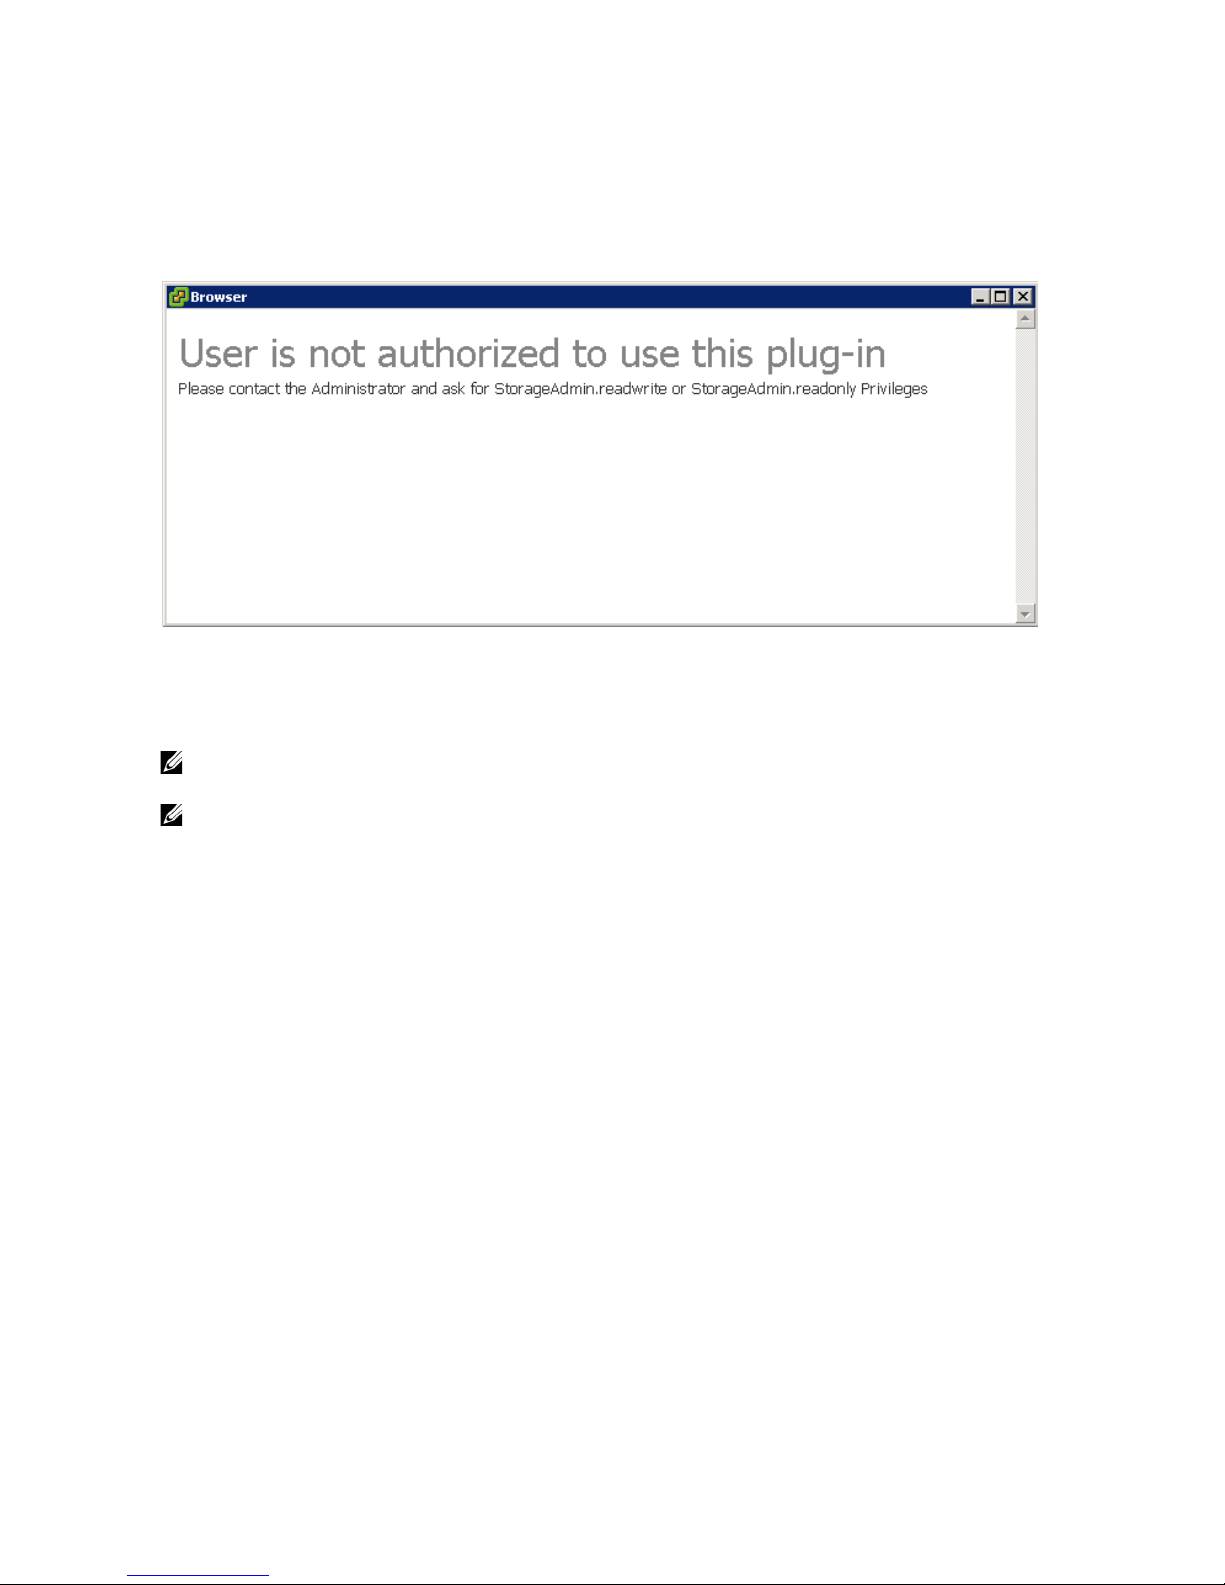
No Access
If users who are not members of a role with either Read Only or Read Wri te Storage Administrator permission
attempt to access the MD vCenter Plug-in, they will receive a
User is not authorized to use this plu g -in
message (shown below).
Figure 6. No Access Message
Configuring SAS Support on ESX and ESXi Hosts
To configure the MD vCenter Plug-in for ESX or ESXi hosts connecting to SAS-based Dell M D storage arrays,
the SAS SMI-S provider must be upgraded on the host.
NOTE:
SAS is supported only on ESX/ESXi 4.1 or later hosts. P revi ous ESX/ESXi versions do not support
SAS-based storage array connections.
NOTE: This upgrade is only required to allow the Host to Storage Configuration option for
configuring SAS-connected storage arrays. If the storage arrays are already configured or
are no t SAS-connected , the in-box provider does not need to be upgraded.
SAS Support Host Requirements
To use the SAS provider, it must first be deployed on the ESX/ESXi-based servers. This requires enabling
either Secure File Transfer Protocol (SFTP) or Secure Copy (SCP) on the ESX/ESXi host. To install the SAS
SMI-S Provider upgra de pac kage, root access is requi red. To install the upgrade package using remote login,
either create a new user with host login privileges or enable remote logins for the root user. The different
options are described below (note that the steps for enabling root login are different between ESX and ESXi
hosts).
To create a new user login with host privileges (ESX and ESXi):
1
Connect the vCenter Client directly to the ESX/ESXi host you are configuring.
2
From the
Home > Inventory > Inventory
window, select the
User and Groups
tab.
3
Select a user, then right-click and select
Add
.
4
Enter the required user information and selec t
Grant shell access to this user
.
5
Click OK to save changes.
6
Log in as the new user, then run the
su -
command to assume the super-user role.
To enable root login from a host console (ESX only):
Use these steps to enable root login from an ESX host. If you are using an ESXi host, see the following section.
1
Log in as root.
2
Open the /etc/ssh/sshd_config file.
3
On the line that contains
PermitRootLogin
, change no to
yes
.
4
Save and close the file.
Dell MD Storage Array vCenter Plug-in | 14
5
At a shell prompt, run the following command to reload the service:
# service sshd restart
To enable root login from a host console (ESXi only):
Use these steps to enable root login from an ESXi host. If you are using an ESX host, see the following section.
1
Press the F2 key to switch to open the configuration menu.
2
Select
Troubleshooting Options
.
3
Select
Enable Remote Tech Support
.
4
Select
Restart Mana gement Agent s
.
5
Press the Esc key to close the
Configuration
menu.
Installing the SAS Provider Upgrade
This section contains two separate sets of steps for installing the SAS provider upgrade, depending on whether
you are configur ing an ESX or ESXi host.
Installing the SAS Provider on ESX 4.1
1
Use either SFTP or SCP to copy the
vmware-esx4.1-SAS-provider.vib
file to your target ESX hos t.
2
Log in to the ESX 4.1 host as root.
NOTE:
If root is not enabled, log in a s a shell-enabled user and run the
su
command to assume super-
user role.
3
From the shell prom pt, enter
vmware -v
to verify the ESX version as 4.1.
NOTE:
If root is not enabled, log in as a shell-enabled user. Then, enter the su command to assume
super-user role.
4
Enter
rpm -q lsi-provider
.
The version listed is
lsi-provider-410.04.V0.24-140815
.
5
Enter the following command, all on the same command line:
esxupdate -b file:/vmware-esx4.1-SAS-provider.vib --nodeps --nosigcheck -maintenancemode update
NOTE:
The
esxupdate
command shown above assumes that the
.vib
file located in the / dir ectory. If it
is not, precede the command with the location of th e
.vib
file.
The following messages should appear:
Unpacking cross_lsi-provider ...
Installing lsi-provider ...
Cleaning up lsi-provider ...
6
When the installation is complete, run the following command:
esxupdate --vib-view query | grep lsi-provider
The following messages should appear:
cross_lsi-provider_410.04.V0.24-260249 pending,installed
cross_lsi-provider_410.04.V0.24-140815 retired
7
Stop any running VMs.
8
Reboot the host.
9
When the host reboot is complete, run the
rpm -q lsi-provider
command to verify that the upgrade
was successfully appli ed.

Dell MD Storage Array vCenter Plug-in | 15
Installing the SAS Provider on ESXi 4.1
1
Run SCP to copy the
vmware-esx4.1-SAS-provider.vib
file to your target ESXi host.
2
Log in to the ESXi 4.1 host as root.
NOTE:
If root is not enabled, enable it temporarily for this installation.
3
From the shell prompt, enter
vmware -v
to verify the ESXi version.
4
Enter the following command, all on the same command line:
esxupdate -b file:/vmware-esx4.1-SAS-provider.vib –nodeps --nosigcheck -maintenancemode update
NOTE:
The
esxupdate
command above assumes that the
.vib
file located in the / directory. If it is not,
precede the command with the location of the
.vib
file.
The following messages should appear:
Unpacking cross_lsi-provider ...
Installing lsi-provider ...
Cleaning up lsi-provider ...
5
When the installation is complete, run the following command:
esxupdate --vib-view query | grep lsi-provider
The following messages should appear:
cross_lsi-provider_410.04.V0.24-260249 pending,installed
cross_lsi-provider_410.04.V0.24-140815 retired
6
Stop any running VMs.
7
Reboot the host.
8
When the host reboot is complete, run the
esxupdate --vib-view query | grep lsi-provider
command to verify that the upgrade was successfully applied.
Installing the SAS Provider on ESXi 5.0
1
Run SCP to copy the
vmware-esx5.0-SAS-provider.vib
file to your target ESXi host.
2
Log in to the ESXi 5.0 host as root.
NOTE:
If root is not enabled, enable it temporarily for this installation.
3
From the shell prompt, enter
vmware -v
to verify the ESXi version.
4
Enter the following command, all on the same command line:
esxcli software vib install -v file:/vmware-esxi5.0-SAS-provider.vib -f
--maintenance-mode
NOTE:
The
esxcli
command above assumes that the
.vib
file locat ed in th e / dir ectory. If it is no t,
precede the command with the location of the
.vib
file.
The following messages should appear:
Installation Result
Message: The update completed successfully, but the system needs to be rebooted
for the changes to be effective.
Reboot Required: true
VIBs Installed: LSI_bootbank_LsiProvider_500.04.V0.24-261033
VIBs Removed:
VIBs Skipped:
5
Stop any running VMs.
6
Reboot the host.
7
When the host reboot is complete, run the
esxcli software vib list | grep LSI
command to
verify that the upgrade was successfully applied.
Dell MD Storage Array vCenter Plug-in | 16
MD vCenter Plug-in Security
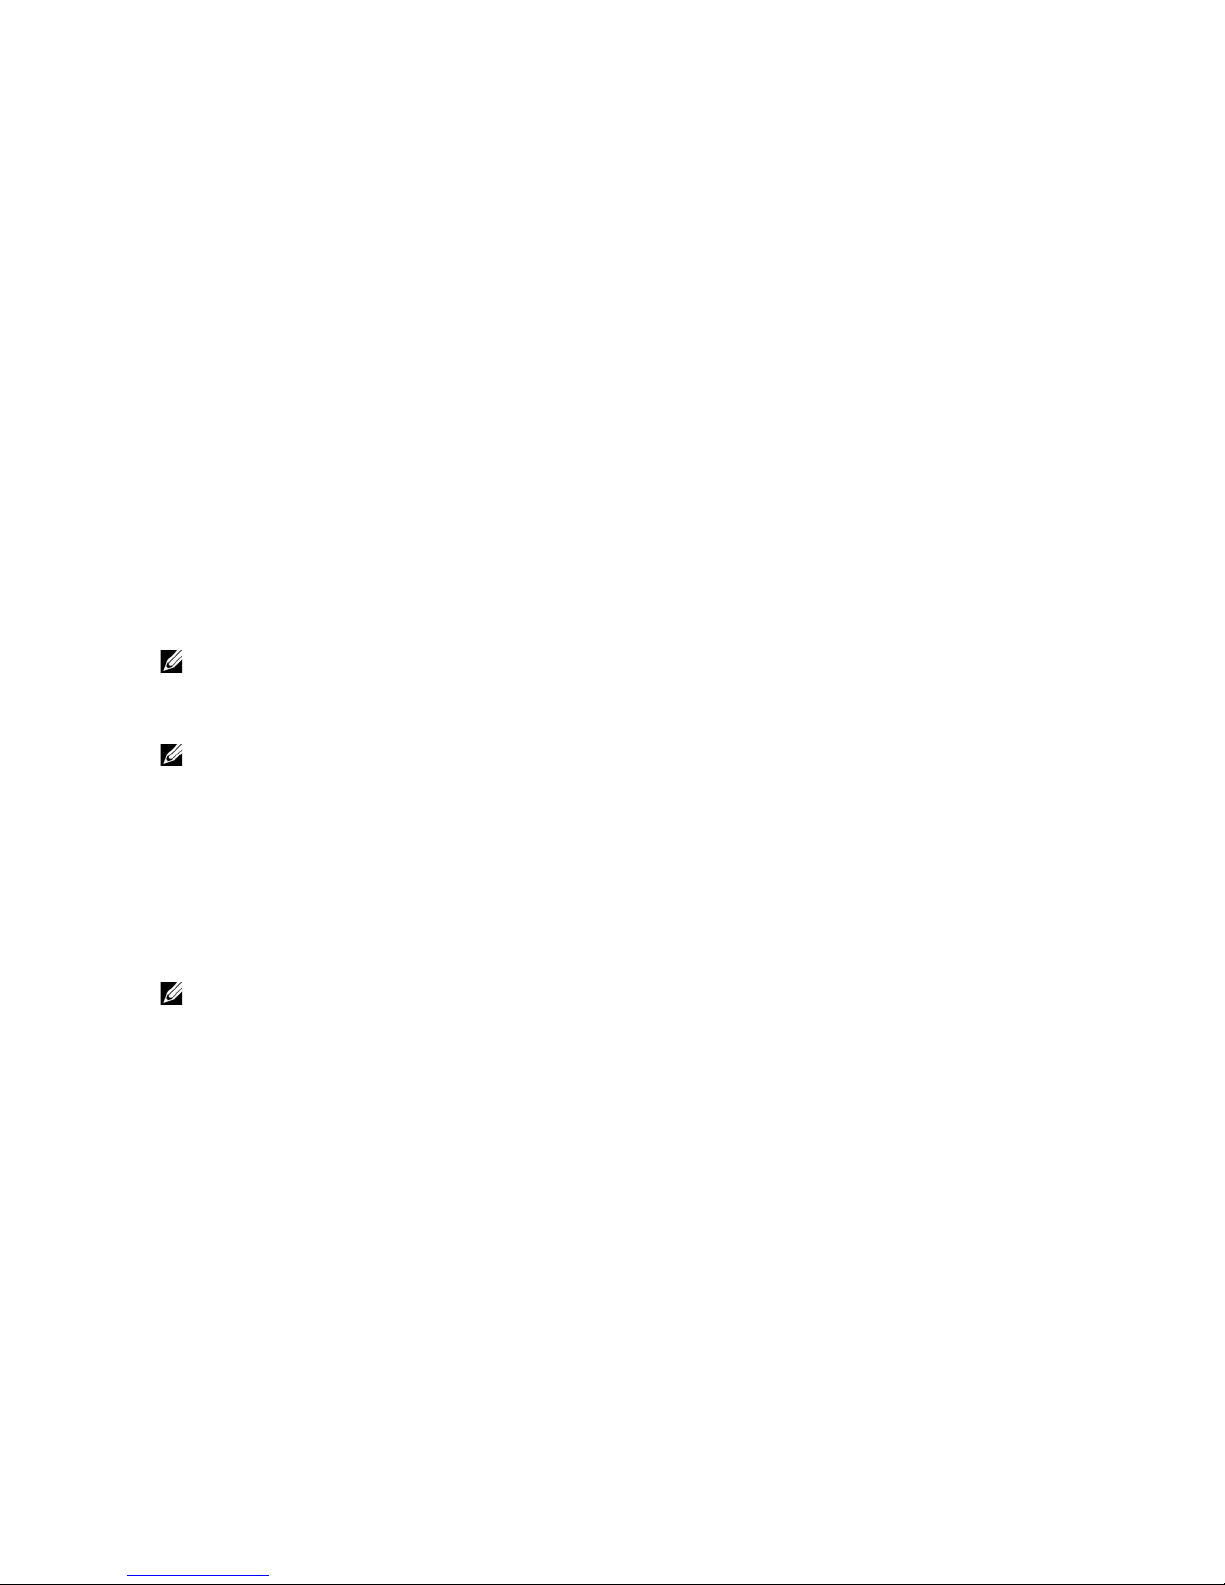
Accep ti ng an d Ins tal l ing th e T r us te d SS L C er tif i c ate
The MD vCenter Plug-in uses Secure Sockets Layer (SSL) to communicate securely between the vSphere
client and application serve r . During the vCenter Server i nstallation process, an SSL certificate is generated for
the vCenter Server system. If this certificate has not been added to the system's Trusted Root Certification
Authorities store, a Security Alert dialog bo x appears.
Figure 7. SSL Secur ity Ale rt Me ss a ge
To avoid this message, you can import the install-generated certificate into the system's Trusted Root
Certification Authorities store using these steps:
1
Click
View Certificate
Dell MD Storage Array vCenter Plug-in | 17
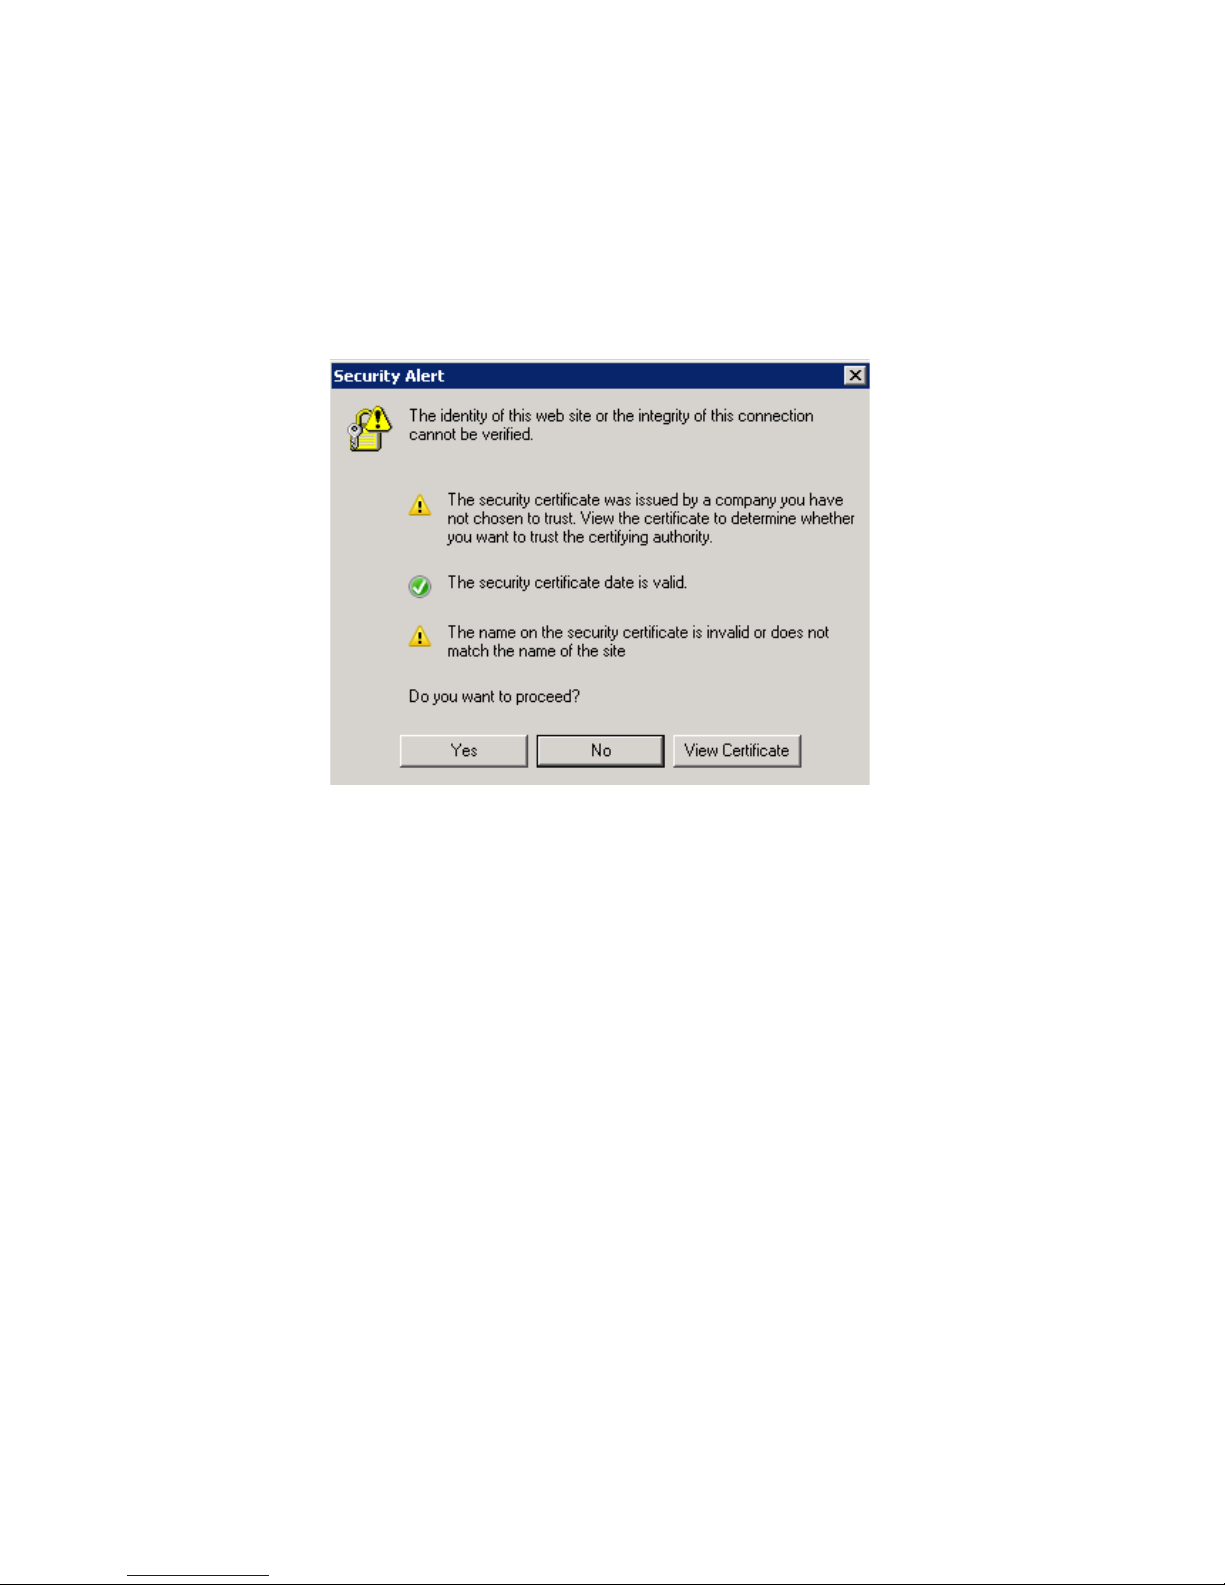
Figure 8. Install Cer tificate Dial o g Box
2
From the
Certificate
window, click
Install Certificate
.
3
In the Certificate Import Wizar d, click
Next
.
Figure 9. Certifi ca te Im por t Wizard
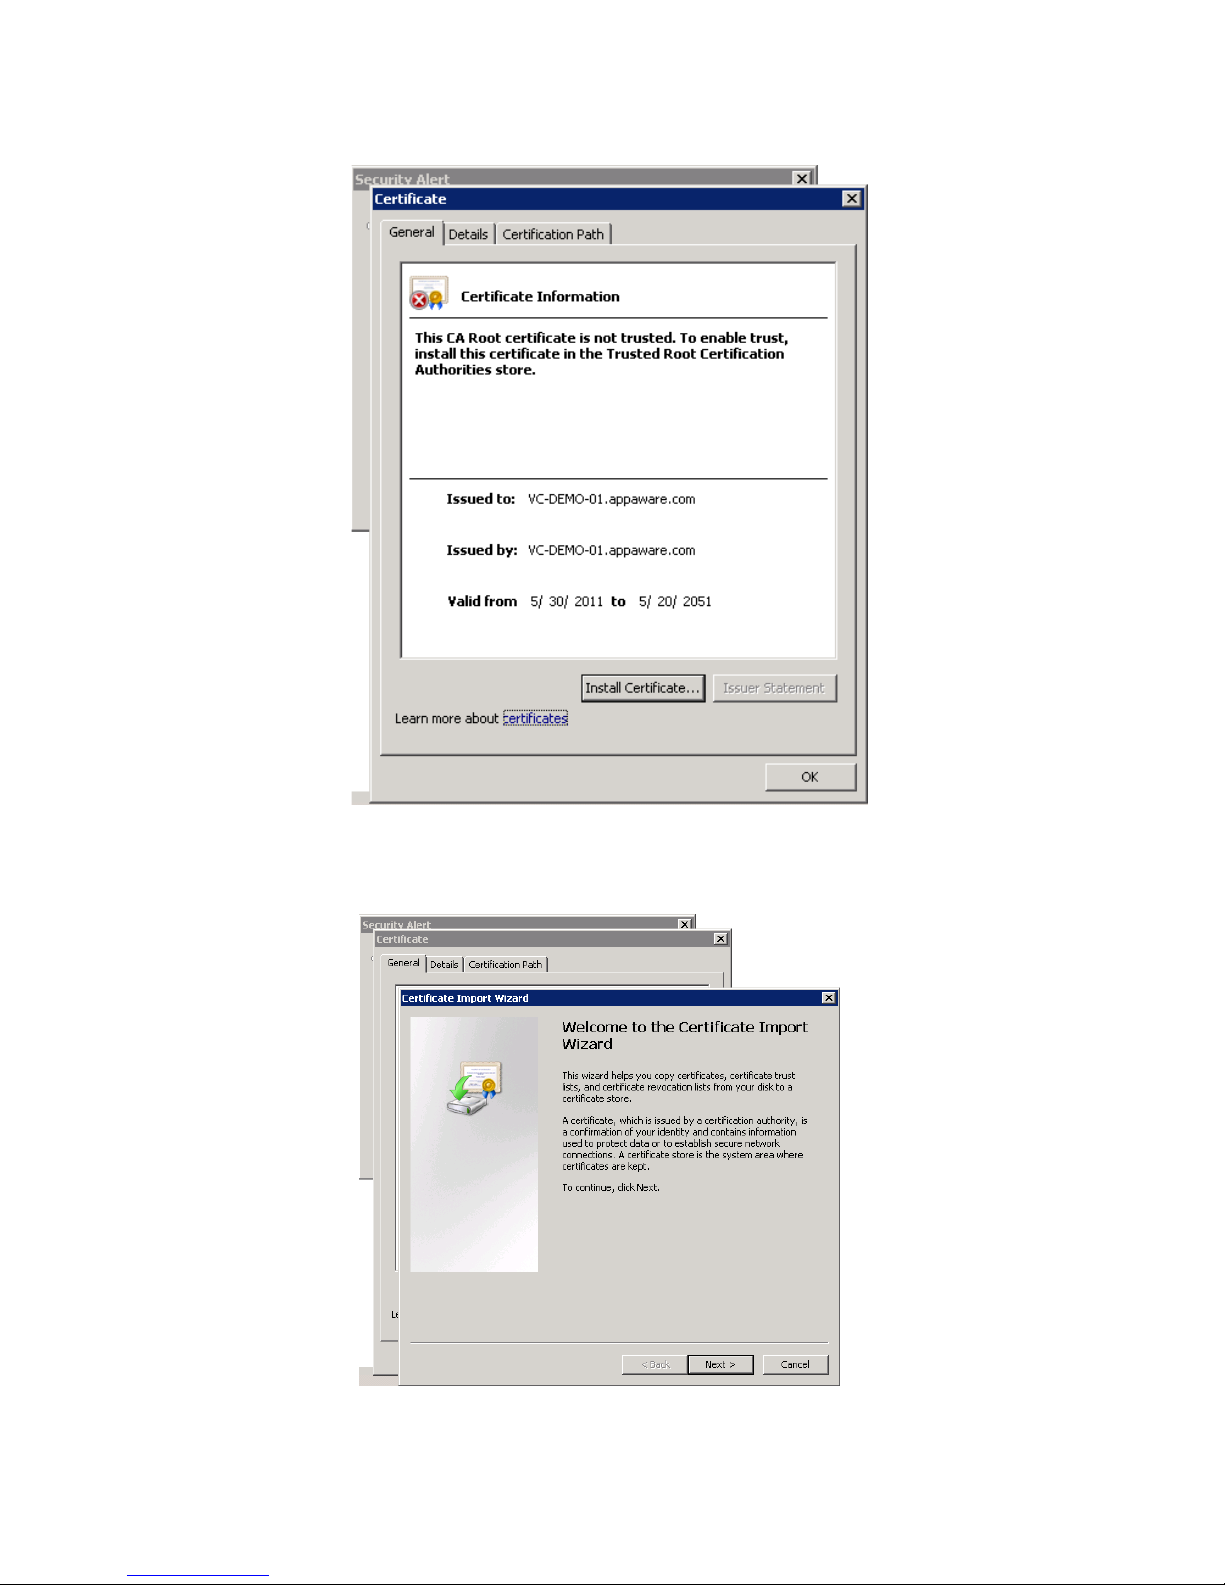
Dell MD Storage Array vCenter Plug-in | 18
4
From the
Certificate Store
window, select
Place all certificates in t he following store
.
5
Click
Browse
6
In the
Select Certifi ca te Store
window, highlight the
Trusted Root C ertification Authorities
folder
and click
OK
.
Figure 10. Select Certificate Store Dialog Box
Dell MD Storage Array vCenter Plug-in | 19
7
Click
Next
, then click
Finish
.
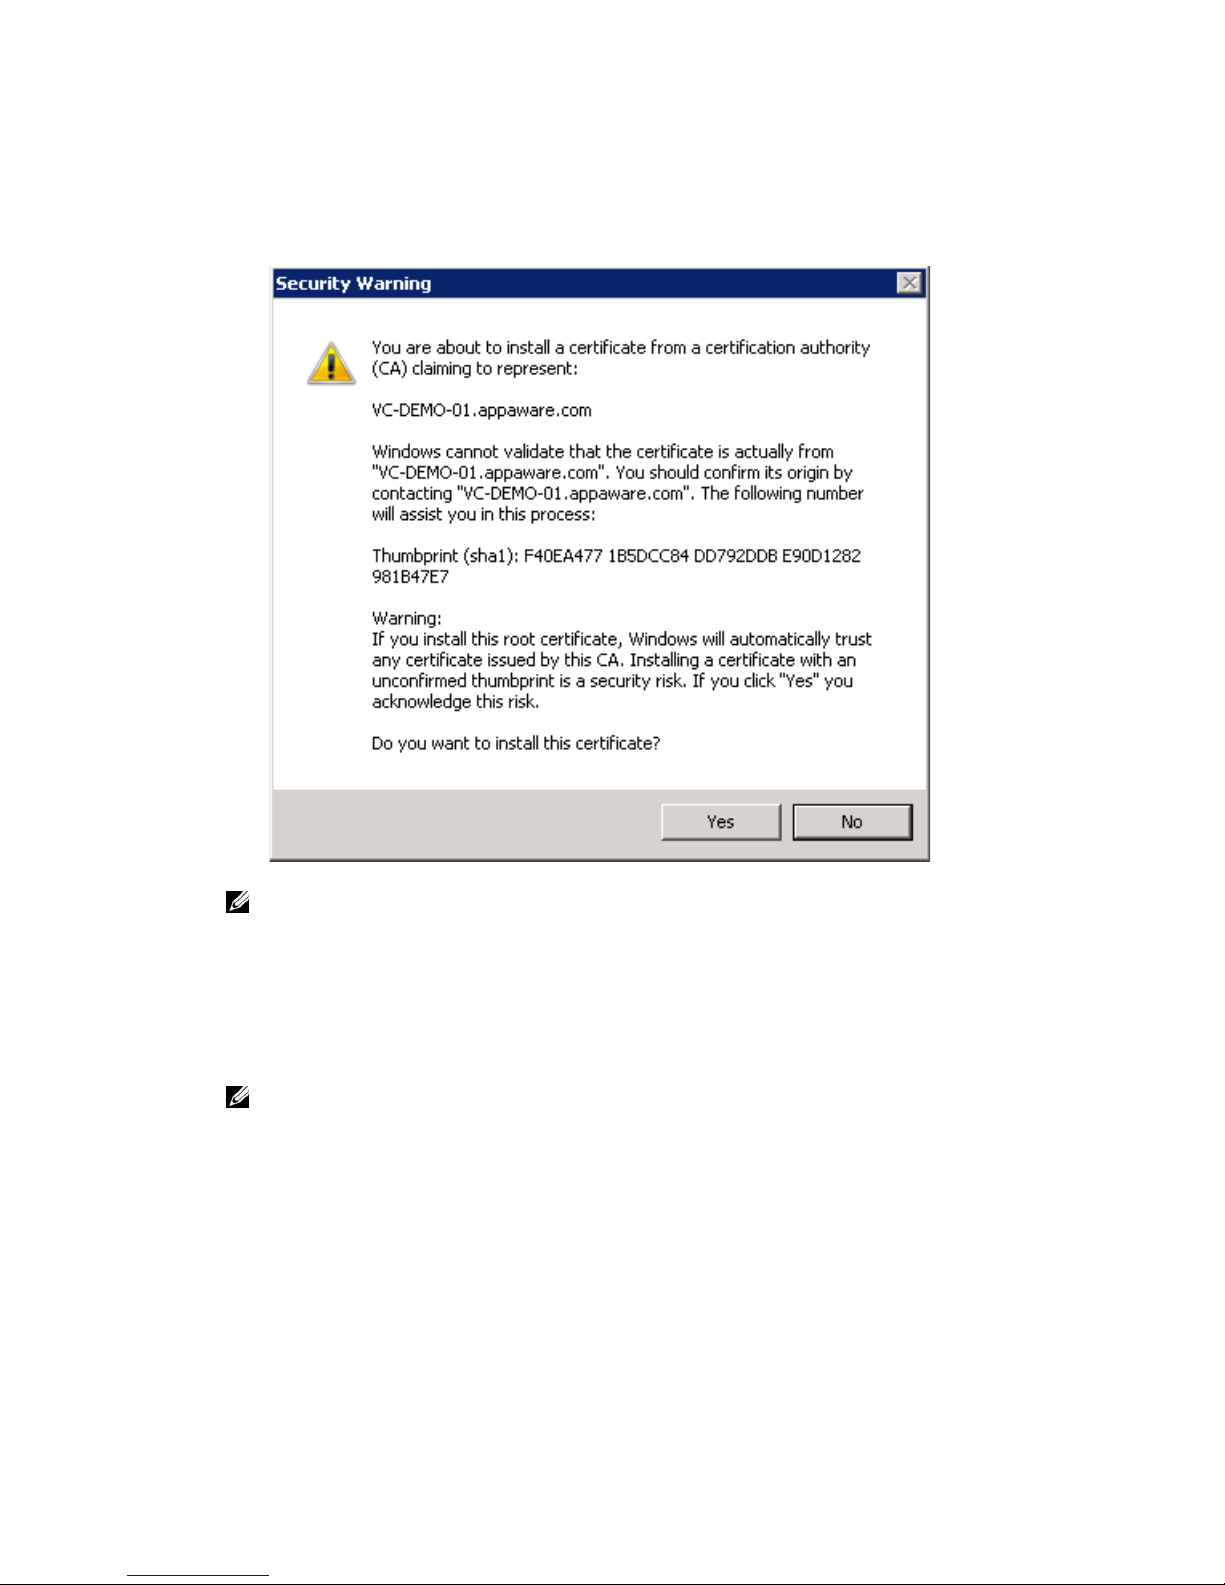
A Security Warning message box will be displayed.
8
Verify the information and click
Yes
to add the certificate to the trust store.
Figure 11. Security Warn in g Message Box
NOTE:
The sub ject nam e o f the system in the certificate must ma tch th e system name of the vCe nter
Server during the vSphere Client login screen. Otherwise, you will con tinue to receiv e warning messages
that the certi fica te do es n ot m at ch th e si te n ame .
Microsoft Enhanced IE Security
When Microsoft's Enhanced IE Security is installed on the vSphere Client system, the security configu r a tion
blocks content from the web site and a warning messa ge is shown. Clicking
Add
establishes a trust relations h ip
with the application server .
NOTE:
You may also be prompted to add
about:security_VpxClient.exe
to your Trusted sites.
 Loading...