

Page 1
Vizioncore™ vOptimizer Pro
Version 2.1
Installation and Setup Guide
Page 2

© 2008 Vizioncore, Inc. ALL RIGHTS RESERVED.
This guide contains proprietary information protected by copyright. The software described in this guide is furnished
under a software license or nondisclosure agreement. This software may be used or copied only in accordance with
the terms of the applicable agreement. No part of this guide may be reproduced or transmitted in any form or by any
means, electronic or mechanical, including photocopying and recording for any purpose other than the purchaser's
personal use without the written permission of Vizioncore, Inc.
If you have any questions regarding your potential use of this material, contact:
Vizioncore, Inc
975 Weiland Ave
Buffalo Grove, IL 60089
www.vizioncore.com
email: info@vizioncore.com
Refer to our Web site for regional and international office information.
Trademarks
Vizioncore, the Vizioncore logo, and vOptimizer Pro are trademarks and registered trademarks of Vizioncore, Inc in
the United States of America and other countries. Other trademarks and registered trademarks used in this guide
are property of their respective owners.Patent Pending
Third Party Contributions
For a list of third-party components and licenses, see Appendix: License Credits.
Disclaimer
The information in this document is provided in connection with Vizioncore products. No license, express or implied,
by estoppel or otherwise, to any intellectual property right is granted by this document or in connection with the sale
of Vizioncore products. EXCEPT AS SET FORTH IN VIZIONCORE'S TERMS AND CONDITIONS AS SPECIFIED
IN THE LICENSE AGREEMENT FOR THIS PRODUCT, VIZIONCORE ASSUMES NO LIABILITY WHATSOEVER
AND DISCLAIMS ANY EXPRESS, IMPLIED OR STATUTORY WARRANTY RELATING TO ITS PRODUCTS
INCLUDING, BUT NOT LIMITED TO, THE IMPLIED WARRANTY OF MERCHANTABILITY, FITNESS FOR A
PARTICULAR PURPOSE, OR NON-INFRINGEMENT. IN NO EVENT SHALL VIZIONCORE BE LIABLE FOR ANY
DIRECT, INDIRECT, CONSEQUENTIAL, PUNITIVE, SPECIAL OR INCIDENTAL DAMAGES (INCLUDING,
WITHOUT LIMITATION, DAMAGES FOR LOSS OF PROFITS, BUSINESS INTERRUPTION OR LOSS OF
INFORMATION) ARISING OUT OF THE USE OR INABILITY TO USE THIS DOCUMENT, EVEN IF VIZIONCORE
HAS BEEN ADVISED OF THE POSSIBILITY OF SUCH DAMAGES. Vizioncore makes no representations or
warranties with respect to the accuracy or completeness of the contents of this document and reserves the right to
make changes to specifications and product descriptions at any time without notice. Vizioncore does not make any
commitment to update the information contained in this document.
Installation and Setup Guide
March 2009
Version 2.1
Page 3

Table of Contents
Introduction to this Guide...................................................................................................................................3
About vOptimizer Pro....................................................................................................................................................... 4
About this Guide............................................................................................................................................................... 4
How to Use this Guide............................................................................................................................................. 4
Text Conventions..................................................................................................................................................... 5
vOptimizer Pro Documentation Suite............................................................................................................................... 5
Core Documentation Set......................................................................................................................................... 5
About Vizioncore Inc. ....................................................................................................................................................... 6
Feedback on the Documentation ..................................................................................................................................... 6
Contacting Dell................................................................................................................................................................. 8
System Requirements .......................................................................................................................................21
Installation Requirements............................................................................................................................................... 22
Resource Requirements................................................. ....................................................................................... 22
Software Requirements......................................................................................................................................... 22
Supported Platforms....................................................................................................................................................... 23
Supported Guest Operating Systems............................................................................................................................. 23
Optimization........................................................................................................................................................... 24
Storage Reclamation............................................................................................................................................. 24
Guest Configuration Requirements................................................................................................................................ 24
VMware Tools........................................................................................................................................................ 24
Connected NIC...................................................................................................................................................... 25
VM Names............................................................................................................................................................. 25
Configurations Not Supported............................................................................................................................... 26
Installing vOptimizer Pro...................................................................................................................................27
Preparing to Install ........................................ ................................................................................................................. 28
Page 4

Installing a new version of vOptimizer Pro..................................................................................................................... 28
Uninstalling vOptimizer Pro............................................................................................................................................ 32
Running vOptimizer Pro....................................................................................................................................35
Before You Get Started.................................................................................................................................................. 36
Starting vOptimizer Pro.................................................................................................................................................. 36
Licensing........................................................................................................................................................................ 37
Online Activation.................................................................................................................................................... 37
Offline Activation.................................................................................................................................................... 40
ESX Server Configuration.............................................................................................................................................. 44
Connecting to VirtualCenter .................................................................................................................................. 44
Connecting to an ESX Server................................................................................................................................ 48
Page 5

Introduction to this Guide 3
Introduction to this Guide
Vizioncore™ vOptimizer Pro is the recognized industry standard VM optimization
solution. vOptimizer Pro is an advanced optimization technology that reduces a virtual
machine's virtual hard drive to the smallest size possible & also optimizes Window's
guest operating systems for speed & performance.
This chapter contains the following sections:
About vOptimizer Pro....................................................................................................................4
About this Guide............................................................................................................................4
About Vizioncore Inc.....................................................................................................................6
Page 6

4vOptimizer Pro
Installation and Setup Guide
About vOptimizer Pro
vOptimizer Pro is a Windows VM optimization and storage reclamation solution that
helps to manage VM sprawl and growing enterprise storage costs - it also maximizes the
guest OS performance of every running VM.
The two main functions of vOptimizer Pro are:
• To enable the reclamation of space taken on ESX datastores by automating the
periodic resizing of NTFS partitions for Windows based VMs.
• To improve VM performance and reduce the footprint of Windows by enabling
the periodic deletion of selected files and services
Perhaps the most impactful of the 2 prime functions is storage reclamation. vOptimizer
Pro performs a partition adjustment of any ESX based VM, via an automated process of
mounting an offline VM, inspection of the VM's file system and guest OS, followed by
a (NTFS) resizing of the VM's partition.
About this Guide
This section outlines an approach for using this guide, reviews the text conventions that
are used, and summarizes the rest of the documentation set.
How to Use this Guide
This guide walks you through a vOptimizer Pro installation, including information on
system requirements and licensing.
This guide is organized as follows:
Chapter 1: System Requirements - This chapter outlines the hardware and software
requirements for installing vOptimizer Pro as well as detailing which platforms and
guest operating systems are supported.
Chapter 2: Installing vOptimizer Pro - This chapter describes the process for
installing vOptimizer Pro.
Chapter 3: Running vOptimizer Pro - This chapter outlines the process of starting
vOptimizer Pro for the first time, licensing the application, and configuring connections
with the Virtual Infrastructure.
Page 7

Introduction to this Guide 5
vOptimizer Pro Documentation Suite
Text Conventions
The following table summarizes how text styles are used in this guide:
Convention Description
Code
Variables
Interface Bold text is used for interface options that you select (such as
Files, components,
and documents
Monospace text represents code, code objects, and commandline input. This includes:
• Java language source code and examples of file contents
• Classes, objects, methods, properties, constants, and events
• HTML documents, tags, and attributes
Monospace-plus-italic text represents variable code or
command-line objects that are replaced by an actual value or
parameter.
menu items) as well as keyboard commands.
Italic text is used to highlight the following items:
• Pathnames, file names, and programs
• Figure captions
• The names of other documents referenced in this guide
vOptimizer Pro Documentation Suite
The documentation suite is made up of the core documentation set plus documents set
for advanced configurations. Documentation is provided in a combination of online help
and PDF.
•
Online Help: You can open online help by selecting Tutorial in the Help menu.
•
PDF: The What’s New Guide, Installation and Setup Guide,and User Guide, are
provided as PDF files. The PDF guides are included in the zip file downloaded
from Vizioncore. Adobe® Reader® is required.
Core Documentation Set
The core documentation set consists of the following:
Page 8

6vOptimizer Pro
Installation and Setup Guide
• Release Notes (PDF)
• What’s New Guide (PDF )
• Installation and Setup Guide set (PDF)
• vOptimizer Pro User Guide (PDF and online help)
About Vizioncore Inc.
Vizioncore was formed in July 2002 as a consulting and software-development
company with the mission to create easy-to-use software solutions that performed
reliable and repeatable automation of datacenter functions specifically for the Citrix
platform. A main corporate goal was to enable business partners to offer solutions that
targeted real-world IT issues and provided the best possible installation and automation
for their clients' systems.
Vizioncore's solutions have proved successful in organizations from small to mid-sized
businesses to large enterprises, in a wide variety of vertical industries, including
Financial Services, Government, Healthcare, Manufacturing, and High Tech.
Vizioncore, Inc. can be found in offices around the globe and at www.vizioncore.com.
Feedback on the Documentation
We are interested in receiving feedback from you about our documentation. For
example, did you notice any errors in the documentation? Were any features
undocumented? Do you have any suggestions on how we can improve the
documentation? All comments are welcome. Please submit your feedback to the
following email address:
info@vizioncore.com
Please do not submit Technical Support related issues to this email address.
Page 9

Introduction to this Guide 7
Feedback on the Documentation
Page 10

Contacting Dell
Note: If you do not have an active Internet connection, you can find contact information on your purchase invoice,
packing slip, bill, or Dell product catalog.
Dell provides several online and telephone-based support and service options. Availability varies by country and
product, and some services may not be available in your area. To contact Dell for sales, technical support, or customer
service issues:
1
Visit http://support.dell.com.
2
Verify your country or region in the Choose A Country/Region drop-down menu at the bottom of the page.
3
Click Contact Us on the left side of the page.Note: Toll-free numbers are for use within the country for which
they are listed.
4
Select the appropriate service or support link based on your need.
5
Choose the method of contacting Dell that is convenient for you.
Country (City)
International Access
Code
Country Code
City Code
Anguilla
Antigua and Barbuda
Aomen
Argentina (Buenos Aires)
International Access
Code: 00
Country Code: 54
City Code: 11
Aruba
Australia (Sydney)
International Access
Code: 0011
Country Code: 61
City Code: 2
Service Type Area Codes,
Web Address
E-Mail Address
Technical Support., Customer Service, Sales
Web Address
E-Mail Address
Technical Support., Customer Service, Sales
Technical Support
™
Dimension™, Dell Inspirion™, Dell
Dell
Optiplex
Precision
™
, Dell Lattitude™, and Dell
™
Servers and Storage
Web Address
E-Mail Address for Desktop/ Portable Computers
E-Mail Address for Servers and EMC
®
Storage
Products
Customer Service
Technical Support
Technical Support Services
Sales
Web Address
E-Mail Address
Technical Support., Customer Service, Sales
Web Address
Contact Dell Web Address
Technical Support., Customer Service, Sales
Local Numbers, and
Toll-Free Numbers
Web and E-Mail Addresses
www.Dell.com/ai
la‐techsupport@dell.com
toll-free: 800-335-0031
www.Dell.com.ag
la‐techsupport@dell.com
1-800-805-5924
0800-105
0800-105
www.dell.com.ar
la‐techsupport@dell.com
la_enterprise@dell.com
toll-free: 0-800-444-0730
toll-free: 0-800-444-0733
toll-free: 0-800-444-0724
0-800-444-3355
www.Dell.com/aw
la‐techsupport@dell.com
toll-free: 800-1578
support.ap.dell.com
support.ap.dell.com/contactus
13DELL-133355
Page 11

Austria (Vienna)
International Access
Code: 900
Country Code: 43
City Code: 1
Bahamas
Barbados
Belgium (Brussels)
Bolivia
Brazil
International Access
Code: 00
Country Code: 55
City Code: 51
British Virgin Islands
Brunei
Country Code: 673
Canada (North York,
Ontario)
International Access
Code: 011
Cayman Islands
Web Address
E-Mail Address
Home/Small Business Sales
Home/Small Business Fax
Home/Small Business Customer Service
Home/Small Business Support
Preferred Accounts/Corporate Customer
Service Preferred Accounts/Corporate Customer
Switchboard
Web Address
E-Mail Address
Technical Support., Customer Service, Sales
Web Address
E-Mail Address
Technical Support., Customer Service, Sales
Web Address
General Support
General Support Fax
Customer Service
Corporate Sales
Fax
Switchboard
Web Address
E-Mail Address
Technical Support., Customer Service, Sales
Web Address
E-Mail Address
Customer Service and Tech Support
Technical Support Fax
Customer Service Fax
Sales
Tech_support_central_europe@dell.com
Support.euro.dell.com
0820 240 530 00
0820 240 530 49
0820 240 530 14
0820 240 530 17
0820 240 530 16
0820 240 530 17
0820 240 530 00
www.dell.com/bs
la‐techsupport@dell.com
toll-free: 1-866-874-3038
www.dell.com/bb
la‐techsupport@dell.com
1-800-534-3142
Support.euro.dell.com
02 481 92 88
02 481 92 95
02 713 15 65
02 481 91 00
02 481 91 99
02 481 91 00
www.dell.com/bo
la_techsupport@dell.com
toll-free: 800-10-0238
www.dell.com/br
BR_TechSupport@dell.com
0800 970 3355
51 2104 5470
51 2104 5480
0800 722 3498
Technical Support, Customer Service, Sales toll-free: 1-866-278-6820
Technical Support (Penang, Malaysia)
Customer Service (Penang, Malaysia)
Transaction Sales (Penang, Malaysia)
Online Order Status Web Address
www.dell.ca/ostatus
604 633 4966
604 633 4888
604 633 4955
AutoTech (automated Hardware and Warranty
Support)
Customer Service
Home/Home Office
Small Business
Medium/Large Business, Government, Education
Hardware Warranty Phone Support
Computers for Home/Home Office
Computers for Small/Medium/Large Business
support.ca.dell.com
toll-free:1-800-247-9362
toll-free:1-800-847-4096
toll-free:1-800-906-3355
toll-free:1-800-387-5757
toll-free:1-800-847-4096
toll-free:1-800-387-5757
Government
Printers, Projectors, Televisions, Handheld,
1-877-335-5767
Digital
Jukebox, and Wireless Sales
Home and Home Office Sales
Small Business
Medium/Large Business, Government
toll-free:1-800-999-3355
toll-free:1-800-387-5752
toll-free:1-800-387-5755
1 866 440 3355
Spare Parts and Extended Service
E-Mail Address
Technical Support, Customer Service, Sales
la‐techsupport@dell.com
1-877-262-5415
Page 12

Chile (Santiago)
Country Code: 56
City Code: 2
China (Xiamen)
Country Code: 86
City Code: 592
Columbia
Costa Rica
Czech Republic (Prague)
International Access
Code: 00
Country Code: 420
Denmark (Copenhagen)
International Access
Code: 00
Country Code: 45
Dominica
Web Address
E-Mail Address
Sales and Customer Support
Technical Support Web Address
Technical Support E-Mail Address
Customer Service E-Mail Address
Technical Support Fax
Technical Support – Dimension and Inspiron
Technical Support – OptiPlex, Lattitude and Dell
Precision
Technical Support – Servers and Storage
Technical Support – Projectors, PDAs, Switches,
Routers, etc
Technical Support – Printers
Customer Service
Customer Service Fax
Home and Small Business
Preferred Accounts Division
Large Corporate Accounts GCP
Large Corporate Accounts Key Accounts
Large Corporate Accounts North
Large Corporate Accounts North Government and
Education
Large Corporate Accounts East
Large Corporate Accounts East Government and
Education
Large Corporate Accounts Queue Team
Large Corporate Accounts South
Large Corporate Accounts West
Large Corporate Accounts Spare Parts
Web Address
E-Mail Address
Technical Support, Customer Service, Sales
Web Address
E-Mail Address
Technical Support, Customer Service, Sales
Web Address
E-Mail Address
Technical Support
Customer Service
Fax
Technical Fax
Switchboard
Web Address
Technical Support
Customer Service – Relational
Home/Small Business Customer Service
Switchboard – Relational
Switchboard Fax – Relational
Switchboard – Home/Small Business
Switchboard Fax – Home/Small Business
Web Address
E-Mail Address
Technical Support, Customer Service, Sales
www.dell.com/cl
la‐techsupport@dell.com
toll-free: 1230-020-4823
support.dell.com.cn
support.dell.com.cn/email
customer_cn@dell.com
592 818 14350
toll-free: 800 858 2969
toll-free: 800 858 0950
toll-free: 800 858 0960
toll-free: 800 858 2920
toll-free: 800 858 2311
toll-free: 800 858 2060
592 818 1308
toll-free: 800 858 2222
toll-free: 800 858 2557
toll-free: 800 858 2055
toll-free: 800 858 2628
toll-free: 800 858 2999
toll-free: 800 858 2955
toll-free: 800 858 2020
toll-free: 800 858 2669
toll-free: 800 858 2572
toll-free: 800 858 2355
toll-free: 800 858 2811
toll-free: 800 858 2621
www.dell.com/co
la‐techsupport@dell.com
01-800-915-4755
www.dell.com/cr
la‐techsupport@dell.com
0800-012-0231
support.euro.dell.com
czech_dell@dell.com
22537 2727
22537 2707
22537 2714
22537 2728
22537 2711
Support.euro.dell.com
7023 0182
7023 0184
3287 5505
3287 1200
3287 1201
3287 5000
3287 5001
www.dell.com/dm
la‐techsupport@dell.com
toll-free: 1-866-278-6821
Page 13

Dominican Republic
Ecuador
El Salvador
Finland (Helsinki)
International Access
Code: 990
Country Code: 358
City Code: 9
France (Paris)
(Montpellier)
International Access
Code: 00
Country Code: 33
City Codes: (1) (4)
Germany (Frankfurt)
International Access
Code: 00
Country Code: 49
City Code: 69
Greece
International Access
Code: 00
Country Code: 49
Grenada
Web Address
E-Mail Address
Technical Support, Customer Service, Sales
Web Address
E-Mail Address
Technical Support, Customer Service, Sales
(Calling from Quito)
Technical Support, Customer Service, Sales
(Calling from Guayaquil)
Web Address
E-Mail Address
Technical Support, Customer Service, Sales
Web Address
E-Mail Address
Technical Support
Customer Service
Switchboard
Sales under 500 employees
Fax
Sales over 500 employees
Fax
Web Address
Home and Small Business
Technical Support
Customer Service
Switchboard
Switchboard (calls from outside of France)
Sales
Fax
Fax (calls from outside of France)
Corporate
Technical Support
Customer Service
Switchboard
Sales
Web Address
E-mail Address
Technical Support
Home/Small Business Customer Service
Global Segment Customer Service
Preferred Accounts Customer Service
Large Accounts Customer Service
Public Accounts Customer Service
Switchboard
Web Address
Technical Support
Gold Service Technical Support
Switchboard
Gold Service Switchboard
Sales
Fax
Web Address
E-Mail Address
Technical Support, Customer Service, Sales
www.dell.com/do
la‐techsupport@dell.com
1-800-156-1588
www.dell.com/ec
la‐techsupport@dell.com
toll-free: 999-119-877-655-3355
toll-free: 1800-999-119-877-655-3355
www.dell.com/sv
la‐techsupport@dell.com
800-6132
support@euro.dell.com
fi_support@dell.com
0207 533 555
0207 533 538
0207 533 533
0207 533 540
0207 533 530
0207 533 533
0207 533 530
Support.euro.dell.com
0825 387 270
0825 832 833
0825 004 700
04 99 75 40 00
0825 004 700
0825 004 701
04 99 75 40 01
0825 004 719
0825 338 339
55 94 71 00
01 55 94 71 00
support.euro.dell.com
tech_support_central_europe@dell.com
069 9792-7200
0180-5-224400
069 9792-7320
069 9792-7320
069 9792-7320
069 9792-7320
069 9792-7000
Support.euro.dell.com
00800-44 14 95 18
00800-44 14 00 83
2108129810
2108129811
2108129800
2108129812
www.dell.com/gd
la‐techsuppo@dell.com
toll-free: 1-866-540-3355
Page 14

Guatemala
Guyana
Hong Kong
International Access
Code: 001
Country Code: 852
India
Web Address
E-Mail Address
Technical Support, Customer Service, Sales
E-Mail Address
Technical Support, Customer Service, Sales
Web Address
Technical Support E-mail Address
Technical Support - Dimension and Inspiron
Technical Support - OptiPlex, Latitude, and Dell
Precision
Technical Support - Servers and Storage
Technical Support - Projectors, PDAs, Switches,
Routers, etc .
Customer Service
Large Corporate Accounts
Global Customer Programs
Medium Business Division
Home and Small Business Division
Dell Support Website
Portable and Desktop Support
Desktop Support E-mail Address
Portable Support E-mail Address
Phone Numbers
www.dell.com/gt
la‐techsupport@dell.com
1-800-999-0136
la‐techsupport@dell.com
toll-free: 1-877-270-4609
support.ap.dell.com
support.dell.com.cn/email
00852-2969 3188
00852-2969 3191
00852-2969 3196
00852-3416 0906
00852-3416 0910
00852-3416 0907
00852-3416 0908
00852-3416 0912
00852-2969 3105
support.ap.dell.com
india_support_desktop@dell.com
india_support_notebook@dell.com
080-25068032 or 080-25068034 or
your city STD code + 60003355 or
toll-free: 1-800-425-8045
Server Support
E-mail Address
Phone Numbers
Gold Support Only
E-mail Address
Phone Numbers
Customer Service
Home and Small Business
Large Corporate Accounts
Sales
Large Corporate Accounts
Home and Small Business
india_support_Server@dell.com
080-25068032 or 080-25068034 or
your city STD code + 60003355 or
toll-free: 1-800-425-8045
eec_ap@dell.com
080-25068033 or your city STD code +
60003355 or
toll-free: 1-800-425-9045
India_care_HSB@dell.com
toll-free : 1800-4254051
India_care_REL@dell.com
toll free : 1800-4252067
1600 33 8044
1600 33 8046
Page 15

Ireland (Cherrywood)
International Access
Code: 00
Country Code: 353
City Code: 1
Italy (Milan)
International Access
Code: 00
Country Code: 39
City Code: 02
Jamaica
Web Address
Technical Support
E-mail Address
Business computers
Home computers
At Home Support
Sales
Home
Small Business
Medium Business
Large Business
E-mail Address
Customer Service
Home and Small Business
Business (greater than 200 employees)
General
Fax/Sales fax
Switchboard
U.K. Customer Service (dealing with U.K.only)
Corporate Customer Service (dial within U.K.
only)
U.K. Sales (dial within U.K. only)
Web Address
Home and Small Business
Technical Support
Customer Service
Fax
Switchboard
Corporate
Technical Support
Customer Service
Fax
Switchboard
E-mail Address
Technical Support, Customer Service, Sales
(dial from within Jamaica only)
Support.euro.dell.com
dell_direct_support@dell.com
1850 543 543
1850 543 543
1850 200 889
1850 333 200
1850 664 656
1850 200 646
1850 200 646
Dell_IRL_Outlet@dell.com
204 4014
1850 200 982
204 0103
204 4444
0870 906 0010
0870 907 4499
0870 907 4000
Support.euro.dell.com
02 577 826 90
02 696 821 14
02 696 821 13
02 696 821 12
02 577 826 90
02 577 825 55
02 575 035 30
02 577 821
la-techsupport@dell.com
1-800-440-920
Page 16

Japan (Kawasaki)
International Access
Code: 001
Country Code: 81
City Code: 44
Korea (Seoul)
International Access
Code: 001
Country Code: 82
City Code: 2
Latin America
Luxemborg
International Access
Code: 00
Country Code: 352
Macao
Country Code: 83
Web Address
Technical Support - Dimension and Inspiron
Technical Support outside of Japan - Dimension
and Inspiron
Technical Support - Dell Precision, OptiPlex, and
Latitude
Technical Support outside of Japan - Dell
Precision, OptiPlex, and Latitude
Technical Support - Dell PowerApp™, Dell
PowerEdge™, Dell PowerConnect™, and Dell
PowerVault™,
Technical Support outside of Japan - PowerApp,
PowerEdge, PowerConnect, and PowerVault
Technical Support - Projectors, PDAs, Printers,
Routers
Technical Support outside of Japan - Projectors,
PDAs, Printers, Routers
Faxbox Service
24-Hour Automated Order Status Service
Customer Service
Business Sales Division - up to 400 employees
Preferred Accounts Division Sales - over 400
employees
Public Sales - government agencies, educational
institutions, and medical institutions
Global Segment Japan
Individual User
Individual User Online Sales
Individual User Real Site Sales
Switchboard
Web Address
Technical Support, Customer Service
T echnical Support - Dimension, PDA, Electronics,
and Accessories
Sales
Fax
Switchboard
Customer Technical Support (Austin, Texas,
U.S.A.)
Customer Service (Austin, Texas, U.S.A.)
Fax (Technical Support and Customer Service)
(Austin, Texas, U.S.A.)
Sales (Austin, Texas, U.S.A.)
SalesFax (Austin, Texas, U.S.A.)
Web Address
Support
Home/Small Business Sales
Corporate Sales
Customer Service
Fax
Technical Support
Customer Service (Xiamen, China)
Transaction Sales (Xiamen, China)
support.jp.dell.com
toll-free: 0120-198-26
81-44-520-1435
toll-free: 0120-198-433
81-44-556-3894
toll-free: 0120-198-498
81-44-556-4162
toll-free: 0120-981-690
81-44-556-3468
044-556-3490
044-556-3801
044-556-4240
044-556-1465
044-556-3433
044-556-5963
044-556-3469
044-556-1657
044-556-2203
044-556-4649
044-556-4300
Support.ap.dell.com
toll-free: 080-200-3800
toll-free: 080-200-3801
toll-free: 080-200-3600
2194-6202
2194-6000
512 728-4093
512 728-3619
512 728-3883
512 728-4397
512 728-4600 or 512 728-3772
Support.euro.dell.com
3420808075
+32 (0)2 713 15 96
26 25 77 81
+32 (0)2 481 91 19
26 25 77 82
toll-free: 0800 105
34 160 910
29 693 115
Page 17

Malaysia (Penang)
International Access
Code: 00
Country Code: 60
City Code: 4
Mexico
International Access
Code: 00
Country Code: 52
Montserrat
Netherlands
Antilles
Netherlands
(Amsterdam)
International Access
Code: 00
Country Code: 31
City Code: 20
New Zealand
International Access
Code: 00
Country Code: 64
Nicaragua
Norway (Lysaker)
International Access
Code: 00
Country Code: 47
Panama
Peru
Web Address
Technical Support - Dell Precision, OptiPlex, and
Latitude
Technical Support - Dimension, Inspiron, and
Electronics and Accessories
Technical Support - PowerApp, PowerEdge,
PowerConnect, and PowerVault
Customer Service
Transaction Sales
Corporate Sales
Web Address
E-mail Address
Customer Technical Support
Sales
Customer Service
Main
E-mail Address
Technical Support, Customer Service, Sales
E-mail Address
Web Address
Technical Support
Technical Support Fax
Home/Small Business Customer Service
Relational Customer Service
Home/Small Business Sales
Relational Sales
Home/Small Business Sales Fax
Relational Sales Fax
Switchboard
Switchboard Fax
Web Address
E-mail Address
Technical Support, Customer Service, Sales
Web Address
E-mail Address
Technical Support, Customer Service, Sales
Web Address
Technical Support
Relational Customer Service
Home/Small Business Customer Service
Switchboard
Fax Switchboard
Web Address
E-mail Address
Technical Support, Customer Service, Sales
Web Address
E-mail Address
Technical Support, Customer Service, Sales
Support.ap.dell.com
toll-free: 1800 880 193
toll-free: 1800 881 306
toll-free: 1800 881 386
toll-free: 1800 881 306 (option 6)
toll-free: 1800 888 202
toll-free: 1800 888 213
www.dell.com/mx
la‐techsupport@dell.com
001-877-384-8979 or 001-877-269-3383
50-81-8800 or 01-800-888-3355
001-877-384-8979 or 001-877-269-3383
50-81-8800 or 01-800-888-3355
la‐techsupport@dell.com
Toll-free: 1-866-278-6822
la‐techsupport@dell.com
support.euro.dell.com
020 674 45 00
020 674 47 66
020 674 42 00
020 674 43 25
020 674 55 00
020 674 50 00
020 674 47 75
020 674 47 50
020 674 50 00
020 674 47 50
Support.ap.dell.com
Support.ap.dell.com/contactus
0800 441 567
www.dell.com/ni
la‐techsupport@dell.com
001-800-220-1377
Support.euro.dell.com
671 16882
671 17575
231 62298
671 16800
671 16865
www.dell.com/pa
la‐techsupport@dell.com
011-800-507-1264
www.dell.com/pe
la‐techsupport@dell.com
0800-50-669
Page 18

Poland (Warsaw)
International Access
Code: 011
Country Code: 48
City Code: 22
Portugal
International Access
Code: 00
Country Code: 351
Puerto Rico
St. Kitts and Nevis
St. Lucia
St. Vincent and the
Grenadines
Singapore
International Access
Code: 005
Country Code: 65
Slovakia (Prague)
International Access
Code: 00
Country Code: 421
South Africa
(Johannesburg)
International Access
Code: 09/091
Country Code: 27
City Code: 11
Web Address
E-mail Address
Customer Service Phone
Customer Service
Sales
Customer Service Fax
Reception Desk Fax
Switchboard
Web Address
Technical Support
Customer Service
Sales
Fax
Web Address
E-mail Address
Technical Support, Customer Service, Sales
Web Address
E-mail Address
Technical Support, Customer Service, Sales
Web Address
E-mail Address
Technical Support, Customer Service, Sales
Web Address
E-mail Address
Technical Support, Customer Service, Sales
NOTE: The phone numbers in this section should
be called from within Singapore or Malaysia only.
Web Address
Technical Support - Dimension, Inspiron, and
Electronics and Accessories
Technical Support - OptiPlex, Latitude,
and Dell Precision
Technical Support - PowerApp, PowerEdge,
PowerConnect, and PowerVault
Customer Service
Transaction Sales
Corporate Sales
Web Address
E-mail Address
Technical Support
Customer Service
Fax
Tech Fax
Switchboard (Sales)
Web Address
E-mail Address
Gold Queue
Technical Support
Customer Service
Sales
support.euro.dell.com
pl_support_tech@dell.com
57 95 700
57 95 999
57 95 999
57 95 806
57 95 998
57 95 999
Support.euro.dell.com
707200149
800 300 413
800-300-410 or 800-300 -411 or
800-300-412 or 21-422-07-10
21-424-01-12
www.dell.com/pr
la‐techsupport@dell.com
1-877-537-3355
www.dell.com/kn
la‐techsupport@dell.com
toll-free: 1-866-540-3355
www.dell.com/lc
la‐techsupport@dell.com
toll-free: 1-866-464-4352
www.dell.com/vc
la‐techsupport@dell.com
toll-free: 1-866-464-4353
support.ap.dell.com
toll-free: 1 800 394 7430
toll-free: 1 800 394 7488
toll-free: 1 800 394 7478
toll-free: 1 800 394 7430 (option 6)
toll-free: 1 800 394 7412
toll-free: 1 800 394 7419
support.euro.dell.com
czech_dell@dell.com
02 5441 5727
420 22537 2707
02 5441 8328
02 5441 8328
02 5441 8328
02 5441 7585
support.euro.dell.com
dell_za_suppor@dell.com
011 709 7713
011 709 7710
011 709 7707
011 709 7700
Page 19

Spain (Madrid)
International Access
Code: 00
Country Code: 34
City Code: 91
Sweden (Upplands
Vasby)
International Access
Code: 00
Country Code: 46
City Code: 8
Switzerland (Geneva)
International Access
Code: 00
Country Code: 41
City Code: 22
Taiwan
International Access
Code: 002
Country Code: 886
Thailand
International Access
Code: 001
Country Code: 66
Trinidad/Tobago
Turks and Caicos Islands
Web Address
Home and Small Business
Technical Support
Customer Service
Sales
Switchboard
Fax
Corporate
Technical Support
Customer Service
Switchboard
Fax
Web Address
Technical Support
Relational Customer Service
Home/Small Business Customer Service
Employee Purchase Program (EPP) Support
Technical Support Fax
Web Address
E-mail Address
Technical Support – Home and Small Business
Technical Support – Corporate
Customer Service – Home and Small Business
Customer Service – Corporate
Fax
Switchboard
Web Address
E-mail Address
Technical Support - OptiPlex, Latitude, Inspiron,
Dimension, and Electronics and Accessories
Technical Support - Servers and Storage
Customer Service
Transaction Sales
Corporate Sales
Web Address
Technical Support (OptiPlex, Latitude, and Dell
Precision)
Technical Support (PowerApp, PowerEdge,
PowerConnect, and PowerVault)
Customer Service
Corporate Sales
Transaction Sales
Web Address
E-mail Address
Technical Support, Customer Service, Sales
Web Address
E-mail Address
Technical Support, Customer Service, Sales
Support.euro.com
902 100 130
902 118 540
902 118 541
902 118 541
902 118 539
902 100 130
902 115 236
91 722 92 00
91 722 95 83
support.euro.dell.com
08 590 05 199
08 590 05 642
08 587 70 527
020 140 14 44
08 590 05 594
Support.euro.dell.com
Tech_support_central_Europe@dell.com
0844 811 411
0844 822 844
0848 802 202
0848 821 721
022 799 01 90
022 799 01 01
support.ap.dell.com
support.dell.com.cn/email
toll-free: 0080 186 1011
toll-free: 0080 160 1256
toll-free: 0080 160 1250 (option 5)
toll-free: 0080 165 1228
toll-free: 0080 165 1227
Support.ap.dell.com
toll-free: 1800 0060 07
toll-free: 1800 0600 09
toll-free: 1800 006 007 (option 7)
toll-free: 1800 006 009
toll-free: 1800 006 006
www.dell.com/tt
la‐techsupport@dell.com
toll-free: 1-888-799-5908
www.dell.com/tc
la‐techsupport@dell.com
toll-free: 1-877-441-4735
Page 20

U.K.(Bracknell)
International Access
Code: 00
Country Code: 44
City Code: 1344
Uruguay
U.S.A. (Austin, Texas)
International Access
Code: 011
Country Code: 1
Web Address
E-mail Address
Customer Service Website
Sales
Home and Small Business Sales
Corporate/Public Sector Sales
Customer Service
Home and Small Business
Corporate
Preferred Accounts (500-5000 employees)
Global Accounts
Central Government
Local Government & Education
Health
Technical Support
Corporate/Preferred Accounts/PCA (1000+
employees)
Other Dell Products
General
Home and Small Business Fax
Web Address
E-mail Address
Technical Support, Customer Service, Sales
Automated Order-Status Service
AutoTech (portable and desktop computers)
Hardware and Warranty Support (Dell TV,
Printers, and Projectors ) for Relationship
customers
Consumer (Home and Home Office) Support for
Dell products
Customer Service
Employee Purchase Program (EPP) Customers
Financial Services Web Address
Financial Services (lease/loans)
Financial Services (Dell Preferred Accounts
[DPA])
Business
Customer Service
Employee Purchase Program (EPP)
Customer s Support for printers, projectors, PDAs,
and MP3 players
Public (government, education, and healthcare)
Customer Service and Support
Employee Purchase Program (EPP) Customers
Dell Sales
Dell Outlet Store (Dell refurbished computers)
Software and Peripherals Sales
Spare Parts Sales
Extended Service and Warranty Sales
Fax
Dell Services for the Deaf, Hard-of-Hearing, or
Speech-Impaired
upport.euro.dell.com
dell_direct_support@dell.com
support.euro.dell.com/uk/en/ECare/
form/home.asp
0870 907 4000
01344 860 456
0870 906 0010
01344 373 185
0870 906 0010
01344 373 186
01344 373 196
01344 373 199
01344 373 194
0870 908 0500
0870 353 0800
0870 907 4006
www.dell.com/uy
la‐techsupport@dell.com
toll-free: 000-413-598-2521
toll-free: 1-800-433-9014
toll-free: 1-800-247-9362
toll-free: 1-877-459-7298
toll-free: 1-800-624-9896
toll-free: 1-800-624-9897
toll-free: 1-800-695-8133
www.dellfinancialservices.com
toll-free: 1-877-577-3355
toll-free: 1-800-283-2210
toll-free: 1-800-624-9897
toll-free: 1-800-695-8133
toll-free: 1-877-459-7298
toll-free: 1-800-456-3355
toll-free: 1-800-695-8133
toll-free: 1-800-289-3355 or
toll-free: 1-800-879-3355
toll-free: 1-888-798-7561
toll-free: 1-800-671-3355
toll-free: 1-800-357-3355
toll-free: 1-800-247-4618
toll-free: 1-800-727-8320
toll-free: 1-877-DELLTTY
(1-877-335-5889)
Page 21

U.S. Virgin Islands
Venezuela
Web Address
E-mail Address
Technical Support, Customer Service, Sales
Web Address
E-mail Address
Technical Support, Customer Service, Sales
www.dell.com/vi
la‐techsupport@dell.com
toll‐free:1‐877‐702‐4360
www.dell.com/ve
la‐techsupport@dell.com
0800‐100‐4752
Page 22

Page 23

System Requirements
This chapter outlines the hardware and software requirements for installing vOptimizer
Pro and the supported platforms for optimization.
This chapter contains the following sections:
Installation Requirements............................................................................................................22
Resource Requirements..............................................................................................................22
Software Requirements...............................................................................................................22
Supported Platforms....................................................................................................................23
Supported Guest Operating Systems..........................................................................................23
Guest Configuration Requirements.............................................................................................24
Configurations Not Supported.....................................................................................................26
System Requirements 21
Page 24

22 vOptimizer Pro
Installation and Setup Guide
Installation Requirements
The resource requirements to run vOptimizer Pro can vary widely based on a number of
factors, including:
• The number and size of VMs being optimized
• The number of concurrent optimization jobs
You should not consider doing a large scale production implementation without
conducting a proper scoping and sizing exercise. At a minimum, you will be required to
provide hardware matching the specifications below.
Resource Requirements
vOptimizer Pro is a standalone application that requires no external database or
infrastructure components. The resource requirements for the vOptimizer Pro server
are:
• CPU: 1 GHz 32-bit (x86) processor.
• RAM: 1 GB of system memory
• Storage: At least 4 GB free hard disk space
• Graphics: At least 1024x768 video resolution (1280x1024 or greater
recommended)
Software Requirements
vOptimizer Pro requires a physical or virtual machine running one of the following
operating systems. All service pack levels are supported.
• Windows XP Professional (x86, x64)
• Windows Vista Business or Ultimate (x86, x64)
• Windows Server 2003 (x86, x64)
• Windows Small Business Server (x86, x64)
• Windows Server 2008 (x86, x64)
Page 25

Note vOptimizer Pro requires the Microsoft .NET Framework version 2.0. You can confirm that
you have .NET Framework v2.0 installed by accessing Start>Add or Remove Programs.
Y ou can install .NET Framework v2.0 through Internet Explorer>T ools>W indows Update.
Alternately, you can download it from www.microsoft.com.
Supported Platforms
vOptimizer Pro supports the following versions of VMware ESX Server:
• VMware ESX Server 3.5 Update 3
• VMware ESX Server 3.5 Update 2
• VMware ESX Server 3.5 Update 1
• VMware ESX Server 3.5
• VMware ESX Server 3.0.3
• VMware ESX Server 3.0.2 Update 1
• VMware ESX Server 3.0.2
• VMware ESX Server 3.0.1
System Requirements 23
Supported Platforms
The following versions of ESX Server are not supported:
• VMware ESXi Server (any version)
• VMware ESX Server 2.5.4
• VMware ESX Server 2.5.3
• VMware ESX Server 2.5.2
Supported Guest Operating Systems
vOptimizer Pro performs two different types of functions - optimizations and storage
reclamations. The supported Guest Operating systems differ for each function.
Page 26

24 vOptimizer Pro
Installation and Setup Guide
Optimization
vOptimizer Pro supports optimization functions on the following guest operating
systems. All service packs are supported.
• Windows 2000 Server (x86)
• Windows 2000 Professional (x86)
• Windows Server 2003 (x86, x64)
• Windows XP Professional (x86, x64)
Storage Reclamation
• Windows 2000 Server (x86)
• Windows 2000 Professional (x86)
• Windows Server 2003 (x86, x64)
• Windows XP Professional (x86, x64)
Guest Configuration Requirements
vOptimizer Pro communicates with target VMs using the VM’s IP address. In addition,
vOptimizer Pro uses VMware Tools to perform certain functions of the optimization
and resize process. For this reason, VMware Tools must be installed and running on
every target VM.
Caution vOptimizer Pro will not be able to optimize or resize VMs without these configurations
being present.
VMware Tools
VMware Tools is a suite of utilities that enhances the performance of the virtual
machine’s guest operating system and improves management of the virtual machine.
VMware Tools must be installed and running on target VMs. will not be able to
optimize or resize a VM if VMware Tools is not running.
For more information on installing VMware Tools, see page 155 of VMware’s Basic
System Administration Guide.
Page 27

System Requirements 25
Guest Configuration Requirements
Connected NIC
In order for a virtual machine to connect to a physical network, the’s virtual network
card (vNIC) seen by the Guest OS must be connected and mapped to a vSwitch
connected to at least one physical network adapter.
For more information on network configuration, see “Networking” and “Advanced
Networking” in the VMware ESX Server Configuration Guide.
Tip VMware documentation is available via the VMware Online Library: http://pubs.vmware.com/
vi35/wwhelp/wwhimpl/js/html/wwhelp.htm
VM Names
Avoid using special characters in VM names. Special characters, such as those listed
below can cause problems during VMDK resizing.
single quote
double quote
dash
exclamation point
at sign
number sign
dollar sign
plus sign
braces
semicolon
colon
‘
“
-
!
@
#
$
+
{ }
;
:
equals
carrot
percent sign
question mark
ampersand
asterisk
parentheses
bracket
pipe
underscore
period
=
^
%
?
&
*
( )
[ ]
|
_
.
Page 28

26 vOptimizer Pro
Installation and Setup Guide
Configurations Not Supported
There are several common configurations for which vOptimizer Pro’s resizing
operations are not supported. These configurations are listed below:
• VMs configured with Dynamic Discs
• VMs that contain VMDKs with open snaphots
• VMs that contain VMDKs stored on either virtual or physical RDMs.
• VMs that contain VMDKs that were thinly provisioned. For more information,
see vOptimizer Pro and Thin Provisioning in the vOptimizer Pro 2.1 Release
Notes.
Caution This list should not be considered as exhaustive. The best course of action is always to
carefully evaluate vOptimizer Pro prior to purchasing.
Page 29

Installing vOptimizer Pro 27
Inst alling vOptimizer Pro
This chapter guides you through the process of installing vOptimizer Pro using the
vOptimizer Pro installer.
This chapter contains the following sections:
Preparing to Install......................................................................................................................28
Installing a new version of vOptimizer Pro..................................................................................28
Uninstalling vOptimizer Pro.........................................................................................................32
Page 30

28 vOptimizer Pro
Installation and Setup Guide
Preparing to Install
You will need the following to install vOptimizer Pro:
• A physical or virtual machine to host the vOptimizer Pro installation.
• Administrator access to the machine on which vOptimizer Pro will be installed.
• Administrator access to the target VMs.
Installing a new version of vOptimizer Pro
The installation of vOptimizer Pro is a simple process with few options for variance.
The installation sequence is the same for all platforms. The procedure below assumes
you’ve downloaded the vOptimizer Pro executable from the Vizioncore website.
To install vOptimizer Pro:
Step 1: File Extraction
The vOptimizer Pro installer prompts you to extract the setup.exe and vOptimizer.msi.
1
Click Unzip to accept the default directory.
or
Click Browse and select a different location. Click Unzip
After the extraction completes, the W elcome to the vOptimizer Pro Setup W izard dialog
appears.
Page 31

Installing vOptimizer Pro 29
Installing a new version of vOptimizer Pro
Step 2: Welcome Screen
The Welcome to the vOptimizer Pro Setup Wizard dialog marks the start of the
installation process.
1
Click Next
Step 3: License Agreement
1
Read through the License Agreement statement, and accept or decline the terms
of the license agreement.
2
If you selected I Agree, click Next
Page 32

30 vOptimizer Pro
Installation and Setup Guide
Step 4: Installation Folder
1
Choose the location where you want to install vOptimizer Pro. Y ou can accept the
default location C:\Program Files\Vizioncore\vOptimizer Pro or click Browse to
navigate to another location.
2
If desired, click Disk Cost to see the amount of free space available on the local
machine, and how much space is required by the vOptimizer Pro installation.
3
Click Next
Step 5: Confirm Installation
1
Click Next to install vOptimizer Pro.
Page 33

Installing vOptimizer Pro 31
Installing a new version of vOptimizer Pro
The vOptimizer Pro installation will begin. This process may take several
minutes.
Step 6: Complete
The installation is complete. Click Close to exit the installer.
Page 34

32 vOptimizer Pro
Installation and Setup Guide
Uninstalling vOptimizer Pro
Uninstalling vOptimizer Pro is a simple process utilizing the application’s installer.
To remove vOptimizer Pro:
Step 1: vOptimizer Pro Installer
1
From the Windows desktop, click Start>Programs>Vizioncore> Vizioncore™
vOptimizer Pro>Uninstall Vizioncore™ vOptimizer Pro
The Vizioncore™ vOptimizer Pro Setup Wizard appears.
2
Select Remove Vizioncore™ vOptimizer Pro.
3
Click Finish.
Step 2: vOptimizer Pro Database
vOptimizer Pro maintains a Cost Statistics database. You are prompted to choose to
keep this database or delete it.
Page 35

Installing vOptimizer Pro 33
Uninstalling vOptimizer Pro
1
If you are going to reinstall vOptimizer Pro, click Yes.
This will save the vOptimizer Pro database to be used by future installations.
or
If you are not going to reinstall vOptimizer Pro, click No.
Caution This will permanently delete the Cost Statistics database.
2
The removal completes.
Click Finish.
Page 36

34 vOptimizer Pro
Installation and Setup Guide
Page 37

Running vOptimizer Pro
This chapter contains the following sections:
Starting vOptimizer Pro...............................................................................................................36
Licensing.....................................................................................................................................37
Online Activation.........................................................................................................................37
Offline Activation.........................................................................................................................40
ESX Server Configuration...........................................................................................................44
Connecting to VirtualCenter........................................................................................................44
Connecting to an ESX Server.....................................................................................................48
Running vOptimizer Pro 35
Page 38

36 vOptimizer Pro
Installation and Setup Guide
Before You Get Started
The instructions in this chapter assume that you have already installed vOptimizer Pro.
If you have not, see “Installing a new version of vO pti mizer Pro” on page 28 for
installation instructions.
Starting vOptimizer Pro
After the installation is complete, you can access vOptimizer Pro through the Start
menu:
• Choose Start>Programs>Vizioncore> Vizioncore™ vOptimizer
Pro>Vizioncore™ vOptimizer Pro
Note You may also access the vOptimizer Pro User Guide and the online help file from the
same location
vOptimizer Pro Service
The vOptimizer Pro Service must be running in order for vOptimizer Pro to operate.
To verify the Service is running:
1
From the Start menu, right-click on My Computer
2
Click Manage
3
Scroll down to find vOptimizer Pro Service
If the vOptimizer Pro Service is running, you will see “Started” under the Status
column.
or
If the vOptimizer Pro Service is stopped, highlight the service and click Start
Page 39

Licensing
vOptimizer Pro includes a fourteen day evaluation period during which you ma y
perform two optimizations. To use vOptimizer Pro after that evaluation period, or for
more machines, you must purchase a license and activate the application. There are two
methods by which vOptimizer Pro can be activated:
Running vOptimizer Pro 37
Licensing
• Online Activation
• Offline activation via e-mail with Vizioncore.
Online Activation
Online activation is the most direct method of activating vOptimizer Pro. Before
beginning the online activation, verify that the machine on which vOptimizer Pro is
installed has a live connection to the internet
In order to activate vOptimizer Pro, you will need the serial number provided to you via
e-mail from Vizioncore.
Step 1: Product Activation Wizard
vOptimizer Pro activation is accomplished via a simple wizard that is accessed from the
Help menu.
• From the vOptimizer Pro user interface, click Help, then Activation.
The Product Activation Wizard dialog appears.
Page 40

38 vOptimizer Pro
Installation and Setup Guide
Step 2: Activation Type
Online activation occurs via communication over the internet between the vOptimizer
Pro machine and the Vizioncore license server. If you use a proxy server for internet
access, configure your proxy information by clicking Proxy Settings. For more
information on Offline Activation “Offline Activation” on page 40
1
Select Activate online with Vizioncore. Click Next.
Step 3: Activation Information
1
The Enter Activation Information dialog appears. Enter your serial number in the
Serial number field. Click Next.
Note Your serial number must be entered exactly as it appears in your license e-mail.
Page 41

Running vOptimizer Pro 39
Licensing
Step 4: Activation Completed
The Activation Completed message appears. vOptimizer Pro is now activ ated.
1
Click Finish to close the dialog.
Page 42

40 vOptimizer Pro
Installation and Setup Guide
Offline Activation
If an internet connection is not available to the vOptimizer Pro machine, you may
perform an offline activation. Offline activation requires an active email account and
email client.
To perform an offline activation:
Step 1: Product Activation Wizard
vOptimizer Pro activation is accomplished via a simple wizard that is accessed from the
Help menu.
• From the vOptimizer Pro user interface, click Help, then Activation.
The Product Activation Wizard dialog appears.
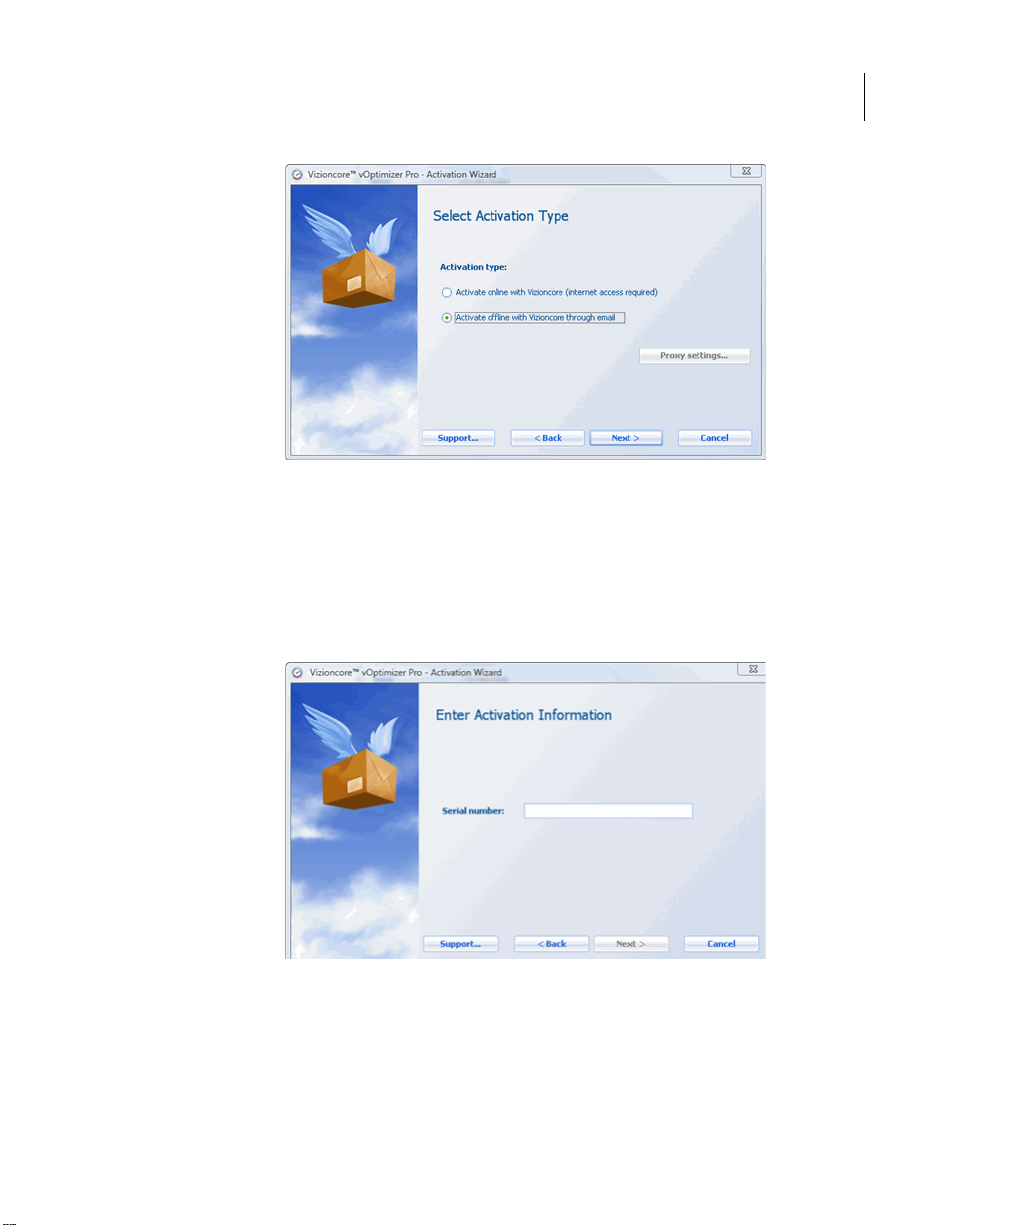
Step 2: Activation Type
1
Select Activate offline with Vizioncore. Click Next.
Page 43
Running vOptimizer Pro 41
Licensing
The Create Activation Request dialog displays.
Step 3: Activation Information
1
The Enter Activation Information dialog appears. Enter your serial number in the
Serial number field. Click Next.
Note Your serial number must be entered exactly as it appears in your license e-mail.
Page 44
42 vOptimizer Pro
Installation and Setup Guide
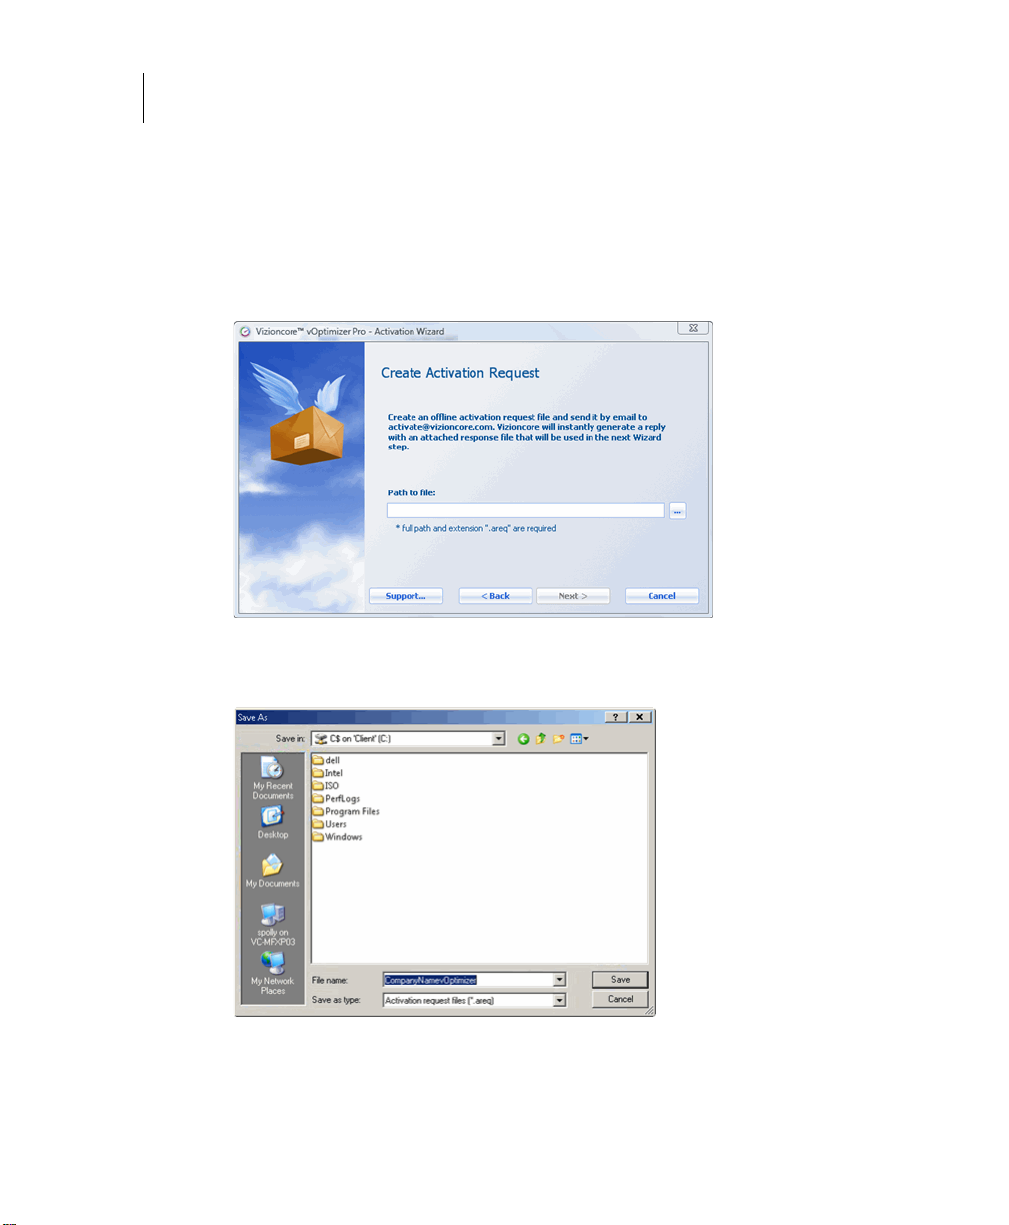
Step 4: Create Request
Offline activation is accomplished by sending a machine specific request file to
Vizioncore via email. This step of the activation process creates and names the folder
per your specifications.
1
Click the browse icon to select the destination for the request file.
2
Browse to the desired location, and enter a name for the file.
Caution Do not change the file extension. Request files must have a *.areq extension.
Page 45

Running vOptimizer Pro 43
Licensing
Step 5: E-mail Request
1
E-mail the request file to activation@vizioncore.com.
Note It is not necessary to specify a subject or provide any details in the email. This is an
automated process
2
After a few moments, you will receive an automated response that contains your
license file. Save this file to a location accessible to the vOptimizer Pro machine.
Step 6: Open Response File
After receiving the response email from Vizioncore, return to the Product Activation
Wizard.
1
Browse to the location of your response file. Click Open.
2
Click Next.
Step 7: Activation Completed
The Activation Completed message appears. vOptimizer Pro is now activ ated.
1
Click Finish to close the dialog.
Page 46

44 vOptimizer Pro
Installation and Setup Guide
ESX Server Configuration
vOptimizer Pro must be configured to connect to VMware® Virtual Infrastructure
components prior to using the program. vOptimizer Pro can be configured to connect to
VirtualCenter - to manage multiple ESX Servers - or configured with connections to
ESX Servers on an individual basis.
To configure:
• A VirtualCenter connection, see “Connecting to VirtualCenter” on page 44
• An individual ESX Server connection, see “Connecting to an ESX Server” on
page 48
Connecting to VirtualCenter
Step 1: ESX Server Tab
1
From the interface, click on the ESX Servers tab.
When accessing the ESX Server tab for the first time, the Welcome to the ESX
Server dialog appears.
2
In the Welcome to ESX Server dialog, click VirtualCenter.
The New VirtualCenter Wizard appears. This wizard walks you through the
process of configuring credentials for a VirtualCenter connection as well as
credentials for each managed ESX Server.
Page 47

Running vOptimizer Pro 45
ESX Server Configuration
Step 2: VirtualCenter Settings
1
In the New VirtualCenter Wizard, enter the required information:
a
IP Address: Enter the IP address of the VirtualCenter server. This field
accepts only IP addresses.
b
Port SDK: This port is used for API calls to VMware’s SDK. The default
value is 443.
c
Name: This field will automatically populate with the name of the
VirtualCenter server.
d
User name: Enter the user name of an account with Administrator access to
the VirtualCenter.
e
Password/Verify Password: Enter the password for the account used.
f
Timeout: This defaults to 5 seconds.
2
Click Next.
Step 3: Default Credentials - All Hosts
vOptimizer Pro offers the option of configuring a single set of credentials for all ESX
Server hosts or specifying credentials for each host individually. For information on
configuring credentials for individual hosts, see “Step 3a: Default Credentials -
Individual Hosts” on page 47
1
In the Default root level credentials dialog, select Use a single default . . .
2
Click Next.
The Default ESX Host Settings dialog appears:
Page 48

46 vOptimizer Pro
Installation and Setup Guide
3
In the Default ESX Host settings dialog, enter the required information:
a
Default user name: Enter the name of an account with non-root access to the
ESX Servers managed by the configured VirtualCenter.
Note This account does not have to exist, vOptimizer Pro can create the account for
b
Default password/Verify Password: Enter the password for the non-root
account.
c
Default Root Password/Verify Root Password: Enter the password for the
root account on your ESX Servers.
you.
4
If the non-root account entered above does not exist on the managed ESX
Servers, select Create default account if it doesn’t exist.
Note If the configured account already exists on an ESX Server with a different
password, it will not be created.
5
Click Next.
Note If the default non-root username or password is not valid for an ESX Server, the
warning screen will appear. If an ESX Server has a non-standard security
configuration, you may configure a connection to that host individually. For more
information, see “Step 3a: Default Credentials - Individual Hosts” on page 47.
6
Click Finish to complete the wizard.
Page 49

Running vOptimizer Pro 47
ESX Server Configuration
Step 3a: Default Credentials - Individual Hosts
Note This procedure continues from “Step 2: VirtualCenter Settings” on page 45
1
In the New VirtualCenter Wizard, select Specify root lever user . . .
2
Click Next.
The Configure ESX Host Settings dialog appears.
3
In the Configure ESX Host Settings dialog, enter the required information:
a
User name: Enter the name of an account with non-root access to the ESX
Server.
Note This account does not have to exist, vOptimizer Pro can create the account for
you.
b
Password/Verify Password: Enter the password for the non-root account.
c
Root Password/Verify Root Password: Enter the password for the root
account on your ESX Server.
d
Port SDK: This port is used for API calls to VMware’s SDK. The default
value is 443.
e
Port SSH: This is the port used for SSH traffic. Default value is 22.
f
Port: Default value is 422. This value should not be changed.
g
Timeout: Default value is 5 seconds.
Page 50

48 vOptimizer Pro
Installation and Setup Guide
4
Click Test Connection.
If the connection is properly configured, a success message appears:
5
Click Next.
Note vOptimizer Pro will automatically repeat this process for each ESX Server managed by the
configured VirtualCenter.
Connecting to an ESX Server
Step 1: ESX Servers Tab
1
From the interface, click on the ESX Servers tab.
When accessing the ESX Server tab for the first time, the Welcome to the ESX
Server dialog appears.
2
In the Welcome to ESX Server dialog, click ESX Server.
Page 51

Running vOptimizer Pro 49
ESX Server Configuration
The New ESX Server Wizard appears. This wizard walks you through the process of
configuring credentials for connection to an ESX Server.
Step 2: ESX Server Settings
1
In the New ESX Server Wizard, enter the required information:
a
IP address: Enter the IP address of the target ESX Server.
b
Port SDK: This port is used for API calls to VMware’s SDK. The default
value is 443.
c
Name: This field will automatically populate with the name of the ESX
Server.
d
Port SSH: This is the port used for SSH traffic. Default value is 22.
e
User name: Enter the user name of a non-root account for vOptimizer Pro to
use to connect to the ESX Server.
f
Port: Default value is 422. This value should not be changed.
g
Password/Verify Password: Enter the password for the non-root account.
h
Timeout: This defaults to 5 seconds.
i
Root Password/Verify Root Password: Enter the password for the root
account on your ESX Server.
Page 52

50 vOptimizer Pro
Installation and Setup Guide
2
Click Test Connection.
If the connection is properly configured, a success message appears:
3
Click Next.
The Congratulations dialog appears:
4
Click Finish
Step 3: Add Additional ESX Servers
1
From the Servers pane, click the Add ESX Server button .
2
Repeat procedure described in “Step 2: ESX Server Settings” on page 49.
Note This concludes the initial setup of Vizioncore™ vOptimizer Pro. For more information,
please refer to the vOptimizer Pro User Guide or the online help.
Page 53

Index 39
A
Activation
Offline
40
Online 37
Adding a VirtualCenter 44
Adding an ESX Server 48
D
Dell
Support
8
H
Hardware Requirements 22
I
Installation Requirements 22
Installing vOptimizer Pro 28
L
Licensing
evaluation license
Licensing vOptimizer Pro 37
37
Characters in VM Names
Guest OS 23
Platforms 23
25
T
Text conventions 5
U
Uninstalling vOptimizer Pro 32
Keeping cost database 32
V
Vizioncore Software 6
VM Names 25
VMware Tools 24
vOptimizer Pro
Installing
Licensing 37
Service 36
Starting 36
Uninstalling 32
28
O
Offline Activation 40
Online Activation 37
R
Requirements
Guest Configuration
Hardware 22
Installation 22
Software 22
24
S
Software Requirements 22
Supported
 Loading...