

Page 1
Dell™ V105 All-In-One Printer
操作ガイド
デル™に消耗品を注文するには、以下の手順に従います。
1. デスクトップのアイコンをダブルクリックします。
2. デルの Web サイトにアクセスするか、電話でデル製プリンタの消耗品を注文します。
www.dell.com/supplies
デルプリンタ サービスタグをお手元にご用意いただくと、よりスムーズにサービスをご利用いただけます。
情報とその入手先 ソフトウェアについて
プリンタ各部の名称とはたらき メンテナンス
用紙や原稿をセットする トラブルシューティング
印刷 仕様
コピー 付録
スキャン ライセンスに関する通知
メモ、注意、および警告について
メモ: メモとは、プリンタの使用方法を向上させるための重要な情報を示したものです。
注意: 注意とは、ハードウェアの故障またはデータの損失を引き起こす可能性のある問題を示し、問題を回避する方法について説明
したものです。
危険: 警告とは、物品の破損やケガ、または人命にかかわる可能性のある問題を示したものです。
本書の内容は予告なく変更される場合があります。
© 2008 Dell Inc. All rights reserved.
方法のいかんを問わず、Dell Inc.の書面による許諾なく本書の内容の一部または全部を複製することは禁止されています。
本書で使用されている商標: Dell、DELL のロゴ、および Dell Ink Management System は Dell Inc. の商標です。Microsoft および Windows は Microsoft
Corporation のアメリカ合衆国および他の国々での登録商標です。 Windows Vista は Microsoft Corporation のアメリカ合衆国および他の国々での商標または登
録商標です。 Adobe および Photoshop は、アメリカ合衆国およびその他の国々における Adobe Systems Incorporated の商標または登録商標です。
本書中では、その他の商標および社名を各社の商号または製品名を示す呼称として使用する場合があります。 Dell Inc. は、自社以外の商標および商品名に対して、
いかなる所有権も主張するものではありません。
アメリカ合衆国政府の権利制限
本ソフトウェアおよび文書は、権利制限に基づいて提供されます。 合衆国政府による使用、複製、または開示は、DFARS 252.227- 7013 の『テクニカルデータおよ
びコンピュータソフトウェアに関する諸権利』の(c)(1)(ii)項および関連条項の規定に基づいて制限されます。 Dell Inc, One Dell Way, Round Rock,
Texas, 78682, USA.
モデル V105
2008 年 2 月 SRV FX703 Rev. A00
Page 2
情報とその入手先
必要な情報 入手先
プリンタのセットアップ方法 プリンタのセットアップ図
印刷用紙をプリンタにセットする方法
印刷操作
文書や写真をスキャンおよびコピーする方法
プリンタの手入れとメンテナンス方法
デル™への連絡方法
メモ: お住まいの国または地域では『オーナーズマニュアル』は
ご利用いただけません。
プリンタの使用準備の安全に関する情報
規制に関する情報
保証に関する情報
オーナーズマニュアル
製品情報ガイド
サポートされている用紙の種類およびサイズ
印刷用紙の選び方および保存方法
印刷用紙をプリンタにセットする方法
プリンタ設定の設定方法
ソフトウェアのセットアップ方法と使用方法
プリンタの手入れとメンテナンス方法
トラブルシューティングおよび問題の解決方法
ソフトウェアおよびドライバ - ご利用のプリンタの認証ドラ
イバおよびデルプリンタソフトウェアのインストーラ
Readme ファイル - プリンタの技術的な変更に関する最新情
報や、熟練ユーザーまたは技術者向けの高度な技術資料
操作ガイド
Drivers and Utilities CD
メモ: コンピュータとプリンタを同時にデルからご購入いただいた
場合には、マニュアルおよびドライバはコンピュータにインストー
Page 3
ルされています。
support.dell.com を利用する際、またはサポートに問い合わ
せる際に、利用しているプリンタを識別する方法
サポートに問い合わせる際にエクスプレスサービスコードを見
つけて、担当者とスムーズに連絡を取る方法
サービスタグおよびエクスプレスコードラベル
これらのラベルはプリンタに貼り付けられています。 これらの場所
についての詳細は、プリンタ各部のはたらき
を参照してください。
ソリューション - トラブルシューティングに関するヒント、
よくある質問、マニュアル、ドライバのダウンロード、および
製品のアップグレード
アップグレード - メモリ、ネットワークカード、オプション
機器などのコンポーネントのアップグレードに関する情報
カスタマーケア - デルの連絡先、修理やご注文の処理状況、
保証、および修理に関する情報
プリンタ用消耗品
プリンタ用アクセサリ
プリンタ用交換インクおよび交換部品
デルサポート Web サイト - support.dell.com
メモ: 地域または事業区分を選択して、該当するサポートサイトを
表示します。
デルプリンタ用消耗品 Web サイト - www.dell.com/supplies
プリンタ用消耗品は、オンライン、電話、または指定小売店でご購
入いただけます。
Page 4
ソフトウェアについて
インク残量のチェック。
Dell Imaging Toolbox を使用する
印刷設定
Dell Ink Management System
デルサービスセンターの使用
XPS ドライバ(オプション)をインストールする
ソフトウェアの削除と再インストール
プリンタソフトウェアには、次のものが含まれます。
Dell Imaging Toolbox- さまざまなスキャン、コピー、および新規または既存の文書や画像を使用した印刷を実行できます。
印刷設定 - プリンタの設定の調整に使用します。
Dell Ink Management System™- プリンタがインク切れになると警告します。
Adobe® Photoshop® Album Starter Edition 3.2- コンピュータに保存された写真の表示、管理、編集を実行できます。
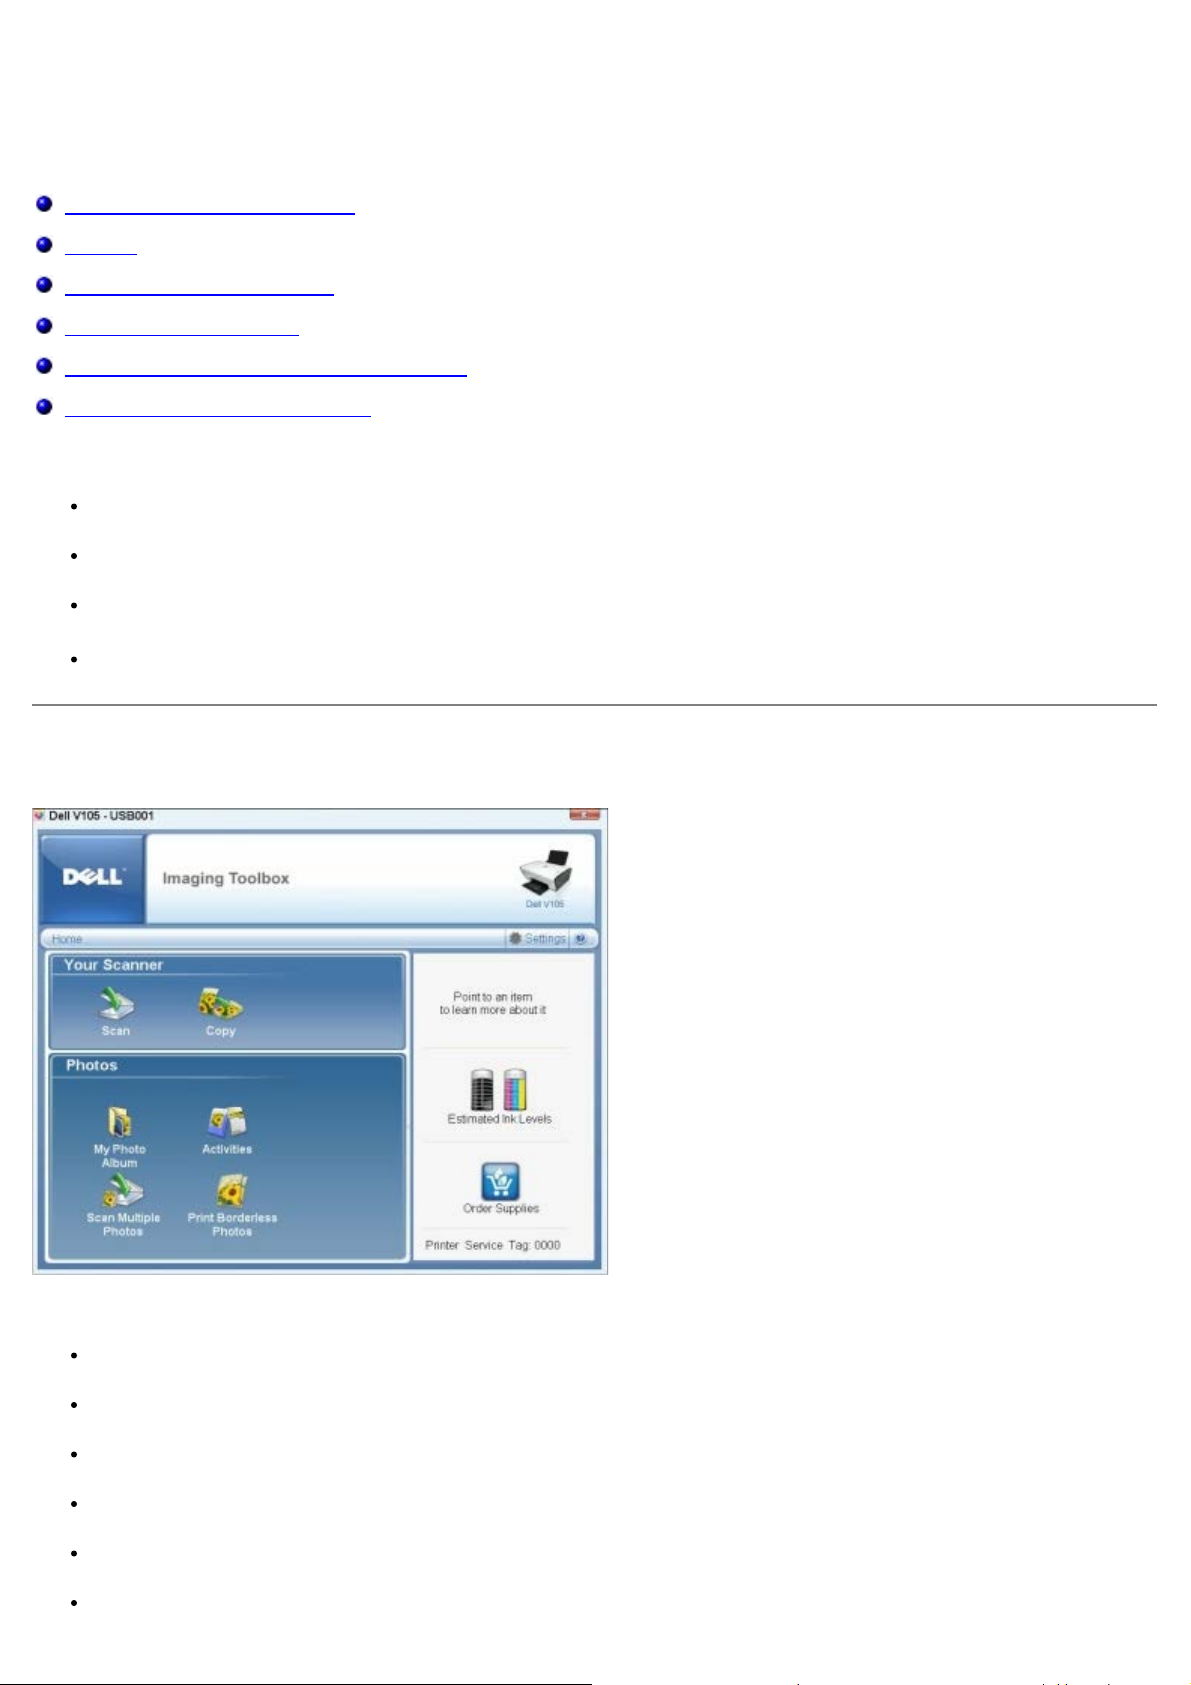
Dell Imaging Toolbox を使用する
[Dell Imaging Toolbox]ダイアログでは以下のことが行えます。
スキャン、コピー、および印刷に必要な様々なツールの使用。
コピー部数とコピー画質の選択。
印刷、スキャン、またはコピーする画像のプレビュー。
デジタルフォトアルバムの写真の管理。
文書や写真の E メール送信。
Page 5
消耗品の注文。
[Dell Imaging Toolbox]を使用するには以下の手順に従います。
1. Windows Vista™ の場合:
a. ® [プログラム]の順にクリックします。
b. [Dell プリンタ]をクリックします。
c. [Dell V105]をクリックします。
Windows
®
XP および Windows 2000 の場合:
[スタート]®[プログラム]または[すべてのプログラム]® [デルプリンタ]®[Dell V105]の順にクリックします。
2. [Dell Imaging Toolbox]を選択します。
[Dell Imaging Toolbox]が開きます。
Dell Imaging Toolbox のホーム画面には、次のセクションがあります。
セクション名ボタン はたらき
スキャナ スキャン
ジョブを開始します。
画像を取り込むアプリケーションを選択します。
スキャンする画像の種類を選択します。
スキャンの品質設定を選択します。
コピー
コピーを作成
コピー部数とカラーモードを選択します。
コピーの品質設定を選択します。
用紙サイズを指定します。
コピーする原稿のサイズを指定します。
コピー濃度を調整します(この操作は操作パネルからも実行できます)。
コピーのサイズを変更します。
写真 フォト アルバム
フォトアルバムに保存済みの写真を管理します。
保存済みの写真を印刷します。
グリーティングカードを作成します。
保存済みの写真でポスターを作成します。
E メールに写真を添付します。
保存済みの写真を PDF 形式に変換します。
操作
画像のサイズを変更します。
写真を編集します。
複数の写真をスキャンします。
スキャンした文書を OCR でテキスト形式に変換します。
複数の写真をスキャンして 1 つのファイルに保存します。
画像を分割して印刷します(ポスター)。
フチなし写真を印刷します。
複数の写真をスキャンする 複数の写真を同時にスキャンして、別々のファイルに保存します。
フチなし写真を印刷するフチなし写真を印刷します。
設定 印刷設定 コピー画質、コピー部数、給紙口、スキャン方向またはコピー方向など、プリンタの設定を調整し
ます。
Page 6
詳細については、[Dell Imaging Toolbox] のヘルプアイコンをクリックしてください。
ツールボックスの設定 スキャン、ファイル設定、E メール、ライブラリなどのツールボックスの設定を調整します。
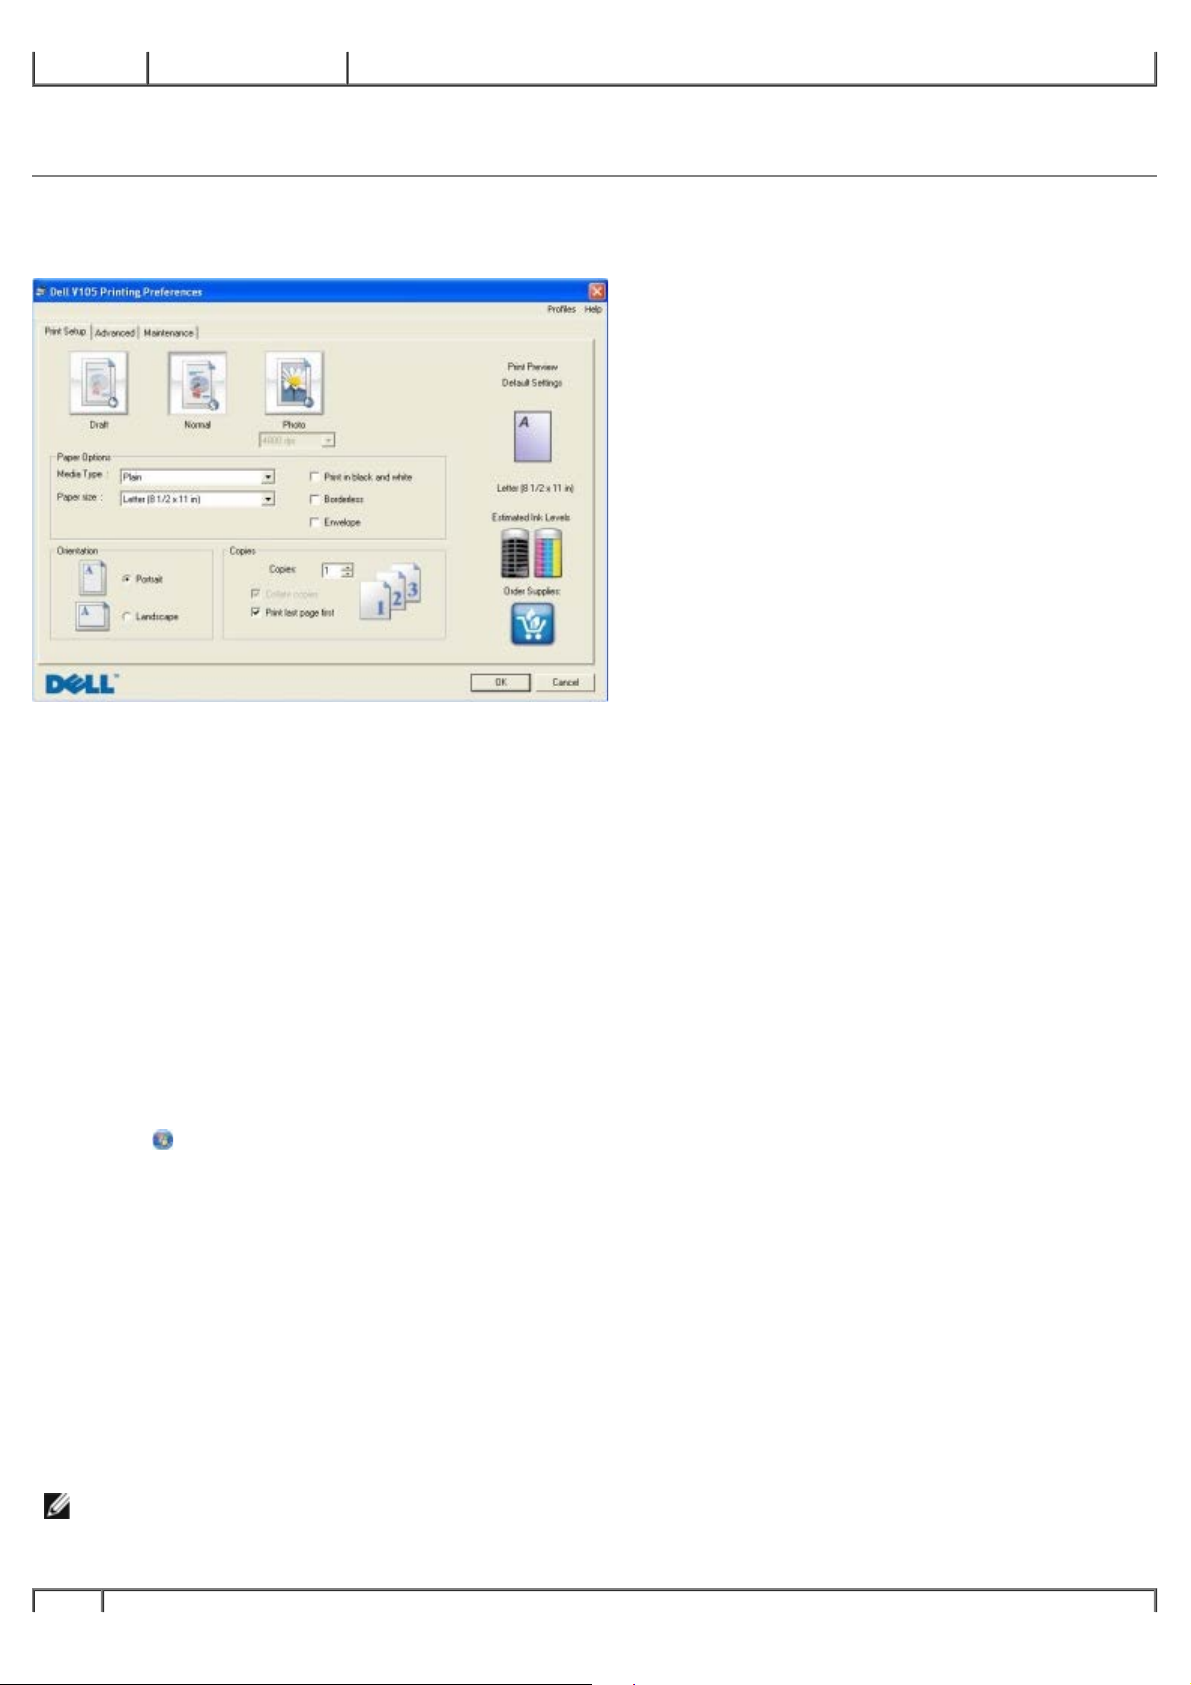
印刷設定
[印刷設定]では、作成する印刷物の種類に応じてプリンタの設定を変更できます。
ドキュメントを開いた状態で[印刷設定]にアクセスするには、以下の手順に従います。
1. [ファイル]®[印刷]の順にクリックします。
[印刷]ダイアログボックスが表示されます。
2. [設定]、[プロパティ]、[オプション]、または[セットアップ]をクリックします(アプリケーションまたはオペレーティン
グシステムによって異なります)。
[印刷設定]ダイアログボックスが表示されます。
ドキュメントが開かれていない状態で、[印刷設定]にアクセスするには、以下の手順に従います。
1. Windows Vista の場合:
a.
® [コントロール パネル]をクリックします。
b. [ハードウェアとサウンド]をクリックします。
c. [プリンタ]をクリックします。
Windows XP の場合は、[スタート]®[設定]® [コントロール パネル]®[プリンタとその他のハードウェア]®[プリンタと
FAX]の順にクリックします。
Windows 2000 の場合は、[スタート]ボタンをクリックして、[設定]、[プリンタ]の順にクリックします。
2. [Dell V105]のアイコンを右クリックします。
3. [印刷設定]をクリックします。
メモ: [プリンタ]フォルダで変更したプリンタの設定は、ほとんどのアプリケーションで標準設定に設定されます。
[印刷設定]ダイアログボックスには、以下の 3 つのセクションがあります。
Page 7
タブ オプション
印刷設
定
[品質/速度]- 印刷の品質に応じて、[高速]、[標準]、または[高品質]を選択します。 [高速]は、最も速く印刷できる
オプションです。ただし、フォトカートリッジがセットされている場合には選択しないでください。
[用紙の種類]- 用紙の種類を手動で選択するか、プリンタで自動的に検出するかを設定します。
[用紙サイズ]- 用紙のサイズを選択します。
[モノクロで印刷]- カラー画像をモノクロで印刷して、カラーカートリッジのインクを節約します。
メモ: [カラーカートリッジを使用して黒で印刷する]オプションが選択されている場合、この設定は選択できません。
[フチなし]- フチなし写真を印刷する場合、このチェックボックスをオンにします。
[印刷方向]- 文書をどの方向に印刷するかを指定します。 縦方向または横方向に印刷できます。
[封筒]- 封筒に印刷する場合、このチェックボックスをオンにします。 [用紙サイズ]の欄には、印刷に使用できる封筒のサ
イズが表示されます。
[印刷部数]- 1 回のジョブで複数のコピーを作成する方法を変更します。 [部単位で印刷]、[標準]、または[逆順で印
刷]などの印刷順序を指定します。
アドバ
ンス
メンテ
ナンス
[両面印刷]— 用紙の両面に印刷する場合に選択します。また、用紙を再セットする手順を示す給紙ガイドを印刷するかどうか
を選択します。
[レイアウト]- [標準]、[バナー]、[左右反転]、[割り付け]、[ポスター]、[小冊子]、または[フチなし]を選
択します。
[画像のシャープ化]- 画像の種類に応じて、最も良い鮮明度のレベルが自動的に選択されます。
[デルカスタマーエクスペリエンス向上プログラム]- デルカスタマーエクスペリエンス向上プログラムに関する情報にアクセ
スし、参加の状態を変更できます。
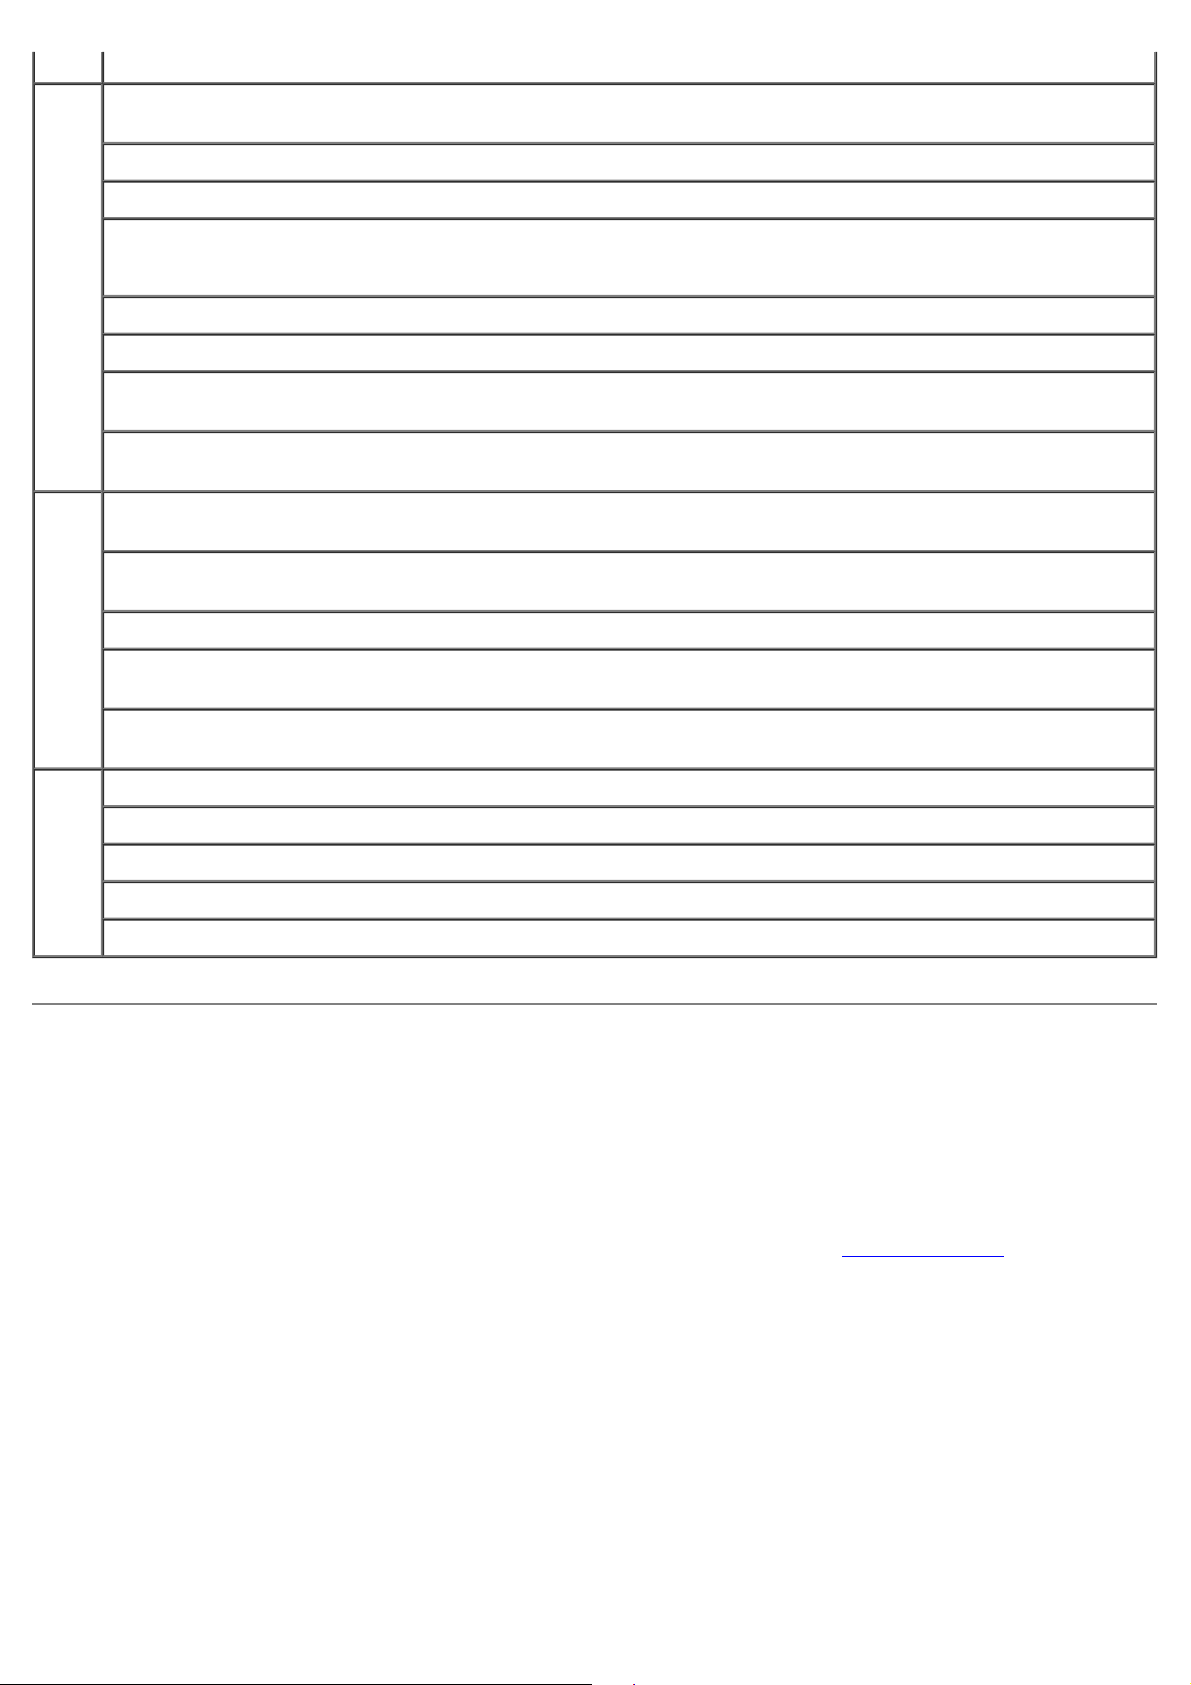
[その他のオプション]- [表示オプション]および[印刷を完了]の設定を指定できます。 プリンタで検出された用紙の種類
を表示することもできます。
[カートリッジの取り付け]
[ノズル清掃]
[プリントヘッド調整]
[テストページの印刷]
[ネットワークサポート]
Dell Ink Management System
印刷を実行するたびに、印刷の進行状況を示す画面が表示されます。この画面には、印刷ジョブの進行状況、カートリッジのインク残量、
残りのインクで印刷できるおよそのページ数が表示されます。 カートリッジを使用し始めてから 50 ページ印刷するまでは、残りのページ
数は表示されません。その間の印刷状況に応じてより正確な枚数を計算しているためです。 残りのページ数は、プリンタで実行される印刷
ジョブの種類に応じて変化します。
カートリッジのインクレベルが低下している場合、印刷しようとすると「インクが残り少なくなっています」という警告が画面に表示され
ます。 この警告は、新しいカートリッジを取り付けるまで、印刷を行うたびに表示されます。 (⇒ カートリッジの交換)
片方または両方のインクカートリッジが空の場合、印刷しようとすると[予備タンク]ウィンドウが画面に表示されます。 この状態で印刷
を続けても、希望どおりに印刷されない場合があります。
ブラックカートリッジがインク切れの場合、[印刷を完了]を選択してから[続ける]ボタンをクリックして、カラーカートリッジを使用
して合成されたブラックで印刷することができます。 [印刷を終了]を選択して[続ける]をクリックすると、ブラックカートリッジを交
換するか、[印刷設定]の[アドバンス]タブにある[その他のオプション]でオプションを解除するまで、すべてのモノクロ印刷に合成
されたブラックが使用されます。 インク切れのカートリッジを交換するまで、[予備タンク]ダイアログボックスは表示されなくなりま
す。 新しいカートリッジまたは別のカートリッジが取り付けられると、[印刷を完了]チャックボックスは自動的にオフになります。
カラーカートリッジがインク切れの場合、[印刷を完了]を選択してから[続ける]ボタンをクリックして、カラーのドキュメントをグ
レースケールで印刷することができます。 [印刷を完了]を選択して[続ける]をクリックすると、カラーカートリッジを交換する
か、[印刷設定]の[アドバンス]タブにある[その他のオプション]からオプションの選択を解除するまで、すべてのカラードキュメン
トはモノクロで印刷されます。 インクが残り少ないカートリッジを交換すると、[予備タンク]ダイアログボックスは表示されなくなりま
す。 新しいカートリッジまたは別のカートリッジが取り付けられると、[印刷を完了]チェックボックスは自動的にオフになります。
Page 8
[印刷を完了]の設定を変更するには、以下の手順に従います。
1. [アドバンス]タブをクリックします。
2. [詳細オプション]をクリックします。
3. [印刷を完了]セクションで、[カラーカートリッジを使用して黒で印刷]または[ブラックカートリッジを使用してモノクロで印
刷]のいずれかを選択して、これらの機能のオン/オフを切り替えます。
4. [OK]をクリックします。
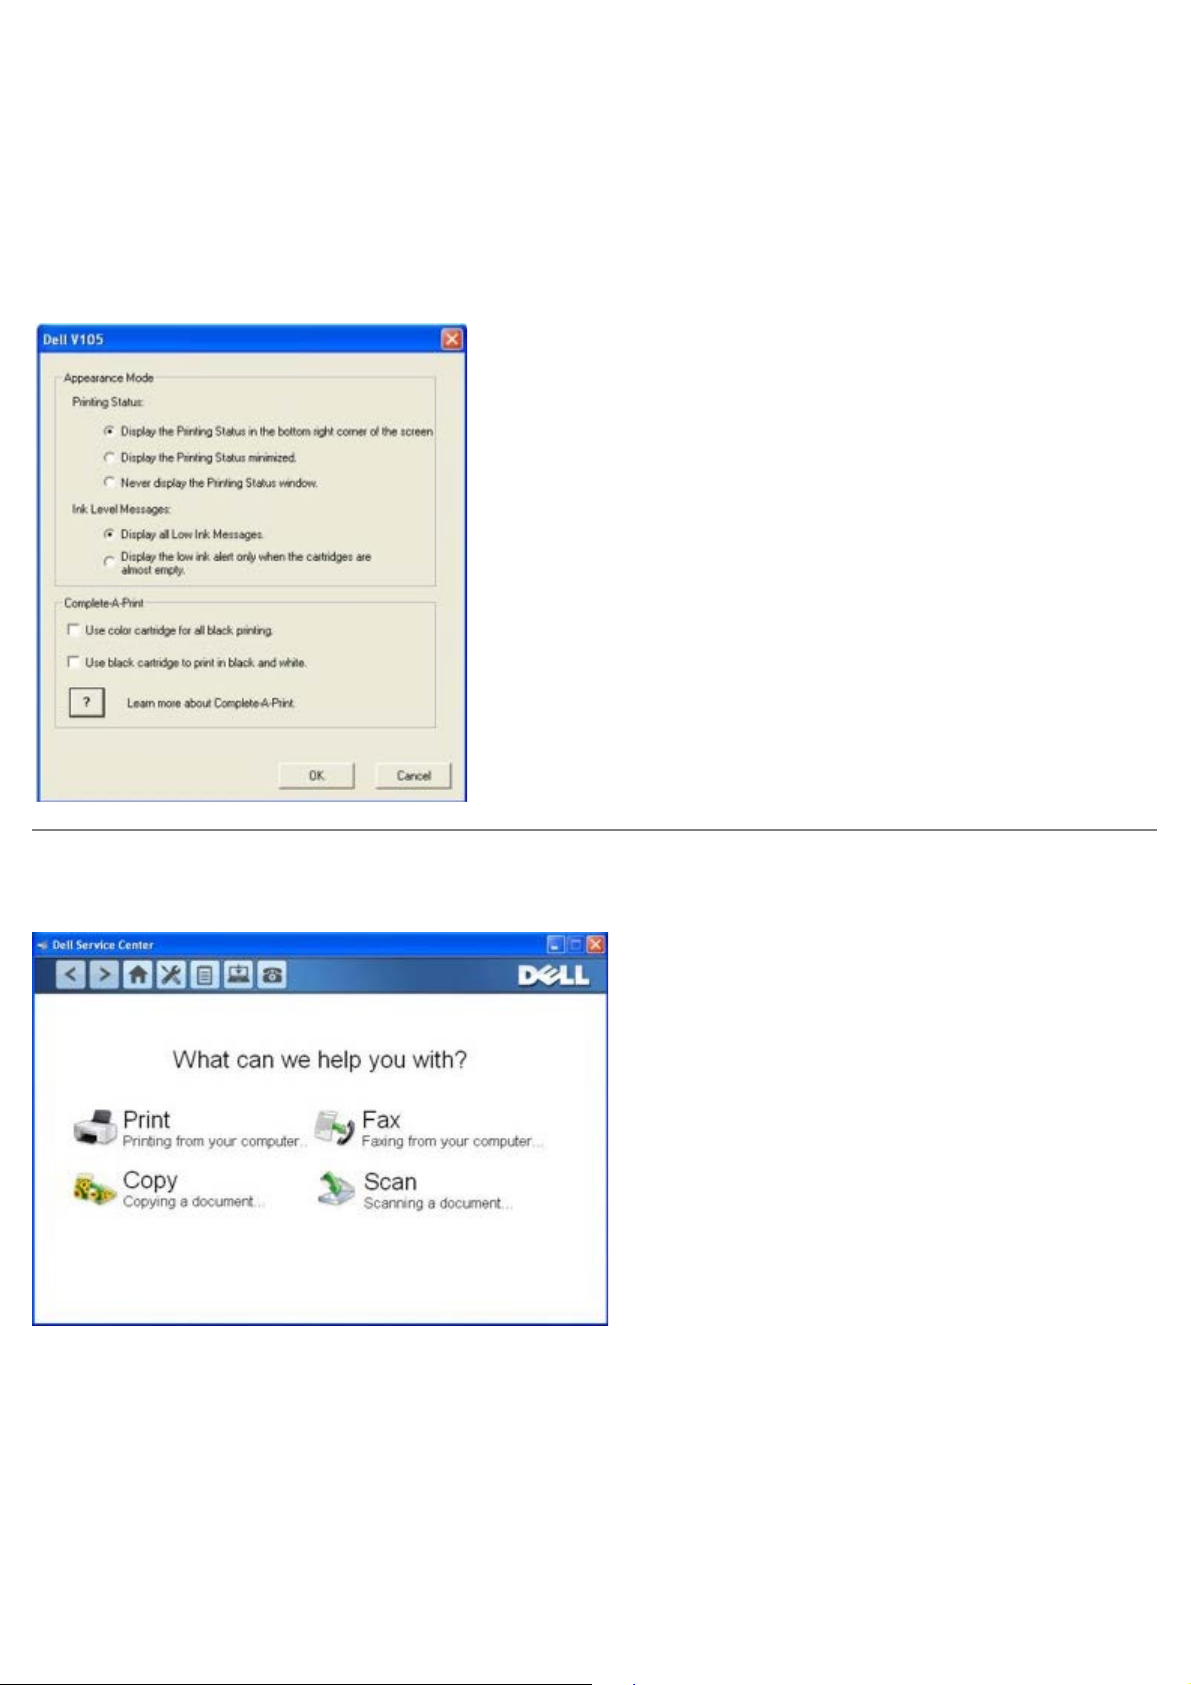
デルサービスセンターの使用
デルサービスセンターは、プリンタの使用中に生じた問題のトラブルシューティングを段階的に実行するのに役立つ診断ツールです。 プリ
ンタのメンテナンス作業やカスタマーサポートへのリンクも含まれています。
デルサービスセンターを使用するには、以下のいずれかの方法を使用します。
エラーメッセージダイアログボックスからアクセスする
[詳細については、デルサービスセンターにアクセスしてください]のリンクをクリックします。
[スタート]メニューからアクセスする
Page 9
1. Windows Vista の場合:
a. ® [プログラム]の順にクリックします。
b. [Dell プリンタ]をクリックします。
c. [Dell V105]をクリックします。
Windows XP および Windows 2000 の場合:
[スタート]®[プログラム]または[すべてのプログラム]® [デルプリンタ]®[Dell V105]の順にクリックします。
2. [デルサービスセンター]をクリックします。
[デルサービスセンター]ダイアログボックスが開きます。
XPS ドライバ(オプション)をインストールする
XPS(XML Paper Specification)ドライバは、Windows Vista のみで使用できる XPS の優れたグラフィック機能およびカラー機能を使
用するための追加プリンタドライバ(オプション)です。XPS 機能を使用するには、プリンタのインストール後に追加ドライバとして
XPS ドライバをインストールする必要があります。
メモ: XPS ドライバをインストールする前に、『プリンタのセットアップ』の手順を実行して、お使いのコンピュータにプリンタ
をインストールします。
メモ: XPS ドライバをインストールする前に、Microsoft QFE パッチをインストールして、Drivers and Utilities CD からドライ
バファイルを展開する必要があります。パッチをインストールするには、コンピュータに対する管理者権限が必要です。
Microsoft QFE パッチをインストールして、ドライバを展開するには、以下の手順に従います。
1. Drivers and Utilities CDをセットし、[設定ウィザード]が表示されたら[キャンセル]をクリックします。
® [コンピュータ]の順にクリックします。
2.
3. CD-ROM ドライブのアイコンをダブルクリックし、Drivers をダブルクリックします。
4. [xps]をダブルクリックしてから、[setupxps]をダブルクリックします。
XPS ドライバファイルがコンピュータにコピーされ、必要に応じた Microsoft XPS ファイルが実行されます。画面に表示される手
順に従って、パッチのインストールを完了します。
ドライバをインストールするには、以下の手順に従います。
1.
® [コントロール パネル]の順にクリックします。
2. [ハードウェアとサウンド]で、[プリンタ]をクリックして[プリンタのインストール]をクリックします。
3. [プリンタの追加]ダイアログボックスで[ローカル プリンタを追加します]をクリックします。
4. [既存のポートを使用]ドロップダウンメニューから、[USB の仮想プリンタポート]を選択して、[次へ]をクリックします。
5. [ディスク使用]をクリックします。
[フロッピー ディスクからインストール]ダイアログボックスが表示されます。
6. [参照]をクリックして、次の手順でコンピュータ上の XPS ドライバファイルの場所を参照します。
a. [コンピュータ]をクリックしてから、(C:) をダブルクリックします。
b. [Drivers]をダブルクリックし、[Printer]をクリックします。
Page 10

c. 名前にお使いのプリンタの機種番号が含まれているフォルダをダブルクリックして、[Drivers]をダブルクリックしま
す。
d. [xps]をダブルクリックしてから、[開く]をクリックします。
e. [フロッピー ディスクからインストール]ダイアログボックスで、[OK]をクリックします。
7. 次の 2 つのダイアログボックスで、[次へ]をクリックします。
XPS ドライバの詳細については、Drivers and Utilities CD に収納されている XPS の readme ファイルを参照してください。ファイル
は setupxps バッチファイルと共に、xps フォルダにあります(D:\Drivers\xps\readme)。
ソフトウェアの削除と再インストール
プリンタの使用時にプリンタが正しく機能しないか、通信エラーのメッセージが表示された場合は、プリンタソフトウェアを削除し、再イ
ンストールします。
1. Windows Vistaの場合:
a. ® [プログラム]の順にクリックします。
b. [Dell プリンタ]をクリックします。
c. [Dell V105]をクリックします。
Windows XP および Windows 2000 の場合:
[スタート]®[プログラム]または[すべてのプログラム]® [デルプリンタ]®[Dell V105]の順にクリックします。
2. [Dell V105 のアンインストール]をクリックします。
3. 画面に表示される手順に従います。
4. コンピュータを再起動します。
5. Drivers and Utilities CDをセットし、画面に表示される手順に従います。
インストール画面が表示されない場合は、以下の手順に従います。
a. Windows Vista の場合は、
Windows XP の場合は、[スタート]® [マイ コンピュータ]の順にクリックします。
Windows 2000 の場合は、デスクトップで[マイ コンピュータ]アイコンをダブルクリックします。
b. CD-ROM ドライブのアイコンをダブルクリックし、setup.exe をダブルクリックします。
® [コンピュータ]の順にクリックします。
c. プリンタソフトウェアのインストール画面が表示されたら、[USB ケーブルを使用する]または[ワイヤレスネットワーク
を使用する]をクリックします。
d. 画面に表示される手順に従い、インストールを完了します。
Page 11
プリンタ各部の名称とはたらき
プリンタ各部のはたらき
操作パネルのはたらき
お使いのプリンタは、さまざまな用途に使用できます。 以下の点に注意してください。
プリンタがコンピュータに接続されている場合、プリンタの操作パネルまたはプリンタソフトウェアを使用して、高品質のドキュメ
ントおよび写真を作成できます。
印刷、スキャンの各機能を使用するには、プリンタがコンピュータに接続されている必要があります。
コピー機能を使用するには、プリンタをコンピュータに接続する必要はありません。
プリンタ各部のはたらき
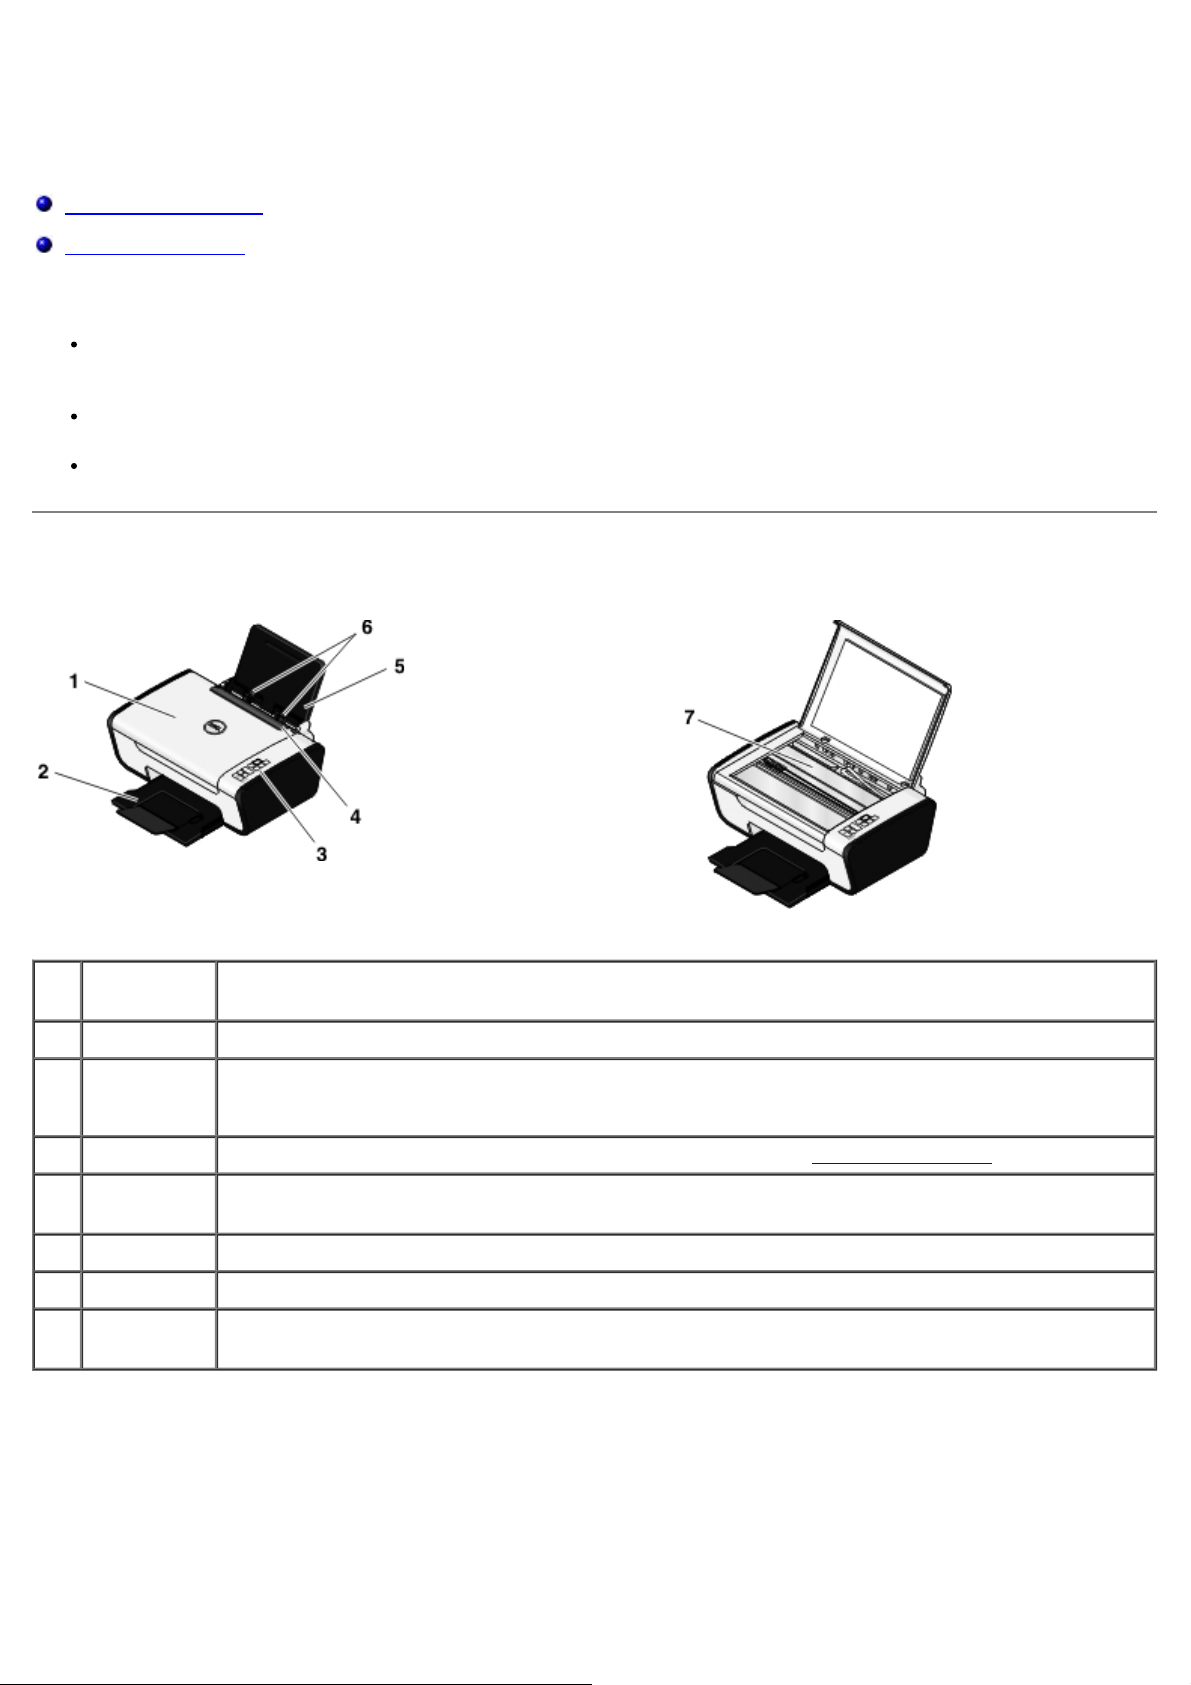
番号名称 説明
1
原稿カバー プリンタの一番上の部分で、スキャンする文書または写真が平らになるように押さえます。
2
排紙トレイ プリンタから排出された用紙を受けるところです。
メモ: 排紙トレイをいっぱいに引き出して延ばします。
3
操作パネル コピー、スキャン、印刷操作に使用するプリンタ上のパネルです。 (⇒ 操作パネルのはたらき
4
落下防止ガード小さな異物がプリンタ内部に入り込むのを防ぎます。
5
用紙サポート セットされた用紙を支えます。
6
用紙ガイド プリンタへの給紙が正しく行われるようにします。
7
原稿台 コピーまたはスキャンする文書や写真をセットする部分です。セットする場合はスキャンする面を下向きに載せま
す。
)
Page 12
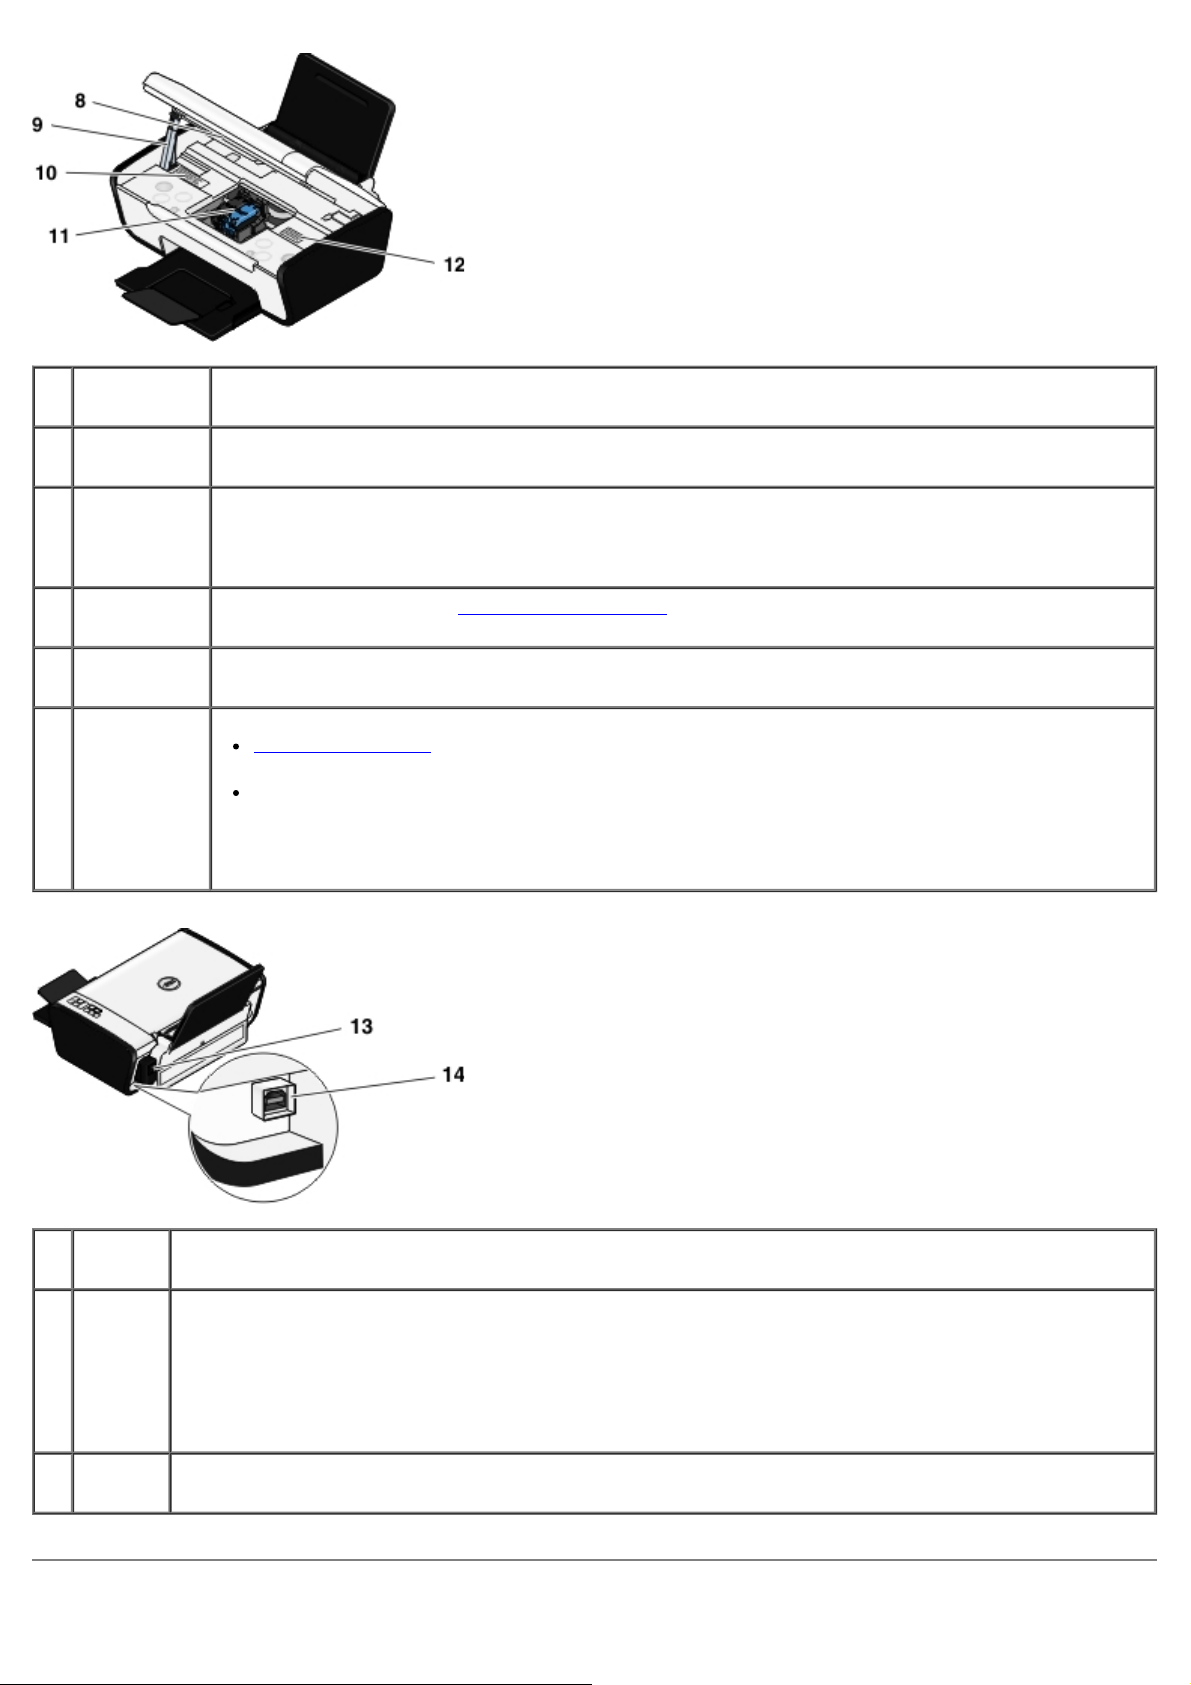
番号名称 説明
8
スキャナベー
スユニット
9
固定レバー スキャナユニットの下にある部分で、カートリッジを交換している間プリンタを開けた状態に保ちます。
10
消耗品注文ラ
ベル
11
カートリッジ
ホルダー
12
エクスプレス
サービスコー
ド
カートリッジを交換する場合は、このユニットを開きます。
メモ: プリンタを閉じて通常の操作を行うには、スキャナベースユニットを持ち上げ、固定レバーをプリンタの背
面方向に向けて倒し、スキャナベースユニットがプリンタ本体の上に収まるまで下ろします。
インクカートリッジや用紙は www.dell.com/supplies
カラーカートリッジ 1 個と、ブラックまたはフォトカートリッジのいずれか 1 個の、合計 2 個のカートリッジを
取り付けることができます。
support.jp.dell.com を使用する際、またはテクニカルサポートにお問い合わせの際に、お使いのプリンタを
識別するための番号です。
テクニカルサポートにお問い合わせの際にエクスプレスサービスコードを入力すると、担当者とスムーズに連
絡を取ることができます。
メモ: 国によっては、エクスプレスサービスコードが使用できない場合があります。
から注文できます。
番号名称 説明
13
電源部 プリンタに電源を供給します。
メモ: 電源部は取り外し可能です。 電源部をコンセントに接続したままプリンタから取り外すと、LED が点灯して、
電源が入ったままであることを知らせます。
メモ: プリンタの電源がオフの際にコンセントから抜くと、次にコンセントに接続したとき、プリンタの電源はオフの
ままです。
14
USB コネクタUSB ケーブル(別売)を接続するための差込口です。 USB ケーブルのもう一方の端末はコンピュータに接続します。
Page 13
操作パネルのはたらき
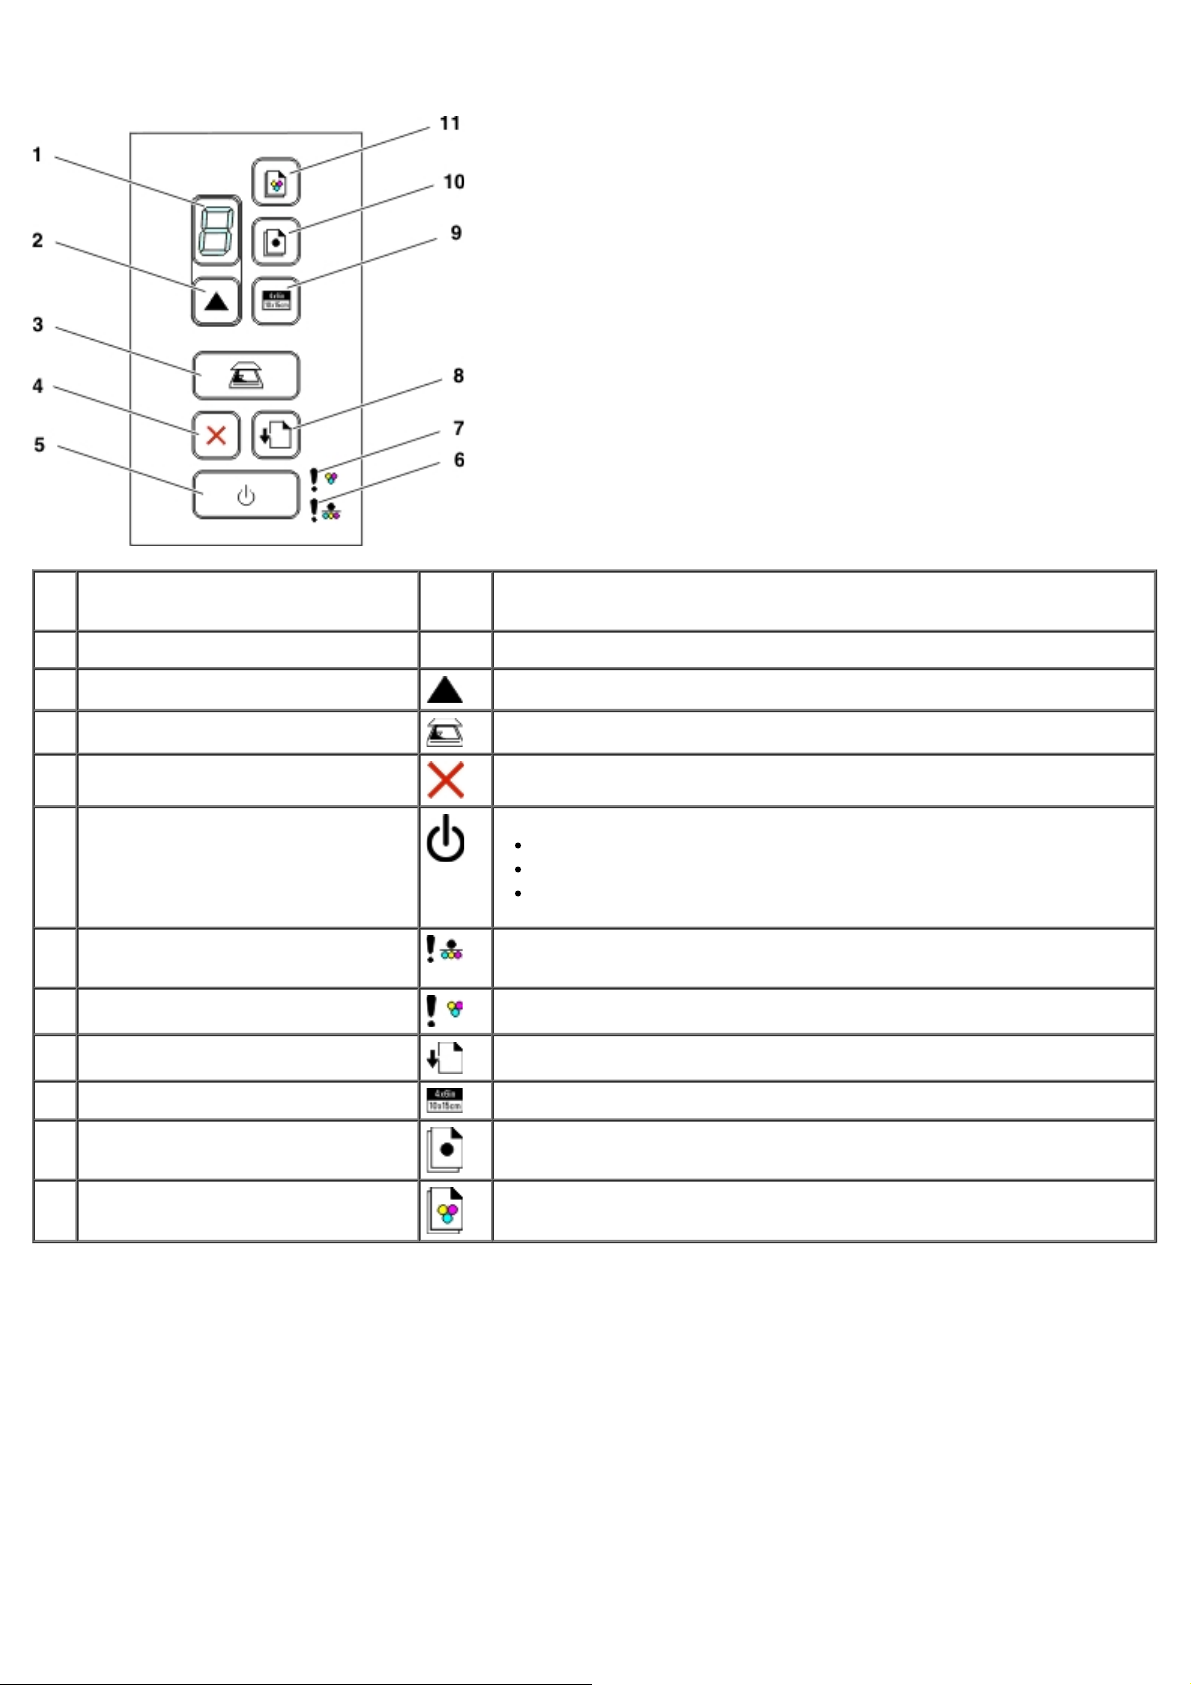
番号名称 アイコンはたらき
1
ディスプレイ
2
コピーボタン
3
スキャンボタン
4
キャンセルボタン
5
電源ボタン
6
ブラックまたはフォトカートリッジエ
ラー LED
7
カラーカートリッジエラー LED
8
給紙ボタン
9
4 x 6 コピーボタン
10
モノクロコピーボタン
11
カラーコピーボタン
印刷されるコピー部数とエラーコードを表示します。
コピーの枚数を設定します。
文書または写真をスキャンしてコンピュータに送ります。
実行中のスキャン、印刷、またはコピー操作をキャンセルします。
プリンタの電源のオン/オフを切り替えます。
実行中の印刷、コピー、またはスキャンをキャンセルします。
プリンタをリセットします。
ブラック(またはフォト)インクカートリッジを交換する必要があるかどうかを
確認します。
カラーインクカートリッジの交換が必要かどうかを確認します。
用紙を送るか、排出します。
4x6 サイズのカラー写真のコピーを開始します。
文書や写真のモノクロコピーを開始します。
文書や写真のカラーコピーを開始します。
Page 14
メンテナンス
カートリッジの交換
ヘッド調整
カートリッジノズルの清掃
プリンタの表面を清掃する
危険: このセクションに記載されている手順を実行する前に、『オーナーズマニュアル』の安全に関する情報を読み、その指示に
従ってください。
デル製カートリッジは、当社でしか取り扱っておりません。 追加のカートリッジは、オンラインで www.dell.com/supplies からご注文
いただくか、お電話でご注文ください。
危険: お使いのプリンタには、デルブランドのカートリッジを使用してください。 デルブランド以外のアクセサリ、部品、または
コンポーネントの使用により問題が発生した場合は、保証の対象とはなりません。
カートリッジの交換
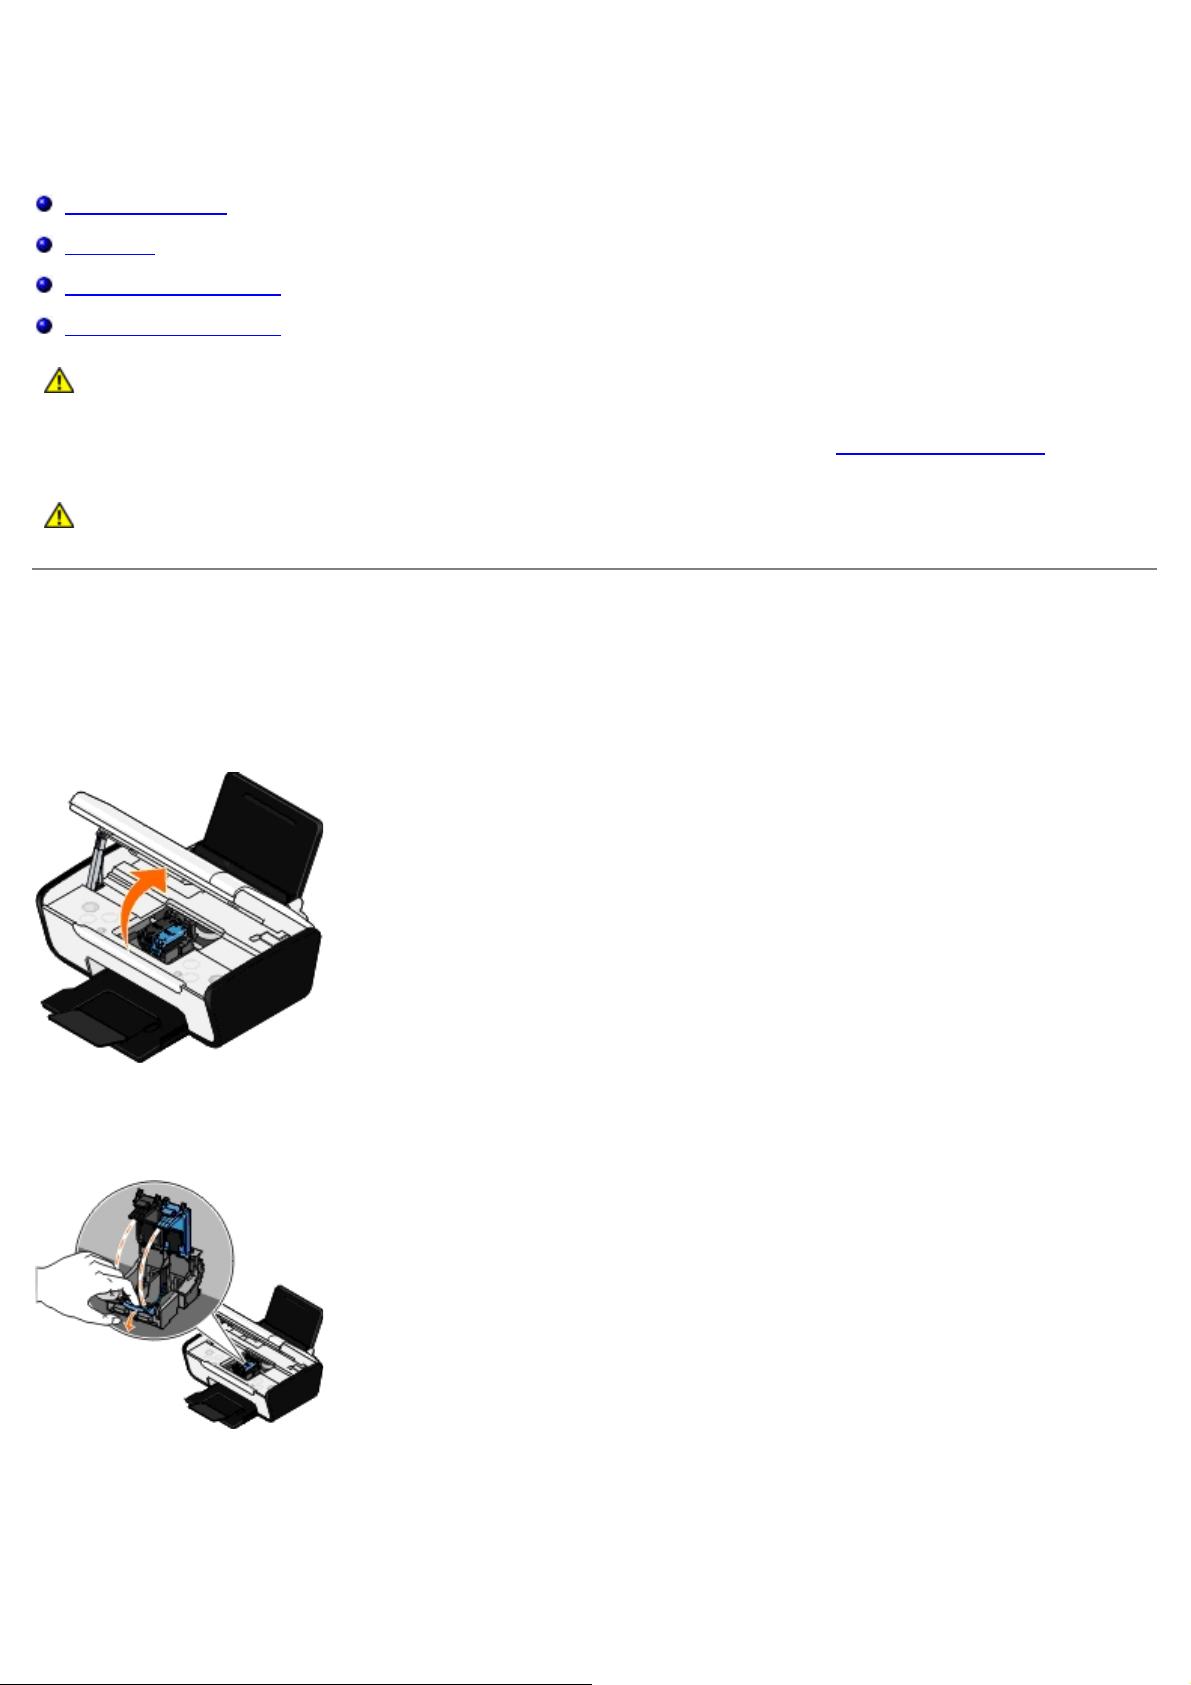
1. プリンタの電源をオンにします。
2. スキャナベースユニットを持ち上げます。
印刷中でなければ、カートリッジホルダーが取り付け位置まで移動して停止します。
3. カートリッジレバーを押し下げると、各カートリッジの蓋が持ち上がります。
4. 使用済みのカートリッジを取り外します。
Page 15
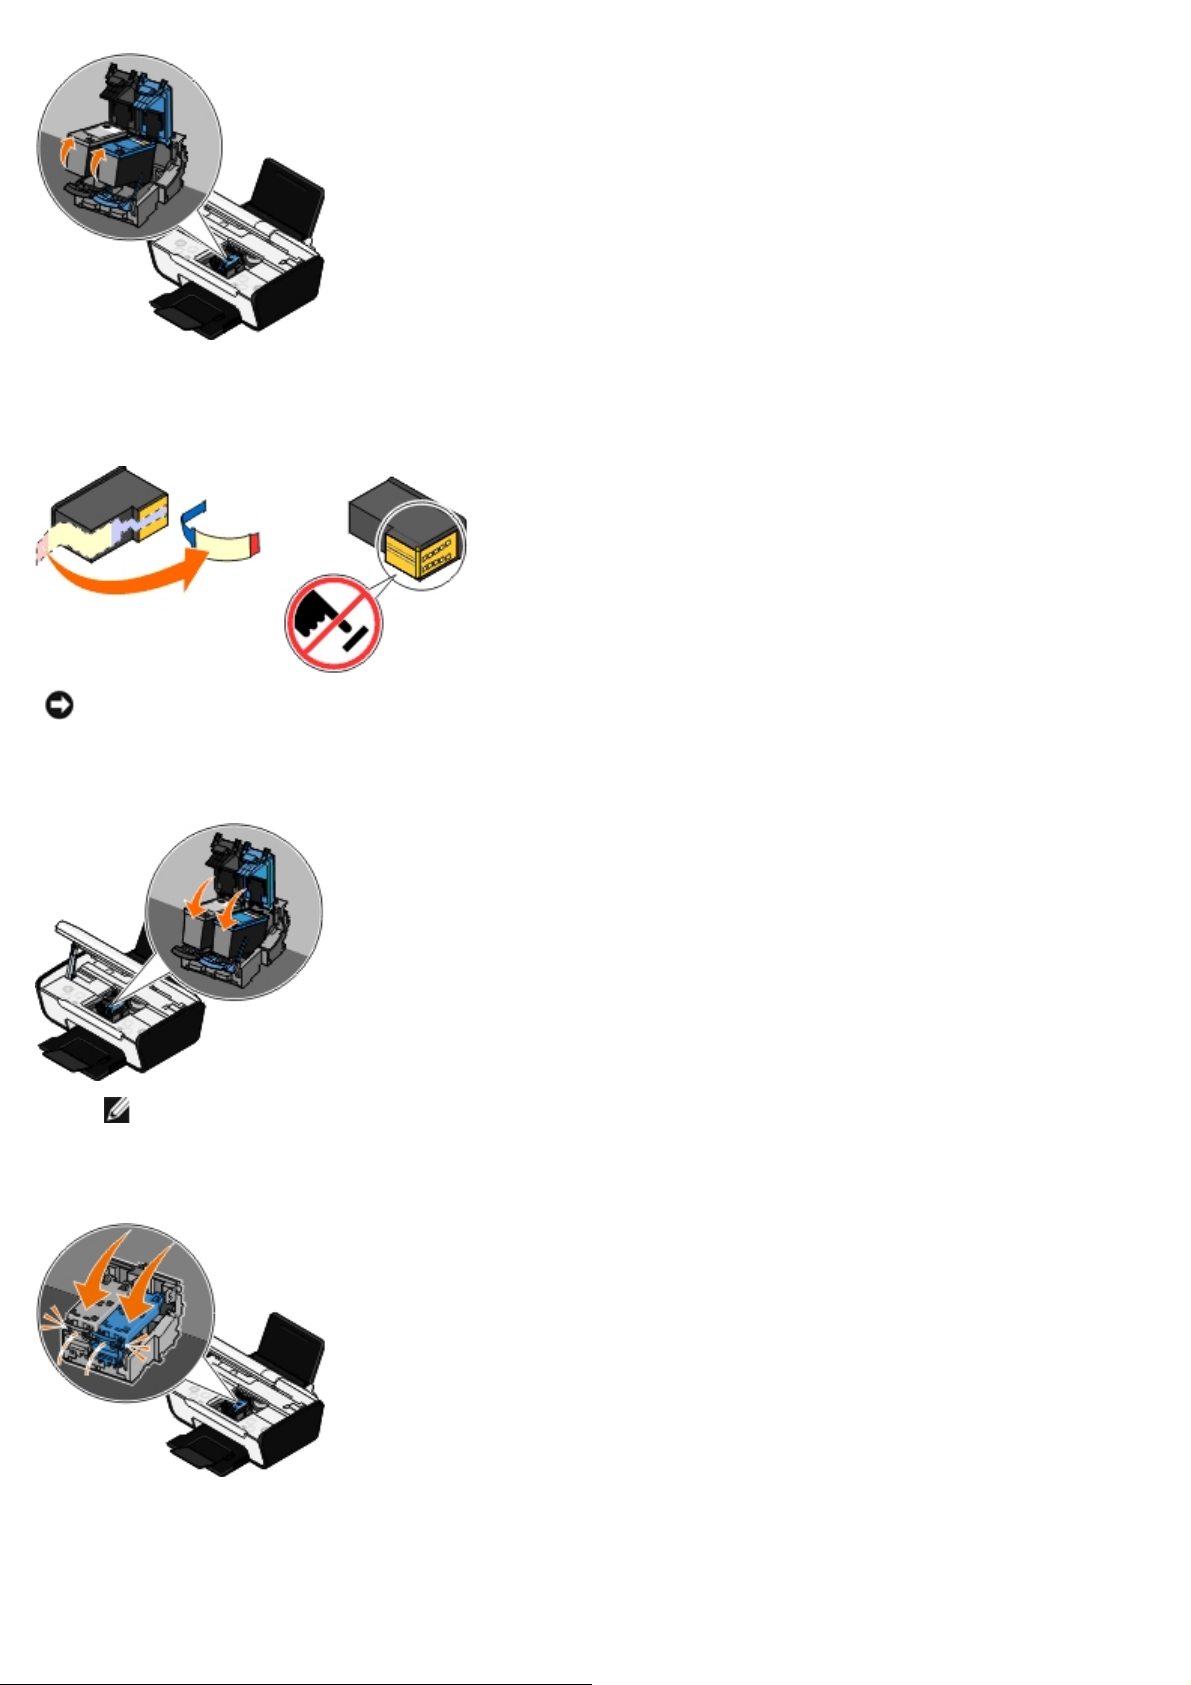
5. カートリッジは、フォトカートリッジに付属する保存容器などの密閉容器に入れて保存するか、適切な方法で廃棄してください。
6. 新品のカートリッジを取り付ける場合は、各カートリッジの背面および下部から粘着テープと透明な保護テープを取り外します。
注意: カートリッジの横の接触面または下のノズルに手を触れないでください。
7. 新しいカートリッジを差し込みます。 ブラックカートリッジまたはフォトカートリッジを左側のカートリッジホルダーに、またカ
ラーカートリッジを右側のカートリッジホルダーにしっかりと取り付けたことを確認します。
メモ: 通常の印刷では、ブラックカートリッジとカラーカートリッジを使用します。 写真を印刷する場合は、ブラックカー
トリッジをフォトカートリッジに交換してください。
8. 固定カバーをカチッと音がするまで閉じます。
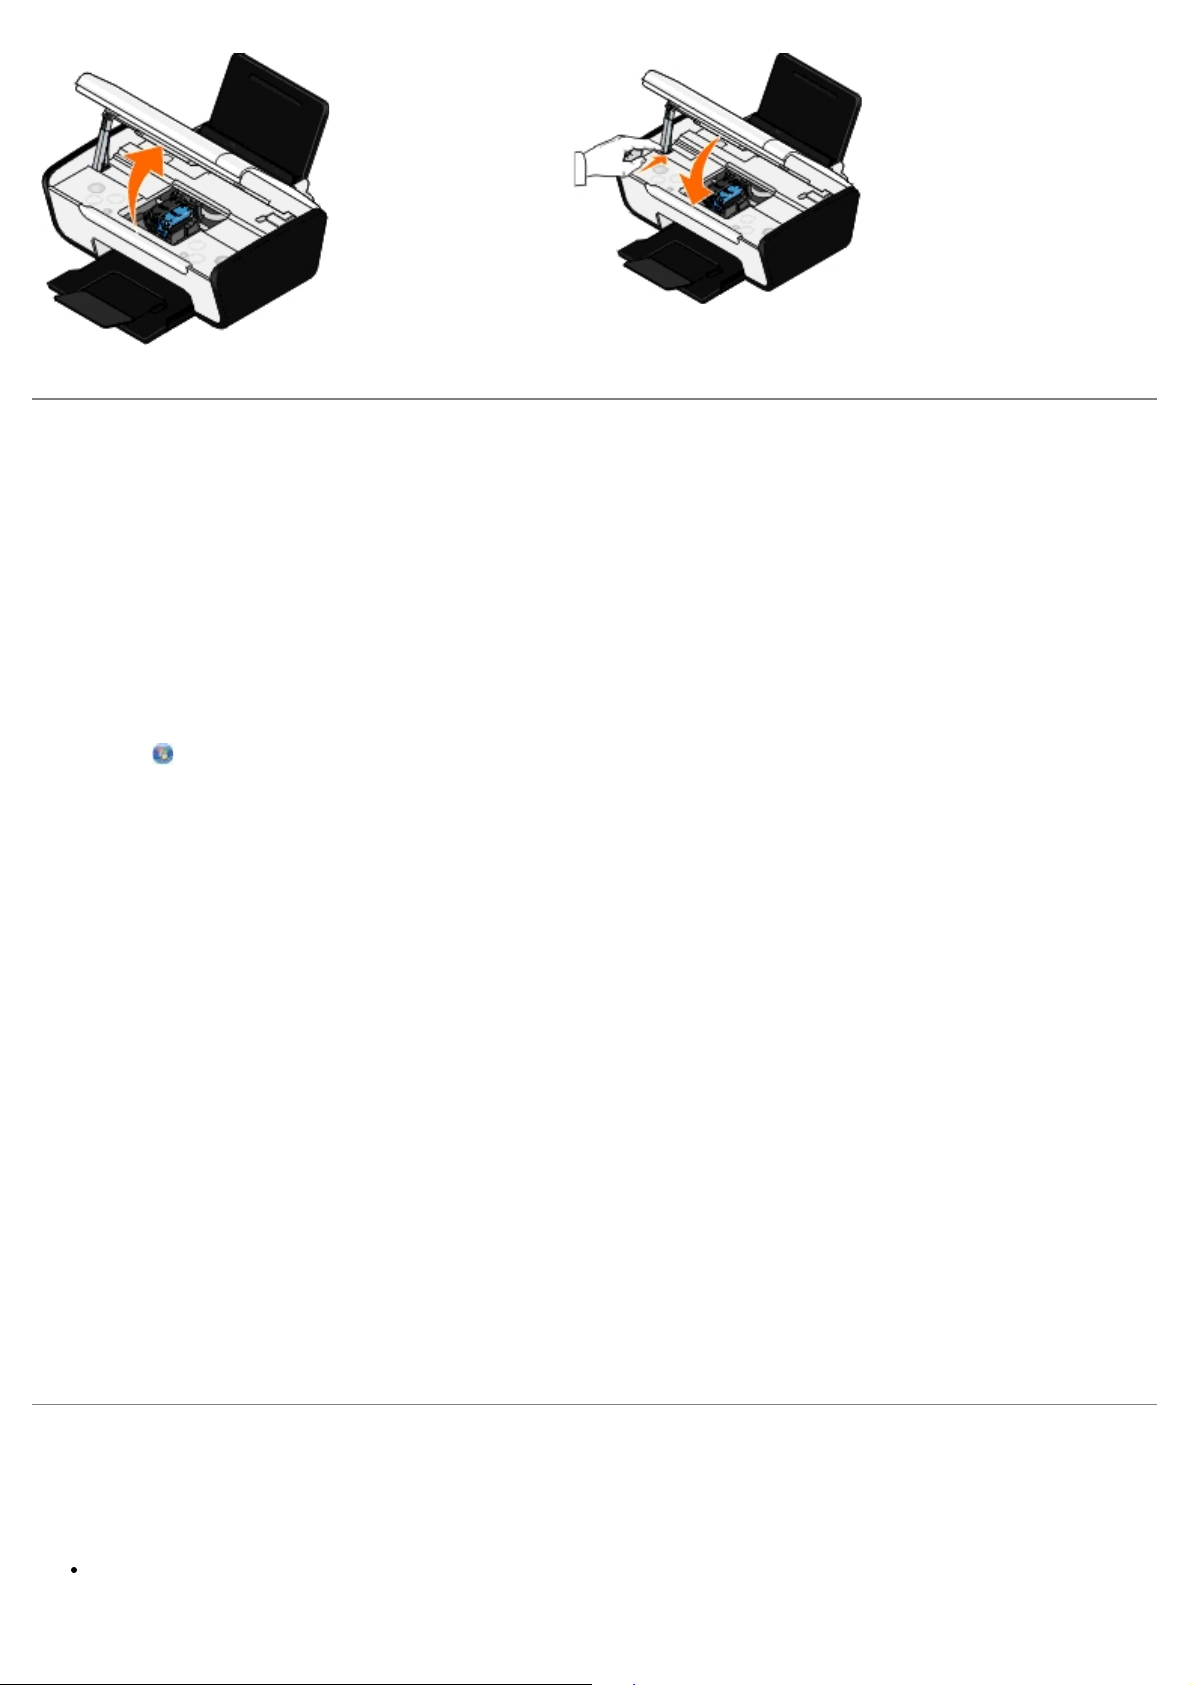
9. メンテナンスカバーを閉じます。 スキャナベースユニットを開け、固定レバーをプリンタの背面方向に向かって押します。 プリン
タ本体の上に収まるまでスキャナベースユニットを下ろします。
Page 16
ヘッド調整
カートリッジの取り付けまたは交換を行うと、プリントヘッドの調整を求めるメッセージが自動的に表示されます。 文字の形が崩れていた
り左マージンにそろっていない場合、または縦の線や直線が波打っていたりする場合は、カートリッジの調整が必要となることがありま
す。
プリントヘッドの調整を行うには、以下の手順に従います。
1. 普通紙をセットします。
2. Windows Vista™ の場合:
a. ® [コントロール パネル]をクリックします。
b. [ハードウェアとサウンド]をクリックします。
c. [プリンタ]をクリックします。
Windows
ア]、[プリンタと FAX]の順にクリックします。
Windows 2000 の場合は、[スタート]ボタンをクリックして、[設定]、[プリンタ]の順にクリックします。
3. [Dell V105]のアイコンを右クリックします。
4. [印刷設定]をクリックします。
[印刷設定]ダイアログボックスが表示されます。
5. [メンテナンス]タブをクリックします。
6. [プリントヘッド調整]をクリックします。
7. [印刷]をクリックします。
8. 画面に表示される手順に従います。
カートリッジの調整が行われ、調整パターンが印刷されます。 調整が完了したら、印刷した用紙は捨ててください。
®
XP の場合は、[スタート]ボタンをクリックして、[コントロール パネル]、[プリンタとその他のハードウェ
カートリッジノズルの清掃
次のような場合は、カートリッジノズルを清掃する必要があります。
画像や黒い塗りの部分に白いすじが入る。
Page 17

印刷が不鮮明または濃すぎる。
色あせが起こる、印刷できない、または正しく印刷されない。
縦の線がギザギザになる、または滑らかでない。
ノズルを清掃するには、以下の操作を行います。
1. 普通紙をセットします。
2. Windows Vista の場合:
a. ® [コントロール パネル]をクリックします。
b. [ハードウェアとサウンド]をクリックします。
c. [プリンタ]をクリックします。
Windows XP の場合は、[スタート]ボタンをクリックして、[コントロール パネル]、[プリンタとその他のハードウェア]、
[プリンタと FAX]の順にクリックします。
Windows 2000 の場合は、[スタート]ボタンをクリックして、[設定]、[プリンタ]の順にクリックします。
3. [Dell V105]のアイコンを右クリックします。
4. [印刷設定]をクリックします。
[印刷設定]ダイアログボックスが表示されます。
5. [メンテナンス]タブをクリックします。
6. [ノズル清掃]をクリックします。
テストパターンが印刷されます。
7. 引き続き印刷品質が改善されない場合は、[ノズル清掃を繰り返す]をクリックします。
8. 文書をもう一度印刷して、印刷品質が改善されたことを確認します。
それでも印刷品質が改善されない場合は、乾いた清潔な布でノズルを拭き、ドキュメントをもう一度印刷します。
プリンタの表面を清掃する
1. プリンタの電源をオフにし、電源コードを壁のコンセントから抜いたことを確認します。
危険: 感電しないように、作業を始める前に電源コードを壁のコンセントから抜き、プリンタに接続されたすべてのケーブ
ルを抜いてください。
2. 用紙サポートと排紙トレイから用紙を取り除きます。
3. 清潔で柔らかく、糸くずの出ない布を水で湿らせます。
注意: プリンタの表面を傷める可能性がありますので、家庭用洗剤は使用しないでください。
4. 排紙トレイに付着したインクの汚れを拭き取り、プリンタの表面だけを拭いてください。
注意: 湿った布で内部を拭くと、プリンタが破損する可能性があります。清掃に関する正しい手順に従わなかったためにプ
リンタが破損した場合、保証は適用されません。
Page 18

5. 新しい印刷ジョブを開始する前に、用紙サポートと排紙トレイが乾いていることを確認してください。
Page 19
用紙や原稿をセットする
[標準]または[写真]のどちらかの印刷品質を選択します。
用紙のセット
原稿を原稿台にセットする
用紙のセット
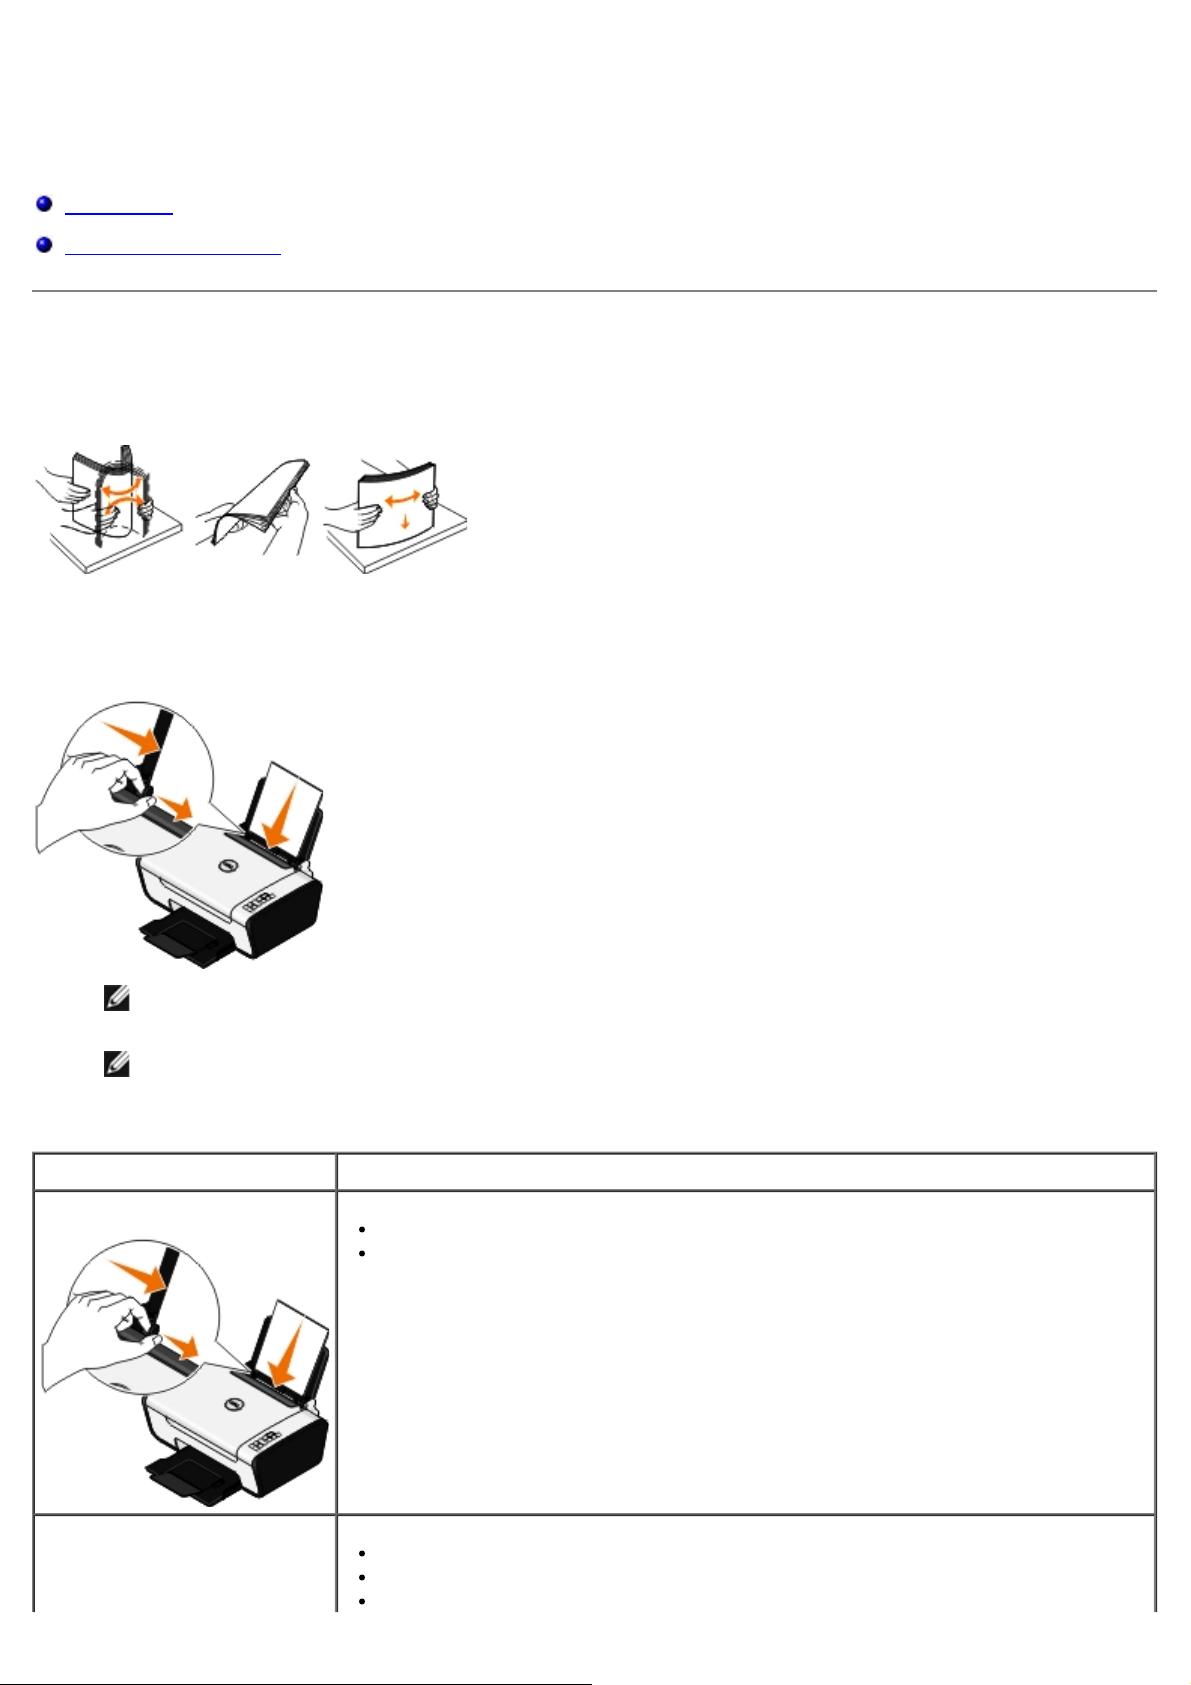
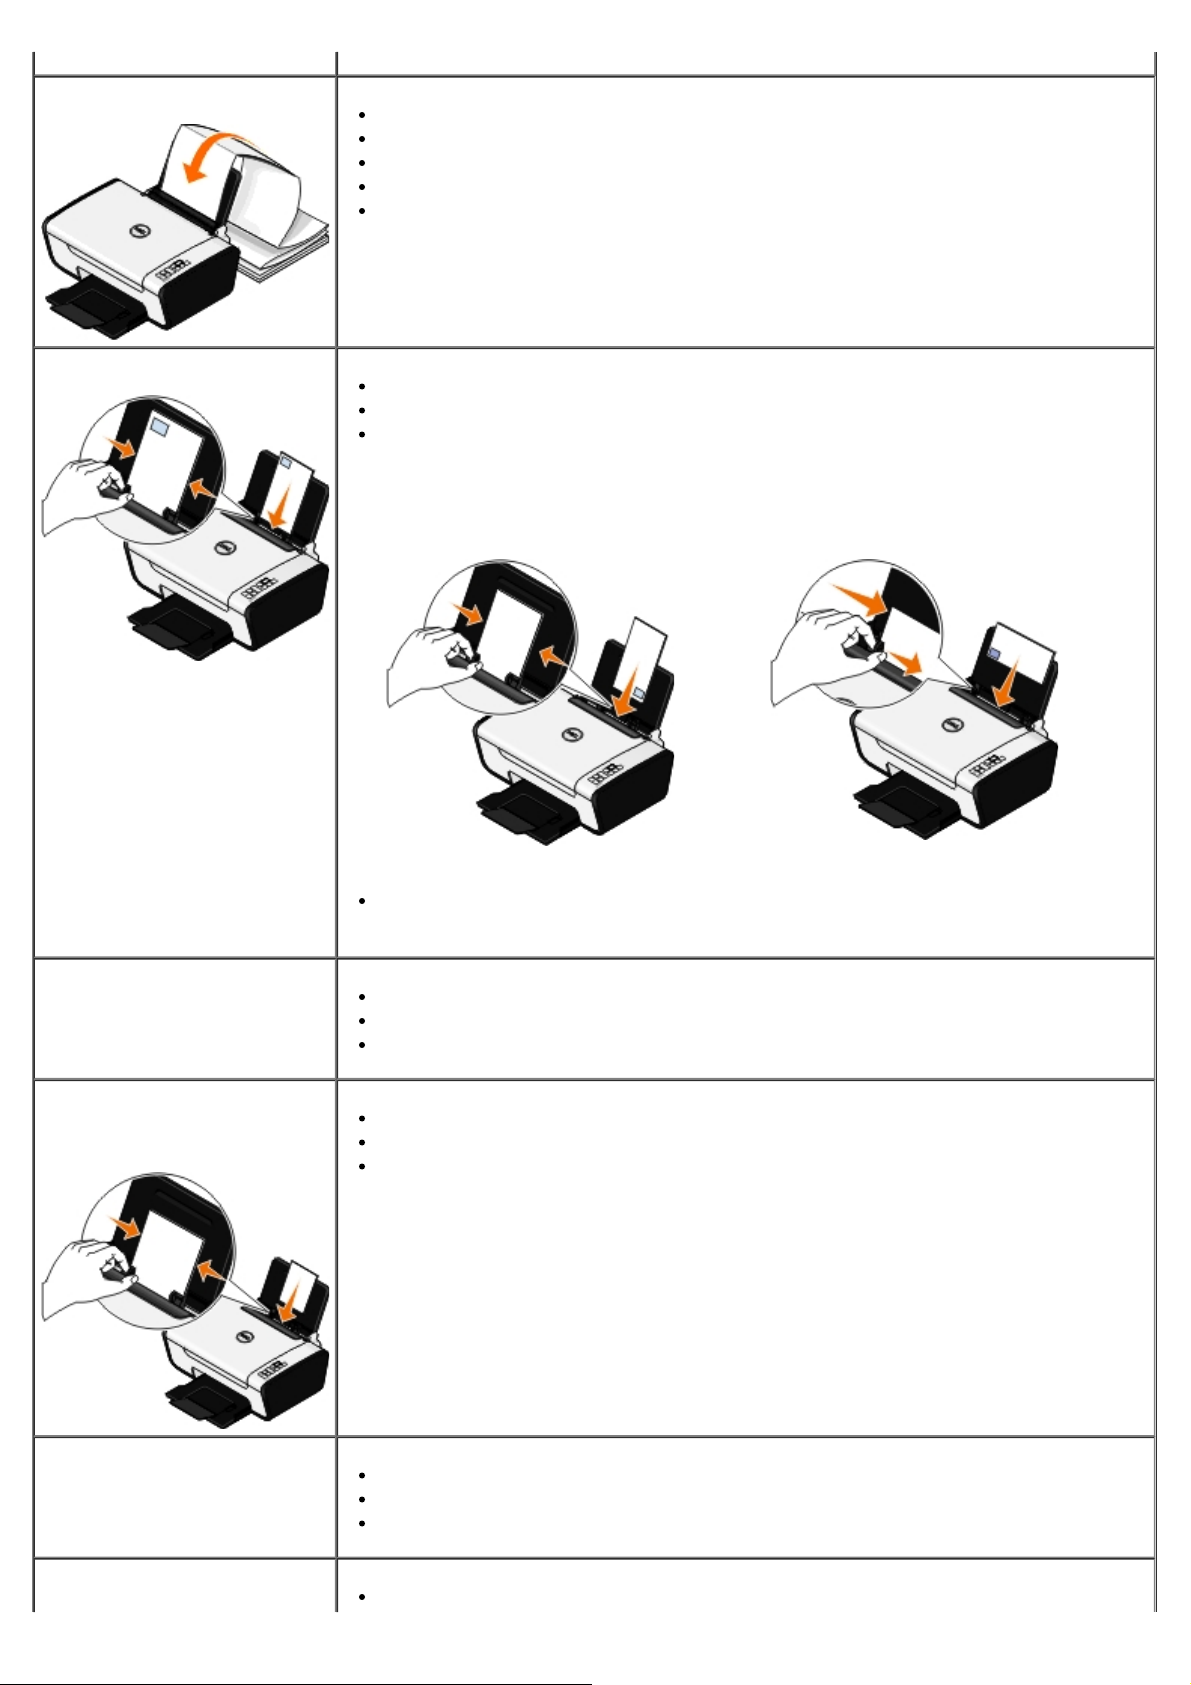
1. 用紙をさばきます。
2. 用紙サポートの中央に用紙をセットします。
3. 用紙ガイドを用紙の両端に合わせます。
メモ: 用紙ガイドを両方同時に引っ張らないでください。 一方の用紙ガイドを移動すると、それに合わせてもう一方のガイ
ドが調整されます。
メモ: 用紙をプリンタに無理に押し込まないでください。 用紙は、用紙サポートに沿うように平らに置き、両端が左右の用
紙ガイドに接するようにセットします。
印刷用紙のガイドライン
セット可能枚数 以下の点をチェックしてください。
普通紙: 100 枚
マット紙: 25 枚
用紙ガイドを用紙の端に合わせます。
レターヘッド付き用紙の場合は、レターヘッドのある方をプリンタ側に向けて、印刷面を上に
向けてセットします。
用紙の印刷面を上に向けてセットします。
用紙ガイドを用紙の端に合わせます。
Page 20
バナー紙の 1 枚目
他の用紙が用紙サポートにある場合は、取り除いてからバナー紙をセットします。
インクジェット用のバナー紙を使用してください。
バナー紙の束をプリンタの上または後方に置き、1 枚目をプリンタに差し込みます。
用紙ガイドを用紙の端に合わせます。
[A4 バナー]または[US レター バナー]のどちらかの用紙サイズを選択します。
封筒: 10 枚
封筒の印刷面を上に向けてセットします。
用紙ガイドを封筒の両端に合わせます。
印刷方向を[横]に設定します。
メモ: 国内で使用する封筒を印刷する場合、切手の位置を右下にして縦向きに印刷すること
も、切手の位置を左下にして横向きに印刷することもできます。 海外向けの封筒を印刷する場
合は、切手の位置を左上にして横向きに印刷してください。
正しい封筒サイズを選択します。 正確な封筒サイズがリストに表示されない場合は次に大きな
サイズを選択し、左右にマージンを設定して封筒に印刷されるテキストの位置を調整します。
ラベル用紙: 25 枚
グリーティングカード、インデック
スカード、ポストカード、フォト
カード: 25 枚
フォトペーパー/光沢紙: 25 枚
ラベル用紙の印刷面を上に向けてセットします。
用紙ガイドをラベル用紙の端に合わせます。
[標準]または[写真]のどちらかの印刷品質を選択します。
カードの印刷面を上に向けてセットします。
用紙ガイドをカードの端に合わせます。
[標準]または[写真]のどちらかの印刷品質を選択します。
用紙の印刷面を上に向けてセットします。
用紙ガイドを用紙の端に合わせます。
[標準]または[写真]のどちらかの印刷品質を選択します。
アイロンプリント紙: 10 枚
アイロンプリント紙のパッケージに記載されているセット手順に従います。
Page 21
アイロンプリント紙の印刷面を上に向けてセットします。
用紙ガイドをアイロンプリント紙の端に合わせます。
[標準]または[写真]のどちらかの印刷品質を選択します。
OHP フィルム: 50 枚
OHP フィルムのざらざらした方の面を上に向けてセットします。
用紙ガイドを OHP フィルムの端に合わせます。
原稿を原稿台にセットする
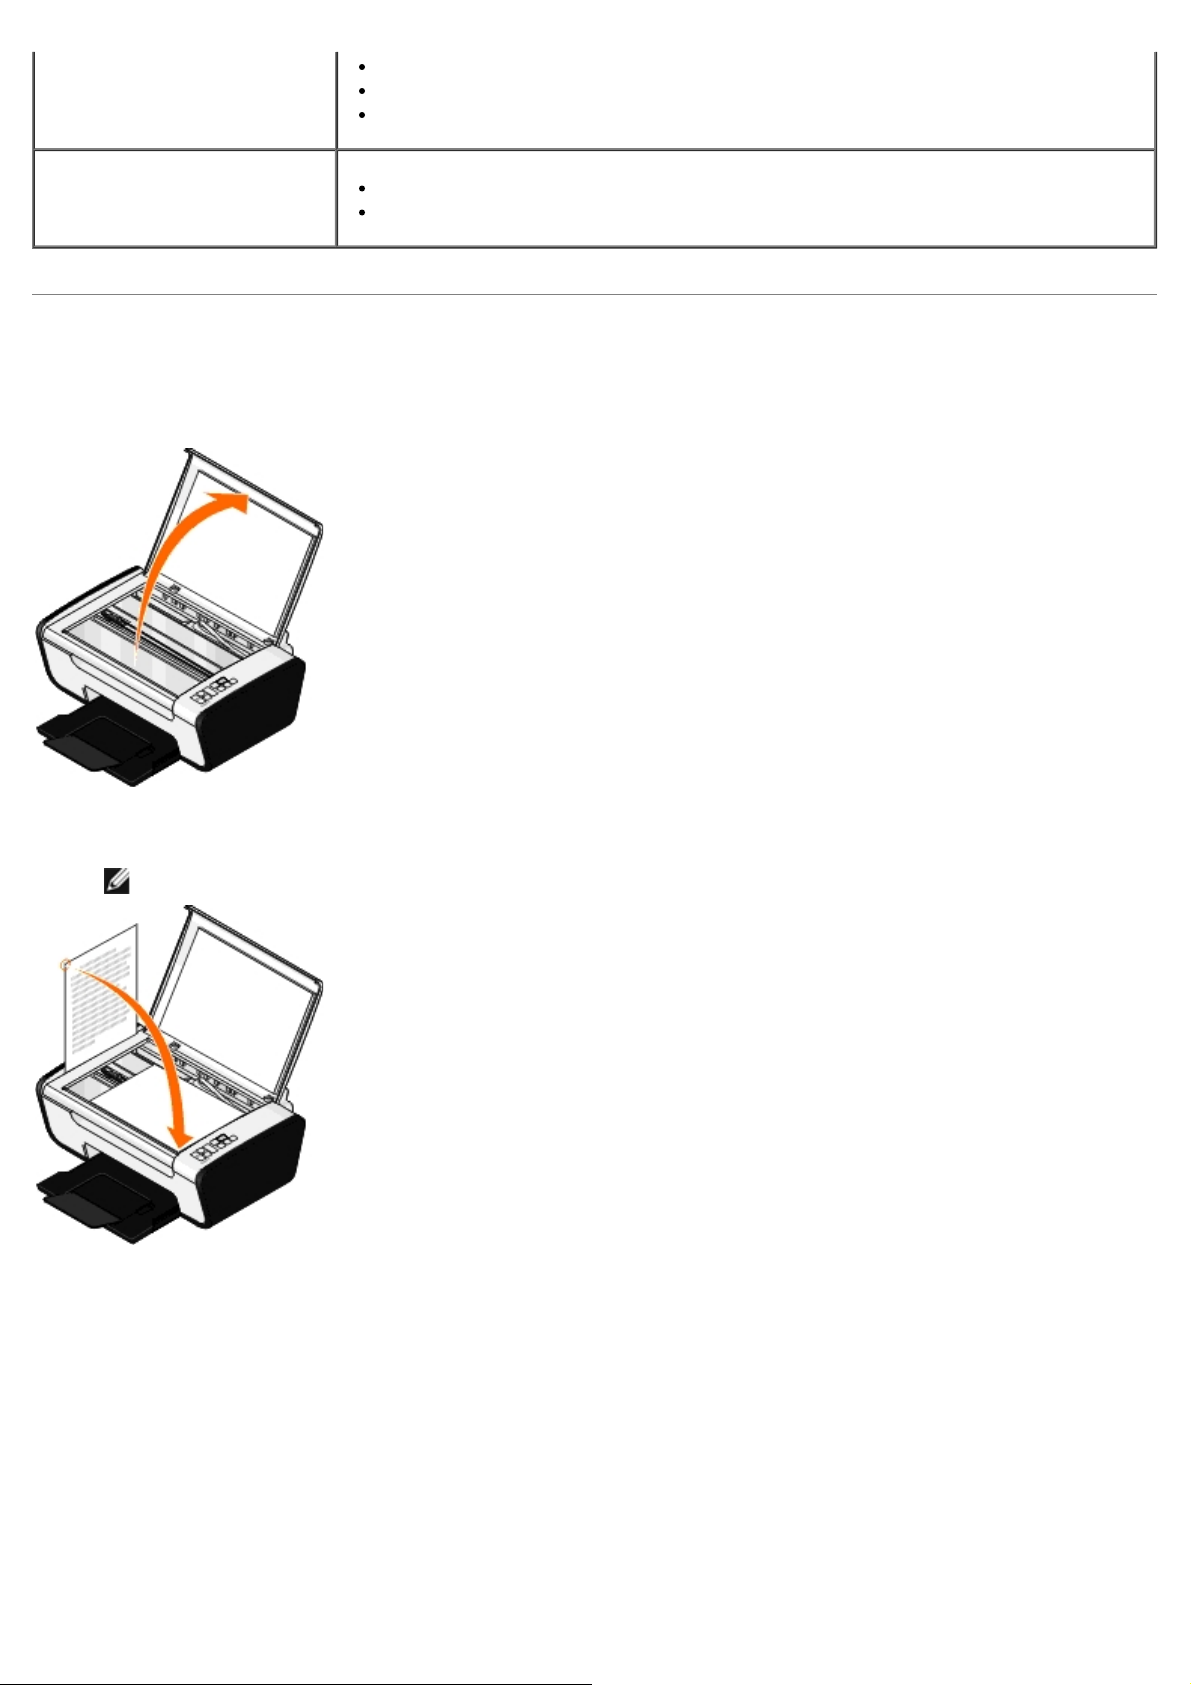
1. 原稿カバーを開きます。
2. 原稿を下向きにして原稿台にセットします。
メモ: このとき、原稿の表の左上角を、プリンタの矢印に合わせるようにセットしてください。
3. 原稿カバーを閉じます。
Page 22

Page 23

トラブルシューティング
セットアップに関するトラブル コピーに関するトラブル
操作パネルのエラーコードおよびランプの点滅 スキャンに関するトラブル
つまった紙を取り除く 用紙に関するトラブル
紙づまりと給紙不良の予防 印刷品質の改善
印刷に関するトラブル 印刷用紙の選択とセット方法に関する一般的なガイドライン
プリンタが動作しない場合は、プリンタが電源コンセントに接続されていること、またコンピュータを使用する場合はコンピュータに正し
く接続されていることを確認します。
カートリッジの問題に関するトラブルシューティングについては、操作パネルのエラーコードおよびランプの点滅を参照してください。
プリンタのメンテナンスに関するヘルプは、メンテナンス
詳細なヘルプや、お使いのプリンタのトラブルシューティングに関する最新情報については、http://support.dell.com/support
てください。
を参照してください。
セットアップに関するトラブル
コンピュータに関するトラブル
プリンタとコンピュータ間に互換性があることを確認する。
このプリンタは、Windows Vista™、Windows® XP、Windows 2000 のみに対応しています。
Windows ME、Windows 98、Windows 95 はこのプリンタでサポートされていません。
プリンタとコンピュータの両方の電源がオンになっていることを確認する。
USB ケーブルを確認する。
を参照し
USB ケーブルがコンピュータとプリンタにしっかりと接続されていることを確認します。
コンピュータをシャットダウンし、USB ケーブルを『プリンタのセットアップ』図で示されているとおりに再接続して、コンピュー
タを再起動します。
ソフトウェアのインストール画面が自動的に表示されない場合は、ソフトウェアを手動でインストールする。
1. Drivers and Utilities CD をセットします。
2. Windows Vista の場合は、
Windows XP の場合は、[スタート]®[マイ コンピュータ]の順にクリックします。
Windows 2000 の場合は、デスクトップで[マイ コンピュータ]アイコンをダブルクリックします。
3. CD-ROMドライブのアイコンをダブルクリックし、setup.exeをダブルクリックします。
®[コンピュータ]の順にクリックします。
Page 24

4.
プリンタソフトウェアのインストール画面が表示されたら、[
ケーブルを使用する]または[ワイヤレスネットワークを使用
する]をクリックします。
5. 画面に表示される手順に従い、インストールを完了します。
USB
プリンタソフトウェアがインストールされているか確認する。
Windows Vista の場合:
® [プログラム]の順にクリックします。
1.
2. [Dell プリンタ]をクリックします。
Windows XP および Windows 2000 の場合:
[スタート]®[プログラム]または[すべてのプログラム]® [デルプリンタ]®[Dell V105]の順にクリックします。
プリンタの一覧にお使いのプリンタが表示されていない場合は、プリンタソフトウェアがインストールされていません。 プリンタソフト
ウェアをインストールします。 (⇒ ソフトウェアの削除と再インストール
)
プリンタとコンピュータ間の通信の問題を修正する。
プリンタとコンピュータから USB ケーブルを取り外します。 USB ケーブルをプリンタとコンピュータに再接続します。
プリンタの電源をオフにします。 プリンタの電源ケーブルをコンセントから抜きます。 電源コードをコンセントに差し直し、プリ
ンタの電源をオンにします。
コンピュータを再起動します。
それでも問題が解消できない場合は、USB ケーブルを交換します。
プリンタを通常使うプリンタに設定する。
1. Windows Vista の場合:
® [コントロール パネル]をクリックします。
a.
b. [ハードウェアとサウンド]をクリックします。
c. [プリンタ]をクリックします。
Windows XP の場合は、[スタート]ボタンをクリックして、[コントロール パネル]、[プリンタとその他のハードウェア]、
[プリンタと FAX]の順にクリックします。
Windows 2000 の場合は、[スタート]ボタンをクリックして、[設定]、[プリンタ]の順にクリックします。
2. [Dell V105]のアイコンを右クリックします。
3. [通常使うプリンタに設定]を選択します。
プリンタが動作せず、印刷ジョブが印刷キューに残っている。
お使いのコンピュータにこのプリンタが複数インストールされていないかチェックします。
1. Windows Vista の場合:
® [コントロール パネル]をクリックします。
a.
b. [ハードウェアとサウンド]をクリックします。
Page 25

c.
[プリンタ]をクリックします。
Windows XP の場合は、[スタート]ボタンをクリックして、[コントロール パネル]、[プリンタとその他のハードウェア]、
[プリンタと FAX]の順にクリックします。
Windows 2000 の場合は、[スタート]ボタンをクリックして、[設定]、[プリンタ]の順にクリックします。
2. プリンタオブジェクトが複数あるかどうかチェックします。
3. 各プリンタオブジェクトに印刷ジョブを送信し、有効なプリンタを見つけます。
4. プリンタを通常使うプリンタに設定するには、以下の手順に従います。
a. [Dell V105]のアイコンを右クリックします。
b. [通常使うプリンタに設定]をクリックします。
5. それ以外のプリンタオブジェクトをそれぞれ右クリックし、[削除]をクリックして、プリンタオブジェクトのコピーを削除しま
す。
[プリンタ]フォルダに同じプリンタが複数インストールされないようにするには、USB ケーブルを差しなおす場合に、最初にプリ
ンタで使用していた USB ポートと同じポートに差してください。 また、Drivers and Utilities CD からプリンタドライバを 2 回
以上インストールしないでください。
プリンタに関するトラブル
プリンタの電源ケーブルがプリンタと電源コンセントにしっかりと接続されていることを確認する。
プリンタが一時停止していないか確認する。
1. Windows Vista の場合:
® [コントロール パネル]をクリックします。
a.
b. [ハードウェアとサウンド]をクリックします。
c. [プリンタ]をクリックします。
Windows XP の場合は、[スタート]ボタンをクリックして、[コントロール パネル]、[プリンタとその他のハードウェア]、
[プリンタと FAX]の順にクリックします。
Windows 2000 の場合は、[スタート]ボタンをクリックして、[設定]、[プリンタ]の順にクリックします。
2. [Dell V105]のアイコンを右クリックします。
3. [一時停止]が選択されていないことを確認します。 [一時停止]が選択されている場合は、クリックしてオプションをオフにしま
す。
プリンタのランプが点滅しているか確認する。
(⇒ 操作パネルのエラーコードおよびランプの点滅)
カートリッジが正しく取り付けられていて、各カートリッジからシールと保護テープが取り外されていることを確認する。
用紙が正しくセットされていることを確認する。
(⇒ 用紙のセット)
Page 26

操作パネルのエラーコードおよびランプの点滅
詳細なヘルプや、お使いのプリンタのトラブルシューティングに関する最新情報については、http://support.dell.com/support を参照し
てください。
ディ
スプ
レイ
の表
示
なし
なし
なし
なし
なし
EC1
操作パネルの
ランプの点滅
ランプがす
ばやく点滅し
ている。
ランプがす
ばやく点滅し
ている。
ランプが点
灯している。
ランプがす
ばやく点滅し
ている。
ランプが点
灯している。
ランプが
ゆっくり点滅
している。
エラーの説明 解決方法
プリンタの用紙が切れているか、紙づ
まりがあります。
カラーカートリッジのインク残量が低
下しています。 交換する時期が近づい
ています。
カラーカートリッジがインク切れで
す。 すぐに交換してください。
ブラックカートリッジまたはフォト
カートリッジのインク残量が低下して
います。 交換する時期が近づいていま
す。
カラーカートリッジがインク切れで
す。 すぐに交換してください。
カラーカートリッジが無効です。 無効なカートリッジを交換してください。 (⇒ カートリッジの交換)
用紙切れの場合はプリンタに用紙をセットし、給紙ボタン を押して
ください。 (⇒ 用紙のセット
紙づまりの場合は、つまっている用紙を取り除いてください。 (⇒ 紙
づまりがないか確認します。)
カートリッジを注文してください。 消耗品の注文は、デル Web サイト
(www.dell.com/support
新しいカートリッジと交換してください。 (⇒ カートリッジの交換)
カートリッジを注文してください。 消耗品の注文は、デル Web サイト
(www.dell.com/support
新しいカートリッジと交換してください。 (⇒ カートリッジの交換)
)
)をご利用下さい。
)をご利用下さい。
EC1
EC2
EC3
EC4
EC5
EC6
ランプが
ゆっくり点滅
している。
および
ランプがすば
やく点滅して
いる。
および
ランプがゆっ
くり点滅して
いる。
ランプが
ゆっくり点滅
している。
および
ランプが交互
に点滅してい
る。
ランプが
ゆっくり点滅
している。
ブラックまたはフォトカートリッジが
無効です。
カートリッジが両方ともありません。 ブラックまたはフォトカートリッジを左のホルダーに、カラーカート
カートリッジが逆にセットされていま
す。
印刷の途中でプリントヘッドキャリア
が停止しました。
片方または両方のカートリッジが
ショートしています。
プリントヘッドキャリアが初期位置に
ないか、移動範囲の左側に適切に停止
していません。
無効なカートリッジを交換してください。 (⇒ カートリッジの交換)
リッジを右のホルダーに取り付けてください。 (⇒ カートリッジの交
換)
カートリッジを入れ替えてください。 ブラックカートリッジまたはフォ
トカートリッジを左側、カラーカートリッジを右側のカートリッジフォ
ルダにセットします。 (⇒ カートリッジの交換
つまっているものを取り除いてください。 キャリアの移動範囲から障害
物を取り除いて、給紙ボタン
不具合のあるカートリッジを確認してください。 カートリッジを両方と
も取り外し、次に 1 つずつセットしてみて、どのカートリッジに不具合
があるか確認します。 不具合のあるカートリッジは交換します。
つまっているものを取り除いてください。 キャリアの移動範囲から障害
物を取り除いて、給紙ボタン
を押してください。
を押してください。
)
EJ
ランプが
ゆっくり点滅
している。
プリントヘッドキャリアが停止しまし
た。
つまっているものを取り除いてください。 キャリアの移動範囲から障害
物を取り除いて、給紙ボタン
を押してください。
Page 27

つまった紙を取り除く
印刷に関するトラブル
給紙口の紙づまり
1. 用紙をしっかりと持って引き出し、取り除きます。 用紙がプリンタ内部にあって届かない場合は、スキャナベースユニットを持ち上
げてプリンタを開きます。
2. 用紙を引き抜きます。
3. スキャナベースユニットを閉じます。
4. 印刷ジョブを再送信して、残りのページを印刷します。
プリンタ内部の紙づまり
1. プリンタの電源をオフにします。
2. スキャナベースユニットを持ち上げます。
3. 用紙をしっかり持ち、静かにプリンタから引き出します。
4. スキャナベースユニットを閉じます。
5. プリンタの電源をオンにし、ドキュメントをもう一度印刷します。
紙づまりと給紙不良の予防
ほとんどの場合、以下のガイドラインに従うことで紙づまりと給紙不良を防ぐことができます。
プリンタの用紙に関するガイドラインに準拠した用紙を使用します。(⇒用紙のセット)
給紙トレイに用紙が正しくセットされていることを確認します。
定められた枚数以上の用紙を給紙トレイにセットしないでください。
印刷中にトレイから用紙を取り出さないでください。
用紙をよくさばき、まとめてからセットしてください。
濡れたり、曲がったり、折れ目のある用紙を使用しないでください。
プリンタの説明に従って用紙の方向を決めてください。
Page 28

インク残量をチェックして、必要に応じて新しいプリントカートリッジと交換する。
(⇒ カートリッジの交換)
排紙トレイから 1 枚ずつ用紙を確実に取り除く。
以下の種類の用紙を使用している場合に用紙が汚れないようにするには、プリンタから排出された用紙は 1 枚ずつ取り除いて乾かします。
フォト光沢紙
OHP フィルム
ラベル用紙
封筒
アイロンプリント紙
印刷速度が遅い場合、コンピュータで使用できるメモリリソースを増やす。
使用していないアプリケーションをすべて閉じます。
ドキュメント内のグラフィックや画像の枚数とサイズをできるだけ少なくします。
メモリ(RAM)の増設を検討します。
ほとんど使用しないフォントをシステムから削除します。
プリンタソフトウェアをアンインストールしてから、再インストールします。 (⇒ ソフトウェアの削除と再インストール)
[印刷設定]ダイアログボックスで低めの印刷品質を選択します。
用紙が正しくセットされていることを確認する。
(⇒ 用紙のセット)
コピーに関するトラブル
プリンタのランプが点滅していたり、エラーメッセージが表示されていないか確認します。
(⇒ 操作パネルのエラーコードおよびランプの点滅)
原稿台が汚れていないことを確認します。
原稿台とその横の細いガラス面を、清潔で柔らかい布を水で湿らせて静かに拭きます。
雑誌や新聞から取り込んだ画像のモアレを取り除きます。
1. Windows Vista の場合:
® [プログラム]の順にクリックします。
a.
b. [Dell プリンタ]をクリックします。
c. [Dell V105]をクリックします。
Page 29

Windows XP または Windows 2000 の場合:
[スタート]®[プログラム]または[すべてのプログラム]® [デルプリンタ]®[Dell V105]の順にクリックします。
2. [Dell Imaging Toolbox]を選択します。
[Dell Imaging Toolbox]が開きます。
3. [ホーム]画面で、[フォトアルバム]をクリックします。
4. [ファイル]®[開く]の順にクリックして、編集する画像を選択します。
5. 画像を開いた状態で[追加補正]タブをクリックします。
6. [パターン補正]をクリックします。
[パターン補正]ダイアログボックスが開きます。
7. [モアレを除去する]を選択します。
8. [除去するモアレのパターンを選択してください]ドロップダウンメニューから、 スキャンした原稿に応じてパターンを選択しま
す。
9. [OK]をクリックします。
スキャンした画像の背景ノイズを調整します。
1. Windows Vista の場合:
® [プログラム]の順にクリックします。
a.
b. [Dell プリンタ]をクリックします。
c. [Dell V105]をクリックします。
Windows XP または Windows 2000 の場合:
[スタート]®[プログラム]または[すべてのプログラム]® [デルプリンタ]®[Dell V105]の順にクリックします。
2. [Dell Imaging Toolbox]を選択します。
[Dell Imaging Toolbox]が開きます。
3. [ホーム]画面で、[フォトアルバム]をクリックします。
4. [ファイル]®[開く]の順にクリックして、編集する画像を選択します。
5. 画像を開いた状態で[追加補正]タブをクリックします。
6. [パターン補正]をクリックします。
[パターン補正]ダイアログボックスが開きます。
7. [カラー画像から背景ノイズを取り除く]を選択します。
8. スライドバーを左右に移動し、スキャンした文書の背景ノイズの程度を調整します。
9. [OK]をクリックします。
ドキュメントや写真が原稿台に正しくセットされていることを確認します。
Page 30

(⇒ 原稿を原稿台にセットする)
用紙サイズを確認します。
使用している用紙のサイズが、操作パネルまたは Dell Imaging Toolbox で選択したサイズと同じであることを確認します。
スキャンに関するトラブル
プリンタのランプが点滅していたり、エラーメッセージが表示されていないか確認します。
(⇒ 操作パネルのエラーコードおよびランプの点滅)
USB ケーブルを確認する。
USB ケーブルがプリンタとコンピュータにしっかりと接続されていることを確認します。
コンピュータをシャットダウンし、USB ケーブルを『プリンタのセットアップ』図で示されているとおりに再接続して、コンピュー
タを再起動します。
プリンタソフトウェアがインストールされているか確認する。
Windows Vista の場合:
® [プログラム]の順にクリックします。
1.
2. [Dell プリンタ]をクリックします。
Windows XP または Windows 2000 の場合:
[スタート]®[プログラム]または[すべてのプログラム]® [デルプリンタ]®[Dell V105]の順にクリックします。
プリンタの一覧にお使いのプリンタが表示されていない場合は、プリンタソフトウェアがインストールされていません。 プリンタソフト
ウェアをインストールします。 (⇒ ソフトウェアの削除と再インストール
)
プリンタとコンピュータ間の通信の問題を修正する。
プリンタとコンピュータから USB ケーブルを取り外してから、再度接続します。
プリンタの電源をオフにします。 プリンタの電源ケーブルをコンセントから抜きます。 電源コードをコンセントに差し直し、プリ
ンタの電源をオンにします。
コンピュータを再起動します。
スキャンに時間がかかる場合や、コンピュータが停止してしまう場合は、スキャン解像度を低めの値に変更します。
1. Windows Vista の場合:
® [プログラム]の順にクリックします。
a.
b. [Dell プリンタ]をクリックします。
c. [Dell V105]をクリックします。
Windows XP および Windows 2000 の場合:
[スタート]®[プログラム]または[すべてのプログラム]® [デルプリンタ]®[Dell V105]の順にクリックします。
Page 31

2. [Dell Imaging Toolbox
]を選択します。
[Dell Imaging Toolbox]が開きます。
3. [ホーム]画面で、[スキャン]をクリックします。
[スキャンした原稿の取り込み先を選択してください。] ダイアログボックスが表示されます。
4. [詳細設定]をクリックします。
5. [スキャン解像度の選択]ドロップダウンメニューから、低めのスキャン解像度を選択します。
6. この設定をすべてのスキャンジョブでデフォルトにするには、[常にこの設定を使ってスキャンする]を選択します。
7. [スタート]をクリックしてスキャンを開始するか、または[プレビュー]をクリックして文書や写真をスキャンする前にプレ
ビューします。
スキャンした画像の画質が悪い場合は、スキャン解像度を高めの値に変更します。
1. Windows Vista の場合:
® [プログラム]の順にクリックします。
a.
b. [Dell プリンタ]をクリックします。
c. [Dell V105]をクリックします。
Windows XP および Windows 2000 の場合:
[スタート]®[プログラム]または[すべてのプログラム]® [デルプリンタ]®[Dell V105]の順にクリックします。
2. [Dell Imaging Toolbox]を選択します。
[Dell Imaging Toolbox]が開きます。
3. [ホーム]画面で、[スキャン]をクリックします。
[スキャンした原稿の取り込み先を選択してください。] ダイアログボックスが表示されます。
4. [詳細設定]をクリックします。
5. [スキャン解像度の選択]ドロップダウンメニューから、高めのスキャン解像度を選択します。
6. この設定をすべてのスキャンジョブでデフォルトにするには、[常にこの設定を使ってスキャンする]を選択します。
7. [スタート]をクリックしてスキャンを開始するか、または[プレビュー]をクリックして文書や写真をスキャンする前にプレ
ビューします。
雑誌や新聞から取り込んだ画像のモアレを取り除きます。
1. Windows Vista の場合:
® [プログラム]の順にクリックします。
a.
b. [Dell プリンタ]をクリックします。
c. [Dell V105]をクリックします。
Windows XP または Windows 2000 の場合:
[スタート]®[プログラム]または[すべてのプログラム]® [デルプリンタ]®[Dell V105]の順にクリックします。
Page 32

2. [Dell Imaging Toolbox]を選択します。
[Dell Imaging Toolbox]が開きます。
3. [ホーム]画面で、[フォトアルバム]をクリックします。
4. [ファイル]® [開く]の順にクリックして、編集する画像を選択します。
5. 画像を開いた状態で[追加補正]タブをクリックします。
6. [パターン補正]をクリックします。
[パターン補正]ダイアログボックスが開きます。
7. [モアレを除去する]を選択します。
8. [除去するモアレのパターンを選択してください]ドロップダウンメニューから、 スキャンした原稿に応じてパターンを選択しま
す。
9. [OK]をクリックします。
スキャンした画像の背景ノイズを調整します。
1. Windows Vista の場合:
® [プログラム]の順にクリックします。
a.
b. [Dell プリンタ]をクリックします。
c. [Dell V105]をクリックします。
Windows XP または Windows 2000 の場合:
[スタート]®[プログラム]または[すべてのプログラム]® [デルプリンタ]®[Dell V105]の順にクリックします。
2. [Dell Imaging Toolbox]を選択します。
[Dell Imaging Toolbox]が開きます。
3. [ホーム]画面で、[フォトアルバム]をクリックします。
4. [ファイル]®[開く]の順にクリックして、編集する画像を選択します。
5. 画像を開いた状態で[追加補正]タブをクリックします。
6. [パターン補正]をクリックします。
[パターン補正]ダイアログボックスが開きます。
7. [カラー画像から背景ノイズを取り除く]を選択します。
8. スライドバーを左右に移動し、スキャンした文書の背景ノイズの程度を調整します。
9. [OK]をクリックします。
ドキュメントや写真が原稿台に正しくセットされていることを確認します。
(⇒ 原稿を原稿台にセットする)
原稿台が汚れていないことを確認します。
Page 33

原稿台とその横の細いガラス面を、清潔で柔らかい布を水で湿らせて静かに拭きます。
用紙に関するトラブル
用紙が正しくセットされていることを確認します。
(⇒用紙のセット)
プリンタに推奨されている用紙のみを使用します。
(⇒印刷用紙のガイドライン)
複数のページを印刷するときは、用紙を少なめにセットします。
(⇒印刷用紙のガイドライン)
用紙が折れ曲がったり、破れたりしていないことを確認します。
紙づまりがないか確認します。
(⇒つまった紙を取り除く)
印刷品質の改善
文書の印刷品質が不十分な場合は、次のような方法で印刷品質を改善することができます。
適切な用紙を使用します。たとえば、フォトカートリッジで写真を印刷する場合は、Dell™ プレミアムフォトペーパーを使用しま
す。
印刷品質を高く設定します。
印刷品質を高く選択するには、以下の手順に従います。
1. 文書を開いた状態で[ファイル]® [印刷]の順にクリックします。
[印刷]ダイアログボックスが表示されます。
2. [設定]、[プロパティ]、[オプション]、または[セットアップ]をクリックします(アプリケーションまたはオペレーティン
グシステムによって異なります)。
[印刷設定]ダイアログボックスが表示されます。
3. [印刷設定]タブで高品質の設定を選択します。
4. 文書をもう一度印刷します。
5. 印刷品質が改善されない場合は、カートリッジの調整またはノズル清掃を行います。(⇒ヘッド調整
清掃)
その他の解決方法を参照するには、http://support.dell.com/support
にアクセスしてください。
印刷用紙の選択とセット方法に関する一般的なガイドライン
および カートリッジノズルの
Page 34

濡れたり、曲がったり、しわがある用紙や、破れている用紙に印刷すると、紙づまりや印刷品質の低下の原因となります。
印刷品質を高めるには、高品質のコピー用紙を使用してください。
エンボス文字や目打ちのある用紙や、表面仕上げに極端に光沢やざらつきがある用紙を使用しないでください。紙づまりの原因とな
ります。
用紙は使用するまでパッケージから取り出さないでください。パッケージは床に直接置かずに、引き出しや棚に収納してください。
用紙やパッケージの上に重い物を乗せないでください。
用紙がしわになったり曲がったりする可能性がありますので、湿気の多い場所などに置かないでください。
未使用の用紙は、気温が 15 ~ 30 ℃(59°~ 86°F)で、相対湿度が 10 ~ 70% の場所に保管してください。
保管時は、プラスティック製のコンテナまたは袋などの湿気を通さないパッケージを使用して、ほこりや湿気で用紙が痛まないよう
にしてください。
Page 35

印刷
文書を印刷する 文書を部単位で印刷する
写真を印刷する 小冊子を印刷する
封筒に印刷する 小冊子をとじる
1 枚の用紙に複数のページを印刷する 文書を両面に印刷する(両面印刷)
画像を分割する(ポスター) 印刷ジョブをキャンセルする
バナー紙に印刷する 印刷設定のデフォルトを変更する
文書を印刷する
1. コンピュータとプリンタが接続された状態であることを確認し、電源をオンにします。
2. 用紙をセットします。(⇒ 用紙のセット)
3. 文書を開いた状態で[ファイル]® [印刷]の順にクリックします。
[印刷]ダイアログボックスが表示されます。
4. [設定]、[プロパティ]、[オプション]、または[セットアップ]をクリックします(アプリケーションまたはオペレーティン
グシステムによって異なります)。
[印刷設定]ダイアログボックスが表示されます。
5. [印刷設定]タブと[アドバンス]タブで、必要に応じて文書に変更を加えます。
6. 設定を変更したら、[OK]をクリックします。
[印刷設定]ダイアログボックスが閉じます。
7. [OK]または[印刷]をクリックします。
写真を印刷する
写真を印刷する
メモ: 写真の印刷には、カラーカートリッジとフォトカートリッジの使用をお勧めします。
1. コンピュータとプリンタが接続された状態であることを確認し、電源をオンにします。
2. 印刷面を上に向けて用紙をセットします。
メモ: 写真の印刷には、フォトペーパーまたは光沢紙の使用をお勧めします。
3. 文書を開いた状態で[ファイル]® [印刷]の順にクリックします。
Page 36

[印刷]ダイアログボックスが表示されます。
4. [設定]、[プロパティ]、[オプション]、または[セットアップ]をクリックします(アプリケーションまたはオペレーティン
グシステムによって異なります)。
[印刷設定]ダイアログボックスが表示されます。
5. [印刷設定]タブで[写真]を選択し、ドロップダウンメニューから写真に適した dpi(ドット/インチ)の値を選択します。
メモ: フチなし写真を印刷するには、[印刷設定]タブで[フチなし]チェックボックスをオンにして、[アドバンス]タ
ブのドロップダウンメニューからフチなし用紙のサイズを選択します。フチなし印刷を実行できるのは、フォトペーパー/光
沢紙を選択した場合のみです。フォトペーパー/光沢紙以外の用紙に印刷する場合は、すべてのフチに 2 mm の余白が生じま
す。
6. [印刷設定]タブと[アドバンス]タブで、必要に応じて文書に変更を加えます。
7. 設定の変更を完了したら、[OK]をクリックします。
[印刷設定]ダイアログボックスが閉じます。
8. [OK]または[印刷]をクリックします。
9. 印刷された写真が貼り付いたり、汚れたりしないように、プリンタから排出された写真は 1 枚ずつ取り除きます。
メモ: 写真をアルバムや額などにはさむ場合、完全にインクが乾くまで十分に時間をおいてください(環境によって 12 ~ 24 時間
かかります)。こうすることで、写真が長持ちします。
コンピュータから写真を印刷する
1. コンピュータとプリンタの電源をオンにして、接続を確認します。
2. 用紙をセットします。 (⇒ 用紙のセット)
3. Windows Vista™ の場合:
a. ® [プログラム]の順にクリックします。
b. [Dell プリンタ]をクリックします。
c. [Dell V105]をクリックします。
Windows
[スタート]®[プログラム]または[すべてのプログラム]® [デルプリンタ]®[Dell V105]の順にクリックします。
4. [Dell Imaging Toolbox]を選択します。
®
XP および Windows 2000 の場合:
[Dell Imaging Toolbox]ダイアログボックスが開きます。
5. [ホーム]画面で[フォトアルバム]をクリックします。
6. [フォルダ]ペインで、写真が保存されているフォルダを開きます。
7. 印刷する写真をクリックして選択します。
8. [写真の印刷]をクリックします。
9. ドロップダウンメニューから、使用する印刷品質、用紙サイズ、用紙の種類を選択します。
10. 写真を複数枚印刷する場合、または 100 x 150 mm(4 x 6 インチ)以外の写真サイズを選択する場合は、使用するオプションを
表から選択します。 最後の列のドロップダウンメニューで、その他のサイズを表示して選択します。
Page 37

11. [印刷]をクリックします。
フチなし写真を印刷する
1. コンピュータとプリンタの電源をオンにして、接続を確認します。
2. 用紙をセットします。 (⇒ 用紙のセット)
3. Windows Vista の場合:
a. ® [プログラム]の順にクリックします。
b. [Dell プリンタ]をクリックします。
c. [Dell V105]をクリックします。
Windows XP および Windows 2000 の場合:
[スタート]®[プログラム]または[すべてのプログラム]® [デルプリンタ]®[Dell V105]の順にクリックします。
4. [Dell Imaging Toolbox]を選択します。
[Dell Imaging Toolbox]ダイアログボックスが開きます。
5. [ホーム]画面で、[フチなし写真を印刷する]をクリックします。
6. [フォルダ]ペインで、写真が保存されているフォルダを開きます。
7. 印刷する写真をクリックして選択します。
8. [次へ]をクリックします。
9. ドロップダウンメニューから、使用する印刷品質、用紙サイズ、用紙の種類を選択します。
10. 表の最後の列で、印刷枚数を選択します。
11. [印刷]をクリックします。
グリーティングカードを作成する
1. コンピュータとプリンタの電源をオンにして、接続を確認します。
2. 用紙をセットします。 (⇒ 用紙のセット)
3. Windows Vista の場合:
a. ® [プログラム]の順にクリックします。
b. [Dell プリンタ]をクリックします。
c. [Dell V105]をクリックします。
Windows XP および Windows 2000 の場合:
[スタート]®[プログラム]または[すべてのプログラム]® [デルプリンタ]®[Dell V105]の順にクリックします。
4. [Dell Imaging Toolbox]を選択します。
Page 38

[Dell Imaging Toolbox]ダイアログボックスが開きます。
5. [ホーム]画面で、[操作]をクリックします。
6. [グリーティングカードの作成]をクリックします。
7. [レイアウト]タブで、グリーティングカードのスタイルをクリックして選択します。
8. [写真]タブで、写真が保存されているフォルダを開きます。
9. 写真を選択して、画面右の[プレビュー]ペインにドラッグします。
10. テキスト領域をクリックすると、グリーティングカードにテキストを追加できます。
11. テキストを編集したら、[OK]をクリックします。
12. 別のレイアウトと写真を使用して別のグリーティングカードを作成するには、[新規カードの追加]をクリックして、手順 7 か
ら手順 11 までを繰り返します。
13. グリーティングカードを印刷するには、[共有]タブで[グリーティングカードを印刷]を選択します。
14. 印刷品質、用紙サイズ、用紙の種類、印刷枚数を選択します。
15. [印刷]をクリックします。
16. グリーティングカードを E メールで送信するには、以下の手順に従います。
a. [共有]タブで、[グリーティングカードを E メールで送る]をクリックします。
b. 画面の[送信画質と送信速度]セクションで、画像のサイズを選択します。
c. [新規メール]をクリックして、グリーティングカードを添付する E メールを作成します。
封筒に印刷する
1. コンピュータとプリンタの電源をオンにして、接続を確認します。
2. 印刷面を上に向けて封筒をセットします。
3. ドキュメントを開いて[ファイル]® [印刷]の順にクリックします。
[印刷]ダイアログボックスが表示されます。
4. [設定]、[プロパティ]、[オプション]、または[セットアップ]をクリックします(アプリケーションまたはオペレーティン
グシステムによって異なります)。
Page 39

[印刷設定]ダイアログボックスが表示されます。
5. [印刷設定]タブで[封筒]を選択して、[用紙サイズ]ドロップダウンメニューから封筒のサイズを選択します。
メモ: 国内で使用する封筒を印刷する場合、切手の位置を右下にして縦向きに印刷することも、切手の位置を左下にして横
向きに印刷することもできます。 海外向けの封筒を印刷する場合は、切手の位置を左上にして横向きに印刷してください。
国内で使用する封筒を印刷する場合、どちらの方向にセットしてもかまいません。
海外向けの封筒を印刷する場合は、この方向にセットしてください。
6. [印刷設定]タブと[アドバンス]タブで、必要に応じて文書に変更を加えます。
7. 設定の変更を完了したら、[OK]をクリックします。
[印刷設定]ダイアログボックスが閉じます。
8. [OK]または[印刷]をクリックします。
1 枚の用紙に複数のページを印刷する
1. コンピュータとプリンタの電源をオンにして、接続を確認します。
2. 用紙をセットします。 (⇒ 用紙のセット)
3. ドキュメントを開いて[ファイル]® [印刷]の順にクリックします。
4. [設定]、[プロパティ]、[オプション]、または[セットアップ]をクリックします(アプリケーションまたはオペレーティン
グシステムによって異なります)。
[印刷設定]ダイアログボックスが表示されます。
5. [アドバンス]タブで、[レイアウト]ドロップダウンリストから[割り付け]を選択します。
Page 40

6. [ページ数/枚]ドロップダウンリストで、1 枚の用紙に印刷するページ数を選択します。
7. ページの間に枠線を印刷する場合は、[ページ枠の印刷]チェックボックスをオンにします。
[印刷設定]ダイアログボックスが閉じます。
8. [印刷設定]タブで、必要に応じてドキュメントに変更を加えます。
9. 設定を変更したら、[OK]をクリックします。
[印刷設定]ダイアログボックスが閉じます。
10. [OK]または[印刷]をクリックします。
画像を分割する(ポスター)
1. コンピュータとプリンタが接続された状態であることを確認し、電源をオンにします。
2. 用紙をセットします。(⇒用紙のセット)
3. 文書を開いた状態で[ファイル]® [印刷]の順にクリックします。
4. [設定]、[プロパティ]、[オプション]、または[セットアップ]をクリックします(アプリケーションまたはオペレーティン
グシステムによって異なります)。
[印刷設定]ダイアログボックスが表示されます。
5. [アドバンス]タブで、[レイアウト]ドロップダウンリストから[ポスター]を選択します。
6. ポスターのサイズを選択します。
7. [印刷設定]タブと[アドバンス]タブで、必要に応じてドキュメントに変更を加えます。
8. 設定を変更したら、[OK]をクリックします。
[印刷設定]ダイアログボックスが閉じます。
9. [OK]または[印刷]をクリックします。
バナー紙に印刷する
1. コンピュータとプリンタが接続された状態であることを確認し、電源をオンにします。
2. 用紙をセットします。(⇒用紙のセット)
3. 文書を開いた状態で[ファイル]® [印刷]の順にクリックします。
4. [設定]、[プロパティ]、[オプション]、または[セットアップ]をクリックします(アプリケーションまたはオペレーティン
グシステムによって異なります)。
[印刷設定]ダイアログボックスが表示されます。
5. [アドバンス]タブで、[レイアウト]ドロップダウンリストから[バナー]を選択し、[バナー紙のサイズ]ドロップダウンリス
トから[US レター バナー]または[A4 バナー]を選択します。
6. [印刷設定]タブと[アドバンス]タブで、必要に応じてドキュメントに変更を加えます。
7. 設定を変更したら、[OK]をクリックします。
Page 41

8. [OK]または[印刷]をクリックします。
メモ: 印刷が開始されたら、バナー紙の先端がプリンタから排出されるのを待ち、プリンタの前の用紙を注意して広げま
す。
文書を部単位で印刷する
1. コンピュータとプリンタが接続された状態であることを確認し、電源をオンにします。
2. 用紙をセットします。(⇒ 用紙のセット)
3. 文書を開いた状態で[ファイル]® [印刷]の順にクリックします。
[印刷]ダイアログボックスが表示されます。
4. [設定]、[プロパティ]、[オプション]、または[セットアップ]をクリックします(アプリケーションまたはオペレーティン
グシステムによって異なります)。
[印刷設定]ダイアログボックスが表示されます。
5. [印刷設定]タブで、印刷する部数を指定します。
メモ: [部単位で印刷]チェックボックスが使用できるようにするには、2 部以上の部数を指定する必要があります。
6. [部単位で印刷]チェックボックスをオンにします。
7. [印刷設定]タブと[アドバンス]タブで、必要に応じて文書に変更を加えます。
8. 設定を変更したら、[OK]をクリックします。
[印刷設定]ダイアログボックスが閉じます。
9. [OK]または[印刷]をクリックします。
小冊子を印刷する
[印刷設定]の設定を変更する前に、アプリケーションで正しい用紙サイズを選択する必要があります。 小冊子を印刷するには、次の用紙
サイズを使用できます。
レター
A4
1. 用紙をセットします。 (⇒ 用紙のセット)
2. ドキュメントを開いて[ファイル]® [印刷]の順にクリックします。
3. [印刷]ダイアログボックスで、[プロパティ]、[設定]、[オプション]、または[セットアップ]をクリックします(アプリ
ケーションまたはオペレーティングシステムによって異なります)。
4. [アドバンス]タブをクリックします。
5. [レイアウト]ドロップダウンメニューから[小冊子]を選択します。
6. 厚手の小冊子を印刷する場合は、1 組の枚数を数字で選択します。
Page 42

メモ: 1 組とは、折り返して組み合わせた複数の用紙のまとまりを指します。 印刷された用紙の組は、正しいページ順序で
1 枚ずつ重ねます。 重ねた組をとじると小冊子になります。 厚手の用紙に印刷する場合は、1 組の枚数で少な目の枚数を指
定します。
7. [OK]をクリックして、開いているプリンタソフトウェアのダイアログボックスをすべて閉じます。
8. 文書を印刷します。
メモ: 小冊子をとじる方法(⇒「小冊子をとじる」)
小冊子をとじる
1. 排紙トレイの印刷済みの用紙を裏返します。
2. 重ねた用紙の一部を取り出して半分に折り返し、最初のページを下にして置きます。
3. 次の一部を取り出して半分に折り返し、最初のページを下にして最初の山の上に置きます。
4. 小冊子が出来上がるまで、残りの用紙を最初のページを下にして順に重ねます。
5. 用紙をとじると、小冊子が完成します。
文書を両面に印刷する(両面印刷)
手動両面印刷機能を使用すると、ドキュメントを用紙の両面に印刷できます。 プリンタは、ドキュメントの奇数ページを用紙の片側に印刷
します。 用紙の白いほうを上に向けて再度セットし、ドキュメントの偶数ページを用紙の反対側に印刷します。
1. コンピュータとプリンタの電源をオンにして、接続を確認します。
2. 用紙をセットします。 (⇒ 用紙のセット)
3. ドキュメントを開いて[ファイル]®[印刷]の順にクリックします。
4. [設定]、[プロパティ]、[オプション]、または[セットアップ]をクリックします(アプリケーションまたはオペレーティン
グシステムによって異なります)。
5. [アドバンス]タブをクリックし、[両面印刷]チェックボックスをオンにします。
6. ページのとじしろを選択します。
7. 設定を変更したら、[OK]をクリックします。
[印刷設定]ダイアログボックスが閉じます。
Page 43

8. [OK]または[印刷]をクリックします。
9. 奇数ページがプリンタからすべて排出されたら、コンピュータの画面に表示される手順に従います。
印刷ジョブをキャンセルする
USB ケーブル経由でプリンタに接続されているコンピュータから送信された印刷ジョブをキャンセルするには、次の 3 とおりの方法があ
ります。
[プリンタ]フォルダから:
1. Windows Vista の場合:
a. ® [コントロール パネル]をクリックします。
b. [ハードウェアとサウンド]をクリックします。
c. [プリンタ]をクリックします。
Windows XP の場合は、[スタート]ボタンをクリックして、[コントロール パネル]、[プリンタとその他のハードウェア]、
[プリンタと FAX]の順にクリックします。
Windows 2000 の場合は、[スタート]ボタンをクリックして、[設定]、[プリンタ]の順にクリックします。
2. [Dell V105]のアイコンを右クリックします。
3. [開く] をクリックします。
4. 表示される一覧から、中止するジョブを選択します。
5. [ドキュメント]メニューで[キャンセル]をクリックします。
[印刷の進行状況]ウィンドウから:
[印刷の進行状況]ウィンドウは、印刷ジョブを送信するたびに画面の右下に自動的に表示されます。 [印刷中止]をク
リックして、現在の印刷ジョブをキャンセルします。
タスクバーから:
1. コンピュータの画面右下またはタスクバーにあるプリンタのアイコン をダブルクリックします。
2. キャンセルする印刷ジョブを右クリックします。
3. [キャンセル]をクリックします。
印刷設定のデフォルトを変更する
文書や写真を印刷するために送信する際には、両面印刷、印刷品質、モノクロ印刷などのさまざまな設定を指定することができます。 頻繁
に使用する設定がある場合は、それをデフォルトに設定して、印刷ジョブを送信するたびに指定する必要がないようにすることができま
す。
希望する設定をほとんどのプログラムでの標準の印刷設定にするには、[プリンタ]フォルダから[印刷設定]ダイアログボックスを開き
ます。
1. Windows Vista の場合:
a. ® [コントロール パネル]をクリックします。
Page 44

b. [ハードウェアとサウンド]をクリックします。
c. [プリンタ]をクリックします。
Windows XP の場合は、[スタート]®[設定]® [コントロール パネル]®[プリンタとその他のハードウェア]®[プリンタと
FAX]の順にクリックします。
Windows 2000 の場合は、[スタート]ボタンをクリックして、[設定]、[プリンタ]の順にクリックします。
2. [Dell V105]のアイコンを右クリックします。
3. [印刷設定]を選択します。
4. 設定を変更して、ほとんどのプログラムから印刷する際にデフォルトで使用する設定を作成します。
[印刷設定]タブで、次を設定できます。
デフォルトの印刷品質を[高速]、[標準]、[高品質]のいずれかに変更します。
デフォルトの用紙の種類とサイズを変更します。
モノクロ印刷およびフチなし印刷をデフォルトの設定にします。
デフォルトの印刷方向を変更します。
デフォルトの印刷部数を変更します。
[アドバンス]タブで、以下を設定できます。
デフォルトに設定するレイアウトを指定します。
[メンテナンス]タブで、以下を設定できます。
[メンテナンス]タブからデフォルトに設定できる印刷設定はありません。 ここでは、以下の操作を行うことができます。
カートリッジの取り付け、清掃、調整を行います。
テストページを印刷します。
プリンタをネットワーク上で共有するための情報を取得します。
Page 45

仕様
概要
環境に関する仕様
消費電力および要件
印刷およびスキャンモードでの機能
オペレーティングシステムのサポート
メモリの仕様と要件
用紙の種類とサイズ
ケーブル
概要
メモリ
接続 USB 2.0 高速
負荷サイクル(平均) 3,000 ページ/月
プリンタの寿命
8 MB SDRAM
8 MB FLASH
プリンタ: 12,000 ページ
スキャナ: スキャン 12,000 回
環境に関する仕様
温度/相対湿度
条件 温度 相対湿度(結露なし)
操作時 17 ℃ ~ 32 ℃ 8% ~ 80%
保管時 2 ℃ ~ 60 ℃ 5% ~ 80%
輸送時 -40 ℃ ~ 60 ℃ 5% ~ 100%
消費電力および要件
定格交流入力 100 ~ 240 V
定格周波数 50 ~ 60 Hz
最小交流入力
最大交流入力
最大入力電流
平均電力消費量
90 VAC
255 VAC
1.0 A
Page 46

スタンバイモード
10 W
未満
操作モード
32 W 未満
印刷およびスキャンモードでの機能
お使いのプリンタでは、72 ~ 19,200 dpi の範囲でスキャンできます。プリンタにも同じ性能がありますが、デル™では、あらかじめ設
定された解像度での使用をお勧めします。
印刷およびスキャン解像度 スキャン解像度 印刷解像度
フォトペーパー/光沢紙 その他の用紙
下書き
標準
写真
150 x 150 dpi 600 x 600 dpi 300 x 600 dpi
300 x 300 dpi 1200 x 1200 dpi 600 x 600 dpi
600 x 600 dpi 4800 x 1200 dpi 1200 x 1200 dpi
オペレーティングシステムのサポート
以下のオペレーティングシステムをサポートしています。
Microsoft Windows Vista™
Microsoft® Windows® XP
Microsoft Windows 2000
メモリの仕様と要件
オペレーティングシステムの最小システム要件を満たしている必要があります。
オペレーティングシステム プロセッサの速度(MHz) RAM(MB) ハードディスク
Microsoft Windows Vista
Microsoft Windows XP 800 MHz Pentium/Celeron 128 500 MB
Microsoft Windows 2000 800 MHz Pentium/Celeron 128 500 MB
800 MHz Pentium
®
/Celeron
®
512 500 MB
用紙の種類とサイズ
用紙の種類 サポートされるサイズ セット可能枚数
普通紙
US レター: 216 x 279 mm(8.5 x 11
インチ)
リーガル: 216 x 355.6 mm(8.5 x 14
インチ)
US エグゼクティブ: 7 1/4 x 10 1/2 イ
ンチ
US Statement: 8 1/2 x 5 1/2 インチ
A4: 210 x 297 mm(8.27 x 11.69 イ
100 枚
Page 47

ンチ)
B5: 182 x 257 mm
A5: 148 x 210 mm
A6: 105 x 148 mm
バナー紙
封筒
グリーティングカード、インデックスカード、ポストカード、
フォトカード
A4 バナー紙
バナー紙の 1 枚目
Letter バナー紙
封筒: 10 枚
US 封筒 #9: 3 7/8 x 8 7/8 インチ
US 封筒 #10: 4 1/8 x 9 1/2 インチ
封筒 6 3/4: 3 1/4 x 6 1/2 インチ
封筒 7 3/4: 3 7/8 x 7 1/2 インチ
封筒 A2 Baronial: 111 x 146 mm
封筒 B5: 176 x 250 mm
封筒 C5: 162 x 229 mm
封筒 C6: 114 x 162 mm
封筒 DL: 110 x 220 mm
封筒 長形 3 号: 120 x 235 mm
封筒 長形 4 号: 90 x 205 mm
封筒 長形 40 号: 90 x 225 mm
封筒 角形 3 号: 216 x 277 mm
封筒 角形 4 号: 197 x 267 mm
封筒 角形 5 号: 190 x 240 mm
封筒 角形 6 号: 162 x 229 mm
25 枚
フォトカード/ポストカード: 4 x 6 イン
チ
インデックスカード: 3 x 5 インチ
ハガキ: 100 x 148 mm
マット紙またはフォトペーパー/光沢紙
216 x 279 mm(8.5 x 11 インチ)
A4: 210 x 297 mm(8.27 x 11.69 イ
ンチ)
101.6 x 152.4 mm(4 x 6 インチ)
アイロンプリント紙
216 x 279 mm(8.5 x 11 インチ)
A4: 210 x 297 mm(8.27 x 11.69 イ
ンチ)
OHP フィルム
216 x 279 mm(8.5 x 11 インチ)
A4: 210 x 297 mm(8.27 x 11.69 イ
ンチ)
ユーザー定義サイズの用紙 用紙サイズの要件は次のとおりです。
幅: 76 ~ 216 mm(3.0 ~ 8.5 イン
チ)
長さ: 127 ~ 432 mm(5.0 ~ 17.0 イ
ンチ)
25 枚
10 枚
OHP フィルム:
50 枚
100 枚
ケーブル
お使いのプリンタには、USB (ユニバーサルシリアルバス)ケーブル(別売り)を使用します。
Page 48

Page 49

コピー
[スタート]ボタンをクリックします。
文書をコピーする
写真をコピーする
文書をコピーする
操作パネルの使用
1. プリンタの電源をオンにします。
2. 用紙をセットします。 (⇒ 用紙のセット)
3. 原稿をセットします。 (⇒ 原稿を原稿台にセットする)
4. 2 枚以上印刷する場合は、ディスプレイに必要な印刷枚数が表示されるまで、コピーボタン を押します。
5. カラーコピーボタン
を押してカラーコピーを始めるか、モノクロコピーボタン を押してモノクロコピーを始めます。
コンピュータの使用
1. コンピュータとプリンタの電源をオンにして、接続を確認します。
2. 用紙をセットします。 (⇒ 用紙のセット)
3. 原稿をセットします。 (⇒ 原稿を原稿台にセットする)
4. Windows Vista™ の場合:
a. ® [プログラム]の順にクリックします。
b. [Dell プリンタ]をクリックします。
c. [Dell V105]をクリックします。
Windows
[スタート]®[プログラム]または[すべてのプログラム]® [デルプリンタ]®[Dell V105]の順にクリックします。
®
XP または Windows 2000 の場合:
5. [Dell Imaging Toolbox]を選択します。
[Dell Imaging Toolbox]が開きます。
6. [ホーム]画面で、[コピー]をクリックします。
[スキャンした原稿の取り込み先を選択してください。] ダイアログボックスが表示されます。
7. [文書]を選択します。
8. コピーを作成する前に文書のスキャン画像を調整する場合は、[カスタム設定]をクリックします。
9.
Page 50

[コピー]ダイアログボックスの右ペインに文書が表示されます。
10. [コピー]ダイアログボックスの左ペインで、好きなコピー設定を選択します。
11. [コピー]をクリックします。
写真をコピーする
操作パネルの使用
1. プリンタの電源をオンにします。
2. 印刷面を上に向けてフォトペーパー/光沢紙をセットします。 4 x 6 サイズの写真をコピーする場合は、4 x 6(10 x 15 cm)サ
イズのフォトカードを印刷面を上にしてセットします。 (⇒ 用紙のセット)
3. 写真を原稿台の上にセットします。 (⇒ 原稿を原稿台にセットする)
4. 2 枚以上印刷する場合は、ディスプレイに必要な印刷枚数が表示されるまで、コピーボタン を押します。
5. 4x6 サイズの写真をコピーするには、4 x 6 コピーボタン
写真を他のサイズでコピーするには、カラーコピーボタン
ノクロコピーを始めます。
を押します。
を押してカラーコピーを始めるか、モノクロコピーボタン を押してモ
コンピュータの使用
1. コンピュータとプリンタの電源をオンにして、接続を確認します。
2. 印刷面を上に向けてフォトペーパー/光沢紙をセットします。 4 x 6 サイズの写真をコピーする場合は、4 x 6(10 x 15 cm)サ
イズのフォトカードを印刷面を上にしてセットします。 (⇒ 用紙のセット)
3. 写真を原稿台の上にセットします。 (⇒ 原稿を原稿台にセットする)
4. Windows Vista の場合:
a. ® [プログラム]の順にクリックします。
b. [Dell プリンタ]をクリックします。
c. [Dell V105]をクリックします。
Windows XP または Windows 2000 の場合:
[スタート]®[プログラム]または[すべてのプログラム]® [デルプリンタ]®[Dell V105]の順にクリックします。
5. [Dell Imaging Toolbox]を選択します。
[Dell Imaging Toolbox]が開きます。
6. [ホーム]画面で、[コピー]をクリックします。
[スキャンした原稿の取り込み先を選択してください。] ダイアログボックスが表示されます。
7. [写真]を選択します。
Page 51

8. コピーを作成する前に文書のスキャン画像を調整する場合は、[カスタム設定]をクリックします。
9. [スタート]ボタンをクリックします。
[コピー]ダイアログボックスの右ペインに写真が表示されます。
10. ドロップダウンメニューから、使用する印刷品質、用紙サイズ、用紙の種類を選択します。
11. 写真を複数枚印刷する場合、または 10 x 15 cm(4 x 6 インチ)以外の写真サイズを選択する場合は、使用するオプションを表か
ら選択します。 最後の列のドロップダウンメニューで、その他のサイズを表示して選択します。
12. [コピー]をクリックします。
Page 52

付録
デル テクニカルサポートのご利用条件
デルへのお問い合わせ
保証および返品条件
デル テクニカルサポートのご利用条件
技術者によるテクニカルサポートをお受けいただくには、トラブルシューティングに対するお客様のご協力とご自身での操作が必要となり
ます。サポートでは、オペレーティングシステム、ソフトウェア、ハードウェア用ドライバなどの出荷時の設定への復元と、プリンタおよ
びデルが取り付けを行ったすべてのハードウェアの機能の適正についての確認を行います。技術者によるこのテクニカルサポートのほか
に、デル カスタマーサービスでのオンラインテクニカルサポートもご利用いただけます。また、テクニカルサポートの追加オプションをご
購入いただくことができます。
デルでは、プリンタおよびデルがインストールまたは取り付けを行ったすべてのソフトウェアと周辺機器に対して、限定テクニカルサポー
トを提供しています。Software & Peripherals (DellWare)、ReadyWare、Custom Factory Integration (CFI/DellPlus) などから購
入およびインストールされたものを含む、サードパーティ製ソフトウェアおよび周辺機器に対するサポートは、それらの製造元により提供
されます。
デルへのお問い合わせ
デルサポートには、support.jp.dell.com からアクセスできます。最初に表示されるページで地域を選択し、要求される詳細に記入する
と、ヘルプツールおよび情報にアクセスできます。
オンラインでのデルへのお問い合わせには、次のアドレスをご利用ください。
インターネット
www.dell.com/
www.dell.com/ap/(アジア太平洋諸国のみ)
www.dell.com/jp/(日本のみ)
www.euro.dell.com(ヨーロッパのみ)
www.dell.com/la/(中南米諸国のみ)
www.dell.ca(カナダのみ)
匿名 FTP(ファイル転送プロトコル)
ftp.dell.com
ログインユーザー名:anonymous、パスワードにはお客様の E メールアドレスを入力してください。
E メールサポートサービス
mobile_support@us.dell.com
support@us.dell.com
la-techsupport@dell.com(中南米諸国のみ)
apsupport@dell.com(アジア太平洋諸国のみ)
support.jp.dell.com(日本のみ)
support.euro.dell.com(ヨーロッパのみ)
Page 53

E メール見積もりサービス
apmarketing@dell.com(アジア太平洋諸国のみ)
sales_canada@dell.com(カナダのみ)
保証および返品条件
Dell Inc.(以下「デル」といいます)は、ハードウェア製品の製造のために、新品、または業界標準の慣例に従い新品と同等とみなされる
部品およびコンポーネントを使用しています。 お使いのプリンタに対するデルの保証については、『製品情報ガイド』を参照してくださ
い。
Page 54

スキャン
スキャンし、デフォルトのワープロアプリケーションではなく、ライブラリへ送ります。
1 ページの原稿または 1 枚の写真をスキャンする 画像や文書を拡大・縮小する
複数の写真をスキャンして 1 つのファイルに保存する ドキュメントや写真を E メールで送信する
写真をスキャンして編集する PDF を作成する
写真をスキャンして編集する スキャン設定を変更する
写真をコンピュータに保存する スキャン設定を変更する
1 ページの原稿または 1 枚の写真をスキャンする
操作パネルの使用
1. コンピュータとプリンタの電源をオンにして、接続を確認します。
2. 原稿をセットします。 (⇒ 原稿を原稿台にセットする)
3. スキャンボタン を押します。
コンピュータの使用
1. コンピュータとプリンタの電源をオンにして、接続を確認します。
2. 文書または写真を下向きにして原稿台にセットします。 (⇒ 原稿を原稿台にセットする)
3. Windows Vista™ の場合:
a. ® [プログラム]の順にクリックします。
b. [Dell プリンタ]をクリックします。
c. [Dell V105]をクリックします。
Windows
[スタート]®[プログラム]または[すべてのプログラム]® [デルプリンタ]®[Dell V105]の順にクリックします。
®
XP または Windows 2000 の場合:
4. [Dell Imaging Toolbox]を選択します。
[Dell Imaging Toolbox]が開きます。
5. [ホーム]画面で、[スキャン]をクリックします。
[スキャンした原稿の取り込み先を選択してください。] ダイアログボックスが表示されます。
6. [写真]オプションを選択します。
スキャンした文書のテキストを編集したり、PDF を作成する必要のない場合は、[写真]オプションを選択して文書を画像として
Page 55

7. [スタート]ボタンをクリックします。
複数の写真をスキャンして 1 つのファイルに保存する
メモ: アプリケーションによっては、一度に複数のページをスキャンできない場合があります。
1. コンピュータとプリンタの電源をオンにして、接続を確認します。
2. 写真を原稿台の上にセットします。 (⇒ 原稿を原稿台にセットする)
メモ: 写真同士の間、および写真とスキャン領域の端との間には十分なスペースを空けてください。
3. Windows Vista の場合:
® [プログラム]の順にクリックします。
a.
b. [Dell プリンタ]をクリックします。
c. [Dell V105]をクリックします。
Windows XP および Windows 2000 の場合:
[スタート]®[プログラム]または[すべてのプログラム]® [デルプリンタ]®[Dell V105]の順にクリックします。
4. [Dell Imaging Toolbox]を選択します。
[Dell Imaging Toolbox]が開きます。
5. [ホーム]画面で、[複数の写真をスキャンする]をクリックします。
6. [スタート]ボタンをクリックします。
写真をスキャンして編集する
OCR(光学式文字認識)機能を使用すると、スキャンした原稿をテキストに変換して、ワープロなどのアプリケーションで編集できます。
メモ: 日本語または簡体字中国語をお使いのお客様は、お使いのコンピュータに OCR ソフトウェアがインストールされていること
を確認してください。 お使いのプリンタには OCR ソフトウェアが 1 つ付属しており、プリンタソフトウェアと同時にコンピュータ
にインストールされています。
1. コンピュータとプリンタの電源をオンにして、接続を確認します。
2. 原稿を下向きにして原稿台にセットします。 (⇒ 原稿を原稿台にセットする)
3. Windows Vista の場合:
a. ® [プログラム]の順にクリックします。
b. [Dell プリンタ]をクリックします。
c. [Dell V105]をクリックします。
Windows XP および Windows 2000 の場合:
[スタート]®[プログラム]または[すべてのプログラム]® [デルプリンタ]®[Dell V105]の順にクリックします。
Page 56

4. [Dell Imaging Toolbox]を選択します。
[Dell Imaging Toolbox]が開きます。
5. [ホーム]画面で、[操作]をクリックします。
6. [OCR ソフトウェアを起動する]をクリックします。
7. [開始]をクリックします。
スキャンした文書は、デフォルトのワープロアプリケーションに取り込まれます。 そこで文書を編集できます。
写真をスキャンして編集する
1. コンピュータとプリンタの電源をオンにして、接続を確認します。
2. 写真を下向きにして原稿台にセットします。 (⇒ 原稿を原稿台にセットする)
3. Windows Vista の場合:
a. ® [プログラム]の順にクリックします。
b. [Dell プリンタ]をクリックします。
c. [Dell V105]をクリックします。
Windows XP および Windows 2000 の場合:
[スタート]®[プログラム]または[すべてのプログラム]® [デルプリンタ]®[Dell V105]の順にクリックします。
4. [Dell Imaging Toolbox]を選択します。
[Dell Imaging Toolbox]が開きます。
5. [ホーム]画面で、[操作]をクリックします。
6. [画像の編集]をクリックします。
7. [写真]または[複数の写真]のオプションを選択します。
8. [スタート]ボタンをクリックします。
[保存/編集]ダイアログボックスに画像が表示されます。
9. 左ウィンドウ枠から編集オプションを選択して、写真を編集します。
写真をコンピュータに保存する
1. コンピュータとプリンタの電源をオンにして、接続を確認します。
2. 1 枚または複数の写真を下向きにして原稿台にセットします。 (⇒ 原稿を原稿台にセットする)
メモ: 写真同士の間、および写真とスキャン領域の端との間には十分なスペースを空けてください。
3. Windows Vista の場合:
® [プログラム]の順にクリックします。
a.
Page 57

b. [Dell プリンタ]をクリックします。
c. [Dell V105]をクリックします。
Windows XP および Windows 2000 の場合:
[スタート]®[プログラム]または[すべてのプログラム]® [デルプリンタ]®[Dell V105]の順にクリックします。
4. [Dell Imaging Toolbox]を選択します。
[Dell Imaging Toolbox]が開きます。
5. [ホーム]画面で、[スキャン]をクリックします。
6. [写真]または[複数の写真]のオプションを選択します。
7. [スタート]ボタンをクリックします。
8. [保存/編集]ダイアログボックスの右ペインで、[保存]をクリックします。
9. 画像の保存方法を変更するには:
a. 以下のいずれかの設定を選択します。
別のフォルダに保存する場合は、[参照]をクリックしてフォルダを選択し、[OK]をクリックします。
ファイルの名前を変更する場合は、[ファイル名]ボックスに名前を入力します。
写真を別のファイル形式で保存する場合は、[ファイルの種類]ドロップダウンメニューからファイル形式を選択し
ます。
写真の日付を選択するには、ドロップダウンメニューをクリックして、カレンダーから日付を選択します。
b. [保存]をクリックします。
画像や文書を拡大・縮小する
1. コンピュータとプリンタの電源をオンにして、接続を確認します。
2. Windows Vista の場合:
a. ® [プログラム]の順にクリックします。
b. [Dell プリンタ]をクリックします。
c. [Dell V105]をクリックします。
Windows XP および Windows 2000 の場合:
[スタート]®[プログラム]または[すべてのプログラム]® [デルプリンタ]®[Dell V105]の順にクリックします。
3. [Dell Imaging Toolbox]を選択します。
[Dell Imaging Toolbox]が開きます。
4. [ホーム]画面で、[操作]をクリックします。
5. [スキャン画像サイズの変更]をクリックします。
6. 画像を新しくスキャンする場合は、以下の手順に従います。
Page 58

a. [ファイル]®[新規]®[新しい画像のスキャン]をクリックします。
メモ: 文書をスキャンして E メールで送る場合は、[写真]または[複数の写真]を選択します。 [文書]を選択すると、
b. [写真]オプションから選択します。
c. [スタート]ボタンをクリックします。
[ライブラリ]ダイアログボックスの右ペインに、スキャン画像のサムネイルが表示されます。
d. サイズを変更する写真を選択します。
保存済みの画像を使用する場合は、以下の手順に従います。
a. [ライブラリ]ダイアログボックスの[フォルダ]ペインから、サイズを変更するファイルが保存されているフォルダを開
きます。
フォルダ内のすべての文書および写真のサムネイルがプレビュー枠に表示されます。
b. サイズを変更する写真を選択します。
7. [次へ]をクリックします。
[画像の解像度/サイズ]ダイアログボックスが開きます。
8. 既定の写真サイズまたは任意のサイズを指定して、新しい画像のサイズを選択します。
9. [OK]をクリックします。
ドキュメントや写真を E メールで送信する
文書や写真をスキャンして E メールで送信する
文書や写真をスキャンして E メールに添付できます。
1. コンピュータとプリンタの電源をオンにして、接続を確認します。
2. 文書または写真を下向きにして原稿台にセットします。 (⇒ 原稿を原稿台にセットする)
3. Windows Vista の場合:
a. ® [プログラム]の順にクリックします。
b. [Dell プリンタ]をクリックします。
c. [Dell V105]をクリックします。
Windows XP および Windows 2000 の場合:
[スタート]®[プログラム]または[すべてのプログラム]® [デルプリンタ]®[Dell V105]の順にクリックします。
4. [Dell Imaging Toolbox]を選択します。
[Dell Imaging Toolbox]が開きます。
5. [ホーム]画面で、[スキャン]をクリックします。
6. [写真]または[複数の写真]のオプションを選択します。
Page 59

スキャンした文書がライブラリではなく、デフォルトのワープロアプリケーションで開きます。
7. [スタート]ボタンをクリックします。
スキャン画像が[保存/編集]ダイアログの右ペインに表示されます。
8. [保存/編集]ダイアログボックスの左ペインの設定を使用して、スキャン画像を調整します。
9. スキャン画像を保存します。
10. スキャンした原稿を選択した状態で、[E メール]をクリックします。
11. [送信画質と速度]セクションで、写真のサイズを選択します。
12. [新規メール]をクリックして、文書または写真を E メールに添付します。
ファイルを E メールに添付する
1. Windows Vista の場合:
a. ® [プログラム]の順にクリックします。
b. [Dell プリンタ]をクリックします。
c. [Dell V105]をクリックします。
Windows XP および Windows 2000 の場合:
[スタート]®[プログラム]または[すべてのプログラム]® [デルプリンタ]®[Dell V105]の順にクリックします。
2. [Dell Imaging Toolbox]を選択します。
[Dell Imaging Toolbox]ダイアログボックスが開きます。
3. [ホーム]画面で[フォトアルバム]をクリックします。
4. [フォルダ]ペインで、送信するファイルが保存されているフォルダを開きます。
フォルダ内のすべての写真および文書のサムネイルがプレビュー枠に表示されます。
5. 添付する写真または文書をクリックして選択し、[E メール]をクリックします。
6. 写真を送信する場合は、写真のサイズを選択します。
7. [新規メール]をクリックして、ファイルを添付する E メールを作成します。
PDF を作成する
スキャンしたイメージから
1. 原稿を下向きにして原稿台にセットします。
2. Windows Vista の場合:
a. ® [プログラム]の順にクリックします。
Page 60

b. [Dell プリンタ]をクリックします。
c. [Dell V105]をクリックします。
Windows XP および Windows 2000 の場合:
[スタート]®[プログラム]または[すべてのプログラム]® [デルプリンタ]®[Dell V105]の順にクリックします。
3. [Dell Imaging Toolbox]を選択します。
[Dell Imaging Toolbox]が開きます。
4. From the [ホーム]画面で[フォトアルバム]をクリックします。
5. [追加]、[スキャナから追加]の順にクリックします。
6. [写真]、[複数の写真]、または[文書]を選択します。
7. [開始]をクリックしてスキャンを開始します。
8. スキャンした原稿を選択した状態で、[PDF に変換]をクリックします。
9. 別の画像をスキャンする場合、またはライブラリから画像を追加する場合は、[その他を追加]をクリックします。
10. 別の画像を追加またはスキャンするには:
a. 以下のいずれかを実行します。
[スキャナから追加]を選択して、[写真]、[複数の写真]、または[文書]を選択します。 [開始]をクリック
します。
[フォトライブラリから追加]を選択してスキャン済みの画像を追加し、プレビュー枠の画像をクリックして、画像
の選択と解除を切り替えます。
b. 選択を完了したら、[ファイルの追加]をクリックします。
11. [すべての画像を 1 つの PDF ファイルで保存する]または[画像ごとに個別の PDF ファイルで保存する]を選択します。
12. [PDF 作成]をクリックします。
ソフトウェアで PDF が作成され、[保存]ダイアログボックスが開きます。
13. PDF ファイルの名前を入力して、保存場所を選択します。
14. [保存]をクリックします。
保存された画像から
1. Windows Vista の場合:
a. ® [プログラム]の順にクリックします。
b. [Dell プリンタ]をクリックします。
c. [Dell V105]をクリックします。
Windows XP および Windows 2000 の場合:
[スタート]®[プログラム]または[すべてのプログラム]® [デルプリンタ]®[Dell V105]の順にクリックします。
2. [Dell Imaging Toolbox]を選択します。
Page 61

[Dell Imaging Toolbox]ダイアログボックスが開きます。
3. [ホーム]画面で、[フォトアルバム]をクリックします。
4. [フォルダ]ペインで、PDF に変換する画像が保存されているフォルダを開き、サムネイルを選択します。
5. [PDF に変換]をクリックします。
6. 別の画像をスキャンする場合、またはライブラリから画像を追加する場合は、[その他を追加]をクリックします。
7. 別の画像を追加またはスキャンするには:
a. 以下のいずれかを実行します。
[スキャナから追加]を選択して、[写真]、[複数の写真]、または[文書]を選択します。 [開始]をクリック
します。
[フォトライブラリから追加]を選択して、プレビュー枠の画像をクリックして画像の選択と解除を切り替えます。
b. 選択を完了したら、[ファイルの追加]をクリックします。
8. [すべての画像を 1 つの PDF ファイルで保存する]または[画像ごとに個別の PDF ファイルで保存する]を選択します。
9. [PDF 作成]をクリックします。
ソフトウェアで PDF が作成され、[保存]ダイアログボックスが開きます。
10. PDF ファイルの名前を入力して、保存場所を選択します。
11. [保存]をクリックします。
スキャン設定を変更する
1. Windows Vista の場合:
a. ® [プログラム]の順にクリックします。
b. [Dell プリンタ]をクリックします。
c. [Dell V105]をクリックします。
Windows XP および Windows 2000 の場合:
[スタート]®[プログラム]または[すべてのプログラム]® [デルプリンタ]®[Dell V105]の順にクリックします。
2. [Dell Imaging Toolbox]を選択します。
[Dell Imaging Toolbox]ダイアログボックスが開きます。
3. [ホーム]画面で、[スキャン]をクリックします。
4. [詳細設定]をクリックします。
5. 必要に応じて、設定を変更します。
設定 オプション
色の設定 [カラー]、[グレースケール]、または[モノクロ]のいずれかを選択します。
スキャン解像度(dpi) ドロップダウンメニューからスキャン解像度の値を選択します
Page 62

用紙サイズ
スキャンした原稿を自動でトリミングします。
ドロップダウンメニューから用紙のサイズを選択して、スキャンする範囲を選択しま
す。
OCR ソフトウェアを起動する 画像をテキストに変換します。
常にこの設定を使ってスキャンするチェックボックスをオンにすると、選択した設定が常に使用されます。
スキャン設定を変更する
1. Windows Vista の場合:
a. ® [プログラム]の順にクリックします。
b. [Dell プリンタ]をクリックします。
c. [Dell V105]をクリックします。
Windows XP および Windows 2000 の場合:
[スタート]®[プログラム]または[すべてのプログラム]® [デルプリンタ]®[Dell V105]の順にクリックします。
2. [Dell Imaging Toolbox]を選択します。
[Dell Imaging Toolbox]ダイアログボックスが開きます。
3. [ホーム]画面で、[設定]、[ツールボックスの設定]の順にクリックします。
4. [スキャン設定]をクリックします。
デフォルトのスキャン設定を使用するには、[常にスキャンの基本設定を使用する]を選択します。
残りのスキャン設定を変更するには、[常に以下の設定でスキャンする]を選択します。
[色の設定]セクションで、リストから色の設定を選択します。
[スキャン解像度(dpi)]セクションで、リストから解像度の値を選択します。
[自動切り取り]をクリックし、スライドバーを使用してトリミング用の設定値を選択します。
[スキャン範囲の選択]をクリックして、リストから値を選択します。
[OCR ソフトウェアを起動する]をクリックして、画像をテキストに変換します。
5. [OK]をクリックします。
Page 63

ライセンスに関する通知
BSD License and Warranty statements
GNU License
プリンタに常駐するソフトウェアには、次のものが含まれています。
デルまたはサードパーティが開発し、著作権を所有するソフトウェア
GNU General Public License version 2 および GNU Lesser General Public License version 2.1 の条項に基づき、デルが改
変したソフトウェア
BSD License and Warranty Statements に基づいて使用許諾されるソフトウェア
Independent JPEG Group の著作物に基づくソフトウェア
デルが改変した GNU ライセンスソフトウェアはフリーソフトウェアです。お客様は、この使用許諾の条項に基づいて、ソフトウェアを再
配布または改変することができます。 この使用許諾は、このプリンタに付属する、デルまたはサードパーティが著作権を所有するソフト
ウェアに対するお客様のいかなる権利も保証するものではありません。
デルが改変の際に基盤として使用した GNU ライセンスソフトウェアは完全に無保証で提供されるため、デルによる改訂版も同様に無保証
で提供されます。 詳細については、適用されるライセンスの保証免責条項を参照してください。
BSD License and Warranty statements
Copyright (c) 1991 The Regents of the University of California. All rights reserved.
Redistribution and use in source and binary forms, with or without modification, are permitted provided that the following
conditions are met:
1. Redistributions of source code must retain the above copyright notice, this list of conditions and the following
disclaimer.
2. Redistributions in binary form must reproduce the above copyright notice, this list of conditions and the following
disclaimer in the documentation and/or other materials provided with the distribution.
3. The name of the author may not be used to endorse or promote products derived from this software without
specific prior written permission.
THIS SOFTWARE IS PROVIDED BY THE AUTHOR ``AS IS'' AND ANY EXPRESS OR IMPLIED WARRANTIES, INCLUDING, BUT
NOT LIMITED TO, THE IMPLIED WARRANTIES OF MERCHANTABILITY AND FITNESS FOR A PARTICULAR PURPOSE ARE
DISCLAIMED. IN NO EVENT SHALL THE AUTHOR BE LIABLE FOR ANY DIRECT, INDIRECT, INCIDENTAL, SPECIAL,
EXEMPLARY, OR CONSEQUENTIAL DAMAGES (INCLUDING, BUT NOT LIMITED TO, PROCUREMENT OF SUBSTITUTE GOODS
OR SERVICES; LOSS OF USE, DATA, OR PROFITS; OR BUSINESS INTERRUPTION) HOWEVER CAUSED AND ON ANY
THEORY OF LIABILITY, WHETHER IN CONTRACT, STRICT LIABILITY, OR TORT (INCLUDING NEGLIGENCE OR OTHERWISE)
ARISING IN ANY WAY OUT OF THE USE OF THIS SOFTWARE, EVEN IF ADVISED OF THE POSSIBILITY OF SUCH DAMAGE.
GNU License
GENERAL PUBLIC LICENSE
Version 2, June 1991
Copyright (C) 1989, 1991 Free Software Foundation, Inc.
59 Temple Place, Suite 330, Boston, MA 02111-1307 USA
Everyone is permitted to copy and distribute verbatim copies of this license document, but changing it is not allowed.
Page 64

Preamble
The licenses for most software are designed to take away your freedom to share and change it. By contrast, the GNU
General Public License is intended to guarantee your freedom to share and change free software--to make sure the
software is free for all its users. This General Public License applies to most of the Free Software Foundation's software
and to any other program whose authors commit to using it. (Some other Free Software Foundation software is covered
by the GNU Library General Public License instead.) You can apply it to your programs, too.
When we speak of free software, we are referring to freedom, not price. Our General Public Licenses are designed to
make sure that you have the freedom to distribute copies of free software (and charge for this service if you wish), that
you receive source code or can get it if you want it, that you can change the software or use pieces of it in new free
programs; and that you know you can do these things.
To protect your rights, we need to make restrictions that forbid anyone to deny you these rights or to ask you to
surrender the rights. These restrictions translate to certain responsibilities for you if you distribute copies of the software,
or if you modify it.
For example, if you distribute copies of such a program, whether gratis or for a fee, you must give the recipients all the
rights that you have. You must make sure that they, too, receive or can get the source code. And you must show them
these terms so they know their rights.
We protect your rights with two steps: (1) copyright the software, and (2) offer you this license which gives you legal
permission to copy, distribute and/or modify the software.
Also, for each author's protection and ours, we want to make certain that everyone understands that there is no warranty
for this free software. If the software is modified by someone else and passed on, we want its recipients to know that
what they have is not the original, so that any problems introduced by others will not reflect on the original authors'
reputations.
Finally, any free program is threatened constantly by software patents. We wish to avoid the danger that redistributors of
a free program will individually obtain patent licenses, in effect making the program proprietary. To prevent this, we have
made it clear that any patent must be licensed for everyone's free use or not licensed at all.
The precise terms and conditions for copying, distribution and modification follow.
GNU GENERAL PUBLIC LICENSE
TERMS AND CONDITIONS FOR COPYING, DISTRIBUTION AND MODIFICATION
0. This License applies to any program or other work which contains a notice placed by the copyright holder saying it may
be distributed under the terms of this General Public License. The "Program", below, refers to any such program or work,
and a "work based on the Program" means either the Program or any derivative work under copyright law: that is to say,
a work containing the Program or a portion of it, either verbatim or with modifications and/or translated into another
language. (Hereinafter, translation is included without limitation in the term "modification".) Each licensee is addressed as
"you". Activities other than copying, distribution and modification are not covered by this License; they are outside its
scope. The act of running the Program is not restricted, and the output from the Program is covered only if its contents
constitute a work based on the Program (independent of having been made by running the Program). Whether that is true
depends on what the Program does.
1. You may copy and distribute verbatim copies of the Program's source code as you receive it, in any medium, provided
that you conspicuously and appropriately publish on each copy an appropriate copyright notice and disclaimer of warranty;
keep intact all the notices that refer to this License and to the absence of any warranty; and give any other recipients of
the Program a copy of this License along with the Program.
You may charge a fee for the physical act of transferring a copy, and you may at your option offer warranty protection in
exchange for a fee.
2. You may modify your copy or copies of the Program or any portion of it, thus forming a work based on the Program,
and copy and distribute such modifications or work under the terms of Section 1 above, provided that you also meet all of
these conditions:
a. You must cause the modified files to carry prominent notices stating that you changed the files and the date of any
change.
b. You must cause any work that you distribute or publish, that in whole or in part contains or is derived from the
Program or any part thereof, to be licensed as a whole at no charge to all third parties under the terms of this License.
c. If the modified program normally reads commands interactively when run, you must cause it, when started running for
such interactive use in the most ordinary way, to print or display an announcement including an appropriate copyright
notice and a notice that there is no warranty (or else, saying that you provide a warranty) and that users may redistribute
the program under these conditions, and telling the user how to view a copy of this License. (Exception: if the Program
itself is interactive but does not normally print such an announcement, your work based on the Program is not required to
print an announcement.)
These requirements apply to the modified work as a whole. If identifiable sections of that work are not derived from the
Program, and can be reasonably considered independent and separate works in themselves, then this License, and its
Page 65

terms, do not apply to those sections when you distribute them as separate works. But when you distribute the same
sections as part of a whole which is a work based on the Program, the distribution of the whole must be on the terms of
this License, whose permissions for other licensees extend to the entire whole, and thus to each and every part regardless
of who wrote it.
Thus, it is not the intent of this section to claim rights or contest your rights to work written entirely by you; rather, the
intent is to exercise the right to control the distribution of derivative or collective works based on the Program.
In addition, mere aggregation of another work not based on the Program with the Program (or with a work based on the
Program) on a volume of a storage or distribution medium does not bring the other work under the scope of this License.
3. You may copy and distribute the Program (or a work based on it, under Section 2) in object code or executable form
under the terms of Sections 1 and 2 above provided that you also do one of the following:
a. Accompany it with the complete corresponding machine-readable source code, which must be distributed under the
terms of Sections 1 and 2 above on a medium customarily used for software interchange; or,
b. Accompany it with a written offer, valid for at least three years, to give any third party, for a charge no more than your
cost of physically performing source distribution, a complete machine-readable copy of the corresponding source code, to
be distributed under the terms of Sections 1 and 2 above on a medium customarily used for software interchange; or,
c. Accompany it with the information you received as to the offer to distribute corresponding source code. (This
alternative is allowed only for noncommercial distribution and only if you received the program in object code or
executable form with such an offer, in accord with Subsection b above.)
The source code for a work means the preferred form of the work for making modifications to it. For an executable work,
complete source code means all the source code for all modules it contains, plus any associated interface definition files,
plus the scripts used to control compilation and installation of the executable. However, as a special exception, the source
code distributed need not include anything that is normally distributed (in either source or binary form) with the major
components (compiler, kernel, and so on) of the operating system on which the executable runs, unless that component
itself accompanies the executable.
If distribution of executable or object code is made by offering access to copy from a designated place, then offering
equivalent access to copy the source code from the same place counts as distribution of the source code, even though
third parties are not compelled to copy the source along with the object code.
4. You may not copy, modify, sublicense, or distribute the Program except as expressly provided under this License. Any
attempt otherwise to copy, modify, sublicense or distribute the Program is void, and will automatically terminate your
rights under this License. However, parties who have received copies, or rights, from you under this License will not have
their licenses terminated so long as such parties remain in full compliance.
5. You are not required to accept this License, since you have not signed it. However, nothing else grants you permission
to modify or distribute the Program or its derivative works. These actions are prohibited by law if you do not accept this
License. Therefore, by modifying or distributing the Program (or any work based on the Program), you indicate your
acceptance of this License to do so, and all its terms and conditions for copying, distributing or modifying the Program or
works based on it.
6. Each time you redistribute the Program (or any work based on the Program), the recipient automatically receives a
license from the original licensor to copy, distribute or modify the Program subject to these terms and conditions. You
may not impose any further restrictions on the recipients' exercise of the rights granted herein. You are not responsible
for enforcing compliance by third parties to this License.
7. If, as a consequence of a court judgment or allegation of patent infringement or for any other reason (not limited to
patent issues), conditions are imposed on you (whether by court order, agreement or otherwise) that contradict the
conditions of this License, they do not excuse you from the conditions of this License. If you cannot distribute so as to
satisfy simultaneously your obligations under this License and any other pertinent obligations, then as a consequence you
may not distribute the Program at all. For example, if a patent license would not permit royalty-free redistribution of the
Program by all those who receive copies directly or indirectly through you, then the only way you could satisfy both it and
this License would be to refrain entirely from distribution of the Program.
If any portion of this section is held invalid or unenforceable under any particular circumstance, the balance of the section
is intended to apply and the section as a whole is intended to apply in other circumstances.
It is not the purpose of this section to induce you to infringe any patents or other property right claims or to contest
validity of any such claims; this section has the sole purpose of protecting the integrity of the free software distribution
system, which is implemented by public license practices. Many people have made generous contributions to the wide
range of software distributed through that system in reliance on consistent application of that system; it is up to the
author/donor to decide if he or she is willing to distribute software through any other system and a licensee cannot
impose that choice.
This section is intended to make thoroughly clear what is believed to be a consequence of the rest of this License.
8. If the distribution and/or use of the Program is restricted in certain countries either by patents or by copyrighted
interfaces, the original copyright holder who places the Program under this License may add an explicit geographical
distribution limitation excluding those countries, so that distribution is permitted only in or among countries not thus
excluded. In such case, this License incorporates the limitation as if written in the body of this License.
Page 66

9. The Free Software Foundation may publish revised and/or new versions of the General Public License from time to time.
Such new versions will be similar in spirit to the present version, but may differ in detail to address new problems or
concerns.
Each version is given a distinguishing version number. If the Program specifies a version number of this License which
applies to it and "any later version", you have the option of following the terms and conditions either of that version or of
any later version published by the Free Software Foundation. If the Program does not specify a version number of this
License, you may choose any version ever published by the Free Software Foundation.
10. If you wish to incorporate parts of the Program into other free programs whose distribution conditions are different,
write to the author to ask for permission. For software which is copyrighted by the Free Software Foundation, write to the
Free Software Foundation; we sometimes make exceptions for this. Our decision will be guided by the two goals of
preserving the free status of all derivatives of our free software and of promoting the sharing and reuse of software
generally.
NO WARRANTY
11. BECAUSE THE PROGRAM IS LICENSED FREE OF CHARGE, THERE IS NO WARRANTY FOR THE PROGRAM, TO THE
EXTENT PERMITTED BY APPLICABLE LAW. EXCEPT WHEN OTHERWISE STATED IN WRITING THE COPYRIGHT HOLDERS
AND/OR OTHER PARTIES PROVIDE THE PROGRAM "AS IS" WITHOUT WARRANTY OF ANY KIND, EITHER EXPRESSED OR
IMPLIED, INCLUDING, BUT NOT LIMITED TO, THE IMPLIED WARRANTIES OF MERCHANTABILITY AND FITNESS FOR A
PARTICULAR PURPOSE. THE ENTIRE RISK AS TO THE QUALITY AND PERFORMANCE OF THE PROGRAM IS WITH YOU.
SHOULD THE PROGRAM PROVE DEFECTIVE, YOU ASSUME THE COST OF ALL NECESSARY SERVICING, REPAIR OR
CORRECTION.
12. IN NO EVENT UNLESS REQUIRED BY APPLICABLE LAW OR AGREED TO IN WRITING WILL ANY COPYRIGHT HOLDER,
OR ANY OTHER PARTY WHO MAY MODIFY AND/OR REDISTRIBUTE THE PROGRAM AS PERMITTED ABOVE, BE LIABLE TO
YOU FOR DAMAGES, INCLUDING ANY GENERAL, SPECIAL, INCIDENTAL OR CONSEQUENTIAL DAMAGES ARISING OUT OF
THE USE OR INABILITY TO USE THE PROGRAM (INCLUDING BUT NOT LIMITED TO LOSS OF DATA OR DATA BEING
RENDERED INACCURATE OR LOSSES SUSTAINED BY YOU OR THIRD PARTIES OR A FAILURE OF THE PROGRAM TO
OPERATE WITH ANY OTHER PROGRAMS), EVEN IF SUCH HOLDER OR OTHER PARTY HAS BEEN ADVISED OF THE
POSSIBILITY OF SUCH DAMAGES.
END OF TERMS AND CONDITIONS
How to Apply These Terms to Your New Programs
If you develop a new program, and you want it to be of the greatest possible use to the public, the best way to achieve
this is to make it free software which everyone can redistribute and change under these terms.
To do so, attach the following notices to the program. It is safest to attach them to the start of each source file to most
effectively convey the exclusion of warranty; and each file should have at least the "copyright" line and a pointer to where
the full notice is found.
1 April 1989
Lexmark International, Inc.
This General Public License does not permit incorporating your program into proprietary programs. If your program is a
subroutine library, you may consider it more useful to permit linking proprietary applications with the library. If this is
what you want to do, use the GNU Library General Public License instead of this License.
GNU LESSER GENERAL PUBLIC LICENSE
Version 2.1, February 1999
Copyright (C) 1991, 1999 Free Software Foundation, Inc.
59 Temple Place, Suite 330, Boston, MA 02111-1307 USA
Everyone is permitted to copy and distribute verbatim copies of this license document, but changing it is not allowed.
[This is the first released version of the Lesser GPL. It also counts as the successor of the GNU Library Public License,
version 2, hence the version number 2.1.]
Preamble
The licenses for most software are designed to take away your freedom to share and change it. By contrast, the GNU
General Public Licenses are intended to guarantee your freedom to share and change free software--to make sure the
software is free for all its users.
This license, the Lesser General Public License, applies to some specially designated software packages--typically
libraries--of the Free Software Foundation and other authors who decide to use it. You can use it too, but we suggest you
first think carefully about whether this license or the ordinary General Public License is the better strategy to use in any
particular case, based on the explanations below.
When we speak of free software, we are referring to freedom of use, not price. Our General Public Licenses are designed
Page 67

to make sure that you have the freedom to distribute copies of free software (and charge for this service if you wish);
that you receive source code or can get it if you want it; that you can change the software and use pieces of it in new free
Activities other than copying, distribution and modification are not covered by this License; they are outside its scope. The
programs; and that you are informed that you can do these things.
To protect your rights, we need to make restrictions that forbid distributors to deny you these rights or to ask you to
surrender these rights. These restrictions translate to certain responsibilities for you if you distribute copies of the library
or if you modify it.
For example, if you distribute copies of the library, whether gratis or for a fee, you must give the recipients all the rights
that we gave you. You must make sure that they, too, receive or can get the source code. If you link other code with the
library, you must provide complete object files to the recipients, so that they can relink them with the library after making
changes to the library and recompiling it. And you must show them these terms so they know their rights.
We protect your rights with a two-step method: (1) we copyright the library, and (2) we offer you this license, which gives
you legal permission to copy, distribute and/or modify the library.
To protect each distributor, we want to make it very clear that there is no warranty for the free library. Also, if the library
is modified by someone else and passed on, the recipients should know that what they have is not the original version, so
that the original author's reputation will not be affected by problems that might be introduced by others.
Finally, software patents pose a constant threat to the existence of any free program. We wish to make sure that a
company cannot effectively restrict the users of a free program by obtaining a restrictive license from a patent holder.
Therefore, we insist that any patent license obtained for a version of the library must be consistent with the full freedom
of use specified in this license.
Most GNU software, including some libraries, is covered by the ordinary GNU General Public License. This license, the GNU
Lesser General Public License, applies to certain designated libraries, and is quite different from the ordinary General
Public License. We use this license for certain libraries in order to permit linking those libraries into non-free programs.
When a program is linked with a library, whether statically or using a shared library, the combination of the two is legally
speaking a combined work, a derivative of the original library. The ordinary General Public License therefore permits such
linking only if the entire combination fits its criteria of freedom. The Lesser General Public License permits more lax
criteria for linking other code with the library.
We call this license the "Lesser" General Public License because it does Less to protect the user's freedom than the
ordinary General Public License. It also provides other free software developers Less of an advantage over competing nonfree programs. These disadvantages are the reason we use the ordinary General Public License for many libraries.
However, the Lesser license provides advantages in certain special circumstances.
For example, on rare occasions, there may be a special need to encourage the widest possible use of a certain library, so
that it becomes a de-facto standard. To achieve this, non-free programs must be allowed to use the library. A more
frequent case is that a free library does the same job as widely used non-free libraries. In this case, there is little to gain
by limiting the free library to free software only, so we use the Lesser General Public License.
In other cases, permission to use a particular library in non-free programs enables a greater number of people to use a
large body of free software. For example, permission to use the GNU C Library in non-free programs enables many more
people to use the whole GNU operating system, as well as its variant, the GNU/Linux operating system.
Although the Lesser General Public License is Less protective of the users' freedom, it does ensure that the user of a
program that is linked with the Library has the freedom and the wherewithal to run that program using a modified version
of the Library.
The precise terms and conditions for copying, distribution and modification follow. Pay close attention to the difference
between a "work based on the library" and a "work that uses the library". The former contains code derived from the
library, whereas the latter must be combined with the library in order to run.
GNU LESSER GENERAL PUBLIC LICENSE
TERMS AND CONDITIONS FOR COPYING, DISTRIBUTION AND MODIFICATION
0. This License Agreement applies to any software library or other program which contains a notice placed by the
copyright holder or other authorized party saying it may be distributed under the terms of this Lesser General Public
License (also called "this License"). Each licensee is addressed as "you".
A "library" means a collection of software functions and/or data prepared so as to be conveniently linked with application
programs (which use some of those functions and data) to form executables.
The "Library", below, refers to any such software library or work which has been distributed under these terms. A "work
based on the Library" means either the Library or any derivative work under copyright law: that is to say, a work
containing the Library or a portion of it, either verbatim or with modifications and/or translated straightforwardly into
another language. (Hereinafter, translation is included without limitation in the term "modification".)
"Source code" for a work means the preferred form of the work for making modifications to it. For a library, complete
source code means all the source code for all modules it contains, plus any associated interface definition files, plus the
scripts used to control compilation and installation of the library.
Page 68

act of running a program using the Library is not restricted, and output from such a program is covered only if its
contents constitute a work based on the Library (independent of the use of the Library in a tool for writing it). Whether
not precisely defined by law.
that is true depends on what the Library does and what the program that uses the Library does.
1. You may copy and distribute verbatim copies of the Library's complete source code as you receive it, in any medium,
provided that you conspicuously and appropriately publish on each copy an appropriate copyright notice and disclaimer of
warranty; keep intact all the notices that refer to this License and to the absence of any warranty; and distribute a copy
of this License along with the Library.
You may charge a fee for the physical act of transferring a copy, and you may at your option offer warranty protection in
exchange for a fee.
2. You may modify your copy or copies of the Library or any portion of it, thus forming a work based on the Library, and
copy and distribute such modifications or work under the terms of Section 1 above, provided that you also meet all of
these conditions:
a. The modified work must itself be a software library.
b. You must cause the files modified to carry prominent notices stating that you changed the files and the date of any
change.
c. You must cause the whole of the work to be licensed at no charge to all third parties under the terms of this License.
d. If a facility in the modified Library refers to a function or a table of data to be supplied by an application program that
uses the facility, other than as an argument passed when the facility is invoked, then you must make a good faith effort
to ensure that, in the event an application does not supply such function or table, the facility still operates, and performs
whatever part of its purpose remains meaningful.
(For example, a function in a library to compute square roots has a purpose that is entirely well-defined independent of
the application. Therefore, Subsection 2d requires that any application-supplied function or table used by this function
must be optional: if the application does not supply it, the square root function must still compute square roots.)
These requirements apply to the modified work as a whole. If identifiable sections of that work are not derived from the
Library, and can be reasonably considered independent and separate works in themselves, then this License, and its
terms, do not apply to those sections when you distribute them as separate works. But when you distribute the same
sections as part of a whole which is a work based on the Library, the distribution of the whole must be on the terms of
this License, whose permissions for other licensees extend to the entire whole, and thus to each and every part regardless
of who wrote it.
Thus, it is not the intent of this section to claim rights or contest your rights to work written entirely by you; rather, the
intent is to exercise the right to control the distribution of derivative or collective works based on the Library.
In addition, mere aggregation of another work not based on the Library with the Library (or with a work based on the
Library) on a volume of a storage or distribution medium does not bring the other work under the scope of this License.
3. You may opt to apply the terms of the ordinary GNU General Public License instead of this License to a given copy of
the Library. To do this, you must alter all the notices that refer to this License, so that they refer to the ordinary GNU
General Public License, version 2, instead of to this License. (If a newer version than version 2 of the ordinary GNU
General Public License has appeared, then you can specify that version instead if you wish.) Do not make any other
change in these notices.
Once this change is made in a given copy, it is irreversible for that copy, so the ordinary GNU General Public License
applies to all subsequent copies and derivative works made from that copy.
This option is useful when you wish to copy part of the code of the Library into a program that is not a library.
4. You may copy and distribute the Library (or a portion or derivative of it, under Section 2) in object code or executable
form under the terms of Sections 1 and 2 above provided that you accompany it with the complete corresponding
machine-readable source code, which must be distributed under the terms of Sections 1 and 2 above on a medium
customarily used for software interchange.
If distribution of object code is made by offering access to copy from a designated place, then offering equivalent access
to copy the source code from the same place satisfies the requirement to distribute the source code, even though third
parties are not compelled to copy the source along with the object code.
5. A program that contains no derivative of any portion of the Library, but is designed to work with the Library by being
compiled or linked with it, is called a "work that uses the Library". Such a work, in isolation, is not a derivative work of the
Library, and therefore falls outside the scope of this License.
However, linking a "work that uses the Library" with the Library creates an executable that is a derivative of the Library
(because it contains portions of the Library), rather than a "work that uses the library". The executable is therefore
covered by this License. Section 6 states terms for distribution of such executables.
When a "work that uses the Library" uses material from a header file that is part of the Library, the object code for the
work may be a derivative work of the Library even though the source code is not. Whether this is true is especially
significant if the work can be linked without the Library, or if the work is itself a library. The threshold for this to be true is
Page 69

If such an object file uses only numerical parameters, data structure layouts and accessors, and small macros and small
inline functions (ten lines or less in length), then the use of the object file is unrestricted, regardless of whether it is
legally a derivative work. (Executables containing this object code plus portions of the Library will still fall under Section
6.)
Otherwise, if the work is a derivative of the Library, you may distribute the object code for the work under the terms of
Section 6. Any executables containing that work also fall under Section 6, whether or not they are linked directly with the
Library itself.
6. As an exception to the Sections above, you may also combine or link a "work that uses the Library" with the Library to
produce a work containing portions of the Library, and distribute that work under terms of your choice, provided that the
terms permit modification of the work for the customer's own use and reverse engineering for debugging such
modifications.
You must give prominent notice with each copy of the work that the Library is used in it and that the Library and its use
are covered by this License. You must supply a copy of this License. If the work during execution displays copyright
notices, you must include the copyright notice for the Library among them, as well as a reference directing the user to the
copy of this License. Also, you must do one of these things:
a. Accompany the work with the complete corresponding machine-readable source code for the Library including whatever
changes were used in the work (which must be distributed under Sections 1 and 2 above); and, if the work is an
executable linked with the Library, with the complete machine-readable "work that uses the Library", as object code
and/or source code, so that the user can modify the Library and then relink to produce a modified executable containing
the modified Library. (It is understood that the user who changes the contents of definitions files in the Library will not
necessarily be able to recompile the application to use the modified definitions.)
b. Use a suitable shared library mechanism for linking with the Library. A suitable mechanism is one that (1) uses at run
time a copy of the library already present on the user's computer system, rather than copying library functions into the
executable, and (2) will operate properly with a modified version of the library, if the user installs one, as long as the
modified version is interface-compatible with the version that the work was made with.
c. Accompany the work with a written offer, valid for at least three years, to give the same user the materials specified in
Subsection 6a, above, for a charge no more than the cost of performing this distribution.
d. If distribution of the work is made by offering access to copy from a designated place, offer equivalent access to copy
the above specified materials from the same place.
e. Verify that the user has already received a copy of these materials or that you have already sent this user a copy.
For an executable, the required form of the "work that uses the Library" must include any data and utility programs
needed for reproducing the executable from it. However, as a special exception, the materials to be distributed need not
include anything that is normally distributed (in either source or binary form) with the major components (compiler,
kernel, and so on) of the operating system on which the executable runs, unless that component itself accompanies the
executable.
It may happen that this requirement contradicts the license restrictions of other proprietary libraries that do not normally
accompany the operating system. Such a contradiction means you cannot use both them and the Library together in an
executable that you distribute.
7. You may place library facilities that are a work based on the Library side-by-side in a single library together with other
library facilities not covered by this License, and distribute such a combined library, provided that the separate distribution
of the work based on the Library and of the other library facilities is otherwise permitted, and provided that you do these
two things:
a. Accompany the combined library with a copy of the same work based on the Library, uncombined with any other library
facilities. This must be distributed under the terms of the Sections above.
b. Give prominent notice with the combined library of the fact that part of it is a work based on the Library, and
explaining where to find the accompanying uncombined form of the same work.
8. You may not copy, modify, sublicense, link with, or distribute the Library except as expressly provided under this
License. Any attempt otherwise to copy, modify, sublicense, link with, or distribute the Library is void, and will
automatically terminate your rights under this License. However, parties who have received copies, or rights, from you
under this License will not have their licenses terminated so long as such parties remain in full compliance.
9. You are not required to accept this License, since you have not signed it. However, nothing else grants you permission
to modify or distribute the Library or its derivative works. These actions are prohibited by law if you do not accept this
License. Therefore, by modifying or distributing the Library (or any work based on the Library), you indicate your
acceptance of this License to do so, and all its terms and conditions for copying, distributing or modifying the Library or
works based on it.
10. Each time you redistribute the Library (or any work based on the Library), the recipient automatically receives a
license from the original licensor to copy, distribute, link with or modify the Library subject to these terms and conditions.
You may not impose any further restrictions on the recipients' exercise of the rights granted herein. You are not
responsible for enforcing compliance by third parties with this License.
Page 70

11. If, as a consequence of a court judgment or allegation of patent infringement or for any other reason (not limited to
patent issues), conditions are imposed on you (whether by court order, agreement or otherwise) that contradict the
conditions of this License, they do not excuse you from the conditions of this License. If you cannot distribute so as to
satisfy simultaneously your obligations under this License and any other pertinent obligations, then as a consequence you
may not distribute the Library at all. For example, if a patent license would not permit royalty-free redistribution of the
Library by all those who receive copies directly or indirectly through you, then the only way you could satisfy both it and
this License would be to refrain entirely from distribution of the Library.
If any portion of this section is held invalid or unenforceable under any particular circumstance, the balance of the section
is intended to apply, and the section as a whole is intended to apply in other circumstances.
It is not the purpose of this section to induce you to infringe any patents or other property right claims or to contest
validity of any such claims; this section has the sole purpose of protecting the integrity of the free software distribution
system which is implemented by public license practices. Many people have made generous contributions to the wide
range of software distributed through that system in reliance on consistent application of that system; it is up to the
author/donor to decide if he or she is willing to distribute software through any other system and a licensee cannot
impose that choice.
This section is intended to make thoroughly clear what is believed to be a consequence of the rest of this License.
12. If the distribution and/or use of the Library is restricted in certain countries either by patents or by copyrighted
interfaces, the original copyright holder who places the Library under this License may add an explicit geographical
distribution limitation excluding those countries, so that distribution is permitted only in or among countries not thus
excluded. In such case, this License incorporates the limitation as if written in the body of this License.
13. The Free Software Foundation may publish revised and/or new versions of the Lesser General Public License from time
to time. Such new versions will be similar in spirit to the present version, but may differ in detail to address new problems
or concerns. Each version is given a distinguishing version number. If the Library specifies a version number of this
License which applies to it and "any later version", you have the option of following the terms and conditions either of
that version or of any later version published by the Free Software Foundation. If the Library does not specify a license
version number, you may choose any version ever published by the Free Software Foundation.
14. If you wish to incorporate parts of the Library into other free programs whose distribution conditions are incompatible
with these, write to the author to ask for permission. For software which is copyrighted by the Free Software Foundation,
write to the Free Software Foundation; we sometimes make exceptions for this. Our decision will be guided by the two
goals of preserving the free status of all derivatives of our free software and of promoting the sharing and reuse of
software generally.
NO WARRANTY
15. BECAUSE THE LIBRARY IS LICENSED FREE OF CHARGE, THERE IS NO WARRANTY FOR THE LIBRARY, TO THE EXTENT
PERMITTED BY APPLICABLE LAW. EXCEPT WHEN OTHERWISE STATED IN WRITING THE COPYRIGHT HOLDERS AND/OR
OTHER PARTIES PROVIDE THE LIBRARY "AS IS" WITHOUT WARRANTY OF ANY KIND, EITHER EXPRESSED OR IMPLIED,
INCLUDING, BUT NOT LIMITED TO, THE IMPLIED WARRANTIES OF MERCHANTABILITY AND FITNESS FOR A PARTICULAR
PURPOSE. THE ENTIRE RISK AS TO THE QUALITY AND PERFORMANCE OF THE LIBRARY IS WITH YOU. SHOULD THE
LIBRARY PROVE DEFECTIVE, YOU ASSUME THE COST OF ALL NECESSARY SERVICING, REPAIR OR CORRECTION.
16. IN NO EVENT UNLESS REQUIRED BY APPLICABLE LAW OR AGREED TO IN WRITING WILL ANY COPYRIGHT HOLDER,
OR ANY OTHER PARTY WHO MAY MODIFY AND/OR REDISTRIBUTE THE LIBRARY AS PERMITTED ABOVE, BE LIABLE TO
YOU FOR DAMAGES, INCLUDING ANY GENERAL, SPECIAL, INCIDENTAL OR CONSEQUENTIAL DAMAGES ARISING OUT OF
THE USE OR INABILITY TO USE THE LIBRARY (INCLUDING BUT NOT LIMITED TO LOSS OF DATA OR DATA BEING
RENDERED INACCURATE OR LOSSES SUSTAINED BY YOU OR THIRD PARTIES OR A FAILURE OF THE LIBRARY TO
OPERATE WITH ANY OTHER SOFTWARE), EVEN IF SUCH HOLDER OR OTHER PARTY HAS BEEN ADVISED OF THE
POSSIBILITY OF SUCH DAMAGES.
END OF TERMS AND CONDITIONS
How to Apply These Terms to Your New Libraries
If you develop a new library, and you want it to be of the greatest possible use to the public, we recommend making it
free software that everyone can redistribute and change. You can do so by permitting redistribution under these terms
(or, alternatively, under the terms of the ordinary General Public License).
To apply these terms, attach the following notices to the library. It is safest to attach them to the start of each source file
to most effectively convey the exclusion of warranty; and each file should have at least the "copyright" line and a pointer
to where the full notice is found.
1 April 1990
Lexmark International, Inc.
That’s all there is to it!
 Loading...