

Page 1

Dell™ Multi-UPS Management Console
Installation and Configuration
User’s Guide
®
www.dell.com | support.dell.com
Page 2

Notes
NOTE: A NOTE indicates important information that helps you make better use of your computer.
____________________
Information in this document is subject to change without notice.
© 2013 Dell Inc. All rights reserved.
Reproduction of these materials in any manner whatsoever without the written permission of Dell Inc. is strictly forbidden.
Trademarks used in this text: Dell and the Dell logo are trademarks of Dell Inc.; Hyper-V, Microsoft, Windows, Internet
Explorer, System Center Virtual Machine Manager, Windows Server, Windows 7, Windows XP, and Windows Vista are either
trademarks or registered trademarks of Microsoft Corporation in the United States and/or other countries; Eaton and ePDU
are registered trademarks of Eaton Corporation; Intel, and Xeon are registered trademarks and Core is a trademark of Intel
Corp.; Mozilla and Firefox are registered trademarks of the Mozilla Foundation; Linux is a registered trademark of Linus
Tor va lds ; Red Hat is a registered trademark of Red Hat, Inc.; VMware, vSphere, vMotion, vCenter, ESX, and ESXi are
trademarks or registered trademarks of VMware, Inc.; Citrix, Xen, XenServer, XenClient, XenCenter, and XenMotion are either
registered trademarks or trademarks of Citrix Inc.; Google and Chrome are trademarks or registered trademarks of Google, Inc..
Other trademarks and trade names may be used in this document to refer to either the entities claiming the marks and names
or their products. Dell Inc. disclaims any proprietary interest in trademarks and trade names other than its own.
November 2013 • P-164000119 2
Page 3

Table of Contents
1 Introduction
2 Installation
Installation Prerequisites . . . . . . . . . . . . . . . . . . . . . . . . . . . . 17
On the System Hosting Dell MUMC
On the System that Displays the Web-based GUI
Quick Start Installation . . . . . . . . . . . . . . . . . . . . . . . . . . . . . 18
Graphical Installation
Configuration
Operation
Installation Result
Uninstalling the Dell MUMC (Standard Methods)
Installing/Uninstalling the Dell MUMC (Command Line)
Upgrading the Product . . . . . . . . . . . . . . . . . . . . . . . . . . . . . 23
. . . . . . . . . . . . . . . . . . . . . . . . . . . . . . . . . . 20
. . . . . . . . . . . . . . . . . . . . . . . . . . . 18
. . . . . . . . . . . . . . . . . . . . . . . . . . . . . . . . 19
. . . . . . . . . . . . . . . . . . . . . . . . . . . . . 22
. . . . . . . . . . . . . . . . . . . . 17
. . . . . . . . . . . . . 17
. . . . . . . . . . . . . 22
. . . . . . . . . . 22
3 Configuration
Node Configuration and Console Settings . . . . . . . . . . . . . . . . . . . 24
Discover Nodes Connected on the Network . . . . . . . . . . . . . . . . . . 24
Configure Actions . . . . . . . . . . . . . . . . . . . . . . . . . . . . . . . . 25
Configure User Accounts . . . . . . . . . . . . . . . . . . . . . . . . . . . . 33
System Settings
. . . . . . . . . . . . . . . . . . . . . . . . . . . . . . . . . 34
Table of Contents 3
Page 4

4 Supervision
Access to the Monitoring Interface. . . . . . . . . . . . . . . . . . . . . . . 36
Local Access
Remote Access
Node List View . . . . . . . . . . . . . . . . . . . . . . . . . . . . . . . . . 37
Flexible Panels View . . . . . . . . . . . . . . . . . . . . . . . . . . . . . . 39
Panels List . . . . . . . . . . . . . . . . . . . . . . . . . . . . . . . . . . . . 41
Information Panel
Status Panel
Outlets Panel
Measures Panel
Environment Panel
Graph Panel
Synoptic Panel
Events Panel
Statistics Panel
Power Components
Device Supervision . . . . . . . . . . . . . . . . . . . . . . . . . . . . . . . 51
Applications List View . . . . . . . . . . . . . . . . . . . . . . . . . . . . . 52
. . . . . . . . . . . . . . . . . . . . . . . . . . . . . . . . 36
. . . . . . . . . . . . . . . . . . . . . . . . . . . . . . . 36
. . . . . . . . . . . . . . . . . . . . . . . . . . . . . 41
. . . . . . . . . . . . . . . . . . . . . . . . . . . . . . . . 42
. . . . . . . . . . . . . . . . . . . . . . . . . . . . . . . . 43
. . . . . . . . . . . . . . . . . . . . . . . . . . . . . . 44
. . . . . . . . . . . . . . . . . . . . . . . . . . . . . 45
. . . . . . . . . . . . . . . . . . . . . . . . . . . . . . . . 45
. . . . . . . . . . . . . . . . . . . . . . . . . . . . . . . 46
. . . . . . . . . . . . . . . . . . . . . . . . . . . . . . . . 50
. . . . . . . . . . . . . . . . . . . . . . . . . . . . . . . 50
. . . . . . . . . . . . . . . . . . . . . . . . . . . . 51
Map View . . . . . . . . . . . . . . . . . . . . . . . . . . . . . . . . . . . . 53
Create a Customized Map View
Map Examples
. . . . . . . . . . . . . . . . . . . . . . . . . . . . . . . 54
. . . . . . . . . . . . . . . . . . . . . . 53
Events . . . . . . . . . . . . . . . . . . . . . . . . . . . . . . . . . . . . . . 58
List Representation
Calendar Representation
Nodes Events List
Launching Device Web Interface
Defining Sub-views
Sharing Sub-views
. . . . . . . . . . . . . . . . . . . . . . . . . . . . . 58
. . . . . . . . . . . . . . . . . . . . . . . . . . 59
. . . . . . . . . . . . . . . . . . . . . . . . . . . . . 60
. . . . . . . . . . . . . . . . . . . . . 63
. . . . . . . . . . . . . . . . . . . . . . . . . . . . 63
. . . . . . . . . . . . . . . . . . . . . . . . . . . . . 65
Table of Contents 4
Page 5

5 Shutdown
Shutdown Configuration . . . . . . . . . . . . . . . . . . . . . . . . . . . . 67
Shutdown through Hibernate
. . . . . . . . . . . . . . . . . . . . . . . 69
Power Source View . . . . . . . . . . . . . . . . . . . . . . . . . . . . . . . 70
Shutdown Sequence . . . . . . . . . . . . . . . . . . . . . . . . . . . . . . 71
6 Advanced Management
Nodes Settings . . . . . . . . . . . . . . . . . . . . . . . . . . . . . . . . . 72
Single Node Configuration Display
Single Card Settings
. . . . . . . . . . . . . . . . . . . . . . . . . . . . 73
Multiple Cards Configurations Synchronization
. . . . . . . . . . . . . . . . . . . . 72
. . . . . . . . . . . . . . 74
Nodes Upgrade . . . . . . . . . . . . . . . . . . . . . . . . . . . . . . . . . 75
Upload Device Firmware
Upgrade Applications
. . . . . . . . . . . . . . . . . . . . . . . . . . 75
. . . . . . . . . . . . . . . . . . . . . . . . . . . 76
7 Virtualization
Dell Multi-UPS Management Console Virtualization Solutions for VMware,
Microsoft, Citrix, OpenSource Xen, and KVM
Dell Solutions for VMware
Dell Solutions for Microsoft
Dell Solutions for Citrix Xen
. . . . . . . . . . . . . . . . . . . . . . . . . 80
. . . . . . . . . . . . . . . . . . . . . . . . 82
. . . . . . . . . . . . . . . . . . . . . . . . 83
Dell Solutions for OpenSource Xen
Dell Solutions for Red Hat KVM or OpenSource KVM
Dell Solutions for Citrix XenClient
. . . . . . . . . . . . . . . . . 80
. . . . . . . . . . . . . . . . . . . . 85
. . . . . . . . . . . 86
. . . . . . . . . . . . . . . . . . . . . 87
Tested environments . . . . . . . . . . . . . . . . . . . . . . . . . . . . . . 88
VMware
Microsoft
Citrix
. . . . . . . . . . . . . . . . . . . . . . . . . . . . . . . . . . 88
. . . . . . . . . . . . . . . . . . . . . . . . . . . . . . . . . . 88
. . . . . . . . . . . . . . . . . . . . . . . . . . . . . . . . . . . . 88
Enabling the Virtualization Module. . . . . . . . . . . . . . . . . . . . . . . 88
Table of Contents 5
Page 6

VMware Supervisors Prerequisites . . . . . . . . . . . . . . . . . . . . . . 89
Microsoft Supervisors Prerequisites . . . . . . . . . . . . . . . . . . . . . . 89
Citrix Supervisors Prerequisites . . . . . . . . . . . . . . . . . . . . . . . . 90
Adding Manager or Hypervisor List. . . . . . . . . . . . . . . . . . . . . . . 90
Introduction
Adding a vCenter Server Manager
Adding a SCVMM Manager
Adding a VMware ESX/ESXi Hypervisor List
Adding a Citrix XenServer Hypervisor List
Adding a XenCenter
. . . . . . . . . . . . . . . . . . . . . . . . . . . . . . . . 90
. . . . . . . . . . . . . . . . . . . . 91
. . . . . . . . . . . . . . . . . . . . . . . . 91
. . . . . . . . . . . . . . . 92
. . . . . . . . . . . . . . . . . 92
. . . . . . . . . . . . . . . . . . . . . . . . . . . . 93
Configuring Hypervisors (ESX/ESXi Server, XenServer) . . . . . . . . . . . . 93
Introduction
Credential Configuration for the Hypervisors (ESX/ESXi, XenServer)
. . . . . . . . . . . . . . . . . . . . . . . . . . . . . . . . 93
. . . 94
Configuring Maintenance and Shutdown . . . . . . . . . . . . . . . . . . . 94
Introduction
Configuration Options for vCenter and SCVMM Installations
. . . . . . . . . . . . . . . . . . . . . . . . . . . . . . . . 94
. . . . . . . 94
Second Type of Nodes (DELL MUMC Detects Dell ULNM Running on the
VMHost)
. . . . . . . . . . . . . . . . . . . . . . . . . . . . . . . . . . 97
8 Redundancy
Redundancy Configuration . . . . . . . . . . . . . . . . . . . . . . . . . . . 100
Redundancy Views . . . . . . . . . . . . . . . . . . . . . . . . . . . . . . . 101
Redundancy View in Node List
Composite Device in Power Source View
Power Components Sub-view
Redundancy Use Cases
. . . . . . . . . . . . . . . . . . . . . . . 101
. . . . . . . . . . . . . . . . . 102
. . . . . . . . . . . . . . . . . . . . . . . 102
. . . . . . . . . . . . . . . . . . . . . . . . . . 103
Table of Contents 6
Page 7

9 Applying Extended Functionality
Configuring the Dell MUMC vCenter Plugin . . . . . . . . . . . . . . . . . . 108
Checking for vCenter Plug-in Registration
Events and Alarms
. . . . . . . . . . . . . . . . . . . . . . . . . . . . . 109
Using Dell MUMC through vCenter
Configuring XenCenter Plug-in . . . . . . . . . . . . . . . . . . . . . . . . . 111
Prerequisites
. . . . . . . . . . . . . . . . . . . . . . . . . . . . . . . . 111
Check XenCenter Plug-in Installation
Using Dell MUMC through XenCenter
Configuring Maintenance Mode and vMotion with vCenter . . . . . . . . . . 113
Prerequisites
Introduction
. . . . . . . . . . . . . . . . . . . . . . . . . . . . . . . . 113
. . . . . . . . . . . . . . . . . . . . . . . . . . . . . . . . 113
Understanding Maintenance Mode
Configuring Maintenance Mode Behavior in vCenter
Configuration Test
. . . . . . . . . . . . . . . . . . . . . . . . . . . . . 115
VMware vCenter High Availability . . . . . . . . . . . . . . . . . . . . . . . 115
Configuring Maintenance Mode and Live Migration with SCVMM . . . . . . 116
Maintenance Mode
Understanding Live Migration
Configuration Test
. . . . . . . . . . . . . . . . . . . . . . . . . . . . 116
. . . . . . . . . . . . . . . . . . . . . . . 116
. . . . . . . . . . . . . . . . . . . . . . . . . . . . . 116
. . . . . . . . . . . . . . . . . 108
. . . . . . . . . . . . . . . . . . . . 110
. . . . . . . . . . . . . . . . . . . 111
. . . . . . . . . . . . . . . . . . . 113
. . . . . . . . . . . . . . . . . . . . 114
. . . . . . . . . . . 114
VMware References . . . . . . . . . . . . . . . . . . . . . . . . . . . . . . 117
Dell and Virtualization
VMware ESX Configuration
vCenter Server (VMware Supervisor)
vSphere SDK for Perl
Microsoft Hyper-V References
Dell and Virtualization
Microsoft TechNet Library
About Maintenance Mode
Requirements for Using Live Migration
. . . . . . . . . . . . . . . . . . . . . . . . . . . 117
. . . . . . . . . . . . . . . . . . . . . . . . 117
. . . . . . . . . . . . . . . . . . . 117
. . . . . . . . . . . . . . . . . . . . . . . . . . . . 117
. . . . . . . . . . . . . . . . . . . . . . . . . 117
. . . . . . . . . . . . . . . . . . . . . . . . . . . 117
. . . . . . . . . . . . . . . . . . . . . . . . . 117
. . . . . . . . . . . . . . . . . . . . . . . . . 117
. . . . . . . . . . . . . . . . . . 117
Table of Contents 7
Page 8

1
Introduction
Dell™ Multi-UPS Management Console® (MUMC) is ideal for monitoring and managing multiple power
and environmental devices. The Dell MUMC delivers a global view across the network from any PC with
an Internet browser. Exceptionally versatile, the software is compatible with any device that supports a
network interface, including other manufacturer’s UPSs, environmental sensors, Power Distribution
Units (PDUs), applications, and more. The Dell MUMC can also organize a management table by
groups, centralize alarms, and maintain events logs for preventive maintenance of the entire installed
equipment base.
The Dell MUMC provides the following:
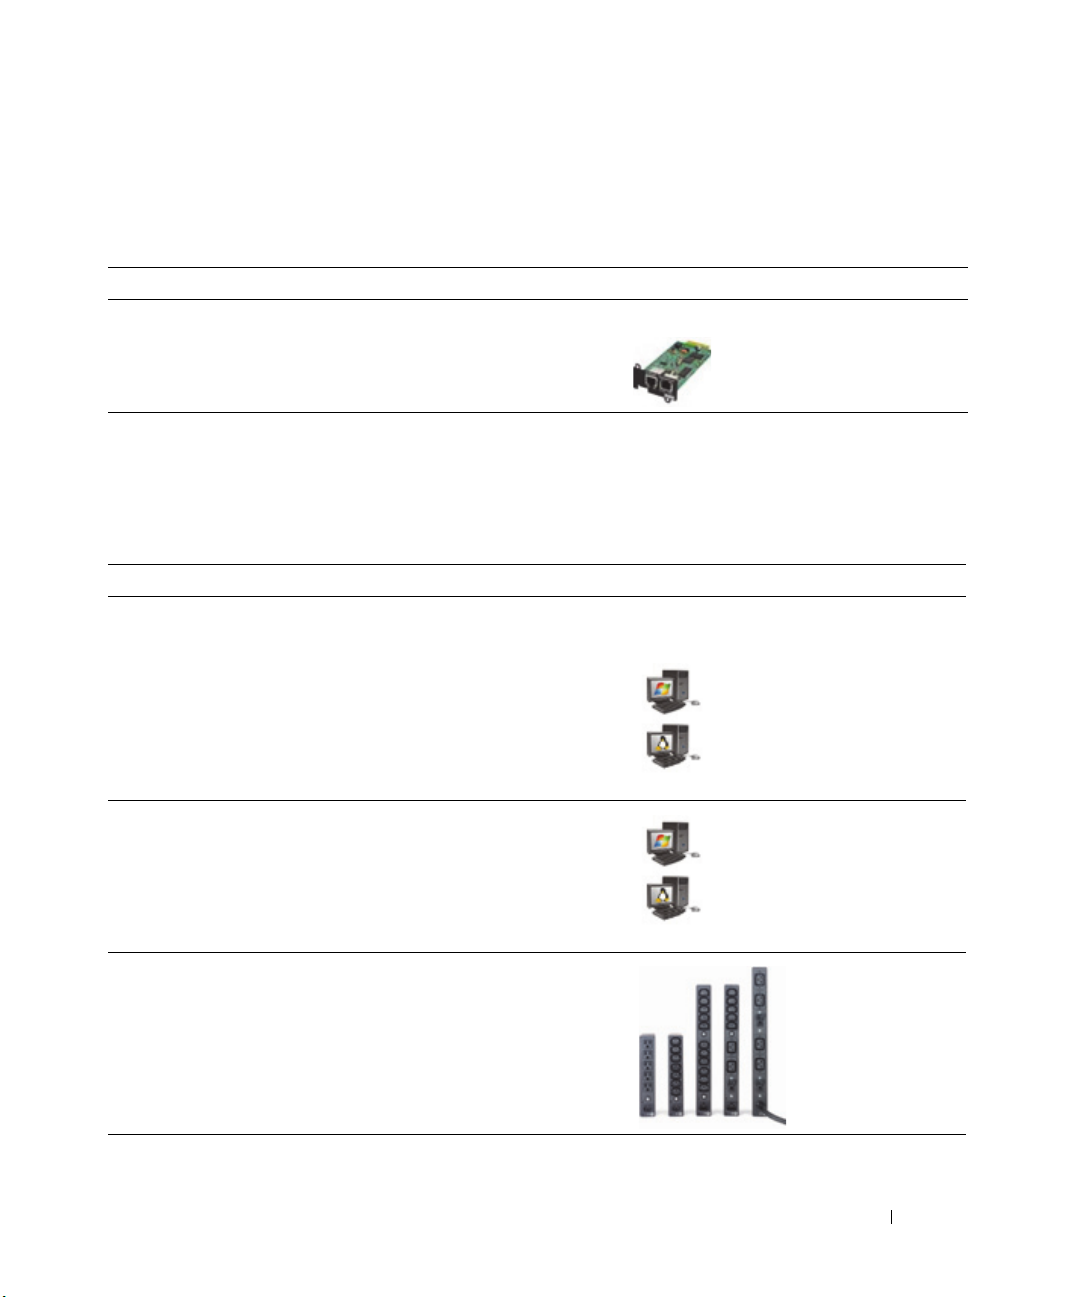
• Discovers and supervises Dell UPSs and Dell PDUs connected to the network either by means of a card
or a proxy. For the detailed list of compatible solutions, see “Compatibility” on page 10.
• Supervises the remote servers hosting the Dell MUMC application.
• Provides advanced management feature (mass configuration and mass upload) with the Dell™
Network Management Card (H910P, also known as an NMC).
• Provides local computer graceful shutdown through the Dell Network Management Card.
• Provides an agentless method for directly managing and controlling VMware
VMware
• Provides centralized management of Dell
on virtualized servers other than VMware vCenter (such as Microsoft
Xen®).
®
vCenter™ management platform
™
UPS Local Node Manager® (ULNM) applications running
®
hypervisors through the
®
Hyper-V™ hypervisor or Citrix
®
Figure 1 shows the Dell MUMC Node Map Page.
Introduction 9
Page 9

Figure 1. Dell MUMC Node Map Page
Compatibility
Serial Line Devices
The Dell MUMC is compatible with the following serial line devices (see Table 1).
Table 1. Serial Line Devices
Dell Equipment Designation Connectivity Type
500 Watt, 1000 Watt, 1920 Watt, 2300 Watt, 2700 Watt Rack/Tower USB or RS-232
Short Depth High Efficiency Online 2700 Watt USB or RS-232
High Efficiency Online 3750 Watt, 4200 Watt, 5600 Watt USB or RS-232
LI 5600 Watt Rack USB or RS-232
Online 10 kW Rack USB or RS-232
Introduction 10
Page 10
Network Devices
The Dell MUMC is compatible with the following network device (see Table 2).
Table 2. Network Device
Dell Equipment Designation Network Device Type
Dell Network Management Card SNMP/Web H910P UPS Option Card
Dell Applications
The Dell MUMC is compatible with the following applications (see Table 3).
Table 3. Applications
Equipment Designation Application Type
Computers (Microsoft
ULNM Shutdown Controller
Fe at ur es :
•Quick Scan
•Supervision
• Management
•Shutdown
Computers (Windows - Linux) hosting the Dell ULNM Application
Fe at ur es :
•Quick Scan
•Supervision
• Management
Dell PDUs
Fe at ur es :
•Quick Scan
•Supervision
®
Windows® - Linux®) hosting the Dell
UPS Proxy
(Shutdown Controller)
Introduction 11
Page 11
Table 3. Applications (Continued)
Equipment Designation Application Type
Eaton® ePDU® Monitored & Advanced Monitored
Fe at ur e:
•Supervision
Eaton ePDU Managed
Fe at ur e:
•Supervision
Eaton ePDU Switched
Fe at ur e:
•Supervision
Dell ULNM Management
The Dell ULNM can be remotely managed, configured, and updated using Dell MUMC supervisory
software. Using the Dell MUMC, you can perform mass configurations and mass updates of Dell ULNM
applications. The Dell MUMC can also remotely perform the following:
• Display a Dell ULNM Release 2 configuration
• Configure a single Dell ULNM Release 2
• Synchronize multiple Dell ULNM Release 2 configurations
• Trigger Dell ULNM Release 2 instances upgrade
Performance Evaluations
To provide a performance evaluation, Dell has tested the following configurations:
Test with Machine 1 (server Dell PowerEdge 2900)
•CPU: Intel® Xeon® 5130 dual-core @2GHz
• Memory: 2Go DDR2 @666MHz
• HDD: 2 HDDs 67GB 7200 rpm RAID 0 (Mirroring)
• OS: Microsoft
®
Windows Server® 2008 64 bits
Introduction 12
Page 12

Test conditions during 40 hours:
– 1300 nodes (including ~50 real), mainly Dell MUMCs, and some NSM and Dell Network
Management Card.
– Average CPU load: 20~30%
– Memory load: 200~300MB
Test with Machine 2 (typical PC)
• CPU: Intel Core™ 2 Duo 6600 @2.4GHz
• Memory: 2Go DDR2
• HDD: 1 HDD 220 GB 7200 rpm
• OS: Microsoft
®
Windows Vista® Enterprise 32 bits
Test conditions during 40 hours:
– 1000 nodes (including ~50 real), mainly Dell MUMCs, and some NSM and Dell Network
Management Card.
– Average CPU load: ~ 60%
– Memory load: 200 ~300MB
NOTE: These tests have been performed on Windows Server Operating System. The Windows 2003 or 2008 Operating
Systems do not have the limitation of 10 simultaneous connections.
Network Ports
Table 4 lists the network ports used by the Dell MUMC.
Introduction 13
Page 13

Table 4. Network Ports
Protocol Mode Port Dell ULNM and Dell
MUMC
SMTP TCP/25 OUT OUT
DHCP/BOOTP UDP/67 X OUT
TFTP UDP/69 OUT IN
HTTP TCP/80 OUT IN
NTP UDP/123 X OUT
SNMP UDP/161 OUT IN
SNMP Traps UDP/162 X OUT
UNMP UDP/200 IN/OUT X
HTTPS TCP/443 OUT IN
Dell Supervision TCP/4679 IN/OUT X
Dell Notification Broadcast UDP/4679 IN/OUT IN/OUT
Dell SSL Supervision TCP/4680 IN/OUT X
Dell Alarms Broadcast UDP/4680 IN OUT
Dell Connected Alarms TCP/5000 OUT IN
Dell Connected Alarms TCP/5001 OUT X
Dell UPS Management
Card
Troubleshooting
HTML pages
Cannot display the UPS properties page. HTTP 404 error with IE.
Solution:
• Check the URL entered.
https://<name or IP of the computer hosting Dell MUMC>:4680/
or
http://<name or IP of the computer hosting Dell MUMC>:4679/
Introduction 14
Page 14

Ter ms
This section provides related terms and definitions.
IP address
When Transmission Control Protocol / Internet Protocol (TCP/IP) is installed on a computer, an
Internet Protocol (IP) address is assigned to the system. Each address is unique and is made up of four
numbers, each between 0 and 256, such as168.8.156.210.
Network Management Proxy
Network Management Proxy is used to control a UPS and connect it to the TCP/IP network.
Network Management System
The Network Management System (NMS) supervises SNMP devices connected to the TCP/IP Network.
Network Shutdown Module
The Network Shutdown Module is a software module that uses the information transmitted by the Dell
Network Management Card/Proxy to inform computer users on the current status of the electrical power
supplied to the computer.
If the supply of the electrical power from the UPS is at risk, the Network Shutdown Module initiates an
orderly shutdown of the computer under the most secure conditions possible.
RSA Algorithm
An algorithm for public-key cryptography encryption protocol. An RSA key is the result of operations
involving prime numbers. RSA refers to Ron Rivest, Adi Shamir, and Leonard Adleman, who described
public-key cryptosystems in 1978.
Secure Socket Layer
The Secure Socket Layer (SSL) is a solution for securing transactions over the internet. SSL is a
communication protocol that authenticates the data exchanged, as well as ensuring its confidentiality
and integrity. The protocol uses a recognized encryption method, the RSA algorithm with a public key.
SSL is built into Internet Web browsers. The padlock in the bottom of your browser screen is
automatically displayed if the server sending information uses SSL.
Transmission Control Protocol / Internet Protocol
TCP/IP is a family of network and communication protocols for the transport and network layers. Also
known as the Internet Protocol suite of network communication protocols.
Introduction 15
Page 15

Acknowledgements
The Dell software development team is grateful to the following projects:
•Spider Monkey
•Ext JS
•SQLite
– The SQLite Project (http://www.sqlite.org/) generously donated source code to the public domain
that helped us for this project.
• Open SSL
– This Dell MUMC product includes software developed by the OpenSSL Project for use in the
OpenSSL Toolkit (http://www.openssl.org/).
– This Dell MUMC product includes cryptographic software written by Eric Young
(eay@cryptsoft.com).
– This Dell MUMC product includes software written by Tim Hudson (tjh@cryptsoft.com).
•Lib USB
•Net SNMP
The full license version for each of these projects is available from Dell MUMC using the
Settings >System > About selection path.
Introduction 16
Page 16

2
Installation
This chapter provides Dell Multi-UPS Management Console (MUMC) installation prerequisites, quick
start installation procedures
product are also included.
Installation Prerequisites
This section provides installation prerequisites for the following:
• Systems hosting the Dell MUMC
• Systems that display the Web-based graphical user interface (GUI)
On the System Hosting Dell MUMC
The Dell MUMC can be installed on
Microsoft® Windows Server® 2003 and 2008 (including R2 revision).
• For better performances with multiple nodes, Dell recommends a Microsoft® Windows Server® OS
(that does not have the limitation of 10 simultaneous connections)
• To avoid network or serial port access conflicts, you can't install the Dell MUMC on a machine that
also hosts:
– Dell UPS Management Software
NOTE: This is the previous Dell software for managing UPSs. If you were using it previously, remove it before
installing the new Dell MUMC software)
– Dell MUMC
, and
command line procedures
Microsoft® Windows XP®,
. Procedures for uninstalling and upgrading the
Microsoft® Windows Vista® 7, and on
On the System that Displays the Web-based GUI
The
Dell MUMC
interface can be secured through Secure Socket Layer (SSL) connection and is also secured through login
and password.
The
Dell MUMC
• Google® Chrome™
• Mozilla Firefox
•Microsoft
graphical interface can be accessed remotely using a simple Web browser. Access to this
graphical interface has been tested with:
®
3.0, 3.5
®
Internet Explorer® 6(*), 7, 8, 9 (*) IE6 should work but the performance is not optimal.
Installation 17
Page 17
Quick Start Installation
This section includes quick start installation and configuration instructions.
Graphical Installation
To install the
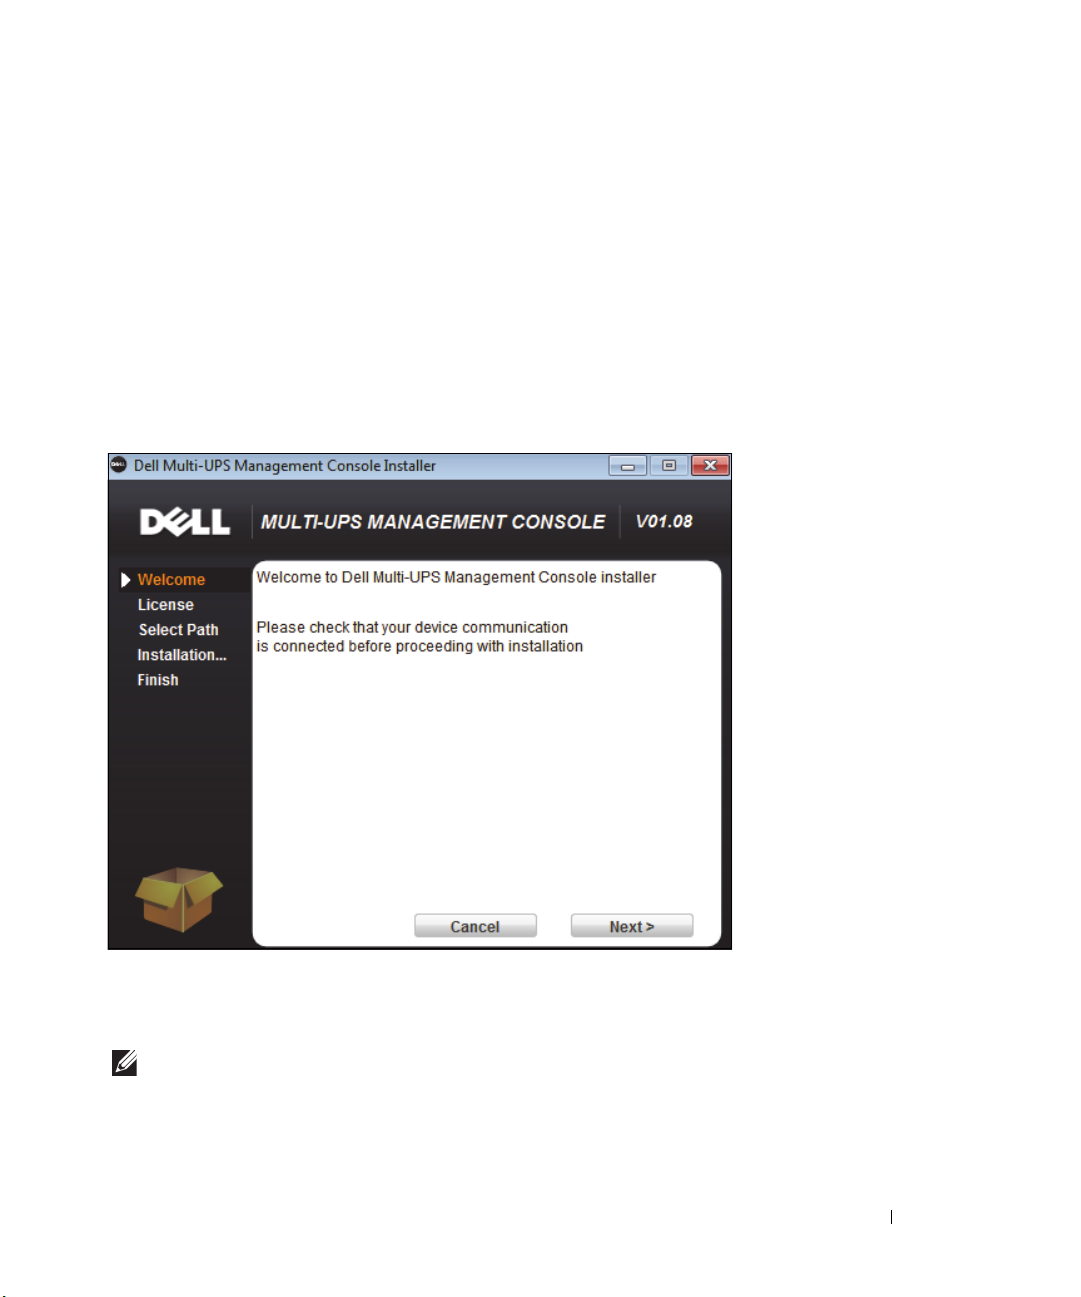
1
On a Windows XP, Vista 7, or on a Windows Server 2003 and 2008 machine, run the Dell Multi-UPS
Management Console package under an administrator account. A Web browser displays the Dell
Multi-UPS Management Console Installer Welcome screen.
2
Observe the prompt and verify that the communication device is connected. Click
The Login screen displays.
Dell MUMC
:
Next
(see Figure 2).
Figure 2. Welcome Screen
3
Read the application description. Type the login and password and click
NOTE: The default entry for login and password is admin.
Login
(see Figure 3).
Installation 18
Page 18
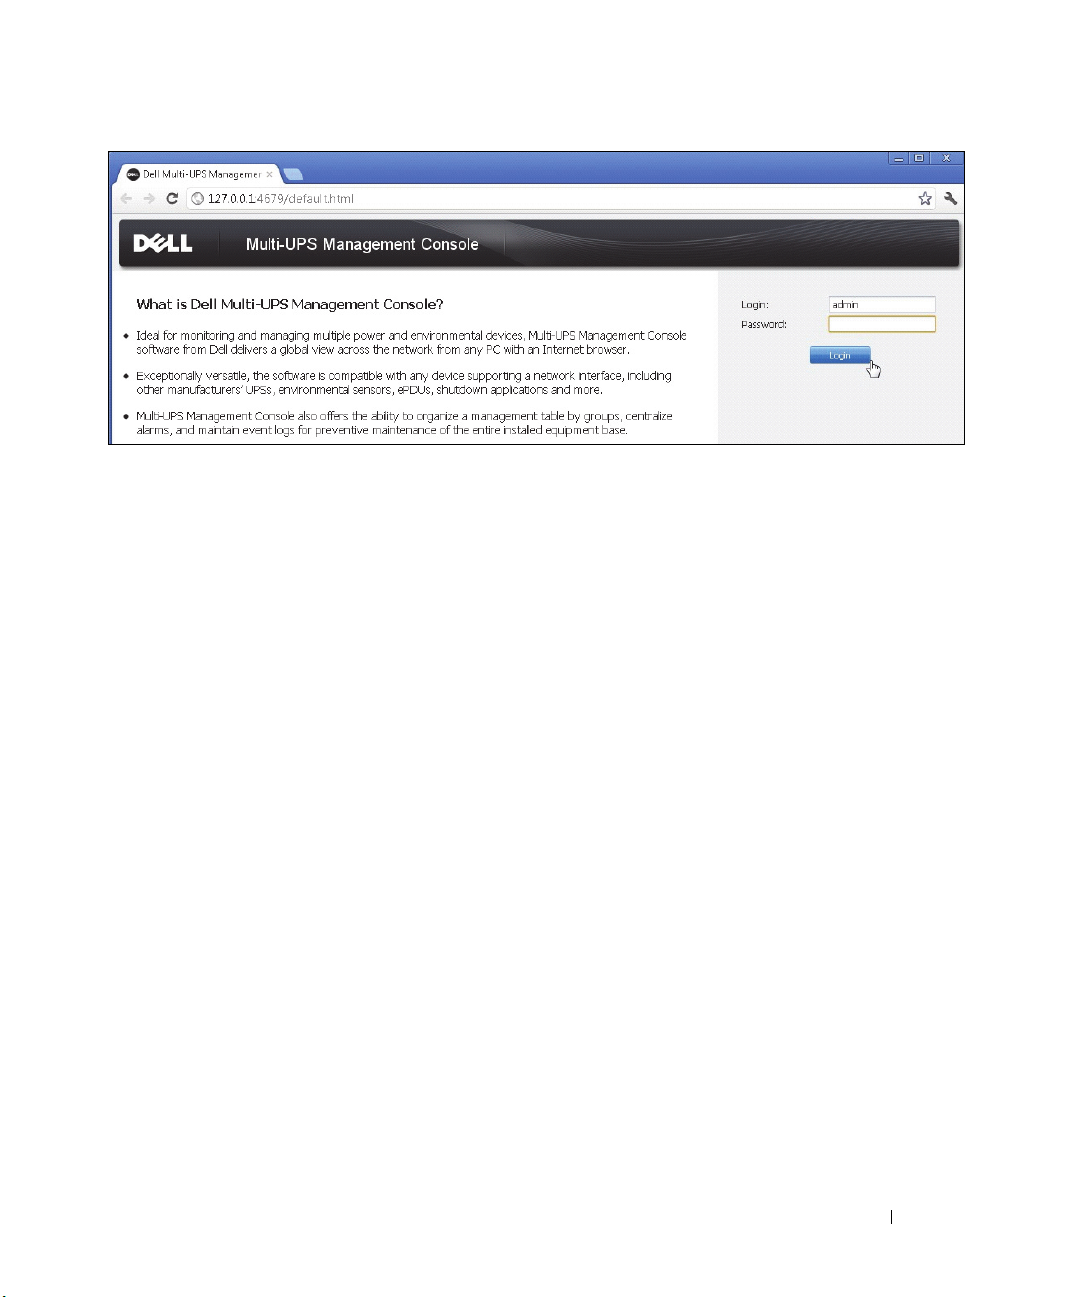
Figure 3. Login Screen
Configuration
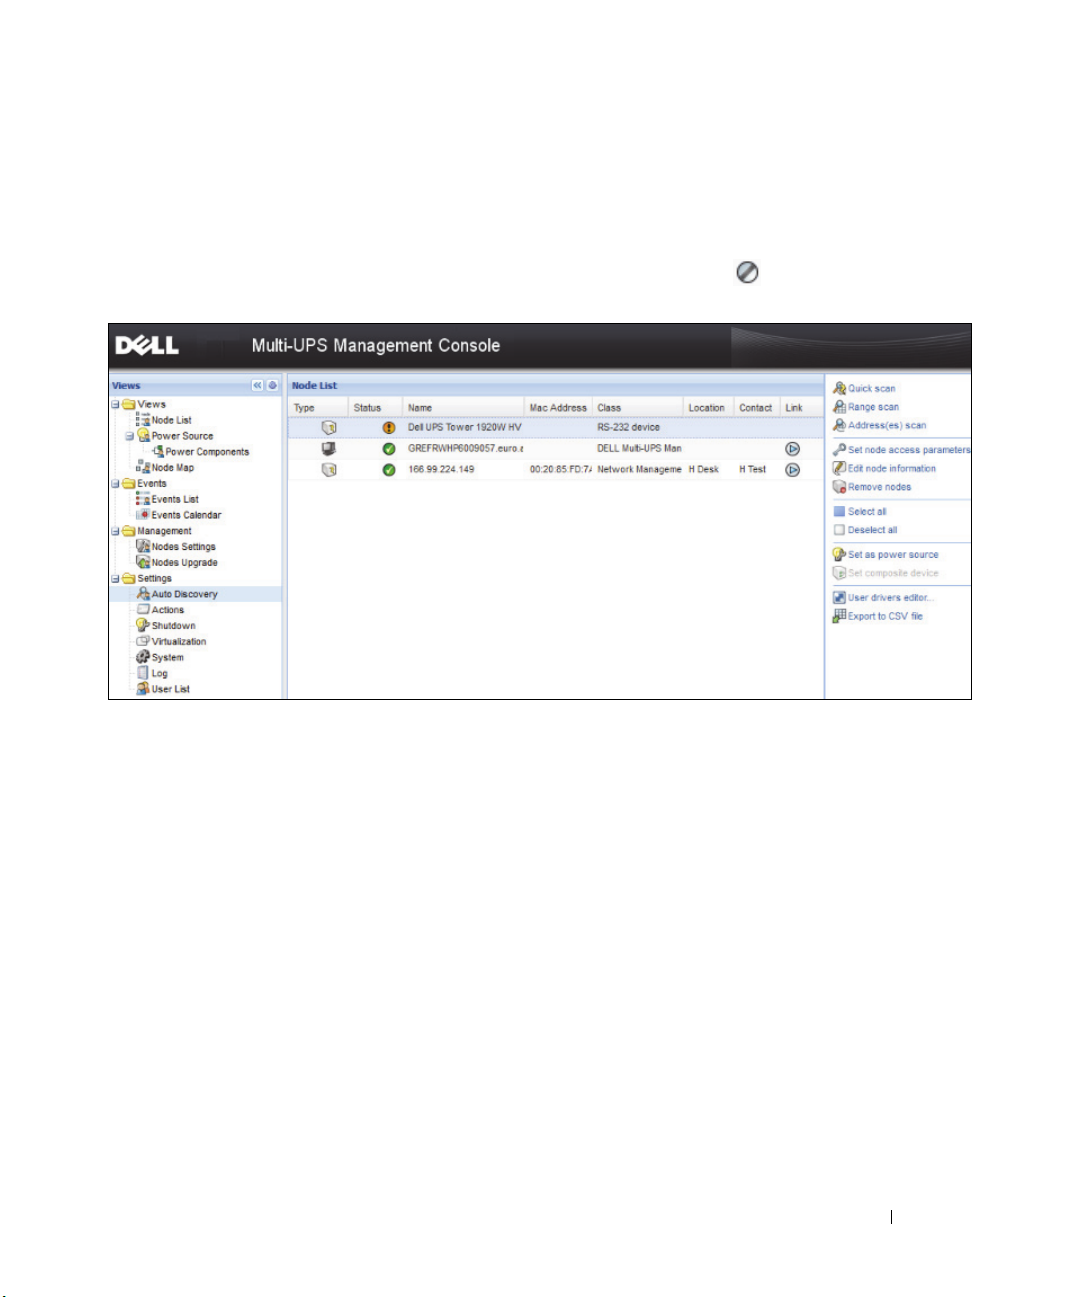
When started, the application automatically performs a discovery using the “Quick Scan” option:
• Using the “Quick Scan” operation, you will discover, through broadcast, within a few seconds, all
Dell UPS Management Cards, Dell PDUs, and Dell UPS Local Node Manager (ULNM)(or Dell
ULNMs)on the local subnet network.
• The discovered nodes are displayed using
Settings > Auto Discovery
(see Figure 4).
• For the other nodes, perform the discovery based on IP address ranges using the “Range Scan” option.
Using “Range Scan” discovers the nodes that are outside of the network segment and nodes that are
not compatible with the “Quick Scan” feature.
• Refer to the Compatibility list to determine if your node supports “Quick Scan” feature.
(Optional) If you want the computer running Dell MUMC to shut down in the event of a power failure:
Use Settings > Shutdown > Module Settings to activate the shutdown module.
From the Settings > Shutdown page, assign the following:
• IP address of the UPS that powers the local Computer
• The access parameters through the login and password entries.
License Code
The Dell MUMC monitors up to 32 devices (including Dell UPSs, Dell PDUs, and Dell Network
Management Card) without a license key.
If there are more devices to be monitored, an appropriate license is needed. The license can also be
upgraded later without reinstallation.
Installation 19
Page 19
For “Silver” or “Gold” paid versions:
•In
Settings > System > Edit System Information
, enter the license product key provided:
– Dell MUMC Silver License (33 to 100 device nodes)
– Dell MUMC Gold License (101 to unlimited devices nodes)
NOTE: Nodes that are not managed due to license limitation will appear with this icon:
Figure 4. Quick Start - Auto Discovery
Operation
The Views > Node menu item allows you to supervise the current state of the compatible power devices
and application. Select a line in the list and the panels are updated with selected device information (see
Figure 5).
Installation 20
Page 20
Figure 5. Quick Start -Node Information in Selection View
[Optional] If you have enabled the Shutdown module:
•The
Views > Power Source
menu item allows you to supervise the current state of the UPS
nominated as power source in the Shutdown optional module.
•The
Events > Event List
view allows you to view the device events.
Installation 21
Page 21

Installation Result
If you install a new
your product settings.
• At the end of the installation, the following shortcuts are created in the group
Dell > Multi-UPS Management Console
–
Open Dell Multi-UPS Management Console:
–
Start Dell Multi-UPS Management Console
–
Stop Dell Multi-UPS Management Console:
–
Uninstall Dell Multi-UPS Management Console
• A service called “Dell Multi-UPS Management Console” is also created for the Database Acquisition
Engine.
– This service automatically starts on machine boot-up.
– This service provides the Web Interface.
• A System Tray Icon displays the alarms on the local computer. Right-click this icon to display the same
shortcuts as the Windows Start menu.
Dell MUMC
release without uninstalling the old one, you will keep your database and
Start > Programs File >
:
Starts the main Dell MUMC graphical interface
: Starts the service
Stops the service
: Uninstalls the program
Uninstalling the Dell MUMC (Standard Methods)
Two standard methods for uninstalling the
• From the Add/Remove programs item of the control panel, select the
Console Vx.xx
• You can also uninstall from the shortcuts to remove the product and custom files (if you confirm the
action):
Start > Program File > Dell > Multi-UPS Management Console > Uninstall Multi-UPS Management
Console
This will allow you to remove the database and custom files if you confirm that choice.
package to remove it.
Dell MUMC
are available:
Dell Multi-UPS Management
Installing/Uninstalling the Dell MUMC (Command Line)
You can install or uninstall the product from a command line in order to deploy the software in a group,
with or without using the graphical interface. This method also provides the ability to configure
protection settings from the command line.
• Detail of available command options can be obtained using command:
– <packageName> -help
– <packageName> [COMMAND] [OPTION]...
• The available commands are:
– -install Launches the installation/upgrade process (default).
– -uninstall Launches the process to uninstall the application.
Installation 22
Page 22

• The available options are:
– -debug Displays debugging information on the console.
– -silent Install the application silently.
• Access the installation folder:
– -dir <installPath>
Example
The command <packageName> -install -silent -dir "C:\Program Files\MyFolder" will install Dell
MUMC silently in C:\Program Files\MyFolder.
After the installation is completed, open a Web browser with the following URL:
http://<host>:4679/,
MUMC.
where
<host> is the host name or IP address of the machine hosting Dell
Upgrading the Product
If you install a new
and product information from the old release.
Dell MUMC
Release without uninstalling the old release, you will keep the database
Installation 23
Page 23

3
Configuration
This chapter describes how to configure the Dell Multi-UPS Management Console (MUMC).
Node Configuration and Console Settings
Each node [Dell UPS Management Card, a Dell PDU, or Dell UPS Local Node Manager (ULNM)],
must have a valid IP address (or a DNS name) in the range that you have entered for auto-discovery. (
“Compatibility
Dell MUMC automatically receives the alarms (through notification or polling) without specific
configuration on the network card, proxies or applications.
For SNMP acquisition, check the community name.
• Default community name is configured in
• A specific community name can be defined for each IP range in
Scan > Password
Discover Nodes Connected on the Network
1
Start the “Dell Multi-UPS Management Console” main graphical interface from the previously created
shortcut.
” on page 10.)
.
Settings > System > Default Community Nam
Settings > Auto Discovery > Range
e.
See
2
Select the
From Settings > Auto Discovery, the following discovery methods are available (see Figure 6):
• “Quick Scan” (automatically performed when application starts)
•“Range Scan”
•“Address Scan”
Settings > Auto Discovery
menu item.
Configuration 24
Page 24
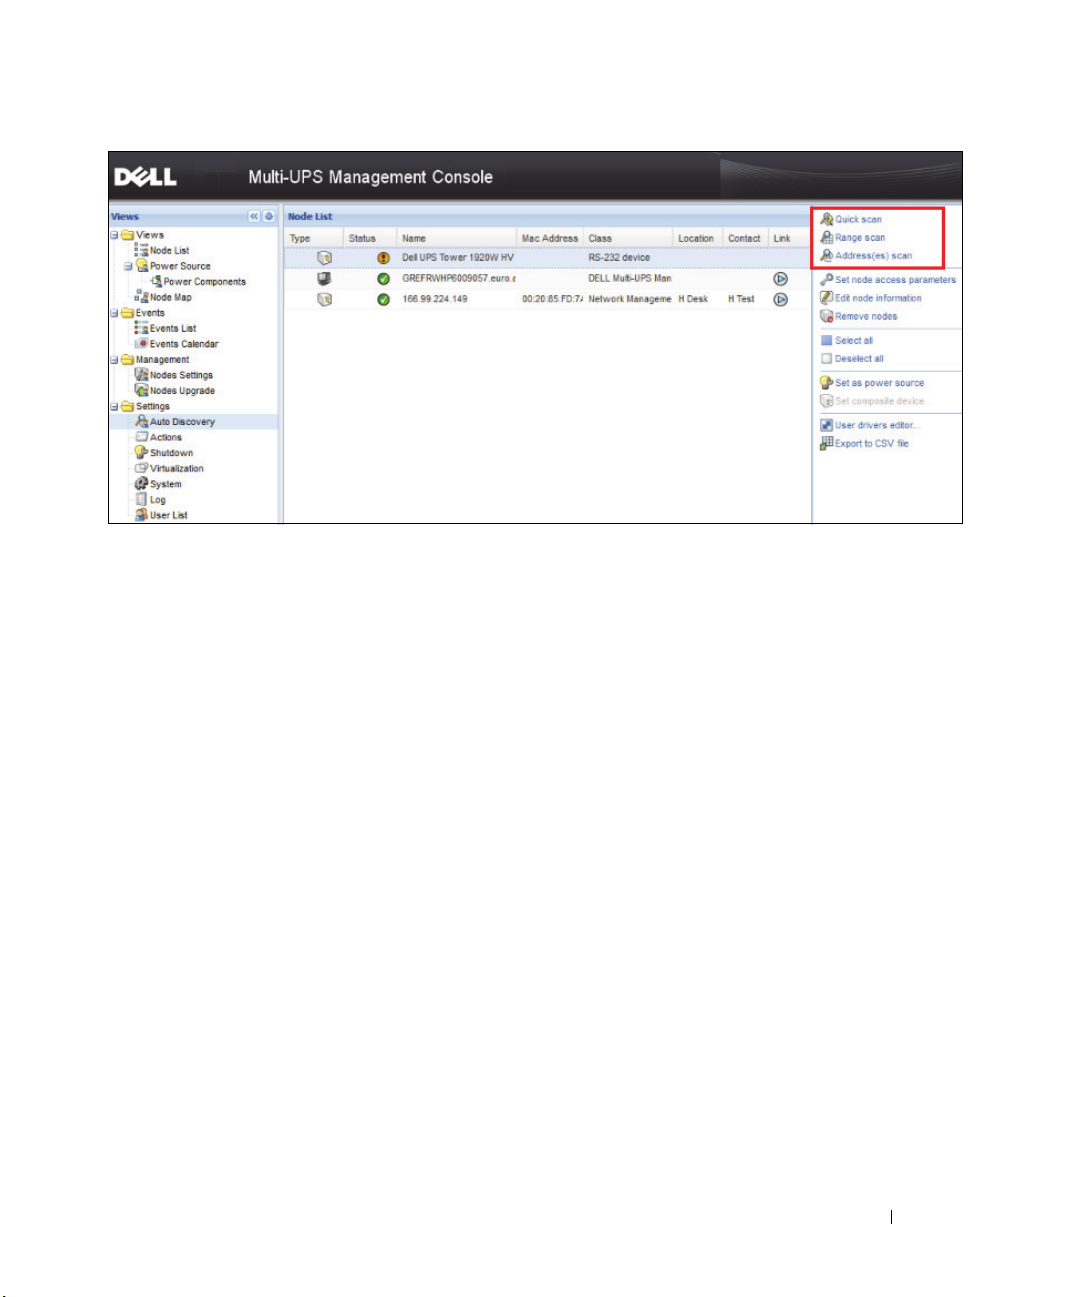
Figure 6. Auto Discovery Method Buttons
The following operation notes apply when discovering nodes:
• The “Quick Scan” request is a Broadcast frame on 4679 IANA reserved port and 69 standard TFTP
port. Using the “Quick Scan” operation, you will discover through broadcast within a few seconds
following Web/SNMP cards.
• For the nodes outside of the network segment, perform the discovery based on IP address ranges using
the “Range Scan” option. Using the “Range Scan” operation you will discover the nodes that are
outside of the Network segment and nodes that are not compatible with the “Quick Scan” feature.
• “Address Scan” performs a single address scan (or several IP addresses separated by the ';'character)
Configure Actions
You can define the way users will be notified when node events happen.
From the Settings > Actions menu item selection, the Actions page displays. The following buttons are
provided (see Figure 7):
• Create a new action
• Copy selected action
• Edit selected action
• Test selected action
• Remove selected action
Configuration 25
Page 25
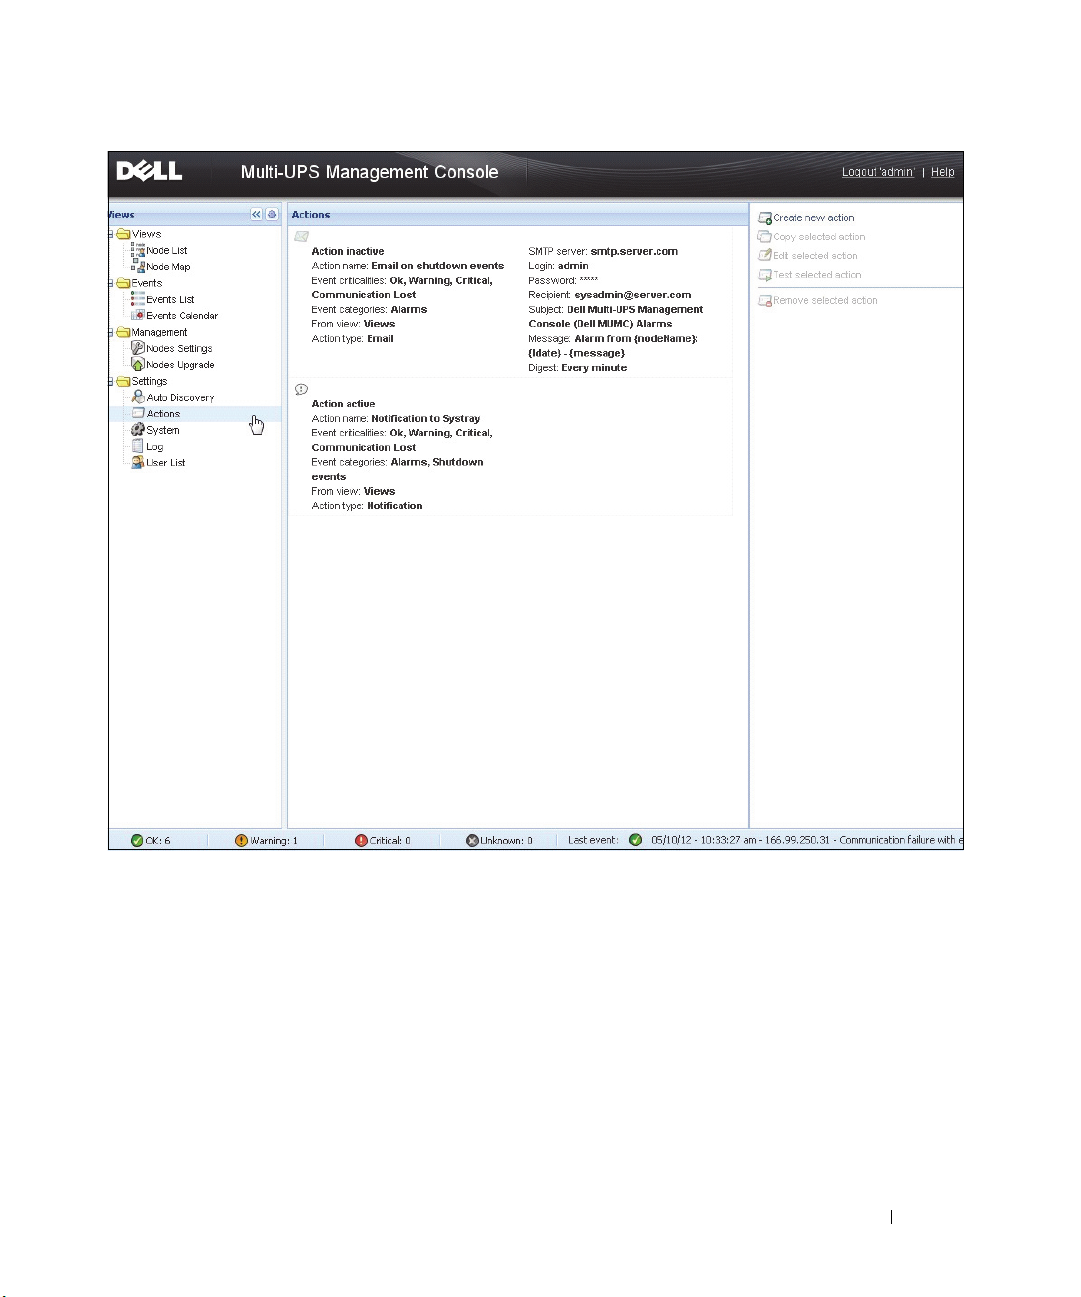
Figure 7. Actions Page
Create a New Action
Using the Create a new action button, you can
to
define the action
•
Send e-mail:
•
Execute script/program
•
Send alarm notification
to respond
as follows
Respond to the action with e-mail
: Execute a script or program
: Send a notification to the local alarm notification box, available from the
System Tray icon
filter the action by selected event criteria and use settings
on UPS events
Configuration 26
Page 26
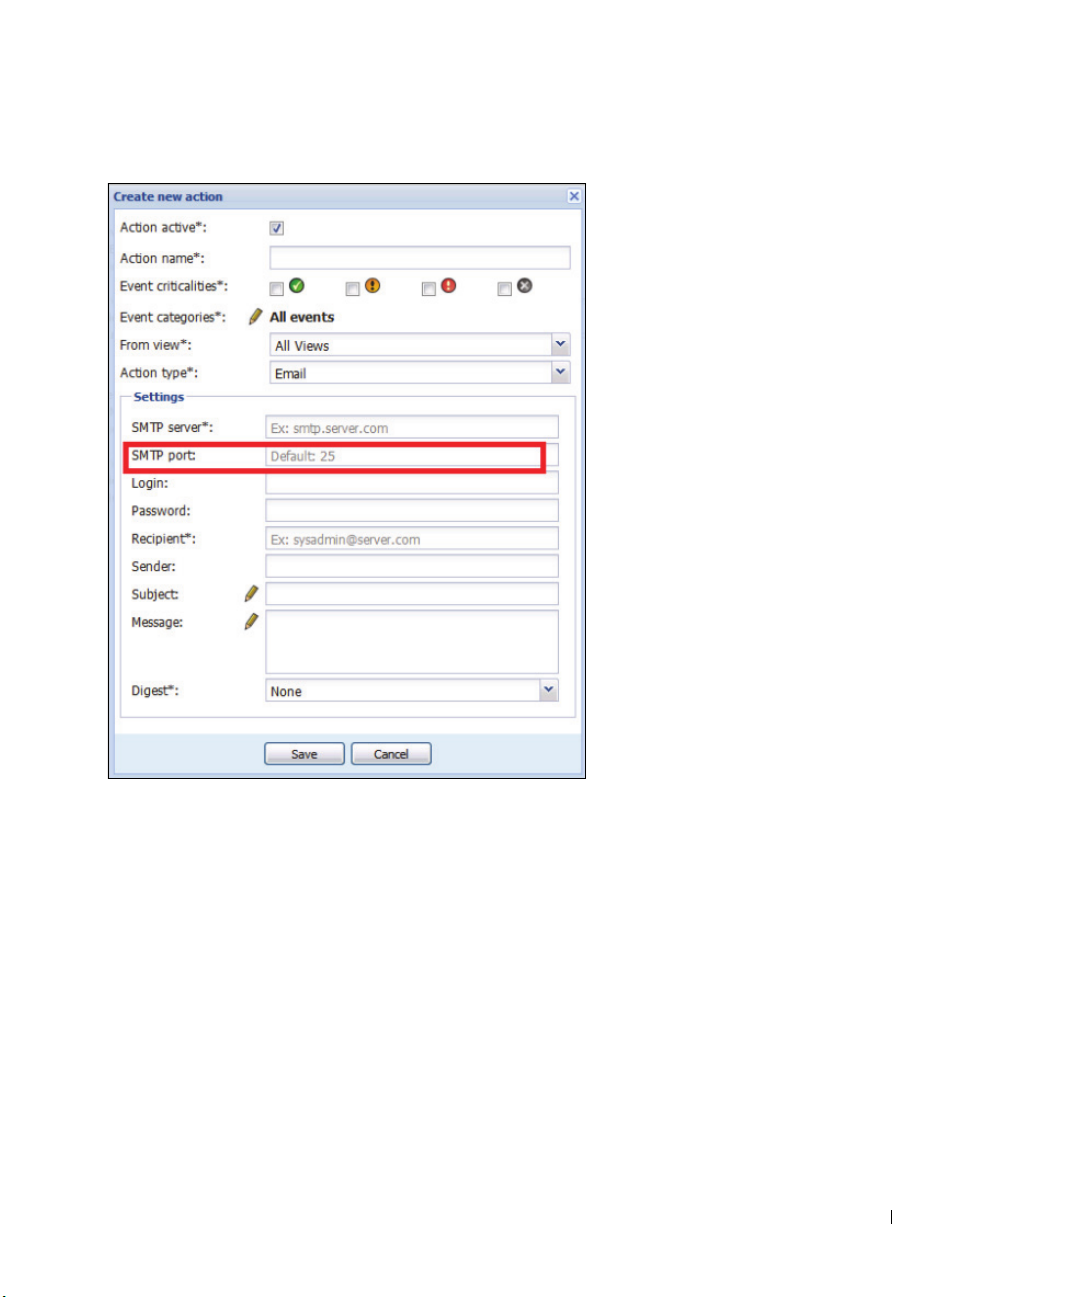
The Create a new action button displays the Create new action dialog (see Figure 8).
Figure 8. Create New Action Dialog Box
NOTE: The “*” fields are required.
Events Filter
You can filter the action according to:
•
Event criticalities
: Critical, Warning, Normal, Communication Lost
NOTE: With this parameter, you can filter the notification according to the event level. Refer to the event list
provided later in this document. If you select “Critical” as filter you will not receive the associated “Normal”
event informing that the device status changes from “Critical” to “Normal.”
•
Event category
: All Events, Alarms, Shutdown events, Power events, Measures
NOTE: The pen icon allows editing and selecting the event category.
•
View
: The view that triggers the event
Configuration 27
Page 27

Email
To receive email on UPS events:
• You have to indicate the SMTP server address and recipient email address. Login and password are
used when SMTP server requests authentication.
For advanced use:
• You can customized the subject, such as when you use third-party service provider to translate email
into SMS.
• You can specify that you want to receive a consolidation of the alarms that occurred during a delay time
duration that you choose.
For example, if you specify none, each alarm will generate an email. With this setting, you will receive
more email for the same number of events.
Execute Script/Program
To execute a program on UPS events, the program path will be required.
The program is executed under the SYSTEM account.
NOTE:
• If an action (script or program) cannot be executed under the SYSTEM account, it is necessary to
modify the execution context before it can be run.
• To allow a user to run specific tools and programs with permissions that are different from those
assigned to the user's account, use the Windows “RunAs” command. This allows you to save the
password (Windows XP Service Pac 2 and more recent versions).
• Use the following Microsoft command:
>
runas /profile /user:<windows_ login> /savecred <DELL_MUMC
INSTALLATION_PATH\mc2.exe>
• When first executed, a password is required; it is saved for subsequent executions.
Alarm Box Notification
The alarms are displayed on the local computer in an alarm box (see Figure 9). The status part of the
alarm box is optional. It only appears if a Power Source has been declared in the Shutdown configuration.
Configuration 28
Page 28
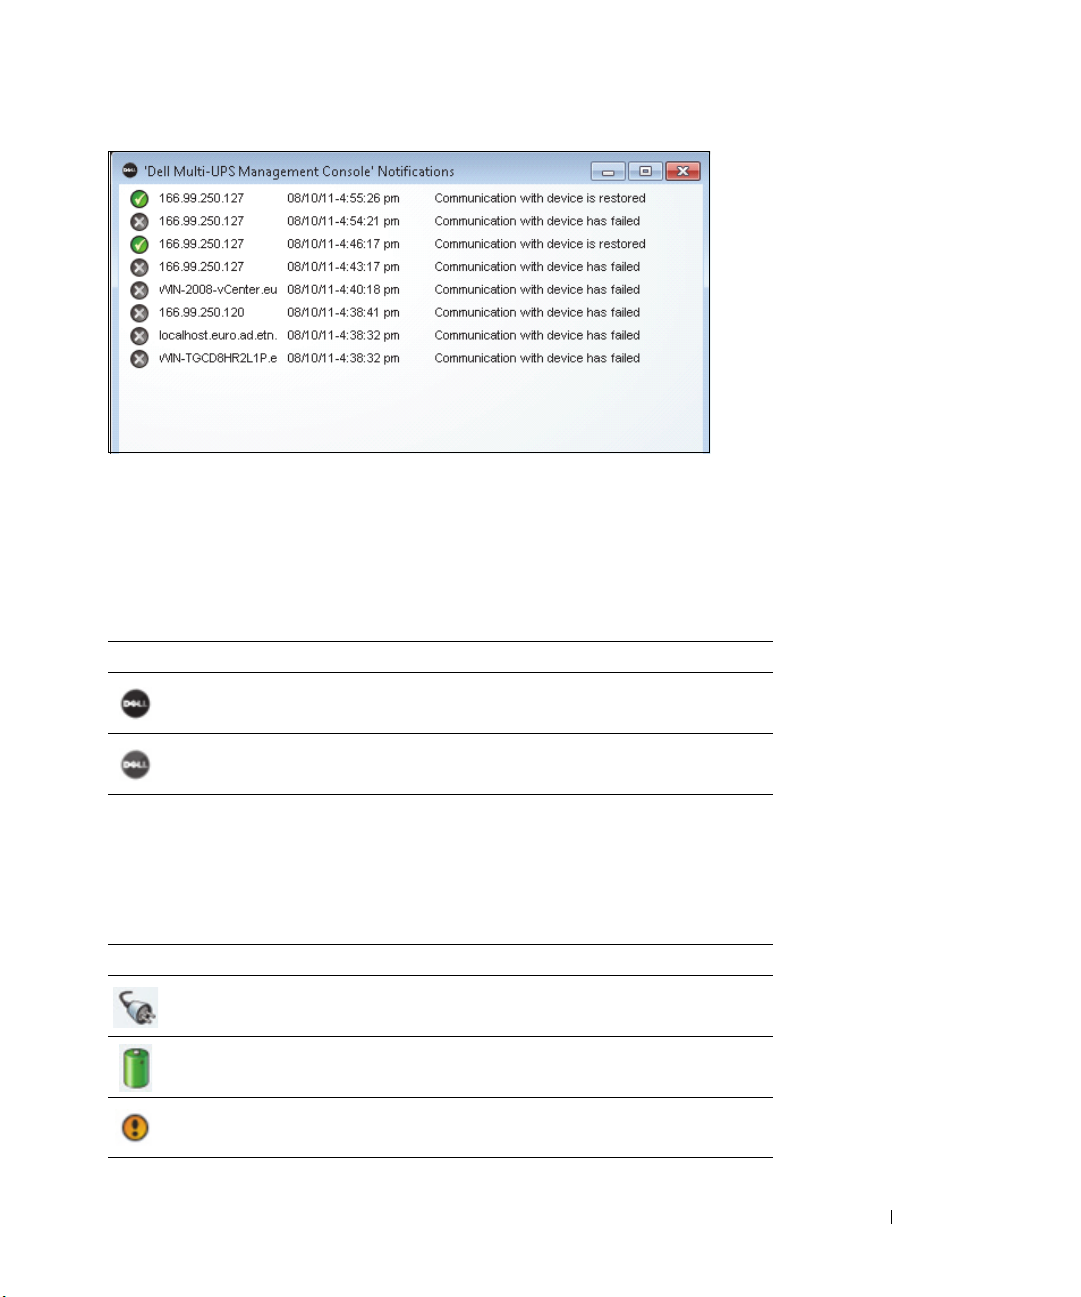
Figure 9. Alarm Notification Box
The Systray provides access to the alarm box. Right-click the System Tray icon for fast access to the
functions. If no Power Source has been declared, the System Tray Icon can have the states described in
Ta b l e 5 .
Table 5. System Tray State Icons (Power Source not Declared)
Icon State Description
The System Tray Icon correctly receives alarms from Dell MUMC.
Communication is lost between Systray and the Dell MUMC.
If a Power Source has been declared, the System Tray Icon can have the states described in Table 6.
Table 6. System Tray State Icons (Power Source Declared)
Icon State Description
The System Tray Icon correctly receives alarms from Dell MUMC. AC is
present on the Power Source.
The System Tray Icon correctly receives alarms from Dell MUMC. The
Power Source runs in battery mode.
The System Tray Icon correctly receives alarms from Dell MUMC. A
Warning event occurred on Power Source.
Configuration 29
Page 29
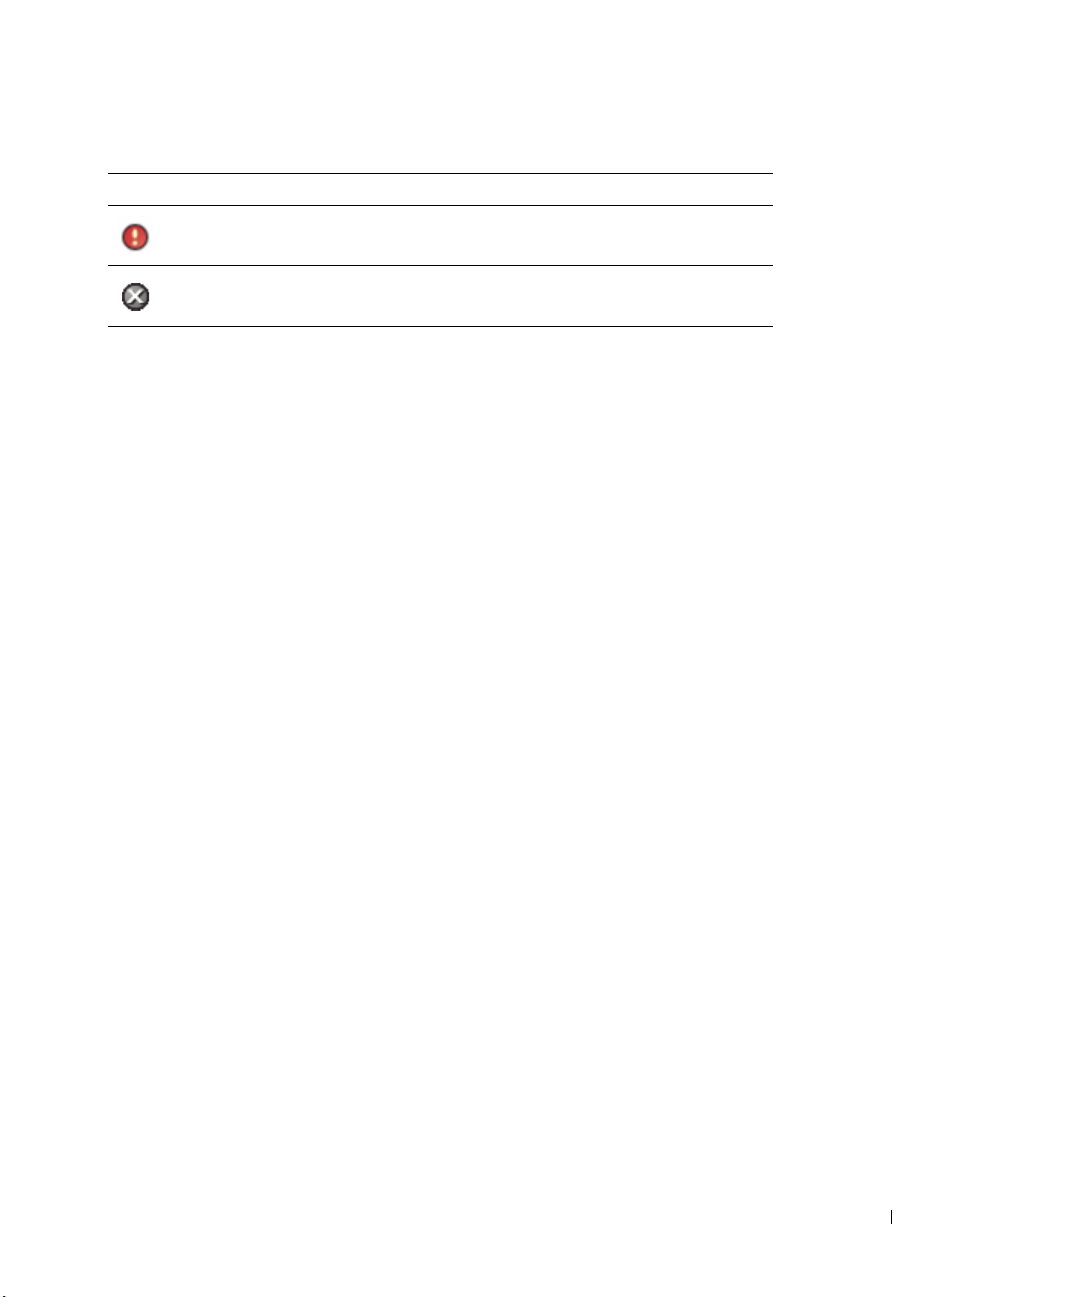
Table 6. System Tray State Icons (Power Source Declared) (Continued)
Icon State Description
The System Tray Icon correctly receives alarms from Dell MUMC. A critical
event occurred on Power Source.
Communication with Power Source has failed.
Advanced Events and Actions Customization
In Dell MUMC installation folder, there is a configs/scripts folder containing a sample user-defined
action script (sample_user_script.js).
You can modify this script or create new scripts that define very specific events and actions. The sample
script provides details about the expected structure and syntax for defining new actions and triggers.
To activate the execution of a script, set the enabled property to true as follows:
UserScript =
{
name: "MyScript",
enabled: true, // Set this property to true to enable the script
}
Sample Scripts found in {INSTALLATION_PATH}/configs/scripts
Sample script: windows_event.js
This is a sample user script for Windows Event Logs. It allows the software to write in the local windows
event log (Utility Failure/Utility Restored events). It is enabled by default.
The bolded attributes can be modified as follows:
UserScript =
{
name: "WindowsEvents",
enabled: true, // Set this property to true to enable the script
onEvent: true,
delay: 0, // This property can be used to delay first execution of
the script
interval: 10000, // and at an interval of every 10 seconds after
that
Sample script: humidity_shutdown.js
This is a sample script to trigger a humidity or temperature alarm from a PDU and launch a shutdown
sequence. This script illustrates what can be done with PDU probes.
Configuration 30
Page 30

The bolded attributes can be modified as follows:
UserScript =
{
name: "ShutdownByTemperatureOrHumidity",
enabled: false, // Set this property to true to enable the script
onEvent: true,
delay: 0, // This property can be used to delay first execution of
the script
interval: 10000, // and every 10s from that
…
/// @property {Integer} pduName This property is PDU ip address
with humidity sonde which must be checked
pduName : "178.222.223.224",
/// @property {Integer} pduHumidityLimit This property is value
limit of humidity before shutdown.
pduHumidityLimit : 20,
/// @property {Integer} pduTemperatureLimit This property is value
limit of temperature before shutdown.
pduTemperatureLimit : 20,
Advanced Sound Alarm Customization
To configure sound alarms on events:
1
In the file {INSTALL DIRECTORY}\Dell\MultiUPSManagementConsole\configs\config.js, change
the configuration as follows:
'systray':
{
'soundAlarm': false,
'notificationIcon': true,
'notificationBox': true
}
Configuration 31
Page 31

2
Change
'soundAlarm': false,
to 'soundAlarm': true, as shown below:
'systray':
{
'soundAlarm': true,
'notificationIcon': true,
'notificationBox': true
}
3
Close and restart the Windows user session so that this configuration is taken into account
NOTE: You can change the alarm sound by setting the Windows sound preferences from Control Panel (see Figure 10).
NOTE: The Dell MUMC alarms are linked to the “Low Battery Alarm” sound that you can change by selecting another
wav file.
Figure 10. Sound Alarm Choice
Configuration 32
Page 32

Configure User Accounts
To configure multiple user accounts:
1
Login with an administrator user profile.
2
Select
Settings > User List.
3
Click
Add user.
4
Type the user’s login and the user’s password (see Figure 12).
5
Select the user's profile level. The following levels are available:
• Admin (the user will be able to access all the features)
• User (the user will only access the visualization and is not able to set changes to the system or
nodes).
6
Click
Create new user
The Add user dialog box displays.
The User List page is displayed (see Figure 11).
.
Figure 11. User List Page
Figure 12. Add User Dialog Box
Configuration 33
Page 33

Note that the Dell MUMC contains a default Administrator profile with:
•“admin” as login
•“admin” as password
WARNING: For security reasons, it is strongly recommended that you change the default password immediately after
the installation. A Popup provides a security warning if the password contains less than eight characters.
System Settings
You can edit system settings. From the Settings > System menu item, you can edit system information,
edit language, edit scan settings, and edit module settings (see Figure 13).
Figure 13. System Settings Page
Select one of the items, and then double-click the item, or single-click on the corresponding button in
the right-hand side menu:
•
Edit system information
Edit scan settings
•
modifies contact and location information.
changes the default SNMP community name for discovery.
Configuration 34
Page 34

•
Edit modules
–
–
–
–
•
Edit language
Management
Shutdown
Virtualization
Redundancy
settings allows you to enable/disable Dell MUMC optional modules:
enables nodes settings mass configuration and nodes upgrade features
enables shutdown of the computer running Dell MUMC in the event of a power failure
enables management of virtualized IT systems
provides support for >1 UPS in N+1 redundant configuration
allows you to change the user language, the date and time format, and the temperature
unit (Celsius or Fahrenheit)
Figure 14. Edit Language Settings
Configuration 35
Page 35

4
Supervision
This chapter describes supervision features in the Dell Multi-UPS Management Console (MUMC).
Access to the Monitoring Interface
To monitor the Power Source, start the main Dell MUMC interface. You can access the interface locally
or remotely.
Local Access
From the system where Dell MUMC is installed, you can use the following shortcut:
•
Start > Programs File > Dell > Multi-UPS Management Console > Open Dell Multi-UPS
Management Console
Remote Access
1
From a remote machine, you can type either of the following URLs in a Web browser:
https://<name or IP address of computer hosting
Or
http://<name or IP address of computer hosting
Dell MUMC
Dell MUMC
>:4680/
>:4679/
2
In SSL mode, accept the certificate by clicking
Figure 15. Accepting the SSL Certificate
Ye s
(see Figure 15)
.
Supervision 36
Page 36

3
To install the certificate on IE7 for Vista, perform the following steps:
a
Run IE as an administrator by right-clicking the desktop icon and choosing “Run as
Administrator.”
b
Open the
c
Click through the certificate error.
d
Click the
e
Click
f
Click
4
Click the “Place all certificates in the following store” radio button, and choose the “Trusted Root
Dell MUMC
Certificate Error
View Certificate
Install Certificate
.
button in the address bar.
.
.
Certification Authorities” store. If you don't do this, the certificate goes in your personal store, and it is
not trusted by IE.
5
Enter the Login and Password.
Node List View
The following default columns are displayed in this page (see Figure 16):
•
Ty p e :
Graphical icon to differentiate UPS/PDU and Applications
•
Status:
This icon represents the severity of the most critical event active on the monitored device
•
Name:
The IP address, the DNS name or user defined name
•
Description:
•
Location:
•
Contact:
•
Link:
The product name or description
The node location
The node contact
Link to the device Web site (if available)
Supervision 37
Page 37

Figure 16. Node List View
You can sort (ascending or descending) your device list by clicking the column titles (Status / Name /
Description/ Location / Load Level …). You can also add columns, as illustrated in Figure 17.
Supervision 38
Page 38

Figure 17. Adding Columns in Node List View
Flexible Panels View
The
Views >Power Source
information and status panels you want to see in the Power Source display for devices and applications in
the Node List. For example, in Figure 18 the following panels display:
• Information and Status
•Measures
• Graph
•Synoptic
menu item selection displays the Power Source page. You can select which
Supervision 39
Page 39

Figure 18. Power Source View
To select which panels display in the view, select one of the device/applications in the list and “Detailed
Panels” displays in the right side of the window (see Figure 19).
• Click the bar title to collapse/extend the panel.
•
You can also show or hide all the views menu or selection view menu.
• Select (check) a checkbox to select which panels you want to add in the selection view.
Supervision 40
Page 40

Figure 19. Panel Selection Dialog Box
NOTE: Some of the panels are only available for specific node types.
Panels List
Information Panel
The following node information is displayed in this panel (see Figure 20):
•
166.99.xx.yy:
•
Description:
•
Firmware version:
•
Nominal Apparent Power:
•
IP address:
•
Mac address:
•
Serial Number:
•
Class:.
•
Location:
•
Contact:
•
Link:
DNS name (or IP address) is displayed near the “status icon”
Commercial product name
Firmware revision level of the UPS or the Dell NMC card setup as power source
Device load capacity in VA
Device IP address
Device MAC address
Device serial number (if available)
Ty p e o f c ar d
Device location (value of syslocation object can also be configured in the Device page)
Device contact (value of syscontact object can also be configured in the Device page)
Link to device Web site (if available)
NOTE: The information displayed in this panel depends on the node types you are viewing.
Supervision 41
Page 41

Figure 20. Information Panel
Status Panel
The following node status is displayed in this panel (see Figure 21):
•
Power source:
•
Battery state:
•
Load Level:
•
Battery capacity:
•
Battery run time:
•
Master Output:
ByPass/Overload)
•
Outlet #x:
NOTE: The information displayed in this panel depends on the UPS capabilities.
AC Power / Battery
Charging / Discharging / Default / Floating / Resting
Output load level of the device
Battery capacity of the device
Thee device remaining backup time
Main output status (ON/OFF/Internal Failure/On Automatic Bypass/Manual
Output outlet status (ON/OFF)
Figure 21. Status Panel
Supervision 42
Page 42

Outlets Panel
The following outlets status information is displayed for the selected PDU in this panel (see Figure 22):
• Contextual information is provided when mouse is over the outlet
• When you select an outlet in this panel, the Graph panel displays the information for this outlet.
• You also have to select Outlet information in the Graph settings dialog (accessible through the graph
settings button in the Graph panel)
Figure 22. Outlet Panel
The outlet state is color coded in the display (see Table 7).
Table 7. Outlet Color Codes
Icon Color Description
Green Powered (ON)
Red Not powered (OFF)
Supervision 43
Page 43

Measures Panel
This panel displays the selected device electrical parameters for single-phase or three-phase devices,
depending on the node capabilities (see Figure 23 and Figure 24).
Figure 23. Measures Panel (Single Phase)
Figure 24. Measures Panel (Three Phase)
Supervision 44
Page 44

Environment Panel
This panel displays the selected device sensor information (see Figure 25):
•
Temperature:
•
Humidity:
•
Input #1:
•
Input #2:
Temperature (in °C)
Humidity level
Status of first contact (open / closed)
Status of second contact (open / closed)
NOTE: For more information about the tow optional input connections, please refer to the Dell Environmental Monitoring
Probe (EMP) User Guide.
Figure 25. Environment Panel
Graph Panel
This panel displays the graph of the main measures of the selected device (see Figure 26):
• The button allows you to zoom in the graph.
• The button allows you to select the data you want to display in the graph.
Supervision 45
Page 45

Figure 26. Graph Panel
Synoptic Panel
This panel displays the selected device synoptic (see Figure 27). In the top left corner under the banner,
the UPS electrical topology is indicated, such as Online UPS, Line Interactive UPS, and so forth. A tool
tip is displayed when you move the mouse over one of the functional blocks.
Figure 27. Synoptic Panel
Supervision 46
Page 46

The Synoptic color coded icons display for the following (see Table 8):
•UPS modules
• Battery modules
•Electrical flows
• Electrical power sources at UPS input
• Load at UPS output, with status linked to UPS output status
•Combined color codes
Table 8. Synoptic Panel Icons
Symbol Color Description
UPS Modules
AC/DC DC/AC Bypass Green Status OK and Active
AC/DC DC/AC Bypass Red Internal Fault and Inactive
AC/DC DC/AC Bypass Gray Status OK and Inactive or Unknown
Battery Modules
Electrical Flows
Green Status OK
Orange Battery charge is less than 50%
Red Battery fault or End-of-backup
Gray Battery status unknown
Supervision 47
Page 47

Table 8. Synoptic Panel Icons (Continued)
Symbol Color Description
Yellow Current flow through the cable
NOTE: The object animation gives the direction of
the current flow.
Gray No current flow through the cable
WARNING: The cable may be under voltage.
Electrical Power Source at UPS Input
Green Source powered. Status OK
Gray Source not powered or status unknown
Load at UPS Output
Green Load powered and protected. Status OK
Red Load not powered
Gray Load status not known
Combined Color Code: Flow and Power Source Status
Green/Yellow Electrical power source is powered and provides
Green/Gray Electrical power source is powered and does not
Combined Color Code: Flow and Load Status
Yellow/Green Load powered and protected
Gray/Red Load not powered
electrical flow
provide electrical flow
Supervision 48
Page 48

Power Source
The Power Source panel displays information on the device that powers the selected application running
on the server (see Figure 28).
Figure 28. Power Source
Powered Applications
The Powered Applications panel displays information on the applications, such as the Dell UPS Local
Node Manager (ULNM), that are powered by the selected device (other Dell ULNM) and their
shutdown timing profile following a power failure event (see Figure 29).
Figure 29. Powered Applications
Supervision 49
Page 49

Events Panel
This panel displays the events list of the selected node (see Figure 30). You can sort the events according
to status, date, and message by clicking the column header.
Figure 30. Events Panel
Statistics Panel
This panel displays the statistics of the selected node (see Figure 31). The button allows you to select
the time interval for the statistics. You can adjust the time interval by clicking the two buttons with the
“From” and “To” dates.
The statistics computed data is as follows:
• Apparent Consumption (or Active Consumption in next release, in Watts)
• Average Apparent Power (or Average Active Power in next release, in Watts)
• Power Failure Count
• Power Failure Cumulated Duration
• Battery Fault Count
• Internal Failure Count
• Overload Count
• Warning Alarm Count
• Critical Alarm Count
• Output Off Count
• Communication Lost Count
NOTE: This information depends on device capabilities.
Supervision 50
Page 50

Figure 31. Statistics Panel
Power Components
Figure 32 illustrates the Power Components View. This panel displays the components of your redundant
UPS system if the Redundancy feature is activated (see Chapter 8, “Redundancy” on page 99).
Figure 32. Power Component View (Sub-view of Power Source View)
Device Supervision
The bar at the bottom of the page provides the status of nodes being supervised. Note the following in
Figure 33:
•14 nodes are OK
• 4 nodes are in Warning status
• 2 nodes are in Critical status
• 0 nodes are in Unknown status
Figure 33. Bottom Bar for Device Supervision
Supervision 51
Page 51

Applications List View
To create a sub-view that filters applications, right click Node List, create a sub-view, then select
Category as criteria to filter the nodes (see Figure 34 and Figure 35). You can create sub-views from the
following information: Category, Contact, Description, IP address, Location, Name, Status, Type, User
Note, User Type. The Dell ULNM running on other computers in the network can be monitored in this
view.
Figure 34. Sub-view Selections
Figure 35. Example Sub-view
Supervision 52
Page 52

The following default information appears in this page:
•
Ty p e :
Application
•
Status:
•
Name:
•
Description:
•
Power source:
•
Run time:
•
Shutdown duration:
•
Link:
This icon represents the status of the server.
Value configured in the Applications screen (by default this is an IP address or a DNS name).
Machine operating system.
The UPS that powers the Dell ULNM application/computer
Operating time in the event of a utility supply loss.
Duration in seconds, needed by the system to carry out its shutdown procedure.
Link to the Web supervision interface of the Dell ULNM
Map View
This supervision map allows you to spatially represent your network nodes and uses “drag and drop”
functionality.
Clicking a node icon will present the node information on the right-hand panel.
NOTE:
Create a Customized Map View
The customized map view is accessed on the left-side menu using the Views > Node Map selection. The
map is automatically generated. (Icons are automatically placed on the Map and IP address assigned.)
The contextual tool button on the Node Map title bar provides tools to modify the map (see
Figure 36):
• Change theme offers three kinds of icons representations (small tower icons, large tower icons, and
large rack icons).
• Manage backgrounds allows you to import a new background image in the supervision tool (png, jpeg,
and gif picture types supported). You can select a background already in the supervision tool for the
map or remove the background images.
• Regroup nodes will rearrange the icons position on the Map.
• “Add a label” allows to create a user defined text and to place it on the Map through drag and drop.
NOTE: To delete a label, right-click on it and then click Delete.
Supervision 53
Page 53

Figure 36. Contextual Tools Menu
Map Examples
Figure 37. World Map View
Supervision 54
Page 54

Figure 38. Manage Backgrounds Contextual Menu
Supervision 55
Page 55

Figure 39. Country Map View
Supervision 56
Page 56

Figure 40. Server Room Map View
Supervision 57
Page 57

Events
List Representation
Select Events > Events List to display the Events List page (see Figure 41). All new alarms are stored in
this log. You can sort the alarms according to the Status, Date, Name, Message, and Ack fields.
Figure 41. Events List Page
The following functions are available:
•
Acknowledge selected events:
•
Acknowledge all events
NOTE: When an alarm is acknowledged, it is marked with a check box but it is still viewable in this Event list. The
acknowledged alarms disappear in the Power Source > Event dedicated portal panel.
•
Export Logs
"Date","Node","Type","Level","Object","Value","Message",
"2009/01/2718:35:20.840","166.99.250.83","Measure","0","UPS.PowerConverter.Inpu
t[1].Frequency","49","",
NOTE:
The export command may take several seconds before allowing download to create the logs file.
: Creates a logs.csv file with the following syntax:
Adds a check box in the Ack column for selected events
: Adds a check box in the Ack column for all events
Supervision 58
Page 58

•
Select all
•
Deselect all
: Selects all displayed events
: Deselects all selected events
Calendar Representation
Select Events > Events Calendar to display the Events Calendar page (see Figure 42). In this matrix
representation, each line is a week and each column is a day in the week. If you select a day or an interval
(with the date-picker or using the shift+click command), the Events and Statistics panels provide all
information for this selection and automatically refresh when new statistics have been computed.
Figure 42. Event Calendar Page
Supervision 59
Page 59

Nodes Events List
The icons in the different views represent the event severity.
NORMAL With this event, the UPS device is returning to a normal status.
Normal Event list (UPSs, PDUs, Applications, Generic devices):
• Communication with device is restored
• Communication restored with UPS
• The system is powered by the utility
• The UPS output is on
• Communication restored with UPS
• Battery OK
• UPS returns to normal load
•UPS OK
•Bypass: Return on UPS
• End of low battery alarm
• The outlet group 1 is on
• The outlet group 2 is on
• Communication failure with environment sensor
• Communication restored with environment sensor
• Humidity is in normal range
• Temperature is in normal range
• Input #x on
• Input #x off
• End of warning alarm
• End of critical alarm
• Redundancy restored
•Protection restored
PDU Normal Event List (Specific to PDUs):
• The input frequency is in normal range
• The input temperature is in normal range
• The input voltage is in normal range
• The input {x} is in normal load
• The section {x} current is in normal range
Supervision 60
Page 60

• The section {x} voltage is in normal range
• The outlet group {x} current is in normal range
• The outlet group {x} is in normal load
• The outlet group {x} is on
• The phase {x} output load is in normal range
• The output frequency is in normal range
• The output load is in normal range
• The output voltage is in normal range
WARNING A problem occurred on the UPS device. Your application is still protected.
Warning Event List (UPSs, PDUs, Applications, Generic devices):
• The system is powered by the UPS battery
• Output on automatic bypass
• Output on manual bypass
• Humidity is below low threshold
• Humidity is above high threshold
• Temperature is below low threshold
• Temperature is above high threshold
• Warning Alarm (a generic Warning alarm is active on the device)
• The device is under its load alarm threshold
• The device is over its load alarm threshold
•Protection lost
• Redundancy lost
• Shutdown in <
time
>
• Remote Communication Error (remote communication or configuration issue is detected)
Supervision 61
Page 61

CRITICAL A serious problem occurred on the UPS device. This problem requires an urgent action.
Your application might NOT BE powered.
Critical Event List (UPSs, PDUs, Applications, Generic devices):
• The UPS output is off
• The outlet group 1 is off
• The outlet group 2 is off
• Battery fault
• UPS overload
• UPS fault
• Low battery alarm
• Applications must stop immediately...
• System shutdown in progress...
• Critical alarm (a generic Critical alarm is active on the device)
PDU Critical Event List (Specific to PDUs):
• The input frequency is out of range
• The input temperature is above high threshold
• The input temperature is below low threshold
• The input voltage is above high threshold
• The input voltage is below low threshold
• The input {x} is overload
• The section {x} current is too high
• The section {x} current is too low
• The section {x} voltage is too high
• The section {x} voltage is too low
• The outlet group {x} current is too high
• The outlet group {x} current is too low
• The outlet group {x} is overload
• The outlet group {x} is off
• The phase {x} output is overload
• The output frequency is out of range
• The output is overload
• The output voltage is above high threshold
• The output voltage is below low threshold
Supervision 62
Page 62

COMMUNICATION LOST Communication is lost.
Communication Lost Event List:
• Communication failure with Device or Application
DEVICE IS NOT MANAGED Device is not managed
• Your device is not managed due to license limitation. Use the
Settings > System
selection to enter a
Silver or Gold license code.
Launching Device Web Interface
From the Status panel, you can access the Web page for Dell cards, including an on-board Web server.
Click the associated Web link for http access (blue icon
)
or the https access (yellow icon ).
Defining Sub-views
When you need to monitor large configurations, it is helpful to define several sub-views and then filter
the nodes or events in these categories. You can select many criteria in order to organize your tree, such as
geographical, organizational, by status, and so forth.
To define a sub-view:
1
Select a view in the
2
Right-click this selection. The contextual menu sub-views displays (see Figure 44).
3
Click
Create a sub-view from …
To filter the nodes in this sub-view,
Views > Node
and follow the instructions.
list, such as “Category: Devices” (see Figure 43).
1
Select a view in the
2
Right-click this selection. The contextual menu sub-views displays (see Figure 44).
3
Click
Edit a Filter View
4
Click
Add rule
NOTE: With the setup shown in
contains the value “Computer Room.”
Views > Node
list, such as “Location: Computer Room” (see Figure 43).
. The View Filter Rules dialog box displays (see Figure 45).
, then key in the Object, Operation and Values.
Figure 45, t
his filtered view will allow you to view the devices whose Location field
Supervision 63
Page 63

Figure 43. Views > Node List Example Hierarchy
Figure 44. Contextual Sub-view Menu
Supervision 64
Page 64

Figure 45. View Filter Rules Dialog Box
Sharing Sub-views
A customized sub-view is “attached” to the user that created it. It is private. The customized sub-view is
marked with a small man on the icon of the sub-view (see Figure 46).
Figure 46. Shared View with Marker (left) and Public View without Marker (right)
If the owner of the sub-view wants to allow the use of the sub-view by the other users, he needs to share
the view.
To share the view:
1
Right-click the view to open the contextual menu (see Figure 47).
Supervision 65
Page 65

Figure 47. Contextual Sub-view Menu
2
Click
Share this view
Figure 48. Share the View Selection
(see Figure 48).
NOTE: Customizing a view cancels the sharing of this view. For the use of this view by all the users, the owner of the view
must share it again.
Supervision 66
Page 66

5
Shutdown
The Dell Multi-UPS Management Console (MUMC) provides local computer graceful shutdown (when
connected to a UPS through either Dell Network Management Card, USB or RS-232)
This shutdown feature can be enabled or disabled from the Settings > System > Modules Settings
selection path.
Shutdown Configuration
To access the shutdown configuration options:
1
Login with an administrator user profile.
2
Select
Settings > Shutdown
. The Shutdown page is displayed (see Figure 49).
Figure 49. Shutdown Page
Shutdown 67
Page 67

Figure 50. Configuration Buttons in Right-side Panel
The following configuration buttons are provided on the right-side panel
(see Figure 50)
•Edit power source
• Edit shutdown configuration
• Edit advanced shutdown criteria
• Edit UPS configuration
• Test shutdown (see Figure 51)
• Run battery test: Launch a battery test if the following conditions are true :
– Battery must be in rest mode.
– The load must be over 25%.
• Run UPS Upgrade Tool: Use if the following conditions are true :
– A power source has been set up in the software.
– The Dell UPS Upgrade tool is installed on the operating system.
:
Shutdown 68
Page 68

• Run UPS Logs Extraction Tool if the following conditions are true:
– A power source has been set up in the software.
– The Dell UPS Logs Extraction Tool is installed on the operating system.
– Communication with UPS trough Serial connection.
– It is installed on a Windows Operating System in the list of supported OS.
NOTE: Note: If the Dell UPS is connected through the USB or if the software is running on a Linux Operating System (not
supported by the “Dell UPS Logs Extraction Tool,” the button will be disabled.
NOTE: Refer to the Dell
description of the Shutdown feature.
™
UPS Local Node Manager® Installation and Configuration User’s Guide for a detailed
NOTE: For Test Shutdown, check the settings for the UPS shutoff option to ensure the expected behavior: with the “UPS
shutoff” option enabled, the shutdown sequence test will lead to the full UPS shutdown (see Figure 51).
Figure 51. Test Shutdown Warning Message
Shutdown through Hibernate
If available with your operating system, it is better to use the hibernation feature (available from
Microsoft® Windows® 2000 and later versions) because there are a number of advantages. When the
computer is shutting down, all work in progress and system information are automatically saved to the
disk. The computer itself is also de-energized. When mains power returns, all the applications re-open
exactly as they were and the user placed back in their work environment.
The Hibernate function must first have been activated in the operating system in the power options on
the Windows control panel Hibernate tab.
NOTE:
If you select hibernate, but your computer does not have this function, the Dell MUMC will still protect the system
by carrying out the normal (default) shutdown action.
Shutdown 69
Page 69

Power Source View
When Shutdown feature is configured from the Views menu Item, select the Power Source item.
You will be able to perform the following:
• To supervise the information from the UPS that powers the Dell MUMC computer.
• To drag and drop the panels in this window to different locations to suit your viewing preference.
• In the graph panel of power source view, several measurement data are displayed (see Figure 52.)
Figure 52. Graph Settings Dialog Box
• To export data shown in the graph panel using the export data button (see Figure 53).
•
To export data into a comma-separated value (CSV) file, use the Export logs button located in the
Graph panel menu bar. The time scale chosen will apply to extracted logs.
Shutdown 70
Page 70

Figure 53. Export Graph Data Button in Graph Panel
Shutdown Sequence
You cannot enable the Shutdown Controller feature in Dell MUMC. However, the Dell MUMC can acquire
shutdown alarms from Dell UPS Local Node Manager (ULNM) with the Shutdown Controller module
enabled.
You will find more details on the Shutdown Sequence and Shutdown Use case in the Dell™ UPS Local
Node Manager
®
Installation and Configuration User’s Guide.
Shutdown 71
Page 71

6
Advanced Management
Nodes Settings
Single Node Configuration Display
Dell Multi-UPS Management Console (MUMC) can display the card/application configuration for other
nodes on the network. Proceed as follows:
1
From
Management> Nodes Settings,
2
After a few seconds, on the right hand, the Node configuration panel is updated.
3
If you wish to save a standard node configuration (for example to deploy to other similar nodes), use
the
Configurations > Export Configuration
select one node from the Node List page (see Figure 54).
file to export this configuration to a file.
Figure 54. Nodes Settings View
Advanced Management 72
Page 72

Single Card Settings
Dell MUMC can configure a remote Dell Network Management Card.
Proceed as follows:
1
Login with an administrator profile.
2
Select one card from the list.
3
From the Node List button , select
The access status changes from Access Denied ( ) to Access OK ( ).
After a few seconds, the Node configuration panel is updated.
4
Click the Edit button , or load a previously saved configuration.
5
In the Network Settings Configuration dialog box, check the parameters you want to change and fill in
the new values (see Figure 55).
Set Login Parameters
, enter the card Login and Password.
Figure 55. Network Section
6
Apply the changes.
NOTE: The parameters that have different values on the cards and on the configuration to apply have the sign.
7
Select the parameters you want to synchronize (with the check box).
8
Click
Synchronize.
Some advanced parameters details are not displayed in the
Network Settings Configuration dialog box
You need to change the advanced parameters details directly on one device and then synchronize the
configuration from this device to other devices.
Advanced Management 73
.
Page 73

Figure 56 provides a typical example with PDU Power Schedule configuration. The details of Power
Schedule 1 to Power Schedule 8 are available from the device Web interface. Checking all Power
Schedule “n” advanced parameters will synchronize all the advanced parameters details of the category.
Figure 56. Advanced Parameters Not Displayed
Multiple Cards Configurations Synchronization
The Dell MUMC can make changes to multiple Dell Network Management Card configurations
simultaneously.
Proceed as follows:
1
From
Management> Nodes Settings,
click” action (see Figure 57).
2
From the Node List button , select
The access status changes from: Access Denied ( ) to Access OK ( ).
After a few seconds, the Node configuration panel is updated.
3
From the combo box select the configuration that will be the model, or click
The parameters that have different values on the cards have the sign.
4
Select the parameters you want to synchronize (with the check box).
5
Click
Synchronize
.
select several cards from the Node List page using a “crtl-and-
Set Login Parameters
and enter the card login and password.
Edit
.
Advanced Management 74
Page 74

Figure 57. NMC Mass Configuration
Nodes Upgrade
Upload Device Firmware
Perform this procedure to upload a device firmware:
NOTE:
Refer to the network cards release notes to determine the latest firmware release compatible with the hardware
revision.
1
From
Management > Nodes Upgrade
2
From the Node List button , select
The access status changes from: Access Denied ( ) to Access OK ( ).
3
From the
4
Click
Firmware > Import Firmware File…
Browse
, select the firmware from a disk accessible from the computer, and click
, select the cards on the Node List page.
Set Login Parameters
list box, the uploading window displays.
and enter the card login and password.
Advanced Management 75
Open
.
Page 75

5
Click
Firmware > Upload Firmware
to nodes.
The cards will be updated with the firmware selected.
NOTE: Dell PDU firmware upgrade is not supported at this time.
Figure 58. Management / Nodes Upgrade View
Upgrade Applications
Perform this procedure to update the applications:
1
Under
Management, select Nodes Upgrade
, then select the application (or applications) to upgrade
in the Node List (see Figure 59).
2
From the Node List button , select
Set Login Parameters,
and enter the access login and password.
The access status changes from: Access Denied ( ) to Access OK ( ).
Advanced Management 76
Page 76

Figure 59. Management / Nodes Upgrade View 2
3
From the Applications upgrade panel, click
Update
(see Figure 60).
The status of the applications (with respect to the version) is updated.
Figure 60. Applications Upgrade Message
Advanced Management 77
Page 77

Advanced Management 78
Page 78

7
Virtualization
The Dell Multi-UPS Management Console (MUMC) Virtualization module for VMware and Hyper-V
requires the Dell Network Management Card. For VMware environments managed by vCenter, only the
Dell MUMC application is required. For VMware environments without vCenter and all other
virtualization platforms, Dell UPS Local Node Manager (ULNM)must be installed on all hosts and
configured to communicate with the UPS Dell Network Management Card.
NOTE:
USB/RS-232 communication protocols are not supported for virtualization applications.
The Dell MUMC Virtualization module will retrieve information from the hypervisor (for example,
VMware
vSphere™ and Microsoft
The Dell MUMC can execute advanced virtualization features on UPS Power Events:
®
ESX™, VMware® ESXi™, and Citrix® XenServer™) or manager (for example, VMware®
• Trigger the move of the virtual machines to other hosts by setting the VM host into maintenance
mode. The data center will benefit with this zero down-time feature.
• Trigger Shutdown of the VM Host through vCenter. The data center will benefit from hosts graceful
shutdown.With other platforms, this function is done by the Dell ULNM application.
®
System Center Virtual Machine Manager® [SCVMM]).
Virtualization 79
Page 79

Dell Multi-UPS Management Console Virtualization Solutions for
Network
Dell UPS
Server is shut down
by hosted Dell ULNM
Server and VM are
managed by vCenter
or vSphere client
ESX and Dell ULNM
POWER
ESXi and Dell
ULNM on vMA
vCenter and
Dell MUMC
Server
Dell UPS
Server and VM are
managed by vCenter
or vSphere client
Server and VM are
managed by vCenter
Server and VM are
managed by vCenter,
DRS, vMotion
Server is shut down
by hosted Dell ULNM
Server is shut down
by remote Dell MUMC
DELL Power Management
and Remote Shutdown and
Remote Maintenance
ESXi or ESX
VMware, Microsoft, Citrix, OpenSource Xen, and KVM
Dell Solutions for VMware
Dell provides three solutions for VMware that are illustrated in Figure 61.
Figure 61. Dell ULNM and Dell MUMC Configurations for VMware
Solution 1
In this solution, ESX and ESXi hosts are controlled by vCenter (paid version only), which provides
following features:
• Agentless host management (Dell ULNM does not need to be installed on each host)
• No CLI programming, or need for vSphere Management Assistant (vMA)
• Remote graceful shutdown of multiple ESX / ESXi servers and hosted VMs
Virtualization 80
Page 80

• Ability to set hosts to maintenance mode (to use VMware® vMotion™)
• A plug-in is created in vCenter for centralized IT and power management
• UPS events are accessible and configurable through vCenter
Solution 2
In this solution, ESX and ESXi hosts are not controlled by vCenter (paid version only), which provides
following features:
• Dell ULNM application is installed on VMware Infrastructure Management Agent (VIMA) / vMA for
each host
• Dell ULNM configurations and actions can be managed centrally from the Dell MUMC client
• Some command line programming is required
• Remote graceful shutdown of multiple ESX / ESXi servers and hosted VMs
NOTE: For paid versions, VMware suppresses the ability to control VM shutdown profiles in non-licensed ESXi
installations. There are third-party methodologies for avoiding this restriction, but this is not covered in this user
guide.
Solution 3
This solution is for ESX-only hosts (paid or free versions), which provides following features:
• Dell ULNM application is installed on each host (on either Windows or Linux VM)
• Remote graceful shutdown of each ESX host and hosted VMs
• Dell ULNM configurations and actions can be managed centrally from Dell MUMC client
Virtualization 81
Page 81

Dell Solutions for Microsoft
Network
Dell UPS
Server is shut down
by hosted Dell ULNM
Server and VM are
managed by SCVMM
or Hyper-V manager
HyperV Server and
Dell ULNM
POWER
HyperV on W2008 and
Dell ULNM
SCVMM and Dell
MUMC Server
Dell UPS
Server and VM are
managed by SCVMM
or Hyper-V manager
Microsoft SCVMM
and Live Migration
Server is shut down
by hosted Dell ULNM
DELL Power Management
and Remote Maintenance
For Microsoft, Dell MUMC provides two solutions that are illustrated in Figure 62.
Figure 62. Dell ULNM and Dell MUMC Configurations for HyperV
Solution 1
The first solution provides graceful shutdown for Microsoft® Hyper-V or Hyper-V Server® on 2008. Dell
ULNM is installed on each Microsoft operating system.
NOTE:
This solution does not require SCVMM management software.
Virtualization 82
Page 82

Solution 2
Network
Dell UPS
Server is shut down
by hosted Dell ULNM
Server and VM are
managed by
XenCenter
Citrix Xen and Dell ULNM
POWER
Citrix Xen and Dell ULNM
Citrix Xen Center Dell
MUMC and Dell MUMC
Xen Plug-in
Dell UPS
Server and VM are
managed by
XenCenter
Citrix: XenCenter and
Xen Motion
Server is shut down
by hosted Dell ULNM
DELL Power Management
and Remote Maintenance
The second solution is for multiple Hyper-V and Hyper-V servers.
It provides following features:
• Hyper-V / Hyper-V server remote maintenance to trigger VM live migration.
• This solution is ideal for biggest infrastructures working through SCVMM server .
NOTE: See Chapter 6, “ULNM with Microsoft Hyper-V or Hyper Server” in the Dell
Installation and Configuration User’s Guide.
™
UPS Local Node Manager®
Dell Solutions for Citrix Xen
For Citr i x® Xen®, Dell MUMC provides two solutions that are illustrated in Figure 63:
Figure 63. Dell ULNM and Dell MUMC Configurations for Citrix XenServer
Virtualization 83
Page 83

Solution 1
The first solution provides the following:
• Provides graceful shutdown for Citrix Xen.
• Dell ULNM is installed on each Citrix Xen system.
• This solution does not require Citrix
®
XenCenter® management software.
Solution 2
The second solution is for multiple Xen servers. It provides following features:
• Xen server Remote maintenance to trigger VM Citrix® XenMotion®.
• Xen server Remote shutdown.
• This solution is ideal for biggest infrastructures working through Citrix XenCenter.
This solution is now integrated in Dell MUMC.
See Chapter 9, “ULNM with Xen Virtualized Architecture” in the Dell™ UPS Local Node Manager® Installation and
NOTE:
Configuration User’s Guide.
.
Virtualization 84
Page 84

Dell Solutions for OpenSource Xen
Network
Dell UPS
Server is shut down
by hosted Dell ULNM
Server and VM are
managed by Xen
console
Xen and Dell ULNM
POWER
Xen and Dell ULNM
Xen and Dell ULNM
Server and VM are
managed by Xen
console
Server and VM are
managed by Xen
console
Server is shut down
by hosted Dell ULNM
Server is shut down by
hosted Dell ULNM
Dell UPS
Figure 64. Dell ULNM Configurations for OpenSource Xen
Dell MUMC provides a solution for OpenSource Xen that is illustrated in Figure 64:
Solution
• It provides graceful shutdown for Xen. Dell ULNM is installed on each Xen system.
NOTE: See Chapter 9, “ULNM with Xen Virtualized Architecture” in the Dell
Configuration User’s Guide.
™
UPS Local Node Manager® Installation and
Virtualization 85
Page 85

Dell Solutions for Red Hat KVM or OpenSource KVM
Network
Dell UPS
Dell UPS
Server is shut down
by hosted Dell ULNM
Server and VM are
managed by KVM
console
KVM and Dell ULNM
POWER
KVM and Dell ULNM
KVM and Dell ULNM
Server and VM are
managed by KVM
console
Server and VM are
managed by KVM
console
Server is shut down
by hosted Dell ULNM
Server is shut down
by hosted Dell ULNM
Figure 65. Dell ULNM Configurations for Red Hat KVM or OpenSource KVM
Dell MUMC provides a solution for Red Hat® KVM and OpenSource KVM that is illustrated in
Figure 65.
Solution
• It provides graceful shutdown for KVM. Dell ULNM is installed on each KVM system.
NOTE: See Chapter 10, “ULNM with KVM Virtualized Architecture” in the Dell
and Configuration User’s Guide.
™
UPS Local Node Manager® Installation
Virtualization 86
Page 86

Dell Solutions for Citrix XenClient
Network
Dell UPS
Shut down is initiated
by the hypervisor
Dell ULNM is hosted
on the hypervisor
Citrix XenClient and
Dell ULNM
POWER
Citrix XenClient
VM Dell ULNM-
Windows
Dell UPS
Dell ULNM is installed on each virtual machine
hosted by XenClient
Shutdown is launched by the VM and after the
XenClient shutdowns
VM Dell ULNM-
Linux
Figure 66. Dell ULNM Configurations for Citrix XenClient
Dell MUMC provides following solution for Citrix® XenClient® that is illustrated in Figure 66.
Solution
• It provides graceful shutdown for
system or on each virtual machine.
NOTE: See Chapter 9, “ULNM with Xen Virtualized Architecture” in the Dell
Citrix
XenClient. Dell ULNM is installed on each
Citrix
™
UPS Local Node Manager® Installation and
Configuration User’s Guide.
Virtualization 87
XenClient
Page 87

Tested environments
Dell has validated the Virtualization module in following environments. Other environment may also be
compatible with Virtualization module but are not officially tested.
VMware
• VMware vCenter 5.0 on Windows Server 2008 x64 and Windows Server 2008 R2 x64, Windows Server
2003 x64, Windows Server 2003 R2 x64,
• VMware vCenter Server 4.1/4.0 on Windows Server 2008 R2, 2008 Enterprise 64 bits, 2008 Standard
32 bits and 2003 64bits
• VMware ESXi 5.0/4.1/4.0 (remote shutdown from Dell MUMC or with Dell ULNM on vMA)
• VMware ESX 4.1/4.0 (shutdown with Dell ULNM on core OS)
Microsoft
• SCVMM on Windows Server 2008 R2
• Windows Server 2008 R2 with Dell UPS Local Node Manager (ULNM)
Citrix
• Citrix XenServer 5.6 and 6.0.0
• Citrix XenCenter 5.6 and 6.0.0
Enabling the Virtualization Module
Enable the Virtualization module in the System > Module Settings panel (see Figure 67).
Figure 67. Enable Virtualization
Virtualization 88
Page 88

VMware Supervisors Prerequisites
The virtualization module requires the following prerequisites:
• VMware vCenter and VMware vSphere Client must be installed.
NOTE: vCenter and Dell MUMC could be installed on the same server (or on a VM/Server on the network)
• To provide the VM graceful shutdown, you have to install VMware tools on each VM.
• You must also have a knowledge / experience with Dell MUMC software and VMware infrastructure.
NOTE: Since Dell MUMC Release 2 (Version 01.04), the VMware vSphere Software Development Kit (SDK) for Perl is no
longer required.
Microsoft Supervisors Prerequisites
The virtualization module needs following prerequisites:
• The Powershell Snapin for Microsoft SCVMM. Either install the VMM console on the machine
hosting Dell MUMC, or install
•The server hosting
•The server hosting
(minimum access “Remote Signed,” for example: Set-ExecutionPolicy RemoteSigned).
Figure 68 displays the parameters after the configuration example:
Dell MUMC
Dell MUMC
Dell MUMC
must be on the same Windows Domain than SCVMM Server
must enable the execution of third party scripts on the local machine
on the machine hosting SCVMM.
Figure 68. Windows PowerShell - Virtual Machine Manager
Virtualization 89
Page 89

Citrix Supervisors Prerequisites
The Virtualization module needs the following prerequisites:
• XenCenter must be installed to manage the XenServers.
• To provide the VM graceful shutdown, you must install Xen tools on each VM.
Adding Manager or Hypervisor List
Introduction
To add a manager or hypervisor list:
1
Enable the Virtualization module.
A new Virtualization menu entry displays in the “Settings” menu.
2
Click this new Virtualization menu entry.
3
Select Add Manager or Hypervisor List on the right panel (see Figure 69).
NOTE: To Edit or Remove Managers or Hypervisors, you have to select a line in the center panel first.
Figure 69. Virtualization module view
The following sections explain how to add different kinds of managers and hypervisors.
Virtualization 90
Page 90

Adding a vCenter Server Manager
To add a new VMware vCenter, complete the following fields (see Figure 70):
•
Product:
•
Hostname or IP address:
•
Username
•
Password:
•
vCenter Plugin:
NOTE: See “Configuring the Dell MUMC vCenter Plugin” on page 108 when using this feature.
Click Save after the fields are updated. Your VMware ESXi hosts will automatically be added to the
managed nodes.
NOTE:
Using http is also possible but the Password is sent to the local or remote server in clear. In both cases, the
password is stored encrypted in Dell MUMC and never sent again on the Client side.
The encrypted password is stored in the following configuration file ({DELL MUMC INSTALL
DIRECTORY}\configs\vmconfig.js).
Type (VMware vCenter)
VMware vCenter Hostname or IP address
: VMware vCenter Administrator Username
VMware vCenter Administrator Password.
Installs and configures Dell MUMC Plug-in into vCenter
When configuring the Login and Password, we recommend using the Dell MUMC Web interface through https.
Figure 70. Add VMware vCenter
Adding a SCVMM Manager
To add a new Microsoft SCVMM, complete the fields below (see Figure 71):
•
Product:
•
Hostname or IP address:
Click Save after the fields are updated.
Type (Microsoft SCVMM)
Microsoft SCVMM Hostname or IP address
Virtualization 91
Page 91

Figure 71. Add Microsoft SCVMM
Adding a VMware ESX/ESXi Hypervisor List
In the case where you do not have a vCenter server manager, add new VMware ESX/ESXi hosts
individually. Complete the following fields (see Figure 72):
•
Product:
•
Hostname or IP address:
Type (VMware ESX/ESXi)
List of VMware ESX/ESXi Hostname or IP address
Click Save after the fields are updated.
The Dell ULNM application must already be installed on each host's VIMA or vMA
NOTE:
Figure 72. Add VMware ESX/ESX)
Adding a Citrix XenServer Hypervisor List
To add a new Citrix XenServer List, complete the fields below (see Figure 73):
•
Product:
•
Hostname or IP address:
Click Save after the fields are updated.
Type (Citrix XenServer)
List of Citrix XenServer Hostname or IP address
Virtualization 92
Page 92

Figure 73. Add Citrix XenServer
Adding a XenCenter
As Citrix XenCenter is a Client and not a Manager, you can install a plug-in on the system where
XenCenter is installed (see Figure 74). This plug-in allows the user to use Dell MUMC into XenCenter.
Click Save after the fields are updated.
Figure 74. Add Citrix XenCenter
Configuring Hypervisors (ESX/ESXi Server, XenServer)
Introduction
For VMware vCenter or Microsoft SCVMM installation in Dell MUMC:
• After you have entered the correct information for the Manager, the Dell MUMC connects to the
Manager (vCenter or SCVMM).
• Dell MUMC automatically retrieves the VMHost information and creates new nodes in Dell MUMC
for each VMhost
• Dell MUMC automatically creates two different types of nodes that will be described after (you can
see the new node in the Node List)
• There is no need to enter the credentials for the hosts in the Node Settings menu. The VMware
vCenter credentials are all that is required to manage the system.
• You can now continue to “Configuring Maintenance and Shutdown” on page 94.
Virtualization 93
Page 93

For individual host installation (no vCenter or SCVMM) in Dell MUMC:
• After you have “Added a new list of Hypervisor,” Dell MUMC creates new nodes and waits for the
credential.
• You can now continue to the “Credential Configuration for the Hypervisors (ESX/ESXi, XenServer)”
section.
Credential Configuration for the Hypervisors (ESX/ESXi, XenServer)
• You have to configure the node credential in the Node Configuration Panel (see Figure 75).
• After you have entered the correct information, Dell MUMC will retrieve Hypervisors information.
• You can now continue to “Configuring Maintenance and Shutdown” on page 94.
Figure 75. Node Configuration Panel
Configuring Maintenance and Shutdown
Introduction
After you have entered the correct credential information for your managers and hypervisors, you have to
configure the Maintenance and Shutdown sequences according to the availability needs of your IT
infrastructure when power fails.
Configuration Options for vCenter and SCVMM Installations
Click each host in the Nodes Settings menu item and configure the required parameters:
•
Remote Maintenance:
“Maintenance Mode.” Depending on your host/cluster configuration, this can trigger vMotion/live
migration to another host. This event is triggered at the time set in the “Maintenance Timer”
parameter.
•
Maintenance Timer:
of the host to maintenance mode
•
Remote Shutdown:
shutdown this server in case of “UPS on battery state” and Shutdown criteria reached)
Enabled or Disabled. When enabled, the MUMC client sets the host to
Time elapsed “on battery state” before the Dell MUMC script changes the state
Enabled or Disabled (When enabled, it allows Dell MUMC to gracefully
Virtualization 94
Page 94

•
Remote Shutdown of the Virtual Machines:
•
Power Source:
•
Load Segment:
•
Master - Shutdown Duration:
•
Master - Shutdown After Value:
UPS powering this server (this node has to exist already in Dell MUMC)
UPS load segment powering the server
Server Shutdown criteria (time needed for graceful host shutdown)
Server Shutdown criteria, which s the time elapsed “on battery state”
Enable Dell MUMC to shut down the virtual machines
before graceful Shutdown. (This timer must be greater than the maintenance timer)
NOTE: The -1 value means that timer is disabled.
Figure 76 illustrates VMware vCenter and Microsoft SCVMM shutdown settings before configuration.
Figure 77 illustrates VMware vCenter and Microsoft SCVMM shutdown settings after configuration.
Figure 76. vCenter and SCVMM Shutdown Settings - Before Configuration
Figure 77. vCenter and SCVMM Shutdown Settings - After Configuration
Virtualization 95
Page 95

Figure 78 shows the above settings in the context of an extended power failure.
Figure 78. UPS Battery Capacity Over Time
NOTE: The Remote Shutdown functionality within Dell MUMC is reserved for VMware ESX/ESXi and Citrix XenServer
nodes. (Microsoft Hyper-V uses Dell ULNM on the host to perform shutdown).
NOTE: The Remote Shutdown of the Virtual Machines is only applicable to VMware ESX/ESXi hosts.
CAUTION: You must set the “Shutdown after value” to a time when all maintenance mode and VM migrations have
completed. If VM migrations have not completed by the time the “Shutdown” command is sent to the host, it will
override the migration request and migration will fail. No data will be lost because the image synchronization
will have failed, but the VM will cease to operate.
Virtualization 96
Page 96

Second Type of Nodes (DELL MUMC Detects Dell ULNM Running on the VMHost)
If there is a Dell ULNM installed on the server that is hosting the Hypervisor (VMHost), the shutdown is
done by the Dell ULNM.
In this case, the node contains both parameter types:
• The remote maintenance mode feature parameters.
• The Dell ULNM shutdown parameters (as a Dell ULNM will perform the shutdown locally).
NOTE: All the parameters are retrieved from Dell ULNM, and you will configure the Dell ULNM from Dell MUMC in
the Node Configuration Panel. See “Nodes Settings” on page 64 for more information on using the
configuration interface.
The Shutdown Settings are (see Figure 79):
•
Remote Maintenance:
“Maintenance Mode.” Depending on your host/cluster configuration, this can trigger vMotion/live
migration to another host. This event is triggered at the time set in the “Maintenance Timer” option
(below).
•
Maintenance Timer:
of the host to maintenance mode.
NOTE: The -1 value means the timer is disabled. See “Configuring Maintenance Mode and vMotion with vCenter”
on page 113 and “Configuring Maintenance Mode and Live Migration with SCVMM” on page 116 for more
information.
•
Remote Shutdown:
shutdown this server in case of “UPS on battery state” and Shutdown criteria reached)
•
Remote Shutdown of the Virtual Machines:
•
Power Source:
•
Load Segment:
•
(NMC Access) Login/Password:
UPS powering this server (this node has to exist already in Dell MUMC)
software to control NMC shutdown sequence.
•
Master - Shutdown Duration:
•
Master - Shutdown After Value:
before graceful Shutdown. (This timer must be greater than the maintenance timer)
NOTE: The -1 value means the timer is disabled.
•
Power Source Shutoff:
or USB. Virtualization behavior requires Ethernet connectivity (Dell Network Management Card).
Enabled or Disabled. When enabled, the Dell MUMC client sets the host to
Time elapsed “on battery state” before the Dell MUMC script changes the state
Enabled or Disabled (When enabled, it allows Dell MUMC to gracefully
Enable Dell MUMC to shutdown the Virtual Machines
UPS load segment powering the server
Network Management Card Login/Password that allows Dell ULNM
Server Shutdown criteria (time needed for graceful host shutdown)
Server Shutdown criteria, which s the time elapsed “on battery state”
Disabled. Enabled is used only for server connected with UPS though RS-232
Virtualization 97
Page 97

Figure 79. Shutdown Settings Configuration (Second types of nodes)
If you install an Dell ULNM on the VMHost after the Dell MUMC node has been created:
• Delete the node in Dell MUMC.
• Rediscover the node with the “Address Scan” in the Auto Discovery panel.
• Dell MUMC will create the right node type and retrieve both the VMHost information and the Dell
ULNM information.
Virtualization 98
Page 98

8
Redundancy
This chapter describes the Dell Multi-UPS Management Console (MUMC) redundancy features.
The Dell MUMC can supervise composite devices. Composite devices are virtual nodes composed of 2
or more UPSs in redundant configuration (Redundant Supplies).
This Redundancy feature is enabled from Settings > System > Modules Settings (see Figure 80).
The Dell MUMC will then:
• Supervise composite devices (if Redundancy feature is activated)
• Shutdown the Dell MUMC computer when powered by several UPSs (if shutdown feature is also
activated).
Figure 80. Edit Modules Settings Dialog Box
Figure 81 illustrates the electrical redundancy Redundant Supplies topology. In this case, the two UPSs
provide power on one or several multiple feed servers.
Figure 81. Redundant Supplies Redundancy Schema
Redundancy 99
Page 99

Redundancy Configuration
To configure redundancy:
1
Login with an administrator user profile.
2
Select two or more nodes.
3
Click
Set composite device
Figure 82. Selecting Set Composite Device for Nodes
(see Figure 82).
4
In the dialog box, specify a device name, redundancy mode, and level (see Figure 83):
•
Device Name
•
Redundancy Leve
value is 0.
NOTE: If you set this parameter to a higher level, you will receive the “Redundancy Lost” alarm.
Figure 83. Set Composite Device Dialog Box
: User name of the composite device
l: The minimal number of redundant UPSs powering your system. The default
Redundancy 100
Page 100

Then, the new node is created:
• You can see it in the “Autodiscovery” node list.
• You can select it as power source.
• You can edit composite device properties by selecting it in the discovery view then click again on the
“Set composite device” menu item.
• If you select components of a composite device and click on the “Set composite device” menu item
again, properties of existing composite device are shown; no new composite device is created so no
composite device duplication is possible.
• The created “Virtual Power Source” is counted as a node for the licensing node limitation.
Redundancy Views
Redundancy View in Node List
When a composite device is selected in the node list, the user can view it in the selection view, with
following information:
• Dedicated states in “Information” and “Status” panels
• “Events” panel shows events from the composite devices and all its child components
A dedicated “Power components” panel displays component states, including load level and battery run
time.
Figure 84. Virtual Power Source in Node List View
Redundancy 101
 Loading...