

Page 1

Dellt Online Rack UPS
10 kW
User's Guide
DELL10KWOLHVUS, DELL10KWOLHV, DELL10KWOLHVB
DELL10KWEBM
w w w . d e l l . c o m | w w w . s u p p o r t . d e l l . c o m | w w w . d e l l u p s . c o m
Page 2

Notes and Warnings
NOTE: A NOTE indicates important information that helps you make better use of your product.
CAUTION: A CAUTION indicates a potentially hazardous situation which, if not avoided, may result in minor or
moderate injury or in property damage incidents.
WARNING: A WARNING indicates a potentially hazardous situation which, if not avoided, could result in death or
injury.
DANGER: A DANGER indicates an imminently hazardous situation which, if not avoided, will result in death or
serious injury.
DANGER: Observe the following instruction to help prevent an imminently hazardous situation which, if not
avoided, will result in death or serious injury:
S The UPS contains LETHAL VOLTAGES. All repairs and service should be performed by
AUTHORIZED SERVICE PERSONNEL ONLY. There are NO USER SERVICEABLE PARTS
inside the UPS or EBM.
S This is Class A Interference Causing Equipment. In a residential environment, this product may cause
radio interference, in which case the user may be required to take additional measures.
Information in this document is subject to change without notice.
E 2012 Dell Inc. All rights reserved.
Reproduction in any manner whatsoever without the written permission of Dell Inc. is strictly forbidden.
Trademarks used in this text: Dell and the DELL logo are trademarks of Dell Inc.; National Electrical Code and NEC are registered
trademarks of National Fire Protection Association, Inc.; ENERGY STAR name is a registered trademark owned by the U.S. Environmental
Protection Agency.
Other trademarks and trade names may be used in this document to refer to either the entities claiming the marks and names or their
products. Dell Inc. disclaims any proprietary interest in trademarks and trade names other than its own.
December 2012 • P-164000156 2
Page 3

Table of Contents
1 Introduction 6.....................................
Finding Information 8...............................................
2 Safety Warnings 9.................................
3 Installation 12......................................
Inspecting the Equipment 12..........................................
Unpacking the Cabinet 14............................................
Rackmount Setup 19................................................
Installing the UPS 25................................................
Connecting the EBM to the UPS 26.....................................
Installing Remote Emergency Power-off 26..............................
Hardwiring the UPS Input 28..........................................
UPS Initial Startup 32...............................................
UPS Rear Panels 34.................................................
4 Operation 37.......................................
UPS Startup and Shutdown 38.........................................
Starting the UPS 38..............................................
Starting the UPS on Battery 38.....................................
UPS Shutdown 39...............................................
Control Panel Functions 39...........................................
Changing the Language 40...........................................
Display Functions 41................................................
Startup Screen 41...............................................
Screen Locked 41...............................................
Table of Contents
|
3
Page 4

Operating Modes 42.............................................
Active Notices and Alarms 44......................................
Battery Operating Status 44.......................................
Event Log 45...................................................
Measurements 46...............................................
Control Screens 47..............................................
Identification 48.................................................
Settings 48....................................................
Transferring the UPS Between Modes 53................................
Transferring from Normal to Bypass Mode 53..........................
Transferring from Bypass to Normal Mode 54..........................
Setting the Power Strategy 54.........................................
Retrieving the Event Log 56...........................................
Behavior on Overload 56.............................................
Configuring Load Segments 57........................................
Controlling Load Segments Through the Display 58.....................
Configuring Automatic Start Delay 58................................
Configuring Automatic on Battery Shutdown 59........................
Configuring Battery Settings 60........................................
Configuring the UPS for an EBM 60..................................
Running Automatic Battery Tests 61.................................
Configuring Automatic Battery Tests 61..............................
Configuring Automatic Restart 61......................................
5 Additional UPS Features 62...........................
RS-232 and USB Communication Ports 62................................
Dell UPS Network Management Card (Optional) 64........................
Environmental Monitoring Probe (Optional) 64............................
Dell MUMC and Dell ULNM Software 65................................
|
4
Table of Contents
Page 5

6 UPS Maintenance 66................................
UPS and Battery Care 66.............................................
Transporting the UPS 66.............................................
Recharging and Replacing Batteries 71.................................
Testing Batteries 78................................................
Updating the UPS Firmware 78........................................
7 Specifications 79...................................
8 Troubleshooting 84..................................
Accessing Alarms and Conditions 84...................................
UPS Status Menu 84.............................................
Event Log Menu 85..............................................
Alarms, Notices, and Events 85........................................
Silencing the Alarm 92..............................................
Table of Contents
|
5
Page 6
1
Introduction
The Dellt Online Rack uninterruptible power system (UPS) protects your sensitive electronic
equipment from basic power problems such as power failures, power sags, power surges, brownouts, and
line noise.
Power outages can occur when you least expect them and power quality can be erratic. These power
problems have the potential to corrupt critical data, destroy unsaved work sessions, and damage
hardware — causing hours of lost productivity and expensive repairs.
With the Dell Online Rack UPS, you can safely eliminate the effects of power disturbances and guard
the integrity of your equipment. The UPS provides flexibility to handle an array of network devices
makes it the perfect choice to protect your LANs, high density servers, blade chassis, and workstations as
well as other electrical equipment. The UPS becomes an ideal solution for cloud applications and a wide
range of virtualization implementations when the Dell Multi-UPS Management Console (MUMC) and
Dell UPS Local Node Manager (ULNM) are used to manage the UPS.
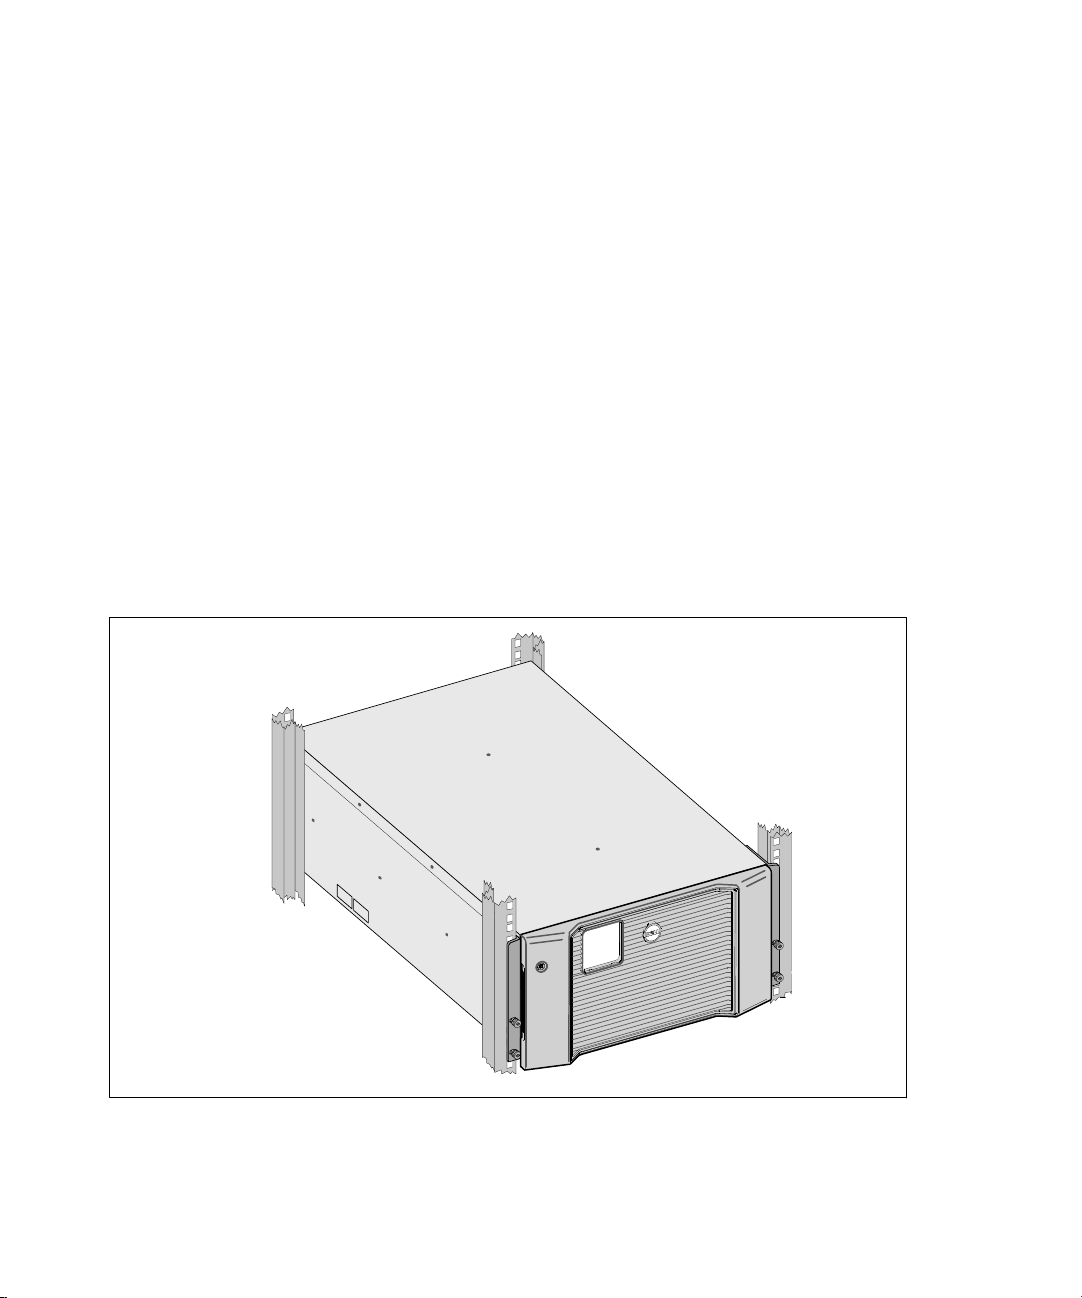
Figure 1 shows the Dell Online Rack 10 kW UPS.
Figure 1. The Dell Online Rack 10 kW UPS
|
6
Introduction
Page 7

Providing outstanding performance and reliability, the UPS's unique benefits include:
S Online UPS design with pure sine wave output.
S True online double-conversion technology with high power density, utility frequency
independence, and generator compatibility.
S Buck and Boost voltage regulation that ensures regulated voltage to your load by correcting voltage
fluctuations.
S The UPS filters and regulates incoming AC power and provides consistent power to your
equipment without draining the battery.
S Selectable High Efficiency mode of operation.
S 5U UPS height.
S Start‐on‐battery capability for powering up the UPS even if utility power is not available.
S Maintenance is simplified by allowing the safe replacement of batteries without powering down the
UPS.
S Dell service tag information can be read from the front panel LCD display.
S Extended runtime with an optional External Battery Module (EBM).
S Emergency shutdown control through the Remote Emergency Power-off (REPO) ports.
S Two standard communication ports (USB and RS-232 serial port).
S Optional Dell UPS Network Management Card (also known as the NMC) with enhanced
communication capabilities for increased power protection and control.
S Optional Environmental Monitoring Probe (EMP) for collecting temperature and humidity
readings in the frame environment and monitoring the environmental data remotely. You can also
collect and retrieve the status of two user-provided contact devices.
S Advanced power management with the Dell MUMC and Dell ULNM Web-based software
applications for graceful shutdowns and power monitoring.
S Sequential shutdown and load management through separate receptacle groups called load
segments.
S Firmware that is easily upgradable without a service call.
S Backed by worldwide agency approvals.
S ENERGY STAR
®
certified UPSs.
Introduction
|
7
Page 8

Finding Information
CAUTION: The Safety, Environmental, and Regulatory Information document provides important safety and
regulatory information.
What are You Looking For?
S The user's guide for my UPS
S The user's guide for the Dell UPS Network
Management Card
S Dell MUMC and Dell ULNM User's Guides
Find It Here
Dell UPS Disc
NOTE: Documentation and software updates can be
found at www.support.dell.com and at
www.dellups.com.
S Specifications
S How to configure UPS settings
S How to troubleshoot and solve problems
S How to install REPO control
S Safety instructions
S Regulatory information
S Recycling information
S Warranty information
S Terms and Conditions (U.S. only)
S End User License Agreement
S Support information Dell Support Website — www.support.dell.com
Dell UPS User's Guide
The user's guide is available on the Dell UPS disc and
on www.support.dell.com.
Safety, Environmental, and Regulatory Information
Dell Warranty and Support Information
NOTE: Select your region or business segment to view
the appropriate support site.
|
8
Introduction
Page 9

2
Safety Warnings
CAUTION: Before performing the procedures in this document, read and follow the safety instructions and
important regulatory information in your Safety, Environmental, and Regulatory Information document.
IMPORTANT SAFETY INSTRUCTIONS
SAVE THESE INSTRUCTIONS
This manual contains important instructions that you should follow during installation and
maintenance of the UPS and batteries. Please read all instructions before operating the equipment and
save this manual for future reference.
DANGER:
avoided, will result in death or serious injury:
S The UPS contains LETHAL VOLTAGES. All repairs and service should be performed by
AUTHORIZED SERVICE PERSONNEL ONLY. There are NO USER SERVICEABLE
PARTS inside the UPS or EBM.
WARNING:
perform the electrical installation.
WARNING: Observe the following instructions to help prevent a potentially hazardous situation which, if not
avoided, could result in death or injury:
S The UPS outputs are protected against overcurrent by circuit breakers.
S This UPS contains its own energy source (batteries). The output receptacles may carry live voltage
even when the UPS is not connected to an AC supply.
S To reduce the risk of fire, connect only to a circuit provided with branch circuit overcurrent
protection with an ampere rating in accordance with the National Electrical Code
ANSI/NFPA 70 or your local electrical code:
S To reduce the risk of fire or electric shock, install this UPS in a temperature and humidity
controlled, indoor environment, free of conductive contaminants. Ambient temperature must not
exceed 40°C (104°F). Do not operate near water or excessive humidity (95% maximum).
S Unpacking the cabinet in a low-temperature environment may cause condensation to occur in and
on the cabinet. Do not install the cabinet until the inside and outside of the cabinet are absolutely
dry (hazard of electric shock).
Observe the following instruction to help prevent an imminently hazardous situation which, if not
Risk of electrical shock. Only qualified service personnel (such as a licensed electrician) shall
®
(NEC®),
UPS Output Power 200V 208V 230V
10 kW 63A (Europe) and 80A (North America and Japan)
2-pole circuit breaker
Safety Warnings
|
9
Page 10

S If the UPS requires any type of transportation, disconnect the internal UPS batteries before
transporting (see page 66).
CAUTION:
avoided, may result in minor or moderate injury or in property damage incidents:
Observe the following instructions to help prevent a potentially hazardous situation which, if not
S Servicing of batteries should be performed or supervised by personnel knowledgeable about
batteries and the required precautions. Keep unauthorized personnel away from batteries.
S Batteries can present a risk of electrical shock or burn from high short-circuit current. The
following precautions should be observed: 1) Remove watches, rings, or other metal objects; 2) Use
tools with insulated handles; 3) Wear rubber gloves and boots; 4) Do not lay tools or metal parts on
top of batteries; 5) Disconnect the charging source prior to connecting or disconnecting battery
terminals.
S Determine if the battery is inadvertently grounded. If inadvertently grounded, remove the utility
source from the ground. Contact with any part of a grounded battery can result in electrical shock.
The likelihood of such shock can be reduced if such grounds are removed during installation and
maintenance (applicable to equipment and remote battery supplies not having a grounded supply
circuit).
S ELECTRIC ENERGY HAZARD. Do not attempt to alter any battery wiring or connectors.
Attempting to alter wiring can cause injury.
S Replace batteries with the same number and type of batteries as originally installed in the UPS.
S Proper disposal of batteries is required. Refer to your local codes for disposal requirements.
S Never dispose of batteries in a fire. Batteries may explode when exposed to flame.
S Do not open or mutilate the battery or batteries. Released electrolyte is harmful to the skin and
eyes and may be extremely toxic.
S The UPS may be connected to a maximum of one External Battery Module (EBM).
WARNING:
Additional instructions for Rack-Mounted Systems:
S Your rack kit has been approved only for the rack cabinet provided. It is your responsibility to
ensure that installation of the equipment into any other rack complies with all applicable
standards. Dell disclaims all liability and warranties with respect to combinations of equipment
with any other rack.
S Before installing your equipment in a rack, install all required stabilizers. Failure to install
stabilizers can allow the rack to tip over.
S Always load from the bottom up, and load the heaviest items first.
S Do not overload the AC power supply branch circuit that provides power to the rack.
S Do not stand or step on any components in the rack.
S When installing multiple systems in a rack, complete all of the procedures for the current system
before attempting to install the next system.
|
10
Safety Warnings
Page 11

WARNING: Slide/rail mounted equipment is not to be used as a shelf or work space.
Do not add weight to slide/rail mounted equipment.
Safety Warnings
|
11
Page 12

3
Installation
This chapter explains:
S Equipment inspection
S Unpacking the cabinet
S UPS rear panels
S UPS setup and installation, including the External Battery Module (EBM)
S Remote Emergency Power-off (REPO) installation
S Initial startup
NOTE:
Discard or recycle the packaging in a responsible manner, or store it for future use.
Inspecting the Equipment
If any equipment has been damaged during shipment, keep the shipping cartons and packing materials
for the carrier (see Figure 2) or place of purchase and file a claim for shipping damage. If you discover
damage after acceptance, file a claim for concealed damage.
To file a claim for shipping damage or concealed damage: 1) File with the carrier within 15 days of
receipt of the equipment; 2) Send a copy of the damage claim within 15 days to your service
representative.
NOTE:
Check the battery recharge date on the shipping carton label. If the date has passed, do not use the
UPS. Contact your service representative.
|
12
Installation
Page 13

Figure 2. Shipping Carton Contents
Installation
|
13
Page 14
Unpacking the Cabinet
CAUTION: Unpacking the cabinet in a low-temperature environment may cause condensation to occur in and
on the cabinet. Do not install the cabinet until the inside and outside of the cabinet are absolutely dry (hazard
of electric shock).
CAUTION: Installing or removing the battery trays should be performed or supervised by personnel
knowledgeable about batteries and the required precautions. Keep unauthorized personnel away from
batteries.
CAUTION: The cabinet is heavy (see page 79): Always remove both battery trays from the UPS before lifting
the cabinet. Lifting the cabinet into the rack requires a minimum of two people.
CAUTION: The batteries are heavy (32 kg/71 lb). Use proper lifting techniques when removing the batteries.
NOTE: Use care when moving and opening the carton. Leave the components packaged until ready to install.
To unpack the system:
1 Using a forklift or pallet jack, move the shipping carton and pallet near the rack where you will
install the UPS (see Figure 3).
Figure 3. Lifting the Pallet with Shipping Carton
|
14
Installation
Page 15
2 Detach and remove the outer carton (see Figure 4).
Figure 4. Detaching the Outer Carton
3 Remove the two accessory boxes tucked into the channels in the top Styrofoam section. Open the
accessory boxes and set them on a flat, stable surface nearby (see Figure 5).
NOTE:
The Dell Online Rack UPS 10 kW Getting Started Guide provides unpacking and installation procedures.
To refer to it, remove it from the accessory box before you set the accessory boxes aside.
Figure 5. Removing the Accessory Boxes
Installation
|
15
Page 16
4 Remove the top Styrofoam section and set it on a flat, stable surface nearby (see Figure 6).
Figure 6. Removing the Top Styrofoam Section
NOTE: The battery retaining brackets are labeled L (left) and R (right) to indicate where they must be installed.
5 Remove both battery retaining brackets from the UPS (see Figure 7):
Locate the left (labeled L) retaining bracket. On the left side of the chassis, turn the thumbscrew
counter-clockwise to release the left retaining bracket.
Push the bracket toward the center post to disengage it from the chassis. Swing the bracket toward
you and pull the bracket to the left to remove it. Set the bracket aside.
Locate the right (labeled R) retaining bracket. On the right side of the chassis, turn the
thumbscrew counter-clockwise to release the right retaining bracket.
Push the bracket toward the center post to disengage it from the chassis. Swing the bracket toward
you and pull the bracket to the right to remove it. Set the bracket aside.
Figure 7. Removing the Battery Retaining Brackets
|
16
Installation
Page 17
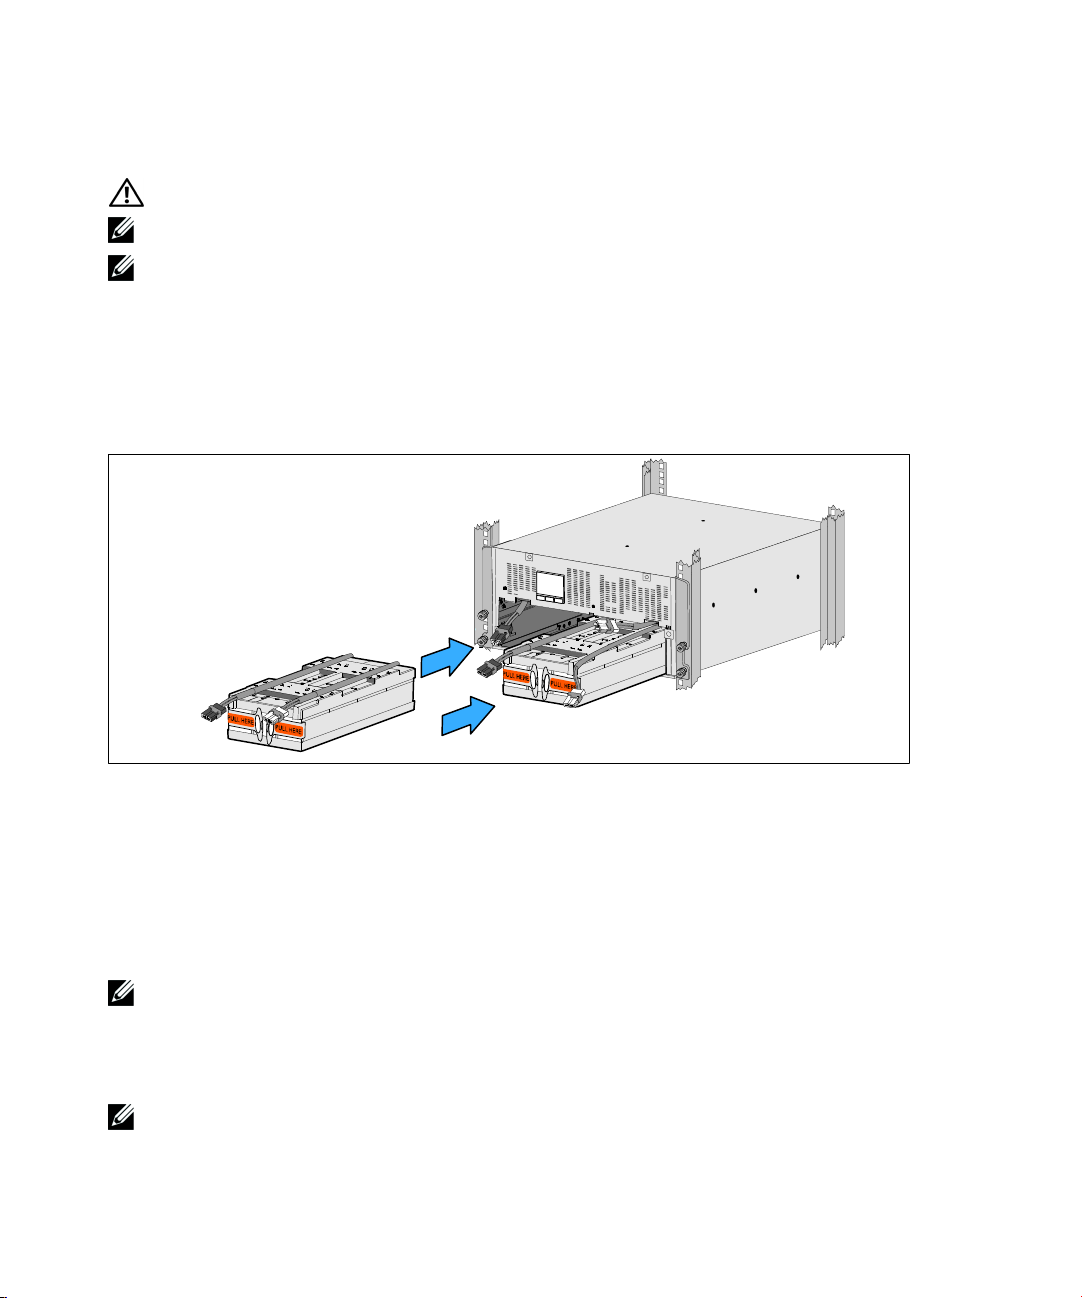
6 Ensure all battery connectors are disconnected.
CAUTION:
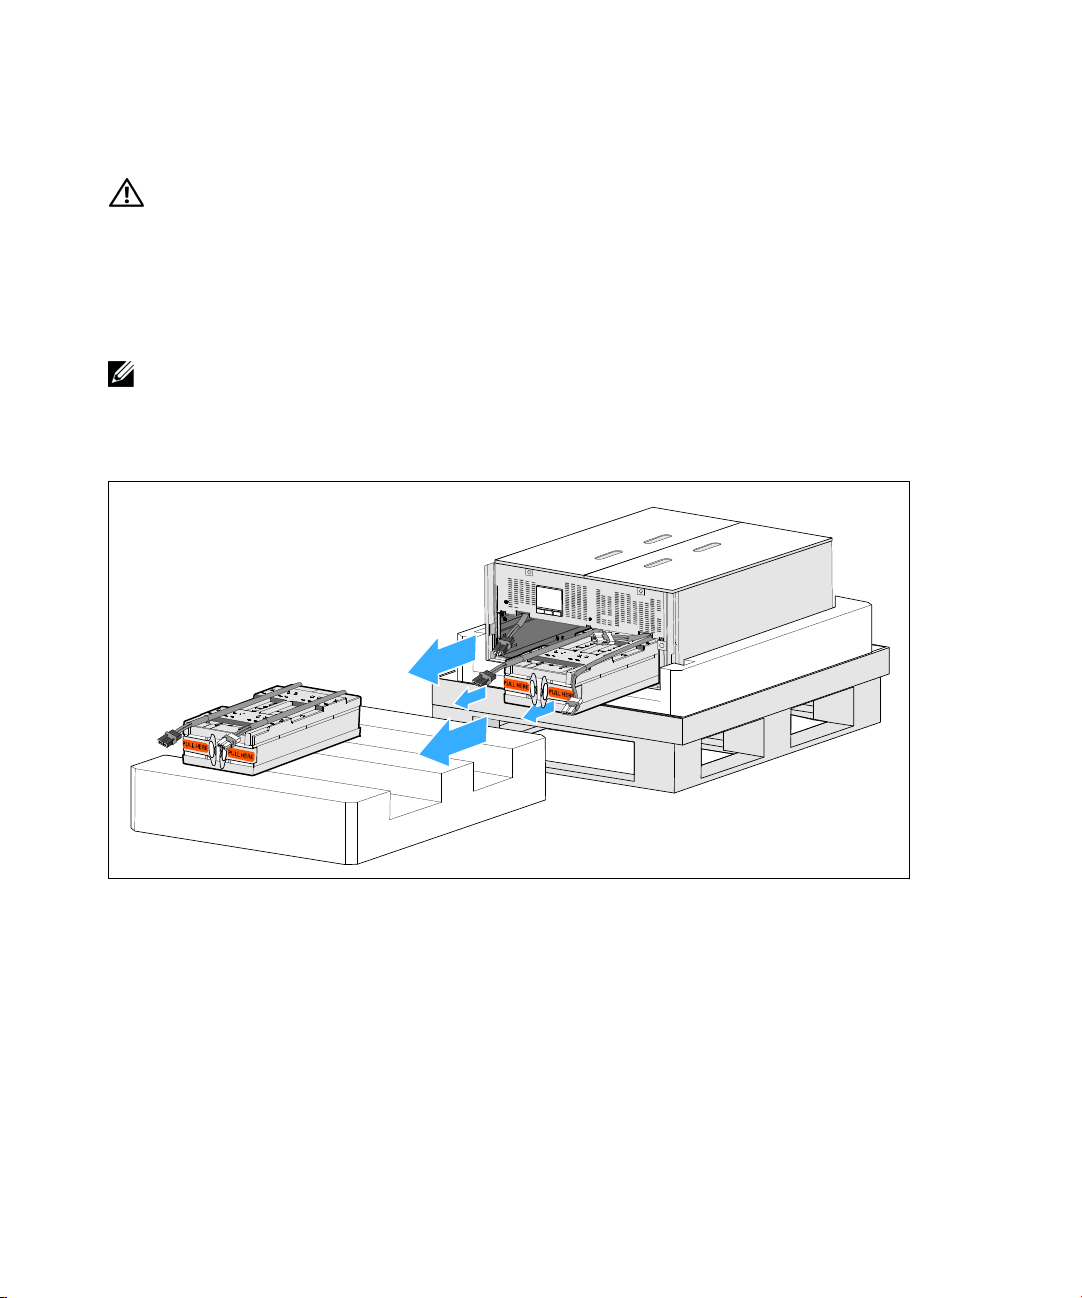
7 Remove the battery trays from the UPS (see Figure 8):
The batteries are heavy (32 kg/71 lb). Use proper lifting techniques when removing the batteries.
Move the disconnected UPS battery connectors at the top of the battery compartment out of the
way.
Grip the two plastic loop tabs on the front of the battery tray. Pull the tray toward you to remove.
The orange PULL HERE labels indicate where to grasp the loop tabs.
NOTE:
Set the battery tray on the Styrofoam section you removed from the top of the UPS.
Repeat with the second battery tray.
Figure 8. Removing the Battery Trays
Installation
|
17
Page 18
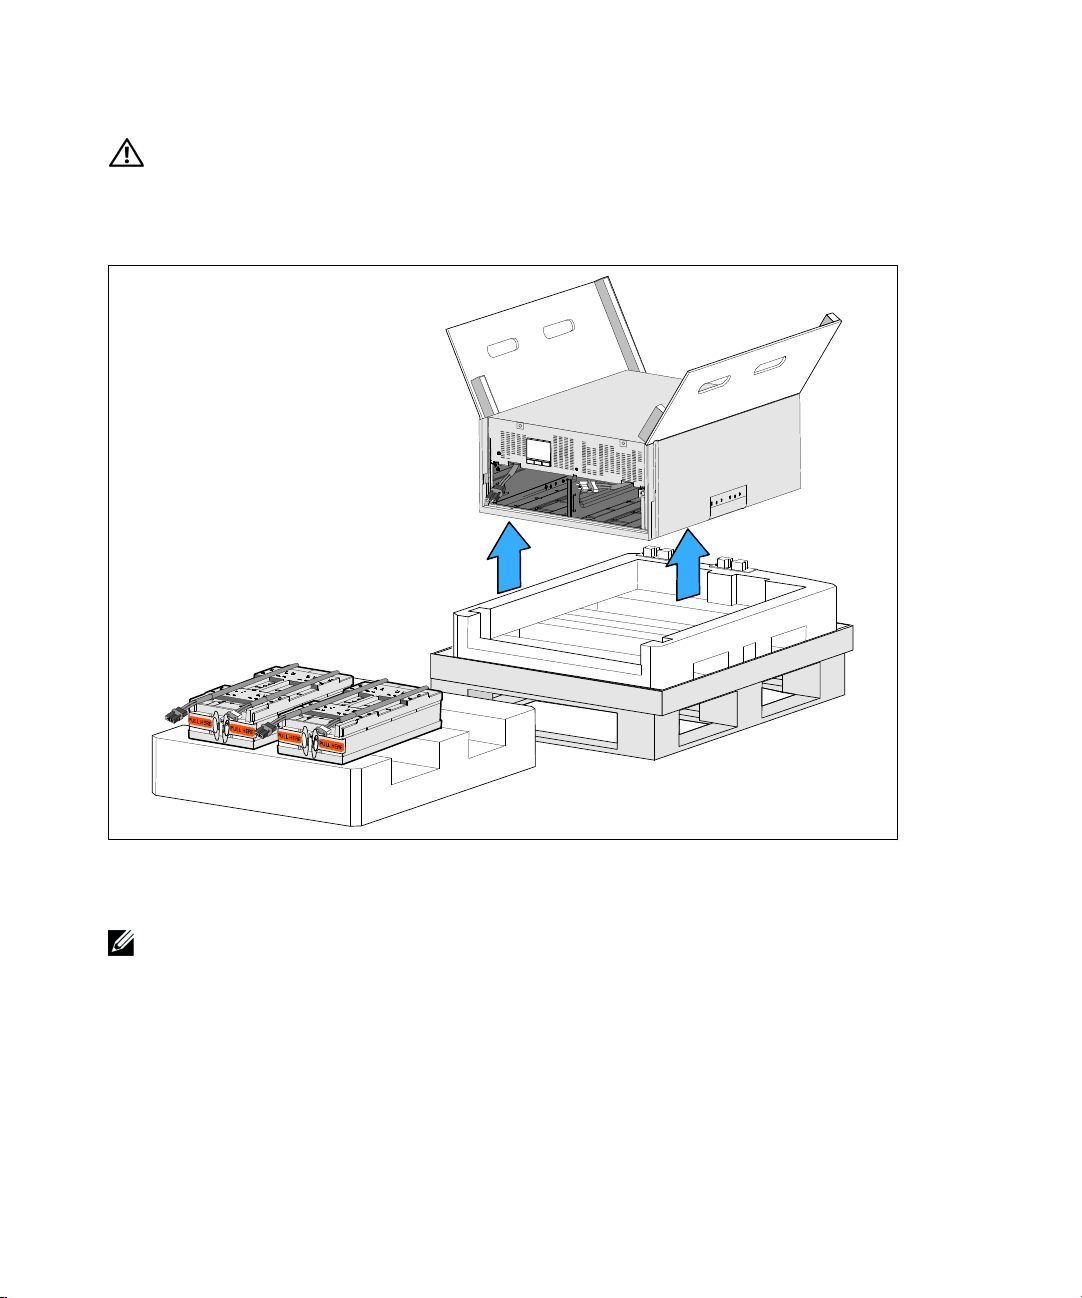
CAUTION: The cabinet is heavy (46 kg/101 lb) with the batteries removed. Lifting the cabinet from the shipping
carton requires a minimum of two people.
8 With one person on each side, carefully lift the cabinet out of the styrofoam using the handles on
the cardboard (see Figure 9).
Figure 9. Lifting the Cabinet
9 Place the cabinet on a flat, stable surface in a protected area near the rack where you will install it.
NOTE:
Ensure that the area has adequate airflow and is free of humidity, flammable gas, and corrosion.
|
18
Installation
Page 19

Rackmount Setup
CAUTION: The cabinet is heavy (see page 79): Always remove both battery trays from the UPS before lifting
the cabinet and installing the UPS on the rails in the rack. Lifting the cabinet into the rack requires a minimum
of two people.
CAUTION: Installing or removing the batteries should be performed or supervised by personnel
knowledgeable about batteries and the required precautions. Keep unauthorized personnel away from
batteries.
CAUTION: The batteries are heavy (32 kg/71 lb). Use proper lifting techniques when removing the batteries.
CAUTION: If installing an optional EBM, the EBM must be located below the UPS with no U space between
the UPS and EBM. This provides better weight distribution in the rack, easier access to the UPS control panel,
and easier routing for the battery cable connections. This also prevents strain between the EBM cord and the
UPS connection and possible connection failure.
WARNING: For Rack-Mounted Systems: When installing multiple systems in a rack, complete all of the
procedures for the current system before attempting to install the next system.
NOTE: Mounting rails are required for each individual cabinet.
NOTE: The cabinet is shipped without the front cover attached.
NOTE: The following instructions are the same for square-hole racks and unthreaded, round-hole racks. The
rails fit both rack styles.
To install the UPS in a rack:
1 Ensure that the following are placed on a flat, stable surface near the rack where you will install the
UPS:
S cabinet
S two accessory boxes
S two battery trays (UPS only)
S two battery retaining brackets (UPS only)
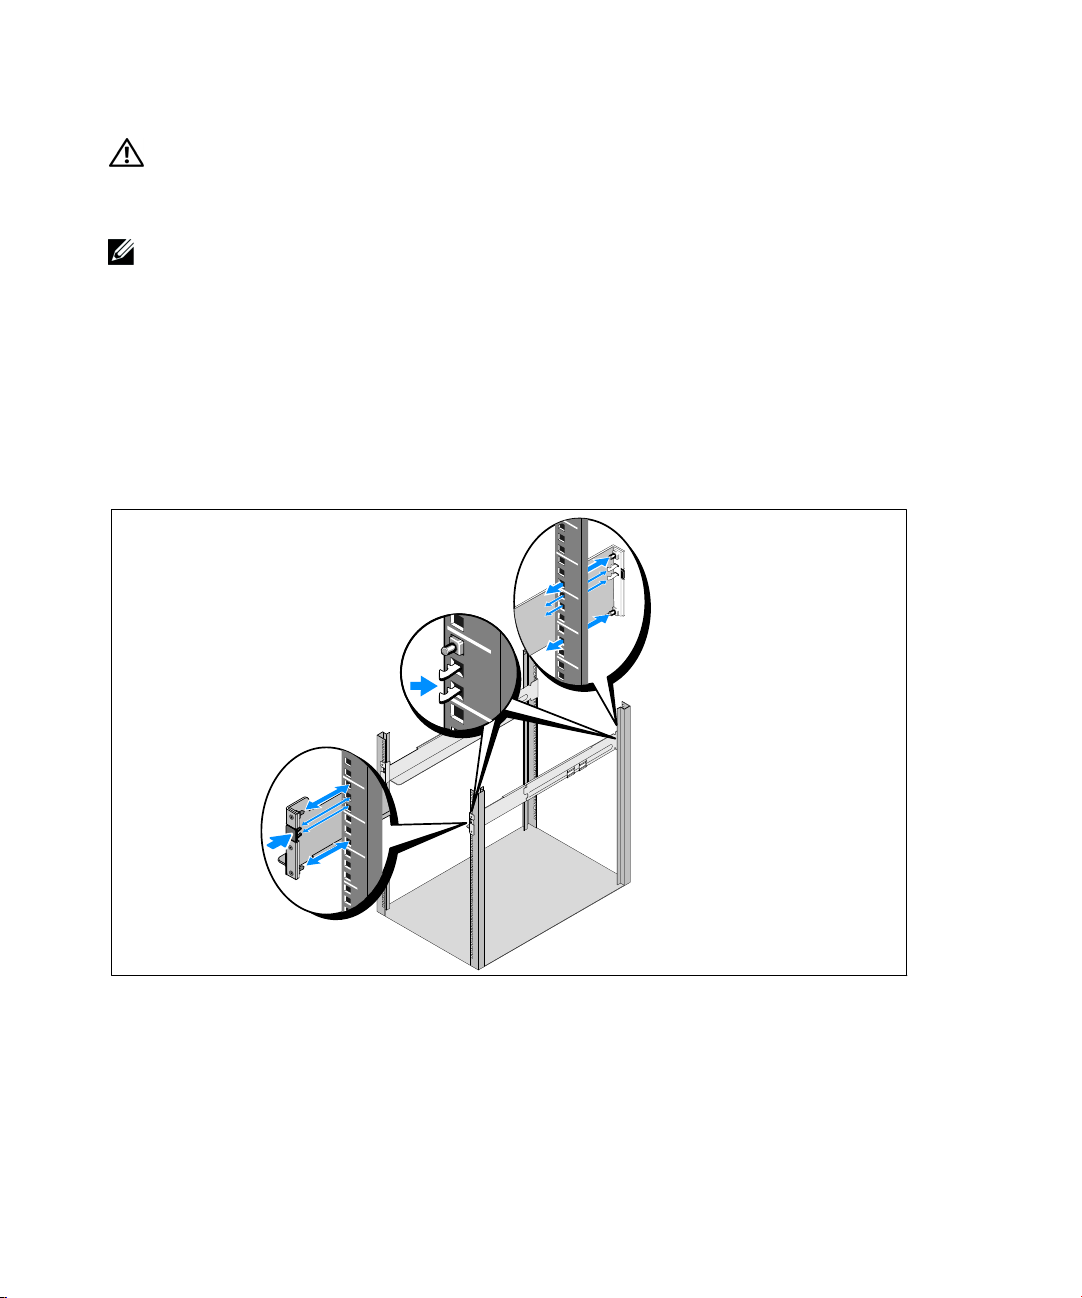
2 Remove the rails from the rail kit accessory box.
3 Select the proper holes in the rail for positioning the cabinet in the desired location in the rack.
Locate the rails at the bottom of the 5U space allocated for the UPS.
|
Installation
19
Page 20
CAUTION: If installing an optional EBM, make provision for installing the EBM directly below the UPS with
no U space between the UPS and EBM.
4 Position the left and right rails as illustrated (see Figure 10).
Observe the labels on the rails for right front (labeled RIGHT FRONT) and left front (labeled LEFT
NOTE:
FRONT).
5 Attach the left and right rails to the rack:
Engage the back end of the rail until it fully seats on the vertical rack flange and the hook latch
locks in place (see Figure 10).
Pull the rail just past the front of the rack.
Push the front end of the rail until it fully seats on the vertical rack flange and the hook latch locks
in place.
Figure 10. Installing the Rails
|
20
Installation
Page 21
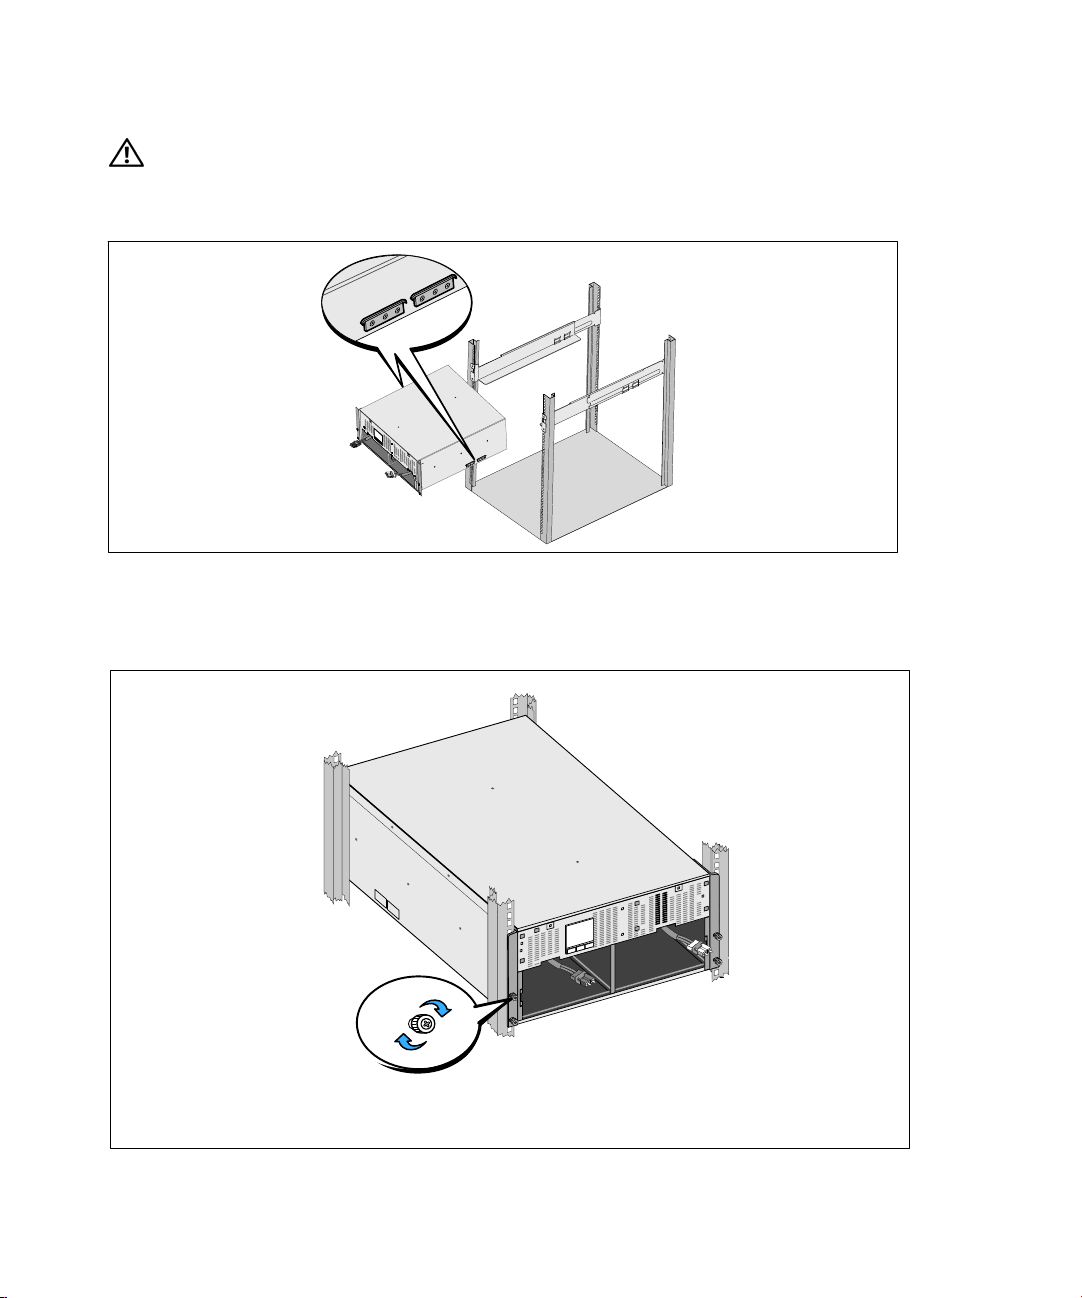
CAUTION: The cabinet is heavy (46 kg/101 lb) with the batteries removed. Lifting the cabinet into the rack
requires a minimum of two people.
6 Slide the cabinet onto the rails and into the rack (see Figure 11).
Figure 11. Installing the Cabinet
7 Secure the front of the cabinet to the rack using the four thumbscrews on the mounting brackets
(see Figure 12). Tighten the thumbscrews clockwise by hand; do not use power tools.
Figure 12. Securing the Cabinet
Installation
|
21
Page 22
8 Locate the battery trays you placed near the rack.
CAUTION:
The batteries are heavy (32 kg/71 lb). Use proper lifting techniques when installing the batteries.
NOTE: The battery trays can be installed in either battery compartment.
NOTE: Insert the tray with the caution label arrow pointing upward.
9 Install the battery trays (see Figure 13):
Move the UPS battery connectors at the top of the battery compartment out of the way.
Slide the battery tray into the battery compartment completely.
Repeat to install the second battery tray.
Figure 13. Installing the Battery Trays
10 Tuck the loop tabs into the plastic sleeve on the front of each battery tray to move them out of the
way.
11 Connect the internal battery connectors (see Figure 14):
Connect the far-left battery tray connector to the UPS battery connector. Connect the far-right
battery tray connector to the UPS battery connector.
NOTE:
A small amount of arcing may occur when connecting the batteries. This is normal and does not damage
the unit or present any safety concerns.
Locate and connect the battery jumpers located on either side of the center post. Place the
connectors on the small shelf at the top of the center post.
NOTE:
Connecting the center battery jumpers connects the two battery trays serially.
|
22
Installation
Page 23
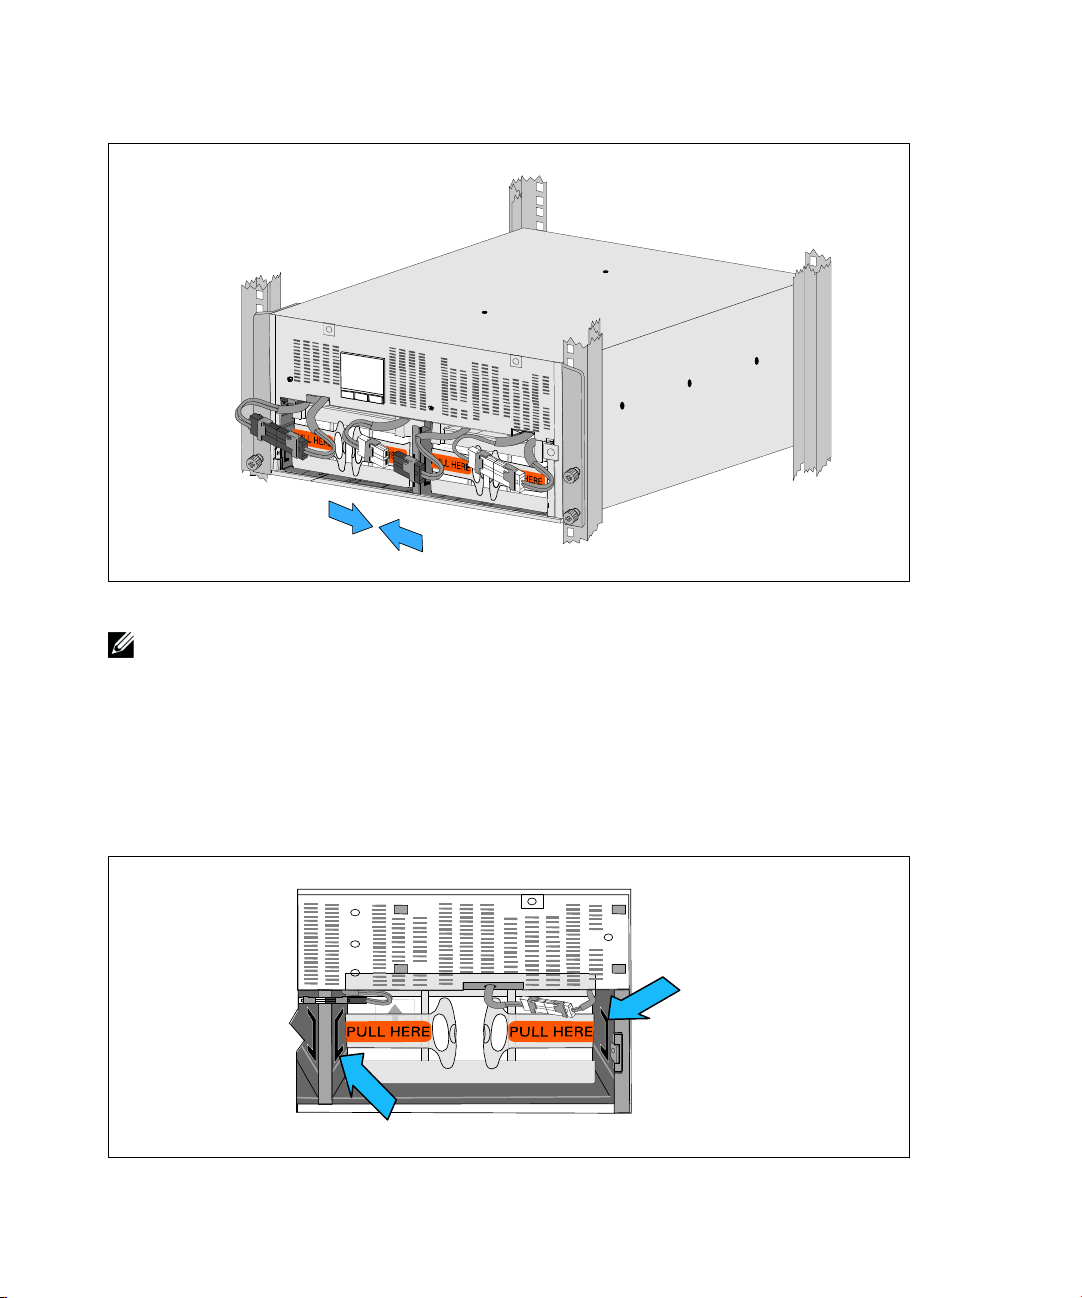
Figure 14. Connecting the Battery Connectors
NOTE: The battery retaining brackets are labeled L (Left) and R (Right) to indicate where they must be installed.
12 Replace the left (L)and right (R) battery retaining brackets (see Figure 15):
For the first battery retaining bracket, insert the bracket tab into the channel on the side of the
center post. Fit the connected battery cables snugly behind the retaining bracket.
Align the end of the battery retaining bracket with the channel on the side of the chassis.
Push the bracket until it is firmly seated into the side channel.
Chassis Side Channel
Center Post Side Channel
Figure 15. Inserting the bracket into the Channels
Installation
|
23
Page 24
Turn the thumbscrew clockwise to secure the bracket.
Repeat to replace the second battery retaining bracket.
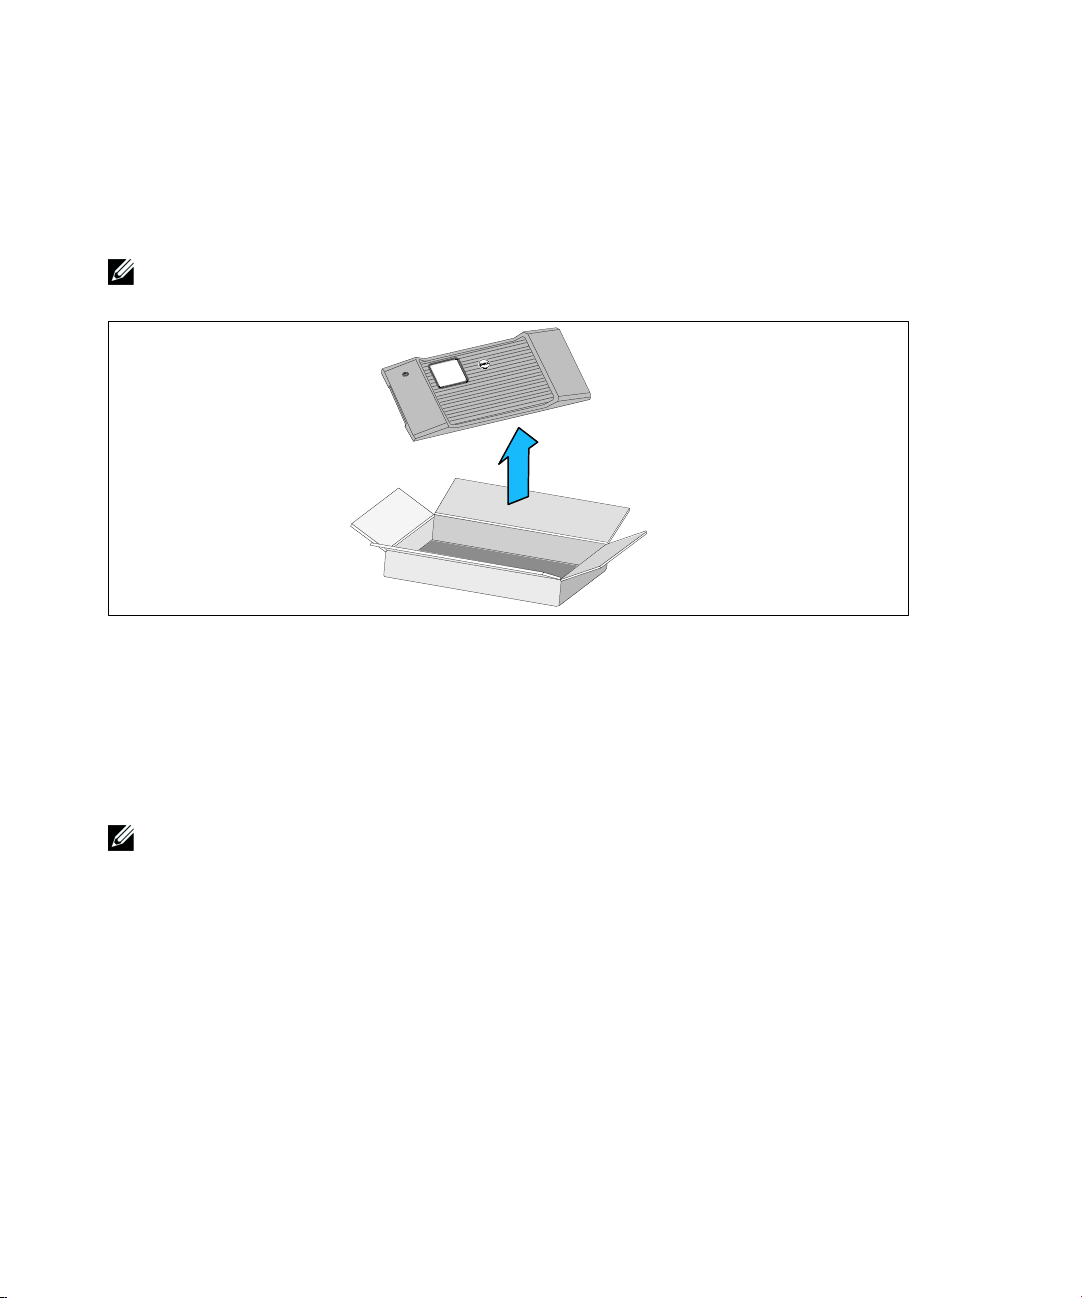
13 Remove the front cover from the accessory box (see Figure 16).
NOTE:
Keep the software CD, communication cable, and (if needed) remote emergency power-off (REPO)
connectors in the accessory box until you install the UPS (see page 25).
Figure 16. Unpacking the Front Cover
14 Install the front cover (see Figure 17):
Align the front cover with the front of the chassis.
Insert the right-side tabs on the front cover into tab openings on the right-side chassis.
Push the left side of the cover forward and snap it to the chassis.
Ensure that the LCD panel on the UPS chassis aligns with the LCD window on the front cover before
NOTE:
securing the cover to the chassis.
15 Discard or recycle the packaging in a responsible manner, or store it for future use.
|
24
Installation
Page 25

1
2
Figure 17. Installing the Front Cover
Installing the UPS
To install the UPS:
1 If you plan to use Dell MUMC and Dell ULNM software, establish communication in one of the
following ways:
S using the Dell UPS Network Management Card (if installed)
S using the supplied cable to connect your computer to the USB port
For more information about communication options, see page 62.
2 If your rack has conductors for grounding or bonding of ungrounded metal parts, connect the
ground cable (not supplied) to the ground bonding screw. See “UPS Rear Panels” on page 34 for
the location of the ground bonding screw for each model.
3 If an emergency power-off (disconnect) switch is required by local codes, see the following section,
“Installing Remote Emergency Power-off” to install the emergency disconnect switch before
powering on the UPS. See “UPS Rear Panels” on page 34 for the location of the REPO connector
for each model.
4 Plug the equipment to be protected into the UPS output receptacles, but do not turn on the
protected equipment.
5 Make any necessary provisions for cord retention and strain relief.
Installation
|
25
Page 26

NOTE: Verify that the total equipment ratings do not exceed the UPS capacity to prevent an overload alarm.
Connecting the EBM to the UPS
If you are installing an optional EBM, refer to the Dell Online Rack EBM 10 kW Getting Started Guide
for installation instructions.
CAUTION:
the UPS and EBM. This provides better weight distribution in the rack, easier access to the UPS control panel,
and easier routing for the battery cable connections. This also prevents strain between the EBM cord and the
UPS connection and possible connection failure.
If installing an optional EBM, the EBM must be located below the UPS with no U space between
CAUTION: If the UPS is stored or used without an EBM, the battery connector cover on the rear panel of the
UPS must be installed as a safety precaution.
CAUTION: When connected to the UPS, the EBM will continue to supply power to the UPS, even if the UPS
batteries are disconnected. This is particularly important if the EBM and UPS will be transported while
installed in a rack enclosure.
Installing Remote Emergency Power-off
The UPS includes a REPO connector that enables you to turn off power at the UPS output receptacles
from a customer-supplied switch in a remote location. For example, this feature can be used for
shutting down the load and the UPS by thermal relay, in the event of room overtemperature. When
REPO is activated, the UPS shuts down the output and all its power converters immediately. The UPS
logic power remains on to issue an alarm.
The REPO feature shuts down the protected equipment immediately and does not follow the orderly
shutdown procedure initiated by any power management software. Any devices that are operating on
battery power are also shut down immediately.
When the REPO switch is reset, the equipment will not return to utility or battery power until the UPS
is manually restarted.
The REPO contacts are normally open.
WARNING:
separated from any hazardous voltage circuits by reinforced insulation.
The REPO circuit is an IEC 60950 safety extra low voltage (SELV) circuit. This circuit must be
CAUTION: The REPO must not be connected to any utility connected circuits. Reinforced insulation to the
utility is required. The REPO switch must have a minimum rating of 24 Vdc and 20 mA and be a dedicated
latching-type switch not tied into any other circuit. The REPO signal must remain active for at least 250 ms for
proper operation.
CAUTION: To ensure the UPS stops supplying power to the load during any mode of operation, the input
power must be disconnected from the UPS when the emergency power-off function is activated.
|
26
Installation
Page 27
NOTE: For Europe, the emergency switch requirements are detailed in Harmonized document HD-384-48 S1,
“Electrical Installation of the Buildings, Part 4: Protection for Safety, Chapter 46: Isolation and Switching.”
REPO Connections
Wire Function Terminal Wire Size Rating Suggested Wire Size
REPO
4–0.32 mm2 (12–22 AWG) 0.82 mm2 (18 AWG)
NOTE: The pins must be open to keep the UPS running. If the UPS shuts down because the REPO connector
pins are shorted, restart the UPS by re-opening the REPO connector pins and turning on the UPS manually.
Maximum resistance in the shorted loop is 10 ohm.
NOTE: Always test the REPO function before applying your critical load to avoid accidental load loss.
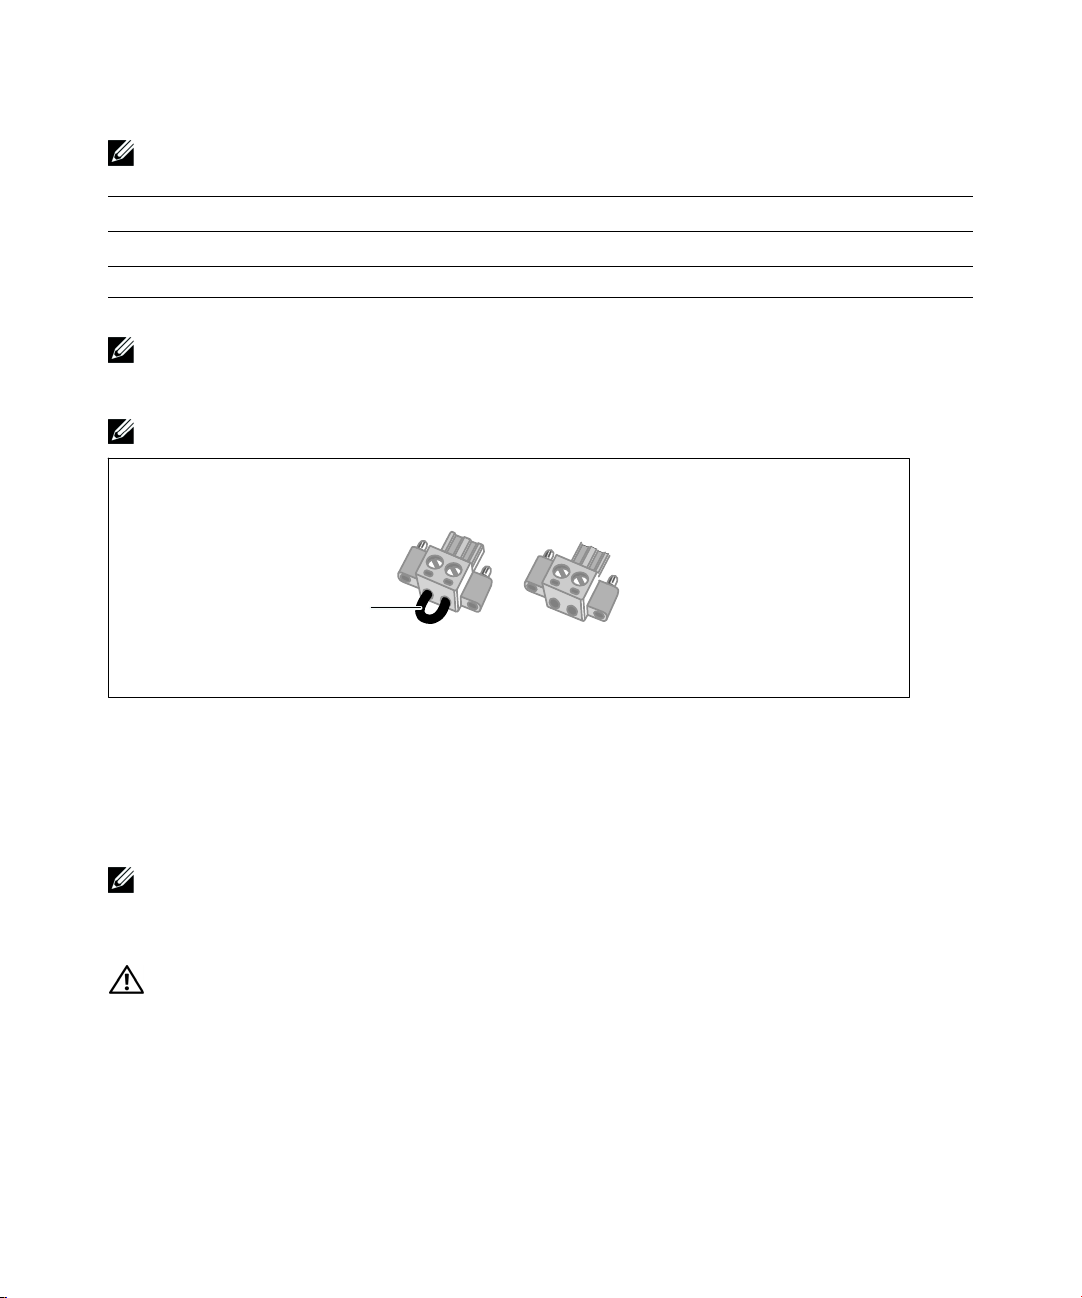
NOTE: Remove
jumper if installed
Figure 18. REPO Connector
To install the REPO switch:
1 Verify that the UPS is off and disconnected from utility power.
2 Remove the REPO connectors from the accessory box.
Verify that there is no jumper installed in the REPO connector. If a jumper is installed, remove it before
NOTE:
connecting to the REPO port. See Figure 18.
3 Connect the REPO connector to the REPO port labeled IN on the UPS rear panel.
CAUTION:
avoid unintentional shutdown of the UPS:
If you are daisy-chaining the REPO function, observe the following connection requirements to
S The left pin of the REPO port labeled OUT on the first UPS must be connected to the left pin of the REPO port
labeled IN on the second UPS.
S The right pin of the REPO port labeled OUT on the first UPS must be connected to the right pin of the REPO
port labeled IN on the second UPS.
Installation
|
27
Page 28

4 Optional. If you are daisy-chaining the REPO function with another UPS, you can shut down the
entire system using a single switch.
Connect the second REPO connector to the REPO port labeled OUT.
NOTE:
A separate contact must simultaneously cause UPS input AC power to be removed.
5 Connect the switch or circuit to the REPO connector on the UPS rear panel using insulated
0.75 mm
6 Optional. If you are daisy-chaining the REPO function with another UPS, connect the REPO port
labeled OUT to the REPO port labeled IN on the next UPS.
Continue for each UPS. On the last UPS in the daisy-chain, connect a REPO connector (without a
jumper) in the REPO port labeled OUT.
7 Verify that the externally-connected REPO switch is not activated to enable power to the UPS
output receptacles.
8 Continue to the following section, “Hardwiring the UPS Input.”
2
–0.5 mm2 (18–20 AWG) wire.
Hardwiring the UPS Input
WARNING: Risk of electrical shock. Only qualified service personnel (such as a licensed electrician) shall
perform the electrical installation.
The Dell Online Rack hardwired models require a dedicated branch circuit that meets the following
requirements:
S Protection device requires a two-pole disconnection device between the UPS input and the mains
(see Figure 19)
S Breaker must be wall-mounted and be readily accessible to the operator
S For Europe. Breaker must meet the IEC/EN 60934 standard and have a contact air gap of at least
3 mm
S 200–240 Vac
S Single-phase
S 50/60 Hz
S Flexible metal conduit (recommended for ease of service and maintenance)
28
|
Installation
Page 29

Wall
2-Pole
Breaker
Line
AC Mains
Neutral/L2
UPS
Figure 19. Circuit Breaker Diagram
To hardwire the UPS input:
1 Switch off utility power at the distribution point where the UPS will be connected. Be absolutely
sure there is no power.
2 Remove the terminal block cover (two screws) and retain.
Knock-out Hole
Terminal Block
Cover
Figure 20. Removing the Terminal Block Cover
Installation
|
29
Page 30

3 Remove the knock-out hole in the terminal block cover for the input conduit. The hole must
accommodate 1” or 1.5” (25.4 mm or 38.1 mm) Intermediate Metal Conduit (IMC).
4 Pull the input wire through the conduit, leaving approximately 2 ft (0.5m) of exposed wire. Attach
a flexible metal fitting to the end of the conduit.
5 Insert the conduit through the wiring access entry and attach the conduit fitting to the panel.
Strip 0.5” (1.5 cm) of insulation from the end of each incoming wire.
CAUTION:
If the UPS does not have an automatic protection device against current backfeed, install an
external isolating device (see Figure 21). After the device is installed, you must add a warning label with the
following wording or the equivalent on the external AC contactor: RISK OF VOLTAGE BACKFEED. Isolate the
UPS before operating on this circuit, then check for hazardous voltage between all terminals.
External Distribution Panel
QT
L/L1
N/L2 N/L2
B
L/L1
Legend
B
Q
T
N/L2
L/L1
UPS
Coil Remote Switch
Magneto-Thermal Input Main Switch
AC Contactor ( see Table 1)
Neutral/L2
L1 Line Input
Figure 21. Typical External Isolating Device Installation
30
|
Installation
Page 31

The following table lists backfeed protection devices (AC contactors) that can be used as an external
isolating device for backfeed protection. Only use AC contactors listed in the table.
Table 1. Backfeed Protection Devices
Manufacturer
ABB France (E12527)
Tianshui 213 Electrical Apparatus Co., Ltd.
(E203071)
(alternative)
Tianshui 213 Electrical Apparatus Co., Ltd.
(E203071)
(alternative)
GSC1(CJX4-d)-6511
GSC1(CJX4-d)-8011
Type Rating
220–240 Vac, 105A
A75-30
25 HP at 208V, 30HP at
240V
220–240 Vac, 68A
25 HP
220–240 Vac, 80A
30 HP
NOTE: Although the UPS does not contain anti-backfeed (ABF) relays, some backfeed protection is provided.
For example, if some components are damaged in battery mode, the output voltage may feed back to the input.
In this case, a current transformer (CT) is used to detect the bypass current feedback voltage. If a current
backfeed fault condition is detected, the UPS will terminate the inverter output to avoid the personal injury.
6 Connect the input and ground wires to the terminal block according to Figure 22 and Table 2.
Figure 22. Connecting Terminal Block Wiring
2
1
3
|
Installation
31
Page 32

Table 2. UPS Wiring Specifications
Wire Function
Terminal
Position
UPS Wire Function
Terminal Wire
Size Rating*
Tightening Torque
Input
1
2
3
Input Ground
L2/Neutral In
L1 In
* Use a minimum:
2 (
S 10 mm
S 25 mm
8 AWG) for equipment grounding wire, 75_C copper wire minimum
2 (
4 AWG) for input line and neutral wires, 75_C copper wire minimum
7 Replace the terminal block cover.
8 Continue to the following section, “UPS Initial Startup.”
UPS Initial Startup
On/Off Button
LCD Panel
16–35 mm
(8–2 AWG)
2
1.7 Nm (15 lb-in)
Scroll Button (Up or Back)
Figure 23. Starting the UPS
|
32
Installation
Scroll Button (Down or Forward)
Select Button
Page 33

To start up the UPS:
1 Verify that the internal batteries are connected.
2 If an optional EBM is installed, verify that the EBM is connected to the UPS. Refer to the Dell
Online Rack EBM 10 kW Getting Started Guide for more information.
3 Verify that all load segment circuit breakers are in the ON position.
4 Switch the main utility breaker on.
The UPS LCD panel display illuminates. The Dell startup screen changes to the UPS status
summary screen. The UPS front panel display shows the flashing Standby icon
5 Press the On/Off button on the UPS front panel (see Figure 23).
.
After the startup is complete, the status icon changes to the appropriate icon based on the UPS
operating mode (see Table 4 on page 42).
6 On the UPS status control panel, press the button to check for active alarms or notices. Resolve
any active alarms before continuing. See “Troubleshooting” on page 84.
If there are no active alarms, a “No Active Alarms” message appears.
7 Verify that the Normal icon appears on the UPS status summary screen, indicating that the
UPS is operating normally and any loads are powered (see Table 4 on page 42).
8 If an optional EBM is installed, see “Configuring the UPS for an EBM” on page 60.
9 To change other factory-set defaults, see “Operation” on page 37.
10 If you installed an optional REPO, test the REPO function:
Activate the external REPO switch. Verify the status change on the UPS display.
Deactivate the external REPO switch and restart the UPS.
11 Charge the batteries.
The internal batteries charge to 90% capacity in less than 4 hours. However, Dell recommends that the
NOTE:
batteries charge for 48 hours after installation or long-term storage.
CAUTION: To prevent an UPS overload condition, connect one load at a time and make sure that each
protected device starts up completely before you connect the next load.
NOTE: Dell recommends setting the date and time for troubleshooting or warranty purposes.
NOTE: At initial startup, the UPS sets system frequency according to input line frequency (input frequency
auto-sensing is enabled by default). After initial startup, auto-sensing is disabled until manually re-enabled by
output frequency setting.
Installation
|
33
Page 34

NOTE: At initial startup, input voltage auto-sensing is enabled by default. After the subsequent startup,
auto-sensing is disabled until manually re-enabled by output voltage setting.
UPS Rear Panels
This section illustrates the rear panels of the three Dell Online Rack 10 kW UPS model options.
DELL10KWOLHVUS
UPS Communication
Bay
One NEMA
L6-30R Outlet
Two Output
Circuit Breakers
RS-232
USB
Port
Port
Two IEC 320-C19
Outlets
REPO
Ports
One NEMA
L6-30R Outlet
Two Output
Circuit Breakers
EBM
Connector
Two IEC 320-C19
Outlets
Ground
Screw
Input Terminal
Block
Load Segment 1 (LS1)
Figure 24. 10 kW, 208V (DELL10KWOLHVUS) Rear Panel
|
34
Installation
Load Segment 2 (LS2)
Page 35

DELL10KWOLHV
Two Output
Circuit
Breakers
UPS Communication
Bay
Two IEC 320-C19
Receptacles
RS-232
USB
Port
Port
One IEC 60309
332R6S Receptacle
REPO
Ports
One Output
Circuit
Breaker
EBM
Connector
One IEC 60309
332R6S Receptacle
Ground
Screw
Input Terminal
Block
Load Segment 1 (LS1)
Figure 25. 10 kW, 230V (DELL10KWOLHV) Rear Panel
Load Segment 2 (LS2)
Installation
|
35
Page 36

DELL10KWOLHVB
UPS Communication
Bay
Two Output Circuit
Breakers
RS-232
Port
Four IEC 320-C19
Receptacles
USB
Port
Two Output Circuit
Breakers
REPO
Ports
EBM
Connector
Four IEC 320-C19
Receptacles
Ground
Screw
Input Terminal Block
Load Segment 1 (LS1)
Figure 26. 10 kW, 230V (DELL10KWOLHVB) Rear Panel
|
36
Installation
Load Segment 2 (LS2)
Page 37

Operation
This chapter contains information on how to use the UPS, including:
S UPS startup and shutdown
S Control panel and display functions
S Retrieving the event log
S Transferring the UPS between modes
S Power-setting strategy
S Behavior on overload
S Configuring load segments, battery settings, and automatic restart
Figure 27 shows Dell Online Rack UPS controls.
4
On/Off Button
Scroll Button (Up or Back)
Figure 27. UPS Controls
LCD Panel
Scroll Button (Down or Forward)
Select Button
Operation
|
37
Page 38

UPS Startup and Shutdown
To start up or shut down the UPS, see:
S “Starting the UPS” on page 38
S “Starting the UPS on Battery” on page 38
S “UPS Shutdown” on page 39
Starting the UPS
To start the UPS:
1 Verify that the UPS is connected to utility power.
2 Switch on utility power where the UPS is connected.
The UPS front panel LCD display illuminates (see Figure 27). The Dell startup screen changes to
the UPS status summary screen. The UPS front panel display shows the Standby mode icon
3 Press the button on the UPS front panel (see Figure 27).
After the startup is complete, the status icon changes to the appropriate icon based on the UPS
operating mode. See Table 4 on page 42.
4 On the control panel, press the button to check for active alarms or notices (see Figure 27).
Resolve any active alarms before continuing. See “Troubleshooting” on page 84.
If there are no active alarms, a “No Active Alarms” message appears.
.
5 Verify that the Normal mode icon appears on the UPS status summary screen, indicating that
the UPS is operating normally and any loads are powered.
Starting the UPS on Battery
NOTE: Before using this feature, the UPS must have been powered by utility power with output enabled at least
once.
NOTE: Utility power cannot be present at startup.
NOTE: Batteries should be charged.
To start the UPS on battery:
1 Press the button on the UPS front panel until the UPS beeps.
The UPS front panel display illuminates, and the UPS begins the startup sequence.
The UPS cycles through Standby mode to Battery mode. The Battery mode icon
the UPS status summary screen. The UPS supplies power to your equipment.
|
38
Operation
displays on
Page 39

NOTE: The UPS does not assume the load if you press the button less than three seconds.
2 Press the button to check for active alarms or notices.
Ignore the “UPS on Battery” notice and notices that indicate missing utility power. Resolve other
active alarms before continuing. See “Troubleshooting” on page 84. After correcting the alarms,
restart if necessary.
You can prevent a battery start (requiring utility power at the next startup) by simultaneously pressing
the
and buttons for three seconds. To disable the battery start, see the Start on Battery setting on
page 50.
UPS Shutdown
To shut down the UPS:
NOTE:
If devices are connected, prepare them to be shut down.
1 Press the button on the front panel for three seconds.
The UPS begins to beep. The UPS transfers to Standby mode.
Releasing the button before three seconds returns the UPS to its original operating state.
NOTE:
2 Switch off utility power where the UPS is connected.
After utility power is removed, the UPS fully shuts down in ten seconds.
Control Panel Functions
The UPS has a three-button graphical LCD. There are three buttons on the control panel:
S Scroll up or back
S Select
S Scroll down or forward
Scroll Button
(Up or Back)
Select Button
Figure 28. UPS LCD Panel Controls
Scroll Button
(Down or Forward)
Operation
|
39
Page 40

Table 3 describes the functions and operation of the LCD control buttons.
Table 3. Control Button Functions
Control Button
Sequence Function
Press for less than one second Scroll back or up to the previous menu.
Press for longer than one
second
Press for less than one second Select the menu or option to be changed.
Press for longer than one
second
Press for less than one second Scroll forward or down to the next menu option.
Press both buttons for three
seconds
Press all three buttons for five
seconds
Return/exit back one menu layer without initiating a command
or changing a setting.
Save the setting being edited.
Temporarily disable the battery startup feature until the next
power cycle. The buzzer emits a one second beep to indicate
that Battery Start has been disabled.
Shortcut for defaulting the language back to English. The
buzzer emits a one second beep to indicate that the setting has
changed to English.
To select an option:
1 When scrolling through the settings, the present setting displays for each selection.
2 Press and release the button to select the option.
The current setting for the option flashes when selected.
3 Use the or buttons to toggle the available options.
4 Set the new option by pressing the button again for longer than one second.
The option stops flashing.
The LCD has dual color backlight. Standard backlight is used to light up the display with white text and a
NOTE:
blue background. When the UPS has a critical alarm, the backlight changes the text to dark amber and the
background to red.
Changing the Language
Language selection is controlled through the user settings. See Table 7 page 48 for information on
available languages.
|
40
Operation
Page 41

Display Functions
The UPS provides useful information about the UPS itself, load status, events, measurements,
identification, and settings through the front panel display.
Startup Screen
During startup, the Dell logo startup screen displays for five seconds and then defaults to the UPS
status summary screen.
The display automatically returns to the UPS status summary screen when no button has been pressed
for 15 minutes and no other screen has been locked by a user. When you return to the status summary
screen, press the
UPS Status from the main menu list lets you to scroll through all of the UPS status menu screens,
including the status summary screen.
A UPS status summary screen replaces the startup screen after the UPS is powered on. The UPS status
summary screen displays until you press
Screen Locked
To lock a screen, press the button. The current view stays locked and does not automatically return
to the default screen after time-out. When the screen is locked, the image of a key appears on the UPS
status summary screen just to the left of the status icon.
Pushing any button returns the normal button function, unlocks the screen, and removes the lock
symbol.
button for longer than one second to exit back to the menu selections. Selecting
to go to the first of the main menu selections.
Only screens that have dynamic, real-time data updates can be locked. Applicable screens include the
status summary screen, measurement screens, active alarms, and the battery status screen.
|
Operation
41
Page 42

Operating Modes
The UPS status summary screens provide operating notification information, including operating mode.
Figure 29. Example UPS Status Summary Screen (Normal Mode)
A unique status icon in the upper right corner of each status summary screen conveys the status of the
UPS. Basic operating modes are described in Table 4.
Table 4. Operating Mode Status Icons
Icon
42
|
Mode Description
UPS Critical Failure The UPS experienced a failure and is in Fault mode. Fault mode
is a fail-safe state to protect the unit and the user from unsafe
power output. There should be no power output.
The status icon and background of the icon are flashing by
inverting colors every second.
UPS in Overload Condition The UPS is overloaded and is in fault mode. Fault mode is a
fail-safe state to protect the unit and the user from unsafe power
output. There should be no power output.
The status icon and background of the icon are flashing by
inverting colors every second.
Operation
Page 43

Table 4. Operating Mode Status Icons (continued)
Icon Mode
Battery Mode The utility input is out of the specified operating range and the
Bypass Mode The UPS is operating in Bypass mode through the static bypass
Bad Battery Detected or
Battery Disconnected
UPS General Alarms Active Alarms are active. The status icon and background of the icon
Battery Test Status The UPS is performing a battery test (started either
Description
UPS is operating on battery power. The load is supplied from the
battery through the inverter. When utility power returns, the
UPS transfers to Normal mode operation while the battery
recharges.
The status icon and background of the icon are flashing. An
audible alarm (0.5 seconds on/4.5 seconds off) accompanies the
switch to Battery mode.
switch. Battery mode is not available.
The status icon and background of the icon are flashing by
inverting colors every second.
The UPS detects a bad battery or that the battery is
disconnected. The status icon and background of the icon are
flashing, along with the outer shell of the battery symbol at the
bottom.
are flashing by inverting colors every second.
automatically or manually. The battery provides power through
the inverter even if the utility input is available and within
operating range.
Normal Mode The UPS is operating in Normal mode from utility power. The
UPS monitors and charges the batteries as needed and provides
filtered power protection to your equipment.
High Efficiency Mode The UPS supplies the load power from the bypass source and
stands ready to automatically transfer to standard
double-conversion (Normal) operation as needed. The battery
recharges when necessary.
NOTE: The High Efficiency setting minimizes heat contribution
to the rack environment.
Operation
|
43
Page 44

Table 4. Operating Mode Status Icons (continued)
Icon Mode
Converter Mode The UPS inverter supplies the load from utility power while
Standby Mode When the UPS is turned off and remains connected to utility
Description
acting as a frequency converter, locking the UPS into a stable
output frequency and transferring to Battery mode as necessary.
However, the input and output frequency are not synchronized.
Bypass mode is not available.
NOTE: Use Converter mode to lock the UPS output frequency
at 50 Hz or 60 Hz to suit power-sensitive equipment, or to
provide 50 Hz output when the available standard utility input is
60 Hz (or the reverse).
power, the UPS is in Standby mode and utility power supplies
the connected equipment. The UPS is not supporting the load,
but is ready to assume the load on command.
Active Notices and Alarms
The notice and alarm screens are visible only when notices or alarms are active. There is a separate
status summary screen for each active notice or alarm. If there are no active notices or alarms, a “No
Active Alarms” message appears in a single screen between the UPS status summary and the battery
status screen. If there are multiple notices or alarms, scroll through each notice or alarm screen to reach
the first battery status screen.
NOTE:
Events are not shown in status summary screens. They appear only in the Event Log.
Battery Operating Status
Table 5 describes the available battery operating status notifications that are provided on status
summary screens. Only one battery operating status is reported at a time.
|
44
Operation
Page 45

Table 5. Battery Operating Status Notifications
Battery Status Notifications
Battery charging Batteries are charged in constant current mode.
Battery floating Batteries are charged in constant voltage mode.
Battery resting Batteries are connected but are not being charged or discharged.
Battery discharging Batteries are discharging.
Battery disconnected Batteries are unavailable because they are disconnected.
Charger disabled The charger is off. You can enable the Charger setting from the Settings menu
Description
(This is part of the normal charging cycle.)
(see page 52).
Event Log
The Event Log holds up to 50 events. You can scroll through the event screens, beginning with the most
recent event.
NOTE:
The date format depends on the language selection.
The first row of each event screen contains the date (MM/DD/YYYY) and time (hh:mm:ss) at which the
event occurred. The second row contains the type of event and code. The event description begins on
the third row and may continue to the fourth row. The bottom right corner of the event screen displays
two numbers: an ordering number of the event in the log, followed by the total number of events in the
log.
If there are no events in the log, the event status summary screen displays “No events in log.”
See “Retrieving the Event Log” on page 56.
Operation
|
45
Page 46

Measurements
The measurements screens provide useful measurement information on:
S Output watts, VA, current, power factor, voltage, and frequency
S Input voltage and frequency
S Battery voltage, percentage charged, and time remaining
S Instantaneous Headroom Watts remaining
S Peak Headroom Watts (the remaining watts available to support the load at peak demand,
includes the date and timestamp of the peak demand)
S Peak Consumption Watts (the peak power demand on the UPS, includes the date and timestamp
of the peak demand)
S Present kWh Consumption (the kWh demand on the UPS averaged over the past hour)
S Cumulative kWh Consumption (the total kWh usage, includes the date and timestamp since it
was last reset)
S DC bus voltages (measured internal bus voltages for double conversion)
NOTE:
For Peak Consumption Watts and Cumulative kWh Consumption, input level is not supported.
46
|
Operation
Page 47

Control Screens
Table 6 describes the available control screens.
Table 6. Control Screens
Control Screens
Go to Bypass Transfers the UPS system to internal Bypass mode.
Battery Test Schedule Battery Test: yes | Cancel Battery test: no
Reset Error State Reset Alarms: yes | no
Load Segments Load segment 1: on | off
Restore Factory Settings Restore Factory Settings: yes | no
Description
When the Go to Bypass command is issued, the screen immediately shows the
message for five seconds: Manual Bypass Command. The option then changes to
Go to Normal.
When the Go to Normal command is issued, the screen immediately shows the
message Normal Mode Command Sent for five seconds. The option then changes
to Go to Bypass.
Starts a manual battery test.
See “Testing Batteries” on page 78.
Manually clears any latched alarms, such as bad battery detected, overload, or DC
Bus OV/UV.
If a bad battery alarm was also active, reset the battery test status to “Not
Tested.”
Load segment 2: on | off
These on/off commands override automatic load segment on/off controls made by
the Automatic Start Delay and Automatic On Battery Shutdown settings. See
“Configuring Load Segments” on page 57.
Available only in Standby mode.
Restoring the factory settings:
S Returns all user-configurable EEPROM settings to default factory settings
S Resets all pending on/off commands
S Clears the Event Log and resets all time stamps
S Resets the battery test status
S Initiates the Self Diagnostics test
Operation
|
47
Page 48

Identification
The identification screens display the following UPS information:
S Type and model
S Part number
S Serial number
S Service tag information
S NMC firmware
S UPS firmware
The NMC firmware screen displays only if the Network Management Card is installed. See “Dell UPS
NOTE:
Network Management Card“ on page 64.
Settings
Only available options are displayed.
User settings are not protected by default. You can enable the password through the User Password
setting.
Table 7 displays the options that can be changed by the user.
Table 7. Settings
Description
Change Language [English] [French] [German] [Spanish] [Japanese]
User Password [Enabled] [Disabled]
Audible Alarms [Enabled] [Disabled]
|
48
Operation
Available Settings Default Setting
[Simplified Chinese] [Russian] [Korean]
[Traditional Chinese]
If Enabled, the default password is USER.
NOTE: If you enter an incorrect password, the
message “Wrong Password” appears. Press any
button to return to the password screen and retry
the password.
NOTE: If you disable audible alarms, it takes effect
instantly and remains disabled, even after a power
cycle. This feature differs from the mute feature
where the horn is temporarily silenced on any
button press, but turns on again if a new alarm is
triggered.
English
Disabled
Enabled
Page 49

Table 7. Settings (continued)
Description Default SettingAvailable Settings
Set Date and Time Set Month, Day, Year, Hours, Minutes, and Seconds
Date: mm/dd/yyyy
Time: hh:mm:ss
NOTE: The date format is dependent on the
language selection.
NOTE: Time is a 24-hour clock.
Control Commands from Serial
Port
[Enabled] [Disabled]
If Enabled, control commands are accepted through
the serial port, USB ports, or option card.
If Disabled, configuration and load control
commands are restricted to LCD only.
Output Voltage [208V] [230V] [Auto-sensing]
NOTE: Numerical output voltage settings that are
configured in Standby mode take effect
immediately. Auto sensing and any settings that are
configured outside of Standby mode take effect
after the next power off and restart. Selecting auto
sensing disables the battery start feature until after
the next successful startup on utility power.
Output Frequency [50Hz] [60Hz] [Auto-sensing]
NOTE: Numerical output voltage settings that are
configured in Standby mode take effect
immediately. Auto sensing and any settings that are
configured outside of Standby mode take effect
after the next power off and restart. Selecting auto
sensing disables the battery start feature until after
the next successful startup on utility power.
Overload Alarm Level [10%] [20%] [30%]...[100%]
If 100%, the UPS issues an Output Overload alarm
at load > 100%.
NOTE: Output Overload Level 1 by default is set to
100% and is configurable from 10% to 100% in 10%
increments through the LCD setting menu. This
feature allows customers to be alerted before the
UPS has reached its rated capacity limits.
Power strategy [Normal] [High Efficiency] [Converter]
See “Setting the Power Strategy” on page 54.
01/01/2012
12:00:00
Enabled
Auto-sensing
NOTE: The default
auto sensing runs
once to set the
output voltage and
then is disabled.
Auto-sensing
NOTE: The default
auto sensing runs
once to set the
output voltage and
then is disabled.
100%
Normal
Operation
|
49
Page 50

Table 7. Settings (continued)
Description Default SettingAvailable Settings
Automatic Start Delay [Off] [0s] [1s] [2s]...[32767s]
See “Configuring Load Segments” on page 57.
0s: Load Segment 1
(LS1)
1s: Load Segment 2
(LS2)
Automatic on Battery Shutdown [Off] [0s] [1s] [2s]...[32767s]
Off
See “Configuring Load Segments” on page 57.
Start on Battery [Enabled] [Disabled]
NOTE: Battery start is disabled from the factory and
Enabled
remains disabled until the UPS has been powered
from utility and enters Standby mode. After the
UPS has been started once from utility, the Start on
Battery feature is automatically enabled. If this is set
by the user, it remains set.
Battery Saving Mode [Disabled] [10%] [20%] [30%]...[100%]
Disabled
The UPS output is turned off in five minutes if the
UPS is on battery and output power is below the
selected level.
On Battery Notice Delay [0s] [1s] [2s]...[99s]
0s
The UPS issues a “UPS on battery” notice in the
specified number of seconds after the UPS starts to
discharge the batteries.
Site Wiring Fault Alarm [Enabled] [Disabled] Disabled
Bypass Voltage Low Limit [-6%] [-7%]...[-20%] of nominal
The Bypass operation is disabled if the measured
bypass voltage level is below the nominal output
voltage (-15%).
NOTE: The Qualify Bypass setting may overrule the
Bypass Voltage Low Limit setting.
Bypass Voltage High Limit [+6%] [+7%]...[+20%] of nominal
The Bypass operation is disabled if the measured
bypass voltage level is above the nominal output
voltage (+10%).
NOTE: The Qualify Bypass setting may overrule the
Bypass Voltage High Limit setting.
|
50
Operation
-15% of nominal
+10% of nominal
Page 51

Table 7. Settings (continued)
Description Default SettingAvailable Settings
Qualify Bypass [Always] [Never] [Bypass Disabled]
If Always, Bypass operation is allowed when:
S Bypass voltages > the value set for Bypass
Voltage Low Limit
S Bypass voltages < the value set for Bypass
Voltage High Limit
S Bypass frequency > (nominal frequency -3 Hz)
S Bypass frequency < (nominal frequency +3 Hz)
S Inverter is synchronized with Bypass when
unsynchronized transfers are disabled by the
value set for Unsynchronized Transfers
If Never, Bypass operation is always allowed; voltage
and frequency limits are not in use.
If Bypass Disabled, Bypass operation is prohibited.
Synchronization Window [Sync Disabled] [±0.5 Hz] [±1.0 Hz] [±1.5 Hz]
[±2.0 Hz] [±2.5 Hz] [±3.0 Hz]
If ±3.0 Hz, on inverter operation the inverter tries to
synchronize with the Bypass when the Bypass
frequency is not more than 3 Hz from the nominal
output frequency; otherwise, the inverter goes to
nominal frequency. On Bypass mode, the sync
window is always ±3 Hz.
NOTE: In Sync Disabled state, if the Bypass
operation is allowed, the UPS synchronizes only
when it is operating on Bypass mode.
Unsynchronized Transfers [Enabled] [Disabled]
If Enabled, unsynchronized transfers to the Bypass
are allowed.
If Disabled, unsynchronized transfers to the Bypass
are not allowed.
NOTE: The Qualify Bypass setting may overrule the
Unsynchronized Transfers setting.
External Battery Modules (EBMs) [0] [1]
See “Configuring the UPS for an EBM” on page 60.
Always
±3.0 Hz
Enabled
0
Operation
|
51
Page 52

Table 7. Settings (continued)
Description Default SettingAvailable Settings
Charger [Enabled] [Disabled]
If Enabled, batteries charge normally.
If Disabled, the battery charger is off.
Battery Charge % to Restart [0%] [10%] [20%] [30%]...[100%]
When enabled, automatic restart is made when the
battery charge state reaches the selected level. If set
to 0%, the feature is disabled.
Battery Low Alarm [Immediate] [2 min] [3 min] [5 min]
If you select a value, the battery low alarm triggers
when the set amount of backup time
(approximately) remains in the batteries.
Automatic Battery Support Tests [Enabled] [Disabled]
See “Running Automatic Battery Tests” on page 61.
Enabled
0%
3 min
Enabled
Reset Peak Consumption Watts [No] [Yes]
If No, no action.
If Yes, the Peak Consumption Watts value is
cleared and the date and time stamp for this
statistic is set to the current date and time.
Reset Cumulative Consumption
kWh
Reset Peak Headroom Watts [No] [Yes]
[No] [Yes]
If No, no action.
If Yes, the Cumulative Consumption kWh value is
cleared and the date and time stamp for this
statistic is set to the current date and time.
If No, no action.
If Yes, the Peak Headroom Watts value is cleared
and the date and time stamp for this statistic is set
to the current date and time.
No
No
No
52
|
Operation
Page 53

Table 7. Settings (continued)
Description Default SettingAvailable Settings
Clear Event Log
LCD Contrast [-5], [-4], [-3], [-2], [-1], [+0], [+1], [+2], [+3],
The number after “Total events” shows how
many events are currently stored in the log.
Press the button for longer than one
second to reset the event count to zero and
clear the log.
[+4], [+5]
The LCD Contrast is adjustable from -5 to +5. This
range covers the maximum adjustment for
contrasting the background with the text in the
visual display of the control panel.
—
+0
Transferring the UPS Between Modes
Transferring between modes includes:
S Transferring from Normal to Bypass mode
S Transferring from Bypass to Normal mode
Transferring from Normal to Bypass Mode
To transfer from Normal to Bypass mode:
1 Press the button for longer than one second to go to the main menu selection and scroll down to
the Control menu using the
button.
2 Press the button to enter the Control menu.
3 Select Go to Bypass.
The text on the screen changes to Manual Bypass Command Sent. The Bypass mode icon
flashes, indicating Bypass mode.
Operation
|
53
Page 54

Transferring from Bypass to Normal Mode
To transfer from Bypass to Normal mode:
1 Press the button for longer than one second to go to the main menu selection and scroll down to
the Control menu using the
2 Press the button to enter the Control menu.
3 Select Go to Normal.
button.
The text on the screen changes to Normal Command Sent. The Normal mode icon
flashes,
indicating Normal mode.
Setting the Power Strategy
The UPS has the following power strategy settings:
S Normal. The UPS operates in Normal mode (powering the load from utility power).
S High Efficiency. The UPS operates in High Efficiency mode (powering the load from the bypass
source but ready to transfer to Normal mode as needed). The UPS is highly sensitive to line
fluctuations and transfers out of High Efficiency mode at ±5% of nominal voltage or ±1% of
nominal frequency. If the UPS transfers to Normal mode, the UPS automatically transfers back to
High Efficiency mode after five minutes of stable power. Transfers to High Efficiency mode are
limited to three times in one hour.
S Converter. The UPS operates as a frequency converter, powering the load from acceptable utility
power while providing a stable output frequency. Bypass operation and bypass-related alarms are
disabled.
Table 8 describes the UPS behavior in Converter mode in detail. To set the output frequency, see
“Settings” on page 48.
To set the power strategy, complete the following steps:
1 Make sure that the UPS is in Standby mode.
2 From the main menu, press the button to scroll to the Settings menu, and press the OK button.
3 Press the button to scroll to Power Strategy, and press the OK button.
4 Press the button to select the power strategy that you want to set and press the OK button.
5 Press the OK button for one second to confirm.
NOTE:
The UPS tests the bypass source for five consecutive minutes of stable power before it transfers to High
Efficiency mode.
|
54
Operation
Page 55

Table 8. UPS Behavior in Converter Mode
Output
Load
≤50% 50 Hz
> 50% 50 Hz
Frequency
Setting
60 Hz
60 Hz
Input Frequency
(Hz)
47–53 47–53 UPS in Converter mode synchronizes the output
45–46 or 54–65 50 UPS in Converter mode converts the input
<45 or >65 50 UPS transfers to Battery mode to provide 50 Hz
57–63 57–63 UPS in Converter mode synchronizes the output
45–56 or 64–65 50 UPS in Converter mode converts the input
<45 or >65 50 UPS transfers to Battery mode to provide 60 Hz
47–53 47–53 UPS in Converter mode synchronizes the output
45–46 or 54 -55 50 UPS in Converter mode converts the input
<45 or >55 50 UPS transfers to Battery mode to provide 50 Hz
57–63 57–63 UPS in Converter mode synchronizes the output
55–56 or 64–65 50 UPS in Converter mode converts the input
<55 or >65 50 UPS transfers to Battery mode to provide 60 Hz
Output
Frequency
(Hz)
UPS Behavior
frequency with the input frequency.
frequency to 50 Hz output frequency
output frequency.
frequency with the input frequency.
frequency to 60 Hz output frequency.
output frequency.
frequency with the input frequency.
frequency to 50 Hz output frequency.
output frequency.
frequency with the input frequency.
frequency to 60 Hz output frequency.
output frequency.
Operation
|
55
Page 56

Retrieving the Event Log
To retrieve the Event Log:
1 Press the button for longer than one second to go to the main menu selection and scroll down to
the Event Log menu using the
button.
2 Press the button to enter the Event Log list.
3 Scroll through the listed events, notices, and alarms using either the button or the button.
Behavior on Overload
See Table 9 for an explanation of how the UPS responds to an overload condition.
Table 9. Behavior on Overload
Overload
Severity
Level 1 100% to 101% Overload alarm and
Level 2 102% to 110% Transfers to Bypass
Level 3 > 110% Transfers to Bypass
Load Level On Utility Power
supports load
indefinitely
mode in 12 sec (±1 sec).
If Bypass mode is not
available, transfers to
Fault mode after 12 sec
(±1 sec).
mode immediately. If
Bypass mode is not
available, transfers to
Fault mode after 300 ms
to 1 sec.
On Bypass/High
Efficiency
Overload alarm
and supports load
indefinitely
Transfers to Fault
mode in 2 min
(±1 sec)
Transfers to Fault
mode in 300 ms
to 1 sec
On Battery/Converter
Overload alarm and supports
load until low battery
shutdown level is reached
Transfers to Fault mode in
12 sec (±1 sec) or when low
battery shutdown level is
reached
Transfers to Fault mode in
300 ms to 1 sec
56
|
Operation
Page 57

Configuring Load Segments
Load segments are sets of receptacles that can be controlled by the Dell MUMC and Dell ULNM
software, the Dell UPS Network Management Card, or through the LCD display, providing an orderly
shutdown and startup of your equipment. For example, during a power outage, you can keep key pieces
of equipment running while you turn off other equipment. This feature allows you to save battery
power.
Each Dell Online Rack model has two configurable load segments (shown in Figure 30).
One NEMA
L6-30R Outlet
Two Output
Circuit Breakers
Load Segment 1
Figure 30. Load Segments (DELL10KWOLHVUS model shown)
Two IEC 320-C19
Outlets
One NEMA
L6-30R Outlet
Two Output
Circuit Breakers
Two IEC 320-C19
Outlets
Load Segment 2
To control the load segments with power management software, see your power management software
manual for details (refer to the Software CD or www.dellups.com for the latest information).
|
Operation
57
Page 58

Controlling Load Segments Through the Display
To control the load segments through the display:
1 Press the button for longer than one second to go to the main menu selection and scroll down to
the Control menu using the
2 Press the button to enter the Control menu.
3 Use the button to scroll to Load Segments.
4 Press the button.
button.
The current setting for the option flashes when selected.
5 Select the desired load segment using the and buttons.
6 Set the desired load segment ON or OFF using the button.
7 Press the button for longer than one second to confirm.
8 Set the other load segment if applicable.
Configuring Automatic Start Delay
You can configure a load segment to turn on automatically after the utility power returns, if it was shut
down by:
S The button
S An external command with auto-restart option
S Battery under voltage state
S Automatic on battery shutdown command
You can specify the restart delay time for each load segment: select zero seconds (0s is the default) to
restart immediately, select 1–32767 seconds to delay for the specified time, or select Off.
To set the restart delay times for each load segment:
1 Press the button for longer than one second to go to the main menu selection and scroll down to
the Settings menu using the
2 Press the button to enter the Settings menu.
3 Use the button to scroll to the Automatic Start Delay option and press the button.
button.
The current setting for the option flashes when selected.
4 Set the restart delay for one load segment using the and buttons.
|
58
Operation
Page 59

5 Press the button to confirm.
6 Set the restart delay for the other load segment if applicable.
7 Press the button to confirm.
NOTE:
Load segment On/Off commands issued through the Control menu override the user settings for load
segments.
NOTE: There is an additional built-in one-second delay between closing load segment 1 and 2 when an On
command is issued for both segments at the same time.
Configuring Automatic on Battery Shutdown
If set to Off (default), the load segment turns off only when commanded manually by the button,
an external command, or through the display (Control > Load Segments).
If set to zero seconds (0s), the load segment turns off automatically when the UPS on Battery state
activates.
If you select a value, the load segment turns off automatically after the selected delay while the UPS
operates on battery, but the shutdown is cancelled if the utility returns before the delay has expired.
To set the shutdown times for each load segment:
1 Press the button for longer than one second to go to the main menu selection and scroll down to
the Settings menu using the
button.
2 Press the button to enter the Settings menu.
3 Use the button to scroll to the Automatic on Battery Shutdown option and press the button.
The options display and the current settings flash when selected.
4 Set the shutdown delay for one load segment using the and buttons.
5 Press the button to confirm.
6 Set the shutdown delay for the other load segment if applicable.
7 Press the button to confirm.
|
Operation
59
Page 60

Configuring Battery Settings
Configure the UPS settings for an installed EBM, including whether to run automatic battery tests and
automatic restart configuration.
Configuring the UPS for an EBM
If the UPS is not configured for the EBM, the UPS reports less battery time remaining on the UPS front
panel and to any remote software. You may receive a shutdown warning prematurely. To ensure
maximum battery runtime when using power management software, configure the UPS for the EBM:
1 Press the button for longer than one second to go to the main menu selection and scroll down to
the Settings menu using the
2 Press the button to enter the Settings menu.
3 Use the button to scroll to the External Battery Modules option and press the button.
The battery number value begins to flash.
4 Set the battery number value using the and buttons.
button.
Configuration
UPS only (internal batteries) 0 (default)
UPS + 1 EBM 1
NOTE: Runtime is automatically adjusted based on present load levels and whether an EBM is configured.
Setting
NOTE: This value represents to the number of attached EBM units, not the number of battery strings.
5 Press the button to confirm.
60
|
Operation
Page 61

Running Automatic Battery Tests
The automatic discharge test, enabled by default, runs during the transition from Float to Rest mode.
After the test completes, the charge cycle restarts to completely charge the batteries and then continues
to Rest mode normally. The automatic test runs approximately once every three months and does not
run again until after three more Float to Rest mode transitions. If a manual battery test is requested, the
automatic battery test timer is reset so it will not run for the next three months.
For an automatic battery test to run:
S The Automatic Battery Tests setting must be enabled for the automatic battery tests to run. (See
the following section, “Configuring Automatic Battery Tests.”)
S The batteries must be fully charged.
S The UPS must be in Normal mode or High Efficiency with no active alarms.
S The load must be higher than 10%.
Configuring Automatic Battery Tests
To configure the automatic battery tests:
1 Press the button for longer than one second to go to the main menu selection and scroll down to
the Settings menu using the
2 Press the button to enter the Settings menu.
3 Use the button to scroll to the Automatic Battery Tests option and press the button.
button.
The option begins to flash.
4 Select whether to enable or disable the automatic battery test using the and buttons.
5 Press the button to confirm.
Configuring Automatic Restart
The UPS automatically restarts if the utility power returns after the output was shut off due to depleted
batteries, a shutdown input signal, or an automatic shutdown command.
You can set the load segments for the amount of time to delay the restart when utility power returns,
using the Automatic Start Delay setting. See “Configuring Load Segments” on page 57. You can also
configure UPS restart to depend on the battery charge level, using the Battery Charge % to Restart
setting from the Settings menu (see page 52).
|
Operation
61
Page 62

5
Additional UPS Features
This chapter describes:
S Communication ports (RS-232 and USB)
S Dell Network Management Card
S Dell Multi-UPS Management Console (MUMC) and Dell UPS Local Node Manager (ULNM)
Software
S Dell Environmental Monitoring Probe (EMP)
RS-232 and USB Communication Ports
To establish communication between the UPS and a computer, connect your computer to one of the
UPS communication ports using an appropriate communication cable (RS-232 cable not supplied). See
“UPS Rear Panels” on page 34 for the communication port locations.
When the communication cable is installed, power management software can exchange data with the
UPS. The software polls the UPS for detailed information on the status of the power environment. If a
power emergency occurs, the software initiates the saving of all data and an orderly shutdown of the
equipment.
The cable pins for the RS-232 communication port are identified in Figure 31, and the pin functions are
described in Table 10.
879
Figure 31. RS-232 Communication Port (DB-9 Connector)
|
62
Additional UPS Features
3
16245
Page 63

Table 10. RS-232 Communication Port Pin Assignment
Pin
1 Unused —
2 Tx Transmit to external device Out
3 Rx Receive from external device In
4 Unused —
5 GND Signal common (tied to chassis) —
6 Unused —
7 Unused —
8 Unused —
9 Unused —
NOTE: Unused pins must be left free on all models.
Signal Name Function Direction from the UPS
Additional UPS Features
|
63
Page 64

Dell UPS Network Management Card (Optional)
The Dell Online Rack 10 kW UPS has one available communication bay, which supports the optional
Dell UPS Network Management Card. See Figure 32 for the location of the communication bay.
NOTE:
It is not necessary to shut down the UPS before installing a communication card.
1 Remove the slot cover secured by two screws. Retain the screws.
2 Insert the communication card into the slot.
3 Secure the card with the retained screws.
Figure 32. Installing the Dell UPS Network Management Card (DELL10KWOLHVUS model shown)
For details on disabling control commands from the Dell UPS Network Management Card, see the
Control Commands from Serial Port setting on page 49.
Refer to the Dell Network Management Card User's Guide for more information.
Environmental Monitoring Probe (Optional)
The EMP is an optional connectivity device that lets you remotely monitor the temperature, humidity,
and status of two contact devices through a standard Web browser, providing greater power
management control and flexible monitoring. Use the EMP with any Dell UPS equipped with a Dell
Network Management Card.
|
64
Additional UPS Features
Page 65

Dell MUMC and Dell ULNM Software
Each Dell Online Rack 10 kW UPS ships with Dell MUMC and Dell ULNM application software.
The Dell MUMC and Dell ULNM software provides up-to-date graphics of UPS power and system data
and power flow. This software also gives you a complete record of critical power events, and it notifies
you of important UPS or power information. If there is a power outage and the Dell Online Rack UPS
battery power becomes low, the software can automatically shut down your computer system to protect
your data before the UPS shutdown occurs.
For details on disabling control commands from the software, see the user setting for Control
Commands from Serial Port setting on page 49.
Additional UPS Features
|
65
Page 66

UPS Maintenance
This chapter explains how to:
S Care for the UPS and batteries
S Transport the UPS
S Store the UPS and batteries
S Test the batteries
S Update the UPS firmware
6
CAUTION:
“Safety and Warning” Chapter on page 9. Also follow the safety instructions and important regulatory
information in your Safety, Environmental, and Regulatory Information document.
Before performing the procedures in this section, read and follow the safety instructions in the
UPS and Battery Care
For the best preventive maintenance, keep the area around the UPS clean and dust‐free. If the
atmosphere is very dusty, clean the outside of the system with a vacuum cleaner. For full battery life,
keep the UPS at an ambient temperature of 25°C (77°F).
NOTE:
The batteries in the UPS are rated for a 3–5 year service life. The length of service life varies, depending
on the frequency of usage and ambient temperature. Batteries used beyond expected service life will often
have severely reduced runtimes. Replace batteries at least every 5 years to keep units running at peak
efficiency.
Transporting the UPS
NOTE: The internal UPS batteries MUST be disconnected before transport.
CAUTION: The following procedure should be performed or supervised by personnel knowledgeable about
batteries and the required precautions. Keep unauthorized personnel away from batteries.
If the UPS requires any type of transportation, the batteries must be disconnected (but not removed)
before the unit is transported.
66
|
UPS Maintenance
Page 67

To prepare the UPS for transport:
1 Verify that the UPS is off and disconnected from utility power.
2 Remove the UPS front cover (see Figure 33):
Hold the right side of the cover against the chassis. Unsnap the left side of the cover and pull it
forward.
Pull the right-side front cover tab from the chassis and remove the front cover.
Set the front cover aside.
Figure 33. Removing the UPS Front Cover
2
1
|
UPS Maintenance
67
Page 68

3 Remove both battery retaining brackets from the UPS (Figure 34):
Locate the left (labeled L) retaining bracket. On the left side of the chassis, turn the thumbscrew
counter-clockwise to release the left retaining bracket.
Push the bracket toward the center post to disengage it from the chassis. Swing the bracket toward
you and pull the bracket to the left to remove it. Set the bracket aside.
Locate the right (labeled R) retaining bracket. On the right side of the chassis, turn the
thumbscrew counter-clockwise to release the right retaining bracket.
Push the bracket toward the center post to disengage it from the chassis. Swing the bracket toward
you and pull the bracket to the right to remove it. Set the bracket aside.
Figure 34. Removing the Battery Retaining Brackets
|
68
UPS Maintenance
Page 69

4 Disconnect the battery connectors (see Figure 35):
Locate the battery jumpers tucked into the small shelf at the top of the center post. Pull them off
the shelf and disconnect them.
Locate and disconnect the remaining battery connectors for the left and right battery trays.
Figure 35. Disconnecting the Battery Connectors
NOTE: The battery retaining brackets are labeled L (Left) and R (Right) to indicate where they must be installed.
UPS Maintenance
|
69
Page 70

5 Replace the left ( L) and right (R) battery retaining brackets (see Figure 36):
For the first battery retaining bracket, insert the bracket tab into the channel on the side of the
center post. Fit the connected battery cables snugly behind the retaining bracket.
Align the end of the battery retaining bracket with the channel on the side of the chassis.
Push the bracket until it is firmly seated into the side channel.
Chassis Side Channel
Center Post Side Channel
Figure 36. Inserting the bracket into the Channels
Turn the thumbscrew clockwise to secure the bracket.
Repeat to replace the second battery retaining bracket.
70
|
UPS Maintenance
Page 71

6 Replace the UPS front cover (see Figure 37).
Align the front cover with the front of the chassis.
Insert the right-side tabs on the front cover into the right-side chassis tab openings.
Push the left side of the cover forward and snap it to the chassis.
Ensure that the LCD panel on the UPS chassis aligns with the LCD window on the front cover before
NOTE:
securing the cover to the chassis.
1
2
Figure 37. Replacing the UPS Front Cover
Recharging and Replacing Batteries
If you store the UPS for a long period, recharge the battery every 6 months by connecting the UPS to
utility power. The batteries charge to 90% capacity in approximately 4 hours. However, it is
recommended that the batteries charge for 48 hours after long-term storage.
You should track recharge dates. Log the last date the batteries were recharged. Do not use the UPS if
the last recharge date was more than six months ago.
When the status summary screen displays the UPS fault icon with the “Service Battery” alarm and the
audible alarm sounds continuously, the batteries may need replacing.
Contact your service representative to order new batteries.
|
UPS Maintenance
71
Page 72

NOTE: With the user-replaceable battery feature, UPS batteries can be replaced easily without turning the UPS
off or disconnecting the load.
To replace the UPS batteries:
1 Remove the UPS front cover (see Figure 38):
Hold the right side of the cover against the chassis. Unsnap the left side of the cover and pull it
forward.
Pull the right-side front cover tab from the chassis and remove the front cover.
Set the front cover aside.
2
1
Figure 38. Removing the UPS Front Cover
2 Remove both battery retaining brackets from the UPS (see Figure 39):
Locate the left (labeled L) retaining bracket. On the left side of the chassis, turn the thumbscrew
counter-clockwise to release the left retaining bracket.
Push the bracket toward the center post to disengage it from the chassis. Swing the bracket toward
you and pull the bracket to the left to remove it. Set the bracket aside.
Locate the right (labeled R) retaining bracket. On the right side of the chassis, turn the
thumbscrew counter-clockwise to release the right retaining bracket.
Push the bracket toward the center post to disengage it from the chassis. Swing the bracket toward
you and pull the bracket to the right to remove it. Set the bracket aside.
|
72
UPS Maintenance
Page 73

Figure 39. Removing the Battery Retaining Brackets
3 Disconnect the battery connectors (see Figure 40):
Locate the battery jumpers tucked into the small shelf at the top of the center post. Pull them off
the shelf and disconnect them.
Locate and disconnect the remaining battery connectors for the left and right battery trays.
Figure 40. Disconnecting the Battery Connectors
UPS Maintenance
|
73
Page 74

CAUTION: The batteries are heavy (32 kg/71 lb). Use proper lifting techniques when removing used batteries
and installing new batteries.
4 Remove the used battery trays from the UPS (see Figure 41):
Move the disconnected UPS battery connectors at the top of the battery compartment out of the
way.
Grip the two plastic loop tabs on the front of the battery tray. Pull the tray toward you to remove.
The orange PULL HERE labels indicate where to grasp the loop tabs.
NOTE:
Repeat with the second battery tray.
CAUTION:
Figure 41. Removing the Battery Trays
Proper disposal of batteries is required. Refer to your local codes for disposal requirements.
NOTE: The battery trays can be installed in either battery compartment.
NOTE: Insert the tray with the caution label arrow pointing upward.
5 Install the new UPS battery trays (see Figure 42):
Move the disconnected UPS battery connectors at the top of the battery compartment out of the
way.
Slide the battery tray into the battery compartment completely.
Repeat to install the second battery tray.
6 Tuck the loop tabs into the plastic sleeve on the front of each battery tray to move them out of the
way.
|
74
UPS Maintenance
Page 75

Figure 42. Installing the Battery Trays
7 Connect the internal battery connectors (see Figure 43):
Connect the left battery tray connector to the UPS battery connector. Connect the right battery
tray connector to the UPS battery connector.
NOTE:
A small amount of arcing may occur when connecting the batteries. This is normal and does not damage
the unit or present any safety concerns.
Locate and connect the battery jumpers located on either side of the center post. Place the
connectors on the small shelf at the top of the center post.
NOTE:
Connecting the center battery jumpers connects the two battery trays serially.
Figure 43. Connecting the Battery Connectors
UPS Maintenance
|
75
Page 76

NOTE: The battery retaining brackets are labeled L (Left) and R (Right) to indicate where they must be installed.
8 Replace the left ( L)and right (R) battery retaining brackets (see Figure 44):
For the first battery retaining bracket, insert the bracket tab into the channel on the side of the
center post. Fit the connected battery cables snugly behind the retaining bracket.
Align the end of the battery retaining bracket with the channel on the side of the chassis.
Push the bracket until it is firmly seated into the side channel.
Chassis Side Channel
Center Post Side Channel
Figure 44. Inserting the bracket into the Channels
Turn the thumbscrew clockwise to secure the bracket.
Repeat to replace the second battery retaining bracket.
|
76
UPS Maintenance
Page 77

9 Replace the UPS front cover (see Figure 45).
Align the front cover with the front of the chassis.
Insert the right-side tabs on the front cover into the right-side chassis tab openings.
Push the left side of the cover forward and snap it to the chassis.
Ensure that the LCD panel on the UPS chassis aligns with the LCD window on the front cover before
NOTE:
securing the cover to the chassis.
1
Figure 45. Replacing the UPS Front Cover
2
|
UPS Maintenance
77
Page 78

Testing Batteries
For a battery test to run:
S The batteries must be fully charged.
S The UPS must be in Normal mode with no active alarms.
S The load must be higher than 10%.
To test batteries:
1 Connect the UPS to utility power for at least 48 hours to charge the batteries.
2 Press the button for one second to go to the main menu selection and scroll down to the
Control menu using the
3 Press the button to enter the Control menu.
4 Use the button to scroll to the Battery Test option.
5 Press the button to start the battery test.
During the battery test, the UPS transfers to Battery mode and discharges the batteries for 25% of
the original expected runtime. The status screen displays “Battery test running” and the
percentage of the test completed. The results display on the UPS status screen when complete.
button.
Updating the UPS Firmware
To keep the UPS firmware updated with the latest improvements and benefits, visit www.dellups.com
for updates. You can download the latest firmware version and the instructions for installing it.
|
78
UPS Maintenance
Page 79

Specifications
This chapter provides the following specifications:
S Model list
S Dimensions and weights
S Electrical input and output
S Environmental and safety
S Battery
S UPS block diagram
NOTE:
All Dell 10 kW UPSs are designed for power factor corrected loads. Using systems with high crest
factors will limit the available power to less than the UPS rating.
Table 11. UPS Model List
208V Model 230V Model 230V Model
UPS Models DELL10KWOLHVUS
Dell Online Rack 10 kW
North American and Japan
DELL10KWOLHV
Dell Online Rack 10 kW
International
7
DELL10KWOLHVB
Dell Online Rack 10 kW
International (Blades)
External Battery
Module (EBM)
Table 12. Weights and Dimensions
DELL10KWOLHVUS 208V Model
and
DELL10KWOLHVB 230V Model
Dimensions
with Front Cover
(W H D)
Rack Unit Size 5U 3U
Weights 99.0 kg (217.8 lb) 79.0 kg (173.8 lb)
438.0 212.0 813.2 mm
(17.2” .8.4” 32.0”)
DELL10KWEBM, 288 Vdc/40A
DELL10KWOLHV
230V Model
438.0 212.0 823.0 mm
(17.2” .8.4” 32.4”)
EBM Model
438.0 127.0 736.6 mm
(17.2” 5.0” 29.0”)
Specifications
|
79
Page 80

Table 13. Electrical Input
DELL10KWOLHVUS
208V Model
Nominal Voltage 208V 230V
Nominal Voltage Range 180–276V auto-sensing
Nominal Frequency 50/60 Hz auto-sensing, ±3 Hz
DELL10KWOLHV and DELL10KWOLHVB
230V Model
Efficiency
Noise Filtering Full-time EMI/RFI filtering
Connections Hardwired
Table 14. Electrical Output
DELL10KWOLHVUS
208V Model
Output Receptacles (2) NEMA L6-30R, 30A
(4) IEC 60320 C19, 20A
Power Levels
(Rated at Nominal Inputs)
Regulation (Normal
Mode)
Regulation (Battery
Mode), Nominal
Voltage ±5%
Voltage Waveform Sine wave
NOTE: Varies based on auto-detected input voltage or customer settings.
NOTE: Varies based on auto-detected input voltage or customer settings.
>96% (High Efficiency Mode)
>94% (Normal Mode)
>90% (Battery Mode)
DELL10KWOLHV
230V Model
(2) IEC 60309 332R6S,
32A
(2) IEC 60320 C19; 16A
for IEC, 20A for UL
10 kW
-6% to +6% of nominal voltage
-6% to +6% of nominal voltage
DELL10KWOLHVB
230V Model
(8) IEC 60320 C19
(4 pairs/4 breakers); 16A
for IEC, 20A for UL
80
|
Specifications
Page 81

Table 15. Environmental and Safety
DELL10KWOLHVUS
208V Model
DELL10KWOLHV and DELL10KWOLHVB
230V Model
Safety Conformance UL 1778 4th Edition;
CSA C22.2, No. 107.3
Safety Markings UL, cUL, VCCI, NOM, BSMI, FCC UL, cUL, CE, GS, GOST, BSMI,
EMC (Class A) FCC Part 15, VCCI, BSMI IEC/EN 62040-2; EN 55022/CISPR 22;
Operating Temperature 0°C to 40°C (32°F to 104°F
Transit Temperature -15°C to 60°C (5°F to 140°F)
Extended Storage
Temperature
Relative Humidity 0–95% noncondensing
Operating Altitude Up to 3048 meters (0–10,000 ft)
Storage Elevation Up to 15240 meters (0–50,000 ft)
Audible Noise Less than 55 dBA on line/bypass mode (less than 75% load), room temperature
Surge Suppression ANSI/IEEE C62.41; 1991 Category B3
-15°C to 45°C (5°F to 113°F)
UL 1778 4th Edition; CSA C22.2,
No. 107.3; IEC/EN 62040-1;
IEC/EN 60950-1
S-MARK, KC, NRCS, NOM, C-tick,
CQC, FCC
CNS14757-2; AS/NZS 62040.2;
FCC Part 15; KN22; GB7260.2;
EN 55024/CISPR 24
Specifications
|
81
Page 82

Table 16. Battery
Configuration
Battery Type YUASA NPW 45-12 9.0 Ah
Voltage 10 kW: 288 Vdc internal; EBM : 288 Vdc/40A
Fuses UPS: (1) 80A fuses
Type Sealed, maintenance‐free, valve‐regulated, lead‐acid
Charging 10 kW internal batteries: Approximately 4 hours to 90% usable capacity at nominal
Monitoring Advanced monitoring for earlier failure detection and warning
Battery Runtimes* 10 kW internal batteries: 5 minutes at full load/14 minutes at half load
* Battery runtimes are approximate and vary depending on the load configuration and battery charge.
10 kW: (24) 288V, 9.0 Ah internal batteries; EBM: (24) 288V, 9.0 Ah
EBM: (1) 80A fuses
line and no supplementary power supply load
EBM: Approximately 8 hours to 90% usable capacity at nominal line and no
supplementary power supply load
10 kW with one EBM attached: 13 minutes at full load/35 minutes at half load
82
|
Specifications
Page 83

CHASSIS
Bypass SW
BFP Module
Main 1
I/P Filter
Cooling
System
Rectifier
Converter
Charger
Internal
Battery
Figure 46. Online UPS Block Diagram
SPS
CNTL
Inverter
INV SW
O/P Filter
Comm
Interface
LCD
Display
Specifications
|
83
Page 84

8
Troubleshooting
The Dell Online Rack UPS is designed for durable, automatic operation and issues alarms to alert you
whenever potential operating problems occur. Usually the alarms shown by the control panel do not
mean that the output power is affected. Instead, they are preventive alarms intended to alert the user.
Active alarms and active notices are accompanied by an audible buzzer.
Accessing Alarms and Conditions
The control panel provides troubleshooting information from two main menus:
S UPS status menu: Access to all active alarms
S Event Log menu: Access to the most recent 50 events, which may include active and closed alarms
UPS Status Menu
From the UPS Status menu, you can access the following screens for troubleshooting information:
S Status summary screen: The status summary screen provides information on both mode and load.
When there is a critical alarm, the status summary screen changes from its normal white text on a
blue background to dark amber text on an amber background.
S Notice or alarm screens: A separate screen appears for each active notice or alarm. If there are no
active alarms or notices, the display reads “No Active Alarms.”
S Battery status screen: The battery status screen indicates the battery charge mode, the percent the
battery is charged, and the runtime with the present load level.
When an alarm is active, the control panel automatically displays an active alarm screen unless the
NOTE:
screen lock is enabled by the user.
To access troubleshooting information using the UPS status menu screen:
1 Press the button for one second or longer to go to the UPS status menu screen.
2 Press the button to access the UPS Status Summary screen.
3 Press the button to access the notice and alarm screens.
The UPS Status Summary screen provides load information. The status icon indicates the UPS
operating mode (see Table 4 on page 42).
4 Use the button to scroll through the notice and alarm screens.
5 After scrolling through all alarms, press the button to access the battery status screen.
|
84
Troubleshooting
Page 85

Event Log Menu
From the Event Log menu, you can access the last 50 events, which includes events, notices, and
alarms, arranged from newest to oldest. Events, notices, and alarms are logged in the Event Log when
they occur and, if applicable, when they were cleared as follows:
S Events are silent conditions that are recorded in the Event Log as status information, such as
“Clock Set Done.” Events do not require a response.
S Notices, including active notices, are recorded in the Event Log. Active notices, such as “Bypass AC
Over Voltage,” are typically announced by an intermittent beep. Notices do not normally require a
response.
S Alarms, including active alarms, are recorded in the Event Log. Active alarms are typically
announced by either an intermittent beep or a continuous audible alarm. Examples are “Fan
Failure” and “Heatsink Over Temperature.” Active alarms require a response.
The UPS Status menu displays by default. To access troubleshooting information using the Event Log
menu:
1 Press the button for one second to go to the main menu selection and scroll down to the
Event Log menu using the
2 Click the button to enter the Event Log list.
3 Scroll through the listed events, notices, and alarms using the or button.
button.
Alarms, Notices, and Events
Table 17 describes typical alarms, notices, and events.
Table 17. Alarms, Notices, and Events
Alarms, Notices, and Events
The UPS does not provide or
indicate the expected backup
time.
Power is not available at the
UPS output receptacles.
The UPS does not start.
(The LCD is off.)
The UPS operates normally,
but some or all of the
protected equipment is not
on.
Possible Cause Action
The batteries need charging or
service.
The UPS is in Standby mode. Supply power to the connected equipment by
Power is not connected. Check the power connections. Also ensure
The equipment is not
connected correctly to the UPS.
Apply utility power for 48 hours to charge the
batteries. If the condition persists, contact
your service representative.
pressing the On/Off button until the front
panel displays the UPS status summary screen.
that the battery is connected to utility power.
Verify that the equipment is plugged into the
UPS receptacles. Also verify that the load
segment is on.
|
Troubleshooting
85
Page 86

Table 17. Alarms, Notices, and Events
Alarms, Notices, and Events ActionPossible Cause
Battery test did not run or
was interrupted.
The UPS does not transfer to
Bypass mode.
UPS on Bypass
(Notice 169)
Intermittent Alarm
On Manual Bypass
(Notice 143)
Intermittent Alarm
Battery Disconnected
(Alarm 199)
Beeping Alarm
Low Battery Warning
(Alarm 56)
Beeping Alarm
Low Battery Shutdown
(Alarm 174)
Continuous Alarm
One of the conditions listed in
“Running Automatic Battery
Tests” on page 61 was not
present.
The bypass utility does not
qualify.
Bypass mode is disabled. Check that the Bypass settings are configured
The UPS is operating from
Bypass mode.
UPS was manually commanded
to transfer to Bypass mode and
will remain in bypass until
commanded.
The UPS does not recognize the
internal batteries.
Battery voltage is lower than the
batteries disconnected level
defined for this UPS. This may
be due to a blown fuse,
intermittent battery
connection, or battery cable
being disconnected.
Battery time remaining or
battery capacity is lower than
the battery low warning level
defined for this UPS.
The UPS has exhausted the
battery capacity and shut down.
Resolve the condition, then restart the test.
Check the bypass utility. The UPS is receiving
bypass utility power that may be unstable or in
brownout conditions.
correctly. See “Settings” on page 48.
The equipment transferred to bypass utility
power. Battery mode is not available and your
equipment is not protected; however, the utility
power continues to be passively filtered by the
UPS. Check for one of the following alarms:
overtemperature, overload, or UPS failure.
None.
If the condition persists, contact your service
representative.
Verify that all batteries are properly connected.
If the condition persists, contact your service
representative.
This warning is approximate. The actual time to
shutdown may vary depending on the UPS load
and presence of an External Battery Module
(EBM).
Resolve the condition that led to shutdown, and
then apply utility power for 48 hours to recharge
the batteries.
86
|
Troubleshooting
Page 87

Table 17. Alarms, Notices, and Events
Alarms, Notices, and Events ActionPossible Cause
Shutdown Imminent
(Alarm 55)
Continuous Alarm
Battery Test Failed
(Notice 191)
Intermittent Alarm
Service Battery
(Alarm 149)
Beeping Alarm
Utility Not Present
(Notice 59)
Intermittent Alarm
Bypass Not Available
(Event 105)
No Alarm
Input AC Over Voltage
(Alarm 6)
Beeping Alarm
Input AC Under Voltage
(Notice 7)
Intermittent Alarm
Input Under/Over Frequency
(Notice 8)
Intermittent Alarm
Site Wiring Problem
(Alarm 194)
Beeping Alarm
Communication to external
devices stops because the UPS
has entered a state where it may
abruptly stop operating without
further notice unless utility
returns.
A weak battery string was
detected during the last battery
test.
A faulted battery string has
been detected and as a result,
the charger is disabled.
The utility level has fallen
below the Utility Not Present
threshold (typically <25 to
50V).
The utility is outside of the
bypass limits defined in the
UPS.
The utility voltage exceeds the
maximum operating range.
The utility voltage is below the
minimum operating range.
The utility frequency is out of
usable frequency range.
An alarm triggers when the
difference between ground and
neutral voltage is >15V.
The alarm is issued when the battery time
remaining reaches zero. All connected devices
should have already shut down gracefully.
This is a warning notice. Dell recommends
that you replace the batteries soon.
Contact your service representative.
Transfer to battery if supporting load. Power
down if not supporting load.
Check the bypass settings. See “Settings” on
page 48.
The UPS transfers to Battery mode if
supporting load.
The UPS transfers to Battery mode if
supporting load.
The UPS transfers to Battery mode if
supporting load.
Have a qualified electrician correct the wiring
problem. If the UPS is not wired with a neutral
wire, Site Fault should be disabled in the
Settings menu (see page 48).
Troubleshooting
|
87
Page 88

Table 17. Alarms, Notices, and Events
Alarms, Notices, and Events ActionPossible Cause
Remote Emergency Power
Off
(Notice 12)
Beeping Alarm
Output Overload
(Alarm 25)
Intermittent Alarm
Output Overload Level 2
(Alarm 159)
Beeping Alarm
Output Overload Level 3
(Alarm 162)
Beeping Alarm
Battery DC Over Voltage
(Alarm 68)
Beeping Alarm
Charger Failure
(Alarm 34)
Continuous Alarm
Inverter AC Over Voltage
(Alarm 0)
Beeping Alarm
Inverter AC Under Voltage
(Alarm 1)
Beeping Alarm
The external contacts in the
rear of the UPS are configured
for REPO operation and they
have been activated.
The load level is at or has
exceeded the configurable
threshold limit for a Level 1
Overload condition.
The load level is >101% and
<110% of the UPS rating.
The load is >110% of the UPS
rating.
Battery voltage levels have
exceeded the maximum
allowable limits.
A battery charger fault has been
detected.
The UPS has detected
abnormally high output voltage
levels.
The UPS has detected
abnormally low output voltage
levels.
The UPS de-energizes the load and enters
Standby mode. See “Installing Remote
Emergency Power-off” on page 26 for more
information.
The UPS can support the load indefinitely at
this load level.
The alarm clears when the load drops below
5% of the set point.
Remove some of the equipment from the
UPS. The UPS continues to operate, but
transfers to Fault mode in two minutes.
The alarm clears when the load drops below
5% of the set point.
Remove some of the equipment from the
UPS. The UPS continues to operate, but
transfers to Fault mode in 300 ms to one
second.
The alarm clears when the load drops below
5% of the set point.
The UPS turns off the charger until the next
power recycle. Contact your service
representative.
The UPS turns off the charger until the next
power recycle. Contact your service
representative.
The UPS transfers to Bypass mode if
supporting the load.
The UPS transfers to Bypass mode if
supporting the load.
88
|
Troubleshooting
Page 89

Table 17. Alarms, Notices, and Events
Alarms, Notices, and Events ActionPossible Cause
Bypass AC Over Voltage
(Notice 3)
Intermittent Alarm
Bypass AC Under Voltage
(Notice 4)
Intermittent Alarm
Bypass Under/Over Freq
(Notice 5)
Intermittent Alarm
Rectifier Input Over Current
(Alarm 26)
Beeping Alarm
Inverter Output Over
Current
(Alarm 27)
Beeping Alarm
DC Link Over Voltage
(Alarm 28)
Beeping Alarm
DC Link Under Voltage
(Alarm 29)
Beeping Alarm
The measured voltage on
Bypass has exceeded the upper
voltage limit specification for
bypass operation.
The measured voltage on
Bypass is less than the upper
voltage limit specification for
bypass operation.
The measured voltage on
Bypass is out-of-range for either
the upper or lower voltage limit
specification for bypass
operation.
The UPS has detected that
rectifier input current limits
have been exceeded.
The UPS has detected that the
inverter output current limits
have been exceeded.
The link or rail voltage has
exceeded its upper threshold
limit.
The link or rail voltage has
dropped below its lower
threshold limit.
A notification alarm is generated and the
notice is logged.
Only apply this setting when Qualify Bypass is
set to Always and utility is present, but above
the bypass overvoltage range.
Do not apply this setting if a Utility Not
Present alarm is active.
A notification alarm is generated and the
notice is logged.
Only apply this setting when Qualify Bypass is
set to Always and utility is present, but below
the bypass undervoltage range.
Do not apply this setting if a Utility Not
Present alarm is active.
A notification alarm is generated and the
notice is logged.
Only apply this setting when Qualify Bypass is
set to Always and utility is present, but outside
the bypass frequency range.
Do not apply this setting if a Utility Not
Present alarm is active.
The UPS transfers to Battery mode if
supporting the load.
The UPS transfers to Bypass mode if
supporting the load.
The UPS transfers to Battery mode if
supporting the load.
The UPS transfers to Battery mode if
supporting the load.
Troubleshooting
|
89
Page 90

Table 17. Alarms, Notices, and Events
Alarms, Notices, and Events ActionPossible Cause
DC Link Imbalance
(Alarm 1234)
Beeping Alarm
Rectifier Fault
(Alarm 30)
Continuous Alarm
Inverter Fault
(Alarm 31)
Continuous Alarm
Heatsink Over Temperature
(Alarm 73)
Beeping Alarm
Fatal EEPROM Fault
(Alarm 53)
Continuous Alarm
Output Short Circuit
(Alarm 58)
Beeping Alarm
Fan Failure
(Alarm 193)
Continuous Alarm
In High Efficiency Mode
(Event 227)
No Alarm
The internal ± DC bus (DC
rail) voltages generated in the
UPS are imbalanced.
The UPS has detected a fault in
the rectifier circuit while
attempting recovery from
Bypass mode or Converter
mode.
The UPS has detected a fault in
the inverter circuit while
attempting a recovery from
Bypass mode or Converter
mode.
The UPS has detected that one
of its heat sinks has exceeded
the maximum defined
operating temperature. Possible
fan failure.
There is EEPROM data
corruption due to a failed
device or incorrect flash
upgrade.
The UPS has detected an
abnormally low impedance
placed on its output and
considers it a short circuit.
The UPS has detected that one
or more fans are not
functioning properly.
The UPS is operating in High
Efficiency Mode.
The UPS transfers to Battery mode if
supporting the load.
Contact your service representative.
Contact your service representative.
The UPS transfers to Bypass mode if available.
If the bypass is not available or the UPS is in
power on or standby mode, the UPS transfers
to fault mode.
Ensure that the fans are spinning and that the
air intake vents on the UPS are not blocked.
Once the maximum temperature is reached,
the UPS shuts down.
Contact your service representative.
If the UPS is in Normal mode, the UPS
transfers to Bypass mode if available,
otherwise, the UPS shuts down after three to
five line cycles.
If the UPS is in Battery mode, the UPS shuts
down after three to five line cycles.
This is an alarm only. Contact your service
representative immediately and remove the
load.
None.
90
|
Troubleshooting
Page 91

Table 17. Alarms, Notices, and Events
Alarms, Notices, and Events ActionPossible Cause
UPS on Battery
(Event 168)
No Alarm
UPS Off
(Event 170)
No Alarm
ABM State Charging
(Event 1600)
No Alarm
ABM State Floating
(Event 1601)
No Alarm
ABM State Resting
(Event 1602)
No Alarm
ABM State Off
(Event 1603)
No Alarm
Clock Set Done
(Event 1999)
No Alarm
To Bypass Command
(Event 94)
No Alarm
From Bypass Command
(Event 95)
No Alarm
The UPS is operating from
batteries (Battery mode).
The UPS is not operating
(Standby or Fault mode).
The status of ABM charge
mode is constant current
charging.
The status of ABM charge
mode is floating.
The status of ABM charge
mode is resting.
The status of ABM charge
mode is Off or disabled.
The UPS real-time clock setting
has been adjusted. This can be
initiated from the LCD or from
the NMC card.
A request to transfer to Manual
Bypass Mode was received from
the software.
A request to transfer to Online
Mode was received from the
software.
None.
None.
None.
None.
None.
None.
None.
None.
None.
Troubleshooting
|
91
Page 92

Table 17. Alarms, Notices, and Events
Alarms, Notices, and Events ActionPossible Cause
UPS On Command
(Event 172)
No Alarm
UPS Off Command
(Event 173)
No Alarm
UPS Control Power On
(Event 181)
No Alarm
UPS System Normal
(Event 237)
No Alarm
A remotely issued UPS start up
command (On command) was
received from the software. It
indicates a manually requested
transition from Standby to
Online mode. This event is not
triggered for auto restarts.
A remotely issued UPS
shutdown command (Off
command) was received from
remote software. It causes the
UPS to open all output relays
and shed the load.
The UPS processor powered up,
either from battery or utility
power (in Standby or Online
mode).
The UPS is in a normal mode of
operation and no alarms are
active.
None.
None.
None.
None.
Silencing the Alarm
Press any button on the control panel to silence the alarm. Check the alarm condition and perform the
applicable action to resolve the condition. If any new alarm becomes active, the audible alarm resumes,
overriding the previously silenced alarm.
|
92
Troubleshooting
 Loading...