

Page 1

Dell™ Update Packages for
Linux Operating Systems
User’s Guide
Page 2

Notes and Cautions
NOTE: A NOTE indicates important information that helps you make better use of
your computer.
CAUTION: A CAUTION indicates potential damage to hardware or loss of data if
instructions are not followed.
____________________
Information in this document is subject to change without notice.
© 2009 Dell Inc. All rights reserved.
Reproduction of these materials in any manner whatsoever without the written permission of Dell Inc.
is strictly forbidden.
Trademarks used in this text: Dell, the DELL logo, and OpenManage are trademarks of Dell Inc.;
Microsoft and Windows are either trademarks or registered trademarks of Microsoft Corporation in
the United States and/or other countries; Intel is a registered trademark of Intel Corporation in the
United States and other countries; Red Hat and Red Hat Enterprise Linux are registered trademarks
of Red Hat, Inc. in the United States and other countries; SUSE is a registered trademark of Novell,
Inc. in the United States and other countries; VMware and ESX Server are registered trademarks or
trademarks of VMware, Inc. in the United States and/or other jurisdictions; Citrix and XenServer are
either trademarks or registered trademarks of Citrix Systems, Inc. in the United States and/or other
countries.
Other trademarks and trade names may be used in this document to refer to either the entities claiming
the marks and names or their products. Dell Inc. disclaims any proprietary interest in trademarks and
trade names other than its own.
December 2009
Page 3

Contents
1 Getting Started With Dell
Update Packages . . . . . . . . . . . . . . . . . . . 9
Overview . . . . . . . . . . . . . . . . . . . . . . . . . . 9
Server Update Utility and DUPs
Update Options
Supported Operating Systems . . . . . . . . . . . . . . 11
OpenIPMI Requirements
Using DUPs in the DTK Pre-Operating
System Environment
Dell-Qualified and Dell-Enabled Packages
Before You Begin . . . . . . . . . . . . . . . . . . . . 13
How to Obtain DUPs from the Dell
Support Website
Installation Order of DUPs
Important Tips to Remember for
Using DUPs . . . . . . . . . . . . . . . . . . . . . 15
Other Documents You May Need . . . . . . . . . . . . 15
Obtaining Technical Assistance
. . . . . . . . . . . . . . . . . . . 10
. . . . . . . . . . . . . . . . . . . 12
. . . . . . . . . . . . . . . . . . 13
. . . . . . . . . . . . . 10
. . . . . . . . . . . . . . . . . 11
. . . . . . . 13
. . . . . . . . . . . . . 14
. . . . . . . . . . . . 16
2 Using Dell Update Packages . . . . . . . . . . 17
Before You Begin . . . . . . . . . . . . . . . . . . . . 17
Contents 3
Page 4

Develop Your System Update Plan . . . . . . . . . 17
Acquiring DUPs
. . . . . . . . . . . . . . . . . . . 18
Update Packages Component and
System Compatibility
Executing DUPs
. . . . . . . . . . . . . . . . 18
. . . . . . . . . . . . . . . . . . . 19
Verifying the Digital Signature . . . . . . . . . . . 21
Compatibility Concerns
. . . . . . . . . . . . . . . 23
Effects of Applying the Updates on a
Running System . . . . . . . . . . . . . . . . . . . 24
Delivering DUPs to Your Systems
Updating Many Systems
. . . . . . . . . . 25
. . . . . . . . . . . . . . 26
Confirming the Update . . . . . . . . . . . . . . . 26
Typical Usage Scenarios. . . . . . . . . . . . . . . . . 27
Scenario One—Retasking a System
. . . . . . . . 27
Scenario Two — BIOS Update for
200 Systems . . . . . . . . . . . . . . . . . . . . . 29
3 Performing BIOS and Firmware
Updates Using Dell Linux
Online Repository . . . . . . . . . . . . . . . . . . 31
4 Contents
Overview . . . . . . . . . . . . . . . . . . . . . . . . . 31
Setting Up/Bootstrapping the Repository
Creating a Local Mirror
Installing Firmware-tools
. . . . . . . . . . . . . . . 32
. . . . . . . . . . . . . . . . 33
. . . . . . . . 32
Downloading Applicable Firmware . . . . . . . . . . . 33
Inventory Installed Firmware
Updating BIOS and Firmware
Updating BIOS and Firmware Using CLI
. . . . . . . . . . . . . . 34
. . . . . . . . . . . . . . 34
. . . . . . 34
Page 5

Updating BIOS and Firmware Using
Graphical User Interface (GUI) . . . . . . . . . . . 36
Automatically Update Firmware
Viewing Log Information
. . . . . . . . . . . . 37
. . . . . . . . . . . . . . . . 37
4 Update and Rollback in Unified
Server Configurator - Lifecycle
Controller Enabled . . . . . . . . . . . . . . . . . 39
Update in USC LCE . . . . . . . . . . . . . . . . . . . . 39
Rollback in USC LCE
. . . . . . . . . . . . . . . . . . . 40
5 Command Line Interface Reference . . . . 41
Using the CLI . . . . . . . . . . . . . . . . . . . . . . . 41
CLI Options
Exit Codes for CLI
. . . . . . . . . . . . . . . . . . . . . 41
. . . . . . . . . . . . . . . . . . . . 44
6 Rebuilding Packages . . . . . . . . . . . . . . . . 47
Overview . . . . . . . . . . . . . . . . . . . . . . . . . 47
Dell-Qualified Path . . . . . . . . . . . . . . . . . . . 47
Dell-Enabled Path
Dynamic Kernel Support
. . . . . . . . . . . . . . . . . . . . 47
. . . . . . . . . . . . . . . . . 49
Determining Whether Your Package
Is Supported
. . . . . . . . . . . . . . . . . . . . . . . 50
Setting Up a Test System for
Rebuilding a Package
. . . . . . . . . . . . . . . . . . 51
Contents 5
Page 6

Scenario. . . . . . . . . . . . . . . . . . . . . . . 51
Prerequisites for the Test System
. . . . . . . . . . . . 52
Rebuilding a Package to Add Kernel
Support to a Single System
. . . . . . . . . . . . . . . 54
Rebuilding the Package to Add Kernel
Support for Multiple Kernel Versions
Scenario
. . . . . . . . . . . . . . . . . . . . . . . 55
. . . . . . . . . . 54
Deploying Custom Packages
Across the Environment
. . . . . . . . . . . . . . 56
7 Troubleshooting . . . . . . . . . . . . . . . . . . . 57
Known Issues . . . . . . . . . . . . . . . . . . . . . . 57
Diagnostic Tasks will not run while a
DUP reboot is pending
Abnormal termination of a DUP. . . . . . . . . . . 57
Error while loading shared libraries
Insufficient free physical memory to
load the BIOS image . . . . . . . . . . . . . . . . 57
Kernel panic while running storage
controller firmware update packages
Loss of functionality while renaming
Linux DUPs . . . . . . . . . . . . . . . . . . . . . 58
Yum and Up2date repository management
software caches incorrect repository
metadata . . . . . . . . . . . . . . . . . . . . . . 58
Use Dell Linux Repository with yum and
Red Hat Enterprise Linux version 4 . . . . . . . . . 58
. . . . . . . . . . . . . . . 57
. . . . . . . . 57
. . . . . . . 58
6 Contents
Messages . . . . . . . . . . . . . . . . . . . . . . . . 59
DUP Message Logs
Messages Log
Messages Log File
. . . . . . . . . . . . . . . . . . . 69
. . . . . . . . . . . . . . . . . . . 69
. . . . . . . . . . . . . . . . . 70
Page 7

Support Log File Example. . . . . . . . . . . . . . 70
Index . . . . . . . . . . . . . . . . . . . . . . . . . . . . . . . 73
Contents 7
Page 8

8 Contents
Page 9

1
Getting Started With Dell Update Packages
Overview
Dell™ Update Packages (DUPs) allow administrators to update a wide range
of system components simultaneously and apply scripts to similar sets of
Dell systems, to bring system software components up to the same
version levels.
By using DUPs, you can perform the following functions:
• Apply an individual update to a system by using an interactive command
line interface (CLI)
• Execute multiple updates for your system by using a script comprised
of non
-
interactive commands that you write using the CLI feature
• Leverage your operating system’s scheduling and software distribution
utilities to apply updates remotely to any number of servers
Each DUP (Dell Update Package) is designed to update a single software
component on your system. This product feature allows you to select and
apply the updates that you want for your system, minimizing the resources
required to transport the DUP across your network.
DUPs improve your ability to update your systems effectively. For example,
each DUP contains pertinent information about when Dell issued the
package, which systems the DUP is designed to support, and what functional
enhancements are contained in the update or which problems were fixed.
Each DUP contains the execution logic to verify that the update will work on your
system. When using DUPs, you are not required to use any Dell OpenManage™
software applications, and you do not have to create alternative media. Each DUP
also carries a digital signature to ensure reliable and trusted authentication.
See "Verifying the Digital Signature" for more information.
You can use DUPs interactively, which is ideal for applying a limited number
of updates. When you execute a package interactively, it first displays
a scrollable view of the package release notes. You may view these notes
Getting Started With Dell Update Packages 9
Page 10

before optionally continuing with the execution of the package. You can also
use DUPs in non
experienced user, to accommodate large environments with multiple systems,
or to process multiple updates per system.
This guide is designed to familiarize you with Linux DUPs so that you can
begin applying them to simplify the system software maintenance on your
Dell systems. The "Using Dell Update Packages" section of this guide
provides several sample scenarios for using DUPs.
-interactive mode to facilitate rapid deployment for an
Server Update Utility and DUPs
Dell OpenManage Server Update Utility (SUU) is a DVD–based application
that is used to identify and apply the latest updates to your system. It is a
Graphical User Interface (GUI) and a Command Line Interface (CLI) based
application. SUU compares the versions of components currently installed on
your system with the update components packaged on the Dell Server
Updates DVD and then displays a comparison report of the versions and
provides the option of updating the components. You can use SUU to update
your system or view the updates available for any system listed in the
repository. The Dell Server Updates DVD is available as part of the
Dell OpenManage subscription service kit.
Linux DUPs can be downloaded from the Dell Support site at
support.dell.com. They are also available in the repository on the Dell Server
Updates DVD. The repository folder in the Dell Server Updates DVD
contains Windows and Linux DUPs, Catalog.xml (that contains information
about both Windows and Linux DUPs), and the
DellSoftwareBundleReport.html. SUU uses DUPs to update the system
components.
Update Options
You can update your system components using any one of the following two
options:
•
Element Update
(element) to a specific version. Use DUP to perform element updates.
•
System Update
that you use SUU to automatically:
– inventory the Dell firmware and drivers on that system
10 Getting Started With Dell Update Packages
–To update an
–To update all elements on your system. Dell recommends
individual
system software component
Page 11
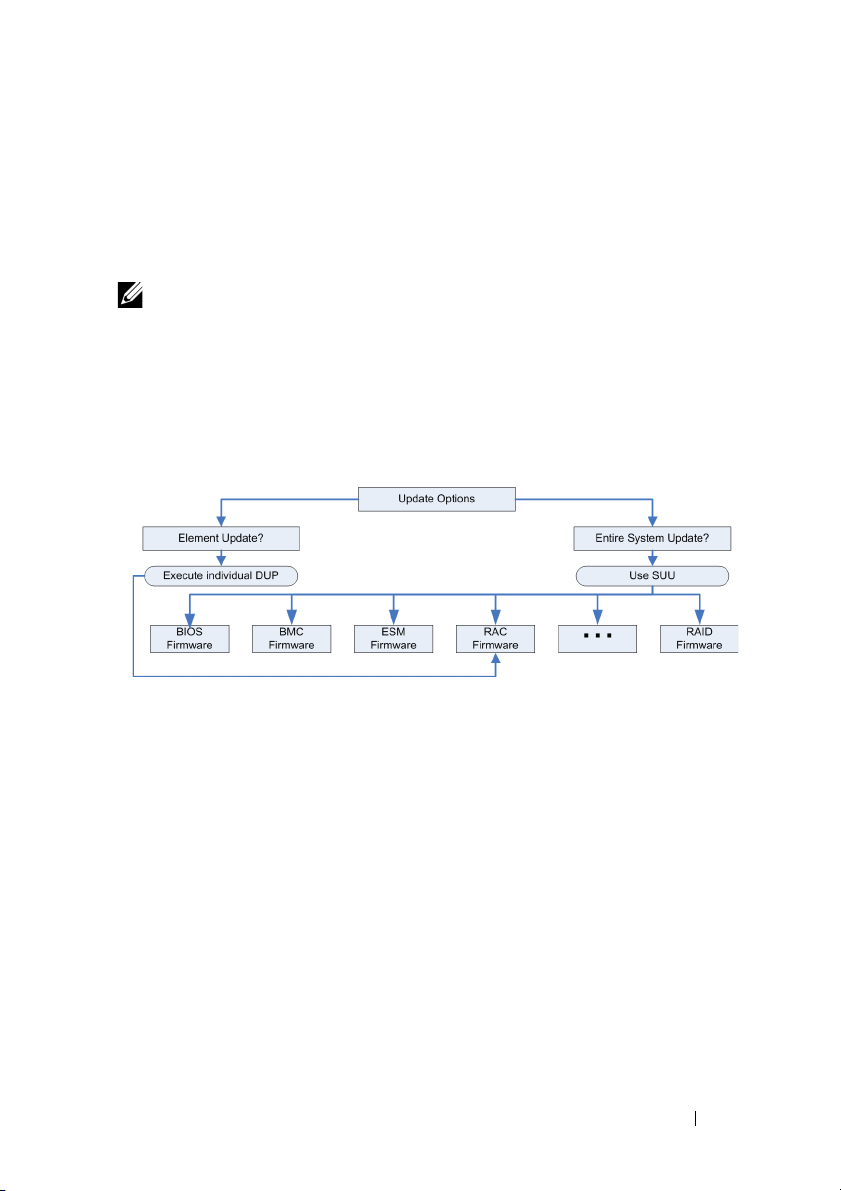
– compare the installed configuration with the content on the
Server Updates
– report on discrepancies and recommend updates, including any
prerequisites that may impact the update sequence
– update and (if needed) reboot the system
NOTE: See the Server Update Utility User's Guide available on the Dell Support
website at support.dell.com/manuals, for information on how SUU identifies and
applies updates to your entire system.
Figure 1-1 helps you choose between SUU and DUPs when performing
updates.
Figure 1-1. Choosing between SUU and DUPs
DVD
Dell
Supported Operating Systems
For a complete list of supported systems and operating systems, see the
Dell Systems Software Support Matrix available on the Dell Support website
at support.dell.com/manuals. The Dell Systems Software Support Matrix has
information about the various Dell systems, the operating systems supported
by these systems, and the Dell OpenManage™ components that can be
installed on these systems.
OpenIPMI Requirements
Certain DUPs may require the latest OpenIPMI Linux device drivers to be
installed on your system. If you are prompted during installation to obtain the
latest drivers, see the Dell Support website at support.dell.com, or visit the
support site for your Linux operating system to download the latest drivers.
Getting Started With Dell Update Packages 11
Page 12

Using DUPs in the DTK Pre-Operating System Environment
The Dell OpenManage Deployment Toolkit (DTK) includes utilities, sample
scripts, and other tools for configuring and deploying Dell systems. DTK is
released in two versions: the Linux version is distributed as an Embedded
Linux
-based ISO, and the Windows
(Windows PE) version is distributed as a package of Dell
with instructions on how to integrate with a standard Windows PE image.
Booting the CD created from the ISO image creates a To ol k it folder which
contains subdirectories with the necessary files to perform deployment tasks.
NOTE: Currently, DUPs are supported only in the DTK embedded Linux
environment.
The bootable DTK embedded Linux environment is required for bare-metal
(or pre-operating system) DUP execution and is bootable from many types of
media and does not require the local disk. It allows users to use Linux DUPs
for change management.
Users can boot to the system under the DTK embedded Linux Environment
and execute the package from either a network drive, a USB device
supporting Linux file systems, or a CD drive, with the following options:
Interactive Mode:
./packagename
Non
-Interactive Mode:
./packagename -q
®
Preinstallation Environment
-provided content
or
./packagename -q -r
A successful update will return the exit code to either 0, 2 or 6.
NOTE: For dependencies and information on running DUPs in the Dell-provided
embedded Linux environment and in a customized embedded Linux environment
and for information on the required files and tools, see the Dell OpenManage
Deployment Toolkit User's Guide on the Dell Support website at
support.dell.com/manuals. The required minimum kernel version is 2.6.9-42.
12 Getting Started With Dell Update Packages
Page 13

Dell-Qualified and Dell-Enabled Packages
A DUP can be applied as a Linux operating system DUP for a system in one
of the following ways:
• The DUP that you are applying
See "Dell-Qualified Path" for more information.
• The DUP that you are applying can be
kernels and operating systems in your environment. See "Dell-Enabled
Path" for more information.
matches
the Dell-qualified operating systems.
enabled
to work with the running
Before You Begin
DUPs support Dell systems running the operating systems listed in the
"
Overview" section.
that has root (administrator) privileges.
How to Obtain DUPs from the Dell Support Website
1
Log on to
2
Click
Drivers and Downloads.
3
Enter your service tag or choose your product model.
4
Select your product family and product line.
5
Select your operating system, language, category, and the update
importance. A list of applicable updates are displayed.
6
Click
Download Now
7
You can also download a different file format from the column labeled
File Title
If you want to download more than one file type, you must do so one at
atime.
8
To complete the download of your file, follow the directions on the screen.
You must be able to log on to the system with an account
support.dell.com
. Select a file format for your DUP and single-click its filename.
.
.
Getting Started With Dell Update Packages 13
Page 14

Before installing DUPs, read the information provided, both online and in the
download package. Ensure that the updates you selected are both necessary
and appropriate for your system. You may also need to complete some or all
of the following steps:
1
Add executable privileges to the package filename. Type the following
command:
chmod +x packagename.bin
2
Verify that the package meets the prerequisites for performing an update.
To perform the check from the CLI, type the following command at the
command line prompt:
./packagename.bin -c
3
Determine a methodology for performing the updates.
• Single update method: Run the DUP from the command line in
interactive mode to perform the update.
• Script method: Use this method if you have a requirement for running
one or more updates from a script on one or more systems in
non-interactive mode.
Installation Order of DUPs
If you are installing multiple DUPs, install the updates that require a reboot at
the end. Table 1-1 provides the recommended installation order.
Table 1-1. Update Packages: Recommended Installation Order
Installation Order System Software Components
1 Device driver
2 Device firmware
3ESM firmware
4BIOS
NOTE: If you have updated the BIOS, the changes to the BIOS do not take effect
until you reboot your system.
NOTE: To ensure a single reboot, you must install the ESM firmware update before
the BIOS update.
14 Getting Started With Dell Update Packages
Page 15

Important Tips to Remember for Using DUPs
• Prepare repair disks before you perform any updates.
• Download the currently installed version of drivers, BIOS, and firmware
so that you have a backup plan in case any issues arise.
• Ensure that you have a backup of operating system files or system
configuration files stored on a system other than the one you are updating.
• Ensure that the updates are planned for and performed by the system
administrator who knows which applications could be affected.
• Before updating all systems, perform the upgrade on one nonessential
system to test the update.
• Do not run other applications while executing DUPs.
• Do not shut down the system while an update is in progress.
• Ensure that the system reboots without power interruption after
performing a BIOS update.
• Do not close any terminal console windows used for performing the
DUP CLI execution, while DUP executions are in progress.
Other Documents You May Need
In addition to this guide, you can find the following guides on the Dell Support
website at support.dell.com/manuals. To access these documents, go to
support.dell.com/manuals and select your product or use the direct link on the
Dell Systems Management Tools and Documentation DVD.
•The
Dell OpenManage Legacy Compatibility Guide
information for all legacy Dell systems.
summarizes support
NOTE: DUPs do not require the Dell OpenManage Server Administrator to be
installed on your system.
•The
Server Update Utility User's Guide
identify and apply updates to your system. Server Update Utility (SUU) is
one of the applications used to update your Dell system or to view updates
available for any supported system. SUU compares the versions of
components currently installed on your system with update components
packaged on the
report of the versions and provides an option of updating the components.
Dell Server Updates
Getting Started With Dell Update Packages 15
provides information on how to
DVD. It then displays a comparison
Page 16

•The
•The
•The
•The
Dell OpenManage Deployment To ol ki t ( D TK ) Us e r 's Gu id e
information on how to execute Linux DUPs in the Dell–provided or in the
customized embedded Linux environment including the required
dependencies.
Dell OpenManage IT Assistant User’s Guide
installing, configuring, and using IT Assistant. Dell OpenManage IT
Assistant allows you to load DUPs and System Update Sets into a central
repository, then compare the packages to the versions of the software
currently running on your enterprise systems. You can then decide whether
to update systems that are not in compliance, either immediately or
according to a schedule you define. You can use SUU with IT Assistant to
update multiple systems in a single session.
Dell Systems Software Support Matrix
various Dell systems, the operating systems supported by these systems,
and the Dell OpenManage components that can be installed on these
systems.
Glossary
provides information about the terms used in this document.
has information about
has information about the
provides
Obtaining Technical Assistance
If at any time you do not understand a procedure described in this guide, or if
your product does not perform as expected, different types of help are
available. For more information see
Installation and Troubleshooting Guide or the Hardware Owner’s Manual.
Additionally, Dell Enterprise Training and Certification is available;
see www.dell.com/training for more information. This service might not be
offered in all locations.
"Getting Help" in your system's
16 Getting Started With Dell Update Packages
Page 17

2
Using Dell Update Packages
Before You Begin
This section is designed to help you get the most out of Dell™ Update
Packages (DUPs). Updating the system software on your Dell systems should
be a key element of your company's overall change management policies and
procedures. Maintaining the system software on your Dell systems helps
ensure smooth operation.
Before you apply any update to your system, you may want to carefully plan
your update strategy, based on the conditions that are necessitating the
update. Many reasons may exist for making the decision to update your
Dell system, such as:
• Correcting a security concern
• Correcting a problem on your system, based on a recommendation from
Dell support personnel
• Updating a system software component to a minimum level required by
an application
• Gaining access to a new feature or improved performance
• Updating all system components as part of your company's periodic
maintenance process
Each of the preceding update situations entails different levels of urgency,
but all require a certain level of planning to ensure a successful update with
minimal disruption to your applications and users. The following subsections
help you develop the system update strategy that best fits your needs, your
company's policies and procedures, and the tools available to you.
Develop Your System Update Plan
You may want to update your system for many reasons, as mentioned in the
preceding section. This update requirement may be planned or unplanned.
Using Dell Update Packages 17
Page 18

Planned updates occur as a part of your regular cycle of maintaining your
systems with up-to-date BIOS, firmware, and drivers. Most IT organizations
establish a regular schedule for performing the updates that are integrated
with the planned maintenance functions. The frequency of these updates
varies from company to company; however, it is common for companies to
adopt quarterly or semi-annual update schedules. Irregular but planned
updates may occur when a system is retasked with a new application or when
the operating system is upgraded or changed. When you have scheduled
planned outage or downtime for your system, consider upgrading the system
software components.
Unplanned updates typically occur as a result of applying a critical upgrade to
your system to avoid data loss, service interruption, or security threats.
You may, for example, be advised to apply an update in response to a call you
have placed to a Dell support professional. Although the urgency of applying
such an update is greater than a planned update, you know that you must apply
careful thought and consideration to ensure a successful update with minimal
disruption to your users. The key to success is always having a well-planned
strategy for all update scenarios.
Acquiring DUPs
Dell provides a number of aids to help you determine whether or not your
system requires an update. You can locate the DUP for your system on the
Dell Support website at support.dell.com. For instructions, see "How to
Obtain DUPs from the Dell Support Website."
Update Packages Component and System Compatibility
After you locate your DUP, read the summary information to determine
whether or not you should download the update and apply it to your system.
You can run the DUP and read the summary information by using the
command line interface option --version. For more information on the
--version option, see "Command Line Interface Reference."
This information is provided to help you determine whether the update is
appropriate for your system and your specific environment.
18 Using Dell Update Packages
Page 19

Executing DUPs
You can run DUPs from the console in both interactive and non-interactive
modes.
Interactive Mode
In the interactive mode, you issue a command, and the interface prompts
you for permission to continue executing the command. When you execute
a package interactively, it first displays a scrollable view of the release notes for
the package. You may view these notes before continuing with the execution of
the package.
The DUP may be executed from a local console attached to the target server
or from an administrator’s workstation by using a remote shell, such as ssh.
Once a package has been delivered to the target system, administrators can
execute the package in its simplest form by typing ./packagename.bin from the
working directory, where packagename is the model and component
name of the package. This syntax assumes that the .bin file has the
appropriate permissions set and that a user account with root privileges
executes the update. Once underway, the DUP will echo its progress and
status to the console (stdout) and log its activity to /var/log/messages.
The following example shows the command for applying a BIOS DUP to
a Dell system in interactive mode:
chmod +x ./PE1650-BIOS-LX-A10.bin
./PE1650-BIOS-LX-A10.bin
The DUP application writes the following messages to the screen. Interactive
mode requires Y/N responses to continue with update and reboot.
Collecting inventory...
Running validation...
BIOS
The version of this Update Package is newer than the currently installed version.
Software application name: BIOS
Package version: A10
Installed version: A9
Continue: Y/N?
Y
Y entered; update was forced by user
Executing update...
WARNING: DO NOT STOP THIS PROCESS WHILE BIOS UPDATE IS IN PROGRESS.
STOPPING MAY CAUSE YOUR SYSTEM TO BECOME UNSTABLE!
Update successful.
Would you like to reboot your system now?
N
The system should be restarted for the update to take effect.
-specific
Using Dell Update Packages 19
Page 20

Version Information
One of the most informative commands uses the --version option.
An actual example that retrieves extensive version information for a DUP is
as follows:
[root@localhost 1027]# ./PE1650-BIOS-LX-A10.bin --version
Dell Update Package 2.x
Copyright (c) 2003-2004 Dell Inc. All rights reserved.
Release Title:
Dell Server System BIOS, A10
Release Date:
November 21, 2003
Release ID:
R60452
Supported System(s):
PowerEdge 1650
Prerequisite(s):
BIOS A05
Description:
PowerEdge 1650, BIOS, A10
Supported Device(s):
Server System BIOS
Fixes / Enhancements:
* Added support for version 2.8 of the onboard RAID controller (PERC3/Di) firmware.
* Corrected issues affecting the Preboot Execution Environment (PXE).
* Corrected problems which cause the system to power up at unexpected times.
* Corrected problems with the Remote BIOS Update feature.
* Corrected issues in BIOS USB Support.
* Corrected issues in Embedded Server Management support.
Non-Interactive Mode
Non-interactive mode is essential when executing a script for applying DUPs
to multiple systems. When applying DUPs to multiple systems, you cannot
answer yes or no during script execution. Your script specifies -q for
non
-interactive mode; often script writers add -f for force and -r for reboot if
a reboot is required for the type of update being performed.
In the following command example, the command applies a BIOS DUP
without any user confirmation, forces the execution in the case of a
downgrade from a more recent BIOS version, and reboots the system after the
DUP is applied. This command is executed provided the DUP satisfies all the
system and version requirements.
./PE2850-ESM_FRMW_LX_R92394.bin -q -f -r
For more information on the command line interface (CLI), see "Command
Line Interface Reference."
20 Using Dell Update Packages
Page 21

Verifying the Digital Signature
A digital signature is used to authenticate the identity of the signer of a file
and to certify that the original content of the file has not been modified since
it was signed.
If you do not already have it installed on your system, you must install the
Gnu Privacy Guard (GPG) to verify a Linux DUP digital signature. To use
the standard verification procedure, perform the following steps:
1
Get the Dell Linux public GnuPG key, if you do not already have it.
You can download it by navigating to
Dell Public GPG key
2
Import the public key to your gpg trust database by running the following
link.
command:
gpg --import <Public Key Filename>
NOTE: You must have your private key to complete the process.
3
To avoid a distrusted-key warning, validate the public key by its fingerprint
before you use it.
a
Type the following command:
gpg --edit-key 23B66A9D
b
Within the GPG key editor, type
appears:
pub 1024D/23B66A9D 2001-04-16 Dell, Inc.
(Product Group) <linux-security@dell.com>
Primary key fingerprint: 4172 E2CE 955A 1776
A5E6 1BB7 CA77 951D 23B6 6A9D
lists.us.dell.com
fpr
. The following message
and clicking the
If the fingerprint of your imported key is the same as the key owner's,
you have a correct copy of the key. You can verify the key's owner in
person, over the phone, or by any other means that guarantees that
you are communicating with the key's true owner.
c
While still in the key editor, type
d
Answer the list of trust-validation questions that appears and create
sign
.
a passphrase to use as your secret key.
You must import and validate the public key only once.
Using Dell Update Packages 21
Page 22

4
Obtain the Linux DUP and its associated signature file from the
Dell Support website at
NOTE: Each Linux DUP has a separate signature file, which is shown on the
same web page as the DUP. You need both the DUP and its associated
signature file for verification. By default, the signature file is named the
same as the DUP filename with a .sign extension. For example, if a Linux
DUP is named PE1850-BIOS-LX-A02.BIN, its signature filename is
PE1850-BIOS-LX-A02.BIN.sign. To download the files, right-click the
download link and use the "Save Target As..." file option.
5
Verif y th e DUP:
support.dell.com/support/downloads
.
gpg --verify <Linux Update Package signature
filename> <Linux Update Package filename>
The following example illustrates the steps that you follow to verify a 1425SC
BIOS DUP:
1
Download the following two files from
support.dell.com
:
• PESC1425-BIOS-LX-A01.bin.sign
• PESC1425-BIOS-LX-A01.bin
2
Import the public key by running the following command line:
gpg --import <linux-security-publickey.txt>
The following output message appears:
gpg: key 23B66A9D: "Dell Computer Corporation
(Linux Systems Group) <linuxsecurity@dell.com>" not changed
gpg: Total number processed: 1
gpg: unchanged: 1
22 Using Dell Update Packages
Page 23

3
Validate the Dell public key, if you haven’t done so previously, by typing
the following command:
gpg --edit-key 23B66A9D
At the command prompt, type the following commands:
fpr
sign
Answer the validation questions.
4
Verify the PESC1425 BIOS package digital signature by running the
following command:
gpg --verify PESC1425-BIOS-LX-A01.bin.sign
PESC1425-BIOS-LX-A01.bin
The following output message appears:
gpg: Signature made Thu 14 Apr 2005 04:25:37 AM
IST using DSA key ID 23B66A9D
gpg: Good signature from "Dell Computer
Corporation (Linux Systems Group) <linuxsecurity@dell.com>"
NOTE: If you have not validated the key as shown in step 3, you will receive
additional messages:
gpg: WARNING: This key is not certified with a
trusted signature!
gpg: There is no indication that the signature
belongs to the owner.
Primary key fingerprint: 4172 E2CE 955A 1776
A5E6 1BB7 CA77 951D 23B6 6A9D
Compatibility Concerns
DUPs are designed to confirm that all prerequisites are satisfied before applying
the update to your system. Each DUP checks to ensure the following:
• The logged-on user has root privileges.
• The DUP to be applied in the command is compatible with your target system.
• The DUP to be applied in the command is compatible with the operating
system running on your system.
Using Dell Update Packages 23
Page 24

• The device associated with the DUP is present on your system.
• The minimum required versions of related system software are running on
your system.
DUPs are designed with built-in error handling capabilities to ensure that the
preceding requirements are validated. If the conditions are not met, no
update occurs. DUPs also check for dependencies between BIOS and certain
ESM packages. The application design allows you to create groups of DUPs
and apply them to a wide range of systems. Additionally, if you only want to
verify that a given package can be applied to your system, you can invoke the
package by using the following CLI command:
./Packagename.bin -c
This command executes the dependency rules within the DUP, issues any
warnings, exits without applying the update to your system, and writes the
results to the console. You can also use the DUP to set an exit code to
perform decisions within your scripts.
Effects of Applying the Updates on a Running System
System Reboot Required
Certain packages, such as those that update the system BIOS, require a
reboot for the new software to take effect. After you apply an update that
requires a reboot, you must restart the system to complete the update.
You have the option of choosing to defer the reboot until another time as
long as you do not turn off the system. This feature is primarily intended to
allow you to apply any number of updates together and perform the system
reboot after the last update has been applied. If this process is interrupted,
for example, through a power interruption, you must repeat the updates.
Therefore, Dell recommends that you schedule updates for a time when the
reboot can take place immediately after you apply the last update.
Impact on Users and Applications
Generally, you can apply the updates to a running system because they
consume few system resources. Be sure to read the information contained in
the DUP before applying the update to determine if applying the update may
cause a service interruption to your users or applications. When in doubt,
always apply updates at a time when no critical applications or users require
the system.
24 Using Dell Update Packages
Page 25

Specifying the Order of Multiple Updates
When applying multiple updates at the same time, be sure to use the order
indicated in "Installation Order of DUPs." As previously noted in "System
Reboot Required," you may defer rebooting the system until after running the
last of multiple DUPs.
Saving Console Output
As the DUPs are executed, messages are printed to the console. To redirect
console output, use the following syntax with interactive commands:
./packagename.bin | tee -a logname.log
The | tee specifies the output from the DUP to be sent to both the console
and to a log file. The -a switch ensures that output is appended to a file,
protecting any previous log file output from being overwritten.
The following are two example commands that redirect output to a log file:
./PE2600-BIOS-LX-A01.bin | tee -a /var/bioslogs.log
./PE2600-BIOS-LX-A01.bin -q | tee -a
/var/bioslogs.log
If you run these commands in the order shown above, the first command
directs its interactive mode output to be appended to the log file. The second
command directs its non
-interactive mode output to be appended to the end
of the same log file.
Delivering DUPs to Your Systems
The DUP application does not provide scheduling and delivery of the packages to
multiple systems. You must rely on third-party or native operating system
applications to accomplish script execution and distribution on multiple systems.
Using Software Distribution Applications With DUPs
Many IT organizations use internally developed or purchased software
distribution applications to remotely install and update software.
Using Dell Update Packages 25
Page 26

Updating Many Systems
For large environments that consist of hundreds or perhaps thousands of
systems, remote software distribution applications provide the best solution.
Many of these tools can effectively leverage the DUP and provide the
convenience of installing and updating a variety of software, such as operating
systems and applications, in a heterogeneous environment.
Network file shares also are an effective method of making DUP accessible in
a distributed environment. When a DUP begins execution, it first copies the
contents of the package to a temporary location on the system’s local drive.
This process ensures that the update can be completed even if the connection
to the network share is lost for any reason.
Stand-alone Systems and Firewalls
For systems that are not connected to the Internet or that have firewalls
which block user downloads, you need to download your DUP from
support.dell.com by using a system that does have access to the Internet,
such as your desktop or portable computer. You can make DUP available to
your system by copying them onto removable media that your system supports
(such as CD, USB devices, tape, and so on).
Confirming the Update
To ensure that DUPs were applied to your system, review the console output
that was generated during execution. See "Troubleshooting" for detailed
information about the messages.
If you want to revert to a previous (older) version of the software after
updating to a newer version, you must download the appropriate DUP from
support.dell.com and install it. To install the previous version from a script,
use -q (unattended) mode. In addition, you must use the CLI -f option,
which forces the downgrade.
NOTE: If your system loses power during the update process, you must perform the
updates again.
26 Using Dell Update Packages
Page 27

NOTE: DUPs for Linux can also be found in the repository on the Dell Server
Updates DVD that contains the updated BIOS, and firmware components for
Dell systems. The Dell OpenManage™ Server Update Utility (SUU) is an application
for identifying and applying updates to your system. You can use SUU to update
your Dell system or to view updates available for any system supported by SUU.
It compares the versions of components currently installed on your system with
update components packaged on the Dell Server Updates DVD and then displays
a comparison report of the versions and provides the option of updating the
components. See the Server Update Utility User's Guide available on the
Dell Support website at support.dell.com/manuals for more information.
Typical Usage Scenarios
Scenario One—Retasking a System
You are the system administrator for a large company. Your group requires an
additional system to support a new financial analysis package, and you have
access to a Dell system that is no longer in use, from another department
within the company. Because the Dell system has an older operating system
installed on it, you plan to upgrade the operating system before installing the
new financial application. You also plan to install the most current BIOS and
ESM firmware offered by Dell, as well as install the Dell OpenManage Server
Administrator systems management software.
To prepare the system to run the company's new financial software, perform
the following general steps:
1
Use the
came with the Dell system to install the most current version of the
Red Hat
2
Log on to
Dell hardware service tag for the Dell system. Otherwise, you can also
select the
3
Locate the BIOS and ESM firmware DUPs for the Dell system and
download them.
Additionally, download the Server Administrator application.
Dell Systems Management Tools and Documentation
®
Enterprise Linux® AS operating system.
support.dell.com
Model
.
, select
Drivers and Downloads
DVD that
and enter the
Using Dell Update Packages 27
Page 28

4
Start to verify the signature of the packages by first downloading the
following two files from
• PE2850-BIOS-LX-A20.bin.sign
• PE2850-BIOS-LX-A20.bin
5
Import the public key by running the following command line:
gpg --import <linux-security-publickey.txt>
The following output message appears:
gpg: key 23B66A9D: "Dell Computer Corporation
(Linux Systems Group) <linux-security@dell.com>"
not changed
gpg: Total number processed: 1
gpg: unchanged: 1
6
Verify the public key by typing the following command:
gpg --edit-key 23B66A9D
Then at the command prompt, type the following commands:
fpr
sig
n
7
Verify the PE2850 BIOS package digital signature by running the following
command:
gpg --verify PE2850-BIOS-LX-A02.bin.sign PE2850BIOS-LX-A02.bin
The following output message appears:
gpg: Signature made Thu 14 Apr 2005 04:25:37 AM
IST using DSA key ID 23B66A9D
gpg: Good signature from "Dell Computer
Corporation (Linux Systems Group) <linuxsecurity@dell.com>"
8
Copy the files that you downloaded to a directory where you want to store
all the packages for the Dell system, for example, to the
/home/updates/2850/bin
support.dell.com
directory.
:
28 Using Dell Update Packages
Page 29

9
Create a simple script that executes the following packages one-by-one in
this order:
a
ESM system firmware
b
BIOS
Use the CLI
-q
option on each line in the script for these packages so that
you can schedule the process by using the task manager. On each line of
the file, you also include
check the results of the execution. Use the CLI
| tee -a /var/log/upgrade.log
-r option for the last line
to
(BIOS) of the script.
10
You analyze the log file, find that the packages installed successfully, and
note that the system was rebooted. You then install Server Administrator.
At this point, the Dell system is running the most current operating system,
system BIOS, and system firmware. You are now ready to install the financial
application for your division.
Scenario Two — BIOS Update for 200 Systems
You are the system administrator for a large business with over 500 stores.
Every store location has a Dell system that is used to manage the company’s
inventory and billing systems. About 200 of these stores are running on
Dell systems. The latest BIOS update available on support.dell.com is
designed to dynamically regulate the system's cooling fan speeds, which
allows the systems to run quieter and consume less energy. Because you
remotely manage these systems, you have invested in a software distribution
tool that allows you to schedule remote software installation and updates.
You also have a planned 4-hour service window each weekend when you can
perform any maintenance functions necessary on the company’s systems.
To roll out the BIOS update to the company’s Dell systems, you perform the
following general steps:
1
Log on to
Dell hardware service tag for the Dell system. Otherwise, you can also
select the
2
Select
3
Download the new BIOS DUP for the Dell system.
chmod +x packagename.bin
support.dell.com
Model
.
BIOS
as the category.
, select
Drivers and Downloads
and enter the
Using Dell Update Packages 29
Page 30

4
Use the software distribution tool to create an update task that delivers the
BIOS DUP to all the systems in the network.
The update task is a script that invokes the BIOS DUP and uses the
CLI
-r -q > redirect_output.log options to ensure that the system is
rebooted when necessary.
Because this BIOS DUP executes only on a Dell system, you can plan
on distributing this to all systems regardless of the system model type.
The DUP does not affect other systems.
5
Use the software distribution tool to schedule the BIOS update task to run
on all systems at 2:00 A.M. this coming Saturday, which falls within the
allotted 4-hour maintenance window.
6
On Sunday morning, you log in to your system and check the execution
results report within the software distribution tool and determine that
180 of your 200 systems successfully applied the BIOS update.
7
The attempted BIOS update on the remaining 20 systems returned the
information that the update was not required.
8
Log on to one of the 20 systems and check the BIOS package's
redirect_output.log
You confirm that on these 20 systems, the BIOS version was already
up–to–date because these systems were those most recently purchased from
Dell.
You have successfully completed the BIOS update process for the company.
file.
30 Using Dell Update Packages
Page 31

3
Performing BIOS and Firmware Updates Using Dell Linux Online Repository
Overview
You can update your system to the latest version or to a specific version of the
BIOS and firmware available in the Dell Linux online repository. The updates
are available in the RPM Package Manager (RPM) format. RPM is a standard
package format for software updates specific to Linux operating systems. You
can inventory the system, scan the repository for matching firmware with
newer version using repository management software such as yum, up2date,
rug, and zypper. The repository management software support the following
operating systems:
• Yum: Red Hat Enterprise Linux 5 Update 3 (x86_32, x86_64)
• Up2date: Red Hat Enterprise Linux 4 Update 8 (x86_32, x86_64)
• Rug: SUSE Linux Enterprise Server 10 SP3 (x86_64)
• Zypper: SUSE Linux Enterprise Server 11 (x86_64)
Firmware-tools are used to update BIOS and firmware on your system. With
firmware-tools, the RPM-based BIOS and firmware updates are available
along with the packages containing the tools to install those updates. Using a
repository management software, you can easily update your BIOS and
firmware to the latest or specific versions on your system.
The latest BIOS and firmware updates are available at the following location:
http://linux.dell.com/repo/hardware/latest/
Performing BIOS and Firmware Updates Using Dell Linux Online Repository 31
Page 32

The steps to update BIOS and firmware for your system are:
1
Setup/bootstrap the repository
2
Install firmware-tools
3
Download applicable firmware
4
Update BIOS and firmware
The commands to setup, install, and update RPM-based BIOS and firmware
for yum, up2date, rug, and zipper are provided in this section.
Setting Up/Bootstrapping the Repository
To setup/bootstrap the Dell Linux online repository, run the following
command at the command prompt:
wget -q -O http://linux.dell.com/repo/hardware/latest/bootstrap.
cgi | bash
The system is configured to access the Dell Linux online repository using
supported repository management software. The Dell GPG keys and
libsmbios (BIOS library) are also installed.
Creating a Local Mirror
You can create a local mirror of the Dell Linux online repository on your
system or on another system using rsync command. The rsync address is:
rsync://linux.dell.com/repo/hardware
The Dell Linux repository contains .htaccess files. To enable your Apache
server to recognize these, you must allow overrides for the directory that
contains the Dell Linux repository.
For exampl e, in yo u r /etc/httpd/conf/httpd.conf file, under the
/var/www/html/yum_repository directory, you will have
AllowOverride All
AllowOverride controls the directives that may be placed in .htaccess
files. It can be All, None, or any combination of the keywords: Options
FileInfo, AuthConfig, or Limit.
32 Performing BIOS and Firmware Updates Using Dell Linux Online Repository
Page 33

Installing Firmware-tools
Depending on the repository management software you are using, run one of
the following commands to install firmware-tools:
For yu m:
yum install dell_ft_install
For up 2dat e:
up2date -i dell_ft_install
For rug:
rug install dell_ft_install
For zypper:
zypper install dell_ft_install
Downloading Applicable Firmware
Depending on the repository management software you are using, run one of
the following commands to download applicable firmware:
For yu m:
yum install $(bootstrap_firmware)
For up 2dat e:
up2date --solvedeps=$(bootstrap_firmware -u)
For rug:
rug install $( bootstrap_firmware | xargs -n1 -r rug -
-terse wp | cut -d'|' -f3 | grep -v "No matches" |
sort | uniq )
For zypper:
zypper install $(bootstrap_firmware)
Bootstrap firmware is a process where the latest BIOS/Firmware update
RPMs for your system are downloaded from the repository, along with the
utilities necessary to inventory and apply updates on your system.
Performing BIOS and Firmware Updates Using Dell Linux Online Repository 33
Page 34

Inventory Installed Firmware
You can also inventory your system for the list of existing versions of BIOS
and firmware using the following command:
inventory_firmware
Here is a sample output:
[root@localhost ~]# inventory_firmware
Wait while we inventory system:
System inventory:
BIOS = a07
Primary Backplane = 1.00
System BIOS for PowerEdge 2850 = A07
PowerEdge Expandable RAID Controller 4e/Di Firmware = 5b2d
PERC 5/E Adapter Controller 0 Firmware = 5.2.2-0076
BMC = 1.83
Dell Remote Access Controller 4/I Firmware = 1.75
[root@localhost ~]#
Updating BIOS and Firmware
After you have installed the firmware-tools and downloaded the applicable
BIOS and firmware updates, you can update the BIOS and firmware on your
system using the CLI or the GUI.
Updating BIOS and Firmware Using CLI
Run the following command to inventory the system and scan the repository
for new versions of components:
update_firmware
This command provides information about the existing versions of
components on your system and the list of component versions that are
available to be installed.
Here is a sample output:
[root@localhost ~]# update_firmware
Running system inventory...
Searching storage directory for available BIOS updates...
Checking BIOS - a07
Available: dell_dup_componentid_00159 - a07
Did not find a newer package to install that meets all installation checks.
Checking Primary Backplane - 1.00
34 Performing BIOS and Firmware Updates Using Dell Linux Online Repository
Page 35

Available: dell_dup_componentid_03967 - 1.00
Did not find a newer package to install that meets all installation checks.
Checking System BIOS for PowerEdge 2850 - A07
Did not find a newer package to install that meets all installation checks.
Checking PowerEdge Expandable RAID Controller 4e/Di Firmware - 5b2d
Available: pci_firmware(ven_0x1028_dev_0x0013_subven_0x1028_subdev_0x016d) -
5b2d
Did not find a newer package to install that meets all installation checks.
Checking PERC 5/E Adapter Controller 0 Firmware - 5.2.1-0066
Available: pci_firmware(ven_0x1028_dev_0x0015_subven_0x1028_subdev_0x1f01) -
5.2.2-0076
Found Update:
pci_firmware(ven_0x1028_dev_0x0015_subven_0x1028_subdev_0x1f01) - 5.2.2-0076
Checking BMC - 1.83
Available: dell_dup_componentid_05814 - 1.83
Did not find a newer package to install that meets all installation checks.
Checking Dell Remote Access Controller 4/I Firmware - 1.75
Available: pci_firmware(ven_0x1028_dev_0x0012_subven_0x1028_subdev_0x0012) -
1.75
Did not find a newer package to install that meets all installation checks.
Found firmware which needs to be updated.
Please run the program with the '--yes' switch to enable BIOS update.
UPDATE NOT COMPLETED!
[root@localhost ~]#
Installing All Applicable Updates
To install all applicable BIOS and firmware updates on your system, run the
following command:
update_firmware --yes
Once the devices are updated, the "Execution Success" message is displayed.
Here is a sample output:
[root@localhost ~]# update_firmware --yes
Running system inventory...
Searching storage directory for available BIOS updates...
Checking BIOS - a07
Available: dell_dup_componentid_00159 - a07
Did not find a newer package to install that meets all installation checks.
Checking Primary Backplane - 1.00
Available: dell_dup_componentid_03967 - 1.00
Did not find a newer package to install that meets all installation checks.
Checking System BIOS for PowerEdge 2850 - A07
Did not find a newer package to install that meets all installation checks.
Checking PowerEdge Expandable RAID Controller 4e/Di Firmware - 5b2d
Performing BIOS and Firmware Updates Using Dell Linux Online Repository 35
Page 36

Available: pci_firmware(ven_0x1028_dev_0x0013_subven_0x1028_subdev_0x016d) 5b2d
Did not find a newer package to install that meets all installation checks.
Checking PERC 5/E Adapter Controller 0 Firmware - 5.2.1-0066
Available: pci_firmware(ven_0x1028_dev_0x0015_subven_0x1028_subdev_0x1f01) -
5.2.2-0076
Found Update:
pci_firmware(ven_0x1028_dev_0x0015_subven_0x1028_subdev_0x1f01) - 5.2.2-0076
Checking BMC - 1.83
Available: dell_dup_componentid_05814 - 1.83
Did not find a newer package to install that meets all installation checks.
Checking Dell Remote Access Controller 4/I Firmware - 1.75
Available: pci_firmware(ven_0x1028_dev_0x0012_subven_0x1028_subdev_0x0012) -
1.75
Did not find a newer package to install that meets all installation checks.
Found firmware which needs to be updated.
Running updates...
100% Installing pci_firmware(ven_0x1028_dev_0x0015_subven_0x1028_subdev_0x1f01) -
5.2.2-0076
Done: Execution Success!
[root@localhost ~]#
Updating BIOS and Firmware Using Graphical User Interface (GUI)
To start the interactive GUI, run the following command:
inventory_firmware_gui
The Inventory and Update Firmware window displays the existing versions of
components on your system and the component versions that are available to
be installed.
To update BIOS and firmware on your system to the versions available in the
repository:
1
Select the required devices to be updated and click
Update Firmware
2
Click
Continue to update page
dialog box is displayed.
....You can also click
the list of selected devices and their versions.
3
Click
Update Now
to start performing the updates.
Once the devices are updated, the "Execution Success" message is
displayed for each device.
Update Firmware
Show Details
to view
. The
36 Performing BIOS and Firmware Updates Using Dell Linux Online Repository
Page 37

You can also perform the following:
• If your system component version is higher than the version available in
the repository, you can downgrade your system components to the versions
in the repository. In the
the required components to downgrade and click
• If you need to re-install the component versions, select the required
components and click
Inventory and Update Firmware
Allow Downgrade
Allow Reflash
.
dialog box, select
.
Automatically Update Firmware
By default, installing a BIOS or firmware RPM does not apply the update to
the hardware. The update is manually applied using the
update_firmware command. However, you can automatically update the
hardware during RPM installation by configuring the
/etc/firmware/firmware.conf file.
To automatically install BIOS and firmware updates, ensure that rpm_mode
is set to auto in the firmware.conf file as shown:
[main]
# Automatically install BIOS updates when an RPM BIOS Update file is installed
# values: 'auto', 'manual'
# default: 'manual'
rpm_mode=auto
Viewing Log Information
The log information is stored in the firmware-updates.log file located at
/var/log/ folder.
Performing BIOS and Firmware Updates Using Dell Linux Online Repository 37
Page 38

38 Performing BIOS and Firmware Updates Using Dell Linux Online Repository
Page 39

4
Update and Rollback in Unified Server Configurator - Lifecycle Controller Enabled
Dell Unified Server Configurator - Lifecycle Controller Enabled (USC LCE) is an embedded configuration utility that enables systems and storage
management tasks from an embedded environment throughout the system’s
life cycle.
Residing on an embedded flash memory card, USC - LCE is similar to a BIOS
utility in that it can be started during the boot sequence and can function
independently of an installed operating system.
Using USC - LCE, you can quickly identify, download, and apply system
updates without searching the Dell Support website at support.dell.com. You
can also configure your system BIOS and system devices (such as NIC, RAID,
and iDRAC), deploy an operating system, and run diagnostics to validate
your system and the attached hardware.
NOTE: Certain platforms or systems may not support the full set of features
provided by USC - LCE.
Update in USC LCE
You can update your system BIOS, iDRAC firmware, power supply firmware,
RAID firmware, and NIC firmware. Use the Platform Update wizard to
display a list of available updates for your system.
You can define a location to search for available updates from the following
options:
• the Dell File Transfer Protocol (FTP) server (
proxy server to access
• a USB device. When accessing updates from a local USB device, the USB
device must be plugged in before selecting the
USC LCE.
Update and Rollback in Unified Server Configurator - Lifecycle Controller Enabled 39
ftp.dell.com
.
ftp.dell.com
Platform Update
). You can use a
option in
Page 40

NOTE: For more information on updating the platform, see the Dell Unified
Server Configurator User Guide available on the Dell Support website at
support.dell.com/manuals
After you select the updates you want to apply, USC - LCE downloads and
applies the updates. If you decide to update any device in USC - LCE, the
update package of the corresponding device is downloaded. After successfully
downloading, verifying, and extracting the DUPs, the corresponding devices
are updated. If the update fails, error messages are displayed.
Rollback in USC LCE
You can update any component, for example BIOS, in both USC - LCE and
your operating system environment. After the update is successful in your
operating system environment using DUPs, you can enter USC - LCE and
revert the component to the version that was previously installed before the
update occurred.
USC - LCE supports platform firmware rollback to the previous version. If
your operating system has a non–functioning application because of a BIOS
or firmware flash, reboot to USC - LCE and roll back to the previous version.
NOTE: Only BIOS and firmware can be rolled back. The USC - LCE application, the
Dell Diagnostics application, and drivers needed for operating system installation
cannot be rolled back to an earlier version.
If you have updated your system’s BIOS or firmware only once, the rollback
feature offers the option of reverting to the factory-installed BIOS or
firmware images. If you have updated your BIOS or firmware to multiple
versions, the factory-installed images are overwritten and you cannot revert to
them.
NOTE: Rollback is not supported in your operating system environment. To enable
rollback, ensure that you boot into USC - LCE.
NOTE: Rollback is only supported for USC - LCE and not supported for USC.
40 Update and Rollback in Unified Server Configurator - Lifecycle Controller
Page 41

5
Command Line Interface Reference
Using the CLI
This section provides information for using the command line interface (CLI)
for Dell™ Update Packages (DUPs).
CLI Options
You can display information about CLI options by typing the DUP name and
either -h or --help at a command line prompt. For example, type the
following command to get a help screen about the CLI options:
./
packagename.bin -h or --help
The console displays all of the command line options and provides help for
each choice.
Table 5-1 provides a list of the CLI options, a description of each option,
and the command syntax.
Table 5-1. CLI Options: Usage
CLI Option CLI Task Description Command Syntax
(no option; run
command without
options)
Run commands in
interactive mode.
-h or --help
Help option
Apply the DUP in interactive
mode; if the DUP is valid and
can be applied, interacts with
the user, asking questions.
Display command line options
and help information.
--help option executes
The
before all other
NOTE: This option exits after
displaying the requested
information; no DUP verification
or updates occur.
-- options.
./packagename.bin
./packagename.bin
-h
./packagename.bin
--help
Command Line Interface Reference 41
Page 42

Table 5-1. CLI Options: Usage
CLI Option CLI Task Description Command Syntax
-c
Check option
-f
Force option
(continued)
Determine if the update can be
applied to the target system.
Force a downgrade or update to
an older version.
The -q option is required when
using the -f option.
./packagename.bin
-c
./packagename.bin
-q -f
NOTE: Before downgrading the
software to a previous version,
see the documentation for the
previous version.
--list
List package contents
option
-q
Run command in
non-interactive mode
-r
Reboot option
Display all files that are
contained in the DUP.
NOTE: This option exits after
displaying the requested
information; no DUP verification
or updates occur.
Execute the DUP silently
without user intervention.
When -q is not specified, the
DUP is in the interactive mode.
Reboot the system, if required,
after performing the update.
The reboot does not occur:
• If the DUP fails or is not
applicable to the target
system.
• If the DUP does not require
the target system to be
rebooted.
The -q option is required with
this option.
./packagename.bin
--list
./packagename.bin
-q
./packagename.bin
-r -q
42 Command Line Interface Reference
Page 43

Table 5-1. CLI Options: Usage
CLI Option CLI Task Description Command Syntax
--rebuild
Rebuild option
-v,--version
Display version option
--extract
<path>
(continued)
Automatically rebuild a DUP to
support Linux operating system
kernels in addition to the
supported kernels.
See "Rebuilding Packages."
Display the version, fixes,
enhancements, and release
date; lists systems to which the
DUP can be applied.
NOTE: This option exits after
displaying the requested
information; no DUP verification
or updates occur.
Extract all files contained in
the DUP to the path you
specify. If the directory
specified in the path does not
exist, it is created.
If the path contains spaces, use
quotation marks around the
<path> value.
./packagename.bin
--rebuild
./packagename.bin
-v
./packagename.bin
--version
./packagename.bin
--extract /update
./packagename.bin
--extract
"/update files"
NOTE: This option exits after
extracting the requested files; no
DUP verification or updates
occur.
Command Line Interface Reference 43
Page 44

Exit Codes for CLI
After running DUPs, the exit codes described in Table 5-2 are set.
The exit codes help you determine and analyze the execution results after
you run DUPs.
Table 5-2. Exit Codes
Value Message Name Display Name Description
0 SUCCESSFUL Success The update was successful.
1 UNSUCCESSFUL
(FAILURE)
2 REBOOT_REQUIRED Reboot
3 DEP_SOFT_ERROR Soft
Unsuccessful An error occurred during the
update process; the update was
not successful.
You must restart the system to
required
dependency
error
apply the updates.
Some possible explanations are:
• You attempted to update to the
same version of the software.
• You tried to downgrade to a
previous version of the software.
To avoid receiving this error,
provide the /f option.
44 Command Line Interface Reference
Page 45

Table 5-2. Exit Codes
Value Message Name Display Name Description
4DEP_HARD_ERRORHard
5 QUAL_HARD_ERROR Qualification
(continued)
dependency
error
error
The required prerequisite software
was not found on your system.
The update was unsuccessful
because the server did not meet
BIOS, driver, or firmware
prerequisites for the update to be
applied, or because no supported
device was found on the target
system. The DUP enforces this
check and blocks an update from
being applied if the prerequisite is
not met, preventing the server from
reaching an invalid configuration
state. The prerequisite can be met
by applying another DUP, if
available. In this case, the other
package should be applied before
the current one so that both
updates can succeed. A
DEP_HARD_ERROR cannot be
suppressed by using the /f switch.
The DUP is not applicable to
the system. Some possible
explanations are:
• The operating system is not
supported by the DUP.
• The system is not supported by
the DUP.
• The DUP is not compatible with
the devices found in your system.
A QUAL_HARD_ERROR cannot
be suppressed by using the /f
switch.
Command Line Interface Reference 45
Page 46

Table 5-2. Exit Codes
Value Message Name Display Name Description
6 REBOOTING_SYSTEM Rebooting
9 RPM_VERIFY_FAILED RPM
(continued)
system
verification has
failed
The system is being rebooted.
The Linux DUP framework uses
RPM verification to ensure the
security of all DUP dependent
Linux utilities. If security is
compromised, the framework
displays a message and an
RPM Verify Legend, and then exits
with exit code 9.
RPM produces output only if there
is a verification failure. The format
of the output is:
.SM5DLUGT 'utility
name'
For example, if the fmt command is
compromised, the framework
displays the message:
rpm verify failed:
.M...... /usr/bin/fmt
RPM Verify Output Legend:
.- Verification test passed
S- File Size differs
M- Mode differs (includes
permissions and file type)
5- MD5 sum differs
D- Device major/minor number
mismatch
L- ReadLink(2) path mismatch
U- User ownership differs
G- Group ownership differs
T- mTime differs
46 Command Line Interface Reference
Page 47

6
Rebuilding Packages
Overview
When you download a Dell™ Update Package (DUP) from the Dell Support
website at support.dell.com, you want to apply it to a specific target system.
The DUP application checks for two general compatibility criteria between
a package and the target system to which you are applying it:
• Is the system on which you are trying to apply the DUP running
a Dell-supported Linux operating system?
• If the system on which you are trying to apply the DUP is running
a Dell–supported Linux operating system, is the system also running
a Dell–supported Linux kernel version?
Dell-Qualified Path
The Dell-qualified path can be described in the following steps:
1
You download a DUP from
2
The DUP meets all compatibility and dependency checks for the target
Dell system.
3
The supported version of the Linux operating system and kernel version
for which the DUP was created, match the running operating system
version and the running kernel version on the target system.
4
Continue applying the DUP to your system.
support.dell.com.
Dell-Enabled Path
The Dell-enabled path allows you to customize DUPs to run on target
systems that do not have supported operating systems or supported kernels.
When you try to apply a package to a system, if the operating system or kernel
is not supported, the DUP application displays a message to that effect.
Rebuilding Packages 47
Page 48

The Dell-enabled path allows you to customize a DUP by using the
Dell
Supported
OS?
Dell
Supported
Kernel?
Continue Execution
packagename.bin
--CUSTOM
Use the --rebuild option to
customize the package
N
N
Y
Y
--rebuild option. The prerequisites for using the --rebuild option
are described in "Setting Up a Test System for Rebuilding a Package."
The Dell-enabled path is described by the flow diagram in Figure 6-1.
Figure 6-1. Dell-Enabled Path for Rebuilding Packages
The Dell-enabled path can be described in the following steps:
1
Download a DUP from
2
When you try to apply the DUP to your system, the DUP application
discovers that your target system does not have a Dell-supported operating
system.
3
The DUP allows you to rebuild a customized package for your
unsupported operating system and issues a disclaimer that this customized
package is not supported or warranted.
48 Rebuilding Packages
support.dell.com.
Page 49

4
The DUP checks to make sure that the kernel, for the package you are
trying to apply to your target system, is supported. If the kernel is not
supported, you must follow the "Dynamic Kernel Support" procedures and
other procedures found later in this section to build a customized package.
NOTE: It is recommended that the --rebuild option be executed on a test system
having the same configuration.
5
When you have successfully built a custom package for the operating system
and kernel that are running on your target system, read the warning
messages before applying the package to your target system.
6
Specifically, the supported version of the Linux operating system and the
kernel version for which the package was created, match the running
operating system version and running kernel version on the target system.
7
Continue applying the package to your system.
Dynamic Kernel Support
The kernel-dependent driver built into the DUP must be compatible with the
kernel on the system to which you are applying the package.
When you download a DUP from support.dell.com, the packages contain
precompiled driver modules for a limited set of kernels and their
corresponding GNU C compiler (GCC) versions. If the kernel that is running
on the system(s) to which you want to apply the DUP is not one of the
supported kernels, then the package will not work on your system. You can
rebuild your package by using your running kernel source and binutils.rpm,
and then apply the rebuilt package to any target systems that have the same
running kernel, as the one where you rebuilt your package.
Customers typically run three or four different kernels across thousands of
servers on their network. Applying updates to systems running these different
kernel versions becomes difficult if you have to meet these prerequisites on
each server across the network. When building customized packages, you can
set up a test system for rebuilding packages that meets the prerequisites for
rebuilding packages. See "Prerequisites for the Test System."
Rebuilding Packages 49
Page 50

Determining Whether Your Package Is Supported
Rebuilding a supported kernel does not require any prerequisites. In this case,
the standard DUP is used and the rebuild process completes successfully.
Rebuilding an unsupported kernel requires prerequisites. See "Prerequisites
for the Test System."
DUP execute on a given target system and can determine if the running
kernel is supported by the package you are trying to apply to your system.
In cases where the currently running kernel is not supported, the DUP
application tries to rebuild the package. If the prerequisites are not present
for an unsupported kernel, the rebuild fails and the DUP application issues
one of the following error messages:
Update Package is unable to build a device driver for
the running kernel because the required kernel source
files are not installed. See "Rebuilding Packages" in
the Update Packages User’s Guide for more information.
or
Update Package does not support the running kernel.
See "Rebuilding Packages" in the Update Packages
User’s Guide for more information.
The above messages indicate that the running kernel is not supported by the
DUP that you attempted to apply to your Dell system. You can proceed with
the update in one of the following ways:
• Install the prerequisites for compiling customized packages for the running
kernel directly on the system to which the package is being applied, rebuild
the package on the system, and then reapply the rebuilt package.
• Rebuild the package on a test system that meets the prerequisites for a test
system, and then distribute the update to systems that have the same
running kernel, model name, and configuration, across the network.
50 Rebuilding Packages
Page 51

Setting Up a Test System for Rebuilding a Package
Dell recommends using a test system that has the same running kernel as the
kernel that is running on the system in the production environment.
Scenario
The following scenario covers the major steps that you would follow in
determining that your downloaded package does not support the running
kernel on the Dell system to which you were trying to apply the package.
The scenario provides a high-level description of the steps for rebuilding the
package and distributing it to the systems on which you want to use the
rebuilt package.
1
Download the latest BIOS version from the Dell Support website at
support.dell.com
2
When trying to apply the package to the Dell system, you learn that the
precompiled package that you downloaded, does not support the kernel
version that is currently running on your system.
3
An inventory of your network’s production environment shows that the
same unsupported kernel is running on a total of 200 systems.
You decide to use the DUP
package. The customized package will support an additional kernel.
for a Dell system.
--rebuild
option to build a customized
4
Select a non–production
add support for this kernel.
5
On this test system, ensure that certain prerequisites are satisfied.
If the prerequisites are not satisfied, the
work. For more information on the prerequisites, see "Prerequisites for the
Tes t S y st em ."
Run the
for the running kernel. For example, type the following command:
./PE2850-ESM_FRMW_LX_R92394.bin --rebuild
--rebuild
test
system on which to rebuild this package to
--rebuild
option against the downloaded DUP to add support
Rebuilding Packages 51
option will not
Page 52

6
Apply the rebuilt package to a test system to ensure that the package applies
without errors. For example, type the following command:
./PE2850--ESM_FRMW_LX_R92394.bin--CUSTOM
If package execution results in errors, correct the errors and rebuild and
reapply the package until you get satisfactory results.
7
Distribute the rebuilt package to all 200 of the target systems. You can
write a script to apply the package to all systems.
Prerequisites for the Test System
Prepare your test system to meet the following prerequisites for executing the
--rebuild command. If these prerequisites are met on the test system,
you can test the package on the test system, and then distribute and use the
rebuilt packages on Dell systems in a production environment.
The test system, or the system on which you are going to rebuild the package,
must meet the following six prerequisites:
1
Kernel match
kernel version running on the system to which the rebuilt package is to be
deployed (target system or production system).
To find out the kernel version that is running on your system, type the
following command:
uname -r
: The kernel version on the test system must match the
The system responds by displaying the kernel version, for example:
2.4.9-e.3smp
2
Kernel GCC compiler match recommended
use the same GCC compiler version on both the test system and the
production system.
NOTE: The kernel source and binutils.rpm do not need to be present on the
production system.
3
Kernel source is installed
kernel version must be installed.
4
The binutils.rpm package is installed
binutils.rpm
52 Rebuilding Packages
is installed on the test system.
: The kernel source for the currently running
: It is recommended that you
: Ensure that at least some version of
Page 53

5
Dell OpenManage™ Server Administrator is not installed on the test
system
: Ensure that the Server Administrator is not installed on the
system. You cannot rebuild a package on a system that has Server
Administrator installed.
NOTE: It does not matter whether Server Administrator is installed on the
production systems to which the rebuilt packages are to be distributed and
applied. Server Administrator cannot be present on the system where the
packages are rebuilt.
6
Dell OpenManage Server Administrator device drivers are not built into
the kernel on the test system
: Ensure that the Server Administrator device
drivers have not been built into the kernel. The Server Administrator
device drivers are named
dcdbas
and
dell_rbu
. You cannot rebuild a
package on a system that has either or both of these device drivers built
into the kernel.
You can identify that a driver is built into a kernel by checking if both of
the following are true:
a
A directory for the driver exists in the
/sys/devices/platform
directory.
For the specific case of Server Administrator device drivers, type the
following command and see if either
dcdbas
or
dell_rbu
is listed:
ls /sys/devices/platform
b
A module is not loaded for the driver.
For the specific case of Server Administrator device drivers, type the
following commands to see if a module for either driver is loaded:
test
lsmod | grep -i dcdbas
lsmod | grep -i dell_rbu
When the test system matches all the prerequisites listed above, you can
rebuild the package.
Rebuilding Packages 53
Page 54

Rebuilding a Package to Add Kernel Support to
Test system
running
kernel
version (a)
Test system
running
kernel
version (c)
Output
package
containing
support for
kernel version
(a), (b), and (c)
Dell Update
Package from
support.dell.com
Test system
running
kernel
version (b)
a Single System
The following command rebuilds the package for the currently running
version of the kernel.
./packagename.bin --rebuild
Depending on your system configuration, the rebuild takes between a few
seconds and a few minutes to complete. DUPs display any error messages
encountered while executing the rebuild command.
The /tmp directory requires 6 MB or more to execute the --rebuild
command. If the /tmp directory lacks space for the execution of the
--rebuild command, the following message is displayed:
Archive cannot be extracted. Please ensure that there
is enough space in the tmp folder.
When the rebuild is complete, an output package is created with the
suffix --CUSTOM. The rebuilt package name has the syntax:
packagename.bin--CUSTOM
The package on which the --rebuild option was run remains unchanged.
Rebuilding the Package to Add Kernel Support for Multiple Kernel Versions
Customers typically have three or four versions of a Linux kernel running
across larger networks. For each unsupported kernel, a package should be
rebuilt on similar test systems. Figure 6-2 describes the process for creating
this package.
Figure 6-2. Creating a Package That Supports Multiple Kernels
54 Rebuilding Packages
Page 55

The package can be built on one test system that supports kernel version (a).
The output from the rebuilt package for kernel (a) can be copied to another
system that is running kernel (b). The package can be rebuilt on the test
system running kernel (b), and then copied to the system running kernel (c).
The package can be rebuilt on test system c and the resulting output package
will have a package that contains support for kernel versions (a), (b), and (c).
Scenario
A customer has two thousand clusters where three different versions of
the kernel, versions (a), (b), and (c), are running. The customer wants
to perform an ESM upgrade. The customer downloads the
PE2850-ESM_FRMW_LX_R92394.bin package.
PE2850-ESM_FRMW_LX_R92394.bin does not support kernels (a), (b),
and (c). To build a package that supports these three additional kernels,
the customer performs the following steps:
1
Downloads package
support.dell.com
2
Types the following command to build support for kernel version (a):
./PE2850-ESM_FRMW_LX_R92394.bin --rebuild
If the package rebuild is successful, then a new package named
PE2850-ESM_FRMW_LX_R92394.bin--CUSTOM
test system running kernel version (a).
PE2850-ESM_FRMW_LX_R92394.bin
on the test system running kernel version (a).
is created on the
from
3
Copies the
one of the system utilities such as scp, rcp, ftp, to the system running
kernel version (b).
4
Types the following command to build support for kernel version (b):
./PE2850-ESM_FRMW_LX_R92394.bin--CUSTOM --rebuild
The output package is
CUSTOM
By using steps 3 and 4 iteratively, you can add additional support for as many
kernels you want.
PE2850-ESM_FRMW_LX_R92394.bin--CUSTOM
PE2850-ESM_FRMW_LX_R92394.bin--
.
Rebuilding Packages 55
file using
Page 56

Deploying Custom Packages Across the Environment
These modified custom packages rebuilt for a custom environment can be
deployed across the network. The execution behavior of the rebuilt packages
will not be modified. DUPs would still check for compatibility of the package
with the system to which it is being applied, and for all other prerequisites that
must be met for successful package execution as discussed in the "Using Dell
Update Packages" and "Command Line Interface Reference" sections.
56 Rebuilding Packages
Page 57

7
Troubleshooting
Known Issues
The following are known issues and corrective actions for Dell™ Update
Packages (DUPs) for Linux operating systems:
Diagnostic Tasks will not run while a DUP reboot is pending
It is recommended that you complete any pending updates with a reboot
prior to running diagnostic tasks.
Abnormal termination of a DUP
When a DUP stop abruptly due to a power outage or abnormal termination,
perform the following steps:
1
Remove the lock file.
2
Type the following command:
3
Run the DUP again to reapply the update.
Error while loading shared libraries
Install the compatibility libraries from your Linux distribution if the
following error is displayed: Error while loading shared
libraries: libstdc++.so.5: Cannot open shared object
file: No such file or directory. To install the compatibility
libraries, use the following command: RPM -ih compat-libstdc++33-3.2.3-47.3.i386.rpm
rm -f /var/lock/.spsetup
Insufficient free physical memory to load the BIOS image
BIOS updates require enough free physical memory to load the entire BIOS
image into the physical memory. If there is insufficient free physical memory
available on the system to load the BIOS image, the DUP for BIOS may fail.
In this instance, the BIOS can be updated using the diskette method, by
running the DUP after adding more memory, or by running the DUP
immediately after a reboot.
Troubleshooting 57
Page 58

Kernel panic while running storage controller firmware update packages
Linux systems running one or more applications that interact with
SCSI devices in certain ways are known to cause a kernel panic situation.
Therefore, it is recommended that you stop Dell OpenManage™ Server
Administrator and Dell OpenManage Server Administrator Storage
Management Service before running storage controller firmware DUPs.
Loss of functionality while renaming Linux DUPs
Linux DUPs can be executed even if they are renamed, but some
functionality is lost. Renamed Linux DUPs with extensions that are in the
Linux MIME (Multimedia Internet Message Extensions) database could fail
to execute from various X
case the desktop issues a file open error message indicating that the DUP
cannot be opened. This occurs if a DUP with an uppercase
renamed to one having a lowercase
an entry in the Linux MIME database which leads to the file open error.
NOTE: The readme.txt file, which is available on the Dell Support website at
support.dell.com/manuals, provides the latest information regarding known issues.
-Windows desktops, for example GNOME. In this
".BIN" extension is
".bin" extension. The ".bin" extension has
Yum and Up2date repository management software caches incorrect repository metadata
For yum, run the yum clean all command to remove old metadata and
retry updating the firmware.
For up2date, run rm -f /var/spool/up2date/* to remove old
metadata. You can also remove all the files under /var/spool/up2date/ at any
time and up2date will automatically download the required updates.
Use Dell Linux Repository with yum and Red Hat Enterprise Linux version 4
If you do not have Red Hat Network (RHN) configured, and need to use the
Dell yum repository with Red Hat Enterprise Linux version 4 and up2date,
you must disable RHN. Open the /etc/sysconfig/rhn/sources file and comment
the following line:
up2date default
58 Troubleshooting
Page 59

Messages
Table 7-1 provides descriptions and solutions to messages that you may
receive when running DUPs.
Table 7-1. Update Packages Message Information
Message Description/Solution
This Update Package is not
compatible with your system
Your system: <Model NameN>
System(s) supported by this
package: <Model NameN>
This Update Package cannot be
executed under the current
operating system.
This Update Package is not
compatible with any of
the devices detected in
your system.
The prerequisite software
version for this update was
not found. Software
application name: <name>
Current version: <version>
Required version: <version>
You must use the -f option to
continue with the update in
the non-interactive mode.
The software to be updated was
not found. Install the
following software, and then
retry the update. Software
name: <name> Required version:
<version>
Select a compatible DUP, and try the
update again.
DUPs support Linux operating systems
and kernels supported by the
rebuild
"Rebuilding Packages."
Select a compatible DUP for the
device(s) you want to update, and
try again.
The DUP you selected cannot be
installed because a prerequisite
requirement was not met. Install the
appropriate prerequisite software
version, and try the update again.
The version of this DUP is either older
than or the same as the version
installed. To apply the DUP, you must
force execution.
Your system does not contain the
software that matches the DUP.
option as explained in
--
Troubleshooting 59
Page 60

Table 7-1. Update Packages Message Information
Message Description/Solution
The version of this Update
Package is newer than the
currently installed version.
Software application name:
<name> Package version:
<version> Installed version:
<version>
The version of this Update
Package is older than the
currently installed version.
Software application name:
<name> Package version:
<version> Installed version:
<version>
The version of this Update
Package is the same as the
currently installed version.
<version> Software application
name: <name> Package version:
<version> Installed version:
<version>
This package is not compatible
with the version of Server
Agent on your system. You must
upgrade to Server
Administrator before running
this package.
This update package requires
an OpenIPMI driver. Currently
no OpenIPMI driver is
installed on the system.
(continued)
This message confirms the version of
the currently installed software before
the update is performed.
(Using the interactive mode) Type Y or
N when prompted to continue.
(Using the CLI) Specify the -f option.
The DUP you selected cannot be
installed because a newer version of the
software already exists on the system.
To install the older version:
(Using the interactive mode) Type Y or
N when prompted to continue.
(Using the CLI) Specify the -f option.
The DUP you selected cannot be
installed because the same version of
the software already exists on the
system.
(Using the interactive mode) Type Y or
N when prompted to continue.
(Using the CLI) Specify the -f option.
Use an alternative update method from
support.dell.com.
The DUP you selected cannot be
installed because you do not have an
OpenIPMI driver installed on your
system.
60 Troubleshooting
Page 61

Table 7-1. Update Packages Message Information
Message Description/Solution
In order to assist in the
<update|install>, you can
download and install a version
of the OpenIPMI driver that
meets the minimum version
requirement from the Dell
Support website at
support.dell.com. The minimum
version required is <version>.
This Update Package requires a
newer version of the OpenIPMI
driver than is currently
installed on the system, which
is version <version>.
Kernel source for the running
kernel is not installed, and
the currently installed
OpenIPMI driver RPM was
installed without the kernel
source for the running kernel.
In order to install OpenIPMI
driver modules for the running
kernel that meet the minimum
version requirement, you must
install kernel source for the
running kernel, and then use
DKMS (see man page for dkms)
to install and build OpenIPMI
driver modules for the running
kernel. To install kernel
source for the running kernel,
install the <filename> RPM
that is applicable to the
running kernel.
(continued)
Download and install the minimum
required OpenIPMI driver from the
Dell Support website.
The OpenIPMI driver that is currently
installed on your system does not meet
the minimum version requirements of
the selected DUP.
Install the kernel source for your
running kernel, and then use the
Dynamic Kernel Module Support
(DKMS) framework to install and build
the OpenIPMI driver modules for the
running kernel.
You must install the kernel source by
installing the .rpm file required by your
kernel.
For information on using DKMS, see
the man page for DKMS.
Troubleshooting 61
Page 62

Table 7-1. Update Packages Message Information
Message Description/Solution
Kernel source for the running
kernel is installed, but the
currently installed OpenIPMI
driver RPM was installed
without the kernel source for
the running kernel. In order
to install OpenIPMI driver
modules for the running kernel
that meet the minimum version
requirement, use DKMS (see man
page for dkms) to install and
build OpenIPMI driver modules
for the running kernel.
You must reboot the system for
the update to take effect.
An Update Package is already
running. Wait until it is
complete before proceeding
with another update.
WARNING: DO NOT STOP THIS
PROCESS OR INSTALL OTHER DELL
PRODUCTS WHILE <BIOS|FRMW>
UPDATE IS IN PROGRESS. THESE
ACTIONS MAY CAUSE YOUR SYSTEM
TO BECOME UNSTABLE.
Cannot find utilities on the
system to execute package.
Make sure the following
utilities are in the
path:<path>
File already exists. The package is attempting to overwrite
(continued)
Use DKMS to install and build the
OpenIPMI driver modules required by
your running kernel.
For information on using DKMS,
see the man page for DKMS.
If you shut down or power off the
system after performing an update, you
will lose the update.
After performing a BIOS update, do not
power off the system. Reboot the
system for the update to take effect.
You can run only one DUP at a time.
Do not interrupt DUP execution.
The package must have certain utilities
to execute.
The utilities named must be in the path
mentioned in the message.
an existing file.
62 Troubleshooting
Page 63

Table 7-1. Update Packages Message Information
Message Description/Solution
Rebuilding package
<package_name> to support
kernel version "kernel.x".
This process may take several
minutes to complete...
No specific kernel version
specified! Building support
for current kernel...
Cannot create directory
/extract directory. Please
ensure that there is
enough space.
Cannot create temporary file
"filename"
Unable to create Temp Files.
Please ensure that there is
enough space in the tmp
folder.
Archive cannot be extracted.
Please ensure that there
is enough space in the
tmp folder.
Please provide a directory
name to extract to.
ROOT directory cannot be used
for extraction.
Successfully extracted to
"/extractdir"
Cannot find utilities on the
system to extract package.
Make sure the following
utilities are on the path:
<path>
(continued)
The DUP application is rebuilding
the package to support a different
kernel version.
Unable to determine current system
kernel. The DUP application attempts
to rebuild the package.
Extracting the package to this
path requires more disk space than
is available.
The package cannot create the
temporary file for a technical reason,
such as lack of disk space, permissions,
or a pre-existing file.
The package cannot create the
temporary file for a technical reason,
such as lack of disk space, permissions,
or a pre-existing file.
There may be insufficient space for
the archive.
Provide a directory name for the
extracted files.
Create a directory for your extracted
files.
The package contents were extracted to
the directory you designated.
Locate the listed utilities and add their
directory to your Pat h.
Troubleshooting 63
Page 64

Table 7-1. Update Packages Message Information
Message Description/Solution
Rebuilding Package Failed Error creating driver support
directory.
Rebuilding Package Failed Error copying kernel modules.
Rebuilding Package Failed Error re-creating archive.
Rebuilding Package Failed Uninstallation of driver was
unsuccessful.
Package has been rebuilt
successfully.
Rebuilding Package Failed Error creating output package.
Rebuilding Package Failed Error creating wrapper files.
Output package: The name of the output package is:
Package execution requires
'root' user privileges.
Successfully extracted to
<target_directory>.
Rebuilding package
packagename.bin to support
’uname -r’.
This process may take several
minutes to complete.
Rebuilding Package Failed Unable to extract package
contents.
(continued)
The package could not be rebuilt
because the support directory could not
be created.
The package could not be rebuilt
because the kernel modules could not
be copied.
The package could not be rebuilt
because the archive could not be
recreated.
The package could not be rebuilt
because the driver could not be
uninstalled.
The package rebuild was successful.
Ensure that the directory from which
the package rebuild option is being
executed is writable.
The required wrapper files could not be
created.
Log in with root privileges, and try the
update again.
The package is being extracted to the
following directory.
DUP is rebuilding the packages to
support the running kernel.
Wait for the process to complete.
Unable to extract the contents of the
package.
64 Troubleshooting
Page 65

Table 7-1. Update Packages Message Information
Message Description/Solution
Rebuilding Package Failed Server Administrator device
driver (HAPI) is already
installed on the system.
Package can be rebuilt only on
a system that does not have
Server Administrator device
driver (HAPI) installed.
Unable to Install Dell
Instrumentation Driver (HAPI).
Rebuilding Package Failed RPM Installation failed with
error code=<RPM Install Error
Return code>
packagename.bin: Rebuilding
Package failed - Unable to
extract package contents.
packagename.bin: Rebuilding
Package - Kernel <kernelversion> is already supported
by this package.
packagename.bin: Rebuilding
Package Failed - RPM
Installation failed with error
code=<LSB_Compliant RPM
Install Error Return code>
packagename.bin: Rebuilding
Package Failed - Error
creating driver support
directory.
packagename.bin: Rebuilding
Package Failed - Error copying
kernel modules.
(continued)
Packages cannot be rebuilt on a system
that has the HAPI device driver
installed.
The package cannot install the HAPI
driver.
Provides the RPM error code that
prevented the package from being
rebuilt.
Ensure that there is enough space in the
/tmp directory.
You do not need to rebuild this package
because you have already customized
the package for your kernel. You will
only receive this message if you
previously used the --rebuild option
and then ran the rebuilt package.
Check the LSB Compliant RPM error
return codes to determine the exact
reason for failure.
Ensure that enough space is available in
the /tmp directory.
Ensure that enough space is available in
the /tmp directory.
Troubleshooting 65
Page 66

Table 7-1. Update Packages Message Information
Message Description/Solution
packagename.bin: Rebuilding
Package Failed - Error
recreating archive.
packagename.bin: Rebuilding
Package Failed - Uninstall of
driver was unsuccessful.
packagename.bin: Rebuilding
Package Failed - Error
creating files.
Package has been rebuilt
successfully. Output package:
packagename.bin:--CUSTOM.
Package has been rebuilt
successfully.
packagename.bin: Rebuilding
Package failed - Unable to
extract package contents.
packagename.bin: Rebuilding
Package failed - Server
Administrator is installed on
the system.
(continued)
Ensure that enough space is available in
the /tmp directory.
The driver could not be uninstalled.
Ensure that enough space is available in
the /tmp directory.
Package is ready for distribution and
execution on production systems with
the same running kernel as the system
on which it was rebuilt.
Package is ready for distribution and
execution on production systems with
the same running kernel as the system
on which it was rebuilt.
Ensure that enough space is available in
the /tmp directory.
Packages cannot be rebuilt on a system
that has Server Administrator installed.
Uninstall Server Administrator from the
system before using the --rebuild
option.
66 Troubleshooting
Page 67

Table 7-1. Update Packages Message Information
Message Description/Solution
The installed operating system
version is not supported by
this Update Package. To
customize this package, see
"Rebuilding Packages" in the
Update Package User’s Guide.
In no event shall Dell Inc. be
held liable for any direct,
indirect, incidental, special,
or consequential damages
suffered during or after
package customization and
execution.
Unable to build a device
driver for the running kernel
because the build environment
is not installed. See
"Rebuilding Packages" in the
Update Package User’s Guide.
The running kernel is not
supported. See "Rebuilding
Packages" in the Update
Package User’s Guide.
In no event shall Dell Inc. be
held liable for any direct,
indirect, incidental, special,
or consequential damages
suffered during or after
package customization and
execution.
packagename.bin: Rebuilding
Package failed - Server
Administrator is already
installed on the system.
(continued)
The prerequisites for rebuilding the
package are present on your system, but
if you apply the customized package to
your system and it causes problems, you
cannot hold Dell Inc. responsible.
Follow the steps in "Rebuilding
Packages" to create the prerequisites for
customizing packages.
See the "Rebuilding Packages" section.
You may be able to customize your
package to support the kernel you are
running.
Fully consider this statement before
executing a customized package that
was enabled by the --rebuild
option.
Packages cannot be rebuilt on a system
that has Server Administrator installed.
Uninstall Server Administrator from the
system before using the --rebuild
option.
Troubleshooting 67
Page 68

Table 7-1. Update Packages Message Information
Message Description/Solution
Attempt to update BIOS or
firmware to the same version.
Update was unnecessary and not
applied.
Inventory operation exceeded
specified timeout.
Execution operation exceeded
specified timeout
/var/lock directory must
exist.
Unable to build a device
driver for the running kernel
because it is not supported on
your system.
The Intel IMB driver is
currently loaded. Please
unload the driver before
executing.
Warning: The shell less
command is not available.
When viewing Release Notes,
press space to continue
viewing notes, q to continue
DUP processing.
(continued)
Re-application of BIOS or firmware
DUP serves no purpose.
Inventory operations have time-out
limits as defined in the package’s
PIEConfig.xml file. Time-out
durations are in seconds. If an operation
times out, the remainder of the package
update is cancelled.
Execution update operations have
time-out limits as defined in the
package. Time-out durations are in
seconds. If an operation times out,
the remainder of the package update
is cancelled.
Create this system directory to ensure
that package updates do not execute
concurrently.
Select a compatible DUP and try again.
®
Unload the
installing the selected DUP.
Continue to view the release notes, or
install the less command from operating
system CDs, and re-execute the package
interactively.
Intel
IMB driver before
68 Troubleshooting
Page 69

Table 7-1. Update Packages Message Information
Message Description/Solution
Press 'q' to exit DUP
(--version).
Press 'q' to continue with DUP
execution (dup dup execution).
Warning: Screen widths of less
than <numeric value> can
distort the information view.
(continued)
The Linux DUP framework uses the
Linux utility, less, to display the release
notes relevant to the specific firmware
or driver release managed by the DUP.
When viewing release notes, DUP
prompts when executed with the below
options:
--version: Press 'q' to exit
DUP (--version)
All other DUP execution: Press 'q'
to continue with DUP
execution
(dup dup execution).
To optionally correct this, answer
<N>o to stop package execution.
Widen the terminal window to the
required size and then re-execute the
package interactively.
DUP Message Logs
Logging occurs when you run a command for a DUP. The logs maintain
information about all update activities. DUPs write to the Messages log.
If you install the same package more than once on the same system, the log
is appended.
Messages Log
Messages log files reside in the following default location:
/var/log/dell/updatepackage/log
The messages log file includes the following information:
• Date and time the DUP was launched
• Package release ID number
• The full path and filename of the support log generated by the command
Troubleshooting 69
Page 70

•DUP type
•DUP version
• Framework version of the DUP
• Version that was previously installed on the system
• Version that the command is trying to apply to the system
• Exit code that results from execution of the command
• Whether a reboot was performed
NOTE: The support log files are intended for use by Dell support personnel.
Dell encourages you to redirect the DUP output to a file of your choice.
Messages Log File
Message logs are informational messages that you can view in one of the
messages files in the /var/log directory. The messages files in the /var/log
directory contain messages about a wide range of events on the system.
Therefore, you must scan through the log file to find the messages that are
relevant to DUPs. The following two messages are from two different dates.
The example dated September 10 is an example of a command that qualifies
for successful execution, but requires a reboot. The example dated September
19 is an example of a command failure.
Sep 10 00:14:54 localhost spsetup.bin[8088]: Package Release ID=R54734 Package
Description=Dell ESM Firmware, A22 Previous version=1.63 New Version=1.63 Support
Log path=/var/log/dell/updatepackage/log/support/R54734.log Exit code = 2
(Reboot required)
Sep 19 17:27:05 7708sk1 spsetup.bin[7835]: Package Release ID=R57025 Package
Description=Dell ESM Firmware, A24 Support Log path=
/var/log/dell/updatepackage/log/support/R57025.log Exit code = 1 (Failure)
Support Log File Example
=====> Dell Update Package application started <=====
Command:-q -f
Date:Wed Nov 8 15:24:18 CST 2007
=====================================================
Release ID: R136685
Update Package version: 5.4 (BLD_31)
Collecting inventory...
<?xml version="1.0"?>
<SVMInventory lang="en">
<Device componentID="159" display="BIOS">
<Application componentType="BIOS" version="A19" display="BIOS"/>
</Device>
70 Troubleshooting
Page 71

<System systemID="121"/>
<OperatingSystem majorVersion="2.4" minorVersion="21" spMajorVersion="0"
spMinorVersion="0"/>
</SVMInventory>
Running validation...
BIOS
Application: BIOS
Previous version: A19
New version: A21
The version of this Update Package is newer than the currently installed version.
Software application name: BIOS
Package version: A21
Installed version: A19
Executing update...
WARNING: DO NOT STOP THIS PROCESS OR INSTALL OTHER DELL PRODUCTS WHILE UPDATE IS IN
PROGRESS.
THESE ACTIONS MAY CAUSE YOUR SYSTEM TO BECOME UNSTABLE!
The system should be restarted for the update to take effect.
================> Update Result <====================
Update ready to be applied at reboot
Application: BIOS
Previous version: A19
New version: A21
=====================================================
Exit code = 2 (Reboot required)
<?xml version="1.0" encoding="UTF-8"?>
<SoftwareComponent schemaVersion="1.0" packageID="R136685" releaseID="R136685"
dateTime="2006-10-06T06:36:59-05:00" releaseDate="October 06, 2006" vendorVersion=
"A21" dellVersion="A21" packageType="LLXP" xmlGenVersion="1.0.2378">
...
...
</SoftwareComponent>
Wed Nov 8 15:24:40 CST 2006
Troubleshooting 71
Page 72

72 Troubleshooting
Page 73

Index
B
BIOS and Firmware Updates, 31
BIOS update for 200 systems
usage scenario, 29
Boostrapping repository, 32
C
Catalog.xml, 10
CLI
-c, 24, 42
Check, 42
exit codes, 44
--extract, 43
-f, 26, 42, 60
For ce , 4 2
--h, 41
-h, 41
non-interactive mode, 42
-q, 26, 29, 42
-r, 42
-r -q, 30
reboot, 4 2
rebuild, 43
-v, 43
--version, 43
conditions that may require
update, 17
D
delivering Update Packages to
your systems, 25
Dell Linux Online
Repository, 31
Dell-enabled path, 47
Dell-qualified path, 47
determining whether your
package is supported, 50
developing system update
strategy, 17
digital signature, verify, 21-23,
28
DKMS, 61
dynamic kernel support, 49
E
executing Update Packages, 19
exit codes, 44
F
Firmware-tools, 31
Index 73
Page 74

H
R
HAPI, 65
Help option, 41
I
Important tips
using Update Packages, 15
K
key, verify, 21, 23
M
message logs for Update
Pack ag e s , 69
messages, 59
N
non-interactive mode, 42
rebuilding a package
Dell-enabled path, 47
Dell-qualified path, 47
determining whether your package
is supported, 50
dynamic kernel support, 49
setting up a test system, 51
to add kernel support for multiple
kernel versions, 54
rebuilding a package to add
kernel support to a single
system, 54
RPM, 46
RPM format, 31
S
Server Administrator
documentation, 15
setting up a test system for
rebuilding a package, 51
signature, verify, 21-23, 28
O
obtaining Update Packages, 13
P
public key, verify, 21, 23
74 Index
specifying order of multiple
updates, 25
standalone systems and
firewalls, 26
strategy for running Update
Packages, 14
system reboot required after
installing some Update
Packages, 24
Page 75

T
troubleshooting
known issues, 57
typical usage scenarios
BIOS update for 200 systems, 29
Retasking a System, 27
U
Update and Rollback in Unified
Server Configurator
Lifecycle Controller
Enabled, 27, 39
Update Options, 10
element update, 10
system update, 10
Update Packages
acquiring, 18
applying on a running system, 24
before you begin, 17, 39
CLI commands, 24, 41
CLI reference information, 41
delivering to your systems, 25
executing, 19
information provided about
updates, 14
message information, 59
message logs, 69
messages, 26
resolving compatibility
concerns, 23
some require system reboot, 24
standalone systems, 26
supported order of installation, 25
system and user requirements, 13
troubleshooting, 59
unattended mode, 26
updating many systems, 26
verifying the digital
signature, 21-23, 28
verifying the update, 26
updating many systems, 26
using Update Packages
important tips, 15
V
verify
digital signature, 21-23, 28
public key, 21, 23
update, 26
Index 75
Page 76

76 Index
 Loading...