

Page 1

Dell PowerEdge T620
Getting Started Guide
Regulatory Model: E17S Series
Regulatory Type: E17S001
Page 2
Notes, Cautions, and Warnings
NOTE: A NOTE indicates important information that helps you make better use of your
computer.
CAUTION: A CAUTION indicates either potential damage to hardware or loss of data and
tells you how to avoid the problem.
WARNING: A WARNING indicates a potential for property damage, personal injury, or
death.
Copyrights
© 2011–2012 Dell Inc.
Trademarks used in this text:
PowerVault
Force10
registered trademarks of Intel Corporation in the U.S. and other countries.
and
Microsoft
Active Directory
™
,
PowerConnect
™
and
Vostro
AMD Opteron
®
,
Windows
™
are trademarks of Dell Inc.
™
,
AMD Phenom
®
,
®
are either trademarks or registered trademarks of Microsoft Corporation in the United
™
, the Dell logo,
Dell
™
,
OpenManage
™
and
Windows Server
Dell Precision
™
,
EqualLogic
Intel
AMD Sempron
®
,
Internet Explorer
States and/or other countries. Red Hat® and Red Hat® Enterprise Linux® are registered trademarks of Red
Hat, Inc. in the United States and/or other countries. Novell® and SUSE® are registered trademarks of
Novell Inc. in the United States and other countries. Oracle® is a registered trademark of Oracle Corporation
and/or its affiliates. Citrix®, Xen®, XenServer® and XenMotion® are either registered trademarks or
trademarks of Citrix Systems, Inc. in the United States and/or other countries. VMware®, Virtual SMP®,
vMotion®, vCenter® and vSphere® are registered trademarks or trademarks of VMware, Inc. in the United
States or other countries. IBM® is a registered trademark of International Business Machines Corporation.
™
,
™
,
Compellent
®
®
,
Pentium
™
are trademarks of Advanced Micro Devices, Inc.
®
,
MS-DOS
OptiPlex
,
Xeon
®
,
™
™
,
®
,
Core
AMD
Windows Vista
™
,
Latitude
KACE
,
PowerEdge
™
,
FlexAddress
®
and
Celeron
®
is a registered trademark
®
and
®
™
are
™
,
,
2012 - 08
Rev. A01
Page 3
Installation And Configuration
WARNING: Before performing the following procedure, review the safety
instructions that came with the system.
Unpacking The System
Unpack your system and identify each item.
Optional—Connecting The Keyboard, Mouse, and Monitor
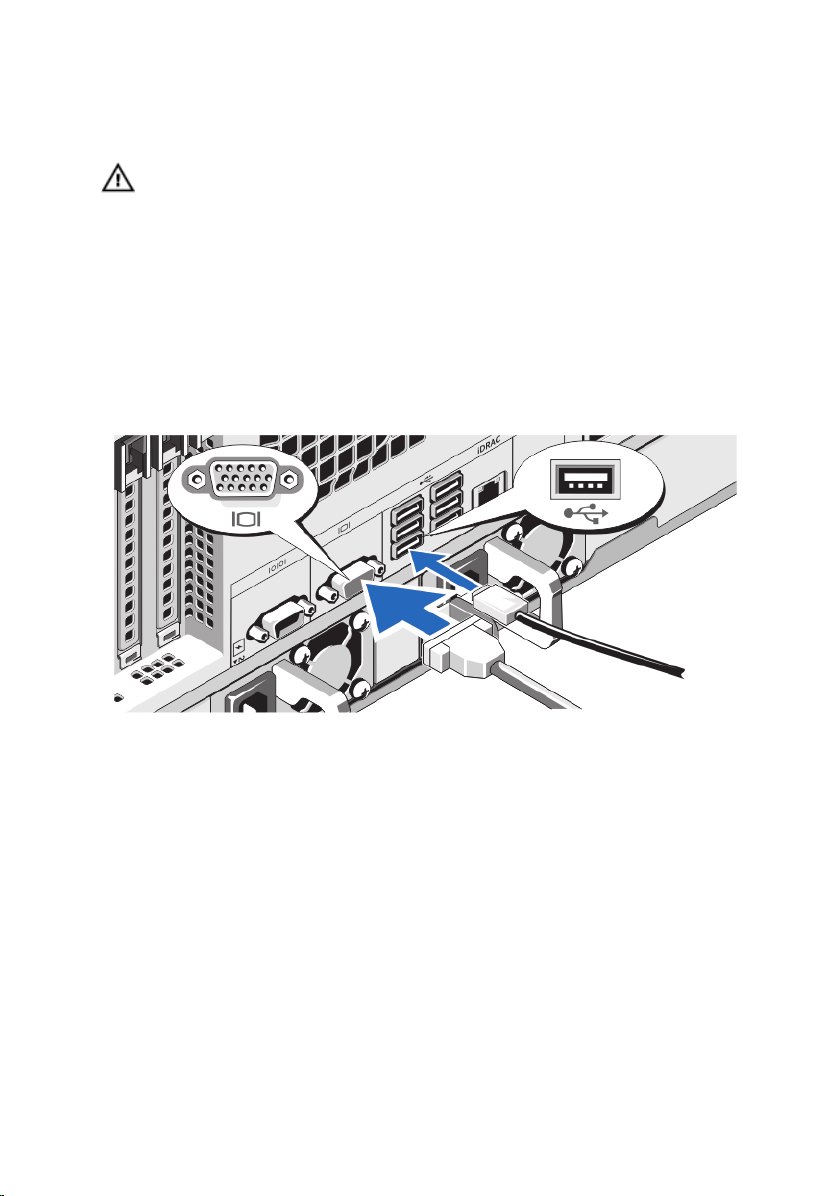
Figure 1. Optional—Connecting Keyboard, Mouse, and Monitor
Connect the keyboard, mouse, and monitor (optional).
The connectors on the back of your system have icons indicating which cable to plug
into each connector. Be sure to tighten the screws (if any) on the monitor's cable
connector.
3
Page 4
Connecting The Power Cable(s)
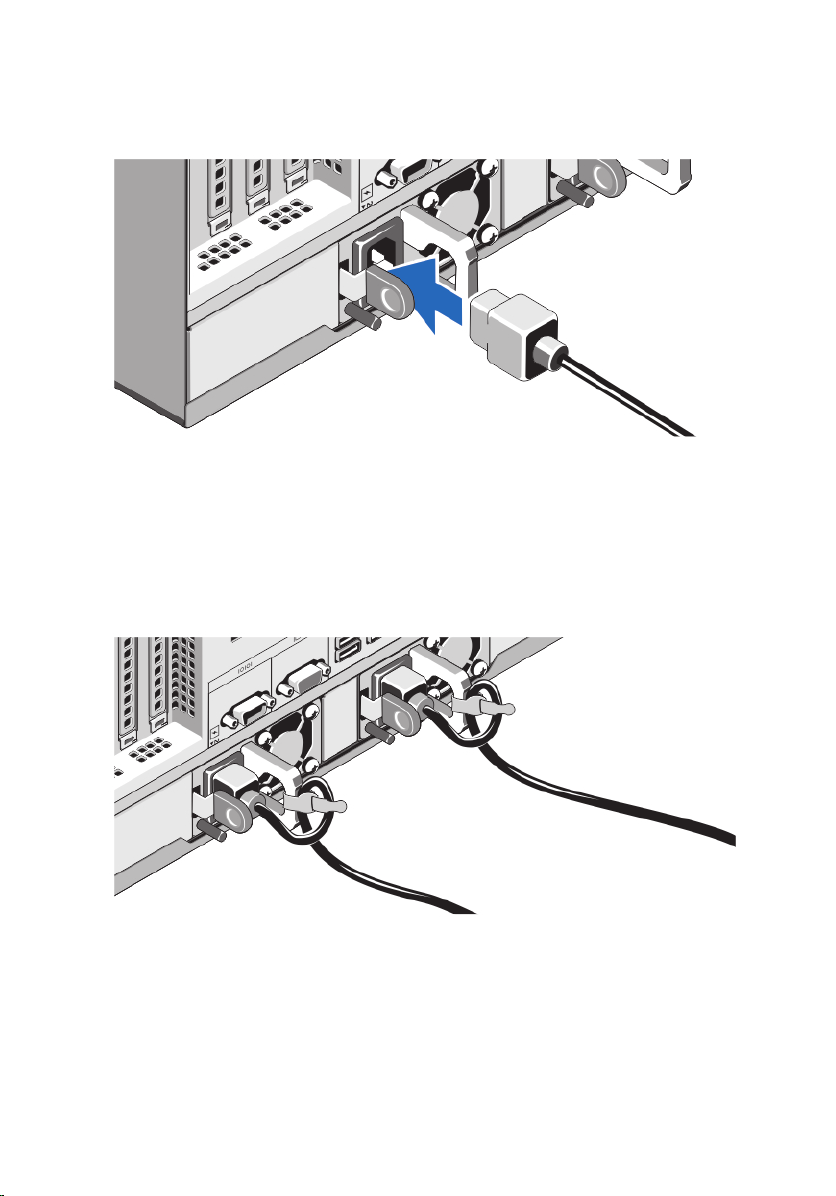
Figure 2. Connecting Power Cable(s)
Connect the system’s power cable(s) to the system, and if a monitor is used, connect the
monitor’s power cable to the monitor.
Securing The Power Cable(s)
Figure 3. Securing Power Cable(s)
Bend the system power cable(s), as shown in the illustration, and attach to the cable
strap.
4
Page 5
Plug the other end of the power cable(s) into a grounded electrical outlet or a separate
power source such as an uninterruptible power supply (UPS) or a power distribution unit
(PDU).
Turning On The System
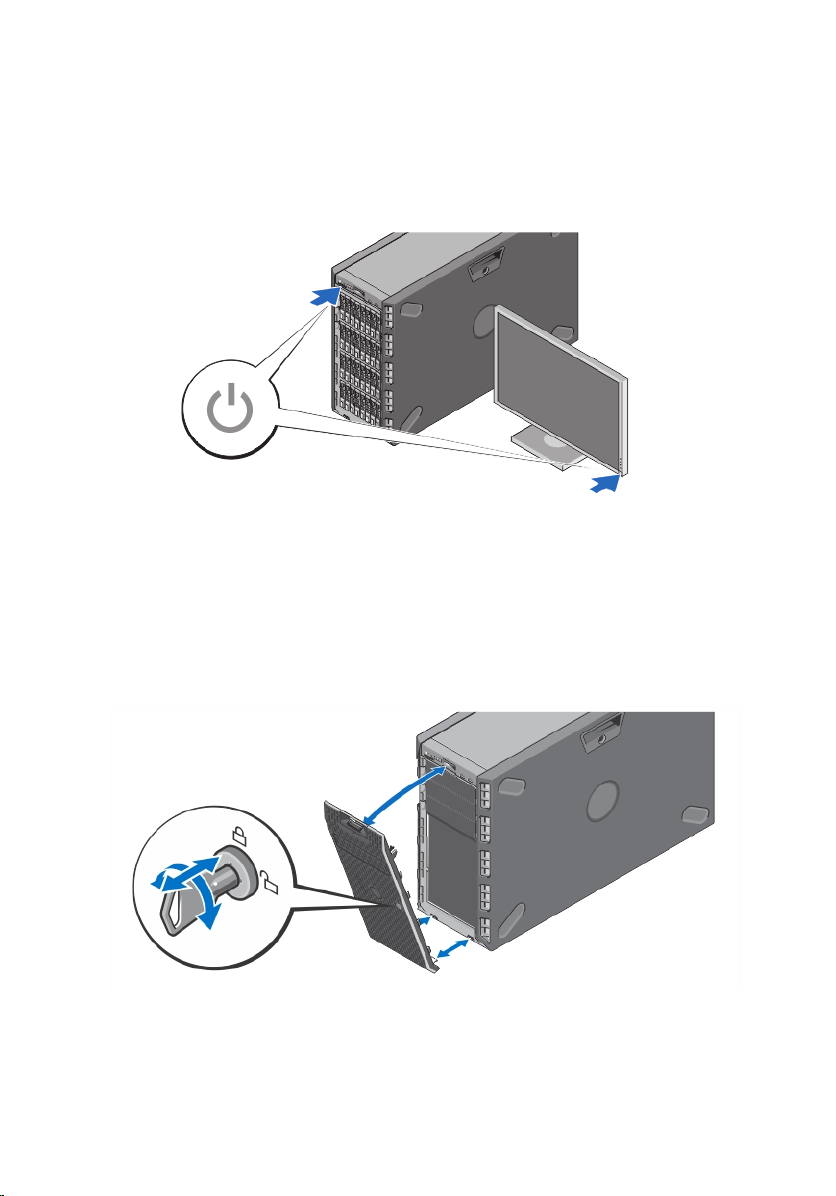
Figure 4. Turning On The System
Remove the optional bezel, if installed. Press the power button on the system. The power
indicator should light.
Installing The Optional Bezel
Figure 5. Installing the Bezel
Install the bezel (optional).
5
Page 6
Complete The Operating System Setup
If you purchased a preinstalled operating system, see the documentation associated
with the operating system. To install an operating system for the first time, see the
installation and configuration documentation for your operating system. Be sure the
operating system is installed before installing hardware or software not purchased with
the system.
NOTE: See dell.com/ossupport for the latest information on supported operating
systems.
Dell Software License Agreement
Before using your system, read the Dell Software License Agreement that came with
your system. You must consider any media of Dell-installed software as BACKUP copies
of the software installed on your system’s hard drive. If you do not accept the terms of
the agreement, call the customer assistance telephone number. For customers in the
United States, call 800-WWW-DELL (800-999-3355). For customers outside the United
States, visit support.dell.com and select your country or region from the bottom of the
page.
Other Information You May Need
WARNING: See the safety and regulatory information that shipped with your
system. Warranty information may be included within this document or as a
separate document.
• The
Owner’s Manual
how to troubleshoot the system and install or replace system components. This
document is available online at support.dell.com/manuals.
• The rack documentation included with your rack solution describes how to
install your system into a rack, if required.
• Any media that ships with your system that provides documentation and tools for
configuring and managing your system, including those pertaining to the
operating system, system management software, system updates, and system
components that you purchased with your system.
NOTE: Always check for updates on support.dell.com/manuals and read the
updates first because they often supersede information in other documents.
6
provides information about system features and describes
Page 7

NOTE: When upgrading your system, it is recommended that you download and
install the latest BIOS, driver, and systems management firmware on your system
from support.dell.com.
Obtaining Technical Assistance
If you do not understand a procedure in this guide or if the system does not perform as
expected, see your
certification. See dell.com/training for more information. This service may not be offered
in all locations.
Owner’s Manual
. Dell offers comprehensive hardware training and
NOM Information
The following information is provided on the device described in this document in
compliance with the requirements of the official Mexican standards (NOM):
Importer:
Model number: E17S
Supply voltage: 100–240 V CA (with 495 W, 750 W, and 1100 W AC power
Frequency: 50 Hz/60 Hz (AC power supply unit)
Current consumption: 12 A – 6.5 A (X 2) (with 1100 W AC power supply unit)
Dell Inc. de México, S.A. de C.V.
Paseo de la Reforma 2620 -11º Piso
Col. Lomas Altas
11950 México, D.F.
supply units) or
200–240 V CA (with 750 W Titanium power supply unit) or
–(48–60) V de CC (with 1100 W DC power supply unit)
10 A – 5 A (X 2) (with 750 W AC power supply unit)
6.5 A – 3 A (X 2) (with 495 W AC power supply unit)
5 A (X 2) (with 750 W Titanium redundant AC power supply
unit)
32 A (X 2) (with 1100 W DC power supply unit)
7
Page 8
Technical Specifications
NOTE: The following specifications are only those required by law to ship with your
system. For a complete and current listing of the specifications for your system, go
to support.dell.com.
Power
AC Power Supply (per power supply)
Wattage 495 W, 750 W, or 1100 W
Heat dissipation
NOTE: Heat dissipation is
calculated using the power supply
wattage rating.
Voltage
NOTE: This system is also designed
to be connected to IT power
systems with a phase to phase
voltage not exceeding 230 V.
DC Power Supply (per power supply)
Wattage 1100 W
Heat dissipation
NOTE: Heat dissipation is
calculated using the power supply
wattage rating.
Voltage –(48–60) V DC
1908 BTU/hr maximum (495 W power
supply)
2891 BTU/hr maximum (750 W power
supply)
2843 BTU/hr maximum (750 W Titanium
power supply)
4100 BTU/hr maximum (1100 W power
supply)
100–240 VAC, autoranging, 50/60 Hz
or
200–240 VAC, autoranging, 50/60 Hz
4416 BTU/hr maximum
Battery
Coin-cell battery 3 V CR2032 Lithium coin cell
8
Page 9
Physical
Height 443.5 mm (17.5 inch) with system feet
430.5 mm (16.94 inch) without system feet
Width 307.9 mm (12.12 inch) with system feet
opened
217.9 mm (8.57 inch) with system feet
closed
Depth 698.1 mm (27.48 inch) without bezel
714.1 mm (28.1 inch) with bezel
Weight (maximum configuration) 46.0 kg (101.41 lb)
Environmental
NOTE: Your system is capable of 40 °C and 45 °C excursion operation for fresh air
cooled data centers. For more information, see the Owner's Manual.
NOTE: For additional information about environmental measurements for specific
system configurations, see dell.com/environmental_datasheets.
Temperature
Operating Continuous operation: 10 °C to 35 °C. De-
rate maximum allowable dry bulb
temperature at 1 °C/300 m above 900 m
(1°F /550 ft).
NOTE: For information on supported
expanded operating temperature
range and configurations, see
support.dell.com/manuals.
Storage –40 °C to 65 °C (–40 °F to 149 °F) with a
maximum temperature gradation of 20 °C
per hour
Relative humidity
Operating 10% to 80% relative humidity (RH), with 26
°C maximum dew point.
Storage 5% to 95% relative humidity ambient with
33 °C (91 °F) maximum dew point.
9
Page 10

Environmental
Maximum vibration
Operating 0.26 Grms at 5 Hz to 350 Hz (all operation
orientations).
Storage 1.87 Grms at 10 Hz to 500 Hz for 15 min (all
six sides tested).
Maximum shock
Operating One shock pulse in the positive z axis
(one pulse on each side of the system) of
31 G for 2.6 ms in the operational
orientation.
Storage Six consecutively executed shock pulses
in the positive and negative x, y, and z
axes (one pulse on each side of the
system) of 71 G for up to 2 ms.
Six consecutively executed shock pulses
in the positive and negative x, y, and z
axes (one pulse on each side of the
system) of 22 G faired square wave pulse
with velocity change at 200 inches/
second (508 centimeters/second).
Altitude
Operating –15.2 m to 3048 m (–50 ft to 10,000 ft).
NOTE: In compliance with the
requirements of the official Chinese
standards, the operating altitude for
systems shipping in China is in the
range of –15.2 m to 2000 m (–50 ft to
6560 ft).
NOTE: For altitudes above 2950 ft, the
maximum operating temperature is
derated 1 ºF/550 ft.
Storage –15.2 m to 10,668 m (–50 ft to 35,000 ft)
Airborne contaminant level
Class G1 as defined by ISA-S71.04-1985
10
 Loading...