

Page 1

Dell Smart Plug-in Version 1.1
For HP Operations Manager
Versions 8.10 and 8.16 For
Microsoft Windows
User’s Guide
Page 2

Notes, Cautions
NOTE: A NOTE indicates important information that helps you make better use of
your computer.
CAUTION: A CAUTION indicates potential damage to hardware or loss of data if
instructions are not followed.
____________________
Information in this document is subject to change without notice.
© 2010 Dell Inc. All rights reserved.
Reproduction of these materials in any manner whatsoever without the written permission of Dell Inc.
is strictly forbidden.
Trademarks used in this text: Dell™, the DELL logo, OpenManage™, PowerEdge™, and
PowerVault™ are trademarks of Dell Inc. Microsoft
registered trademarks of Microsoft Corporation in the United States and/or other countries. VMware
and ESXi Server™ are registered trademarks of VMware, Inc. in the United States and/or other
jurisdictions. SUSE
Red Hat Enterprise Linux
countries. Linux
Other trademarks and trade names may be used in this document to refer to either the entities claiming
the marks and names or their products. Dell Inc. disclaims any proprietary interest in trademarks and
trade names other than its own.
October 2010
®
is a registered trademark of Novell, Inc. in the United States and other countries.
®
®
is a registered trademark of Red Hat, Inc. in the United States and other
is a registered trademark of Linus Torvalds.
®
, and Windows®, are either trademarks or
®
Page 3

Contents
1 Introduction . . . . . . . . . . . . . . . . . . . . . . . . 7
Key Features and Benefits of Dell Smart Plug-in . . . . . 7
What’s New in This Release. . . . . . . . . . . . . . . . 9
Supported Dell Devices
Supported Operating Systems
Other Documents You May Need . . . . . . . . . . . . 10
Obtaining Technical Support
. . . . . . . . . . . . . . . . . . 9
. . . . . . . . . . . . . . 10
. . . . . . . . . . . . . . 11
2 Installing and Uninstalling the Dell
Smart Plug-in . . . . . . . . . . . . . . . . . . . . . 13
Accessing Dell Smart Plug-in Installer . . . . . . . . . 13
Before You Begin
Configuring the Management Server for Dell SPI
Configuring User Authorization for WinRM
Configuring the Managed Systems
Installing the Dell SPI
Configuring Communication Parameters
Verifying Dell SPI Installation. . . . . . . . . . . . . . 21
. . . . . . . . . . . . . . . . . . . . 13
. . . . . . . . . . . 16
. . . . . . . . . . . . . . . . . . 17
. . . . . . 18
. . . 14
. . . . 15
Using the Modify Option in the Installer
. . . . . . . . 22
Contents 3
Page 4

Using the Repair Option in the Installer . . . . . . . . . 23
Upgrading Dell SPI from a Previous Version
. . . . . . 23
Uninstalling the Dell SPI. . . . . . . . . . . . . . . . . 24
3 Using Dell Smart Plug-in (SPI) . . . . . . . 27
Understanding the Dell Smart Plug-in. . . . . . . . . . 27
Deploying the Policies Automatically
Deploying the Policies Manually . . . . . . . . . . . . 29
Auto-grouping Policy
SNMP Interceptor Policies
. . . . . . . . . . . . . . . . . . 29
. . . . . . . . . . . . . . . 31
Dell_Process_SNMPTraps Policy
Dell_Process_SNMPTraps_AckManual
Policy
. . . . . . . . . . . . . . . . . . . . . . . . 32
Understanding Dell SPI Trap Message
Severity . . . . . . . . . . . . . . . . . . . . . . . 32
SNMP Trap Based Severity Propagation
Monitoring the Health of Dell Devices
. . . . . . . . . . 28
. . . . . . . . . 31
. . . . . . 33
. . . . . . . . . 34
4 Contents
Launching Dell OpenManage Server
Administrator
. . . . . . . . . . . . . . . . . . . . . . . 34
Launching Server Administrator from Tools
Launching Server Administrator from the
Node Group . . . . . . . . . . . . . . . . . . . . . 35
Launching Server Administrator from the
Service Map
. . . . . . . . . . . . . . . . . . . . 36
Launching Server Administrator from the
Alert Message . . . . . . . . . . . . . . . . . . . 36
. . . . 35
Page 5

Launching Distributed Web Server Console . . . . . . 37
Launching the DWS Console from Tools
. . . . . . 37
Launching the DWS Console from the
Node Group . . . . . . . . . . . . . . . . . . . . . 38
Launching the DWS Console from the
Service Map
. . . . . . . . . . . . . . . . . . . . 38
Launching the DWS Console from the
Alert Message . . . . . . . . . . . . . . . . . . . 38
4 Troubleshooting Dell Smart Plug-in
(SPI) . . . . . . . . . . . . . . . . . . . . . . . . . . . . 41
Installer Takes Time to Launch . . . . . . . . . . . . . 41
Upgrade Process Stops Responding
. . . . . . . . . . 41
SNMP Trap Messages are Not Created . . . . . . . . . 42
SNMP Traps Received at Wrong Nodes
. . . . . . . . 42
Global Health Status Not Retrieved for
Dell Systems
. . . . . . . . . . . . . . . . . . . . . . . 43
Contents 5
Page 6

6 Contents
Page 7

1
Introduction
CAUTION: Perform the procedures in this document only if you have proper
knowledge and experience in using HPOM to avoid data corruption and/or data
loss.
The Dell Smart Plug-in provides grouping and monitoring capability for Dell
systems and enables the users to take remedial action when an inefficient
system is identified. This guide is intended for system administrators
who use Dell Smart Plug-in (SPI) on HP Operations Manager (HPOM)
versions 8.10 and 8.16 for Microsoft Windows
With the integration of Dell SPI into HPOM, you can use the HPOM
console to monitor the availability of your Dell devices that are
discovered in HPOM.
Key Features and Benefits of Dell Smart Plug-in
The Dell SPI consists of different policies and tools that you can deploy on
the management server. It enables you to:
• Create the
group the Dell systems which are discovered either as managed or
external nodes with the supported Windows or Linux operating systems,
or VMware ESXi operating system in the HPOM console.
• Process Simple Network Management Protocol (SNMP) traps generated
by Dell OpenManage Server Administrator (Server Administrator) and
OpenManage Storage Systems’ (Storage Systems) agents running on Dell
systems.
• Periodically monitor the global system health of Dell systems grouped
under the
• Launch Server Administrator web console as a tool from the HPOM
console for troubleshooting the alerts from the Windows and Linux
systems.
• Launch the Distributed Web Server (DWS) console as a tool from the
HPOM console to connect to the ESXi systems, for troubleshooting the
alerts.
Dell Managed Systems
Dell Managed Systems
group.
to monitor Dell systems.
group under the nodes group, and
Introduction 7
Page 8
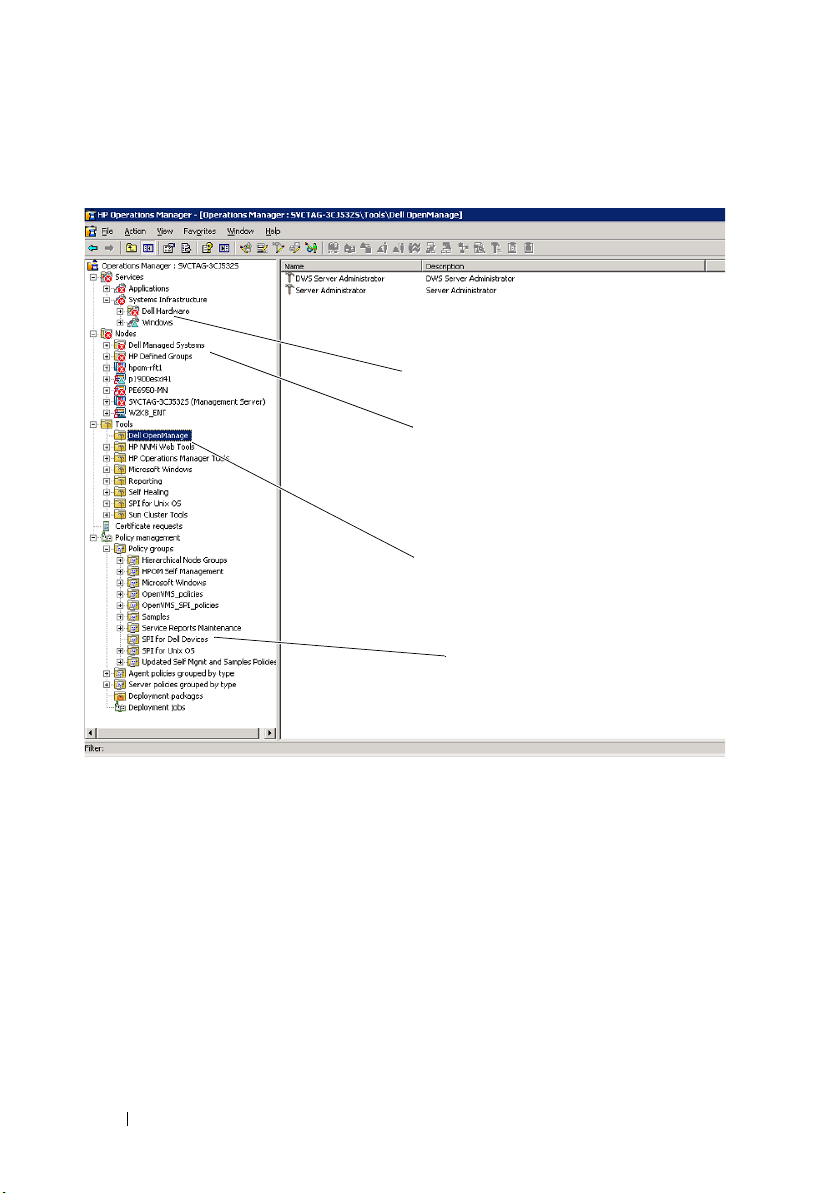
Figure 1-1 displays the HPOM console after you have installed Dell SPI.
Dell Service Maps
Dell Managed Systems Node Group
Dell OpenManage Tools
(Server Administrator, and
DWS Server Administrator)
SPI for Dell Devices Policy Group
Figure 1-1. Dell SPI Deployed On HPOM Console
8 Introduction
Page 9

What’s New in This Release
• Grouping and monitoring Dell Linux systems
–Creating the
view on the HPOM console to display all the Linux systems.
• Grouping and monitoring Dell ESXi systems
–Creating the
view on the HPOM console to display all the ESXi servers.
• Upgrading from Dell SPI version 1.0 to 1.1 using the Dell SPI installer
• Launching the Server Administrator web console from Linux systems
• Custom installation options between Windows, Linux, or ESXi to
monitor either Windows, Linux, or ESXi systems.
• Distributed Web Server (DWS) launch tool integrated with HPOM to
launch the Server Administrator web console for ESXi Server, through
the configured DWS web console URL
• Integration of the Dell SPI configurator – a command line utility to
configure the following parameters:
– SNMP Timeout and retries
– WSMAN username, password, Certificate Authority check,
Common Name check, Revocation check, and WSMAN timeout
– DWS URL for OMSA Launch
Dell Linux Servers
Dell ESXi Servers
service group under the
service group under the
Service Map
Service Map
Supported Dell Devices
Dell SPI for HPOM supports the following Dell devices:
• Dell PowerEdge systems — complete support for systems ranging from
x8xx to xx1x (both inclusive) that have OMSA versions 5.5 to 6.3 and
the supported Windows operating system installed
• Dell PowerEdge systems — complete support for systems ranging from
x9xx to x1xx (both inclusive) that have OMSA versions 6.1 to 6.3 and
ESXi version 4.0 and above installed
Introduction 9
Page 10

• Dell PowerEdge systems — complete support for systems ranging from
x9xx to x1xx (both inclusive) that have OMSA versions 6.1 to 6.3 and
supported Linux operating system installed
• Dell PowerVault systems — support for Windows systems that have
OMSA versions 5.5 to 6.3 installed
Supported Operating Systems
For the latest information on operating system support for the Dell SPI, see
the Readme file.
The Readme file packaged with the Dell SPI contains information about
the hardware and software requirements for the management station and
the managed nodes, and information about known issues. The readme
file is available on the Systems Management documentation page on the
Dell Support website at support.dell.com/manuals and is also packaged in
the self-extracting executable Dell Smart Plug-in v1.1_A00.exe file.
Other Documents You May Need
In addition to this guide, you can access the following guides available on the
Dell Support website at support.dell.com/manuals. On the Manuals page,
click Software Systems Management. Click the appropriate product link
on the right-side to access the documents:
•The
•The
•The
Dell OpenManage Installation and Security User's Guide
detailed installation procedures and step-by-step instructions for
installing, upgrading, and uninstalling Server Administrator for each
supported operating system.
Dell OpenManage Server Administrator User’s Guide
information about setting up and using OpenManage Server
Administrator on Dell systems with various operating systems
installed on them.
Dell OpenManage Server Administrator Compatibility Guide
compatibility information about Server Administrator installation and
operation on various hardware platforms (or systems) running
supported operating systems.
provides
provides detailed
provides
10 Introduction
Page 11

•The
•The
•The
•The
•
Dell OpenManage Server Administrator Messages Reference Guide
lists the messages that are displayed in your Server Administrator home
page Alert log or on the event viewer of your operating system. This guide
explains the text, severity, and cause of each service alert message that the
Server Administrator issues.
Dell OpenManage Server Administrator Command Line Interface
User's Guide
Server Administrator, including an explanation of the command line
interface (CLI) commands to view system status, access logs, create
reports, configure various component parameters, and set critical
thresholds.
Dell OpenManage With VMware ESX/ESXi 4 Systems Management
Guide
information for running the Dell OpenManage systems management
software suite on VMware ESX 4 and VMware ESXi 4 software for
Dell PowerEdge systems. To access this guide, click
SoftwareVirtualization Solutions VMware Software on
support.dell.com/manuals
SNMP Trap Correlation Guide
SNMP Trap correlation.
For information on terms used in this document, see the Glossary on
the Dell Support website at support.dell.com/manuals.
documents the complete command line interface for
provides installation steps, usage guidelines, and support
.
provides information on
Obtaining Technical Support
For assistance and information about Dell SPI, see the Dell Support website
at support.dell.com.
Introduction 11
Page 12

12 Introduction
Page 13

2
Installing and Uninstalling the Dell Smart Plug-in
You must install the pre-requisite softwares on your management server and
managed systems before installing the Dell Smart Plug-in(SPI).
A complete list of software requirements is provided in the Dell SPI readme.
The readme is available with the Dell SPI installer and on the Systems
Management documentation page on the Dell Support website at
support.dell.com/manuals.
Accessing Dell Smart Plug-in Installer
The Dell SPI (Dell Smart Plug-In v1.1.msi), and readme file are packaged in
the self-extracting executable Dell Smart Plug-in v1.1_A00.exe file. You can
download the installer from the Dell Support website at support.dell.com.
Before You Begin
Before you begin installing Dell SPI, you must:
• Configure the management server
• Configure the managed system
• Download the Dell SPI self-extracting executable from the Dell Support
website.
Installing and Uninstalling the Dell Smart Plug-in 13
Page 14

Configuring the Management Server for Dell SPI
To configure the management server for Dell SPI:
NOTE: You must have domain administrator privileges on the HP Operations
Manager (HPOM) management server where you install the Dell SPI, and ensure
that you also have WinRM privileges on the system in case you want to monitor Dell
ESXi systems. For more information on configuring the WinRM privileges, see
"Configuring User Authorization for WinRM" on page 15.
1
Install HPOM version 8.10 or 8.16 for Microsoft Windows with the latest
patches on the management server.
HPOM, see the HP Operations Manager Installation Guide
the HP Support website.
2
Install and enable the Simple Network Management Protocol (SNMP)
service to establish communication between the management server and
the managed node.
3
Ensure that you install the Windows Management Instrumentation
(WMI) Windows Installer Provider on the management server.
To install the WMI Windows Installer Provider on Windows 2003
systems:
a
Navigate to
b
Click
Component Wizard
c
On the
Monitoring Tools
d
Select
Settings Control Panel Add/Remove Programs
Add/Remove Windows Components
is displayed.
Windows Components Wizard
and click
WMI Windows Installer Provider
is installed on the management server.
4
Ensure that you install the WMI SNMP Provider on the management
server.
For more information on installing
available on
. The
Windows
, select
Management and
Details
.
and click OK. The provider
.
14 Installing and Uninstalling the Dell Smart Plug-in
Page 15

To install the WMI SNMP Provider on Windows 2003 systems:
a
Navigate to
b
Click
Component Wizard
c
On the
Monitoring Tools
d
Select
Settings Control Panel Add/Remove Programs
Add/Remove Windows Components
. The
Windows
is displayed.
Windows Components Wizard
and click
WMI SNMP Provider
Details
and click OK. The provider is installed
.
, select
Management and
on the management server.
5
Install and configure WinRM version 2.0 or above to establish
communication between the management server and the VMware ESXi
systems that you are monitoring.
NOTE: If you are running HPOM on a Windows 2003 Server operating system,
restart the system after you install WinRM. If you do not restart the system,
the Auto-grouping policy does not group the ESXi systems under Dell
Managed Systems.
Configuring User Authorization for WinRM
To provide access rights to WinRM and WMI services, add users with the
appropriate access levels.
NOTE: You must login with administrator privileges to configure user authorization
for WinRM and WMI Servers. The administrator is configured by default.
To configure user authorization for WinRM:
Click
Start
1
2
Ty p e
3
Click
4
Provide the appropriate permission(s) to the respective users and click OK.
and click
winrm configsddl default
Add
and add the required local or domain users or groups to the list.
Run
.
and click OK.
.
Installing and Uninstalling the Dell Smart Plug-in 15
Page 16

Configuring the Managed Systems
To configure the managed systems:
1
Install the supported Windows or Linux operating systems, or the
supported ESXi version on the managed systems.
2
Install and enable the SNMP service on the managed system and ensure
that the management server is able to communicate with it.
3
Configure the SNMP agent to change the community name, enable Get
operations, and send traps to the HPOM management server. For
information on configuring the SNMP agent on Windows systems, see the
OpenManage Server Administrator User’s Guide
Support website at
For information on configuring the SNMP agent on ESXi systems, see the
Dell OpenManage With VMware ESX/ESXi 4 Systems Management Guide
available on the Dell Support website at
4
Install Server Administrator on the Windows and the Linux systems. The
supported versions of Server Administrator:
• For Windows systems — versions 5.5 to 6.3
• For ESXi and Linux systems — versions 6.1 to 6.3.
For more information on configuring SNMP for Windows, ESXi, and
Linux systems, see the
available on the Dell Support website at
support.dell.com/manuals.
OpenManage Server Administrator User’s Guide
available on the Dell
support.dell.com/manuals
support.dell.com/manuals
.
.
5
Install Dell OpenManage Server Administrator (Server Administrator) on
ESXi and enable the OEM CIM providers and ensure that the
management server is able to communicate with the systems. For more
information on enabling the OEM CIM providers, see the
OpenManage With VMware ESX/ESXi 4 Systems Management Guide
available on the Dell Support website at
You can download OMSA from the Dell Support website
support.dell.com.
16 Installing and Uninstalling the Dell Smart Plug-in
support.dell.com/manuals
at
Dell
.
Page 17

Installing the Dell SPI
NOTE: You must close the HPOM console before you install or uninstall the Dell SPI
or use the Repair, Modify, or Upgrade options on the Dell SPI installer.
To install the Dell SPI on the HPOM management server:
1
Download the Dell SPI installer from the Dell Support website at
support.dell.com
extracting file.
2
Login to the HPOM management server as an administrator and
HP_OVE_ADMIN privileges.
3 Ensure that HPOM version 8.10/8.16 for Windows is installed correctly
and running on the management server by launching the management
console, and close the console after verification.
4
Extract the contents of the
management server to any folder on the system.
5
Run the
The
6
Click
7
In the
license agreement
Availability and Location
8
Click
9
In the custom screen, select one or all the options —
Windows Servers
Servers
If you select any one of the options, you can monitor only the servers
pertaining to your selection. For example, if you choose
ESXi Servers
Dell Smart Plug-In v1.1.msi
Welco me
Next
License Agreement
Next
as per your requirement.
. The
Dell Smart Plug-in v1.1_A00.exe
Dell Smart Plug-in v1.1_A00.exe
from the extracted folder.
screen is displayed.
.
screen, select the
option and click
screen is displayed.
. The custom screen is displayed.
,
Monitor Dell ESXi Servers, or Monitor Dell Linux
, you can monitor only the ESXi systems.
Next
I accept the terms in the
. The
Documentation
is a self-
on the
Monitor Dell
Monitor Dell
Installing and Uninstalling the Dell Smart Plug-in 17
Page 18

10
Select
Yes
to auto-deploy the policy files during installation. If you select
No
, then you must deploy them manually on the management server. For
more information, see "Deploying the Policies Automatically" and
"Deploying the Policies Manually" on page 29.
The Summary screen displays information about the folder where the Dell
SPI is installed, the policy files that are deployed, the tools that are
installed, and the systems that are monitored by the Dell SPI.
11
Click
Install
.
When the installation process completes, click
Finish
.
Configuring Communication Parameters
After you complete installing the Dell SPI, configure the SNMP parameters
for Windows and Linux systems and WSMAN parameters for ESXi systems
to ensure that communication between the management server and the Dell
systems is established correctly. The Dell SPI installer includes the
DellSPIConfigUtility.exe, which is a command line utility that you must run
to configure the communication parameters.
You can configure the following parameters:
• WSMAN Connection Parameters:
–Username
–Password
–Timeout
– Security options that include Certificate Authority check, Common
Name check, and Revocation check
• SNMP timeout and retries
•DWS URL
Table 2-1 lists the options that the command line utility uses to set the
different values for WSMAN, SNMP, and DWS.
18 Installing and Uninstalling the Dell Smart Plug-in
Page 19

Table 2-1. Command Line Options
Option Description
-wsmanusername Specifies user name of a local or a domain account on
the ESXi system. This property determines the user
name for authentication to access the ESXi system.
-wsmanpassword Specifies the password for the user name you
specified.
-wsmancacheck Skips the authentication of Certificate Authority that
issued the certificate. The value is either yes or no.
The default value is no. If you set the value to yes,
then the authentication of Certificate Authority is
checked.
-wsmancncheck Skips authentication of the Common Name (CN).
The value is either yes or no. The default value is no.
If you set the value to yes, then the common name is
checked.
-wsmanrevocationcheck Specifies a value to indicate whether the WSMAN
connection should validate the revocation status of
the server certificate or not. The value is either yes or
no. The default value is no. If you set the value to
yes, then the revocation status of the server
certificate is checked.
-wsmantimeout Specifies WSMAN timeout value in milliseconds. The
default value is 30000 (30 seconds). Set a value
between 500 milliseconds to 4294967290
milliseconds.
-snmptimeout Specifies the SNMP timeout in milliseconds. The
default value is 5000 (5 seconds). Set a value between
100 milliseconds to 4294967290 milliseconds.
-snmpretries Specifies the number of SNMP retries. The default
value is 1.
- dwsurl Specifies the DWS URL. You cannot specify an
invalid URL or leave the URL blank.
Installing and Uninstalling the Dell Smart Plug-in 19
Page 20

Table 2-1. Command Line Options
Option Description
-getall Specifies the values of all the options and display
them on the screen. This option gets all the values for
all the individual parameters except wsmanusername
and wsmanpassword.
-resetdefaults Resets all the configurable values to the default
values.
NOTE: This option does not reset the values for the -
wsmanusername and -wsmanpassword options.
-help Displays the help for using this tool.
To use the configuration utility:
1
Launch the command prompt on the management server.
2
Navigate to
DellSPIConfigUtility.exe
. The default location is
C:\Program
Files\Dell\OpenManage Connection for HP.
3
Type the following command:
DellSPIConfigUtility.exe -<option>=<value>
Enter
. For example, if you want to set the WSMAN timeout, type the
following command:
DellSPIConfigUtility.exe -
and press
wsmantimeout=60
NOTE: If you enter invalid values, the utility displays the error message with
the help text.
You can use WSMAN specific options only if you enable ESXi systems
monitoring when you install the Dell SPI.
If you do not specify new values for any of the options, the utility uses the
default values. However, you must set the values for wsmanusername and
wsmanpassword if you are monitoring the ESXi systems. You must also set
the value for the DWS URL.
When you specify the value for wsmanpassword, type the following command
DellSPIConfigUtility.exe -wsmanpassword and press Enter.
You do not need to specify = after -wsmanpassword. When you specify the
password for the first time, you need to enter the password twice. When you
modify the password, the utility prompts you to enter the old password and
then the new password twice.
20 Installing and Uninstalling the Dell Smart Plug-in
Page 21

NOTE: The utility prompts you to change the password even when you change the
username.
To view the values for each option other than the values for wsmanusername
and wsmanpassword, type the following command:
DellSPIConfigUtility.exe -<option>
Verifying Dell SPI Installation
To verify the Dell SPI installation:
1
Launch the HPOM console and verify that the
group is created under
2
Verify that the following policies are present under the
Devices
• Dell_Autogroup_Servers
• Dell_Process_SNMPTraps
• Dell_Process_SNMPTraps_AckManual
•
3
Verify that the HPOM console displays the
DWS Server Administrator
4
If you select the auto-deploy option during installation:
• Select the management server under
• Right-click and select
• In this case, the following policies are deployed:
policy group:
Dell_Sched_Status_Update
are displayed on the right pane.
•
Dell_Process_SNMPTraps
• Dell_Autogroup_Servers
•
Dell_Sched_Status_Update
Policy ManagementPolicy Groups
tools under
ViewPolicy Inventory
SPI for Dell Devices
.
SPI for Dell
Server Administrator
ToolsDell OpenManage
Nodes.
. The Dell SPI policies
and the
policy
.
Installing and Uninstalling the Dell Smart Plug-in 21
Page 22

Using the Modify Option in the Installer
The Modify option in the Dell SPI installer, modifies the program features
that are installed. This option retains the schedules you have set for the
various policies and enables you to perform the following actions:
• Install a feature that you did not install earlier
• Remove a feature that you have installed earlier
To install a feature that you did not install earlier:
1
Disable all the Dell SPI policies that are running on the management
server in the HPOM console.
2
Run the
The
3
Click
4
Select the
5
In the custom screen, select
Dell ESXi Servers,
that you did not install earlier and click
6
Click
When the installation process completes, click
To remove a feature that you had installed earlier:
1
Repeat steps 1– 4 mentioned in the previous procedure.
2
In the
3
Click the feature and select the option
and click
4
Click
management server.
Dell Smart Plug-In v1.1.msi
Welco me
Next.
Install
Install
screen is displayed.
The installer displays three options.
Modify
Custom
Next.
option. The
or
Monitor Dell Linux Servers,
.
screen, select the feature that you want to remove.
. The installer removes the feature from the HPOM
Custom
Monitor Dell Windows Servers, Monitor
from the extracted folder.
screen is displayed.
or select the feature
Next.
Finish
.
This feature will not be available
22 Installing and Uninstalling the Dell Smart Plug-in
Page 23

Using the Repair Option in the Installer
If you accidentally delete any of the policies from the
policy group, or from the Policy Inventory of the management server, use the
Repair option in the Dell SPI installer to re-install the policies.
The Repair option installs the missing Dell SPI policies, and automatically
deploys all the policies on the management server. Before you use the Repair
option, ensure that you remove all the Dell SPI policies from the HPOM
management server node on the HPOM console.
NOTE: If you modify any of the policies and then delete them, the Repair option
installs only the original version of the policies. You must modify them again as per
your requirements. The repair option resets the values of the SNMP, WSMAN, and
DWSURL parameters. You must set the values of the parameters again.
Additionally, if any of the files are missing or corrupted, the Repair option
replaces the file.
SPI for Dell Devices
Upgrading Dell SPI from a Previous Version
If you have a previous version of Dell SPI installed on the management server,
you can upgrade the same to the latest version.
When you upgrade from a previous version, the existing policies upgrade to
the latest version and the existing Dell groups from nodes and services are
removed. After upgrade, the Dell nodes and service maps are recreated
automatically.
NOTE: The Upgrade process does not preserve the schedule settings for the policy
files. The schedules are reset to the default settings.
During upgrade, select all the options
Monitor Dell ESXi Servers,
of the options as per your requirement.
If you select only the Monitor Dell ESXi Servers or the Monitor Dell Linux
Servers options, the upgrade process uninstalls all the Windows related policy
files, nodes, service maps, and the OMSA tool from HPOM, and enables you
to monitor only the ESXi or Linux systems.
and the
— Monitor Dell Windows Servers,
Monitor Dell Linux Servers
or select one
Installing and Uninstalling the Dell Smart Plug-in 23
Page 24

If you select only the Monitor Dell Windows Servers option, the upgrade
process only preserves the alerts for the Windows servers. All the nodes
grouped under Dell Managed Systems are removed and are added again
when the Dell_Autogroup_Servers policy runs as per the default schedule.
NOTE: If you have installed Dell SPI version 1.0 with a particular user account, then
you must login with the same user account to upgrade to Dell SPI version 1.1. For
example, if you have installed Dell SPI version 1.0 as User A, you must login to the
management server as User A to upgrade. If you login as User B, then the upgrade
process displays an error message and prevents you from proceeding.
To upgrade to the current version:
1
Remove all the Dell SPI policies from the HPOM management server
node on the HPOM console.
2
Close the HPOM console.
3
Run the
The
that another version of Dell SPI is installed and whether you want to
upgrade to a newer version.
4
Click
5
Follow steps 6 - 11 mentioned in "Installing the Dell SPI" on page 17.
6
After the upgrade process is complete, the Auto-grouping policy runs
automatically to group the Dell systems. For more information, see "Autogrouping Policy" on page 29.
Dell Smart Plug-In v1.1.msi
Welco me
Yes
screen is displayed. You are also prompted with a message
to proceed with the installation.
from the extracted folder.
Uninstalling the Dell SPI
You can uninstall the Dell SPI from the Windows Control Panel or use the
Remove option in the Dell SPI installer. Before you uninstall the Dell SPI,
ensure the following:
• Dell policies are not running on the management server.
• Remove all the Dell SPI policies from the HPOM management server
node on the HPOM console.
• Users of the Dell SPI policies have logged out of the system.
24 Installing and Uninstalling the Dell Smart Plug-in
Page 25

NOTE: You must uninstall the Dell SPI first before you uninstall HPOM. If you
uninstall HPOM first and then attempt to uninstall the Dell SPI, the uninstallation
process may fail with some errors.
NOTE: When you uninstall the Dell SPI, the following error may be displayed: One
or more Dell SPI processes in progress. Stop all
Dell SPI processes and try again
policies, or wait till the policies complete execution, and then retry the
uninstallation.
. To resolve this, disable the
To remove the Dell SPI using Windows Control Panel:
1
From the
Remove Programs/Programs and Features
2
Select
Start
menu, select
Dell Smart Plug-in 1.1
Settings Control Panel
.
and click
Remove
.
and open
Add/
The uninstallation process removes the Dell SPI from the HPOM
management server.
To remove Dell SPI using the installer:
1
Run the
the contents of the self extracting package
v1.1_A00.exe
The
2
Click
3
Select the
Dell Smart Plug-In v1.1.msi
.
Welco me
Next.
screen is displayed.
The installer displays three options.
Remove
option. The Dell SPI is removed from the management
from the folder where you extracted
Dell Smart Plug-in
server.
To verify that the Dell SPI is completely uninstalled from the management
server:
1
Launch the HPOM console and ensure that the
policy group under
2
Click
Nodes
Policy ManagementPolicy Group
and ensure that the
Dell Managed Systems Group
SPI for Dell Devices
is removed.
is
removed.
3
Click
Service System Infrastructure
and ensure that the
Dell Hardware
service and the service map for all Dell devices is removed.
4
Click
Tools
and ensure that the
Dell OpenManage
group is removed.
Installing and Uninstalling the Dell Smart Plug-in 25
Page 26

26 Installing and Uninstalling the Dell Smart Plug-in
Page 27

3
Using Dell Smart Plug-in (SPI)
This chapter discusses the various operations that you can perform after you
install the Dell SPI on the HP Operations Manager (HPOM) management
server.
Understanding the Dell Smart Plug-in
The Dell SPI consists of four policy files. Table 3-2 lists the policy files
included in the Dell SPI.
Table 3-2. Dell SPI Policy Files
Policy File Description
Dell_Autogroup_Servers This policy scans across all managed nodes and
external nodes, identifies the Dell systems, and
groups them under Dell Managed Systems on
the HPOM console.
This policy groups only those Dell systems where
you have:
• Installed the supported versions of
OpenManage Server Administrator (Server
Administrator) running on supported versions
of Windows operating systems, ESXi, or Linux
operating systems
•Enabled
Protocol (SNMP)
• Enabled SNMP and WSMAN on the ESXi
systems. For more information on configuring
the SNMP agent on ESXi systems, see the
OpenManage With VMware ESX/ESXi 4
Systems Management Guide
Dell Support website at
support.dell.com/manuals
• Enabled SNMP on the Linux systems
This policy is scheduled to run at 23:00 hours
everyday.
Simple Network Management
on the Windows systems
Dell
available on the
Using Dell Smart Plug-in (SPI) 27
Page 28

Table 3-2. Dell SPI Policy Files
Policy File Description
Dell_Process_SNMPTraps This policy processes Server Administrator and
OpenManage Storage Systems (Storage Systems)
SNMP traps from the Dell systems and sends
appropriate messages to the HPOM console. The
policy retrieves the global health status of the
Dell system for every trap received from the
system. This policy has trap correlation feature
enabled and auto-acknowledges the traps.
Dell_Process_SNMPTraps_AckM
anual
Dell_Sched_Status_Update This policy periodically polls the Dell systems
This policy also processes the Server
Administrator and Storage Systems SNMP traps
from the Dell systems and sends appropriate
messages to the HPOM console. This policy does
not have the trap correlation feature enabled and
does not acknowledge the traps automatically.
grouped under Dell Managed Systems and
retrieves the system health status information.
This policy is scheduled to run every one hour.
Deploying the Policies Automatically
You can choose to deploy the Dell SPI policies automatically on the
management server when you install the Dell SPI.
If you automatically deploy the policies, the policies run as per the default
schedule. The following policies are deployed automatically:
• Dell_Autogroup_Servers
• Dell_Process_SNMPTraps
• Dell_Sched_Status_Update
28 Using Dell Smart Plug-in (SPI)
Page 29

Deploying the Policies Manually
You can deploy the policies manually after you complete installing the Dell
SPI.
To deploy the policies manually:
1
Launch the HPOM console and navigate to
Policy Groups SPI for Dell Devices.
2
Select the policy that you want to deploy
3
Right-click and select
screen is displayed.
4
Select the management server and click OK. The policy is deployed on the
management server and runs as per the default schedule. You can change
the default schedule when you manually run the policies.
NOTE: Ensure that you deploy the policies only on the management server
and not on the managed nodes.
All Tasks
Deploy on
Policy Management
.
. The
Deploy policies on
Auto-grouping Policy
The auto-grouping policy Dell_Autogroup_Servers is a scheduled task. The
policy is scheduled to run at 23:00 hours every day. You could change this
default schedule as per your requirement.
The auto-grouping policy:
• Identifies and groups Dell PowerEdge and PowerVault systems running the
supported Windows operating systems, have Server Administrator
installed on them, and have SNMP enabled, under the
Systems
• Identifies and groups Dell PowerEdge systems running the supported
Linux operating systems, have Server Administrator installed on them, and
have SNMP enabled, under the
HPOM console
• Identifies and groups PowerEdge systems running the supported version of
ESXi, have Server Administrator installed on them, and have the OEM
CIM providers enabled on them, under the
group on the HPOM console
node group on the HPOM console
Dell Managed Systems
Dell Managed Systems
Dell Managed
node group on the
node
Using Dell Smart Plug-in (SPI) 29
Page 30

• Groups the PowerEdge and PowerVault systems under two broad
categories according to the hardware configuration—
Systems
•
and
Dell Modular Systems
Dell Modular Systems
—Creates a group with the Chassis Service tag
Dell Monolithic
as the name of the group. All the blade servers belonging to the same
chassis are grouped under the
•
Dell Monolithic Systems
•Creates
Dell Windows Servers
Dell ESXi Servers
Servers
service group for the Linux systems in the
service group for the ESXi systems, and the
Chassis Service tag
group.
—Groups all the monolithic servers.
service group for the Windows systems,
Dell Linux
Service Map
view on the
HPOM console
• Creates the
corresponding to each server under the
Servers,
SNMP Traps
and the
Dell Linux Servers
service and
Global System Status
service
Dell Windows Servers, Dell ESXi
service groups. The
SNMP Traps
service displays the severity status of the system based on SNMP traps and
the Global System Status service displays the severity status of the system
based on server health poll. For more information see, "SNMP Trap Based
Severity Propagation" on page 33
NOTE: To know the actual health of the Dell system, view the status in the
Global System Status service.
To view the Dell systems in the
a
Select
Systems Infrastructure
Service Map
under
Services
view:
in the HPOM console.
The Service Map view is displayed on the right pane.
b
Click
Dell Hardware
Servers,
The
under
or
Dell Linux Servers.
Service Map
Dell Modular Systems
and click
Dell Windows Servers, Dell ESXi
view displays all the Dell systems that are grouped
and
Dell Monolithic Systems
.
30 Using Dell Smart Plug-in (SPI)
Page 31

SNMP Interceptor Policies
The SNMP interceptor policies have predefined rules to process all the Server
Administrator/Storage System SNMP traps sent by the Dell devices to the
management server, generate formatted messages, and send them to the
HPOM console.
Dell SPI provides two SNMP policies:
• Dell_Process_SNMPTraps
• Dell_Process_SNMPTraps_AckManual
Dell_Process_SNMPTraps Policy
This policy has the trap correlation feature enabled and you can auto-deploy
this policy when you are installing the Dell SPI. For every trap received from
the Dell systems, it processes the traps in the following way:
1
Sends a message to the active message browser of the node on the HPOM
console, which sends the trap.
2
For all
Normal
moves them from the active message browser to the acknowledged
message browser of the node.
3
For all
Critical
once it receives a trap with the information that the issue for the critical or
warning trap is resolved. It retains the critical and warning messages in the
active message browser.
For more information on the trap correlation, see the
Correlation Guide
support.dell.com/manuals.
traps, the policy auto-acknowledges the messages and
and
Warn i ng
available on the Dell Support website at
traps, the policy auto-acknowledges the trap
Dell SPI Trap
NOTE: If there is any message corresponding to an SNMP trap present in an
active message browser for a particular Dell system, and the SNMP
interceptor policy receives the same trap again, then it is counted as a
duplicate trap, if message suppression is enabled.
4
The policy reflects the severity of the message in the
in the
Service Map
view.
Using Dell Smart Plug-in (SPI) 31
SNMP Traps
service
Page 32

5
The policy also retrieves the global health status of the node and sends a
message with the global health status to the active message browser of the
node. You can also view the current global health status in the
System Status
NOTE: If a node is not DNS resolvable, the Dell SPI may not update the global
health status for that node.
service.
Global
Dell_Process_SNMPTraps_AckManual Policy
This policy does not have the trap correlation feature enabled and you cannot
deploy this policy automatically when you are installing the Dell SPI. For
every trap received from the Dell systems, it processes the traps in the
following manner:
1
Sends a message to the active message browser of the node on the HPOM
console, which sends the trap.
2
Retains all the
browser of the node. You must manually acknowledge the traps and move
them to the acknowledged message browser of the node.
The policy does not correlate the traps from the node and does not
perform auto-acknowledgement of the traps.
3
Reflects the severity of the message in the
Service Map
4
Retrieves the global health status of the node and sends a message with
the global health status to the active message browser of the node. You can
also view the current global health status in the
service.
Normal, Critical
view.
, and
Wa rn in g
SNMP Traps
traps in the active message
service in the
Global System Status
NOTE: You can run either the Dell_Process_SNMPTraps or
Dell_Process_SNMPTraps_AckManual policy at a time. Both policies cannot run
together.
Understanding Dell SPI Trap Message Severity
Traps often contain information about values recorded by probes or sensors.
Probes and sensors monitor critical components for values such as amperage,
voltage, and temperature. When an event occurs on the Dell system, it sends
a trap having one of the following severities:
32 Using Dell Smart Plug-in (SPI)
Page 33

•
Normal
— An event that describes the successful operation of a unit, such
as a power supply turning on, or a sensor reading returning to normal
•
War ni ng
— An event that is not necessarily significant, but may indicate a
possible future problem, such as crossing a warning threshold
•
Critical
— A significant event that indicates actual or imminent loss of
data or loss of function, such as crossing a failure threshold or a hardware
failure
SNMP Trap Based Severity Propagation
The severity propagation for the managed nodes is different for Nodes view
and the Service Map view.
Table 3-3 describes the severity propagation based on SNMP traps.
Table 3-3. Severity Propagation Behavior
View Description
Nodes View The node status displays the highest severity of all the active
messages. This status is propagated to the parent node groups.
To know the actual health of the node, view the status in the
Global System Status service.
Service Map View The SNMP Traps service displays the highest severity of all the
active trap messages of the corresponding node. This is not
propagated to the parent services. The Global System Status
service displays the present health status of the corresponding
node, and this is propagated to the parent object.
Using Dell Smart Plug-in (SPI) 33
Page 34

Monitoring the Health of Dell Devices
The global status update policy Dell_Sched_Status_Update is a scheduled
policy that updates the global status of the Dell systems periodically. The
default schedule for this policy is every one hour.
The global status update policy polls each Dell system grouped under the
Dell Managed Systems node group to get the global system status and sends
corresponding severity messages to the active message browser of the HPOM
console.
The global health is the overall health of the system. However, the health of
the individual components of the system may differ. To view the health of the
individual components for Windows or Linux systems, launch the Server
Administrator tool. To view the health of individual components for ESXi
systems, launch the DWS tool to access Server Administrator.
The policy also updates the status of the systems under the Dell Server
Global Health component in the Service Map view.
NOTE: Until the Dell_Autogroup_Servers policy runs for the first time, and the Dell
systems are grouped under the Dell Managed Systems group, the global health
status of the systems is not displayed on the HPOM console.
Launching Dell OpenManage Server Administrator
You can launch the
about the Dell system you are monitoring. After you install the Dell SPI, you
can see the Dell OpenManage folder under To ol s on the HPOM console.
For Windows or Linux systems you can launch
console directly from Tools, Node Group, Service Map, or Alerts Messages.
For ESXi systems, you can launch the DWS console from Too ls , Node
Group, Service Map, or Alert Messages. For more information, see
"Launching Distributed Web Server Console" on page 37.
34 Using Dell Smart Plug-in (SPI)
Server Administrator
web console to get more information
Server Administrator
web
Page 35

Launching Server Administrator from Tools
To launch the
HPOM console:
1
Select
2
On the right pane select
3
Select
Parameters
4
Select any Dell Windows or Linux system under
You can only select a single system under the parent nodes. If you select
any of the parent nodes such as
Systems
Modular Systems
Server Administrator
web console from the To ol s folder on the
ToolsDell OpenManage
Server Administrator
All TasksLaunch Tool
from the pop-up menu. The
window is displayed.
Dell Managed Systems, Dell Modular
,
Dell Monolithic Systems
the following message is displayed:
.
and right-click.
Dell Managed Systems
, or the chassis group under
Edit
.
Dell
Tool cannot be launched on multiple nodes
5
Click
Launch
. The Server Administrator web console is launched on the
default browser on your system.
NOTE: HPOM enables you to select non-Dell systems. However, if you select
such a system, the Server Administrator web console does not launch.
Launching Server Administrator from the Node Group
To launch the
Systems node group:
1
Select any Dell Windows or Linux system under any of the parent nodes
such as
Modular Systems.
2
Right click and select the
pop-up menu. The
3
Select
Launch.
your system.
Server Administrator
Dell Monolithic Systems
Select the Tool to Execute
Server Administrator
web console from the Dell Managed
, or the chassis group under
All Tasks Launch Tool
option from the
window is displayed.
under
Tools Dell OpenManage and
The OMSA web console is launched on the default browser on
.
Dell
click
Using Dell Smart Plug-in (SPI) 35
Page 36

Launching Server Administrator from the Service Map
To launch the
Dell Windows Servers or Dell HardwareDell Linux Servers service map
object:
1
Select any Dell system under
service groups on the
2
Right-click and select the
Select the Tool to Execute
3
Select
Launch.
browser on your system.
Server Administrator
Service Map
Server Administrator
The Server Administrator web console is launched on the default
web console from the Dell Hardware
Dell Windows Servers
view
.
Launch Tool
window is displayed.
under
option from the pop-up menu. The
Tools Dell OpenManage and
or
Dell Linux Servers
click
Launching Server Administrator from the Alert Message
To launch the
associated with a Dell system:
1
Select any Dell Windows or Linux system under any of the parent nodes
such as
Modular Systems.
2
Select any alert message associated with the system on the right pane.
3
Right-click and select
Launch ToolService
Execute
Server Administrator
Dell Monolithic Systems
Launch ToolMessage, Launch ToolNodes
window is displayed.
web console from the alert messages
from the pop-up menu. The
, or the chassis group under
Select the Tool to
Dell
, or
NOTE: For external nodes, only the Launch ToolMessage option is
available.
4
Select
Server Administrator
Launch.
browser on your system.
36 Using Dell Smart Plug-in (SPI)
The Server Administrator web console is launched on the default
under
ToolsDell OpenManage and
click
Page 37

Launching Distributed Web Server Console
The Dell SPI enables you to launch the
HPOM console for the ESXi systems. You can use the DWS console to connect
to the ESXi systems for troubleshooting the alerts.
SPI, you can see the DWS Server Administrator option under Too lsDell
OpenManage on the HPOM console.
For ESXi systems you can launch the DWS console directly from Too l s, Node
Group, Service Map, or Alert Messages.
DWS console as a tool from the
After you install the Dell
Launching the DWS Console from Tools
To launch the DWS console from the Too ls folder on the HPOM console:
1
Select
ToolsDell OpenManage
2
On the right pane select
3
Select
All TasksLaunch Tool
Parameters
4
Select any Dell ESXi system under
You can select only a single system under the parent nodes. If you select
any of the parent nodes such as
Systems
Modular Systems
launched on multiple nodes
5
Click
launched on the default browser on your system.
window is displayed.
,
Dell Monolithic Systems
NOTE: You can launch the DWS console for a Windows system if you have
configured your Windows system to support the DWS console.
Launch
on the
DWS Server Administrator
the following message is displayed
Edit Parameters
.
and right-click.
from the pop-up menu. The
Dell Managed Systems
Dell Managed Systems, Dell Modular
, or the chassis group under
Tool cannot be
.
window. The DWS console is
Edit
.
Dell
NOTE: HPOM enables you to select even non-Dell systems. However, if you
select such a system, the DWS console launches, but you cannot launch the
OMSA console for troubleshooting.
Using Dell Smart Plug-in (SPI) 37
Page 38

Launching the DWS Console from the Node Group
To launch the DWS console from the Dell Managed Systems node group:
1
Select any Dell ESXi system under any of the parent nodes such as
Monolithic Systems
2
Right click and select the
up menu. The
3
Select
DWS Server Administrator
click
Launch.
your system.
, or the chassis group under
All TasksLaunch Tool
Select the Tool to Execute
under
The DWS console is launched on the default browser on
Dell Modular Systems.
option from the pop-
window is displayed.
ToolsDell OpenManage and
Dell
Launching the DWS Console from the Service Map
To launch the DWS console from the Dell HardwareDell ESXi Servers
service map object:
1
Select any ESXi system under
2
Right click and select the
Select the Tool to Execute
3
Select
DWS Server Administrator
click
Launch.
your system.
The DWS console is launched on the default browser on
Dell ESXi Servers
Launch Tool
window is displayed.
option from the pop-up menu. The
under
ToolsDell OpenManage and
on the
Service Map
view
Launching the DWS Console from the Alert Message
To launch the DWS console from the alert messages associated with a Dell
system:
1
Select any Dell ESXi system under any of the parent nodes such as
Monolithic Systems
2
Select any alert message associated with the system on the right pane.
, or the chassis group under
Dell Modular Systems.
Dell
.
38 Using Dell Smart Plug-in (SPI)
Page 39

3
Right-click and select
Launch ToolService
4
Execute
Select
click
window is displayed.
NOTE: For external nodes, only the Launch ToolMessage option is
available.
DWS Server Administrator
Launch.
The DWS console is launched on the default browser on
Launch ToolMessage, Launch ToolNodes
from the pop-up menu. The
under
ToolsDell OpenManage and
Select the Tool to
your system.
NOTE: You can also launch the DWS console for a Windows system if you
have configured your Windows system to support the DWS console.
, or
Using Dell Smart Plug-in (SPI) 39
Page 40

40 Using Dell Smart Plug-in (SPI)
Page 41

4
Troubleshooting Dell Smart Plug-in (SPI)
This section lists the problems that you may encounter while using the Dell
SPI.
Installer Takes Time to Launch
When the Dell SPI installer is run for the first time on the management
server, there is a delay of 40-45 seconds to launch the installer if the system
does not have access to the internet.
This problem occurs because the .NET Framework 2.0 managed assembly
that has an Authenticode signature takes longer than usual to load. The
signature is always verified when the .NET Framework 2.0 managed assembly
that has an Authenticode signature is loaded.
To resolve this, ensure that the management server is connected to the
internet when you run the installer.
Upgrade Process Stops Responding
When you run the upgrade process, if it stops responding, you can resolve this
by performing the following steps:
Check whether OvEpStatusEngine and OvEpMessageActionServer services
are running. If the services are not running, then perform any one of the
following:
• Manually start the services from the services console
• Run the following command:
cmd /c net start OvEpMessageActionServer /Y & net
start OvEpStatusEngine /Y
Troubleshooting Dell Smart Plug-in (SPI) 41
.
Page 42

SNMP Trap Messages are Not Created
The SNMP Interceptor policy may not display the SNMP trap messages in
the active message browser of the node from which it receives the traps.
To resolve this, ensure that the trap destinations and the community strings
on the Dell managed nodes are configured correctly and communication is
established between the managed node and the management server.
SNMP Traps Received at Wrong Nodes
After you start monitoring the Dell systems grouped under Dell Managed
Systems group, if you interchange the IP addresses of the nodes, then the
SNMP traps are received on the wrong nodes. For example, if you have two
nodes A and B under Dell Managed Systems Dell Monolithic Servers
group and you interchange the IP addresses of the two nodes, then the traps
from A are displayed as messages in the active message browser of B and vice
versa.
To res ol ve th i s:
1
Launch the Server Configuration Editor on the HP Operations Manager
(HPOM) console.
2
Under the
to disable the DNS caching.
The nodes now display the traps correctly.
Node Cache Settings
option, set the
DNS cache
value to
False
42 Troubleshooting Dell Smart Plug-in (SPI)
Page 43

Global Health Status Not Retrieved for Dell Systems
The global status update policy, Dell_Sched_Status_Update, does not
retrieve the global health of discovered Dell systems until the systems are
grouped under the Dell Managed Systems group.
If you choose to auto-deploy the policy files during the Dell SPI installation,
the policies start running as per the default schedule. The global status
update policy runs every one hour and starts polling systems for global health
status. However, the auto grouping policy is scheduled to run only at 23:00
hours every day. Therefore, until the Dell_Autogroup_Servers policy runs and
the Dell systems are grouped under the Dell Managed Systems group, the
global health status of the systems is not displayed on the HPOM console.
Troubleshooting Dell Smart Plug-in (SPI) 43
Page 44

44 Troubleshooting Dell Smart Plug-in (SPI)
 Loading...