

Page 1

Dell Precision Performance Optimizer
Owner's Manual
Page 2

Notes
NOTE: A NOTE indicates important information that helps you make better use of your computer.
© 2013 Dell Inc.
Trademarks used in this text:
™
OptiPlex
are registered trademarks or trademarks of Intel Corporation in the U.S. and other countries.
AMD Opteron
Devices, Inc.
,
Vostro
™
Microsoft
™
, and
,
AMD Phenom
®
™
, the DELL logo,
Dell
Wi-Fi Catcher
™
,
AMD Sempron
Windows
®
,
™
are trademarks of Dell Inc.
,
MS-DOS
Dell Precision
™
,
AMD Athlon
®
,
Windows Vista
trademarks or registered trademarks of Microsoft Corporation in the United States and/or other countries.
owned by the Blu-ray Disc Association (BDA) and licensed for use on discs and players. The
trademark and owned by the
Bluetooth
®
SIG, Inc. and any use of such mark by Dell Inc. is under license.
trademark of Wireless Ethernet Compatibility Alliance, Inc.
2013 - 04
Rev. A00
™
,
Precision ON
Intel
™
,
ATI Radeon
®
, the Windows Vista start button, and
®
,
Pentium
™
,
ExpressCharge
®
,
™
, and
ATI FirePro
Xeon
®
,
Core
AMD
Bluetooth
™
,
Latitude
™
,
Atom
®
is a registered trademark and
™
are trademarks of Advanced Micro
Office Outlook
®
™
,
Latitude ON
™
,
Centrino
Blu-ray Disc
word mark is a registered
®
is a registered
Wi-Fi
™
,
®
, and
Celeron
®
are either
™
is a trademark
®
Page 3

Contents
Notes................................................................................................................................................2
Dell Precision Performance Optimizer (DPPO).........................................................................4
Profiles......................................................................................................................................................................5
Active Profiles....................................................................................................................................................5
Inactive Profiles.................................................................................................................................................5
System Updates........................................................................................................................................................6
Resource Utilization..................................................................................................................................................7
Profiles and Policies......................................................................................................................8
System Maintenance.....................................................................................................................9
System Information...................................................................................................................................................9
Update Filters............................................................................................................................................................9
Notifications............................................................................................................................................................12
System Maintenance Settings................................................................................................................................12
Schedule Updates............................................................................................................................................12
Notification.......................................................................................................................................................13
Update Filters...................................................................................................................................................13
Update History........................................................................................................................................................14
Track and Analyze........................................................................................................................15
Enable/Disable Smart Tracking..............................................................................................................................15
Smart Tracking.......................................................................................................................................................16
Enable Smart Tracking.....................................................................................................................................16
Smart Tracking Reports..........................................................................................................................................17
Troubleshooting............................................................................................................................19
Installation Issues...................................................................................................................................................19
Home Page..............................................................................................................................................................19
Profiles & Policies...................................................................................................................................................19
System Maintenance..............................................................................................................................................19
Track and Analyze..................................................................................................................................................20
2 Getting Help................................................................................................................................21
Contacting Dell.......................................................................................................................................................21
Page 4
Dell Precision Performance Optimizer (DPPO)
Dell Precision Performance Optimizer contains a powerful engine that allows you to dynamically configure your system
settings to optimize the performance of your system. It also keeps you informed of any available software updates and
applies them when configured to do so. Further, it contains a tracking subsystem that can gather extensive data about
your system and help identify potential problems.
DPPO consists of the following components:
• Profiles & Policies
• System Maintenance
• Track and Analyze
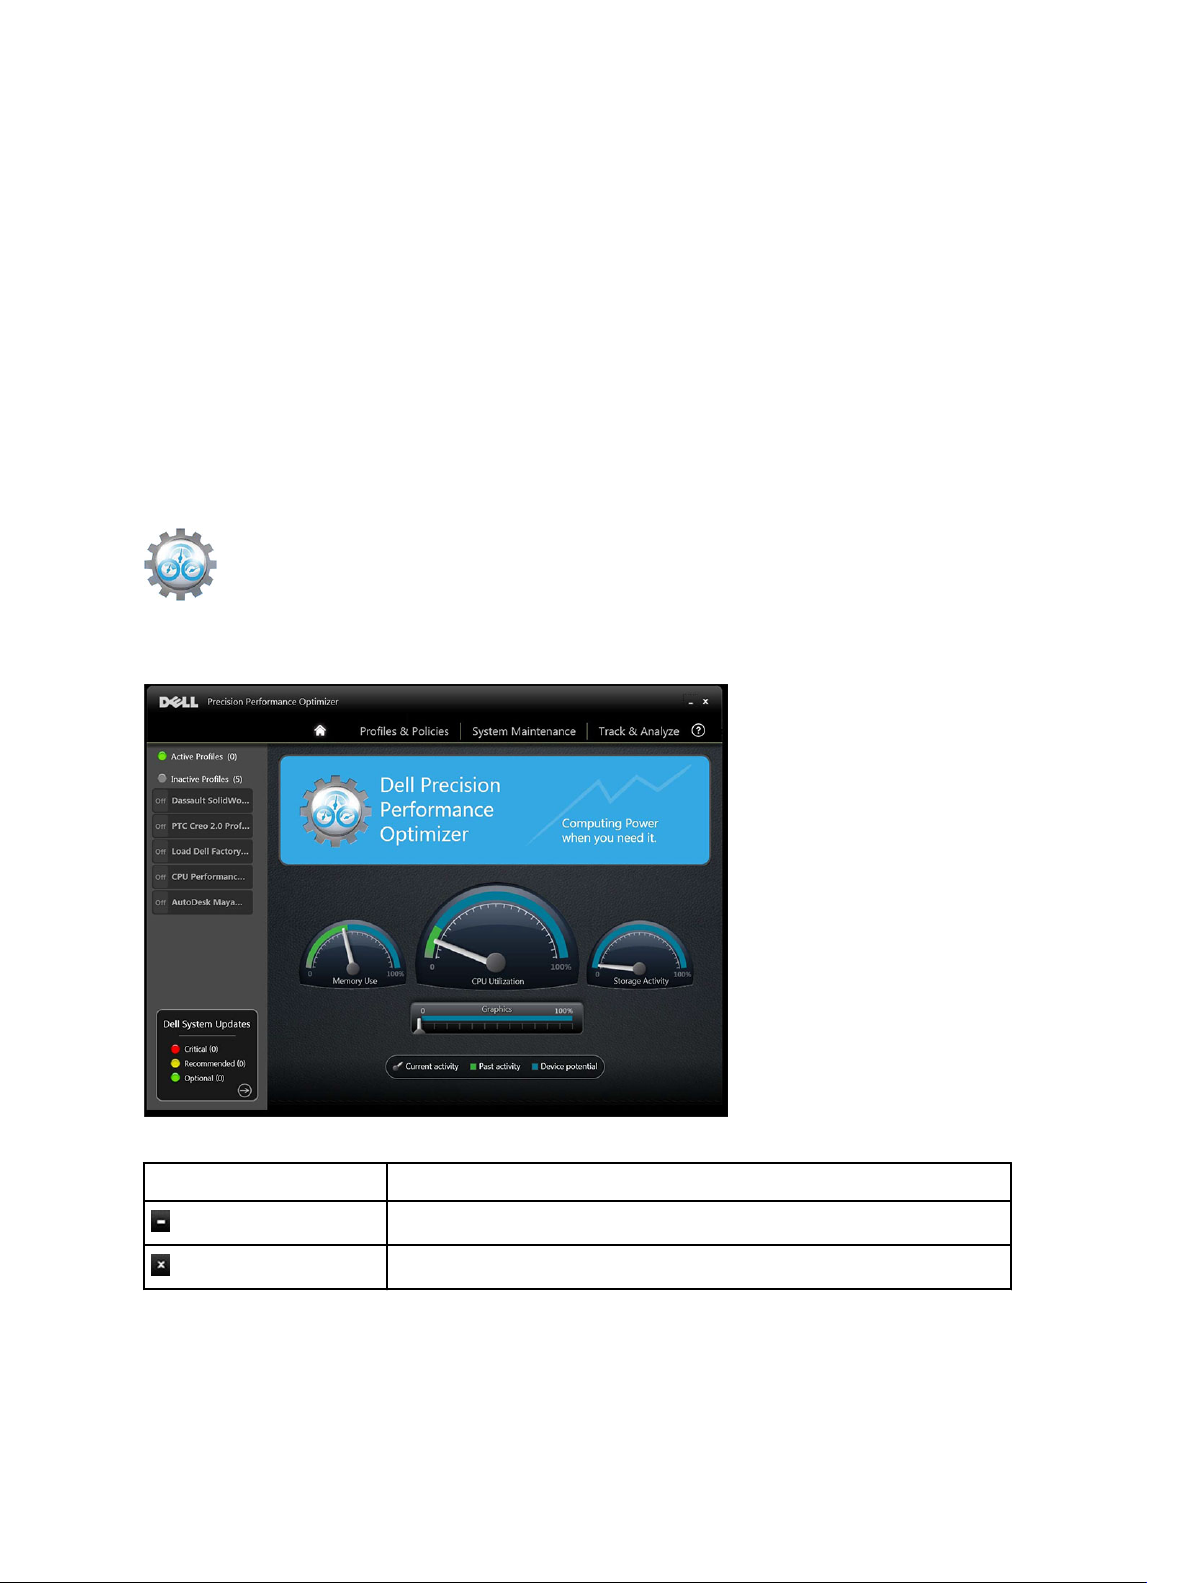
Each of the components is available as a separate tab on the application’s home page. This page is displayed when you
launch the application by double-clicking the following icon on the Desktop.
On Windows 7, the application may also be launched from Start > Program Files > Dell Inc > Dell Precision Performance
Optimizer. This page depicts the current and past recorded resource utilization values of your system. This page also
displays the active and inactive profiles and the available system updates.
The following options appear on the top right corner of all windows:
Option Function
Minimizes the application.
Closes the application.
The following options appear on the menu bar of all windows:
4
Page 5
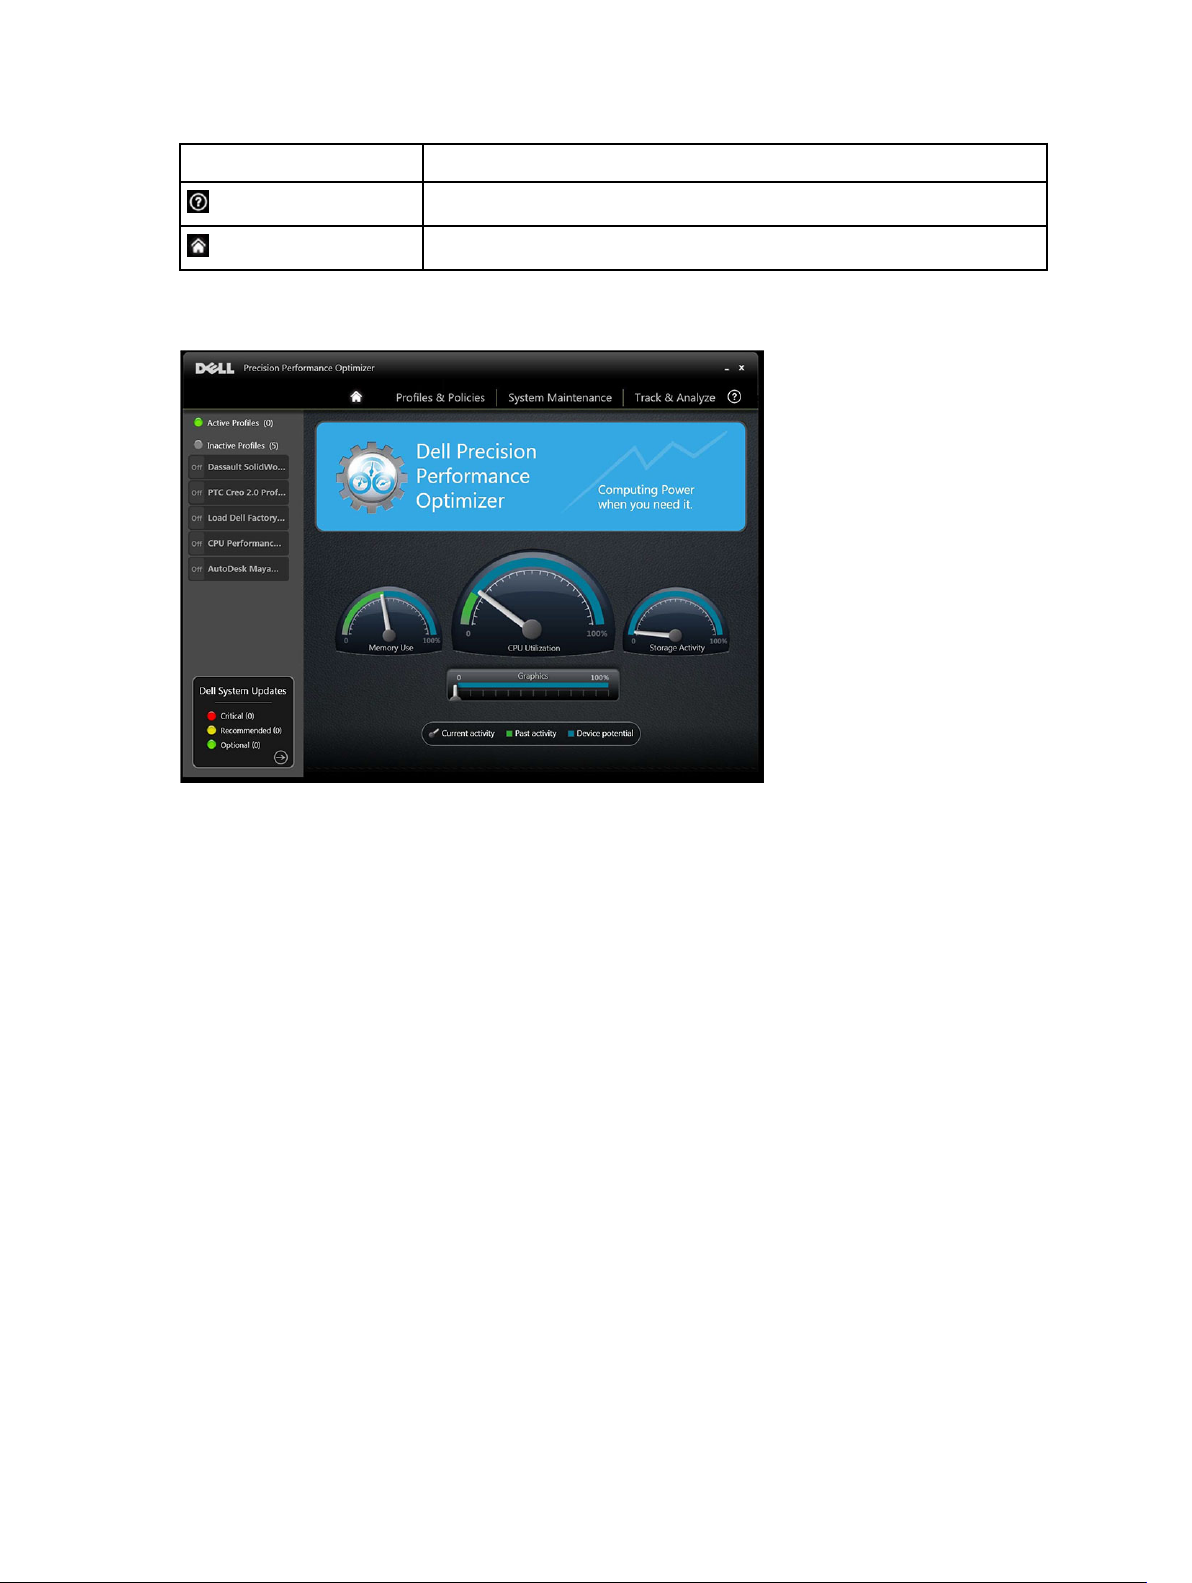
Option Function
Brings up a menu that allows you to launch either the About Page or this Help
Takes you to the Home page
Profiles
The left pane of the home page displayed lists the active and inactive profiles. A profile is a collection of policies that are
grouped together to achieve a common performance objective. Profiles are referred by a friendly name that identifies
this objective. Multiple profiles may be active at the same time. A policy defines the system parameters that must be
monitored. When these parameters satisfy a certain condition the policy is said to have triggered. The policy also
defines the action(s) that is taken when an input trigger is detected. The actions consist of applying some recommended
settings to the system designed to optimize the performance of the running application.
DPPO has several application specific profiles to improve the user experience. These profiles are disabled by default.
You must enable the profile for your given application (if available in DPPO).
New application profiles will be made available via the DPPO system updates.
Active Profiles
This section lists the profiles that are currently active on the system. A profile is considered active if it is enabled and the
policies start every time the system is activated. You can click on any profile to navigate to the Profiles and Policies
page to view the details of the selected profile. If you have Local Administrator rights, you will be able to disable an
active profile or enable an inactive profile.
Inactive Profiles
A profile that is not active is called an inactive profile. These profiles are disabled by the Local Administrator.
5
Page 6
NOTE: The software may come with special profiles that can be activated when no other profile is active. These
profiles are automatically deactivated by the software once they have executed. For example:
Defaults
profile is a profile that can be used to restore certain system parameters back to the factory defaults.
Load Dell Factory
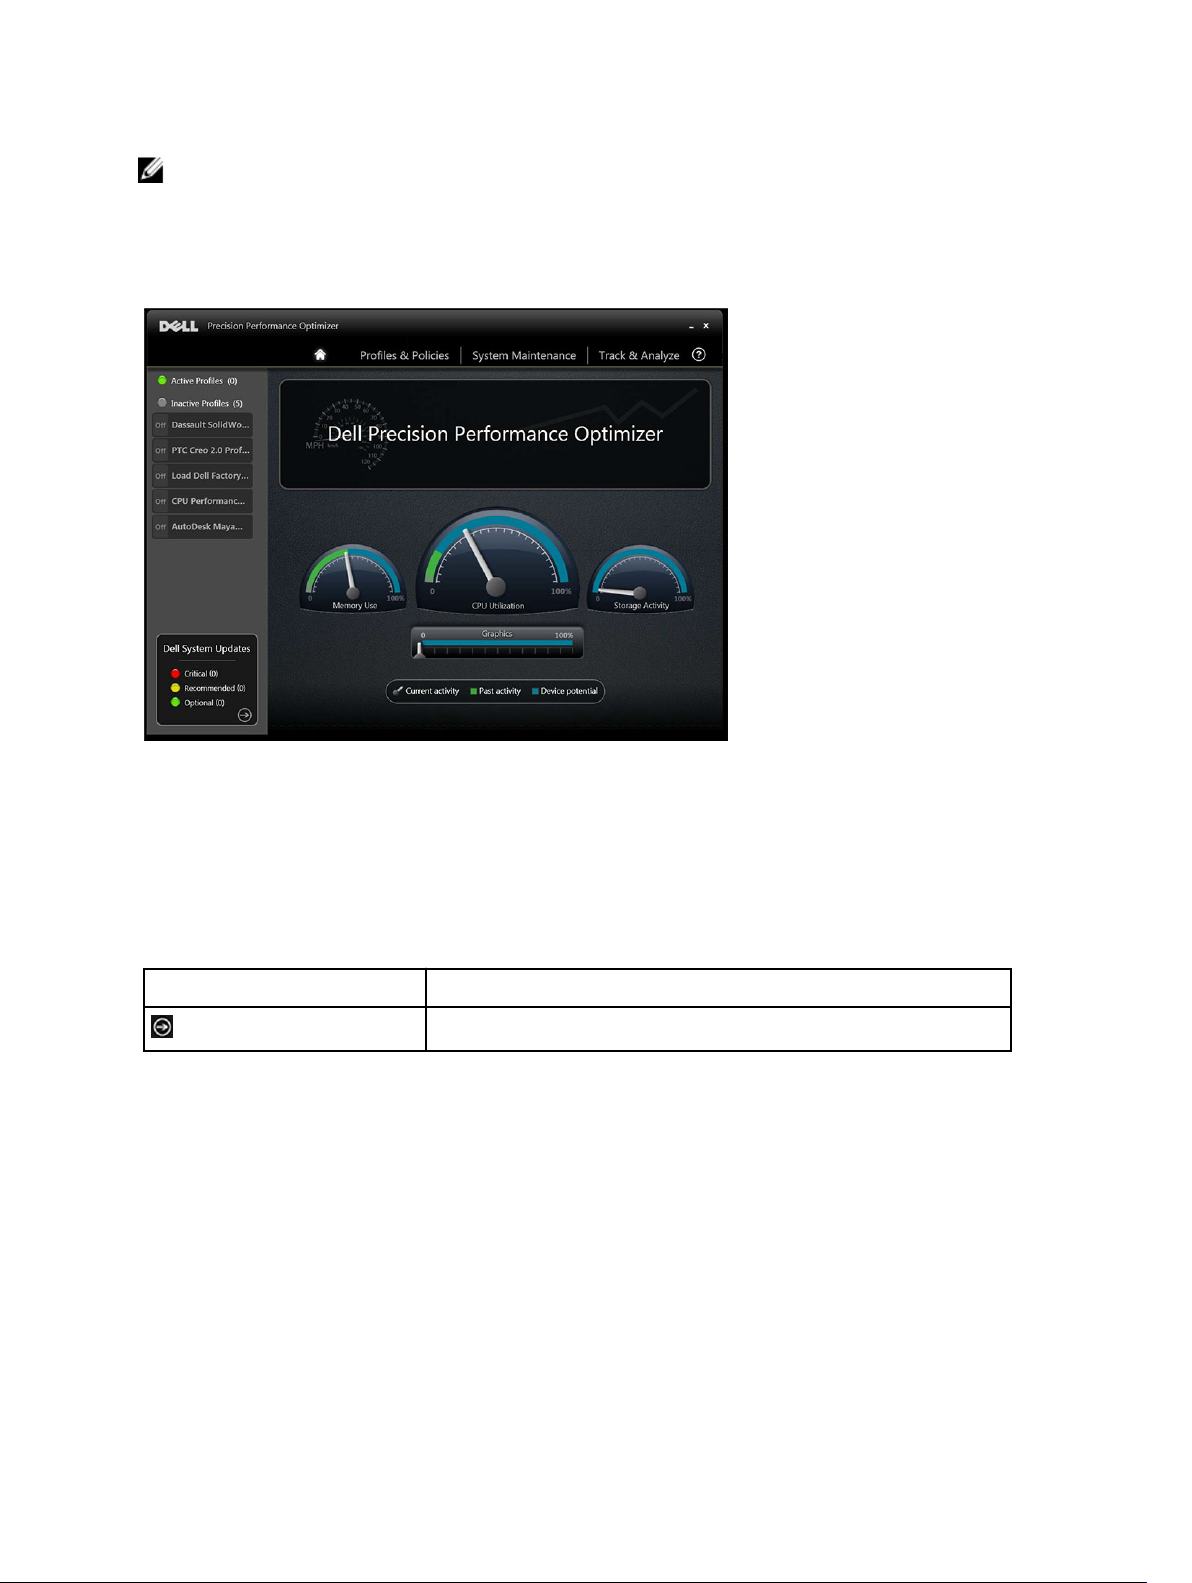
System Updates
The bottom left side of the home page displays the number of software updates available. Dell System Updates are
specific to DPPO and your system's hardware and software configuration. Windows Updates are available within your
operating system. The updates are grouped into three categories:
• Critical
• Recommended
• Optional
The following option is displayed in this section of the home page:
Option Function
Takes you to the System Maintenance page.
6
Page 7
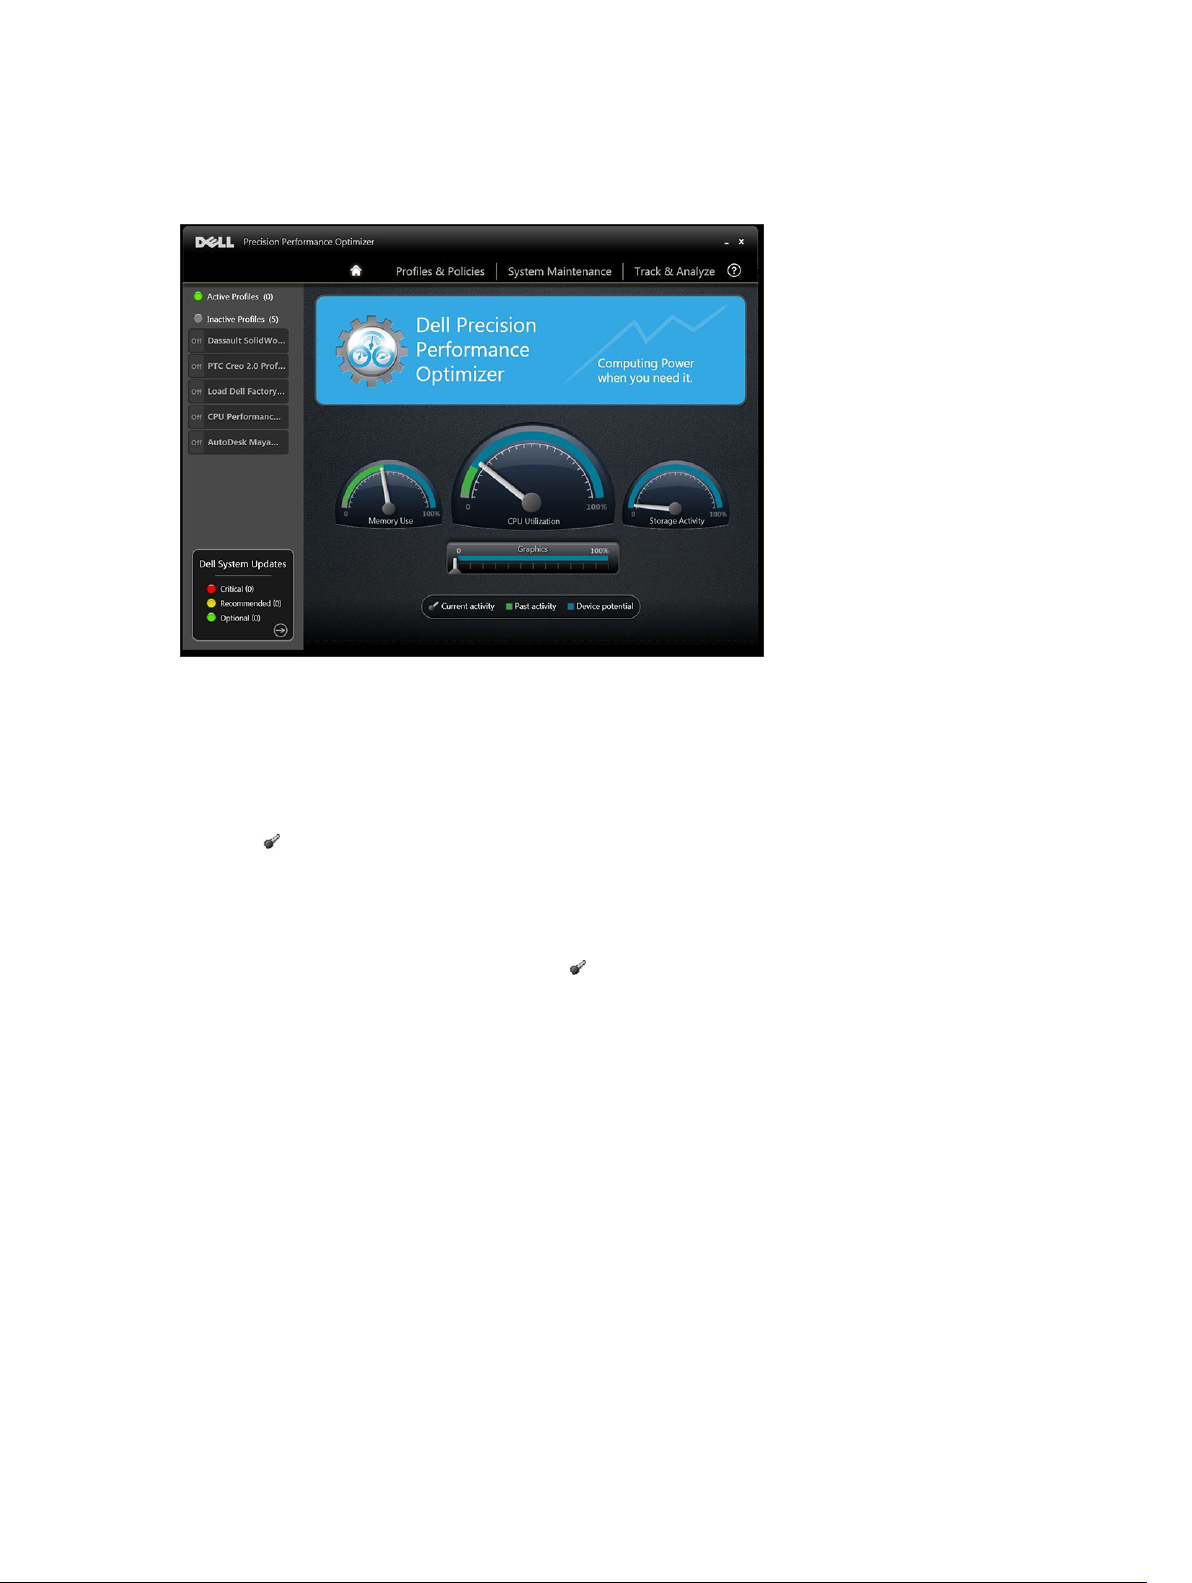
Resource Utilization
The home page displays the utilizations of the following resources:
• Memory
• CPU
• Storage
• Graphics
The needle of the speedometers shows the current utilization of Memory, CPU and Storage. This data is refreshed
every 2 seconds. If Dell Smart Tracking is enabled on the system, you will see a green bar in the speedometer dials. The
green bar represents the previous utilization average read from the last Dell Smart Tracking report. For example, if the
Average Memory Utilization (previously recorded) was 38%, then the green bar will go from 0-38% in the first
speedometer dial.
Current Graphics utilization is displayed by the needle on the horizontal bar.
7
Page 8

Profiles and Policies
This page lists all the policies in a selected profile. The name of the selected profile appears in the blue bar on the
screen. The names and descriptions of policies appears in the space after the blue bar.
The left pane contains the following:
• list of active and inactive profiles
• number of system updates
8
Page 9

System Maintenance
System Information
This page shows a summary of your system configuration. It also lists the available software updates for your system.
The blue banner contains the System Make and Model along with the Dell Service Tag. The following option appears on
this banner:
Option Function
This icon will launch standard Windows utility that
displays the detailed System Information
Dell System Updates are specific to DPPO and your system's hardware and software configuration. Windows Updates
are available within your operating system.
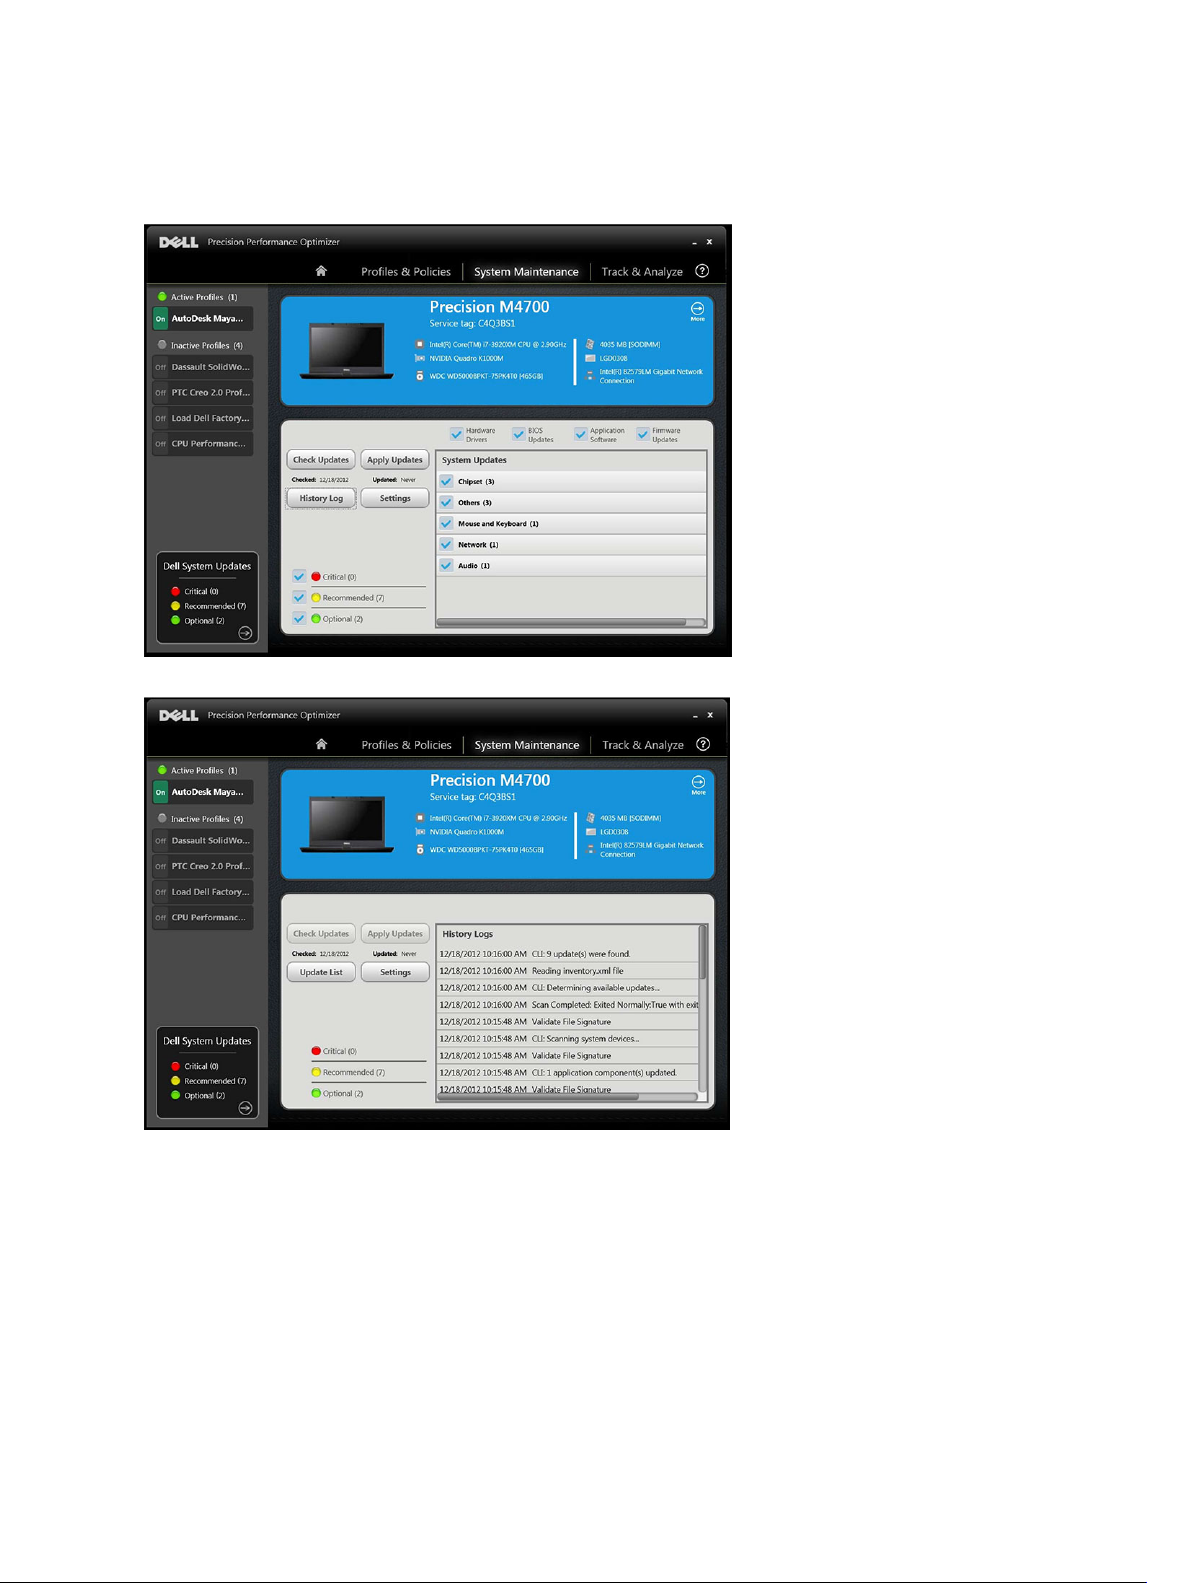
Update Filters
All software updates are categorized based on three criteria:
• Criticality (Critical/Recommended/Optional)
• Type (Hardware Drivers/BIOS Updates/Application Software/Firmware Updates)
• Device Category (Audio/Mouse and Keyboard/Storage/Chipset/Network and Bluetooth/Video/All others)
This page contains three sets of check box – one set for each of the above – allowing you to select/deselect updates
based on their Criticality, Type and Device Category. Selected updates have a check mark before their names. It is not
possible to select or deselect individual updates by name.
This page contains the following buttons:
9
Page 10

Check Updates Click this button to check for available updates. This operation may take a few minutes to complete.
Once the operation completes, the list of all available updates is displayed in the right pane and all
updates are selected by default. Individual updates are listed under their respective Device
Categories and the appropriate criticality icon is also displayed before the name of the update.
The date/time when the last check for updates was performed (either manually by the user or by
DPPO automatic updates) is displayed under this button.
Apply Updates Clicking this button causes the currently selected updates to be downloaded and installed on your
system. It is recommended that you create a system restore point and close all running applications
before applying any updates. You must ensure that you have selected the appropriate filters before
clicking this button. To filter out the updates that you do not want to apply, you must uncheck the
appropriate Criticality, Type and Device Category check boxes on this screen. This operation may
take a few minutes to complete. A reboot may be required once the operation completes. Please
restart your system when notified by DPPO.
The date/time when the last set of updates was applied (either manually by the user or by DPPO
automatic updates) is displayed under this button.
History Log Click this button to display the logs containing detailed information of previous update history.
Settings Click this button to schedule automatic updates and select options and filters that must be applied.
After viewing the history logs, you may click the
updates.
Update List
button to go back to the previous page listing all the
10
Page 11

The list of available updates displays detailed information including the Version and Release Date information:
• Check/Uncheck TYPE (Hardware Drivers, BIOS Updates, Application software, Firmware Updates) check boxes
to select or de-select the corresponding updates from the selection.
• Check/Uncheck criticality (Critical/Recommended/Optional) check boxes to select or de-select the
corresponding updates from the selection.
• Click on
The software can check the Dell server to retrieve the list of updates available for your specific system and/or download
and install certain updates upon your request.
The updates can be configured so that they are done either manually or periodically. The updates are classified as
Critical, Recommended or Optional.
All updates belong to one of the following four types:
• Hardware Drivers
• BIOS Updates
• Application Software
• Firmware Updates
In addition the following seven categories exist for updates:
• Audio
• Chipset
• Mouse and Keyboard
• Network and Bluetooth
• Storage
• Video
• All others
Apply Update
button to install the current selection of updates.
If the software is configured to CHECK or INSTALL UPDATE periodically, then the above filters is used to determine
which updates is displayed to the user or which will be downloaded and installed on the system.
If the user selects only Critical Updates, all 4 types and 7 categories, then if the Dell Server has one Recommended BIOS
Update or one Optional Video Driver update for your system, then these two updates will not displayed or installed.
11
Page 12

Notifications
The application may give notifications to the user using pop-up dialog boxes to inform user if some problem occurred
during a check for updates or if a system reboot is required for installed update to work. You may see a dialog similar to
the one below:
If you click
your data before proceeding.
If you click
Further, the left side of this page also contains the list of active and inactive profiles and number of system updates .
Yes
the system will start the reboot process. Please make sure that you close all other applications and save
No
the installed update will not be complete.
System Maintenance Settings
Schedule Updates
These check box are used to select manual updates or schedule automatic weekly or monthly updates:
12
Page 13

Manual Select if you do not want the application to perform any update operation periodically in the background.
You must use
these updates from the System Maintenance page.
Weekly Select option to allow the application to perform weekly update operations based on other filters
selected on this page.
Select day of the week (M, TU, W, TH, F, SA, SU) and then select the time of the day (AM/PM) when the
operation is scheduled
Monthly Select this option to allow the application to perform monthly update operations based on other filters
selected on this page.
Select day of the month (1-28) and then select the time of the day (AM/PM) when the operation is
scheduled
Check Updates
button to look for available updates and then use
Apply Updates
to install
Notification
This set of check boxes identifies the action that is performed in the automatic mode (that is, when the
Updates
is set to either weekly or monthly).
Notify when updates are
available
Download and install updates The application downloads and installs any available updates (based on the filter
The application notifies the user if any updates (based on the filter selection) are found
to be available. Updates is not downloaded to the local system, nor are they
automatically installed.
selection) before notifying the user.
Scheduled
Update Filters
This page also contains three sets of check box allowing you to filter scheduled updates based on their Criticality, Type
and Device Category. The check box on this page is applicable to scheduled updates only.
• Criticality (Critical/Recommended/Optional)
• Type (Hardware Drivers/BIOS Updates/Application Software/Firmware Updates)
• Device Category (Audio/Mouse and Keyboard/Storage/Chipset/Network and Bluetooth/Video/All others)
Following options appear on this page:
Option Function
Cancel Click this button to exit the settings page without saving
any changes
Restore Settings Click this button to load the program default values for all
the settings
Save Changes Click to save changes (if any)
13
Page 14
Update History
After viewing the history logs, click the
Update List
button to go back to the previous page that lists all the updates.
14
Page 15

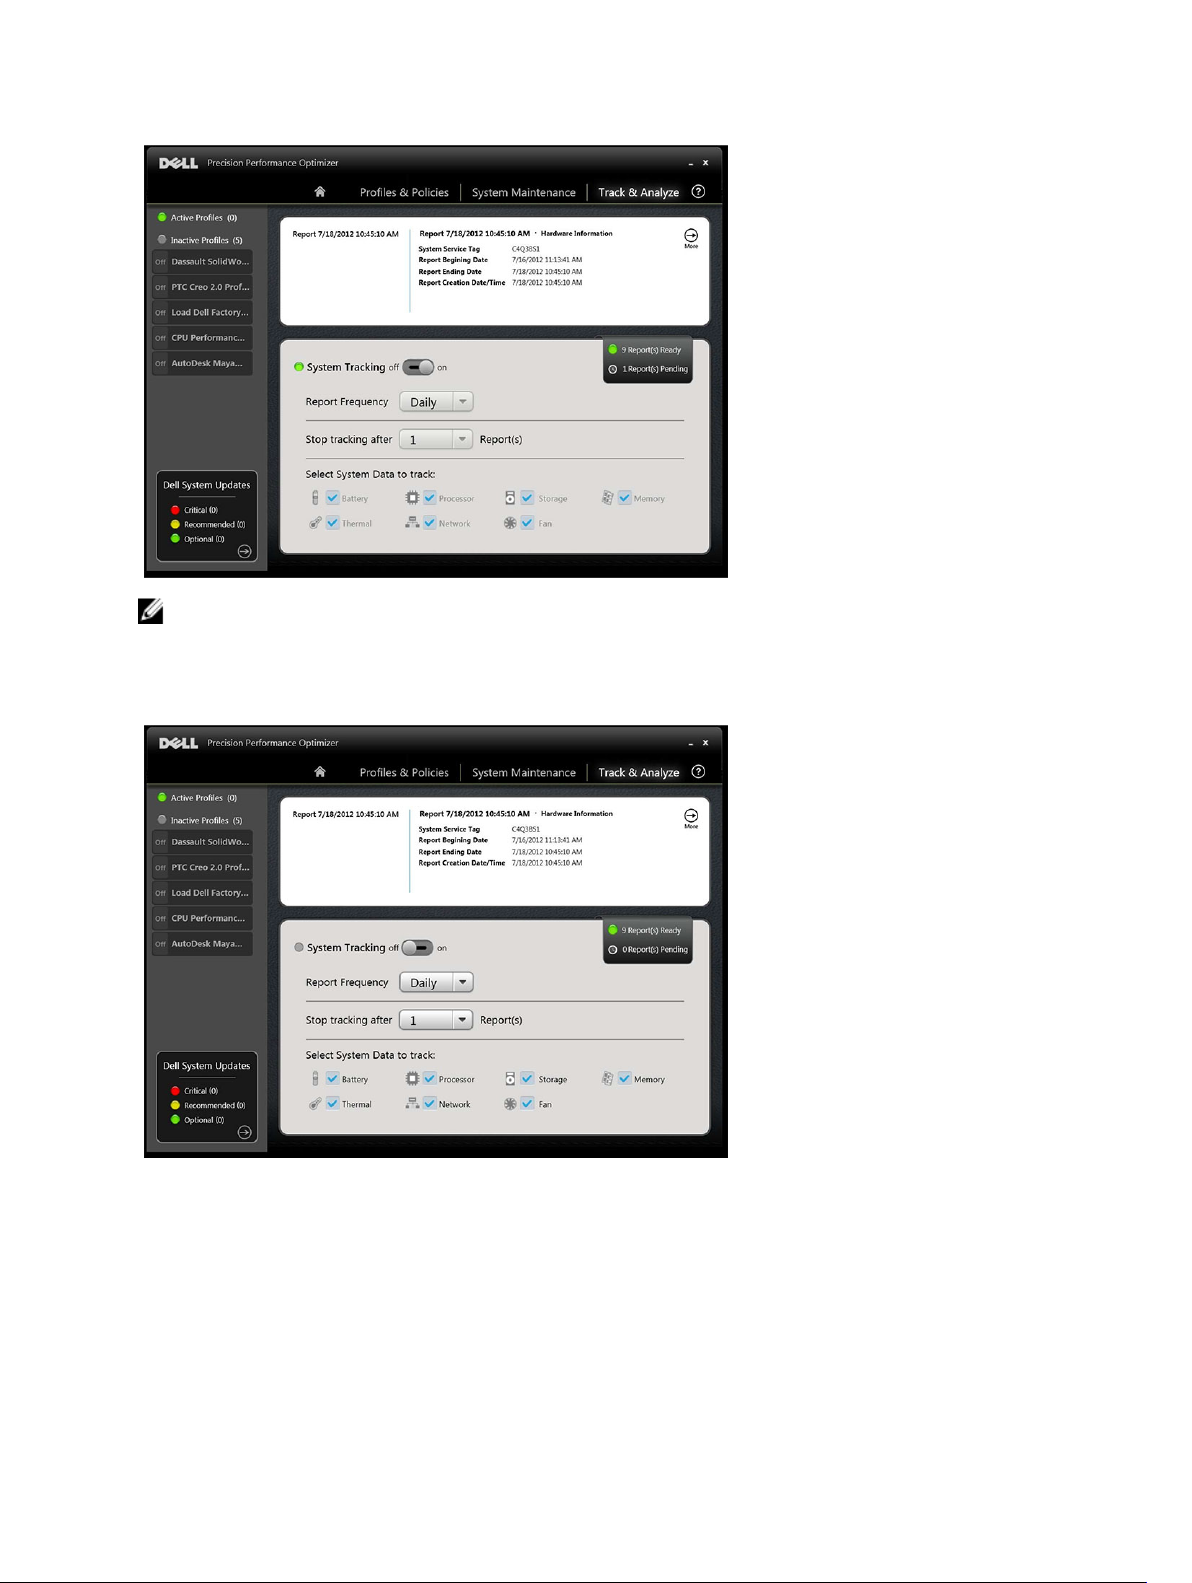
Track and Analyze
This page allows you to enable/disable Dell Smart Tracking feature as well as view previously generated reports.
Enable/Disable Smart Tracking
When enabled, Smart Tracking collects system configuration information as well as subsystem usage data in the
background. Smart Tracking reports contain data such as Fan speed, Thermal data, Battery usage, Processor Utilization
etc. over a period of time. These reports can help you understand the behavior of your specific system under the
operating environment that was present when the report was running.
You can configure the following options that control the operation of Smart Tracking:
Report Frequency This setting controls how often reports are generated. Daily reports are generated
whenever the system date changes which may be a period less than 24 hours. The report
frequency period does not include the time your system spends in Sleep/Hibernate/
Shutdown states.
Stop Tracking After This setting controls how many reports are generated before Smart Tracking gets disabled
automatically. E.g. If you configure the system with a ‘Report Frequency’ of 10 hours and
‘Stop Tracking after’ 3 Report(s), then you should expect to see your first report after 10
hours. Two new reports should be seen every 10 hours after the first one. Smart Tracking
should stop after three reports are generated.
Select System Data To
Track
The following screen shot shows how the GUI will look once you have enabled Smart Tracking to generate one report
after 4 hours.
This set of check boxes allows you to choose the subsystems Smart Tracking collects
data from. By default all subsystems are selected.
15
Page 16
NOTE: This page also shows you if there are any previously generated reports available for you to view. Click on
“… Reports Ready” to view these Smart Tracking reports.
Smart Tracking
Enable Smart Tracking
This page allows you to enable/disable Dell Smart Tracking feature by clicking the On/Off button. When enabled, Smart
Tracking runs for the specified period and collects system configuration and subsystem usage data. This data is
collected in the background, and compiled in the form of a Smart Tracking Report, at the end of that period.
16
Page 17

Smart Tracking reports contain data such as Fan speed, Thermal data, Battery usage, Processor Utilization etc. These
reports help you understand the behavior of specific system, under the operating environment, that was present when
the report was running.
You can configure the following options that control the operation of Smart Tracking:
Report Frequency This setting controls how often reports are generated. Daily reports are generated
whenever the system date changes which may be a period less than 24 hours. The report
frequency period does not include the time your system spends in Sleep/Hibernate/
Shutdown states.
Stop Tracking After This setting controls how many reports are generated before Smart Tracking gets disabled
automatically. for example, If you configure the system with a
and
Stop Tracking after
hours. Two new reports should be seen every 10 hours after the first one. Smart Tracking
should stop after three reports are generated.
3 Report(s), then you should expect to see your first report after 10
Report Frequency
of 10 hours
Select System Data To
Track
NOTE: This page also shows you the number of previously completed Smart Tracking Reports ready for viewing.
You can click the
This set of check box allows you to choose the subsystems Smart Tracking collects data
from. By default all subsystems are selected.
… Report(s) Ready
text to view these reports.
Smart Tracking Reports
You can perform the following functions:
Select/View a Report If there is more than 1 report ready on your system, you can select the report to view by
clicking the? and? arrows on the left side of the page. The right side of the page displays
detailed information and graphs from the selected report. The bottom left side of this page
displays a tree view of the report. Click a node on the tree to view that section of the report.
Reading a Graph
X-axis — displays the range of data collected for a given system parameter.
17
Page 18

Export/Print a Report
Y-axis — displays the percentage of time the given range (or specific value) was found
during the report interval
For example: In the preceding report for Temperature (Location Memory), the graph shows
the range of temperature in degree Celsius on the X-axis. The Y-axis shows the percentage
of time the temperature was found to be in the range, say 30-40 C.
Click the
Export
icon to save the selected report in an XML format.
Click the
Delete a Report Click the
Print
icon on this page to save the report in the PDF format.
Delete
button to delete the selected report.
18
Page 19

Troubleshooting
Installation Issues
1. Can I use DPPO on my non-Dell laptop or desktop?
No. DPPO software has been especially designed to optimize the performance of your Dell machine. DPPO will not
run on any non-Dell system.
2. Why does DPPO installer fail with a message saying my system is not supported?
DPPO will not install on operating systems other than Windows 7 or Windows 8. Windows Vista or earlier versions
are not supported.
3. Why does DPPO installer fail with a message saying Dell Data Vault software is already installed?
DPPO includes a copy of Dell Data Vault in the installation package. If another copy of Dell Data Vault is found to
be pre-installed, DPPO installer will abort. Please uninstall Dell Data Vault before attempting to install DPPO again.
Home Page
1. Why don’t I see the Graphics Utilization bar on the home page of DPPO application?
This is not a cause for concern. Graphics utilization is not available on some Dell systems. Based on the
configuration of your system, this data may not be available.
Profiles & Policies
1. Why do I see “Policy needs reboot” message?
Some of the DPPO policies change system attributes that require a reboot before the changes can take effect.
When this happens the user is informed and given an opportunity to reboot the system. You can decide to reboot
later but the changes applied to your system will become effective only after you reboot. Some examples of
policies that require reboot are those that change Processor Hyper-Threading, Processor Cores etc.
2. Why do I see “Policy needs application restart” message?
Some of the DPPO policies change system attributes that require the ISV application to be restarted before the
changes can take effect. When this happens the user is informed and given an opportunity to restart the ISV
application. You can decide to continue using the application but the changes applied to your system will become
effective only the next time the application is started. Some examples of policies that require application restart
are those that change Nvidia settings.
3. Why do I see “Policy conflict occurred” message?
You may have two different active profiles that contain policies that change the same system attribute to different
values. When such a situation is detected by DPPO, one the policies is aborted and the user is notified. DPPO
determines a policy conflict at application runtime, not policy selection.
To avoid such a situation, you must not activate conflicting policies at the same time. Such policies are meant to be
enabled one at a time to optimize the system for ISV applications running in different modes. If you get a policy
conflict message, please disable one of the profiles.
System Maintenance
1. Why does “Check for Updates” or “Apply Updates” fail?
Check for updates or Apply updates may fail if you do not have an internet connection or if the Dell server is not
reachable. Please check your network connection and try again after some time.
19
Page 20

You may also see this failure because of a conflict with some other application that updates your system e.g. Dell
Client System Update software. If this happens, please retry the operation after closing other applications and
associated update schedulers.
2. Why do I see “Update requires reboot” message sometimes?
Not all software updates require the system to be rebooted. If you get this message, it means that the software
update that was just applied can only become effective once your system is rebooted. Please save all your data
and close all running applications before rebooting your system.
Track and Analyze
1. Will enabling Dell Smart Tracking impact my system’s performance?
Dell Smart Tracking is a very powerful tool and has been extensively tested to ensure that it does not adversely
impact your system’s performance or battery life. However, please bear in mind that it is a tracking tool meant to
be used as needed. You should not need to keep it enabled at all times.
20
Page 21

2
Getting Help
Contacting Dell
NOTE: If you do not have an active Internet connection, you can find contact information on your purchase invoice,
packing slip, bill, or Dell product catalog.
Dell provides several online and telephone-based support and service options. Availability varies by country and
product, and some services may not be available in your area. To contact Dell for sales, technical support, or customer
service issues:
1. Visit dell.com/support
2. Select your support category.
3. Verify your country or region in the Choose a Country/Region drop-down menu at the top of page.
4. Select the appropriate service or support link based on your need.
21
 Loading...