


Dell Precision M6600 Omistajan käsikirja
Säädösten mukainen malli P10E
Säädösten mukainen tyyppi P10E001

Huomautukset, varoitukset ja vaarat
HUOMAUTUS: HUOMAUTUKSET sisältävät tärkeitä tietoja, joiden avulla voit käyttää
tietokonetta tehokkaammin.
VAROITUS: VAROITUS varoittaa tilanteista, joissa laitteisto voi vahingoittua tai tietoja
voidaan menettää, ellei ohjeita noudateta.
VAARA: VAARA kertoo tilanteista, joihin saattaa liittyä omaisuusvahinkojen,
loukkaantumisen tai kuoleman vaara.
Tämän asiakirjan tiedot voivat muuttua ilman erillistä ilmoitusta.
© 2011 Dell Inc. Kaikki oikeudet pidätetään.
Tämän tekstin kaikenlainen kopioiminen ilman Dell Inc:n kirjallista lupaa on jyrkästi kielletty.
Tekstissä käytetyt tavaramerkit:
Latitude™, Latitude ON™, OptiPlex™, Vostro™ ja Wi-Fi Catcher™ ovat Dell Inc:n tavaramerkkejä. Intel®,
Pentium®, Xeon®, Core™, Atom™, Centrino® ja Celeron® ovat Intel Corporationin rekisteröityjä
tavaramerkkejä tai tavaramerkkejä Yhdysvalloissa ja muissa maissa. AMD® on rekisteröity tavaramerkki ja
AMD Opteron™, AMD Phenom™, AMD Sempron™, AMD Athlon™, ATI Radeon™ ja ATI FirePro™ ovat
Advanced Micro Devices, Inc:n tavaramerkkejä. Microsoft®, Windows®, MS-DOS®, Windows Vista®,
Windows Vista -käynnistyspainike ja Office Outlook® ovat Microsoft Corporationin tavaramerkkejä tai
rekisteröityjä tavaramerkkejä Yhdysvalloissa ja/tai muissa maissa. Blu-ray Disc
Associationin (BDA) omistama tavaramerkki, jota käytetään lisenssillä levyissä ja soittimissa.
sanamerkki on rekisteröity tavaramerkki, jonka omistaa
lisenssillä.
Muut tässä julkaisussa käytettävät tavaramerkit ja tuotenimet viittaavat merkkien ja nimien omistajiin tai
tuotteisiin. Dell Inc. kieltää kaikki omistusoikeudet muihin kuin omiin tavara- ja tuotemerkkeihinsä.
®
Wi-Fi
on Wireless Ethernet Compatibility Alliance, Inc:n rekisteröity tavaramerkki.
Dell™, DELL-logo, Dell Precision™, Precision ON™,ExpressCharge™,
™
Bluetooth
on Blu-ray Disc
®
SIG, Inc ja jota Dell Inc käyttää
Bluetooth
®
-
2011 — 06
Rev. A00

Sisällysluettelo
Huomautukset, varoitukset ja vaarat.........................................................2
Luku 1: Tietokoneen käsittely......................................................................9
Before Working Inside Your Computer.............................................................................9
Recommended Tools.......................................................................................................10
Turning Off Your Computer..............................................................................................11
After Working Inside Your Computer..............................................................................11
Luku 2: Secure Digital (SD) -kortti............................................................13
Secure Digital (SD) -kortin irrottaminen..........................................................................13
Secure Digital (SD) -kortin asentaminen.........................................................................13
Luku 3: ExpressCard-kortti.........................................................................15
ExpressCard-kortin irrottaminen.....................................................................................15
ExpressCard-kortin asentaminen....................................................................................15
Luku 4: Akku.................................................................................................17
Akun irrottaminen............................................................................................................17
Akun asentaminen...........................................................................................................17
Luku 5: SIM-kortti........................................................................................19
SIM-kortin irrottaminen...................................................................................................19
SIM-kortin asentaminen..................................................................................................20
Luku 6: Bluetooth-kortti..............................................................................21
Bluetooth-kortin irrottaminen..........................................................................................21
Bluetooth-kortin asentaminen.........................................................................................22
Luku 7: Rungon suojus................................................................................23
Rungon suojuksen irrottaminen......................................................................................23

Rungon suojuksen asentaminen.....................................................................................24
Luku 8: Näppäimistön kehys......................................................................25
Näppäimistön kehyksen irrottaminen.............................................................................25
Näppäimistön kehyksen asentaminen............................................................................26
Luku 9: Näppäimistö....................................................................................27
Näppäimistön irrottaminen..............................................................................................27
Näppäimistön asentaminen............................................................................................29
Luku 10: Optinen asema.............................................................................31
Optisen aseman irrottaminen..........................................................................................31
Optisen aseman asentaminen.........................................................................................32
Luku 11: Ensisijainen kiintolevy.................................................................33
Ensisijaisen kiintolevyn irrottaminen...............................................................................33
Ensisijaisen kiintolevyn asentaminen..............................................................................35
Luku 12: Toissijainen kiintolevy.................................................................37
Toissijaisen kiintolevyn irrottaminen...............................................................................37
Toissijaisen kiintolevyn asentaminen..............................................................................38
Luku 13: WLAN (langaton lähiverkko) -kortti..........................................39
WLAN-kortin irrottaminen...............................................................................................39
WLAN-kortin asentaminen..............................................................................................40
Luku 14: WWAN (langaton suuralueverkko) -kortti...............................41
WWAN-kortin irrottaminen.............................................................................................41
WWAN-kortin asentaminen............................................................................................42
Luku 15: Ensisijainen muisti.......................................................................43
Ensisijaisen muistin irrottaminen....................................................................................43
Ensisijaisen muistin asentaminen...................................................................................44

Luku 16: Toissijainen muisti.......................................................................45
Toissijaisen muistin irrottaminen....................................................................................45
Toissijaisen muistin asentaminen...................................................................................46
Luku 17: CPU:n tuuletin...............................................................................47
CPU:n tuulettimen irrottaminen.......................................................................................47
CPU:n tuulettimen asentaminen......................................................................................48
Luku 18: Nappiparisto.................................................................................49
Nappipariston irrottaminen.............................................................................................49
Nappipariston asentaminen............................................................................................50
Luku 19: Kämmentuki..................................................................................51
Kämmentuen irrottaminen...............................................................................................51
Kämmentuen asentaminen..............................................................................................56
Luku 20: CPU ja jäähdytyselementti.........................................................57
CPU:n jäähdytyselementin irrottaminen..........................................................................57
CPU:n jäähdytyselementin asentaminen.........................................................................58
Luku 21: Suoritin..........................................................................................59
Suorittimen irrottaminen.................................................................................................59
Suorittimen asentaminen................................................................................................60
Luku 22: Näytönohjaimen jäähdytyselementti........................................61
Näytönohjaimen jäähdytyselementin irrottaminen.........................................................61
Näytönohjaimen jäähdytyselementin asentaminen........................................................64
Luku 23: Näytönohjain................................................................................65
Näytönohjaimen irrottaminen.........................................................................................65
Näytönohjaimen asentaminen........................................................................................66
Luku 24: ExpressCard-moduuli..................................................................67
ExpressCard-moduulin irrottaminen...............................................................................67

ExpressCard-moduulin asentaminen..............................................................................68
Luku 25: I/O-kortti........................................................................................69
I/O-kortin irrottaminen.....................................................................................................69
I/O-kortin asentaminen....................................................................................................70
Luku 26: DC-in-liitin.....................................................................................71
DC-in-liittimen irrottaminen.............................................................................................71
DC-in-liittimen asentaminen............................................................................................73
Luku 27: Näyttö............................................................................................75
Näytön irrottaminen........................................................................................................75
Näytön asentaminen.......................................................................................................79
Luku 28: Emolevy.........................................................................................81
Emolevyn irrottaminen.....................................................................................................81
Emolevyn asentaminen...................................................................................................84
Luku 29: Kosketusnäytön kehys................................................................85
Kosketusnäytön kehyksen irrottaminen..........................................................................85
Kosketusnäytön kehyksen asentaminen.........................................................................87
Luku 30: Kosketusnäyttöpaneeli...............................................................89
Kosketusnäyttöpaneelin irrottaminen.............................................................................89
Kosketusnäyttöpaneelin asentaminen............................................................................92
Luku 31: Näytön kehys................................................................................93
Näytön kehyksen irrottaminen........................................................................................93
Näytön kehyksen asentaminen.......................................................................................94
Luku 32: Näyttöpaneeli...............................................................................95
Näyttöpaneelin irrottaminen...........................................................................................95
Näyttöpaneelin asentaminen..........................................................................................97

Luku 33: Kamera..........................................................................................99
Kameran irrottaminen.....................................................................................................99
Kameran asentaminen..................................................................................................100
Luku 34: Näytön saranan tulpan torni....................................................101
Näytön saranan tulpan tornin irrottaminen...................................................................101
Näytön saranan tulpan tornin asentaminen..................................................................103
Luku 35: LVDS-kamerakaapeli.................................................................105
LVDS-kamerakaapelin irrottaminen..............................................................................105
LVDS-kamerakaapelin asentaminen.............................................................................107
Luku 36: Tekniset tiedot............................................................................109
Tekniset tiedot...............................................................................................................109
Luku 37: Järjestelmän asennusohjelma................................................115
Järjestelmän asennusohjelman yleiskatsaus...............................................................115
Järjestelmän asennusohjelman avaaminen.................................................................115
Järjestelmän asennusohjelman asetukset...................................................................115
Luku 38: Diagnostiikka..............................................................................129
Laitteen tilavalot............................................................................................................129
Akun tilavalot.................................................................................................................129
Diagnostiikka.................................................................................................................129
Luku 39: Dellin yhteystiedot.....................................................................133
Dellin yhteystiedot ........................................................................................................133

8
Tietokoneen käsittely 1
Before Working Inside Your Computer
Use the following safety guidelines to help protect your computer from potential
damage and to help to ensure your personal safety. Unless otherwise noted,
each procedure included in this document assumes that the following
conditions exist:
• You have performed the steps in Working on Your Computer.
• You have read the safety information that shipped with your computer.
• A component can be replaced or--if purchased separately--installed by
performing the removal procedure in reverse order.
VAARA: Before working inside your computer, read the safety information that
shipped with your computer. For additional safety best practices information, see
the Regulatory Compliance Homepage at www.dell.com/regulatory_compliance.
VAROITUS: Many repairs may only be done by a certified service technician. You
should only perform troubleshooting and simple repairs as authorized in your
product documentation, or as directed by the online or telephone service and
support team. Damage due to servicing that is not authorized by Dell is not covered
by your warranty. Read and follow the safety instructions that came with the
product.
VAROITUS: To avoid electrostatic discharge, ground yourself by using a wrist
grounding strap or by periodically touching an unpainted metal surface, such as a
connector on the back of the computer.
VAROITUS: Handle components and cards with care. Do not touch the components
or contacts on a card. Hold a card by its edges or by its metal mounting bracket.
Hold a component such as a processor by its edges, not by its pins.
VAROITUS: When you disconnect a cable, pull on its connector or on its pull-tab,
not on the cable itself. Some cables have connectors with locking tabs; if you are
disconnecting this type of cable, press in on the locking tabs before you disconnect
the cable. As you pull connectors apart, keep them evenly aligned to avoid bending
any connector pins. Also, before you connect a cable, ensure that both connectors
are correctly oriented and aligned.
9
HUOMAUTUS: The color of your computer and certain components may appear
differently than shown in this document.
To avoid damaging your computer, perform the following steps before you begin
working inside the computer.
1. Ensure that your work surface is flat and clean to prevent the computer
cover from being scratched.
2. Turn off your computer (see
Turning Off Your Computer
).
3. If the computer is connected to a docking device (docked) such as the
optional Media Base or Battery Slice, undock it.
VAROITUS: To disconnect a network cable, first unplug the cable from your
computer and then unplug the cable from the network device.
4. Disconnect all network cables from the computer.
5. Disconnect your computer and all attached devices from their electrical
outlets.
6. Close the display and turn the computer upside-down on a flat work
surface.
HUOMAUTUS: To avoid damaging the system board, you must remove the main
battery before you service the computer.
7. Remove the main battery (see
Battery
).
8. Turn the computer top-side up.
9. Open the display.
10. Press the power button to ground the system board.
VAROITUS: To guard against electrical shock, always unplug your computer from
the electrical outlet before opening the display.
VAROITUS: Before touching anything inside your computer, ground yourself by
touching an unpainted metal surface, such as the metal at the back of the
computer. While you work, periodically touch an unpainted metal surface to
dissipate static electricity, which could harm internal components.
11. Remove any installed ExpressCards or Smart Cards from the appropriate
slots.
Recommended Tools
The procedures in this document may require the following tools:
• Small flat-blade screwdriver
10
• #0 Phillips screwdriver
• #1 Phillips screwdriver
• Small plastic scribe
• Flash BIOS update program CD
Turning Off Your Computer
VAROITUS: To avoid losing data, save and close all open files and exit all open
programs before you turn off your computer.
1. Shut down the operating system:
• In Windows Vista :
Click Start
, then click the arrow in the lower-right corner of the
Start menu as shown below, and then click Shut Down.
• In Windows XP:
Click Start → Turn Off Computer → Turn Off . The computer turns off
after the operating system shutdown process is complete.
2. Ensure that the computer and all attached devices are turned off. If your
computer and attached devices did not automatically turn off when you
shut down your operating system, press and hold the power button for
about 4 seconds to turn them off.
After Working Inside Your Computer
After you complete any replacement procedure, ensure you connect any
external devices, cards, and cables before turning on your computer.
VAROITUS: To avoid damage to the computer, use only the battery designed for this
particular Dell computer. Do not use batteries designed for other Dell computers.
1. Connect any external devices, such as a port replicator, battery slice, or
media base, and replace any cards, such as an ExpressCard.
2. Connect any telephone or network cables to your computer.
11

VAROITUS: To connect a network cable, first plug the cable into the network device
and then plug it into the computer.
3. Replace the battery.
4. Connect your computer and all attached devices to their electrical outlets.
5. Turn on your computer.
12
Secure Digital (SD) -kortti 2
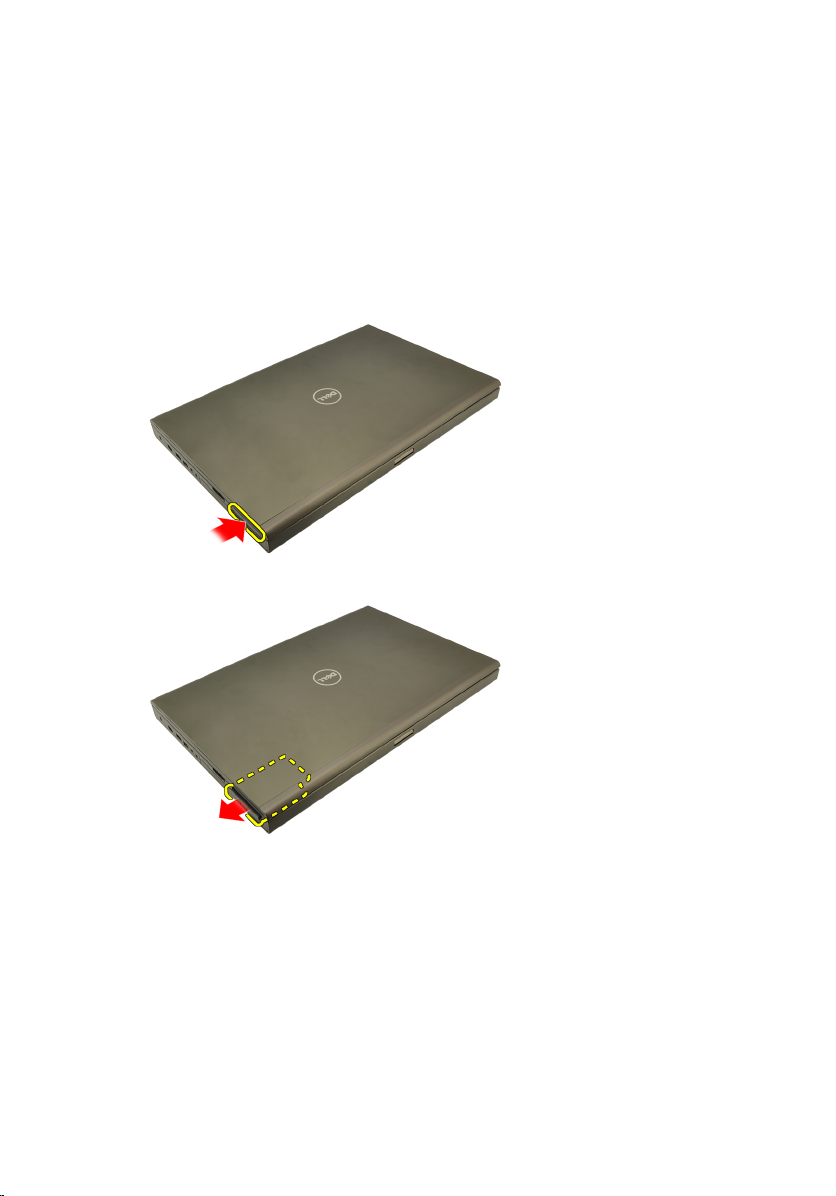
Secure Digital (SD) -kortin irrottaminen
1. Noudata
2. Vapauta Secure Digital (SD) -muistikortti painamalla sitä.
3. Vedä SD-muistikortti ulos tietokoneesta.
Ennen kuin avaat tietokoneen kannen
-kohdan ohjeita.
Secure Digital (SD) -kortin asentaminen
1. Paikanna Secure Digital (SD) -muistikortin paikka kotelon vasemmalta
puolelta.
2. Työnnä SD-muistikortti paikoilleen siten, että kuulet napsahduksen.
13

14
ExpressCard-kortti 3
ExpressCard-kortin irrottaminen
1. Noudata
2. Vapauta ExpressCard-kortti tietokoneesta painamalla sitä varoen.
3. Ota kiinni ExpressCard-kortista ja irrota se tietokoneesta vetämällä sitä.
Ennen kuin avaat tietokoneen kannen
-kohdan ohjeita.
ExpressCard-kortin asentaminen
1. Työnnä ExpressCard-kortti paikoilleen siten, että kuulet napsauhduksen.
2. Noudata
Tietokoneen sisällä työskentelyn jälkeen
-kohdan ohjeita.
15

16
Akku 4
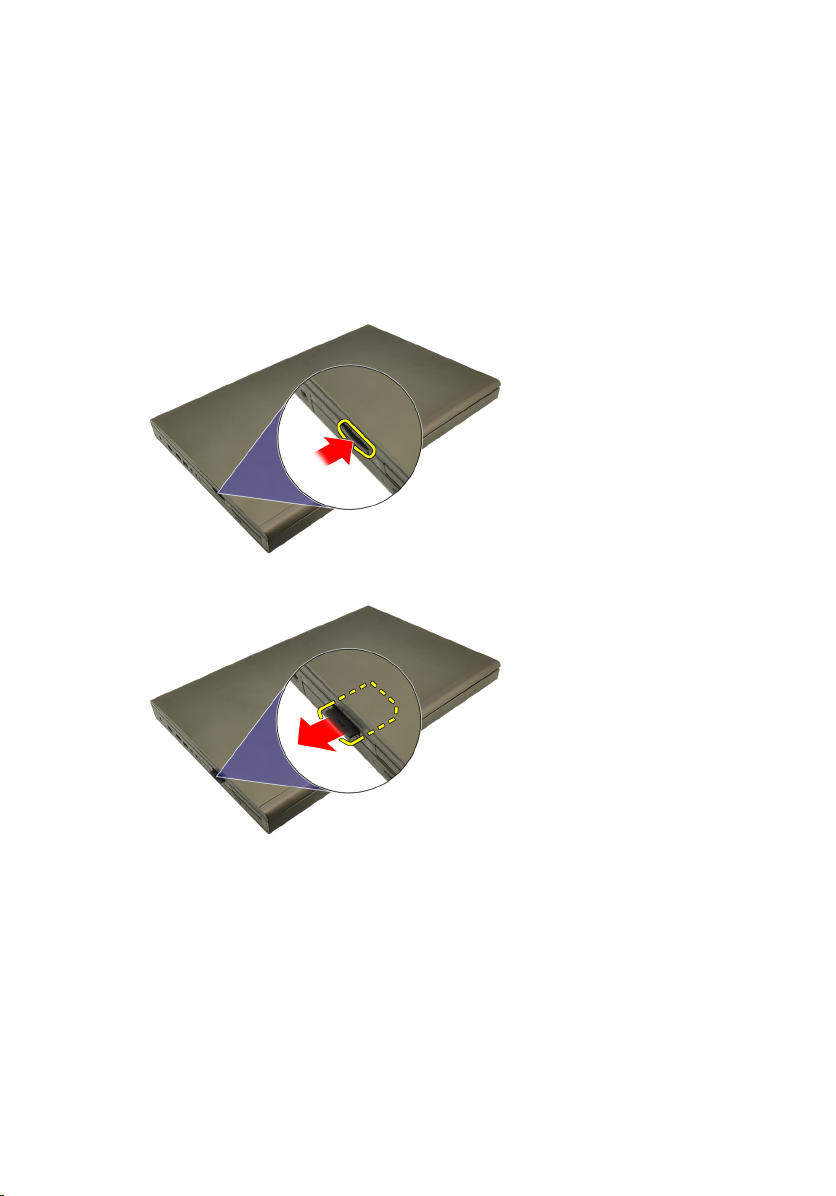
Akun irrottaminen
1. Noudata
2. Liu'uta akun lukitussalpa auki.
3. Irrota akku tietokoneesta.
Ennen kuin avaat tietokoneen kannen
-kohdan ohjeita.
Akun asentaminen
1. Työnnä akku tietokoneeseen.
2. Akun vapautussalpa loksahtaa automaattisesti takaisin lukitusasentoon.
3. Noudata
Tietokoneen sisällä työskentelyn jälkeen
-kohdan ohjeita.
17

18
SIM-kortti 5
SIM-kortin irrottaminen
1. Noudata
2. Irrota
3. Työnnä SIM-korttia ulospäin lovestaan.
4. Vedä SIM-kortti ulos lovestaan.
Ennen kuin avaat tietokoneen kannen
akku.
-kohdan ohjeita.
19

SIM-kortin asentaminen
1. Paikanna SIM-kortin paikka akkutilasta.
2. Työnnä SIM-kortti paikoilleen siten, että se istuu asianmukaisesti.
3. Asenna
4. Noudata
akku
.
Tietokoneen sisällä työskentelyn jälkeen
-kohdan ohjeita.
20

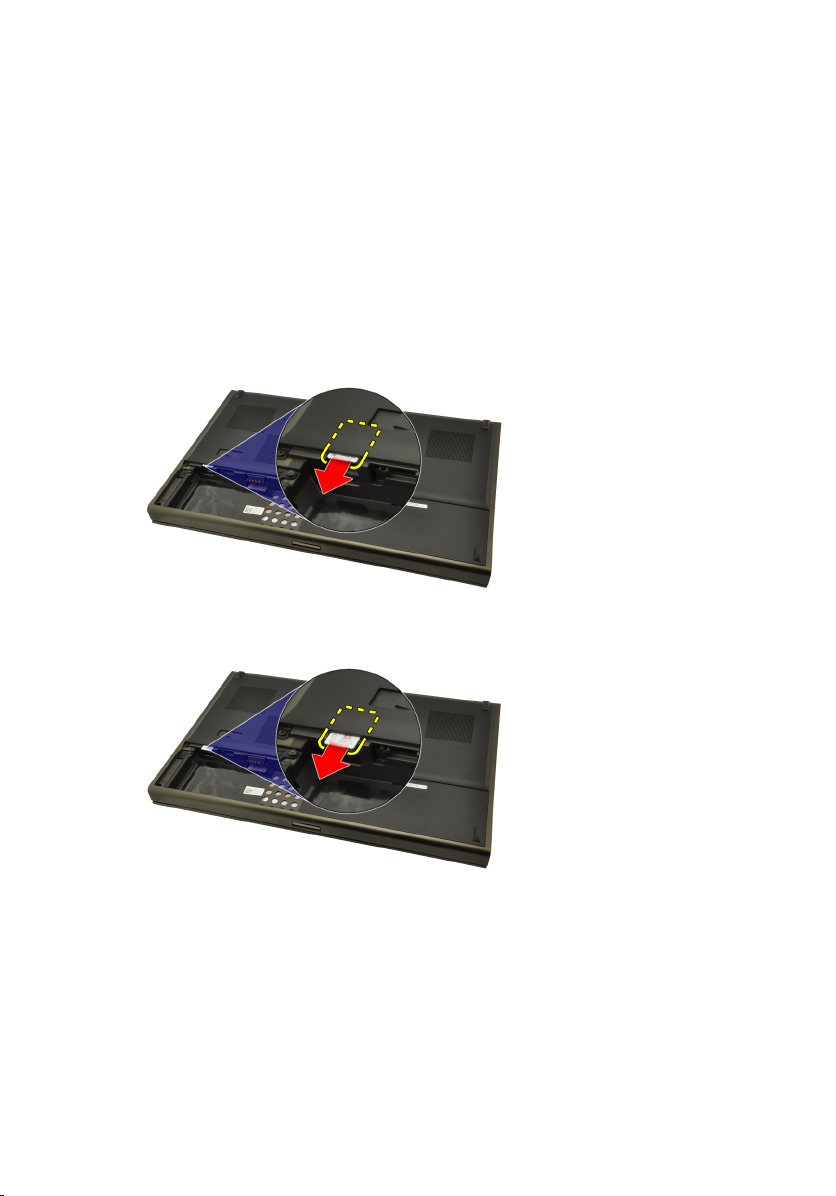
Bluetooth-kortti 6
Bluetooth-kortin irrottaminen
1. Noudata
2. Irrota
3. Työnnä Bluetooth-kortin kantta ylospäin ja vapauta kortti tilastaan.
4. Irrota Bluetooth-kaapeli Bluetooth-kortista.
Ennen kuin avaat tietokoneen kannen
akku.
-kohdan ohjeita.
5. Irrota ruuvi, joka kiinnittää Bluetooth-kortin paikoilleen.
21
6. Irrota Bluetooth-kortti.
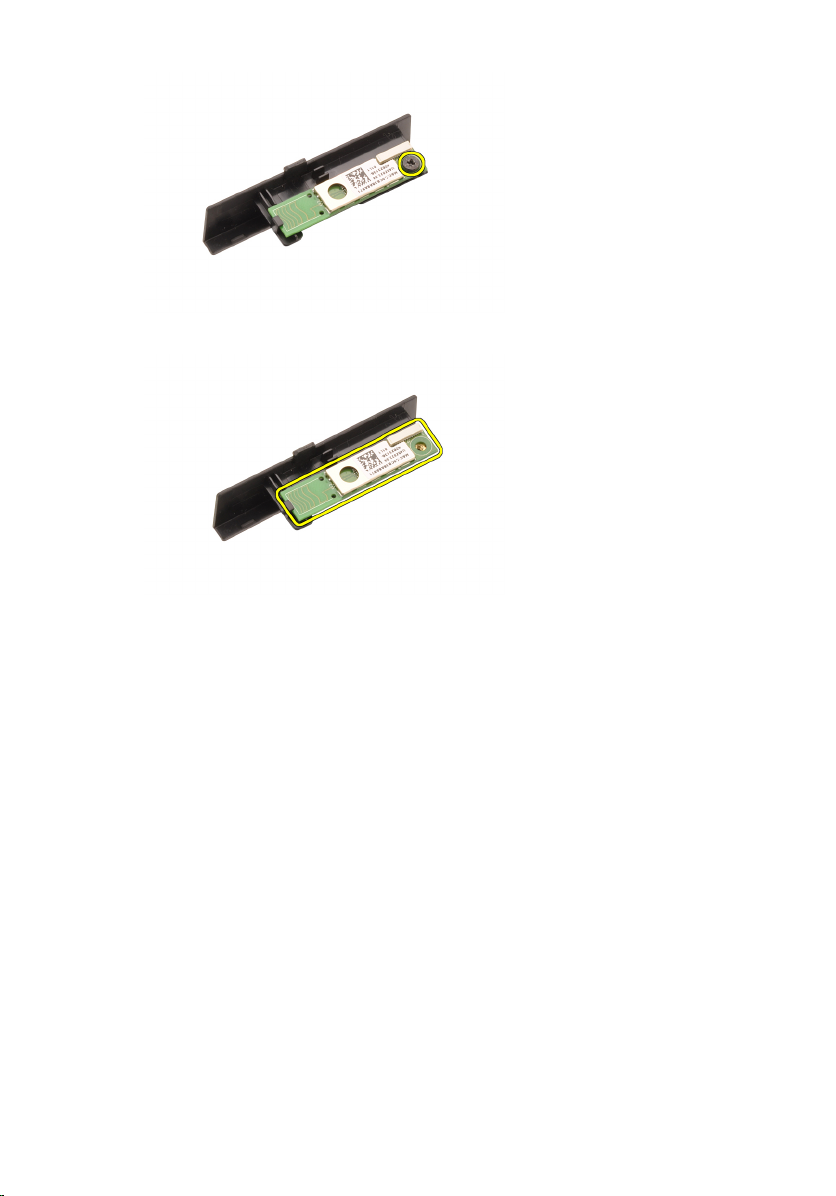
Bluetooth-kortin asentaminen
1. Aseta Bluetooth-kortti Bluetooth-kortin kannen päälle ja kohdista
ruuvinaukot.
2. Kiristä ruuvi, jolla Bluetooth-kortti kiinnittyy paikoilleen.
3. Kytke Bluetooth-kaapeli Bluetooth-korttiin.
4. Paikanna Bluetooth-kortin kannen tila.
5. Työnnä Bluetooth-kortin kansi tilaansa siten, että kieleke istuu paikoillaan.
6. Asenna
7. Noudata
akku.
Tietokoneen sisällä työskentelyn jälkeen
-kohdan ohjeita.
22
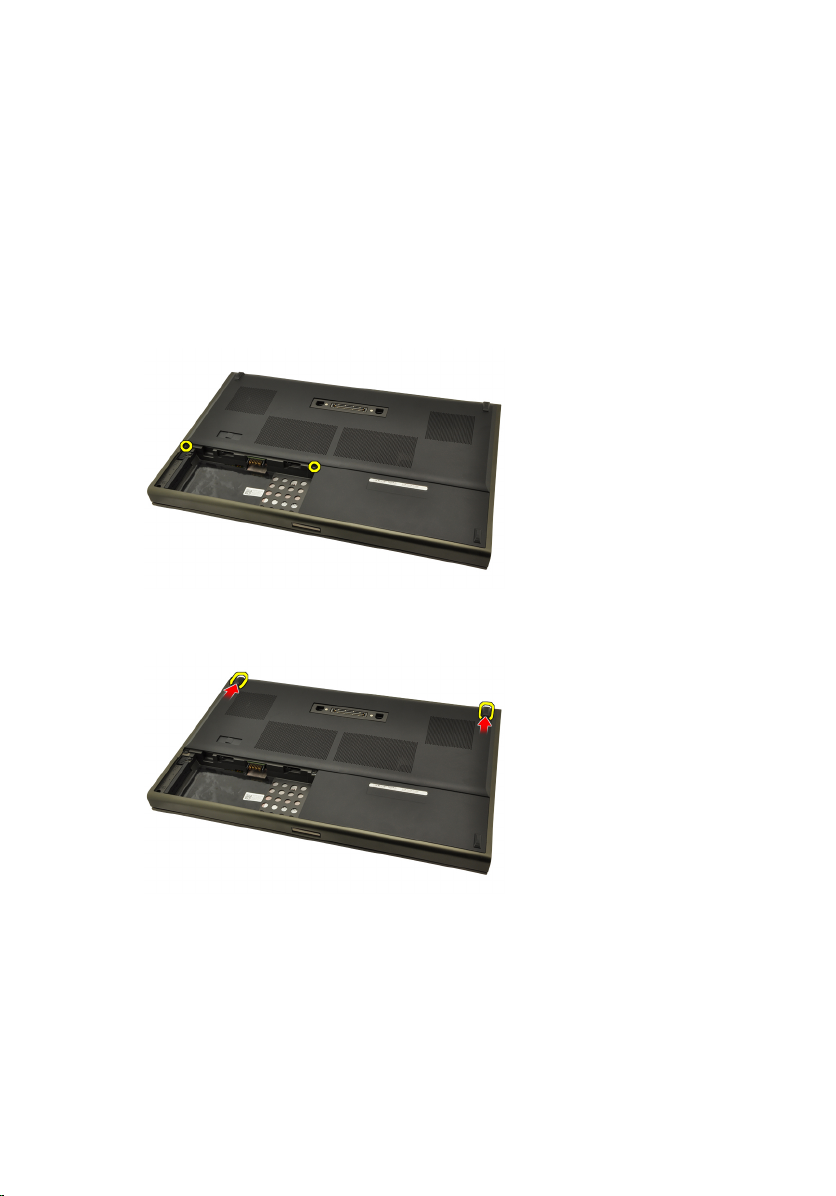
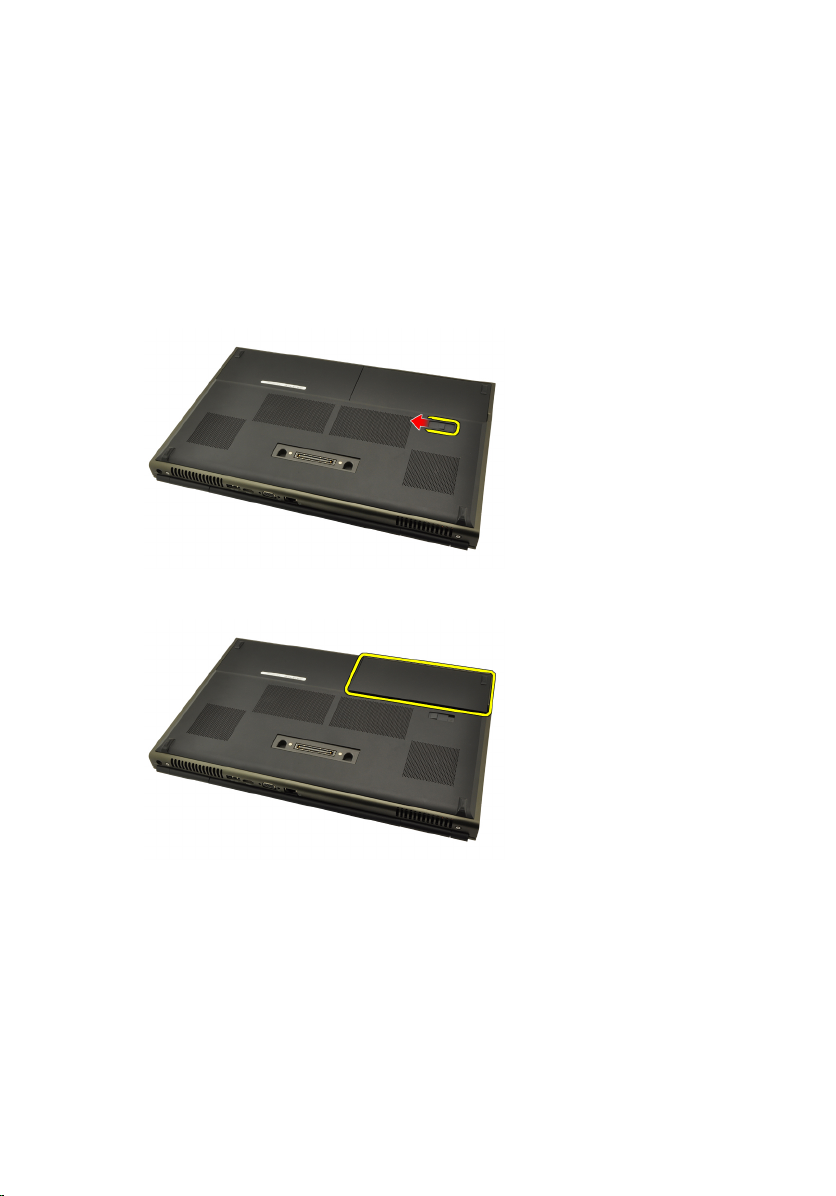
Rungon suojus 7
Rungon suojuksen irrottaminen
1. Noudata
2. Irrota
3. Irrota ruuvit, joilla rungon suojus on kiinnitetty tietokoneeseen.
4. Työnnä kumijalkoja tietokoneen takaosaa kohden siten, että alaluukku
aukeaa.
Ennen kuin avaat tietokoneen kannen
akku.
-kohdan ohjeita.
5. Irrota rungon suojus tietokoneesta.
23

Rungon suojuksen asentaminen
1. Työnnä alaluukkua alas ja tietokoneen etuosaa kohden.
2. Kiristä ruuvit, joilla rungon suojus kiinnittyy tietokoneeseen.
3. Asenna
4. Noudata
akku.
Tietokoneen sisällä työskentelyn jälkeen
-kohdan ohjeita.
24

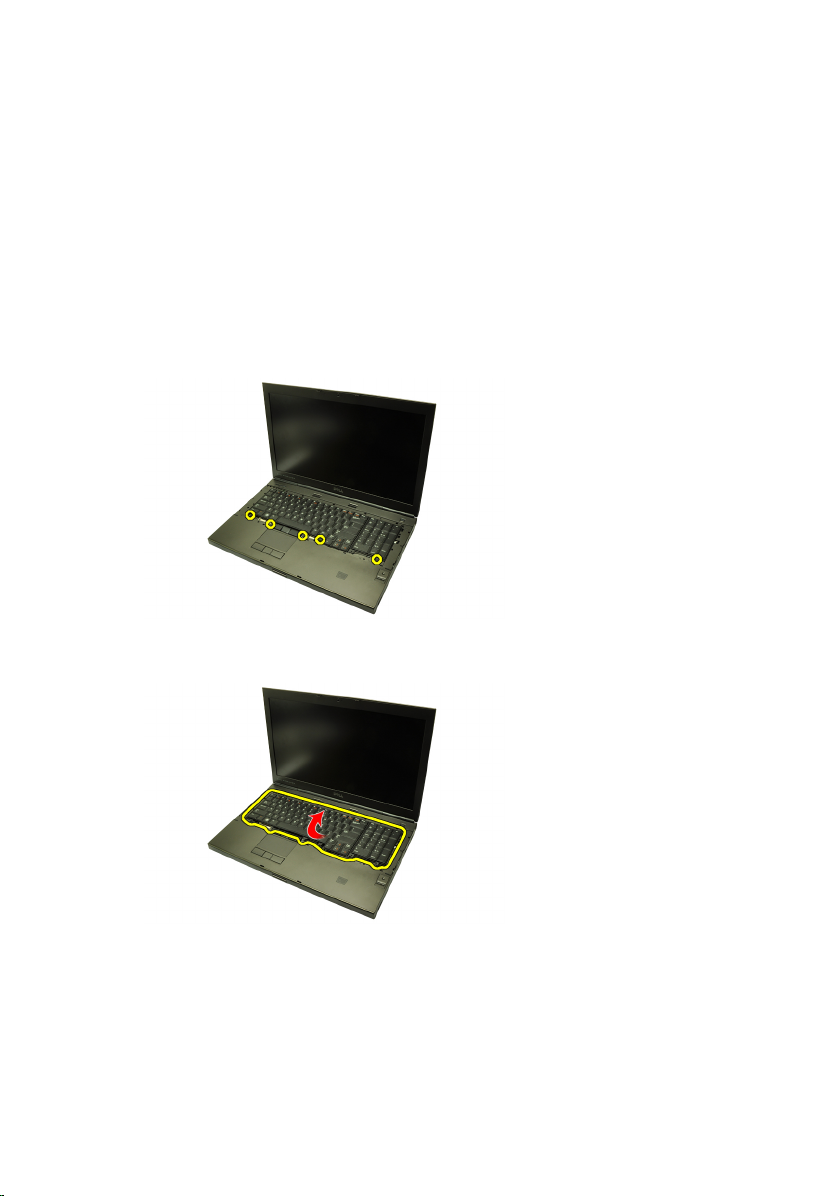
Näppäimistön kehys 8
Näppäimistön kehyksen irrottaminen
1. Noudata
2. Irrota
3. Irrota näppäimistön kehys tietokoneesta kankeamalla muovipuikolla sen
alta.
4. Paina näppäimistön kehys kiinni sivuilta ja alareunasta.
Ennen kuin avaat tietokoneen kannen
akku.
-kohdan ohjeita.
5. Nosta näppäimistön kehys irti tietokoneesta.
25

Näppäimistön kehyksen asentaminen
1. Kohdista näppäimistön kehys kämmentuen yläosassa olevien kielekkeiden
kanssa.
2. Paina alareunaa alaspäin siten, että kielekkeet napsahtavat paikoilleen.
3. Paina näppäimistön kehys kiinni sivuilta ja yläreunasta.
4. Asenna
5. Noudata
akku.
Tietokoneen sisällä työskentelyn jälkeen
-kohdan ohjeita.
26
Näppäimistö 9
Näppäimistön irrottaminen
1. Noudata
2. Irrota
3. Irrota
4. Irrota ruuvit, jotka kiinnittävät näppäimistön paikoilleen.
5. Irrota näppäimistö tietokoneesta alkaen näppäimistön alaosasta ja käännä
näppäimistö ympäri.
Ennen kuin avaat tietokoneen kannen
akku.
näppäimistön kehys
.
-kohdan ohjeita.
6. Irrota näppäimistön datakaapeli emolevystä.
27
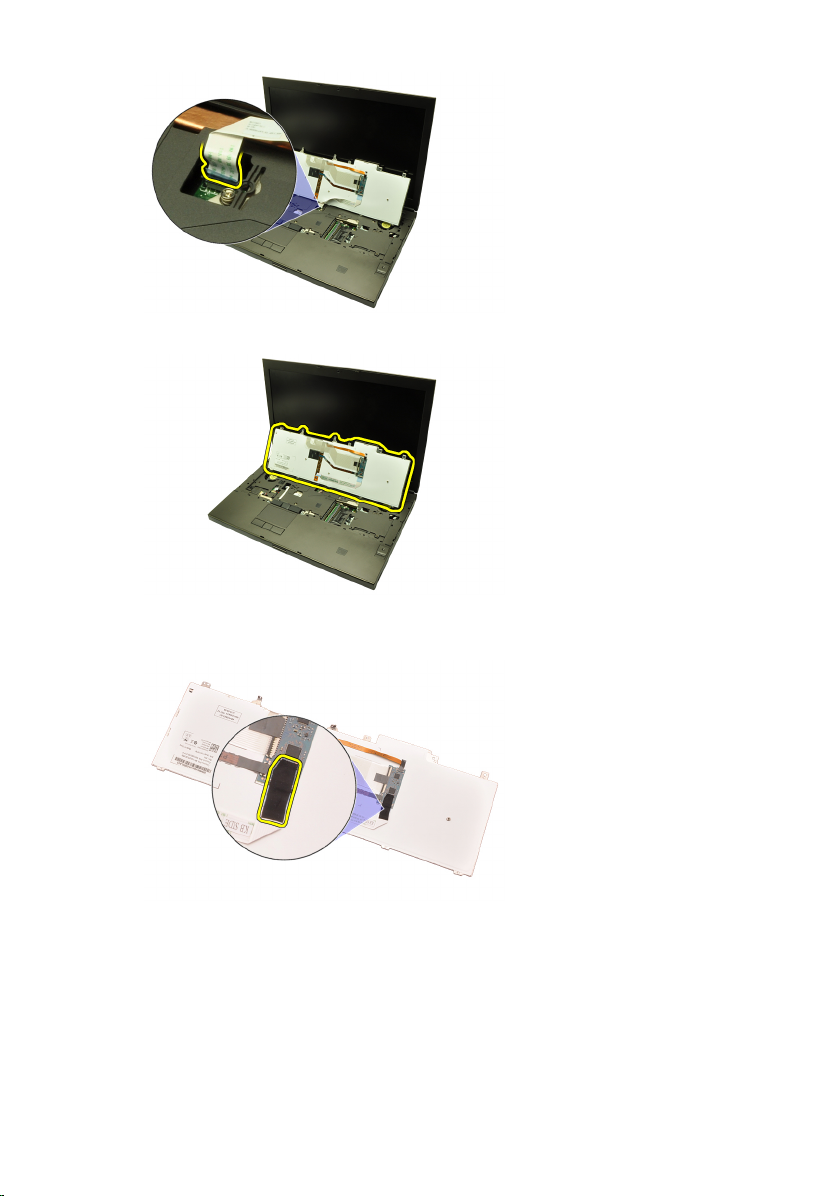
7. Irrota näppäimistö.
8. Irrota teippi, joka kiinnittää näppäimistön datakaapelin näppäimistön
taakse.
9. Irrota näppäimistön datakaapeli näppäimistön takaa.
28
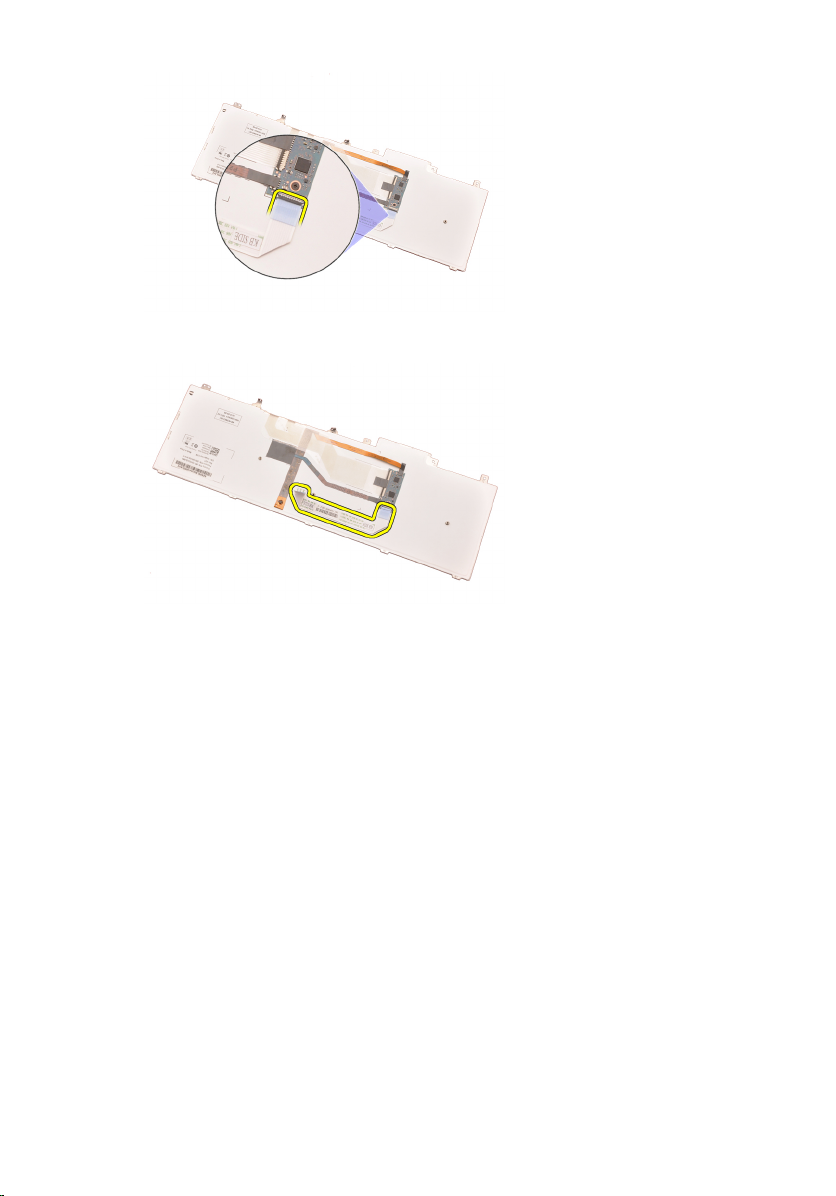
10. Irrota näppäimistön datakaapeli näppäimistöstä ja irrota se.
Näppäimistön asentaminen
1. Kiinnitä näppäimistön datakaapeli näppäimistön taakse.
2. Liimaa näppäimistön datakaapeli näppäimistön taakse teipillä.
3. Kiinnitä näppäimistön datakaapeli emolevyyn.
4. Aseta näppäimistö kämmentuelle siten, että se on kohdakkain
ruuvinaukkojen kanssa.
5. Kiristä näppäimistön ruuvit.
6. Asenna
7. Asenna
8. Noudata
näppäimistön kehys
.
akku.
Tietokoneen sisällä työskentelyn jälkeen
-kohdan ohjeita.
29

30
 Loading...