


Manuale dell'utente Dell Precision M6600
Modello normativo P10E
Tipo normativo P10E001

Messaggi di N.B., Attenzione e Avvertenza
N.B.: Un messaggio di N.B. indica informazioni importanti che contribuiscono a migliorare
l'utilizzo del computer.
ATTENZIONE: Un messaggio di ATTENZIONE indica un potenziale danno all'hardware o
una perdita di dati nel caso in cui non si seguano le istruzioni..
AVVERTENZA: Un messaggio di AVVERTENZA indica un rischio di danni materiali, lesioni
personali o morte.
Le informazioni contenute nel presente documento sono soggette a modifica senza preavviso
© 2011 Dell Inc. Tutti i diritti riservati.
È severamente vietata la riproduzione, con qualsiasi strumento, senza l'autorizzazione scritta di Dell Inc.
Marchi commerciali utilizzati nel presente documento:
ExpressCharge
di Dell Inc.
commerciali di Intel Corporation negli Stati Uniti e/o in altri Paesi.
AMD Opteron
marchi commerciali di Advanced Micro Devices, Inc.
pulsante Start di Windows Vista e
Corporation negli Stati Uniti e/o in altri Paesi.
Blu-ray Disc Association (BDA) e concesso in licenza per l'uso su dischi e lettori. Il marchio della parola
Bluetooth
da parte di Dell Inc. è concesso in licenza.
™
®
Intel
™
,
AMD Phenom
,
Latitude
,
Pentium
™
,
Latitude ON
®
,
Xeon
™
™
,
®
™
,
,
Core
,
AMD Sempron
OptiPlex
Atom
Office Outlook
®
è un marchio registrato di proprietà di
Wi-Fi
™
®
Blu-ray Disc
®
™
, il logo DELL,
Dell
™
™
,
Centrino
,
AMD Athlon
sono marchi commerciali o marchi registrati di Microsoft
Bluetooth
™
,
Microsoft
e
Vostro
®
e
Celeron
™
®
,
™
è un marchio commerciale di proprietà della
®
SIG, Inc. e un eventuale uso di tale marchio
Dell Precision
Wi-Fi Catcher
®
sono marchi registrati o marchi
®
è un marchio registrato e
AMD
,
ATI Radeon
Windows
™
®
MS-DOS
,
è un marchio registrato di Wireless Ethernet Compatibility
Alliance, Inc.
Altri marchi di fabbrica e nomi commerciali possono essere utilizzati in questo documento sia in riferimento
alle aziende che rivendicano il marchio e i nomi che ai prodotti stessi. Dell Inc. nega qualsiasi
partecipazione di proprietà relativa a marchi e nomi commerciali diversi da quelli di sua proprietà.
™
,
™
sono marchi commerciali
e
Precision ON
ATI FirePro
®
Windows Vista
,
™
sono
™
®
,
, il
2011 — 06
Rev. A00

Sommario
Messaggi di N.B., Attenzione e Avvertenza.............................................2
Capitolo 1: Operazioni con il computer......................................................9
Before Working Inside Your Computer.............................................................................9
Recommended Tools.......................................................................................................10
Turning Off Your Computer..............................................................................................11
After Working Inside Your Computer..............................................................................11
Capitolo 2: Scheda Secure Digital (SD)...................................................13
Rimozione della scheda Secure Digital (SD)...................................................................13
Installazione della scheda Secure Digital (SD)...............................................................13
Capitolo 3: ExpressCard.............................................................................15
Rimozione dell'ExpressCard............................................................................................15
Installazione dell'ExpressCard........................................................................................15
Capitolo 4: Batteria......................................................................................17
Rimozione della batteria..................................................................................................17
Installazione della batteria..............................................................................................18
Capitolo 5: Scheda Subscriber Identity Module (SIM).........................19
Rimozione della scheda Subscriber Identity Module (SIM)............................................19
Installazione della scheda Subscriber Identity Module (SIM)........................................20
Capitolo 6: Scheda Bluetooth....................................................................21
Rimozione della scheda Bluetooth..................................................................................21
Installazione della scheda Bluetooth..............................................................................22
Capitolo 7: Coperchio della base..............................................................23
Rimozione del coperchio della base...............................................................................23

Installazione del coperchio della base............................................................................24
Capitolo 8: Cornice della tastiera..............................................................25
Rimozione della cornice della tastiera............................................................................25
Installazione della cornice della tastiera........................................................................26
Capitolo 9: Tastiera.....................................................................................27
Rimozione della tastiera..................................................................................................27
Installazione della tastiera..............................................................................................29
Capitolo 10: Unità ottica.............................................................................31
Rimozione dell'unità ottica..............................................................................................31
Installazione dell'unità ottica..........................................................................................32
Capitolo 11: Disco rigido principale..........................................................33
Rimozione del disco rigido principale.............................................................................33
Installazione del disco rigido principale.........................................................................35
Capitolo 12: Disco rigido secondario.......................................................37
Rimozione del disco rigido secondario...........................................................................37
Installazione del disco rigido secondario.......................................................................38
Capitolo 13: Scheda Wireless Local Area Network (WLAN)...............39
Rimozione della scheda Wireless Local Area Network (WLAN)....................................39
Installazione della scheda Wireless Local Area Network (WLAN)................................40
Capitolo 14: Scheda Wireless Wide Area Network (WWAN).............41
Rimozione della scheda Wireless Wide Area Network (WWAN)...................................41
Installazione della scheda Wireless Wide Area Network (WWAN)...............................42
Capitolo 15: Memoria principale...............................................................43
Rimozione della memoria principale...............................................................................43
Installazione della memoria principale...........................................................................44

Capitolo 16: Memoria secondaria.............................................................45
Rimozione della memoria secondaria.............................................................................45
Installazione della memoria secondaria.........................................................................46
Capitolo 17: Ventola della CPU..................................................................47
Rimozione della ventola della CPU..................................................................................47
Installazione della ventola della CPU..............................................................................48
Capitolo 18: Batteria pulsante...................................................................49
Rimozione della batteria pulsante...................................................................................49
Installazione della batteria pulsante...............................................................................50
Capitolo 19: Supporto per i polsi...............................................................51
Rimozione del supporto per i polsi..................................................................................51
Installazione del supporto per i polsi..............................................................................56
Capitolo 20: CPU e dissipatore di calore.................................................57
Rimozione del dissipatore di calore della CPU................................................................57
Installazione del dissipatore di calore della CPU............................................................58
Capitolo 21: Processore.............................................................................59
Rimozione del processore...............................................................................................59
Installazione del processore...........................................................................................60
Capitolo 22: Dissipatore di calore della scheda grafica.......................61
Rimozione del dissipatore di calore della scheda grafica..............................................61
Installazione del dissipatore di calore della scheda grafica..........................................64
Capitolo 23: Scheda grafica.......................................................................65
Rimozione della scheda grafica......................................................................................65
Installazione della scheda grafica..................................................................................66
Capitolo 24: Modulo ExpressCard.............................................................67
Rimozione del modulo ExpressCard................................................................................67

Installazione del modulo ExpressCard............................................................................68
Capitolo 25: Scheda di Input/Output.........................................................69
Rimozione della scheda di Input/Output.........................................................................69
Installazione della scheda di Input/Output......................................................................71
Capitolo 26: Jack DC-in..............................................................................73
Rimozione del jack della DC-in........................................................................................73
Installazione del jack della DC-in....................................................................................75
Capitolo 27: Gruppo dello schermo..........................................................77
Rimozione del gruppo dello schermo..............................................................................77
Installazione del gruppo dello schermo..........................................................................81
Capitolo 28: Scheda di sistema.................................................................83
Rimozione della scheda di sistema.................................................................................83
Installazione della scheda di sistema.............................................................................86
Capitolo 29: Cornice dello schermo a sfioramento................................89
Rimozione della cornice dello schermo a sfioramento...................................................89
Installazione della cornice dello schermo a sfioramento...............................................91
Capitolo 30: Pannello dello schermo a sfioramento..............................93
Rimozione del pannello dello schermo a sfioramento....................................................93
Installazione del pannello dello schermo a sfioramento................................................96
Capitolo 31: Cornice dello schermo..........................................................97
Rimozione della cornice dello schermo..........................................................................97
Installazione della cornice dello schermo......................................................................98
Capitolo 32: Pannello dello schermo........................................................99
Rimozione del pannello dello schermo............................................................................99
Installazione del pannello dello schermo......................................................................101

Capitolo 33: Videocamera........................................................................103
Rimozione della videocamera.......................................................................................103
Installazione della videocamera...................................................................................104
Capitolo 34: Torre tappi cardini dello schermo....................................105
Rimozione della torre dei tappi dei cardini dello schermo............................................105
Installazione della torre dei tappi dei cardini dello schermo........................................107
Capitolo 35: Cavo videocamera di segnale differenziale a bassa
tensione (LVDS).........................................................................................109
Rimozione del cavo videocamera di segnale differenziale a bassa tensione (LVDS)...109
Installazione del cavo videocamera di segnale differenziale a bassa tensione
(LVDS)............................................................................................................................111
Capitolo 36: Specifiche.............................................................................113
Specifiche tecniche......................................................................................................113
Capitolo 37: Installazione del sistema....................................................119
Panoramica configurazione del sistema.......................................................................119
Accesso al programma di configurazione del sistema.................................................119
Opzioni di menu del programma di configurazione del sistema...................................119
Capitolo 38: Diagnostica...........................................................................133
Indicatori di stato delle periferiche...............................................................................133
Indicatori di stato della batteria....................................................................................133
Diagnostica...................................................................................................................133
Capitolo 39: Come contattare Dell..........................................................137
Come contattare Dell ....................................................................................................137

8

Operazioni con il computer 1
Before Working Inside Your Computer
Use the following safety guidelines to help protect your computer from potential
damage and to help to ensure your personal safety. Unless otherwise noted,
each procedure included in this document assumes that the following
conditions exist:
• You have performed the steps in Working on Your Computer.
• You have read the safety information that shipped with your computer.
• A component can be replaced or--if purchased separately--installed by
performing the removal procedure in reverse order.
AVVERTENZA: Before working inside your computer, read the safety information
that shipped with your computer. For additional safety best practices information,
see the Regulatory Compliance Homepage at www.dell.com/
regulatory_compliance.
ATTENZIONE: Many repairs may only be done by a certified service technician. You
should only perform troubleshooting and simple repairs as authorized in your
product documentation, or as directed by the online or telephone service and
support team. Damage due to servicing that is not authorized by Dell is not covered
by your warranty. Read and follow the safety instructions that came with the
product.
ATTENZIONE: To avoid electrostatic discharge, ground yourself by using a wrist
grounding strap or by periodically touching an unpainted metal surface, such as a
connector on the back of the computer.
ATTENZIONE: Handle components and cards with care. Do not touch the
components or contacts on a card. Hold a card by its edges or by its metal
mounting bracket. Hold a component such as a processor by its edges, not by its
pins.
ATTENZIONE: When you disconnect a cable, pull on its connector or on its pull-tab,
not on the cable itself. Some cables have connectors with locking tabs; if you are
disconnecting this type of cable, press in on the locking tabs before you disconnect
the cable. As you pull connectors apart, keep them evenly aligned to avoid bending
any connector pins. Also, before you connect a cable, ensure that both connectors
are correctly oriented and aligned.
9
N.B.: The color of your computer and certain components may appear differently
than shown in this document.
To avoid damaging your computer, perform the following steps before you begin
working inside the computer.
1. Ensure that your work surface is flat and clean to prevent the computer
cover from being scratched.
2. Turn off your computer (see
Turning Off Your Computer
).
3. If the computer is connected to a docking device (docked) such as the
optional Media Base or Battery Slice, undock it.
ATTENZIONE: To disconnect a network cable, first unplug the cable from your
computer and then unplug the cable from the network device.
4. Disconnect all network cables from the computer.
5. Disconnect your computer and all attached devices from their electrical
outlets.
6. Close the display and turn the computer upside-down on a flat work
surface.
N.B.: To avoid damaging the system board, you must remove the main battery
before you service the computer.
7. Remove the main battery (see
Battery
).
8. Turn the computer top-side up.
9. Open the display.
10. Press the power button to ground the system board.
ATTENZIONE: To guard against electrical shock, always unplug your computer from
the electrical outlet before opening the display.
ATTENZIONE: Before touching anything inside your computer, ground yourself by
touching an unpainted metal surface, such as the metal at the back of the
computer. While you work, periodically touch an unpainted metal surface to
dissipate static electricity, which could harm internal components.
11. Remove any installed ExpressCards or Smart Cards from the appropriate
slots.
Recommended Tools
The procedures in this document may require the following tools:
• Small flat-blade screwdriver
10

• #0 Phillips screwdriver
• #1 Phillips screwdriver
• Small plastic scribe
• Flash BIOS update program CD
Turning Off Your Computer
ATTENZIONE: To avoid losing data, save and close all open files and exit all open
programs before you turn off your computer.
1. Shut down the operating system:
• In Windows Vista :
Click Start
, then click the arrow in the lower-right corner of the
Start menu as shown below, and then click Shut Down.
• In Windows XP:
Click Start → Turn Off Computer → Turn Off . The computer turns off
after the operating system shutdown process is complete.
2. Ensure that the computer and all attached devices are turned off. If your
computer and attached devices did not automatically turn off when you
shut down your operating system, press and hold the power button for
about 4 seconds to turn them off.
After Working Inside Your Computer
After you complete any replacement procedure, ensure you connect any
external devices, cards, and cables before turning on your computer.
ATTENZIONE: To avoid damage to the computer, use only the battery designed for
this particular Dell computer. Do not use batteries designed for other Dell
computers.
1. Connect any external devices, such as a port replicator, battery slice, or
media base, and replace any cards, such as an ExpressCard.
2. Connect any telephone or network cables to your computer.
11

ATTENZIONE: To connect a network cable, first plug the cable into the network
device and then plug it into the computer.
3. Replace the battery.
4. Connect your computer and all attached devices to their electrical outlets.
5. Turn on your computer.
12

Scheda Secure Digital (SD) 2
Rimozione della scheda Secure Digital (SD)
1. Seguire le procedure descritte in
computer
2. Premere la scheda di memoria Secure Digital (SD) per liberarla.
3. Far scorrere la scheda di memoria SD ed estrarla dal computer.
.
Prima di effettuare interventi sul
Installazione della scheda Secure Digital (SD)
1. Individuare l'alloggiamento della scheda di memoria Secure Digital (SD) sul
lato sinistro del telaio.
2. Spingere la scheda di memoria SD nell'alloggiamento finché non è
completamente bloccata (si ode un clic).
13

14
ExpressCard 3
Rimozione dell'ExpressCard
1. Seguire le procedure descritte in
computer
2. Premere il fermo del ExpressCard delicatamente per rimuoverla dal
computer.
3. Afferrare l'ExpressCard ed estrarla dal computer.
.
Prima di effettuare interventi sul
Installazione dell'ExpressCard
1. Far scorrere la scheda ExpressCard nell'alloggiamento finché non scatta in
posizione.
2. Seguire le procedure descritte in
componenti interni del computer
Dopo aver effettuato gli interventi sui
.
15

16
Batteria 4
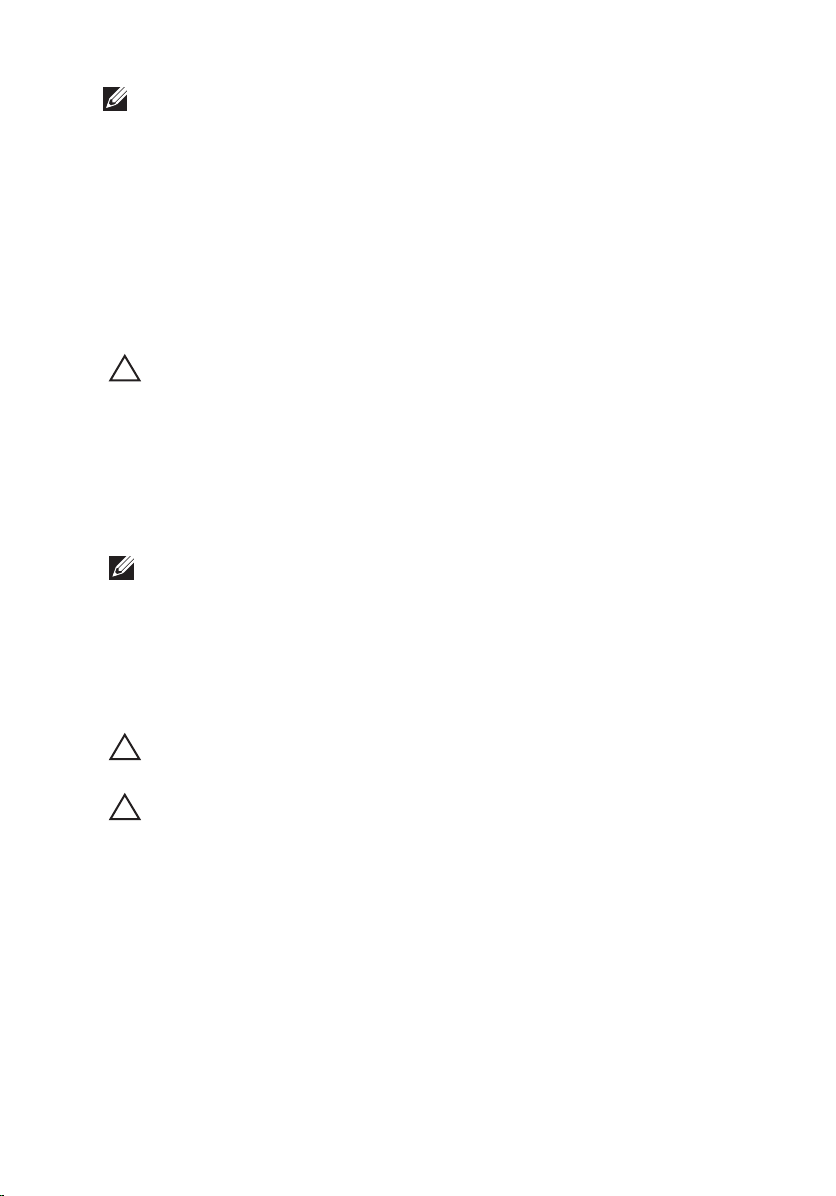
Rimozione della batteria
1. Seguire le procedure descritte in
computer
2. Far scorrere il dispositivo di chiusura a scatto della batteria verso la
posizione di sblocco.
3. Rimuovere la batteria dal computer.
.
Prima di effettuare interventi sul
17

Installazione della batteria
1. Far scorrere il gruppo batteria nel computer.
2. Il fermo di sblocco della batteria scatta automaticamente in posizione
bloccata.
3. Seguire le procedure descritte in
componenti interni del computer
Dopo aver effettuato gli interventi sui
.
18
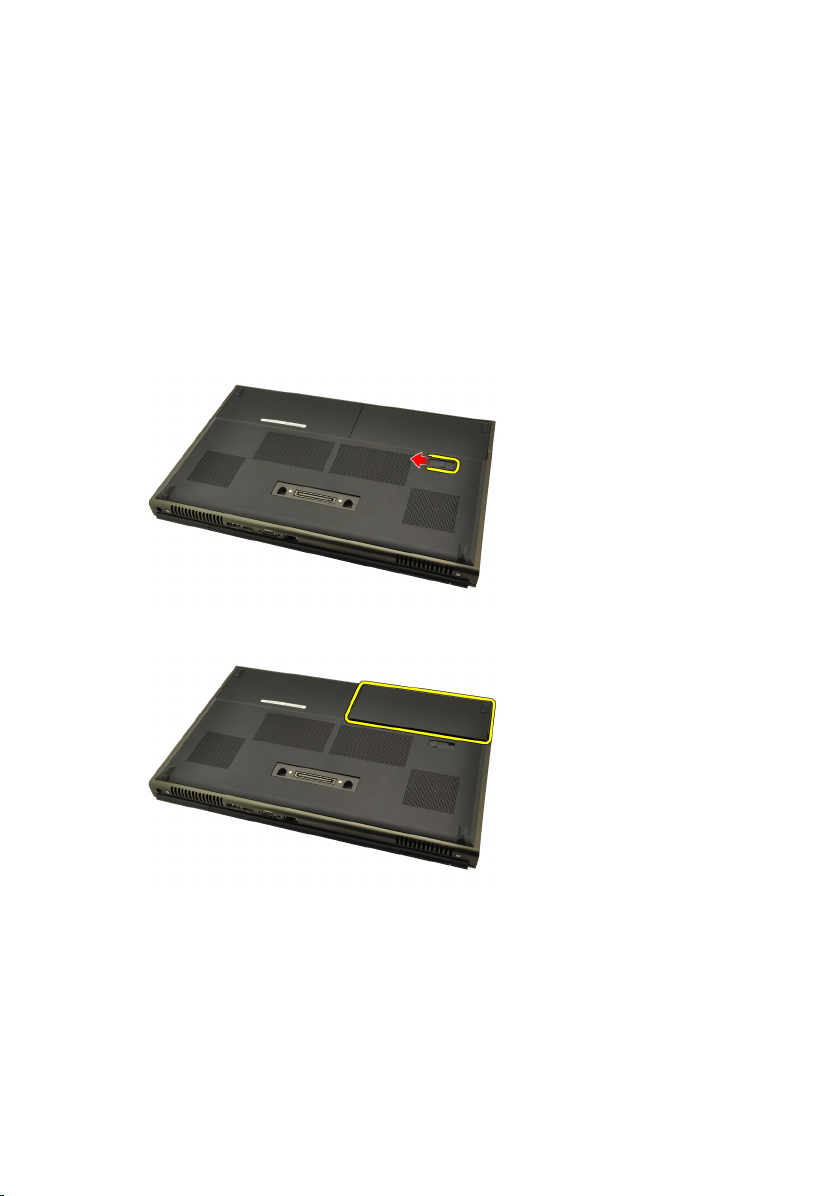
Scheda Subscriber Identity Module
(SIM) 5
Rimozione della scheda Subscriber Identity Module (SIM)
1. Seguire le procedure descritte in
computer
2. Rimuovere la
3. Far scorrere il Subscriber Identity Module (SIM) verso l'esterno
dell'alloggiamento.
4. Estrarre la scheda SIM dall'alloggiamento.
.
batteria
.
Prima di effettuare interventi sul
19

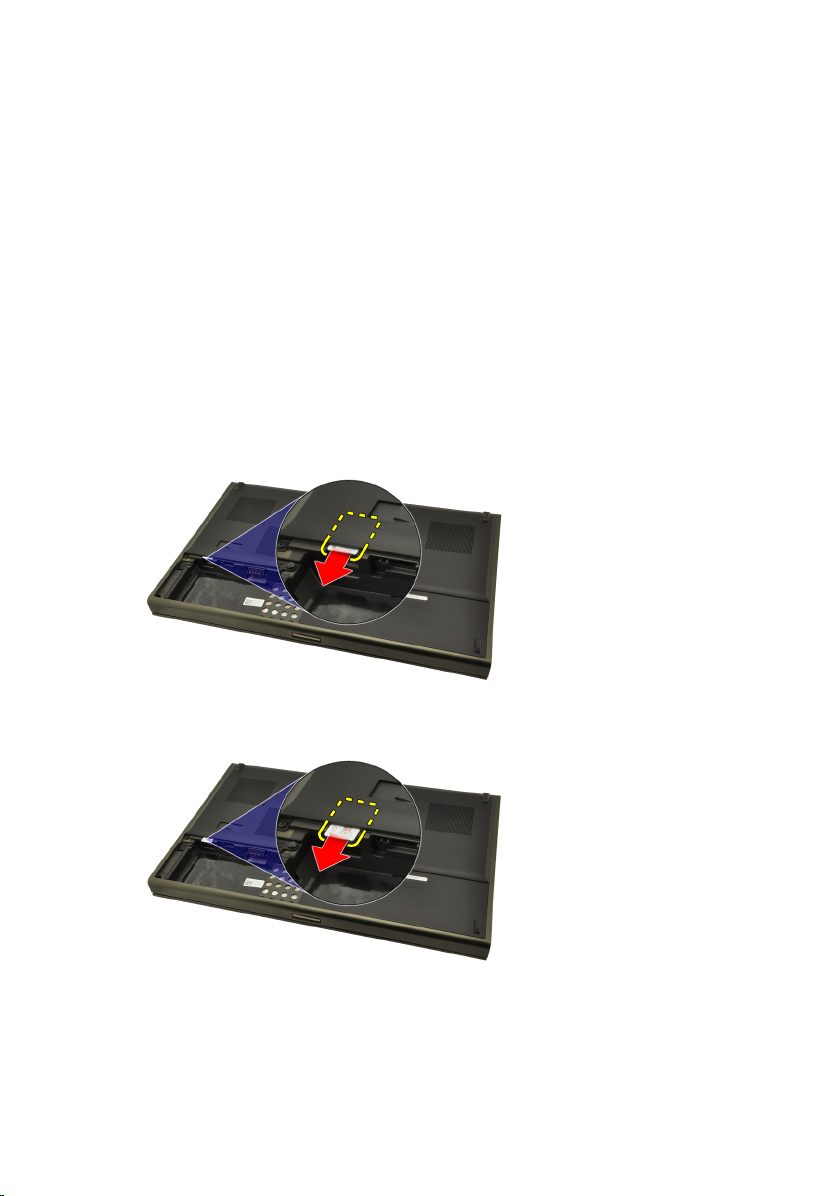
Installazione della scheda Subscriber Identity Module (SIM)
1. Individuare l'alloggiamento della scheda Subscriber Identity Module (SIM)
nel vano batteria.
2. Spingere la scheda SIM nell'alloggiamento finché non è completamente
bloccata.
3. Riposizionare la
4. Seguire le procedure descritte in
componenti interni del computer
batteria.
Dopo aver effettuato gli interventi sui
.
20
Scheda Bluetooth 6
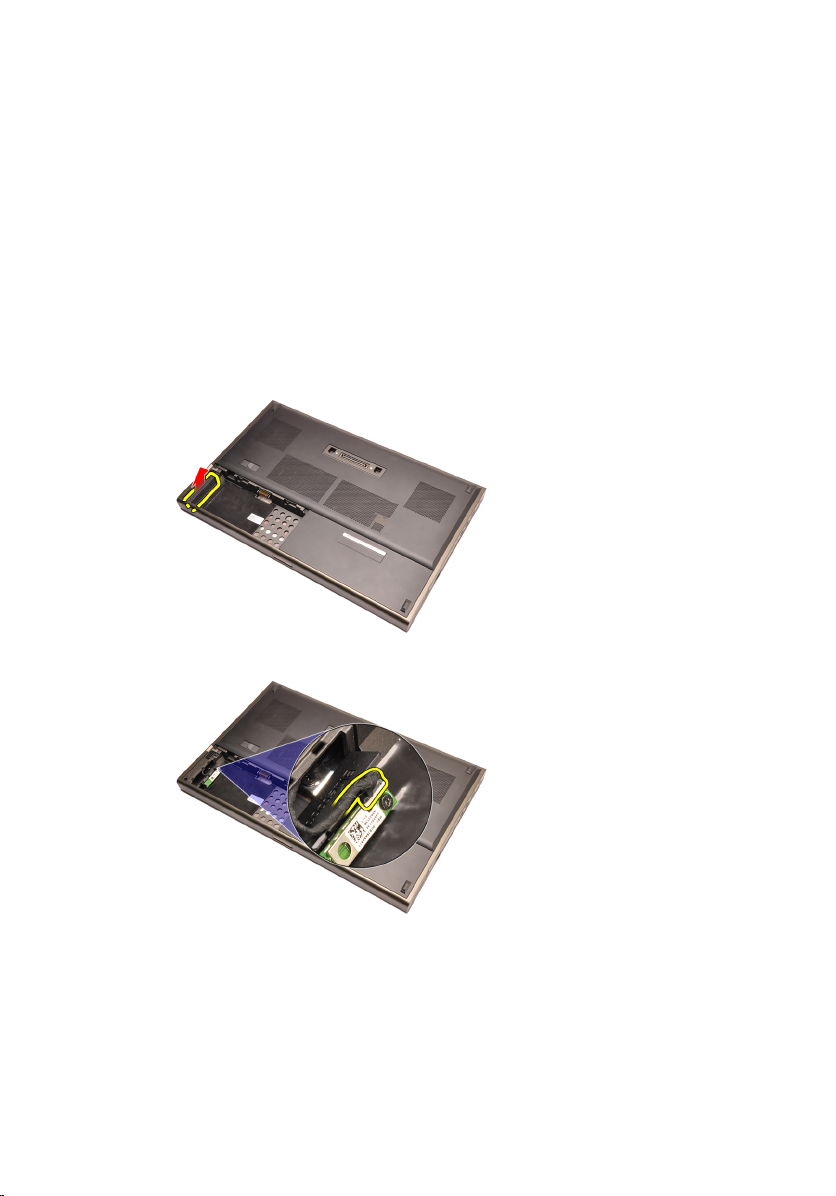
Rimozione della scheda Bluetooth
1. Seguire le procedure descritte in
computer
2. Rimuovere la
3. Far scorrere lo sportello Bluetooth verso l'alto ed estrarlo
dall'alloggiamento.
4. Scollegare il cavo Bluetooth dalla scheda Bluetooth.
.
batteria
.
Prima di effettuare interventi sul
5. Rimuovere la vite che fissa la scheda Bluetooth in posizione.
21
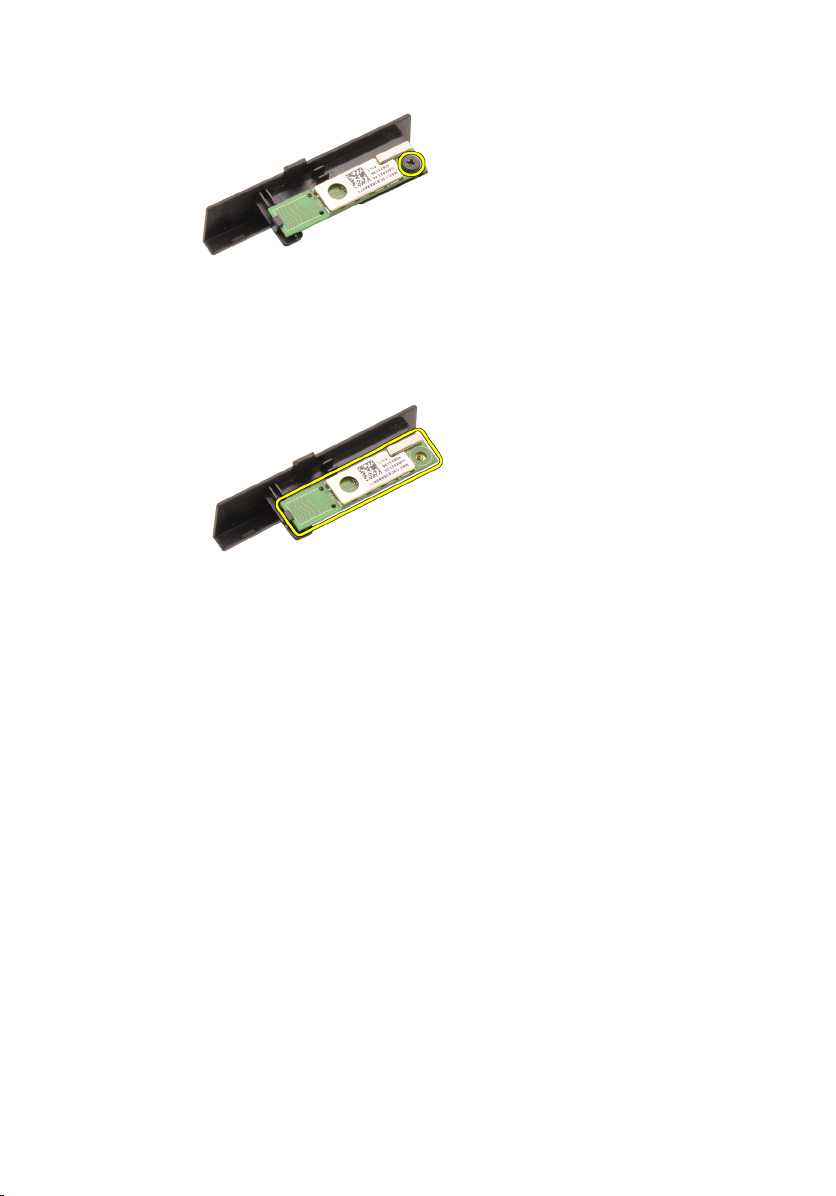
6. Rimuovere la scheda Bluetooth.
Installazione della scheda Bluetooth
1. Posizionare la scheda Bluetooth sullo sportello Bluetooth e allinearla con il
foro della vite.
2. Serrare la vite per fissare la scheda Bluetooth in posizione.
3. Collegare il cavo Bluetooth alla scheda Bluetooth.
4. Individuare l'alloggiamento dello sportello Bluetooth.
5. Far scorrere lo sportello Bluetooth nell'alloggiamento finché la linguetta
non è completamente bloccata.
6. Installare la
7. Seguire le procedure descritte in
batteria.
componenti interni del computer
22
Dopo aver effettuato gli interventi sui
.
Coperchio della base 7
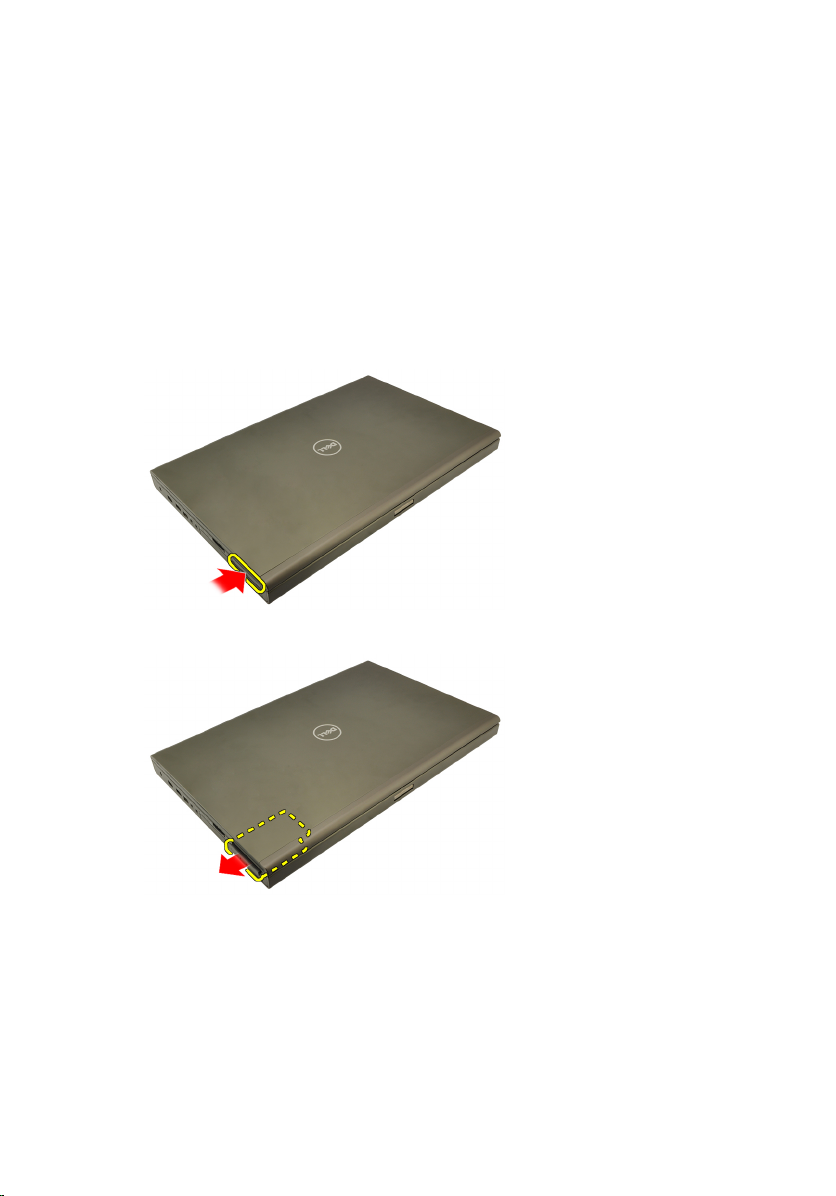
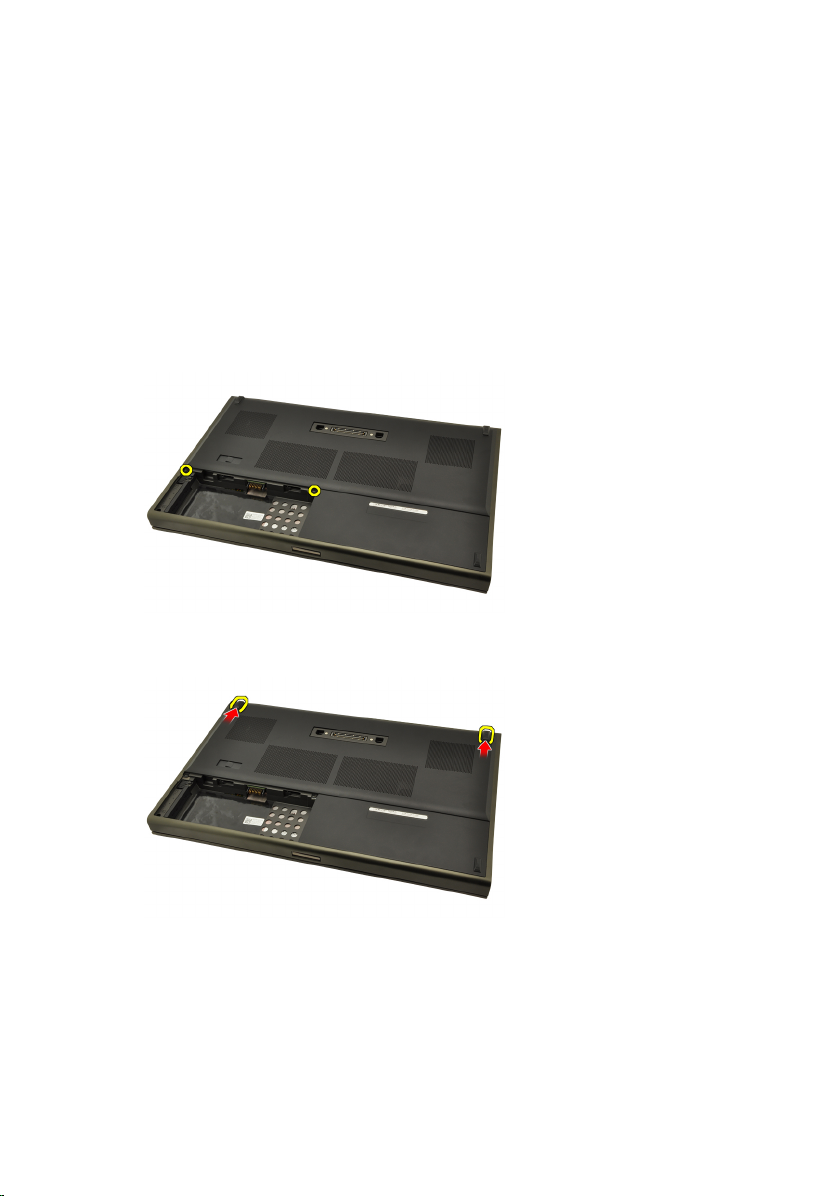
Rimozione del coperchio della base
1. Seguire le procedure descritte in
computer
2. Rimuovere la
3. Rimuovere le viti che fissano il coperchio della base al computer.
4. Premere il piedino in gomma verso la parte posteriore del computer per
sganciare lo sportello inferiore.
.
batteria
.
Prima di effettuare interventi sul
5. Rimuovere il coperchio della base dal computer.
23
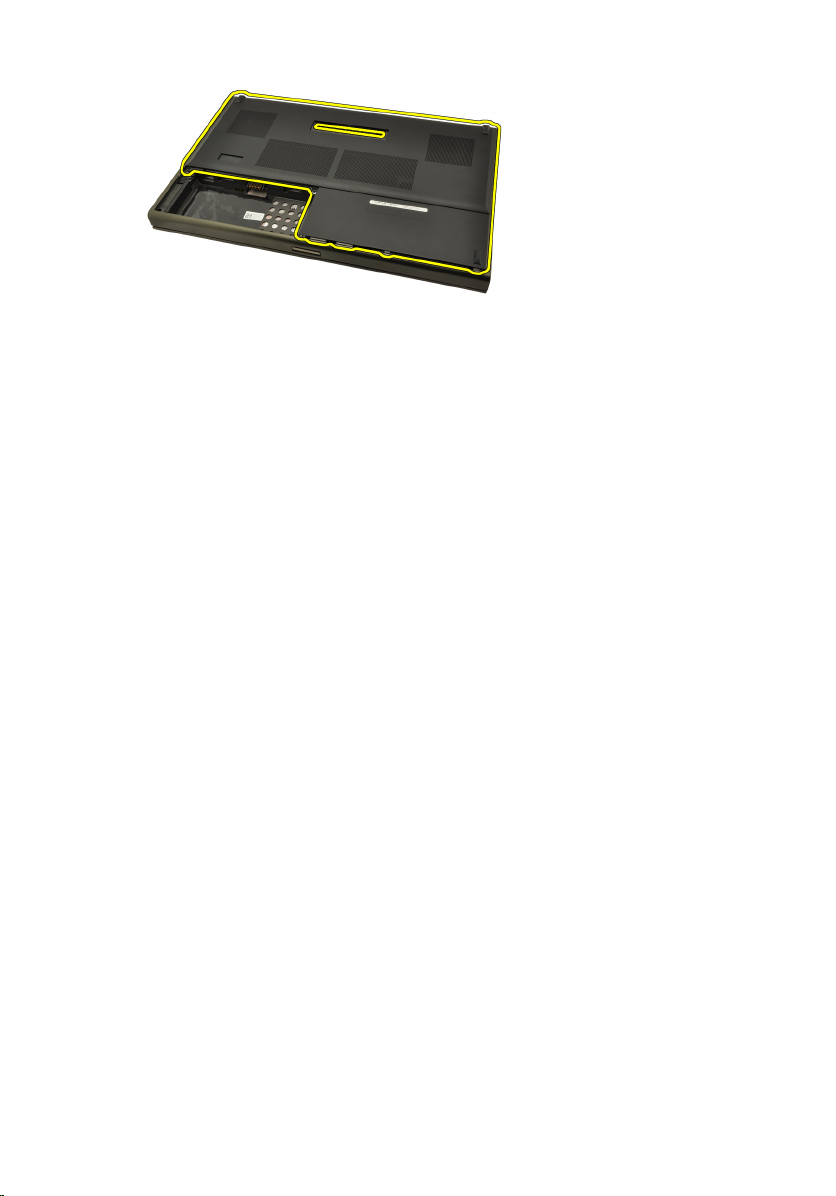
Installazione del coperchio della base
1. Far scorrere il pannello inferiore verso la parte inferiore e anteriore del
computer.
2. Serrare le viti che fissano il coperchio della base al computer.
3. Installare la
4. Seguire le procedure descritte in
componenti interni del computer
batteria.
Dopo aver effettuato gli interventi sui
.
24
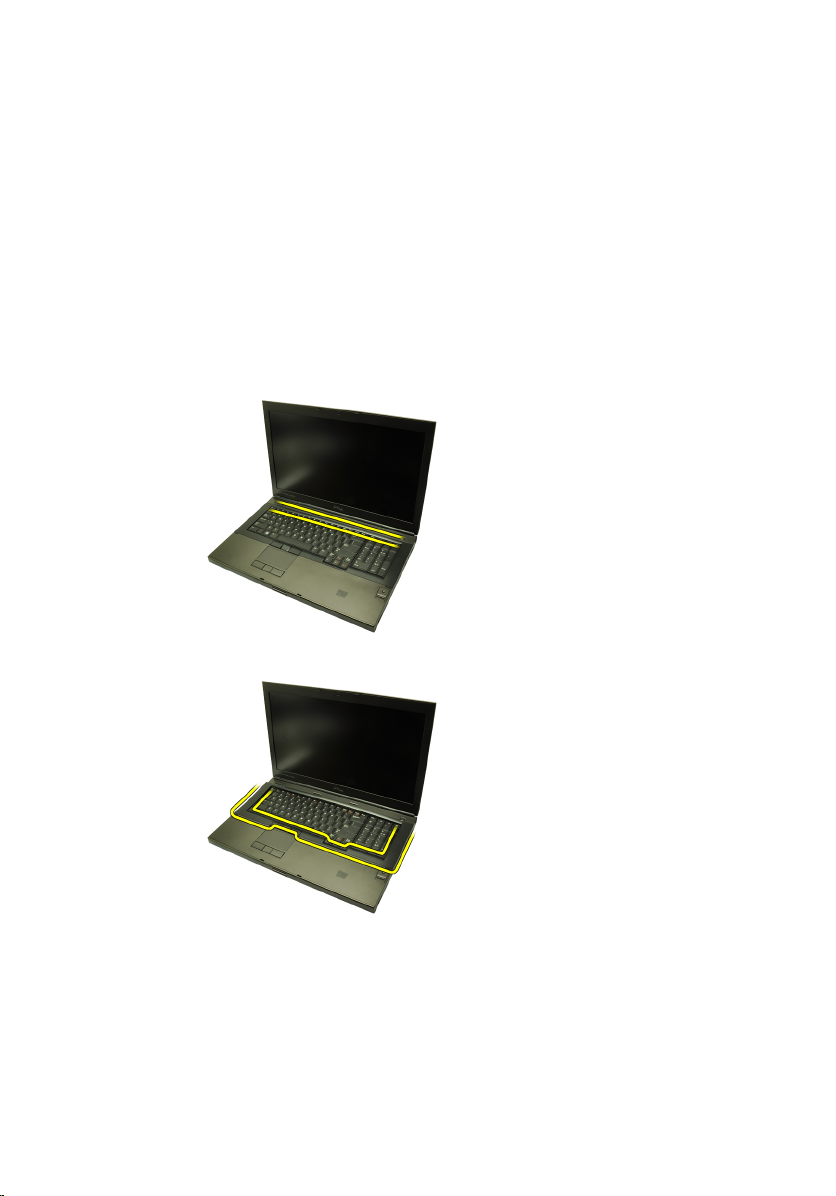
Cornice della tastiera 8
Rimozione della cornice della tastiera
1. Seguire le procedure descritte in
computer
2. Rimuovere la
3. Utilizzando un graffietto in plastica, fare leva sotto alla cornice della
tastiera per liberarla dal computer.
4. Procedere lungo i lati e il bordo inferiore della cornice della tastiera.
.
batteria
.
Prima di effettuare interventi sul
5. Sollevare per rimuovere la cornice della tastiera dall'unità.
25
Installazione della cornice della tastiera
1. Allineare la cornice della tastiera con le linguette sulla parte superiore del
supporto per i polsi.
2. Premere verso il basso lungo il bordo inferiore per agganciare le linguette
fino a udire dei clic.
3. Procedere lungo i lati e il bordo superiore della cornice della tastiera.
4. Installare la
5. Seguire le procedure descritte in
componenti interni del computer
batteria.
Dopo aver effettuato gli interventi sui
.
26
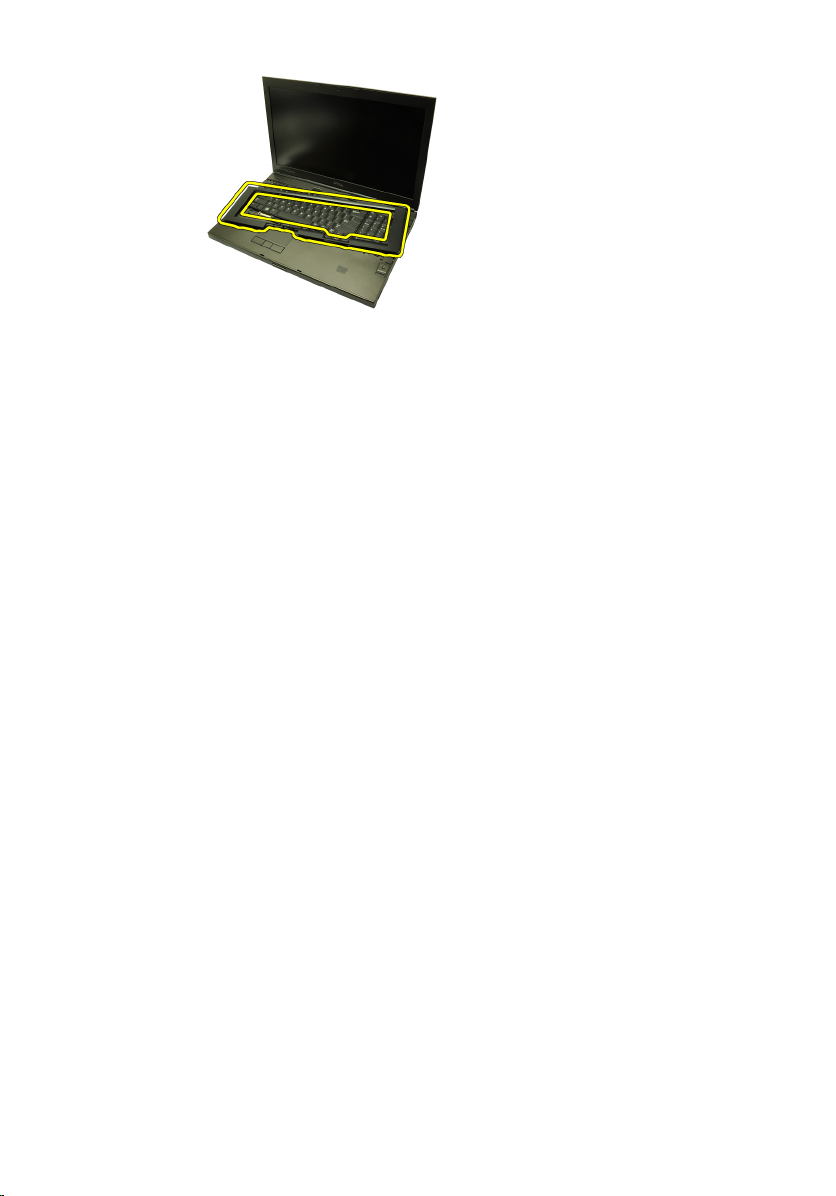
Tastiera 9
Rimozione della tastiera
1. Seguire le procedure descritte in
computer
2. Rimuovere la
3. Rimuovere la
4. Rimuovere le viti che fissano la tastiera in posizione.
5. Partendo dalla parte inferiore della tastiera, separare la tastiera dal
computer e capovolgerla.
.
batteria
cornice della tastiera
.
Prima di effettuare interventi sul
.
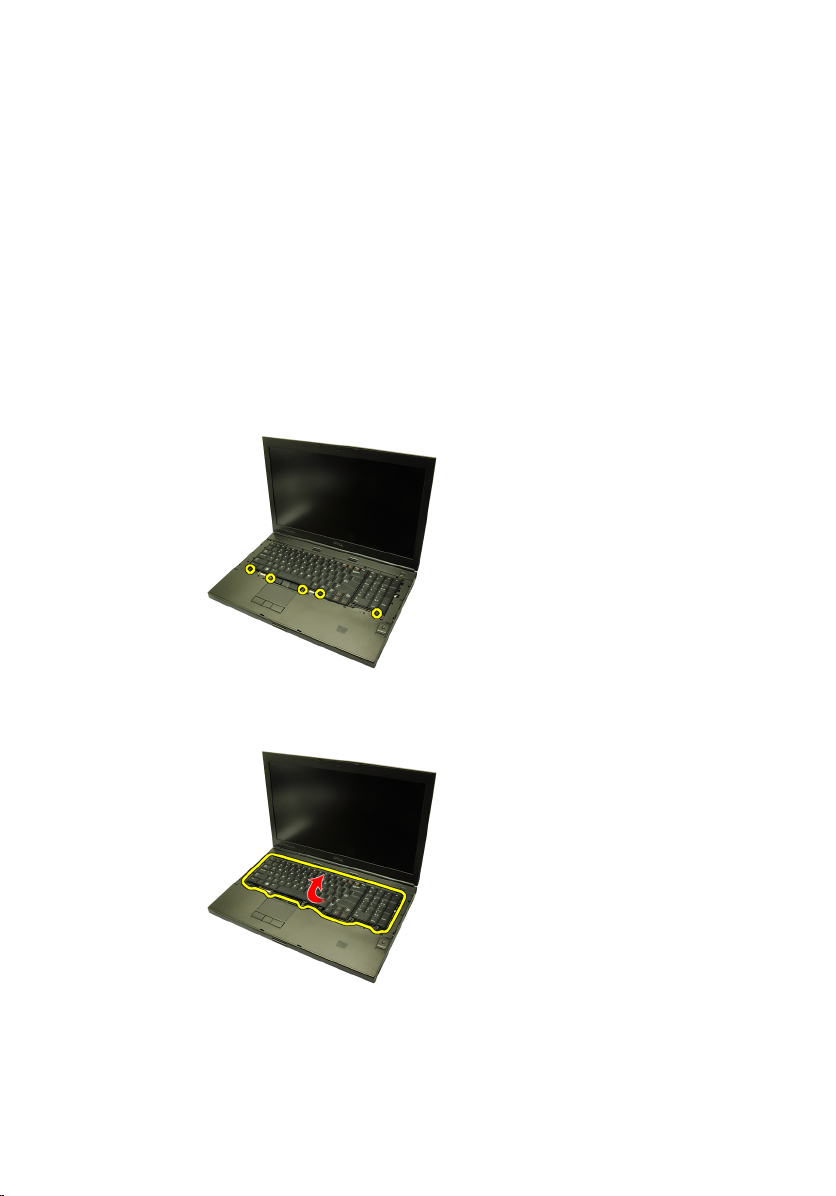
6. Scollegare il cavo dati della tastiera dalla scheda di sistema.
27
7. Rimuovere la tastiera.
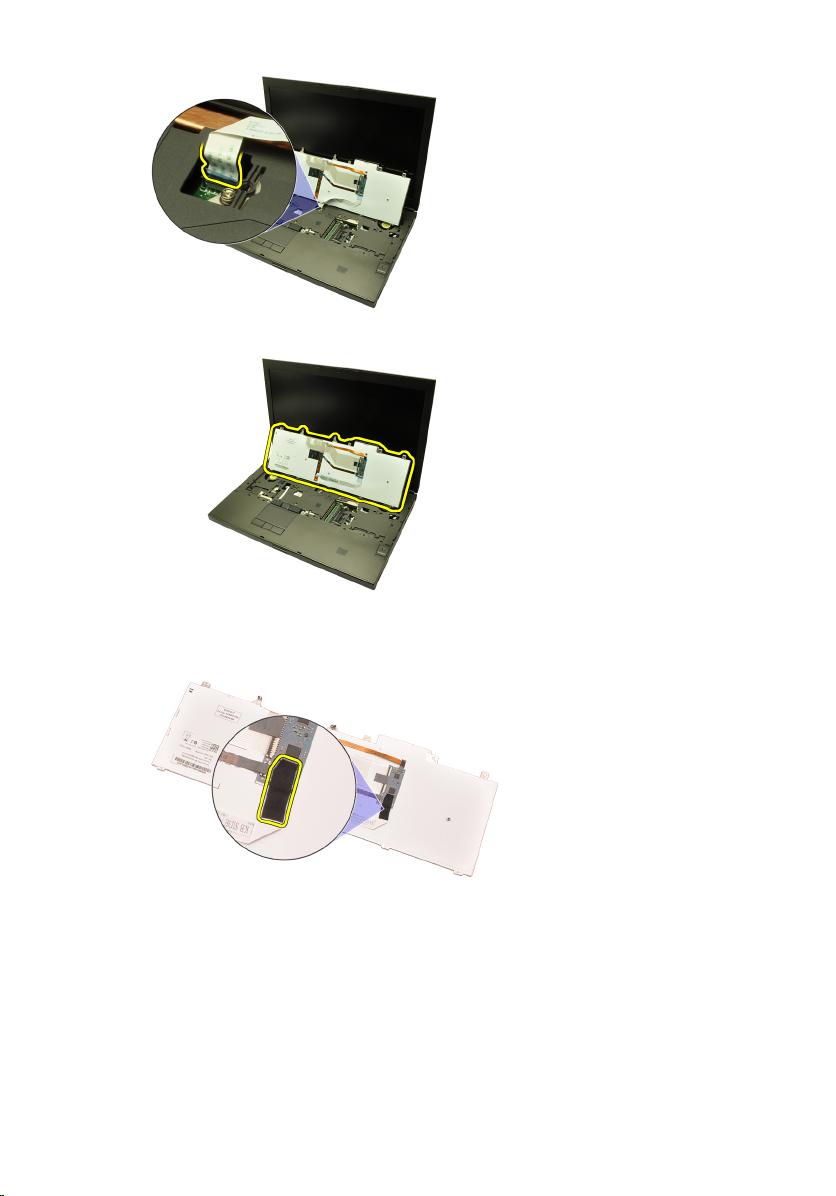
8. Rimuovere il nastro adesivo che fissa il cavo dati della tastiera al retro della
tastiera.
9. Scollegare il cavo dati della tastiera dal retro della tastiera.
28
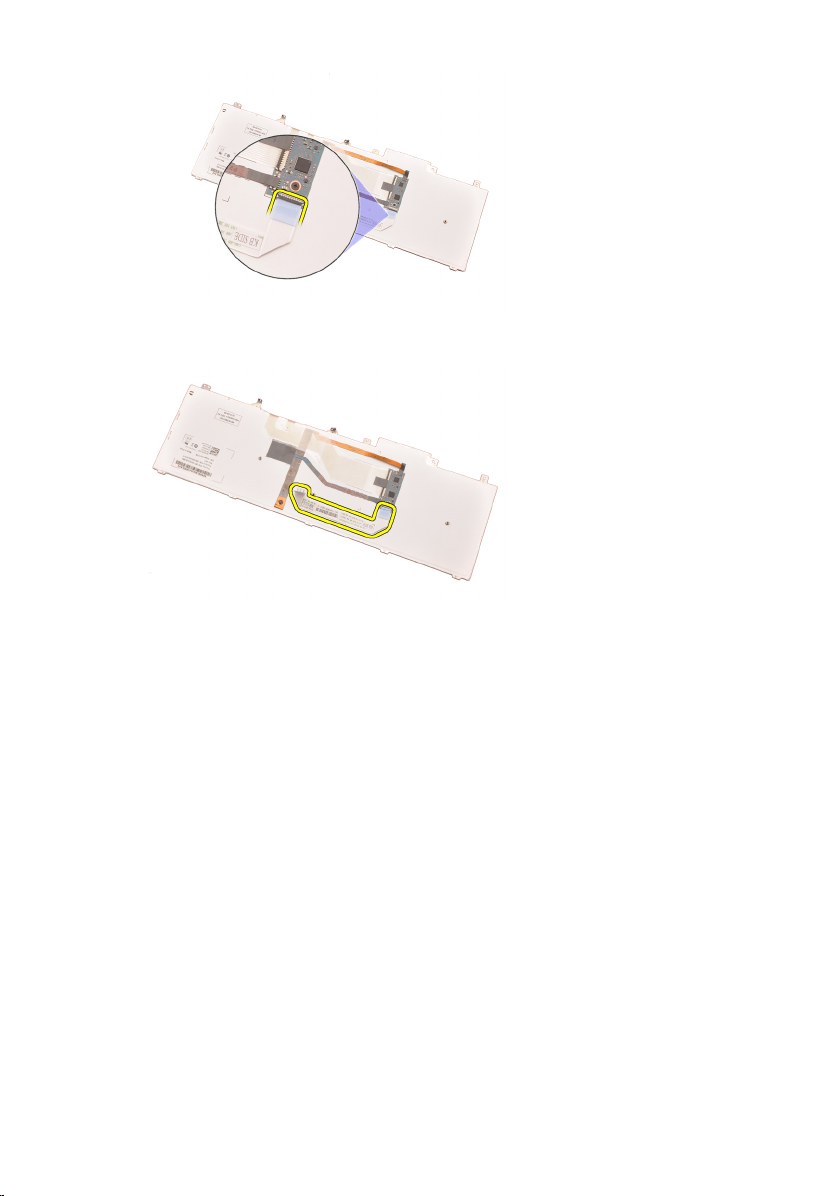
10. Staccare il cavo dati dalla tastiera e rimuoverlo.
Installazione della tastiera
1. Collegare il cavo dati della tastiera al retro della tastiera.
2. Riposizionare il nastro adesivo per fissare il cavo dati della tastiera al retro
della tastiera.
3. Collegare il cavo dati della tastiera alla scheda di sistema.
4. Posizionare la tastiera sul supporto per i polsi e allinearla con i fori delle
viti.
5. Serrare le viti della tastiera.
6. Installare la
7. Installare la
8. Seguire le procedure descritte in
cornice della tastiera
batteria.
componenti interni del computer
.
Dopo aver effettuato gli interventi sui
.
29

30
 Loading...