


Dell Precision M6600 擁有者手冊
管制型號 P10E
管制類型 P10E001

註、警示及警告
註: 「註」表示可以幫助您更有效地使用電腦的重要資訊。
警示: 「警示」表示若沒有遵從指示,可能導致硬體損壞或資料遺失。
警告: 「警告」表示有可能導致財產損失、人身傷害甚至死亡。
本出版物中的資訊如有變更,恕不另行通知。
© 2011 Dell Inc. 保留所有版權。
未經 Dell Inc. 的書面許可,不得以任何形式進行複製這些內容。
本文所使用的商標:
Latitude ON™、OptiPlex™、Vostro ™及 Wi-Fi Catcher™ 為 Dell Inc. 的商標。Intel®、Pentium®、Xeon®、
Core™、Atom™、Centrino® 及 Celeron® 為 Intel Corporation 在美國或其他國家的註冊商標或商標。
AMD® 為 Advanced Micro Devices、Inc. 的註冊商標,AMD Opteron™、AMD Phenom™、AMD Sempron™、
AMD Athlon™、ATI Radeon™ 及 ATI FirePro™ 為 Advanced Micro Devices、Inc. 的商標。Microsoft®、
Windows®、MS-DOS®、Windows Vista®、Windows Vista 開始按鈕及 Office Outlook® 為 Microsoft
Corporation 在美國及/或其他國家的商標或註冊商標。Blu-ray Disc™ 為 Blu-ray Disc Association (BDA)
所有的商標並授權予光碟及播放機使用。Bluetooth® 文字商標為 Bluetooth® SIG、Inc. 的註冊商標且
Dell Inc. 經授權使用。Wi-Fi® 為 Wireless Ethernet Compatibility Alliance、Inc. 的註冊商標。
本出版物中提及的其他商標及商品名稱是指擁有該商標及名稱或其產品的實體,Dell Inc. 對其他公司
的商標和商品名稱不擁有任何專有權益。
2011 — 06
Rev. A00
Dell™、DELL 徽標、Dell Precision™、Precision ON™、ExpressCharge™、Latitude™、

目錄
註、警示及警告..........................................................................................2
章 1: 拆裝電腦..............................................................................................9
Before Working Inside Your Computer.............................................................................9
Recommended Tools.......................................................................................................10
Turning Off Your Computer..............................................................................................11
After Working Inside Your Computer..............................................................................11
章 2: Secure Digital (SD) 卡.......................................................................13
卸下 Secure Digital (SD) 卡............................................................................................13
安裝 Secure Digital (SD) 卡............................................................................................13
章 3: ExpressCard........................................................................................15
卸下 ExpressCard...........................................................................................................15
安裝 ExpressCard...........................................................................................................15
章 4: 電池.....................................................................................................17
卸下電池.........................................................................................................................17
安裝電池.........................................................................................................................17
章 5: 用戶身份模組 (SIM) 卡...................................................................19
卸下用戶身份模組 (SIM) 卡.........................................................................................19
安裝用戶身份模組 (SIM) 卡.........................................................................................20
章 6: 藍芽卡.................................................................................................21
卸下藍芽卡....................................................................................................................21
安裝藍芽卡....................................................................................................................22
章 7: 基座護蓋............................................................................................23
卸下基座護蓋................................................................................................................23

安裝基座護蓋................................................................................................................24
章 8: 鍵盤邊條............................................................................................25
卸下鍵盤邊條................................................................................................................25
安裝鍵盤邊條................................................................................................................26
章 9: 鍵盤.....................................................................................................27
卸下鍵盤.........................................................................................................................27
安裝鍵盤.........................................................................................................................29
章 10: 光碟機...............................................................................................31
卸下光碟機....................................................................................................................31
安裝光碟機....................................................................................................................32
章 11: 主硬碟機..........................................................................................33
卸下主硬碟機................................................................................................................33
安裝主硬碟機................................................................................................................35
章 12: 次硬碟機..........................................................................................37
卸下次硬碟機................................................................................................................37
安裝次硬碟機................................................................................................................38
章 13: 無線區域網路 (WLAN) 卡.............................................................39
卸下無線區域網路 (WLAN) 卡......................................................................................39
安裝無線區域網路 (WLAN) 卡......................................................................................40
章 14: 無線廣域網路 (WWAN) 卡...........................................................41
卸下無線廣域網路 (WWAN) 卡....................................................................................41
安裝無線廣域網路 (WWAN) 卡....................................................................................42
章 15: 主記憶體..........................................................................................43
卸下主記憶體................................................................................................................43
安裝主記憶體................................................................................................................44

章 16: 次記憶體..........................................................................................45
卸下次記憶體................................................................................................................45
安裝次記憶體................................................................................................................46
章 17: CPU 風扇...........................................................................................47
卸下 CPU 風扇................................................................................................................47
安裝 CPU 風扇................................................................................................................48
章 18: 幣式電池..........................................................................................49
卸下幣式電池................................................................................................................49
安裝幣式電池................................................................................................................50
章 19: 手掌墊...............................................................................................51
卸下手掌墊....................................................................................................................51
安裝手掌墊....................................................................................................................56
章 20: CPU 和散熱器..................................................................................57
卸下 CPU 散熱器............................................................................................................57
安裝 CPU 散熱器............................................................................................................58
章 21: 處理器...............................................................................................59
卸下處理器....................................................................................................................59
安裝處理器....................................................................................................................60
章 22: 圖形卡散熱器.................................................................................61
卸下圖形卡散熱器........................................................................................................61
安裝圖形卡散熱器........................................................................................................64
章 23: 圖形卡...............................................................................................65
卸下圖形卡....................................................................................................................65
安裝圖形卡....................................................................................................................66
章 24: ExpressCard 模組............................................................................67
卸下 ExpressCard 模組..................................................................................................67

安裝 ExpressCard 模組..................................................................................................68
章 25: 輸入/輸出面板................................................................................69
卸下輸入/輸出面板.......................................................................................................69
安裝輸入/輸出面板.......................................................................................................70
章 26: DC-in 插孔........................................................................................71
卸下 DC-in 插孔..............................................................................................................71
安裝 DC-in 插孔..............................................................................................................73
章 27: 顯示器組件......................................................................................75
卸下顯示器組件............................................................................................................75
安裝顯示器組件............................................................................................................79
章 28: 主機板...............................................................................................81
卸下主機板....................................................................................................................81
安裝主機板....................................................................................................................84
章 29: 觸控螢幕顯示器前蓋....................................................................85
卸下觸控螢幕顯示器前蓋............................................................................................85
安裝觸控螢幕顯示器前蓋............................................................................................87
章 30: 觸控螢幕顯示板.............................................................................89
卸下觸控螢幕顯示板....................................................................................................89
安裝觸控螢幕顯示板....................................................................................................92
章 31: 顯示器前蓋......................................................................................93
卸下顯示器前蓋............................................................................................................93
安裝顯示器前蓋............................................................................................................94
章 32: 顯示板...............................................................................................95
卸下顯示板....................................................................................................................95
安裝顯示板....................................................................................................................97

章 33: 攝影機...............................................................................................99
卸下攝影機....................................................................................................................99
安裝攝影機..................................................................................................................100
章 34: 顯示器鉸接套管...........................................................................101
卸下顯示器鉸接套管..................................................................................................101
安裝顯示器鉸接套管..................................................................................................103
章 35: 低電壓差動訊號 (LVDS) 攝影機纜線......................................105
卸下低電壓差動訊號 (LVDS) 攝影機纜線.................................................................105
安裝低電壓差動訊號 (LVDS) 攝影機纜線.................................................................107
章 36: 規格.................................................................................................109
技術規格.......................................................................................................................109
章 37: 系統設定........................................................................................115
系統設定概觀..............................................................................................................115
進入系統設定..............................................................................................................115
系統設定程式選單選項..............................................................................................115
章 38: 診斷.................................................................................................127
裝置狀態指示燈..........................................................................................................127
電池狀態指示燈..........................................................................................................127
診斷...............................................................................................................................127
章 39: 與 Dell 公司聯絡...........................................................................131
與 Dell 公司聯絡 .........................................................................................................131

8
拆裝電腦 1
Before Working Inside Your Computer
Use the following safety guidelines to help protect your computer from potential
damage and to help to ensure your personal safety. Unless otherwise noted,
each procedure included in this document assumes that the following
conditions exist:
• You have performed the steps in Working on Your Computer.
• You have read the safety information that shipped with your computer.
• A component can be replaced or--if purchased separately--installed by
performing the removal procedure in reverse order.
警告: Before working inside your computer, read the safety information that
shipped with your computer. For additional safety best practices information, see
the Regulatory Compliance Homepage at www.dell.com/regulatory_compliance.
警示: Many repairs may only be done by a certified service technician. You should
only perform troubleshooting and simple repairs as authorized in your product
documentation, or as directed by the online or telephone service and support team.
Damage due to servicing that is not authorized by Dell is not covered by your
warranty. Read and follow the safety instructions that came with the product.
警示: To avoid electrostatic discharge, ground yourself by using a wrist grounding
strap or by periodically touching an unpainted metal surface, such as a connector
on the back of the computer.
警示: Handle components and cards with care. Do not touch the components or
contacts on a card. Hold a card by its edges or by its metal mounting bracket. Hold
a component such as a processor by its edges, not by its pins.
警示: When you disconnect a cable, pull on its connector or on its pull-tab, not on
the cable itself. Some cables have connectors with locking tabs; if you are
disconnecting this type of cable, press in on the locking tabs before you disconnect
the cable. As you pull connectors apart, keep them evenly aligned to avoid bending
any connector pins. Also, before you connect a cable, ensure that both connectors
are correctly oriented and aligned.
註: The color of your computer and certain components may appear differently than
shown in this document.
9
To avoid damaging your computer, perform the following steps before you begin
working inside the computer.
1. Ensure that your work surface is flat and clean to prevent the computer
cover from being scratched.
2. Turn off your computer (see
Turning Off Your Computer
).
3. If the computer is connected to a docking device (docked) such as the
optional Media Base or Battery Slice, undock it.
警示: To disconnect a network cable, first unplug the cable from your computer
and then unplug the cable from the network device.
4. Disconnect all network cables from the computer.
5. Disconnect your computer and all attached devices from their electrical
outlets.
6. Close the display and turn the computer upside-down on a flat work
surface.
註: To avoid damaging the system board, you must remove the main battery before
you service the computer.
7. Remove the main battery (see
Battery
).
8. Turn the computer top-side up.
9. Open the display.
10. Press the power button to ground the system board.
警示: To guard against electrical shock, always unplug your computer from the
electrical outlet before opening the display.
警示: Before touching anything inside your computer, ground yourself by touching
an unpainted metal surface, such as the metal at the back of the computer. While
you work, periodically touch an unpainted metal surface to dissipate static
electricity, which could harm internal components.
11. Remove any installed ExpressCards or Smart Cards from the appropriate
slots.
Recommended Tools
The procedures in this document may require the following tools:
• Small flat-blade screwdriver
• #0 Phillips screwdriver
• #1 Phillips screwdriver
10
• Small plastic scribe
• Flash BIOS update program CD
Turning Off Your Computer
警示: To avoid losing data, save and close all open files and exit all open programs
before you turn off your computer.
1. Shut down the operating system:
• In Windows Vista :
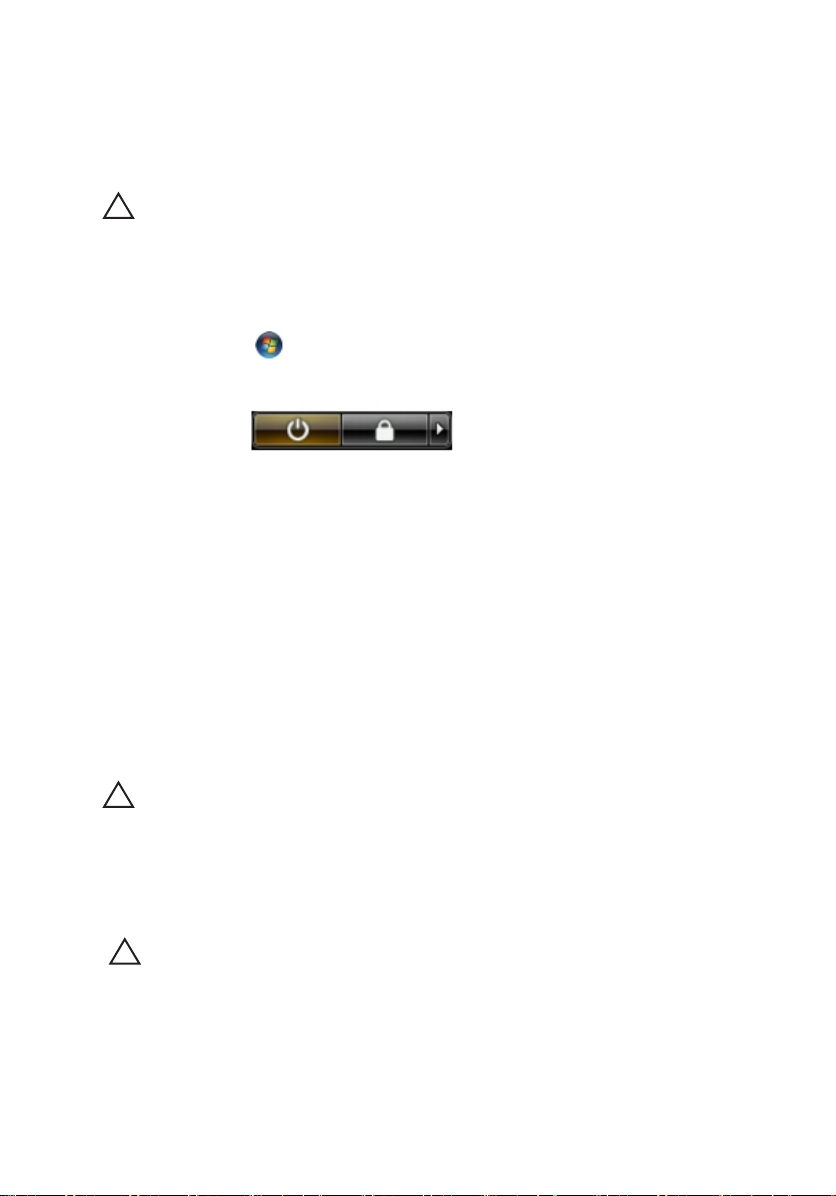
Click Start
, then click the arrow in the lower-right corner of the
Start menu as shown below, and then click Shut Down.
• In Windows XP:
Click Start → Turn Off Computer → Turn Off . The computer turns off
after the operating system shutdown process is complete.
2. Ensure that the computer and all attached devices are turned off. If your
computer and attached devices did not automatically turn off when you
shut down your operating system, press and hold the power button for
about 4 seconds to turn them off.
After Working Inside Your Computer
After you complete any replacement procedure, ensure you connect any
external devices, cards, and cables before turning on your computer.
警示: To avoid damage to the computer, use only the battery designed for this
particular Dell computer. Do not use batteries designed for other Dell computers.
1. Connect any external devices, such as a port replicator, battery slice, or
media base, and replace any cards, such as an ExpressCard.
2. Connect any telephone or network cables to your computer.
警示: To connect a network cable, first plug the cable into the network device and
then plug it into the computer.
3. Replace the battery.
4. Connect your computer and all attached devices to their electrical outlets.
5. Turn on your computer.
11

12
Secure Digital (SD) 卡 2
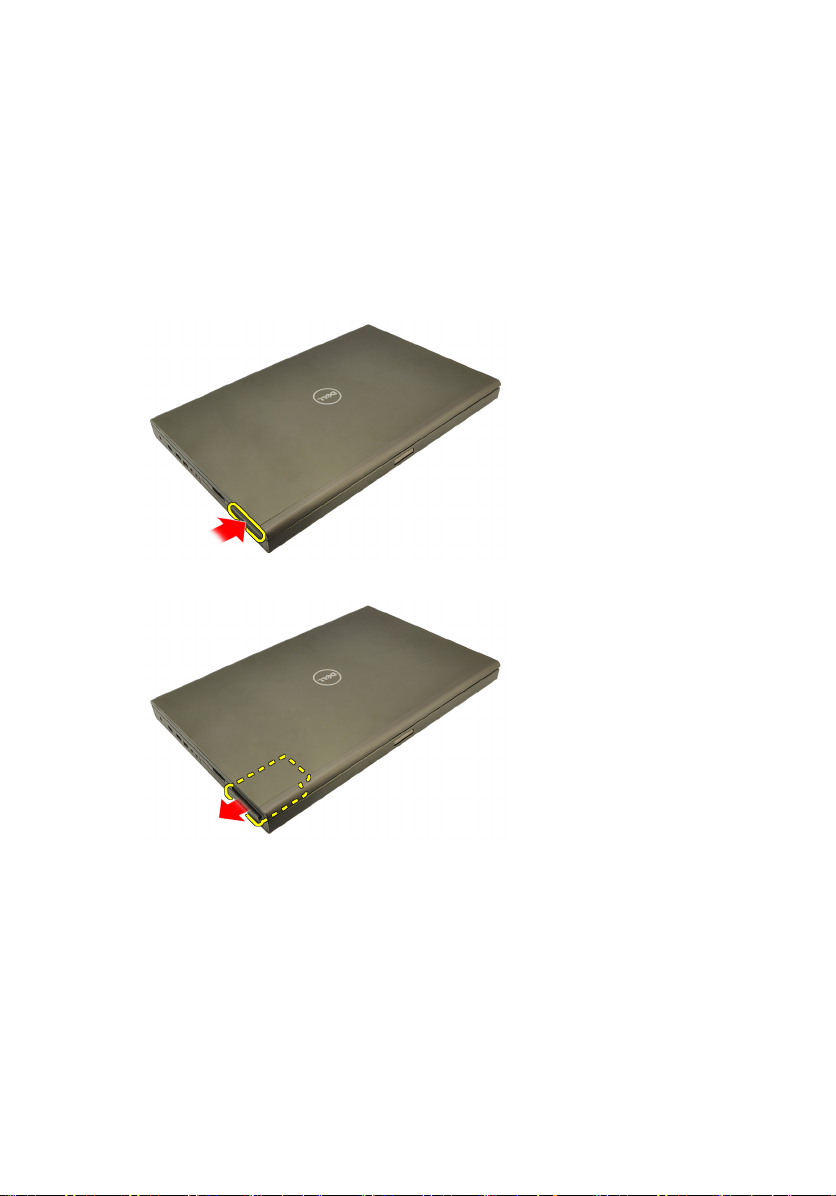
卸下 Secure Digital (SD) 卡
1. 按照
2. 向內按壓 Secure Digital (SD) 記憶卡以鬆開插卡。
3. 將 SD 記憶卡從電腦推出。
拆裝電腦內部元件之前
中的程序進行操作。
安裝 Secure Digital (SD) 卡
1. 在機箱左側找到 Secure Digital (SD) 記憶卡凹槽。
2. 將 SD 記憶卡推入凹槽,直到聽到表示完全接合的卡嗒聲。
13

14
ExpressCard 3
卸下 ExpressCard
1. 按照
2. 輕輕壓下 ExpressCard,將它從電腦釋放。
3. 握住並拉出 ExpressCard,將它從電腦取出。
拆裝電腦內部元件之前
中的程序進行操作。
安裝 ExpressCard
1. 將 ExpressCard 推入其插槽直到它卡至定位。
2. 按照
拆裝電腦內部元件之後
中的程序進行操作。
15

16
電池 4
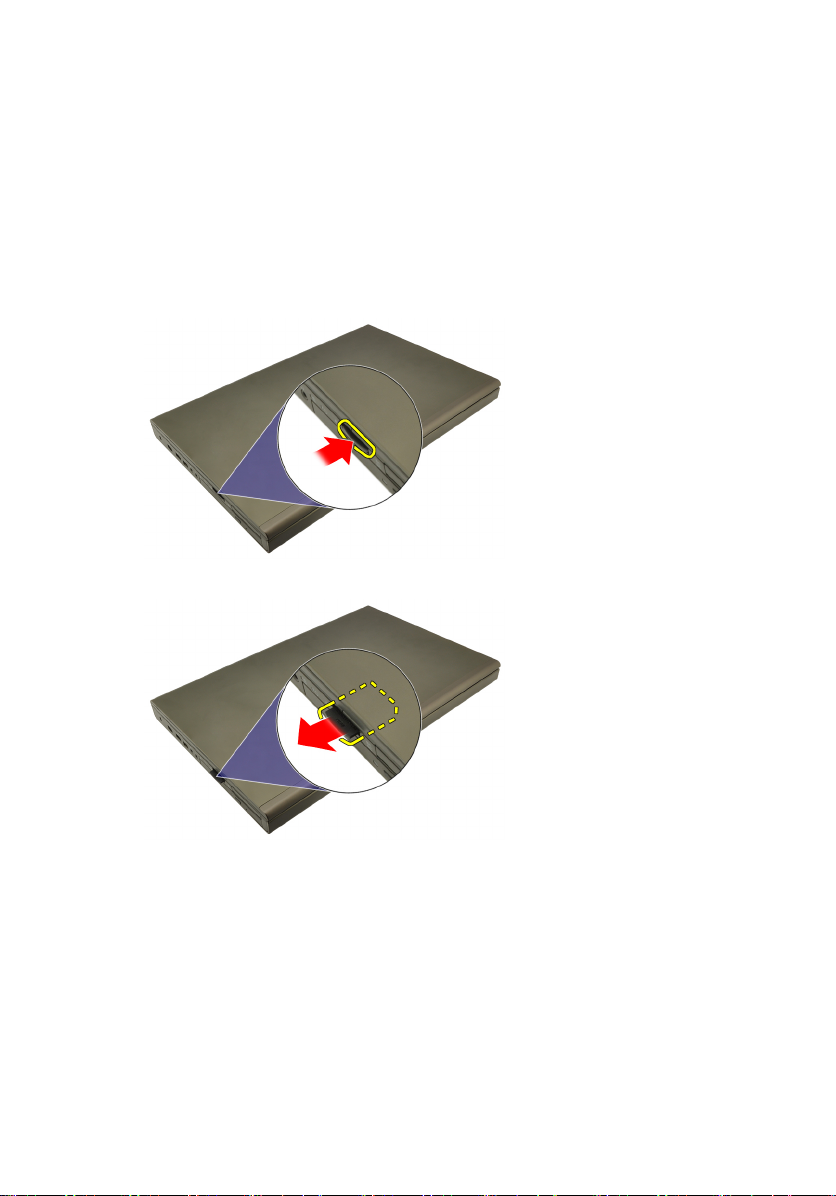
卸下電池
1. 按照
2.
3.
拆裝電腦內部元件之前
將電池釋放閂鎖滑到解除鎖定位置。
從電腦卸下電池。
中的程序進行操作。
安裝電池
將電池裝回電腦。
1.
電池釋放閂鎖會自動卡回鎖定位置。
2.
3. 按照
拆裝電腦內部元件之後
中的程序進行操作。
17

18
用戶身份模組 (SIM) 卡 5
卸下用戶身份模組 (SIM) 卡
1. 按照
2. 卸下
3. 將用戶身份模組 (SIM) 卡往插槽外滑出。
4. 從插槽拉出 SIM 卡。
拆裝電腦內部元件之前
電池
。
中的程序進行操作。
19

安裝用戶身份模組 (SIM) 卡
1. 在電池凹槽找出安裝用戶身份模組 (SIM) 卡插槽。
2. 將 SIM 卡推入插槽,直到它完全接合。
3. 裝回
4. 按照
電池
。
拆裝電腦內部元件之後
中的程序進行操作。
20
藍芽卡 6
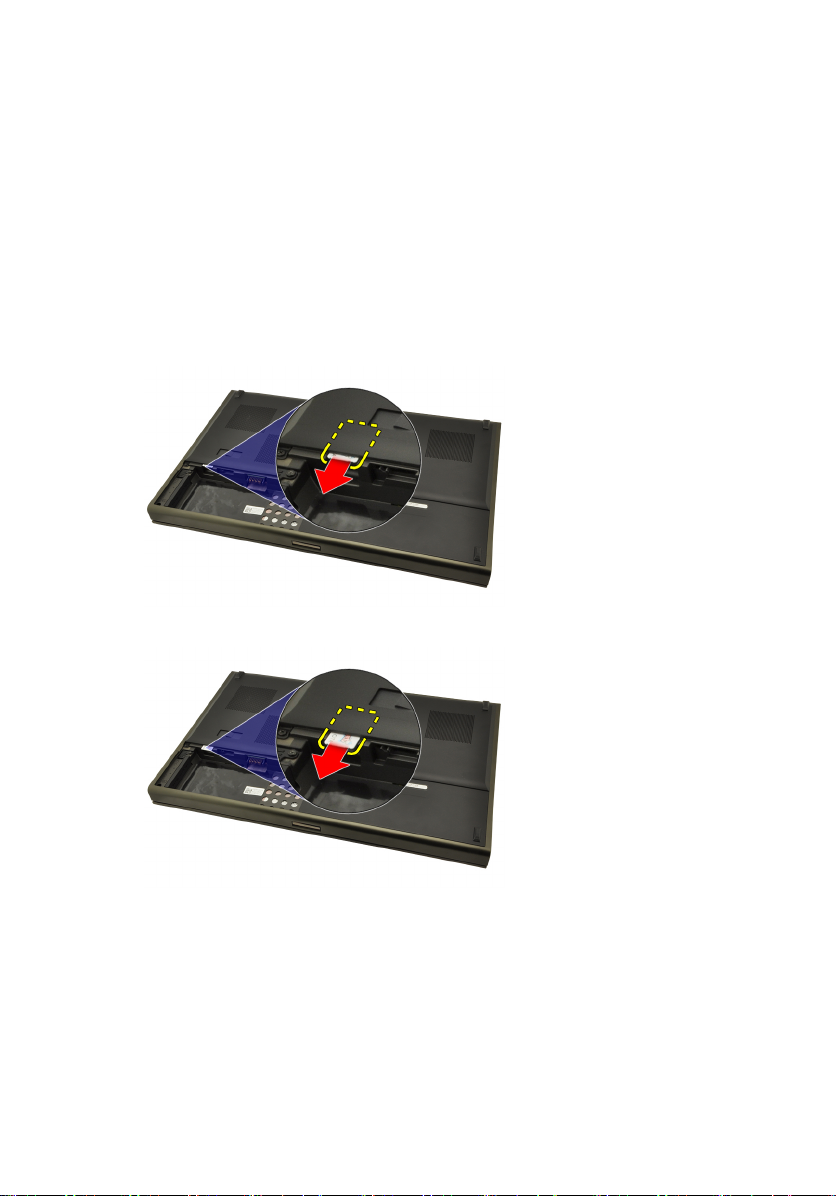
卸下藍芽卡
1. 按照
2. 卸下
3.
4.
拆裝電腦內部元件之前
電池
。
將藍芽卡蓋向上滑動並從插槽取下。
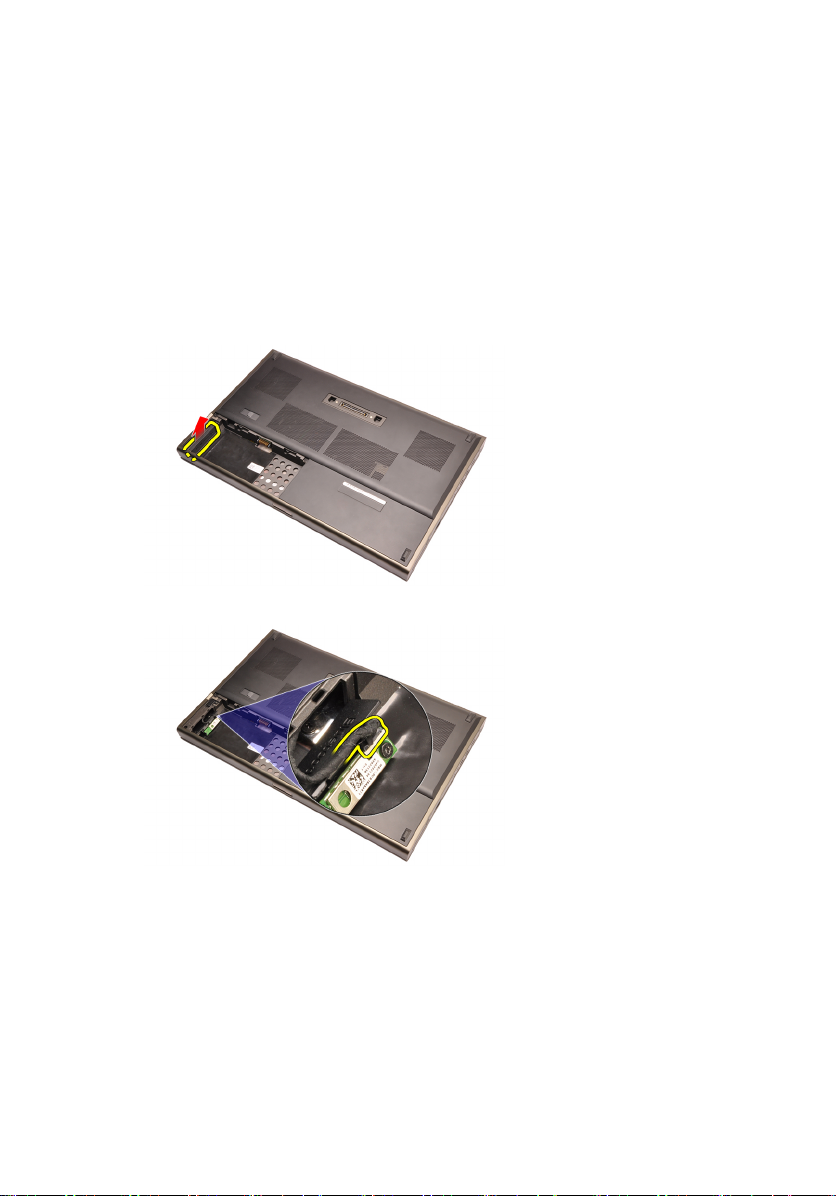
將藍芽纜線從藍芽卡拔下。
中的程序進行操作。
卸下將藍芽卡固定到位的單顆螺絲。
5.
21
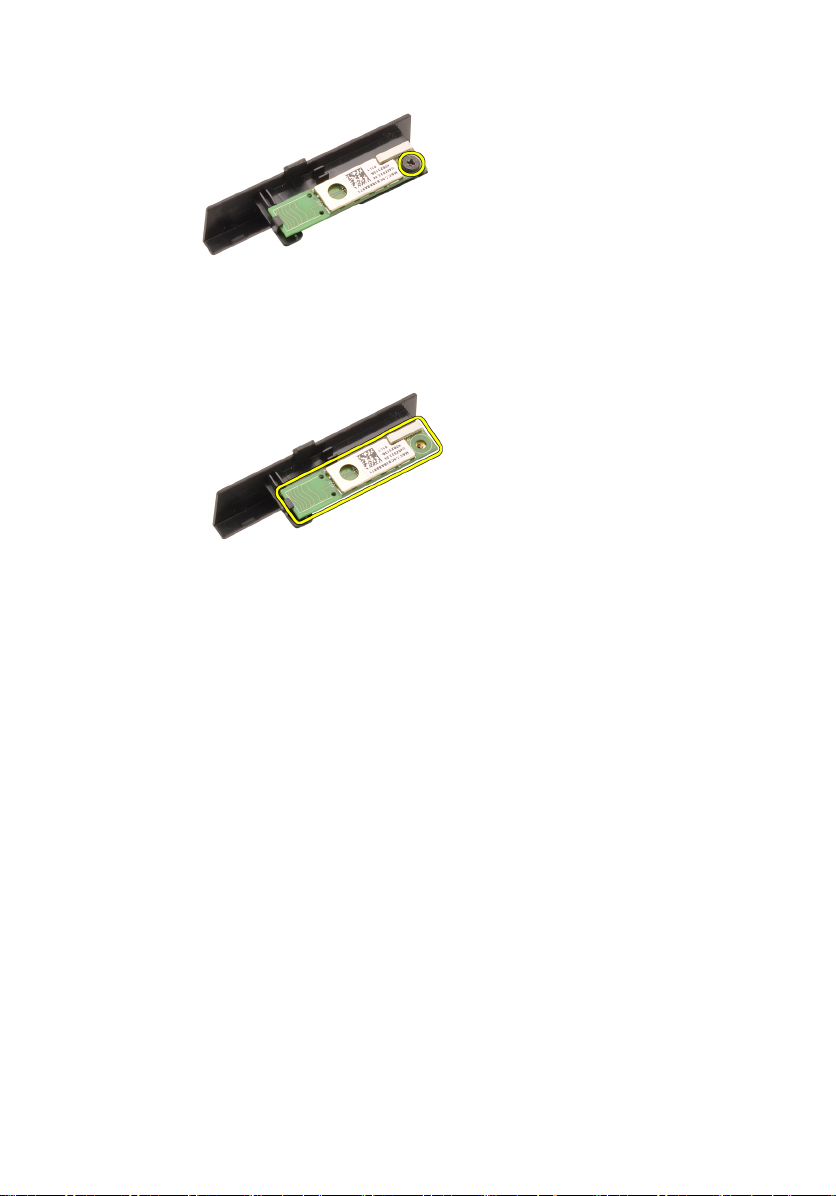
卸下藍芽卡。
6.
安裝藍芽卡
將藍芽卡置於藍芽卡蓋上並對齊螺絲孔。
1.
旋緊將藍芽卡固定到位的螺絲。
2.
將藍芽纜線連接至藍芽卡。
3.
找到藍芽卡蓋凹槽。
4.
將藍芽卡蓋滑入凹槽,直到彈片完全接合。
5.
6. 安裝
7. 按照
電池
。
拆裝電腦內部元件之後
中的程序進行操作。
22
基座護蓋 7
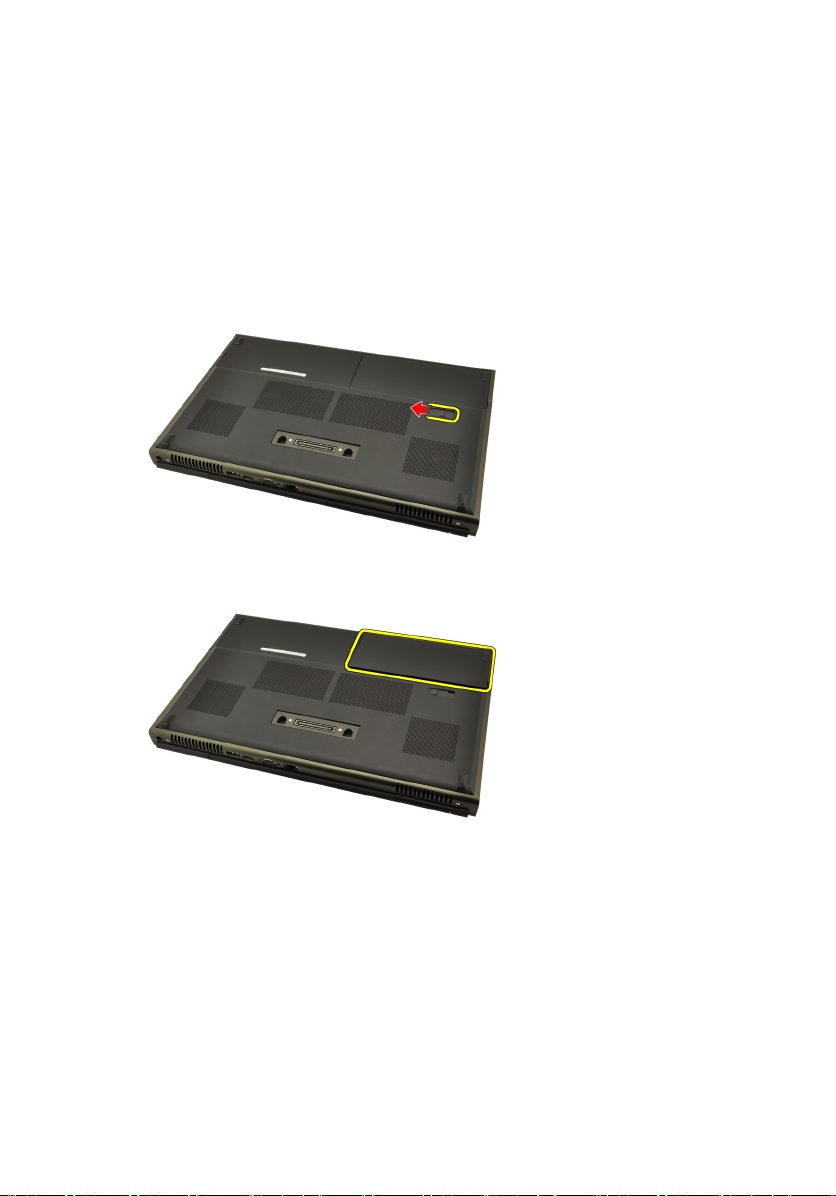
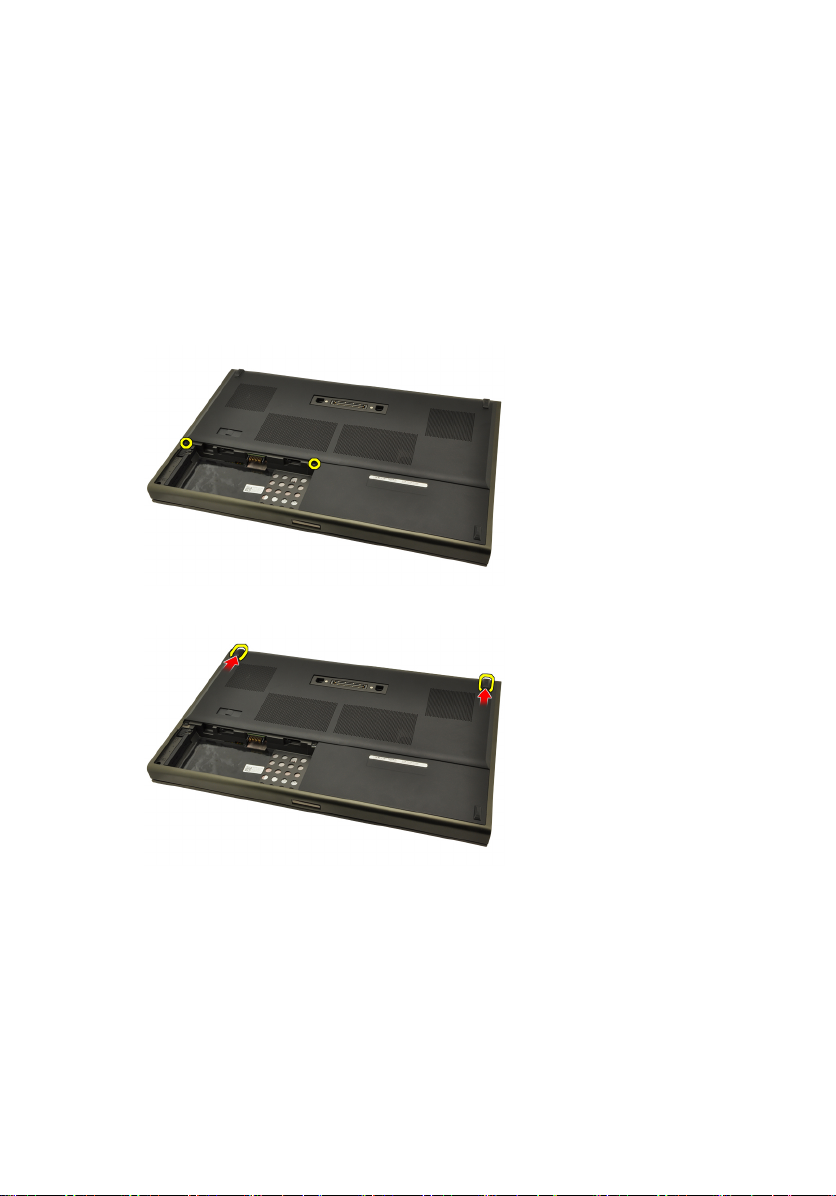
卸下基座護蓋
1. 按照
2. 卸下
3.
4.
拆裝電腦內部元件之前
電池
。
卸下用來將基座護蓋固定至電腦的螺絲。
朝電腦後側按壓橡膠腳墊,以鬆開底蓋。
中的程序進行操作。
從電腦中卸下基座護蓋。
5.
23

安裝基座護蓋
將底蓋向下推動,然後朝電腦正面推動。
1.
旋緊用來將基座護蓋固定至電腦的螺絲。
2.
3. 安裝
4. 按照
電池
。
拆裝電腦內部元件之後
中的程序進行操作。
24
鍵盤邊條 8
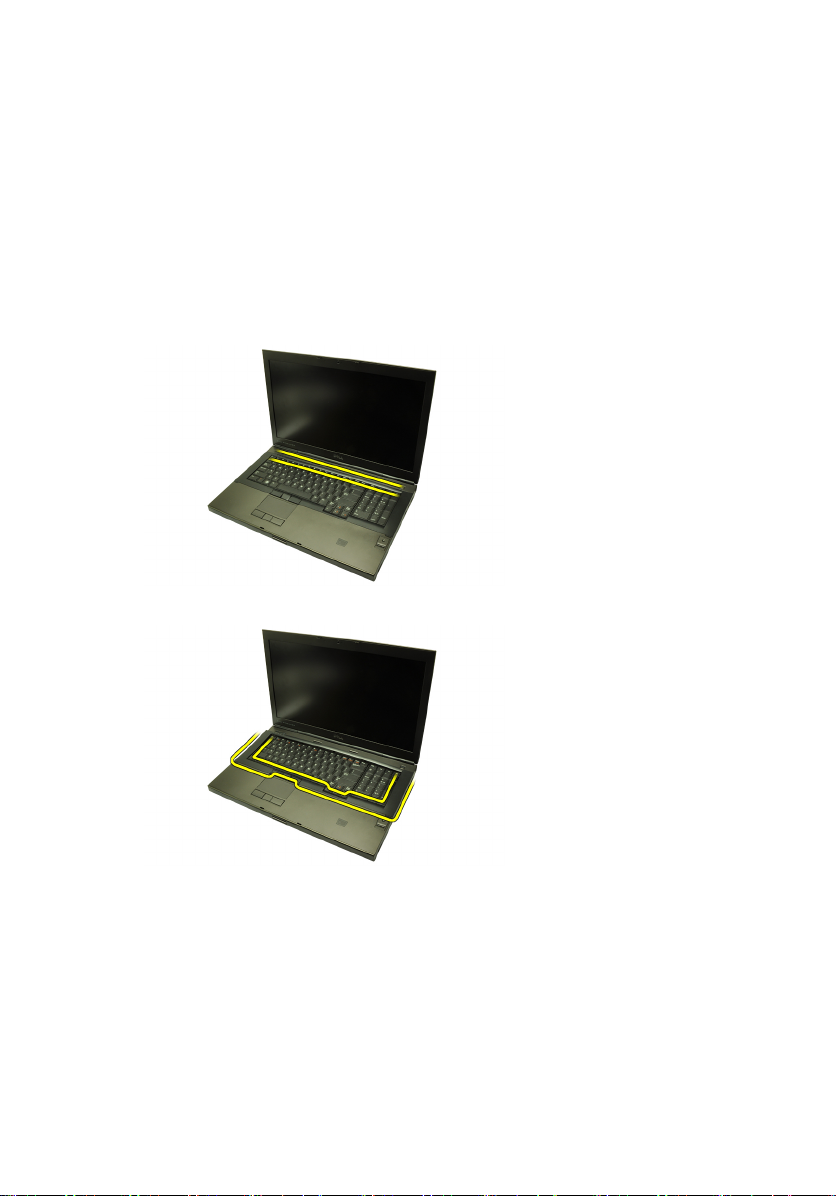
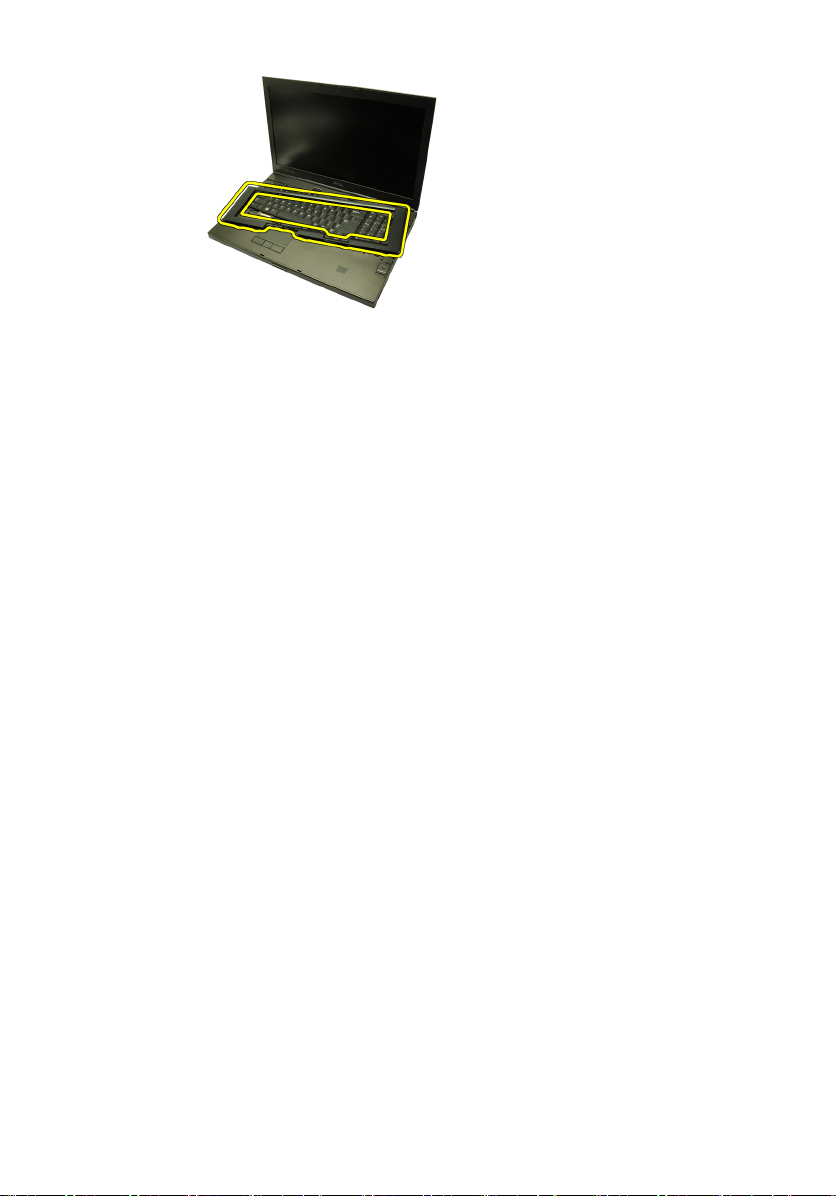
卸下鍵盤邊條
1. 按照
2. 卸下
3.
4.
拆裝電腦內部元件之前
電池
。
使用塑膠劃線器,將鍵盤邊條從底部撬開,使它從電腦鬆開。
沿著鍵盤邊條兩側和底緣作業。
中的程序進行操作。
從電腦抬起並取出鍵盤邊條。
5.
25
安裝鍵盤邊條
將鍵盤邊條對齊手掌墊頂部的彈片。
1.
沿著底緣壓下以接合彈片,直至聽到喀嗒聲。
2.
沿著鍵盤邊條兩側和頂緣壓下。
3.
4. 安裝
5. 按照
電池
。
拆裝電腦內部元件之後
中的程序進行操作。
26
鍵盤 9
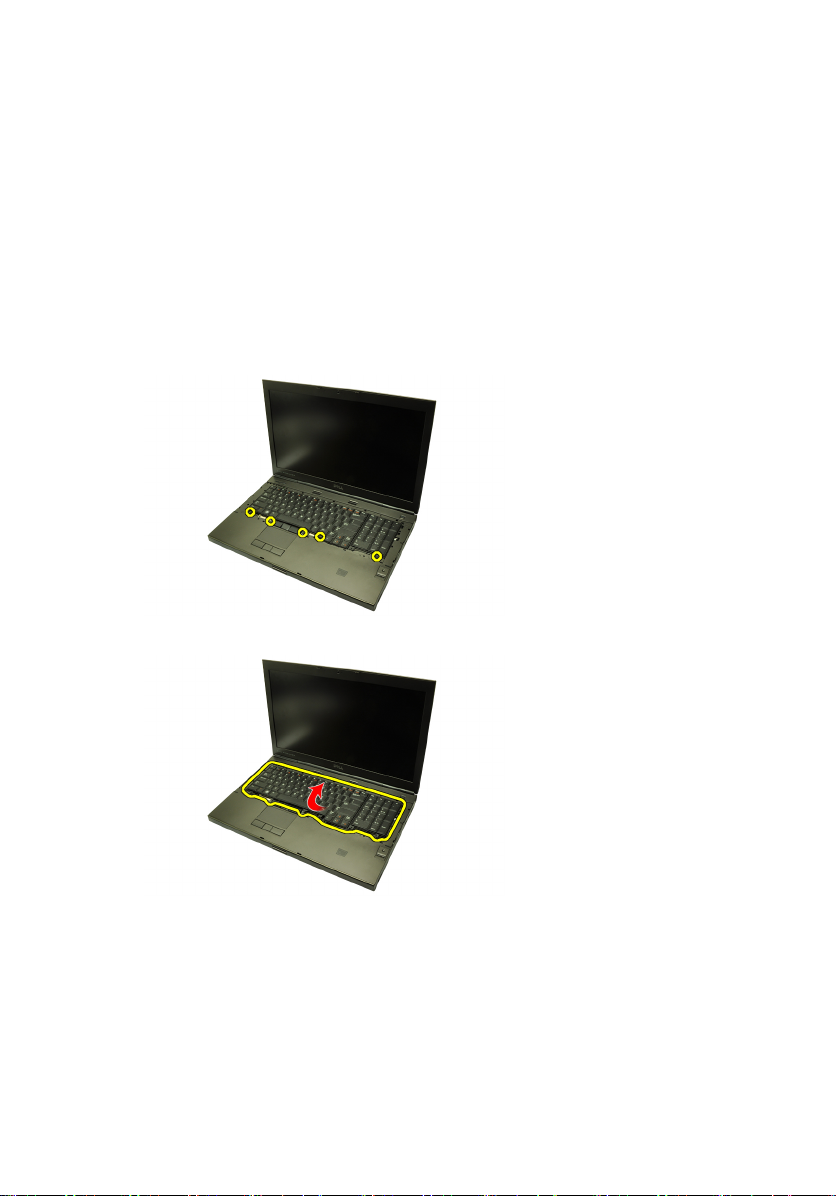
卸下鍵盤
1. 按照
2. 卸下
3. 卸下
4.
5.
拆裝電腦內部元件之前
電池
。
鍵盤邊條
卸下將鍵盤固定到位的螺絲。
從鍵盤底部開始,從電腦拔下鍵盤並將鍵盤翻轉過來。
。
中的程序進行操作。
從主機板上拔下鍵盤資料纜線。
6.
27
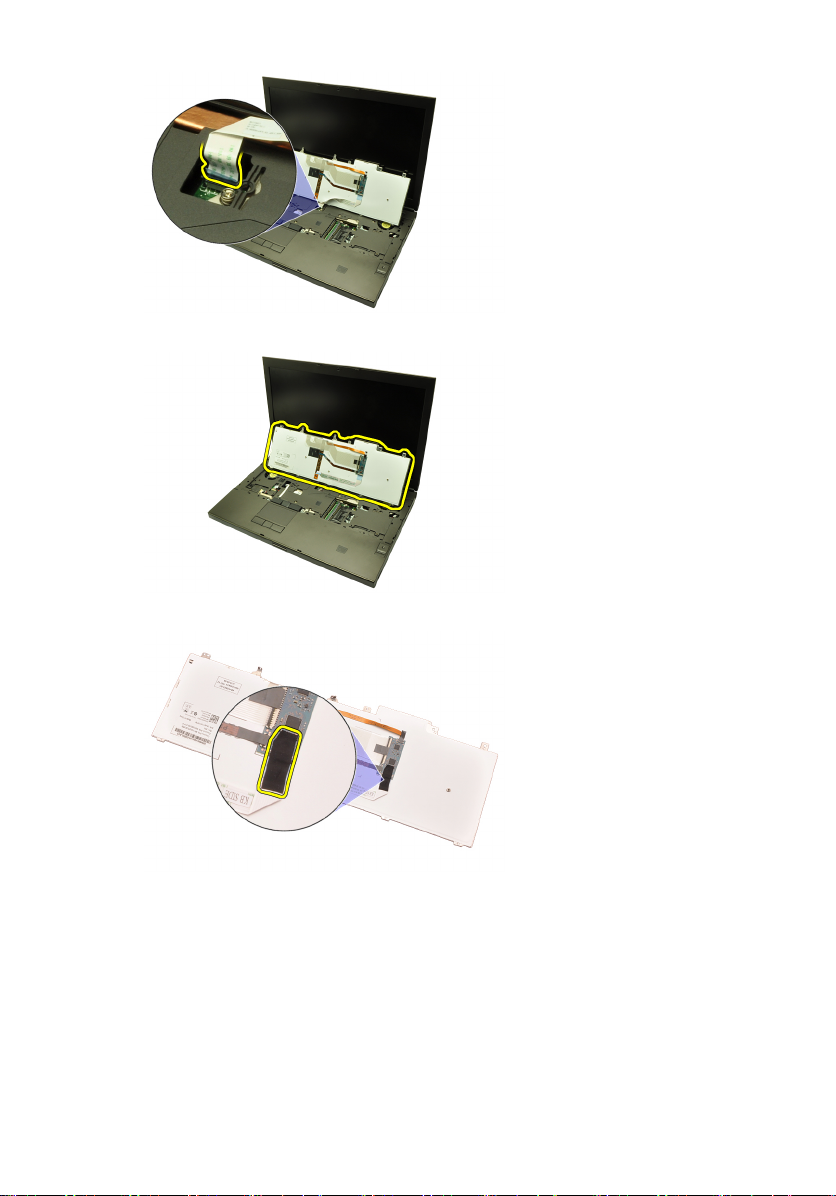
卸下鍵盤。
7.
剝除用來將鍵盤資料纜線固定至鍵盤背面的膠帶。
8.
從鍵盤背面拔下鍵盤資料纜線。
9.
28

從鍵盤剝開並取下鍵盤資料纜線。
10.
安裝鍵盤
將鍵盤資料纜線連接至鍵盤背面。
1.
貼回用來將鍵盤資料纜線固定至鍵盤背面的膠帶。
2.
將鍵盤資料纜線連接至主機板。
3.
將鍵盤置於手掌墊上,並對齊螺絲孔。
4.
旋緊鍵盤螺絲。
5.
6. 安裝
7. 安裝
8. 按照
鍵盤邊條
電池
。
。
拆裝電腦內部元件之後
中的程序進行操作。
29

30
 Loading...