

Page 1
Dell™ Latitude ON™ Flash Help
Setting Up Dell Latitude ON Flash
Configuring Network Settings
Configuring Remote Connections
Using "Chat" Instant Messaging
Setting Up your Latitude ON Flash Email
Using the LaunchBar
Using the Settings Panel
Latitude ON / Power button behavior
Hot Keys Supported in Latitude ON Flash
Getting the Source Code
Acknowledgements
NOTE: Latitude ON and Precision ON are used interchangeably depending upon the system. In this document, we use the term "Latitude ON" to refer to both the Latitude ON and Precision ON features.
NOTE: For quick answers to the most commonly asked questions, please visit http://support.dell.com. Go to Product Support > Troubleshooting and enter the requested information to view the FAQs for Latitude
ON Flash.
Information in this document is subject to change without notice.
© 2009 Dell Inc. All rights reserved. Printed in the U.S.A.
Trademarks used in this text: Dell, the DELL logo, Dell Precision, and Latitude ON are trademarks of Dell Inc.; Microsoft and Windows are either registered trademarks or trademarks of Microsoft Corporation in the United States
and/or other countries.
Splashtop and the Splashtop logo are registered trademarks of DeviceVM, Inc., in the U.S. and elsewhere.
Other trademarks and trade names may be used in this document to refer to either the entities claiming the marks and names or their products. Dell Inc. disclaims any proprietary interest in trademarks and trade names other
than its own.
For additional regulatory information, see the Regulatory Compliance Homepage at the following location: www.dell.com/regulatory_compliance.
For a list of included third-party software, please view the Credits file at http://www.splashtop.com/dellcommercial/cm/credits.html.
Initial release: October 2009
Page 2
Back to Contents Page
Setting Up Dell™ Latitude ON™ Flash
To use Account Setup in Windows:
If you have not yet created a Latitude ON Flash user account, then after you have booted your computer to the Windows®
operating system, a Welcome message box informs you that Latitude ON™ Flash is installed on the computer, and invites you
to use it. First, you will need to create an account for use with Latitude ON Flash.
1. Click the Set Up Now button. The Account Setup dialog box will open. Your current Windows User Name is shown in
the Account Setup dialog box. This name will be used for your Latitude ON Flash user account.
2. Enter a password for use with Latitude ON Flash. To view the rules for password creation, click the question mark
icon in the Account Setup dialog box.
3. Type the password again in the Confirm field.
4. Click OK. The First-Time Wizard will run, as explained below.
To use Account Setup in Latitude ON Flash:
Press the Latitude ON button ( ) on your keyboard. If you have not yet created a Latitude ON Flash user account, a
message displays and offers two choices for creating your account:
The first option is "Create an account using your Windows login name." This is the recommended method. If you
select this button and then click Set Up Now, your computer will restart and boot to the Windows OS. You can then
select Start Menu > Programs > Dell Latitude ON Flash Tool > Dell Latitude ON Configuration Utility and
create your account as described above. Your Windows login name will be used as your Latitude ON Flash user name,
and you only need to create a password.
Alternatively, you can click the second button. This option uses the default name "User" in Latitude ON Flash. This
option will not allow you to use your Windows login name and password. Click Set Up Now and create your
password. To view the rules for password creation, click the question mark
box. After you create a password and click OK, the First-Time Wizard runs.
icon in the Account Setup dialog
First-Time Wizard
After you have created the account, the First-Time Wizard will be launched. It allows you to set some initial preferences. You
will have the opportunity to:
Select language and keyboard.
View the End-User License Agreement (you must click Accept to continue).
Set date, time, and time zone (you can change this in the future using Date and Time in the Settings panel).
Specify network settings.
Configure One-Click Access to Web Email. You can optionally enter your Email address and Password associated with
the web-based Email service you chose. If you do this, you will automatically be logged in to that Email service every
time you click the Mail icon in the future.
Select a default remote desktop protocol (Citrix® Receiver™, VMware® View Client, or rdesktop).
After the First-Time Wizard has completed, you will be able to select various applications from the LaunchBar
bottom of the Latitude ON screen by default.
To configure further preferences, click the Settings icon in the LaunchBar and use the Settings Panel
NOTE: After you have set up a Latitude ON Flash user account, you can open the Configuration Utility from the Start
.
, located at the
Page 3
Menu at any time (Start Menu > Programs > Dell Latitude ON Flash Tool > Dell Latitude ON Configuration
Utility). This utility allows you to make changes to your account or to delete your account. If you delete your
account, pressing the Latitude ON (
Account Setup Wizard.
) button on your keyboard would once again launch the Dell Latitude ON
Subsequent Log-ins
After you have created an account, a Login screen will appear each time you launch Latitude ON Flash. If there is more than
one user and your User ID is not displayed, click change user and select your User ID from the list.
If you are in the Windows environment and press the Latitude ON button, this will hibernate Windows and boot to the
Latitude ON Flash environment.
After you have logged in successfully, the first screen of Latitude ON Flash will display. It contains icons for Mail, the Web
browser, Chat instant messaging, VoIP (Skype™), and the Remote Desktop application which you have currently set as the
default.
NOTE: To change the keyboard type, click the Keyboard icon near the bottom of the Login screen. Then, enter your
password and click the Log in button.
NOTE: Latitude ON Flash prompts you to enter the password during every new session. If you enter a wrong password
five consecutive times, the computer shuts down. Restart your computer in the Latitude ON mode to try again.
Exiting Latitude ON Flash
Click the Enter OS button if you wish to exit Latitude ON Flash and boot to the Windows operating system. Click
the Shut Down button
Back to Contents Page
to turn off the computer. In either case, your changes will automatically be saved.
20091005a
Page 4

Back to Contents Page
Connecting to a Wireless Network (WiFi)
Configuring Network Settings
Enabling LAN, WiFi, or WWAN
Connecting to a Local Area Network (LAN)
Connecting to a Wireless Network (WiFi)
Connecting to a Mobile Broadband Network (WWAN)
Enabling LAN, WiFi, or WWAN
Before you start using your computer in the Dell™ Latitude ON™ mode, you must configure it to connect to either a LAN,
WiFi, or WWAN. The first time you launch Latitude ON Flash, a First-Time Wizard will guide you through the network setup
process. You can also configure settings at any time, as explained below.
1. Open the Network Configuration dialog box by either:
Clicking the Network icon on the LaunchBar. (Hovering the mouse pointer over this icon displays the current
LAN and WiFi connection status.)
Clicking the WWAN icon icon on the LaunchBar, available if a WWAN device is detected. (Hovering the mouse
pointer over the icon displays the current WWAN connection status and the detected signal strength.)
Clicking the Settings Panel icon on the LaunchBar, then clicking Network within the Settings Panel.
2. Select your connection type by clicking WIFI, LAN, or WWAN at the left side of the Network Configuration dialog box.
3. If the Enable checkbox is not checked, click the checkbox to enable the connection. (If the checkbox is checked, clicking
it will disable the connection.)
If the network settings are properly configured, then after establishing a connection for the first time, Latitude ON Flash
automatically recognizes the connection and connects to the enabled network, whether it is LAN, WiFi, or WWAN; or a
combination of them.
Connecting to a Local Area Network (LAN)
For standard automatic connection:
1. Ensure that a network cable has been plugged in to your computer.
2. After a cable has been connected, the DHCP service is available on your network by default, and you should get the
appropriate IP/DNS settings automatically.
However, if you wish to specify connection settings manually:
1. Click LAN at the left side of the Network Configuration dialog box.
2. Uncheck the IP Settings and DNS Settings checkboxes. This enables the fields under them for manual text input.
3. Enter the values for IP or DNS settings assigned by your IT staff.
Alternatively, you can click Connection Assistant in the bottom right corner of the dialog box. This convenient
feature guides you through the configuration process.
Page 5
1. Click WiFi at the left side of the Network Configuration dialog box. A list of available networks, their signal
strength, and security levels will be shown.
2. Select the network you want to connect to.
To connect to a non-broadcasting WiFi network, click the + icon. The Connect to Network dialog box opens.
Enter the Network Name and Password, and other information needed to connect.
3. Enter or select the WiFi network's connection information (Security Type, IP/DNS settings, Password, etc.) to connect.
Click Advanced Settings if you wish to set the IP/DNS manually.
Connecting to a Mobile Broadband Network (WWAN)
If you have a WWAN device installed, this tab will be available for use. Otherwise, "No Device" will be displayed under
"WWAN" at the left side of the Network Configuration dialog box, and the Settings button will be disabled.
In addition, if a WWAN device is inserted, a WWAN icon
but not currently enabled, it will display as
connection status and the detected signal strength. Clicking on the icon will open the Network Configuration dialog box,
with the WWAN tab active.
NOTE: Your WWAN account as well as your WWAN card MUST be activated/registered before you can use it. In
addition, the first time you use it, you will be prompted to select your Country and WWAN Service Provider name
(Operator Name) from drop-down lists.
If a SIM card is inserted, Latitude ON Flash can generally detect the required information and automatically create a profile,
ready for connection.
However, you can also create a profile manually. First, some notes:
For an EV-DO type of WWAN network (such as Verizon or Sprint), you will not need a profile.
For a WCDMA WWAN network (such as AT&T), you do need a profile in order to use a WWAN connection.
For a WCDMA (UMTS) type of WWAN network, you may need to know Access Point Name (APN), Username, Password,
and PIN information.
1. Click WWAN at the left side of the Network Configuration dialog box.
2. Click Settings to access four tabs for advanced settings, if needed: Profiles, PIN, Radio Preference, and Device
Properties.
In the Profiles tab, click New to create a new profile (specify Profile Name, Operator Name, User Name, Password,
and Access Point Name). Or, you can select already-existing profiles and click Edit to modify them, or Delete to
remove them.
Select the PIN tab if you want to enter or change the associated WWAN Personal Identification Number. Check the
Enable PIN checkbox to require PIN entry, or un-check it if you want to disable this requirement. (This is similar to
the way you might protect your mobile phone from unauthorized use by setting up a PIN.)
In the Radio Preference tab, you can specify the radio preference used for connection.
The Device Properties tab displays a variety of information about the WWAN hardware device.
. Hovering the mouse pointer over the icon will display the current WWAN
will be displayed in the LaunchBar. If the device is detected
3. When finished with the four Settings tabs, click OK. You will be returned to the previous page and you can now check
the Enable checkbox. (Note that the Enable checkbox will be available only if a WWAN profile has been created.) After the
Enable checkbox has been checked, the process of detecting the SIM card and the operator (carrier) will begin. Strength
and protocol will interactively be displayed during this time.
4. Click the Connect button to connect to the WWAN network. After a successful connection, the button label will change
from "Connect" to "Disconnect." The three icons under the button display the following status:
Number of bytes uploaded are displayed to the right of this icon.
Number of bytes downloaded are displayed to the right of this icon.
Connection time is displayed to the right of this icon.
Page 6

Back to Contents Page
20091005a
Page 7
Back to Contents Page
1. In the LaunchBar, select the VMware View icon.
Configuring Remote Connections
Accessing a server remotely via rdesktop
Accessing applications on a server remotely via Citrix Receiver
Accessing a server remotely using VMware View Client
NOTE: If you use one of the three features above more than the others, you can set it as your "default remote
desktop protocol." That is, it will be available in the first screen that appears when you launch Latitude ON Flash, for
convenient selection. To do so, select Applications
desired application.
rdesktop
1. In the LaunchBar, click the rdesktop icon.
in the Settings panel, then click Remote Desktop and select the
2. In the rdesktop dialog box, enter the IP address or Domain name of the server you wish to connect to.
3. The Windows® login window will open. Enter the related User ID and Password to access that server.
NOTE: You can right-click on the rdesktop icon in the LaunchBar and select Edit from the menu to open the Edit
rdesktop Settings dialog box. (It can also be opened by clicking Applications
selecting rdesktop.) It allows you to conveniently enter the connection data for each desired server just one time and
save it for future selection in the drop-down list.
in the Settings panel and then
Citrix® Receiver™
1. In the LaunchBar, select the Citrix Receiver icon.
2. In the Citrix Receiver window, select Settings from the Tools Menu.
3. In the Settings dialog box, click Preferences and then select Citrix XenApp.
4. Enter the URL of the Server you want to connect to. (You may need to click the Change... button to enable the
Server URL field.)
5. Click OK. You will be returned to the initial Citrix Receiver window.
6. Open the View Menu and select Citrix XenApp View. The Citrix XenApp Logon dialog box opens.
7. Enter the related Username, Password, and Domain.
8. The applications that you have been authorized to use will be then be listed and available. Select the application you
wish to use.
VMware® View Client
Page 8
2. Enter the IP address of the desired server. Click Connect.
3. In the next dialog box that appears, enter the related Username, Password, and Domain.
4. Click the Login button. The system will then provide you the VMware environment you are authorized to access based
on your enterprise rules.
Back to Contents Page
20091005a
Page 9

Back to Contents Page
Using "Chat" Instant Messaging
Setting Up Chat Accounts
Adding Buddies and Groups
Adding New Groups
Sending a Chat message
Setting Up Chat Accounts
The Chat feature allows you to chat with your friends using your existing user accounts in a variety of popular Instant
Messaging tools. You can also organize your "buddies" into groups, and perform many other functions. You can specify
detailed Preferences settings and log in to multiple IM accounts simultaneously.
Click the Chat
identify at least one of your existing IM accounts to be used with Chat.
1. Ensure you have already created one or more User Accounts in at least one of the supported protocols.
2. Click the Add button in the Accounts window. The Add Account window will open.
3. In the Basic tab, open the Protocol drop-down list and select the protocol associated with the account you wish to add
(such as AIM, MSN, Yahoo, etc.).
4. In the field under the Protocol field, enter the name of the corresponding account, the Password for that account,
and then click Save. (Alias is optional.)
icon. The first time you start Chat, the Accounts dialog box will open. You will be required to
Adding Buddies and Groups
1. In the Chat window, select Add Buddy... from the Buddies Menu. The Add Buddy dialog box will open. It will already
contain your Account Name near the top of the dialog box. The other fields will be blank.
2. Enter the Buddy's username (screen name) and optionally the Alias name of the person you want to add, and specify
the Group you want him/her to be added to. You can either select an existing group from the drop-down list or you
can type a new group name to add a new group.
3. Click the Add button. A notification will display to that person whom you are attempting to add, saying that you wish
to add him/her to your Buddy List. Then he or she can choose to allow it or not. (By the same token, you can choose
to Deny or Authorize attempts by others to add you to their Buddy List.)
Adding New Groups
Select Add Group... from the Buddies Menu. The Add Group dialog box will open. Simply type the desired name for the new
group into the Please enter the name of the group to be added field and then click the Add button.
In the Chat window, you can click on a group name to display a list of all buddies currently in that group.
Note also that if you hover the mouse pointer over a Buddy's name in that list, information about that Buddy will be
displayed. In the displayed information, Has You refers to whether or not that person has you included in his/her Buddy
List. If Yes is displayed, then you are in his/her Buddy List.
Page 10

Sending a Chat message
Double-click on the name of the Buddy to whom you want to send a message and then type the message into the New
Instant Message dialog box. Alternatively, you can select New Instant Message... from the Buddies Menu in the Chat
window and then enter the Alias or the Screen Name of the Buddy you want to send a message to.
Back to Contents Page
20091005a
Page 11
Back to Contents Page
Setting Up Your Latitude ON™ Flash Email
Before you begin sending or receiving Email in the Latitude ON™ mode, you must specify which web-based Email client you
want to use with Latitude ON Flash.
During the First-Time Wizard, you were given an opportunity to do this. If you skipped this set-up during the First-Time
Wizard, then the same dialog box will appear the first time you click the Mail icon in the LaunchBar or in the main screen of
Latitude ON Flash.
Click the Mail
If you have already specified the web-based Email service you want to use with Latitude ON Flash, the "login page" for
that web-based Email service will automatically be launched, and you can enter your login and password as usual.
If you have not yet specified a web-based Email service, the Edit Mail Application Settings dialog box will open.
Select the Email service you wish to use.
Note that if you select Outlook Web Access, you will be required to enter the related URL address, login name,
and password.
If you select Other, you will need to enter the URL address of that other web-based Email service.
Click Finish. The next time you click the Mail icon pictured above, the Email service you chose will be invoked.
After logging in to the web-based Email service, you can use that service's option to "stay logged in" if you want
it to remember your login/password and log you in automatically every time you click the Mail icon in the future.
NOTE: You can also view and edit Email attachments. If the attachment is a PDF, DOC, XLS, or PPT file, you may view
and/or edit the file, but note that the file can only be saved to external storage such as a USB device.
icon.
Switching to a different Email service
If you have already specified an Email service to be used with Latitude ON Flash, and then later decide to use a different
Email service, you can switch to the desired Email service at any time by clicking Applications
right-clicking on the Mail icon), and then clicking Edit under "Mail Application."
Back to Contents Page
in the Settings Panel (or by
20091005a
Page 12
Back to Contents Page
Using the LaunchBar
The LaunchBar is located at the bottom of the Latitude ON screen by default. (You can change the position of the LaunchBar
by clicking on the LaunchBar icon
Click on the icons in the LaunchBar to invoke/switch between applications, or to launch various utilities. Each icon on the
LaunchBar is individually illustrated below.
Mail. Left-click this icon to access the web-based Email application which has
been specified to use with Latitude ON Flash. If no Email application has yet
been specified, the Edit Mail Application Settings
also right-click the icon to open the Edit Mail Application Settings dialog box
anytime.
Web. Starts the web browser for access to the World Wide Web, optimized to
give you a great Internet experience instantly.
Starts the Chat instant messaging tool, which lets you use your existing accounts
in various instant messaging programs to chat with your friends, and to set
preferences as desired. A separate Help file for Chat can be accessed from within
the Chat application.
in the Settings panel and then setting the Orientation.)
dialog box will open. You can
VoIP. Starts Skype™ , a VoIP (Voice-over-Internet Protocol) application that
lets you communicate free-of-charge with other Skype users. A separate Help file
for Skype can be accessed from within the Skype application.
Remotely access a server via rdesktop.
Access applications on a server remotely via Citrix Receiver.
Remotely access a server via VMware View Client.
Starts the Music application, which allows you to play music files in the MP3
format. A separate Help file for Music Player can be accessed from within the
Music Player application.
Starts Photo, an image viewer that lets you arrange your JPEG / BMP / GIF /
PNG files into albums, and display/share them in different view modes. A
separate Help file for Photo Manager can be accessed from within the Photo
Manager application.
Removable storage device indicator. This icon displays in the LaunchBar
when a removable storage device such as a USB drive is inserted into the
system. Left-clicking on it will open the File Manager window, which lets you
conveniently access the folders/files on the removable storage device. If you
want to remove the storage device, right-click on the icon and then select Eject
USB Disk.
Page 13
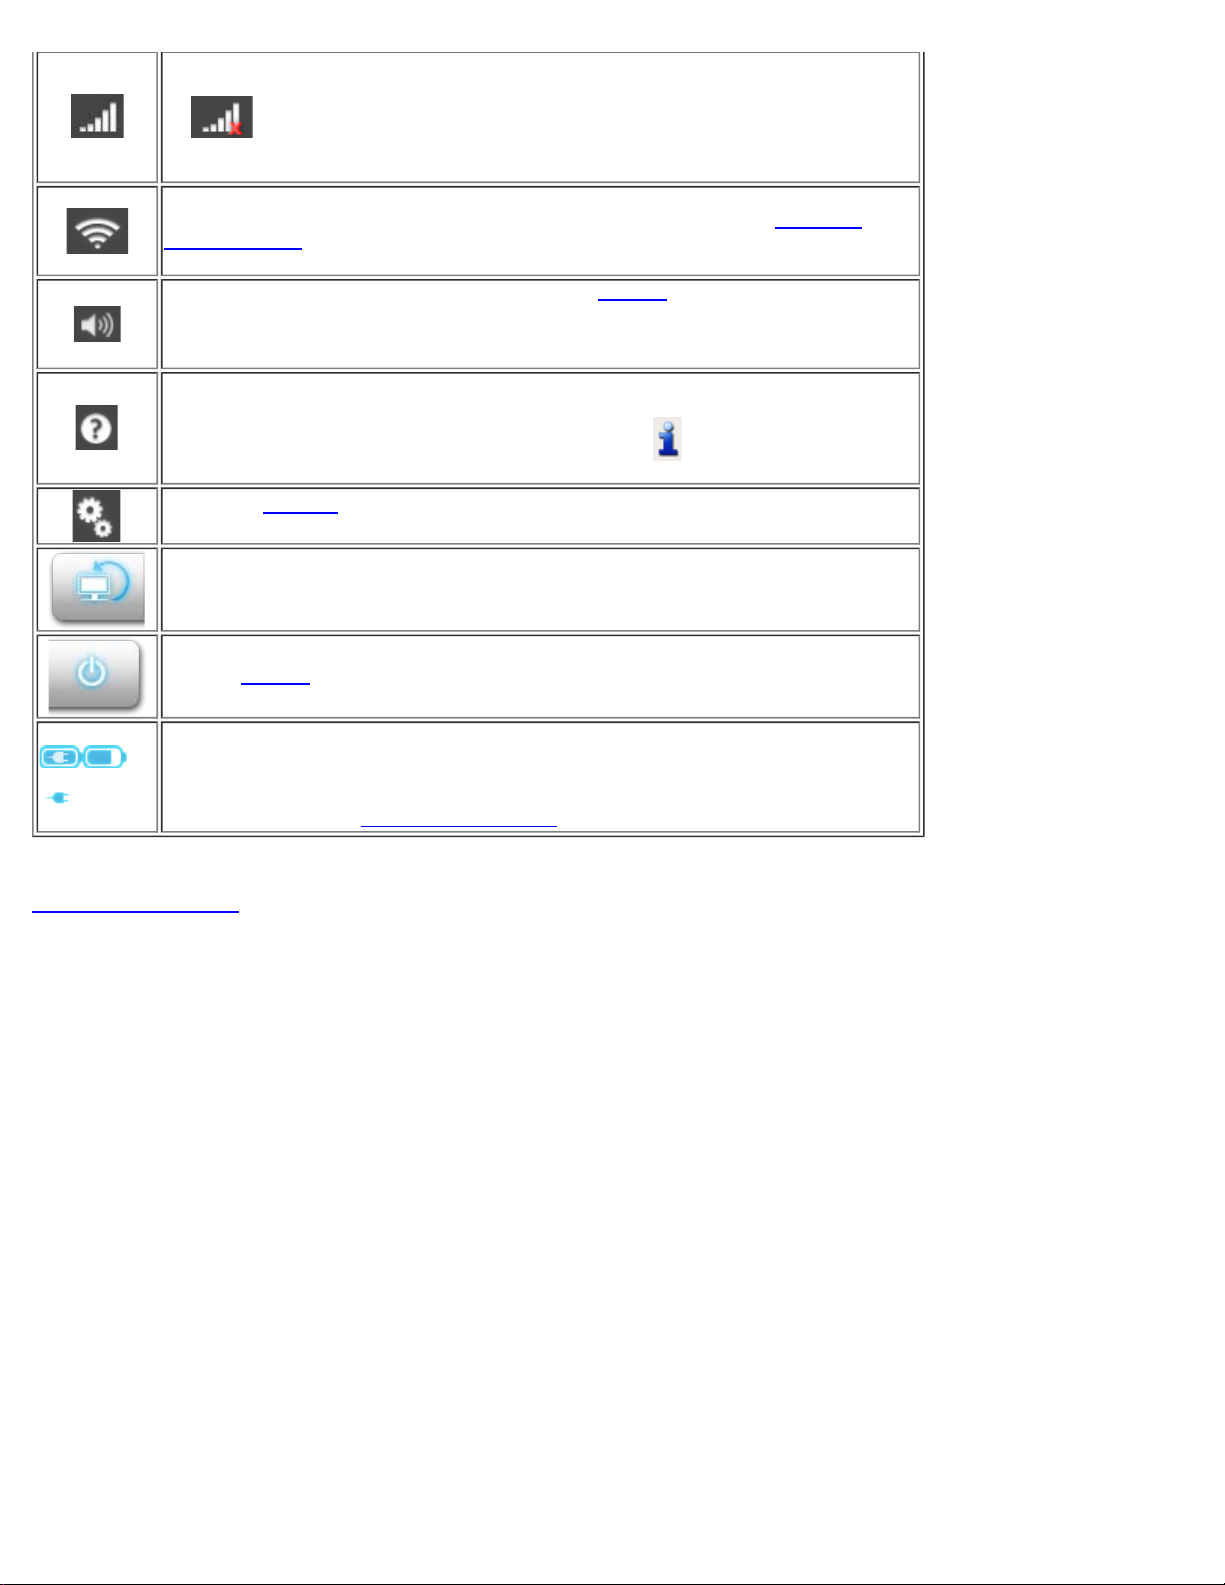
WWAN. If a WWAN device is inserted and enabled, this WWAN icon will be
displayed in the LaunchBar. (If the device is detected but disabled, it will display
as
WWAN connection status and the detected signal strength. Clicking on the icon
will open the Network Configuration dialog box, with the WWAN tab active.
Network status. Hovering the mouse pointer over this icon will display the
current LAN and WiFi connection status. If you click this icon, the Network
Configuration dialog box opens, which can also be opened from the Settings
panel.
Volume. Clicking this icon will open the same Volume control box that opens
when you click Volume on the Settings panel. Hovering the mouse pointer over
the icon will display the current volume setting for the main speaker and
microphone.
Help. Click this icon to access the main on-line Help for Latitude ON Flash.
After opening the Help window, you can access the About box (which displays
version and copyright information) by clicking on the
right of the Help window.
Opens the Settings panel, which allows you to set preferences for various
functions and behaviors in Latitude ON Flash.
Enter OS. Allows you to exit Latitude ON Flash and log in to your Microsoft®
Windows® operating system. After you click this icon, a message will ask you to
confirm.
Shut Down. After you click this icon, you will be required to confirm that you
want to turn off
will automatically be saved.
.) Hovering the mouse pointer over the icon will display the current
icon near the upper
the computer. Any changes you have made during this session
Battery/AC Power status. One of several different icons might display,
depending on power source and current strength. (Only a few samples are
illustrated at left.) Hover the mouse pointer over the displayed icon to display
Power status/level. Or, click on the icon if you wish to open the Power
Management tab of Environment Settings
Back to Contents Page
.
20091005a
Page 14

Back to Contents Page
Using the Settings Panel
To open the Settings Panel, click the icon in the LaunchBar. Then, click on the desired icon within the Settings Panel
to open the corresponding configuration tool. The following tools are available:
Date and Time. Opens a dialog box that lets you set the date and time, and
select a time zone. You can also open this dialog box by clicking on the time
display in the LaunchBar of the Latitude ON screen.
Input Language. Lets you adjust input methods, languages, and options for the
SCIM (Smart Common Input Method) Input Language feature.
NOTE: To enable this feature, make sure the Enable input language service
checkbox is checked. Then, placing the Text Cursor within an editable input field
of Latitude ON Flash and pressing Ctrl + Space will activate the current SCIM
input language. To turn off the SCIM feature, press the Ctrl + Space hotkey
again.
Language and Keyboard. Allows you to set the input language and input
method desired — the language in which menus, messages, etc. will be displayed,
and the language for keyboard input.
LaunchBar settings. Allows you to:
Specify the default location of the LaunchBar.
Turn the display of ToolTips (on the LaunchBar) on or off.
Elect whether or not to Auto-Hide the LaunchBar.
Choose whether or not to force it to display on top of other windows.
Network. Specify how your computer connects to the Internet. If assistance is
needed, you can click the Connection Assistant button for easy setup.
Environment Settings. This dialog box contains two tabs:
Power Management tab — Two profiles with default settings are provided.
Select either the Energy Saving profile or the Performance profile. If desired,
you can change the default time-out settings for Display or for Shutdown,
according to the type of power supply being used. If you change the settings, a
new profile named Custom will automatically be created for those settings.
General tab — This tab contains a Restore button. It allows you to clear the
Latitude ON Flash settings, as well as any personal information stored by the web
browser, restoring the system to the default factory settings. The user
data/environment will be reset to the original default configuration. All
bookmarks, network settings, and other changes you made will be lost. After you
click Restore, a confirmation dialog box will open. If you click Yes in the
confirmation dialog box, your system will shut down, in order to finish clearing the
settings. This is also useful in the rare case where settings might become
corrupted.
Display. Choose the most optimal screen resolution for your display.
Volume. Lets you adjust the output volume for your speaker/headphone; or the
input volume for your built-in or external microphone. You can click Advanced in
the Volume box if you wish to specify Microphone 1 (Default) or Microphone 2
(Front/External).
Page 15

Applications. Click the Edit button for the related item if you want to change the
current settings for:
Back to Contents Page
Mail Application: The default web-based Email service to be accessed
when the Mail icon is clicked in the LaunchBar or in the main screen.
rdesktop: A variety of settings for type of display, local resources, and
logon.
Remote Desktop: Choose the remote desktop application you want to be
available for selection in the first screen every time you log in to Latitude
ON Flash.
User Account. Allows you to change your password for Latitude ON Flash. To
view the rules for password creation, click the question mark icon in the
Account Setup dialog box.
20091005a
Page 16

Back to Contents Page
Latitude ON button / Power button Behavior
The following tables describe the effect of pressing the Power button, or the Latitude ON button ( ) next to it, depending
on the current state of the computer.
Latitude ON mode
Computer state Press Latitude ON button Press Power button
Off Boots to Latitude ON Flash Boots to Windows
At initial password screen or Main
application launch screen
On Powers down system
Powers down system Powers down system
User is prompted to shut
down, or boot to Windows
Windows mode
(Latitude ON Configuration Utility installed)
Computer state Press Latitude ON button Press Power button
Off Boots to Latitude ON Flash Boots to Windows
Windows will resume and
Standby / Hybrid Sleep
Hibernate Boots to Latitude ON Flash Resume to Windows
On
immediately hibernate. Latitude
ON Flash will then boot. *
Windows will immediately
hibernate and Latitude ON Flash
will then boot. *
Resume to Windows
User configured action in Windows
* If the Latitude ON Flash user account(s) have not been configured, you will be prompted to configure an account.
Back to Contents Page
20091005a
Page 17

Back to Contents Page
Hotkeys Supported in Latitude ON™ Flash
Hot Key Action
Fn + F2 Enable / Disable battery charger
Fn + F4 Enable / Disable Numlock
←
Fn +
→
Fn +
↑
Fn +
↓
Fn +
Back to Contents Page
Enable / Disable Ambient Light Sensor
Enable / Disable backlit keyboard (if installed)
Increase LCD brightness
Decrease LCD brightness
20091005a
Page 18

Back to Contents Page
Obtaining source code for Open Source programs
This product contains software that is licensed under the General Public License Version 2 (“GPL”) which is listed below in
“GPL Software.” This product also contains software that is licensed under the Lesser General Public License Version 2.1
(“LGPL”) which is listed below in “LGPL Software.” We have included copies of the GPL and the LGPL in the
Acknowledgements
You will find the source code in an archive file in the C:\DELL sub-directory on your system. You can also download the
source code from the Dell Support website at http://support.dell.com.
GPL Software
acpid 1.0.4
acpi-support 0.109-11
actkbd 0.2.8
Alps touchpad show coordinate in procfs 2.6.27.7
alsa 1.0.20-5.12rc1
alsa-utils 1.0.14rc2
alsa-utils 1.0.15
another union file system patch SVN20080610
anthy 9100e
at-spi 1.22.1-0
bash 3.1.17
bash 3.2-0
bbdock 0.2.8
bbkeys 0.9.0
beep 1.2.2
bootsplash 3.1.6
Broadcom's hybrid Linux driver 5.10.91.9
busybox 1.8.2
busybox static build 1.5.0
compat_wireless 2.6.30
coreutils 5.94
coreutils 6.9
dbus 1.2.12
dbus-glib 0.80
DeviceVM version structure patch 2.6.27.7
disable cursor in console mode 2.6.27.7
dmidecode 2.8
dmraid 1.0.0.rc15
e2fsprogs 1.38
eject 2.1.4
Ericsson 3G device driver 0.03
ethtool 3
FBV 1.0b
Find Meta Data 1.0.0
findutils 4.2.27
freetype 2.3.9
fuse 2.6.5
Garuda 2.58
gdm 2.20.7-0
gettext 0.14.5
GlassyBleu themes 21
Gnome themes 2.14.3
gnome-icon-theme 2.8.0
GNU crypto library 1.2
GNU Diff Utilities 2.8.1
GNU Wget 1.10.2
gnutls 1.2
gnutls 2.4.0
install.patch 2.6.27.7
libatk 1.11.4-2
section.
Page 19

libatk1.0-0 1.22.0-0
libbz2 1.0.3
libc6 2.7-10
libcdparanoia 3a9.8-11
libcups 1.1.20
libcupsys2 1.3.7-1
libdbus-glib-1-2 0.74-2
libdirectfb 1.2.0
libgail-gnome-module 1.20.0-1
libgcc1 4.2.4-1
libgconf2-4 2.22.0-0
libgconf2-4 2.4.0-1
libglib 2.16.6
libglib2.0-0 2.16.6-0
libglib2.0-0 2.17.4-0
libgpg-error 1.4.2
libgtk2.0-0 2.12.9-3
libjpeg 6.2.0
libkeyutils1 1.2-4
libltdl3 1.5.26-1
liborbit2 2.10.0-0
liborbit2 2.14.12-0.1
libpam0g 0.99.7.1-5
libpango1.0-0 1.18.3-0
libpango1.0-0 1.20.5-0
libreadline5 5.2-3build1
librsvg2-common 2.22.2-2
libsepol1 2.0.20-0
libslp1 1.2.1
libtiff 3.8.2
libvolume-id0 117-8
Linux kernel 2.6.27.7
Linux Qualcomm Serial USB driver 2008_11_13
LKUG 0.3
Lohit fonts 2.3.1
loopback file system max count patch 2.6.27.7
LuzSans-Medium 1.00
Manchu 2.005 (2005)
Metacity 2.14.5
Miscellaneous system utilities 2.12r
Mobile Manager 0.7
mtools 4.0.1
music cdscan 1.0.0
nspr 1.8.0-1-8
NTFS Tools and Library 2.0.0
ntfs-3g 1.516
ntfsinfo 1.13.1
optimize mouse device tap move 2.6.27.7
pam 0.79
pcmanfm 0.3.2.2
pcmanfm_PO 0.4.5
pidgin 2.5.6
pidgin 2.5
PPP 2.4.4
PPP-over-Ethernet 3.10
python2.4-dbus 0.61-5
python-gnome2 2.12.4
python-gtk-2 2.8.2-3
quirk usb hand off patch 2.6.27.7
readline 4.2a
readline 5.1-7
scim-anthy 1.2.6
scim-bridge 0.4.15
scim-bridge-client-gtk 0.4.14-1
scim-chewing 0.3.3
scim-gtk2-immodule 1.4.7-3
scim-hangul 0.3.2
scim-m17n 0.2.2
scim-pinyin 0.5.91
Page 20

scim-tables 0.5.7
scim-thai 0.1.1
setuid-root program 3.26.1
squash file system patch 3.3
startup-notification 0.7
Terafik 2.900
The Linux Console Tools 0.2.3
this is the ASN.1 library used in GNUTLS 2.0.17
Ubuntu 8.10 ath9k driver for 2.6.27 kernel Ubuntu 8.10
Ubuntu 8.10 iwlwifi driver for 2.6.27 kernel Ubuntu 8.10
udev 116
usb storage patch 2.6.27.7
uvcvideo_official SVN20081112
uvcview 20071108
vbetool 0.7
WenQuanYi ZenHei 0.8.37
wirelss_tool 29
wpa_supplicant 0.6.7
wpa_supplicant 0.6.9
wvdial 1.56
WvStreams 4.2
xmms 1.2.10
xmodmap_data 2.14.3
LGPL Software
alsa_lib 1.0.14RC2
fam 2.7.0
gamin 0.1.9
Glade2 Library 2.5.1
glib 2.10.2
GLIBC 2.3.6
GLIBC 2.7
gtk+ 2.12.9
GTK2 engines 2.8.2
gtk2-engines 2.14.3-0
gtk2-engines-murrine 0.53.1-1
gtk2-engines-pixbuf 2.12.9-3
Khmer OS Freehand 4.10 (2007)
libasound2 1.0.15
libcairo2 1.6.0-0
libchewing 0.3.2
libdatrie 0.2.2
libgcrypt 1.2.1
libgcrypt11 1.2.3
libglade2-0 2.6.2-1
libgnutls13 2.0.4-1
libgpg-error0 1.4-2
libgtk1.2 1.2.10
libgtk2.0 2.12.9
libhangul 0.0.8
libidn 0.5.18
libidn11 1.1-1
libntfs-3g23 1.2216-1
libstdc++6 4.2.4-1
libtasn1-3 1.1-1
libthai 0.1.11
libtool 1.5.22
libusb-0.1-4 2:0.1.12-8
libwmf0.2-7 0.2.8.4-6
libxplc 0.3.13
m17n-lib 1.5.2
pycurl 7.15.2
python2.4-cairo 1.0.2
python-support 0.5.6
Page 21

scim 1.4.7
Splashtop and the logo are registered trademarks of DeviceVM, Inc. in the U.S. and elsewhere. All other trademarks, product
and company names, and logos are the property of their respective owners.
Patented. US patent numbers 7,082,526 and 7,441,113. US and other patents pending.
Back to Contents Page
20091005a
Page 22

Back to Contents Page
Acknowledgements
Official binaries of this product released by DeviceVM, Inc. are made available under the corresponding EULA.
Portions of the source code to this product are available under licenses which are both free and open source. Most are
available under one of the following: the Mozilla Public License (MPL), the GNU General Public License (GPL) or the Lesser
General Public License (LGPL); hence you may copy and distribute such software according to the terms of the appropriate
licenses.
Mozilla Public License
GNU General Public License
GNU Lesser General Public License
The portions of the software which are not under the above licenses may be available under one of a variety of more
permissive licenses. Those that require reproduction of the license text in the distribution are given below. (Note: your copy
of this product may or may not contain code covered by one or more of the licenses listed here, depending on the exact
product and version you choose.)
BSD Licenses
bspatch License
Cairo Licenses
Expat License
MIT License
Myspell License
Python Licenses
University of California License
Certain portions of the software product are proprietary and may contain third-party proprietary products. For latest
information regarding third-party licenses, please visit the credits
This software contains third-party proprietary products:
Adobe® Flash® Player. Copyright © 1996-2009 Adobe Systems Incorporated. All Rights Reserved.
Adobe and Flash are either trademarks or registered trademarks in the United States and/or other countries.
The use of Adobe® Flash® Player is conditional upon your accepting all of the terms of the EULA, which is
available at
http://www.adobe.com/products/eulas/pdfs/Reader_Player_WWEULA-Combined20060724_1430.pdf
page.
Mozilla Public License
[Version 1.1]
1. Definitions.
1.0.1. "Commercial Use"
means distribution or otherwise making the Covered Code available to a third party.
1.1. "Contributor"
means each entity that creates or contributes to the creation of Modifications.
1.2. "Contributor Version"
means the combination of the Original Code, prior Modifications used by a Contributor, and the Modifications made by that
particular Contributor.
Page 23

1.3. "Covered Code"
means the Original Code or Modifications or the combination of the Original Code and Modifications, in each case including
portions thereof.
1.4. "Electronic Distribution Mechanism"
means a mechanism generally accepted in the software development community for the electronic transfer of data.
1.5. "Executable"
means Covered Code in any form other than Source Code.
1.6. "Initial Developer"
means the individual or entity identified as the Initial Developer in the Source Code notice required by Exhibit A.
1.7. "Larger Work"
means a work which combines Covered Code or portions thereof with code not governed by the terms of this License.
1.8. "License"
means this document.
1.8.1. "Licensable"
means having the right to grant, to the maximum extent possible, whether at the time of the initial grant or
subsequently acquired, any and all of the rights conveyed herein.
1.9. "Modifications"
means any addition to or deletion from the substance or structure of either the Original Code or any previous Modifications.
When Covered Code is released as a series of files, a Modification is:
1.9.1. Any addition to or deletion from the contents of a file containing Original Code or previous Modifications.
1.9.2. Any new file that contains any part of the Original Code or previous Modifications.
1.10. "Original Code"
means Source Code of computer software code which is described in the Source Code notice required by Exhibit A as Original
Code, and which, at the time of its release under this License is not already Covered Code governed by this License.
1.10.1. "Patent Claims"
means any patent claim(s), now owned or hereafter acquired, including without limitation, method, process, and
apparatus claims, in any patent Licensable by grantor.
1.11. "Source Code"
means the preferred form of the Covered Code for making modifications to it, including all modules it contains, plus any
associated interface definition files, scripts used to control compilation and installation of an Executable, or source code
differential comparisons against either the Original Code or another well known, available Covered Code of the Contributor's
choice. The Source Code can be in a compressed or archival form, provided the appropriate decompression or de-archiving
software is widely available for no charge.
1.12. "You" (or "Your")
means an individual or a legal entity exercising rights under, and complying with all of the terms of, this License or a future
version of this License issued under Section 6.1. For legal entities, "You" includes any entity which controls, is controlled by,
or is under common control with You. For purposes of this definition, "control" means (a) the power, direct or indirect, to
cause the direction or management of such entity, whether by contract or otherwise, or (b) ownership of more than fifty
percent (50%) of the outstanding shares or beneficial ownership of such entity.
2. Source Code License.
2.1. The Initial Developer Grant.
The Initial Developer hereby grants You a world-wide, royalty-free, non-exclusive license, subject to third party intellectual
property claims:
1. Under intellectual property rights (other than patent or trademark) Licensable by Initial Developer to use, reproduce,
modify, display, perform, sublicense and distribute the Original Code (or portions thereof) with or without Modifications,
and/or as part of a Larger Work; and
2. Under Patents Claims infringed by the making, using or selling of Original Code, to make, have made, use, practice,
sell, and offer for sale, and/or otherwise dispose of the Original Code (or portions thereof).
3. The licenses granted in this Section 2.1 (a) and (b) are effective on the date Initial Developer first distributes Original
Code under the terms of this License.
4. Notwithstanding Section 2.1 (b) above, no patent license is granted: 1) for code that You delete from the Original
Code; 2) separate from the Original Code; or 3) for infringements caused by: i) the modification of the Original Code or
ii) the combination of the Original Code with other software or devices.
Page 24

2.2. Contributor Grant.
Subject to third party intellectual property claims, each Contributor hereby grants You a world-wide, royalty-free, nonexclusive license:
1. Under intellectual property rights (other than patent or trademark) Licensable by Contributor, to use, reproduce,
modify, display, perform, sublicense and distribute the Modifications created by such Contributor (or portions thereof)
either on an unmodified basis, with other Modifications, as Covered Code and/or as part of a Larger Work; and
2. Under Patent Claims infringed by the making, using, or selling of Modifications made by that Contributor either alone
and/or in combination with its Contributor Version (or portions of such combination), to make, use, sell, offer for sale,
have made, and/or otherwise dispose of: 1) Modifications made by that Contributor (or portions thereof); and 2) the
combination of Modifications made by that Contributor with its Contributor Version (or portions of such combination).
3. The licenses granted in Sections 2.2 (a) and 2.2 (b) are effective on the date Contributor first makes Commercial Use
of the Covered Code.
4. Notwithstanding Section 2.2 (b) above, no patent license is granted: 1) for any code that Contributor has deleted from
the Contributor Version; 2) separate from the Contributor Version; 3) for infringements caused by: i) third party
modifications of Contributor Version or ii) the combination of Modifications made by that Contributor with other
software (except as part of the Contributor Version) or other devices; or 4) under Patent Claims infringed by Covered
Code in the absence of Modifications made by that Contributor.
3. Distribution Obligations.
3.1. Application of License.
The Modifications which You create or to which You contribute are governed by the terms of this License, including without
limitation Section 2.2. The Source Code version of Covered Code may be distributed only under the terms of this License or a
future version of this License released under Section 6.1, and You must include a copy of this License with every copy of the
Source Code You distribute. You may not offer or impose any terms on any Source Code version that alters or restricts the
applicable version of this License or the recipients' rights hereunder. However, You may include an additional document
offering the additional rights described in Section 3.5.
3.2. Availability of Source Code.
Any Modification which You create or to which You contribute must be made available in Source Code form under the terms of
this License either on the same media as an Executable version or via an accepted Electronic Distribution Mechanism to
anyone to whom you made an Executable version available; and if made available via Electronic Distribution Mechanism, must
remain available for at least twelve (12) months after the date it initially became available, or at least six (6) months after a
subsequent version of that particular Modification has been made available to such recipients. You are responsible for
ensuring that the Source Code version remains available even if the Electronic Distribution Mechanism is maintained by a
third party.
3.3. Description of Modifications.
You must cause all Covered Code to which You contribute to contain a file documenting the changes You made to create that
Covered Code and the date of any change. You must include a prominent statement that the Modification is derived, directly
or indirectly, from Original Code provided by the Initial Developer and including the name of the Initial Developer in (a) the
Source Code, and (b) in any notice in an Executable version or related documentation in which You describe the origin or
ownership of the Covered Code.
3.4. Intellectual Property Matters
(a) Third Party Claims.
If Contributor has knowledge that a license under a third party's intellectual property rights is required to
exercise the rights granted by such Contributor under Sections 2.1 or 2.2, Contributor must include a text file
with the Source Code distribution titled "LEGAL" which describes the claim and the party making the claim in
sufficient detail that a recipient will know whom to contact. If Contributor obtains such knowledge after the
Modification is made available as described in Section 3.2, Contributor shall promptly modify the LEGAL file in all
copies Contributor makes available thereafter and shall take other steps (such as notifying appropriate mailing
lists or newsgroups) reasonably calculated to inform those who received the Covered Code that new knowledge
has been obtained.
(b) Contributor APIs.
If Contributor's Modifications include an application programming interface and Contributor has knowledge of
patent licenses which are reasonably necessary to implement that API, Contributor must also include this
information in the legal file.
(c) Representations.
Contributor represents that, except as disclosed pursuant to Section 3.4 (a) above, Contributor believes that
Contributor's Modifications are Contributor's original creation(s) and/or Contributor has sufficient rights to grant
the rights conveyed by this License.
Page 25

3.5. Required Notices.
You must duplicate the notice in Exhibit A in each file of the Source Code. If it is not possible to put such notice in a particular
Source Code file due to its structure, then You must include such notice in a location (such as a relevant directory) where a
user would be likely to look for such a notice. If You created one or more Modification(s) You may add your name as a
Contributor to the notice described in Exhibit A. You must also duplicate this License in any documentation for the Source
Code where You describe recipients' rights or ownership rights relating to Covered Code. You may choose to offer, and to
charge a fee for, warranty, support, indemnity or liability obligations to one or more recipients of Covered Code. However,
You may do so only on Your own behalf, and not on behalf of the Initial Developer or any Contributor. You must make it
absolutely clear than any such warranty, support, indemnity or liability obligation is offered by You alone, and You hereby
agree to indemnify the Initial Developer and every Contributor for any liability incurred by the Initial Developer or such
Contributor as a result of warranty, support, indemnity or liability terms You offer.
3.6. Distribution of Executable Versions.
You may distribute Covered Code in Executable form only if the requirements of Sections 3.1, 3.2, 3.3, 3.4 and 3.5 have been
met for that Covered Code, and if You include a notice stating that the Source Code version of the Covered Code is available
under the terms of this License, including a description of how and where You have fulfilled the obligations of Section 3.2. The
notice must be conspicuously included in any notice in an Executable version, related documentation or collateral in which You
describe recipients' rights relating to the Covered Code. You may distribute the Executable version of Covered Code or
ownership rights under a license of Your choice, which may contain terms different from this License, provided that You are in
compliance with the terms of this License and that the license for the Executable version does not attempt to limit or alter the
recipient's rights in the Source Code version from the rights set forth in this License. If You distribute the Executable version
under a different license You must make it absolutely clear that any terms which differ from this License are offered by You
alone, not by the Initial Developer or any Contributor. You hereby agree to indemnify the Initial Developer and every
Contributor for any liability incurred by the Initial Developer or such Contributor as a result of any such terms You offer.
3.7. Larger Works.
You may create a Larger Work by combining Covered Code with other code not governed by the terms of this License and
distribute the Larger Work as a single product. In such a case, You must make sure the requirements of this License are
fulfilled for the Covered Code.
4. Inability to Comply Due to Statute or Regulation.
If it is impossible for You to comply with any of the terms of this License with respect to some or all of the Covered Code due
to statute, judicial order, or regulation then You must: (a) comply with the terms of this License to the maximum extent
possible; and (b) describe the limitations and the code they affect. Such description must be included in the legal file
described in Section 3.4 and must be included with all distributions of the Source Code. Except to the extent prohibited by
statute or regulation, such description must be sufficiently detailed for a recipient of ordinary skill to be able to understand it.
5. Application of this License.
This License applies to code to which the Initial Developer has attached the notice in Exhibit A and to related Covered Code.
6. Versions of the License.
6.1. New Versions
Netscape Communications Corporation ("Netscape") may publish revised and/or new versions of the License from time to
time. Each version will be given a distinguishing version number.
6.2. Effect of New Versions
Once Covered Code has been published under a particular version of the License, You may always continue to use it under the
terms of that version. You may also choose to use such Covered Code under the terms of any subsequent version of the
License published by Netscape. No one other than Netscape has the right to modify the terms applicable to Covered Code
created under this License.
6.3. Derivative Works
If You create or use a modified version of this License (which you may only do in order to apply it to code which is not already
Covered Code governed by this License), You must (a) rename Your license so that the phrases "Mozilla", "MOZILLAPL",
"MOZPL", "Netscape", "MPL", "NPL" or any confusingly similar phrase do not appear in your license (except to note that your
license differs from this License) and (b) otherwise make it clear that Your version of the license contains terms which differ
from the Mozilla Public License and Netscape Public License. (Filling in the name of the Initial Developer, Original Code or
Contributor in the notice described in Exhibit A shall not of themselves be deemed to be modifications of this License.)
7. Disclaimer of warranty.
Page 26

Covered code is provided under this license on an "as is" basis, without warranty of any kind, either expressed or implied,
including, without limitation, warranties that the covered code is free of defects, merchantable, fit for a particular purpose or
non-infringing. The entire risk as to the quality and performance of the covered code is with you. Should any covered code
prove defective in any respect, you (not the initial developer or any other contributor) assume the cost of any necessary
servicing, repair or correction. This disclaimer of warranty constitutes an essential part of this license. No use of any covered
code is authorized hereunder except under this disclaimer.
8. Termination.
8.1. This License and the rights granted hereunder will terminate automatically if You fail to comply with terms herein and fail
to cure such breach within 30 days of becoming aware of the breach. All sublicenses to the Covered Code which are properly
granted shall survive any termination of this License. Provisions which, by their nature, must remain in effect beyond the
termination of this License shall survive.
8.2. If You initiate litigation by asserting a patent infringement claim (excluding declatory judgment actions) against Initial
Developer or a Contributor (the Initial Developer or Contributor against whom You file such action is referred to as
"Participant") alleging that:
1. Such Participant's Contributor Version directly or indirectly infringes any patent, then any and all rights granted by such
Participant to You under Sections 2.1 and/or 2.2 of this License shall, upon 60 days notice from Participant terminate
prospectively, unless if within 60 days after receipt of notice You either: (i) agree in writing to pay Participant a
mutually agreeable reasonable royalty for Your past and future use of Modifications made by such Participant, or (ii)
withdraw Your litigation claim with respect to the Contributor Version against such Participant. If within 60 days of
notice, a reasonable royalty and payment arrangement are not mutually agreed upon in writing by the parties or the
litigation claim is not withdrawn, the rights granted by Participant to You under Sections 2.1 and/or 2.2 automatically
terminate at the expiration of the 60 day notice period specified above.
2. Any software, hardware, or device, other than such Participant's Contributor Version, directly or indirectly infringes any
patent, then any rights granted to You by such Participant under Sections 2.1(b) and 2.2(b) are revoked effective as of
the date You first made, used, sold, distributed, or had made, Modifications made by that Participant.
8.3. If You assert a patent infringement claim against Participant alleging that such Participant's Contributor Version directly or
indirectly infringes any patent where such claim is resolved (such as by license or settlement) prior to the initiation of patent
infringement litigation, then the reasonable value of the licenses granted by such Participant under Sections 2.1 or 2.2 shall
be taken into account in determining the amount or value of any payment or license.
8.4. In the event of termination under Sections 8.1 or 8.2 above, all end user license agreements (excluding distributors and
resellers) which have been validly granted by You or any distributor hereunder prior to termination shall survive termination.
9. Limitation of liability.
Under no circumstances and under no legal theory, whether tort (including negligence), contract, or otherwise, shall you, the
initial developer, any other contributor, or any distributor of covered code, or any supplier of any of such parties, be liable to
any person for any indirect, special, incidental, or consequential damages of any character including, without limitation,
damages for loss of goodwill, work stoppage, computer failure or malfunction, or any and all other commercial damages or
losses, even if such party shall have been informed of the possibility of such damages. This limitation of liability shall not apply
to liability for death or personal injury resulting from such party's negligence to the extent applicable law prohibits such
limitation. Some jurisdictions do not allow the exclusion or limitation of incidental or consequential damages, so this exclusion
and limitation may not apply to you.
10. U.S. government end users.
The Covered Code is a "commercial item," as that term is defined in 48 C.F.R. 2.101 (Oct. 1995), consisting of "commercial
computer software" and "commercial computer software documentation," as such terms are used in 48 C.F.R. 12.212 (Sept.
1995). Consistent with 48 C.F.R. 12.212 and 48 C.F.R. 227.7202-1 through 227.7202-4 (June 1995), all U.S. Government
End Users acquire Covered Code with only those rights set forth herein.
11. Miscellaneous.
This License represents the complete agreement concerning subject matter hereof. If any provision of this License is held to
be unenforceable, such provision shall be reformed only to the extent necessary to make it enforceable. This License shall be
governed by California law provisions (except to the extent applicable law, if any, provides otherwise), excluding its conflictof-law provisions. With respect to disputes in which at least one party is a citizen of, or an entity chartered or registered to do
business in the United States of America, any litigation relating to this License shall be subject to the jurisdiction of the
Page 27

Federal Courts of the Northern District of California, with venue lying in Santa Clara County, California, with the losing party
responsible for costs, including without limitation, court costs and reasonable attorneys' fees and expenses. The application of
Aaron Leventhal, Aaron Schulman, ActiveState Tool Corp,
Akkana Peck, Alex Fritze, Alexa Internet, Alexander Surkov,
Andreas Otte, Andreas Premstaller, Andrew Thompson,
the United Nations Convention on Contracts for the International Sale of Goods is expressly excluded. Any law or regulation
which provides that the language of a contract shall be construed against the drafter shall not apply to this License.
12. Responsibility for claims.
As between Initial Developer and the Contributors, each party is responsible for claims and damages arising, directly or
indirectly, out of its utilization of rights under this License and You agree to work with Initial Developer and Contributors to
distribute such responsibility on an equitable basis. Nothing herein is intended or shall be deemed to constitute any admission
of liability.
13. Multiple-licensed code.
Initial Developer may designate portions of the Covered Code as "Multiple-Licensed". "Multiple-Licensed" means that the
Initial Developer permits you to utilize portions of the Covered Code under Your choice of the MPL or the alternative licenses,
if any, specified by the Initial Developer in the file described in Exhibit A.
Exhibit A - Mozilla Public License:
"The contents of this file are subject to the Mozilla Public License Version 1.1 (the "License"); you may not use this file except
in compliance with the License. You may obtain a copy of the License at:
http://www.mozilla.org/MPL/
Software distributed under the License is distributed on an "AS IS" basis, WITHOUT WARRANTY OF ANY KIND, either express
or implied. See the License for the specific language governing rights and limitations under the License.
The Original Code is ______________________________________.
The Initial Developer of the Original Code is ________________________.
Portions created by ______________________ are Copyright (C) ______
_______________________. All Rights Reserved.
Contributor(s): ______________________________________.
Alternatively, the contents of this file may be used under the terms of the _____ license (the "[___] License"), in which case
the provisions of [______] License are applicable instead of those
above. If you wish to allow use of your version of this file only under the terms of the [____] License and not to allow others
to use your version of this file under the MPL, indicate your decision by deleting the provisions above and replace them with
the notice and other provisions required by the [___] License. If you do not delete the provisions above, a recipient may use
your version of this file under either the MPL or the [___] License."
NOTE: The text of this Exhibit A may differ slightly from the text of the notices in the Source Code files of the Original Code.
You should use the text of this Exhibit A rather than the text found in the Original Code Source Code for Your Modifications.
Initial Developers:
In accordance with MPL section 3.3, we state that this software is derived, directly or indirectly, from Original Code provided
by some or all of the following people, companies and organisations:
GNU General Public License
Page 28

Version 2, June 1991
Copyright (C) 1989, 1991 Free Software Foundation, Inc. 51 Franklin St, Fifth Floor, Boston, MA 02110-1301 USA
Everyone is permitted to copy and distribute verbatim copies of this license document, but changing it is not allowed.
Preamble
The licenses for most software are designed to take away your freedom to share and change it. By contrast, the GNU General
Public License is intended to guarantee your freedom to share and change free software--to make sure the software is free
for all its users. This General Public License applies to most of the Free Software Foundation's software and to any other
program whose authors commit to using it. (Some other Free Software Foundation software is covered by the GNU Library
General Public License instead.) You can apply it to your programs, too.
When we speak of free software, we are referring to freedom, not price. Our General Public Licenses are designed to make
sure that you have the freedom to distribute copies of free software (and charge for this service if you wish), that you receive
source code or can get it if you want it, that you can change the software or use pieces of it in new free programs; and that
you know you can do these things.
To protect your rights, we need to make restrictions that forbid anyone to deny you these rights or to ask you to surrender
the rights. These restrictions translate to certain responsibilities for you if you distribute copies of the software, or if you
modify it.
For example, if you distribute copies of such a program, whether gratis or for a fee, you must give the recipients all the rights
that you have. You must make sure that they, too, receive or can get the source code. And you must show them these terms
so they know their rights.
We protect your rights with two steps: (1) copyright the software, and (2) offer you this license which gives you legal
permission to copy, distribute and/or modify the software.
Also, for each author's protection and ours, we want to make certain that everyone understands that there is no warranty for
this free software. If the software is modified by someone else and passed on, we want its recipients to know that what they
have is not the original, so that any problems introduced by others will not reflect on the original authors' reputations.
Finally, any free program is threatened constantly by software patents. We wish to avoid the danger that redistributors of a
free program will individually obtain patent licenses, in effect making the program proprietary. To prevent this, we have made
it clear that any patent must be licensed for everyone's free use or not licensed at all.
The precise terms and conditions for copying, distribution and modification follow.
GNU GENERAL PUBLIC LICENSE
TERMS AND CONDITIONS FOR COPYING, DISTRIBUTION AND MODIFICATION
0. This License applies to any program or other work which contains a notice placed by the copyright holder saying it may be
distributed under the terms of this General Public License. The "Program", below, refers to any such program or work, and a
"work based on the Program" means either the Program or any derivative work under copyright law: that is to say, a work
containing the Program or a portion of it, either verbatim or with modifications and/or translated into another language.
(Hereinafter, translation is included without limitation in the term "modification".) Each licensee is addressed as "you".
Activities other than copying, distribution and modification are not covered by this License; they are outside its scope. The act
of running the Program is not restricted, and the output from the Program is covered only if its contents constitute a work
based on the Program (independent of having been made by running the Program). Whether that is true depends on what the
Program does.
1. You may copy and distribute verbatim copies of the Program's source code as you receive it, in any medium, provided that
you conspicuously and appropriately publish on each copy an appropriate copyright notice and disclaimer of warranty; keep
intact all the notices that refer to this License and to the absence of any warranty; and give any other recipients of the
Program a copy of this License along with the Program.
You may charge a fee for the physical act of transferring a copy, and you may at your option offer warranty protection in
exchange for a fee.
2. You may modify your copy or copies of the Program or any portion of it, thus forming a work based on the Program, and
copy and distribute such modifications or work under the terms of Section 1 above, provided that you also meet all of these
conditions: a) You must cause the modified files to carry prominent notices stating that you changed the files and the date of
any change. b) You must cause any work that you distribute or publish, that in whole or in part contains or is derived from
the Program or any part thereof, to be licensed as a whole at no charge to all third parties under the terms of this License. c)
If the modified program normally reads commands interactively when run, you must cause it, when started running for such
interactive use in the most ordinary way, to print or display an announcement including an appropriate copyright notice and a
notice that there is no warranty (or else, saying that you provide a warranty) and that users may redistribute the program
under these conditions, and telling the user how to view a copy of this License. (Exception: if the Program itself is interactive
Page 29

but does not normally print such an announcement, your work based on the Program is not required to print an
announcement.)
These requirements apply to the modified work as a whole. If identifiable sections of that work are not derived from the
Program, and can be reasonably considered independent and separate works in themselves, then this License, and its terms,
do not apply to those sections when you distribute them as separate works. But when you distribute the same sections as
part of a whole which is a work based on the Program, the distribution of the whole must be on the terms of this License,
whose permissions for other licensees extend to the entire whole, and thus to each and every part regardless of who wrote it.
Thus, it is not the intent of this section to claim rights or contest your rights to work written entirely by you; rather, the
intent is to exercise the right to control the distribution of derivative or collective works based on the Program.
In addition, mere aggregation of another work not based on the Program with the Program (or with a work based on the
Program) on a volume of a storage or distribution medium does not bring the other work under the scope of this License.
3. You may copy and distribute the Program (or a work based on it, under Section 2) in object code or executable form under
the terms of Sections 1 and 2 above provided that you also do one of the following: a) Accompany it with the complete
corresponding machine-readable source code, which must be distributed under the terms of Sections 1 and 2 above on a
medium customarily used for software interchange; or, b) Accompany it with a written offer, valid for at least three years, to
give any third party, for a charge no more than your cost of physically performing source distribution, a complete machinereadable copy of the corresponding source code, to be distributed under the terms of Sections 1 and 2 above on a medium
customarily used for software interchange; or, c) Accompany it with the information you received as to the offer to distribute
corresponding source code. (This alternative is allowed only for noncommercial distribution and only if you received the
program in object code or executable form with such an offer, in accord with Subsection b above.)
The source code for a work means the preferred form of the work for making modifications to it. For an executable work,
complete source code means all the source code for all modules it contains, plus any associated interface definition files, plus
the scripts used to control compilation and installation of the executable. However, as a special exception, the source code
distributed need not include anything that is normally distributed (in either source or binary form) with the major components
(compiler, kernel, and so on) of the operating system on which the executable runs, unless that component itself
accompanies the executable.
If distribution of executable or object code is made by offering access to copy from a designated place, then offering
equivalent access to copy the source code from the same place counts as distribution of the source code, even though third
parties are not compelled to copy the source along with the object code.
4. You may not copy, modify, sublicense, or distribute the Program except as expressly provided under this License. Any
attempt otherwise to copy, modify, sublicense or distribute the Program is void, and will automatically terminate your rights
under this License. However, parties who have received copies, or rights, from you under this License will not have their
licenses terminated so long as such parties remain in full compliance.
5. You are not required to accept this License, since you have not signed it. However, nothing else grants you permission to
modify or distribute the Program or its derivative works. These actions are prohibited by law if you do not accept this License.
Therefore, by modifying or distributing the Program (or any work based on the Program), you indicate your acceptance of this
License to do so, and all its terms and conditions for copying, distributing or modifying the Program or works based on it.
6. Each time you redistribute the Program (or any work based on the Program), the recipient automatically receives a license
from the original licensor to copy, distribute or modify the Program subject to these terms and conditions. You may not
impose any further restrictions on the recipients' exercise of the rights granted herein. You are not responsible for enforcing
compliance by third parties to this License.
7. If, as a consequence of a court judgment or allegation of patent infringement or for any other reason (not limited to patent
issues), conditions are imposed on you (whether by court order, agreement or otherwise) that contradict the conditions of this
License, they do not excuse you from the conditions of this License. If you cannot distribute so as to satisfy simultaneously
your obligations under this License and any other pertinent obligations, then as a consequence you may not distribute the
Program at all. For example, if a patent license would not permit royalty-free redistribution of the Program by all those who
receive copies directly or indirectly through you, then the only way you could satisfy both it and this License would be to
refrain entirely from distribution of the Program.
If any portion of this section is held invalid or unenforceable under any particular circumstance, the balance of the section is
intended to apply and the section as a whole is intended to apply in other circumstances.
It is not the purpose of this section to induce you to infringe any patents or other property right claims or to contest validity
of any such claims; this section has the sole purpose of protecting the integrity of the free software distribution system, which
is implemented by public license practices. Many people have made generous contributions to the wide range of software
distributed through that system in reliance on consistent application of that system; it is up to the author/donor to decide if
he or she is willing to distribute software through any other system and a licensee cannot impose that choice.
This section is intended to make thoroughly clear what is believed to be a consequence of the rest of this License.
8. If the distribution and/or use of the Program is restricted in certain countries either by patents or by copyrighted
Page 30

interfaces, the original copyright holder who places the Program under this License may add an explicit geographical
distribution limitation excluding those countries, so that distribution is permitted only in or among countries not thus
excluded. In such case, this License incorporates the limitation as if written in the body of this License.
9. The Free Software Foundation may publish revised and/or new versions of the General Public License from time to time.
Such new versions will be similar in spirit to the present version, but may differ in detail to address new problems or
concerns.
Each version is given a distinguishing version number. If the Program specifies a version number of this License which applies
to it and "any later version", you have the option of following the terms and conditions either of that version or of any later
version published by the Free Software Foundation. If the Program does not specify a version number of this License, you may
choose any version ever published by the Free Software Foundation.
10. If you wish to incorporate parts of the Program into other free programs whose distribution conditions are different, write
to the author to ask for permission. For software which is copyrighted by the Free Software Foundation, write to the Free
Software Foundation; we sometimes make exceptions for this. Our decision will be guided by the two goals of preserving the
free status of all derivatives of our free software and of promoting the sharing and reuse of software generally.
NO WARRANTY
11. BECAUSE THE PROGRAM IS LICENSED FREE OF CHARGE, THERE IS NO WARRANTY FOR THE PROGRAM, TO THE EXTENT
PERMITTED BY APPLICABLE LAW. EXCEPT WHEN OTHERWISE STATED IN WRITING THE COPYRIGHT HOLDERS AND/OR
OTHER PARTIES PROVIDE THE PROGRAM "AS IS" WITHOUT WARRANTY OF ANY KIND, EITHER EXPRESSED OR IMPLIED,
INCLUDING, BUT NOT LIMITED TO, THE IMPLIED WARRANTIES OF MERCHANTABILITY AND FITNESS FOR A PARTICULAR
PURPOSE. THE ENTIRE RISK AS TO THE QUALITY AND PERFORMANCE OF THE PROGRAM IS WITH YOU. SHOULD THE
PROGRAM PROVE DEFECTIVE, YOU ASSUME THE COST OF ALL NECESSARY SERVICING, REPAIR OR CORRECTION.
12. IN NO EVENT UNLESS REQUIRED BY APPLICABLE LAW OR AGREED TO IN WRITING WILL ANY COPYRIGHT HOLDER, OR
ANY OTHER PARTY WHO MAY MODIFY AND/OR REDISTRIBUTE THE PROGRAM AS PERMITTED ABOVE, BE LIABLE TO YOU FOR
DAMAGES, INCLUDING ANY GENERAL, SPECIAL, INCIDENTAL OR CONSEQUENTIAL DAMAGES ARISING OUT OF THE USE OR
INABILITY TO USE THE PROGRAM (INCLUDING BUT NOT LIMITED TO LOSS OF DATA OR DATA BEING RENDERED
INACCURATE OR LOSSES SUSTAINED BY YOU OR THIRD PARTIES OR A FAILURE OF THE PROGRAM TO OPERATE WITH ANY
OTHER PROGRAMS), EVEN IF SUCH HOLDER OR OTHER PARTY HAS BEEN ADVISED OF THE POSSIBILITY OF SUCH DAMAGES.
END OF TERMS AND CONDITIONS
How to Apply These Terms to Your New Programs
If you develop a new program, and you want it to be of the greatest possible use to the public, the best way to achieve this is
to make it free software which everyone can redistribute and change under these terms.
To do so, attach the following notices to the program. It is safest to attach them to the start of each source file to most
effectively convey the exclusion of warranty; and each file should have at least the "copyright" line and a pointer to where the
full notice is found.
Copyright (C)
This program is free software; you can redistribute it and/or modify it under the terms of the GNU General Public
License as published by the Free Software Foundation; either version 2 of the License, or (at your option) any
later version.
This program is distributed in the hope that it will be useful, but WITHOUT ANY WARRANTY; without even the
implied warranty of MERCHANTABILITY or FITNESS FOR A PARTICULAR PURPOSE. See the GNU General Public
License for more details.
You should have received a copy of the GNU General Public License along with this program; if not, write to the
Free Software Foundation, Inc., 51 Franklin St, Fifth Floor, Boston, MA 02110-1301 USA
Also add information on how to contact you by electronic and paper mail.
If the program is interactive, make it output a short notice like this when it starts in an interactive mode:
Gnomovision version 69, Copyright (C) year name of author Gnomovision comes with ABSOLUTELY NO
WARRANTY; for details type "show w". This is free software, and you are welcome to redistribute it under
certain conditions; type "show c" for details.
The hypothetical commands "show w" and "show c" should show the appropriate parts of the General Public License. Of
course, the commands you use may be called something other than "show w" and "show c"; they could even be mouse-clicks
Page 31

or menu items -- whatever suits your program.
You should also get your employer (if you work as a programmer) or your school, if any, to sign a "copyright disclaimer" for
the program, if necessary. Here is a sample; alter the names:
Yoyodyne, Inc., hereby disclaims all copyright interest in the program "Gnomovision" (which makes passes at
compilers) written by James Hacker.
, 1 April 1989
Ty Coon, President of Vice
This General Public License does not permit incorporating your program into proprietary programs. If your program is a
subroutine library, you may consider it more useful to permit linking proprietary applications with the library. If this is what
you want to do, use the GNU Library General Public License instead of this License.
GNU Lesser General Public License
Version 2.1, February 1999
Copyright (C) 1989, 1991 Free Software Foundation, Inc. 51 Franklin St, Fifth Floor, Boston, MA 02110-1301 USA
Everyone is permitted to copy and distribute verbatim copies of this license document, but changing it is not allowed.
[This is the first released version of the Lesser GPL. It also counts as the successor of the GNU Library Public License, version
2, hence the version number 2.1.]
Preamble
The licenses for most software are designed to take away your freedom to share and change it. By contrast, the GNU General
Public Licenses are intended to guarantee your freedom to share and change free software--to make sure the software is free
for all its users.
This license, the Lesser General Public License, applies to some specially designated software packages--typically libraries--of
the Free Software Foundation and other authors who decide to use it. You can use it too, but we suggest you first think
carefully about whether this license or the ordinary General Public License is the better strategy to use in any particular case,
based on the explanations below.
When we speak of free software, we are referring to freedom of use, not price. Our General Public Licenses are designed to
make sure that you have the freedom to distribute copies of free software (and charge for this service if you wish); that you
receive source code or can get it if you want it; that you can change the software and use pieces of it in new free programs;
and that you are informed that you can do these things.
To protect your rights, we need to make restrictions that forbid distributors to deny you these rights or to ask you to
surrender these rights. These restrictions translate to certain responsibilities for you if you distribute copies of the library or if
you modify it.
For example, if you distribute copies of the library, whether gratis or for a fee, you must give the recipients all the rights that
we gave you. You must make sure that they, too, receive or can get the source code. If you link other code with the library,
you must provide complete object files to the recipients, so that they can relink them with the library after making changes to
the library and recompiling it. And you must show them these terms so they know their rights.
We protect your rights with a two-step method: (1) we copyright the library, and (2) we offer you this license, which gives
you legal permission to copy, distribute and/or modify the library.
To protect each distributor, we want to make it very clear that there is no warranty for the free library. Also, if the library is
modified by someone else and passed on, the recipients should know that what they have is not the original version, so that
the original author's reputation will not be affected by problems that might be introduced by others.
Finally, software patents pose a constant threat to the existence of any free program. We wish to make sure that a company
cannot effectively restrict the users of a free program by obtaining a restrictive license from a patent holder. Therefore, we
insist that any patent license obtained for a version of the library must be consistent with the full freedom of use specified in
this license.
Most GNU software, including some libraries, is covered by the ordinary GNU General Public License. This license, the GNU
Lesser General Public License, applies to certain designated libraries, and is quite different from the ordinary General Public
License. We use this license for certain libraries in order to permit linking those libraries into non-free programs.
When a program is linked with a library, whether statically or using a shared library, the combination of the two is legally
speaking a combined work, a derivative of the original library. The ordinary General Public License therefore permits such
Page 32

linking only if the entire combination fits its criteria of freedom. The Lesser General Public License permits more lax criteria
for linking other code with the library.
We call this license the "Lesser" General Public License because it does Less to protect the user's freedom than the ordinary
General Public License. It also provides other free software developers Less of an advantage over competing non-free
programs. These disadvantages are the reason we use the ordinary General Public License for many libraries. However, the
Lesser license provides advantages in certain special circumstances.
For example, on rare occasions, there may be a special need to encourage the widest possible use of a certain library, so that
it becomes a de-facto standard. To achieve this, non-free programs must be allowed to use the library. A more frequent case
is that a free library does the same job as widely used non-free libraries. In this case, there is little to gain by limiting the
free library to free software only, so we use the Lesser General Public License.
In other cases, permission to use a particular library in non-free programs enables a greater number of people to use a large
body of free software. For example, permission to use the GNU C Library in non-free programs enables many more people to
use the whole GNU operating system, as well as its variant, the GNU/Linux operating system.
Although the Lesser General Public License is Less protective of the users' freedom, it does ensure that the user of a program
that is linked with the Library has the freedom and the wherewithal to run that program using a modified version of the
Library.
The precise terms and conditions for copying, distribution and modification follow. Pay close attention to the difference
between a "work based on the library" and a "work that uses the library". The former contains code derived from the library,
whereas the latter must be combined with the library in order to run.
GNU LESSER GENERAL PUBLIC LICENSE
TERMS AND CONDITIONS FOR COPYING, DISTRIBUTION AND MODIFICATION
0. This License Agreement applies to any software library or other program which contains a notice placed by the copyright
holder or other authorized party saying it may be distributed under the terms of this Lesser General Public License (also called
"this License"). Each licensee is addressed as "you".
A "library" means a collection of software functions and/or data prepared so as to be conveniently linked with application
programs (which use some of those functions and data) to form executables.
The "Library", below, refers to any such software library or work which has been distributed under these terms. A "work
based on the Library" means either the Library or any derivative work under copyright law: that is to say, a work containing
the Library or a portion of it, either verbatim or with modifications and/or translated straightforwardly into another language.
(Hereinafter, translation is included without limitation in the term "modification".)
"Source code" for a work means the preferred form of the work for making modifications to it. For a library, complete source
code means all the source code for all modules it contains, plus any associated interface definition files, plus the scripts used
to control compilation and installation of the library.
Activities other than copying, distribution and modification are not covered by this License; they are outside its scope. The act
of running a program using the Library is not restricted, and output from such a program is covered only if its contents
constitute a work based on the Library (independent of the use of the Library in a tool for writing it). Whether that is true
depends on what the Library does and what the program that uses the Library does.
1. You may copy and distribute verbatim copies of the Library's complete source code as you receive it, in any medium,
provided that you conspicuously and appropriately publish on each copy an appropriate copyright notice and disclaimer of
warranty; keep intact all the notices that refer to this License and to the absence of any warranty; and distribute a copy of
this License along with the Library.
You may charge a fee for the physical act of transferring a copy, and you may at your option offer warranty protection in
exchange for a fee.
2. You may modify your copy or copies of the Library or any portion of it, thus forming a work based on the Library, and copy
and distribute such modifications or work under the terms of Section 1 above, provided that you also meet all of these
conditions: a) The modified work must itself be a software library. b) You must cause the files modified to carry prominent
notices stating that you changed the files and the date of any change. c) You must cause the whole of the work to be licensed
at no charge to all third parties under the terms of this License. d) If a facility in the modified Library refers to a function or a
table of data to be supplied by an application program that uses the facility, other than as an argument passed when the
facility is invoked, then you must make a good faith effort to ensure that, in the event an application does not supply such
function or table, the facility still operates, and performs whatever part of its purpose remains meaningful. (For example, a
function in a library to compute square roots has a purpose that is entirely well-defined independent of the application.
Therefore, Subsection 2d requires that any application-supplied function or table used by this function must be optional: if the
Page 33

application does not supply it, the square root function must still compute square roots.)
These requirements apply to the modified work as a whole. If identifiable sections of that work are not derived from the
Library, and can be reasonably considered independent and separate works in themselves, then this License, and its terms,
do not apply to those sections when you distribute them as separate works. But when you distribute the same sections as
part of a whole which is a work based on the Library, the distribution of the whole must be on the terms of this License,
whose permissions for other licensees extend to the entire whole, and thus to each and every part regardless of who wrote it.
Thus, it is not the intent of this section to claim rights or contest your rights to work written entirely by you; rather, the
intent is to exercise the right to control the distribution of derivative or collective works based on the Library.
In addition, mere aggregation of another work not based on the Library with the Library (or with a work based on the Library)
on a volume of a storage or distribution medium does not bring the other work under the scope of this License.
3. You may opt to apply the terms of the ordinary GNU General Public License instead of this License to a given copy of the
Library. To do this, you must alter all the notices that refer to this License, so that they refer to the ordinary GNU General
Public License, version 2, instead of to this License. (If a newer version than version 2 of the ordinary GNU General Public
License has appeared, then you can specify that version instead if you wish.) Do not make any other change in these notices.
Once this change is made in a given copy, it is irreversible for that copy, so the ordinary GNU General Public License applies
to all subsequent copies and derivative works made from that copy.
This option is useful when you wish to copy part of the code of the Library into a program that is not a library.
4. You may copy and distribute the Library (or a portion or derivative of it, under Section 2) in object code or executable form
under the terms of Sections 1 and 2 above provided that you accompany it with the complete corresponding machinereadable source code, which must be distributed under the terms of Sections 1 and 2 above on a medium customarily used for
software interchange.
If distribution of object code is made by offering access to copy from a designated place, then offering equivalent access to
copy the source code from the same place satisfies the requirement to distribute the source code, even though third parties
are not compelled to copy the source along with the object code.
5. A program that contains no derivative of any portion of the Library, but is designed to work with the Library by being
compiled or linked with it, is called a "work that uses the Library". Such a work, in isolation, is not a derivative work of the
Library, and therefore falls outside the scope of this License.
However, linking a "work that uses the Library" with the Library creates an executable that is a derivative of the Library
(because it contains portions of the Library), rather than a "work that uses the library". The executable is therefore covered
by this License. Section 6 states terms for distribution of such executables.
When a "work that uses the Library" uses material from a header file that is part of the Library, the object code for the work
may be a derivative work of the Library even though the source code is not. Whether this is true is especially significant if the
work can be linked without the Library, or if the work is itself a library. The threshold for this to be true is not precisely
defined by law.
If such an object file uses only numerical parameters, data structure layouts and accessors, and small macros and small inline
functions (ten lines or less in length), then the use of the object file is unrestricted, regardless of whether it is legally a
derivative work. (Executables containing this object code plus portions of the Library will still fall under Section 6.)
Otherwise, if the work is a derivative of the Library, you may distribute the object code for the work under the terms of
Section 6. Any executables containing that work also fall under Section 6, whether or not they are linked directly with the
Library itself.
6. As an exception to the Sections above, you may also combine or link a "work that uses the Library" with the Library to
produce a work containing portions of the Library, and distribute that work under terms of your choice, provided that the
terms permit modification of the work for the customer's own use and reverse engineering for debugging such modifications.
You must give prominent notice with each copy of the work that the Library is used in it and that the Library and its use are
covered by this License. You must supply a copy of this License. If the work during execution displays copyright notices, you
must include the copyright notice for the Library among them, as well as a reference directing the user to the copy of this
License. Also, you must do one of these things: a) Accompany the work with the complete corresponding machine-readable
source code for the Library including whatever changes were used in the work (which must be distributed under Sections 1
and 2 above); and, if the work is an executable linked with the Library, with the complete machine-readable "work that uses
the Library", as object code and/or source code, so that the user can modify the Library and then relink to produce a
modified executable containing the modified Library. (It is understood that the user who changes the contents of definitions
files in the Library will not necessarily be able to recompile the application to use the modified definitions.) b) Use a suitable
shared library mechanism for linking with the Library. A suitable mechanism is one that (1) uses at run time a copy of the
library already present on the user's computer system, rather than copying library functions into the executable, and (2) will
operate properly with a modified version of the library, if the user installs one, as long as the modified version is interfacecompatible with the version that the work was made with. c) Accompany the work with a written offer, valid for at least three
Page 34

years, to give the same user the materials specified in Subsection 6a, above, for a charge no more than the cost of
performing this distribution. d) If distribution of the work is made by offering access to copy from a designated place, offer
equivalent access to copy the above specified materials from the same place. e) Verify that the user has already received a
copy of these materials or that you have already sent this user a copy.
For an executable, the required form of the "work that uses the Library" must include any data and utility programs needed
for reproducing the executable from it. However, as a special exception, the materials to be distributed need not include
anything that is normally distributed (in either source or binary form) with the major components (compiler, kernel, and so
on) of the operating system on which the executable runs, unless that component itself accompanies the executable.
It may happen that this requirement contradicts the license restrictions of other proprietary libraries that do not normally
accompany the operating system. Such a contradiction means you cannot use both them and the Library together in an
executable that you distribute.
7. You may place library facilities that are a work based on the Library side-by-side in a single library together with other
library facilities not covered by this License, and distribute such a combined library, provided that the separate distribution of
the work based on the Library and of the other library facilities is otherwise permitted, and provided that you do these two
things: a) Accompany the combined library with a copy of the same work based on the Library, uncombined with any other
library facilities. This must be distributed under the terms of the Sections above. b) Give prominent notice with the combined
library of the fact that part of it is a work based on the Library, and explaining where to find the accompanying uncombined
form of the same work.
8. You may not copy, modify, sublicense, link with, or distribute the Library except as expressly provided under this License.
Any attempt otherwise to copy, modify, sublicense, link with, or distribute the Library is void, and will automatically terminate
your rights under this License. However, parties who have received copies, or rights, from you under this License will not have
their licenses terminated so long as such parties remain in full compliance.
9. You are not required to accept this License, since you have not signed it. However, nothing else grants you permission to
modify or distribute the Library or its derivative works. These actions are prohibited by law if you do not accept this License.
Therefore, by modifying or distributing the Library (or any work based on the Library), you indicate your acceptance of this
License to do so, and all its terms and conditions for copying, distributing or modifying the Library or works based on it.
10. Each time you redistribute the Library (or any work based on the Library), the recipient automatically receives a license
from the original licensor to copy, distribute, link with or modify the Library subject to these terms and conditions. You may
not impose any further restrictions on the recipients' exercise of the rights granted herein. You are not responsible for
enforcing compliance by third parties with this License.
11. If, as a consequence of a court judgment or allegation of patent infringement or for any other reason (not limited to
patent issues), conditions are imposed on you (whether by court order, agreement or otherwise) that contradict the conditions
of this License, they do not excuse you from the conditions of this License. If you cannot distribute so as to satisfy
simultaneously your obligations under this License and any other pertinent obligations, then as a consequence you may not
distribute the Library at all. For example, if a patent license would not permit royalty-free redistribution of the Library by all
those who receive copies directly or indirectly through you, then the only way you could satisfy both it and this License would
be to refrain entirely from distribution of the Library.
If any portion of this section is held invalid or unenforceable under any particular circumstance, the balance of the section is
intended to apply, and the section as a whole is intended to apply in other circumstances.
It is not the purpose of this section to induce you to infringe any patents or other property right claims or to contest validity
of any such claims; this section has the sole purpose of protecting the integrity of the free software distribution system which
is implemented by public license practices. Many people have made generous contributions to the wide range of software
distributed through that system in reliance on consistent application of that system; it is up to the author/donor to decide if
he or she is willing to distribute software through any other system and a licensee cannot impose that choice.
This section is intended to make thoroughly clear what is believed to be a consequence of the rest of this License.
12. If the distribution and/or use of the Library is restricted in certain countries either by patents or by copyrighted
interfaces, the original copyright holder who places the Library under this License may add an explicit geographical distribution
limitation excluding those countries, so that distribution is permitted only in or among countries not thus excluded. In such
case, this License incorporates the limitation as if written in the body of this License.
13. The Free Software Foundation may publish revised and/or new versions of the Lesser General Public License from time to
time. Such new versions will be similar in spirit to the present version, but may differ in detail to address new problems or
concerns.
Each version is given a distinguishing version number. If the Library specifies a version number of this License which applies
to it and "any later version", you have the option of following the terms and conditions either of that version or of any later
version published by the Free Software Foundation. If the Library does not specify a license version number, you may choose
any version ever published by the Free Software Foundation.
14. If you wish to incorporate parts of the Library into other free programs whose distribution conditions are incompatible
Page 35

with these, write to the author to ask for permission. For software which is copyrighted by the Free Software Foundation,
write to the Free Software Foundation; we sometimes make exceptions for this. Our decision will be guided by the two goals
of preserving the free status of all derivatives of our free software and of promoting the sharing and reuse of software
generally.
NO WARRANTY
15. BECAUSE THE LIBRARY IS LICENSED FREE OF CHARGE, THERE IS NO WARRANTY FOR THE LIBRARY, TO THE EXTENT
PERMITTED BY APPLICABLE LAW. EXCEPT WHEN OTHERWISE STATED IN WRITING THE COPYRIGHT HOLDERS AND/OR
OTHER PARTIES PROVIDE THE LIBRARY "AS IS" WITHOUT WARRANTY OF ANY KIND, EITHER EXPRESSED OR IMPLIED,
INCLUDING, BUT NOT LIMITED TO, THE IMPLIED WARRANTIES OF MERCHANTABILITY AND FITNESS FOR A PARTICULAR
PURPOSE. THE ENTIRE RISK AS TO THE QUALITY AND PERFORMANCE OF THE LIBRARY IS WITH YOU. SHOULD THE LIBRARY
PROVE DEFECTIVE, YOU ASSUME THE COST OF ALL NECESSARY SERVICING, REPAIR OR CORRECTION.
16. IN NO EVENT UNLESS REQUIRED BY APPLICABLE LAW OR AGREED TO IN WRITING WILL ANY COPYRIGHT HOLDER, OR
ANY OTHER PARTY WHO MAY MODIFY AND/OR REDISTRIBUTE THE LIBRARY AS PERMITTED ABOVE, BE LIABLE TO YOU FOR
DAMAGES, INCLUDING ANY GENERAL, SPECIAL, INCIDENTAL OR CONSEQUENTIAL DAMAGES ARISING OUT OF THE USE OR
INABILITY TO USE THE LIBRARY (INCLUDING BUT NOT LIMITED TO LOSS OF DATA OR DATA BEING RENDERED INACCURATE
OR LOSSES SUSTAINED BY YOU OR THIRD PARTIES OR A FAILURE OF THE LIBRARY TO OPERATE WITH ANY OTHER
SOFTWARE), EVEN IF SUCH HOLDER OR OTHER PARTY HAS BEEN ADVISED OF THE POSSIBILITY OF SUCH DAMAGES.
END OF TERMS AND CONDITIONS
How to Apply These Terms to Your New Libraries
If you develop a new library, and you want it to be of the greatest possible use to the public, we recommend making it free
software that everyone can redistribute and change. You can do so by permitting redistribution under these terms (or,
alternatively, under the terms of the ordinary General Public License).
To apply these terms, attach the following notices to the library. It is safest to attach them to the start of each source file to
most effectively convey the exclusion of warranty; and each file should have at least the "copyright" line and a pointer to
where the full notice is found.
Copyright (C)
This library is free software; you can redistribute it and/or modify it under the terms of the GNU Lesser General
Public License as published by the Free Software Foundation; either version 2.1 of the License, or (at your
option) any later version.
This library is distributed in the hope that it will be useful, but WITHOUT ANY WARRANTY; without even the
implied warranty of MERCHANTABILITY or FITNESS FOR A PARTICULAR PURPOSE. See the GNU Lesser General
Public License for more details.
You should have received a copy of the GNU Lesser General Public License along with this library; if not, write to
the Free Software Foundation, Inc., 51 Franklin St, Fifth Floor, Boston, MA 02110-1301 USA
Also add information on how to contact you by electronic and paper mail.
You should also get your employer (if you work as a programmer) or your school, if any, to sign a "copyright disclaimer" for
the library, if necessary. Here is a sample; alter the names:
Yoyodyne, Inc., hereby disclaims all copyright interest in the library `Frob' (a library for tweaking knobs) written
by James Random Hacker.
, 1 April 1990
Ty Coon, President of Vice
That's all there is to it!
BSD Licenses
Page 36

Copyright (c) 199x-200x ,
All rights reserved.
1987, 1988, 1989, 1998 The Open Group
Redistribution and use in source and binary forms, with or without modification, are permitted provided that the following
conditions are met:
Redistributions of source code must retain the above copyright notice, this list of conditions and the following
disclaimer.
Redistributions in binary form must reproduce the above copyright notice, this list of conditions and the following
disclaimer in the documentation and/or other materials provided with the distribution.
Neither the name of the nor the names of its contributors may be used to endorse or promote products derived from
this software without specific prior written permission.
THIS SOFTWARE IS PROVIDED BY THE COPYRIGHT HOLDERS AND CONTRIBUTORS "AS IS" AND ANY EXPRESS OR IMPLIED
WARRANTIES, INCLUDING, BUT NOT LIMITED TO, THE IMPLIED WARRANTIES OF MERCHANTABILITY AND FITNESS FOR A
PARTICULAR PURPOSE ARE DISCLAIMED. IN NO EVENT SHALL THE COPYRIGHT OWNER OR CONTRIBUTORS BE LIABLE FOR
ANY DIRECT, INDIRECT, INCIDENTAL, SPECIAL, EXEMPLARY, OR CONSEQUENTIAL DAMAGES (INCLUDING, BUT NOT LIMITED
TO, PROCUREMENT OF SUBSTITUTE GOODS OR SERVICES; LOSS OF USE, DATA, OR PROFITS; OR BUSINESS
INTERRUPTION) HOWEVER CAUSED AND ON ANY THEORY OF LIABILITY, WHETHER IN CONTRACT, STRICT LIABILITY, OR
TORT (INCLUDING NEGLIGENCE OR OTHERWISE) ARISING IN ANY WAY OUT OF THE USE OF THIS SOFTWARE, EVEN IF
ADVISED OF THE POSSIBILITY OF SUCH DAMAGE.
bspatch License
This license applies to the files toolkit/mozapps/update/src/updater/bspatch.cpp and
toolkit/mozapps/update/src/updater/bspatch.h.
Copyright 2003,2004 Colin Percival
All rights reserved
Redistribution and use in source and binary forms, with or without modification, are permitted providing that the following
conditions are met:
1. Redistributions of source code must retain the above copyright notice, this list of conditions and the following
disclaimer.
2. Redistributions in binary form must reproduce the above copyright notice, this list of conditions and the following
disclaimer in the documentation and/or other materials provided with the distribution.
THIS SOFTWARE IS PROVIDED BY THE AUTHOR ``AS IS'' AND ANY EXPRESS OR IMPLIED WARRANTIES, INCLUDING, BUT
NOT LIMITED TO, THE IMPLIED WARRANTIES OF MERCHANTABILITY AND FITNESS FOR A PARTICULAR PURPOSE ARE
DISCLAIMED. IN NO EVENT SHALL THE AUTHOR BE LIABLE FOR ANY DIRECT, INDIRECT, INCIDENTAL, SPECIAL, EXEMPLARY,
OR CONSEQUENTIAL DAMAGES (INCLUDING, BUT NOT LIMITED TO, PROCUREMENT OF SUBSTITUTE GOODS OR SERVICES;
LOSS OF USE, DATA, OR PROFITS; OR BUSINESS INTERRUPTION) HOWEVER CAUSED AND ON ANY THEORY OF LIABILITY,
WHETHER IN CONTRACT, STRICT LIABILITY, OR TORT (INCLUDING NEGLIGENCE OR OTHERWISE) ARISING IN ANY WAY OUT
OF THE USE OF THIS SOFTWARE, EVEN IF ADVISED OF THE POSSIBILITY OF SUCH DAMAGE.
Cairo Licenses
This license, with different copyright holders, applies to certain files in the directory gfx/cairo/. The copyright holders and
the applicable ranges of dates are as follows:
2004 Richard D. Worth
2004, 2005 Red Hat, Inc.
2003 USC, Information Sciences Institute
2004 David Reveman
2005 Novell, Inc.
2004 David Reveman, Peter Nilsson 2000 Keith Packard, member of The XFree86 Project, Inc.
2005 Lars Knoll & Zack Rusin, Trolltech
1998, 2000, 2002, 2004 Keith Packard
2004 Nicholas Miell
2005 Trolltech AS
2000 SuSE, Inc.
2003 Carl Worth
Page 37

1987, 1988, 1989 Digital Equipment Corporation, Maynard, Massachusetts.
1998 Keith Packard
2003 Richard Henderson
Copyright ©
Permission to use, copy, modify, distribute, and sell this software and its documentation for any purpose is hereby granted
without fee, provided that the above copyright notice appear in all copies and that both that copyright notice and this
permission notice appear in supporting documentation, and that the name of not be used in advertising or publicity pertaining
to distribution of the software without specific, written prior permission. makes no representations about the suitability of this
software for any purpose. It is provided "as is" without express or implied warranty.
DISCLAIMS ALL WARRANTIES WITH REGARD TO THIS SOFTWARE, INCLUDING ALL IMPLIED WARRANTIES OF
MERCHANTABILITY AND FITNESS, IN NO EVENT SHALL BE LIABLE FOR ANY SPECIAL, INDIRECT OR CONSEQUENTIAL
DAMAGES OR ANY DAMAGES WHATSOEVER RESULTING FROM LOSS OF USE, DATA OR PROFITS, WHETHER IN AN ACTION OF
CONTRACT, NEGLIGENCE OR OTHER TORTIOUS ACTION, ARISING OUT OF OR IN CONNECTION WITH THE USE OR
PERFORMANCE OF THIS SOFTWARE.
Expat License
This license applies to certain files in the directory parser/expat/.
Copyright (c) 1998, 1999, 2000 Thai Open Source Software Center Ltd. and Clark Cooper.
Copyright (c) 2001, 2002, 2003 Expat maintainers.
Permission is hereby granted, free of charge, to any person obtaining a copy of this software and associated documentation
files (the"Software"), to deal in the Software without restriction, including without limitation the rights to use, copy, modify,
merge, publish, distribute, sublicense, and/or sell copies of the Software, and to permit persons to whom the Software is
furnished to do so, subject to the following conditions:
The above copyright notice and this permission notice shall be included in all copies or substantial portions of the Software.
THE SOFTWARE IS PROVIDED "AS IS", WITHOUT WARRANTY OF ANY KIND, EXPRESS OR IMPLIED, INCLUDING BUT NOT
LIMITED TO THE WARRANTIES OF MERCHANTABILITY, FITNESS FOR A PARTICULAR PURPOSE AND NONINFRINGEMENT. IN
NO EVENT SHALL THE AUTHORS OR COPYRIGHT HOLDERS BE LIABLE FOR ANY CLAIM, DAMAGES OR OTHER LIABILITY,
WHETHER IN AN ACTION OF CONTRACT, TORT OR OTHERWISE, ARISING FROM, OUT OF OR IN CONNECTION WITH THE
SOFTWARE OR THE USE OR OTHER DEALINGS IN THE SOFTWARE.
The MIT License
Copyright (c)
Permission is hereby granted, free of charge, to any person obtaining a copy of this software and associated documentation
files (the "Software"), to deal in the Software without restriction, including without limitation the rights to use, copy, modify,
merge, publish, distribute, sublicense, and/or sell copies of the Software, and to permit persons to whom the Software is
furnished to do so, subject to the following conditions:
The above copyright notice and this permission notice shall be included in all copies or substantial portions of the Software.
THE SOFTWARE IS PROVIDED "AS IS", WITHOUT WARRANTY OF ANY KIND, EXPRESS OR IMPLIED, INCLUDING BUT NOT
LIMITED TO THE WARRANTIES OF MERCHANTABILITY, FITNESS FOR A PARTICULAR PURPOSE AND NONINFRINGEMENT. IN
NO EVENT SHALL THE AUTHORS OR COPYRIGHT HOLDERS BE LIABLE FOR ANY CLAIM, DAMAGES OR OTHER LIABILITY,
WHETHER IN AN ACTION OF CONTRACT, TORT OR OTHERWISE, ARISING FROM, OUT OF OR IN CONNECTION WITH THE
SOFTWARE OR THE USE OR OTHER DEALINGS IN THE SOFTWARE.
Myspell License
This license applies to certain files in the directory extensions/spellcheck/myspell/src/.
Copyright 2002 Kevin B. Hendricks, Stratford, Ontario, Canada, and Contributors. All rights reserved.
Redistribution and use in source and binary forms, with or without modification, are permitted provided that the following
Page 38

conditions are met:
1. Redistributions of source code must retain the above copyright notice, this list of conditions and the following
2.3 2.2.2 2002-2003 PSF yes
disclaimer.
2. Redistributions in binary form must reproduce the above copyright notice, this list of conditions and the following
disclaimer in the documentation and/or other materials provided with the distribution.
3. All modifications to the source code must be clearly marked as such. Binary redistributions based on modified source
code must be clearly marked as modified versions in the documentation and/or other materials provided with the
distribution.
THIS SOFTWARE IS PROVIDED BY KEVIN B. HENDRICKS AND CONTRIBUTORS "AS IS"' AND ANY EXPRESS OR IMPLIED
WARRANTIES, INCLUDING, BUT NOT LIMITED TO, THE IMPLIED WARRANTIES OF MERCHANTABILITY AND FITNESS FOR A
PARTICULAR PURPOSE ARE DISCLAIMED. IN NO EVENT SHALL KEVIN B. HENDRICKS OR CONTRIBUTORS BE LIABLE FOR ANY
DIRECT, INDIRECT, INCIDENTAL, SPECIAL, EXEMPLARY, OR CONSEQUENTIAL DAMAGES (INCLUDING, BUT NOT LIMITED TO,
PROCUREMENT OF SUBSTITUTE GOODS OR SERVICES; LOSS OF USE, DATA, OR PROFITS; OR BUSINESS INTERRUPTION)
HOWEVER CAUSED AND ON ANY THEORY OF LIABILITY, WHETHER IN CONTRACT, STRICT LIABILITY, OR TORT (INCLUDING
NEGLIGENCE OR OTHERWISE) ARISING IN ANY WAY OUT OF THE USE OF THIS SOFTWARE, EVEN IF ADVISED OF THE
POSSIBILITY OF SUCH DAMAGE.
Python 2.4.4 License
This is the official license for the Python 2.4 release.
A. HISTORY OF THE SOFTWARE
===========================
Python was created in the early 1990s by Guido van Rossum at Stichting Mathematisch Centrum (CWI, see
http://www.cwi.nl) in the Netherlands as a successor of a language called ABC. Guido remains Python's principal author,
although it includes many contributions from others.
In 1995, Guido continued his work on Python at the Corporation for National Research Initiatives (CNRI, see
http://www.cnri.reston.va.us) in Reston, Virginia where he released several versions of the software.
In May 2000, Guido and the Python core development team moved to BeOpen.com to form the BeOpen PythonLabs team. In
October of the same year, the PythonLabs team moved to Digital Creations (now Zope Corporation, see
http://www.zope.com). In 2001, the Python Software Foundation (PSF, see http://www.python.org/psf/) was formed,
a non-profit organization created specifically to own Python-related Intellectual Property. Zope Corporation is a sponsoring
member of the PSF.
All Python releases are Open Source (see http://www.opensource.org for the Open Source Definition). Historically, most,
but not all, Python releases have also been GPL-compatible; the table below summarizes the various releases:
Release
0.9.0 thru 1.2 1991-1995 CWI yes
1.3 thru 1.5.2 1.2 1995-1999 CNRI yes
1.6 1.5.2 2000 CNRI no
2.0 1.6 2000 BeOpen.com no
1.6.1 1.6 2001 CNRI yes (2)
2.1 2.0 + 1.6.1 2001 PSF no
2.0.1 2.0 + 1.6.1 2001 PSF yes
2.1.1 2.1 + 2.0.1 2001 PSF yes
2.2 2.1.1 2001 PSF yes
2.1.2 2.1.1 2002 PSF yes
2.1.3 2.1.2 2002 PSF yes
2.2.1 2.2 2002 PSF yes
2.2.2 2.2.1 2002 PSF yes
2.2.3 2.2.2 2003 PSF yes
Derived
from
Year Owner
GPL-
compatible?
Page 39

2.3.1 2.3 2002-2003 PSF yes
2.3.2 2.3.1 2002-2003 PSF yes
2.3.3 2.3.2 2002-2003 PSF yes
2.3.4 2.3.3 2004 PSF yes
2.3.5 2.3.4 2005 PSF yes
2.4 2.3 2004 PSF yes
2.4.1 2.4 2005 PSF yes
2.4.2 2.4.1 2005 PSF yes
2.4.3 2.4.2 2006 PSF yes
2.4.4 2.4.3 2006 PSF yes
Footnotes:
(1) GPL-compatible doesn't mean that we're distributing Python under the GPL. All Python licenses, unlike the GPL, let you
distribute a modified version without making your changes open source. The GPL-compatible licenses make it possible to
combine Python with other software that is released under the GPL; the others don't.
(2) According to Richard Stallman, 1.6.1 is not GPL-compatible, because its license has a choice of law clause. According to
CNRI, however, Stallman's lawyer has told CNRI's lawyer that 1.6.1 is "not incompatible" with the GPL.
Thanks to the many outside volunteers who have worked under Guido's direction to make these releases possible.
B. TERMS AND CONDITIONS FOR ACCESSING OR OTHERWISE USING PYTHON
=================================================================
PSF LICENSE AGREEMENT FOR PYTHON 2.4
-----------------------------------------------------
1. This LICENSE AGREEMENT is between the Python Software Foundation ("PSF"), and the Individual or Organization
("Licensee") accessing and otherwise using Python 2.4 software in source or binary form and its associated documentation.
2. Subject to the terms and conditions of this License Agreement, PSF hereby grants Licensee a nonexclusive, royalty-free,
world-wide license to reproduce, analyze, test, perform and/or display publicly, prepare derivative works, distribute, and
otherwise use Python 2.4 alone or in any derivative version, provided, however, that PSF's License Agreement and PSF's
notice of copyright, i.e., "Copyright (c) 2001, 2002, 2003, 2004 Python Software Foundation; All Rights Reserved"
are retained in Python 2.4 alone or in any derivative version prepared by Licensee.
3. In the event Licensee prepares a derivative work that is based on or incorporates Python 2.4 or any part thereof, and
wants to make the derivative work available to others as provided herein, then Licensee hereby agrees to include in any such
work a brief summary of the changes made to Python 2.4.
4. PSF is making Python 2.4 available to Licensee on an "AS IS" basis. PSF MAKES NO REPRESENTATIONS OR WARRANTIES,
EXPRESS OR IMPLIED. BY WAY OF EXAMPLE, BUT NOT LIMITATION, PSF MAKES NO AND DISCLAIMS ANY REPRESENTATION
OR WARRANTY OF MERCHANTABILITY OR FITNESS FOR ANY PARTICULAR PURPOSE OR THAT THE USE OF PYTHON 2.4 WILL
NOT INFRINGE ANY THIRD PARTY RIGHTS.
5. PSF SHALL NOT BE LIABLE TO LICENSEE OR ANY OTHER USERS OF PYTHON 2.4 FOR ANY INCIDENTAL, SPECIAL, OR
CONSEQUENTIAL DAMAGES OR LOSS AS A RESULT OF MODIFYING, DISTRIBUTING, OR OTHERWISE USING PYTHON 2.4, OR
ANY DERIVATIVE THEREOF, EVEN IF ADVISED OF THE POSSIBILITY THEREOF.
6. This License Agreement will automatically terminate upon a material breach of its terms and conditions.
7. Nothing in this License Agreement shall be deemed to create any relationship of agency, partnership, or joint venture
between PSF and Licensee. This License Agreement does not grant permission to use PSF trademarks or trade name in a
trademark sense to endorse or promote products or services of Licensee, or any third party.
8. By copying, installing or otherwise using Python 2.4, Licensee agrees to be bound by the terms and conditions of this
License Agreement.
BEOPEN.COM LICENSE AGREEMENT FOR PYTHON 2.0
-------------------------------------------------------------------
Page 40

BEOPEN PYTHON OPEN SOURCE LICENSE AGREEMENT VERSION 1
1. This LICENSE AGREEMENT is between BeOpen.com ("BeOpen"), having an office at 160 Saratoga Avenue, Santa Clara, CA
95051, and the Individual or Organization ("Licensee") accessing and otherwise using this software in source or binary form
and its associated documentation ("the Software").
2. Subject to the terms and conditions of this BeOpen Python License Agreement, BeOpen hereby grants Licensee a nonexclusive, royalty-free, world-wide license to reproduce, analyze, test, perform and/or display publicly, prepare derivative
works, distribute, and otherwise use the Software alone or in any derivative version, provided, however, that the BeOpen
Python License is retained in the Software, alone or in any derivative version prepared by Licensee.
3. BeOpen is making the Software available to Licensee on an "AS IS" basis. BEOPEN MAKES NO REPRESENTATIONS OR
WARRANTIES, EXPRESS OR IMPLIED. BY WAY OF EXAMPLE, BUT NOT LIMITATION, BEOPEN MAKES NO AND DISCLAIMS ANY
REPRESENTATION OR WARRANTY OF MERCHANTABILITY OR FITNESS FOR ANY PARTICULAR PURPOSE OR THAT THE USE OF
THE SOFTWARE WILL NOT INFRINGE ANY THIRD PARTY RIGHTS.
4. BEOPEN SHALL NOT BE LIABLE TO LICENSEE OR ANY OTHER USERS OF THE SOFTWARE FOR ANY INCIDENTAL, SPECIAL,
OR CONSEQUENTIAL DAMAGES OR LOSS AS A RESULT OF USING, MODIFYING OR DISTRIBUTING THE SOFTWARE, OR ANY
DERIVATIVE THEREOF, EVEN IF ADVISED OF THE POSSIBILITY THEREOF.
5. This License Agreement will automatically terminate upon a material breach of its terms and conditions.
6. This License Agreement shall be governed by and interpreted in all respects by the law of the State of California, excluding
conflict of law provisions. Nothing in this License Agreement shall be deemed to create any relationship of agency,
partnership, or joint venture between BeOpen and Licensee. This License Agreement does not grant permission to use
BeOpen trademarks or trade names in a trademark sense to endorse or promote products or services of Licensee, or any third
party. As an exception, the "BeOpen Python" logos available at http://www.pythonlabs.com/logos.html may be used
according to the permissions granted on that web page.
7. By copying, installing or otherwise using the software, Licensee agrees to be bound by the terms and conditions of this
License Agreement.
CNRI LICENSE AGREEMENT FOR PYTHON 1.6.1
----------------------------------------------------------
1. This LICENSE AGREEMENT is between the Corporation for National Research Initiatives, having an office at 1895 Preston
White Drive, Reston, VA 20191 ("CNRI"), and the Individual or Organization ("Licensee") accessing and otherwise using
Python 1.6.1 software in source or binary form and its associated documentation.
2. Subject to the terms and conditions of this License Agreement, CNRI hereby grants Licensee a nonexclusive, royalty-free,
world-wide license to reproduce, analyze, test, perform and/or display publicly, prepare derivative works, distribute, and
otherwise use Python 1.6.1 alone or in any derivative version, provided, however, that CNRI's License Agreement and CNRI's
notice of copyright, i.e., "Copyright (c) 1995-2001 Corporation for National Research Initiatives; All Rights Reserved" are
retained in Python 1.6.1 alone or in any derivative version prepared by Licensee. Alternately, in lieu of CNRI's License
Agreement, Licensee may substitute the following text (omitting the quotes): "Python 1.6.1 is made available subject to the
terms and conditions in CNRI's License Agreement. This Agreement together with Python 1.6.1 may be located on the
Internet using the following unique, persistent identifier (known as a handle): 1895.22/1013. This Agreement may also be
obtained from a proxy server on the Internet using the following URL: http://hdl.handle.net/1895.22/1013".
3. In the event Licensee prepares a derivative work that is based on or incorporates Python 1.6.1 or any part thereof, and
wants to make the derivative work available to others as provided herein, then Licensee hereby agrees to include in any such
work a brief summary of the changes made to Python 1.6.1.
4. CNRI is making Python 1.6.1 available to Licensee on an "AS IS" basis. CNRI MAKES NO REPRESENTATIONS OR
WARRANTIES, EXPRESS OR IMPLIED. BY WAY OF EXAMPLE, BUT NOT LIMITATION, CNRI MAKES NO AND DISCLAIMS ANY
REPRESENTATION OR WARRANTY OF MERCHANTABILITY OR FITNESS FOR ANY PARTICULAR PURPOSE OR THAT THE USE OF
PYTHON 1.6.1 WILL NOT INFRINGE ANY THIRD PARTY RIGHTS.
5. CNRI SHALL NOT BE LIABLE TO LICENSEE OR ANY OTHER USERS OF PYTHON 1.6.1 FOR ANY INCIDENTAL, SPECIAL, OR
CONSEQUENTIAL DAMAGES OR LOSS AS A RESULT OF MODIFYING, DISTRIBUTING, OR OTHERWISE USING PYTHON 1.6.1,
OR ANY DERIVATIVE THEREOF, EVEN IF ADVISED OF THE POSSIBILITY THEREOF.
6. This License Agreement will automatically terminate upon a material breach of its terms and conditions.
7. This License Agreement shall be governed by the federal intellectual property law of the United States, including without
limitation the federal copyright law, and, to the extent such U.S. federal law does not apply, by the law of the Commonwealth
of Virginia, excluding Virginia's conflict of law provisions. Notwithstanding the foregoing, with regard to derivative works based
on Python 1.6.1 that incorporate non-separable material that was previously distributed under the GNU General Public License
(GPL), the law of the Commonwealth of Virginia shall govern this License Agreement only as to issues arising under or with
Page 41

respect to Paragraphs 4, 5, and 7 of this License Agreement. Nothing in this License Agreement shall be deemed to create any
relationship of agency, partnership, or joint venture between CNRI and Licensee. This License Agreement does not grant
permission to use CNRI trademarks or trade name in a trademark sense to endorse or promote products or services of
Licensee, or any third party.
8. By clicking on the "ACCEPT" button where indicated, or by copying, installing or otherwise using Python 1.6.1, Licensee
agrees to be bound by the terms and conditions of this License Agreement.
ACCEPT
CWI LICENSE AGREEMENT FOR PYTHON 0.9.0 THROUGH 1.2
--------------------------------------------------------------------------Copyright (c) 1991 - 1995, Stichting Mathematisch Centrum Amsterdam, The Netherlands. All rights reserved.
Permission to use, copy, modify, and distribute this software and its documentation for any purpose and without fee is hereby
granted, provided that the above copyright notice appear in all copies and that both that copyright notice and this permission
notice appear in supporting documentation, and that the name of Stichting Mathematisch Centrum or CWI not be used in
advertising or publicity pertaining to distribution of the software without specific, written prior permission.
STICHTING MATHEMATISCH CENTRUM DISCLAIMS ALL WARRANTIES WITH REGARD TO THIS SOFTWARE, INCLUDING ALL
IMPLIED WARRANTIES OF MERCHANTABILITY AND FITNESS, IN NO EVENT SHALL STICHTING MATHEMATISCH CENTRUM BE
LIABLE FOR ANY SPECIAL, INDIRECT OR CONSEQUENTIAL DAMAGES OR ANY DAMAGES WHATSOEVER RESULTING FROM
LOSS OF USE, DATA OR PROFITS, WHETHER IN AN ACTION OF CONTRACT, NEGLIGENCE OR OTHER TORTIOUS ACTION,
ARISING OUT OF OR IN CONNECTION WITH THE USE OR PERFORMANCE OF THIS SOFTWARE.
University of California License
This license applies to the following files or, in the case of directories, certain files in those directories:
dbm/
db/mork/src/morkQuickSort.cpp
xpcom/glue/nsQuickSort.cpp
Copyright (c) 1990, 1993
The Regents of the University of California. All rights reserved.
Redistribution and use in source and binary forms, with or without modification, are permitted provided that the following
conditions are met:
1. Redistributions of source code must retain the above copyright notice, this list of conditions and the following
disclaimer.
2. Redistributions in binary form must reproduce the above copyright notice, this list of conditions and the following
disclaimer in the documentation and/or other materials provided with the distribution.
3. [3 is deleted as of 22nd July 1999. See ftp://ftp.cs.berkeley.edu/pub/4bsd/README.Impt.License.Change for
details.]
4. Neither the name of the University nor the names of its contributors may be used to endorse or promote products
derived from this software without specific prior written permission.
THIS SOFTWARE IS PROVIDED BY THE REGENTS AND CONTRIBUTORS "AS IS"' AND ANY EXPRESS OR IMPLIED WARRANTIES,
INCLUDING, BUT NOT LIMITED TO, THE IMPLIED WARRANTIES OF MERCHANTABILITY AND FITNESS FOR A PARTICULAR
PURPOSE ARE DISCLAIMED. IN NO EVENT SHALL THE REGENTS OR CONTRIBUTORS BE LIABLE FOR ANY DIRECT, INDIRECT,
INCIDENTAL, SPECIAL, EXEMPLARY, OR CONSEQUENTIAL DAMAGES (INCLUDING, BUT NOT LIMITED TO, PROCUREMENT OF
SUBSTITUTE GOODS OR SERVICES; LOSS OF USE, DATA, OR PROFITS; OR BUSINESS INTERRUPTION) HOWEVER CAUSED
AND ON ANY THEORY OF LIABILITY, WHETHER IN CONTRACT, STRICT LIABILITY, OR TORT (INCLUDING NEGLIGENCE OR
OTHERWISE) ARISING IN ANY WAY OUT OF THE USE OF THIS SOFTWARE, EVEN IF ADVISED OF THE POSSIBILITY OF SUCH
DAMAGE.
Credits
Page 42

DeviceVM acknowledges all open source community members, and especially thanks contributors to the following open source
projects that we leveraged in developing Splashtop®. If you find your project missing from the list below, please contact
DeviceVM through your project lead, and we will add your project name to the list. To obtain the source code, please visit
http://www.splashtop.com/developer.
bbdock http://bbdock.nethence.com
blackbox http://blackboxwm.sourceforge.net
busybox http://www.busybox.net
cairo http://cairographics.org
gamix http://www.gamix.org
glade http://glade.gnome.org
glib http://www.gtk.org
gtk http://www.gtk.org
kernel http://www.kernel.org
libxml http://xmlsoft.org
pango http://www.gtk.org
Pidgin http://www.pidgin.im
pygtk http://www.pygtk.org
scim-chewing http://chewing.csie.net
scim-im http://www.scim-im.org
Wen Quan Yi http://wqy.sourceforge.net
Wireless tools http://www.hpl.hp.com/personal/Jean_Tourrilhes/Linux/Tools.html
xserver http://xorg.freedesktop.org
Certain portions of the software product are proprietary and may contain third-party proprietary products. For
latest information regarding third-party licenses, please visit the credits
Splashtop and the logo are registered trademarks of DeviceVM, Inc. in the U.S. and elsewhere. All other trademarks, product
and company names, and logos are the property of their respective owners.
Patented. US patent numbers 7,082,526 and 7,441,113. US and other patents pending.
Back to Contents Page
page.
20091005a
 Loading...