

Dell Precision™ M60 Series Mobile Workstation
System Information Guide
Model PP02X
www.dell.com | support.dell.com


Dell Precision™ M60 Series Mobile Workstation
System Information Guide
www.dell.com | support.dell.com

Notes, Notices, and Cautions
NOTE: A NOTE indicates important information that helps you make better
use of your computer.
NOTICE: A NOTICE indicates either potential damage to hardware or loss of
data and tells you how to avoid the problem.
CAUTION: A CAUTION indicates a potential for property damage,
personal injury, or death.
Abbreviations and Acronyms
For a complete list of abbreviations and acronyms, see the User’s Guide
(depending on your operating system, double-click the User’s Guide icon
on your desktop, or click the Start button, click Help and Support Center,
and then click User and system guides).
If you purchased a Dell™ n Series computer, any references in this
®
document to Microsoft
Windows® operating systems are not applicable.
____________________
Information in this document is subject to change without notice.
© 2003 Dell Computer Corporation. All rights reserved.
Reproduction in any manner whatsoever without the written permission of Dell Computer
Corporation is strictly forbidden.
Trademarks used in this text: Dell, the DELL logo, Dell Precision, Latitude, and TrueMobile are
trademarks of Dell Computer Corporation; Intel, Pentium, and Celeron are registered trademarks
of Intel Corporation; Microsoft and Windows are registered trademarks of Microsoft Corporation;
EMC is the registered trademark of EMC Corporation.
Other trademarks and trade names may be used in this document to refer to either the entities claiming
the marks and names or their products. Dell Computer Corporation disclaims any proprietary interest
in trademarks and trade names other than its own.
February 2003 P/N 2Y134 Rev. A00

Contents
CAUTION: Safety Instructions . . . . . . . . . . . . . . . . . . . . . . . . . . 5
General . . . . . . . . . . . . . . . . . . . . . . . . . . . . . . . . . . . . . . . . . . . . 5
Power . . . . . . . . . . . . . . . . . . . . . . . . . . . . . . . . . . . . . . . . . . . . . 6
Battery . . . . . . . . . . . . . . . . . . . . . . . . . . . . . . . . . . . . . . . . . . . . 7
Air Travel . . . . . . . . . . . . . . . . . . . . . . . . . . . . . . . . . . . . . . . . . . 8
EMC Instructions . . . . . . . . . . . . . . . . . . . . . . . . . . . . . . . . . . . . . 8
California Residents . . . . . . . . . . . . . . . . . . . . . . . . . . . . . . . . . . . 8
When Using Your Computer . . . . . . . . . . . . . . . . . . . . . . . . . . . . 9
Ergonomic Computing Habits . . . . . . . . . . . . . . . . . . . . . . . . . . . 10
When Working Inside Your Computer . . . . . . . . . . . . . . . . . . . . . 10
Protecting Against Electrostatic Discharge . . . . . . . . . . . . . . . . . 11
Battery Disposal . . . . . . . . . . . . . . . . . . . . . . . . . . . . . . . . . . . . . 11
Finding Information for Your Computer . . . . . . . . . . . . . . . . . . . 12
Setting Up Your Computer . . . . . . . . . . . . . . . . . . . . . . . . . . . . 14
About Your Computer . . . . . . . . . . . . . . . . . . . . . . . . . . . . . . . . 16
Front View . . . . . . . . . . . . . . . . . . . . . . . . . . . . . . . . . . . . . . . . . 17
Left Side View . . . . . . . . . . . . . . . . . . . . . . . . . . . . . . . . . . . . . . 18
Right Side View . . . . . . . . . . . . . . . . . . . . . . . . . . . . . . . . . . . . . 18
Back View . . . . . . . . . . . . . . . . . . . . . . . . . . . . . . . . . . . . . . . . . 19
Bottom View . . . . . . . . . . . . . . . . . . . . . . . . . . . . . . . . . . . . . . . 20
Removing a Battery . . . . . . . . . . . . . . . . . . . . . . . . . . . . . . . . . 20
Installing a Battery . . . . . . . . . . . . . . . . . . . . . . . . . . . . . . . . . 21
Removing a Reserve Battery . . . . . . . . . . . . . . . . . . . . . . . . . . . 22
Installing a Reserve Battery . . . . . . . . . . . . . . . . . . . . . . . . . . . 23
Contents 3

Running the Dell Diagnostics . . . . . . . . . . . . . . . . . . . . . . . . . . . 23
Regulatory Notices . . . . . . . . . . . . . . . . . . . . . . . . . . . . . . . . . . 26
4 Contents

CAUTION: Safety Instructions
Use the following safety guidelines to help ensure your own personal safety and to help protect
your computer and working environment from potential damage.
General
• Do not attempt to service the computer yourself unless you are a trained service
technician. Always follow installation instructions closely.
• If you use an extension power cable with your AC adapter, ensure that the total ampere
rating of the products plugged in to the extension power cable does not exceed the
ampere rating of the extension cable.
• Do not push objects into air vents or openings of your computer. Doing so can cause fire
or electric shock by shorting out interior components.
• Do not store your computer in a low-airflow environment, such as a carrying case or a
closed briefcase, while the computer is turned on. Restricting airflow can damage the
computer or cause a fire.
• Keep your computer away from radiators and heat sources. Also, do not block cooling
vents. Avoid placing loose papers underneath your computer; do not place your computer
in a closed-in wall unit or on a bed, sofa, or rug.
• Place the AC adapter in a ventilated area, such as a desk top or on the floor, when you use
it to run the computer or to charge the battery. Do not cover the AC adapter with papers
or other items that will reduce cooling; also, do not use the AC adapter inside a carrying
case.
• The AC adapter may become hot during normal operation of your computer. Use care
when handling the adapter during or immediately after operation.
• Do not allow your portable computer to operate with the base resting directly on exposed
skin for extended periods of time. The surface temperature of the base will rise during
normal operation (particularly when AC power is present). Allowing sustained contact
with exposed skin can cause discomfort or, eventually, a burn.
• Do not use your computer in a wet environment, for example, near a bath tub, sink, or
swimming pool or in a wet basement
• If your computer includes an integrated or optional (PC Card) modem, disconnect the
modem cable if an electrical storm is approaching to avoid the remote risk of electric
shock from lightning via the telephone line.
System Information Guide 5

CAUTION: Safety Instructions (continued)
• To help avoid the potential hazard of electric shock, do not connect or disconnect any
cables or perform maintenance or reconfiguration of this product during an electrical
storm. Do not use your computer during an electrical storm unless all cables have been
disconnected and the computer is operating on battery power.
• If your computer includes a modem, the cable used with the modem should be
manufactured with a minimum wire size of 26 American wire gauge (AWG) and an FCCcompliant RJ-11 modular plug.
• Before you open the memory module/Mini PCI card/modem cover on the bottom of your
www.dell.com | support.dell.com
computer, disconnect all cables from their electrical outlets and disconnect the telephone
cable.
• If your computer has a modem RJ-11 connector and a network RJ-45 connector, insert the
telephone cable into the RJ-11 connector, not the RJ-45 connector.
• PC Cards may become very warm during normal operation. Use care when removing PC
Cards after their continuous operation.
• Before you clean your computer, disconnect the computer from the electrical outlet.
Clean your computer with a soft cloth dampened with water. Do not use liquid or aerosol
cleaners, which may contain flammable substances.
Power
• Use only the Dell-provided AC adapter approved for use with this computer. Use of
another AC adapter may cause a fire or explosion.
• Before you connect the computer to an electrical outlet, check the AC adapter voltage
rating to ensure that the required voltage and frequency match the available power
source.
• To remove the computer from all power sources, turn the computer off, remove the
battery pack, and disconnect the AC adapter from the electrical outlet.
• To help prevent electric shock, plug the AC adapter and device power cables into properly
grounded power sources. These power cables may be equipped with 3-prong plugs to
provide an earth grounding connection. Do not use adapter plugs or remove the
grounding prong from the power cable plug. If you use a power extension cable, use the
appropriate type, 2-prong or 3-prong, to mate with the AC adapter power cable.
• Be sure that nothing rests on your AC adapter’s power cable and that the cable is not
located where it can be tripped over or stepped on.
6 System Information Guide

CAUTION: Safety Instructions (continued)
• If you are using a multiple-outlet power strip, use caution when plugging the AC
adapter’s power cable into the power strip. Some power strips may allow you to insert the
plug incorrectly. Incorrect insertion of the power plug could result in permanent damage
to your computer, as well as risk of electric shock and/or fire. Ensure that the ground
prong of the power plug is inserted into the mating ground contact of the power strip.
Battery
• Use only Dell™ battery modules that are approved for use with this computer. Use of
other types may increase the risk of fire or explosion.
• Do not carry a battery pack in your pocket, purse, or other container where metal objects
(such as car keys or paper clips) could short-circuit the battery terminals. The resulting
excessive current flow can cause extremely high temperatures and may result in damage
to the battery pack or cause fire or burns.
• The battery poses a burn hazard if you handle it improperly. Do not disassemble it.
Handle a damaged or leaking battery pack with extreme care. If the battery is damaged,
electrolyte may leak from the cells and may cause personal injury.
• Keep the battery away from children.
• Do not store or leave your computer or battery pack near a heat source such as a radiator,
fireplace, stove, electric heater, or other heat-generating appliance or otherwise expose it
to temperatures in excess of 60ºC (140ºF). When heated to excessive temperatures,
battery cells could explode or vent, posing a risk of fire.
• Do not dispose of your computer’s battery in a fire or with normal household waste.
Battery cells may explode. Discard a used battery according to the manufacturer’s
instructions or contact your local waste disposal agency for disposal instructions. Dispose
of a spent or damaged battery promptly.
System Information Guide 7

CAUTION: Safety Instructions (continued)
Air Travel
• Certain Federal Aviation Administration regulations and/or airline-specific restrictions
may apply to the operation of your Dell computer while you are on board an aircraft. For
example, such regulations/restrictions may prohibit the use of any personal electronic
device (PED) that has the capacity for intentional transmission of radio frequency or
other electromagnetic signals while on an aircraft.
– In order to best comply with all such restrictions, if your Dell portable computer is
equipped with Dell TrueMobile™ or some other wireless communication device,
www.dell.com | support.dell.com
EMC Instructions
Use shielded signal cables to ensure that you maintain the appropriate EMC classification for
the intended environment. For parallel printers, a cable is available from Dell. If you prefer, you
can order a cable from Dell at its worldwide website at www.dell.com.
please disable this device before you board the aircraft and follow all instructions
provided by airline personnel with regard to such device.
– Additionally, the use of any PED, such as a portable computer, may be prohibited in
aircraft during certain critical phases of flight, for example, takeoff and landing. Some
airlines may further define the critical flight phase as any time the aircraft is below
3050 m (10,000 ft). Please follow the airline’s specific instructions as to when the use
of a PED is allowed.
Static electricity can harm electronic components inside your computer. To prevent static
damage, discharge static electricity from your body before you touch any of your computer’s
electronic components, such as a memory module. You can do so by touching an unpainted
metal surface on the computer’s input/output panel.
California Residents
WARNING: Handling the cord on this product, or cords associated with accessories sold with
this product, will expose you to lead, a chemical known to the State of California to cause birth
defects or other reproductive harm.
8 System Information Guide
Wash your hands after handling the cord
.

When Using Your Computer
Observe the following safe-handling guidelines to prevent damage to your computer:
• When setting up the computer for work, place it on a level surface.
• When traveling, do not check the computer as baggage. You can put your computer
through an X-ray security machine, but never put your computer through a metal
detector. If you have the computer checked by hand, be sure to have a charged battery
available in case you are asked to turn on the computer.
• When traveling with the hard drive removed from the computer, wrap the drive in a
nonconducting material, such as cloth or paper. If you have the drive checked by hand, be
ready to install the drive in the computer. You can put the hard drive through an X-ray
security machine, but never put the drive through a metal detector.
• When traveling, do not place the computer in overhead storage compartments where it
could slide around. Do not drop your computer or subject it to other mechanical shocks.
• Protect your computer, battery, and hard drive from environmental hazards such as dirt,
dust, food, liquids, temperature extremes, and overexposure to sunlight.
• When you move your computer between environments with very different temperature
and/or humidity ranges, condensation may form on or within the computer. To avoid
damaging the computer, allow sufficient time for the moisture to evaporate before using
the computer.
NOTICE: When taking the computer from low-temperature conditions into a warmer environment
or from high-temperature conditions into a cooler environment, allow the computer to acclimate to
room temperature before turning on power.
• When you disconnect a cable, pull on its connector or on its strain-relief loop, not on the
cable itself. As you pull out the connector, keep it evenly aligned to avoid bending any
connector pins. Also, before you connect a cable make sure both connectors are correctly
oriented and aligned.
• Handle components with care. Hold a component such as a memory module by its edges,
not its pins.
• When preparing to remove a memory module from the system board or disconnect a
device from the computer, turn off the computer, disconnect the AC adapter cable, and
then wait 5 seconds before proceeding to help avoid possible damage to the system board.
System Information Guide 9
When Using Your Computer (continued)
• Clean the display with a soft, clean cloth and water. Apply the water to the cloth; then
stroke the cloth across the display in one direction, moving from the top of the display to
the bottom. Remove moisture from the display quickly and keep the display dry. Longterm exposure to moisture can damage the display. Do not use a commercial window
cleaner to clean your display.
• If your computer gets wet or is damaged, follow the procedures described in “Solving
Problems” in your User’s Guide. If, after following these procedures, you confirm that
your computer is not operating properly, contact Dell (see "Getting Help" in your User ’s
Guide for the appropriate contact information).
www.dell.com | support.dell.com
Ergonomic Computing Habits
CAUTION: Improper or prolonged keyboard use may result in injury.
CAUTION: Viewing the display or external monitor screen for extended periods of
time may result in eye strain.
For comfort and efficiency, observe the ergonomic guidelines in the Appendix of your online
User’s Guide when setting up and using your computer.
This portable computer is not designed for continuous operation as office equipment. For
extended use in an office, it is recommended that you connect an external keyboard.
When Working Inside Your Computer
Before removing or installing memory modules, Mini PCI cards, or modems, perform the
following steps in the sequence indicated.
NOTICE: The only time you should ever access the inside of your computer is when you are
installing memory modules, a Mini PCI card, or a modem.
NOTICE: Wait 5 seconds after turning off the computer before disconnecting a device or removing
a memory module, Mini PCI card, or modem to help prevent possible damage to the system board.
Shut down your computer and turn off any attached devices.
1
2 Disconnect your computer and devices from electrical outlets to reduce the potential for
personal injury or shock. Also, disconnect any telephone or telecommunication lines from
the computer.
3 Remove the main battery from the battery bay and, if necessary, the secondary battery
from the module bay.
10 System Information Guide

When Using Your Computer (continued)
4 Ground yourself by touching the unpainted metal surface of the I/O panel on the back of
the computer.
While you work, periodically touch the I/O panel to dissipate any static electricity that
might harm internal components.
Protecting Against Electrostatic Discharge
Static electricity can harm electronic components inside your computer. To prevent static
damage, discharge static electricity from your body before you touch any of your computer’s
electronic components, such as a memory module. You can do so by touching an unpainted
metal surface on the computer’s I/O panel.
As you continue to work inside the computer, periodically touch an I/O connector to remove
any static charge your body may have accumulated.
You can also take the following steps to prevent damage from electrostatic discharge (ESD):
• When unpacking a static-sensitive component from its shipping carton, do not remove
the component from the antistatic packing material until you are ready to install the
component. Just before unwrapping the antistatic packaging, be sure to discharge static
electricity from your body.
• When transporting a sensitive component, first place it in an antistatic container or
packaging.
• Handle all sensitive components in a static-safe area. If possible, use antistatic floor pads
and workbench pads.
Battery Disposal
Your computer uses a lithium-ion battery. For instructions about replacing the lithium-ion
battery in your computer, see "Removing a Battery" later in this document and "Using a
Battery" in your online User’s Guide.
Do not dispose of the battery along with household waste. Contact your local waste disposal
agency for the address of the nearest battery deposit site.
System Information Guide 11
Finding Information for Your Computer
What are you looking for? Find It Here
• A diagnostic program for my computer
• Drivers for my computer
•My User’s Guide
• My device documentation
www.dell.com | support.dell.com
• Warranty Information Dell System Information Guide
Drivers and Utilities CD (also known as the
ResourceCD)
Documentation and drivers are already
installed on your computer when shipped
from Dell. You can use the CD to reinstall
drivers, run the Dell Diagnostics, or access
your documentation.
Readme files may be included on your CD
to provide last-minute updates about
technical changes to your computer or
advanced technical-reference material for
experienced users or technicians.
• How to remove and replace parts
• Technical specifications
• How to configure system settings
• How to troubleshoot and solve
problems
12 System Information Guide
User’s Guide Icon (Microsoft Windows 2000)
Double-click the User’s Guides icon on your desktop.
Windows Help and Support Center
1
Click the Start button and click Help and Support
2 Click User’s and system guides and click User’s guides.
What are you looking for? Find It Here
• Express Service Code and Service Tag
®
• Microsoft
Windows® License Label
Express Service Code and Product Key Label
These labels are located on your
computer.
• Latest drivers for my computer
• Answers to technical service and
support questions
• Online discussions with other users
and technical support
• Documentation for my computer
including the Service Manual
• Service call status and support history
• Top technical issues for my computer
• Frequently asked questions
• File downloads
• Details on my computer configuration
• Service contract for my computer
• How to use Windows XP
• Documentation for my computer
• Documentation for devices (such as a
modem)
D e l l S u p p o r t W e b s i t e — support.dell.com
The Dell Support website provides several online tools, including:
• Solutions — Troubleshooting hints and tips, articles from
technicians, and online courses
• Community Forum — Online discussion with other Dell customers
• Upgrades — Upgrade information for components, such as memory,
the hard drive, and the operating system
• Customer Care — Contact information, order status, warranty, and
repair information
• Downloads — Drivers, patches, and software updates
• Reference — Computer documentation, product specifications, and
white papers
Dell Premier Support Website —
premiersupport.dell.com
The Dell Premier Support website is customized for corporate,
government, and education customers. This website may not be
available in all regions.
Windows Help and Support Center
1 Click the Start button and click Help and Support.
2 Type a word or phrase that describes your problem and click the
arrow icon.
3 Click the topic that describes your problem.
4 Follow the instructions on the screen.
System Information Guide 13
What are you looking for? Find It Here
• How to reinstall my operating system Operating System CD
If you reinstall your operating system,
use the Drivers and Utilities CD to
reinstall drivers for the devices that came
with your computer.
The product key for your operating
system is located on your computer.
www.dell.com | support.dell.com
Setting Up Your Computer
1 Unpack the accessories box.
2 Set aside the contents of the accessories box, which you will need to complete the
setup of your computer.
The accessories box also contains user documentation and any software or additional
hardware (such as PC Cards, drives, or batteries) that you have ordered.
or
14 System Information Guide
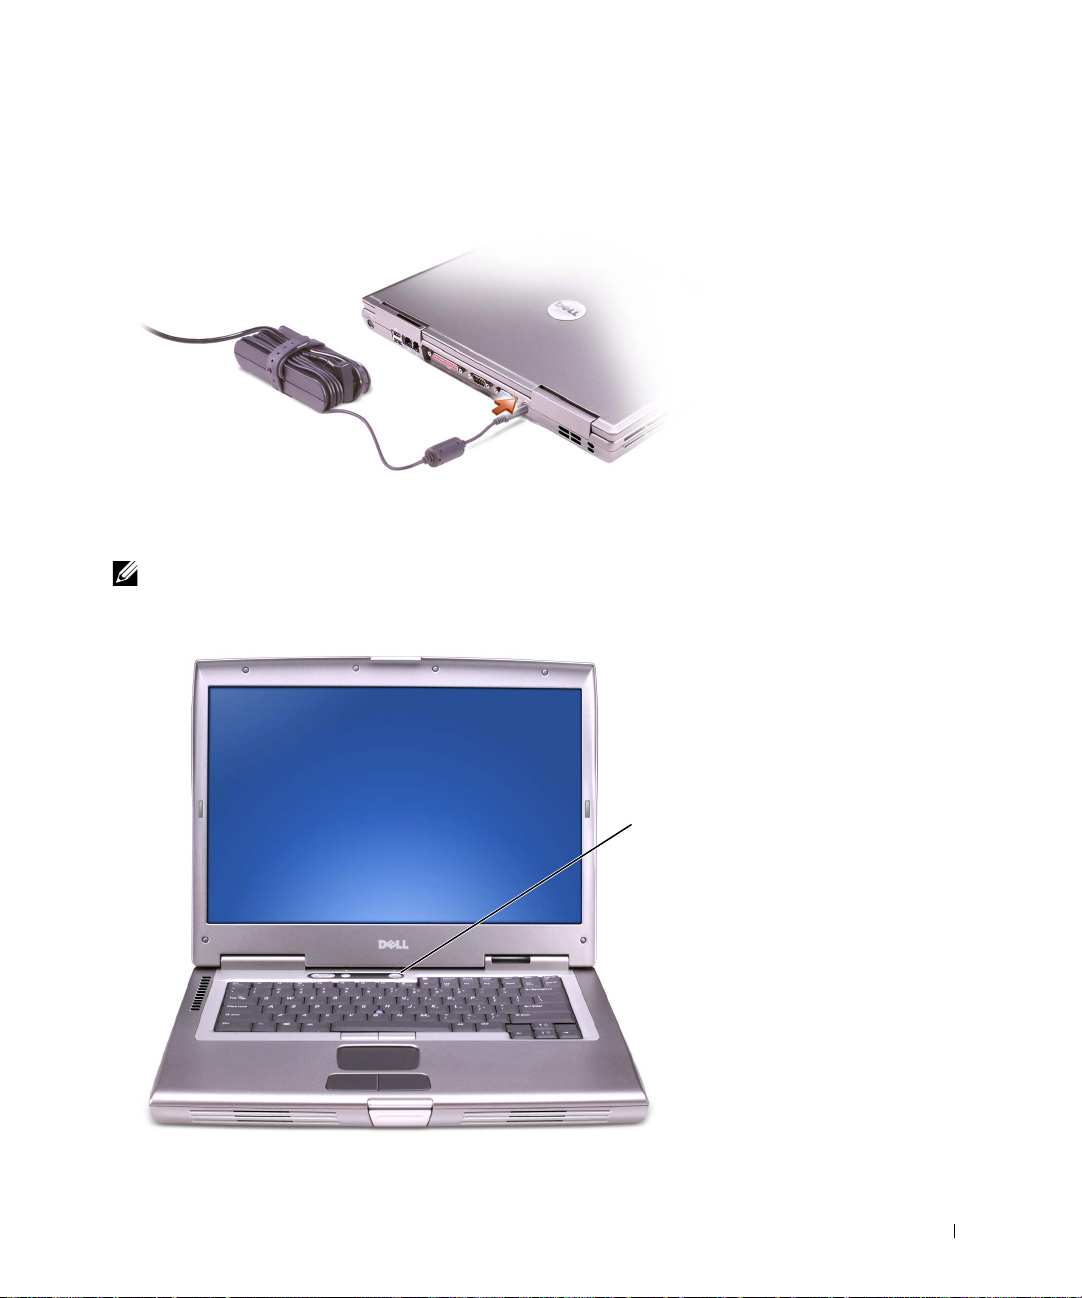
3 Connect the AC adapter to the AC adapter connector on the computer and to the
electrical outlet.
4 Open the computer display and press the power button to turn on the computer.
NOTE: Do not connect the computer to the docking device until the computer has been turned
on and shut down at least once.
power
button
System Information Guide 15

About Your Computer
See your online User’s Guide for detailed information about the computer. Depending on
your operating system, double-click the User’s Guide icon on your desktop, or click the
Start button, click Help and Support Center, and then click User and system guides. The
following items address some of the more commonly asked questions about the computer.
• Modem and network adapter: The computer may include both a v.92 56K modem and a
10/100/1000 Ethernet LOM network adapter. For connector locations, see "Right
View" later in this document. For more information on ports and connectors, see
"About Your Computer" in your online User’s Guide.
www.dell.com | support.dell.com
• Battery life and usage: Various batteries are available for use with your computer. Using
the 72 WHr/6486-mAh battery that comes standard with the computer, you can
expect from 3 to 4 hours of operating time from a single fully charged battery with
average usage. Performing certain types of operations, such as extended wireless
operation, can significantly reduce battery life.
– For more information on battery performance, usage, and conserving power, see
"Using a Battery" and "Power Management" in the User’s Guide.
– For information on an optional second battery, see "Using the Module Bay" in the
User’s Guide.
• Module bay devices: For information on the module bay and the devices it supports, see
"Using the Module Bay" in the User’s Guide.
• Docking devices: Your computer supports the Dell D/Dock Expansion Station and the
Dell D/Port Advanced Port Replicator.
NOTE: Docking devices may not be available in all countries.
– For information on your optional docking device, see the documentation that
accompanied the device.
– For information on obtaining optimal performance when using a docking device
with this computer, see "Solving Problems" in the User’s Guide.
16 System Information Guide
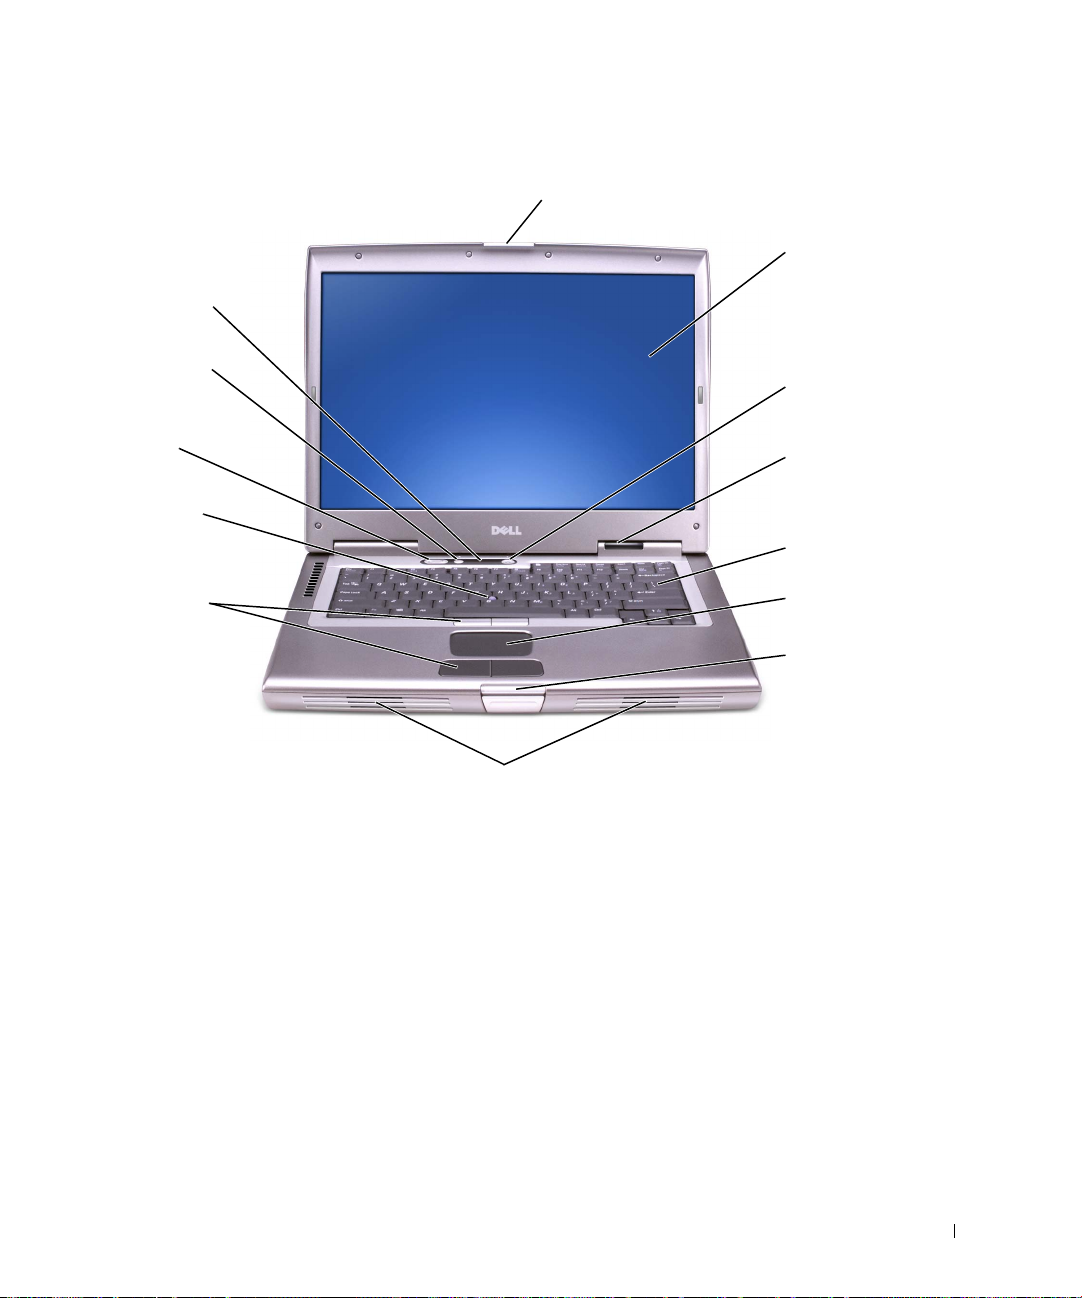
Front View
keyboard
status lights
display latch
display
mute button
volume control
buttons
track stick
track stick/touch
pad buttons
power button
device status
lights
keyboard
touch pad
display latch
button
speakers
System Information Guide 17
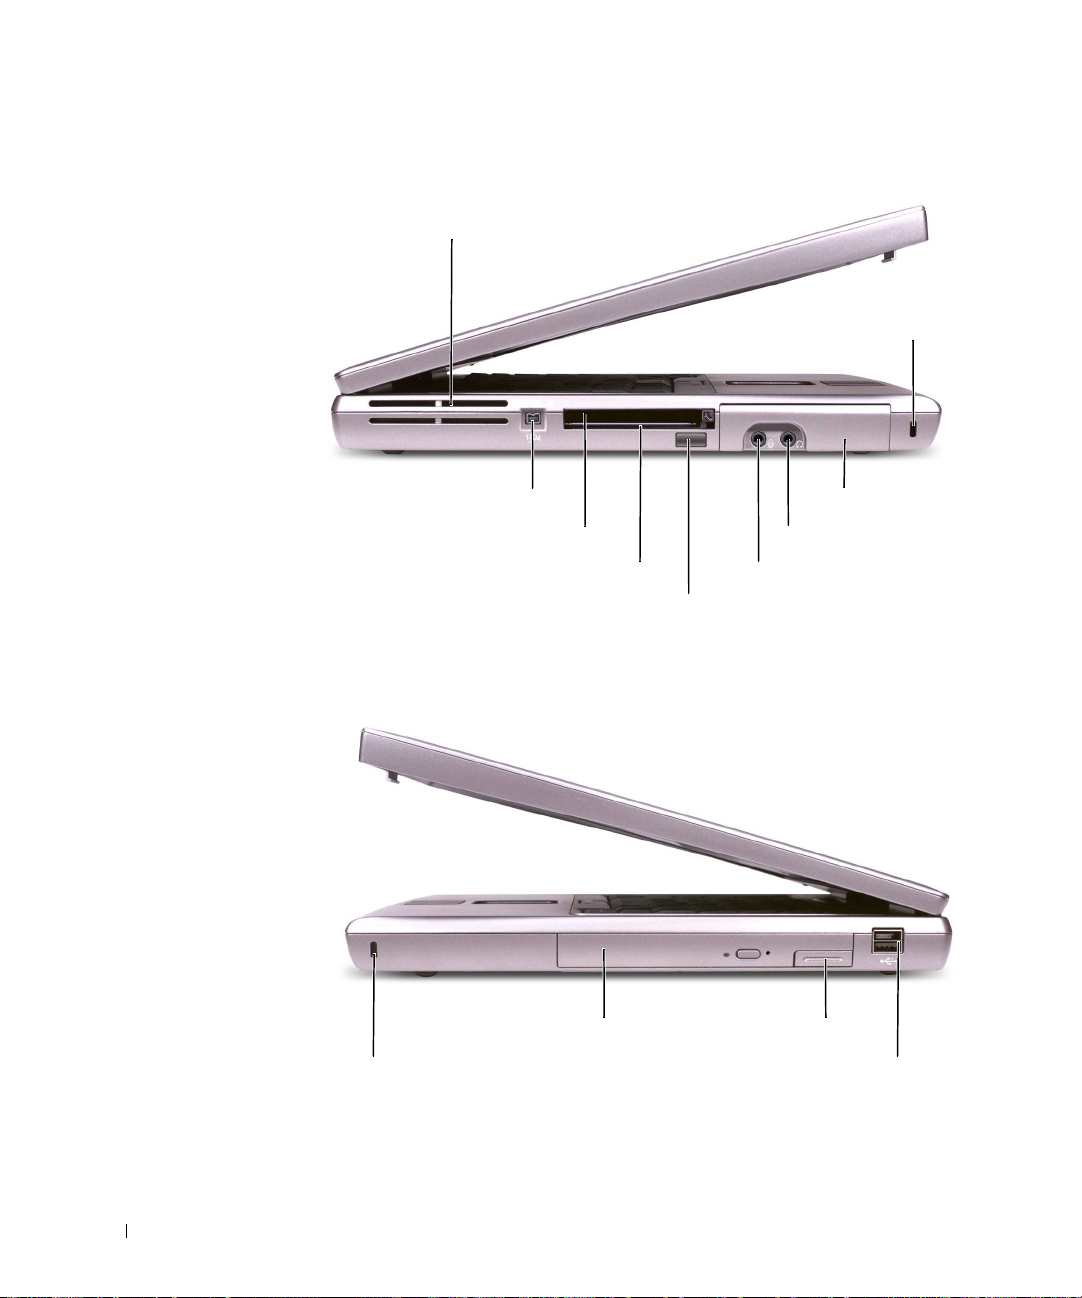
Left Side View
www.dell.com | support.dell.com
air vents
security cable slot
Right Side View
IEEE 1394 connector
PC Card slot
headphone connector
smart card slot
infrared sensor
module bay device latch release
microphone connector
Dell D/Bay connectorsecurity cable slot
hard drive
18 System Information Guide
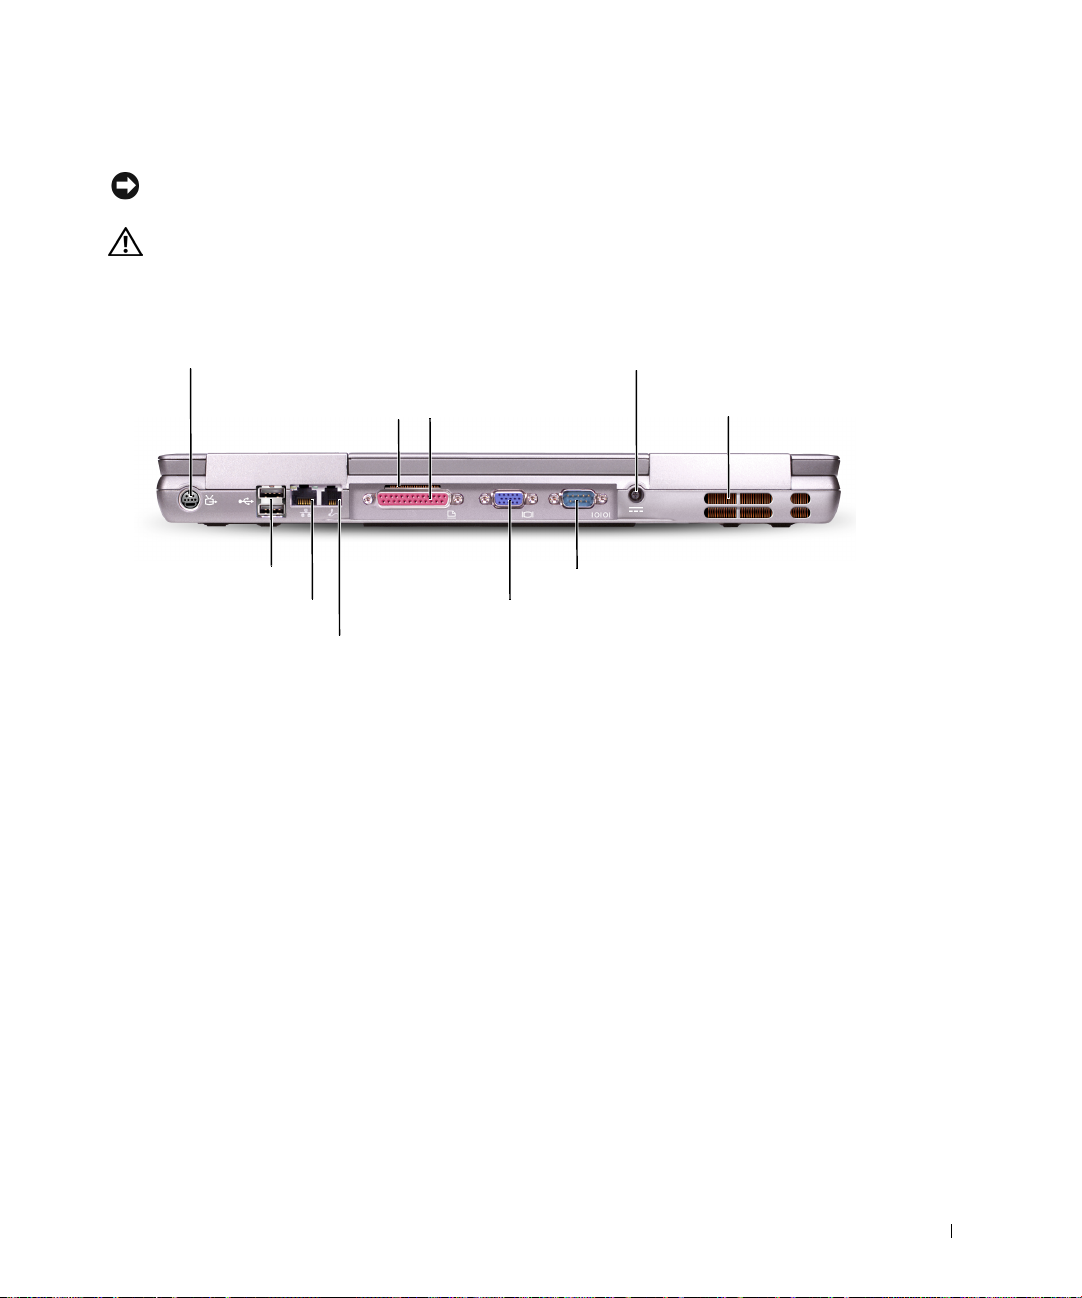
Back View
NOTICE: To avoid damaging the computer, wait 5 seconds after you turn off the computer
before you disconnect an external device.
CAUTION: Do not block, push objects into, or allow dust to accumulate in the air
vents. Do not store your computer in a low-airflow environment, such as a closed
briefcase, while it is running. Restricting the airflow can damage the computer
or cause a fire.
S-video TV-out connector
USB connectors (2)
network connector (RJ-45)
modem connector (RJ-11)
air vent
parallel connector
video connector
AC adapter connector
air vents
serial connector
System Information Guide 19
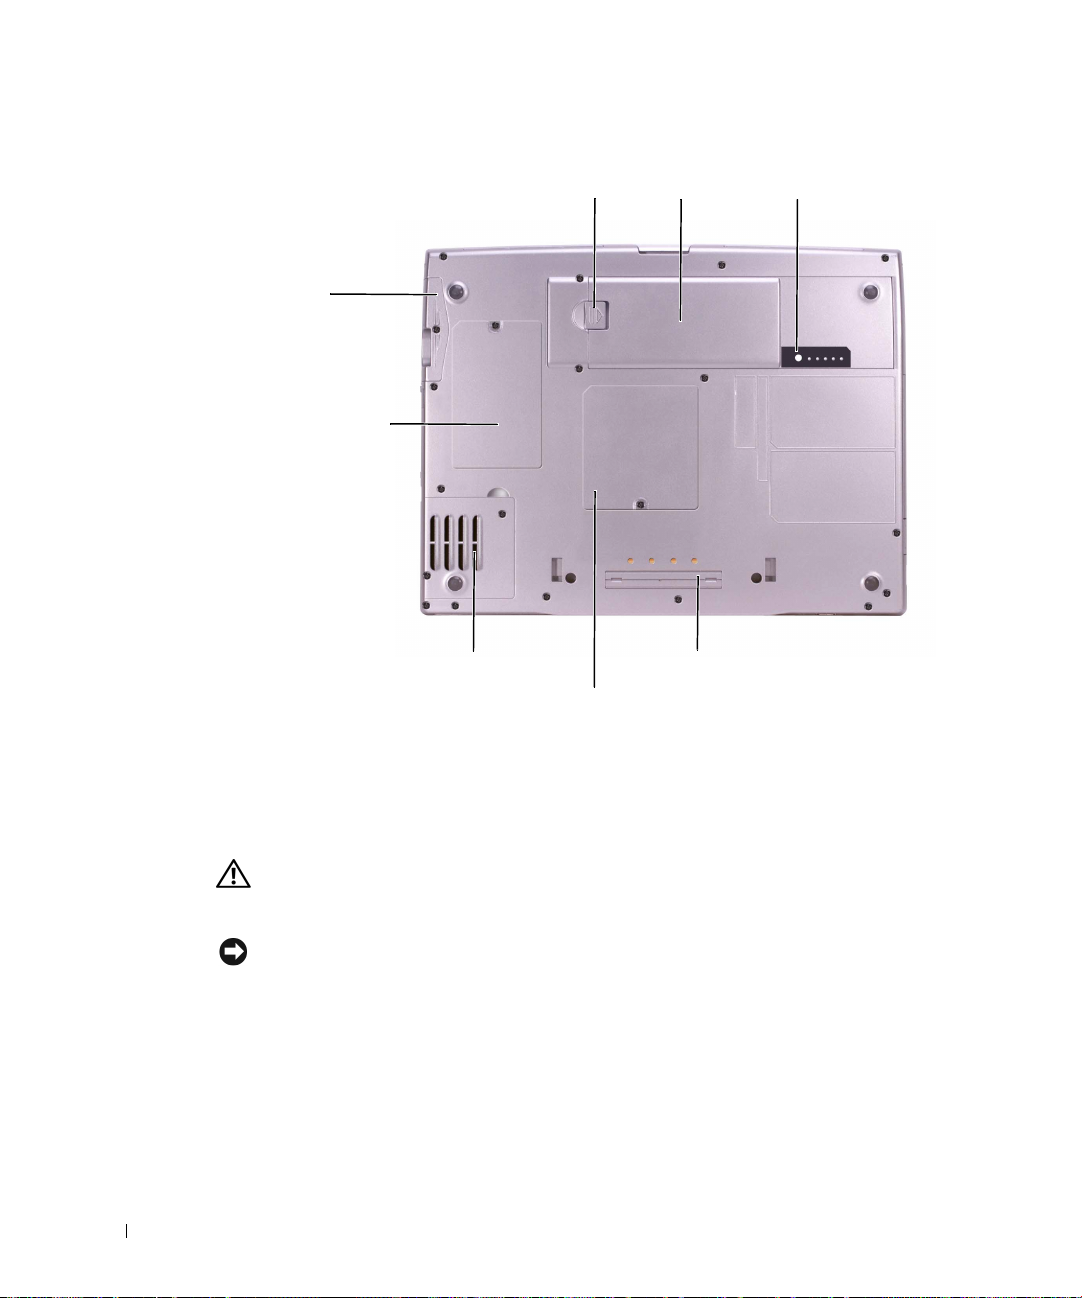
Bottom View
hard drive
Mini PCI
card/modem cover
www.dell.com | support.dell.com
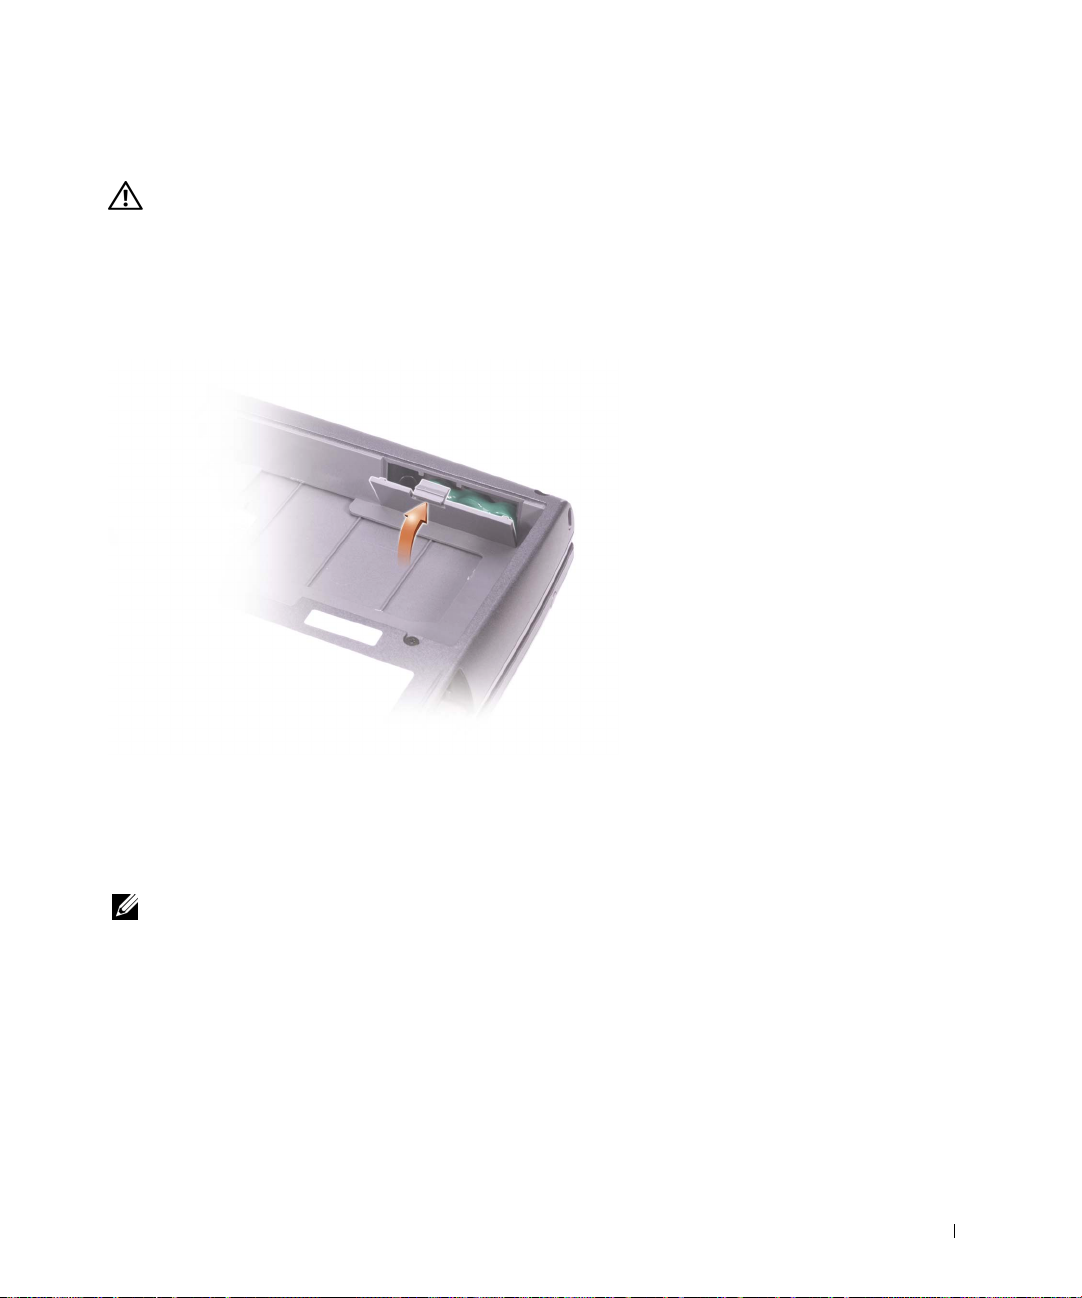
Removing a Battery
battery-bay latch release battery charge gauge
fan
memory module cover
battery
docking device slot
For more information about removing the second battery, see "Using the Module Bay" in
your online User’s Guide.
CAUTION: Before performing these procedures, read and follow the safety
instructions that begin on page 5, turn off the computer, disconnect it from the
electrical outlet, and disconnect the modem from the telephone wall jack.
NOTICE: If you choose to replace the battery with the computer in standby mode, you have up
to 90 seconds to complete the battery replacement before the computer shuts down and loses any
unsaved data.
1
Ensure that the computer is turned off, suspended in a power management mode, or
connected to an electrical outlet.
2 If the computer is connected to a docking device (docked), undock it.
See the documentation that came with your docking device for instructions.
20 System Information Guide
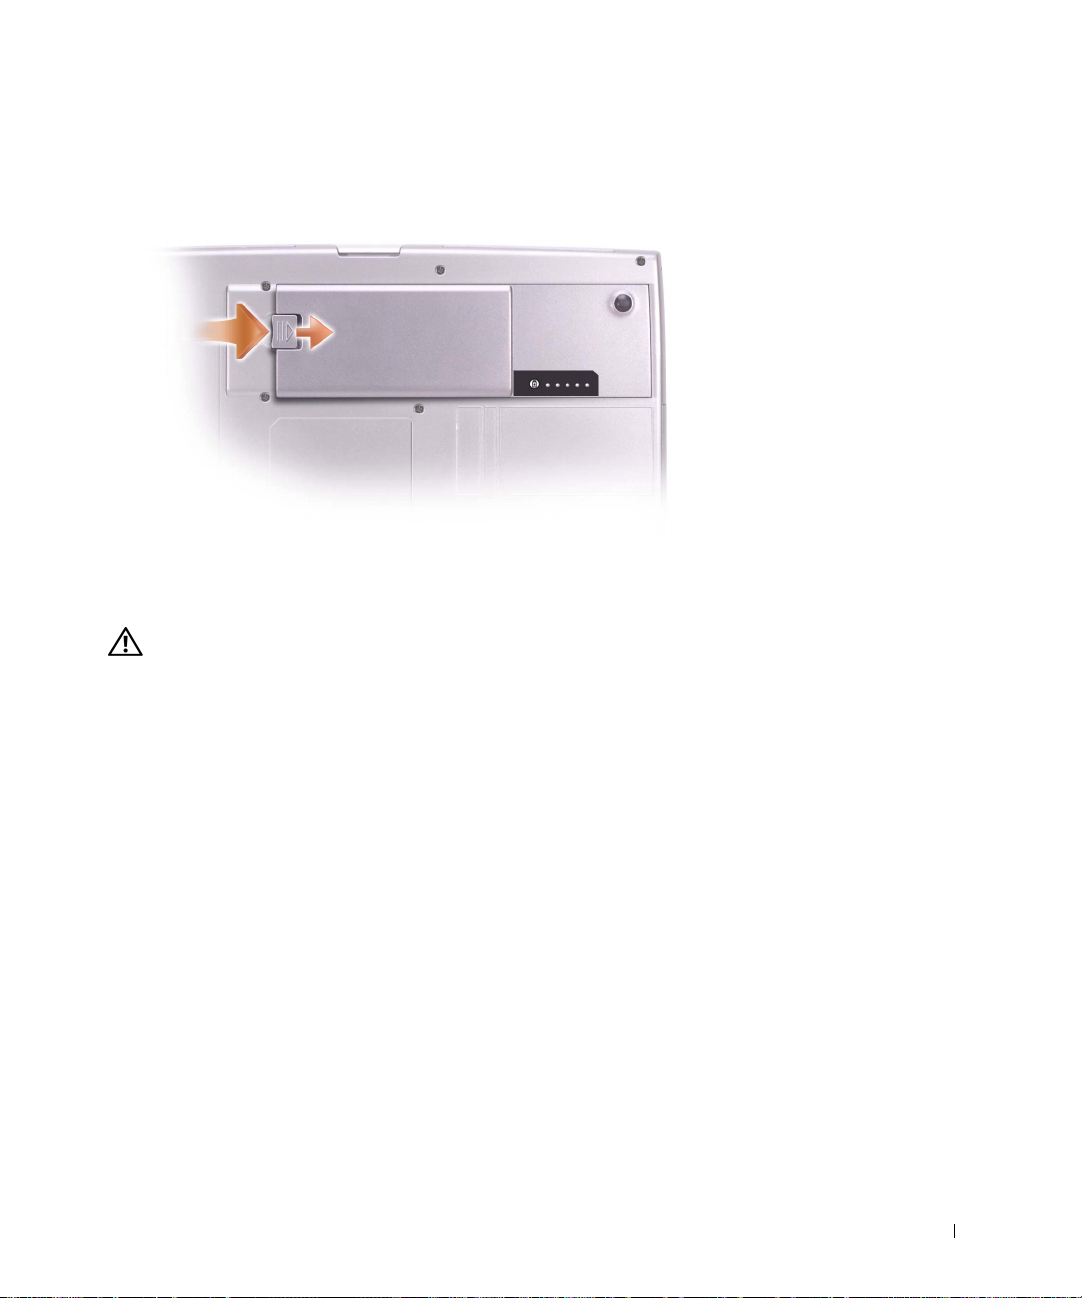
3 Slide and hold the battery-bay latch release on the bottom of the computer, and then
remove the battery from the bay.
Installing a Battery
CAUTION: Before performing this procedure, read and follow the safety
instructions that begin on page 5.
Slide the battery into the bay and lower the battery until the latch release clicks.
For more information about installing the second battery, see "Using the Module Bay" in
your online User’s Guide.
System Information Guide 21
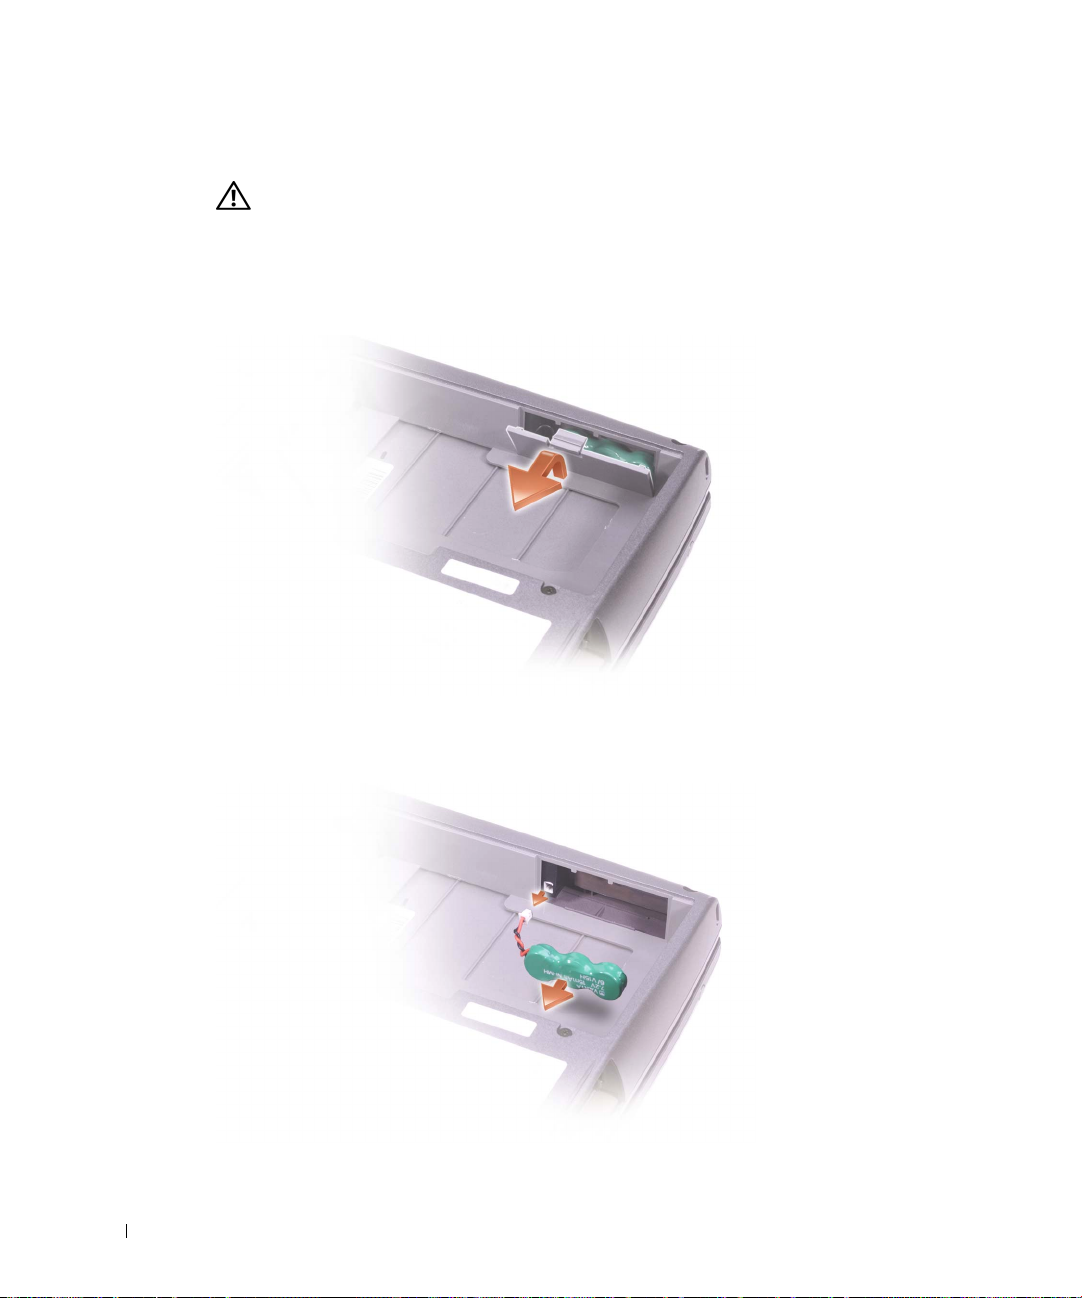
Removing a Reserve Battery
CAUTION: Before performing these procedures, read and follow the safety
instructions that begin on page 5.
1
Remove the battery.
2 Remove the reserve battery cover.
www.dell.com | support.dell.com
3 Pull the reserve battery out of its compartment, and disconnect the cable from the
connector.
22 System Information Guide
Installing a Reserve Battery
CAUTION: Before performing these procedures, read and follow the safety
instructions that begin on page 5.
1
Connect the reserve battery cable to the connector in the reserve battery
compartment.
2 Place the reserve battery in the compartment, and replace the reserve battery cover.
Running the Dell Diagnostics
The Dell Diagnostics is located on a hidden Diagnostic utility partition on your hard drive.
NOTE: If your computer cannot display a screen image, contact Dell (see "Getting Help" in your
User’s Guide for the appropriate contact information).
Shut down the computer.
1
2 If the computer is connected to a docking device (docked), undock it.
See the documentation that came with your docking device for instructions.
System Information Guide 23
3 Connect the computer to an electrical outlet.
NOTE: If you cannot see anything on your display, you can hold down the mute button and press
the power button (instead of F12) to begin the Dell Diagnostics. You do not need to highlight
Diagnostics and press . The computer automatically runs the Pre-boot System
Assessment.
Turn on the computer. When the DELL™ logo appears, press immediately. If
4
you wait too long and the Microsoft
®
Windows® logo appears, continue to wait until
you see the Windows desktop. Then shut down your computer and try again.
www.dell.com | support.dell.com
5 When the boot device list appears, highlight Diagnostics and press .
The computer begins to run the Pre-boot System Assessment, a series of embedded
diagnostics that perform initial testing on your system board, keyboard, hard drive, and
display.
• During the assessment, answer any questions that appear.
• If a component failure is detected, the computer stops and beeps. To stop the
assessment and reboot to the operating system, press ; to continue to the
next test, press ; to retest the component that failed, press .
• If failures are detected during the Pre-boot System Assessment, write down the
error code(s) and contact Dell (see "Getting Help" in your User’s Guide for the
appropriate contact information) before continuing on to the Dell Diagnostics.
• If you receive a message stating that no Diagnostics utility partition has been
found, follow the instructions on the screen to run the Dell Diagnostics from your
Drivers and Utilities CD.
If the Pre-boot System Assessment completes successfully, you receive the message
Booting Dell Diagnostic Utility Partition. Press any key to
continue
6 Press any key to start the Dell Diagnostics from the Diagnostics utility partition on
your hard drive.
7 After the Dell Diagnostics loads and the Main Menu screen appears, click the button
for the option you want.
.
NOTE: The service tag for your computer is located in the title bar of each screen.
24 System Information Guide

Option Function
Express Test Performs a quick test of devices. The test typically takes 10 to 20 minutes
and requires no interaction on your part. Run Express Test first to increase
the possibility of tracing the problem quickly.
Extended Test Performs a thorough check of devices. The test typically takes 1 hour or
more and requires you to answer questions periodically.
Custom Test Tests a specific device. You can customize the tests to be run.
Symptom Tree Allows you to select tests based on a symptom of the problem you are
experiencing. The option lists the most common symptoms.
8 If a problem is encountered during a test, a message appears, displaying the error code
and a description of the problem. Write down the error code and problem description
and follow the instructions on the screen. If you cannot resolve the error condition,
contact Dell (see "Getting Help" in your User’s Guide for the appropriate contact
information).
9 If you run a test from the Custom Test or Symptom Tree option, click the applicable
tab described in the following table for more information.
Tab Function
Results Displays the results of the test and any error conditions encountered.
Errors Displays error conditions encountered, error codes, and problem
description.
Help Describes the test and may indicate requirements for running the test.
Configuration Displays your hardware configuration for the selected device.
The Dell Diagnostics obtains your configuration information for all devices
from the system setup program, memory, and various internal tests and
displays the information in the device list in the left pane of the screen.
The device list may not display the names of all the components installed
on your computer or all devices attached to your computer.
Parameters Allows you to customize the test by changing the test settings.
10 When you have finished running a test, close the screen to return to the Main Menu
screen. To exit the Dell Diagnostics and reboot the computer, close the Main Menu
screen.
System Information Guide 25

Regulatory Notices
Electromagnetic Interference (EMI) is any signal or emission, radiated in free space or
conducted along power or signal leads, that endangers the functioning of a radio navigation
or other safety service or seriously degrades, obstructs, or repeatedly interrupts a licensed
radio communications service. Radio communications services include but are not limited
to AM/FM commercial broadcast, television, cellular services, radar, air-traffic control,
pager, and Personal Communication Services (PCS). These licensed services, along with
unintentional radiators such as digital devices, including computers, contribute to the
electromagnetic environment.
Electromagnetic Compatibility (EMC) is the ability of items of electronic equipment to
www.dell.com | support.dell.com
function properly together in the electronic environment. While this computer has been
designed and determined to be compliant with regulatory agency limits for EMI, there is no
guarantee that interference will not occur in a particular installation. If this equipment does
cause interference with radio communications services, which can be determined by
turning the equipment off and on, you are encouraged to try to correct the interference by
one or more of the following measures:
• Reorient the receiving antenna.
• Relocate the computer with respect to the receiver.
• Move the computer away from the receiver.
• Plug the computer into a different outlet so that the computer and the receiver are on
different branch circuits.
If necessary, consult a Dell Technical Support representative or an experienced
radio/television technician for additional suggestions.
For additional regulatory information, see "Regulatory Notices" in the Appendix of your
online User’s Guide. The sections specific to each regulatory agency provide countryspecific EMC/EMI or product safety information.
26 System Information Guide

Dell Precision™ M60
系列移动工作站
系统信息指南
www.dell.com | support.dell.com
注 注意和警告
注 注表示可以帮助您更好地使用计算机的重要信息
注意
问题
警告
注意表示可能会损坏硬件或导致数据丢失 并告诉您如何避免此类
警告表示存在可能导致财产损失 人身伤害或死亡的潜在危险
缩略语和缩写词
有关缩写词或缩略语的完整列表 请参阅 用户指南 视您使用的操
作系统而定
击
Start [
中心
]
双击桌面上的
开始
然后单击
如果您购买的是
®
Windows
操作系统的任何参考内容均不适用
User's Guide [
]
按钮
单击
Help and Support Center [
User and system guides [
Dell™ n
系列计算机 则本文中关于
用户指南] 图标
用户与系统指南
Microsoft
或者单
帮助和支持
]
®
____________________
本文件中的信息如有更改 恕不另行通知
© 2003 Dell Computer Corporation
未经
Dell Computer Corporation
本文件中使用的商标
Computer Corporation
Microsoft 和 Windows 是 Microsoft Corporation
注册商标
本文件中述及的其它商标和产品名称是指拥有相应商标和名称的公司或其制造的产品
Dell Computer Corporation
2003 年 2 月 P/N 2Y134 Rev. A00
Dell DELL
的商标
对其它公司的商标和产品名称不拥有任何专利权
版权所有 翻印必究
书面许可 不准以任何形式进行复制
徽标
Dell Precision Latitude 和 TrueMobile 是 Dell
Intel Pentium 和 Celeron 是 Intel Corporation
的注册商标
EMC 是 EMC Corporation
的注册商标
的

目录
警告 安全说明
一般信息 . . . . . . . . . . . . . . . . . . . . . . . . . . . . . . . . . . . . . . . . . . 31
电源 . . . . . . . . . . . . . . . . . . . . . . . . . . . . . . . . . . . . . . . . . . . . . 32
电池 . . . . . . . . . . . . . . . . . . . . . . . . . . . . . . . . . . . . . . . . . . . . . 33
乘飞机旅行 . . . . . . . . . . . . . . . . . . . . . . . . . . . . . . . . . . . . . . . . 33
EMC 说明 . . . . . . . . . . . . . . . . . . . . . . . . . . . . . . . . . . . . . . . . . 34
使用计算机时
符合人机工程学操作习惯 . . . . . . . . . . . . . . . . . . . . . . . . . . . . . 35
拆装计算机内部组件时 . . . . . . . . . . . . . . . . . . . . . . . . . . . . . . . 35
防止静电损害 . . . . . . . . . . . . . . . . . . . . . . . . . . . . . . . . . . . . . . 36
电池处理 . . . . . . . . . . . . . . . . . . . . . . . . . . . . . . . . . . . . . . . . . . 36
查找计算机的相关信息
安装计算机
关于您的计算机
正面视图 . . . . . . . . . . . . . . . . . . . . . . . . . . . . . . . . . . . . . . . . . . 42
左侧视图 . . . . . . . . . . . . . . . . . . . . . . . . . . . . . . . . . . . . . . . . . . 43
右侧视图 . . . . . . . . . . . . . . . . . . . . . . . . . . . . . . . . . . . . . . . . . . 43
背面视图 . . . . . . . . . . . . . . . . . . . . . . . . . . . . . . . . . . . . . . . . . . 44
底部视图 . . . . . . . . . . . . . . . . . . . . . . . . . . . . . . . . . . . . . . . . . . 45
. . . . . . . . . . . . . . . . . . . . . . . . . . . . . . . . . . . . 31
. . . . . . . . . . . . . . . . . . . . . . . . . . . . . . . . . . . . . . 34
. . . . . . . . . . . . . . . . . . . . . . . . . . . . . . . 37
. . . . . . . . . . . . . . . . . . . . . . . . . . . . . . . . . . . . . . . 39
. . . . . . . . . . . . . . . . . . . . . . . . . . . . . . . . . . . . 41
取出电池
安装电池
卸下备用电池
安装备用电池
. . . . . . . . . . . . . . . . . . . . . . . . . . . . . . . . . . . . . . . . . 45
. . . . . . . . . . . . . . . . . . . . . . . . . . . . . . . . . . . . . . . . . 46
. . . . . . . . . . . . . . . . . . . . . . . . . . . . . . . . . . . . . . 47
. . . . . . . . . . . . . . . . . . . . . . . . . . . . . . . . . . . . . . 48
目录 29

运行
Dell
诊断程序
. . . . . . . . . . . . . . . . . . . . . . . . . . . . . . . . . . 48
管制通告
. . . . . . . . . . . . . . . . . . . . . . . . . . . . . . . . . . . . . . . . . 51
30 目录

警告 安全说明
遵循以下安全原则可以确保您的人身安全 并且有助于避免计算机和工作环境出现损坏的
危险
一般信息
• 除非您是合格的维修技术人员
说明进行
• 如果您使用延长电缆连接交流适配器
总和不超过延长电缆的额定电流
• 不要将物体塞入计算机的通风孔或开口处
而引起火灾或电击
• 请勿将打开的计算机存放在通风不畅的环境中
畅会损坏计算机或导致起火
• 将计算机置于远离暖气片和有热源的地方
在计算机下
• 使用交流适配器运行计算机或为电池充电时
如桌面或地板上
配器的冷却速度
• 在计算机正常操作期间
请小心处理该适配器
后
• 直接在裸露的皮肤上操作便携式计算机时
充电器底部的表面温度会逐渐升高 特别在使用交流电源时 长久地接触会
行
引起皮肤不适
• 不要在潮湿的环境中使用计算机
也不要将计算机紧靠墙壁或放置在床 沙发或地毯上
不要将纸张或其它物品置于交流适配器上面 因为它们会降低适
另外 也不要在手提箱中使用交流适配器
交流适配器可能会变得很热 在操作期间或刚执行操作之
甚至会灼伤皮肤
否则请勿尝试自行维修计算机 始终严格按照安装
请确保延长电缆连接的所有产品的额定电流
如果塞入物体 可能会导致内部组件短路
例如浴缸 水池 游泳池旁边或潮湿的地下室内
例如手提箱或密封的公文包 通风不
另外 切勿堵塞通风孔 不要将纸张垫
请将交流适配器放在通风的地方 例
请不要操作太长的时间 随着操作的进
• 如果计算机中安装了集成的或可选的
开调制解调器的电缆
成电击
• 为避免潜在的触电危险
配置本产品
断开了所有电缆
切勿在雷雨期间使用计算机 除非您的计算机使用电池供电 并且已
以免雷电产生的危险电压通过电话线从远处传入计算机而造
切勿在雷电期间连接或断开任何电缆 也不要维修或重新
卡 调制解调器 请在雷雨快要来临时断
PC
系统信息指南 31

警告 安全说明 续
• 如果计算机中安装了调制解调器
(AWG)
• 打开计算机底部的内存模块/小型
源插座的连接
• 如果计算机具有调制解调器
RJ-11
• 正常运行期间
请务必小心
• 清洁计算机之前
切勿使用液体或喷雾清洁剂 因为其中可能含有易燃物质
www.dell.com | support.ap.dell.com/china
中规定的最细电线以及符合
并断开电话电缆的连接
连接器而不是
RJ-45
卡的温度可能会很高
PC
请先断开计算机与电源插座的连接 使用蘸水的软布擦拭计算机
电源
• 只使用经认证可与本计算机配合使用的
器可能会导致起火或爆炸
• 将计算机连接至电源插座之前
频率与提供的电源相匹配
• 要断开计算机的所有电源连接
开交流适配器的连接
• 为避免遭受电击
电缆配有三脚插头
插头的接地插脚
连接交流适配器电源电缆
请将交流适配器和设备电源电缆插入正确接地的电源 这些电源
可以确保正确接地 不要使用转接插头 也不要拔下电源电缆
如果使用延长电缆 请使用适当类型的二线或三线电缆 以正确
RJ-11
连接器
则调制解调器所用的电缆应采用
标准的
FCC
PCI 卡/
连接器和网络
请检查交流适配器的额定电压 确保所需的电压和
请关闭计算机并取出电池组 然后从电源插座中断
调制解调器护盖之前
RJ-45
如果您在计算机连续运行后卸下
交流适配器
Dell
模块化插头进行制造
RJ-11
连接器
使用其它类型的交流适配
美国线规
26
请断开所有电缆与电
请将电话电缆插入
PC
卡
• 不要在交流适配器电源电缆上放置任何物品
• 如果您使用多插座配电盘
息
某些配电盘可能会允许您错误地插入电源插头 错误地插入电源插头可能会对计
算机造成永久性的损坏
接地插脚正确插入配电盘的相应接地触点
32 系统信息指南
同时还可能会导致电击和 或 起火 请确保将电源插头的
并将电缆置于不会被踩踏或踢到的地方
请注意有关将交流适配器电源电缆插入配电盘的警告信

电池
警告 安全说明 续
• 仅可使用经认证可以配合本计算机使用的
会导致起火或爆炸
• 不要将电池组放入您的口袋
汽车钥匙或纸夹
从而烧坏电池组或灼伤皮肤
度
• 如果处理不当
请务必小心谨慎 如果电池损坏 电解液可能会从中流出并造成人身伤害
组时
• 将电池放置在远离儿童的地方
• 不要将计算机或电池组存储或放置在热源
它产生热能的装置
高温时
• 不要将计算机电池丢入火中
炸
理电池的有关说明
电池可能会发生爆炸而导致起火
根据制造商的说明处理废弃的电池 或者与当地的废品处理机构联系 了解处
可能会造成电池两端短路 由此产生的强大电流会形成极高的温
电池可能会灼伤皮肤 切勿拆开电池 处理已损坏或发生漏液的电池
附近 也不要暴露在温度超过
请尽快处理已耗尽电量或已损坏的电池
钱包或其它类似容器中 因为其中的金属物体 例如
也不要与普通家庭废品放在一起 电池可能会发生爆
乘飞机旅行
• 在登机后使用
定的限制
电磁信号的个人电子设备
例如 这些条例/限制可能会禁止在飞机上使用任何可以发送射频或其它
Dell
计算机时
(PED)
可能会受到某些联邦航空管制条例或航空公司特有规
Dell™
电池模块
例如暖气片 壁炉 火炉 电暖气或其
60ºC (140ºF)
使用其它类型的电池可能
的环境中 加热到
– 为了更好地遵守所有这些限制
或其它一些无线通信设备
设备提供的所有使用说明
– 另外
使用个人计算机等个人电子设备
时允许使用个人电子设备所作出的特别说明
在某些关键飞行状态下 例如飞机起飞或降落时 可能会禁止在飞机上
10,000
英尺 高度以下飞行时定义为关键飞行状态 请务必遵守航空公司就何
如果您的
请在登机前禁用此类设备 并且遵守机组人员就此类
便携式计算机配有
Dell
某些航空公司可能会进一步将飞机在
Dell TrueMobile
系统信息指南 33
3050
™
米

EMC
警告 安全说明 续
说明
使用屏蔽信号电缆 确保在特定的环境中维持相应的
电缆
静电会损坏计算机内部的电子组件 为防止静电损害 请在接触计算机的任何电子组件
漆的金属表面来导去静电
如果您愿意 可以通过
例如内存模块 之前先导去身上的静电 您可以通过触摸计算机输入/输出面板上未上
使用计算机时
遵循以下安全处理原则 防止对计算机造成损害
www.dell.com | support.ap.dell.com/china
• 安装计算机时
• 旅行时
但不可让其通过金属检测器 如果工作人员需要对计算机进行人工检查 请确保计算
机配有已充电的电池
• 如果在旅行期间携带从计算机中卸下的硬盘驱动器
或纸张
将驱动器装回计算机的准备
其通过金属探测器
• 旅行时
动
• 保护好您的计算机
灰尘 食物 液体 过高或过低的温度以及阳光直射
请不要将计算机当作行李接受检查 您可以让计算机通过
包好硬盘驱动器 如果工作人员需要对硬盘驱动器进行人工检查 请做好
不要将计算机放置在座位上方的储物箱中 计算机在此储物箱中会四处滑
切勿让计算机跌落或受到机械性撞击
请将其放置在平面上
电池和硬盘驱动器 防止外部环境对它们造成危害 例如污垢
分类
EMC
Dell 的 WWW
因为工作人员可能会要求您打开计算机
您可以让硬盘驱动器通过
站点
www.dell.com 向 Dell
请用不导电的材料 例如布料
X
光安全检查机 但切勿让
提供了并行打印机
Dell
订购电缆
光安全检查机
X
• 在温度和
成冷凝
注意 将计算机从低温移至温暖环境或从高温移至较冷环境时 请在计算机适应室温后再开机
• 断开电缆时
接器时应均匀用力
器正确定位并对齐
• 处理组件时应小心
34 系统信息指南
或 湿度差别较大的环境中移动计算机时 可能会在计算机表面或内部形
为避免损坏计算机 请在使用前让计算机有足够的时间蒸发掉水份
请抓住电缆的连接器或张力释放拉环将其拔出 切勿拉扯电缆 拔出连
以免弄弯连接器插针 此外 在连接电缆之前 请确保两个连接
您应握住组件 例如内存模块 的边缘 而不要握住组件的插针

使用计算机时 续
• 如果您准备从主机板上卸下内存模块或从计算机中断开某个设备的连接
机并断开交流适配器电缆的连接
然后等待
秒钟再继续操作 这样可以避免损坏主
5
请关闭计算
机板
• 使用干净的软布和清水清洁显示屏
沿着一个方向擦拭显示屏
在潮湿环境中
会使显示屏受到损坏 清洁显示屏时 请勿使用购买的窗户清洁剂
应迅速擦去显示屏上的水渍 使显示屏保持干燥 长期暴露
• 如果您的计算机受潮或损坏
执行这些步骤后 如果您确认计算机仍然不能正常工作 请与
的联系信息
请参阅 用户指南 中的 获得帮助
将软布蘸上水 然后从显示屏的顶部开始 向底部
请执行 用户指南 中 解决问题 部分所述的步骤
联系 有关适当
Dell
符合人机工程学操作习惯
警告
不正确或超长时间地使用键盘可能会造成身体损伤
警告
长时间地观看显示屏或外部显示器屏幕可能会造成眼睛疲劳
为满足舒适和高效的要求 在安装和使用计算机时 请遵循联机 用户指南 附录中的人
机工程学原则
本便携式计算机不适合作为办公设备进行连续操作 如果在办公室内长时间使用 建议您
连接外部键盘
拆装计算机内部组件时
拆卸或安装内存模块 小型
注意 仅在安装内存模块 小型 PCI 卡或调制解调器时 才有必要拆卸计算机的内部组件
注意 请在关闭计算机后等待 5 秒钟 然后再断开设备连接或取出内存模块 小型 PCI 卡或
调制解调器
这样可以避免损坏主机板
卡或调制解调器时 请按所示顺序执行以下步骤
PCI
1
关闭计算机和已连接的任何设备
2
从电源插座中拔出计算机和外围设备的电源插头 以免造成人身伤害或电击 另外
从计算机上断开所有电话或电信线路的连接
3
从电池槽中取出主电池 如果有必要 从模块化托架中取出次电池
4
触摸计算机背面
在工作期间不时地触摸
面板上未上漆的金属表面 导去身上的静电
I/O
面板 导去可能会损坏内部组件的静电
I/O
系统信息指南 35

使用计算机时 续
防止静电损害
静电会损坏计算机内部的电子组件 为防止静电损害 请在接触计算机的任何电子组件
例如内存模块 之前先导去身上的静电 您可以通过触摸计算机
属表面来导去静电
面板上未上漆的金
I/O
连续拆装计算机内部组件时 请不时地触摸
另外 请采取以下措施防止静电释放
• 打开静电敏感组件的包装箱时
准备好安装此组件
• 运送对静电敏感的组件时
www.dell.com | support.ap.dell.com/china
• 在无静电的工作区内处理所有的敏感组件
作台垫
打开防静电包装之前 应确保已导去身上的静电
电池处理
您的计算机使用锂离子电池 有关更换计算机中的锂离子电池的说明 请参阅本文稍后的
取出电池 和联机 用户指南 中的 使用电池
不要将电池与家庭废品放在一起 有关最近的电池回收点位置 请与当地的废品处理机构
联系
连接器 导去身上可能累积的静电
I/O
(ESD)
请不要将组件从防静电的包装材料中取出 除非您已
应先将其放入防静电的容器或包装内
造成损害
如果有可能 请使用防静电的地板垫和工
36 系统信息指南

查找计算机的相关信息
您查找的内容 可以找到的位置
• 适用于计算机的诊断程序
• 适用于计算机的驱动程序
• 用户指南
• 设备说明文件
Drivers and Utilities CD
您的计算机从
明文件和驱动程序
来重新安装驱动程序
序或访问说明文件
中可能包含 自述 文件 介绍了
CD
有关计算机技术的最新更新信息
为有经验的用户或技术人员提供了高级
技术参考资料
也称为
出厂时 已安装了说
Dell
您可以使用该
运行
Dell
ResourceCD
CD
诊断程
或者
• 保修信息
• 如何卸下和装回部件
• 技术规格
• 如何配置系统设置
• 如何排除故障并解决问题
系统信息指南
Dell
Users Guide
Windows
单击
1
Support
2
单击
后单击
用户指南 图标
双击桌面上的
帮助和支持中心
Start
User's Guides
开始
帮助和支持
User's and system guides
User's guides
(Microsoft Windows 2000)
用户指南
按钮 然后单击
Help and
用户和系统指南
用户指南
图标
然
系统信息指南 37

您查找的内容 可以找到的位置
• 快速服务代码和服务标签号码
•
Microsoft
®
Windows®
许可标签
快速服务代码和产品密钥标签
这些标签位于您的计算机上
• 适用于计算机的最新驱动程序
• 对技术服务与支持问题的解答
• 与其他用户和技术支持人员进行联
机讨论
• 适用于计算机的说明文件
www.dell.com | support.ap.dell.com/china
务手册
包括服
• 服务呼叫状态与支持历史记录
• 关于计算机的重要技术问题
• 常见问题
• 文件下载
• 关于计算机配置的详情
• 计算机的服务合同
• 如何使用
Windows XP
• 适用于计算机的说明文件
• 设备说明文件
例如调制解调器
Dell 支持 Web
Dell 支持 Web
• 解决方案
• 社区论坛
• 升级
• 客户服务
• 下载
• 参考
客户特选支持
Dell
客户特选支持
Dell
并非所有地区均可访问此
做
Windows
单击
1
站点 — support.dell.com
站点提供了几种联机工具
故障排除提示
与其他
Dell
内存
硬盘驱动器和操作系统等组件的升级信息
联系信息
驱动程序
计算机说明文件 产品规格和白皮书
补丁程序和软件更新
Web
Web
技术性文章和联机课程
客户进行联机讨论
订购状态 保修和维修信息
站点 — premiersupport.dell.com
站点专为企业
站点
Web
帮助和支持中心
按钮 然后单击
Start
开始
帮助和支持
键入说明问题的字词 然后单击箭头图标
2
单击说明问题的主题
3
按照屏幕上的说明进行操作
4
包括
政府和教育部门客户量身订
Help and Support
38 系统信息指南

您查找的内容 可以找到的位置
• 如何重新安装操作系统
Operating System CD
或
如果您重新安装操作系统
Drivers and Utilities CD
的设备重新安装驱动程序
操作系统的产品密钥位于计算机上
请使用
为计算机附带
安装计算机
1
打开附件盒
2
将附件盒中的物品放在一边 您需要使用它们安装计算机
附件盒还包含用户说明文件以及您订购的所有软件或附加硬件 例如
器或电池
PC
卡 驱动
系统信息指南 39

3
将交流适配器连接至计算机上的交流适配器连接器 然后连接至电源插座
4
www.dell.com | support.ap.dell.com/china
打开计算机显示屏 按下电源按钮启动计算机
注 至少必须打开并关闭一次计算机 才能将其连接至对接设备
40 系统信息指南
电源按钮

关于您的计算机
有关计算机的详情 请参阅联机 用户指南 视您使用的操作系统而定 双击桌面上
的
User's Guide
and Support Center
与系统指南
以下项目解决了与计算机有关的一些常见问题
用户指南
帮助和支持中心
图标 或者单击
Start
然后单击
开始
按钮 单击
User and system guides
Help
用户
• 调制解调器和网络适配器
Ethernet LOM
有关端口与连接器的详情 请参阅联机 用户指南 中的 关于您的计算机
图
• 电池使用时间与用法
72WHr/6486mAh
作时间可达到
使用时间可能会明显降低
– 有关电池性能
池
– 有关可选备用电池的信息
• 模块化托架设备
中的 使用模块化托架
• 对接设备
并非所有国家或地区均提供了对接设备
注
– 有关可选对接设备的信息
– 有关在将对接设备与本计算机配合使用时如何获得最佳性能的信息
用户指南 中的 解决问题
网络适配器
电池
小时
3 至 4
用法与节省电量的详情 请参阅 用户指南 中的 使用电
和 电源管理
有关模块化托架及其所支持设备的信息 请参阅 用户指南
您的计算机支持
计算机可能附带了
有关连接器位置 请参阅本说明文件后面的 右侧视
有各种电池可供计算机使用 如果使用随计算机附带的
在一般使用方法与电池充满电的情况下 单块电池的操
执行某些类型的操作 例如扩展无线操作 时 电池
请参阅 用户指南 中的 使用模块化托架
Dell D/Dock
请参阅随设备附带的说明文件
v.92 56K
扩充站和
调制解调器和
Dell D/Port
高级端口复制器
10/100/1000
请参阅
系统信息指南 41

正面视图
键盘状态
指示灯
显示屏闩锁
显示屏
静音按钮
音量控制
按钮
www.dell.com | support.ap.dell.com/china
定点杆
定点杆/
触摸板按钮
电源按钮
设备状态
指示灯
键盘
触摸板
显示屏闩锁
按钮
扬声器
42 系统信息指南

左侧视图
通风孔
安全缆线孔
IEEE 1394 连接器
右侧视图
安全缆线孔
PC 卡插槽
智能卡插槽
红外线感应器
模块化托架 设备释放闩锁
麦克风连接器
Dell D/Bay 连接器
硬盘驱动器
耳机连接器
系统信息指南 43

背面视图
注意 为避免损坏计算机 请在关闭计算机之后等待 5 秒钟 然后再断开外部设备的连接
警告
运行的计算机存储在通风不良的环境中
导致起火
请勿堵塞通风孔或将物体塞入通风孔 也不要让灰尘积聚在通风孔内 不要将正在
例如密封的公文包中 通风不畅会损坏计算机或
超级视频电视输出连接器
www.dell.com | support.ap.dell.com/china
USB 连接器 2 个
网络连接器 (RJ-45)
调制解调器连接器 (RJ-11)
通风孔
并行连接器
交流适配器连接器
通风孔
串行连接器
视频连接器
44 系统信息指南

底部视图
硬盘驱动器
小型 PCI 卡/
调制解调器护盖
电池槽释放闩锁 电池电量表
风扇
内存模块盖
电池
对接设备插槽
取出电池
有关取出第二块电池的详情 请参阅联机 用户指南 中的 使用模块化托架
警告
源插座中断开其连接
注意 如果您在计算机处于备用模式时更换电池 则最多有 90 秒钟的时间来完成电池更
换
1
请确保计算机已关闭 已暂挂至电源管理模式或已连接至电源插座
2
如果已将计算机连接至对接设备 即已对接 请断开其对接
有关说明 请参阅对接设备附带的说明文件
执行这些过程之前 请阅读并遵循第
然后从墙上电话插孔中断开调制解调器的连接
否则计算机将会关机并丢失任何未保存的数据
31
页开始处的安全说明 关闭计算机并从电
系统信息指南 45

3
滑动并按住计算机底部的电池槽释放闩锁 然后从电池槽中取出电池
www.dell.com | support.ap.dell.com/china
安装电池
警告
将电池滑入槽中 然后向下按入电池直至释放闩锁卡入到位
有关安装第二块电池的详情 请参阅联机 用户指南 中的 使用模块化托架
执行本过程之前 请阅读并遵循第
页开始处的安全说明
31
46 系统信息指南

卸下备用电池
警告
1
取出电池
2
卸下备用电池盖
3
从电池盒中取出备用电池 然后从连接器中断开电缆的连接
执行这些过程之前 请阅读并遵循第
页开始处的安全说明
31
系统信息指南 47

安装备用电池
警告
1
将备用电池电缆连接至备用电池盒中的连接器
2
将备用电池放入电池盒 然后装回备用电池盖
www.dell.com | support.ap.dell.com/china
执行这些过程之前 请阅读并遵循第
页开始处的安全说明
31
运行
Dell
1
2
48 系统信息指南
Dell
诊断程序位于隐藏在硬盘驱动器上的诊断公用程序分区中
如果计算机无法显示屏幕图象 请与 Dell 联系 有关适当的联系信息 请参阅 用户
注
指南
关闭计算机
如果已将计算机连接至对接设备 即已对接 请断开其对接
有关说明 请参阅对接设备附带的说明文件
诊断程序
中的 获得帮助

3
将计算机连接至电源插座
注 如果显示屏未显示任何内容 则可以在按住静音按钮的同时按下电源按钮 而不是
F12 键
4
打开计算机 屏幕显示
长
桌面
开始运行 Dell 诊断程序 您无需突出显示
计算机将自动运行预引导系统评估程序
键
徽标时 请立即按
®
Windows®
并且屏幕上显示了
DELL™
Microsoft
关闭计算机 然后再试一次
Diagnostics
键 如果您等待的时间太
请继续等待直至显示
徽标
诊断程序
Windows
并按
5
屏幕显示引导设备列表时 突出显示
Diagnostics
诊断程序
并按
键
计算机将开始运行预引导系统评估程序 这是一套嵌入式诊断程序 可用于对主机
键盘 硬盘驱动器和显示屏进行初步检测
板
• 评估期间
• 如果检测到组件故障
导至操作系统
检测出现故障的组件
• 如果在预引导系统评估期间检测到故障
Dell
南
中 获得帮助
• 如果显示的信息表示未找到诊断公用程序分区
Drivers and Utilities CD
如果预引导系统评估成功完成 则会显示以下信息
Utility Partition. Press any key to continue.
用程序分区
6
按任意键 从硬盘驱动器上的诊断公用程序分区中启动
7
诊断程序载入并显示
Dell
请回答显示的任何问题
请按
诊断程序之前先与
请按任意键继续
计算机将停止运行并发出哔声 要停止评估并重新引
键 要继续下一项检测 请按
请按
键
键 要重新
请写下错误代码 然后在继续运行
Dell
联系
有关适当的联 系 信息 请参阅 用户指
请按照屏幕上的说明通过
来运行
Main Menu
Dell
诊断程序
主菜单
Booting Dell Diagnostic
Dell
Dell
正在引导
诊断程序
屏幕后 单击对应于所需选
项的按钮
诊断公
计算机的服务标签位于每个屏幕的标题栏中
注
系统信息指南 49

选项 功能
Express Test
快速检测
Extended Test
扩展检测
Custom Test
自定义检测
Symptom Tree
症状树视图
8
如果在检测期间遇到问题 屏幕将出现一则信息 其中显示了错误代码和对问题的
描述
www.dell.com | support.ap.dell.com/china
决错误
记下错误代码和问题描述 然后按照屏幕上的说明进行操作 如果您无法解
请与
Dell
帮助
对设备执行快速检测 此检测通常需要
先运行
操作
可能性
对设备执行彻底的检测 此检测通常需要一个小时甚至更长时间 并且
需要您定期回答一些问题
检测特定的某个设备 您可以自定义要运行的检测程序
使您可以根据问题的症状选择检测程序 此选项列出了最常见的症状
Express Test
10 至 20
快速检测 有利于提高快速找出问题的
分钟 并且无需您参与
联系 有关适当的联系信息 请参阅 用户指南 中的 获得
9
如果您通过
Custom Test
自定义检测
或
Symptom Tree
选项运行检测程序 请单击以下表格中列出的适当标签以了解有关详情
标签 功能
Results
Errors
Help
Configuration
配置
Par ame ters
10
结果 显示检测的结果以及遇到的任何错误
错误 显示遇到的错误 错误代码以及问题描述
帮助 对检测程序进行说明 可能还会提示运行检测程序所需满足的要求
显示选定设备的硬件配置
诊断程序通过系统设置程序 内存和各种内部检测程序获得所有设
Dell
备的配置信息
能不会显示计算机中安装的所有组件或计算机连接的所有设备的名称
参数 使您可以通过更改检测程序设置来自定义检测
检测程序运行完毕后 关闭屏幕以返回
诊断程序并重新启动计算机
Dell
然后将其显示在屏幕左窗格的设备列表中 设备列表可
主菜单
主菜单
请关闭
MainMenu
Main Menu
症状树视图
屏幕 要退出
屏幕
50 系统信息指南

管制通告
电磁干扰
对无线电导航或其它安全服务设施的正常工作造成危害
中断经许可的无线电通信服务
视
许可的服务与无意放射体
电磁兼容性
符合管制机构关于
如果此设备确实对无线电通信服务造成了干扰 可以通过关闭和打开设备确定是否有
干扰
• 重新调整接收天线的方向
• 根据接收器的位置重新放置计算机
• 将计算机移至远离接收器的位置
• 将计算机连接至不同的电源插座
如果有必要 请咨询
益建议
有关管制通告的详情 请参阅 用户指南 附录中的 管制通告 每个管制机构的特
定部分提供了适用于特定国家或地区的
(EMI)
蜂窝式无线电通信 雷达 空中交通管制 寻呼机和个人通信服务
请尝试以下一种或多种方法排除干扰
是一种信号或辐射 它散布在空中或通过电源线或信号线传送 这样会
并且严重地干扰 阻碍或重复
(EMC)
无线电通信服务包括但不仅限于
例如包括计算机在内的数字设备 一起形成了电磁环境
是指各种电子设备在电子环境中共同工作的能力 本计算机的设计
EMI
Dell
的限制
技术支持代表或有经验的无线电/电视技术人员 获得其它有
但是不能保证在特定的安装环境中绝对不产生干扰
使计算机与接收器占用不同的分支电路
EMC/EMI
或产品安全信息
AM/FM
商业电台 电
(PCS)
这些经
系统信息指南 51

www.dell.com | support.ap.dell.com/china
52 系统信息指南

Dell Precision™ M60 系列行動工作站
系統資訊指南
www.dell.com | support.dell.com

註、注意事項和注意
註:
註表示可以幫助您更有效地使用電腦的重要資訊。
注意事項:
何避免此類問題的發生。
注意:
注意事項表示可能會損壞硬體或導致資料遺失,並告訴您如
注意表示可能會導致財產損壞、人身受傷或生命危險。
縮寫和簡寫用語
若要獲得縮寫和簡寫用語的完整清單,請參閱使用者指南 (依據作業系
統的不同,在桌面上連按兩下
User's Guide [
按一下開始按鈕、說明及支援中心和
系統指南
如果您購買了
。
])
Dell™ n
系列電腦,則本文件中對
作業系統的任何參考都不適用。
User and system guides [
使用者指南
Microsoft
圖示,或依次
]
使用者和
®
Windows
®
____________________
本文件中的資訊如有變更,恕不另行通知。
著作權所有
未經
本文件中使用的商標:
Computer Corporation
標;
的註冊商標。
本文件中述及的其他商標和商業名稱可能指擁有相應商標和名稱的公司實體或其產品。
Dell Computer Corporation
2003 年 2 月 P/N 2Y134 Rev. A00
© 2003 年 Dell Computer Corporation
Dell Computer Corporation
Dell、DELL
的商標;
Microsoft 和 Windows 是 Microsoft Corporation
的書面許可,不得以任何形式進行複製。
標誌、
Intel、Pentium 和 Celeron 是 Intel Corporation
對本公司之外的商標和產品名稱不擁有任何專利權。
。所有權利均予保留。
Dell Precision、Latitude 和 TrueMobile 是 Dell
的註冊商標;
EMC 是 EMC Corporation
的註冊商

目錄
注意:安全說明 . . . . . . . . . . . . . . . . . . . . . . . . . . . . . . . . . . . . 57
一般規定 . . . . . . . . . . . . . . . . . . . . . . . . . . . . . . . . . . . . . . . . . . 57
電源 . . . . . . . . . . . . . . . . . . . . . . . . . . . . . . . . . . . . . . . . . . . . . 58
電池 . . . . . . . . . . . . . . . . . . . . . . . . . . . . . . . . . . . . . . . . . . . . . 59
空中旅行 . . . . . . . . . . . . . . . . . . . . . . . . . . . . . . . . . . . . . . . . . . 59
EMC 說明 . . . . . . . . . . . . . . . . . . . . . . . . . . . . . . . . . . . . . . . . . 60
使用您的電腦時 . . . . . . . . . . . . . . . . . . . . . . . . . . . . . . . . . . . . 60
人體工學計算習慣 . . . . . . . . . . . . . . . . . . . . . . . . . . . . . . . . . . . 61
進行主機內部組裝時 . . . . . . . . . . . . . . . . . . . . . . . . . . . . . . . . . 61
防止靜電損害 . . . . . . . . . . . . . . . . . . . . . . . . . . . . . . . . . . . . . . 62
電池處理 . . . . . . . . . . . . . . . . . . . . . . . . . . . . . . . . . . . . . . . . . . 62
尋找關於電腦的資訊 . . . . . . . . . . . . . . . . . . . . . . . . . . . . . . . . . 63
安裝您的電腦 . . . . . . . . . . . . . . . . . . . . . . . . . . . . . . . . . . . . . . 65
關於您的電腦 . . . . . . . . . . . . . . . . . . . . . . . . . . . . . . . . . . . . . . 67
前視圖 . . . . . . . . . . . . . . . . . . . . . . . . . . . . . . . . . . . . . . . . . . . . 68
左側視圖 . . . . . . . . . . . . . . . . . . . . . . . . . . . . . . . . . . . . . . . . . . 69
右側視圖 . . . . . . . . . . . . . . . . . . . . . . . . . . . . . . . . . . . . . . . . . . 69
後視圖 . . . . . . . . . . . . . . . . . . . . . . . . . . . . . . . . . . . . . . . . . . . . 70
底視圖 . . . . . . . . . . . . . . . . . . . . . . . . . . . . . . . . . . . . . . . . . . . . 71
取出電池 . . . . . . . . . . . . . . . . . . . . . . . . . . . . . . . . . . . . . . . . . 71
安裝電池 . . . . . . . . . . . . . . . . . . . . . . . . . . . . . . . . . . . . . . . . . 72
取出備用電池 . . . . . . . . . . . . . . . . . . . . . . . . . . . . . . . . . . . . . . 73
安裝備用電池 . . . . . . . . . . . . . . . . . . . . . . . . . . . . . . . . . . . . . . 74
目錄 55

執行 Dell 診斷程式 . . . . . . . . . . . . . . . . . . . . . . . . . . . . . . . . . . 74
管制通告 . . . . . . . . . . . . . . . . . . . . . . . . . . . . . . . . . . . . . . . . . 77
56 目錄

注意:安全說明
為了確保您自身的安全,以及保護電腦和工作環境免受潛在因素的損壞,請務必遵照下列
安全規範。
一般規定
• 除非您是受過訓練的維修技術人員,否則請勿嘗試自己維修電腦。請務必嚴格遵循
安裝說明。
• 如果使用延長電源線連接交流電變壓器,請確定與延長電源線插接的產品之總安培
額定值不超過延長線的安培額定值。
• 請勿在電腦的通風口或開口處塞入任何物件,否則可能會導致內部元件短路而發生
火災或觸電。
• 電腦開啟電源時,切勿將其置於通風不好的環境中,例如攜帶盒或密閉的箱子中。
通風不好會損壞電腦或導致發生火災。
• 將您的電腦擺放在遠離散熱器或其他熱源的地方。此外,不可堵塞散熱通風孔。且
避免將紙張墊在電腦下,也不要將電腦緊貼牆壁或是擺放在床、沙發或地毯上。
• 使用交流電變壓器為電腦供電或為電池充電時,請將交流電變壓器放在通風的位
置,例如桌面或地板上。請勿用紙張或其他會影響散熱的物件蓋住交流電變壓器;
另外,請勿在攜帶盒內使用交流電變壓器。
• 交流電變壓器在電腦正常作業期間可能會變熱。作業期間或作業剛完成後處理變壓
器時,請務必謹慎。
• 可攜式電腦作業時,請勿讓基座長時間與皮膚直接接觸。正常作業期間 (尤其是使用
交流電源時),基座的表面溫度將會升高。如果皮膚長時間接觸基座,可能會導致不
適或灼傷。
• 請勿在潮濕的環境中 (例如浴缸、洗滌槽或游泳池附近,或者潮濕的地下室) 使用電
腦。
• 如果您的電腦配有內建或選購的
以免閃電透過電話線而造成觸電危險。
• 為避免觸電的潛在危險,請勿在發生雷暴時連接或拔除任何纜線,或對本產品進行
維護或重新組態。除非已拔除所有纜線且電腦使用電池電能進行作業,否則請勿在
發生雷暴時使用電腦。
(PC 卡)
數據機,請在雷暴來臨前拔除數據機纜線,
系統資訊指南 57

注意:安全說明 (續)
• 如果您的電腦配有數據機,則數據機使用的纜線在製造時應符合
的最小電線尺寸之規定,並具有符合
• 當您打開電腦底部的記憶體模組
有纜線並拔除電話線。
• 如果電腦配備一個數據機
接頭而不是
• 正常作業期間,
• 清潔電腦之前,請先從電源插座上拔除電腦的電源線。然後使用一塊用水蘸濕的軟
www.dell.com | support.ap.dell.com
布清潔電腦。切勿使用可能含易燃物質的液體或噴霧清潔劑。
R-45
接頭。
PC
電源
• 請僅使用獲准用於本電腦的
會導致發生火災或爆炸。
• 將電腦連接至電源插座之前,請檢查交流電變壓器的電壓額定值,以確保所需的電
壓和頻率與供電來源一致。
• 若要切斷電腦的所有電源,請關閉電腦電源,取出電池組,然後從電源插座上拔除
交流電變壓器的電源線。
• 為防止觸電,請將交流電變壓器和裝置的電源線插入已正確接地的電源。這些電源
線可能配有三叉式插頭以提供接地連接。請勿使用變壓器插頭或移除電源線插頭上
的接地叉腳。如果使用延長電源線,請使用適當的電源線類型 (雙叉或三叉),以與
交流電變壓器的電源線相匹配。
標準的
FCC
/Mini PCI 卡/
RJ-11
卡可能會變得很熱。在持續作業後取出
接頭和一個網路
提供之交流電變壓器。使用其他交流電變壓器可能
Dell
數據機蓋之前,請從電源插座中拔除所
RJ-45
模組化插頭。
RJ-11
接頭,請將電話線插入
美規線徑
26
卡時,請務必謹慎。
PC
(AWG)
RJ-11
• 請確定交流電變壓器的電源線上沒有放置任何物件,且不是處於會被絆倒或踩到的
地方。
• 如果使用的是多插座電源板,請小心地將交流電變壓器的電源線插入電源板。某些
電源板可能會使您錯誤插接插頭。錯誤插接電源插頭可能會導致電腦永久性損壞,
並會有觸電和 (或) 發生火災的危險。請確定電源插頭的接地叉腳已插入電源板上相
匹配的接地插座。
58 系統資訊指南

電池
注意:安全說明 (續)
• 請僅使用獲准用於本電腦的
發生火災或爆炸的危險。
• 請勿將電池組放在口袋、錢包或其他箱子中,以免其中的金屬物件 (例如車鑰匙或迴
紋針) 引起電池短路。短路導致的過強電流會產生極高溫度,並可能損壞電池組,或
導致發生火災或灼傷。
• 如果電池處理不當,可能會導致燃燒的危險。請勿將電池拆開。請特別小心處理已
損壞或電解液漏出的電池組。如果電池已損壞,電池中的電解液可能會洩漏出來並
導致人身受傷。
• 將電池置於小孩觸摸不到的地方。
• 請勿將電腦或電池組存放在或置於熱源 (例如暖氣爐、壁爐、火爐、電暖氣或其他發
熱設備) 附近,或者將其置於攝氏
高,電池組可能會爆炸或冒煙,進而導致發生火災的危險。
• 請勿焚燒電腦的電池或將其與一般家居廢棄物放在一起處理。電池組可能會爆炸。
請按照製造廠商的說明丟棄使用過的電池,或與當地的廢棄物處理機構聯絡,詢問
如何處理電池。請及時處理已報廢或損壞的電池。
Dell™
電池模組。使用其他類型的電池模組可能會增加
60 度 (
華氏
140 度)
以上的環境中。如果溫度過
空中旅行
• 搭乘飛機時,使用
的限制。例如,這些條例/限制可能禁止在飛機上使用任何可主動發射無線電頻率或
其他電磁訊號的個人電子裝置
電腦可能要遵循某些聯邦航空管理條例和 (或) 特定航空公司
Dell
(PED)
。
– 如果您的
格遵循上述所有限制,請在登機前關閉此裝置,並遵循空服人員對此類裝置提出
的所有說明。
– 另外,在某些重要的飛行階段 (例如起飛和降落時),飛機上可能禁止使用任何如
可攜式電腦之類的
(10,000 呎)
遵循航空公司的特定說明。
可攜式電腦配有
Dell
。某些航空公司可能會進一步規定,高度低於
PED
的飛行均屬於重要的飛行階段。關於何時可以使用
Dell TrueMobile™
或其他無線通訊裝置,為了嚴
公尺
3050
的資訊,請
PED
系統資訊指南 59

注意:安全說明 (續)
EMC 說明
請使用帶保護層訊號纜線以確定系統符合相應使用環境的
其纜線將由
靜電會損壞電腦內部的電子元件。為防止靜電損壞,請在觸摸電腦的任何電子元件 (例如
記憶體模組) 之前,先導去您身上的靜電。您可以觸摸電腦輸入/輸出面板上未上漆的金屬
表面以導去身上的靜電。
提供。您也可以透過全球資訊網網站
Dell
使用您的電腦時
www.dell.com | support.ap.dell.com
請遵循下列安全處理指引,以防止損壞電腦:
• 當安裝電腦以進行操作時,請將其放置在平坦的表面上。
• 在旅行時,請勿將電腦當作行李進行檢查。您可以讓電腦通過
勿讓電腦接受金屬偵測器的檢查。如果您讓工作人員徒手檢查電腦,請確保電腦配有
已充電的電池,以防工作人員要求您開機檢查。
• 如果要在旅行時卸下電腦中的硬碟,請用不導電的材料 (例如布或紙張) 包好硬碟。如
果您讓工作人員徒手檢查硬碟,請將硬碟安裝在電腦中。您可以讓硬碟通過
檢查機,但切勿讓硬碟接受金屬偵測器的檢查。
• 旅行途中,請勿將電腦放置在頭頂上的置物櫃中以免它四處滑動。切勿讓電腦摔落
地面或受到機械性的撞擊。
• 請保護電腦、電池和硬碟機免受污垢、塵埃、食物、液體、溫度過高或過低和過度
曝曬的環境危害。
等級。對於並列印表機,
EMC
(www.dell.com) 向 Dell
光安全檢查機,但切
X
訂購纜線。
光安全
X
• 在溫度和 (或) 濕度相差非常大的環境中移動電腦時,可能會使電腦表面或內部形成冷
凝。使用電腦前,請確保有足夠的時間讓水分蒸發,以免損壞電腦。
注意事項:
至室溫後再開啟電源。
• 拔除纜線時,請拉扯其接頭或放鬆拉環,避免直接拉扯纜線。拉出接頭時,接頭的
兩邊應同時退出,以免弄彎接頭的插腳。另外,連接纜線之前,請確定兩個接頭均
已正確定位且對準插孔。
• 請小心處理元件。拿取記憶體模組之類的元件時,請握住其邊緣,避免接觸到插腳。
• 準備從主機板上取出記憶體模組或中斷裝置與電腦的連接之前,請先關閉電腦電
源,拔除交流電變壓器的纜線,然後等待
60 系統資訊指南
將電腦從低溫移至較溫暖的環境,或從高溫移至較涼爽的環境時,請讓電腦恢復
秒鐘再繼續進行,以免損壞主機板。
5

使用您的電腦時 (續)
• 使用一塊用水蘸濕的乾淨軟布清潔顯示器。將軟布蘸濕,然後沿著一個方向由上而下
擦拭顯示器。請迅速擦乾顯示器上的水分並保持顯示器乾燥。長時間帶有水分可能會
損壞顯示器。請勿使用市面上可買到的窗戶清潔劑來清潔顯示器。
• 如果您的電腦被弄濕或損壞,請按照使用者指南中的「解決問題」所述的程序進
行。完成這些程序之後,如果您確認電腦仍然無法正常操作,請與
請參閱使用者指南中的「獲得幫助」,以獲得適當的聯絡資訊)。
(
人體工學計算習慣
注意:
不正確或長時間使用鍵盤可能會導致傷害。
注意:
長時間注視顯示器或外接式監視器螢幕可能會導致眼睛疲勞。
安裝和使用電腦時,為了能舒適地使用和獲得最高的效率,請遵循線上使用者指南的附錄
中之人體工學指引。
此可攜式電腦設計目的並非是作為連續作業的辦公設備使用。如果要長時間在辦公室中使
用,建議您連接外接式鍵盤。
進行主機內部組裝時
Dell
公司聯絡。
在卸下或安裝記憶體模組、
注意事項:
注意事項:
並等待 5 秒鐘,以免損壞主機板。
關機並關閉所有連接裝置的電源。
1
請從電源插座上拔除電腦和裝置的電源線,以免造成人身受傷或觸電。另外,請從電
2
僅在安裝記憶體模組、Mini PCI 卡或數據機時,才需要裝卸電腦的內部元件。
中斷裝置的連接或卸下記憶體模、Mini PCI 卡或數據機之前,請先關閉電腦電源
Mini PCI
卡或數據機之前,請依序執行下列步驟。
腦上拔除所有電話或電信通訊連線。
從電池槽中取出主電池,如有必要,請從模組槽中取出第二顆電池。
3
觸摸電腦背面
4
在您進行工作時,應經常觸摸
面板上未上漆的金屬表面以導去您身上的靜電。
I/O
面板,以導去可能損壞內部元件的靜電。
I/O
系統資訊指南 61

使用您的電腦時 (續)
防止靜電損害
靜電會損壞電腦內部的電子元件。為防止靜電損壞,請在觸摸電腦的任何電子元件 (例如
記憶體模組) 之前,先導去您身上的靜電。您可以觸摸電腦
以導去您身上的靜電。
面板上未上漆的金屬表面
I/O
進行電腦內部操作時,應經常觸摸
您也可以採取下列步驟以防止靜電釋放
• 打開對靜電敏感之元件的運送紙箱時,在您已準備好將它安裝到電腦內之前,請勿
將元件從防靜電的包裝材料中取出。打開防靜電的包裝之前,請務必導去您身上的
www.dell.com | support.ap.dell.com
靜電。
• 運送敏感元件時,首先應將它放入防靜電的容器或包裝內。
• 請在無靜電的工作區域處理所有的敏感元件。如有可能,請使用防靜電地板墊和工
作檯墊。
電池處理
您的電腦使用鋰電池。若要獲得關於更換電腦鋰電池的說明,請參閱本文件後面的「取出
電池」和線上使用者指南中的「使用電池」。
切勿將電池與一般家居廢棄物一起處理。請與當地的廢棄物處理機構聯絡以瞭解離您最近
的電池收集地點。
接頭,以導去您身上可能累積的靜電。
I/O
(ESD)
所造成的損壞:
62 系統資訊指南

尋找關於電腦的資訊
要尋找的項目是? 所在位置
• 電腦的診斷程式
• 電腦的驅動程式
• 使用者指南
• 裝置說明文件
• 保固資訊 Dell 系統資訊指南
驅動程式和公用程式 CD (也稱為 ResourceCD)
電腦出廠時,
和驅動程式。您可以使用此光碟重新安
裝驅動程式、執行
說明文件。
光碟中可能包含
它提供關於電腦技術變更之最新資訊,
或者為有經驗的使用者或技術人員提供
進階技術參考資料。
已經安裝了說明文件
Dell
診斷程式或存取
Dell
readme (讀我)
檔案,
• 如何卸下和裝回零件
• 技術規格
• 如何設定系統設定值
• 如何排除故障和解決問題
使用者指南圖示 (Microsoft Windows 2000)
連按兩下桌面上的
Windows 說明及支援中心
1
依次按一下開始按鈕和說明及支援中心。
依次按一下
2
User's and system guides 和 User's guides
User's Guides
圖示。
。
系統資訊指南 63

要尋找的項目是? 所在位置
• 快速服務代碼和服務標籤
•
Microsoft
®
Windows®
授權標籤
快速服務代碼和產品識別碼標籤
這些標籤均位於您的電腦上。
• 最新的電腦驅動程式
• 技術服務和支援問題的解答
• 與其他使用者和技術支援進行線上
討論
www.dell.com | support.ap.dell.com
• 包含維修手冊的電腦說明文件
• 服務呼叫狀態和支援歷程記錄
• 關於電腦的首要技術問題
• 常見問題
• 檔案下載
• 電腦組態的詳細資料
• 電腦的服務合約
• 如何使用
Windows XP
• 電腦的說明文件
• 裝置 (例如數據機) 的說明文件
Dell 支援網站 — support.dell.com
支援網站提供幾種線上工具,其中包括:
Dell
•
Solutions (
•
Community Forum (
•
Upgrades (升級) —
解決方案) — 故障排除提示、技術文件和線上課程
社群論壇) — 與其他
Dell
元件的升級資訊,例如記憶體、硬碟機和作業
系統
•
Customer Care (
客戶關懷中心) — 聯絡資訊、訂單狀態、保固和
維修資訊
•
Downloads (
•
Reference (參考) —
下載軟體) — 驅動程式、修補程式和軟體更新
電腦說明文件、產品規格及白皮書
Dell Premier Support (Dell 優先支援) 網站 —
premiersupport.dell.com
Dell Premier Support
網站是專為公司、政府和教育機構的客戶量身
定做的。此網站可能不適用於所有地區。
Windows 說明及支援中心
依次按一下開始按鈕和說明及支援。
1
鍵入描述問題的字詞或短語,然後按一下箭頭圖示。
2
按一下描述問題的主題。
3
按照螢幕上的說明進行。
4
客戶進行線上討論
64 系統資訊指南

要尋找的項目是? 所在位置
• 如何重新安裝作業系統 作業系統光碟
安裝您的電腦
或
如果重新安裝作業系統,請使用驅動程
式和公用程式
腦隨附的裝置之驅動程式。
作業系統的產品識別碼位於您的電腦
上。
來重新安裝用於電
CD
打開附件盒的包裝。
1
取出附件盒內的物件並放在一邊。您需要這些物件才能完成電腦的安裝。
2
附件盒內亦包含使用者說明文件和您訂購的任何軟體或附加硬體 (例如
碟機或電池)。
PC
卡、磁
系統資訊指南 65

將交流電變壓器連接至電腦上的交流電變壓器接頭和電源插座。
3
www.dell.com | support.ap.dell.com
打開電腦顯示器,然後按下電源按鈕以開啟電腦電源。
4
註:
在您開啟電腦電源並關機至少一次之前,請勿將電腦連接至連線裝置。
66 系統資訊指南
電源按鈕

關於您的電腦
請參閱線上使用者指南以獲得關於電腦的詳細資訊。依據作業系統的不同,在桌面上
連按兩下
system guides
User's Guide
。下列項目將解決關於電腦的一些常見問題。
圖示,然後依次按一下開始按鈕、說明及支援中心和
User and
• 數據機和網路配接卡:電腦可能配有一個
網路
圖」。若要獲得更多關於連接埠和接頭的資訊,請參閱線上使用者指南中的「關
於您的電腦」。
• 電池的使用壽命與用量:您的電腦可使用各種電池。一顆電腦隨附的標準
72 WHr/6486 mAh
操作 (例如延伸無線操作) 會大大縮短電池的使用壽命。
– 若要獲得更多關於電池效能、用量和省電的資訊,請參閱使用者指南中的「使
用電池」和 「電源管理」。
– 若要獲得關於選購的第二顆電池的資訊,請參閱使用者指南中的 「使用模組
槽」。
• 模組槽裝置:若要獲得關於模組槽和其支援裝置的資訊,請參閱使用者指南中的
「使用模組槽」。
• 連線裝置:您的電腦支援
註:
– 若要獲得關於選購的連線裝置之資訊,請參閱裝置隨附的說明文件。
– 若要獲得關於配合本電腦使用連線裝置時獲得最佳效能的資訊,請參閱使用
者指南中的「解決問題」。
網路配接卡。若要瞭解接頭的位置,請參閱本文件中後面的「右側視
LOM
電池,在完全充電後一般可操作電腦
Dell D/Dock
連線裝置可能不適用於所有國家。
v.92 56K
擴充站和
數據機和一個
3 至 4
Dell D/Port
10/100/1000
個小時。執行特別
進階連接埠複製裝置。
乙太
系統資訊指南 67

前視圖
鍵盤狀態燈
顯示器閂鎖
顯示器
靜音按鈕
音量控制
按鈕
www.dell.com | support.ap.dell.com
觸控桿
觸控桿/
觸控墊按鈕
電源按鈕
裝置狀態燈
鍵盤
觸控墊
顯示器閂鎖
按鈕
喇叭
68 系統資訊指南

左側視圖
通風口
安全纜線孔
右側視圖
安全纜線孔
IEEE 1394 接頭
PC 卡插槽
耳機接頭
智慧卡插槽
紅外線感應器
模組槽 裝置釋放閂鎖
麥克風接頭
Dell D/Bay 接頭
硬碟機
系統資訊指南 69

後視圖
注意事項:
鐘。
注意:
風不好的環境中,例如密閉的箱子中。通風不好會損壞電腦或導致火災發生。
為避免損壞電腦,請在中斷外接式裝置的連接之前,關閉電腦電源並等待 5 秒
請勿阻塞、將物件塞入或讓塵埃積聚在通風口。在電腦執行期間,切勿將其置於通
S-video 電視輸出接頭
www.dell.com | support.ap.dell.com
USB 接頭 (2)
網路接頭 (RJ-45)
數據機接頭 (RJ-11)
通風口
並列接頭
交流電變壓器接頭
通風口
序列接頭
視訊接頭
70 系統資訊指南

底視圖
硬碟機
Mini PCI 卡/
數據機蓋
電池槽釋放閂鎖 電池電量指示器
風扇
記憶體模組蓋
電池
連線裝置插槽
取出電池
若要獲得更多關於取出第二顆電池的資訊,請參閱線上使用者指南中的使用模組槽。
注意:
源,從電源插座中拔下電源線,然後從牆上電話插孔中拔下數據機纜線。
注意事項:
池更換。如果超過此時間仍未完成電池更換,電腦將會關機,並且會遺失所有未儲存的資料。
確定電腦電源已關閉、已處於電源管理模式的暫停狀態或已連接至電源插座。
1
如果電腦已連接至連線裝置 (已連線),請解除其連線。
2
請參閱連線裝置隨附的說明文件以獲得說明。
執行這些程序之前,請閱讀並按照從第 57 頁開始的安裝說明進行:關閉電腦電
如果您選擇在電腦處於等候模式時更換電池,則您僅有 90 秒的時間來完成電
系統資訊指南 71

按住並滑動電腦底部的電池槽釋放閂鎖,然後從凹槽中取出電池。
3
www.dell.com | support.ap.dell.com
安裝電池
注意:
將電池滑入凹槽並放下電池,直至釋放閂鎖卡入定位。
若要獲得關於安裝第二顆電池的資訊,請參閱線上使用者指南中的使用模組槽。
執行此程序之前,請閱讀並按照從第 57 頁開始的安全說明。
72 系統資訊指南

取出備用電池
注意:
取出電池。
1
卸下備用電池蓋。
2
從電池盒中取出備用電池,然後從接頭上拔除纜線。
3
執行這些程序之前,請閱讀並按照從第 57 頁開始的安全說明。
系統資訊指南 73

安裝備用電池
注意:
將備用電池纜線連接至備用電池盒中的接頭上。
1
將備用電池放入電池盒中,然後裝回備用電池蓋。
2
www.dell.com | support.ap.dell.com
執行這些程序之前,請閱讀並按照從第 57 頁開始的安全說明。
執行 Dell 診斷程式
Dell
1
2
74 系統資訊指南
診斷程式位於硬碟機上的隱藏診斷公用程式分割區中。
註:
如果您的電腦無法顯示螢幕影像,請與 Dell 公司聯絡 (請參閱使用者指南中的「獲得
幫助」以獲得適當的聯絡資訊)。
關機。
如果電腦已連接至連線裝置 (已連線),請解除其連線。
請參閱連線裝置隨附的說明文件以獲得說明。

將電腦連接至電源插座。
3
註:
如果您的顯示器上無任何顯示,您可以按住靜音按鈕並按下電源按鈕 (而不是 F12) 以
開始執行 Dell 診斷程式。您無需反白顯示 Diagnostics (診斷程式) 並按下 。電
腦會自動執行啟動前系統評測 (Pre-boot System Assessment)。
開啟電腦電源。在螢幕上出現
4
且螢幕上出現
Microsoft
DELL™
®
Windows®
標誌時立即按下
。如果您等待太久
標誌,請繼續等待,直至您看到
Windows
面。然後關機並再試一次。
啟動裝置清單出現時,反白顯示
5
電腦開始執行啟動前系統評測
Diagnostics
(Pre-boot System Assessment) —
並按下
。
對主機板、鍵盤、
硬碟機和顯示器執行起始測試的一系列內嵌診斷程式。
• 在評測期間,請回答畫面上出現的問題。
• 如果偵測到某個元件發生故障,電腦會停止並發出「嗶」聲。若要停止評測
並重新啟動至作業系統,請按下
;若要重新測試發生故障的元件,請按下
;若要繼續下一個測試,請按下
。
• 如果在啟動前系統評測期間偵測到任何故障,請記下錯誤代碼,然後在繼續
執行
診斷程 式之前 與
Dell
公司聯絡 (請參閱使用者指南中的「獲得幫
Dell
助」以獲得適當的聯絡資訊)。
• 如果您收到一則訊息,表示未找到診斷公用程式分割區,則請按照螢幕上的
指示進行,以執行驅動程式和公用程式
如果啟動前系統評測順利完成,您將收到
Utility Partition
(啟動
診斷公用程式分割區) 的訊息。按下任意鍵以
Dell
上的
CD
Booting Dell Diagnostic
Dell
診斷程式。
繼續進行操作。
桌
按下任意鍵以從硬碟機的診斷公用程式分割區啟動
6
在
7
診斷程式載入且
Dell
Main Menu (
主功能表
項的按鈕。
註:
您電腦的服務標籤將位於每個螢幕的頂部。
診斷程式。
Dell
螢幕出現後,按一下代表所需選
)
系統資訊指南 75

選項 功能
Express Test
快速測試
(
Extended Test
全面測試
(
Custom Test
自訂測試
(
Symptom Tree
症狀樹
(
8
www.dell.com | support.ap.dell.com
)
)
)
)
如果在測試時遇到問題,則會出現顯示錯誤代碼和問題說明的訊息。請記下錯誤
代碼和問題說明,然後按照螢幕上的說明進行。如果您無法更正錯誤,請與
公司聯絡 (請參閱使用者指南中的「獲得幫助」以獲得適當的聯絡資訊)。
快速測試裝置。本測試通常需要
請先執行
全面檢查裝置。本測試通常需要一小時或更長時間,且需要您不時地回
答問題。
測試特定裝置。您可以自訂要執行的測試。
可讓您根據所遇問題的症狀選擇測試類型。此選項列出了大多數常見症
狀。
Express Test
以便能快速地找到問題。
10 至 20
分鐘,且無需使用者作出回應。
Dell
如果您是使用
9
Custom Test 或 Symptom Tree
適當標籤以獲得更多資訊。
標籤 功能
Results (結果)
Errors (錯誤)
Help (說明)
Configuration
(組態)
Parameters (參數)
在您執行完測試之後,請關閉螢幕並回到
10
程式並重新啟動電腦,請關閉
顯示測試結果和所有遇到的錯誤狀況。
顯示遇到的錯誤狀況、錯誤代碼和問題說明。
對測試進行說明,同時還可能會指明測試執行要求。
顯示所選裝置的硬體組態。
診斷程式會從系統安裝程式、記憶體和各種內部測試中獲得所有裝
Dell
置的組態資訊,並將其顯示在螢幕左窗格的裝置清單中。裝置清單可能
不會顯示電腦中安裝的所有元件或連接至電腦的所有裝置之名稱。
可讓您透過變更測試設定值來自訂測試。
Main Menu
選項執行測試,請按一下下表所述的
Main Menu
螢幕。若要結束
Dell
螢幕。
診斷
76 系統資訊指南

管制通告
電磁干擾
會危及無線導航或其他安全服務的操作,也會嚴重降低、妨礙或反覆中斷有執照的無
線電通訊服務。無線電通訊服務包括但不侷限於
務、雷達、飛行控制、傳呼機和個人通訊服務
發射體 (例如數位裝置,包括電腦) 共同產生了電磁環境。
電磁相容性
計符合管制機構對
生干擾。您可以透過關閉和開啟本設備來判斷它是否會對無線電通訊服務產生干擾;
如果確實如此,我們建議您嘗試採取下列一種或多種措施來排除干擾:
• 重新調整天線的接收方向。
• 依接收器的位置,重新放置電腦。
• 將電腦移到遠離接收器的地方。
• 將電腦的電源線插入不同的電源插座,使電腦與接收器使用不同的分支電路。
如有必要,請向
的建議。
若要獲得附加的管制資訊,請參閱線上使用者指南的附錄中之「管制通告」。每個管
制機構的特定部分將提供特定國家的
(EMI)
是在周圍空間散發,或沿電源或訊號導線傳導的任何訊號或發射,它
商業廣播、電視、蜂巢式服
。這些有執照的服務和非有意的
(EMC)
Dell
AM/FM
(PCS)
是指電子設備能夠在電子環境中正常運作的能力。儘管本電腦的設
的限制並已得到確定,但我們並不保證在個別的安裝中不會產
EMI
技術支援代表或有經驗的無線電/電視技術人員諮詢,以獲得更多
EMC/EMI
或產品安全資訊。
系統資訊指南 77

www.dell.com | support.ap.dell.com
78 系統資訊指南

Dell Precision™ M60 シリーズモバイルワークステーション
システム情報ガイド
www.dell.com | support.dell.com

メモ、注意および警告
メモ:
しています。
注意:
を示し、その危険を回避するための方法を説明しています。
警告:
ことを示します。
メモは、コンピュータを使いやすくするための重要な情報を説明
注意は、ハードウェアの損傷やデータの損失の可能性があること
警告は、物的損害、けが、または死亡の原因となる可能性がある
略語について
本書で使用する略語の一覧については、『ユーザーズガイド』を参照し
てください。『ユーザーズガイド』を参照するには、お使いのオペレー
ティングシステムに応じて、デスクトップの
ンをダブルクリックするか、スタート
サポートセンター
ガイド
Dell™ n
をクリックしてください。
シリーズコンピュータをお買い上げいただいた場合は、このマ
ニュアルで参照する
をクリックして ユーザーズガイドおよびシステム
Microsoft® Windows®
ムについての記述は適用されません。
ユーザーズガイド アイコ
ボタンをクリックし、ヘルプと
オペレーティングシステ
____________________
ここに記載されている内容は予告なく変更されることがあります。
© 2003 すべての著作権は Dell Computer Corporation にあります。
Dell Computer Corporation の書面による許可のない複写は、いかなる形態においても
厳重に禁じられています。
本書で使用されている商標について:Dell、Dell ロゴ、Dell Precision、Latitude、およ
び TrueMobile は Dell Computer Corporation の商標です。Intel、Pentium および
Celeron は Intel Corporation の登録商標です。Microsoft および Windows は Microsoft
Corporation の登録商標です。EMC は EMC Corporation の登録商標です。
本書では、必要に応じて上記記載以外の商標および会社名が使用されている場合があり
ますが、これらの商標や会社名は、一切 Dell Computer Corporation に所属するもので
はありません。
2003 年 2 月 P/N 2Y134 Rev. A00

目次
警告:安全にお使いいただくために
一般規定
電源
バッテリ
飛行機での移動
EMC
コンピュータを使用する際のご注意
人間工学に基づいたコンピュータの使用
コンピュータ内部の作業をする際の注意点
静電気障害への対処
バッテリの廃棄
お使いのコンピュータに関する情報の入手先
コンピュータのセットアップ手順
コンピュータの各部
正面図
左側面図
右側面図
背面図
底面図
. . . . . . . . . . . . . . . . . . . . . . . . . . . . . . . . . . . . . . . . . . 83
. . . . . . . . . . . . . . . . . . . . . . . . . . . . . . . . . . . . . . . . . . . . . 84
. . . . . . . . . . . . . . . . . . . . . . . . . . . . . . . . . . . . . . . . . . 85
. . . . . . . . . . . . . . . . . . . . . . . . . . . . . . . . . . . . 86
に関する注意
. . . . . . . . . . . . . . . . . . . . . . . . . . . . . . . . . . . . . . . . . . . . 95
. . . . . . . . . . . . . . . . . . . . . . . . . . . . . . . . . . . . . . . . . . 96
. . . . . . . . . . . . . . . . . . . . . . . . . . . . . . . . . . . . . . . . . . 96
. . . . . . . . . . . . . . . . . . . . . . . . . . . . . . . . . . . . . . . . . . . . 97
. . . . . . . . . . . . . . . . . . . . . . . . . . . . . . . . . . . . . . . . . . . . 98
. . . . . . . . . . . . . . . . . . . . . . . . . . . . . . . . . . 86
. . . . . . . . . . . . . . . . . . . . . . . . . . . . . . . . . 89
. . . . . . . . . . . . . . . . . . . . . . . . . . . . . . . . . . . . 90
. . . . . . . . . . . . . . . . . . . . . . . . . . . . . . . . . . . . 94
. . . . . . . . . . . . . . . . . . . . . . . . 83
. . . . . . . . . . . . . . . . . . . . . . . . 87
. . . . . . . . . . . . . . . . . . . . . . . . . . 92
. . . . . . . . . . . . . . . . . 88
. . . . . . . . . . . . . . . 88
. . . . . . . . . . . . . . . . . 90
バッテリの取り外し
バッテリの取り付け
予備バッテリの取り外し
予備バッテリの取り付け
診断プログラムの実行
Dell
認可機関の情報
. . . . . . . . . . . . . . . . . . . . . . . . . . . . . . . . . . . . 98
. . . . . . . . . . . . . . . . . . . . . . . . . . . . . . . . . . . . 99
. . . . . . . . . . . . . . . . . . . . . . . . . . . . . . . . . . . . . . . 104
. . . . . . . . . . . . . . . . . . . . . . . . . . . . . . . . 100
. . . . . . . . . . . . . . . . . . . . . . . . . . . . . . . . 101
. . . . . . . . . . . . . . . . . . . . . . . . . . . . . . 101
目次 81

82 目次

警告:安全にお使いいただくために
ご自身の身体の安全を守り、コンピュータおよび作業環境を保護するために、以下の安
全に関するガイドラインに従ってください。
一般規定
• トレーニングを受けたサービス技術者以外の方は、ご自身でコンピュータを修理し
ないでください。各種機器の取り付けに関しては、それぞれの手順に必ず従ってく
ださい。
•
AC
アダプタと延長ケーブルを使用する場合は、延長ケーブルに接続する機器の定
格電流の合計が、ケーブルの許容定格電流を超えないことを確認してください。
• コンピュータの通風孔や開口部に異物を押し込まないでください。開口部に異物を
押し込むと、内部の部品がショートして、発火や感電の原因となる場合があります。
• キャリングケースの中など、空気の流れない密封された環境でコンピュータを動作
させないでください。このような場所でコンピュータを使用すると、コンピュータ
が破損したり、発火の原因になる恐れがあります。
• 暖房器具や熱源の近くにコンピュータを設置しないでください。また、冷却用の通
気孔を塞がないでください。コンピュータの下に紙を置いたり、コンピュータを
キャビネット内、ベッド、ソファ、じゅうたんの上に設置しないでください。
•
AC
アダプタは通気の良い場所に設置してください。コンピュータに電源を供給し
たりバッテリを充電する場合、アダプタは机の上や床などに設置してください。
紙や、冷却効果を妨げるもので
ダプタをキャリングケースに入れて使用しないでください。
AC
アダプタを覆わないでください。また、
AC
ア
AC
•
• ノートブックコンピュータの底部を露出した皮膚に直接載せた状態で、長時間コン
• 浴槽、洗面台、プールの近くや湿気の多い地下室など、湿気のある場所ではコン
• ご使用のコンピュータに内蔵またはオプションの(
アダプタは、コンピュータの通常操作時に熱くなることがあります。操作時ま
たは使用した直後にアダプタを扱う際は注意してください。
AC
ピュータを使用しないでください。通常操作時でも(特に、
る場合)、コンピュータ底部の表面が熱くなります。皮膚に触れたままにしておく
と、皮膚に悪影響を及ぼし、火傷をする恐れがあります。
ピュータを使用しないでください。
PC
カード)モデムが付属してい
る場合は、まれに電話線を介して稲妻の電気的なショックが伝わる危険があるの
で、雷雨が近づいているときはモデムケーブルを取り外してください。
電源を接続してい
システム情報ガイド 83

警告:安全にお使いいただくために(続き)
• 雷雨の際は、感電の危険を避けるため、ケーブルの抜き差しや本製品の再設定は一
切行わないでください。コンピュータからケーブルをすべて取り外してバッテリ電
源で使用している場合を除き、雷雨の際はコンピュータを使用しないでください。
• ご使用のコンピュータにモデムが付属している場合は、モデムケーブルには最低
AWG
をご使用ください。
• コンピュータ底部のメモリモジュール、ミニ
開ける前に、すべてのケーブルを電源コンセントから外し、またモデムケーブルを
外してください。
www.dell.com | support.jp.dell.com
• コンピュータにモデム
ている場合は、この
デムケーブルは必ず
PC
•
で取り外すときは、注意してください。
• コンピュータを清掃する際は、電源コンセントからコンピュータを取り外してくだ
さい。コンピュータの清掃には、水で湿らせたやわらかい布を使用してください。
可燃性物質を含む可能性のある液体または噴霧状のクリーナを使用しないでくだ
さい。
American Wire Gauge)で FCC
(
カードは通常動作時でも非常に熱くなります。
電源
• デルから提供された
アダプタを使用すると、発火や破裂の恐れがあります。
• コンピュータを電源に接続する前に、
定格電圧と周波数に適合していることを確認してください。
準拠の
RJ-11
コネクタとネットワーク
2
つのコネクタの形状が似ていますので間違えないように、モ
RJ-45
AC
コネクタではなく、
アダプタ以外はご使用にならないでください。その他の
AC
RJ-11
モジュラープラグがあるもの
PCI
カード、またはモデムのカバーを
RJ-45
コネクタの両方が付い
RJ-11
コネクタに接続してください。
PC
カードを連続して使用した後
アダプタの定格電圧が、使用する電源の
26
AC
• コンピュータの電源を遮断するには、コンピュータの電源を切って
電源コンセントから抜いて、バッテリパックを取り外してください。
• 感電の危険を避けるために、
スされている電源コンセントに接続してください。これらの電源ケーブルでは、正
しくアースするために、三芯プラグが使用されていることがあります。アダプタプ
ラグを使用したり、アース用のピンをケーブルから取り外したりしないでくださ
い。延長ケーブルを使用する場合は、
もしくは
84 システム情報ガイド
3
ピンタイプのものを使用してください。
AC
アダプタやデバイスの電源ケーブルは、正しくアー
AC
アダプタ電源ケーブルに適合する
AC
アダプタを
2
ピン

警告:安全にお使いいただくために(続き)
•
AC
アダプタの電源ケーブルの上に物を載せないでください。また、人が踏んだり
つまずいたりする恐れのある位置に設置しないでください。
• 複数のコンセントがある電源タップを使用する場合、
を電源タップへ接続する際は、特に注意してください。電源タップによっては、プ
ラグが正しく差し込まれていなくても、差し込めることがあります。電源プラグを
正しく差し込まないと、ご使用のコンピュータが完全に損傷したり、感電したり発
火する恐れがあります。電源プラグの接地芯が対応する電源タップの接地端子に挿
入されていることを確認します。
AC
アダプタの電源ケーブル
バッテリ
• 専用の
• バッテリパックは、金属(車のキーやペーパークリップなど)がバッテリの端子を
• バッテリは、不適切に取り扱うと、火傷を負う恐れがあります。バッテリは分解し
• バッテリはお子様の手の届かないところに保管してください。
• コンピュータやバッテリパックは、ラジエータ、暖炉、ストーブ、ヒーターなどの
Dell™
タイプのバッテリモジュールを使用すると、発火や破裂の恐れがあります。
ショートさせる可能性があるポケット、バッグ、または入れ物にいれて持ち運ばな
いでください。過剰な電流が流れ、バッテリが極めて高温になり、バッテリパック
が損傷したり、発火や火傷の原因になる場合があります。
ないでください。損傷または液洩れしているバッテリパックは、特に注意して取り
扱ってください。バッテリが損傷している場合、バッテリセルから電解液が漏れ、
けがをする可能性があります。
熱源、またはその他の熱を発生する器具の近くに保管したり、放置しないでくださ
い。また、
ルが破裂したり、爆発して、発火する恐れがあります。
バッテリモジュール以外はご使用にならないでください。その他の
60ºC
を超える熱にさらさないでください。高温になると、バッテリのセ
• バッテリは、焼却処分したり、家庭用のゴミと一緒に廃棄しないでください。バッ
テリのセルが破裂することがあります。使用済みのバッテリは、製造元の指示に
従って破棄するか、廃棄方法を市役所などの行政機関へお問い合わせください。消
耗または破損したバッテリはすみやかに廃棄してください。
システム情報ガイド 85

警告:安全にお使いいただくために(続き)
飛行機での移動
• 飛行機内で
会社の制限が適用されることがあります。たとえば、機内で無線周波やその他の電
磁信号を故意に発信する可能性のあるパーソナル電子機器(
る規定
– こうした制限を遵守するために、
装置がついている
ような装置を無効にし、航空機乗務員の指示に従ってください。
www.dell.com | support.jp.dell.com
– さらに、飛行機が離着陸などの重要な運航状態にある場合、ノートブックコン
ピュータなどの
度
会社もあり、
で、航空会社の指示に従ってください。
Dell
/
規制があります。
3,050 m
以下にある場合は、常に重要な運航状態にあたると定めている航空
EMC に関する注意
目的とする環境に適した
使用してください。
静電気はコンピュータ内部の電子部品を損傷する恐れがあります。静電気による損傷を
防ぐために、メモリモジュールなどのコンピュータの電子部品に触れる前に、身体から
静電気を除去してください。コンピュータの
れることによって、身体から静電気を除去できます。
コンピュータの損傷を防ぐために、以下の安全に関するガイドラインに従ってください。
コンピュータを使用する際に、米国連邦航空局の規制および各航空
PED
)の使用を禁止す
Dell TrueMobile
Dell
ノートブックコンピュータでは、飛行機に乗る前にその
PED
は、機内での使用を禁じられることがあります。機体が高
PED
の使用が許可される時期は各航空会社によって異なりますの
EMC
分類基準を満たすために、シールド付き信号ケーブルを
I/O
パネルの塗装されていない金属面に触
™
または、その他の無線通信
• コンピュータを設置して作業を行う際は、コンピュータを平らな面に設置してくだ
さい。
• 旅行の際は、コンピュータを手荷物としてお取り扱いください。コンピュータは
線セキュリティマシンには通せますが、金属探知機には絶対に通さないでくださ
い。係員によるコンピュータの検査が行われる場合がありますので、コンピュータ
に電源を入れられるように、充電済みのバッテリを用意しておいてください。
86 システム情報ガイド
X

コンピュータを使用する際のご注意
• 旅行中にハードドライブをコンピュータから取り外して運ぶ際は、布や紙など伝導性
のない素材でドライブを包んでください。係員によるコンピュータの検査が行われる
場合がありますので、コンピュータにドライブを取り付けられるよう準備しておいて
ください。ハードドライブは、
には絶対に通さないでください。
• 旅行の際は、コンピュータを頭上のコンパートメントに入れないでください。コン
ピュータが内部で動いて破損する恐れがあります。コンピュータを落とすなど、衝撃
を与えないでください。
• コンピュータ、バッテリ、ハードドライブは、土、ほこり、食品、液体などから保護
してください。また、極端な温度や、過度に日光があたる環境に放置しないでください。
• 温度や湿度が大幅に異なる環境へコンピュータを移動させると、コンピュータの表面
や内部に結露が発生することがあります。コンピュータの損傷を避けるため、コン
ピュータを使用する前に、結露が蒸発するまで充分な時間を置くようにしてください。
X
線セキュリティマシンには通せますが、金属探知器
注意:
• ケーブルを外す際は、ケーブルそのものを引っ張らずに、コネクタやストレインリリー
• 部品はていねいに取り扱ってください。メモリモジュールなどの部品を取り扱う際は、
• メモリモジュールをシステム基板から取り外すときや、デバイスをコンピュータから
• ディスプレイを掃除するには、水を使い、柔らかくきれいな布で拭き取ります。布に
寒い場所から暖かい場所へ、また暖かい場所から寒い場所へコンピュータを移動したと
きは、コンピュータを部屋の温度に慣らしてから電源を入れてください。
フループをつかんで抜いてください。コネクタを抜く際は、コネクタのピンを曲げな
いようにまっすぐに引き抜いてください。また、ケーブルを接続する前に、両方のコ
ネクタの方向と位置が正しいかどうかを確認してください。
ピンには触れないで縁を持ってください。
取り外すときは、システム基板の損傷を避けるために、システムの電源を切って
アダプタケーブルを取り外した後、5 秒間待ってから、メモリモジュールや機器を取
り外してください。
水をつけて、ディスプレイの上端から下端に向かって一定方向に拭きます。ディスプ
レイから水分をすばやく取り除き、ディスプレイを乾燥させます。長時間湿気を帯び
たままにすると、ディスプレイが損傷することがあります。ディスプレイに市販のウィ
ンドウクリーナを使用しないでください
。
AC
システム情報ガイド 87

コンピュータを使用する際のご注意(続き)
• コンピュータが濡れたり破損した場合は、『ユーザーズガイド』の「問題の解決」の手
順に従ってください。それでもコンピュータが正しく動作しない場合は、デルまでお
問い合わせください(連絡先に関する情報については、『ユーザーズガイド』の「困っ
たときは」を参照してください)。
•
Dell
から提供された
それ以外の電源ケーブルを使用すると、コンピュータまたは
り、火災や感電を引き起こす恐れがあります。
人間工学に基づいたコンピュータの使用
www.dell.com | support.jp.dell.com
コンピュータのセットアップおよび使用に際し、オンライン『ユーザーズガイド』の付録
にある人間工学に関するガイドラインに従うと、快適で効率的に作業を進めることができ
ます。
このノートブックコンピュータは、オフィス機器として恒常的に使用するようには設計さ
れていません。オフィスで長時間ご使用になる場合は、外付けキーボードを接続すること
をお勧めします。
無理な姿勢で長時間キーボードを使用すると、身体に悪影響を及ぼす可能性があります。
警告:
ディスプレイや外付けモニタ画面を長時間見ていると、眼に負担がかかることがありま
警告:
す。
AC
アダプタに付属の
AC
電源ケーブルのみをお使いください。
AC
アダプタが損傷した
コンピュータ内部の作業をする際の注意点
メモリモジュール、ミニ
次の操作を順に実行してください。
1
2
コンピュータの内部に触れるのは、メモリモジュール、ミニ
注意:
を取り付けるときだけにしてください。
システム基板の損傷を避けるために、コンピュータの電源を切ったあと
注意:
デバイスやメモリモジュール、ミニ
コンピュータをシャットダウンして、接続しているデバイスの電源を切ります。
けがや感電の危険を避けるために、電源コンセントからコンピュータとデバイスを外
します。また、電話回線またはモデムまたはネットワークケーブルもコンピュータか
ら抜きます。
88 システム情報ガイド
PCI
カード、またはモデムの取り外しまたは取り付けを行う前に、
カード、またはモデム
PCI
秒待ってから、
5
カード、またはモデムの取り外しを行ってください。
PCI

コンピュータを使用する際のご注意(続き)
3
メインバッテリをバッテリベイから取り外します。必要に応じ、セカンドバッテリを
モジュールベイから取り外します。
4
コンピュータ背面にある
体から除去します。
作業中も定期的に
去してください。
I/O
パネルの塗装されていない金属面に触れて、静電気を身
I/O
パネルに触れて、内部部品を損傷する可能性のある静電気を除
静電気障害への対処
静電気はコンピュータ内部の電子部品を損傷する恐れがあります。静電気による損傷を防
ぐために、メモリモジュールなどのコンピュータの電子部品に触れる前に、身体から静電
I/O
気を除去してください。コンピュータの
とにより、静電気を除去することができます。
コンピュータ内部での作業を続ける間も定期的に
静電気を除去してください。
さらに、静電気(
します。
• 静電気に敏感な部品を梱包箱から取り出す場合は、コンピュータに部品を取り付ける
用意ができるまで、その部品を静電気防止梱包材から取り出さないでください。静電
気防止パッケージを開梱する直前に、必ず身体から静電気を除去してくだ
さい。
• 静電気に敏感な部品を運ぶ場合は、最初に静電気防止容器またはパッケージに入れて
ください。
ESD
)による損傷を防止するために、以下の手順を実行することもお勧め
パネルの塗装されていない金属面に触れるこ
I/O
コネクタに触れて、身体に蓄積した
• 静電気に敏感な部品の取り扱いは、静電気の発生しない場所で行ってください。静電
気防止用のフロアパッドと作業用パッドをなるべく使用してください。
システム情報ガイド 89

コンピュータを使用する際のご注意(続き)
バッテリの廃棄
お使いのコンピュータでは、リチウムバッテリが使用されています。コンピュータのリチ
ウムバッテリの交換手順については、このマニュアルで後述する「バッテリの取り外し」お
よびオンライン『ユーザーズガイド』の「バッテリの使い方」を参照してください。
家庭のゴミと一緒にバッテリを廃棄しないでください。最寄りのバッテリの廃棄場所の所
在地については、市役所などの行政機関にお問い合わせください。
www.dell.com | support.jp.dell.com
お使いのコンピュータに関する情報の入手先
参照したい情報 参照する情報
• コンピュータの診断プログラム
• コンピュータのドライバ
• ユーザーズガイド
•
デバイスのマニュアル
•
保証情報 コンピュータに付属の「サービス&サポートのご案内」を参照し
Drivers and Utilities CD(ResourceCD とも呼びます)
マニュアルおよびドライバは、デルか
ら出荷する際にコンピュータにすでに
インストールされています。この
は、ドライバを再インストールしたり、
診断プログラムを実行したり、マ
Dell
ニュアルにアクセスするときに使用し
ます。
CD 内の Readme
ピュータの技術的変更に関する最新の
アップデートや、専門知識をお持ちの
ユーザーや技術者を対象とした高度な
技術資料を参照できます。
てください。
ファイルでは、コン
CD
90 システム情報ガイド

参照したい情報 参照する情報
• 部品の取り外しおよび交換方法
• 仕様
•
システムの設定方法
ユーザーズガイド アイコン(Microsoft Windows 2000)
デスクトップの
リックします。
• 問題の解決方法
Windows XP ヘルプとサポートセンター
スタート ボタンをクリックし、ヘルプとサポート をク
1
リックします。
2
ユーザーズガイドおよびシステムガイド をクリック
し、ユーザーズガイド
エクスプレスサービスコード
•
およびサービスタグ
•
Microsoft® Windows®
ラベル
•
コンピュータに対応したドライバ
ライセンス
• テクニカルサービスやサポートに
関する質問の答え
• サービスマニュアルを含むコン
ピュータのマニュアル
エクスプレスサービスコードおよびサービスタグ
デルサポート Web サイト — support.jp.dell.com
デルサポート
ています。
• 技術情報
プログラム)、インストールガイドなど。
• ダウンロード
ティリティなどのファイルのダウンロードサービス。
•
テクニカルサポートへのお問い合わせ
電話テクニカルサポート、引き取り修理状況確認。
その他にも、参考資料、ショッピング、サポートツールなどのメ
ニューがあります。
•
Windows XP
•
コンピュータのマニュアル
•
デバイス(モデムなど)の
マニュアル
の使用方法
Windows XP ヘルプとサポートセンター
スタート ボタンをクリックし、ヘルプとサポート をクリックし
1
ます。
問題を説明する単語や語句を入力して、矢印のアイコンをク
2
リックします。
問題を説明しているトピックをクリックします。
3
画面の指示に従います。
4
サイトでは、下記のようなメニューが提供され
Web
— Q & A
ファイルライブラリでは、ドライバ、ユー
—
ユーザーズガイド アイコンをダブルク
をクリックします。
これらのラベルはコンピュータに
貼付されています。
集、トラブル解決ナビ、
Diagnostics
メールサポート、
— E-
(診断
システム情報ガイド 91

参照したい情報 参照する情報
オペレーティングシステムの
•
再インストール方法
www.dell.com | support.jp.dell.com
オペレーティングシステム CD
『オペレーティングシステム
用してオペレーティングシステムを
再インストールした後は、コンピュー
タに付属の『
を使用してデバイスのドライバを再
インストールします。
または
』を使
CD
Drivers and Utilities CD
』
コンピュータのセットアップ手順
1
アクセサリボックスの梱包を開きます。
2
アクセサリボックスの中から、コンピュータのセットアップ完了に必要となるも
のを別に取っておきます。
アクセサリボックスには、この他にマニュアルが入っています。また、ご注文さ
れた場合には、ソフトウェアやオプションのハードウェア(
ブ、バッテリなど)が入っています。
92 システム情報ガイド
PC
カード、ドライ

3
AC
アダプタをコンピュータの
AC
アダプタコネクタに接続し、電源コンセント
に差し込みます。
4
コンピュータの電源を入れるには、コンピュータディスプレイを開き、電源ボタ
ンを押します。
ドッキングデバイスにコンピュータを接続する前に、最低
メモ:
電源を入れて、切る操作を行ってください。
回はコンピュータの
1
電源ボタン
システム情報ガイド 93

コンピュータの各部
お使いのコンピュータの詳細については、オンラインの『ユーザーズガイド』を参照
してください。お使いのオペレーティングシステムに応じて、デスクトップの
ザーズガイド
クし、ヘルプとサポートセンター
ガイド
の回答をいくつか示します。
アイコンをダブルクリックするか、あるいは スタート ボタンをクリッ
をクリックして ユーザーズガイドおよびシステム
をクリックします。次に、コンピュータについて一般的に寄せられる質問とそ
ユー
• モデムとネットワークアダプタ:
10/100/1000 Ethernet LOM
ます。各コネクタの位置については、後述の「右側面図」を参照してください。
www.dell.com | support.jp.dell.com
ポートおよびコネクタの詳細については、オンラインの『ユーザーズガイド』
の「コンピュータについて」を参照してください。
• バッテリの寿命と使い方:
す。コンピュータに標準で付属する
充電した状態で取り付けた場合、平均的な使用方法で約
ます。ワイヤレス操作などの特定の操作を長時間行うと、バッテリ寿命が極端に
減少します。
– バッテリのパフォーマンス、使い方および消費電力の節約の詳細について
は、『ユーザーズガイド』の「バッテリの使い方」および「電力の管理」を
参照してください。
– オプションのセカンドバッテリについては、『ユーザーズガイド』の「モ
ジュールベイの使い方」を参照してください。
• モジュールベイデバイス:
れるデバイスの詳細については、『ユーザーズガイド』の「モジュールベイの使
い方」を参照してください。
• ドッキングデバイス:
ンおよび
Dell D/Port
コンピュータに、
ネットワークアダプタが搭載されている場合があり
コンピュータではさまざまなバッテリが使用できま
72 WHr/6486-mAh
モジュールベイ、およびモジュールベイでサポートさ
お使いのコンピュータでは、
アドバンスポートリプリケータがサポートされます。
v.92 56K
Dell D/Dock
モデムと
バッテリ
3 ~ 4
1
つを完全に
時間ご利用頂け
拡張ステーショ
メモ:
– オプションのドッキングデバイスの詳細については、デバイスに付属するマ
– このコンピュータでドッキングデバイスを使用する場合に最適なパフォー
94 システム情報ガイド
ドッキングデバイスが入手できない国もあります。
ニュアルを参照してください。
マンスを得るための詳細については、『ユーザーズガイド』の「問題の解決」
を参照してください。

正面図
ディスプレイラッチ
キーボード
ステータス
ライト
ミュートボタン
ボリューム
コントロール
ボタン
トラック
スティック
トラック
スティック /
タッチパッド
ボタン
ディスプレイ
電源ボタン
デバイス
ステータスライト
キーボード
タッチパッド
ディスプレイ
ラッチボタン
スピーカー
システム情報ガイド 95

左側面図
www.dell.com | support.jp.dell.com
右側面図
通気孔
IEEE 1394 コネクタ
PC カードスロット
スマートカードスロット
セキュリティケーブルスロット
ハードドライブ
ヘッドフォンコネクタ
マイクコネクタ
赤外線センサ
96 システム情報ガイド
モジュールベイ
セキュリティケーブルスロット
デバイスリリースラッチ
Dell D/Bay 用 コネクタ

背面図
コンピュータの損傷を避けるために、コンピュータの電源を切ったあと
注意:
てから、周辺機器を取り外してください。
通気孔を塞いだり、異物を押し込まないでください。また、通気孔にほこりが吸
警告:
い込まれないようにしてください。書類カバンの中など、空気の流れない密封された環境
でコンピュータを動作させないでください。このような場所でコンピュータを使用する
と、コンピュータが破損したり、火災の原因になる恐れがあります。
5
秒待っ
S- ビデオ TV 出力コネクタ
USB コネクタ(2)
ネットワーク
コネクタ (RJ-45)
通気孔
モデムコネクタ(RJ-11)
パラレルコネクタ
ビデオコネクタ
AC アダプタコネクタ
通気孔
シリアルコネクタ
システム情報ガイド 97

底面図
ハードドライブ
ミニ PCI カード /
モデムカバー
www.dell.com | support.jp.dell.com
バッテリリリースラッチ
ファン
バッテリ
ドッキングデバイススロット
メモリモジュールカバー
バッテリ充電ゲージ
バッテリの取り外し
セカンドバッテリの取り外し方の詳細については、オンラインの『ユーザーズガイド』
の「モジュールベイの使い方」を参照してください。
警告:
んでから、コンピュータの電源を切り、電源コンセントを抜いて、モデムを電話ジャック
から取り外してください。
注意:
バッテリを交換してください。それ以上経過するとコンピュータがシャットダウンし、保
存されていないデータは失われます。
1
コンピュータの電源が入っていないこと、省電力モードモードでコンピュータが
サスペンドしていること、または電源コンセントに接続されていることを確認し
てください。
98 システム情報ガイド
この手順を開始する前に、83 ページの安全にお使いいただくための注意をよく読
コンピュータをスタンバイモードにしてバッテリを交換する場合は、
秒以内に
90
 Loading...