

Dell Precision KR019, Precision WMTE01, Precision R5400 WMTE01 Setup And Quick Reference Manual

Dell Precision™ R5400
Setup and Quick Reference Guide
This guide provides an overview of features, specifications, and quick setup,
software, and troubleshooting information for your computer. For more
information about your operating system, devices, and other technologies, see
the Dell Technology Guide at support.dell.com.
Model WMTE01
www.dell.com | support.dell.com

Notes, Notices, and Cautions
NOTE: A NOTE indicates important information that helps you make better use of
your computer.
NOTICE: A NOTICE indicates either potential damage to hardware or loss of data
and tells you how to avoid the problem.
CAUTION: A CAUTION indicates a potential for property damage, personal injury,
or death.
If you purchased a Dell™ n Series computer, any references in this document to
Microsoft
____________________
®
Windows® operating systems are not applicable.
Information in this document is subject to change without notice.
© 2008 Dell Inc. All rights reserved.
Reproduction in any manner whatsoever without the written permission of Dell Inc. is strictly
forbidden.
Trademarks used in this text: Dell, Dell Precision, DellConnect, Dell MediaDirect, and the DELL logo
are trademarks of Dell Inc.; Intel and Xeon are registered trademarks of Intel Corporation in the U.S.
and other countries; Bluetooth is a registered trademark owned by Bluetooth SIG, INC., and is used
by Dell under license; Microsoft, Windows, Windows Vista, and the Windows Vista start button logo
are either trademarks or registered trademarks of Microsoft Corporation in the United States and/or
other countries.
Other trademarks and trade names may be used in this document to refer to either the entities claiming
the marks and names or their products. Dell Inc. disclaims any proprietary interest in trademarks and
trade names other than its own.
This product incorporates copyright protection technology that is protected by method claims of certain
U.S. patents and other intellectual property rights owned by Macrovision Corporation and other rights
owners. Use of this copyright protection technology must be authorized by Macrovision Corporation,
and is intended for home and other limited viewing uses only unless otherwise authorized by
Macrovision Corporation. Reverse engineering or disassembly is prohibited.
Model WMTE01
June 2008 P/N KR019 Rev. A00

Contents
1 About Your Computer. . . . . . . . . . . . . . . . . 7
Front View . . . . . . . . . . . . . . . . . . . . . . . . . 7
Back View
Back Panel Connectors
. . . . . . . . . . . . . . . . . . . . . . . . . 7
. . . . . . . . . . . . . . . . . . 8
2 Setting Up Your Computer . . . . . . . . . . . . . 9
Quick Setup . . . . . . . . . . . . . . . . . . . . . . . . 9
Connecting to the Internet
Setting Up Your Internet Connection
Transferring Information to a New Computer
Microsoft Windows Vista
Microsoft Windows XP
. . . . . . . . . . . . . . . . 13
. . . . . . . . 13
. . . . . . 15
. . . . . . . . . . . . . . 15
. . . . . . . . . . . . . . . 15
3 Specifications . . . . . . . . . . . . . . . . . . . . . 19
4 Troubleshooting
Troubleshooting Tools . . . . . . . . . . . . . . . . . . 29
. . . . . . . . . . . . . . . . . . . . 29
Power Light
Beep Codes
Error Messages
. . . . . . . . . . . . . . . . . . . . . 29
. . . . . . . . . . . . . . . . . . . . . 30
. . . . . . . . . . . . . . . . . . . 32
System Messages
. . . . . . . . . . . . . . . . . 37
Contents 3

Troubleshooting Software and Hardware
Problems
. . . . . . . . . . . . . . . . . . . . . . 38
Dell Diagnostics
Troubleshooting Tips
Power Problems
Memory Problems
Lockups and Software Problems
Dell Technical Update Service
Dell Support Utility
. . . . . . . . . . . . . . . . . . . 39
. . . . . . . . . . . . . . . . . . . 44
. . . . . . . . . . . . . . . . . . 45
. . . . . . . . . . . . . . . . . 46
. . . . . . . . . . 47
. . . . . . . . . . . 49
. . . . . . . . . . . . . . . . . 49
5 Reinstalling Software . . . . . . . . . . . . . . 51
Drivers . . . . . . . . . . . . . . . . . . . . . . . . . . 51
Identifying Drivers
Reinstalling Drivers and Utilities
Restoring Your Operating System
Using Microsoft
. . . . . . . . . . . . . . . . . 51
. . . . . . . . . . 52
. . . . . . . . . . . . 55
Windows System Restore . . . . . 56
Using Dell Factory Image Restore and Dell
PC Restore
Using the Operating System Media
. . . . . . . . . . . . . . . . . . . . . 57
. . . . . . . . . 60
6 Finding Information . . . . . . . . . . . . . . . . 63
7 Getting Help
Obtaining Assistance . . . . . . . . . . . . . . . . . . 65
Technical Support and Customer Service
DellConnect™
Online Services
AutoTech Service
Automated Order-Status Service
. . . . . . . . . . . . . . . . . . . . . . 65
. . . . . 66
. . . . . . . . . . . . . . . . . . . . 66
. . . . . . . . . . . . . . . . . . . 66
. . . . . . . . . . . . . . . . . . 67
. . . . . . . . . . 67
4 Contents

Problems With Your Order. . . . . . . . . . . . . . . . 67
Product Information
Returning Items for Warranty Repair or Credit
Before You Call
Contacting Dell
. . . . . . . . . . . . . . . . . . . 68
. . . . . 68
. . . . . . . . . . . . . . . . . . . . . 69
. . . . . . . . . . . . . . . . . . . . . 71
Index . . . . . . . . . . . . . . . . . . . . . . . . . . . . . . . 73
Contents 5

6 Contents
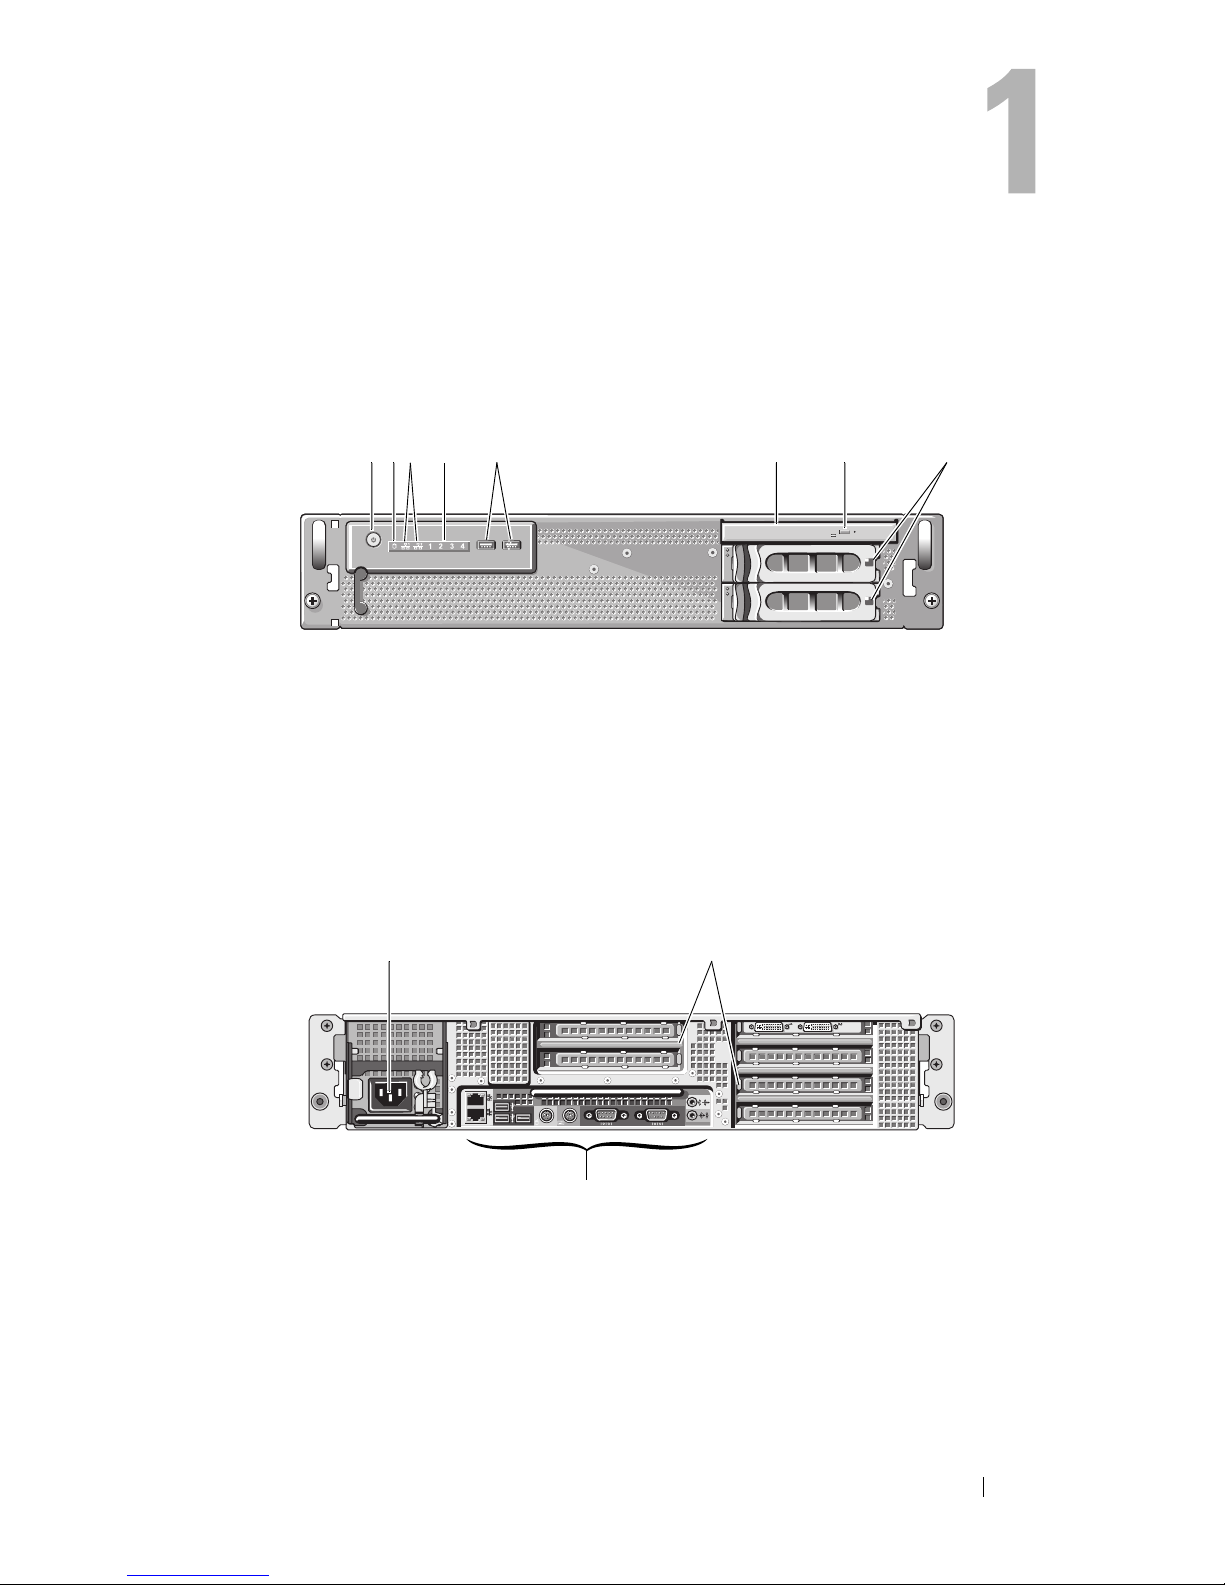
About Your Computer
Front View
35142678
1 power button, power light 2 drive activity light
3 network activity lights (2) 4 diagnostic lights (4)
5 USB 2.0 connectors (2) 6 optical drive
7 optical drive eject button 8 hard drive bays (2)
Back View
1
3
1 power connector 2 expansion card slots
3 back panel connectors
2
About Your Computer 7
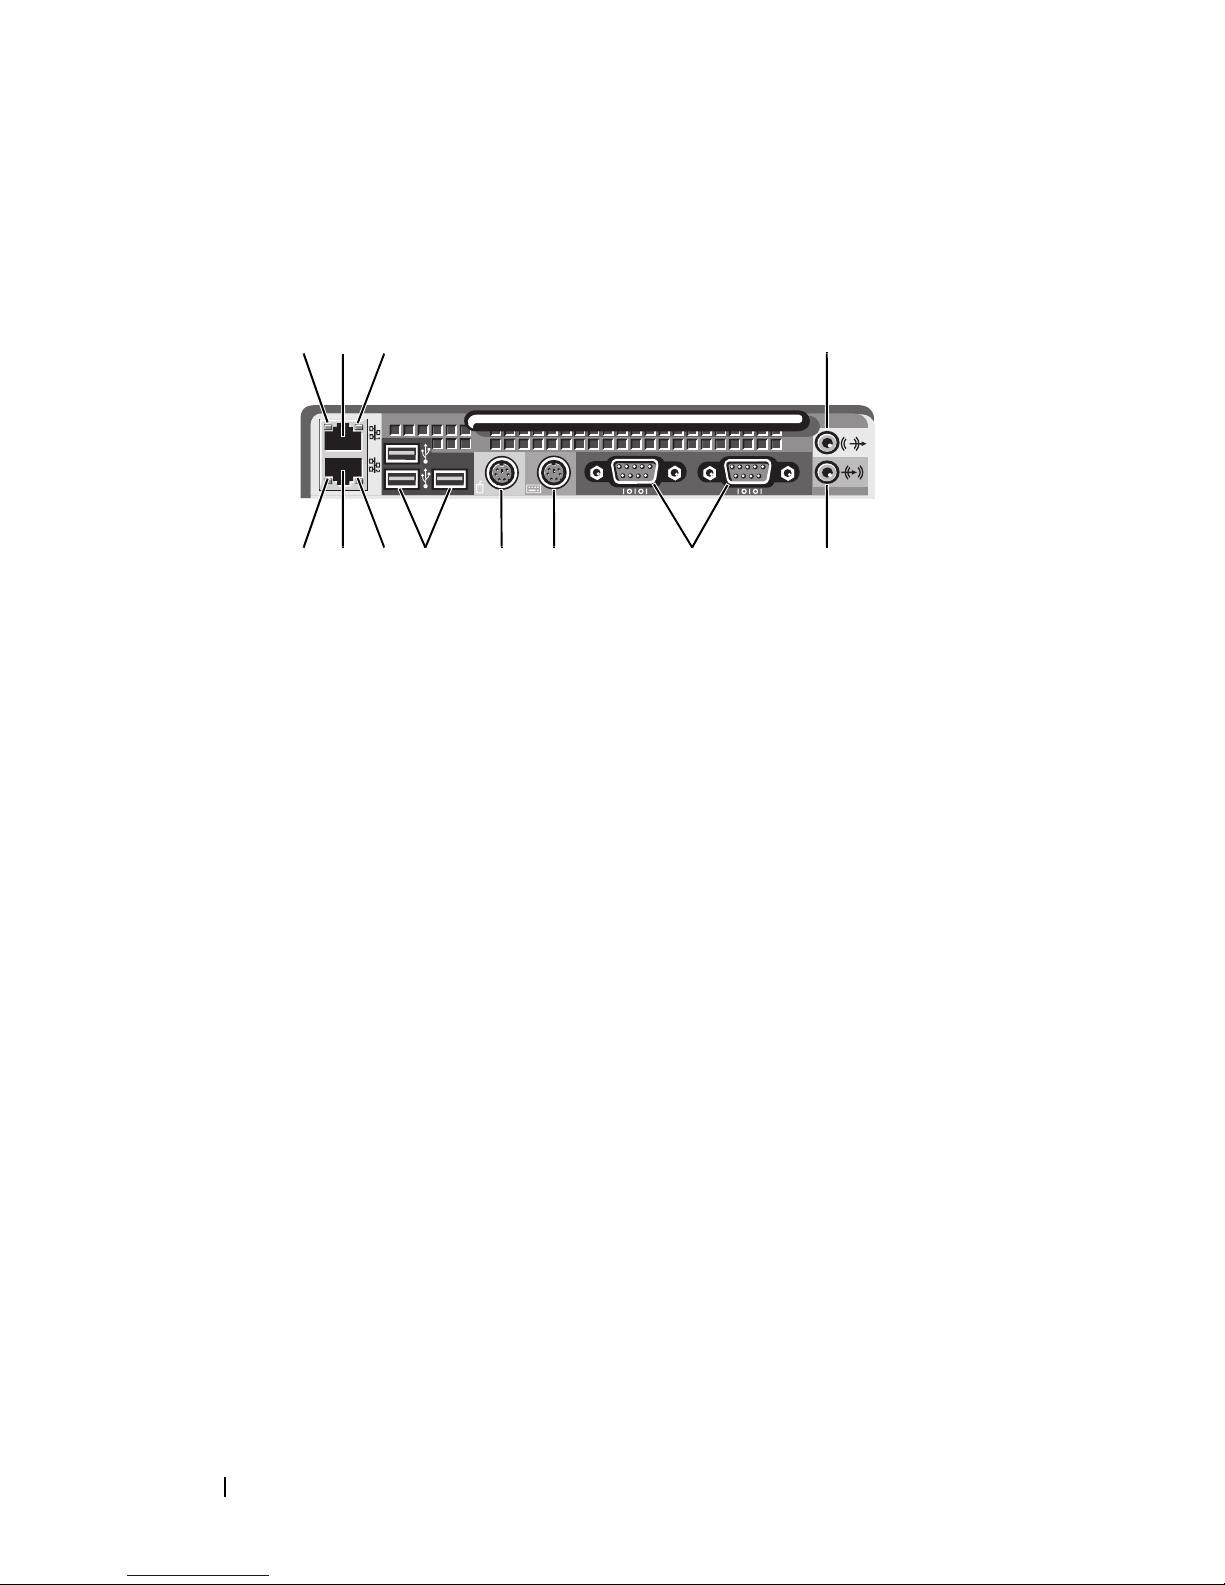
Back Panel Connectors
123
12 11 10
1 network link integrity light 2 network adapter connector (primary)
3 network activity light 4 line-out connector
5 line-in connector 6 serial connectors (2)
7 keyboard connector 8 mouse connector
9 USB 2.0 connectors (3) 10 network activity light
11 network adapter connector
(secondary)
7965
8
12 network link integrity light
4
8 About Your Computer
Setting Up Your Computer
Quick Setup
CAUTION: Before you begin any of the procedures in this section, read and follow
the safety instructions provided with your computer.
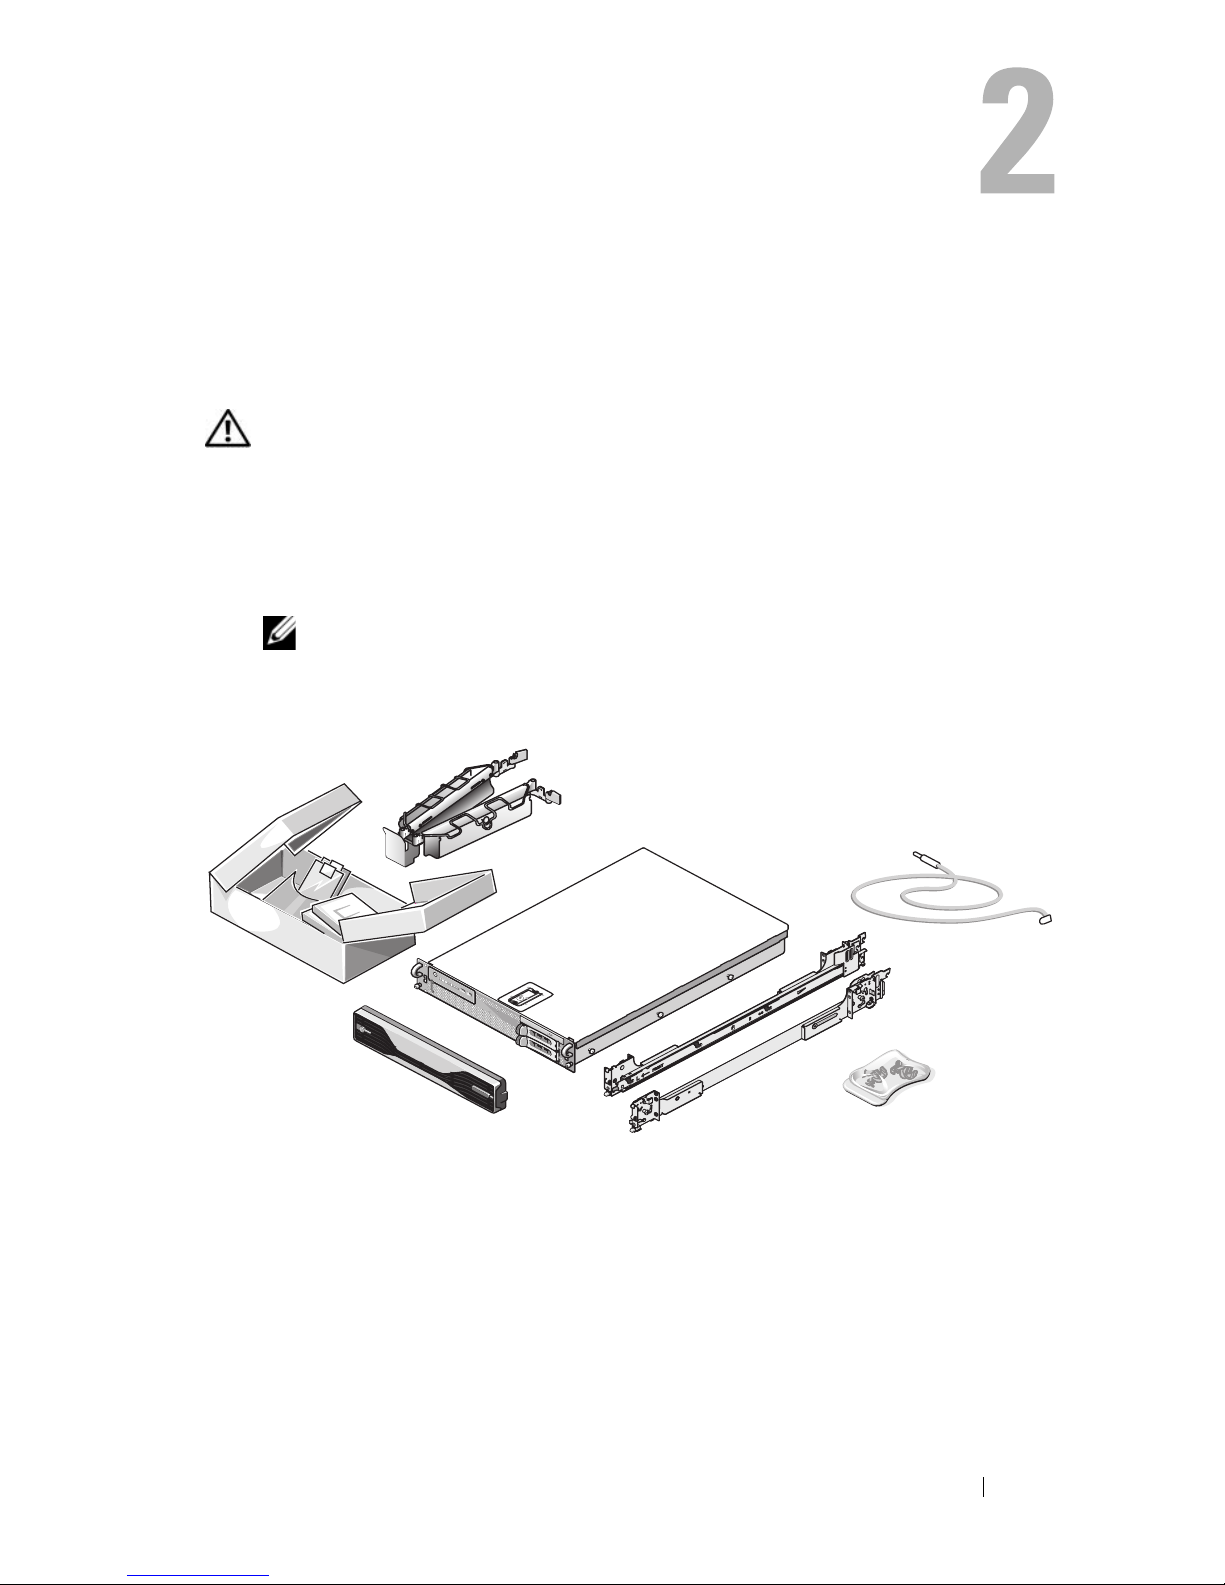
This section describes the steps to set up your computer for the first time.
1
Unpack your computer and identify each item.
Keep all shipping materials in case you need them later.
NOTE: Some items included with your computer may not be required for
installation (see your rack installation documentation for installation
instructions).
Setting Up Your Computer 9
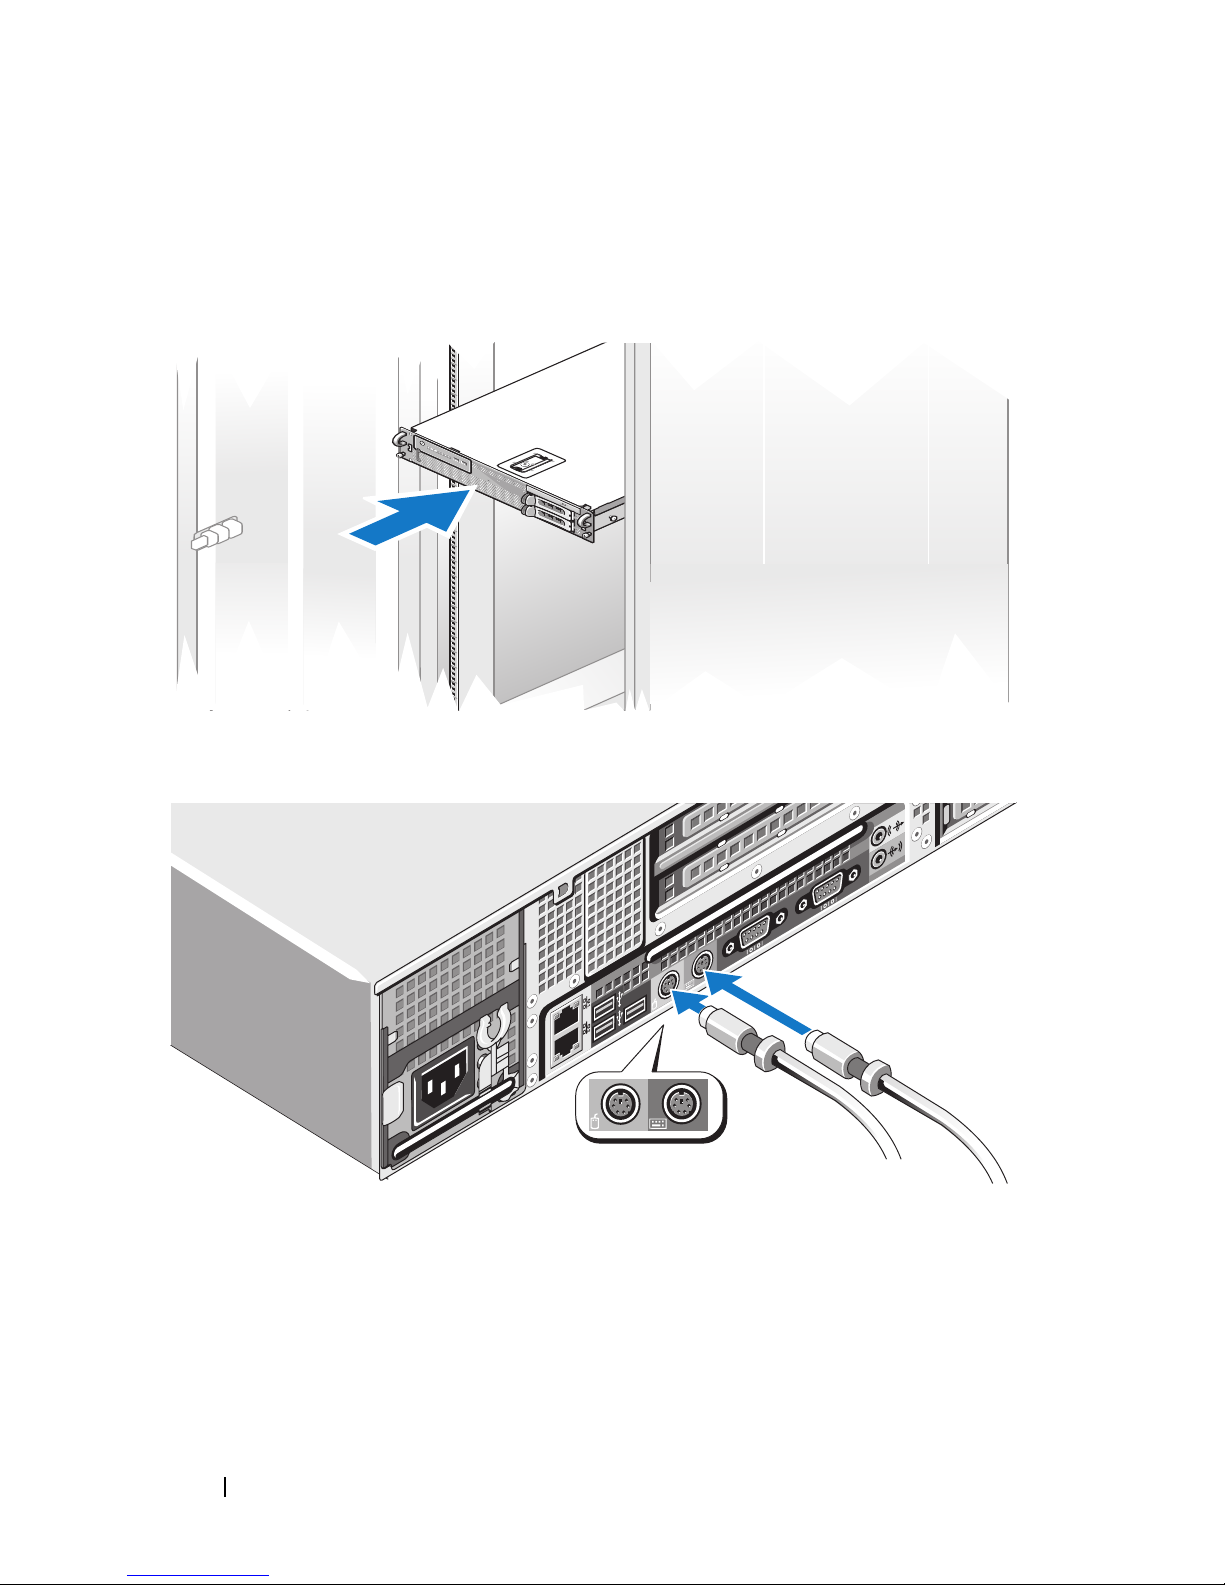
2
Install the rails and the computer in the rack.
See your rack installation documentation for safety instructions and
instructions on installing your computer in a rack.
3
Connect the keyboard and mouse.
10 Setting Up Your Computer
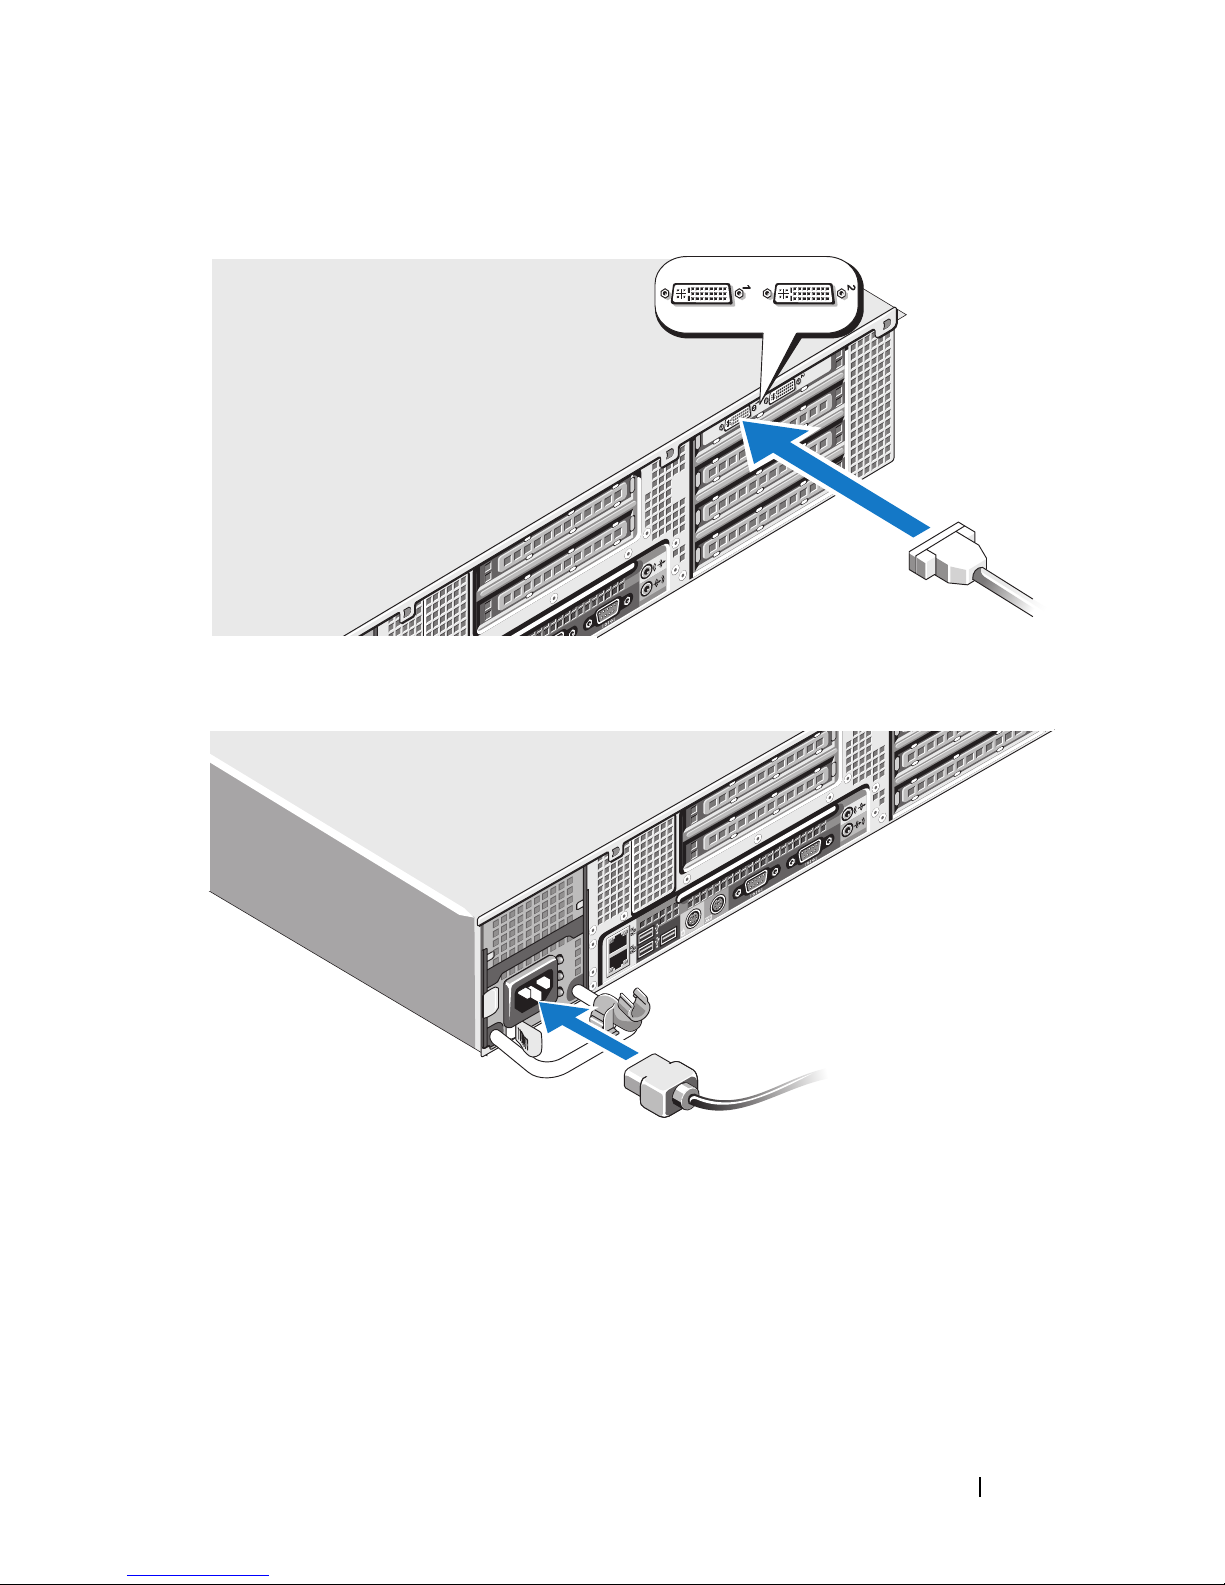
4
Connect the monitor (optional).
5
Connect the computer and monitor (optional) power cables.
Setting Up Your Computer 11
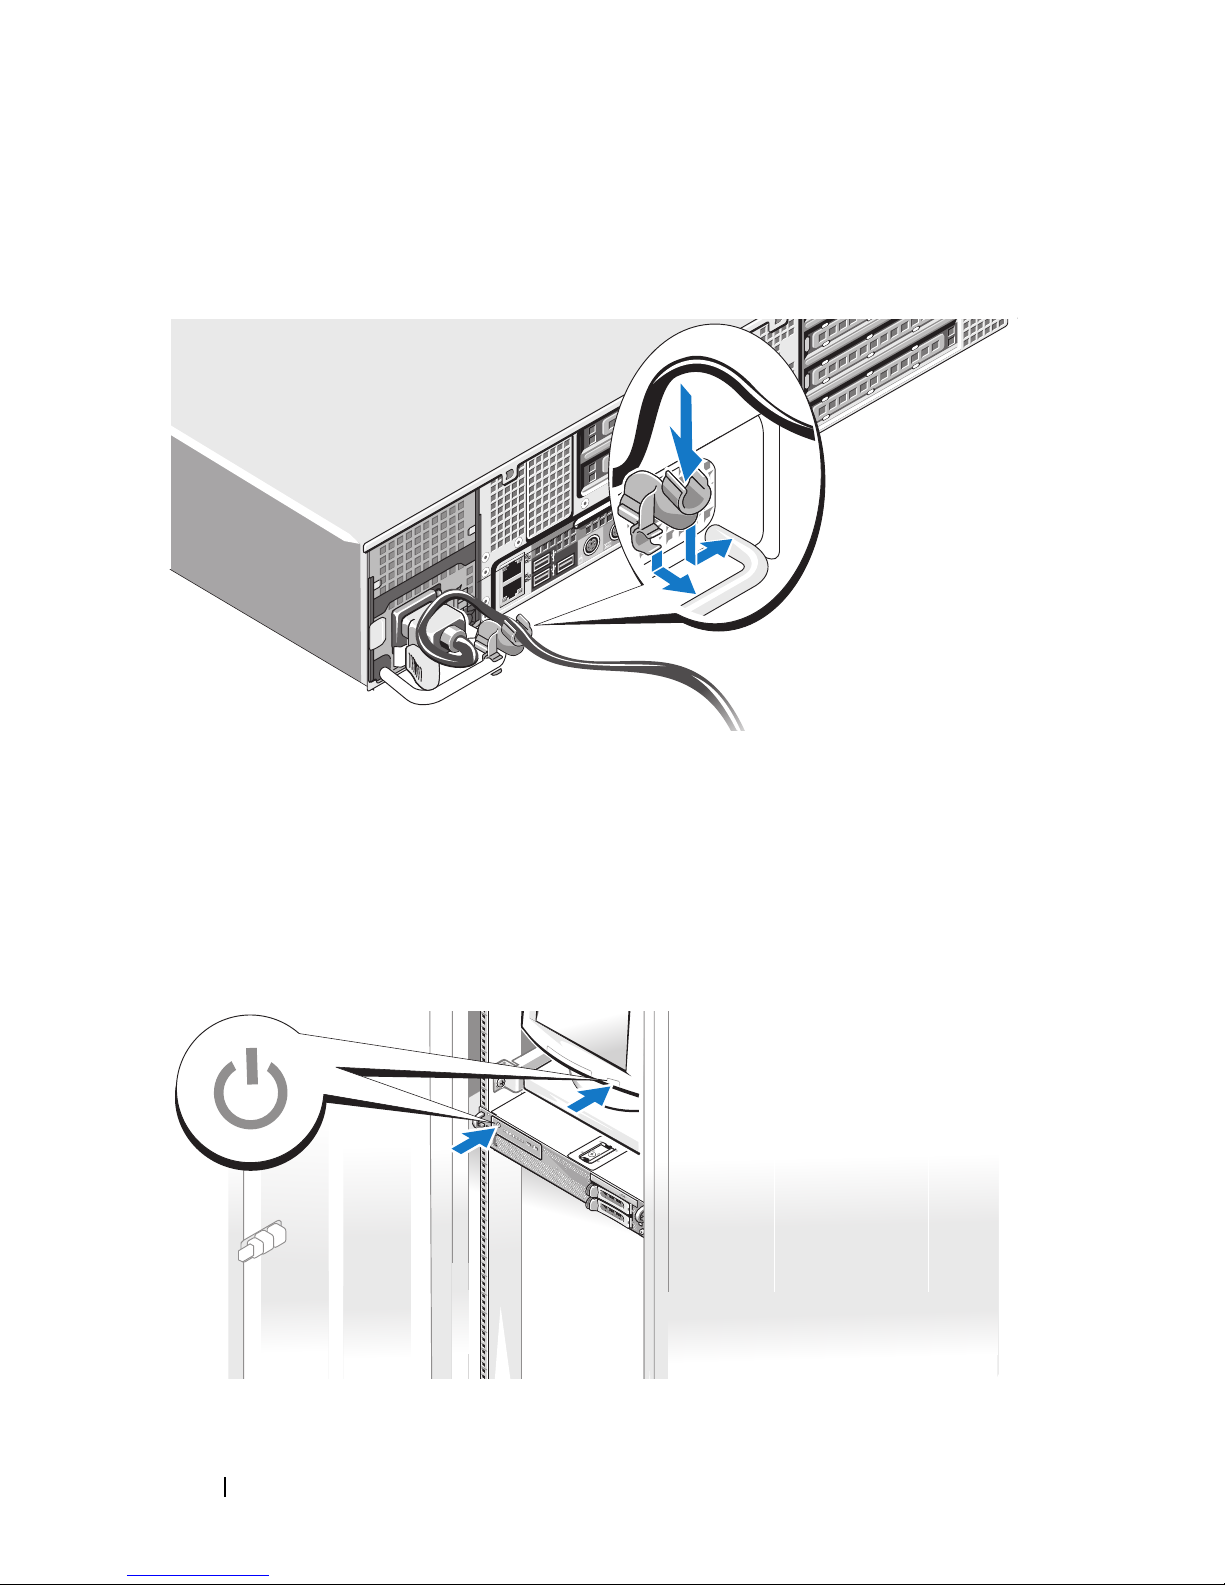
6 Attach the power cable retention bracket on the right bend of the power
supply handle. Bend the power cable into a loop as shown in the
illustration and attach the cable to the bracket’s cable clasp.
Plug the other end of the power cable into a grounded electrical outlet or a
7
separate power source such as an uninterrupted power supply (UPS) or a
power distribution unit (PDU).
8
Press the power button on the computer and monitor (optional).
Adjust the monitor's controls, as needed, until the displayed image is
satisfactory.
12 Setting Up Your Computer

9
Install the bezel (optional).
Connecting to the Internet
NOTE: ISPs and ISP offerings vary by country.
To connect to the Internet, you need a network connection and an Internet
service provider (ISP). Contact your ISP for setup instructions.
Setting Up Your Internet Connection
To set up an Internet connection with an ISP desktop shortcut:
Save and close any open files, and exit any open programs.
1
2
Double-click the ISP icon on the Microsoft® Windows® desktop.
3
Follow the instructions on the screen to complete the setup.
If you do not have an ISP icon on your desktop or if you want to set up an
Internet connection with a different ISP, perform the steps in the appropriate
section below.
NOTE: If you are having problems connecting to the Internet, see your Dell
Technology Guide at support.dell.com. If you cannot connect to the Internet, but
have successfully connected in the past, your ISP may have a service outage.
Contact your ISP to check the service status, or try connecting again later.
NOTE: Have your ISP information ready. If you do not have an ISP, the Connect to
the Internet wizard can help you get one.
Setting Up Your Computer 13

Microsoft Windows Vista
1
Save and close any open files, and exit any open programs.
2
Click the Windows Vista Start button™ , and then click
.
Network and Internet,
Connect to the Internet
Connect to the Internet
Dial-up
, depending on how you want to connect:
3
4
Panel
Under
The
In the
or
®
click
Connect to the Internet
window appears.
window, click either
Control
.
Broadband (PPPoE)
• Choose
modem, or Bluetooth
• Chose
NOTE: If you do not know which type of connection to select, click Help me
choose or contact your ISP.
5
Follow the instructions on the screen and use the setup information
Broadband
Dial-up
if you are using a dial-up modem or ISDN.
if you are using a DSL, satellite modem, cable TV
®
wireless technology connection.
provided by your ISP to complete the setup.
Microsoft Windows XP
1
Save and close any open files, and exit any open programs.
2
Click
The
3
Click
4
In the next window, click the appropriate option:
Start→
Internet Explorer
New Connection Wizard
Connect to the Internet
.
appears.
.
• If you do not have an ISP and want to select one, click
list of Internet service providers (ISPs)
.
Choose from a
• If you have already obtained setup information from your ISP but you
did not receive a setup CD, click
• If you have a CD, click
5
Click
If you selected
Next
.
Set up my connection manually
Otherwise, follow the instructions on the screen to complete the setup.
14 Setting Up Your Computer
Set up my connection manually
Use the CD I got from an ISP
, continue to step 6.
.
.

6
Click the appropriate option under
Internet?
NOTE: If you do not know which type of connection to select, contact your
7
Use the setup information provided by your ISP to complete the setup.
, and then click
ISP.
Next
How do you want to connect to the
.
Transferring Information to a New Computer
Microsoft Windows Vista
1
Click the Windows Vista Start button , and then click
and settings
2
In the
3
Click
4
Follow the instructions provided on the screen by the Windows Easy
Start a new transfer
→
Start Windows Easy Transfer.
User Account Control
or
dialog box, click
Continue
Continue a transfer in progress
Transfer wizard.
Transfer files
.
.
Microsoft Windows XP
The Microsoft Windows XP operating system provides the Files and Settings
Transfer Wizard to transfer data, such as:
• E-mail messages
• Toolbar settings
• Window sizes
• Internet bookmarks
You can transfer data from one computer to another computer over a network
or serial connection, or by storing the data on removable media, such as a
writable CD or DVD.
NOTE: You can transfer information from one computer to another computer by
directly connecting a serial cable to the input/output (I/O) ports of the two
computers.
For instructions on setting up a direct cable connection between two computers,
see Microsoft Knowledge Base Article #305621, titled How to Set Up a Direct Cable
Connection Between Two Computers in Windows XP. This information may not be
available in certain countries.
Setting Up Your Computer 15

Using the Files and Settings Transfer Wizard requires the Operating System
installation media that came with your computer or a wizard disk, which the
wizard can create for you.
NOTE: For more information about transferring data, search support.dell.com for
document #154781 (What Are The Different Methods To Transfer Files From My Old
Computer To My New Dell™ Computer Using the Microsoft
Operating System?).
NOTE: Access to the Dell Knowledge Base document may not be available in
certain countries.
Files and Settings Transfer Wizard (With the Operating System Media)
NOTE: The Files and Settings Transfer Wizard designates the source computer
from which data is to be transferred as the old computer, and designates the
destination computer to which the data is going to be transferred as the new
computer.
PREPARE THE DESTINATION COMPUTER FOR THE FILE TRANSFER
1
Click
Settings Transfer Wizard
Start→
All Programs→
.
Accessories→ System Tools→
®
Windows® XP
Files and
2
Under
3
Under
the Windows XP CD
4
Review the information under
to the source computer. Do
COPY DATA FROM THE SOURCE COMPUTER
1
Insert the Windows XP
Which computer is this?
, click
Do you have a Windows XP CD?
, and click
Next
Now go to your old computer
not
click
Operating System
source computer.
The
Welcome to Microsoft Windows XP
2
3
4
5
Click
Under
The
Click
Under
Perform additional tasks
What do you want to do?
.
, click
Files and Settings Transfer Wizard
Next
.
Which computer is this?
, click
New computer
, click
I will use the wizard from
, and click
.
, and then go
Next
.
installation media into the
screen appears.
Transfer files and settings
window appears.
Old Computer
, and click
Next
.
Next
.
.
16 Setting Up Your Computer

6
Under
and click
7
Under
Select a transfer method
Next
What do you want to transfer?
transfer, and click
, click the transfer method of your choice,
.
, click to select the data you want to
Next
.
The selected data is copied and the
Completing the Collection Phase
screen appears.
8
Click
TRANSFER DATA TO THE DESTINATION COMPUTER
1
Go to the destination computer.
2
Under
3
Under
chose for transferring your settings and files, and then click
Finish
.
Now go to your old computer
, click
Where are the files and settings?
Next
.
, click to select the method you
Next
.
The wizard reads the collected files and settings and applies them to the
destination computer. When the transfer is complete, the
Finished
screen
appears.
4
Click
Files and Settings Transfer Wizard (Without the Operating System Media)
Finished
, and then restart the computer.
To run the Files and Settings Transfer Wizard without the Operating System
installation media, you must create a wizard disk. The wizard disk allows you
to create a backup image file on removable media.
NOTE: The Files and Settings Transfer Wizard designates the source computer
from which data is to be transferred as the old computer, and designates the
destination computer to which the data is going to be transferred as the new
computer.
CREATE A WIZARD DISK
1
On the destination computer, click
System Tools
2
Under
3
Under
Which computer is this?
Do you have a Windows XP CD?
→
Disk in the following drive
4
Insert removable media, such as a writable CD or DVD, and click OK.
Start→
Files and Settings Transfer Wizard
, click
, and click
Next.
All Programs→
New computer
, click
Setting Up Your Computer 17
I want to create a Wizard
.
, and click
Accessories→
Next
.

5
Review the information under
to the source computer. Do
COPY DATA FROM THE SOURCE COMPUTER
1
Insert the wizard disk into the source computer.
2
Click
3
Click
4
Under
5
Under
and click
6
Under
transfer, and click
Start→
Browse...
Run
.
and navigate to
Which computer is this?
Select a transfer method
Next
.
What do you want to transfer?
Next
.
Now go to your old computer
not
click
fastwiz
, click
, click the transfer method of your choice,
, and then go
Next
.
on the wizard disk, and click OK.
Old Computer
, and click
Next
.
, click to select the data you want to
The selected data is copied and the
Completing the Collection Phase
screen appears.
7
Click
TRANSFER DATA TO THE DESTINATION COMPUTER
1
Go to the destination computer.
2
Under
3
Under
chose for transferring your settings and files, and click
Finish
.
Now go to your old computer
, click
Where are the files and settings?
Next
.
, click to select the method you
Next
.
The wizard reads the collected files and settings and applies them to the
destination computer. When the transfer is complete, the
Finished
appears.
4
Click
Finished
, and then restart the computer.
screen
18 Setting Up Your Computer

Specifications
NOTE: Offerings may vary by region. For more information regarding the
configuration of your computer, click Start→ Help and Support and select the
option to view information about your computer.
Processor
®
Processor type one or two Dual-Core Intel
one or two Quad-Core Intel Xeon 5400 processors
Level 2 (L2) cache Dual-Core Intel Xeon 5200 processor: 6 MB
Quad-Core Intel Xeon 5400 processor: 12 MB
Front side bus (FSB) 1333 MHz
System Information
Chipset Intel 5400
Data bus width 64 bits
Xeon® 5200 processors
Address bus width 38 bits
DMA channels seven
Interrupt levels 24
BIOS chip (NVRAM) 8 Mb
Specifications 19

System Information (continued)
NIC integrated network interface with ASF 2.0 support as
defined by DMTF, capable of 10/100/1000-Mbps
communication:
• green — A good connection exists between a
10-Mbps network and the computer.
• orange — A good connection exists between a
100-Mbps network and the computer.
• yellow — A good connection exists between a
1000-Mbps (1-Gb) network and the computer.
• off — The computer is not detecting a physical
connection to the network.
NOTE: ASF 2.0 support and wakeup on LAN are not
available on the secondary NIC and are not available on
the primary NIC in teaming mode.
RAID support RAID 0 and RAID 1 (mirroring)
Memory
Type 667-MHz DDR2 ECC fully buffered DIMMs (FBD)
Memory connectors four
Memory capacities 256 MB, 512 MB, 1 GB, 2 GB, 4 GB, and 8 GB
Minimum memory 256 MB
Maximum memory 32 GB
Drives
Externally accessible up to two 3.5-inch drive bays (FlexBay)
one 5.25-inch slimline drive bay
NOTICE: Hard drives are not hot swappable.
Available devices up to two 3.5-inch SATA hard drives
one slimline SATA optical drive
Video
Type PCI Express x16 (two slots)
20 Specifications

Audio
Type integrated ADI 1984 High Definition Audio CODEC
and AC97/High Definition digital controller
Expansion Bus
Bus type PCI 2.3
PCI Express 1.0a
SATA 2.0
USB 2.0
Bus speed/transfer rate PCI: 133 MB/s
PCI Express:
x8 slot bidirectional speed — 500 MB/s
Expansion slots:
Center riser:
PCI-X
PCI
Center riser:
PCI-X
PCI Express x8
Outer riser:
x16 slot bidirectional speed
—
1 GB/s
SATA 1.0 and 2.0: 150 and 300 Mbps per drive
USB 2.0: up to 480 Mbps (high speed)
one full height, full length 3.3 V, 64 bit, 100 MHz
one PCI Universal, full height, full length 5.0 V,
32 bit, 33 MHz
NOTE: The center riser expansion slot configuration
varies according to the riser installed on your computer.
one full height, full length 3.3 V, 64 bit, 100 MHz
one full height, full length x8 lane
NOTE: The center riser expansion slot configuration
varies according to the riser installed on your computer.
PCI Express x16 (two
slots)
two full height, full length x16 lane
Specifications 21

Expansion Bus (continued)
PCI:
Connector
Connector size
Connector data width
(maximum)
PCI-X:
Connector
Connector size
Connector data width
(maximum)
PCI Express x8:
Connector
Connector size
Connector data width
(maximum)
PCI Express x16:
one
124 pins
32 bits
one
188 pins
64 bits
one x16 (supports x8, x4 and x1 cards)
164 pins
x8 PCI Express lane
Connector
Connector size
Connector data width
(maximum)
Connectors
External connectors:
USB
Network adapter (NIC)
Video
two x16
164 pins
x16 PCI Express lane
two front panel USB 2.0-compliant connectors
three back panel USB 2.0-compliant connectors
two back panel RJ-45 connectors (for integrated 1-GB
NICs)
back panel DVI connector (on graphics card)
back panel VGA connector (on graphics card)
22 Specifications

Connectors (continued)
PS/2 (keyboard and mouse)
Serial
Audio
System board connectors:
Serial ATA
Internal USB
Fans
PCI (on center riser)
PCI-X (on center riser)
PCI Express x8 (on center
riser)
PCI Express x16 (on outer
riser)
two back panel 6-pin mini-DIN
two back panel 9-pin connectors
(16550C-compatible)
two back panel connectors (line-in and line-out)
three 7-pin connectors
one 10-pin connector
two 4-pin connectors
two 5-pin connectors
one 124-pin connector
one 188-pin connector
one 164-pin connector
two 164-pin connectors
Front control panel
Front panel USB
Processor
Memory
Power 12 V
Power (main)
one 20-pin connector
one 10-pin connector
two 775-pin connectors
four 240-pin connectors
three 6-pin connectors
one 24-pin connector
Specifications 23
 Loading...